

Page 1
LCD TV
USER'S MANUAL
Befor e using the TV, Pl ease read th is manual
thoro ughly, retain it f or future re ference.
LED19T28
LED
LED
IES010
22T28P
26T28
English
Page 2

Content s
Specification
Important safety instructions and Environment
View the control panel and connection panel
Connections to other devices
View the remote control
Brief operation of the remote control
Basic operation
Tur n on/ off
Changing channels/volume
Channel setting
Picture setting
Sound setting
Screen setting
Function setting
Digit al mu ltimedia functio n
Envir onm ent
Pedes tal I nstallation Inst ruc tion
Tro uble shooting
Acces sor ies
2
3
5
6
8
9
11
11
11
12
13
14
15
16
18
22
23
24
24
1
Page 3
Specifi cation
Model Name
Dimens ion W itho ut stand 48 6×3 40×35 ×376×3 5 668
(W×H×D) (mm) With sta nd 48 6×392×1 60 ×4 25×160 66 8
Wei ght (kg)
With st and 5.2 6.2 8 .6
Withou t stand 4.0
LED1 9T 28 LED2 2T 28P LED26 T2 8
549 ×449 ×3 5.9
549 ×49 8. 5×2 20
5 6.5
LCD Pan el
Minimu m size(diagon al) 47 55 66
Screen r esoluti on 1366×7 68
Power c onsumpt ion 25W 25W 6 5
Audio p ower 1.8W +1.8W 5W+5W
1920 ×1 080 1366 ×7 68
W
1.8W +1 .8W
Power s upply Ref er to back la bel
Receiv ing sys tems
AV PAL, S EC AM, N TS C
RF PAL (D/ K, I, B/G) , SE CAM
Chan ne l range C1~ C5 7 Z1~ Z3 8
Envi ro nme nt al con dit io ns Temperat ur e 5° ~ 35° Humi di ty: 20 %- 80% R H,
C C
Atmo sp he ric p re ssure : 86 kPa -1 06kPa
Comp on ent I np ut 480I、4 80 P、576 I、57 6P
720P /6 0Hz、108 0I /50 Hz、1 080I/ 60 Hz
1080 P/ 50Hz、10 80 P/6 0H z
VGA Inp ut V GA(640× 48 0 60H z)、 S VGA( 800 ×6 00 60 Hz)
XGA (102 4× 76 8 60H z)
HDMI I np ut RGB/ 60 Hz ( 64 0× 48 0、800 ×6 00、10 24 ×7 68)
YUV /50 Hz ( 5 76P、720 P、10 80I、1 08 0P)
YUV /60 Hz (4 80I、480 P、72 0P、10 80 I、10 80P )
2
Page 4
Importa nt safet y instru ctions and Environment
Importa nt safet y instru ctions
Attentions
The flash with the symbol of arrowhead inside a triangle alerts the user about the
presence of a dangerous tension inside the product.
The flash with the symbol of exclamation inside a triangle alerts the user about the
important instruction related to the product.
General instruction.
Alerts: Before using the product, please read the following clauses carefully.
Powe r and s ign al
Before rainfall, pull out the power plug or outside antenna plug to avoid any possible
damage to the TV set. Please not touch the inducting wire of the antenna.
If you do not use the product for a long time, please pull out the power plug.
Please do not press the power line and signal line with other things.
Please do not the power outlet , or it could possible result in a fire.
Keep the power line away from high temperature.
If the outdoor antenna is outside for an extended period of time, the picture quality of the
TV may be affected, so please check and replace the antenna regularly.
LCD display instruction and maintenance
LCD display panel is the high technical product, composed of several millions of Movie
transistors. There can be dark or bright spots appearing on the panel. please note that this
is a normal phenomenon, which does not affect the overall performance.Incorrect
maintenance will lead to damage to the LCD screen, which will affect the image effect, so
you must pay attention to the following items:
Please do not clean the screen with the organic solvents, such as alcohol, gasoline, etc. or
chemical reagents ,such as acid, alkali, etc.
Please do not clean the screen with any kind of detergent.
After the TV is turned off, you, when necessary, can clean the screen with a clean and soft
cotton cloth to properly safeguard it, but repeatedly cleaning with force is prohibited.
Directly touching the screen with your fingers may damage the screen’s surface. Please
do not put pressure on the LCD as it is delicate and vulnerable.
Please do not The screen is easily scratched.
Product
Please do not disassemble any part of the product. This may cause damage to the product
as well as harm to your health. The product warranty will be voided.
If there is an abnormal sound or smell, or there is sound but no image, please turn off the
TV and pull out the plug immediately and contact our professional technicians.
Please do not remove the back cover. The adjust and check inside the unit should only be
carried out by the professional technicians.
Please do not cover or block the heat-radiating holes in order not to hamper the unit to
give off heat.
overload
touch the LCD screen with a hard object.
3
Page 5
Importa nt safet y instru ctions and Environment
Importa nt safet y instru ctions
Please do not stick the sharp objects, metal, or liquid into or use them to touch the signal
interface or heat-radiating holes in case of short circuit or damage to the product.
Maintenance
Do not clean this unit with volatile oils or diluent, which may cause cabinet deterioration or
damage its coating surface.
If the cabinet becomes dirty, please clean it with a soft cloth which has neutral detergent
wet with water.
In the case where such substances that are painted with paint or organic solvent and
grease, etc. on the surface of the TV cabinet, the chemical reaction may be occurred in
between the rubber cushion on the base and such substances hereinbefore, which may
cause a slight corrosion on the surface of the TV cabinet. Therefore, users are
recommended to firstly put a layer of protective material (such as pressboard or glass
sheet, etc.) on the TV cabinet and then place the TV set.
Method of placement
Even and steady occasions
Plac es un der d ire ct su nsh ine o r clo se to h eat ing d evi ces
P lac es wi th po or ve nti lat ion
Plac es cl ose t o fur nac e or pl ace s to wh ich w ate r, oil o r smo ke is e asy t o ent er
P lac es wh ere v ent ila tin g ope nin gs ar e clo sed
Unsteady places
Places suffer ing f rom e asy v ibr ati on
Places of lot of dust or moist pla ces
Places of high temperatures
Watching TV
Watch TV at a proper distance, and the best distance is 5 to 7 times the length of the
vertical distance of LCD.
Keep the lighting indoors bright enough to read newspaper.
The volume should be properly set in order not to disturb your neighbours, esp. when it is
during the night.
Others
It is recommended that 2 or more people should load, unload and carry the unit; try to
avoid any crash when carrying the unit, and protect the LCD screen in particular.
If you touch the LCD screen when turning on or off the TV, you can feel the slight electric
shock, which is the so-called electrostatic and does no harm to your health.
Pay special attention to the following items
The information contained in this manual is subject to change without notice.
All the other product names mentioned in this manual is the logos or trademarks of their
respective owners.
4
Page 6
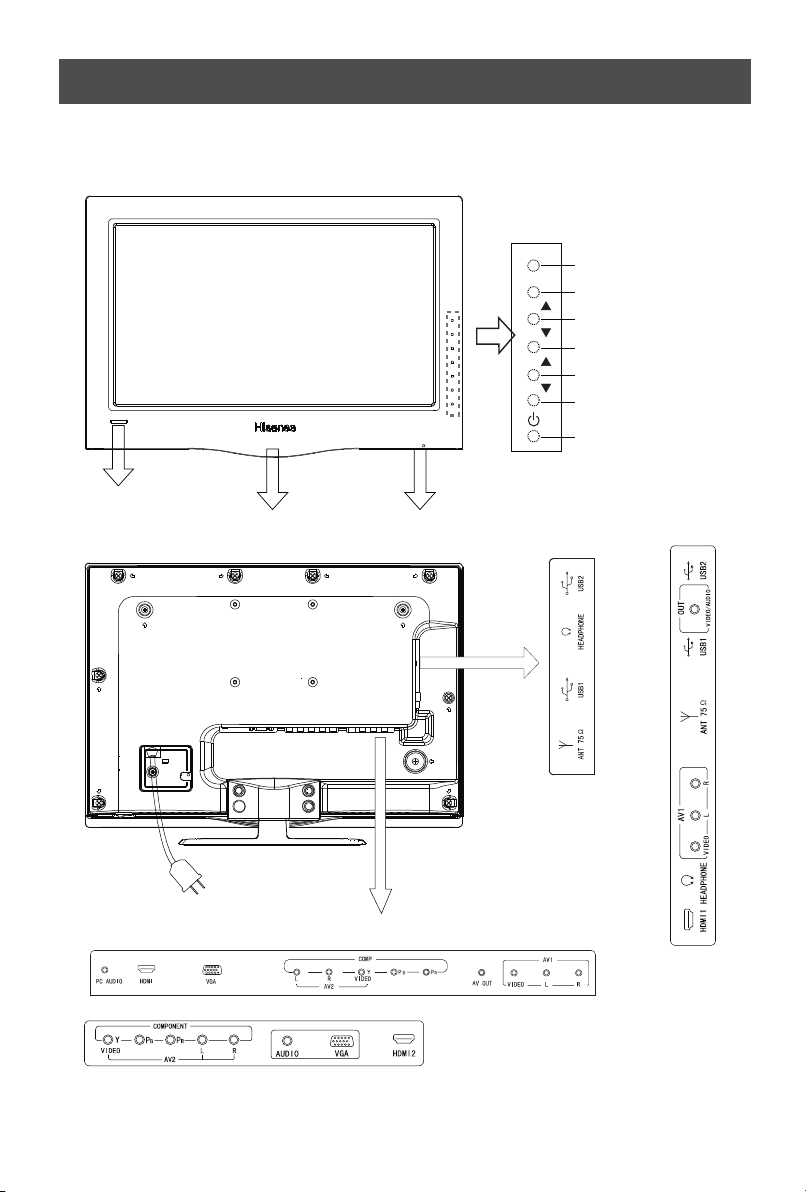
View the control panel an d connec tion panel
Remo te se nsi ng wi ndo w
Powe r ind ica tor
MEN U
SOU RCE
VOL
VOL
CH
CH
Main p owe r swi tch
Menu b utt on
Sour ce se lec t
Volume up
Volume dow n
Channel u p
Channel d own
Powe r
LED1 9T2 8
LED2 2T2 8P
LED1 9T2 8
LED2 2T2 8P
T28LED2 6
T28LED2 6
NOTE: The above picture is for reference only, please refer to the actual TV to determine their appearance.
5
Page 7
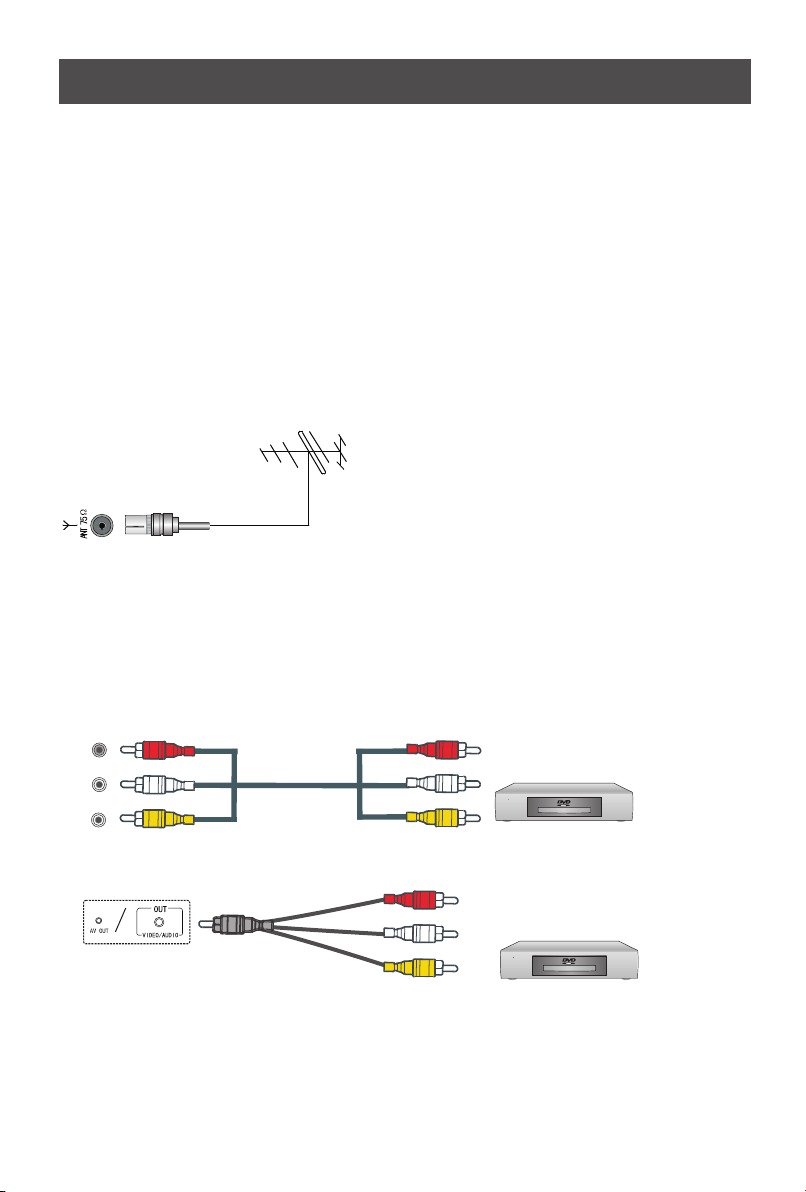
Connect ions to ot her devices
Warning: Before connecting the TV to any other electronic device, unplug the TV and
electronic device AC cords from the AC input.
Connecting the broadcast antenna or the cable TV
To have an optimal picture quality, it is strongly recommended to have an external antenna or a
cable TV.
Note:
n When using the outdoor antenna, please unplug the cord of the indoor antenna ( if any ) from
the antenna terminal outlet. It is recommended that coaxial cable (75Ω) be used to eliminate the
interference caused by the mismatched impedance.
n The antenna cable should not be bound together with the power cord.
n When using the cable TV, please insert the plug of the coaxial cable (75Ω) directly into the
antenna outlet.
How to connect the AV devices
The multimedia function of this unit makes it possible for the unit to be connected to more
external devices. The above figures about how to connect the unit with other AV devices. After
having been connected with various external devices, select the desired Source with the remote
control to enjoy the wonderful display.
Video in(composite video) transmits video as a single signal.
Red
R
White
L
Yellow
VID EO
6
VCD, DVD, set-top boxes, etc.
The equipment with S-Video output
function ( such as VCD, DVD, set-top
boxes, etc.).
Page 8

Connect ions to ot her devices
Component video(Y, Pb, Pr)transmits video as separate red, green and blue signals. Use this
connection for high-definition video signals from a DVD or other equipment.
Red
L R
White
Red
Blue
Green
Audio R
Audio L
PR/CR
PB/CB
Y
DVD With Component jacks
Connecting the devices with HDMI interface
HDMI, which is also called "High Definition Multimedia Interface", is a newer generation interface
that transmits digital AV signals via a single cable without compression. The difference between
HDMI and DVI lies in that HDMI is equipped with HDCP( High-Bandwidth Digital Content
Protection) encoding function with a comparatively smaller size, and supports multi-sound track
digital audio at the same time.
The HDMI interface can be connected to the equipment with HDMI output function ( such as DVD
players, set-top boxes, etc.).
HDMI
The equipment with HDMI output jack
( such as DVD players, set-top boxes, etc.).
The connection with PC
Thanks to the PC standard RGB interface with D-sub 15 pins, it is very easy for it to be connected
with the PC. What you need to do is to insert the PC display card 15 pin output signal cord into the
corresponding interface at the back of this unit.
VGA
Computer
Connecting to USB devices
This unit has standard USB interface and can be connected to the standard USB1.1 and USB2.0
devices such as hardware, U disks and digital cameras.
You can either use the USB connection cord or directly insert the USB into the USB port at the
side of the TV.
USB
7
Page 9

Power button
Picture mode selecting button
Sound mode selecting button
View the remote control
Picture
1
Power
Sound
2
ZOOM
3
Source
TV
Power indicator
Source selecting button
Enter TV source button
Zoom button
Program selecting
button
Display information button
Menu button
Mute button
Multimedia function
buttons
4
7
Display
VOL-
Menu
PIP
Source
DMP
Exit
Display
5
8
0
CH+
OK
CH-
Mute
Move
Swap
ZOOM
EN-21678A
Recall
Still
Time
Recall
CH
6
9
Special function buttons
Recall button
CH+/-: Channel up/Down
VOL+
Cursor up/Down
VOL+/-: Volume up/Down
Cursor Left/Right
OK: Enter or confirm your
operations
Sleep
Sleep: Set sleep time button
Picture still button
E.S
V
V
CH
DMP SET
PIP: PIP mode selecting button
Swap: Interchange the main
and sub picture button
Position: Change the position
of PIP picture
Source: PIP source selecting
button
CH :Channel
CH∧/ ∨
Media
R
up/down of PIP picture
8
Page 10

Brief ope ration o f the remote control
Change the batteries
1. Open the battery cover on the back of the remote control.
2. Install two AAA size (1.5V) batteries. Match the “+” and “-” signs on the batteries to the signs
on the battery compartment.
3. Close the battery cover.
Note:
1. If the remote control doesn't work normally, unstable, or cannot control the TV, please replace
the batteries.
2. If you do not use the remote control for a long time, remove the batteries.
The effective range of remote control
1. The remote control distance: 8 meters in front of the TV set.
2. The remote control angle: taking the television infrared light receiver window as an apex, 6
meters away, its controlled angle (left to right) is within 30 degrees, while the vertical angle
(up to down)is within 30 degrees.
Quick function operation of the remote control
1. Source: Choose the current input signal of the main
Main
TV
AV1
AV2
Comp one nt
HDMI
VGA
Hi-D MP
: Sel ect
Mode Picture feature
Standard Normal picture
Bright Bright and fresh picture
Soft Mild picture
User The picture feature you set
Pi ct u re M od e
OK : En ter
picture. First press this button to display the signal
inputs: TV, AV1, AV2, Component, HDMI (or
HDMI1, Press CH+/- button to
HDMI2,) VGA, Hi-DMP.
select the source you wanted to enter,
+/
VOL OK button to confirm.
then press
2. Picture: It can be set as Standard, Bright, soft and
User. This mode achieves a certain image display
effect by setting the brightness, contrast and color
etc.
3. Sound : It can be set as Music, Standard, Speech
and User. This mode achieves a special sound effect
by setting equalizer.
4. Still: Press this button the moving picture become a
still one.
5. Mute: Press Mute button to turn the sound off, press
this button again to turn the sound back on. This
function is used to switch off sound temporarily.
Mode Sound feature
Music Various music mode
Standard Standard music
Speech Enhance the dialogue effect
User The sound feature you set
So un d M od e
9
Page 11

Brief ope ration o f the remote control
Sleep Ti me r
Sleep Ti me 4 0 Mi nu te
Mins Le ft 3 9 Mi nu te
4:3
16:9
Zoom 1
Zoom 2
Panorama
6. Sleep: It can set the TV to let it enter into the Standby
state automatically, Press this button repeatedly to select
the proper sleeping clock mode, and the clock tells you
the remaining time before the TV enters Standby state.
The clock mode is as follows: Off-10minutes-20minutes30minutes…120minutes.
7. Zoom: For the various Sources, this unit has set various
display modes. Press Zoom button to select the proper
display mode, including ''4:3", "16:9", "Zoom 1", "Zoom
2", "Panorama”, .
"Dot to Dot”
◇ 4:3: Shows the standard 4:3 ratio picture image in the
center of the TV with dark bars on the left and right.
◇ 16:9: This mode display the picture of input source
expanded to fill the screen.
◇ Zoom1: Proportionally stretches the TV picture, but
clips the top and bottom of the image to fit the screen.
Eliminates black bars.
◇ Zoom2: Zooms further into the middle of the screen
and clips off more from the top and bottom.
◇ Panorama: Similar to 16:9 mode, but shows more of
the sides.
Note: The option of zoom mode is different in different
sources.
Dot to Dot
10
Page 12

Basic ope ration
Turn on/off
1. Connect the TV power line to AC outlet.
2. Press the Power button on the TV set. When the TV is on, press the Power button on the
remote control, and the TV will enter Standby state. Press this button again, and you can
watch TV normally.
3. Press the Power button again to turn off the TV.
Note:
uIn order to save power consumption, if you do not watch TV for a
short time, if you do not watch TV for a very long time, shut down the main power of the TV.
uIf the TV is turned off , to turn it on agin, please wait at least 5 seconds in case the abnormal
phenomena occurred.
Changing Channels/ Volume
1. Press CH+/- button on the remote control, you can change the channels.
(Press VOL button to raise or lower the volume).
2. Press CH button on the front panel of the TV set, you can also change the channels.
(Press VOL button to raise or lower the volume).
3. Press the numeric buttons on the remote control to display the corresponding channels.
Note:
Changing the channels can also be achieved by directly pressing the Program No. If you want to
choose the program No. from 1 to 9, press the numeric buttons directly. If you want to select a
program No. from 10 to 200, the time spent between twice pressing the numbers mustn't be
more than 3 seconds.
+/-
+/-
+/-
set the TV in Standby state
11
Page 13

Channel s etting
To set the channels:
Cha nnel
Pro gram No . 25
Col or Syst em Auto
Sou nd Syst em D/K
Fin e Tune
Aut o Insta ll
Man ual Ins tall
Pro gram Ed it
: Sel ect
OK : En ter
: Bac k
The options are:
• Program NO.: Adjusts the current channel number.
• Color System: Adjusts the color system.
• Sound System: Adjusts the sound system. Irrelevancy colour or sound system may cause the
picture and sound to be abnormal.
• Fine Tune: Fine adjusts frequency to achieve a perfect effect.
1 Press Menu button to display the main menu.
2 Press button to select Channel item.
3 Press OK button to enter Channel menu.
4 Press button to select the option, press
CH+/VOL+/
CH+/-
VOL+/OK VOL+/-
button to enter or press button to
adjust the option.
5.When you are finished, press the Menu button to close
the menu.
• Manual : Start searching the channels by manual settings. Before the manual ,
Install Install
please set the proper colour system and sound system. The initial frequency of the manual
search can not be adjusted, and its value changes with the frequency band or the channel
number automatically.
• Auto Install: Searches the channels automatically. Before searching the channels automatically,
you can select the country you located.
• Program Edit: Edit the channels, Including:
¨Rename: press Red button to change the name of the selected channel. Press
CH+/-
button to adjust the token of the name. Press OK button to confirm or Green button to
cancel. The longest channel number name has 6 letters.
¨Skip the channel: press Green button to select skip function. If you want to cancel skip,
press Green button again. The channels which are set to skipped will be skipped when
pressing the button on the remote control to brows the programs. However, they will
CH+/-
still be directly selected by pressing the Program No.
¨Delete the channel: Press Blue button to select delete function, and then press Red button
to confirm.
¨Copy the channel: Press Yellow button to select copy function. Then press button to
CH+/-
move to the desired position and press Red button to confirm.
¨ Arrange the channel: If you want to change the order of the programs, press
button; press button to move to the desired position, and then press button to
CH+/- VOL-
VOL+
confirm.
12
Page 14

Picture s etting
To adjust the picture:
Pic ture
Bri ghtne ss
Con trast
Col or
Sha rpnes s
Col or Temp. St andar d
Enh anced S ettin g
: Sel ect OK : En ter
:
Bac k
50
50
50
The options are:
• Brightness: Increases the brightness to add more light to dark areas of the picture. Decreases
the brightness to add more dark to light areas of picture.
• Contrast: Increases the picture level to adjust the white areas of the picture. Decreases the
picture level to adjust the black areas of the picture.
• Color: Adjusts the intensity of the color.
• Sharpness: Increases the sharpness level to show cleaner and cleaner image. Decreases the
level to show a smoother picture.
• Color Temp.: Selects the color temperature. You can select Standard, Warm or Cool.
1 Press Menu button to display the main menu.
2 Press button to select Picture item.
3 Press /OK button to enter Picture menu.
4 Press button to select the option, press
5
CH+/VOL+
CH+/-
VOL+ VOL+/-
/OK button to enter or press button to
adjust the option.
5 When you are finished, press the Menu button to close
the menu.
• Enhanced Settings: Accesses advanced video settings, Including:
DNR: It can optimize the picture signal from time and space; reduce the outside noise
interference and return the pure initial signal. It has four ratings: Low, Standard,
Strong and Off.
CTI: Marginal improvements in color, that color the edge of a sharp transition
Flesh Tone: When this feature is "on" state, the TV could be the basis of image content, for
color correction.
Adaptive Luma Control: According to the screen in different scenes, the dynamic
adjustment of image contrast to show the effect of better quality.
13
Page 15

Sound set ting
Sound set ting
To adjust the sound:
Sou nd
Bal ance
Spe akers I ntern al
Sou nd Fiel d Table
Equ alize r
AVC Off
Lip S ync Off
: Sel ect OK : Enter : Bac k
0
1 Press Menu button to display the main menu.
2 Press button to select Sound item.
3 Press OK button to enter Sound menu.
4 Press button to select the option, press
CH+/VOL+/
CH+/-
VOL+/ VOL+/-
OK button to enter or press button to
adjust the option.
5.When you are finished, press the Menu button to close
the menu.
The options are:
• Balance: Adjusts the volume from the left and right speakers.
• Speakers: Choice of internal speaker or external speakers, when the speaker is set to internal,
the TV sound is output to the machine speaker; when the speaker is set to external, the sound
through the audio line output to connect to other external speaker at this time, at the same time,
the switch to open an external speaker.
•
Sound Field: select the place Table or Wall of TV.
• Equalizer: Weaken or enlarge the sound of the main frequency points.
• AVC: Auto volume control, turns automatic volume control on or off. The option keeps the audio
in a preset range to eliminate large spikes in volume.
Lip Sync: Keep sound and image synchronization
•
14
Page 16

Screen se tting
To adjust the screen image:
Scr een
H Siz e
V Siz e 5
Ima ge Posi tion
: Sel ect OK : Enter : Bac k
The options are:
• H-Size: Adjusts the horizontal size of the image.
• V-Size: Adjusts the vertical size of the image.
1 Press Menu button to display the main menu.
2 Press button to select Screen item.
5
3 Press OK button to enter Screen menu.
4 Press button to select the option, press OK
CH+/VOL+/
CH+/- VOL+/
button to enter or press button to adjust the
option.
5.When you are finished, press the Menu button to close
the menu.
VOL+/-
• Image Position: Adjusts the position of image on screen by press button.
CH+/- /VOL+/-
• Phase: Adjusts the phase of the clock used for synchronizing the image.
• Manual Clock: Adjusts the clock used for synchronizing the image.
• Auto Setting: Adjusts the position and the size of the image automatically.
Note:
HDMI interface transmits whole digital signal and Geometry Adjust function is not used, so
Screen cannot be selected under HDMI. H-Size and V-Size are not available under VGA source,
Phase and Manual Clock are only available under VGA source.
Take Windows2000 as an example, and the Windows system display setting is as illustrated:
1 Click "Setting" on the Windows Start menu and select "Setting" to move the mouse
horizontally to click "Control Panel".
2 The control panel window appears; click "Display" to display a dialogue box.
3 Find the "Settings" item on the dialogue box, set the screen Resolution.
4 Click "OK" to exit.
15
Page 17

To set the parameters:
Fun ction
OSD L angua ge Engl ish
Blu e Scree n On
Lig ht Effe ct On
OSD S ettin g
Fac tory Re set
: Sel ect OK : En ter
: Bac k
Functio n settin g
1 Press Menu button to display the main menu.
2 Press button to select Function item.
3 Press OK button to enter Function menu.
4 Press button to select the option, press OK
5.When you are finished, press the Menu button to close
CH+/VOL+/
CH+/- VOL+/
button to enter or press button to adjust the
VOL+/-
option.
the menu.
The options are
OSD Language: Sets the menu language.
Blue Screen: Turns on or off display of a blue screen as the image when there is no video
:
signal.
Light Effect: To set the front of TV indicate Light mode On or Off.
OSD Setting:
Time: press set the OSD time out.
Transparency: set the OSD transparency.
Factory Reset: Resets your TV to the factory defaults. You can use this function when this
VOL+/- button to
press VOL+/- button to
unit is in an abnormal state or you want to make it return to the factory reset.
16
Page 18

PIP setting
To adjust the PIP image:
PIP M ode
PIP M ode PIP
PIP P ositi on Righ t Botto m
Sub B right ness
Sub C ontra st
Sub C olor
: Sel ect OK : En ter
: Bac k:
The options are:
• PIP Mode: Sets the size of the sub picture, there are Off, PIP and PBP Full Screen to choice.
• PIP Position: Sets the position of the sub picture.
• Sub Brightness: Sets the brightness of the sub picture.
• Sub Contrast: Sets the contrast of the sub picture.
• Sub Color: Sets the color of the sub picture.
1 Press Menu button to display the main menu.
2 Press button to select PIP Mode item.
3 Press OK button to enter PIP Mode menu.
50
50
4 Press button to select the option, press OK
50
CH+/VOL+/
CH+/- VOL+/
button to enter or press button to adjust the option.
VOL+/-
5.When you are finished, press the Menu button to close
the menu.
17
Page 19

Digital m ultime dia function
Brief Function Introduction
signal mode
Picture
Music
Movie
support format
JPEG
MP3
MPEG1(.dat) MPEG2(.mpg)
MPEG4(.mpg) DIVX3.1(.avi)
Introduction to the functions of the remote control buttons
DMP
Exit
Display
ZOOM
Zoom : Pictures can be zoomed through this
DMP SET
Media
button when you enjoy movies and browse images.
Display : Press this button to display the function menu in this state.
Media button: Such files as pictures, music and movies can be chosen or masked through
this button.
► II : When you are listening to music and enjoying movies, you can switch between
playing and pause through this button. In addition, you can continue to play through this
button when AV file forward or backward mode is entered.
: Exit the current state.
This unit has USB digital multimeadia player . It can identify
such standard USB1.1 and USB2.0 devices as hardware, U
disk, digital camera, etc.
At the same time, you can browse the images, listen to music,
and enjoy various files such as MPEG1, MPEG2, MPEG4, AVI,
DAT, etc.
DMP : Initial interface of multimedia player can be
entered through this button and you can choose the files
you want.
▲: Move the cursor upward/ Forward the movie when you
playing AV files.
▼: Move the cursor downward /Backward the movie when
you playing AV files.
◄ : Move the cursor left/Return to the senior contents
► : Move the cursor right the subclass contents
: Press this button to confirm your selection and
operation.
DMP SET: All the DMP function parameters including
language selecting, picture playing means or speed and
multipicture type can be set through this button.
DMP setup menu: set the parameters of DMP function
Fun ction
Tran sitio n Effec t No
Pic ture Sw itch In terva l 5s
Rep eat Mod e Repea t One
Tran sitio n Effec t
1. Press DMP SET button to enter DMP setup menu.
2. Press ▲/▼ button to select the corresponding item,
press ◄/► button to adjust. The items are:
Transition Effect: the mode of the picture into the
screen during browse the pictures.
Picture Switch interval: Set the interval time of
: Sel ect OK : En ter
: Bac k:
switching the picture during browse the pictures.
Repeat Mode: files of the way to repeat playing.
DMP SET3. Press button to exit.
18
Page 20

Digital m ultime dia function
Picture Browsing: Browse the pictures
DMP main interface
C: Picture 001/004
\USB\
-
Picture1
Picture2
Picture3
Music Info
: 00:00 00:00
Picture Info: 1100×1600
: Sel ect OK : En ter
Play
: Exi t
1600×1200
Introduction to Function Menu
Press Display button to display the function menu.
You can select and browse the kept pictures in the storage
device.
1. Press DMP button to enter DMP main interface and the
contents of the storage device will appear on the screen.
2. Press the Media button on the remote control; the icon is
chromatic in the main menu of DMP so that the other types
of files can be shielded and you can browse the pictures
more conveniently.
3. According to the reminding on the screen, press
button to select the disk symbol of the storage device, and
press button to enter.
4. Press to select the file to be played, and
▲/▼ picture
press button to start.
5. When browsing the pictures, the screen will display the
function menu automatically.
6. Press button to select the corresponding function
◄/►
icon.
7. Press button to finish.
8. During the course of browsing, press Exit button to stop
browsing and return to the contents where the file is
stored.
▲/▼
Play
4
1
The state of the being browsedpicture
1
2
Picture browsing/Pause, and press OK button
2 3
5
6 7 8 9
to shift
3
Stop browsing the pictures and return to
root file
Revolve the counter-clockwise by
4
picture
90º, and it can be revolved continuously
by pressing OK button repeatedly
Mirror the verticallypicture
5
6
Mirror the horizontallypicture
1600×1200
11
10
7
Enlarge the picture, and the pictur can be
12
enlarged by pressing OK button repeatedly.
8
Browse the previous picture.
9
Browse the next picture.
10
Display the specific information of the picture file.
11
Preview the several s at the same time.
12
Picture resolution
picture
19
Page 21

Digital m ultime dia function
Enjoying Music: Play audio files
You can select and browse the kept images in the storage
C: Music 001/002
\USB\
the day you went away
say you say me
: Sel ect OK : En ter
Title: Say you Say me
Artist:
Album:
Year:
Comment: http//mp3.ttin.com
Music Info
: 00:11 05:03 186kbps
:
Picture Info:
LRC file not found!
: Exi t
Play AV files: Play the AV files on the storage device
Play
devices.
1. Press DMP button to enter DMP main interface and the
contents of the storage device will appear on the screen.
2. Press the Media button on the remote control; the icon is
chromatic in the main menu of DMP so that the other
types of files can be shielded and you can listen to music
more conveniently.
3. According to the reminding on the screen, press ▲/▼
button to select the disk symbol of the storage device, and
press button to enter.
Press ▲/▼ to
4. select the music file to be played, and press
button to start.
5. During the course of playing, press Exit button to stop
playing and return to the contents where the file is stored.
1. Press DMP button to enter DMP main interface and the
contents of the storage device will appear on the screen.
2. Press the Media button on the remote control; the icon is
chromatic in the main menu of DMP so that the other
types of files can be shielded and you can enjoy the
movie more conveniently.
3. According to the reminding on the screen, press ▲/▼
button to select the disk symbol of the storage device,
and press button to enter.
4. When the AV files are being played, press Display button
and the function menu appears on the screen.
5. Press ◄/► button to select the corresponding function
icon.
6. Press button to finish.
7. During the course of playing, press Exit button to stop
playing and return to the contents where the file is
stored.
20
Page 22

Digital m ultime dia function
Introduction to Function Menu
Press Display button to display the function menu.
Play
1
State information column, displaying the
1
2
current state.
2
Pause/Play
3
Stop playing the AV file and return to root file
4
A ,B-point repeat playback
5
Backward the movie
5
3
6 7
4
8
9
6
Forward the movie
Browse the previous AV file
7
8
Browse the next AV file
9
Display the specific information of the AV file
Note: A, B point to repeat playback, click this button to select the A-point, and then
click the button to select the B point. In this way, the screen play will be A, B Loop
between two points. If cancel the circle of players, and then click the button.
Exit the DMP source
When you are under the source of DMP, you can exit it as followed:
1. Press Source button to display the main source.
2. Press button to exit the apparatus list, then press button to select the source you
◄ ▲/▼
want to enter.
Attentions:
1. The USB port of Digital multimedia player supports most hard disks, digital cameras, U
disks, etc. If the unidentified phenomenon appears, it does not belong to the breakdown
of this unit, for it has something to do with the driver of the equipment.
2. The USB port of this unit provides 5V voltage and the maximum current is 500mA.
Because the port specification adopted by certain storage devices is different from that of
the standard USB agreement, so it may affect the correct identification of the multimedia
player. This belongs to the normal phenomenon.
3. Due to the difference of the equipment and the storage capacity, the time which the
digital multimedia player needs to read the information also differs. The speed of reading
the information may slow down temporarily. Please note that this is not the breakdown of
this unit.
4. USB system only can support FAT32 format and NTFS format is not supported at
present.
21
Page 23

Importa nt safet y instru ctions and Environment
Importa nt safet y instru ctions and Environment
Environ ment
Environ ment
(Waste Electronic Electric Equipment)
(Waste Electronic Electric Equipment)
WEEE
WEEE
European Directi ve 2002/96/EC & 2003/108 /EC
European Directi ve 2002/96/EC & 2003/108 /EC
barred
The symbol of the dustbin means that this apparatus cannot be
The symbol of the dustbin means that this apparatus cannot be
put at the rebus with other current domestic waste. Some components
put at the rebus with other current domestic waste. Some components
may be harmful to the environment.
may be harmful to the environment.
Do not throw away with domestic waste, to deposit it on the
Do not throw away with domestic waste, to deposit it on the
public domain or any other site which is not used for this purpose.
public domain or any other site which is not used for this purpose.
Contact your local authority to know the place of collection.
Contact your local authority to know the place of collection.
This apparatus has a particular recycling treatment for the re-
This apparatus has a particular recycling treatment for the reemployment of the matters which make it up.
employment of the matters which make it up.
The selective collection of waste electronics makes it possible to reduce
The selective collection of waste electronics makes it possible to reduce
the number of substances which are not recycled and thus
the number of substances which are not recycled and thus
contribute to the safeguard of the environment.
contribute to the safeguard of the environment.
(Reduction of Hazardous Substance)
(Reduction of Hazardous Substance)
ROHS
ROHS
European Directi ve 2002/95/EC
European Directi ve 2002/95/EC
This European directive limits the use of dangerous and hazardous
This European directive limits the use of dangerous and hazardous
substances which are not recyclable or those of which recycling is
substances which are not recyclable or those of which recycling is
difficult.
difficult.
This allows recycling easily the EEE and contributes to the safeguard
This allows recycling easily the EEE and contributes to the safeguard
of the environment.
of the environment.
Substances included in this product match to the RoHS directive.
Substances included in this product match to the RoHS directive.
barred
dangerous
dangerous
Battery
Battery
Do not throw away battery with common domestic waste. Throw battery
Do not throw away battery with common domestic waste. Throw battery
in a collecting zone indicated. Do not throw the pile in fire.
in a collecting zone indicated. Do not throw the pile in fire.
Do not mix different kinds of batteries. Do not combine the worn battery
Do not mix different kinds of batteries. Do not combine the worn battery
with the new ones.
with the new ones.
Immediately remove the over-heated battery to prevent the acid from
Immediately remove the over-heated battery to prevent the acid from
fleeing in the battery compartment.
fleeing in the battery compartment.
If you do not intend to use the remote control for a long period of time,
If you do not intend to use the remote control for a long period of time,
remove the batteries.
remove the batteries.
22
Page 24

Pedesta l instal lation instruction
Pedestal Installation Instruction
Put the TV set on the level table on which is the pad cloth or other soft material. Use the
provided 4 screws (in the enclosed bag of the base) to fix the base to the whole unit.
4 screws
23
Page 25

Trouble sh ooting
When there is something wrong with your TV, you can try turning off the TV and then restart it.
You can also operate according to the following chart. If the problem still cannot be solved, please
contact the professional technicians.
1. Check if the power line is in the outlet and if it
has electricity.
2. Check if you have pressed Power button on the
No sound or picture
The picture is normal
but there is no sound
No picture and white
or black picture
The sound and picture are
interfered
Unclear picture or picture with snow
The remote control does not work
TV or Power button on the remote control.
3. Check the setting of picture brightness and
contrast.
4. Check the volume.
1. Check the volume.
2. Check if Mute mode is set.
1. Adjust Picture Setting.
2. Check Color System.
1. Try to find the appliance affecting TV set, and
move it far away from the TV set.
2. Try to insert the power plug of the TV set into
another outlet.
1. Check the direction, position and connection of
your antenna.
2. Adjust the direction of your antenna or reset or
fine tune the channel.
1. Change the batteries in the remote control.
2. Clean the upper side of the remote control
(radiating window)
3. Check the contacting points of the batteries.
4. Check if there is obstruction between the
remote control and the monitor.
5. Check if the batteries are correctly installed.
H/V strip or the picture shaking
The cabinet of the TV makes “Click” sound
Check if there is interfering source nearby, such as
appliance or electric tools.
makes "Click" sound''Sometimes the room
temperature change can cause the television
cabinet to inflate or contra, which makes the
sound. This does not mean the TV breaks
down.
Ac c e ssori e s
Remote control...........................1
User's Manual.............................1
Dry Cell Battery...........................2
NOTE: This manual is for reference only, please refer to the actual TV to determine their features.
24
 Loading...