

Hisense LCDF0104 User Manual
English
ES-

Copyright Statement
Portions © 2017 Hisense Company Ltd. All rights reserved. Material in this User Manual is the property of Hisense
Company Ltd. and its subsidiaries, and is protected under US and International copyright and/or other intellectual
property laws. Reproduction or transmission of the materials, in whole or in part, in any manner, electronic, print, or
otherwise, without the prior written consent of the Hisense Company Ltd. is a violation of Hisense Company Ltd. rights
under the aforementioned laws.
No part of this publication may be stored, reproduced, transmitted or distributed, in whole or in part, in any manner,
electronic or otherwise, whether or not for a charge or other or no consideration, without the prior written permission of
Hisense Company Ltd.
Requests for permission to store, reproduce, transmit or distribute materials may be made to the following address:
Hisense USA Corporation 7310 McGinnis Ferry Road Suwanee, GA 30024.
Hisense, and any and all other Hisense product names, logos, slogans or marks are registered trademarks of Hisense
Company Ltd. and its subsidiaries. All other trademarks are the property of their respective holders.
Portions © 2016 Roku, Inc.
All rights reserved. ROKU, the ROKU Logo, ROKU READY, the ROKU READY Logo, “STOP DREAMING. START
STREAMING.”, “HAPPY STREAMING.”, “THERE’S A TON OF ENTERTAINMENT IN THIS LITTLE BOX.”, “STREAMING
STICK”, and “NOW THIS IS TV.” are trademarks and/or registered trademarks of Roku, Inc. in the United States and
other countries.

Disclaimers
**Notwithstanding anything to the contrary, including in any or all descriptions, representations, statements or other
communications related to this Hisense device (hereinafter “Device”) made in any form whatsoever and at any time, some
or all of the pre-installed, or subsequently installed Application Services may not be available or capable of functioning
as intended by the provider of the Application Services in any or all usage areas for reasons outside of Hisense’s control,
including but not limited to, Internet access, local service limitations, etc. Any purchase or use of the Device, including
any Application Services, is purely at the user’s risk. Application Services are provided on an as-available basis without
warranties of any kind, either expressed or implied, that the Application Service will be uninterrupted or error-free,
including but not limited to vagaries of weather, disruption of Service, acts of God, warranties of title, local or regional
limitations, no infringement, NOR IMPLIED WARRANTIES OF MERCHANTABILITY OR FITNESS FOR A PARTICULAR
PURPOSE. No advice or information given by Hisense, providers, affiliates, or contractors or their respective employees
shall create such a warranty. Hisense specifically disclaims responsibility for any or all Application Services from
functioning at any time, and by purchasing the Device, you accept such disclaimer without any claim on Hisense. You are
solely responsible for providing an active and working connection to the Internet, along with any and all hardware and/or
software necessary to use the Hisense Device as intended.
----------------------------------------------------------------------------------------------------------------------------------------------------------------
**Illustrations in this User Manual are provided for reference only and may differ from actual product appearance. Product
design and specification may be changed without notice.

1
Table of Contents
Welcome ................................................................................................................... 4
The new standard in Smart TVs .........................................................................................................4
Get the most out of your new TV ........................................................................................................ 4
Connect your TV ................................................................................................................................6
Connections and setup ........................................................................................... 6
AC power ...........................................................................................................................................9
Remote control batteries .................................................................................................................... 9
Roku TV Remote control ....................................................................................................................9
Panel buttons ...................................................................................................................................10
Starting Guided Setup......................................................................................................................11
Guided Setup ...........................................................................................................11
Setting up your TV ............................................................................................................................ 12
Connected Home Screen ................................................................................................................17
Non-connected TV Home screen.....................................................................................................17
Connecting brings out your TV’s full potential! ................................................................................19
Benefits of connecting .......................................................................................... 19
What is streaming? ........................................................................................................................... 20
But what if I didn’t connect my TV? .................................................................................................. 20
Setting up Antenna TV ........................................................................................... 21
Why do I have to set up the TV tuner? .............................................................................................21
How do I set up the TV tuner? .......................................................................................................... 21
Using your TV ......................................................................................................... 25
Status light .......................................................................................................................................25
Standby mode energy savings ........................................................................................................25
Watching broadcast TV channels .................................................................................................... 25
Switching TV inputs .......................................................................................................................... 27
Pausing Live TV ...............................................................................................................................27
Switching TV inputs .......................................................................................................................... 28
Playing content from local network media servers ..........................................................................29
Playing content from USB storage devices .....................................................................................29
Playing content from local network media servers ..........................................................................29
Using your TV in a hotel or dorm room ............................................................................................29

2
Table of Contents
Adjusting TV settings ............................................................................................ 32
Settings menu ..................................................................................................................................32
Options menu ................................................................................................................................... 32
Accessibility .....................................................................................................................................34
Advanced picture settings ............................................................................................................... 35
Changing privacy settings ...............................................................................................................36
My Feed ................................................................................................................... 37
Movies Coming Soon .......................................................................................................................37
Movies, TV shows, and people ........................................................................................................37
Searching for something to watch ....................................................................... 38
How do I search? .............................................................................................................................38
I found a show, now what? ............................................................................................................... 38
Follow on Roku ................................................................................................................................. 39
Recent Searches .............................................................................................................................. 39
Using the Roku Channel Store ............................................................................. 40
Customizing your TV ............................................................................................. 41
Rearrange tiles ................................................................................................................................. 41
Edit broadcast TV channel lineup .................................................................................................... 42
Rename inputs .................................................................................................................................42
Remove unwanted tiles .................................................................................................................... 42
Change themes ................................................................................................................................ 43
Change sound effects volume .........................................................................................................43
Configure power settings ................................................................................................................. 43
Configure accessibility ..................................................................................................................... 44
Configure parental controls..............................................................................................................45
More settings .......................................................................................................... 50
Changing network settings ..............................................................................................................50
Changing time settings ....................................................................................................................50
Scanning for broadcast TV channels again ..................................................................................... 50
Setting the HDMI mode .................................................................................................................. 51
Using the TV in a home theater ........................................................................................................ 51
Restarting the TV .............................................................................................................................. 53
Resetting the TV ............................................................................................................................... 53
Changing your Roku Channel Store PIN preference .......................................................................54
Getting system updates ................................................................................................................... 54

3
Other devices ......................................................................................................... 57
Screen Mirroring your phone or tablet .............................................................................................57
Getting and using the Roku mobile app ..........................................................................................57
Using a universal remote .................................................................................................................57
FAQ .......................................................................................................................... 58
Additional Legal Statements ............................................................................................................63
Table of Contents
4
Welcome
Congratulations on the purchase of your new TV! Discover the joy of endless entertainment. After it’s set up, you’ll be able to
access a world of streaming content channels that may include Netflix, YouTube, Crackle, CNET and literally thousands more.
Important: Your TV receives automatic updates from time to time, enabling new content and features. To determine the current
version of your Roku TV, go to Settings > System > About after you complete Guided Setup.
The new standard in Smart TVs
Welcome to TV like you’ve most likely never seen before — a home screen that you can personalize with your favorite devices
and streaming channels. Choose from hundreds of thousands of streaming movies and TV episodes, plus music, sports, kids,
family, international and much more. You should never run out of things to watch.
NOTE
• A paid subscription or other payments may be required for some channels. Channel availability is subject to change and
varies by country. Not all content is available in countries or regions where Roku
®
products are sold.
Get the most out of your new TV
Follow these simple steps to get the most out of your new TV.
1. Connect to the Internet.
• It’s simple, it’s easy, and it will unlock a world of entertainment. All you need is a network connection. There are hundreds
of free streaming channels, paid subscription services like Netflix and Spotify, convenient ways to rent or buy a favorite
film or show with Google Play and Cineplex and more.
2. Pick your favorite streaming channels.
• Find the entertainment you love. From the latest blockbuster movies to your favorite TV shows, with tons of live sports, a
broad selection of music streaming channels, popular programming in a dozen international languages, 24x7 live news
and so much more, your new Roku TV has your sweet spot. A paid subscription or other payments may be required for
some channels.
3. Personalize your Home screen.
• Put your favorite broadcast TV, streaming channels, gaming console and other devices front-and-center on the Home
screen. No more flipping through inputs or wading through complicated menus. You can even personalize the names of
each input and move tiles around so your most-often used devices and streaming channels are only a click away.
4. Search for your favorite movie, TV show, actor, or director.
• Once you’re connected to the internet, you can easily search across top streaming channels by movie or TV show title,
actor or director—all from one place. Search results are organized by price so you can always see the best priced option.
A paid subscription or other payments may be required for some channels.
5. Pause live TV.
• Pause, resume, fast forward, and rewind TV shows. Simply connect your own USB drive with 16GB or bigger capcity to
the TV and pause live TV for up to 90 minutes.
• Live TV Pause is available on digital TV shows received on the TV’s antenna input only, and only when the TV is
linked to a valid Roku account.
6. Send your personal media to the big screen.
• Send personal photos, videos, and music from your compatible smartphone or tablet to the TV screen in just a few
taps. Plus, with certain channels, such as Netflix and YouTube, you can send movies, shows, sport highlights, and more
directly to your TV.
• The Roku app for Microsoft Windows® mobile devices does not cast videos.
7. Follow movies coming soon.
• Use My Feed to choose from and follow a list of upcoming movies, and then watch for alerts each time one of your
followed movies becomes available or changes price.
NOTE
NOTE

5
• My Feed is not available in the Roku App for Windows mobile devices in the United States or Canada.
8. Take charge with a smartphone or tablet.
• Control your TV with the included remote or from your compatible smartphone or tablet with the free mobile app for iOS
®
,
Android
™
, and Windows™ mobile devices. Browse channels, view My Feed, listen to audio from streaming programs, and
even search with voice via the free mobile app.
• Mirror your compatible smartphone or tablet on your TV. Share videos, photos, web pages, and more from compatible
devices.
• Use your compatible smartphone or tablet to connect your Roku TV to the types of networks found in hotels and college
dorms, where you may have to agree to terms, enter codes, or provide identifying information.
• Voice search, Mobile listening, and My Feed are not available in the Roku app for Windows devices.
• Using your Roku TV on a restricted public network requires wireless availability and use of your network-connected
smartphone, tablet, or computer to authenticate access to your account. You must use your Roku TV remote control
to initiate the connection process. Streaming content might be limited due to your geographic location or because of
restrictions imposed by the wireless network host.
Go to support.roku.com for device compatibility information.
Let’s get started.
--------------------------------------------------------
* IOS
®
is a trademark or registered trademark of Cisco in the U.S. and other countries and is used under license.
Android
™
is a trademark of Google Inc.
Windows
®
is a registered trademark of Microsoft Corporation in the United States and other countries.
NOTE
NOTES
Welcome
6
Connect your TV
This section explains how to connect your devices to your TV.
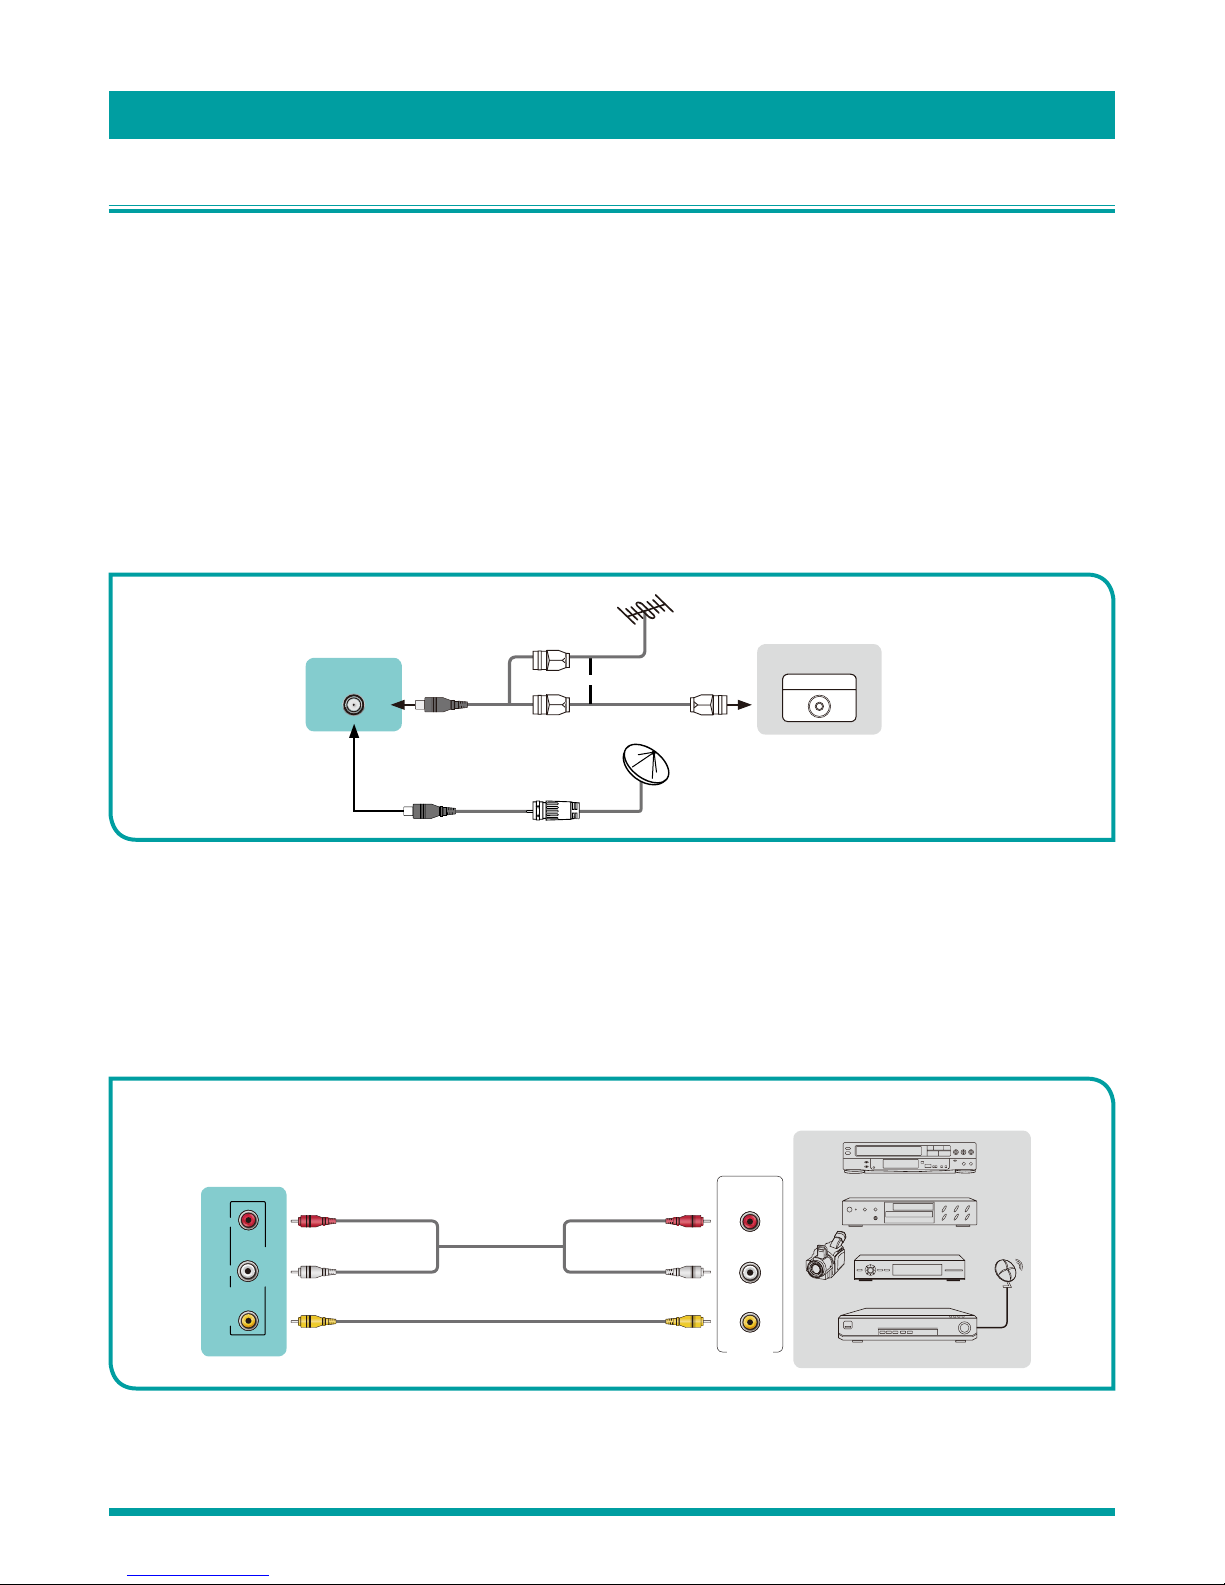
Connecting an antenna, cable or satellite box
If you are using an antenna, CATV cable without a set-top box, or a cable or satellite box that has only an antenna output,
connect a 75-ohm coaxial cable (not provided) from the device to the ANT/CABLE input on the TV.
TIP: If you are using an antenna with a 300 ohm twin-lead cable, you need to use a 300-75 ohm adapter (not provided) to
adapt the cable to a connection that is compatible with the TV’s antenna input.
If you receive your TV stations through a set top box from a cable or satellite TV provider, connect it to the TV using the
best connection method available. From most to least desirable:
• HDMI
®
input – Digital HD and SD video
• AV input – analog SD video
• Antenna input – analog SD video using NTSC
Connecting a component with a composite AV video cable
If the best connection available on your component is AV or composite video output, connect it to the TV using a composite AV
cable (not provided). Composite AV cables typically have three RCA-type plugs on each end, color coded as follows:
• Yellow : Video
• Red : Audio, right channel
• White or black : Audio, left channel
Connect each plug to the corresponding connector on the component and on the TV.
or
ANT OUT
Cable Set top box
RF Out
EXTERNAL DEVICE
TV PORT
ANT/CABLE
(not included)
(not included)
AV OUT
Video
L
R
White (L)White (L)
Yellow (Video)Yellow or Green (Video)
Red (R)Red (R)
Audio Cable
TV PORTS
VIDEOL R
AV IN
EXTERNAL DEVICES
DVD Player/Recorder
Video
Camera
Set-top box
Satellite Receiver
Satellite
antenna
cable
VCR
Connections and setup

7
Connecting a component with an HDMI® cable
If possible, connect your devices using HDMI® cables (not provided). They help to provide the best video quality and also carry
audio signals, so that only one cable is needed. For better picture quality, we recommend that you use cables designated as
High Speed HDMI
®
cables.
TIP: You might need to configure the component to send its signal through its HDMI
®
connector.
The connector labeled HDMI IN (ARC) has the additional ability to use the audio return channel to send digital audio to a
receiver or sound bar, as explained in select models also have an audio line out connection that is not affected by TV volume
or mute settings and does not disable the TV speakers. Use this connection when you want to use your amplifier or sound bar
to control the TV volume. To turn off the TV’s built-in speakers, in the Home screen menu, navigate to Settings > Audio > TV
speakers and change the setting.
NOTES
• Because the HDMI connector provides video and audio signals, it is not necessary to connect an audio cable.
• We strongly recommend to use HDMI Cable with 2 cores as shown in the figure.
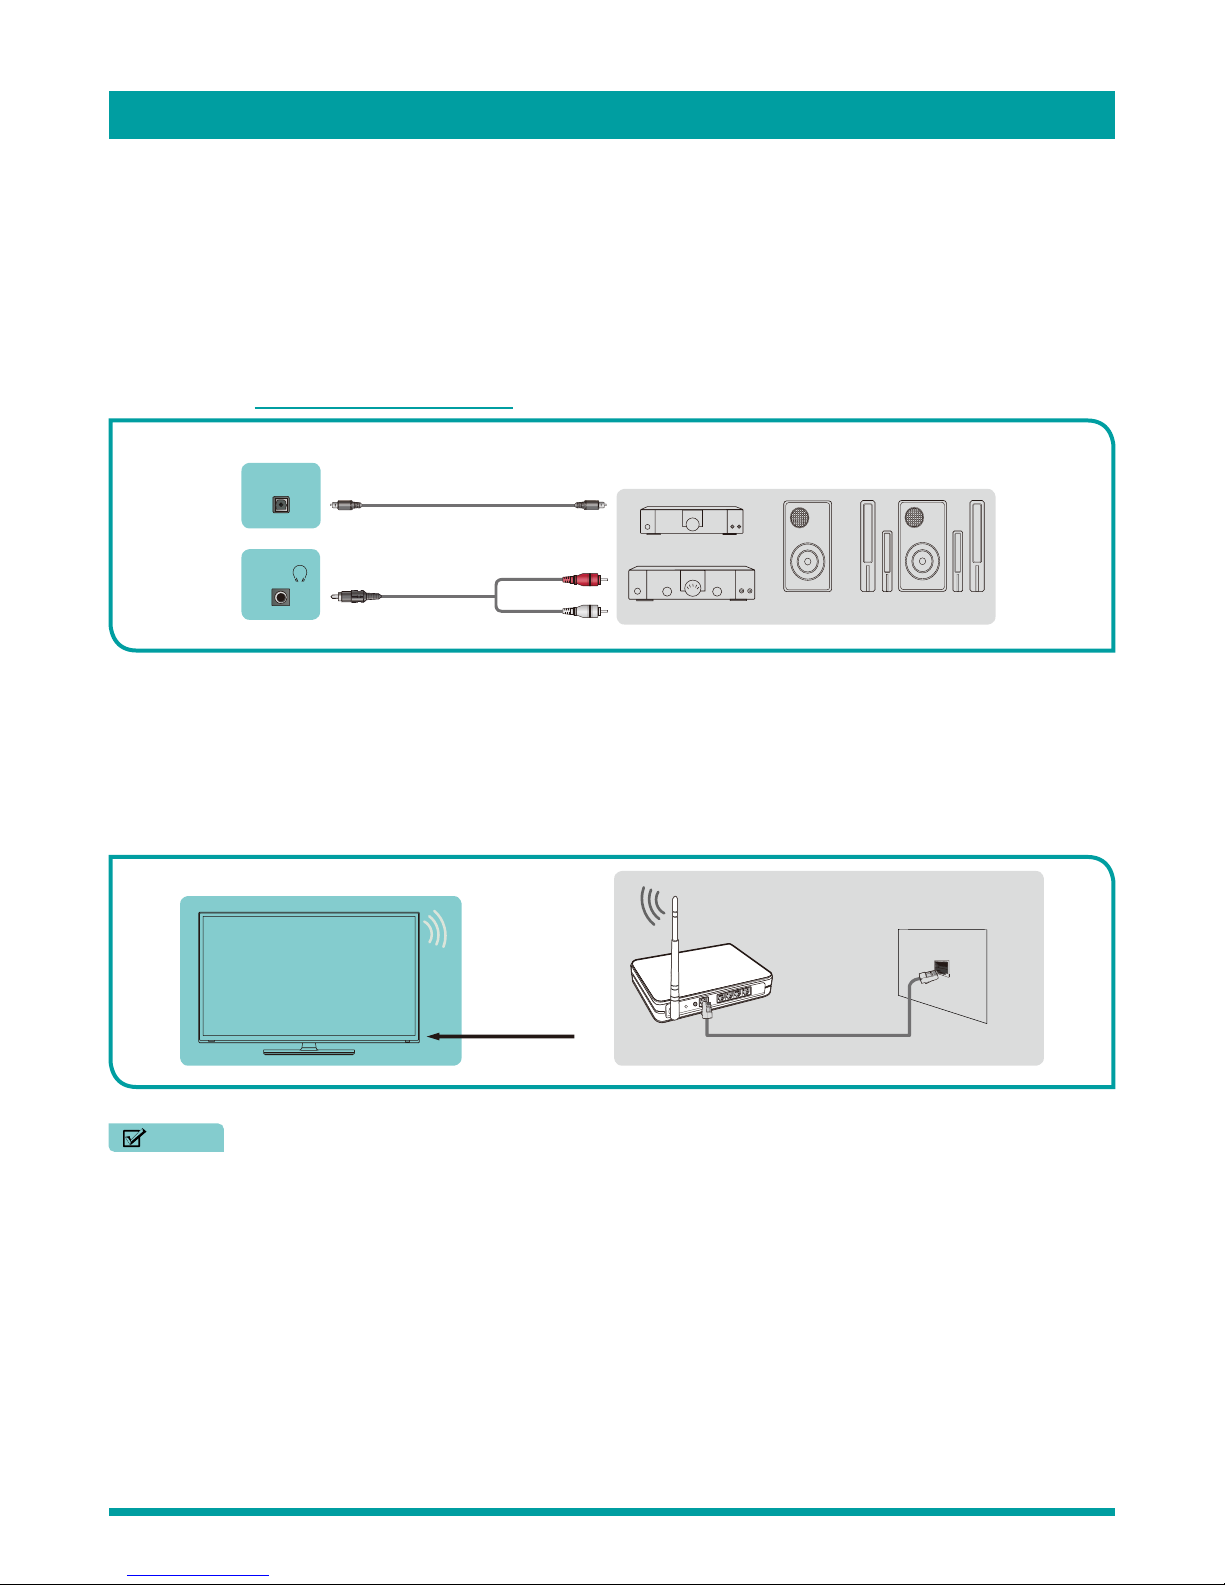
Connecting headphones or analog sound bar
You can connect headphones or an analog sound
bar (not provided) to the TV’s headphone jack.
TIP: Inserting a plug in the headphone jack disables
the sound from the TV’s built-in speakers.
NOTE
• Loud noise can damage your hearing. When
using headphones, use the lowest volume
setting on your headphones that still lets you
hear the sound.
Connecting a USB device to the USB port
1. Connect the USB devices such as hard drives,
USB sticks and digital cameras for browsing
photos, listening music and watching recorded
movies into the USB port.
2. Select the Roku Media Player tile from the Home
screen
.
NOTES
• When connecting a hard disk or a USB hub,
always connect the mains adapter of the connected device to the power supply.
• If a USB 1.1 or USB2.0 device requires more than 500mA or 5V, the USB device may not be supported. Exceeding the
max supported current may result in damage or data loss.
HDMI
HDMI
EXTERNAL DEVICES
DVD
Set-top Box
TV PORT
HDMI Cable
/
AUDIO
OUT
TV PORT
EXTERNAL DEVICE
Headphone
TV PORT
EXTERNAL DEVICE
USB
DC 5V
0.5A(MAX)
Connections and setup
8
Connecting an AV receiver or digital sound bar
You can enjoy Dolby Audio™ multichannel sound from your TV if you connect a digital amplifier or sound bar (not provided) in
either of two ways:
• Digital optical audio out (S/PDIF) – Connect a TOSLINK optical cable (not provided) from the TV to the Optical input on
your receiver or sound bar.
• HDMI
®
ARC – Connect an HDMI
®
cable (not provided) from the HDMI (ARC) connector to the HDMI® input on your
receiver or sound bar. This connection uses the Audio Return Channel (ARC) feature of the HDMI
®
specification to output
sound from the TV to a compatible device. To use this feature, you must configure the TV to enable HDMI
®
ARC, as
explained in Enabling HDMI ARC on page 52.
Preparing for Internet connectivity
If you want to connect your TV to the Internet to watch streaming content, you must connect using a wireless modem/router or
a wireless access point. The TV connects through a built-in wireless LAN adapter. The TV does not support a wired connection
or the use of a USB network adapter.
We recommend that your wireless connection support the IEEE 802.11b/g/n specification for the best experience.
Wireless Adapter
built-in the TV set
LAN Cable
Wireless Wi-Fi device or
Wireless IP sharer
The LAN Port on the Wall
NOTES
• You must use the Hisense built-in Wireless LAN Adapter to use a wireless network because the TV does not support an
external USB network adapter.
• To use a wireless network, your TV must be connected to a wireless IP sharer. If the wireless IP sharer supports Dynamic
Host Configuration Protocol (DHCP), your TV can use a DHCP or static IP address to connect to the wireless network.
• Select a channel for the wireless IP sharer that is not currently being used. If the channel set for the wireless IP sharer is
currently being used by another device nearby, this will result in interference and communication failure.
• If you apply a security system other than the systems listed below, it will not work with the TV.
• If Pure High-throughput (Greenfield) 802.11N mode is selected and the Encryption type is set to WEP, TKIP or TKIP-AES
(WPS2 Mixed) for your Access Point (AP), then the Hisense TV will not support a connection in compliance with these
Wi-Fi certification specifications.
• If your access point (AP) supports Wi-Fi Protected Setup (WPS), you can connect to the network via Push Button
Configuration (PBC) or PIN (Personal Identification Number). WPS will automatically configure the SSID.
EXTERNAL DEVICES
Powerless
Bass Speaker
Speaker
Digital Sound Bar
Audio Amplifier
DIGITAL
AUDIO OUT
TV PORTS
/
AUDIO
OUT
Audio Cable
White(L)
Red(R)
Audio Cable
Connections and setup
9
AC power
Plug your TV into a power outlet. You can tell that the TV has power because the status light on the front of the TV lights up.
Status light on page 25 explains how the status indicator shows what is happening with the TV.
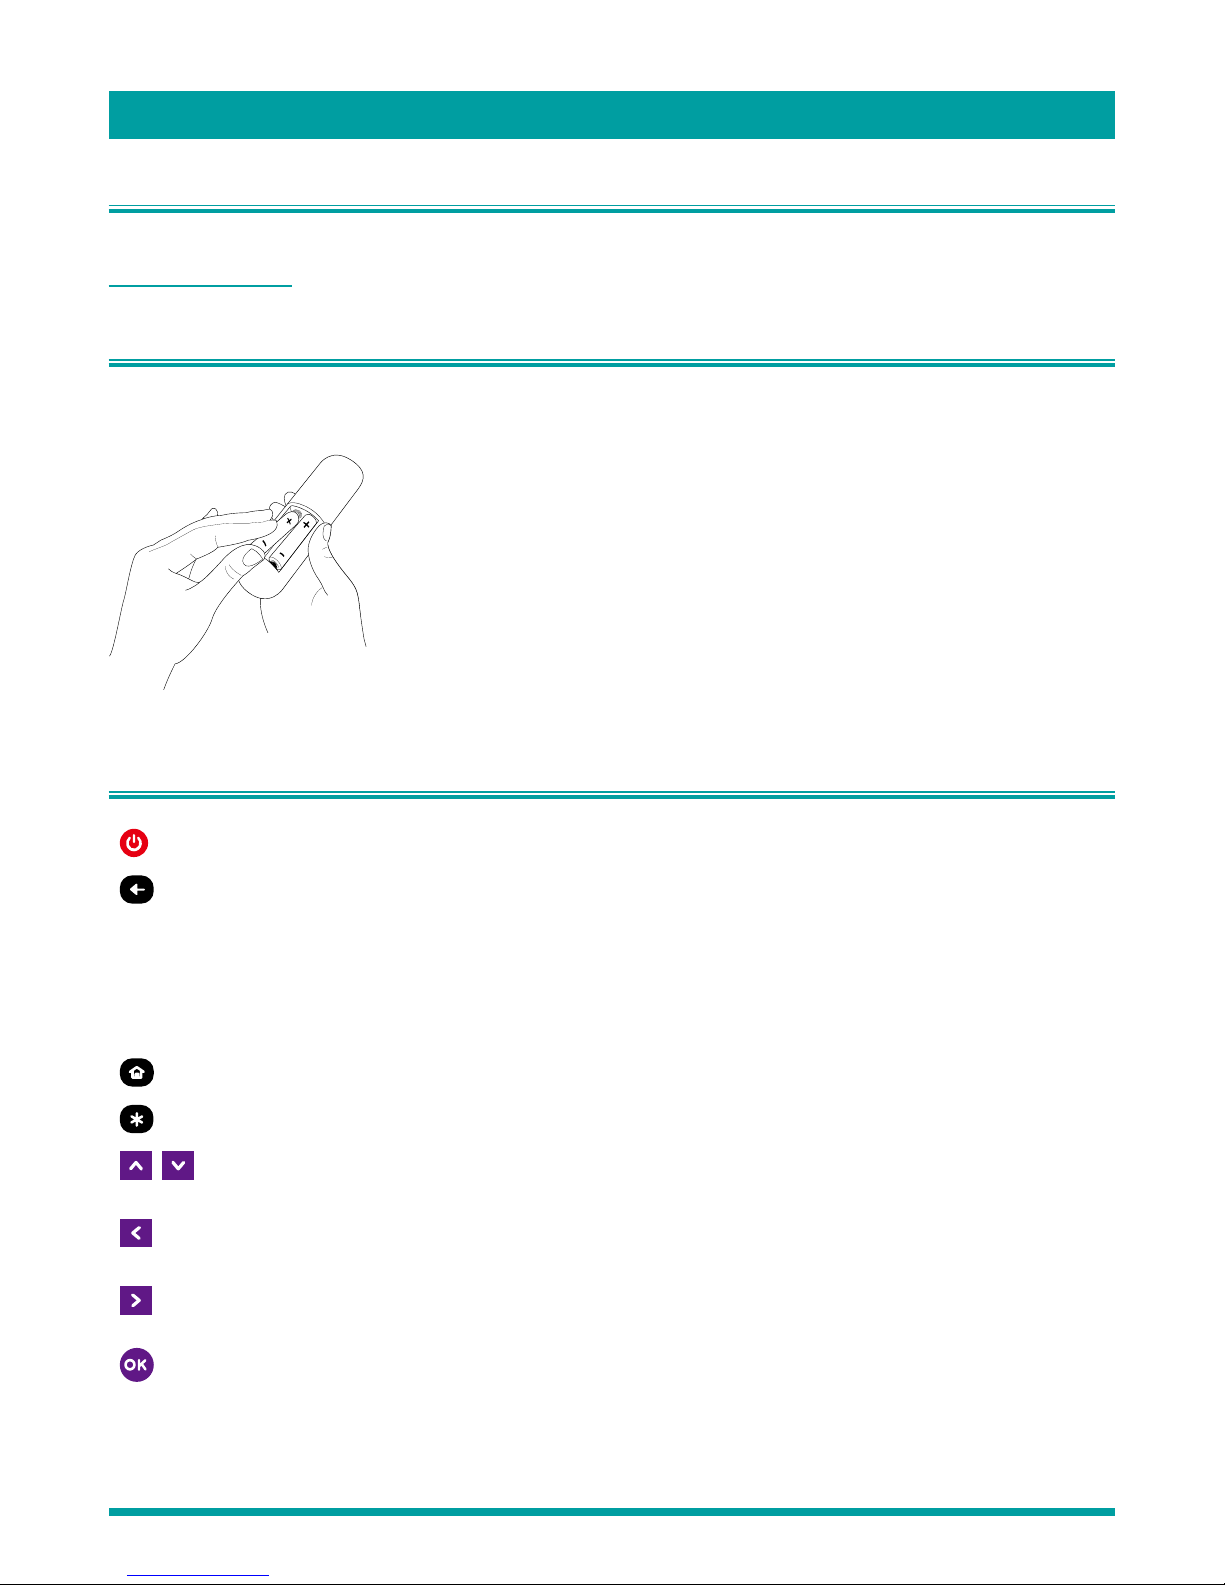
Remote control batteries
Open the back of your Roku TV remote control and insert the included batteries, observing the proper orientation as indicated
in the battery compartment. Reattach the back cover.
Roku TV Remote control
POWER Turns TV on and off.
BACK • Menu: Goes back to previous menu/screen.
• Home screen tile: Moves highlight back to the Home menu option.
• Watching Antenna TV or a TV input: Returns to Home screen.
• Playing streaming content: Stops playing stream and returns to the previous menu or
screen.
• Browsing streaming content: Goes to the previous level in the content tree.
HOME Immediately returns to the Home screen menu.
OPTIONS Displays additional options when available.
UP / DOWN Moves the highlight in the corresponding direction.
When watching TV, this button changes channel.
LEFT Moves the highlight left, if possible (if a < hint appears).
When watching TV, displays your channel list.
RIGHT Moves the highlight to the right, if possible (if a > hint appears).
When watching TV with the channel list displayed, dismisses the channel list.
OK Selects the highlighted option.
When watching TV, this button displays program information banner.
Connections and setup
10
MEDIA
PLAYBACK
CONTROLS
Rewind, pause, play, and fast forward streaming content and broadcast TV (if Live TV Pause
is enabled).
Press REWIND or FAST FORWARD one, two, or three times to control the speed of the
operation.
REWIND and FAST FORWARD also jump backward and forward one page at a time when
viewing long lists, such as your channel list.
INSTANT
REPLAY
Streaming programs that support this feature and broadcast TV if Live TV Pause is enabled,
jumps back a few seconds with each press and resumes playing.
Broadcast TV if Live TV Pause is disabled, jumps to previous channel.
When using an on-screen keyboard, backspaces in the text you are entering.
SLEEP Displays a banner showing the remaining sleep time, if any, or Sleep timer is off. Subsequent
presses cycle among the preset sleep time intervals. Once set, the sleep timer remains in
effect regardless of what you are watching.
VOLUME / MUTE
(Side view)
Increases/decreases volume and mutes the TV sound.
NOTE
• If the TV is muted, pressing VOLUME UP unmutes. Pressing VOLUME DOWN does
not unmute the sound.
STREAMING
CHANNELS
SHORTCUTS
Dedicated buttons show the logo of a preset streaming content provider. Pressing a button:
• Displays the streaming channel’s main page if you have already added the channel to your
Home screen.
• Displays the streaming channel’s sign-up page if you have not already added the channel.
Panel buttons
The controls on the TV enable you to perform simple functions, but are not a substitute for the remote control. Your TV has
seven buttons on the right edge of the screen. From top to bottom, they perform the following functions:
• Input: Selects among the configured TV inputs. Each press moves down one item. Pressing Channel + or Channel –
moves the highlight up or down. Pausing for a few moments selects the highlighted input.
• Channel +: Moves the highlighted item up in the current menu.
• Channel –: Moves the highlighted item down in the current menu.
• Volume +: Increases the volume.
• Volume –: Decreases the volume.
• Mute: Mutes and unmutes the sound.
• Power: Turns the power on and off.
Connections and setup

11
With the preliminaries out of the way, it’s time to turn on your TV. As the TV starts for the first time, it leads you through Guided
Setup, which configures the TV before you start to use it.
During Guided Setup, you’ll:
• Answer a few questions
• Provide network connection information
• Get a software update
• Link the TV to your Roku account
• Connect devices such as a DVD player, game console, or cable box
NOTE
• Guided Setup only runs the first time you turn on your TV. If you need to run Guided Setup again, you’ll have to perform a
factory reset, as explained in Factory reset everything on page 53.
Starting Guided Setup
To start Guided Setup, press the red [POWER] button on the remote control to turn on your TV.
When you first turn on your TV, it will take a few seconds to get itself ready. You’ll notice the following things happening:
The status light blinks every time the TV is busy doing something; in this case it’s powering up and getting ready for you.
The Power-on screen appears and the status light blinks slowly for a few more seconds. The Power-on screen displays a
TV logo while the TV starts up.
After a few seconds, the Guided Setup starts.
TIP: On TVs sold in the United States, if you are blind or visually impaired, you can activate the Audio Guide, a text-to-
speech screen reader to help you navigate the TV’s menus and commands.
To enable the Audio Guide, press the
button on the remote control four times in rapid succession. Repeat to disable
the Audio Guide. (The
button is located directly below the directional pad on the right side of the Roku remote
control.)
For more information on using the Audio Guide and adjusting its settings, see Configure accessibility on page 44.
If the TV prompts you for a language, press the [DOWN] on the remote control to highlight your preferred language.
Guided Setup

12
Setting up your TV
With the first Guided Setup screen on your TV, follow these steps to set up your TV:
1. Press the [OK] or [RIGHT] buttons on the remote control to go to the next screen:
2. Press [OK] to select Set up for home use. Home mode is the right choice for enjoying your TV at home. It provides energy
saving options as well as access to all features of the TV.
NOTE
• ‘Store’ mode configures the TV for retail display and is not recommended for any other use. In store mode, some
features of the TV are missing or limited. To switch from one mode to the other, you have to perform a factory reset as
explained in Factory reset everything on page 53, and then repeat Guided Setup.
After you select Set up for home use, the TV scans for the wireless networks within range and displays them in order, with
the strongest signals first. In addition to your own wireless signal, the TV might pick up signals from your neighbors.
3. Press [UP] or [DOWN] to highlight the name of your wireless network, and then press [OK] to select it.
NOTE
• Some wireless networks, such as those often found in dorm rooms, hotels, and other public places, may require you
to read and agree to terms, enter a code, or provide identifying information before letting you connect to the Internet. If
the Roku TV detects that you are connecting to such a network, it prompts you through the connection process using
your compatible smartphone or tablet to provide the needed information. For more information, see Using your TV in a
hotel or dorm room on page 29.
Other options:
Connect to the Internet later – If you’re unable to connect to the Internet, that’s OK. You can skip this step and use
the TV to watch broadcasts, play games, and watch DVDs. If you want to connect later, it’s easy. We’ll show you how in
Benefits of connecting on page 19.
Guided Setup

13
NOTE
• If you decide not to connect, Guided Setup skips ahead to setting up the devices that you’ve connected to your TV.
See Non-connected TV Home screen on page 17 to get started using your non-connected TV.
Scan again / Scan again to see all networks – This option depends on the number of wireless networks within range:
• Scan again appears if the list already shows all available wireless networks within range. If you don’t see your wireless
network name in the list, you might need to adjust the location of your wireless router or the TV, turn on your router, or
make other changes. When everything is ready, select Scan again to see if your network name now appears in the list.
• Scan again to see all networks appears if the TV finds more than seven wireless networks, because the TV initially
displays only the strongest seven networks. If you don’t see your wireless network name in the list, this option displays
the complete list. If you still don’t see your network name, you might have your router configured to provide wireless
service as a “private network.”
NOTE
• Highlighting either of these options displays an informational panel with the unique media access control (MAC)
address of your Roku TV. You will need the MAC address if your wireless router is configured to use MAC address
filtering.
Private network – If your wireless network name is hidden, it won’t appear in the list. Select Private network to display
an on-screen keyboard, and use it to enter your network name. Unless you changed the factory-set network name, you
can find the name (also called SSID) on a label on the router.
If you select a wireless network that is password-protected, an on-screen keyboard appears. Use the keyboard to enter the
network password.
TIP: Wireless networks that are password-protected display a “padlock” icon adjacent to the name. This icon enables you to
know that you are going to be prompted to enter a password after you select that network.
4. After you submit your network password, the TV displays progress messages as it connects to your wireless network, your
local network, and the Internet.
Guided Setup

14
5. Your TV needs to know the local time zone so that it can correctly display time information about the program you are
currently watching. If the TV is unable to automatically determine the local time zone, it prompts you to choose your time
zone from a list. Use the [UP] and [DOWN] buttons to highlight your time zone, and then press [OK].
6. As soon as the TV is able to connect to the Internet, it downloads and installs its first software update, and then restarts.
TIP: Your TV automatically checks for updates periodically. These updates provide new features and improve your overall
experience with the TV. After an update, you might notice that some options have moved, and that there are new options or
features.
You can download an updated User Guide that matches your Roku TV software version from the web site at :
www.[[URL]].com/support
After the TV restarts, it displays the Activation screen:
NOTE
• A paid subscription or other payments may be required for some channels. Channel availability is subject to change
and varies by country. Not all content is available in countries or regions where Roku
®
products are sold.
Guided Setup

15
7. Using a computer, tablet, or smartphone with an Internet connection, go to the web address displayed on the screen and
enter the code that appears on your screen.
After you log in or create your Roku account, the link page
suggests that you select some streaming channels. After you
confirm your selections, the TV gets an acknowledgement,
and then adds your preexisting and newly-selected streaming
channels to your Roku TV. This process is automatic and takes
a few moments—a little longer if you already have a lot of
streaming channels to add.
TIP: Streaming channels from all Roku streaming devices
associated with your account are synchronized periodically, so
all of your Roku streaming devices have the same streaming
channels (subject to compatibility with the device).
After it adds your selected streaming channels, the TV helps you
set up the devices that you’re connecting to it, such as a cable
box, Blu-ray player, or game console:
8. Press [OK] or [RIGHT] to proceed:
Why do I need a Roku Account?
You need a Roku account for several reasons.
• It links you, your Roku TV and your other Roku
streaming devices to the Roku Channel Store and
billing service.
• Streaming content providers know that it’s OK to
send content you request to your TV.
• Roku can automatically send updates to your device.
Important: When you set up a Roku account, you
must register a payment method. Adding a payment
method now lets you easily rent or buy movies
on demand, or try popular paid subscription or
transaction-based streaming channels. You won’t
be charged unless you agree to the terms and
cost of the content. If you are concerned about
unauthorized charges, you can set up a PIN that you
must enter to authorize each charge.
Guided Setup

16
9. Connect all the devices you plan to use with your TV, turn them all on, and then select Everything is plugged in and
turned on. The TV now takes you step by step through each of its inputs and asks what kind of device you have connected.
On each input that has a connected and active device, you can see its picture and hear its sound.
10. Press [UP] or [DOWN] to highlight the label you want to associate with the input, and then press [OK] to move on to the
next input.
You’re done with Guided Setup.
NOTE
• Some Roku TVs, depending on where you live and other factors, show you an introductory video filled with some great
hints and tips. If you’re not interested in viewing this video, press [
] on the remote control to exit to the Roku TV
Home screen.
When you finish Guided Setup, and whenever you press [
] on the remote control, the Home screen greets you.
From here, you can explore everything your TV has to offer. Press the arrow buttons to move around, and press [OK] to
select a highlighted item. We’ve designed the TV to encourage you to explore, and you can probably figure out most of the
capabilities and settings on your own. If you have any questions or difficulties, you can find answers and solutions in this guide.
If you find yourself a long way from the Home screen, you can always get back right away by pressing one button: [
].
Guided Setup

17
Connected Home Screen
Here is a typical Home screen from a TV that’s connected to the Internet and paired with a Roku account.
NOTE
• A paid subscription or other payments may be required for some channels. Channel availability is subject to change
and varies by country. Not all content is available in countries or regions where Roku
®
products are sold.
Personalize your Home screen
You can do a lot to personalize your Home screen and make it just right for you and your family:
Add streaming channels by using the Streaming Channels menu option to browse the Roku Channel Store.
Remove a tile by highlighting it and pressing [
]. Then highlight Remove input or Remove channel and press OK.
Reposition a tile by highlighting it and pressing [
]. Then highlight Move input or Move channel and press OK. Use the
arrow buttons to move the tile, and then press OK to lock it in its new location.
Rename a TV input tile by highlighting it and pressing [
]. Then highlight Rename input and press OK. Highlight a new
name in the list, and then press OK to assign that name to the tile.
Change the screen theme by going to Settings > Themes to find and pick one to suit your mood.
Non-connected TV Home screen
Here is a typical Home screen from a TV that is not connected to the Internet.
Highlighted item -
press [OK] to select
Press [
] for options
when available
Hint - Press [RIGHT] to
see another screen
Streaming channels
and applications
Home menu
TV inputs
Highlighted item -
press [OK] to select
Press [
] for options
when available
Hint - Press [RIGHT] to
see another screen
Home menu
TV inputs
Guided Setup
 Loading...