

Page 1

15
Page 2

4
2
3
5
6
7
8
9
0
1
MUTE
PICTURE
ENTER
AUDIO
SLEEP
GUIDE
EXIT
MENU
VOL+
Power indicator
EN -2 16 38 D
Power ON/OFF
Mute: Mute the sound
PICTURE:
Select the picture mode
Select TV channels
Select digital channels
OSD menu Up arrow
OSD menu Left arrow
OSD menu Down arrow
LAST
INPUT
ZOOM
INFO
INPUT: Switch among TV, Video, S-Video,
Component,HDMI and VGA
ZOOM: Select Screen Mode
AUDIO: Select the sound mode
GUIDE: ATSC tuners feature the Electronic
Program Guide (EPG) function
INFO: Display current Status
information
EXIT: On Screen Display (OSD) menu exit
MENU:
Call up the main menu
LAST:
Return to previous channel
ENTER:
Confirm selected function or
return to the previous menu
OSD menu Right arrow
VOL+:
Volume up
VOL-:
Volume down
CCD: Closed caption decoder function
MTS/SAP: Multi-channel television
sound selection
CCD
VOL-
MTS/SAP
CH-
CH+
TIME
CH+: Channel up
CH-:
Channel down
TIME: Display the current time
SLEEP:
Set the sleep timer
Electronic Program Guide (EPG) function:
After pressing the "GUIDE" button in the
digital TV channel option, the 4 same color
buttons will appear with explanations in the
OSD. Follow the steps illustrated in the OSD.
16
Page 3

zoom
17
Page 4

18
Page 5

INFO
INFO
1920212223
Page 6
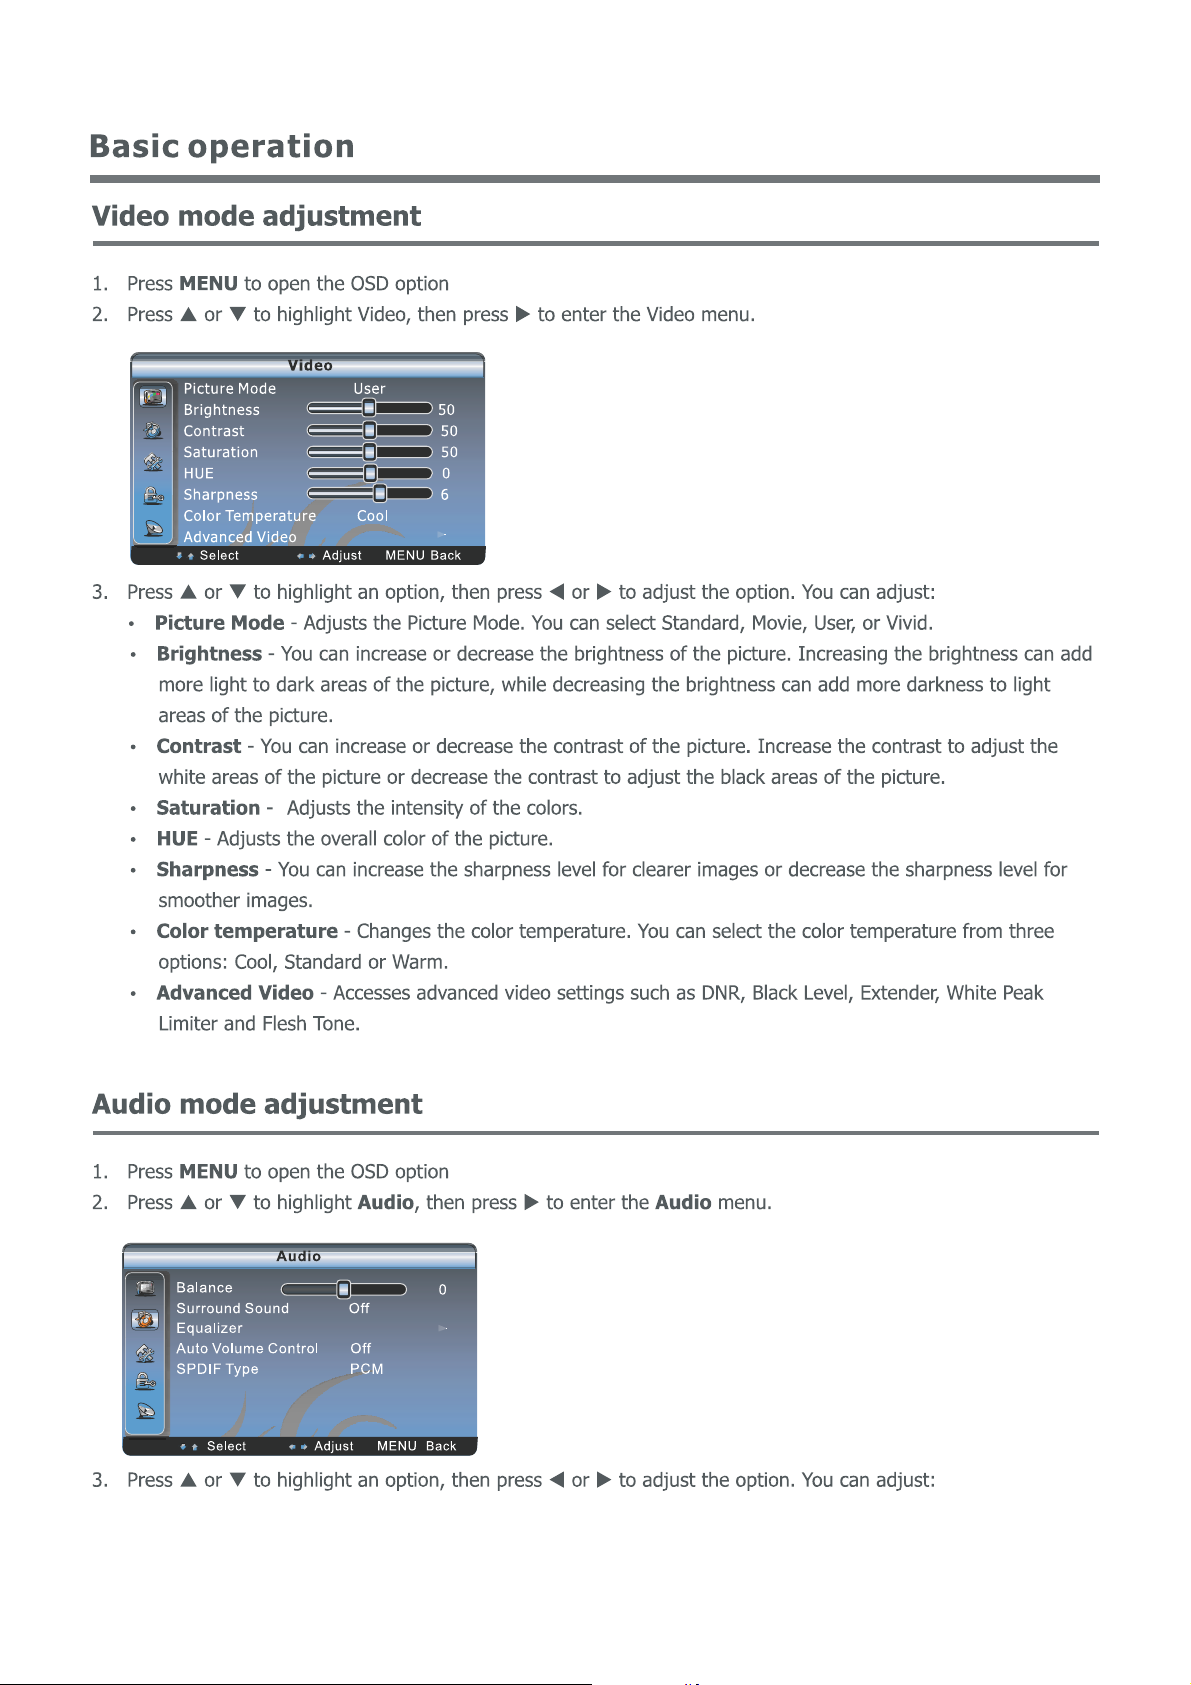
Page 7
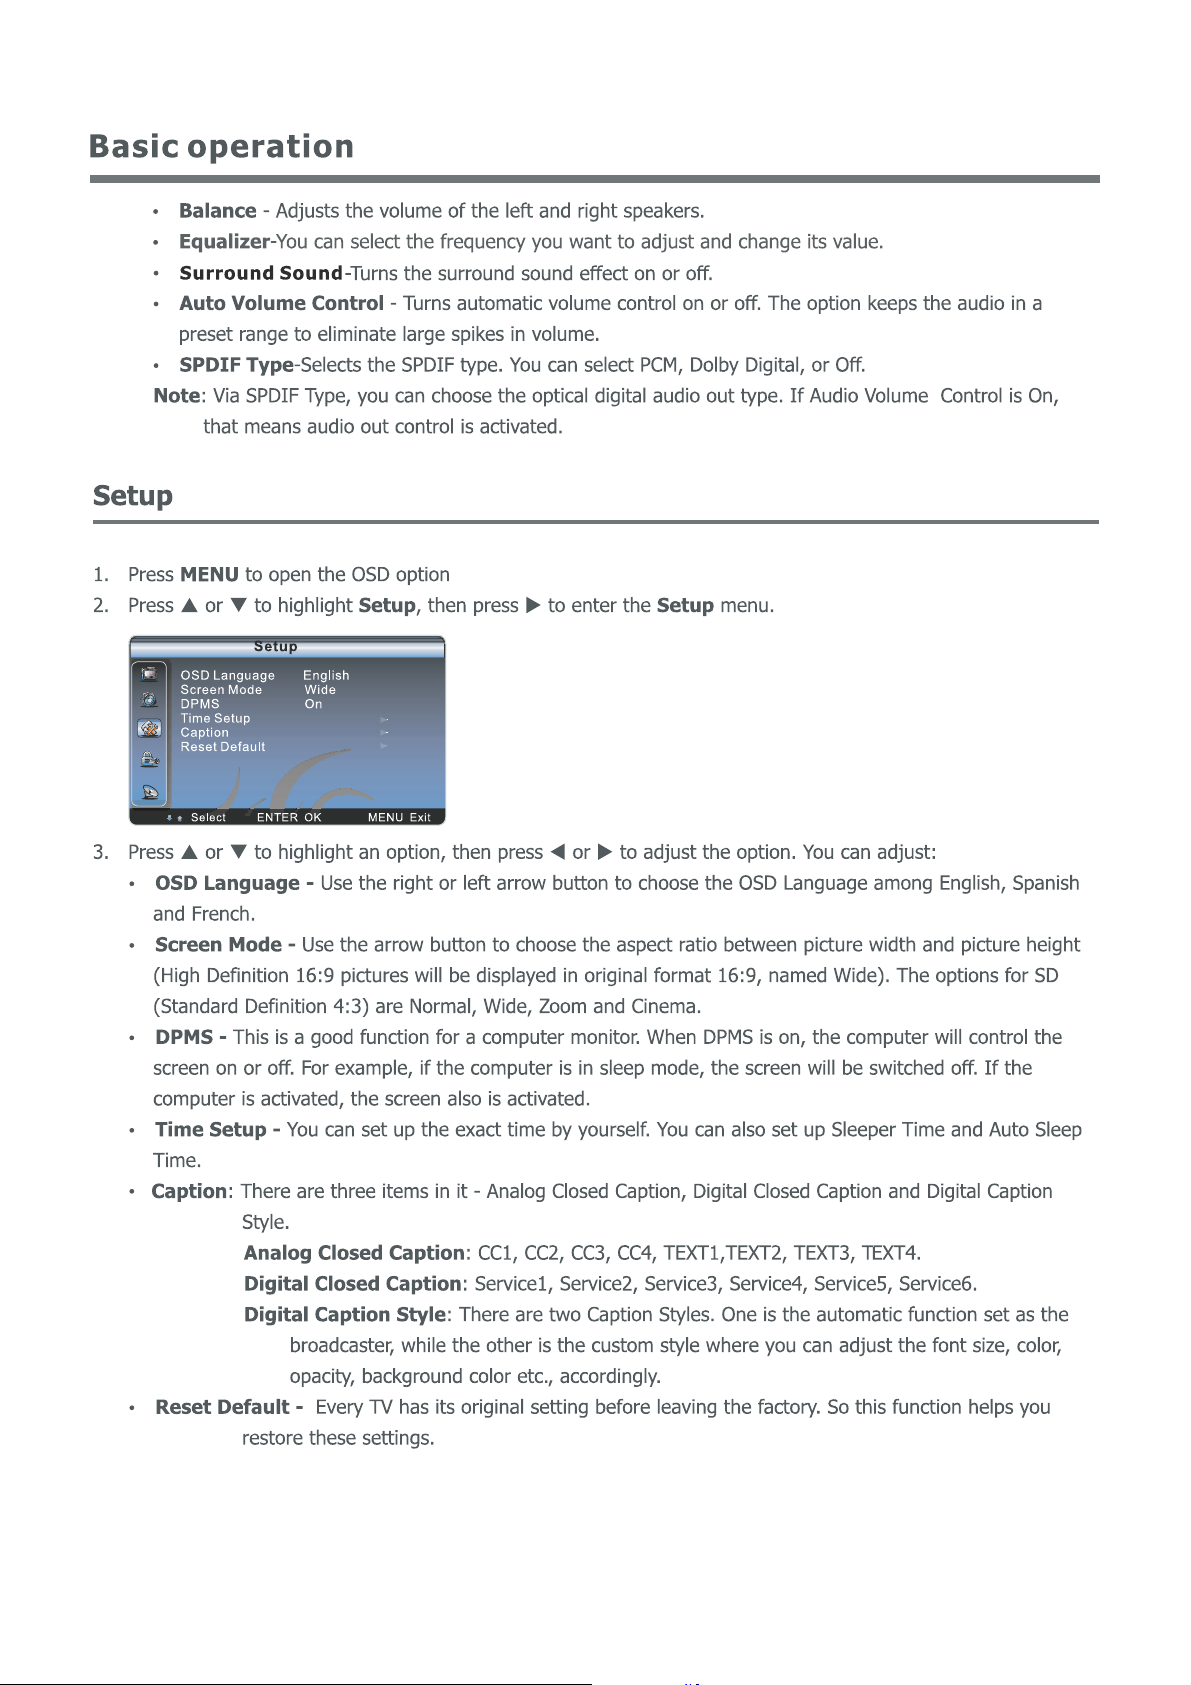
Page 8
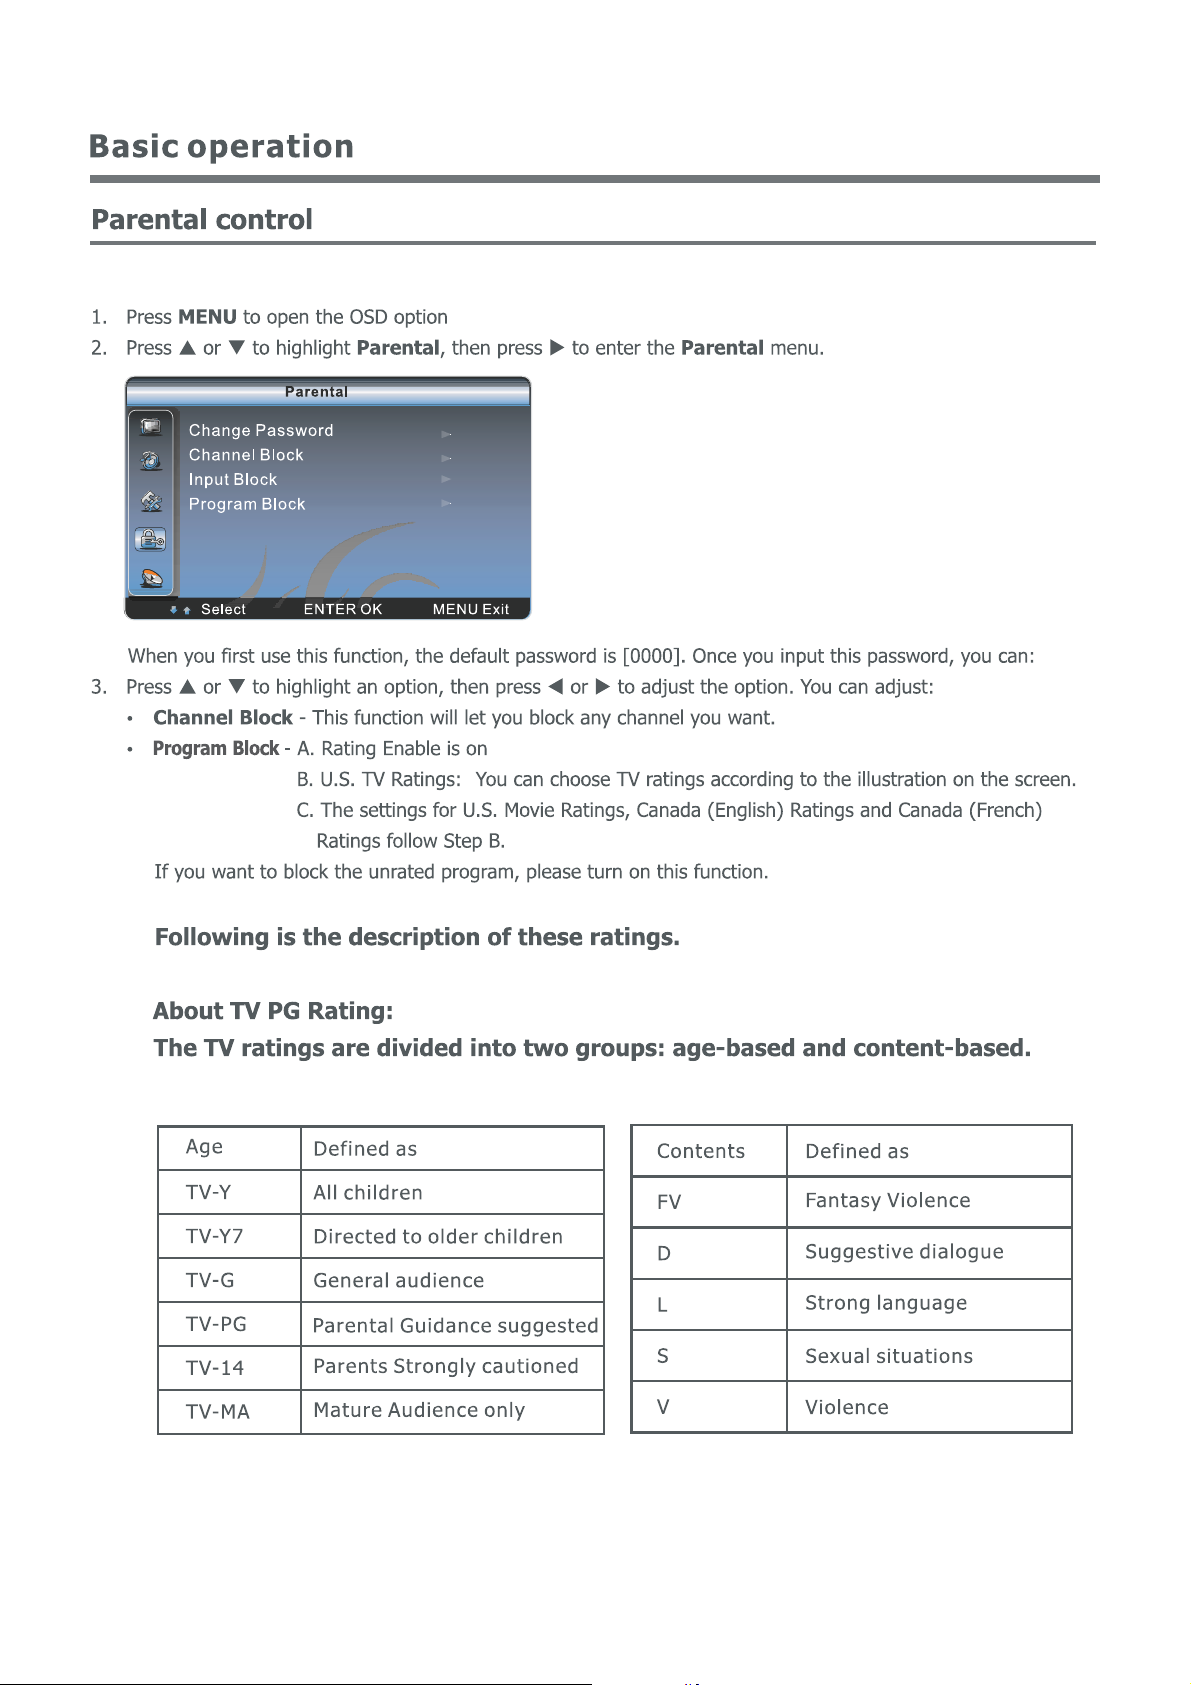
Page 9
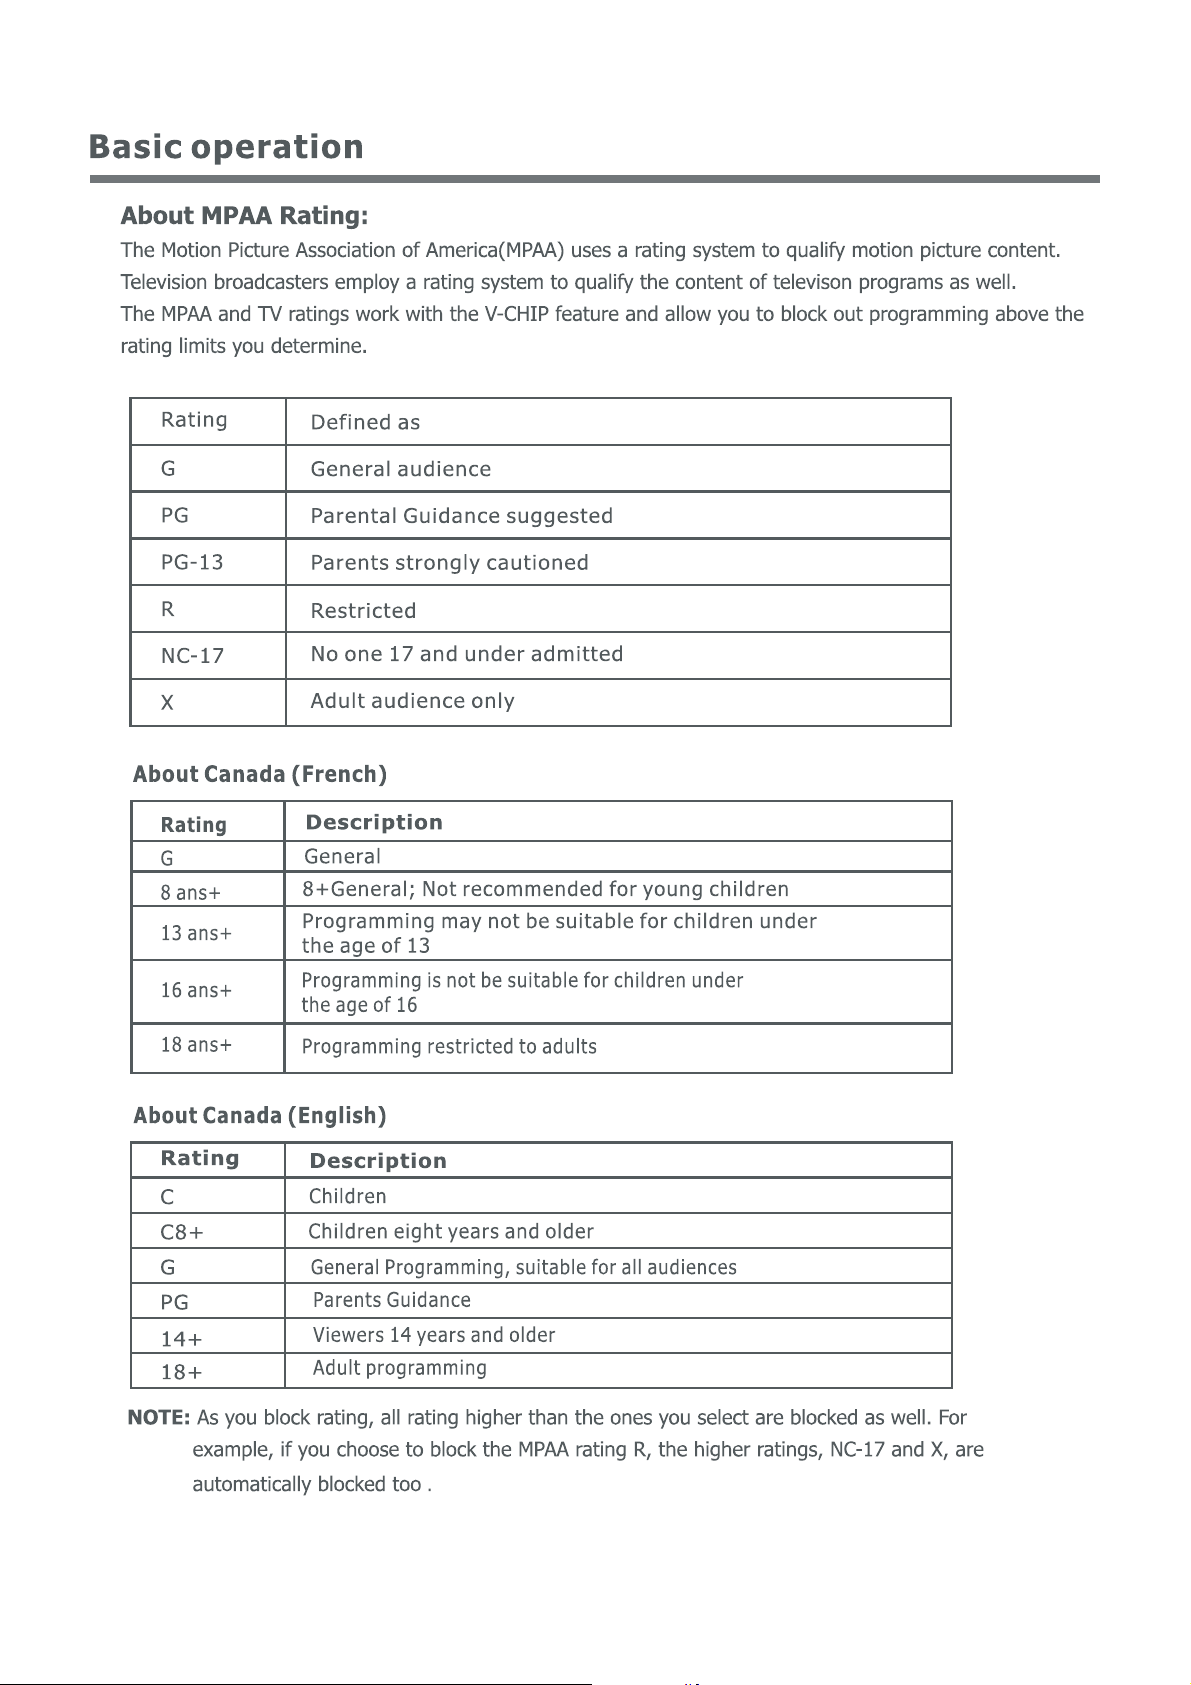
Page 10
24
Page 11
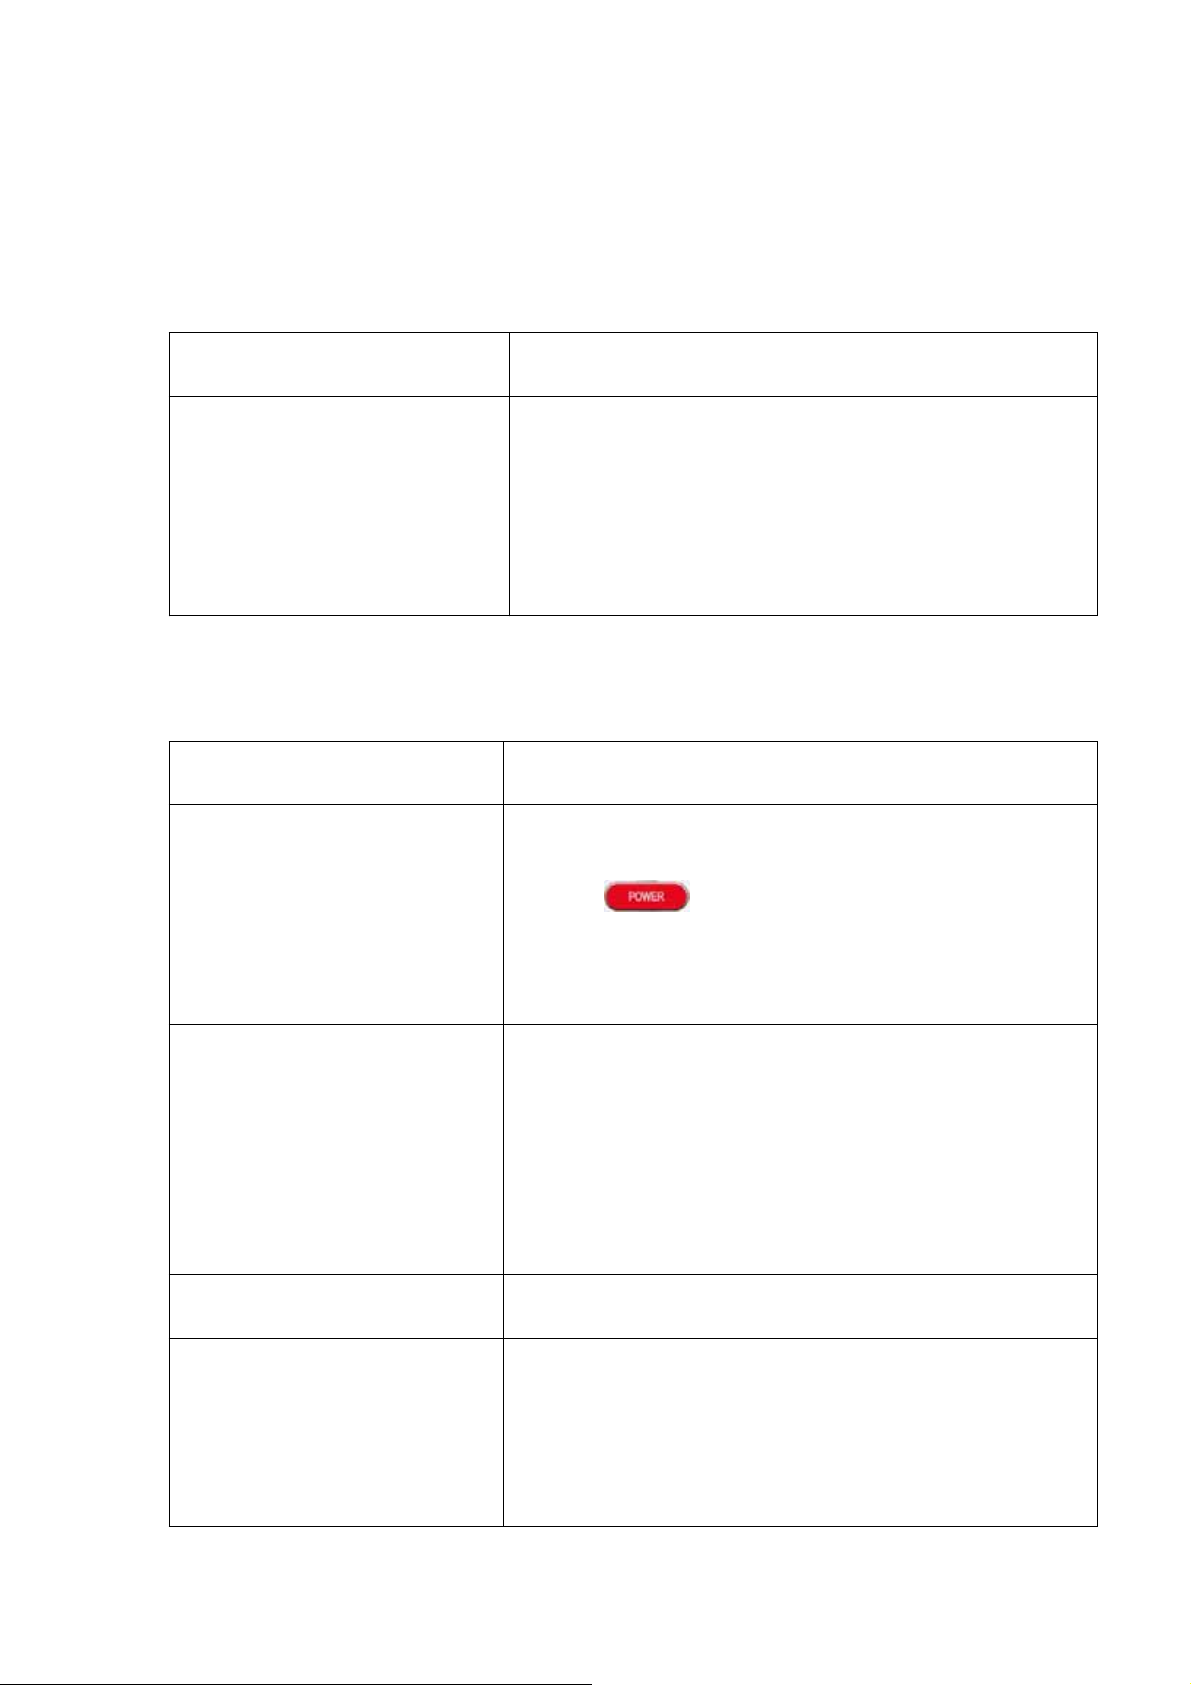
Troubleshooting
Warning: Do not try to repair your TV yourself. Contact authorized
service personnel.
Remote control
Problem Solution
Remote control does not work z Replace the batteries. For more information, see
“Installing the remote control batteries” on page 15.
z Make sure that the batteries are inserted correctly.
For more information, see “Installing the remote
control batteries” on page 15.
z Make sure that the power cord is plugged into a
power outlet.
Video and Audio
Problem Solution
No picture or sound ˄ the
screen is not lit˅.
Dark, poor, or picture (the
screen is lit), but sound is
good.
No color, picture is dark, or
color is not correct.
Only noise (snow) appears
on the screen.
z Make sure that the power cord is plugged into a
power outlet.
z Press (power) on your TV or the remote
control.
z Try another channel. The problem could be with the
TV station.
z Select the correct mode. For more information, see
“Video mode adjustment” on page 20.
z Adjust the brightness. For more information, see
“Video mode adjustment” on page 20.
z Make sure the antenna or cable TV is connected
correctly. For more information, see “Connect to an
antenna” on page 12. or see “Connect to a cable
convert box on page 14.
z Adjust the color saturation. For more information,
see “Video mode adjustment” on page 20.
z Make sure the antenna or cable TV is connected
correctly. For more information, see see “Connect to
an antenna” on page 12. or see “Connect to a
cable convert box on page 14.
z Try another channel, The problem could be with the
TV station..
25
Page 12
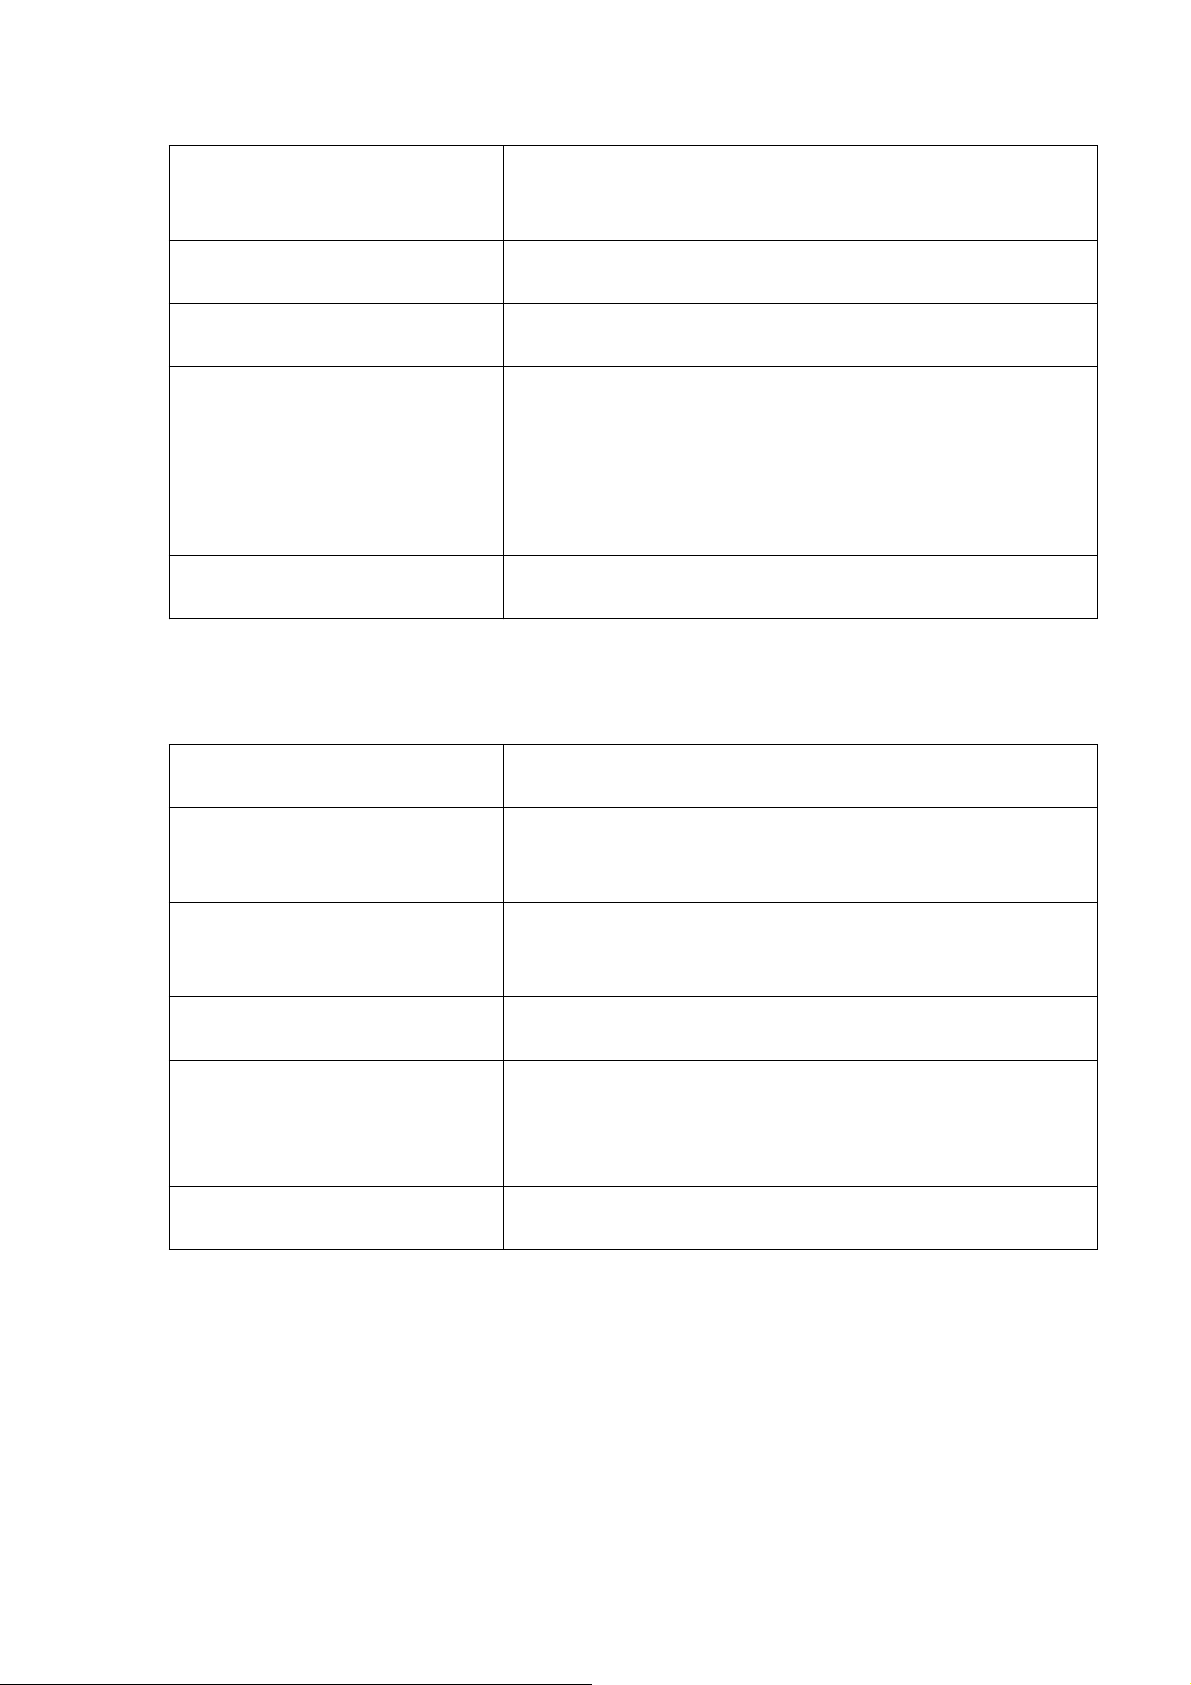
Picture has dotted lines or
strips.
z Adjust the antenna.
z Move your TV away from noise source, such as cars
neon signs, or hair dryers.
Picture has double images. z Use a highly directional outdoor antenna or switch to
cable or satellite TV.
Picture has a few bright or
dark dots.
z A few bright or dark dots on an LCD screen is
normal. It does not affect the operation of this TV.
Good picture, no sound. z Increase the volume.
z Press Mute to make sure that the sound is not
muted.
z Make sure that the audio mode is set to STEREO or
MONO. For more information, see “Audio mode
adjustment” on page 20.
Audio noise or static z Move radio frequency communication equipment,
such as a cordless phone, away from your TV.
General
Problem Solution
Cannot tune to one or more
channels.
Password is lost z On the Lock menu, enter 1111 for the password. For
Cannot access some items z If a setting or option is grayed out, it is not available
TV cabinet creaks z When you are using your TV, the temperature inside
Buttons do not work z Unplug the power cord for a few second, then plug it
z The program you want to watch may be blocked
through the parental controls. For more information,
see “Setting parental”
more information, see “Parental Control” on page
22.
in the current input mode.
the cabinet increase, This cause the cabinet to
extend or contract, which produces the creaking
noise. This is not a malfunction.
back in and turn on your TV.
FCC Warning
Changes or modifications not expressly approved by the party responsible
compliance with the FCC Rules could void the user’s authority to operate
equipment.
26
Page 13

Canada ICES-003 statement
This class B digital apparatus complies with Canadian ICES-003. Standard
Television Receiving Apparatus – Appareil de réception télévision odinaire,
Canada BETS-7/NTMR-7
Notices
Specifications and features are subject to change without notice or obligation.
For service and support call (800) 305-2204.
27
Page 14
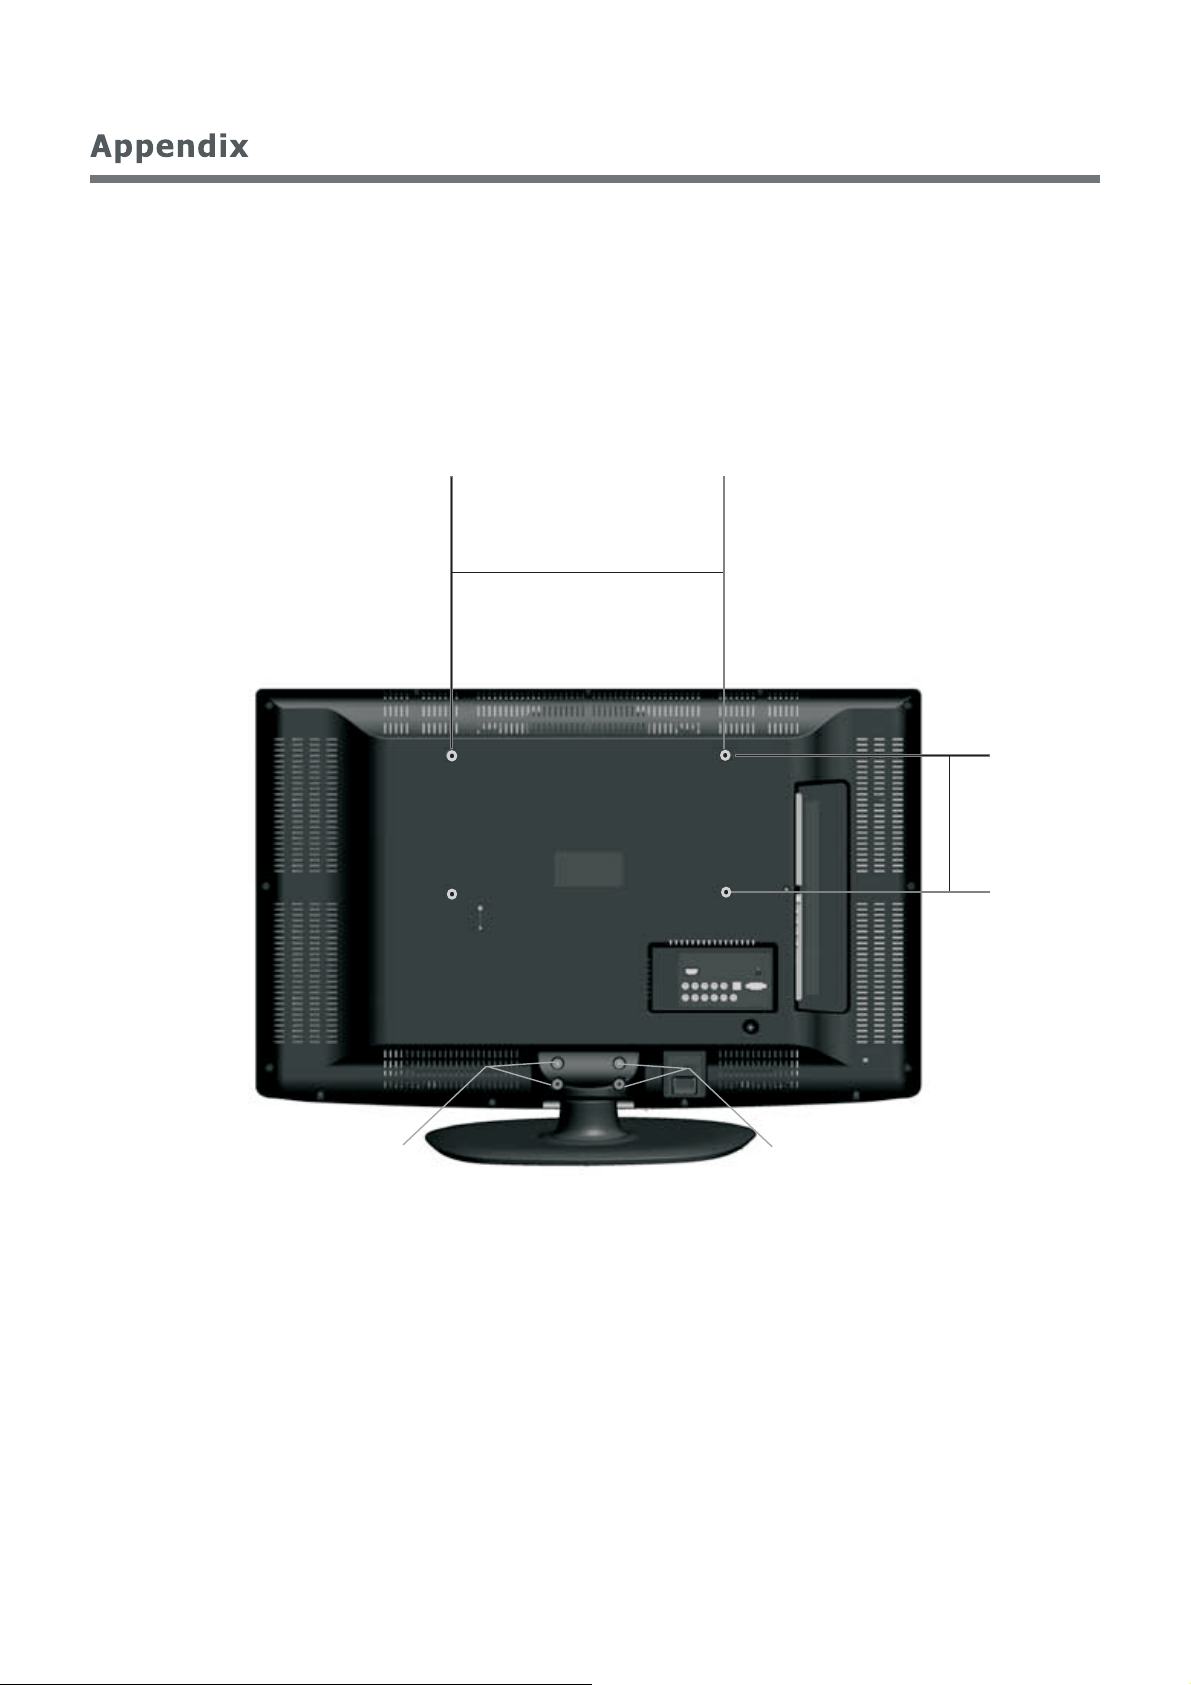
To attach a wall mount bracket to your TV:
1 Remove the four M4 screws holding your TV to the stand.
2 Secure the wall mount bracket to the back of your TV using your M6 screws,
ss indicated in the illustration.
400mm
Attach wall bracket
200mm
Remove M6 screws Remove M6 screws
Remove Stand
28
Page 15
DX-L40-10A
185
29
 Loading...