

Page 1
32H3B*
40H3B*
H3B Series
H3B Series TV
Quick Start Guide
Help Hisense improve the environment by reducing paper waste.
For detailed instructions and feature descriptions, access the full User Manual online .
where “*” would be replaced by any Arabian number or English letter or blank.
Page 2

© 2015 Hisense Company Ltd. All Rights Reserved.
All material in this Quick Start Guide is the property of Hisense Company Ltd. and its subsidiaries, and is protected under US, CANADA,
MEXICO and International copyright and/or other intellectual property laws. Reproduction or transmission of the materials, in whole or in
part, in any manner, electronic, print, or otherwise, without the prior written consent of the Hisense Company Ltd. is a violation of Hisense
Company Ltd. rights under the aforementioned laws.
No part of this publication may be stored, reproduced, transmitted or distributed, in whole or in part, in any manner, electronic or
otherwise, whether or not for a charge or other or no consideration, without the prior written permission of Hisense Company Ltd.
Requests for permission to store, reproduce, transmit or distribute materials may be made to one of the following addresses:
USA:
Hisense USA Corporation
PO Box 3289
Suwanee, GA 30024
CANADA: Hisense Canada Co., Ltd,
405 Britannia Rd E., Suite 11
Mississauga, Ontario,L4Z 3E6
MEXICO: Hisense Mexico S de RL de CV
Boulevard Miguel de Cervantes Saavedra No. 301, Torre Norte, Piso 2,
Colonia Ampliación Granada, C.P. 11520, en México Distrito Federal.
Hisense, and any and all other Hisense product names, logo’s, slogans or marks are registered trademarks of Hisense Company Ltd.
and its subsidiaries. All other trademarks are the property of their respective holders.
Page 3

Enjoy TV in a Super Simple and Super Unique Way!
LED TV with Popular Features
• LED backlight that offers better brightness and contrast
• Energy-efficient design to reduce your utility bill
• HiMedia Digital Media Player to play back digital content
from your USB drive
• 720p resolution for (32" TVs) and 1080p resolution for (40"
TVs)
• Mobile High-Definition Link (MHL) to connect mobile
phones, tablets and other portable devices
High-Quality Picture and Sound
• Vibrant contrast and brightness to display images accurately
• Crisp sound and powerful TV speaker output
• 1080p full high definition (FHD) resolution for (40" TVs)
Multiple Connection Methods
• 1 Digital Audio Out port
• 1 USB Connector
• 3 HDMI Connectors
• RF Antenna connector
• 1 VGA connector
• Component ports
• Composite ports
Easy Setup Menu and Simple Design
• Short and easy-to-follow first-time setup menu
• Simple user interface (UI) design to navigate the TV screens
• Descriptive features to help make your selections
1
Page 4
WELCOME TO THE HISENSE FAMILY!
Congratulations on the purchase of your new Hisense TV! This Quick Start Guide will walk you through a few
easy steps to set up your TV. For more details about all of the features and instructions to use them, download
a PDF of the
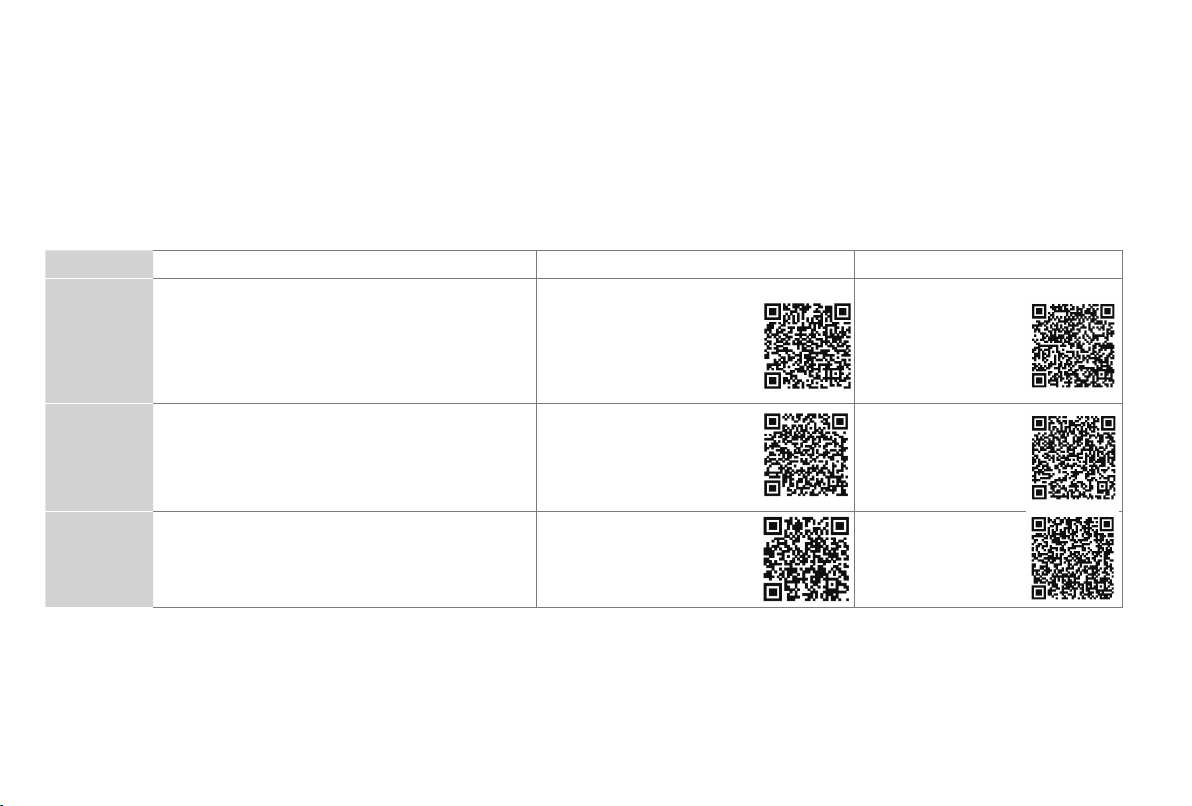
Because we value your business, we want to keep you in the know of 'all things Hisense'. Using your mobile phone, scan the Registration page QR code
to register your TV. Depending on the make and model of your phone, you may need to download a QR code scanning app.
Hisense H3B Series TV User Manual
from the Hisense support website below.
Country
U.S.A
CANADA
MEXICO
To view and open the user manual, you will need to install Adobe® Reader® (which is FREE) to your computer. Once you arrive on the Support page of the
Hisense website, enter the model number located on the back of the TV or on the outside of the box.
Disclaimer:
• Phone: 1-888-935-8880
• Hours of Operation:
Monday - Friday: 9 AM to 9 PM EST
Saturday - Sunday: 9 AM to 6 PM EST
• Service Email: [email protected]
• Phone: 1-855-344-7367
• Hours of Operation:
Monday - Friday: 8 AM to 8 PM EST
• Service Email: [email protected]
• Phone: 01-800-008 8880
• Hours of Operation: L-V 09:00-14:00 y 15:00-18:00
• Service Email: [email protected]
This Quick Start Guide is intended as a general guideline to help you set up your Hisense TV.
Customer Care Center Hisense Support Page REGISTER YOUR TV
http://www.hisense-usa.com/
support/
http://www.hisense-canada.
com/support/
http://www.hisense.com.mx/
support/
http://www.hisenseusa.com/support/
productReg.asp
http://www.hisensecanada.com/
support/productReg.
asp
http://www.hisense.
com.mx/support/
productReg.asp
Images throughout this document are for illustrative purposes only and may differ from the actual product.
2
Page 5
Packaged contents
Your package in which you purchased your new TV contains the following items:
TV 2 AAA batteries
A left and right leg that forms the TV stand
Important Safety Information and Warranty Card leaflet
Remote Control Stop Page
4 screws (ST4X12) for 32" / 4 screws (ST4X14) for 40"
Hisense H3B Series TV Quick Start Guide (this document)
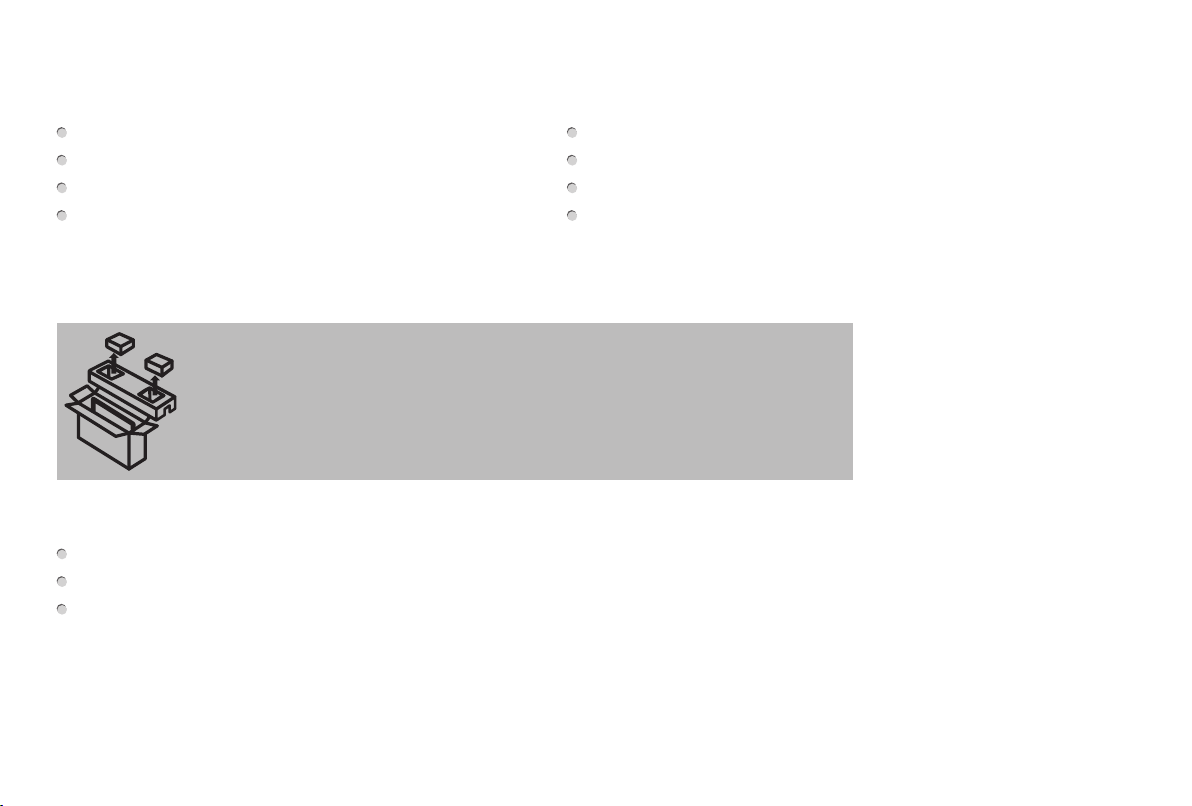
IMPORTANT:
To prevent accidentally discarding items that came with your TV, be sure to
check ALL of the foam
Please check foam for accessories before discarding.
·
Veuillez vérifier la mousse pour qu'il n'y ait pas d'accessoires avant de la jeter.
·
Antes de desechar la espuma, asegúrese de retirar todos los accesorios.
·
Required tools and devices
Phillips screwdriver (not included) to secure the TV stand
HDMI and other types of cables (not included) to connect external devices to the TV
Wall mount bracket (not included) if you prefer to mount the TV to the wall
in the carton box.
3
Page 6
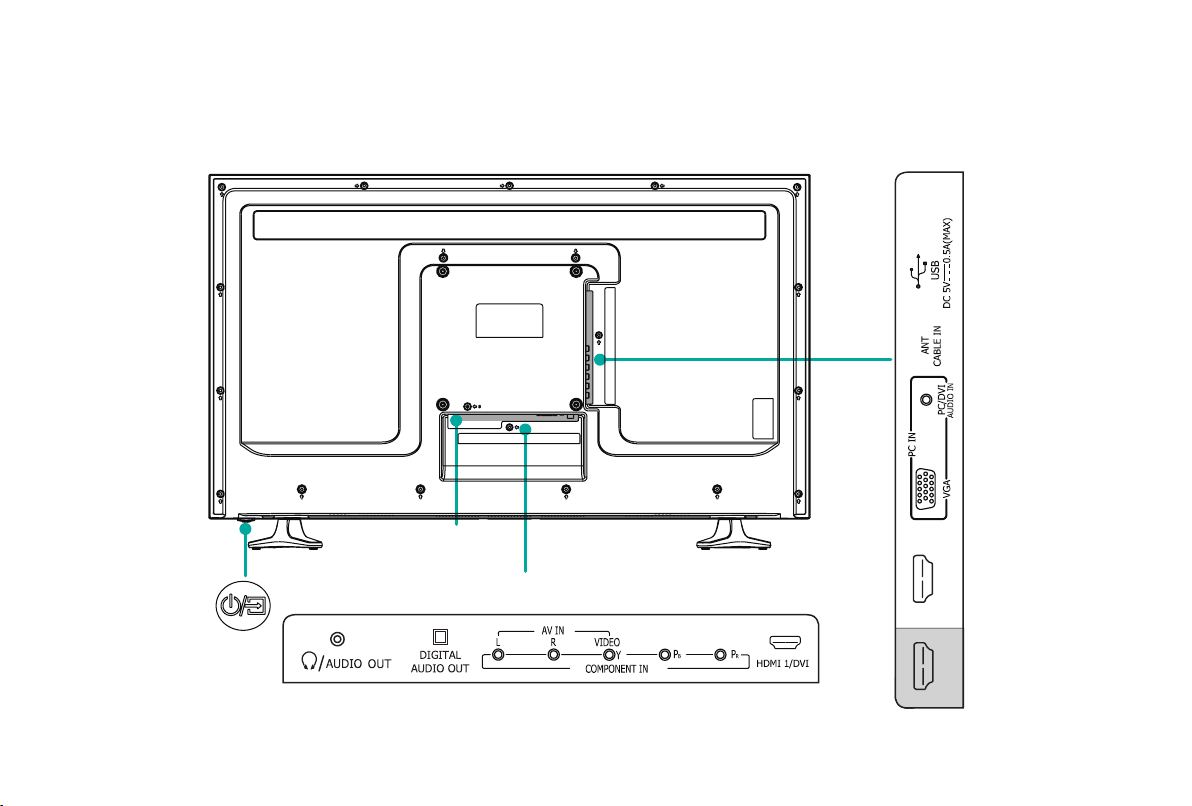
BUTTONS AND PORTS ON THE H3B SERIES TV
Back View of the TV (32H3B*/40H3B*)
TV Side View
Power Input
TV Bottom View
HDMI 2/MHL HDMI 3/ARC
4
Page 7
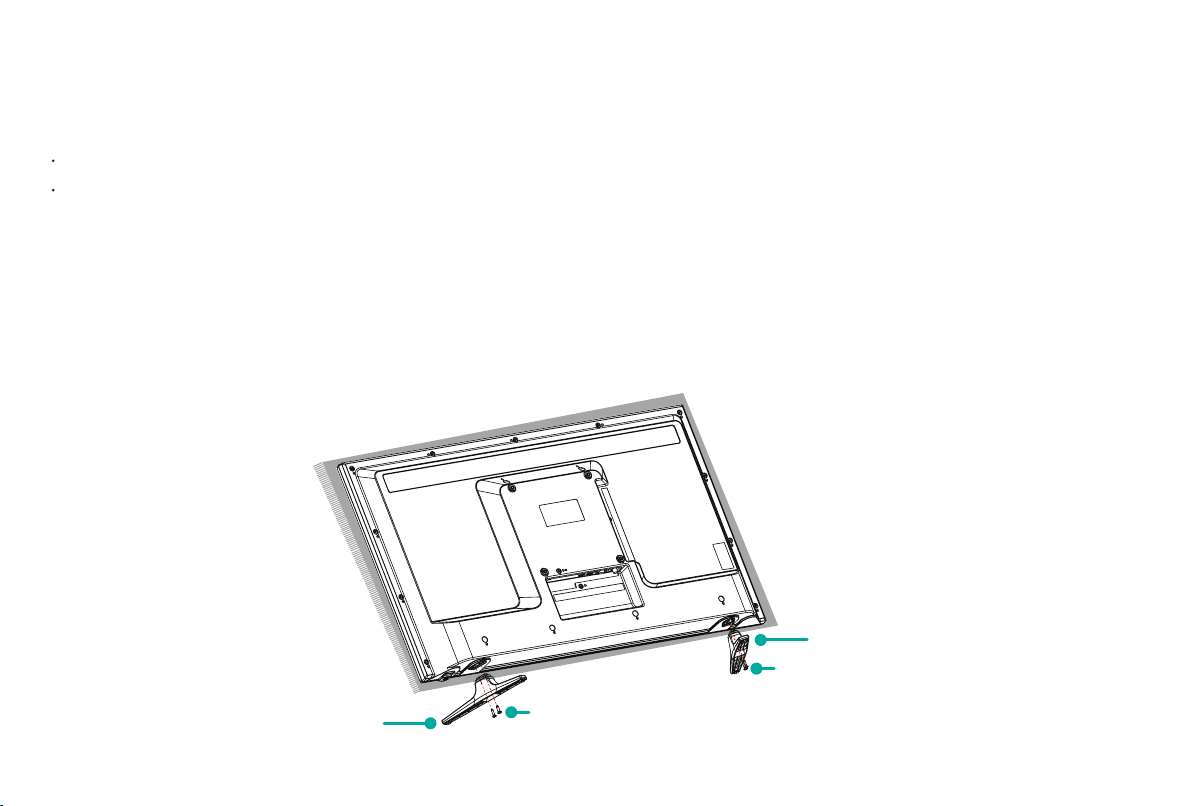
STEP 1. Attach the TV stand or wall mount bracket (not included)
Attach the TV Stand
CAUTION:
Be sure to disconnect the A/C power cord before installing a stand or Wall-Mount brackets.
The LED display is very fragile and must be protected at all times when installing the legs that form the stand. Be sure to protect the
TV screen from getting scratched or damaged by any hard objects. In addition, DO NOT exert pressure on the front of the TV at any
time because it could crack.
To attach the left and right leg that forms the stand:
1. Carefully place your TV face down on a soft, flat surface to prevent damage to the TV or scratching to the screen.
2. Remove the 2 legs from the foam and then insert the stands into the bottom slots of the TV.
3. Use the screws that came inside the carton with your TV to secure each leg tightly.
(For steps to attach the wall mount see page 6)
leg
Screws: ST4X12 (for 32")
ST4X14 (for 40")
leg
Screws: ST4X12 (for 32")
ST4X14 (for 40")
5
Page 8
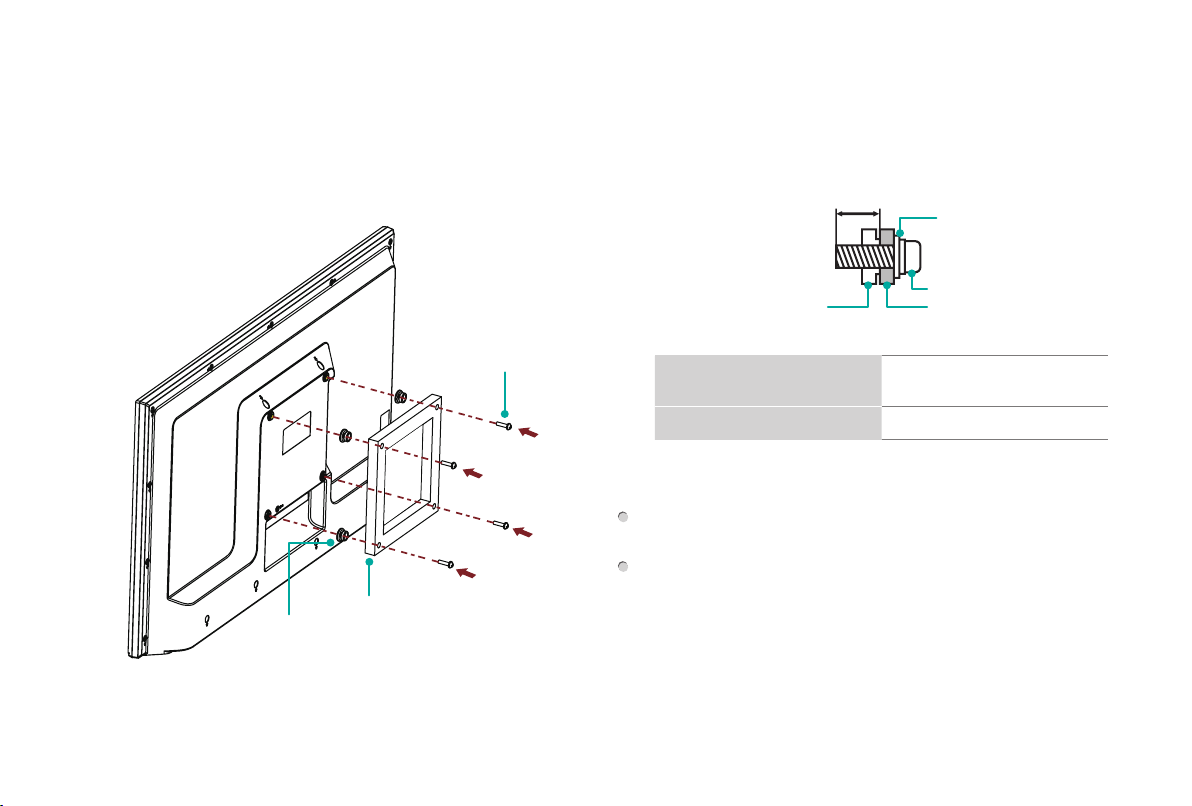
Attach the Wall Mount Bracket (not included)
Before you begin the third-party manufacturer instructions, be
sure to do the following things:
1. Remove the TV stand if you already attached it.
2. Place the TV face down on a clean, safe and cushioned surface.
3. Place the spacers (not included) in the corresponding bracket
holes.
• Toprevent internal damage totheTVandensure it is
mountedsecurely,besure to use fixing screws (not
provided) that are 9.5 - 11.5 mm in length when measured
from the attaching surface of rear cover.
9.5 - 11.5 mm
Wall mount bracket
Screw
(not provided)
Bracket
Spacer
(not provided)
(not provided)
CAUTION:
• Whenyouattachthe mount, be sure tousethespacers
(provided by the third-party manufacturer) between the TV
and the bracket.
Rear cover of the TV Spacer
Wall mount hole pattern
VESA (mm)
Wall mount screw size (mm) M6
Screw
200 × 100 (32H3B*)
200 × 200 (40H3B*)
Follow instructions provided with the Wall mount bracket.
To complete the installation, please contact the wall-mount
manufacturer.
The selected screws are 9.5 - 11.5 mm in length when
measured from the attaching surface of the rear cover. The
length of the screws differ depending on the Wallmount bracket
model.
NOTE: The length of the screws differ depending on the wall
mount bracket model.
6
Page 9
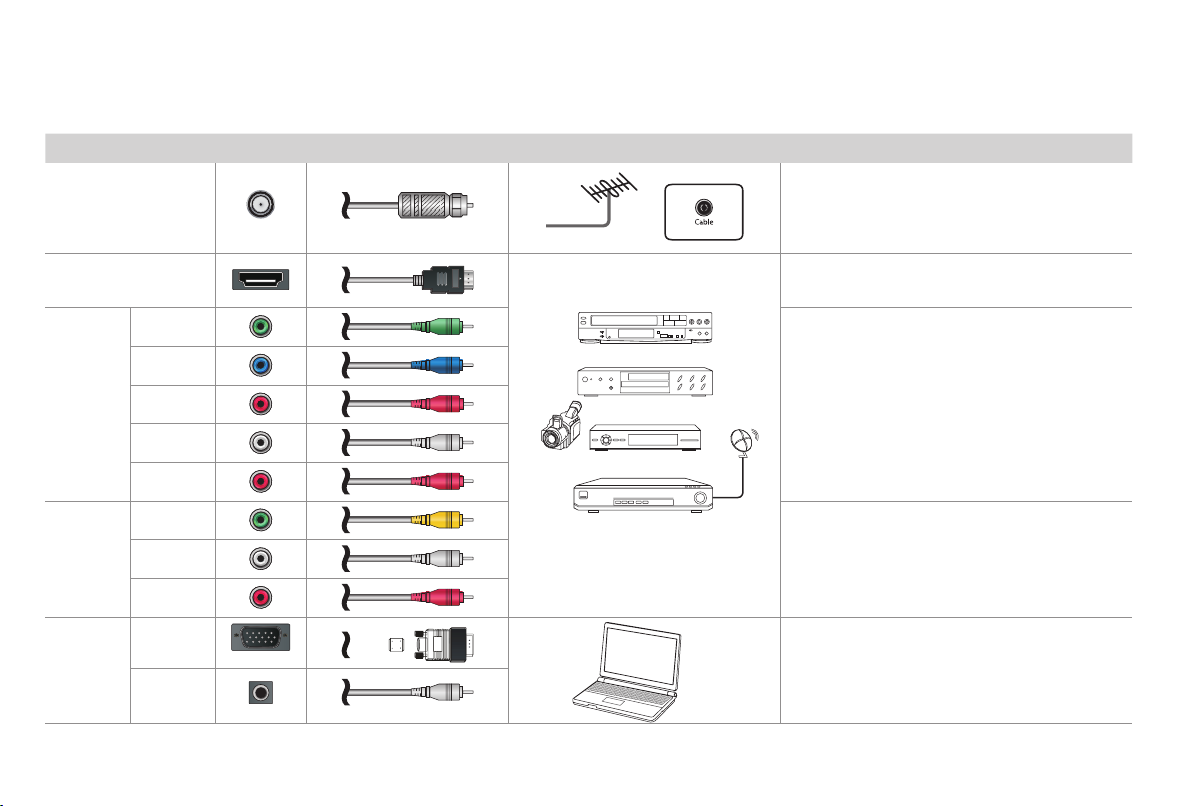
STEP 2. Connect devices to your TV
Check to ensure that you have selected the right cables for the ports and that they are connected securely. Loose connections can affect
the quality of the picture image and color.
TV label Port Cable External Equipment Brief Description
VHF/UHF Antenna
ANT/CABLE IN
Antenna
ANT OUT
Connect an outdoor VHF/UHF antenna.
COMPO-
NENT IN
AV IN
PC IN
7
HDMI
AUDIO IN
Y
P
B
P
R
L
R
VIDEO
L
R
VGA
PC / DVI
Green
Blue
Red
White
Red
Yellow
White
Red
Video
Camera
VCR
DVD Player/Recorder
Set-top Box
Satellite Receiver
PC
Satellite
antenna
cable
Connect a High Denition Multimedia Interface
(HDMI) cable from an external device.
Connect a component video cable and left-right
audio cables from an external AV device.
Connect a composite video cable and left-right
audio cables from an external AV device.
Connect a VGA cable from your PC to use the
TV as a monitor. Connect an audio cable from
the PC audio out.
Page 10
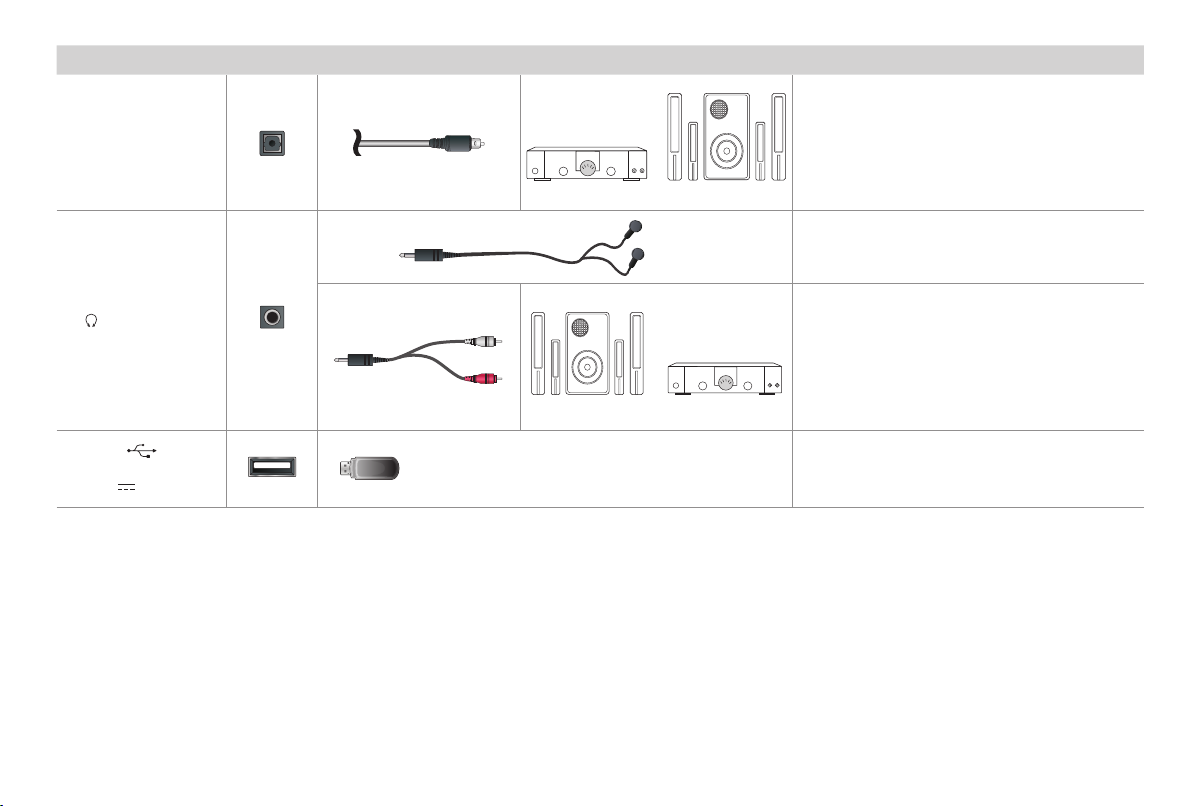
TV label Port Cable External Equipment Brief Description
DIGITAL AUDIO OUT
/ AUDIO OUT
USB
DC 5V 0.5A(MAX)
White
Connect an optical cable from an external
digital audio system.
SpeakerAudio Amplier
Connect headphones to hear audio from the
TV.
Connect an audio adapter (not provided) from
an external analog audio system.
Red
Speaker
Audio Amplier
Connect a USB device for browsing photos,
music and movies.
The unit only recognizes a USB Memory Stick.
8
Page 11
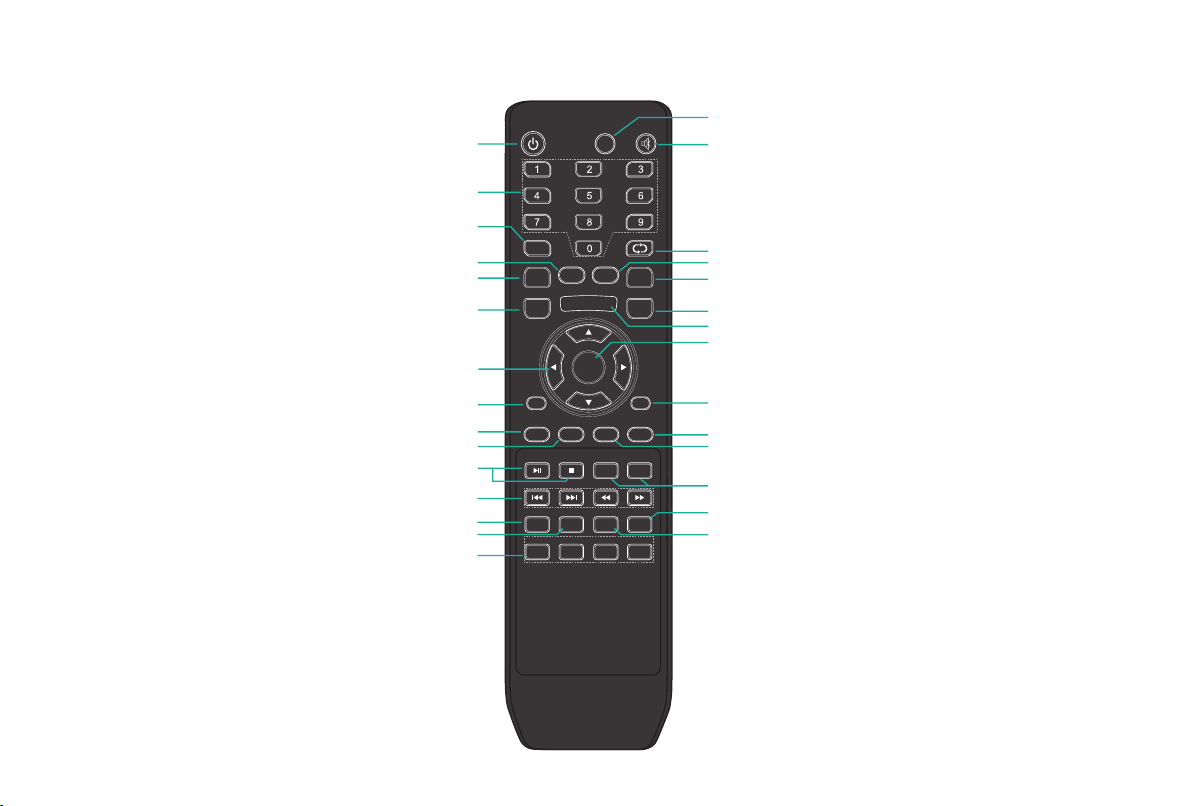
Buttons on your TV remote
Power on / off
Direct channel selection
Select a digital sub-channel
Mono /Stereo/SAP operation
Dash button
Audio select button
Increase volume
Decrease volume
D-pad (up/down/left/right naviga-
tion buttons)
Close the menu
Auto adjust button
ASPECT button
Favorite program controlling but-
ton & Media player button
Media player button
Select picture mode
Select sound mode
Select TV AV VGA USB source
MUTE
INPUT
DISPLAY
OK
*
CHLIST
LAST
++
CH.
-
HOME
GUIDE
-
SAP
MTS CCD
VOL
-
EXIT MENU
AUTO
ASPECT STILL SLEEP
FAVLIST
ADD/ERASE
PICTURE
SOUND
TV AV VGA MEDIA
Select input source
MUTE button
Go to the previous channel
Adjust CC mode
Next channel
Previous channel
Display the information banner
Conrm selections
MENU button
Sleep timer button
Pause the screen
For Roku® Streaming Stick
Open the DTV program guide
(if available)
®
Channel list
9
Page 12
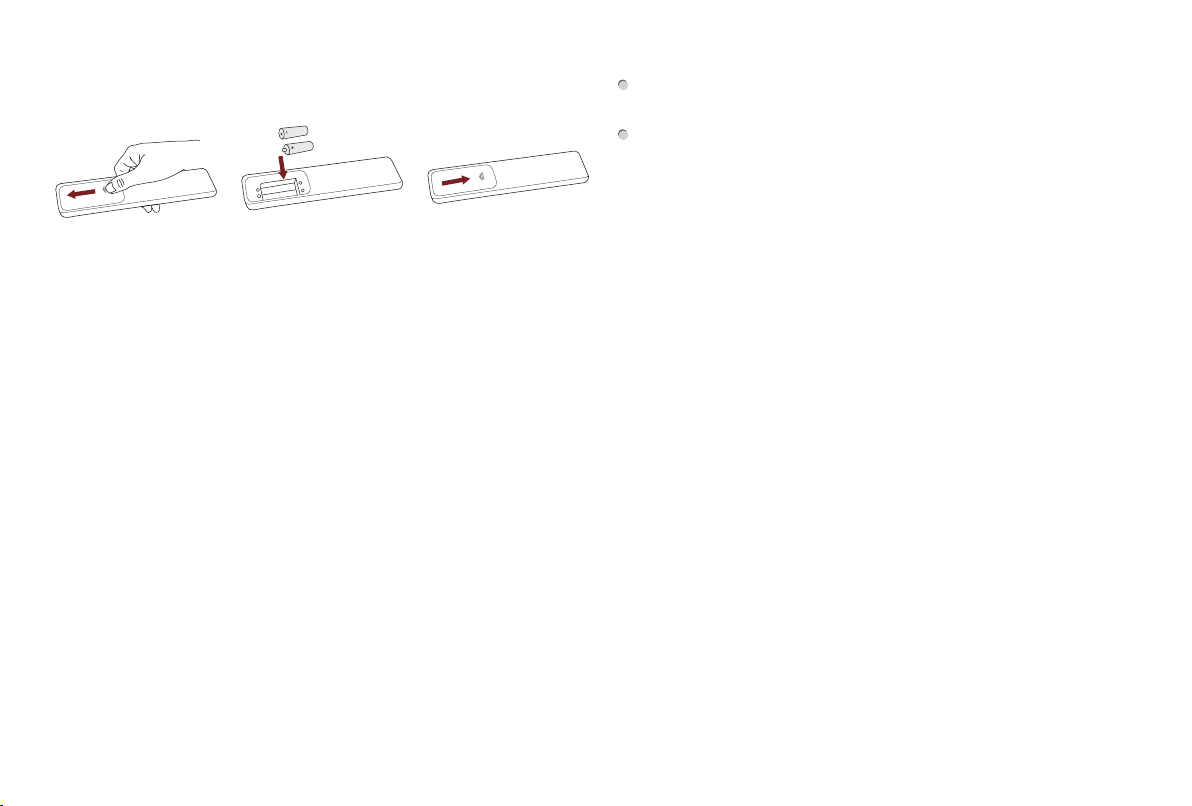
STEP 3. Begin using your remote
1. Slide the back cover to open the battery compartment of the
remote control.
Insert the batteriesGently push and slide Gently push and slide
2. Insert two AAA size batteries. Make sure to match the (+) and (-)
ends of the batteries with the (+) and ( - ) ends indicated in the
battery compartment.
3. Replace the battery compartment cover.
Important Information about the remote and batteries:
• Discard batteries in adesignateddisposalarea.Do not
throw them into a fire.
• Remove old batteries immediatelytopreventthemfrom
leaking into the battery compartment.
• Ifyoudonot intend to use theremotecontrolforalong
time,removethebatteries.
• Batterychemicalscan cause a rash. Ifthebatteriesleak,
clean the battery compartment with a cloth. If chemicals
touch your skin then wash it immediately.
• Donotmixoldandnewbatteries.
• Do notmixalkaline,standard(carbon-zinc) or rechargeable
(NiCd,NiMH,etc.)batteries.
• Donotcontinueusingtheremoteifitgetswarmorhot.
Call our Support Center immediately on the Hisense support
website.
Remote Control Range Information
The remote control can work at a distance of up to 26 feet in
front of the TV set.
It can work at a 30 degree horizontal or vertical angle.
Program Your Universal Cable or Satellite Remote
Control to Operate Your New Hisense Television
(only for USA)
If you would like to program your other household remote controls
to your new Hisense television,please refer to the User's Manual
supplied by your Cable or Satellite provider. The Cable or Satellite
providers' User's Manuals should include instructions on how to
program their remote to your television.
A list of Hisense codes for the most common Cable and Satellite
providers are listed below. Use the Hisense code that is
associated with your Cable or Satellite provider (if applicable).
DIRECTV
11780, 12049, 10171, 11204, 11326, 11517, 11564, 11641, 11963,
12002, 12183
Time Warner Cable
0748, 1463, 0463, 10463
Comcast
10171, 11204, 11326, 11517, 11641, 11780, 11785, 11892, 11963,
12002
CoxCommunications
Dish Network
If the Hisense code associated with your Cable or Satellite
provider is not listed, does not work or you cannot locate the
instructions to program your remote, call your local Cable or
......0178, 10178, 10019, 10748, 11314, 11660, 11710,
......386, 0178, 10178, 400, 450, 461, 456,
......0178, 10178, 10463, 11463, 10748, 11314, 11660,
......0178, 10178, 1326, 1463
......505, 627, 538, 720, 659
10
Page 13
Satellite provider's customer service center.
If your Cable or Satellite provider does not have a Hisense code
available, please contact us at one of the phone numbers on Page 2.
UsingYourCableSet-topBoxorSatelliteReceiver
Remote as a ‘Universal’ Remote
If you prefer to use your Cable Set-top Box or Satellite Receiver
Remote as a ‘Universal Remote’, then visit the Support page to view a
list of the codes.
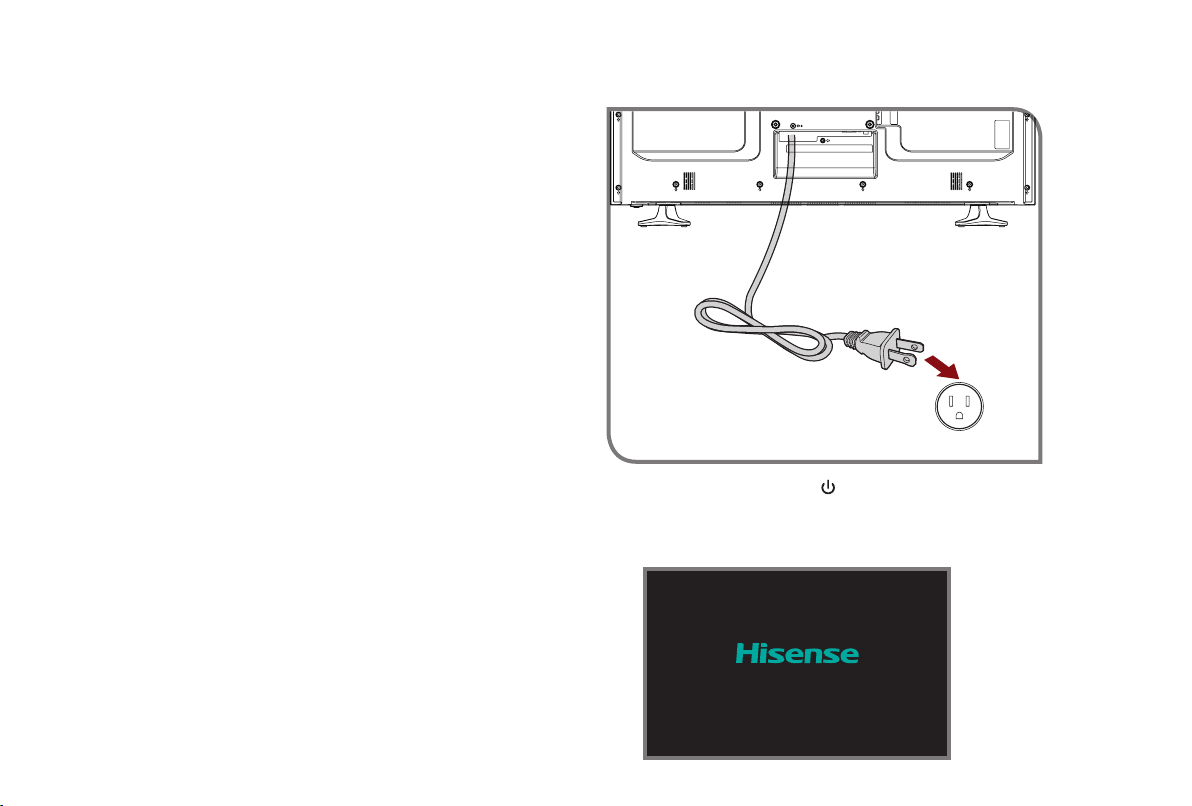
STEP 4. Power on the TV
Plug the power cord into a power outlet.
Power Cord
Wall Outlet
Press the
splash screen that shows the Hisense logo appears. Next, the
First-Time Setup Menu begins by prompting you to choose your
Language, Country
11
Power button
, and
on the remote to turn on the TV. A
Time Zone
.
Page 14
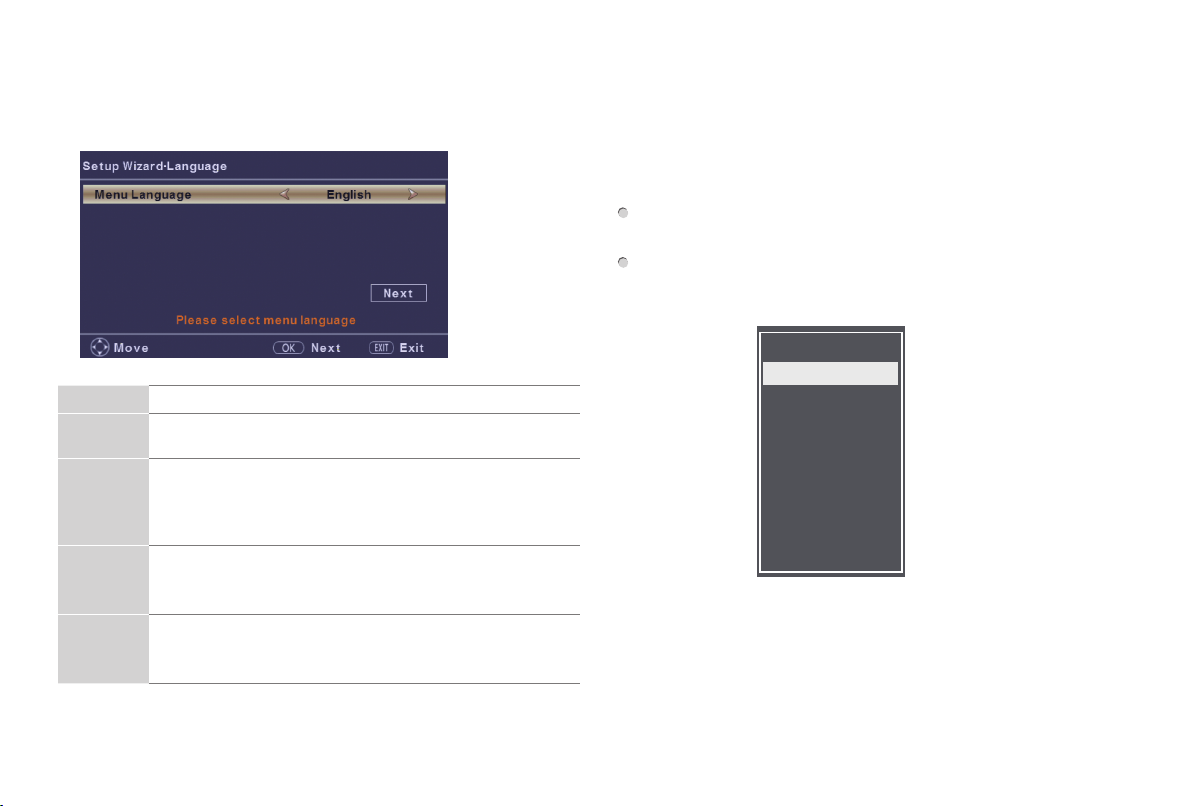
STEP 5. Complete the first-time setup menu
After the splash screen that shows the Hisense logo appears, begin
the first-time setup menu.
Menu Operations
Language
setting
Use Mode • Select your Mode Setting: Home Mode or Retail Mode.
Time zone
setting
Channel
Search
• Choose your language:
and then select
Home Mode
•
full functionality of the television. If you selected
Mode
• Select the local time zone according to your region.
• Daylight Saving: Set the Daylight Savings time for your
area.
• Select your Tuner Mode: Air or Cable, press
to conrm.
• Select
is the recommended setting which offers
, Energy Savings is not realized.
Next
and press
English, EspañolorFrançais,
Next
.
OK button
to scan channels.
Retail
OK button
STEP 6. Selecting the Input Source
When you finish the first-time setup, you must select the TV signal
source. Because your TV stores this information, you do not need
to change the TV signal source unless it changes. For example, if
you begin receiving channels from a cable provider instead of an
antenna, then you'll need to change the TV signal source.
TV
AV
INPUT button
on the remote or on
OK
Turn on your TV, then press
the TV. The INPUT menu opens.
▲/▼ button
Press
button
.
to highlight the input source, then press
Source Select
Component
HDMI1
HDMI2
HDMI3
VGA
Media
The above is for reference only ! For details, please see the "Completing
the First-Time Setup Menu" part in the USER MANUAL!
12
Page 15
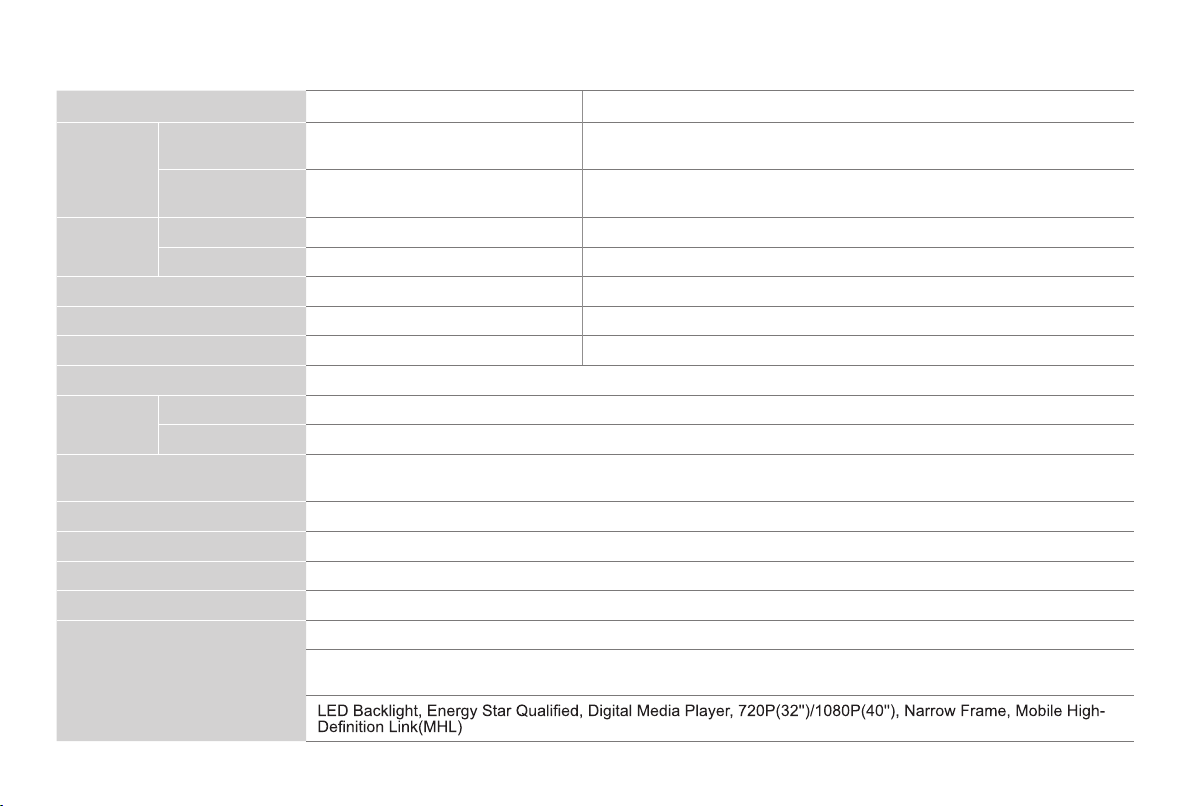
PRODUCT SPECIFICATIONS
Model Name 32H3B* 40H3B*
Dimension
(W × H × D)
Weight Without Stand 10.6 lbs (4.8 kg) 17.6 lbs (8.0 kg)
Active Screen Size (Diagonal) 31.5 inches 39.6 inches
Screen Resolution 1366 × 768 1920 × 1080
Audio Power 6 W + 6 W 7W + 7 W
Power Supply 120 V ~ 60 Hz
Receiving
systems
Receiving Channels VHF: 2~13 UHF: 14~69 CATV: 1 ~ 125 Digital Terrestrial Broadcast (8VSB): 2 ~ 69
Tuner Type Frequency synthesized
Environmental Conditions Temperature: 41°F ~ 95°F (5°C ~ 35°C) Humidity: 20% ~ 80% RH Atmospheric pressure: 86 kPa ~ 106 kPa
Component Input 480 I / 60 Hz, 480 P / 60 Hz, 720 P / 60 Hz, 1080 I / 60 Hz, 1080 P / 60 Hz (for 40")
VGA Input VGA (640×480 / 60 Hz), SVGA (800×600 / 60 Hz), XGA (1024×768 / 60 Hz)
HDMI Input RGB / 60 Hz (640×480, 800×600, 1024×768), YUV / 60 Hz (480 I, 480 P, 720 P, 1080 I, 1080 P(for 40"))
Ports 3 HDMI ports, 1 USB port, 1 RF input, 1 RCA composite combine with component Video input, 1 left/right Audio
Key features
Without Stand 28.9 × 17.1 × 3.5 inches
(733 × 434 × 89 mm)
With Stand 28.9 × 18.8 × 7.1 inches
(733 × 477 × 180 mm)
With Stand 10.8 lbs (4.9 kg) 18.1 lbs (8.2 kg)
Analog NTSC
Digital ATSC / QAM
Digital cable (64/256 QAM): 1 ~ 135
input for composite, 1 Digital Audio output,1 Earphone Audio output, 1 PC/DVI Audio input, 1 PC Video input
35.5 × 20.6 × 3.4 inches
(902 × 523 × 86 mm)
35.5 × 22.2 × 8.0 inches
(902 × 563 × 204 mm)
where “*” would be replaced by any Arabian number or English letter or blank.
13
Page 16
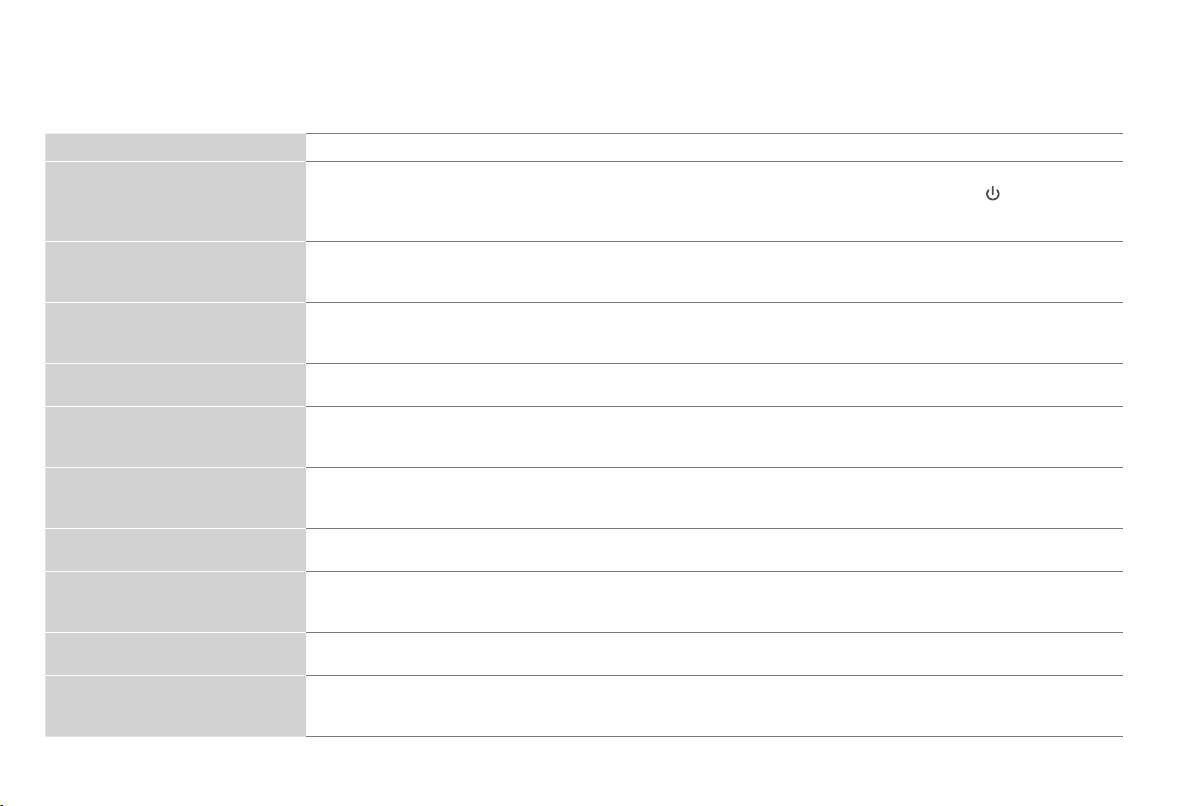
QUICK PROBLEM-SOLVING TIPS
When you experience an issue with your TV, turn it off and on again. If this does not resolve the problem, then refer to the tips below. If
the problem is still not resolved, then refer to our contact information on page 2.
ISSUES POSSIBLE SOLUTIONS
There is no sound or picture from
the TV
I have connected an external
source to my TV and do not see a
picture and/or hear any sound
When I turn on my TV, there is a
delay for a few seconds before the
picture appears. Is this normal?
The picture is normal but there is
no sound
Sound but no picture or black and
white picture
The sound and/or picture is
distorted or appears wavy
The sound and picture is blurry or
cuts out
A horizontal or vertical stripe
appears on the picture and/or the
picture is shaking
The plastic cabinet makes a
"clicking" type of sound
The remote control does not work
• Check to see if the power cord is plugged into a power outlet.
• A power switch on the right side bottom edge of the front panel must be turned on. Press the
on the remote control to activate the unit from 'Standby' mode.
• Check to see if the LED light is on or not. If it is, then the TV is receiving power.
• Check for the correct output connection on the external source and for the correct input connection on the TV.
• Make sure you have made the correct selection for the input mode for the incoming signal.
• Yes, this is normal. The TV is initializing and searching for previous setting information.
• Check the volume settings.
• Check if 'Mute' mode is set to On.
• If the picture is black and white, unplug the TV from the AC outlet and replug it after 60 seconds.
• Check that the Color is set to 50 or higher.
• Try different TV channels.
• An electric appliance may be affecting the TV. Turn off any appliances that are nearby and move it farther away
from the TV.
• Insert the power plug of the TV set into another power outlet.
• If using an external antenna, check the direction, position and connection of the antenna.
• Adjust the direction of your antenna or reset or ne tune the channel.
• Check to see if there is an appliance or electric tool nearby that is causing interference.
• The 'click' sound can occur when the temperature of the television changes. This change causes the television
cabinet to expand or contract, which makes the sound. This is normal and the TV is OK.
• Conrm that TV still has power and is operational.
• Change the batteries in the remote control.
• Check if the batteries are correctly installed.
Power button
14
Page 17
Certification and Compliance
FCC Notice
This device has been tested and found to comply with the limits
for a Class B digital device pursuant to Part 15 of the FCC Rules.
These limits are designed to provide reasonable protection
against harmful interference in a residential installation. This
device generates, uses, and can radiate radio frequency energy
and, if not installed and used in accordance with the instructions,
may cause harmful interference to radio communications.
However, there is no guarantee that interference will not
occur in a particular installation. If this device does cause
harmful interference to radio or television reception, which can
be determined by turning the device off and on, the user is
encouraged to try to correct the interference by one or more of the
following measures:
Reorient or relocate the receiving antenna.
Increase the separation between the device and receiver.
Connect the device into an outlet on a circuit different from that
to which the receiver is connected.
Consult the dealer or an experienced radio/TV technician for
help.
NOTE: The manufacturer is not responsible for any radio or
TVinterferencecausedby unauthorized modifications to
this equipment. Such modifications could void the user’s
authority to operate the equipment.
ENERGY STAR
Your Hisense TV is ENERGY STAR®
qualified in the "Energy Saving" mode. It
meets strict energy efficiency guidelines set
by the U.S. Environmental Protection Agency
and Department of Energy. ENERGY STAR
is a joint program of these government agencies, designed
to promote energy efficient products and practices. Changes
to certain features, settings, and functionalities of this TV (i.e.
TV Guide, Picture, Sound) can increase or change the power
consumption. Depending upon such changed settings, the power
consumption may exceed the limits required for the ENERGY
STAR qualification in the "Energy Saving" mode.
The terms HDMI and HDMI High-Definition Multimedia
Interface, and the HDMI Logo are trademarks or
registered trademarks of HDMI Licensing LLC in the United States and other
countries.
©2015. All rights reserved. Hisense and the Hisense logo are trademarks of
Hisense. Other brand and product names are trademarks of their respective
owners.
15
Page 18

 Loading...