

Page 1
User Manual
Page 2

1
Content
Getting Started ............................................................................................................. 3
Overview ............................................................................................................................................................................. 3
Accessories ........................................................................................................................................................................ 4
Home Screen .................................................................................................................................................................... 5
Buttons ................................................................................................................................................................................. 7
Making Connections ................................................................................................... 9
Battery ................................................................................................................................................................................... 9
Micro-USB ........................................................................................................................................................................ 10
Mini-HDMI ....................................................................................................................................................................... 10
Micro SD ........................................................................................................................................................................... 11
Headphone .................................................................................................................................................................... 11
Wi-Fi.....................................................................................................................................................................................11
VPN ...................................................................................................................................................................................... 13
Basics ..............................................................................................................................14
Setup Guide ................................................................................................................................................................... 14
Basic Operation ............................................................................................................................................................ 14
Power Control ............................................................................................................................................................... 16
Typing ................................................................................................................................................................................ 16
Google Now ................................................................................................................................................................... 18
Voice Search & Voice Actions .............................................................................................................................. 20
Sharing .............................................................................................................................................................................. 22
Security ............................................................................................................................................................................. 22
Settings ............................................................................................................................................................................. 23
Google Account .......................................................................................................................................................... 25
Syncing.............................................................................................................................................................................. 26
Featured Apps .............................................................................................................27
Walmart ............................................................................................................................................................................ 27
Sam’s Club ....................................................................................................................................................................... 27
VUDU .................................................................................................................................................................................. 28
Apps ................................................................................................................................30
Gallery ................................................................................................................................................................................ 30
Camera .............................................................................................................................................................................. 31
Play Music ........................................................................................................................................................................ 32
Play Books ........................................................................................................................................................................ 33
Play Movies & TV .......................................................................................................................................................... 35
Gmail .................................................................................................................................................................................. 37
Google+ ........................................................................................................................................................................... 40
Maps ................................................................................................................................................................................... 46
Page 3

2
Appendix A ..................................................................................................................52
Specifications ................................................................................................................................................................ 52
Trouble Shooting ........................................................................................................................................................ 52
Multimedia Compatibility ..................................................................................................................................... 53
Appendix B ..................................................................................................................54
Important Safety Instructions ............................................................................................................................. 54
Certification and Compliance ............................................................................................................................. 55
Appendix C ..................................................................................................................57
Legal Terms ..................................................................................................................................................................... 57
Additional Support .................................................................................................................................................... 63
Warranty ........................................................................................................................................................................... 63
Copyright and Trademark Notices ................................................................................................................... 64
Page 4

3
Getting Started
Getting Started
Read this chapter to learn about Sero 7 features, how to use the controls, and more.
Overview
1
Power Button
Headphone port
Reset
Micro SD port
Micro-USB port
Mini-HDMI port
Front Camera
Volume Up/Down
Buttons
Speakers
WLAN Antenna
Page 5
4
Getting Started
Item Function
Power Button Press & hold to turn on/o; Press it to put/wake the unit in/from sleep mode.
Volume Up/Down Buttons
Press to adjust the volume.
Headphone port Headphone connections for personal listening.
Micro SD port Plug microSD card (up to 32G).
Micro-USB port Connect to wall outlet with Micro-USB cable and power adapter for charging.
Connect to a computer, keyboard, more other devices with USB port.
Mini-HDMI port Connect to an external device for transferring the content in your Sero.
Reset If sero 7 fails to power on & o, please trigger the reset port in the rear cover
for enforced reset.
NOTE
Enforced reset may result in data lost, you’d better backup the important
data periodically.
WLAN Antenna Supports wireless network function.
NOTE
Avoid holding this region when using WLAN.
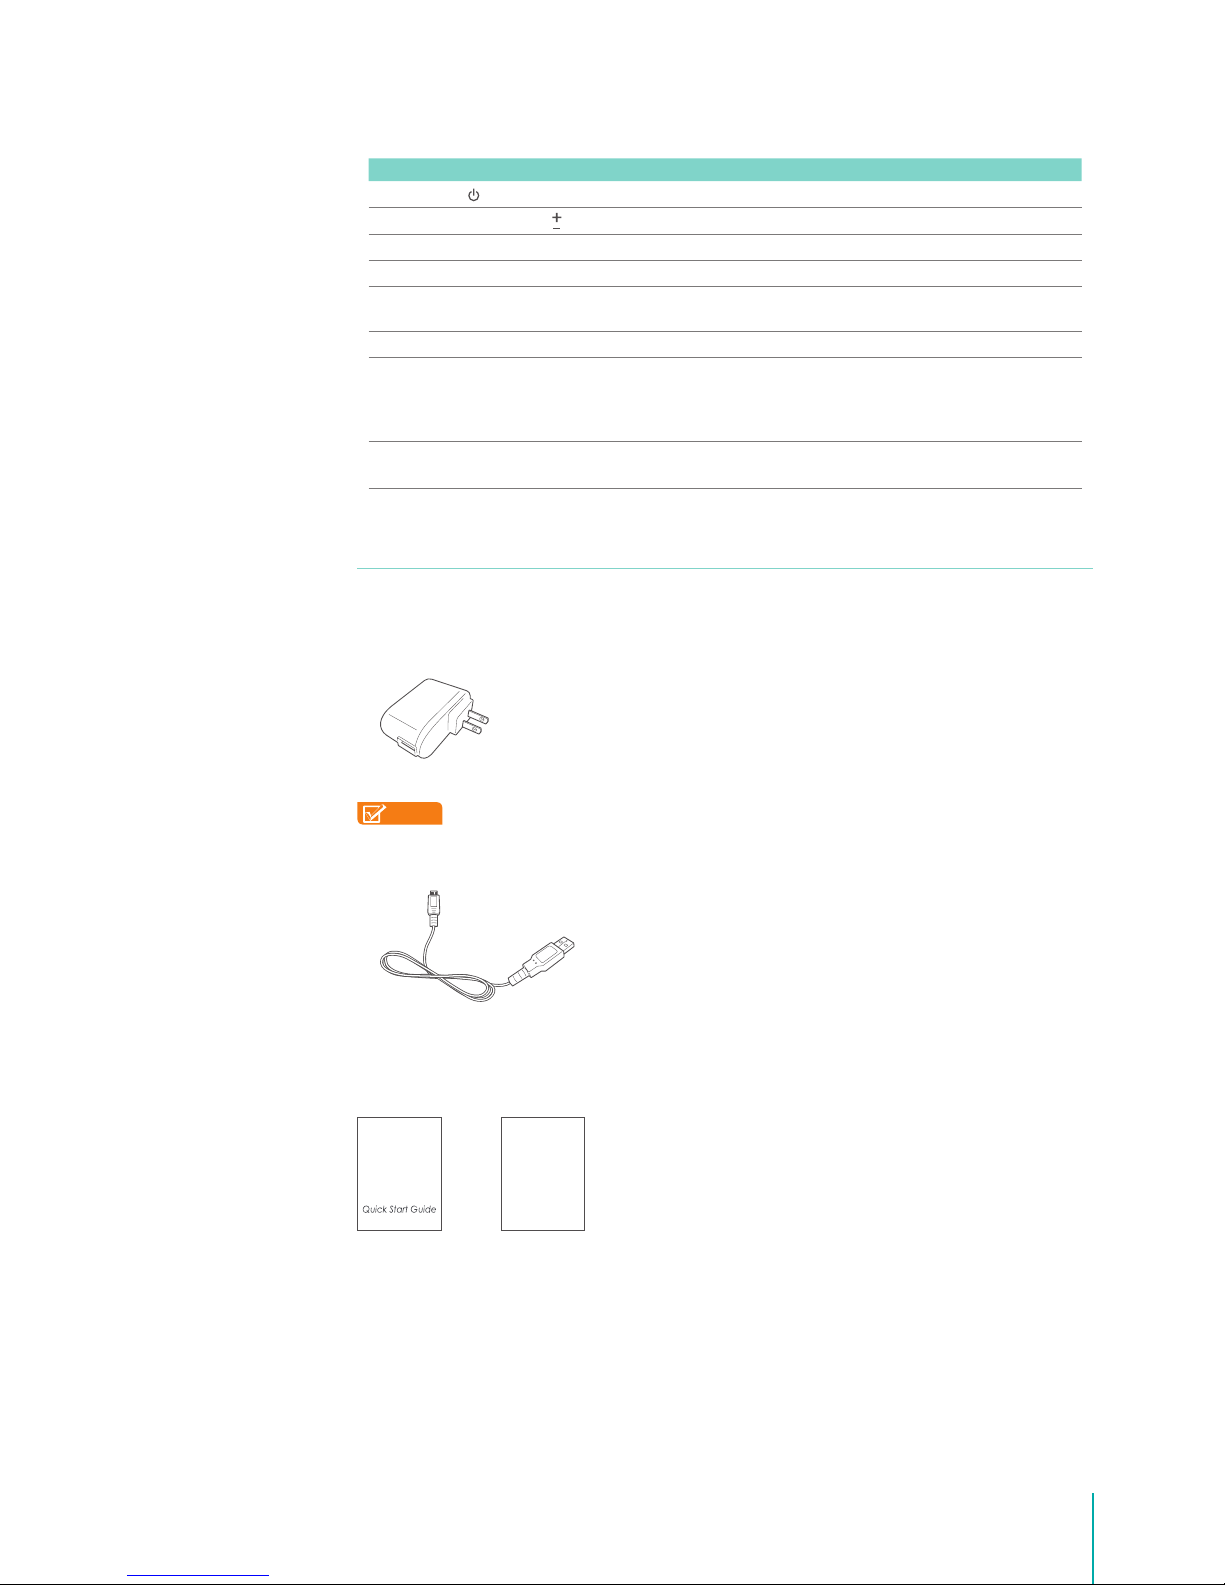
Accessories
The following accessories are included with the Sero 7:
Power Adapter
Use the power adapter to connect the outlet to charge the battery.
NOTE
The power adapter may vary by model.
Micro-USB Cable
Use the USB cable to connect the Sero 7’s Micro-USB port to the power adapter to charge the battery,
or to your computer.
Quick Start Guide & Warranty
Warranty
Page 6
5
Getting Started
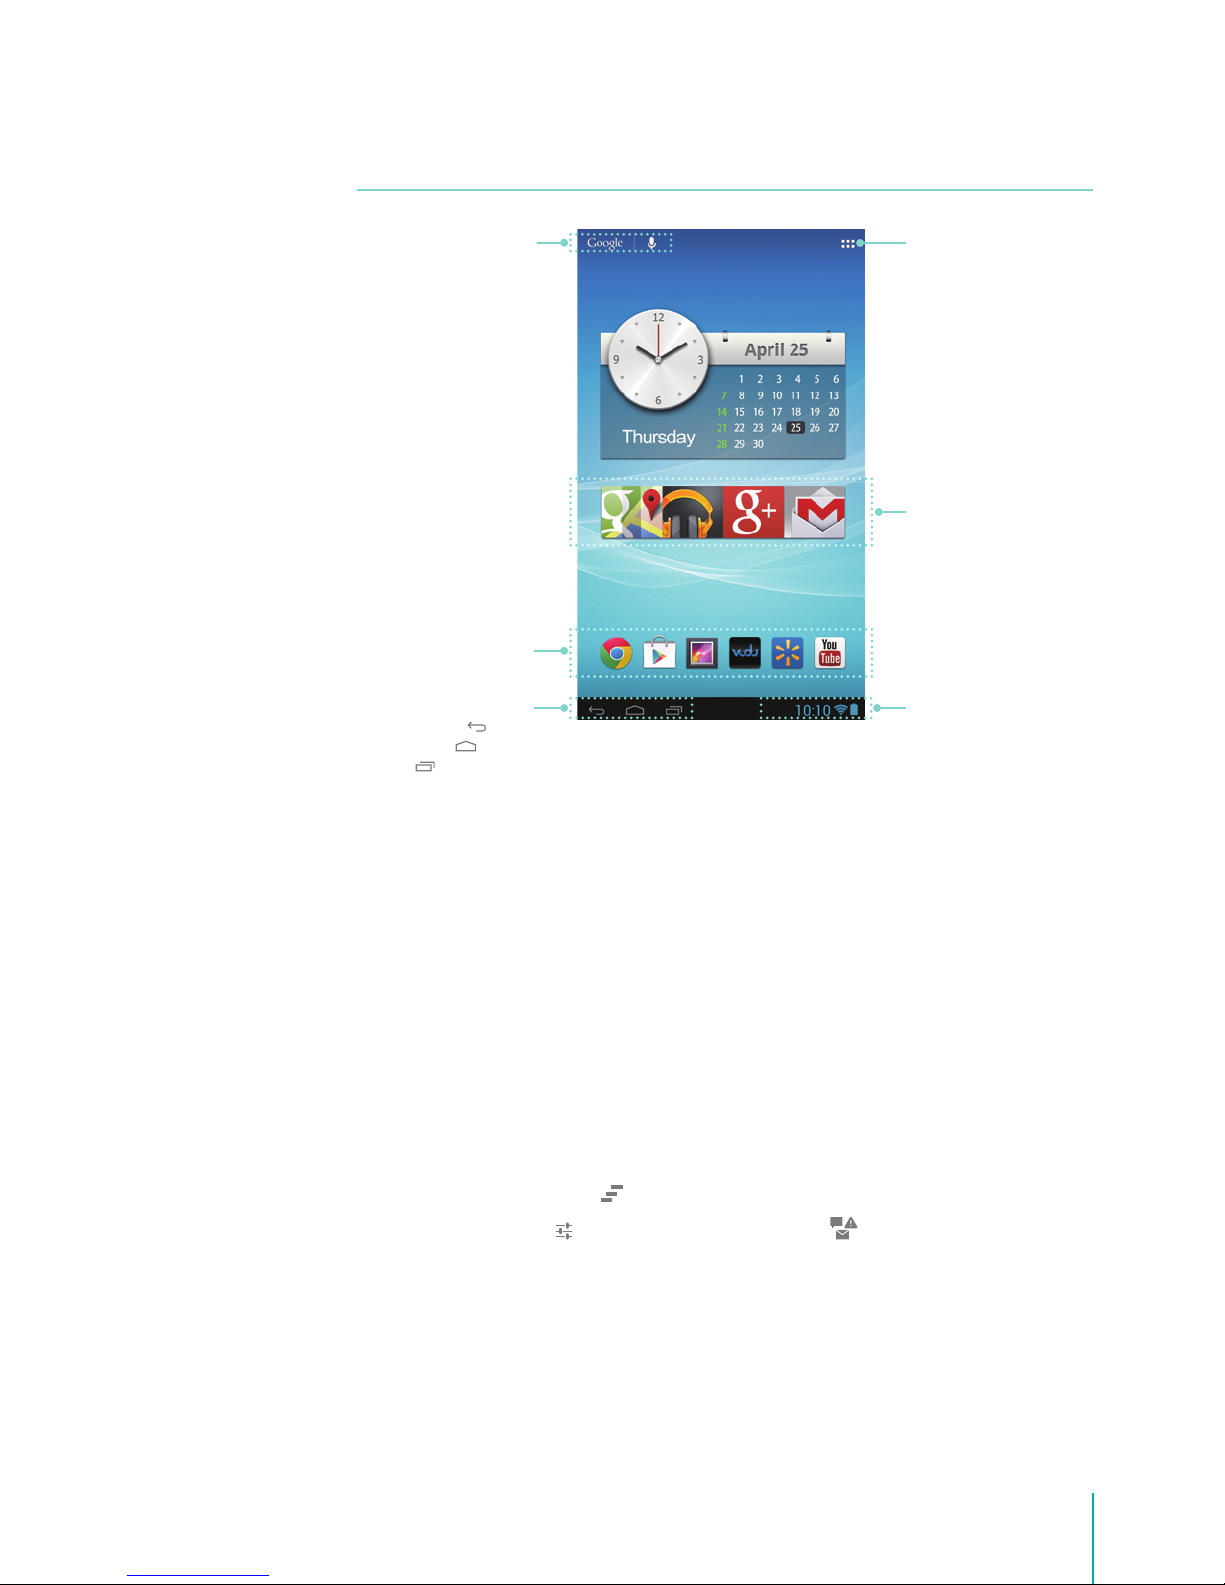
Home Screen
To move between Home screens, slide left or right.
Status Bar
At the bottom of the screen, you’ll see indicators that inform you about the status of your Sero. You can
open the Notication Tray by tapping the Status bar.
Notication Tray
Notications can come from the system, a game, an application such as E-mail, or the music player.
Certain notications can be expanded to show more information, such as email previews or calendar
events.
To open the related app, tap the notication icon on the left of the Notication Tray. Some notications
also allow you to take specific actions by tapping icons within the notification. For example, Music
notications allow you to pause/play or play the previous/next music.
When you’re nished with a notication, just slide it away to the left or right. If you want to dismiss all
notications, tap the Dismiss icon
at the top of the Notication Tray.
Tap the Quick Settings icon
to open it, tap the Notication icon to return to the Notication Tray.
Quick Settings
Display settings for commonly performed tasks, including setting display brightness/sound, accessing
the system/Wi-Fi settings, locking and unlocking screen rotation, displaying the percentage of battery,
turning on or o the Wi-Fi/Mute mode/Notications sound, and so on.
All Apps icon
Status Bar
App Recommendation
Navigation Buttons
Back
Home
Recent Apps
Google Search
App Icons
Page 7

6
Getting Started
Notication & Status Icons
The below table list the frequently showed up icon at Status bar:
Icon What it means
Alarm An alarm is alerting or snoozed.
Alert Install/update/enable Google Play service.
Calendar Task reminders.
Message Received new message.
Music Play Music application is running.
Screenshots Screenshot captured.
USB Sero has connected to a computer as Mass Storage.
Wi-Fi Sero has a Wi-Fi Internet connection. The more bars, the stronger the connection.
Google Now
Google Now is about getting you just the right information, at just the right time.
To open Google Now, you can press & hold the Home button at the bottom of any screen and slide up
to Google Now icon, or tap the Google Search bar at the top of the screen. For more information about
Google Now, See Google Now on page 18 .
All Apps Icon
Press the All Apps icon to enter the All Apps screen. This is where you can see all your apps,
including those downloaded on Google Play. You can tap the app to open it, drag the app or widget to
Home screen, or buy the app though Google Play Store. For more information, see Using Apps on page
14 .
From All Apps screen, you can:
Move between screens: Slide left or right.
Open an app: Tap its icon.
Move an app icon on a Home screen: Press & hold an icon or widget and slowly drag it to the
location of your choice.
Browse widgets: Tap the Widgets tab at the top of any All Apps screen.
Get more apps: Tap the Google Play Store icon in the list of app icons, or the Shop icon at
the upper right.
View info about an app: Press & hold it, drag it to the top of the screen, and drop the app over the
App Info icon
.
Tip: Most apps include a Menu icon
near the top or bottom of the screen that lets you control the
app’s settings.
Page 8

7
Getting Started
Buttons
Power Button
Turn Sero On
Press & hold the Power button until the Hisense logo displays.
Turn Sero O
In waken mode, press & hold the Power button until a message displays, tap OK, then your Sero 7 will
shut down.
Put Sero in Sleep Mode
Press the Power button to put the Sero 7 in sleep mode.
If you don’t touch the screen for a several minutes, the Sero 7 will put in sleep mode automatically.
Tip: You can go to Settings > Device > Display > Sleep to set the screen timeout.
Wake Sero From Sleep Mode
Press the Power button to wake the Sero 7 from sleep mode.
Forced Shutdown
If your Sero 7 becomes unresponsive during use, you can press & hold the Power button for 8 seconds
to shut it down. Then press the Power button to restart it.
Volume Up/Down Buttons
Mute Mode O
Press the Volume Up/Down button
or to increase or decrease the volume, also you can slide the
focus on the volume bar to adjust the volume.
Press settings button
to stretch the volume bar, then you can adjust the notications’ volume.
Tip: You can go to Settings > Device > Sound > Volumes to adjust the alarms’ volume.
Mute Mode On
Press the Volume Up/Down button
to turn o Mute mode, then you can press the Volume button
or
to increase or decrease the volume.
Tip: You can open Quick Settins, tap Mute to turn it o.
Navigation Buttons
Back Button
Tap this button to open the previous screen you were working in, even if it was in a dierent app. Once
you go back to the Home screen, no further history will be available.
Page 9
8
Getting Started
Home Button
Tap this button from anywhere on your Sero to return to the Home screen. If you’re viewing a left or
right Home screen, this will open the central Home screen. To open Google Now, see Google Now on
page 6 .
Recent Apps Button
Tap this button to view recently used apps. Tap an app to use it again.
You can slide down to see more apps. You can also slide it away to the left or right.
NOTE
The slide direction will be dierent as the orientation of the screen.
Screenshots Button
Tap this button to capture the screen. The screenshots is saved in Gallery > Screenshots.
Tip: You can go to Settings > Device > ScreenshotSetting, check the Show the screenshot button
checkbox to showed up the Screenshots button
at the bottom of the screen.
Page 10

9
Making Connections
Making Connections
Read this chapter to learn how to connect to an external device and establish data
transmission .
Battery
The Sero 7 has an internal Lithium-ion Polymer rechargeable battery. For important safety instructions
about the battery and charging the Sero 7, see Important Safety Instructions on page 54 .
The Battery Icon
The battery icon in the lower-right corner of the status bar shows the battery level or charging status.
High battery Low battery Needs to be charged Charging
Charging the Battery
The best way to charge the battery is to plug your Sero 7 into a wall outlet using the power adapter
and Micro-USB cable included with your accessories.
NOTE
Use the power adapter and Micro-USB cable included with your accessories. Other power
adapters and Micro-USB cables may charge more slowly or not at all.
The Sero 7 also charges slowly when you connect it to the USB port on your computer. The battery
may drain instead of charge when the battery usage is large.
Check the Level and Details of Battery
You can check the percentage of battery in the Notication Tray, or you can go to Settings > Device
> Battery to check the details of battery. The list at the bottom of the screen shows the breakdown of
battery usage for individual apps and services. Tap a graph for more details.
Extend the Life of Battery
You can extend your battery’s life between charges by turning o features that you don’t need. You can
also monitor how apps and system resources consume battery power.
If you aren’t using Wi-Fi, you can turn it o.
Turn down screen brightness and set a shorter screen timeout: Settings > Device > Display.
If you don’t need it, turn o automatic syncing for all apps: Settings > Accounts > [Google account-
name]. This means you need to sync manually to collect messages, email, and other recent
information, and won’t receive notications when updates occur.
Micro-USB
Cable
Power
Adapter
Wall Outlet
2
Page 11

10
Making Connections
Micro-USB
You can use the included Micro-USB cable to connect the Sero 7’s Micro-USB port to your computer’s
USB port.
To change your Sero 7’s USB connection options, go to Settings > Device > Storage > Menu icon
>
USB computer connection, or open the Notication Tray, tap the USB
icon. You can select the Sero 7
is connected as MTP, PTP, or Mass Storage.
Connect to a Windows Computer
You can connect your Sero 7 to a Windows computer and transfer music, pictures, and other les in
both directions.
This connection uses the MTP protocol, which is supported by most recent versions of Windows.
1. When you connect your Sero 7 to the USB port on your computer, its USB storage is mounted as a
drive and appears on your computer screen.
2. You can now copy les back and forth as you would using any other external device.
3. When you’re nished, simply disconnect the Sero 7 by unplugging the USB cable.
Connect to a Macintosh Computer
You can connect your Sero 7 to a computer running Mac OS X and transfer music, pictures, and other
les in both directions.
This connection uses the MTP protocol, which is not supported by Mac OS X natively.
1. You rst need to install the free File Transfer application on your Macintosh. It’s available from www.
android.com/letransfer, along with instructions on how to install it.
2. After you install File Transfer, follow these steps:
If you are using File Transfer for the rst time, double tap it to open it. After you start File Transfer
once, it opens automatically whenever you connect your Sero 7 to your computer.
Connect your Sero 7 to your computer with a Micro-USB cable.
File Transfer starts, if it’s not already running, and opens a window that displays the contents of your
Sero 7, along with storage space details at the bottom of the window.
3. You work with this window much as if it was a Finder window: opening and closing folders, creating
new folders, and dragging les to or from it and other Finder windows.
4. Disconnect the USB cable when you’re nished.
Connect to a Keyboard, a Mouse & Other Devices
You can connect a keyboard, a mouse or other input devices to your Sero 7 via USB and use it just as
you would with a PC.
Tip: To set the Pointer speed, go to Settings > Personal > Language & input > Mouse/trackpad >
Pointer speed.
NOTE
You may need an adapter to connect the keyboard or other device to your Sero 7’s USB port.
Mini-HDMI
You can use the cable to connect the Sero 7’s Mini-HDMI port to your external device’s HDMI port and
transfer the content in your Sero 7 to external device, such as TV or projector.
Page 12
11
Making Connections
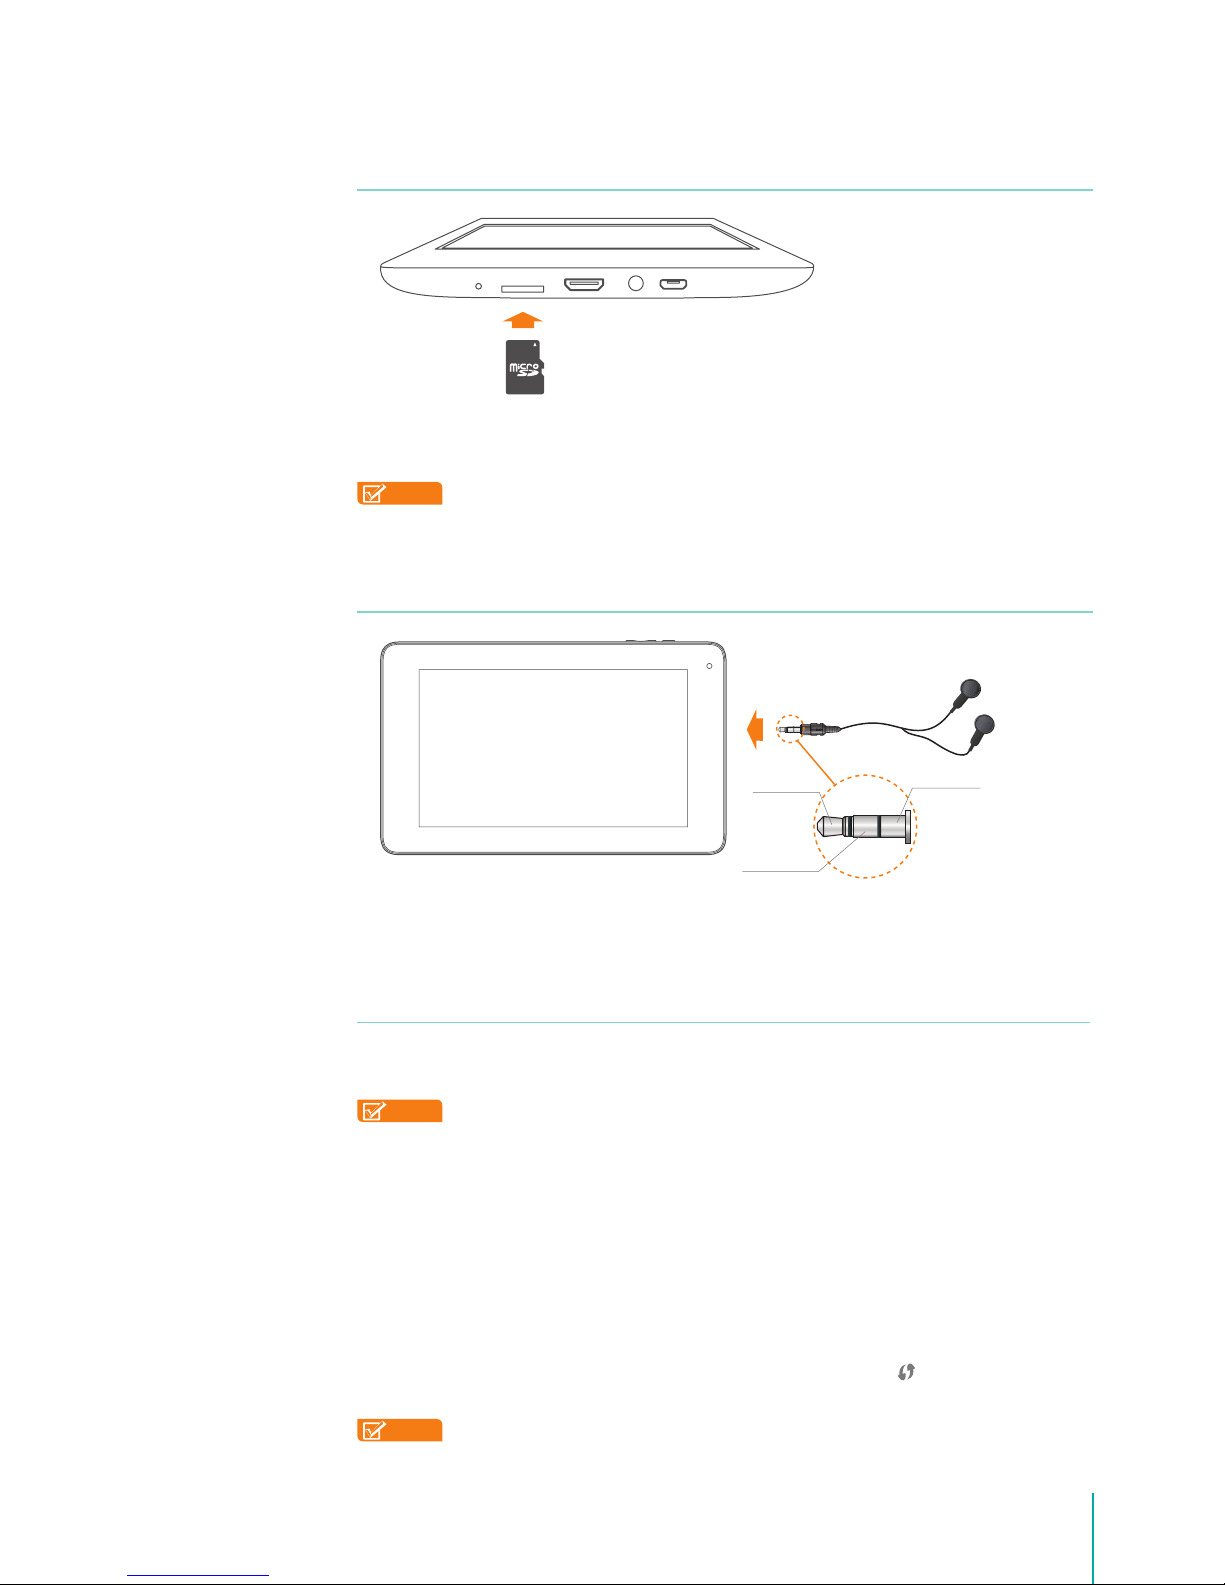
Micro SD
Insert the microSD card contacts facing down into the Sero 7’s Micro SD port.
To check the storage of microSD card, go to Settings > Device > Storage.
NOTES
• You can use microSD TM card and microSDHC TM card.
• Never remove or insert microSD card while the Sero 7 is powered on.
Headphone
Headphones can be connected to the Sero 7’s headphone port. For more information about
headphones, see Important Safety Instructions on page 54 .
Wi-Fi
You can connect to a wireless access point, or hotspot to use Wi-Fi. Some hotspots are open and you
can simply connect to them. Others implement security features that require other steps to set up.
NOTE
To extend the life of your battery between charges, turn o Wi-Fi when you’re not using it.
Connect to a Wi-Fi Network
If you’re adding a Wi-Fi network when rst setting up your device, Wi-Fi is turned on automatically.
1. Open Quick Settings, tap Wi-Fi icon, or go to Settings > Wireless & networks > Wi-Fi.
2. Slide the Wi-Fi switch to the ON position.
3. The device scans for available Wi-Fi networks and displays the names of those it nds. If the device
nds a network that you connected to previously, it connects to it.
4. Tap a network name to see more details or connect to it, and enter a password if necessary.
5. Or, if your Wi-Fi router supports Wi-Fi Protected Setup, tap the WPS icon
at the top of the screen,
and then tap the same button on your router.
NOTE
To modify a network’s settings, press & hold the network name.
microSD
Card
Audio left
Audio right
Grounded
Page 13

12
Making Connections
Add a Wi-Fi Network
You can add a Wi-Fi network so your device will remember it, along with any security credentials, and
connect to it automatically when it’s in range. You must also add a Wi-Fi network if the network does
not broadcast its name (SSID ), or to add a Wi-Fi network when you are out of range.
1. Turn on Wi-Fi, if it’s not already on.
2. Tap the Plus icon
at the top of the screen.
3. Enter the SSID (name) of the network. If necessary, enter security or other network conguration
details.
4. Tap Save.
Forget a Wi-Fi Network
You can make the Sero 7 forget about the details of a Wi-Fi network that you added - for example, if
you don’t want the Sero 7 to connect to it automatically or if it’s a network that you no longer use.
To forget a Wi-Fi network, go to Settings > Wireless & networks > Wi-Fi > [the network name] > Forget.
WPS Pin Entry
If your Wi-Fi router supports Wi-Fi Protected Setup, tap the Menu icon
> WPS Pin Entry, and then input
the pin of the tablet on your router.
Advanced Wi-Fi Settings
To set the Advanced Wi-Fi, go to Settings > Wireless & networks > Wi-Fi > Menu icon
> Advanced .
Network notication - By default, when Wi-Fi is on, you receive notication in the Status bar when
your device detects an open Wi-Fi network. Uncheck this option to turn o notication.
Keep Wi-Fi on during sleep - To select whether to put the Sero 7 in sleep mode when it’s connected
to Wi-Fi.
MAC address - The Media Access Control (MAC) address of your device when connected to a Wi-Fi
network.
IP address - The Internet Protocol (IP) address assigned to the device by the Wi-Fi network you are
connected to (unless you used the IP settings to assign it a static IP address).
Congure Proxy Settings for a Wi-Fi Network
Some network administrators require you to connect to internal or external network resources via a
proxy server. By default, the Wi-Fi networks you add are not congured to connect via a proxy, but you
can change that for each Wi-Fi network you’ve added.
1. Press & hold a network in the list of Wi-Fi networks you’ve added.
2. Tap Modify network in the dialog that opens.
3. Select Show advanced options.
4. If the network has no proxy settings, tap None under Proxy Settings, then tap Manual in the menu
that opens.
5. Enter the proxy settings supplied by your network administrator.
6. Tap Save.
NOTE
Proxy settings are used by the browser but may not be used by other apps.
Page 14

13
Making Connections
VPN
Virtual private networks (VPNs) allow you to connect to the resources inside a secured local network,
from outside that network. VPNs are commonly deployed by corporations, schools, and other
institutions to let people access local network resources when not on campus, or when connected to a
wireless network.
To congure VPN access, you must rst obtain the details from your network administrator. Depending
on your organization’s solution, you may need to obtain a VPN app, either from your administrator or
on Google Play.
The VPN settings screen allows you to add VPN networks and adjust their settings. To view this screen
and perform the tasks described here, go to Settings > Wireless & networks > More > VPN.
Add a VPN
1. From the VPN screen, touch Add VPN prole.
2. In the form that appears, ll in the information provided by your network administrator.
3. Tap Save.
Connect to a VPN
1. From the VPN screen, tap the name of the VPN.
2. In the dialog that opens, enter any requested credentials.
3. Tap Connect.
Tip: When you’re connected to a VPN, a Status icon and notification are displayed continuously. To
disconnect, tap the notication for the VPN connection.
Edit a VPN
1. From the VPN screen, press & hold the name of the VPN prole.
2. In the dialog that opens, tap Edit prole.
3. Edit the VPN settings you want.
4. Tap Save.
Delete a VPN
1. From the VPN screen, press & hold the name of the VPN prole.
2. Press & hold the VPN you want to delete.
3. In the dialog that opens, touch Delete prole.
Page 15

14
Basics
Basics
Read this chapter to learn about the Sero 7 basic features.
Setup Guide
Turning Your Sero 7 On for the First Time
To start, turn on your Sero 7 by pressing and holding Power button for a few seconds. After boot
animation follow the on-screen instructions to set up your Sero 7.
1. Slide up and down to select the language, then tap Start.
2. When prompted, sign in the using email address and password for your Google Account. If you
don’t have one yet, go ahead and create one. For more information about Google Account, see
Google Account on page 25 .
Connect to a Wi-Fi network. Tap a network name to see more details or connect to it, and enter a
password if necessary.
Set up your credit card with Google Wallet, then back up with your Google Account, and restore
from your Google Account.
NOTES
• You can skip connecting progress, and set a Wi-Fi network in Settings later. For more
information, see Wi-Fi on page 11 .
• When you sign in with a Google Account, step 4 ~ 6 will be cancelled.
3. Select whether use Wi-Fi location or not, whether let Google Apps access your location or not.
4. Select your time zone, set current date and time of your Sero 7.
5. Enter owner name.
6. Read the Google services.
7. Sign up the VUDU account.
Basic Operation
Using Apps
You interact with the Sero 7 using your ngers to tap, double tap, press & hold, slide, pinch, and rotate
objects on the touchscreen.
Tap or Double Tap
To select a feature or item, touch your nger quickly to the screen.
Double tap your nger quickly on an item to bring up more details.
Press & Hold
Touch your nger to the screen and hold it there for approximately 2 seconds.
In many situations, pressing and holding will open a menu.
Slide or Drag
Touch your nger to the screen and slide it to another location on the screen.
Press & hold on an object and slide it to another location on the screen.
3
Page 16

15
Basics
Zoom
Place two ngers about an inch apart on the screen. Slide them together to “Zoom
out“.
Slide your ngers apart to “Zoom in“.
Rotate
Place two ngers about an inch apart on the screen. Rotate them in clockwise or
anti-clockwise.
Rearrange Home Screen
From All Apps screen to Home screen: Tap All Apps button open All Apps screen, press & hold
an icon or widget and slowly to drag it to the location of your choice. This makes it much easier to
change your Home screen layout.
Move apps or widgets: Press & hold an icon or widget, slowly to drag it to the screen edge, the
screen will switch.
Delete apps or widgets: Press & hold an icon or widget, when the Remove icon appears at the
top of the screen, drag the icon or widget into it.
Press & hold the wallpaper on your Home screen, choose your wallpaper from Gallery, Live
Wallpapers or Wallpapers.
Organize Your Apps With Folders
Make a new folder on your Home screen: Press & hold an icon, slowly to drag it on top of another
app.
Rename folder: Tap the folder, then tap the name of folder, enter a new name.
Press & hold an icon, slowly to drag it into / out of a folder.
Manage Downloads
To manage most downloads, tap the Downloads icon
on the All Apps screen.
Google Play streams your purchases and rentals from Google servers while you’re playing them. They
don’t occupy any permanent storage space. However, you can pin (download) books, movies, and
other content in order to access it oine.
In addition to downloading content from Google Play, you can download les from Gmail messages or
a variety of other sources. Use the Downloads app to view, reopen, or delete what you’ve downloaded
in this way.
Some mobile networks restrict the size of the les you can download, to manage the demands on their
networks or to help you avoid unexpected charges. When you try to download an oversized-le when
connected to such networks, you may be required to delay downloading until your Sero 7 is connected
to a Wi-Fi network, when the download will resume automatically. You can view and manage these
queued les in the Downloads app as well.
Gmail Email
Unnamed Folder
Page 17

16
Basics
From the Download app:
Tap an item to open it.
Tap headings for earlier downloads to view them.
Check items you want to share. Then tap the Share icon and choose a sharing method from the
list.
Check items you want to delete. Then tap the Trash icon .
At the bottom of the screen, tap Sort by size or Sort by date to switch back and forth.
Tip: Files available in the Download app can also be viewed in the Download directory that’s visible
when your Sero 7 is connected to a computer. You can view and copy les from this directory.
Screen Orientation
You can view many Sero 7 apps in either portrait or landscape orientation. Rotate the Sero 7 and the
screen rotates too, adjusting to t the new orientation.
In Quick Settings, you can slide the rotation switch to turn the Auto-rotation screen mode on or o. Or
go to Settings > System > Accessibility > Auto-rotate screen.
Lock Screen
Unlock Your Sero 7
If you don’t touch the screen for several minutes, the Sero 7 will go into sleep mode, and the screen
will be locked.
To unlock your Sero 7 after waking it from sleep mode, press the lock icon and drag it to the right of
the circle.
Tip: You can set your Sero 7 screen lock in many ways. For more information, see Security on page 22 .
Widgets in Lock Screen
From the lock screen, press the lock icon and drag it to the left of the circle, you will open the
Camera.
Press the lock icon and drag it to the upper of the circle, you will open the Google Now.
Power Control
Tap these icons to quickly turn on / off Wi-Fi and Sync. Repeated tap Brightness icon to adjust the
brightness of the screen.
Typing
You can enter text using the on-screen keyboard. Some apps open it automatically. In others, you open
it by tapping where you want to type.
To change your Sero 7’s keyboard and input methods, go to Settings > Personal > Language & input.
Page 18

17
Basics
Entering Text
Enter text: Tap a text eld to bring up the keyboard, then tap keys on the keyboard. The letter isn’t
entered until you release your nger from the key.
Delete text: Tap to delete selected text or the characters before the cursor.
Type capital letters: Tap the Shift key to switch to capital letters for one letter. Or press & hold
Shift key
while you type. When you release the key, the lowercase letters reappear.
Turn caps lock on: Double tap or press & hold Shift key , so it changes to . Tap Shift key again
to return to lowercase.
Editing Text
Move the insertion point: Tap where you want to type. The cursor blinks in the new position, and a
blue tab appears below it. Drag the tab to move the cursor.
Select text: Press & hold or double tap within the text. The nearest word highlights, with a tab at
each end of the selection. Drag the tabs to change the selection.
Cut, copy, paste: Select the text you want to manipulate. Then tap Cut, Copy or Paste icon:
Type Text by Speaking (Speech-to-Text)
You can use Voice Actions to type text by speaking. This feature uses Google’s speech-recognition
service, so your Sero 7 must be connected to a Wi-Fi network to use it.
You can speak to enter text in most places that you can enter text with the on-screen keyboard.
Tap a text eld, or a location in text you’ve already entered in a text eld.
Tap the Microphone key on the on-screen keyboard.
When you see the microphone image, speak what you want to type. When you pause, what you
spoke is transcribed by the speech-recognition service and entered in the text eld.
Tip: Say “comma”, “period”, “question mark”, “exclamation mark”, or “exclamation point” to enter
punctuation.
NOTE
To improve processing of your Voice Actions, Google may record a few seconds of ambient
background noise in temporary memory at any time. This recording remains on the device only
briey and is not sent to Google.
Tap a suggestion to
type it
Press & hold it to see
Input languages and
keyboard settings
Tap to hide the on-
screen keyboard
Press & hold it to
choose a smiley face
Press & hold it to type
character at upper
right
Edit icon
Page 19

18
Basics
Google Now
Google Now gives you just the right information at just the right time - before you even ask. Just slide
up from the bottom of your Sero 7 to get commute trac before work, popular nearby places, your
favorite team’s current score, and more.
After you opt in to Google Now, you don’t need to do anything else. If you like, you can adjust settings
for dierent types of Now cards as they appear, but Google Now doesn’t need any elaborate setup. The
information you need is always at your ngertips.
To know when to display which cards, Google Now uses contextual data from your Sero 7 and data in
Google products and thirdparty products that you allow Google Now to access.
For example, Google Now uses the time of day, your location, and your location history to show you
what the trac on your commute is like when you wake up in the morning. It also uses information
from Google services such as your Web History for sports or ight status cards, or from your synced
calendar entries for appointment cards.
Turn Google Now On
To open Google Now, you can press & hold the Home button at the bottom of any screen and slide up
to Google Now icon, or tap the Google Search bar at the top of the screen.
Google Now Cards
A Google Now card is a short snippet of useful information that slides into view right when you’re most
likely to need it. After you opt in to Google Now, you can view these cards easily no matter what else
you’re doing.
Use Google Now Cards
Google Now displays cards when they are most likely to be useful and relevant based on the current
time and your current location. To expand that search and get additional ones, you can show sample
cards.
Show/Hide Sample Cards
To see some sample cards, tap Show sample cards at the bottom of Google Now screen, or tap Menu
icon
> Sample cards. When you’re nished and want to get back to the main Google Now screen, tap
Hide sample cards at the bottom of Google Now screen.
Edit individual Card Settings
You can change the settings for each Google Now card.
1. Go to Menu icon
> Settings > Google Now, tap the Google Now card you want to edit, or tap
Settings on the Google Now card you want to edit in the sample cards list.
2. The settings screen appears, which allows you to make changes as well as turn a specic card On or
O. When you turn o a card, it won’t appear when you launch Google Now.
Search, or say Google
Page 20

19
Basics
Dismiss Cards
When you’re nished with a card, just slide it left or right to dismiss it from the Google Now screen.
NOTE
The card appears again when a new update is available.
Adjust Notications
When a card has a new update, you’ll receive a notication at the bottom of your screen. You can tap
the icon in the Notication Tray to open the card or dismiss the notication.
Most notifications for Now cards can be turned off or set to low priority or standard priority. Low
priority notifications appear at the bottom of the notifications shade without any additional signal.
Standard notications appear like the others, in chronological order, and you can set vibration and a
ringtone to accompany them.
To set notications to low priority or standard for an individual card that supports both options:
• When the card appears, tap Menu icon
> Settings on the card.
• From the lower right corner of the Google Now screen, tap Menu icon
> Settings > Google Now
> [card name] > Notications.
To change ringtone and vibrate options for all standard notifications, start from the Google
Now screen, tap Menu icon
> Settings > Google Now, and adjust the options under Standard
Notications.
Search
A Google Now card is a short snippet of useful information that slides into view right when you’re most
likely to need it.
Search by Typing
Type your query in the search box on the Google Now card, or in Google Chrome’s omnibox. For more
information, see Typing on page 16 .
As you type, suggestions appear below the Search box. The rst few suggestions attempt to complete
what you’re typing:
To search for a suggestion immediately, tap it.
To search for the contents of the search eld, tap the Search icon on the right side of the on-
screen keyboard.
Voice Search
You can use Voice Actions with Google Search to get directions, send messages, and perform a number
of other common tasks. For more information, see Voice Search & Voice Actions on page 20 .
Search Tips & Tricks
You can search and control your Sero 7 with the following Search tips & tricks.
What you want What to type or say Examples
Sports information [team’s name] San Francisco Giants
Pictures Pictures of [topic]
Images of [topic]
Pictures of San Francisco
Images of cats
Convert measurements [original measurement] in [new
measurement]
30 degrees Celsius in Fahrenheit
Search, or say Google
Page 21

20
Basics
What you want What to type or say Examples
Movie showtimes Movie
Movie [location]
[movie name]
Movie
Movie Chicago
The Horse’s Mouth
Word denition Dene [word] Dene campanile
Weather forecast Weather
Weather [location]
Weather
Weather Detroit
Identify an area code Area code [###] Area code 215
Identify zip code Zip code [#####] Zip code 46202
Time Time
Time [location]
Time
Time in London
Flight information [Airline] [ight number] American airlines ight
390
Translation Translate to [language] [phrase] Translate to Spanish, Where is the
Palace Hotel?’
Calculator [A math phrase] 75 divided by 6
Food [ Type of food]
[Type of food] in [location]
Mexican food
Mexican food in Urbana, Illinois
Tablet Search
The Tablet search settings let you select which apps on your Sero 7 are included in Google searches.
Privacy & Accounts
These settings control the account for use with Google Search and search-related privacy options for
that account. You can view Privacy and accounts in two ways:
From the Google Search screen, go to Menu icon > Settings > Privacy & accounts.
From the Home screen, go to Settings > Accounts > Google > Privacy > Search.
Tap each setting to learn more:
Manage location history - Sign in as your Google Account on Maps and open location settings to
manage history and reporting.
Location service - Set the location access options.
Tip: This doesn’t aect the settings for Google’s location service. To turn those settings o or on, go
to Settings > Personal > Location services.
Show recent searches - Show web history suggestions from your account.
Manage Web History - Open your Web History settings in a browser. You may have to sign in to
reach them.
Legal - View the legal terms.
Voice Search & Voice Actions
You can use Voice Actions with Google Search to get directions, send messages, and perform a number
of other common tasks. You can also use Voice Actions to type text by speaking.
Turn Voice Search or Voice Action On
You can initiate a Voice Search or Voice Action in several ways:
Tap the Microphone icon in the Google Chrome omnibox.
Tap the Microphone icon on the Home screen or Google Now screen and speak.
Tap the search bar on the Home screen and say “Google”.
Page 22

21
Basics
When you’re viewing the Google Now screen, you don’t have to touch anything. Just say “Google.”
NOTE
To detect when you say “Google” to launch Voice Search or Voice Actions, Google analyzes
sound picked up by your Sero 7’s microphone in intervals of a few seconds or less. The sound is
immediately discarded after analysis and is not stored on the device or sent to Google servers.
Using Voice Actions
Speak the Voice Action you want to use. Here are some typical examples:
“Set alarm for 8:30 a.m.”
“Send email to Marcus Foster. Subject: Coming tonight? Message: Hope to see you later.”
“Navigate to Mike’s bikes in Palo Alto.”
As you speak, Voice Search analyzes your speech and initiates the action.
If Voice Search doesn’t understand you, it lists a set of possible meanings. Just tap the one you want.
Some Voice Actions, such as “send email” and “note to self,” open a panel that prompts you to complete
the action by speaking or typing more information.
Tap any text already entered in the panel to add or edit the text by typing.
To speak text instead of typing, rst tap the Microphone key
near the bottom left of the on-screen
keyboard.
Tap underlined words or phrases or drag across multiple words to view a list of alternate
transcriptions, or to edit by speaking or typing.
When condent that the transcription is accurate, Voice Search displays transcribed words as regular
text. Words or phrases for which it has provided alternate transcriptions are underlined.
Tap a button at the bottom of the window to add any optional elds (you can also speak the name
and content of any of these elds in your original voice action).
When you’re done, tap the button appropriate to complete the action, such as Send.
Voice Actions Commands
You can search and control your Sero 7 with the following Voice Action commands.
Say Followed by Examples
Words you want to search for “bike shoes”
“Map of” Address, name, business name,
type of business, or other
location
“Map of Golden Gate Park, San
Francisco.”
“Directions to” or “Navigate to” Address, name, business name,
type of business, or other
destination
“Directions to 1299 Colusa Avenue,
Berkeley, California” or “Navigate to
Union Square, San Francisco.”
Contact name “Mike LeBeau” (opens Mike’s contact
card)
“Go to” Search string or URL “Go to Google.com”
“Send SMS” or “Send Text” “To” & contact names, “Message”
& message text (speak
punctuation)
“Send text to Hugh Briss, message, I
can’t wait to show you my new shoes,
period”
“Send email” One or more of:
“To” & contact names, “Cc” &
contact names, “Bcc” & contact
names, “Subject” & subject text
“Message” & message text (speak
punctuation)
“Send email to Hugh Briss, subject,
new shoes, message, I can’t wait to
show you my new shoes, period.”
“Note to self” Message text “Note to self: remember the milk”
Page 23

22
Basics
Say Followed by Examples
“Set alarm” “Time” or “for” & time, such as
“10:45 a.m.”
or “20 minutes from now,” “Label”
& name of alarm
“Set alarm for 7:45 p.m., label, switch
the laundry”
“Listen to” Words to search YouTube for,
such as the name of a song,
artist, or album.
“Listen to: Smells Like Teen Spirit”
Speech Settings
Speech settings control dierent aspects of speech input and output when you search by voice or use
voice actions:
Go to Settings > Personal > Language & input > Speech > Voice Search.
Language - The language you select here for Voice Search input and output can be dierent from
the language displayed by your Sero 7.
Speech output - To turn on speech output only when you’ve got a headset attached to your Sero 7,
select Hands-free only.
Block oensive words - Check to ensure that search results with oensive language is blocked.
Hotword detection - When this is checked, you can say “Google” when viewing the Google Now
screen rather than tapping the Microphone icon
to initiate a voice search or action.
Download oine speech recognition - Check to select one or more additional languages for speech
recognition when you don’t have a network connection.
Go to Settings > Personal > Language & input > Speech > Text-to speech output.
Preferred engine - You can select the preferred text-to-speech engine if you installed other engines.
Tap settings icon
, you can set the language-specic voice, view source licenses, or install the
voice data.
Speech rate - You can adjust the speed at which the text is spoken.
Listen to an example - Play a short demonstration of speech synthesis.
Sharing
The Sero 7 gives you lots of ways to share with other people.
In many apps, tap Share or Share icon
and choose a sharing method from the list for sharing. The
options vary depending on the app you’re using.
Security
Set Screen Lock
You can set an automatic screen lock to prevent unauthorized access.
NOTE
If your Sero 7’s playing music when the screen locks, you can continue listening or pause the
selection without unlocking.
To adjust your lock settings:
1. Go to Settings > Personal > Security > Screen Security > Screen lock.
2. Tap the type of lock you want and follow the on-screen instructions. If you have previously set a
lock, you must enter the pattern, PIN, or password to unlock the lock settings. You can choose lock
options, in order of strength:
Page 24

23
Basics
Slide - The slide provides no protection, but lets you get to the Home screen quickly, or open the
Camera and take pictures immediately.
Face Unlock - Lets you unlock your Sero 7 by using facial recognition. This is the least secure lock
option.
Tip: After you set Face Unlock up, look under Settings > Personal > Security > Screen Security for
two additional settings: Improve face matching and Liveness check. Use these to make Face
Unlock more reliable and secure.
Pattern - Lets you draw a simple pattern with your nger on the screen to unlock your Sero 7.
This is slightly more secure than Face Unlock.
PIN - Requires four or more numbers. Longer PINs tend to be more secure to unlock.
Password - Requires four or more letters or numbers. This is the most secure option, as long as
you create a strong password.
Tips: For best security, specify a password that is
• A least 8 characters long.
• Contains a mixture of numbers, letters, and special symbols.
• Doesn’t contain any recognizable words or phrases.
Settings
Settings lets you congure the Sero 7, set app options, add accounts, and change other preferences.
See other chapters for information about settings for the built-in apps. For example, for Wi-Fi settings,
see Wi-Fi on page 11 .
Device
Sound
You can set your Sero 7 to play a sound whenever you get a new message, email, alert, or reminder.
You can also set sounds for pressing icons and locking your Sero 7.
Display
You can adjust the brightness of the display or the screen timeout. You can set the wallpaper, or the
font size. And you can also set what appears on screen when sleep mode is on.
HDMI
When the Sero 7 is connected to external device’s HDMI port, you can adjust the HDMI resolution,
screen zoom and screen timeout.
ScreenshotSetting
You can select delay time to capture the screen. You can also set the location of screenshot storage.
Storage
You aect the way apps use internal storage directly and indirectly in many ways - for example, by:
Installing or uninstalling apps.
Downloading les in Chrome, Gmail, and other apps.
Creating les (for example, by taking pictures).
Deleting downloaded les or les you created.
Copying les between Sero 7 and a computer via USB.
You rarely need to manage the way apps use RAM. But you can monitor apps’ RAM usage and stop
them if they misbehave.
Page 25

24
Basics
Apps
You’ll see four tabs at the top of the screen, each displaying a list of apps or their components:
Downloaded - Displays apps you’ve downloaded on Google Play or other sources.
On SD card - Displays apps you’ve installed on SD card.
Running - Displays all apps, processes, and services that are currently running or that have cached
processes, and how much RAM they are using.
All - Displays all apps that came with the Sero 7 and all apps you downloaded from Google Play or
other sources.
To switch the order of the lists displayed in the Downloaded or All tabs, tap Menu icon
> Sort by
name or Sort by size.
To view details about an app or other item listed under any tab, tap its name. The information and
controls available vary among dierent types of apps, but commonly include:
Force stop button - Stops an app that is misbehaving. Stopping an app, process, or service may
cause your Sero 7 to stop working correctly. You may need to restart Sero 7 after doing this.
Uninstall button - Deletes the app and all of its data and settings.
Disable button - Prevents the app from running, but does not uninstall it. This option is available for
some apps and services that can’t be uninstalled.
Move to SD card / Move to tablet button - Moves the app and all of its data and settings to SD card /
tablet.
Clear data button - Delete an app’s settings and other data without removing the app itself.
Clear cache - If the app stores data in a temporary area of the Sero 7’s memory, lists how much
information is stored, and includes a button for clearing it.
Launch by default - If you have congured an app to launch certain le types by default, you can
clear that setting here.
Permissions - Lists the kinds of information about your Sero 7 and data the app has access to.
Personal
Backup & Reset
You can back up app data, Wi-Fi passwords, and other settings to Google servers. You can also restore
the Sero 7’s conguration to factory settings.
System
Date & Time
You can set time zone, date, time and date format. If Sero 7 connected with a Wi-Fi, you can also select
use network-provided time.
About Tablet
You can view the version information, the status of battery, network, and other information.
You can also update the software version via the network. There are two ways to access the update
screen:
If the latest version is checked by system, a notification will appear in the Status Bar. Open the
Notication Tray and tap the notication.
If you dismiss the update notication, go to Settings > System > About tablet > System updates.
Page 26

25
Basics
Google Account
Why Use a Google Account?
A Google Account lets you organize and access your personal information from any computer or
mobile device:
Google Play - Google Play brings together all your favorite content in one place: movies, books,
music, magazines, apps, and more. When you sign in with your Google Account, you can reach any
of this content from any of your devices – as long as you have a network connection. You can also
shop for more in the Google Play Store.
Synchronize and back up everything - Whether you draft an email, add an event to your calendar,
or add a friend’s address, your work gets backed up continuously by Google and synchronized with
any computer where you use the same Google Account.
Access from anywhere - Check your latest calendar, email, text messages, or social stream, no matter
what computer or mobile device you’re using.
Keep your stu secure and available - Google works round the clock to protect your personal data
from unauthorized access and to ensure that you get it when you need it, wherever you need it.
Simplify shopping - You can connect your Google account with Google Wallet, which makes it easy
to purchase music, books, apps, and more on Google Play and other online stores.
Other Google services - Your Google Account also lets you take full advantage of any other Google
apps and services that you may want to use, such as Gmail, Google Maps, Navigation, Google Play,
YouTube, Google Talk, Messenger, and many more.
Add an Account
You can use multiple Google Accounts and Microsoft Exchange ActiveSync accounts on your Sero 7.
You may also be able to add other kinds of accounts, depending on your apps. To add some accounts,
you may need to obtain details from your system administrator about the service to which the account
connects. For example, you may need to know the account’s domain or server address.
1. Go to Settings > Accounts > Add account.
2. Tap the kind of account to add.
3. Follow the on-screen instructions.
4. Most accounts require a username and password, but the details depend on the kind of account
and the conguration of the service you’re connecting to.
When you’re nished, the account is added in one of two places:
Google Accounts show up under Settings > Accounts > Google.
Other accounts show up under Settings > Accounts on the main Settings screen.
Remove an Account
You can remove any account and all information associated with it from your Sero 7, including email,
contacts, settings, and so on.
To remove a Google account, go to Settings > Accounts > Google > [account-name] > Menu icon
> Remove account.
For any other type of account, go to Settings > Accounts > [account - type] > [account - name] and
look for the Remove option.
Page 27

26
Basics
Syncing
Congure Sync Options
You can congure synchronization options for any of your apps. You can also decide what kinds of data
to synchronize for each account.
For some accounts, syncing is two-way; changes that you make to the information on your Sero 7 are
made to the copy of that information on the web. Your Google Account works this way. Other accounts
support only one-way sync: the information on your mobile device is read-only.
Congure Auto-sync for All Apps
To control Auto-sync for all apps that use it, tap sync icon
at Power control to turn it on / o.
If you turn off Auto-sync, you need to sync manually to collect messages, email, and other recent
information, and won’t receive notications when updates occur. For example, changes that you make
in your People app are automatically made to your Google contacts on the web.
NOTE
Leaving Auto-sync off can help extend your battery life, but will prevent you from receiving
notications when updates occur.
Congure Google Account Sync Settings
To adjust a single Google Account’s sync settings:
1. Go to Settings > Personal > Accounts > Google.
indicates that none of an account’s information is congured to sync automatically.
indicates that some or all of an account’s information is congured to sync automatically.
2. Tap the account whose sync settings you want to change.
3. The Sync Settings screen opens, displaying a list of the kinds of information the account can sync.
4. Tap items as needed.
Unchecking an option does not remove the information from your Sero 7; it simply stops it from being
kept in sync with the version on the web.
Sync a Google Account Manually
1. Go to Settings > Accounts > Google.
2. Tap the account whose data you want to sync.
3. Tap Menu icon
> Sync now.
Tip: None of an account’s information is congured to sync automatically.
Page 28

27
Featured Apps
Featured Apps
Introducing the featured apps of Sero 7.
Walmart
The Walmart app helps you find and buy quality products at unbeatable prices whether you’re at
home, in their stores or anywhere in between. You’ll also be able to stay up-to-date on app-only
exclusive shopping events.
Home Page
Title Function
Search bar Search products in Walmart.
Scanner Scan barcodes and QR codes for additional information.
Shop by Dept Browse, search and buy Walmart.com products by departments.
Cart View the list of products in cart.
Rollbacks View Rollbacks.
Local Ad Browse your store’s Local Ad.
Find a store Locate the nearest Walmart store.
Pharmacy Browse $4 prescriptions and order refills.
Menu
Tap the logo
from any screen to display menu options.
Title Function
Home Return to the Home page.
Shop Browse, search and buy Walmart.com products by departments.
Track Order Track your orders.
Stores Locate the nearest Walmart store.
Local Ad Interactive Local Ad. Page through an ad and tap items to learn more.
More Open more menu.
Photo View, share and print your online photos.
Feedback Send your feedback.
Change Your Store Change the locations of nearest Walmart store.
Terms of Use Read the terms of use.
Privacy Policy Read the privacy policy.
Go to Walmart.com Browse Walmart website.
Sign In
Sign Out
Sign in or out your Walmart account.
Allow Notifications Push notifications.
Sam’s Club
The must-have app for every Sam’s Club Member. Whether you’re on a road trip and need to nd your
nearest Club or at home planning a weekend shopping trip, you can do it all with your Sam’s Club app.
Use it as a member - Sign in your account.
Use it not as a member - Choose your membership and ll your account info.
4
Page 29

28
Featured Apps
Home Page
You can browse the products, view your messages, access the instant savings, use scanner and search
tool from Home page.
Tips: These options can be found in menu.
You can also tap Cart icon
from Home page to make purchases, view prices, edit cart or simply
browse-all shipping list.
Menu
Tap the icon
from any screen to display menu options.
Title Function
Home Return to the Home page.
Search Search products in Sam’s Club.
Shop by Category Browse, search and buy SamsClub.com products by Category.
Club locator
Locate and get driving directions to any Sam’s Club – narrow the selection by
services, including: Photo, Gas, Tire and Battery and more.
Instant Savings
Check your account to see your available Instant Savings and view your
Instant Savings while you shop.
Lists Create new shopping lists, edit existing lists and add to cart.
Scanner Get in-depth product details by using the built-in barcode scanner.
Pharmacy Refills
Refill your prescriptions in a flash with your app. Simply choose the pick up
club time/location, enter your prescription number and your done.
Photo Center
Upload photos from your Sero 7 and have prints made at any Sam’s Club
Photo Center.
Recipes Browse through all simply delicious meals in Sam’s Club.
Membership Renew your account info, view your order history, or track your orders.
Settings Adjust the Sam’s Club app settings, for example – push notifications.
Messages
Get updates and alerts about your Membership, Instant Savings, featured
products, local Club events and more.
VUDU
Instantly watch thousands of movies & TV episodes streaming over the Internet from VUDU.
Home Page
Title Function
New The latest movies.
Top Picks Mostly picked up movies.
New Rentals Latest rented movies.
New Trailers Latest trailers.
Coming Soon The movies can be picked soon.
Browse Browse all the movies & TV in VUDU, you can also filter the movies by type, sort and genre.
Collections Collection is a curated selection of movies and TV shows that share an attribute like,
genre, director, theme, etc. You can find similar content to what you already enjoy.
Showcases Collection that are being showcase.
Most Watched Mostly watched movies.
TV Networks Browse the TV networks.
Recommended Movies recommended.
Page 30

29
Featured Apps
Title Function
My VUDU You can browse the movies and TV that you have bought or rented, you can also view
your wishlist.
Search
Search movies in VUDU.
Subpage
Tap the logo
from any subpage to return to Home page.
Title Function
Overview The overview of current movie.
Cast & Crew The cast and crew of current movies and find their related movies.
Reviews The reviews of current movie.
Similar The similar types of movies.
More Info The detail information of current movie.
Rent From To rent current movie.
Own From To buy current movie.
2 Minute Preview To preview current movie for 2 minutes.
+ Wishlist Add current movie to your Wishlist.
Control Bar
You can tap the screen to hide/show the control bar when playing.
Standard
Denition
Play/Pause
Data speed Progress Bar
Page 31

30
Apps
Apps
Introducing the common Apps of Sero 7.
Gallery
Gallery is used to view pictures and play videos that you’ve taken, downloaded, or copied. You can
perform basic editing tasks on pictures and set them as your wallpaper or contact photo. You can also
share your pictures and videos with friends.
Tip: You can view pictures in a Picasa web album.
Turn Gallery On
Tap the Gallery icon on the All Apps screen or the Home screen.
If the Screenshots icon shows up in the Status Bar, open the Notication Tray and tap it.
Tip: If you have a Picasa account associated with a Google Account that you’ve added to your Sero 7,
and have congured it to sync with Picasa, Gallery also shows your Picasa web albums.
NOTE
If you have many pictures or videos on your microSD card in storage, or in Picasa, it may take
Gallery a few minutes to discover and organize them.
Viewing Albums
From Gallery’s main screen, you can:
Tap more icon to display the pictures and videos in the album by group, such as locations.
Tap Camera icon to open it.
Select album: Press & hold the le, or you can tap Menu icon > select album.
After selected, you can tap the Share icon and choose a sharing method from the list. You can tap
the Trash icon
to delete. You can also tap Menu icon to view the details when one le selected.
Make available oine: Go to Menu icon > Make available oine, then tap the les you want to
choose. This
icon at the lower-right corner of le means you can oine view the content in this
le.
Working With Albums
Tap the album whose contents you want to view. Albums open displaying the pictures and videos
ordered grid. The name of the album is shown at the top of the screen.
Tap the Slideshow icon to play the pictures. When playing, tap the picture to back grid view.
Tap Menu icon > Select item and select the items. You can share or delete or edit the selected
picture. You can also set the selected picture as wallpaper or contact photo. You can view the details
of picture.
Working With Pictures
Open a Gallery album and tap a picture.
You can zoom in a picture by double tapping it or zooming in with your ngers.
Tip: You can tap the picture to hide/show the controls bar.
Tap the arrow beside the Gallery icon at the upper-left corner to back to Album.
Tap the Share icon and choose a sharing method from the list to share the picture.
Tap Menu icon > Slideshow to play the pictures. You can delete or edit the picture. You can also set
the selected picture as wallpaper or contact photo. You can view the details of picture.
5
Page 32

31
Apps
Tap Menu icon > Edit show all the editing tools summarized in the table:
Icon Mode Description
Contrast Increase or decrease the contrast to adjust the white and areas of the image.
Special Eects Apply artistic lters, including Lomo, Vignette, Film Grain, and many more.
Colors Adjust the color in the image.
Geometry Straighten, crop, rotate, or ip the image.
Working With Videos
Open a Gallery album and tap a video.
The video plays, with the orientation (portrait or landscape) you shot it in.
Tap the arrow beside the Gallery icon at the upper-left corner to back to Album.
Tap the video to view the playback controls.
Tap the Share icon and choose a sharing method from the list to share the video.
You can tap the Trash icon to delete the video. You can also view the details of video.
Camera
Turn the Camera On
You have many ways to turn the camera on:
From lock screen, press the lock icon and drag it to the left of the circle.
From Home screen, tap All Apps button > Camera.
In many apps, tap camera or take a photo can turn the camera on, such as Gallery.
Camera Mode
Tap the icon to switch camera mode from Video recording
, Camera .
Using the Camera
In Camera mode, you can adjust focal distance. Then tap the Shoot icon to take a photo.
In Video recording mode, tap the Record icon to record. Then tap the Stop icon to stop
recording.
Tip: You can view the photos and video recordings in Gallery > Camera.
Tap to take a photo
Settings
Adjust focal distance
Camera / Video
recording mode
Page 33

32
Apps
Camera Settings
Tap the Settings icon
to open camera menu:
Tap the White Balance icon to select the White Balance mode from cloudy, daylight, auto,
uorescent and incandescent.
Tap SCN to select the Scene mode.
Tap the Time lapse interval icon to select the timer.
Play Music
When you’re online, you can play the music you added to Music by Google Play. Your Google Play
music library is accessible from any computer and up to ten mobile devices. If you’ve disabled autosync on the Sero 7, you’ll need to either manually sync or enable auto-sync for your Google Play music
library to appear.
NOTE
Music from your Google Play music library cannot be played simultaneously on more than one
device. If you’re currently playing music, you’ll need to stop playback in order to play your music
on another device.
When you’re oine, only some of your music is available.
Tip: You can listen to music by using the Sero 7’s built-in speakers, through a headphone, or other
device that supports the wireless streaming prole.
Tap the Play Music icon on the All Apps screen or tap a shortcut icon on the Home screen.
You’ll be prompted to select the account whose online music library you want to access from the Play
Music app. If you don’t select an account, music you’ve copied directly to the tablet from a computer
will only work.
Play a Song
Tap a song in your library to play.
While viewing playlists, recent, artists, albums, songs, or genres, tap an album to open it or tap a
song to play.
The Now Playing screen opens and the song you tapped, rst song in the album, or other list starts to
play. The tracks in the current list play in order until you reach the end of the list (unless you choose a
repeat option). Otherwise, playback stops only if you stop it, even when you switch applications.
You can return to the Now Playing screen from other Music screens by tapping the name of the
current song in the Now Playing bar.
Play Song in Random
You can play the songs a current album, playlist, or other list in random: Music plays the songs in the
list in random order, until you turn shue o.
When viewing a list of songs in an album, playlist, or other list, tap Menu icon > Shue all.
Tap the Shue icon in the lower-left corner of Now Playing screen. If you’d like to turn shue
o, tap it again.
Delete a Song
Tap the
icon to the right of a playlist, song or genre, and tap Delete.
Create and Manage Playlists
Follow the instructions below to create or add a song to a playlist:
Page 34

33
Apps
1. Tap the icon to the right of an album, artist, song or genre, and tap Add to playlist. You can also
add the currently playing song from the Now Playing screen by tapping the list icon
to the right
of the song title and tapping the
icon > Add to playlist.
2. Tap the name of the playlist to add the song to it. Or tap New playlist to create a playlist.
Rearrange songs in a playlist - Open a playlist and press icon on the left of song’s name, then drag
it into the order you want.
Remove songs from a playlist - Open a playlist and tap the icon to the right of the song you want
to remove, then tap Remove from playlist.
NOTE
You haven’t deleted this song from Sero 7 or other playlists. You removed it only from the
playlist you’re working with.
Navigating Music
You can navigate away from the Now Playing screen by tapping the Music icon in the top left-
hand corner of the screen.
If you navigate away from the Now Playing screen, a bar appears at the bottom of the Music screen,
which you can use to control playback.
You can return to the Now Playing screen from any other application by tapping the song title in
Notication Tray. Press and slide down the song title to stretch it, you can also pause and resume
playback and skip to the next or previous song in Notication Tray.
If the screen is locked when music is playing, you can pause, resume playback, and skip to the next
or previous song from the lock screen.
Play Books
Google Play stores your library in the digital cloud, which means you get to shop for all of your favorite
books wherever you want, and read them wherever you go, using Sero 7 with an Internet connection.
Whenever you open one of your books, you’ll pick up right where you left off (as long as you are
connected to the Internet).
Your Books
If you are new to using the Play Books app, you’ll nd three free books in your library to help you get
started.
To add more books to your library, tap the shop icon
to browse a selection of books on Google
Play or tap the search icon
to search by book title or author name. If a book in your library does not
appear on Sero 7, tap Menu icon
> Refresh to update the display.
Reading a Book on Google Play
To resume reading a book, simply tap on the cover.
To turn the page, tap the right side of the screen or slide from right to left. (To turn back, tap the left
side or slide the other way.)
Tap the center of the screen to show/hide controls bar.
In the bottom of controls bar, you can use a slider to see what page you’re on or to move around
the book. Or, you can tap the
icon > [Chapter Name] to move quickly to other parts of the book.
NOTE
If you are reading a free sample, the chapters that are not available as part of the free
sample are grayed out.
Back to library: Tap the Google Play Books icon in the top-left corner of your book to go back to
your library.
Page 35

34
Apps
Flowing Text & Original Pages
Books are available in two viewing modes. In Flowing text mode, the text of the book is wrapped
according to Sero 7’s screen size, which allows you to read most books clearly even on a screen that is
smaller than the original physical book. In original pages mode, the original scanned image of the book
is displayed, which is useful when viewing on a larger screen, or when the contents of the book do not
render well in Flowing text mode.
To change the viewing mode, tap Menu icon
and tap the Flowing text or Original pages. For some
titles, only one of these two modes may be available.
Book Settings and Features
Display - To change the way your books are displayed, tap the icon in the top-right corner of
controls bar when reading.
There, you can adjust the themes, typeface, text alignment, brightness, line height, and font size.
NOTE
Many of these settings only apply when you are viewing the Flowing text mode of a book.
Search - Tap the Search icon in the top-right corner of controls bar to search for a word or phrase
in the book you’re reading. If you’ve made a book for oine reading, you’ll be able to use inbook
search even when oine.
NOTE
This feature works only for books in Flowing text.
Make available oine - To ensure that your book will remain available for oine reading, tap the
Menu icon
> Make available oine.
Bookmarks - To add a bookmark in your book, tap the top-right corner of the screen you wish to
bookmark. A red bookmark icon
will appear. You can also tap the Menu icon > Add bookmark in
the controls bar.
To remove a bookmark, simply tap on it. You can also tap the Menu icon
> Remove bookmark in
the controls bar.
To review all of the bookmarks you’ve placed in a book, tap the
icon > Bookmarks to display all
of the pages you’ve bookmarked. Tap on a displayed result to be taken to that page.
Settings - Tap Menu icon > Settings to open Settings menu. This menu gives you more options for
your Google Play Books app.
• Auto-rotate screen allows you to choose between using your current system setting, or locking the
app into portrait or landscape mode.
• Uncheck Automatically read aloud if your books automatically read aloud whenever opened and
you did not specify this, which is often caused by other screen-reader apps.
• Check Use volume keys to turn pages to enable this feature.
• Uncheck Use 3D eect for page turning to disable the 3D page turning animation.
Audio/Video content - For books containing audio or video content, the Google Play Books app
allows you to play this content. Simply tap the play icon
to start playback.
NOTES
• The audio/video content is streaming only in the app, meaning that you won’t be able to
play the content when the Sero 7 is oine; you’ll need to be connected to a network.
• When you make a book available for offline reading, the app does not download the
audio/video content, so your download le size will not increase due to this content.
Selecting text - To select a word, press & hold on that word in your book, and the word will turn
blue, with blue handles on either side. To adjust selected text, move the blue handles.
NOTE
This feature works only for books in Flowing text.
Highlighting and taking notes.
• To highlight a word or phrase in your book - Select that text, then tap that
icon to show the
color options and select the highlight color you’d like.
Page 36

35
Apps
• To remove a highlight you’ve made - Tap on the highlight and tap the icon.
• To add a note to text in your book - Select the text and tap the
icon, enter your note, then tap
the
icon to go back. Your annotated text will appear highlighted in the color last used, with a
note icon on the far right side of the page.
• To edit the note you created - Tap the note icon
to bring up the editable text eld again.
• To remove a note and highlight - Tap on the highlight and tap the
icon. To only remove a note,
but keep the highlight, delete all of the text within the note.
• To review all the highlights you’ve made or notes you’ve taken in a book - Tap the
icon > Notes.
There you’ll see all of your highlights and notes, with the page number they occur on, tap on a
highlight or note to be taken to that page.
NOTE
This feature works only for books in Flowing text.
Translate - To translate a word or phrase in your book: Select the text, then tap the Translate icon .
The Translate card appears, in which you can choose which languages to translate to and from, and
the “to” language will be remembered for your next translation request.
NOTE
This feature works only for books in Flowing text.
Info Cards - This feature is only available for books in Flowing text mode, and right now only
available when you have network connection. When you select a word or phrase in your book, one
or more info cards may appear at the bottom of your screen. Tap to see just the top card, or slide up
to see all of them.
Managing Your Books
Getting books - Books that you read are automatically added to your library and downloaded to the
Sero 7. If the Sero 7 runs low on space, the local copies of books that you have not read recently
may be removed to free up space. As long as you have a network connection, however, these books
are still available to read, since they are still available in your library.
Oine reading - Books that are available for oine reading, are marked by a blue dot . In your
library’s carousel mode, the blue dot
appears on the bottom right corner of the book cover. In list
mode, the
icon appears next to the book.
If you plan to be without a network connection, then you can guarantee that a book will be
available oine by pinning it. If you are in carousel mode, tap Menu icon
> Make available oine.
You’ll be taken to the library’s list mode. If you’re already in list mode, tap on the
icon next to the
cover of the book you want to keep available oine. Once the book is nished downloading, the
icon should be showed up.
Removing books - Press & hold the book cover in your library and tap Remove from my library to
remove a book.
Play Movies & TV
With Google Play you can rent or buy movies, TV episodes or complete seasons, then bring your
content with you wherever you go.
On your Sero 7, you can use the Play Movies & TV app to stream your video on Wi-Fi, or download for
oine viewing without an Internet connection.
Movies - Under the Movies tab you’ll see sections for My Rentals and My Movies, which display all
of your recent movie rentals as well as your purchased movies. For each movie you’ll nd the poster
art, title of the movie and the year it was released, its download status, as well as the expiration
period for rentals.
At the bottom of the screen are suggested movies. Tapping any of them will take you directly to the
Google Play Store.
Page 37

36
Apps
TV Shows - Under the TV Shows tab you’ll see sections for the shows you’ve purchased, as well as
suggested shows that may be of interest.
Personal Videos - This section will display the videos you create using the camera on Sero 7, as well
as any videos that you copy over to your tablet via a Micro-USB cable.
Searching for movies & TV shows - You can search for movies and TV shows by typing your query
into the Search bar in the Google Play Store on the tablet.
Spotlight and featured movies - If you aren’t looking for anything in particular, you can ip through
the featured section, top selling movies, new movie releases, top TV shows, and TV new episodes.
Stream on Your Sero 7
You can stream your videos over Wi-Fi. If you’re in the Google Play Store, go to the information page of
any of your rentals or purchases and press Play icon
to begin your video.
From the Play Movies & TV app just select the movie or TV show you want to watch and press the Play
icon
at the top of the page.
When streaming a video from your Sero 7, the bitrate may adjust automatically, to allow for smoother
playback, even if your internet connection slows down a bit.
Tip: If you want to ensure the highest quality playback, we recommend downloading your video for
oine use.
Basic Controls
Show/hide - Tap the screen to show/hide controls bar at the bottom of the player when playing.
Play/pause - To pause the video, simply tap anywhere in the video player. To resume, tap again.
Seek - Tap the progress bar to seek to the desired point in your movie.
Download for Oine Viewing
You can download your movie or TV show onto your Sero 7 from the Google Play Movies app and
watch it without an Internet connection.
1. Find the video you want to download under either the Movies or TV Shows section of the Google
Play Movies & TV app.
2. Tap the
icon at the bottom-right corner of the video, and your download will begin automatically.
3. As your video downloads, you’ll see the progress percentage next to the
icon. To remove a
download, or stop a download in progress, tap the
icon again and press Remove.
NOTE
Purchased movies and TV shows can be downloaded on ve devices at a time. Movie rentals
can only be downloaded to one device at a time, and when downloaded, streaming of the
movie rental will be disabled on your computer and any other devices. Removing the
download of the movie rental will re-enable it for streaming or for downloading onto
additional devices.
Remove Video
You can remove movies or TV shows to prevent them from displaying on a particular device, without
aecting your rental period or permanently removing purchased items from your video library.
Press & hold on the selected video, then tap Remove from this device to delete the video.
Page 38

37
Apps
Gmail
When you set up your Sero 7 with a Gmail account, the Gmail app is ready to go. If you haven’t set up
a Gmail account yet, or to set up another Gmail account, add accounts in Settings > Accounts > Add
account. For more information, see Google Account on page 25 .
Your messages are stored on Google servers, but you can read, write, and organize messages with the
Gmail app on your Sero 7.
Open and Read Email
Use the Gmail app to read and write email from your Sero 7. To open it, tap the Gmail icon on a
Home screen or All Apps screen.
Open Gmail & Your Inbox
Open your Inbox - When Gmail is running, tap the Gmail icon at the top left of the screen until
you return to your Inbox.
Switch accounts - If you have more than one account, you can switch accounts:
1. From your Inbox, tap the current account at the top left of the screen.
2. Tap the account that contains the email you want to read. The account’s Inbox opens.
Search your mail - From the Inbox or any other list view, tap the Search icon and type the terms
you want to search for. Then tap the Search icon on the keyboard to display search results.
Archived and sent items are included in the results.
Read Your Messages
When you receive a new message, the Gmail icon
appears on your Status Bar - unless you’ve turned
off notifications for the Gmail account. If you’re using Priority Inbox as your default inbox, you only
receive notications for important messages.
When viewing a list of conversations, tap one to read the messages it contains.
To open a list of ways to quickly contact the sender, tap the photo or icon beside the sender’s name.
When reading messages in a conversation, use icons at the top of the screen to archive , delete
, label , or mark the conversation as unread . You can also tap the Menu icon to use the
Mark important, Mute, Report spam, or Report phishing commands.
These icons on conversations list or at the conversation indicate:
Icon Description
The messages is sent directly to you.
The messages is sent to you as copies.
The important messages is sent directly to you.
The important messages is sent to you as copies.
The important messages is sent to part of a group.
The message has an attachment.
The sender is currently available via Google Talk.
Archive and delete: When you archive a conversation, it’s still available via Gmail Search, any labels
you’ve associated with it, or along with all your other stored email under the All Mail label. When
you delete a conversation, it’s moved under the Trash label, where it will be deleted automatically
after approximately 30 days.
Tip: To permanently delete a conversation from the Trash label, you must use the Gmail web.
Reread messages in a conversation: To see the sender and rst line of previously read messages in
the conversation, tap Previously read messages just above the blue bar.
To expand one of the previously read messages, tap it.
Page 39

38
Apps
Working With Attachments
When a message has an attachment, Gmail displays information about that attachment at the top of
the message.
Depending on the kind of attachment, the applications you have installed, and your settings, Gmail
may also display a thumbnail image and one or more of the buttons to preview, view or play, view the
information, or save the attachment.
NOTE
Downloaded items are available from the Downloads app or, when your Sero 7’s connected to
a computer via USB, the Download directory.
Swipe Conversation List to Archive or Delete
While viewing a list of conversations, you can slide left or right to quickly archive or delete
conversations.
Default swipe behavior - In your Inbox, swiping archives the conversation. In All Mail, Sent and other
system labels, swiping deletes the conversation. In labels you created, swiping removes the current
label.
Change swipe behavior - In the Gmail app, tap Menu icon > Settings > General settings > Swiping
conversation list, and choose Has no eect, Archives or deletes, or Always deletes.
Set Priority Inbox as Your Default Inbox
You can set Priority Inbox as the conversation list to open when you have new mail, rather than Inbox.
You can tap Menu icon
> Settings, then tap the account you want to congure. Check Priority Inbox.
Report Spam
You can report the conversation as spam. Check one or more spam conversations in your Inbox or
other conversation list,tap Menu icon
> Report spam. Or While reading a conversation’s messages, tap
Menu icon
> Report spam.
Compose Messages
Compose & Send a Message
1. When viewing a list of conversations, tap the Compose icon
.
2. Set the address you want to send the email from.
3. Address the message. As you enter email addresses, matching addresses from your contacts are
suggested. Tap one to select it.
To add copies or blind copies, tap +CC/BCC to the right of the To line.
4. Enter a subject for the message.
5. Add a photo or a video to the message. Tap the Add image icon
to the right of the Subject
line. Or tap the Menu icon
> Attach video. If you change your mind, tap the to the right of an
attachment’s name to remove it.
6. Enter the text of the message.
7. Tap the Send icon
.
If you’re not ready to send the message, tap Menu icon > Save draft. You can read your drafts by
opening messages with the Draft label.
To abandon the message, tap the Menu icon > Discard.
NOTE
If you aren’t connected to a network, the messages that you send are stored with the Outbox
label until you connect to a network again.
Page 40

39
Apps
Reply to or Forward a Message
You can continue a conversation by replying to or forwarding one of its messages.
1. When reading a message, you can reply to or forward it from the message header. Tap the Reply
icon
, the Reply All icon , or the Forward icon .
2. The new message opens in a new screen where you can add or remove addresses, edit the subject,
and add or remove text or attachments. You can also tap more icon
at the top left to change
whether you are replying, replying to all, or forwarding the message.
NOTE
Replying to or forwarding messages without changing the subject adds your reply to the
current conversation. Changing the subject starts a new conversation.
Attachments are included automatically in messages you forward, but not in messages you reply to.
To interleave your message with the text of the old one, tap Respond inline. However, this removes
any attachments or formatting in the original message.
To exclude the message you’re replying to from the text of the new message, uncheck Quote text.
NOTE
All of the messages in the conversation, up to the one you are replying to or forwarding, are
included in the new message; any messages that follow the message you are responding to are
omitted.
3. Tap the Send icon
.
Change Gmail Settings
You can change a number of settings for Gmail. General settings apply to all Gmail accounts. Other
settings apply only to a specic account.
To change Gmail settings, tap Menu icon
> Settings from any Gmail screen.
General Settings
Conrm before deleting - Check if you want a dialog to open when you delete messages, asking you
to conrm that you want to delete them.
Conrm before archiving - Check if you want a dialog to open when you archive messages, asking
you to conrm that you want to archive them.
Conrm before sending - Check if you want a dialog to open when you send messages, asking you
to conrm that you want to send them.
Swiping conversation list - By default, you can archive conversations in the Inbox by swiping left
or right. For All Mail, Sent, and other system labels, swiping left or right deletes the conversation
instead. For labels you created, swiping left or right removes the label. You can change this behavior
so that swiping always deletes, or you can disable swiping altogether.
Auto-t messages - Shrink messages to t the screen. When you receive large HTML emails, they are
resized to t to the screen. You can zoom in to see more detail.
Auto-advance - Opens a dialog where you can set which screen opens when you delete or archive a
conversation whose messages you are viewing: the messages in the next conversation, the previous
conversation, or the Inbox or other conversation list you’re working with.
Clear search history - Tap to remove the history of the words you’ve searched for previously in Gmail
in any account.
Hide pictures in messages - Restores the default setting (don’t show pictures automatically) for
all the people who send you email, including those whose Show pictures setting you may have
changed when reading messages from them.
Page 41

40
Apps
Account Settings
Each account has independent settings.
Priority Inbox - Check to make Priority Inbox your default inbox, so it opens when you start Gmail
with new messages (instead of Inbox), and you only receive notications for new messages that are
part of important conversations. This setting is not visible unless you have congured Gmail on the
web to show Priority Inbox.
Notications - When checked, you will receive a notication when you have new email.
Sound & vibrate - Available when Email notications is selected. Tap to change any of three settings:
The sound and vibrate settings for notications, and an option to notify only the rst time you have
new email since you last read your messages, rather than each time a new message arrives. If you
never want the device to vibrate, set Vibrate to Never and Sound to Silent. If you don’t suppress the
sound, you’ll still get vibrate notications.
Signature - Opens a dialog where you can type text that is appended to every message you send.
Gmail is ON- Indicates whether you have Gmail synchronization turned on for this account in the
main Sync settings. Tap to open those settings; then tap an account name to change its Gmail sync
setting.
Days of mail to sync - Opens a dialog where you can set the number of days’ worth of email that
you want to sync automatically.
Manage labels - Opens a screen where you can manage which conversations are synchronized.
Download attachments - Check to download attachments to messages when you receive them,
rather than requiring you to explicitly download attachments when you open each message.
Automatic downloads occur only when you are connected to a Wi-Fi network.
Sync Conversations by Label
Select which labels to synchronize:
1. Tap Menu icon
> Settings, then tap the account whose labels you want to work with.
2. Tap Manage labels to change which label or whether to sync.
3. Tap the label you want to set the sync options.
4. From Manage labels screen, tap Sync messages, then tap the option you want:
• Sync: None - Don’t download any conversations that have only this label.
• Sync: Last 30 days - Download the previous 30 days of conversations with this label (or whatever
number of days you have set separately).
• Sync: All - Download all conversations with this label.
Set how many days to synchronize:
1. Tap Menu icon
> Settings, then tap the account whose labels you want to work with.
2. Tap Days of mail to sync, then tap the arrows to select the number of days.
3. Tap OK.
Google+
Sign In or Out
Follow these steps to sign into Google+ for the rst time:
1. Select your Google account:
Page 42

41
Apps
• If you already have a Google account but you don’t see your account in this list, tap Add
account, then tap Existing. Fill out your information and tap Sign in.
• If you’d like to create a new Google+ account, tap Add account, then tap New to sign up for a
new Google account.
2. Set up your Google+ Prole.
NOTE
You won’t see this step if you’ve already set up your prole on your computer or at an
earlier time.
3. Your contacts:
• Keep your address book up to date - Add prole photos, circles and contact information from
Google+ to your Sero 7 contacts.
• Improve suggestions - Let Google make suggestions based on who you communicate with
most often on your Sero 7.
4. Back up your photos.
5. Get started with Google+.
Sign out: Sign out of the app to switch to a dierent Google+ account. If you are already signed in
to the app, you can sign out by tapping Menu icon
and choosing Sign out.
Home
When you rst sign in to Google+, the screen you’ll see is your Home Stream. You can see What’s hot
and recommended posts by tapping more icon
at the top left.
Go to the Google+ menu by tapping the Google+ icon
in the top left-hand corner of the screen.
Create a Post
You’ll see a bar with four icons at the bottom of the stream. Tap any icon to begin composing your
post.
Icon Description
Snap a picture instantly or choose from your gallery.
Attach your location to a post.
Share your mood.
Share a thought quickly via text.
After you’re done composing your post, select which circles or people you’d like to share with, then tap
the icon
to share your post.
Edit a Post
Tap the post you want to edit and tap Menu icon
, then tap Edit. When you’re done, tap icon .
Delete a Post
Tap the post you want to delete and tap Menu icon
, then tap Delete. Conrm you want to delete the
post by tapping OK.
Mentioning People in Posts
1. Type +[person’s name] or @[person’s name]. (You can also type their email address instead of their
name.)
2. As you type, an autocomplete list of people will appear, select the person you want to mention.
Mute a Post
Tap the post you want to mute and tap Menu icon
> Mute.
Page 43

42
Apps
Reshare a Post
Open a post and tap the Share arrow icon
, then add comments and choose which circles or
people to share with. Tap icon
to share the post.
Post Comments
Join the conversation by commenting on a post. Just tap the Add a comment box at the bottom of the
post you’d like to comment on.
+1, Edit or Delete Comments
Open a post and tap on the comment you’d like to +1, edit or delete, then select +1 comment, Edit
comment or Delete comment.
Circles
Circles are an essential part of Google+. The great thing about circles is that they let you group people
together based on how you think of them in real life.
Go to the Circles by tapping the Google+ icon
in the top left-hand corner of the screen, then
tapping Find People.
Create a New Circle
Tap the Create a new circle at he bottom of the stream and name your circle, then mark the circle as
Just following if you want to exclude this circle when you share with Your circles. Tap OK.
Manage Circles
From the Home stream, tap the more icon
to navigate to a specific circle. From a circle, you can
change the circle settings, and add or remove people.
Find people to add to your Google+ circles by visiting the Find people destination in the Google+
menu. To add a suggestion to your circles, tap the Add icon. This will automatically add this person
to a default circle. Tap the circle name again to move the person to a dierent circle.
To remove people , go to [their prole] > [circle’s name], then uncheck any checkboxes.
Prole
Change Your Prole Photo
1. From the Google+ menu, tap the Prole icon.
2. Tap your prole photo to edit.
Tap Take Photo to use a new photo.
Tap Your photos to select a photo from your Google+ photos.
Mute, Block or Report Abuse Someone
Go to [their prole] > Menu icon
, then tap the option you need.
Photos
Instant Upload
To change this setting after signing in:
1. Tap Menu icon
> Settings.
2. Select Instant Upload.
3. Switch Instant Upload On or O.
Page 44

43
Apps
Once enabled, photos taken with Sero 7’s camera will be uploaded to your private album on Google+.
Instant upload won’t work when you’re signed out of Google+.
View Photos
To view your photos, including your Instant Upload album, visit your prole:
1. From the Google+ menu, go to Photos.
2. Tap the photo album you want to view.
Share Instant Upload Photos
1. From the Google+ menu, go to Photos > Instant Upload.
2. Tap Menu icon
and choose Select items (or long-press on a photo).
3. Select the photos you want to share.
4. Tap the icon
to share.
Manage Photos
When viewing the photos, tap Menu icon
, you can manage the photos, including set as prole photo,
set as wallpaper, delete photo, or download image.
Approve or Remove Name Tags
When somebody tags you in a photo, you’ll receive a notication. Photo tags pending approval appear
with red badges
in your Photos of you album.
To approve your name on a tagged photo, tap the approve checkmark. Once approved, the name
tag will link to your prole and be displayed in the Photos of you album.
To remove a tagged photo, tap the remove icon . Once removed, no one can tag you in that
photo again.
Events
RSVP, Invite or Remove Others
To respond to an invitation or change your status, tap the event in your stream or on the Events page.
This expands the selected event, so you can see event activity.
Tap Yes, Maybe, or No to select your RSVP status.
If you’ve already responded, tap Yes, Maybe, or No to make a change.
If you did not RSVP before the event, you can still indicate that you attended by updating this status
after the event has taken place.
When you RSVP the event’s activity stream will be updated with your response. In addition, your name
will be added to the Attending area of the guest list.
To view who’s attending the event, tap View All to see all invited guests and their status.
If the event creator has enabled the ability for guests to invite others, you will be able to invite guests.
Event creators will have the option to tap Remove next to the name of a guest to remove their
invitation to the event.
NOTE
Downgrading your account will not remove your RSVP from an event.
View or Edit Event Details and Event Photo Collections
View event activity: To view the details of an event, tap an event in your stream or on the Events
page. Here you can scroll through view event activity, read comments, and view photos shared by
other guests.
Page 45

44
Apps
To add a comment or photo:
• Tap the add comment icon
to share a comment to other Event guests.
• Tap the add photo icon
to upload a photo from Sero 7, or take a new photo with your Camera.
The Menu icon will allow you to:
• Edit this event (Event owners only): change details of the event.
• Delete this event (Event owners only): delete the event entirely.
• Invite more (if Event owner enables this feature): allows invitees to invite other guests.
View the events photo collection:
• To reach Events, tap the Google+ icon
in the top left-hand corner and select Events.
• Tap the event whose photos you’d like to view.
• Tap the more icon
and choose Photos.
Party Mode
When in Party Mode, the Google+ app will automatically upload and share photos and videos to
a Google+ event photo collection. You can tell that Party Mode is on when you see this icon
in
Notication Bar.
Turn On/O Party Mode: Tap the Google+ icon
in the top left hand corner of the screen and tap
Events. Then tap the event for which you’d like to enable/disable Party Mode and check/uncheck Party
Mode.
Hangouts
Join a Hangout
If someone invites you to a Hangout: You’ll see a Incoming Hangout screen pop-up.
Join a Hangout: Press the Hangout icon and drag it to the right of the circle to join a Hangout.
Adjust your microphone, video and camera settings. If you decide not to join the Hangout, press
the Hangout icon
and drag it to the left of the circle.
Hangout control:
Icon Description
Switch between text chat and Hangout video chat.
Leave the Hangout.
Mute Sero 7’s microphone.
Turn o Sero 7’s camera.
See additional Hangout options:
Mute: Mute Hangout notications.
Leave: Leave the Hangout.
Mute Video: Mute Sero 7’s video so you are only sharing audio from Sero 7’s microphone.
Invite: Invite additional people to the Hangout.
Tip: When you enter a Hangout, the current participants’ prole photos are displayed at the top of the
Hangout. Each Hangout can have up to 10 participants.
Start a Hangout
1. Tap the Google+ icon
in the top left hand corner of the screen.
2. Select Hangout.
3. Type a name or name of a Circle. Or, select participants from the list of suggested contacts by
tapping their icon. When you add multiple participants, the name of each participant will appear at
the top of your screen.
Page 46

45
Apps
4. If you’d like to turn o ringing notications, tap the bell icon .
5. To browse a list of your Circles and contacts, tap the
icon.
When you’re ready to video chat, tap the START HONGOUT at the bottom of the screen. The Hangout
will start immediately, all you have to do is wait for people to accept the invitation and join.
When you start a Hangout, the people you invited will receive a notication.
You can also start a Hangout in a Messenger conversation. Only other participants in the Messenger
conversation can join these Hangouts.
Navigate Away From a Hangout
If you navigate away from a Hangout, the Hangout remains active. You’ll continue to send and receive
audio from the Hangout.
Tap the Hangout push notication in your Notication Tray to get back to the Hangout. There will
be a persistent notication in the Notication Tray that says “Hangout in progress. Tap to return to
the Hangout.”
Tap the hang up icon in the Hangout to leave it entirely.
Turn O Notications
To stop your Sero 7 from ringing when you’re invited to a Hangout, turn o Notications:
1. From the Hangouts screen, tap Menu icon
> Settings> Hangouts.
2. Tap Hangout notications. If the checkbox is unchecked, Hangout notications are disabled.
Messenger
With Messenger, you can bring groups of friends together into a simple group conversation with text,
photos and face-to-face video chat.
To get started: Tap the Google+ icon
in the top left-hand corner of the screen. Then select
Messenger.
Start a Conversation
1. From Messenger screen, tap the new conversation icon
in the top bar to start a conversation.
2. Start to type the name of a person or circle you’d like to add, or tap the
icon to choose specic
Circles or people. Add up to 50 people to each conversation.
3. Type what you’d like to say at the bottom of the screen where it says Type a message.
4. Tap the
icon when you’re ready to send. Your message will be sent instantly.
Accept an Invitation
1. Open the invite notication in Sero 7’s Notication Tray.
2. Respond to the message by typing what you’d like to say where it says Type a message.
Add People to a Conversation
Expand your conversation by adding more people or circles at any time.
1. From a conversation, tap the
icon at the top of the conversation.
2. Tap the add person icon
.
3. Add people to a conversation by typing the name of a person or circle, or tap the
icon to select
circles and individual people from a list.
Page 47

46
Apps
Message Receipts
Message receipts appear next to messages in a conversation to show if a message has been received,
read, or sent. The following message receipts appear for one-on-one conversations:
Icon Description
The message is being sent.
The message has been delivered.
The message has been read.
Conversation Settings
If you don’t want to receive message notications for your conversations, you can tap Menu icon >
Mute.
If you want to leave a group conversation or delete a one-to-one conversation, you can tap Menu
icon
> Leave.
Local
Local helps users discover and share places. The integration of Zagat’s expressive 30-point scoring
system gives you detailed insight into businesses before you visit, and Zagat summaries of user reviews
help you decide where you want to go.
With Local, you can:
Get place recommendations based on your circles, your past reviews, and your location.
Publish reviews and photos of your favorite places.
Read Zagat summaries of user reviews for a place.
View the local Google+ page for a business to see reviews, photos, and other useful information.
Find reviews from people you know and trust highlighted in your search results.
My Reviews and Ratings
If you rated or reviewed locations in Google Places (previous to May 30, 2012) and you can’t see them
under Your places in Local, try following these steps: Go to maps.google.com. and select My Places in
the left-hand panel, then tap the Rated tab.
Maps
Google Accounts in Maps
Google Maps uses your Google Account for enhanced personalization and access to certain features
such as My Places, Latitude and more.
Sign In
If you don’t connect your Google account with your Sero 7, tap Menu icon
> Settings > Sign in from
Maps screen.
Switch Accounts
You can switch between additional accounts you’ve synced with your Sero 7. From Maps screen, tap
Menu icon
> Settings > Switch Account.
Enable Location Services
You must have Location Services turned on to view your location in Maps and to use your location to
nd local resources.
Page 48

47
Apps
To enable Location Services, go to Settings > Personal > Location services from Home screen. Select
the location options that you want to use:
Enable Google Location Services.
Enable Google use your location to improve search results and other services.
View the Map
Navigate the Map
In Google Maps, you can pan, rotate, zoom, and tilt the map with the following gestures on your
touchscreen.
To move the map
Drag the map with your nger. Repeat if you wish to move the map farther.
To rotate the maps
Touch an area with two fingers and drag them simultaneously in a circular
motion. A compass icon will appear in the top-left corner which you can click to
return the map to North-up view.
To zoom in
Either double tap a location with one nger or touch an area with two ngers at
once and spread them apart.
Tip: To zoom in with one hand, double tap a location, hold the second tap, and
drag your nger up.
To zoom out
Either tap once with two ngers or touch an area with two ngers and pinch
them together. Note that not all zoom levels are available for all locations.
Tip: To zoom out with one hand, double tap a location, hold the second tap, and
drag your nger down.
To tilt the map
Touch an area with two ngers and drag them from top to bottom in parallel
to see an angled view of the map. Drag from bottom to top to return to an
overhead view.
View Location Details
You can obtain the address and other information about an area on a map.
1. Press & hold a location, star, or labeled feature, or select a search result on the map.
2. An info window opens over the location with the address and a thumbnail from Street View.
3. Tap the info window to open a place page with additional details about the location.
From place page, you can get directions or navigation, explore Street View, check in, and see reviews
and ratings.
My Location
The My Location feature on Google Maps lets you center the map on your current approximate
location using a variety of methods to determine your location.
Tap the My Location icon / in the header. The map centers on a blue dot that indicates
your location.
A blue circle around the arrow indicates that your actual location is within the circle.
Page 49

48
Apps
My Places
My Places gives you easy access to your important locations and personal Maps history. In My Places
you’ll nd your: Oine Maps, Starred places (including Home and Work locations), Recently viewed
Maps items, Directions, My Maps, Rated Places, and Maps searches.
To access My Places, you can tap the Menu icon
> My places, and slide right and left or tap on the
tabs to see the other options.
My Maps
The My Maps feature for Google Maps for Sero 7 allows you to access personalized, annotated, and
customized maps that you’ve created in Google Maps from your computer.
Labs
Google Maps Labs allows you to try out experimental new features in Maps. To turn on a Labs feature
in Google Maps, you can tap the Menu icon
> Settings > Labs.
The current Maps Labs features are:
Measure - Adds an on-screen button to measure distances and elevation changes between
locations. Tap the button to start and stop measuring, then tap a start and end point to get the
measurements.
Bigger Text - Increase the text size of labels on the map.
Directions Elevation - Displays an elevation prole for walking and biking directions. Once you get
walking or biking directions you’ll automatically see a prole of your total ascent and the highest
point on the route.
Intersection Explorer - Enables blind and low-vision users to explore a given neighborhood for
informational purposes only.
Search Maps
Search for a Location
You can search for a location or browse the area around you.
1. In the search box, enter the place you’re looking for. You can enter an address, a city, or a type of
business or establishment.
2. Tap the Search icon on the keyboard.
Search History
In Google Maps, you can quickly access certain places from your search history, such as previously
searched locations and queries, without having to type them in again. You’ll see any available search
history appear below the search box along with other search suggestions.
To view your recent searches in Maps, go to Menu icon
> My places > Recent.
Layers
View Layers
Initially, Google Maps opens with a street map. Enable Layers to view satellite or terrain imagery of a
location, check on trac, access Street View, and more.
Tap Menu icon
> Layers, a dialog opens with a list of layers including:
1. Shortcuts to any recent searches.
2. Tap the layer you’d like to view, or tap a checked layer to hide it.
3. Tap to access My Maps, Wikipedia information.
Page 50

49
Apps
4. Tap Clear map to clear the map of all layers.
Trac Layer
Google Maps will either show current color-coded traffic conditions on highways and roads where
data is available.
Color Description (highways) (Roads smaller than highways)
Green More than 50 miles per hour or 80 kilometers per hour The trac conditions are good
Yellow 25 - 50 miles per hour or 40 - 80 kilometers per hour The trac conditions are fair
Red Less than 25 miles per hour or 40 kilometers per hour The trac conditions are poor
Red/Black Very slow, stop-and-go trac The trac conditions are poor
Gray No data currently available
Transit Layer
Google Maps allows you to view available transit information overlaid on the map.
Types of transit - While the transit layer is active, you can view all transit types or limit what is shown
to Subway, Bus, Train, or Tram only. This lter is located in the upper right corner of the map.
Transit lines - By default, all transit lines are shown for a particular area. Zoom in to see the stops for
a certain line. Tap on a stop or station (indicated by a blue square) to highlight that line.
Station pages - Tapping on a stop or station (indicated by a blue square) will also bring up the
station page. This page provides information on which lines stop at that station and when the next
transportation will arrive. You can also get directions to that station, see Street view, or view nearby
stations.
Indoor Maps
Indoor Maps is built into Google Maps, which means you can use many of the same great Maps
features to explore your indoor space:
View and navigate floor plans of several commercial locations such as airports, department stores,
malls, and more within Google Maps.
Here are a couple ways you can use indoor maps:
Easily meet up with friends with Latitude while you’re out shopping.
Search for the nearest bathroom, coee shop, or airport gate.
NOTE
Indoor Maps is only available in selected locations.
View Indoor Maps
Indoor Maps works just like regular Maps. Search and see friends on Latitude the same way you would
with any location in Google Maps.
1. Find an available Indoor Maps location.
2. Zoom into the map until you start to see an indoor oor plan of the building.
3. Use the level switcher to move from the ground oor to other available oors in the building.
Search Indoor Maps
Search results for Indoor Maps won’t show unless you’re fully zoomed into a building where an indoor
map is available. Searching works just like it does in the rest of Google Maps.
Find Friends Indoors
If you use Latitude to share your location with friends, you can use the same Latitude features for
indoor locations. Latitude makes it easy to nd friends while you’re out shopping, dining or traveling.
Page 51

50
Apps
1. Open the Map and zoom in to an available indoor map.
2. Nearby Latitude friends will appear overlaid on the map.
NOTE
Accuracy of your indoor location may vary depending on the data available.
Oine Maps
Oine maps lets you select and download certain areas in your Google Maps, so that you can view
that area even when you aren’t connected to the Internet or wireless network.
Downloading an Area
There are two ways to select an area:
Go to Menu icon > Make available oine. The area selector will appear on your screen.
Go to Menu icon > My Places > Oine > New oine map. A dialog will appear on your screen
where you can type a region or city--like New York--to select from the map.
To choose and download an area, zoom in or out on the map within the area selector and then save
your selection.
Estimated size - To nd the estimated size of an area you’ve selected, look at the bottom of your
screen.
Maximum download size - You can download up 6 maps total as long as you have sucient storage
space on Sero 7. There’s also a maximum size for the area you can download; if surpassed, you’ll be
asked to zoom in to a smaller area.
Storage capacity - When Sero 7’s storage is at capacity and can’t save the entire area, your Sero 7 will
pause the download and show the message “Download failed. Storage may be full.” You can resume
the download after you’ve cleared some space on your Sero 7.
NOTE
You may also see black outlines delineating areas where you’ve already saved an oine map.
Viewing Saved Maps Oine
To access a map area that you’ve downloaded, tap Menu icon
> Show oine list.
You can’t use the features that require a network connection.
Managing Your Oine Maps
To get a list of your downloaded map areas, go to Menu icon
> My Places > Oine.
To rename or delete any of your downloaded map areas, click
next to an area.
Rename - Changes the name of your downloaded map area.
Delete - Deletes an area. Unlike downloading, you can’t pause or resume a deletion.
Street View
View street-level imagery of certain locations with the Street View feature on your Sero 7. Street View
isn’t available for all areas.
Access Street View
1. Tap and hold a location on a map to open an info window with the address and a Street View
thumbnail.
2. Tap the info window.
3. On the page that opens, tap the Street View icon
.
Page 52

51
Apps
Navigate Within Street View
Use your nger to pan the map.
Drag the Pegman icon in the lower-left corner to a point in the image in order to zoom directly
to that point.
Double tap a point in Street View with one nger to zoom in; tap once with two ngers to zoom
out.
Tap Compass mode in the Google Maps menu to use Sero 7 itself to navigate Street View. Tilt, pan,
or turn the Sero 7 to change the view. Tap Compass mode again to end it.
Directions
Get Directions
To get directions to a specic location in Google Maps:
1. From Maps screen, tap Directions icon
, or tap a specic location, search result, friend, or place
from the map, then tap Directions icon
.
2. Select your start and end points. By default, your start address will use the My Location feature to
get directions from your current location. You can enter a physical address or search for a location,
contact, previous query, or starred place.
3. Select your transportation method. Depending on your region, you can select from driving, walking,
bicycling or transit directions. Tap Go to see your route on the map.
View Route
Once you’ve entered your start and end points, Google Maps will display your route with step-by-step
directions.
Use the map view to visually view your route details on the map. Changes in direction are
represented by red points along your route.
Use the list view to see all the written directions.
Clear the Map
Easily clear search results, directions, layers or selected places from the map: tap Menu icon
> Clear
Map.
You can delete your entire oine list and My Place cache by going to Menu icon
> Settings > Oine
and cache.
Page 53

52
Appendix A
Appendix A
Specifications
Product Name Sero 7 Lite
Model E270BSA
Dimension (L × W × T) 7.87 inches × 4.80 inches × 0.41 inches
(200 mm × 122 mm × 10.5 mm)
Weight 0.73 lbs (330 g)
Display Diagonal 7 inches
Resolution 1024 × 600
Hardware Platform RK3066
Storage RAM 1GB
ROM 4GB
1
Extendable Memory Micro SD (up to 32G, support hot plug)
Antenna Wi-Fi 802.11 b/g/n (2.4 G)
Camera Front Camera 0.3 M
Power AC Power Adapter (5V/ 2A)
Battery Rechargeable
2
lithium polymer battery
Battery Capacity 3400 mAh
Audio Built-in stereo speakers
External Port 3.5 mm stereo headphone port; Mini-HDMI port; Micro-USB port;
Micro SD port
Operating Temperature 32°F to 95°F (0°C to 35°C)
Storage Temperature -4°F to 113°F (-20°C to 45°C)
1 : Because the system will occupy part of the memory space, the available user space will be less than 4GB.
2 : The rechargeable battery in Sero 7 should be replaced only by Hisense Service.
Trouble Shooting
When something wrong appears with your Sero 7 refer to following. If the problem still cannot be
solved, please contact Electronics Consumer Care Center provided on the warranty card or professional
technician.
Sero 7 displays network or service error message
When you are located in places with poor signals, your Sero 7 may lose the receiving ability, please
try again moved to other places.
If you do not make a reservation, some of the options can not be used. Please contact your service
provider for more details.
Touch screen response is slow or incorrect
If the Sero 7’s touch screen response is incorrect, please try the following:
Remove any protective film of the touch screen. The protective film may prevent the device
recognition input.
Make sure that your ngers dry and clean before you tap the touch screen.
Restart the Sero 7 to clear any temporary software bugs.
A
Page 54

53
Appendix A
Make sure that the Sero 7’s software has been upgraded to the latest version.
Sero 7 is frozen or a serious error appears
If the Sero 7 is frozen or suspended, you may need to close the app program or reset the tablet.
If the Sero 7 is frozen or slow to respond, press & hole the power button for 8 seconds to the reset
the tablet.
If the problem persists, restore the factory data.
Sero 7 gets warm
When using for a long time, the Sero 7 may be warm to the touch. This is normal and will not aect the
life or performance of the unit.
Multimedia Compatibility
Video Decode 1080P, MPEG-1/2: DAT, MPG, VOB, TS, MPEG-4 / DIVX / H.264: AVI, MKV, MP4, MOV, 3GP
REAL MEDIA: RM, RMVB, GOOGLE VP8: WEBM, VC-1: WMV, ASF, H.263: 3GP, MOV, MP4,
SORENSON SPARK: FLV
Video Encode H.264, MPEG-4, H.263
Audio Decode MP1, MP2, MP3 / WMA / WAV/ APE / OGG, OGA / FLAC /AAC, M4A
Audio Encode AAC-LC, AMR-NB, AMR-MB
Picture Encode JPG, GIF, BMP, PNG
Page 55

54
Appendix B
Appendix B
Important Safety Instructions
1. Read these instructions.
2. Keep these instructions.
3. Heed all warnings.
4. Follow all instructions.
5. Do not defeat the safety purpose of the polarized or grounding-type plug. A polarized plug has two
blades with one wider than the other. A grounding type plug has two blades and a third grounding
prong. The wide blade or the third prong are provided for your safety. If the provided plug does not
t into your outlet, consult an electrician for replacement of the obsolete outlet.
6. Protect the power cord from being walked on or pinched particularly at plugs, convenience
receptacles, and the point where they exit from the unit.
7. Only use attachments/accessories specied by the manufacturer.
8. Refer all servicing to qualified service personnel. Servicing is required when the unit has been
damaged in any way, such as power-supply cord or plug is damaged, liquid has been spilled or
objects have fallen into the unit, the unit has been exposed to rain or moisture, does not operate
normally, or has been dropped.
9. Do not install near any heat sources such as radiators, heat registers, stoves, or other units (including
ampliers) that produce heat.
10. Unplug this unit during lightning storms or when unused for long periods of time.
Warning
All packing materials such as internal bags, plastic collars, plastic lms, and carton inserts are not
part of this product and should be discarded.
Do not try to disassemble the unit.
Plug your Sero 7 into a wall outlet to charge, only use the power adapter supplied with Sero 7. If the
no-bundled charger results in some safety issue, we assume no responsibility for user’s incorrect
operation.
Do not expose the unit to moisture or water.
Keep the unit clean by wiping it with a slightly damp cloth.
To prevent hearing damage, never use headphones at excessive volume levels. Listening to loud
sounds for an extended period may cause temporary or permanent hearing loss.
Never use Sero 7 while operating a motor vehicle or bicycle.
If you feel discomfort in your hands or any pain using Sero 7, please stop immediately.
In case of long periods of use, take frequent breaks.
The lightning flash with arrow head symbol,
within an equilateral triangle is intended to
alert the user that parts inside the product
constitute a risk of electric shock to persons.
The exclamation point within an equilateral
triangle is intended to alert the user that
important operating and servicing instructions
are in the papers with the appliance.
WARNING: TO REDUCE THE RISK OF ELECTRIC SHOCK, DO
NOT REMOVE COVER OR BACK. NO USER-SERVICEABLE
PARTS INSIDE. REFER SERVICING TO QUALIFIED SERVICE
PERSONNEL.
WARNING
RISK OF ELECTRIC SHOCK
DO NOT OPEN
B
Page 56

55
Appendix B
If a small part is coming out of the Sero 7, do not try to remove it. Keep it away from small children.
Never force a connector into a port of Sero 7. If a connector and a port do not join with reasonable
force, make sure that the connector matches the port and that you have positioned the connector
correctly in relation to the port.
To clean the screen, simply use a soft damp cloth. Do not use alcohol, solvent, aerosol spray or
abrasive cleaners to clean your Sero 7.
The product and the adapter should be periodically examined for conditions that may result in the
risk of re, electric shock, or injury to persons and that, in an event such conditions, the adapter
should not be used until properly repaired.
Operate Sero 7 in a place where the temperature is between 0º and 35º C (32º to 95º F). Low - or
high - temperature conditions might temporarily shorten battery life or cause Sero 7 to temporarily
stop working properly. Avoid dramatic changes in temperature or humidity when using Sero 7, as
condensation may form on or within Sero 7.
Store Sero 7 in a place where the temperature is between -20º and 45º C (-4º to 113º F). Don’t leave
Sero 7 in your car, because temperatures in parked cars can exceed this range.
When you’re using Sero 7 or charging the battery, it is normal for Sero 7 to get warm. The exterior
of Sero 7 functions as a cooling surface that transfers heat from inside the unit to the cooler air
outside.
The rechargeable battery in Sero 7 should be replaced only by Hisense Service.
A warning that batteries (battery pack or batteries installed) shall not be exposed to excessive heat
such as sunshine, re or the like.
In order to maximize lifespan of the battery, fully charging and discharging the battery every three
months is recommended if Sero 7 is not used frequently.
In order to maximize lifespan of the battery, keep the battery level at around 50% is recommended
if Sero 7 is not used frequently.
If Sero 7 has not been used for a long period of time, the battery might be in over-discharge
protection mode and may take longer to charge the battery.
This device is restricted to indoor use when operating in the 2.4 to 2.483 GHz frequency band.
Never remove or insert microSD card while the Sero 7 is powered on.
The manufacturer is not responsible for any radio or TV interference caused by unauthorized
modications to this equipment. Such modications could void the user’s authority to operate the
equipment.
Sero 7 North America edition is limited using channel 1-11. This limited operation can be only set by
software and was done before the product down from the product line. All the products for North
America marketing were embedded this limited before shipping. Customers have no way to choose
the channel 12 & 13.
Certification and Compliance
Exposure to Radio Frequency Energy
Sero 7 contains radio transmitters and receivers. When on, Sero 7 sends and receives radio frequency
(RF) energy through its antenna. The WLAN antenna is located at rear of the tablet, see Overview on
page 3 for more details. Sero 7 has been tested and meets the SAR exposure requirements for WLAN
operation.
Sero 7 is designed and manufactured to comply with the limits for exposure to RF energy set by the
Federal Communications Commission (FCC) of the United State. The exposure standard employs a
unit of measurement known as the specic absorption rate, or SAR. The SAR limit applicable to Sero 7
Page 57

56
Appendix B
set by the FCC is 1.6 watts per kilogram (W/kg). Tests for SAR are conducted using standard operating
positions specied by these agencies, with Sero 7 transmitting at its highest certied power level in
all tested frequency bands. Although SAR is determined at the highest certied power level in each
frequency band, the actual SAR level of Sero 7 while in operation can be well below the maximum
value because Sero adjusts its WLAN transmitting power based in part on orientation and proximity to
the wireless network. In general, the closer you are to a WLAN Router, the lower the WLAN transmitting
power level.
Sero 7 has been tested, and meets the FCC RF exposure guidelines for WLAN operation. When tested at
direct body contact, Sero 7’s maximum SAR value for each frequency band is outlined below:
FCC SAR
Frequency Band (MHz) FCC 1g SAR Limit (W/kg) Highest Value ( W/kg)
Model: E270BSA
2412-2462 1.6 0.187
Additional Information
For more information from the FCC about exposure to RF energy, see: www.fcc.gov/oet/rfsafety
The FCC and the U.S. Food and Drug Administration (FDA) also maintain a consumer website at www.
fda.gov/Radiation-EmittingProducts/default.htm to address inquiries about the safety of mobile
phones. Check the website periodically for updates.
For information about the scientific research related to RF energy exposure, see the EMF Research
Database maintained by the World Health Organization at: www.who.int/emf
FCC Compliance Statement
This device complies with part 15 of the FCC rules. Operation is subject to the following two conditions:
(1) this device may not cause harmful interference, and (2) this device must accept any interference
received, including interference that may cause undesired operation.
NOTE This equipment has been tested and found to comply with the limits for a Class B digital device,
pursuant to part 15 of the FCC Rules. These limits are designed to provide reasonable protection
against harmful interference in a residential installation. This equipment generates, uses and can
radiate radio frequency energy and, if not installed and used in accordance with the instructions, may
cause harmful interference to radio communications. However, there is no guarantee that interference
will not occur in a particular installation. If this equipment does cause harmful interference to radio
or television reception, which can be determined by turning the equipment o and on, the user is
encouraged to try to correct the interference by one or more of the following measures:
Reorient or relocate the receiving antenna.
Increase the separation between the equipment and receiver.
Connect the equipment to an outlet on a circuit different from that to which the receiver is
connected.
Consult the dealer or an experienced radio/TV technician for help.
Model: E270BSA
FCC ID: SPRLCDX0008
Disposal and Recycling Information
The symbol above means that according to local laws and regulations your product should
be disposed of separately from household waste. When this product reaches its end of life,
take it to a collection point designated by local authorities. Some collection points accept
products for free. The separate collection and recycling of your product at the time of
disposal will help conserve natural resources and ensure that it is recycled in a manner that
protects human health and the environment.
Page 58

57
Appendix C
Appendix C
Legal Terms
The product/device you have purchased from Hisense USA Corp., or it’s Parent Company, aliates and/
or Subsidiary Company, its successors and/or assigns (hereinafter referred to as “Hisense”) provides
direct access to the internet through one or more internet provider services (hereinafter referred “Web
Service”). All content and services accessible through this device belong to Hisense USA Corp., “Hisense”
is sometimes also referred to herein as “we” or “us”) or third parties and are protected by copyright,
patent, trademark and/or other intellectual property laws. Such content and services are provided
solely for your personal non-commercial use. You may not use any content or services in a manner
that has not been authorized by the content owner or service provider or prohibited by law. You may
not modify, copy, republish, upload, post, transmit, translate, sell, create derivative works, exploit, or
distribute in any manner or medium any content or services displayed through this device except as
permitted by applicable law or as authorized in writing by Hisense.
YOU EXPRESSLY ACKNOWLEDGE AND AGREE THAT USE OF THE DEVICE IS AT YOUR SOLE RISK. TO
THE EXTENT PERMITTED BY LAW, THE DEVICE AND ALL CONTENT AND SERVICES ARE PROVIDED
“AS IS”WITHOUT WARRANTY, CONDITION, TERM, REPRESENTATION OR UNDERTAKING OF ANY KIND,
EITHER EXPRESS OR IMPLIED. TO THE EXTENT PERMITTED BY LAW, HISENSE EXPRESSLY DISCLAIMS
ALL WARRANTIES, CONDITIONS, TERMS, REPRESENTATIONS AND UNDERTAKINGS WITH RESPECT TO
THE DEVICE AND ANY CONTENT AND SERVICES, EITHER EXPRESSED OR IMPLIED, INCLUDING, BUT
NOT LIMITED TO, WARRANTIES OF MERCHANTABILITY, OF SATISFACTORY QUALITY, FITNESS FOR A
PARTICULAR PURPOSE, OF ACCURACY, OF QUIET ENJOYMENT, AND NON-INFRINGEMENT OF THIRD
PARTY RIGHTS. TO THE EXTENT PERMITTED BY LAW, HISENSE DOES NOT GUARANTEE THE ACCURACY,
VALIDITY, TIMELINESS, LEGALITY, OR COMPLETENESS OF ANY CONTENT OR SERVICE MADE AVAILABLE
THROUGH THE DEVICE AND DOES NOT WARRANT THAT THE DEVICE, CONTENT OR SERVICES WILL MEET
YOUR REQUIREMENTS, OR THAT OPERATION OF THE DEVICE OR SERVICES WILL BE UNINTERRUPTED
OR ERROR-FREE. TO THE EXTENT PERMITTED BY LAW, UNDER NO CIRCUMSTANCES, INCLUDING
NEGLIGENCE, SHALL HISENSE BE LIABLE, WHETHER IN CONTRACT OR TORT OR OTHERWISE, FOR ANY
DIRECT, INDIRECT, INCIDENTAL, SPECIAL OR CONSEQUENTIAL LOSS OR DAMAGES, LOSS OF PROFIT,
REVENUE, INTEREST, BUSINESS OR CORRUPTION OF DATA, ATTORNEY FEES, EXPENSES, OR ANY OTHER
LOSS OR DAMAGES ARISING OUT OF, OR IN CONNECTION WITH, ANY INFORMATION CONTAINED IN,
OR AS A RESULT OF THE USE OF THE DEVICE, OR ANY CONTENT OR SERVICE ACCESSED BY YOU OR
ANY THIRD PARTY, EVEN IF ADVISED OF THE POSSIBILITY OF SUCH LOSS OR DAMAGES. IF THE LAW OF
A PARTICULAR JURISDICTION DOES NOT PERMIT HISENSE TO EXCLUDE WARRANTIES AS CONTAINED
HEREIN, THEN HISENSE SHALL BE READ TO PERMIT HISENSE TO LIMIT AND EXCLUDE ANY SUCH
WARRANTIES TO THE MAXIMUM EXTENT AS PERMITTED BY THE LAW.
The country location you have identied during the set-up process may grant you access to certain
content, advertising and services of third parties or Hisense. The third party content and linked sites are
not under our control, and we have neither reviewed the contents of these third-party web sites, nor
do we claim any responsibility for the access to, maintenance, content or suitability of, these third-party
web sites or applications. You expressly acknowledge and agree that the identication of your country
location and you’re linking to any third party site or application is entirely at your own risk, and it is your
responsibility to view and abide by the terms of use and privacy policies applicable to any third party
site. You understand and agree that, to the extent permitted by law, Hisense shall in no event be liable
for any direct, indirect, incidental, special or consequential loss or damages, attorney fees, expenses, or
any other loss or damages arising out of, or in connection with, your unauthorized access to third party
content based on your selection of a country location or otherwise.
All content and services accessible through this device may be changed, suspended, removed,
terminated or interrupted, or access may be denied or disabled at any time, without notice, and
Hisense makes no representation or warranty that any content or service will remain available for any
C
Page 59

58
Appendix C
period of time. Content and services are transmitted by means of networks and transmission facilities
over which Hisense has no control. Without limiting the generality of this Disclaimer, and to the extent
permitted by law, Hisense expressly disclaims any responsibility or liability for any change, interruption,
disabling, removal or suspension of any content or service made available through this device. Hisense
may impose limits on the use, disabling, removal or suspension of any content or service made
available through this device. Hisense may impose limits on the use of, or access to, certain services or
content in any case and without notice or liability. Hisense is neither responsible nor liable for customer
service related to the third party content and services. You need to accept the terms of service and
privacy policy in order to use “Hisense Smart” platform on your Tablet. All the applications in the Tablet
are provided by are subject to modication or termination with or without any notice. Any question or
request for service relating to such content or services should be made directly to the respective third
party applications and service providers.
END USER TERMS AND CONDITIONS FOR HISMART@ SERVICES
Welcome to Hisense Smart Tablet. These End User Terms and Conditions for HISMART@ Services
(these “Terms and Conditions”) are a legal agreement between you and Hisense. By installing and/or
using the embeddable and executable software application (“Application”), and/or accessing or using
the Content and Services through Hisense Smart Tablet or any other features of functionality made
available on your Hisense device, you are legally bound to these Terms and Conditions. To the extent
permitted by law, Hisense reserves the right to modify or update these Terms and Conditions from
time to time.
DEFINITION
“Content” means all audio and visual elements and ideas oered by Hisense or third parties including
but not limited to data, movies, videos, photographs, software, games, designs, likenesses, artwork,
images, music, sound, information and other materials, tangible and intangible, including derivative
works, on all media and formats, existing now or in the future. “Service” means all types of services
or functions typically available from the internet, offered by Hisense or third parties including but
not limited to provisions of music, movie, video, messaging, blogging, chatting, social networking,
information, procurement, disposal, sale, purchase, rental and consultation through your Hisense
device. The Applications, Content and Services collectively shall mean “HISMART@ Services”. From
time to time, Hisense may directly oer and make available to you certain Applications, Services and/
or Contents, and in such events, your use of such Applications, Services and Contents shall be subject
to these Terms and Conditions. Applications, Content and Services may be provided locally subject to
local laws and regulations, and depending on your residence and location, you may be limited to types
and levels of Applications, Content and Services. Terms and conditions for the use of such Applications,
Services or Content may dier for each dierent country, region or market and subject to relevant local,
country and regional laws.
USE OF HISMART@ SERVICES
HISMART@ Services are intended for use by persons 13 years of age or older. If you are not at lease
13 years of age or older or are legally, or otherwise, restricted form using HISMART@ Services, please
discontinue using HISMART@ Services. If you are not 18 years of age or older, you must have a parent
of guardian’s approval prior to using HISMART@ Services. By using any portion of HISMART@ Services
and accepting the Terms and Conditions, you are certifying that you are at least 13 years of age, have
parental consent if you are between 13 and 18, and are otherwise not restricted from agreeing to
these Terms and Conditions. The use of any portion of HISMART@ Services (including the Application,
Content and Services) are restricted to only personal, non-commercial purposes. No other used are
permitted.
Access to certain Applications Content and/or Services, online or otherwise, may require registration,
the creation of a user account with Hisense or a third party, and/or a fee. Registration may require
providing personal information and choosing a unique, secret password that may not be shared with
others. Any personal information provided by you to Hisense will be handled in accordance with
Page 60

59
Appendix C
our Privacy Policy. Your personal information must be complete, accurate, and must be YOURS. You
shall not use any third party personal information to create an account in connection with the use of
HISMART@ Services, and you are not allowed to access others’ accounts. HISENSE RESERVES THE RIGHT
TO BLOCK ANY USER ACCOUNT IN THE EVENT HISENSE REASONABLY DETERMINES THAT THE USE OF
HISMART@ SERVICES IS IN VIOLATIONS OF THESE TERMS AND CONDITIONS, INCLUDING CREATING
ACCOUNTS WITH FALSE INFORMATION. Content and Service oered through HISMART@ Services that
require a fee may not be accessed by persons who have not paid the appropriate fee. In the event that
registration, creation of a user account, and/or a fee is required for the Service or Content oered or
provided by a third party provider, such registration, creation of a user account, and/or a fee shall be
subject to privacy policies, terms and condition of the Services and/or Contents of such third party.
SPECIFIC USE OF HISMART@ SERVICES THROUGH HISENSE APPLICATIONS
Access to certain portions of HISMART@ Services at Hisense Apps may require registration and creation
of a user account and/or a fee. Such registration, creation of a user account and payment of a fee may
be completed on a webpage run by us (or an aliate of Hisense) or a third party (including a payment
gateway provider). Such registration may require providing personal information to such us or third
party and choosing a unique, secret password that may not be shared with others. In the event that
registration, creation of a user account, and/or a fee on such third party or Hisense website is required
for the Service or Content oered or provided through Hisense Apps, such registration, creation of a
user account, and/or a fee shall be subject to privacy policies, terms and condition of the Services and/
or Contents of such website.
RESTRICTIONS AND PROHIBITIONS
You or any third party (directed by You) may not display, copy, store, modify, sell, publish, broadcast or
redistribute any Application, Content and/or Service (a portion or in its entirety), and such displaying,
copying, storing, modification, sale, publishing, broadcasting or redistribution shall be prohibited
unless you have obtained all necessary rights and permissions from Hisense or relevant owners or right
holders of such Application, Content and/or Service or as permitted by applicable law. Unauthorized
use of the Content or Service is prohibited and may result in criminal prosecution and/or civil liability.
You may not use any portion of the device for any other purposes, including, but not limited to, illegal
activity, to make unsolicited oers or advertisements, to impersonate or falsely claim aliation with
any person or entity, to misrepresent, harass, defraud or defame others, to post, upload, transmit or
disseminate any obscene, unreasonably oensive or any other unlawful material, to negatively present
the HISMART@ Services, nor for any commercial purposes. Except as expressly permitted by these
Terms and Conditions, and except to the extent that applicable laws prevent Hisense from restraining
you from doing so, you are not allowed to disassemble, reverse engineer, tamper with the HISMART@
Services, or transmit hidden or malicious code or to collect information of other users through the
HISMART@ Services. You may not take any action to interrupt the functionality of or tamper with the
Application, Content or Service contained in or provided through HISMART@ Services or its servers
or to unreasonably aect others’ use or enjoyment of HISMART@ Services in any way. ONCE AGAIN,
PLEASE NOTE THAT WE RESERVE THE RIGHT TO BLOCK ACCESS BY ANY USER TO HISMART@ SERVICES AT
OUR SOLE DISCRETION FOR ANY REASON.
GRANT OF LICENSE
Subject to your full compliance with these Terms and Conditions, Hisense grants you a non-exclusive,
limited and personal license to download and use the Application (other than other Applications
which may be governed by separate license terms) to display, receive or otherwise use (only to the
extent permitted) the Content and Service from your Hisense device only. No other rights to the
Application are granted. The scope of rights for Content and Service shall be subject to the terms and
conditions of the respective Content and Service and other licensing requirement and restrictions
otherwise imposed or required by the relevant Content and Service providers. All rights including
intellectual property rights in the Application, Content and Service remain the property of Hisense or
the relevant licensors or owners of the Application, Content and Service. Any breach of the Terms and
Page 61

60
Appendix C
Conditions will result in an immediate revocation of the rights granted herein and Hisense may engage
in further legal action to protect any of its rights hereunder including but not limited to the recovery of
monetary damages.
MATERIALS PROVIDED BY YOU
Any Content submitted, uploaded or posted by you or on behalf of you on or through your Hisense
device or HISMART@ Services (“Submitted Content”) will be considered non-confidential and nonproprietary. We also have the right to disclose your information as necessary due to any third party
who is claiming that any of your Submitted Content constitutes a violation of their intellectual
property rights, or of their right to privacy. By posting, submitting, uploading or otherwise transmitting
Submitted Content in any way via your Hisense device, you grant us a perpetual, irrevocable,
unrestricted, non-exclusive, worldwide, fully paid-up, royalty free, sub-licensable license to change,
copy, disclose, license, perform, display, post, publish, distribute, transmit or use such Submitted
Content in any manner and create derivative works thereof or incorporate the Submitted Consent into
other work anywhere in the world. We have the right to remove any Submitted Content on HISMART@
Services for any reason including if, in our sole opinion, such Submitted Content is unnecessary,
oensive, indecent or objectionable. We do not control the Submitted Content and do not warrant the
nature, accuracy, integrity, appropriateness or quality of the Submitted Content. You warrant that any
of your Submitted Content does not and will not infringe any third party intellectual property rights.
You are solely responsible for all Submitted Content that you upload, post, email, transmit or otherwise
make available in any portion of HISMART@ Services. We assume no liability for such Submitted
Content and you are solely responsible for any liability arising from or related to any Submitted
Content posted, uploaded or transmitted by you or on your behalf or through your Hisense device or
HISMART@ Services.
ADVERTISEMENTS AND CUSTOMER SERVICE COMMUNICATIONS
You understand and agree that HISMART@ Services may include advertisements, certain
communications from Hisense or third parties such as update announcements, administrative
messages, newsletters and other materials (“Communications”). As those advertisements
or communications are part of HISMART@ Services, you may not opt out of receiving these
advertisements or communications. Certain Services and Content may not be suitable for minors or
other users. Such Services and Content may not be rated or identified as having violent or explicit
images or language. Therefore, you understand and agree that you are using the Services and Content
at your own risk and Hisense shall have no liability to you for any oensive Services or Content. For
purposes of clarity none of your behavioral or personal information provided for the HISMART@
Services is used in any Communications.
WARRANTIES AND LIABILITIES: DISCLAIMER
TO THE EXTENT PERMITTED BY LAW, THE APPLICATION, CONTENT AND SERVICE ARE PROVIDED TO
YOU “AS IS” WITHOUT ANY WARRANTIES, TERMS, REPRESENTATIONS OR UNDERTAKINGS OF ANY
KIND, EXPRESS OR IMPLIED, WITH REGARD TO BUT NOT LIMITED TO THEIR QUALITY, RELIABILITY,
PERFORMANCE, PURPOSE, OR ACCURACY. YOU AGREE TO ASSUME ALL RISKS OF USING THE
APPLICATION, AND, TO THE EXTENT PERMITTED BY LAW, NOT TO HOLD HISENSE OR ANY OF
ITS HOLDINGS, DIRECTORS, OFFICERS, EMPLOYEES, PARTNERS, CONTRACTORS, LICENSORS OR
ADVERTISERS RESPONSIBLE FOR ANY DAMAGES, LOSSES, OR HARM, TANGIBLE OR INTANGIBLE,
INCLUDING BUT NOT LIMITED TO COMPENSATORY, CONSEQUENTIAL, PUNITIVE, INCIDENTAL, LOSS OF
PROFIT, REVENUE, INTEREST OR BUSINESS, OR CORRUPTION OF DATA OR ATTORNEY’S FEES ARISING
FROM THE USE OF THE APPLICATION, CONTENT OR SERVICE. To the fullest extent permitted by law,
Hisense shall not be held responsible for any third party Content or Service that may be accessed
through HISMART@ Services, nor shall Hisense be held responsible for hidden or malicious code
contained on or distributed through the HISMART@ Services or Hisense device by third parties.
Hisense does not guarantee that there will be no interruptions, delays or inaccuracies in the Content
or Service and does not guarantee the continued availability of such Content and Service. Due to the
Page 62

61
Appendix C
various capabilities of Hisense devices featuring the HISMART@ Services, as well as limitations in the
available Content and Services oered via HISMART@ Services, certain features, Applications, Content
and Services may not be available on all devices or in all territories. Some features on the HISMART@
Services may also require additional peripheral devices that are sold separately. Hisense does not
endorse any of the ideas, products, persons, or opinions expressed in the Content or Service.
Certain legislation may imply warranties or conditions or impose obligations upon Hisense which
cannot be excluded, restricted or modied or cannot be excluded, restricted or modied except to
a limited extent. These Terms and Conditions must be read subject to these statutory provisions. If
these statutory provisions apply, to the extent to which Hisense is able to do so, its liability under those
provisions will be limited, at is sole and exclusive option, in the case of services to (a) the supplying of
the services again; or (b) the payment of the cost of having the services supplied again and, in the case
of goods, to (a) the replacement of the goods or the supply of equivalent goods; (b) the repair of the
goods; (c) the payment of the cost of replacing the goods or of acquiring equivalent goods; or (d) the
payment of the cost of having the goods repaired.
You assume full responsibility for any damages, losses, costs, or harm arising from your use of the
HISMART@ Services. To the extent permitted by law, Hisense disclaims all liabilities with respect to your
use of the HISMART@ Services (regardless of whether or not such use requires registration, creation
of a user account and/or payment of a fee), Content and Service. If any portion of these Terms and
Conditions are illegal or unenforceable or there is a claim that we have breached any of these Terms
and Conditions, it does not aect or invalidate the other terms. These Terms and Conditions may not
be waived without written consent from Hisense.
GOVERNING LAW AND JURISDICTION
These Terms and Conditions shall be governed by the laws of the Sate of Georgia, USA and by
accepting these Terms and Conditions, and by your use of the HISMART@ Services, you are agreeing
that such Terms and Conditions and all other aspects of the HISMART@ Services will be construed in all
respects in accordance with the laws of the State of Georgia, USA applicable to the agreement entered
into and to be wholly performed therein. Any claims that are filed by you, your successors and/or
assigns as against Hisense shall be led exclusively in the State or Federal Court’s located in the State of
Georgia, USA.
ACTIONS REQUIRED BY LAW
Hisense may need to comply with the lawful interception and/or data retention requirements of local
law enforcement agencies from time to time. Hisense may restrict access to any part of HISMART@
Services and the Hisense device or terminate your access to the HISMART@ Services, at any time in its
sole discretion if required by law or by the relevant authorities or regulatory agencies to do so.
Hisense Privacy Policy and Terms and Conditions of Use
The product you have purchased from Hisense provides direct access to the internet through one or
more internet provider services Hisense does not warrant the accuracy, integrity or completeness of
the content provided through the use of the Web Service. Hisense makes no representation as to the
legality, applicability and/or appropriateness of the use of the Web Service, or its content, by persons
located outside the United States. Hisense disclaim all warranties, whether expressed or implied,
including but not limited to the warranties of title, merchantability or tness for a particular purpose.
No oral advice or written information given by Hisense or its agents, distributors or employees shall
create a warranty.
UNDER NO CIRCUMSTANCES SHALL HISENSE BE LIABLE FOR ANY DIRECT, INDIRECT, INCIDENTAL,
SPECIAL OR CONSEQUENTIAL DAMAGES THAT RESULT FROM YOUR USE OF OR INABILITY TO USE THE
WEB SERVICE, INCLUDING BUT NOT LIMITED TO RELIANCE BY YOU ON ANY INFORMATION OBTAINED
FROM THE WEB SERVICE THAT RESULTS IN MISTAKES, OMISSIONS, INTERRUPTIONS, DELETION OR
CORRUPTION OF FILES, VIRUSES, DELAYS IN OPERATION, THIRD PARTY SOFTWARE MALFUNCTIONS OR
HARDWARE MALFUNCTIONS OR TRANSMISSION, OR ANY FAILURE OF PERFORMANCE. THE FOREGOING
Page 63

62
Appendix C
LIMITATION OF LIABILITY SHALL APPLY IN ANY ACTION, WHETHER IN CONTRACT, TORT OR ANY OTHER
CLAIM, EVEN IF AN AUTHORIZED REPRESENTATIVE OF HISENSE HAS BEEN ADVISED OF OR SHOULD
HAVE KNOWLEDGE OF THE POSSIBILITY OF SUCH DAMAGES. User hereby acknowledges that this
limitation of liability shall apply to all Hisense content, merchandise and services available through the
Web Service. Some states or territories of the United States do not allow the exclusion or limitation of
incidental or consequential damages, so the above limitation or exclusion may not apply to you. These
guidelines and privacy policy are specic to the Hisense.
The Hisense product/device the user direct access to the internet through one or more internet
provider services (“Web Services”). The guidelines and privacy policy are eective June 1, 2012, and
apply to information that may be gathered through the use of the Web Services provide through the
Television Tablet Product you purchased.
Hisense maintains privacy policies to safeguard personal identifying information and communications
from unauthorized intrusions. By “personal identiable information”, we mean any personal information
that identifies you, such as name, address, telephone number, e-mail address, and any information
about activities (online or otherwise) that is directly linked to your information.
You may choose not to receive marketing communications, if any, from Hisense in connection with
the Web Services provided through your purchase of the Hisense product/device. You may also tell us
how you would like to be contacted in connection with information you provided to Us via our online
services. If you notify us that you do not want to receive any marketing information, we:
will not contact you directly with marketing messages in connection with Hisense online services;
will not disclose your information to others.
If you notify Hisense that you do not want us to use any of your information in the ways described
in this policy, we will honor your request. However, if you then later provide additional personal
information to this site or otherwise respond to one of Hisense’s online inquiries, we will assume that
you have changed your preference with respect to Hisense’s use of your information. You may at
anytime follow the procedure described above to elect not to be contacted by Hisense.
Hisense will use commercially reasonable efforts to insure that your personal information will be
kept secure, and We will continue to enhance our security procedures as new technology becomes
available.
Hisense will use commercially reasonable eorts to assure that your e-mail will be kept private. Hisense
will not read or disclose to those parties not aliated with Hisense, private e-mail communications
except that is required in the normal course of business.
Hisense will respond to improper conduct. Hisense may use personal information to investigate and
help prevent potentially unlawful activity or activity that threatens the company or otherwise violates
the customer agreement for any products or services that Hisense provides.
We may use session log data and cookies combined with anonymous user data (and personal data if
you provide it) to track user movement and behavior. We may use this information to help us or our
authorized retailers to oer to you products and services that may serve your needs and to perform
website-user analytics. We may supply this information to a third party metric provider to perform the
analysis for us and to provide the results to us. Our relationship with the metric provider is governed by
contract. The contract restricts the metric provider’s use of the data to performing requested analytics
and compiling reports for Hisense. The metric provider is prohibited from otherwise selling or sharing
the information or the results with anyone else. We use the information and the analytic results to
improve our website and the user’s experience.
Hisense will keep its privacy policy current, and make every eort to promptly update this web page
every time there is a change to this policy.
Hisense recognizes that children, including young teens, may not be able to make informed choices
about personal information requested online. Accordingly, Hisense does not knowingly target children
or teenagers (younger than eighteen years of age) for collection of information online. Hisense does
not solicit or collect personally identifying information from children and teenagers under eighteen
and does not allow anyone else to do so.
Page 64

63
Appendix C
Your use of the Web Services provided through the use of the Hisense product is at your own risk.
Hisense, its suppliers, distributors and the other parties involved in creating and delivering the content
contained in the Web Services, are not liable for any damages arising from the use of such Web
Services.
Through the use of the Hisense product/device and the Web Services, you will have access to various
websites that may also contain links to other websites, not owned or maintained by authorized
Hisense. Such websites are not under the control of Hisense, and Hisense is not responsible for the
content of any website or any link contained in a linked website.
Hisense reserves the right to modify the information contained on this site at any time without notice.
While Hisense makes all reasonable eorts to ensure that all material on this site is correct, accuracy
cannot be guaranteed and Hisense does not assume any responsibility for the accuracy, completeness
or authenticity of any information contained on this site. This site and all information and materials
contained herein, is provided to you “as is” without any warranty of any kind.
The use of the Hisense product and the Web Services is at the user’s risk. By using the Web Services
through the use of the Hisense product, you acknowledge and agree to be bound by all of the legal
terms outlined in this Privacy Policy as well as by all applicable laws and regulations. Hisense reserves
the right to change this Privacy Policy at any time and without prior notice.
Additional Support
For additional support information, please visit www.hisense-usa.com/support for:
Product Registration.
Accessories.
Frequently asked questions.
Firmware updates.
Warranty Information.
You can also call Customer Service Center at 1-888-935-8880 or Email Service@hisense-usa.com .
Warranty
The Warranty for this Hisense Branded Product (including any accessories included in the packaging,
hereinafter “Product(s)”) as supplied to the original consumer purchaser(hereinafter “CONSUMER”)
against defects in material and workmanship (hereinafter “Warranty”) as follows:
1. LABOR: For a period of one year from date of CONSUMER purchase, if this Product or any functional
part is determined by HISENSE, or a HISENSE authorized service provider(hereinafter “HISENSE
SERVICE CENTER”), to be defective, HISENSE will repair or replace the Product with a like refurbished
product of similar or better quality, at HISENSE’s sole discretion, at no charge to the CONSUMER,
or pay the labor charges to any HISENSE SERVICE CENTER. CONSUMER is responsible for one
way transportation charges to any HISENSE SERVICE CENTER. After the expiration of the one year
Warranty period, CONSUMER is responsible for all labor charges.
2. PARTS: For a period of one year from the date of CONSUMER purchase, HISENSE will supply, at no
charge to the CONSUMER, new, rebuilt or refurbished replacement functional parts in exchange for
defective functional parts which is subject to HISENSE’s determination. After the one year Warranty
period, CONSUMER is responsible for the costs of all parts.
3. TRANSPORTATION: CONSUMER assumes responsibility for all transportation or shipping charges of
Product to HISENSE SERVICE CENTER. During the aforementioned Warranty period, HISENSE will pay
the cost of shipping the Product back to the CONSUMER at HISENSE’s expense. HISENSE does not
oer in-home service.
Page 65

64
Appendix C
To obtain Warranty Service and troubleshooting information:
To receive Warranty service, the CONSUMER must contact HISENSE to troubleshoot and set up the
service. Proof of purchase in the form of an original bill of sale, receipt, or evidence that the Product is
within the applicable Warranty period(s) MUST be presented to HISENSE, or a HISENSE SERVICE CENTER.
CONSUMER should keep a separate backup copy of any contents of the product before delivering
the product to a HISENSE SERVICE CENTER for warranty service, as some or all of the contents may be
deleted or reformatted during the course of warranty service.
Exclusions and Limitations:
This Warranty covers manufacture defects in materials and workmanship encountered in the normal,
noncommercial use of the Product, and does not cover consumer instruction, delivery, installation, setup, adjustments, signal reception problems (including network), cosmetic damage or damage due to
acts of nature, accident, misuse, abuse, negligence, commercial use or modication of, or to any part of
the Product. This Warranty applies to the CONSUMER only and does not cover Products sold “AS IS” or
“WITH ALL FAULTS” and the Warranty is invalid if the factory-applied serial number has been altered or
removed from the Product. This Warranty is valid only in the United States, and only applies to Products
purchased and serviced in the United States.
THERE ARE NO EXPRESS WARRANTIES OTHER THAN THOSE EXPRESSLY DESCRIBED ABOVE, AND
NO WARRANTIES WHETHER EXPRESS OR IMPLIED, INCLUDING, BUT NOT LIMITED TO, ANY IMPLIED
WARRANTIES OF MERCHANTABILITY OR FITNESS FOR A PARTICULAR PURPOSE, SHALL APPLY AFTER
THE EXPRESS WARRANTY PERIOD STATED ABOVE, AND NO OTHER EXPRESS WARRANTY OR GUARANTY
GIVEN BY ANY PERSON, FIRM OR ENTITY WITH RESPECT TO THE PRODUCT SHALL BE BINDING ON
HISENSE. THIS WARRANTY IS THE EXCLUSIVE WARRANTY WITH RESPECT TO THE PRODUCT AND
HISENSE IS THE EXCLUSIVE WARRANTY PROVIDER FOR THE PRODUCT. REPAIR OR REPLACEMENT IS
THE EXCLUSIVE REMEDY OF THE CONSUMER. HISENSE SHALL NOT BE LIABLE FOR ANY INCIDENTAL
OR CONSEQUENTIAL DAMAGES CAUSED BY THE USE, MISUSE OR INABILITY TO USE THE PRODUCT.
NOTWITHSTANDING THE FOREGOING, CONSUMER’S RECOVERY AGAINST HISENSE SHALL NOT EXCEED
THE PURCHASE PRICE OF THE PRODUCT SOLD BY HISENSE. THIS WARRANTY SHALL NOT EXTEND
TO ANYONE OTHER THAN THE ORIGINAL CONSUMER WHO PURCHASED THE PRODUCT AND IS NOT
TRANSFERABLE.
Some states do not allow the exclusion or limitation of incidental or consequential damages, or allow
limitations on warranties, so the above limitations or exclusions may not apply to those states. This
Warranty gives consumer specic rights, and consumer may have other rights, which vary from state to
state.
Copyright and Trademark Notices
Hisense and associated logos where applicable are registered trademarks of Hisense Group in the
United States and/or other countries. All other trademarks are property of their respective owners. 2013
Hisense USA, Corporation. All Rights Reserved.
This Tablet PC incorporates High-Definition Multimedia Interface (HDMITM)
technology. HDMI, the HDMI logo and High-Denition Multimedia Interface are
trademarks or registered trademarks of HDMI Licensing LLC.
Wi-Fi® is a registered mark of the Wi-Fi Alliance.
Android, Google Play and other marks are trademarks of Google Inc..
Screenshots and product images are simulated and for instructional purposes only. They may dier
from the actual product and are subject to change without notice. Content shown may vary from
actual available content, which may change without notice.
Page 66

Ver. 13.01
 Loading...