

Hisense AS-09HR4SVCUH, AS-12HR4SVCUH, AS-18HR4STVUH, AS-24HR4SQJUH Installation Instructions Manual

CLIMATIZZATORE D’ARIA
Hisense Corporation
Serie Classical on off
Grazie per aver acquistato un climatizzatore d’aria HISENSE, Le raccomandiamo di leggere attentamente
questo manuale d’uso e di installazione prima di installare ed utilizzare questo apparecchio, e, di conservare
questo manuale in caso di eventuali future necessità.
Le raccomandiamo inoltre di attivare la GARANZIA “ 3 anni “ HISENSE ITALY come riportato sul certificato
di garanzia unito al presente (a corredo dell’unità interna).
Dismissione degli elettrodomestici
La direttiva europea 2002/96/CE sui rifiuti di apparecchiature elettriche ed elettroniche (RAEE), prevede che
gli elettrodomestici non debbano essere smaltiti nel normale flusso dei rifiuti solidi urbani.
Gli apparecchi dimessi devono essere raccolti separatamente per ottimizzare il recupero ed il riciclaggio dei
materiali che li compongono, per ottenere un importante risparmio d’energia ed impedire potenziali danni per
la salute umana e per salvaguardare l’ambiente.
Il simbolo del cestino barrato è riportato su tutti i prodotti per ricordare gli obblighi di raccolta separata.
Il consumatore potrà consegnare gli elettrodomestici dismessi al servizio di raccolta di raccolta, portarli
presso le apposite aree comunali o, se previsto dalla legge nazionale in materia, renderli ai rivenditori
contestualmente all’acquisto di un nuovo prodotto.
Tutti i principali produttori di elettrodomestici sono attivi nella creazione e gestione di raccolta e smaltimento
degli elettrodomestici dimessi, tramite appositi consorzi.

INDICE / INDEX
1. Informazioni importanti / Important informations
1.1. Preparazione prima dell’utilizzo / Preparation before use . . . . . . . . . . . . . . . . . . . . . 1
1.2. Informazioni sulla sicurezza / Important safety information . . . . . . . . . . . . . . . . . . . . 3
1.3. Consigli per il risparmio / Hints for economical operation . . . . . . . . . . . . . . . . . . . . . 4
2. Componenti / Components
2.1. Schema globale / Global view . . . . . . . . . . . . . . . . . . . . . . . . . . . . . . . . . . . . . . . . . . 5
2.2. Indicatori dell’unità interna / Indoor unit leds . . . . . . . . . . . . . . . . . . . . . . . . . . . . . . . 6
3. Telecomando / Remote control
3.1. Pulsanti / Buttons . . . . . . . . . . . . . . . . . . . . . . . . . . . . . . . . . . . . . . . . . . . . . . . . . . . . 7
3.2. Utilizzo e funzionamento / Handling and operating modes . . . . . . . . . . . . . . . . . . . . 8
3.3. Controllo flusso aria / Air flow control. . . . . . . . . . . . . . . . . . . . . . . . . . . . . . . . . . . . . 9
3.4. Modalità SMART / SMART mode. . . . . . . . . . . . . . . . . . . . . . . . . . . . . . . . . . . . . . . 10
3.5. Tasto OROLOGIO / CLOCK button . . . . . . . . . . . . . . . . . . . . . . . . . . . . . . . . . . . . . 10
3.6. Modalità TIMER / TIMER mode . . . . . . . . . . . . . . . . . . . . . . . . . . . . . . . . . . . . . . . . 11
3.7. Modalità SLEEP / SLEEP mode . . . . . . . . . . . . . . . . . . . . . . . . . . . . . . . . . . . . . . . 12
3.8. Modalità SUPER / SUPER mode. . . . . . . . . . . . . . . . . . . . . . . . . . . . . . . . . . . . . . . 12
4. Manutenzione / Maintenance
4.1. Generale / General. . . . . . . . . . . . . . . . . . . . . . . . . . . . . . . . . . . . . . . . . . . . . . . . . . 13
4.2. Pulizia del filtro / Filter cleaning . . . . . . . . . . . . . . . . . . . . . . . . . . . . . . . . . . . . . . . . 13
5. Operazioni e prestazioni / Operations and performances . . . . . . . . . . . . . . . . . . . . . . . . . . 14
6. Problemi e loro cause / Problems and causes
6.1. Generale / General. . . . . . . . . . . . . . . . . . . . . . . . . . . . . . . . . . . . . . . . . . . . . . . . . . 15
6.2. Problemi relativi al telecomando / Concerning the remote control. . . . . . . . . . . . . . 17
7. Installazione / Installation
7.1. Norme di sicurezza - Preliminari / Safety regulations - Preliminary . . . . . . . . . . . . . 18
7.2. Alimentazione elettrica - Locazione / Power supply - Installation site . . . . . . . . . . . 19
7.3. Locazione dell’unità esterna / Outdoor unit installation site . . . . . . . . . . . . . . . . . . . 20
7.4. Posizione delle unità - Tubazioni / Units installation - Pipes . . . . . . . . . . . . . . . . . . 21
7.5. Installazione dell’unità interna / Indoor unit installation . . . . . . . . . . . . . . . . . . . . . . 22
7.6. Connessioni elettriche / Wiring connections . . . . . . . . . . . . . . . . . . . . . . . . . . . . . . 23
7.7. Tubazioni - Collegamenti frigoriferi / Pipes - Refrigerant connections . . . . . . . . . . . 25
7.8. Spurgo aria / Air purging . . . . . . . . . . . . . . . . . . . . . . . . . . . . . . . . . . . . . . . . . . . . . 26
7.9. Svuotamento / Pump down . . . . . . . . . . . . . . . . . . . . . . . . . . . . . . . . . . . . . . . . . . . 28
7.10. Tubazioni di drenaggio / Drain pipes . . . . . . . . . . . . . . . . . . . . . . . . . . . . . . . . . . . 29
8. Caratteristiche tecniche / Technical characteristics
8.1. Dati tecnici / Technical data . . . . . . . . . . . . . . . . . . . . . . . . . . . . . . . . . . . . . . . . . . . 30
9. Schemi elettrici / Electrical layouts. . . . . . . . . . . . . . . . . . . . . . . . . . . . . . . . . . . . . . . . . . . . 31

Prima di utilizzare l condizionatore assicurarsi di effettuare
le seguenti impostazioni e verifiche.
Preparazione del telecomando
- Il telecomando non è preimpostato nè per il fuzionamento
in solo freddo nè per quello in pompa di calore.
- Ogni qualvolta che si sostituiscono le batterie o viene attivato il telecomando per la prima volta, l’indicatore di raffreddamento e di riscaldamento lampeggaiano alternativamente sul display.
L’utente deve impostare il telecomando a seconda del
modello di climatizzatore che ha aquistato, come segue:
- premendo un pulsante qualsiasi quando lampeggia si
imposta il funzionamento in solo raffreddamento.
- premendo un pulsante qualsiasi quando lampeggia si
imposta il funzionamento in pompa di calore.
- se non si preme alcun pulsante entro 12 secondi il telecomando si imposta automaticamente in pompa di calore.
Note:
Se impostate il telecomando per il funzionamento in solo freddo,
la modalità riscaldamento viene esclusa dal telecomando.
Impostazioni di auto-restart
Se desiderate la funzione di auto-restart , alimentate il climatizzatore e tenete premuto il pulsante di emergenza (ON/OFF)
sull’unità intera per più di 5 secondi, la funzione di auto-restart si
attiva emettendo un suono e il climatizzatore rimane in stand-by .
Se è attivo l’auto-restart, tenendo premuto il pulsante di emergenza (ON/OFF) sull’unità intera per più di 5 secondi, la funzione
di auto-restart viene disattivata, viene emesso un suono e il climatizzatore rimane in stand-by .
Before using the air conditioner, be sure to check and preset
the following.
Remote Controller presetting
-The remote controller is NOT presetting as Cooling Only Air
Conditioner or Heat Pump by manufacturer.
-Each time after the remote controller replaces batteries or is
energized, the Cooling indicator and Heating indicator
will flashes alternately on LCD of the remote controller.
- User can preset the remote controller type depending on the
air conditioner type you have purchased as follows:
- Press any button when flashes, Heat Pump is set.
- Press any button when flashes, Cooling Only is set.
- If you don't press any button within 12 seconds, the remote
controller is preset as Heat Pump automatically.
Note:
If the air conditioner you purchased is a Heat Pump one, and
you preset the remote controller as Cooling Only, then you CAN
NOT preset the Heating operation with the remote controller.
Auto Restart Presetting
If you want auto restart function, let the appliance is energized,
hold down the Emergency button (ON/OFF) on the indoor unit
for over 5 seconds, auto restart function is set with buzz sound,
air conditioner is on standby.
If auto restart has been set, hold down the Emergency button
(ON/OFF) on the indoor unit for over 5 seconds, auto restart
function is canceled with buzz sound, air conditioner is on
standby.
1. INFORMAZIONI IMPORTANTI
1. IMPORTANT INFORMATIONS
1.1. Preparazione prima dell’utilizzo
1.1. Preparation before use
1

2
3
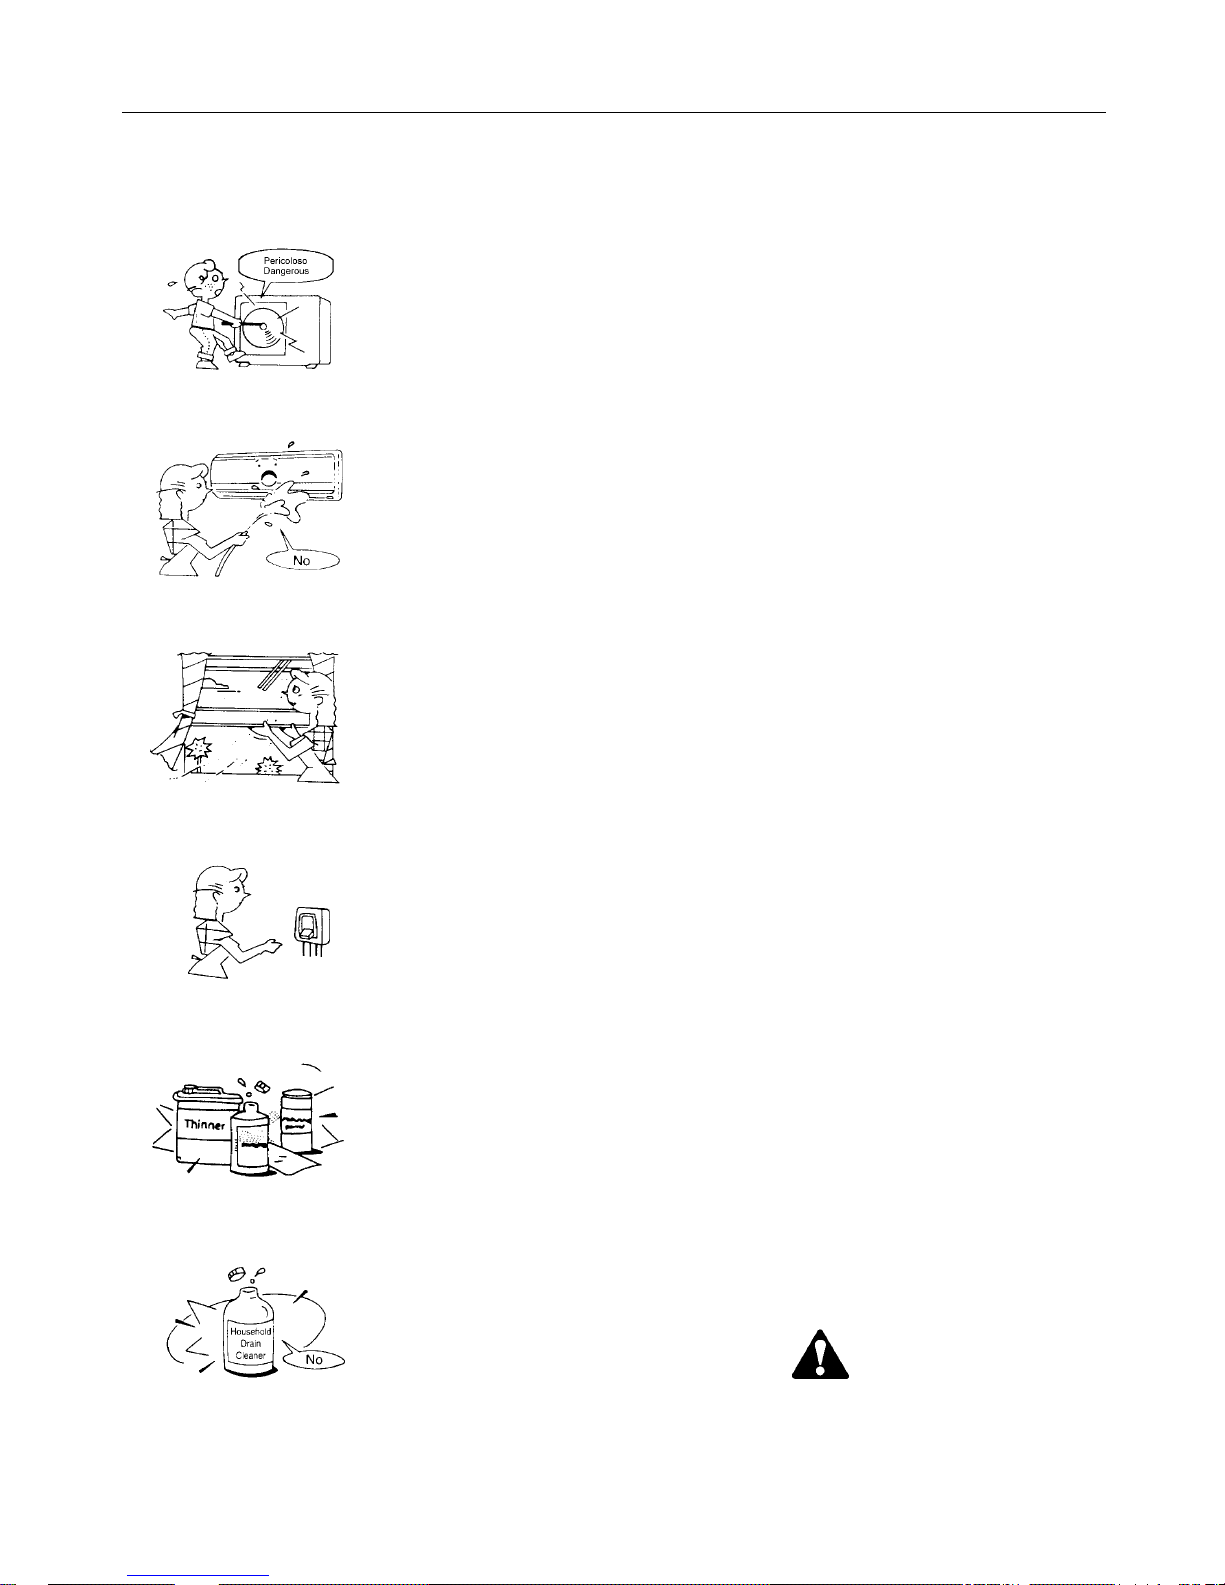
PRECAUZIONI
Non provare a installare l'unità da soli.
Questa unità richiede l'installazione da
parte di persone qualificate.
CAUTION
Do not attempt to install this unit yourself.
This unit requires installation by qualified
persons.
PERICOLO
Non provare da soli a fornire assistenza
alla macchina. Questa unità non ha elementi di utilizzo che devono essere aperti
e la rimozione del coperchio può esporvi
a pericolosi voltaggi. Togliere l’ alimentazione non basta ad evitare possibili shock
elettrici.
DANGER
Do not attempt to service the unit yourself. This unit has no user serviceable
components opening and removing the
cover will expose you to dangerous voltage.
Turning off the power supply will not prevent potential electric shock.
PERICOLO
Mai mettere le mani o oggetti nello sbocco
d'entrata e uscita dell'unità. Questa unità
contiene una ventola che gira ad alta
velocità. Un contatto con essa può causare serie lesioni.
DANGER
Never put hands or objects into the air
outlet of indoor and outdoor units. This
unit contain a fan running at high speed.
Contact with the moving fan will cause
serious injury.
PERICOLO
Per evitare il rischio di serie scariche elettriche, mai spruzzare o versare acqua o
altri liquidi nell'unità.
DANGER
To avoid the risk of serious electrical
shock, never sprinkle or spill water or
liquid on the unit.
ATTENZIONE
Ventilare la stanza ogni tanto mentre il
condizionatore è in funzione, specialmente
se ci sono altre apparecchiature a gas in
uso nella stanza. Non seguire questi
consigli può causare una perdita di
ossigeno nella stanza.
WARNING
Ventilate the room occasionally while the
air conditioner is in use, especially if
there is also a gas appliance in use in
this room. Failure to follow these directions
may result in a loss of oxygen in the
room.
ATTENZIONE
Per prevenire una scarica elettrica, spegnere la corrente o staccare la spina
prima di iniziare ogni pulizia o altre varie
manutenzioni. Seguire le indicazioni per
la pulizia nel manuale utente.
WARNING
To prevent electric shock, turn off the
power or disconnect the power supply
plug before beginning any cleaning or
other routine maintenance. Follow the
directions for cleaning in the owner's
manual.
ATTENZIONE
Non usare liquidi o aereosol per la pulizia.
Usare un soffice e asciutto panno per
pulire l'unità. Per evitare scariche elettriche, mai provare a pulire l'unità spruzzando acqua su di essa.
WARNING
Do not use liquid cleaners or aerosol
cleaners. Use a soft and dry cloth for
cleaning the unit. To avoid electric shock,
never attempt to clean the unit by sprinkling water on it.
1. INFORMAZIONI IMPORTANTI
1. IMPORTANT INFORMATIONS
1.2. Informazioni sulla sicurezza
1.2. Important safety informations
NOTE
Per un'adeguata prestazione, utilizzare
l'unità sotto la temperatura operativa e le
condizioni d'umidità indicate nel Manuale
Utente. Se l'unità è utilizzata al di fuori di
queste indicazioni, questo può causare
malfunzionamenti dell'unità o gocciolamento dall'unità interna.
NOTE
For proper performance, operate the unit
under the usable operating temperature
and humidity conditions indicated in this
owner's ma-nual. If the unit is operated
beyond these condition, it may cause
malfunctions of the unit or dew dripping
from the unit.
PRECAUZIONI
Non usare detergenti nell'unità. I solventi
possono velocemente distruggere gli elementi dell'unità (vaschetta di scarico e gli
elementi dello scambiatore di calore).
CAUTION
Do not use caustic household dry cleaners in the unit. Drain cleaners can
quickly destroy the unit components
(drain pan and heat-exchanger coil etc.).
1. INFORMAZIONI IMPORTANTI
1. IMPORTANT INFORMATIONS
1.3. Consigli per il risparmio
1.3. Hints for economical operation
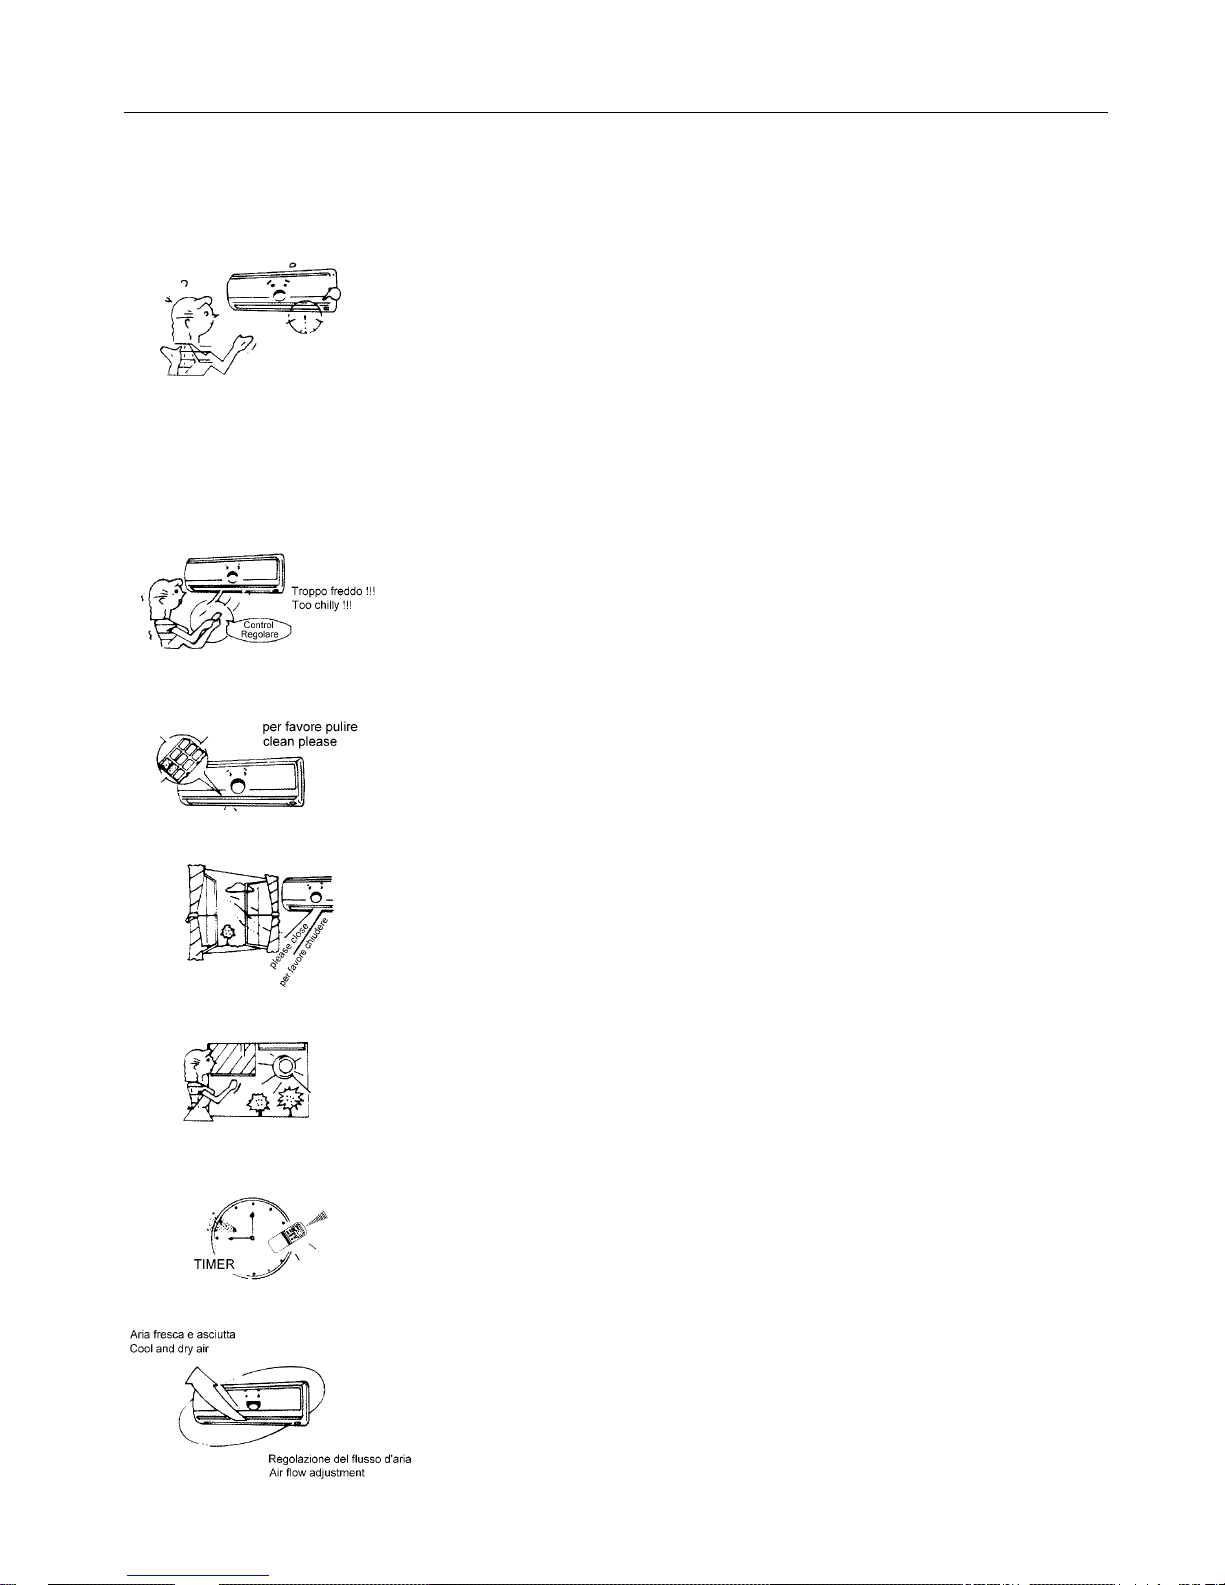
Mantenere la temperatura della stanza
a un livello confortevole.
Maintain room temperature at a
comfortable level.
Pulizia del filtro dell'aria
Un filtro dell'aria intasato, riduce la potenza di raffreddamento. Pulirlo ogni due settimane.
Clean air filter
A clogged air filter reduce cooling effi-
ciency. Clean it once two weeks.
Mai aprire porte e finestre oltre ciò che
è necessario
Per mantenere fresca o calda l'aria nella
stanza, mai aprire porte e finestre oltre
ciò che è necessario.
Never open doors and windows more
often than necessary
To keep cool or warm air in the room,
never open doors and windows more
often than necessary.
Tende
In raffreddamento, chiudere le tende per
evitare la luce solare diretta.
Windows curtains
In cooling, close the curtain to avoid direct
sunlight.
Usare regolarmente il timer
Regolare il funzionamento per il tempo di
utilizzo desiderati.
Use the timer effectively
Set the timer for the desired operating
time.
Rendere uniforme la circolazione dell'aria nella stanza
Sistemare la direzione del flusso d'aria
per ogni circolazione nella stanza.
Get uniform circulation of room air
Adjust airflow direction for ever circulation
of room air.
4
5
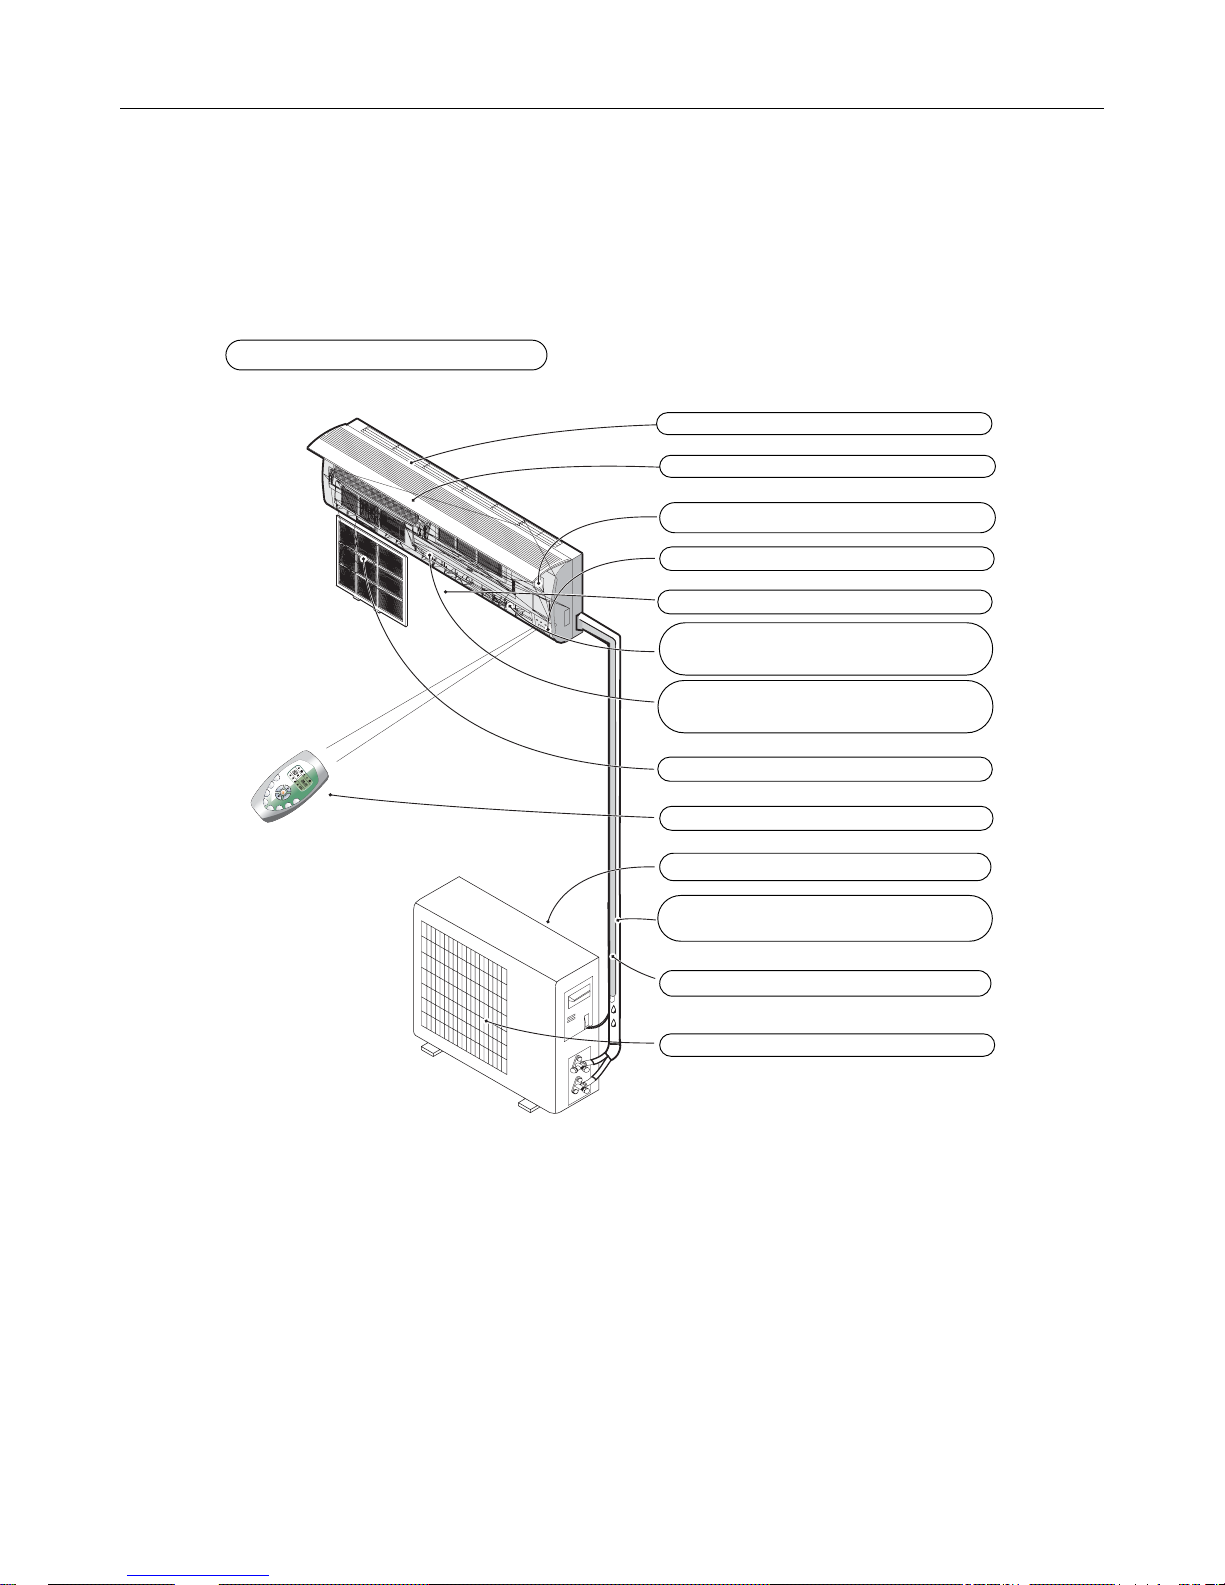
2. COMPONENTI
2. COMPONENTS
2.1. Schema globale - Selettori
2.1. Global view - Switches
UNITA' INTERNA / INDOOR UNIT
F
A
N
M
O
D
E
T
I
M
E
R
O
N
C
L
O
C
K
L
O
C
K
T
I
M
E
R
O
FF
S
L
E
E
P
S
W
IN
G
SMART
SU
PER
O
N
O
N
OF
F
O
FF
Tubazioni connessione elettrica
Pipes and power connection cord
Scarico condensa / Drain
Ingresso aria / Air inlet
Griglia frontale / Front panel
Pannello di controllo / Control panel
Pannello display / Display panel
Uscita aria / Air outflow
Filtri aria / Air filter
Telecomando /Remote control
Alette orizzontale regolazione flusso aria
Horizontal air flow grille
Uscita aria / Air outlet
Ingresso aria / Aifr intake
Alette verticale regolazione flusso aria
Horizontal air flow grille

6
2. COMPONENTI
2. COMPONENTS
2.2. Indicatori dell’unità interna
2.2. Indoor unit leds
1) Indicatore Timer
Si illumina quando è impostata la funzione TIMER.
2) Indicatore OPERATION
L’indicatore lampeggia dopo che il climatizzatore è stato alimentato e si illumina durante il funzionamento.
3) Indicatore SLEEP
Si illumina quando il climatizzatore è in modalità risparmio
energetico.
4) Indicatore di TEMPERATURA
Visualizza la temperatura impostata durante il funzionamento
del climatizzatore.
5) Indicatore COMPRESSORE
Si illumina quando il compressore in funzionamento.
1) TIMER Indicator
This indicator illuminates when TIMER is set ON/OFF.
2) OPERATION Indicator
This indicator flashes after power is on ond illuminates when
the unit is in operation.
3) SLEEP Indicator
This indicator appears when the unit is in Energy-saving operation.
4) TEMPERATURE Indicator
It displays the seeting temperature during the operation of the
air conditioner.
5) COMPRESSOR Indicator
It lights up when compressor is running.
.
1
2
3
4
5
3.1. TELECOMANDO 3.1. REMOTE CONTROLLER
DISPLAY DISPLAY
Timer
C omp.
Run
Sleep
10
11
12
13
3
4
1
2
6
7
5
8
9
FAN
T
I
M
E
R
O
N
C
L
O
C
K
L
O
C
K
T
I
M
E
R
O
F
F
S
L
E
E
P
S
W
I
N
G
S
M
A
R
T
SU
P
ER

(1) TASTO ON/OFF
Premere il tasto per accendere il climatizzatore, premere
nuovamente per fermare le opzioni.
(2) TASTO MODALITÀ
Premere questo tasto per selezionare la modalità di funzionamento
(3) T astao ventilazione
Questo tasto è usato per selezionare la velocità del ventilatore in
sequenza auto, high, medium or low.
(4) (5) T asto di temperatura
Questo tasto è usato per impostare la temperatura e anche il tempo
reale.
(6) TASTO SMART
È usato per entrare direttamente nel funzionamento di logica
incoerente, malgrado che l'unità sia accesa o spenta.
(7) TASTO SWING
È usato per arrestare o aggiustare l'aletta oscillante verticale
e regolare il senso desiderato del flusso d'aria su/giù.
(8) TASTO SONNO
È usato per impostare o annullare la modalità di funzionamento sonno.
(9) TASTO DI BLOCCAGGIO
Premendo il tasto di bloccaggio, tutti i tasti sono disattivi. Premendo di nuovo il tasto annullarlo.
(10) TASTO OROLOGIO
È usto per impostare l’ora corrente.
(11) (12) TASTO TIMER
È usto per impostare il timer di funzionamento.
(13) TASTO SUPER
É usato per inviare o arrestare il raffreddamento veloce.
(il raffreddamento veloce funziona automaticamente ad alta
velocità del ventilatore ed a temp. d’ impostatazione 18°C)
(1) ON/OFF BUTTON
The appliance will be started when it is energized or will be
stopped when it is in operation, if you press this button.
(2) MODE BUTTON
Press this button to slect the operation mode
(3)Fan BUTTON
Used to select fan speed in sequence auto, high, medium or
low.
(4) (5) ROOM TEMPERATURE SETTING BUTTONS
Used to adjust the room temperature and the timer, also real
time.
(6) SMART BUTTON
Used to enter fuzzy logic operation directly, regardless of the
unit is on or off.
(7) SWING BUTTON
Used to stop or start vertical adjustment louver swinging and
set the desired up/down airflow direction.
(8) SLEEP BUTTON
Used to set or cancel Sleep Mode operation.
(9) LOCK BUTTON
When you press this button, all the buttons are locked and
not available. Press again to cancel it.
(10) CLOCK BUTTON
Used to set the current time.
(11) (12) TIMER ON/OFF BUTTON
Used to set or cancel the timer operation.
(13) SUPER BUTTON
Used to start or stop the fast cooling.
(Fast cooling operates at high fan speed with 18 C set temp
automatically)
Cooling indicator
Dry indicator
Fan only indicator
Heating indicator
Auto fan speed
High fan speed
Medium fan speed
Low fan speed
Smart indicator
Lock indicator
Super indicator
Signal transmit.
Display set timer
Display current time
Display set temperature
Indicatore di temperatuira
Indicatore deumidificazione
Indicatore ventilazione
Indicatore riscaldamento
Velocità ventilatore auto
Velocità ventilatore alta
Velocità ventilatore media
Velocità ventilatore bassa
Smart indicator
Indicatore di bloccaggio
Indicatore Super
Trasmissione segnale.
Display impostazione timer
Display ora corrente
Display temperatura d’impostazione
ON
ON
OFF
OF F
3. TELECOMANDO
3. REMOTE CONTROL
3.1. Pulsanti
3.1. Buttons
7
3. TELECOMANDO
3. REMOTE CONTROL
3.2. Utilizzo e funzionamento
3.2. Usage and operating modes
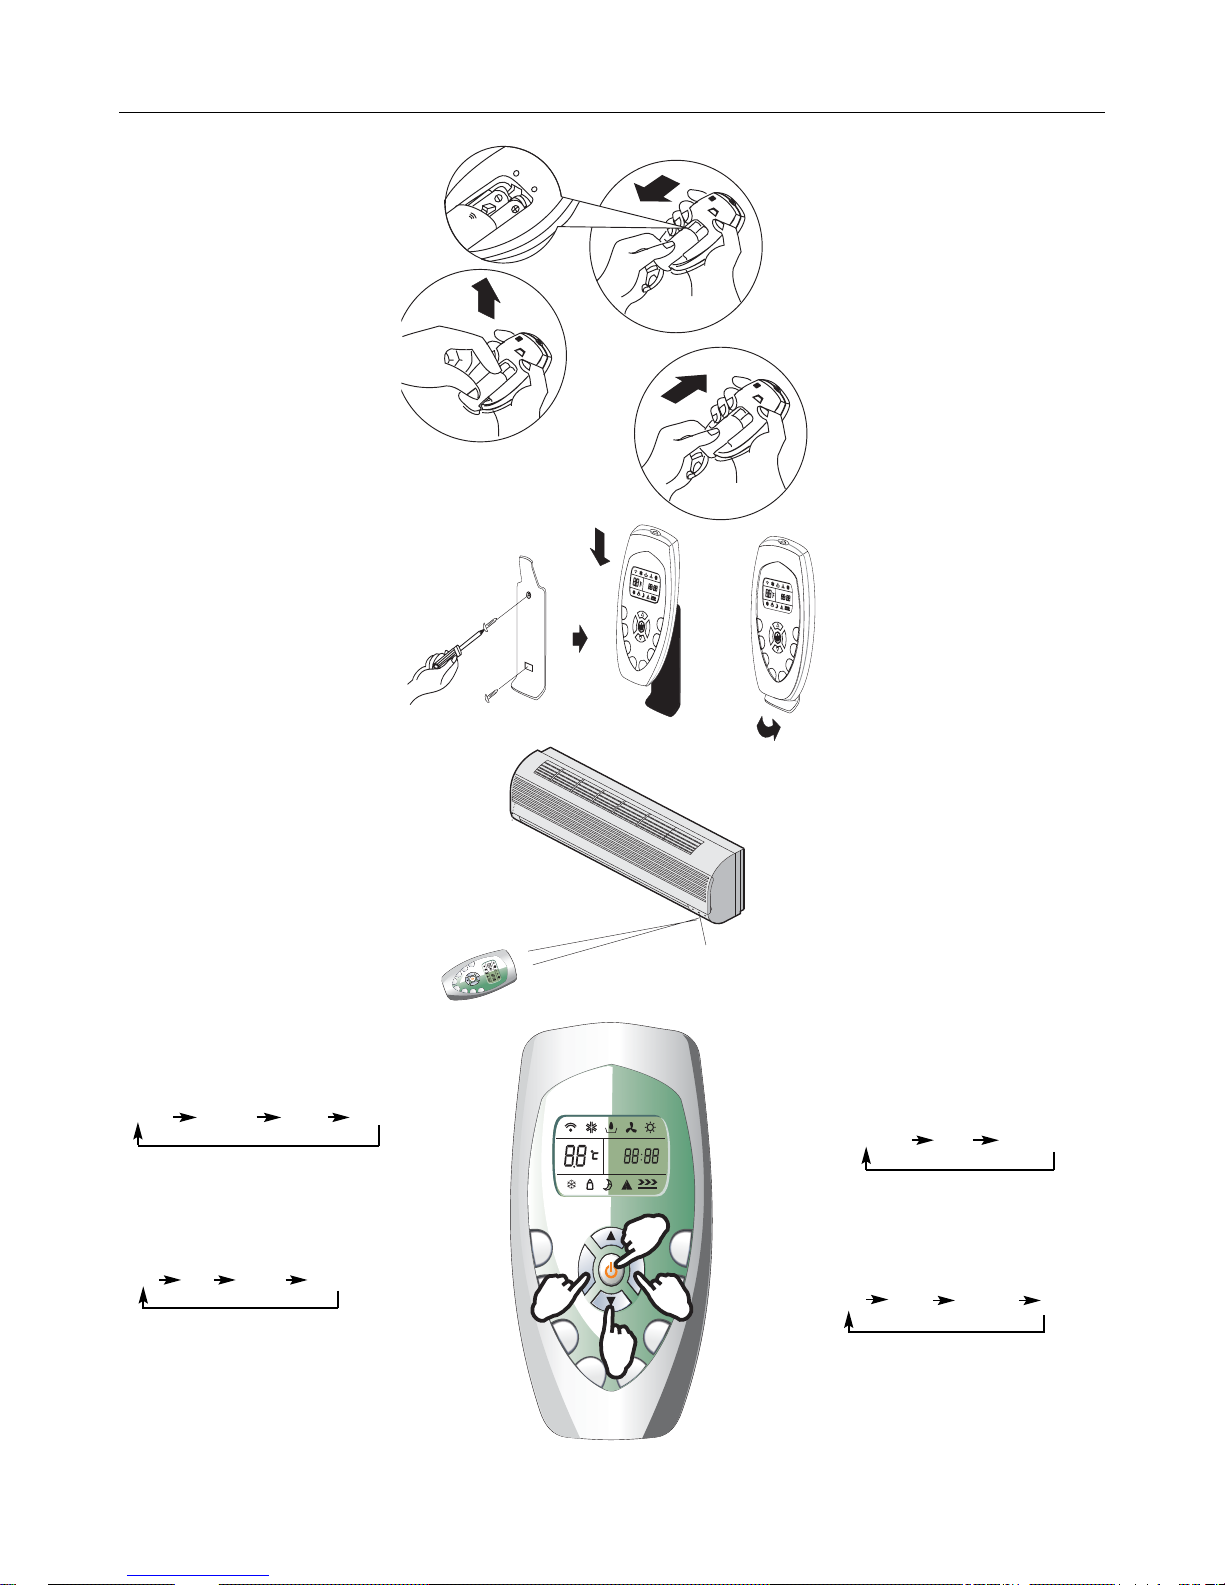
How to insert the batteries
(1) Slide down the cover of the battery compartment.
Remove the used batteries and
insert new ones correctly.
(2) Reattach the cover by sliding it
back into position.
NOTE
- Do not use old batteries or different type batteries. Such a use may
cause remote control wrong functioning.
- If you do not use the remote control more than two weeks, remove
the batteries. Damages may be
caused by possible leakages.
- Replace batteries when no “beep”
is received from the indoor unit or if
the transmission indicator on the
remote controller fails to light.
Notes for Using the Remote Con-
troller
Put the remote controller on the
frame. Fix the frame on the wall or
pillar with attached screw (to ensure
the normal signal transmission)(optional).
How to use
Keep the remote controller where its
signals can reach the receiver of the
indoor unit.
A distance of 7m is allowed.
Operating modes
(1) Slecting mode
Each TIME “MODE” button is pressed, the operation mode is changed
in sequence:
COOLING DRY FAN ONLY
(2) Fan mode
Each time the “FAN” button is pressed, the fan speed is changed in
sequence:
Auto High Medium Low
At “FAN ONLY” mode, only “High”,
“Medium”, and “ Low” are available.
At “DRY” mode, Fan speed is set at
“Low” automatically, “FAN” button is
ineffective in this case.
Come inserire le batterie
(1) Rimuovere il coperchio del compartimento delle batterie facendo
scivolare nella direzione della freccia.
(2) Richiudere il coperchio del vano
batterie.
NOTE
- Non mettere insieme batterie
nuove con vecchie o batterie di tipo
differente. Ciò può essere causa di
malfunzionamento.
- Se non si usa il telecomando per
un lungo periodo le batterie devono
essere tolte per evitare danni causati da eventuali perdite.
- Le batterie vanno sostituite quando non si riceve alcun “bip” dal l’unità interna o se l’indicatore di trasmissione sul telecomando non si
accende.
- Note per l’uso del telecomando
Posizionare il telecomando nell’apposito supporto fissato a muro (per
assicurare la trasmissione corretta
del segnale).
Modo d’uso
Tenere il telecomando in maniera
tale che il segnale possa raggiugere
il ricevitore dell’unità interna.
È permessa una distanza massima
di 7m.
Modalità di funzionamento
(1) Selezione modalità
Ogni volta il tasto “MODE” viene
premuto, la modalità di funzionamento è cambiata nella sequenza
seguente:
RAFF. DEUM. VENT RISC.
(2) Modalità ventilazione
Ogni volta il tasto “FAN” viene premuto, la modalità di funzionamento
è cambiata nella sequenza seguente:
Auto Alta Media Bassa
In modalità "VENTILAZIONE", soltanto la "Alta", "Media" e "Bassa"
velocità del ventilatore sono disponibile. In modalità di "DEUMIDIFICAZIONE" il ventilatore è automaticamente in "Bassa", il tasto "FAN" è
disattivo in questo caso.
Ricevitore del segnale
Signal receptor
F
A
N
M
O
D
E
T
I
M
E
R
O
N
C
L
O
C
K
LO
C
K
T
IM
E
R
O
F
F
S
L
E
E
P
SWIN
G
S
M
A
R
T
SUP
ER
O
N
O
N
O
F
F
O
FF
F
A
N
FAN
MODE
MO
D
E
ON
ON
OF
F
O
F
F
F
A
N
FA
N
M
O
D
E
M
ODE
ON
O
N
O
F
F
O
FF
FAN
MODE
TIMER ON
CLOCK
LOCK
TIMER OFF
SLEEP
SWING
SMART
SUPER
ON
ON
OFF
OF F
2
3
1
4
8
 Loading...