

Hisense AP-10CR1SEPS, AP-12CR1SEPS, AP-12CR1SEJS, AP-14DR1SFJS2, AP-08CR1SEJS Use And Installation Instructions
...
AP-10CR1SEPS
AP-12CR1SEPS
AP-14DR1SFJS2
AP-08CR1SEJS
AP-10CR1SEJS
AP-12CR1SEJS
For questions about features, operation/performance, parts or service, call:
1-877-465-3566
Thank you very much for purchasing this Air Conditioner. Please read
these use and installation instructionscarefully before installing and using
this appliance,and keep this manual for future reference.
Para preguntas sobre las características, la operación/el funcionamiento, los
componentes o el servicio del producto, llame: 1-877-465-3566
Muchísimas gracias por la compra de este aire acondicionado. Que lea las
instrucciones de uso e instalación detalladamente antes de su instalación y
utilización del Producto y preserve este manual para la futura referencia.
INSTRUCCIONES DE USO E INSTALACIÓN

1
TABLE OF CONTENTS
AIR CONDITIONER SAFETY.........................................................
3
INSTALLATION REQUIREMENTS................................................
3
Tools and Parts...........................................................................
3
Location Requirements...............................................................
4
Electrical Requirements..............................................................
4
INSTALLATION INSTRUCTIONS..................................................
5
Unpack the Air Conditioner.........................................................
5
Install Portable Air Conditioner................................................................................................
.
7
6
...................................................................................
9
8
PORTABLE AIR CONDITIONER USE. .......................................
10
Starting Your Portable Air Conditioner .....................................
10
Using the Remote Control .......................................................
11
IDENTIFICATION OF P
ARTS............................................
2
Normal Sounds..........................................................................
15
Draining the Air Conditioner.......................................................
16
Cleaning the Air Filter.................................................................
16
Storing After Use........................................................................
16
TROUBLESHOOTING..................................................................
17
PORTABLE AIR CONDITIONER
CARE
.....................................16..
1
Cleaning the Outside..................................................................
6
Window Vent Panel And Extensions
Installation In Vertical Sliding Windows
Installation In Horizontal Sliding Windows
WARRANTY ..................................................................................
19
State California Proposition 65 Warnings:
WARNING:This product contains one or more chemicals known to the State of California to cause cancer.
WARNING:This product contains one or more chemicals known to the State of California to cause birth
defects or other reproductiver harm.
ÍNDICE DE CONTENIDOS
..............
............................................
..................................................................
.............................................................
.
..............................................................
.....................................
................................................
....................................................................................
.
.
...................................................
.
30
.
...........................
31
................................
31
..................................................
32
................................................
.....................................................................
36
....................................
37
..........................................................
37
...............................................
37
....................................................
38
.........................................................................................
40
...............
37
........................................................................
37
IDENTIFICACIÓN DE LAS PARTES
MEDIDAS DE SEGURIDAD DEL AIRE ACONDICIONADO
REQUISITOS PARA LA INSTALACIÓN
INSTRUCCIONES PARA LA INSTALACIÓN
Desembalaje del aire acondionado
Panel de Ventanillas Y Extensiones
Instalación del aire acondicionado portátil
Instalación en las ventanas deslizantes verticales
Instalación En Ventanas Deslizantes Horizontales
USO DEL AIRE ACONDICIONADO PORTÁTIL
Para comenzar con el aire acondicionado
Utilización del control remoto
Sonidos normales
ATENCIÓN DEL AIRE ACONDICIONADO PORTÁTIL
Limpieza exterior
Limpieza del filtro de aire
Para guardarlo después del uso
Para el drenaje del aire acondicionado
SOLUCIÓN DE PROBLEMAS
GARANTÍA
Herramientas y piezas
Requisitos de localización
Requisitos eléctricos
.....
29
24
23
24
24
25
25
La propuesta 65 del Estado de California advierte:
ADVERTENCIA: Este producto contiene uno o más químicos conocidos por el Estado de California que causan
cáncer.
ADVERTENCIA: Este producto contiene uno o más químicos conocidos por el Estado de California que causan
defectos de nacimiento o daños reproductivos.
26
26
27
28
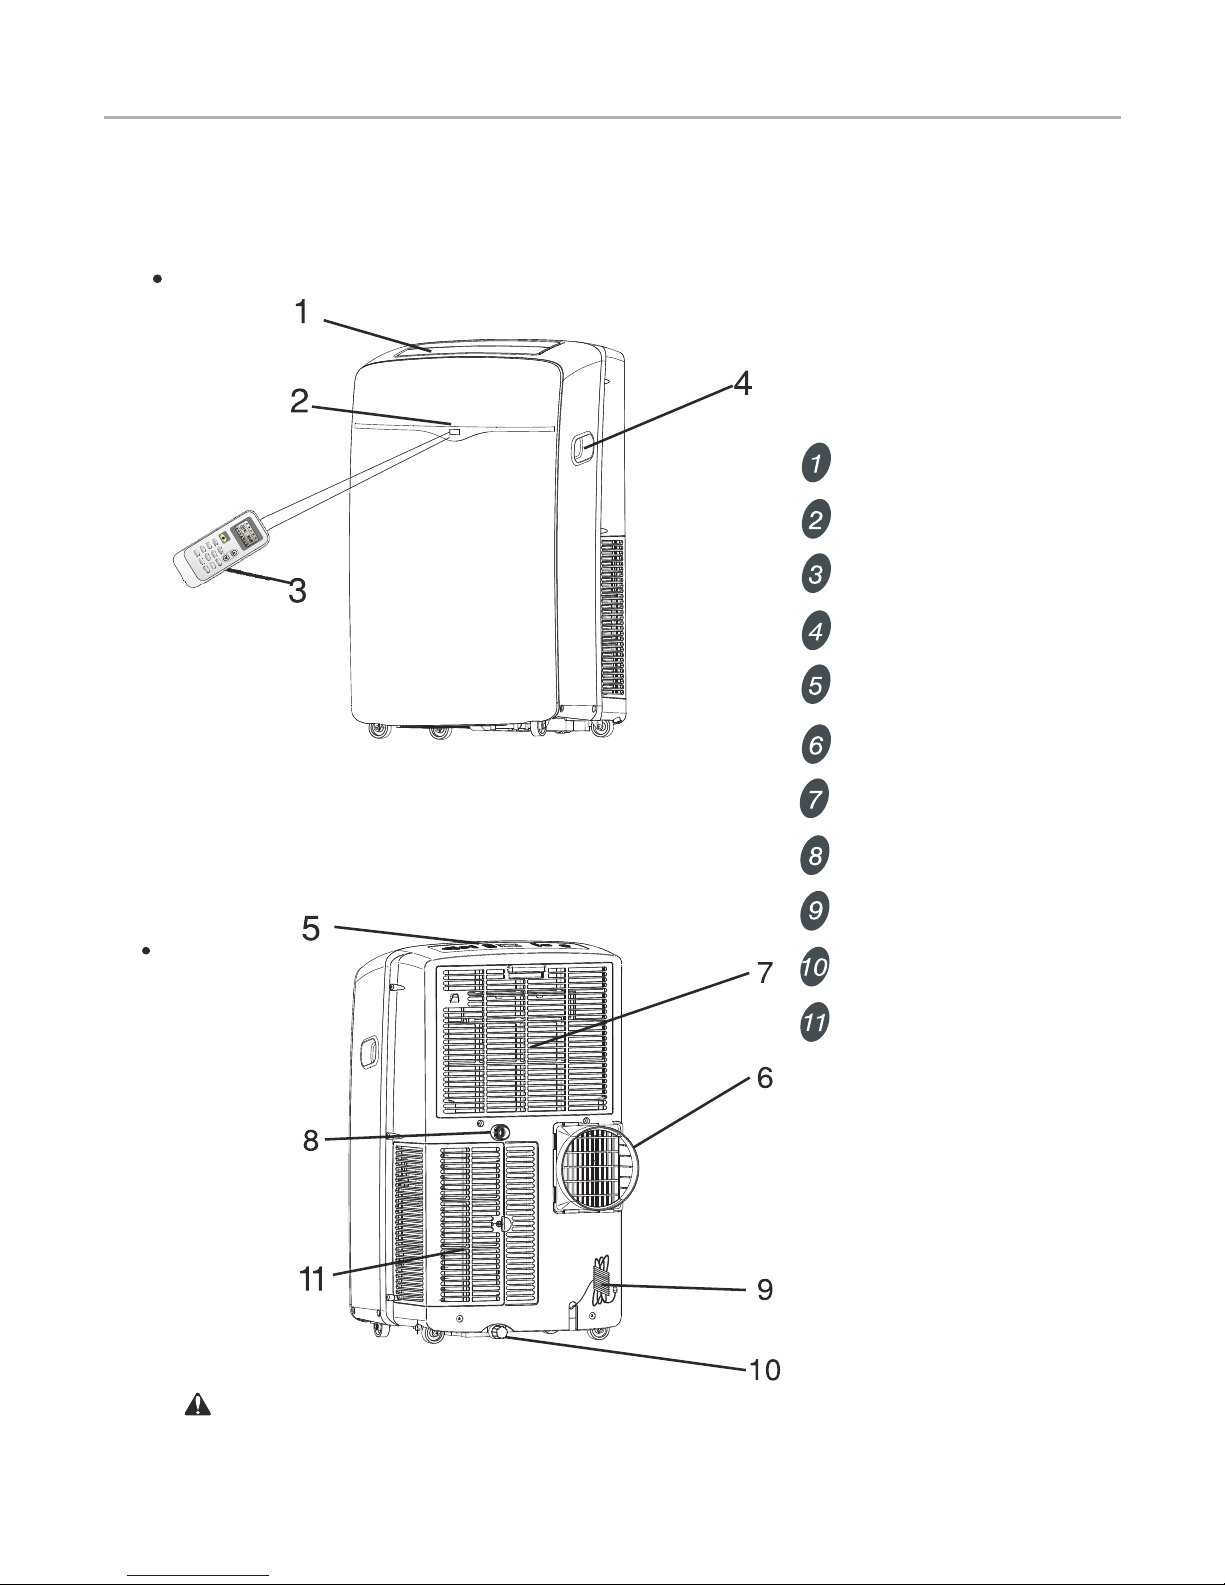
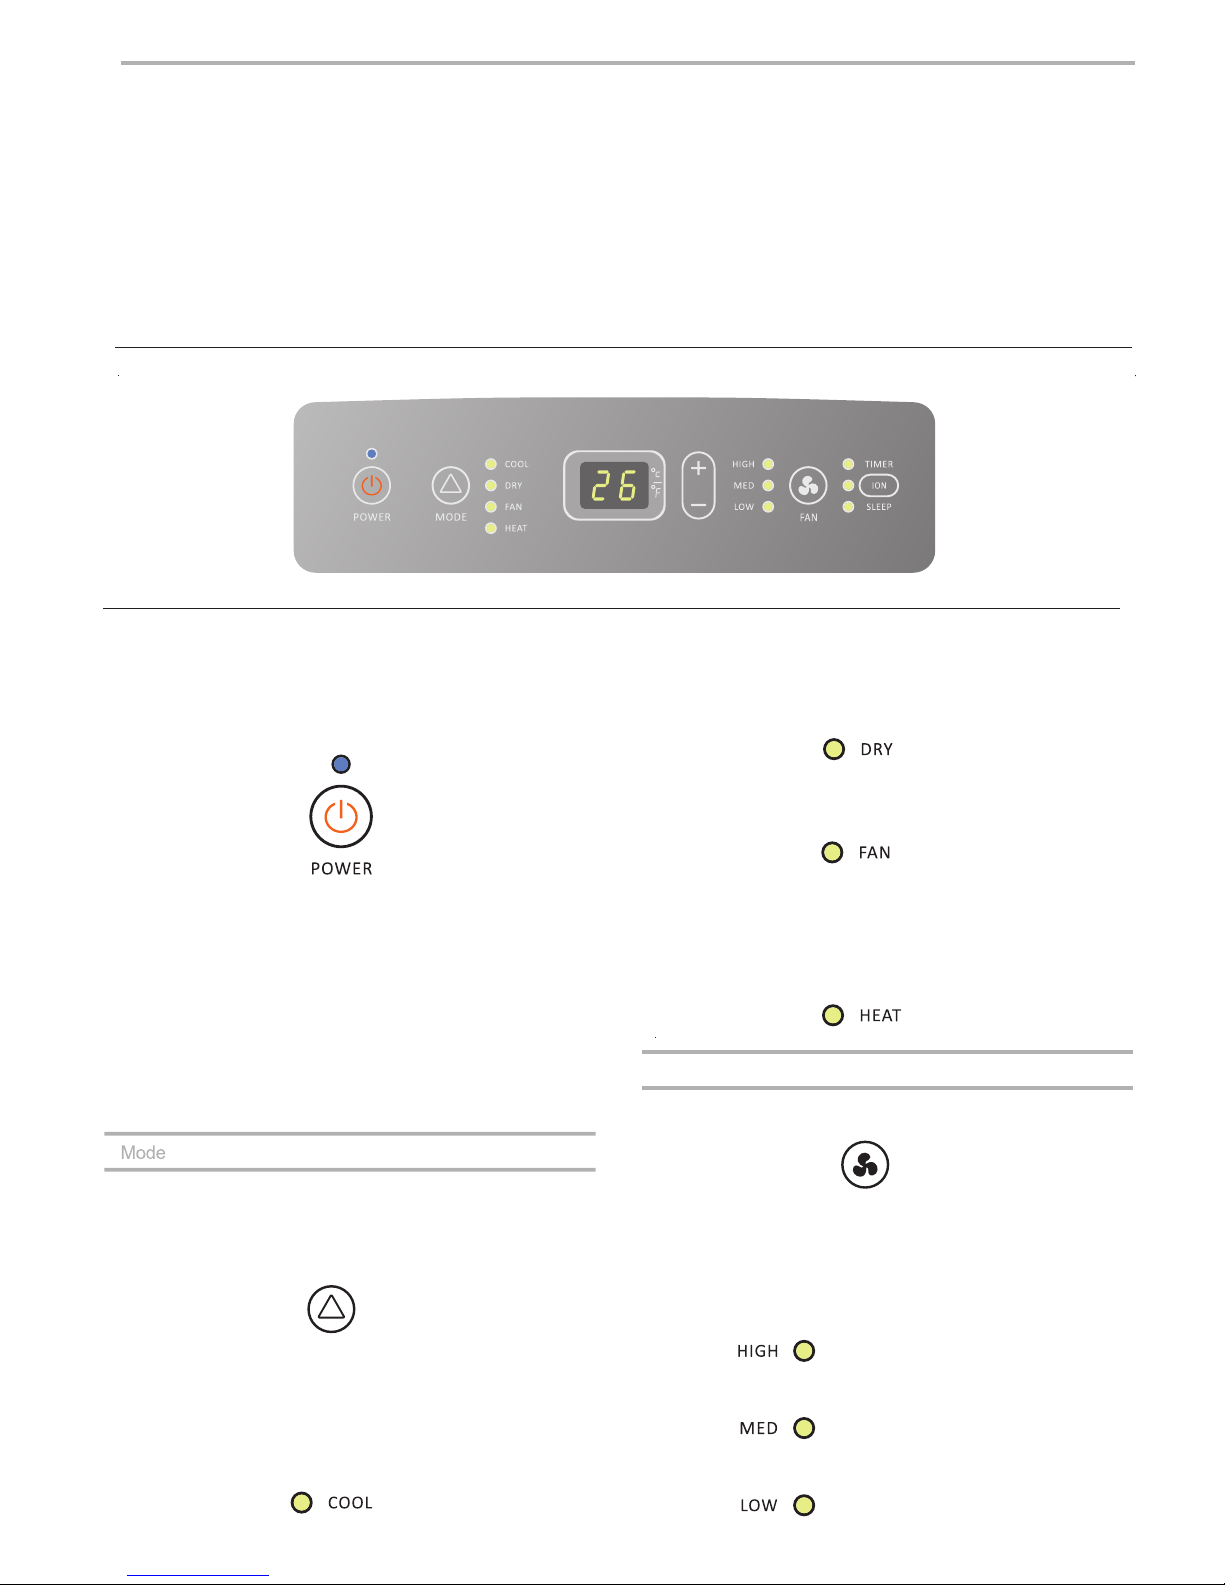
IDENTIFICATION OF PARTS
Control panel
Cool air outlet
Signal receptor
Remote control
Transport handle
Air outlet hose
Evaporator air intake
Secondary drain port
Power supply
Primary drain port
Front
Back
The figures in this manual are based on the external view of a standard model.
They may differ from that of the air conditioner you have selected.
Condenser air intake
ON/OF
F
MODE FAN
SWING
SLEEP
SUP
E
R
SMAR
T
IF
EEL DIMME
R
TIMER ON
TIMER OFF CLOCK
ON
OFFON OFF
2
3
AIR CONDITIONER SAFETY
You can be injured if you don't immediately killed or seriously
follow instructions.
You can be injured if you don't follow instructions.
All safety messages will tell you what the potential hazard is and tell you how to reduce the chance of injury.
We have provided many important safety messages in this manual and on your appliance. Always read and obey all safety
messages.
This is the safety alert symbol.
This symbol alerts you to potential hazards that can kill or hurt you and others.
All safety messages will follow the safety alert symbol and either the word "DANGER" or "WARNING."
These words mean:
DANGER
WARNING
IMPORTANT SAFETY INSTRUCTIONS
WARNING:
To reduce the risk of fire, electrical shock or injury when using your air conditioner, follow these basic precautions:
SAVE THESE INSTRUCTIONS
Unplug air conditioner before servicing.
Use two or more people to move and install air conditioner.
Plug into a grounded 3 prong outlet.
Do not remove ground prong.
Do not use an adapter.
Do not use an extension cord.
Your safety and the safety of others is very important.
DISPOSING OF THE UNIT
Please recycle or dispose of the packaging material for product in an environmentally responsible manner.
Never store or ship the air conditioner upside down or sideways to avoid damage to the compressor .
The appliance is not intended for use by young children or infirm persons without supervision. Young children should be
supervised to ensure that they do not play with the appliance.
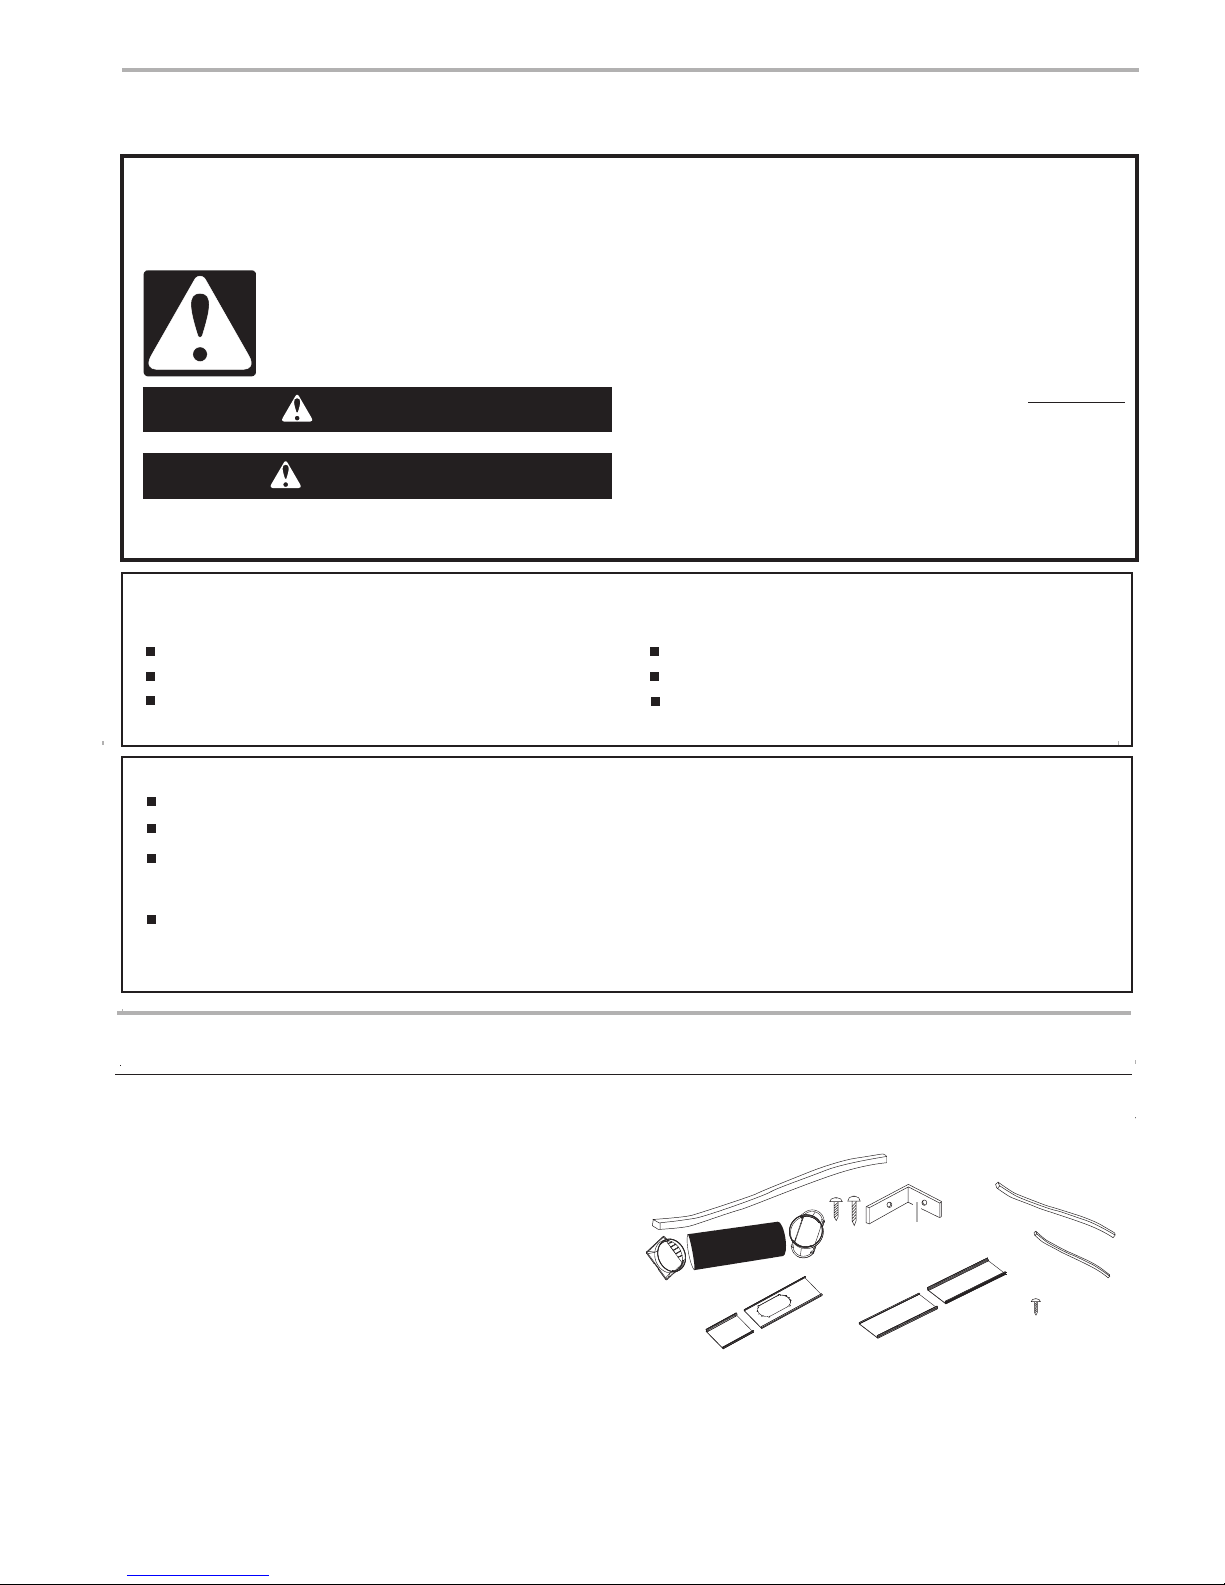
INSTALLATION REQUIREMENTS
Tools and Parts
Gather the required tools and parts before starting installation.
Read and follow the instructions provided with any tools listed
here.
Tools needed
Parts supplied
Check that all parts are included in parts package.
■ Phillips screwdriver
■ Pencil
■ Scissors
A.Foam seal
B.Dummy coupling
C.Flexible exhaust hose
D.Window exhaust adapter
E.1⁄₂ screws (2)
F.Wood screws(4)
G.Window-lock bracket(2)
H.Outer slider section panel A
"
I. Inner slider section panel B
J.Outer slider section panel D
K.Inner slider section panel C
L.3⁄8"screws (2)
M.Foam seal (2)
N.Foam seal(2)
B
F
G
A
C
D
E
L
N
M
H
J
I
K
All air conditioners contain refrigerants, which under federal law must be removed prior to product disposal. If old
products with refrigerants are being disposed of, check with your local disposal company for local requirements.
Do not dispose of batteries in fire. Batteries may explore or leak.
■
4
Location Requirements
Electrical Requirements
■ The portable air conditioner should be dedicated to a 115V, 60
Hz, 15-amp fuse grounded 3 prong outlet.
■ The use of a time-delay fuse or time-delay circuit breaker is
required.
■ All wiring must comply with local and the national electrical
codes and be installed by a qualified electrician. If you have
any questions, contact a qualified electrician.
Electrical Shock Hazard
Plug into a grounded 3 prong outlet.
Do not remove ground prong.
Do not use an adapter.
Do not use an extension cord.
Failure to follow these instructions can result in death,
WARNING
fire, or electrical shock.
NOTES:
■ The flexible exhaust hose allows placement of the air
conditioner between 23⁵⁄₈" and 64 " (60 cm and 163 cm)
from window or door
■ Confirm you are using the correct size air conditioner for the
space to be cooled, per sizing recommendations, below:
¹⁄₈
Vertical Slide Widow
NOTES:
■ To ensure proper ventilation, keep the required distance from
the return air outlet to the wall or other obstacles at least
23⁵⁄₈" (60 cm).
■ Do not block the air outlet.
■ Provide easy access to the grounded 3 prong outlet.
23⁵⁄₈" - 64¹⁄₈"
(60 cm - 163 cm)
Horizontal Slide Window
23⁵⁄₈" - 64¹⁄₈"
(60 cm - 163 cm)
Up to a 15 x 20 Room" "
Up to a 20 x 20 Room" "
Up to a 20 x 25 Room" "
Area to be cooled
Capacity needed
8,000
12,000
10,000
14,000
NOTE:Adjust BTUs to room use and location:
■Shaded room reduce by 10%
■Sunny room increace by 10%
■For occupancy over two people add 600 BTUs per
person
■Kitchen use add 4,000 BTUs
(BTUs)
Square Footage
200
300
400
500
Up to a 10 x 20 Room" "
5
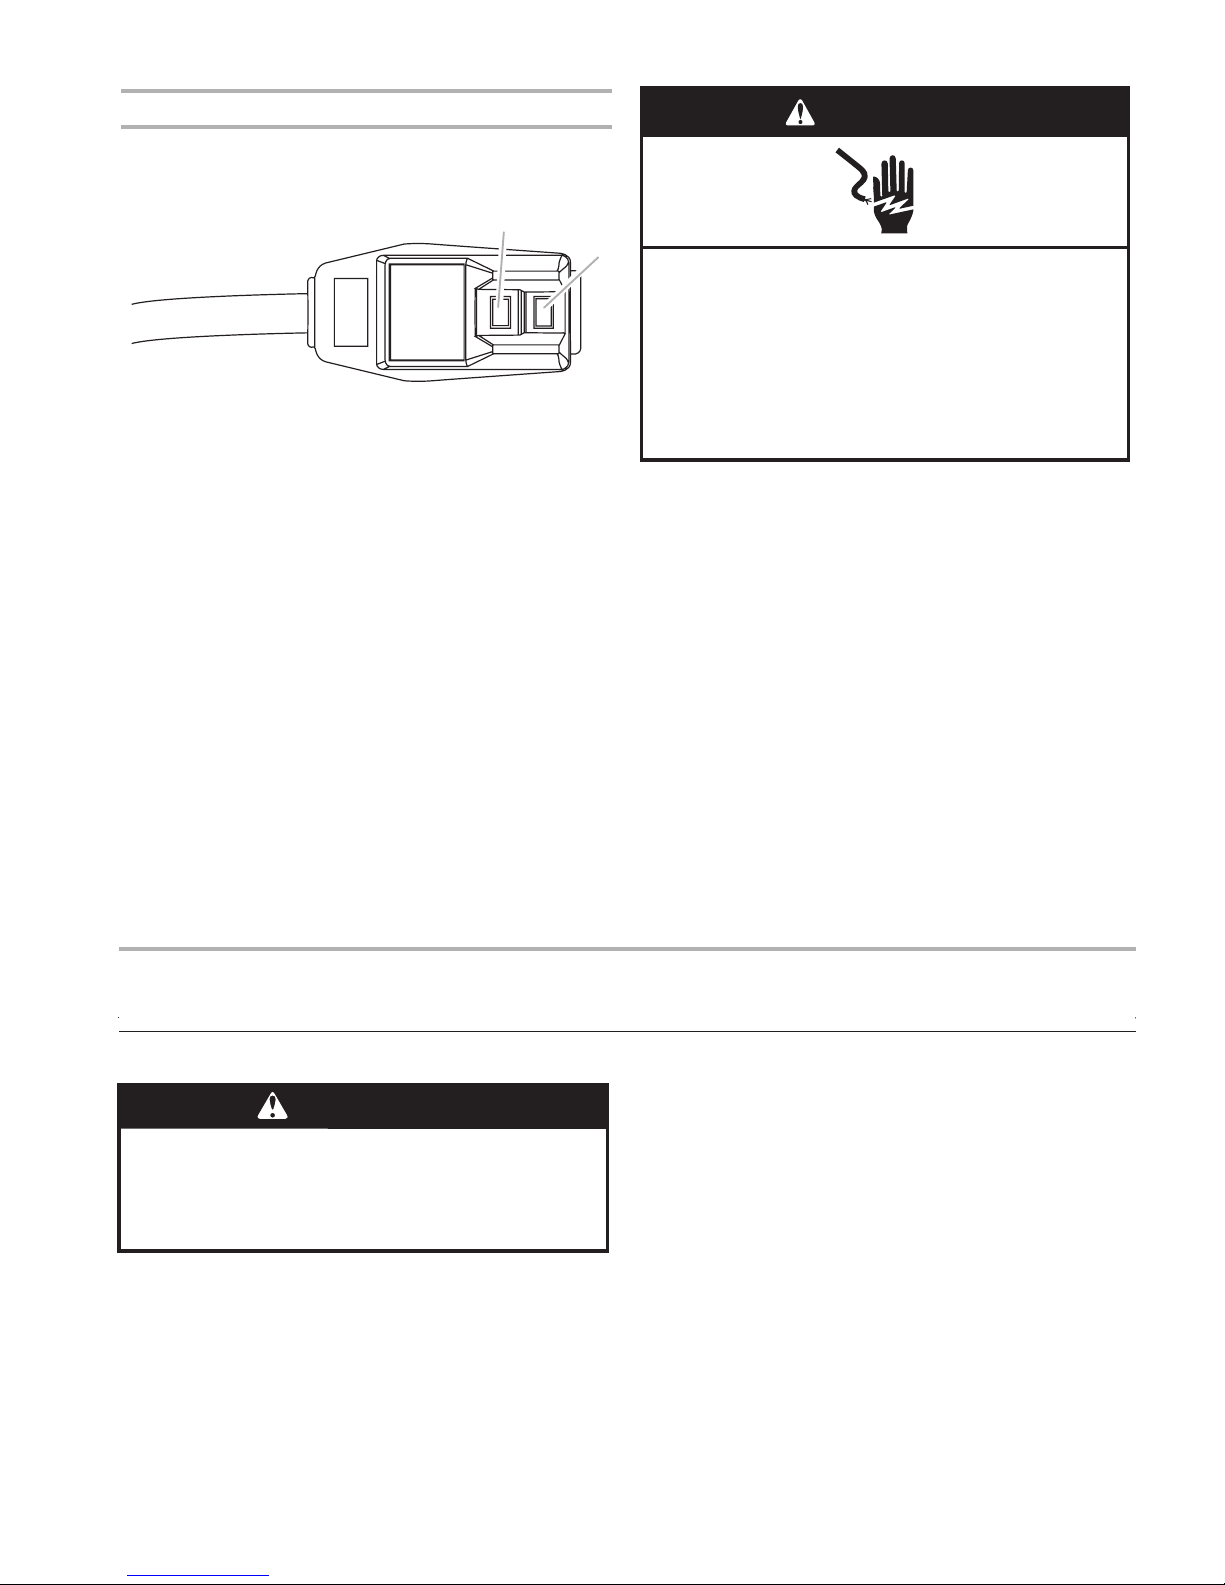
Power Supply Cord
NOTE: Your air conditioners device may differ from the one
shown.
To test your power supply cord:
1. Plug power supply cord into a grounded 3prong outlet.
2. Press RESET (on some devices, a green light will turn on).
3. Press TEST (listen for click; Reset button will trip, and on
some devices, a green light will turn off).
4. Press and release RESET (listen for click; Reset button will
latch, and on some devices, a green light will turn on). The
power supply cord is ready for operation.
NOTES:
■ The Reset button must be pushed in for proper operation.
■ The power supply cord must be replaced if it fails to trip when
the test button is pressed or fails to reset.
■ Do not use the power supply cord as an off/on switch. The
power supply cord is designed as a protective device.
■ A damaged power supply cord must be replaced with a new
power supply cord obtained from the product manufacturer
and must not be repaired.
■ The power supply cord contains no user serviceable parts.
Opening the tamper-resistant case voids all warranty and
performance claims.
INSTALLATION INSTRUCTIONS
Unpack the Air Conditioner
Remove packaging materials
■ Remove and recycle packaging materials.
Remove tape and glue residue from surfaces before turning
on the air conditioner. Rub a small amount of liquid dish soap
over the adhesive with your fingers. Wipe with warm water
and dry.
■ Do not use sharp instruments, rubbing alcohol, flammable
fluids, or abrasive cleaners to remove tape or glue. These
products can damage the surface of your air conditioner.
■
■
Handle the air conditioner gently.
Keep unit upright at least 2 hours prior to use.
A.Test button
B.Reset button
TEST
RESET
A
B
Electrical Shock Hazard
Plug into a grounded 3 prong outlet.
Do not remove ground prong.
Do not use an adapter.
Do not use an extension cord.
Failure to follow these instructions can result in death,
fire, or electrical shock.
WARNING
WARNING
Excessive Weight Hazard
Use two or more people to move and install
air conditioner.
Failure to do so can result in back or other injury.
WARNING
This room air conditioner is equipped with a power supply cord
required by UL. This power supply cord contains state-of-the-art
electronics that sense leakage current. If the cord is crushed, the
electronics detect leakage current and power will be
disconnected in a fraction of a second.
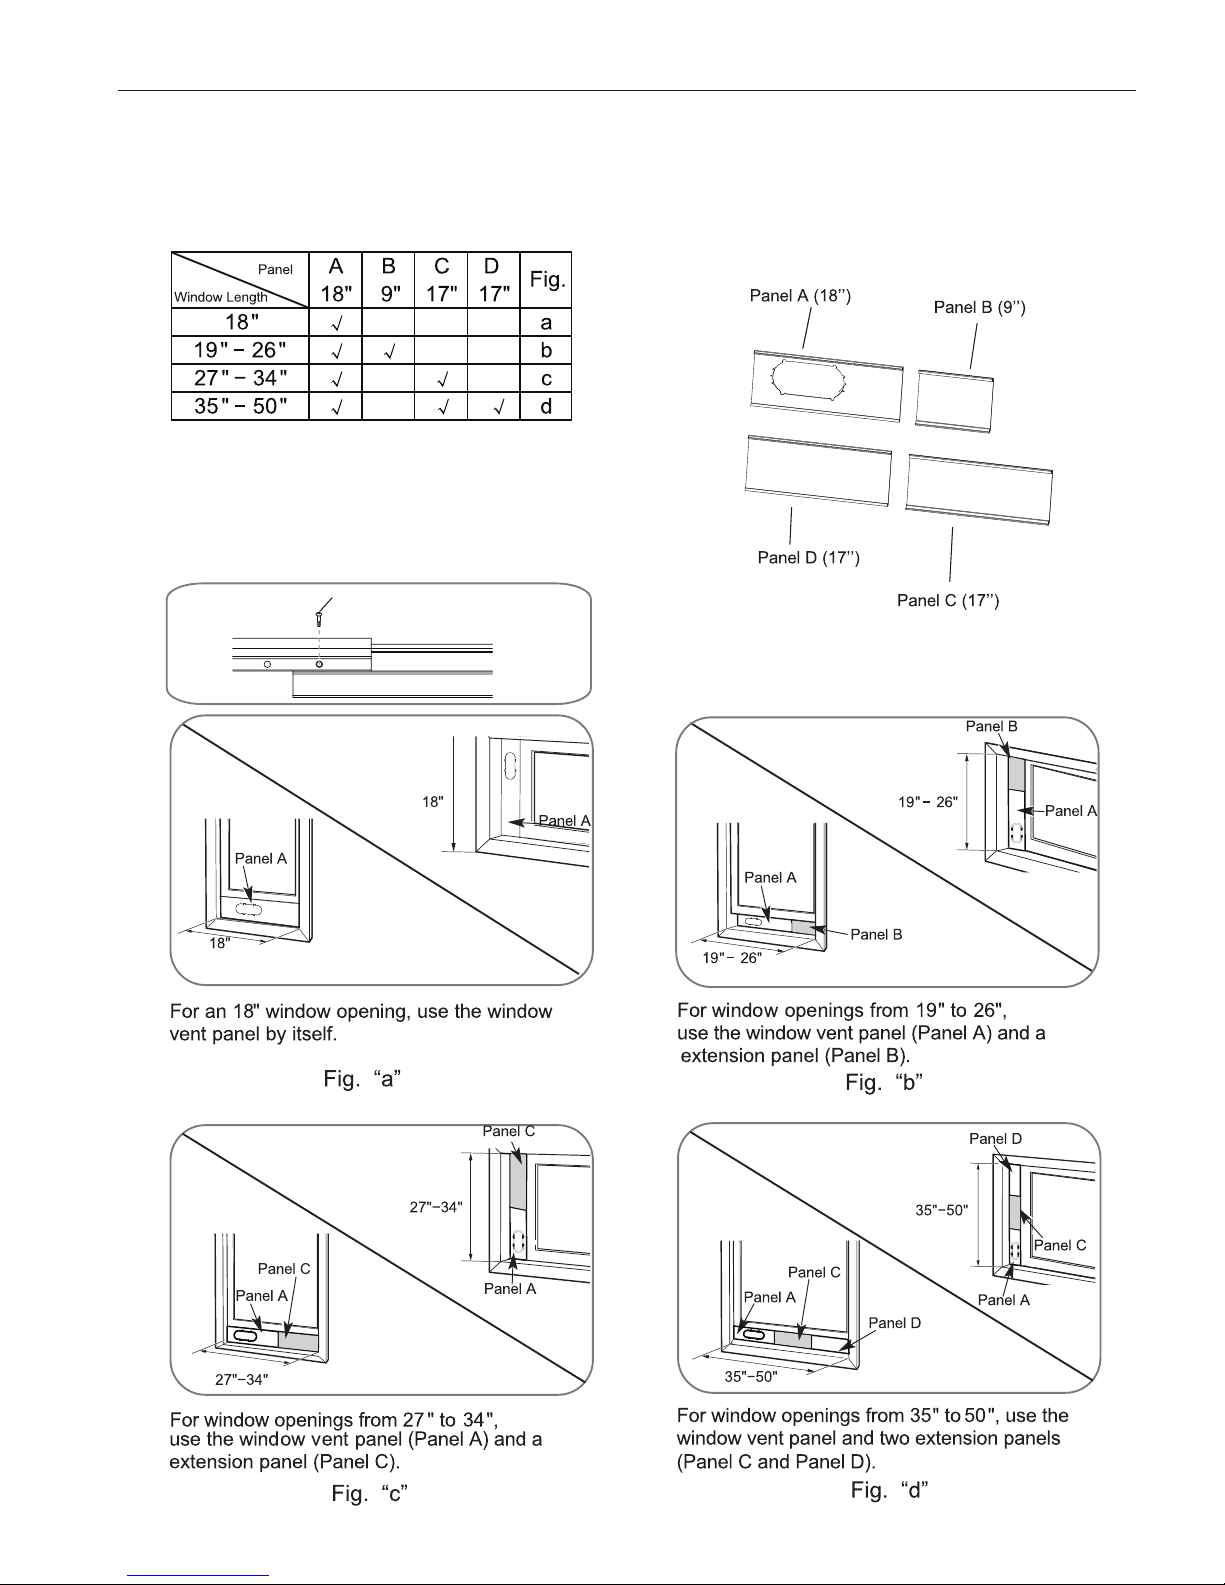
Window Vent Panel And Extensions
The window installation kit allows you to install the air conditioner in most vertical-sliding windows 18'' to 50'' wide,or
casement-style windows from 18'' to 50'' high.
1.Please check your window length and choose the
fit from the above table.
2.If your window length need more than 2 panels,after
adjust the length,please use a type L screw to fix them.
Screw L
6
7
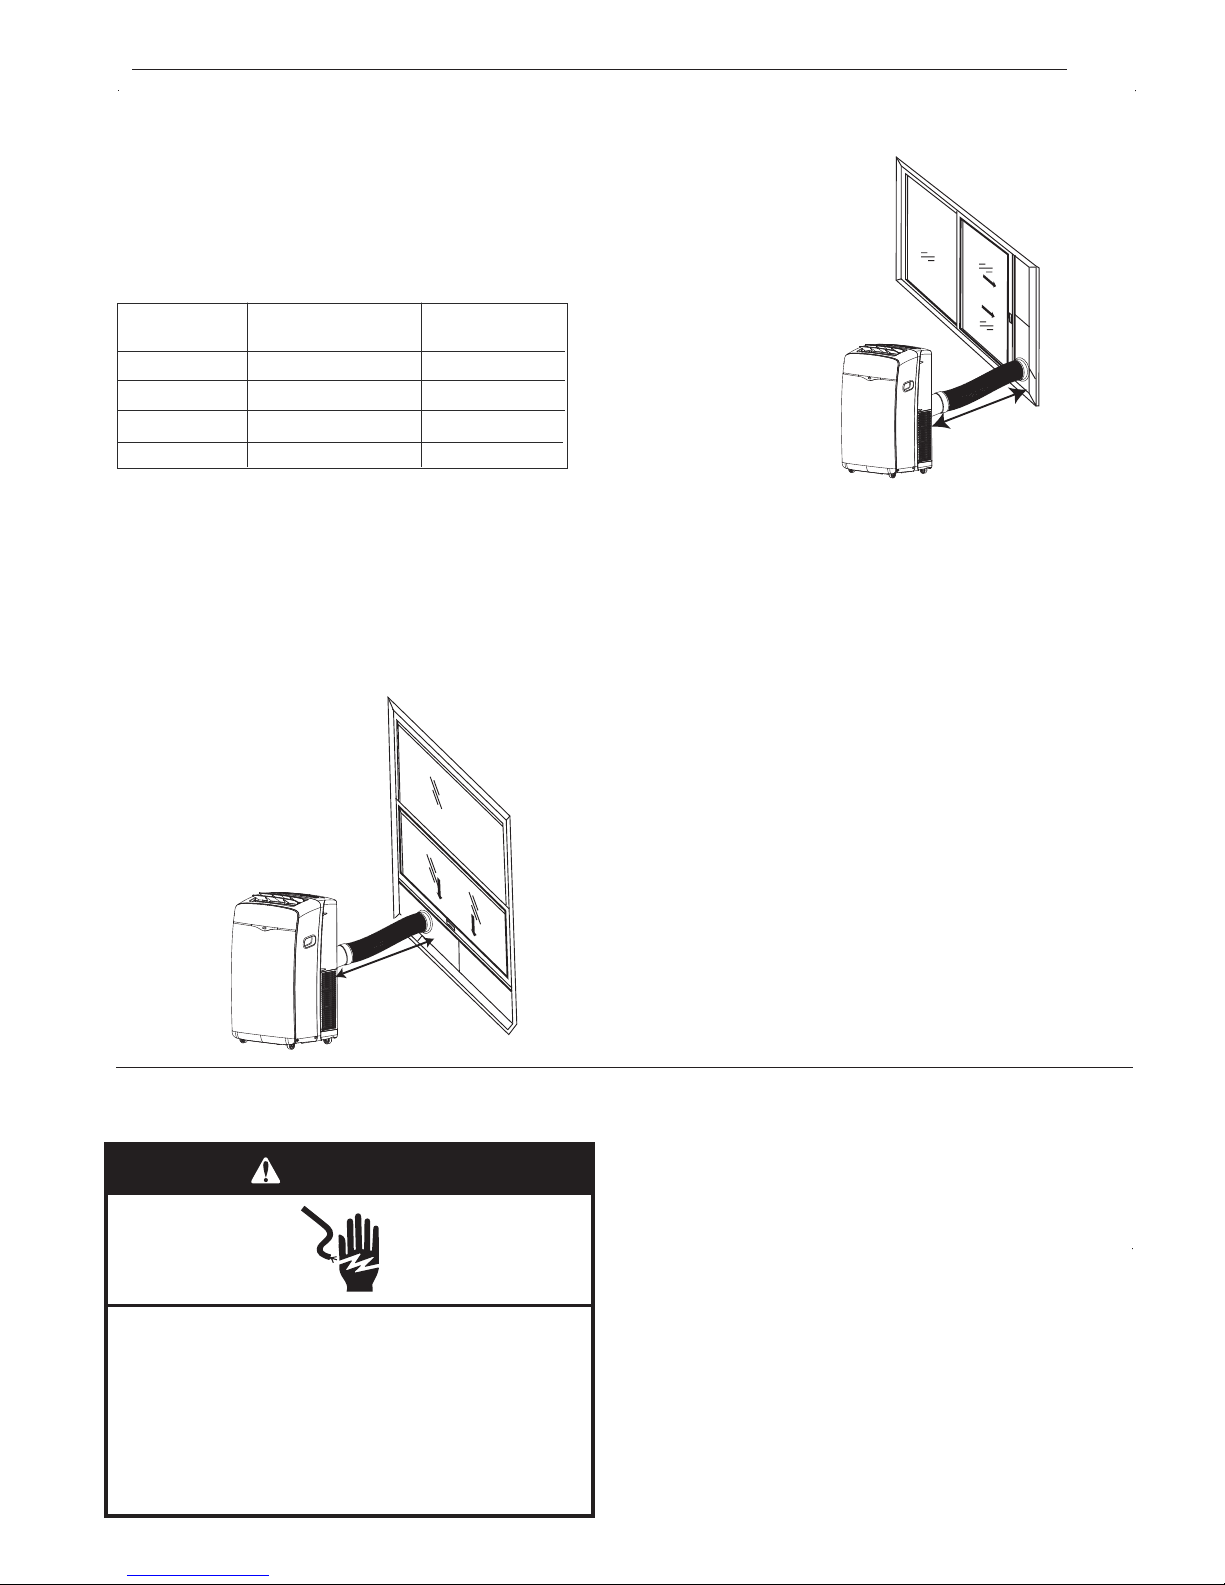
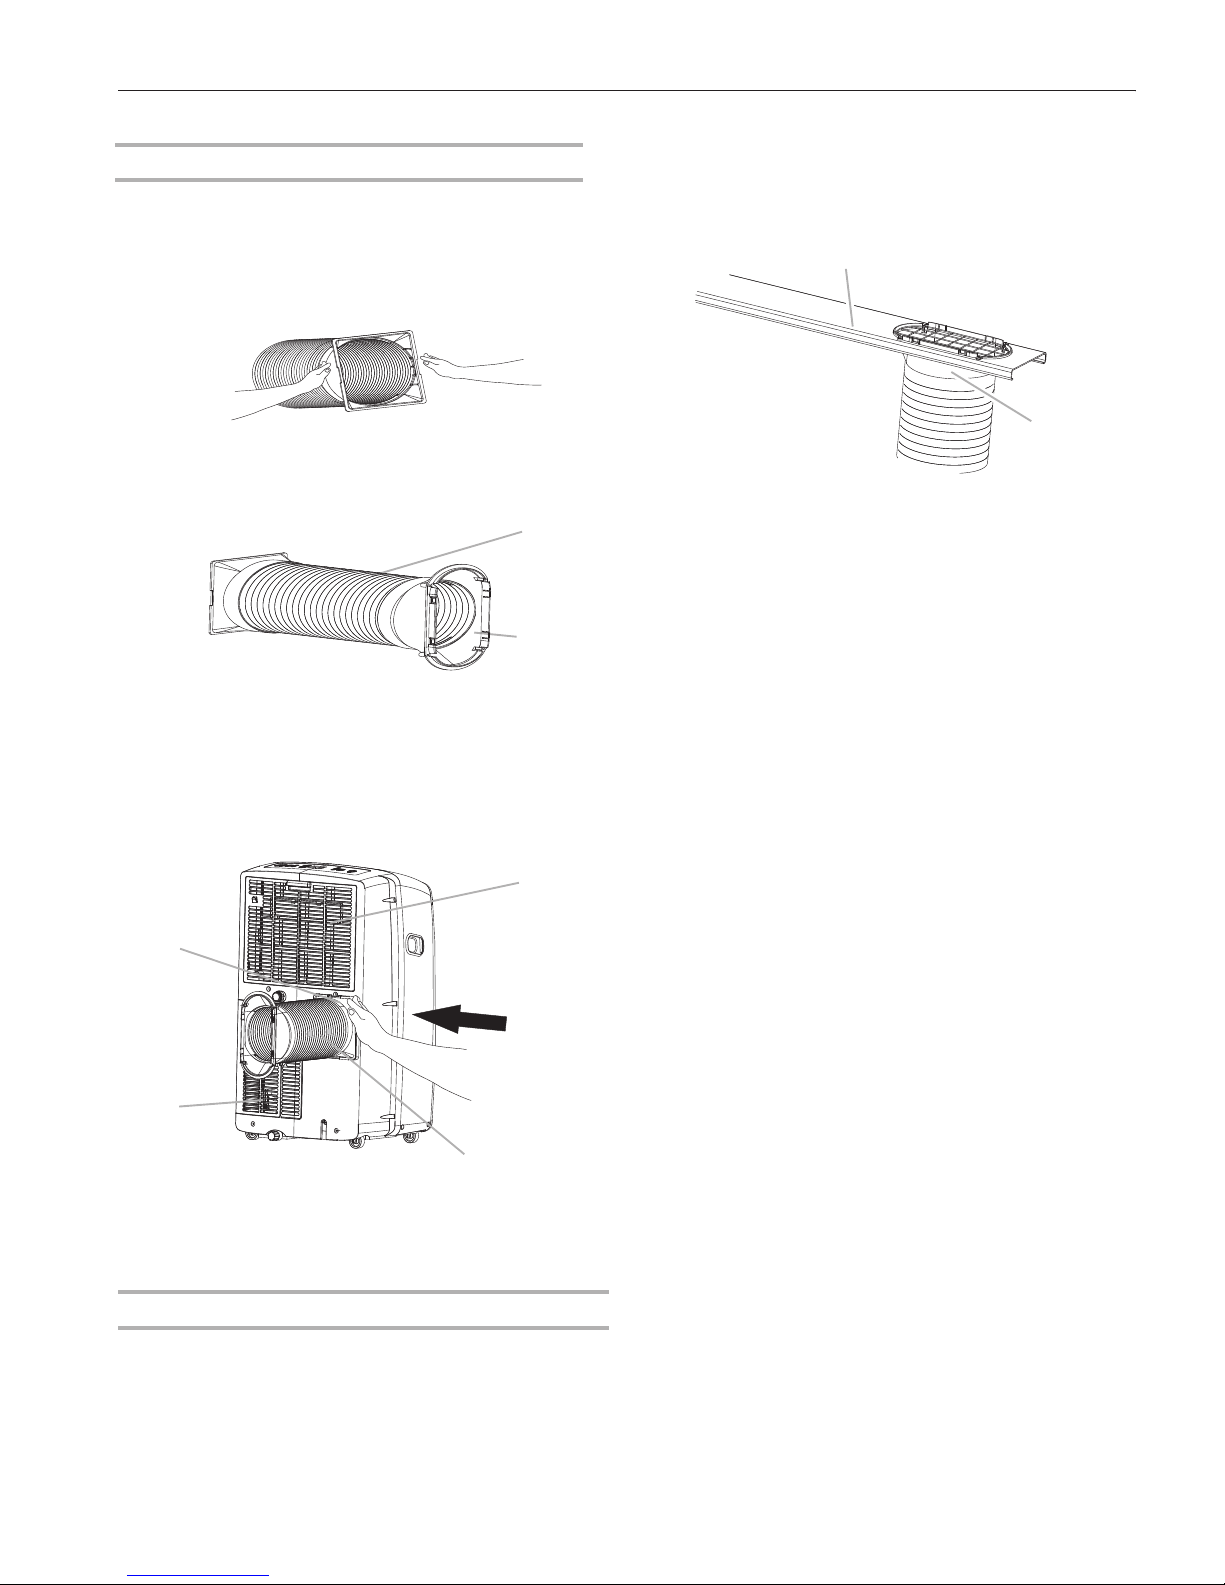
Window Installation
1. Roll the air conditioner to selected location. see “Location
Requirements.”
2. Stretch the end of the hose. Attach the dummy coupling to the
flexible exhaust hose. Turn counter-clockwise until securely
Install Exhaust Hose and Adapter
3. Attach the window exhaust adapter to the flexible exhaust
hose. Turn counter-clockwise until securely locked into place.
Your window slider kit has been designed to fit most standard
vertical and horizontal window applications. Roll the air
conditioner to selected location. see “Location Requirements.”
1. Attach the window exhaust adapter to the outer slider section
(the piece with the large exhaust hole).
A. Outer slider section
B. Window exhaust adapter
4. Insert the d
ummy coupling into the slot on the back of the air
conditioner.
5. Slide down to lock the hose into place.
A
B
Install Portable Air Conditioner
A. Evaporator air intake
B. Dummy coupling
C. Flexible exhaust hose
D. Condenser air intake
A
C
B
D
A. Flexible exhaust hose
B. Window exhaust adapter
A
B
NOTE: Product must be used with included Duct Window
installation kit for effective cooling.
locked into place.
8
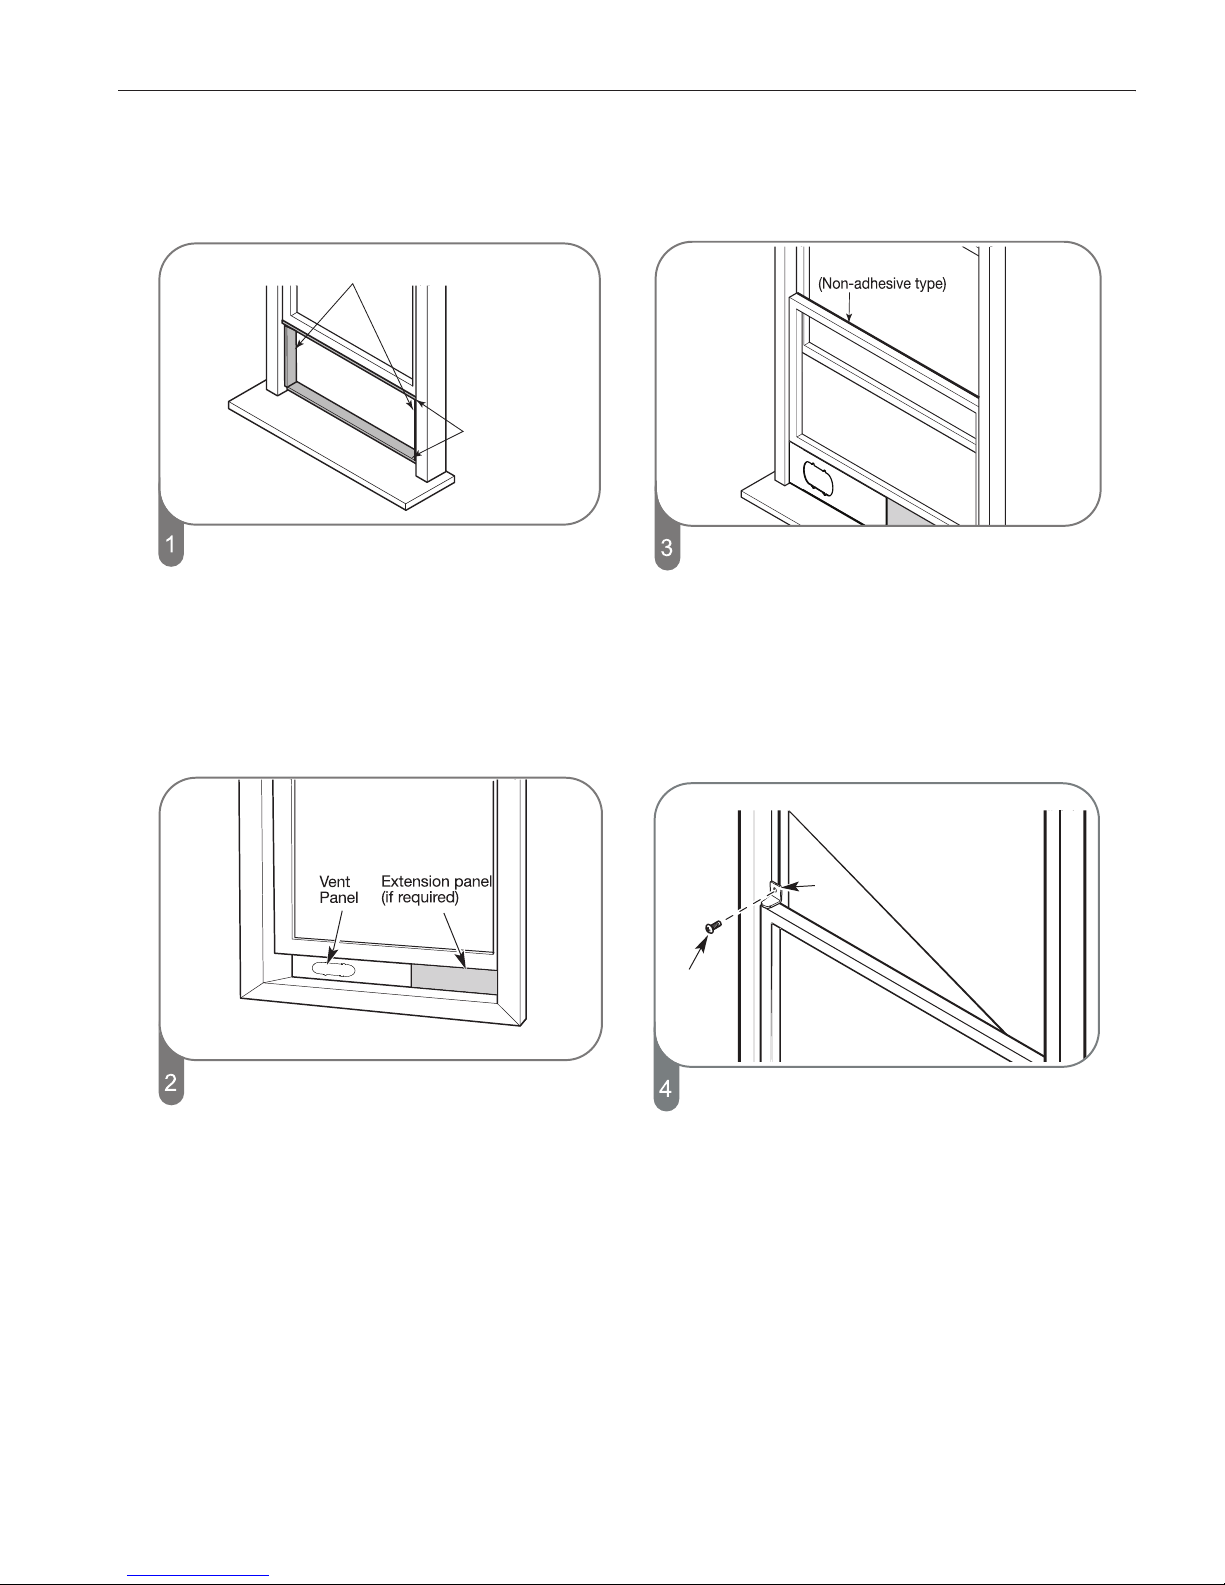
Installation In Vertical Sliding Windows
NOTE:The window installation kit can be used with vertical sliding windows between 18'' and 50'' wide.
Foal seal N
(Adhesive type-shorter)
Foal seal M
(Adhesive type)
A
E or F
Window-lock Bracket
Cut the foam seal M(adhesive type) & N
(adhesive type-shorter)to the proper
length,and attcah it to the window sash and
frame.
Cut the foam seal A(Non-adhesive type) to the
window width.Stuff the foam seal A between
the glass and the window to prevent air and
insects from getting into the room.
Install the Window-lock bracket with a E or F screw as
shown if you need. E screw is suitable for wood
window, F screw is suitable for metal window.
Insert the vent panel assembly,including
extension panels,if needed,
into the window
opening.Extend the extension panels,if used.
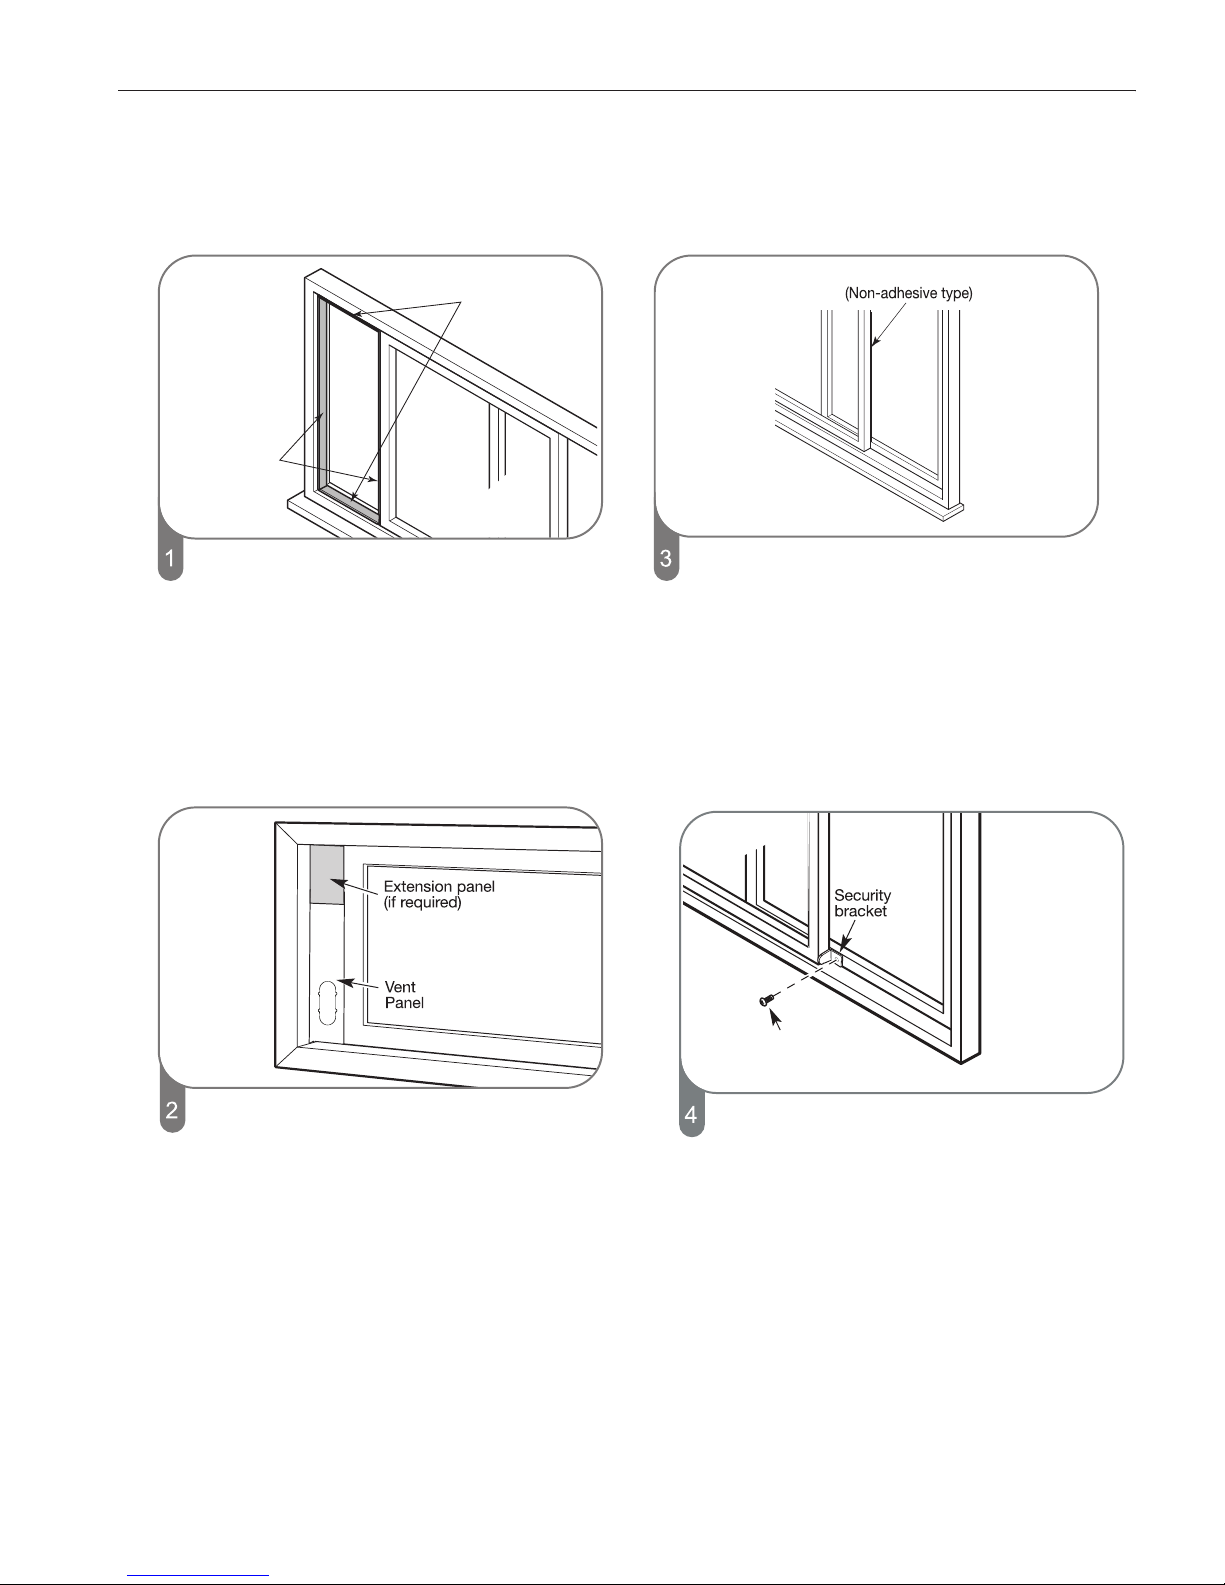
Installation In Horizontal Sliding Windows
NOTE:The window installation kit can be used with vertical sliding windows between 18'' and 50'' wide.
Foal seal N
(Adhesive
type-shorter)
Foal seal M
(Adhesive type)
A
E or F
9
Cut the foam seal M(adhesive type) &
N (adhesive type-shorter)to the proper
length,and attcah it to the window sash
and frame.
Cut the foam seal A(Non-adhesive type)
to the window width.Stuff the foam seal
A
between the glass and the window to
prevent air and insects from getting into
the room.
Install the Window-lock bracket with a E or F screw as
shown if you need. E screw is suitable for wood window,
F screw is suitable for metal window.
Insert the vent panel assembly,including
extension panels,if needed,into the window
opening.Extend the extension panels,if used.
10
Starting Your Portable Air Conditioner
1. Select the mode. See " MODE ".
2. Select the fan speed. See " FAN ".
3. Set the temperature. See "TEMPERATURE".
4. Press POWER button to start the air conditioner.
When the air conditioner is turned on for the first time after it is
plugged in, it will run in the Smart Mode. When the air conditioner
is turned on at all other times, it will run according to the previous
setting. Smart Mode can be selected with the remote control only.
Only if the unit is operated in EXTREMELY HUMID air, water
will be collected in the container inside the unit. If the water
container is full, the air conditioner will stop. The screen will
displays “E5” to inform you to empty the internal container.
NOTE:
1.Press and release MODE until you see the symbol flashes for the
operating modes:
2. Choose Cooling, Dry, Fan Only or Heating.
Dry-Dries the room. The air conditioner automatically selects
Cooling-Cools the room. Press FAN to select High,
Mid or Low. Press the Plus or Minus button to adjust the
temperature.
the temperature. The fan
runs on Low speed only.
NOTE:
Dry mode should not be used to cool the room.
Fan Only mode. Press FAN to select High, Mid or Low.
Heating-heats the room. Press FAN to select High,Mid or
Low. Press the PLUS or MINUS button to adjust the
temperature.
NOTE: Heating is NOT available for cooling.To cool,that
Fan Speed
Mid-for normal fan speed
Low-for minimum fan speed
Auto-automatically controls the fan speed depending on the
current room temperature and temperature control setting.
High-for maximum fan speed
1.Press and release FAN to choose the
desired fan speed.
2.Choose High, Mid or Low.
NOTE:The symbols may be different from these models, but the functions are similar.
Keep upright at least 2 hours before use to prevent
damaging the compressor.
mode must be selected.
(Optional)
PORTABLE AIR CONDITIONER USE
Operating your portable air conditioner properly helps you to
obtain the best possible results.
This section explains proper air conditioner operation.
IMPORTANT:
NOTE: In the event of a power failure, your air conditioner will
operate at the previous settings when the power is restored.
The air conditioner display shows the current room
temperature.
When changing modes while the air conditioner is in
operation, the compressor will stop for 3 to 5 minutes before
restarting.
■
■
If a button is pressed during this time, the compressor will
not restart for another 3 to 5 minutes.
In Cooling or Dry mode, the compressor and condenser fan
will stop when the room temperature reaches the set
temperature.
■
MODE
FAN
11
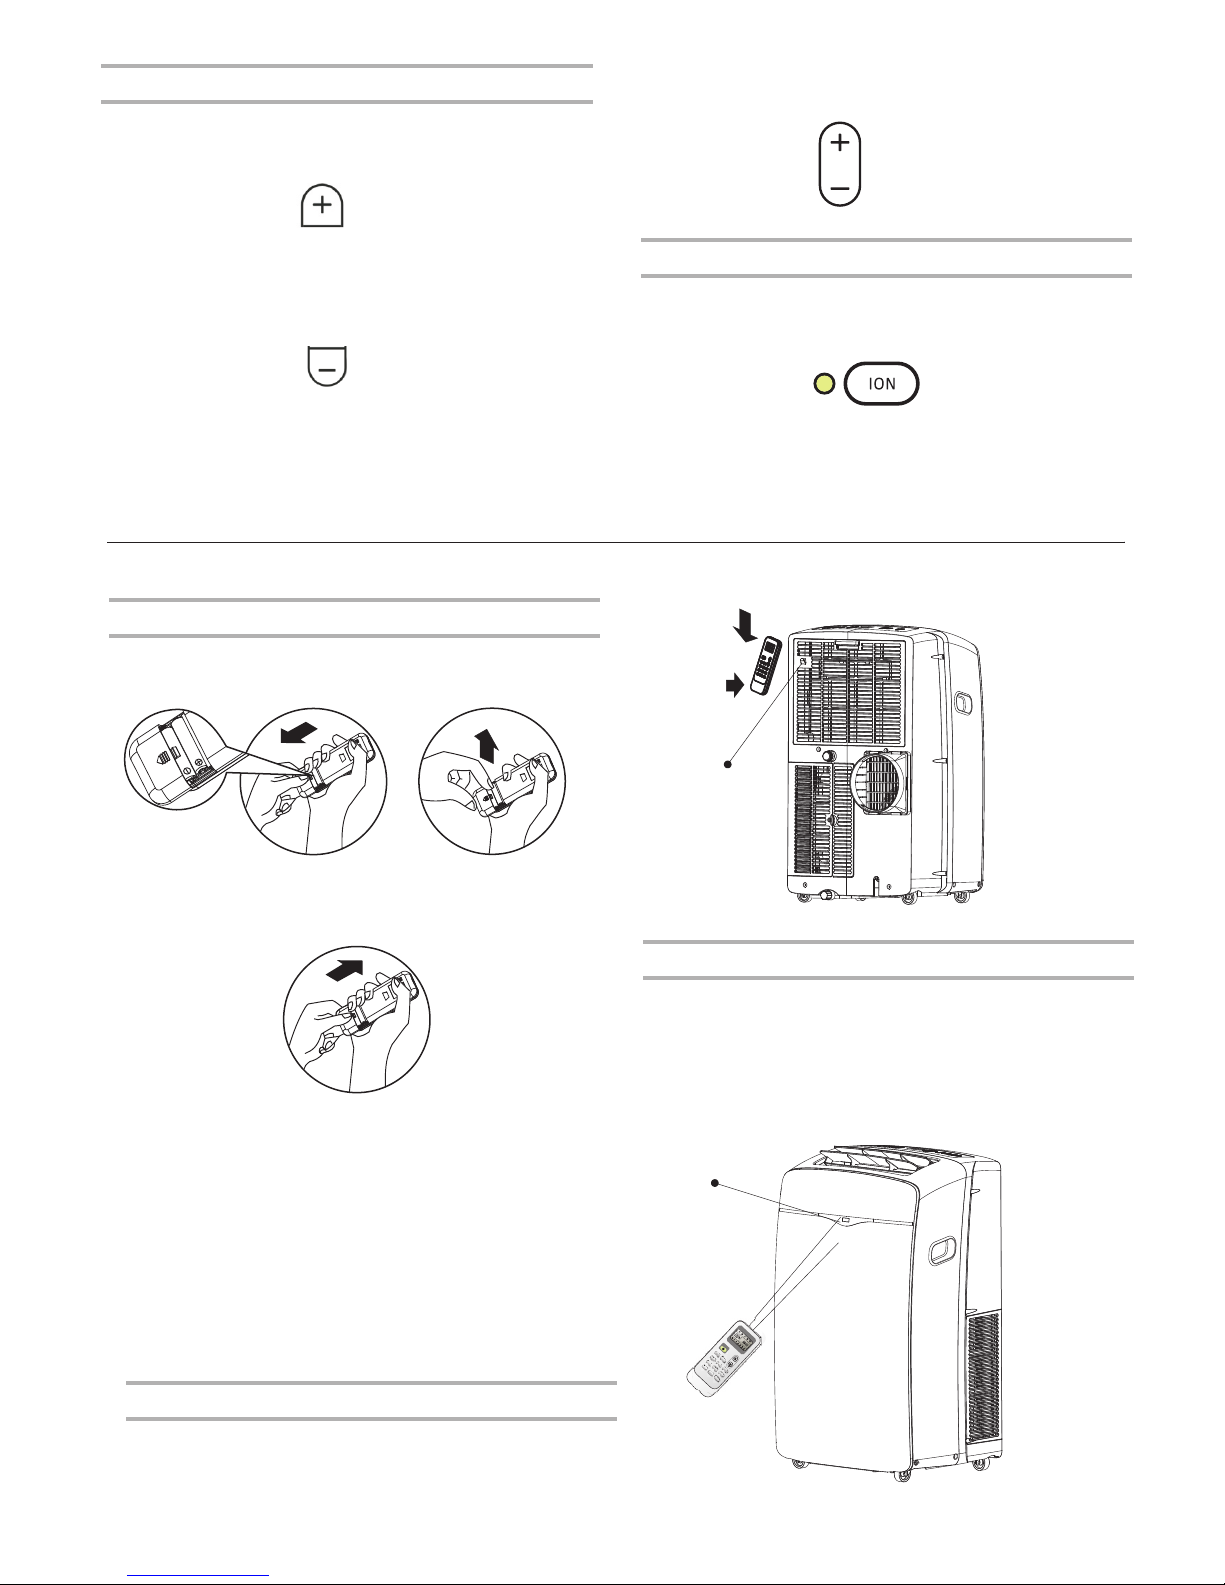
1. Remove the battery cover along the arrowed direction.
2. Insert new batteries making sure that the (+) and (-) of
battery are matched correctly.
3. Re-attach the cover by sliding it back into position.
NOTE:
Use the included 2 standard AAA(1.5volt) batteries. Do not use
rechargeable batteries. Replace batteries with new ones of the same
type when the display becomes dim, or after 6 months.
If you reload batteries after removing the old ones, previous settings will
be lost.
Do not recharge non-rechargeable batteries.
Do not mix different types of batteries such as alkaline, carbon-zinc, or
rechargeable batteries.
Do not mix old and new batteries.
Batteries are to be inserted with the correct polarity.
Exhausted batteries are to be removed from the product.
Using the Remote Control
Insert the Batteries
Storage tip
The clip on the back of the unit can be used to store the remote
control.
How to Use
To operate the room air conditioner, aim
the remote controller to the signal receptor.
The remote control will operate the air
conditioner at a distance of up to 23’ (7m) when
pointing at signal receptor of the air conditioner.
Signal receptor
O
N/OFF
MODE FAN
SWING
SLEEP
SUPER
SMART
IFEEL DI
M
MER
T
IMER O
N TIM
ER OFF CLOCK
ON
OFFON OFF
Holder
NOTE:
In the Cooling mode, the temperature can be set between
61°F and 86°F (16°C and 30°C).
In Fan Only mode, the temperature cannot be set.
Press the PLUS button to raise the temperature. Press the
PLUS button once to increase the set temperature by 1°F (1°C).
PLUS
Press the MINUS button to lower the temperature. Press the MINUS
button once to decrease the set temperature by 1°F (1°C).
Temperature
MINUS
To change the temperature display between °C and °F
press both the Plus and Minus Adjust
buttons at the same time.
ION (Optional)
Press the ION button to start or stop the Plasma Generator.
When the ION indicator light of the appliance flashes,
Plasma Generator will turn on.
the
■
■
■
■
■
■
■
■
12
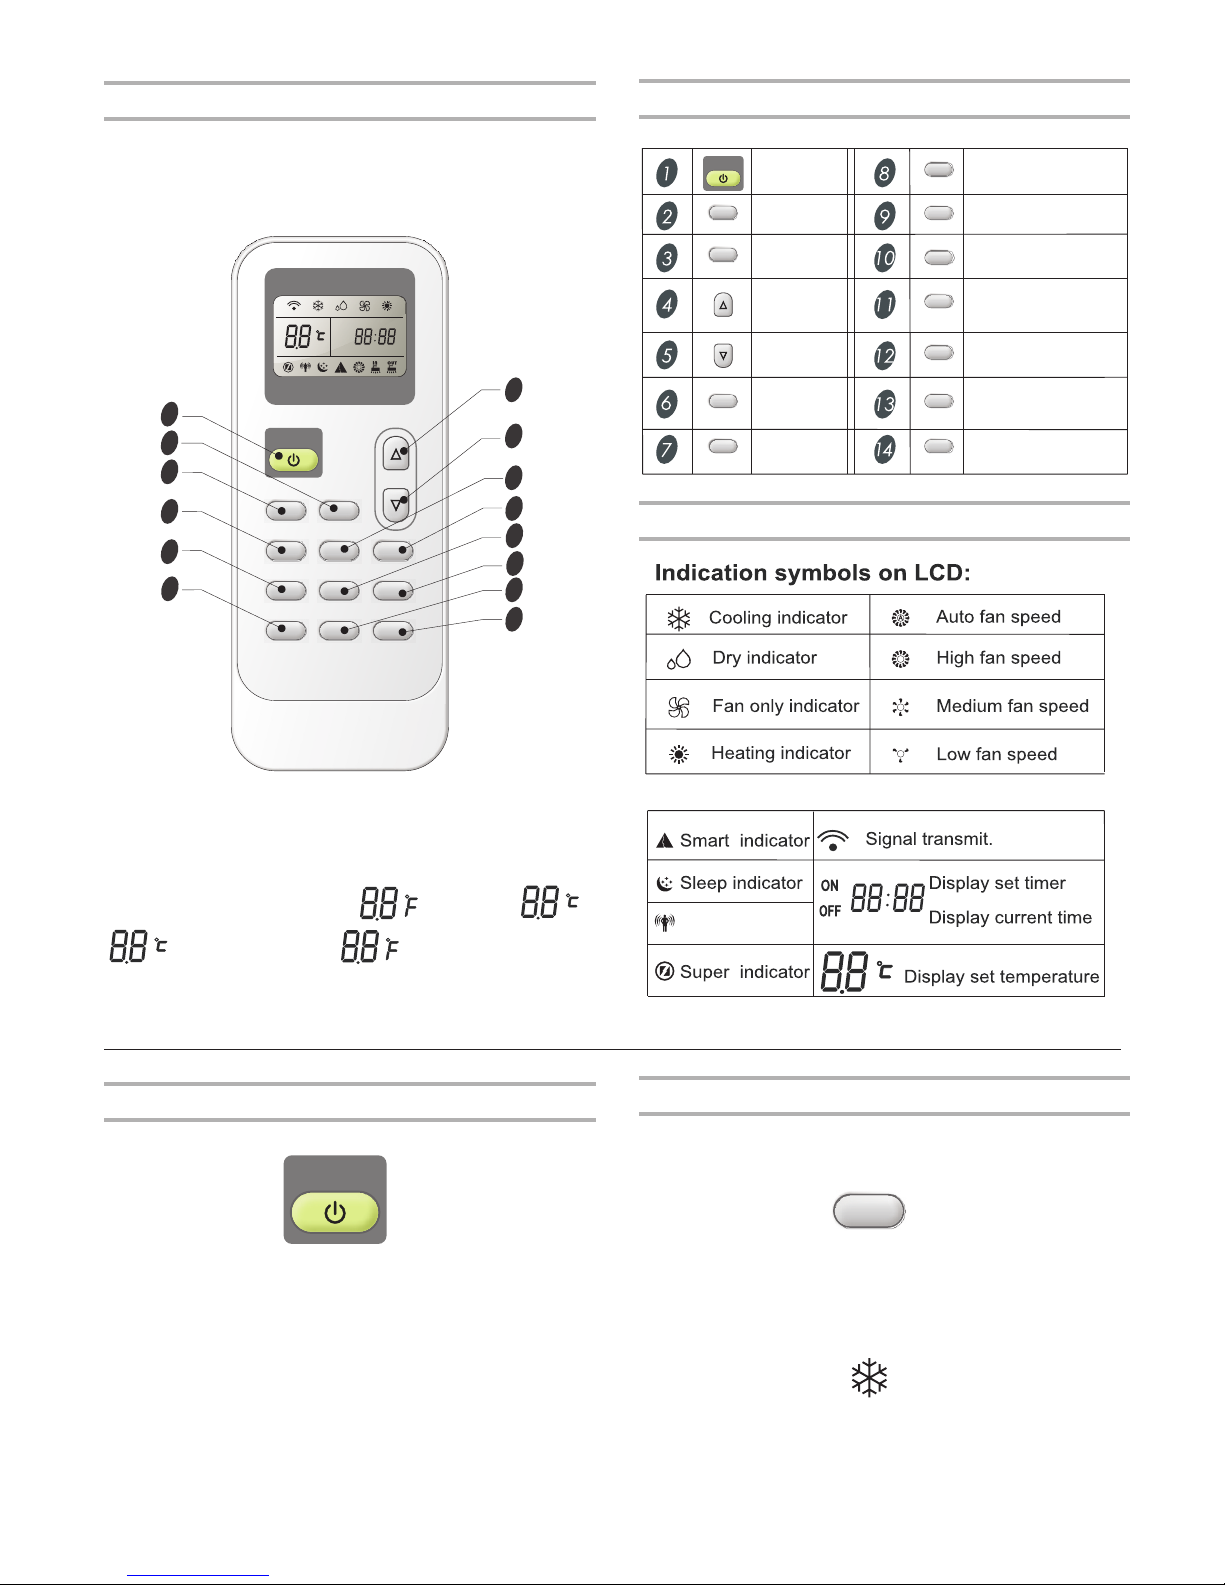
Indication symbols
Ifeel indicator
Remote control may differ in appearance.
NOTE:
Remote control
10
11
12
13
14
3
4
ON/OFF
MODE FAN
SWING
SLEEP
SUPER
SMART
IFEEL DIMMER
TIMER ON TIMER OFF CLOCK
ON
OFFON OFF
1
2
6
7
5
8
9
Button and Function
MODE
ON/OFF
SUPER
CLOCK
IFEEL
SLEEP
SWING
SMART
DOWN
UP
FAN
ON/OFF
MODE
FAN
SWING
SLEEP
SUPER
SMART
DIMMER
Timer On
TIMER ON
Timer Off
TIMER OFF
CLOCK
DIMMER
IFEEL
Power On or Off
Press ON/OFF button to turn on or off the unit
NOTE:
When changing modes during operation, sometimes the
Wait 3 minutes before restarting the appliance.
■
■
unit does not response at once.
ON/OFF
Mode
1. Press MODE repeatedly until you see the symbol flash for the
desired setting.
2. Choose Cooling, Dry, Fan Only and Heating.
■
Cooling-Cools the room. Press FAN
MID or LOW.
Press the UP or DOWN button to adjust the temperature.
to select AUTO, HIGH,
MODE
NOTE:
You remote controller may be
cannot switch to .
instead of
,
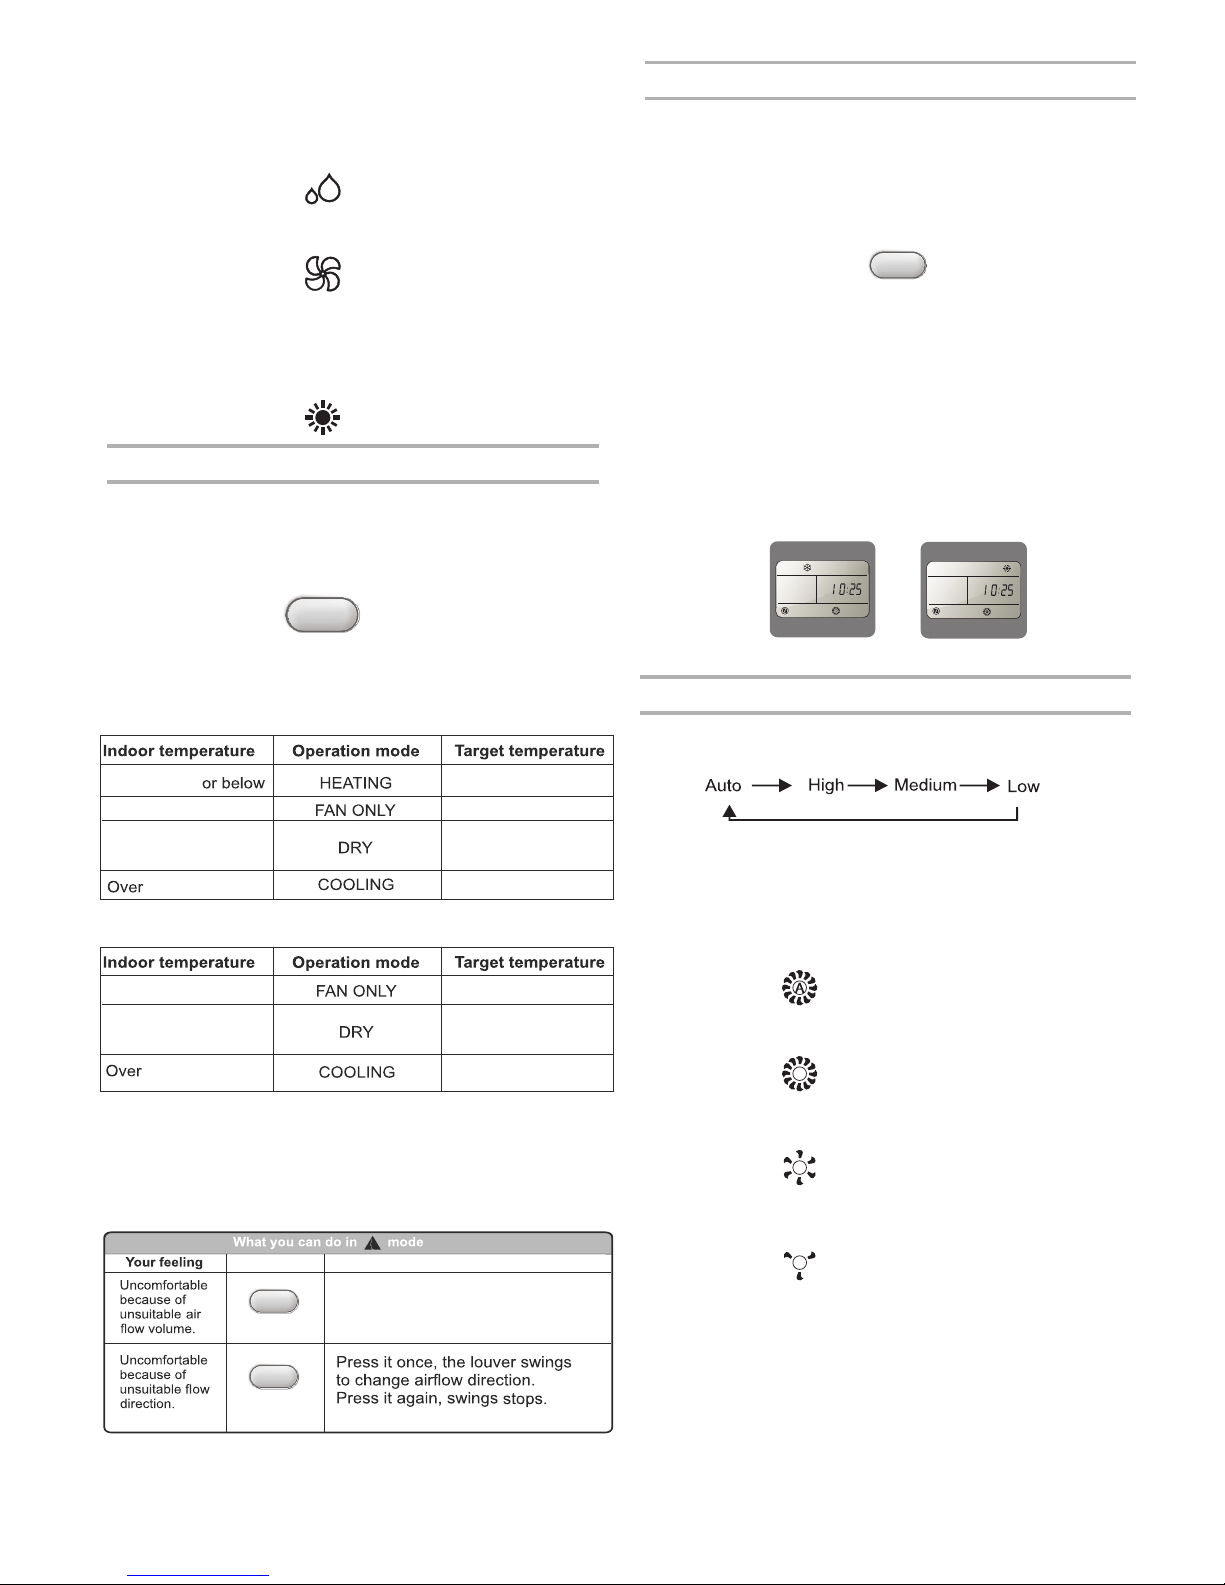
13
Fan Only-Only the fan runs. Press FAN button to adjust
fan speed.
NOTE: Auto fan speed cannot be selected in Fan Only mode.
SMART Mode
Press the SMART button,regardless If the unit is on or off, to set
temperature and fan speed automatically based on the actual
room temperature.
■
■ Heating-Heats the room. Press FAN to select the fan speed.
Press the up or down TEMP button to adjust the temperature.
Dry-Dries the room. The air conditioner automatically
selects the temperature. The fan runs on Low speed only.
NOTE: Dry mode should not be used to cool the room.
■
SMART
72°F 22°C ( )
79°F 26°C ( )
79°F 26°C ( )
73-79°F 23-26°C ( )
70-73°F 21-23°C ( )
70°F 21°C ( )
23-26°C 73-79°F ( )
23°C 73°F ( ) or below
Room temperature decrease
4 2 after operate for 3
minutes
°F( )°C
Operation mode and temperature are determined by indoor temperature.
Temperature, airflow and direction are controlled
automatically in smart mode. However, a decrease or rise of
up to can be set with the remote controller
if you still feel uncomfortable.
4°F 2°C ( )
NOTE:
With Heater models
Cooling only models
SUPER
SUPER button is used to start or stop fast cooling or heating.
1. Press SUPER
button. The air conditioner automatically
sets the fan speed to High and the temperature to 61°F 16°C ( ).
2. To turn off Super control, press any button on the remote
control or control panel except Timer On, Timer Off, Clock,
Dimmer,Ifeel and Swing.
NOTE:
In the SUPER mode you can set airflow direction or timer.
■
SMART mode is not available in SUPER mode.
■
SUPER button is ineffective in SMART mode.
■
SUPER
fast heating
ON
OFF
fast cooling
ON
OFF
Fast heating operates at auto fan speed,changing the set
temperature automatically to 86°F 30°C ( ) .
FAN
SWING
Indoor fan speed alternates among
High, Medium and Low each time
this button is pressed.
Button
Button
Adjustment
■ High for maximum fan speed
Fan Speed
1. Press FAN button, Choose desired fan speed.
■ Auto-Automatically controls fan speed depending on
current room temperature and temperature control
setting.
Auto fan speed cannot be selected in Fan Only
mode.
■ Mid for normal fan speed
■ Low for minimum fan speed
NOTE:
Room temperature decrease
4 2 after operate for
3 minutes
°F( )°C
A decrease or rise of up to can be set with the
remote controller if you still feel uncomfortable.
4°F (2°C)
26°C 79°F ( )
26°C 79°F ( )
 Loading...