


Hisense User Manual
VIDAA U5

Contents
Live TV....................................................................................... 5
Channel Scan.............................................................................................5
Channel List............................................................................................... 7
Channel Edit...............................................................................................9
Favourite...................................................................................................10
Guide (EPG).............................................................................................11
PVR.......................................................................................................... 13
Recording List.......................................................................................... 14
Timeshift................................................................................................... 16
Connection...............................................................................18
Wired Internet Connection....................................................................... 18
Wireless Internet Connection...................................................................19
Connecting Bluetooth Devices.................................................................20
Connecting Headphones..........................................................................22
Connecting USB Devices.........................................................................22
Connecting an Antenna........................................................................... 23
Connecting Audio Visual (AV) Devices................................................... 23
Connecting Speakers or Other Audio Receivers..................................... 25
Connecting a Digital Audio System to Use ARC/eARC...........................25
Using HDMI & CEC................................................................................. 26
Connecting a PC or a Game Console.....................................................28
Multi-screen............................................................................. 29
Screen Sharing........................................................................................ 29
Content Sharing....................................................................................... 29
Smart Functions......................................................................31
Getting Familiar with the Home Screen...................................................31
Using a VIDAA Account...........................................................................34
Using Voice Service.................................................................................34
Media........................................................................................................40
App........................................................................................................... 43

Installing Mobile App to Control your TV.................................................44
Picture and Sound.................................................................. 45
Adjusting the Picture Quality................................................................... 45
Game Mode Settings............................................................................... 50
Adjusting the Sound Quality.................................................................... 51
Speakers Settings.................................................................................... 54
Using Headphones...................................................................................55
Accessibility and System.......................................................56
Accessibility.............................................................................................. 56
Setting Time............................................................................................. 56
Using Timer.............................................................................................. 57
Using Parental Control.............................................................................58
Setting Language and Location...............................................................58
Using Power Indicator..............................................................................59
Enhanced Viewing................................................................................... 59
Setting Usage Mode................................................................................ 60
Using Remote Control Service................................................................ 60
Upgrade....................................................................................................61
Reset to Factory Default..........................................................................62
Troubleshooting...................................................................... 63
Picture Issues...........................................................................................63
Sound Issues........................................................................................... 64
Network Issues.........................................................................................64
External Device Connection Issues......................................................... 65
Apps......................................................................................................... 66
Media Files............................................................................................... 66
Voice Service Issues............................................................................... 66
TV Status Diagnosis................................................................................ 67
Recording/Timeshift Issues......................................................................67
Other Issues............................................................................................. 68
Using the E-Manual................................................................ 69
Launching the E-Manual.......................................................................... 69
Using the buttons in the E-Manual.......................................................... 69

Guidelines.................................................................................................69

Live TV
Channel Scan
You can scan for channels automatically or manually.
Note:
• Satellite/antenna/cable function may not be applicable in some models/
countries/regions.
Auto Scan
Automatically scan for channels to view programmes from TV source.
> TV
Alternatively, in Live TV, / > Settings > Channel > Auto Scan.
If no TV channels were saved before, you will be prompted to do a channel
search.
Satellite
• Single satellite: You can use single satellite if you only have one satellite
equipped.
• DiSEqC: You can choose DiSEqC if you have DiSEqC equipment. Up to
four satellites in DiSEqC 1.0 mode can be installed.
If you are using a motorized antenna, you can use DiSEqC 1.2 mode.
• Unicable: If your house is equipped with Unicable satellite distribution,
you should use this option.
Please make sure that you know the Unicable band and frequency that
can be used. The information should be available on the equipment or the
landlord can provide it.
Antenna
• Channel: Select from All Channels or Free Channels. This option may
not be available depending on countries/regions/operators.
• Scan Mode: Select from digital channels only (DTV), digital and analogue
channels (DTV+ATV) or analogue channels only (ATV).
If you receive DVB-T or DVB-T2 signal, you can use DTV.
• LCN: Switch on/off LCN (Logical Channel Number).
Please note that some operators are restricted to manually change the
channel order. If you switch off LCN, then the channel list can be edited
after channel scan.
This function may not be applicable in some models/countries/regions.
5

Cable
• Channel: Select from All Channels or Free Channels. This option may
not be available depending on countries/regions/operators.
• Scan Mode: Select from digital channels only (DTV), digital and analogue
channels (DTV+ATV) or analogue channels only (ATV).
• LCN: Switch on/off LCN (Logical Channel Number).
Please note that some operators are restricted to manually change the
channel order. If you switch off LCN, then the channel list can be edited
after channel scan.
This function may not be applicable in some models/countries/regions.
Manual Scan
Manually scan for channels to view programmes from your TV sources
through DTV or ATV.
In Live TV, / > Settings > Channel > Advanced Settings > Manual
Scan
DTV Manual Scan
Manually scan for DTV channels to view programmes from a TV source.
When the DTV Manual Scan screen appears, press / button to select
Antenna, Cable or Satellite, and select Start to commence the search
of that channel. When the signal has been tuned, signal strength will be
displayed on the screen.
ATV Manual Scan
Manually scan for ATV channels to view programmes from a TV source.
• Frequency: Input the channel frequency you want.
• Picture System: Select the Colour System.
• Sound System: Select the Sound System.
Live TV tutorial
After channel scanning is done for the first time, the screen will display Live
TV operating tutorial, including:
/ : Load the info bar
/ : Load the channel list
/ : Open the electronic programme guide (only available in some
models/countries/regions)
/ : Load onscreen menu
: Call up search function
6

: Jump to the previous channel
Note:
• The remote control buttons may vary depending on models/countries/
regions.
Related Topic
• Connecting an Antenna
Channel List
Displaying the channel list
In Live TV, press / button to display the Channel List menu.
Alternatively, in Live TV, / > Channel List.
Entering the sub-menu of channel list
In Live TV, / >
Introducing the sub-menu
In Live TV, / >
7
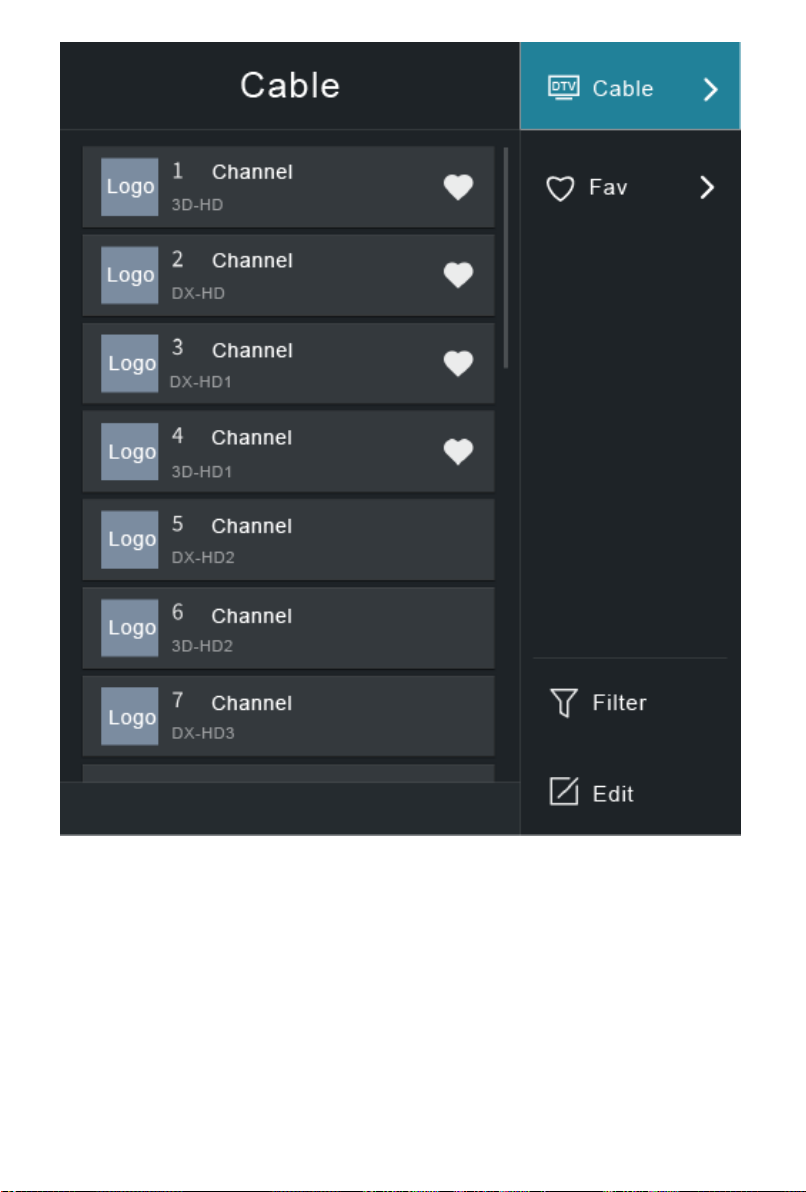
TV List
Display Live TV channel categories, such as Cable and Antenna.
Fav
Display favourite lists 1 to 4.
Filter
Select channels by Content, HD, Child Lock, Scrambled and Sort.
Some options in Filter may not be available in some models/countries/
regions.
Edit
8
Edit the channel list.
Note:
• The sub-menu options may vary depending on models/countries/regions.
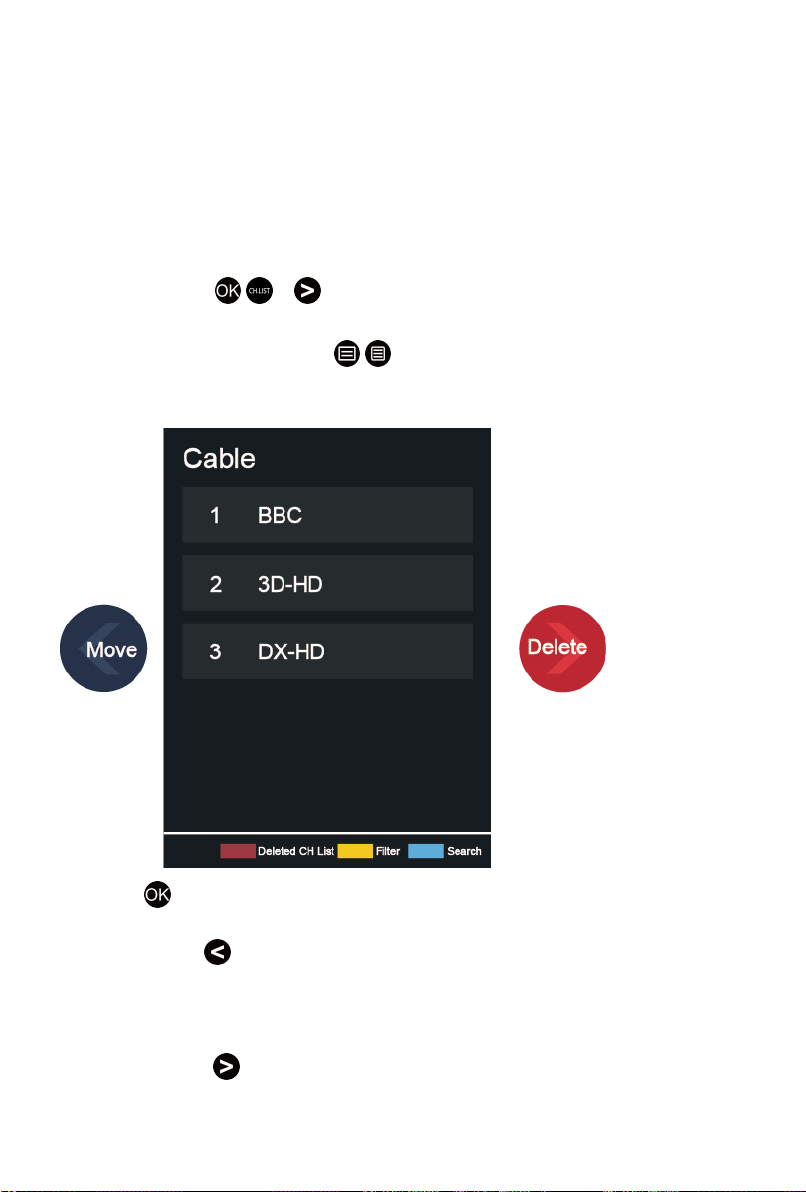
Channel Edit
Manually edit the channel list to your preference.
Editing Live TV channels
In Live TV, press / > to select a Live TV channel category such as
Antenna or Cable, then use D-pad to select Edit.
Alternatively, in Live TV, press / button, select Settings > Channel >
Channel Edit, and select a Live TV channel category such as Antenna or
Cable.
•
Press button on the selected channel, then a checkbox will appear.
You can select multiple channels at the same time to move or delete.
•
Move: Press button to move the selected channel.
Moving the channels could be restricted by the operator. If you want to
be able to move channels, it is not recommended to choose an operator
during channel scan, and LCN should be set to Off.
•
Delete: Press button to delete the selected channel.
9

•
Restore: Press [RED] button, or press button to call out the
colour menu and select RED to enter the list of deleted channels. Press
button to restore the deleted channel.
•
Filter: Press [YELLOW] button or press button to call out the
colour menu and select YELLOW, the filter screen will pop up. Press
button to select options, and the channel list can be updated.
•
Search: Press [BLUE] button or press button to call out the
colour menu and select BLUE, to search the channel.
Exporting to USB
Allow you to export the current channel list to a USB storage device.
In Live TV, / > Settings > Channel > Channel Edit > Export to USB
Importing from USB
Allow you to import a previously exported channel list via a USB storage
device.
In Live TV, / > Settings > Channel > Channel Edit > Import from
USB
Related Topic
• Connecting USB Devices
Favourite
Adding a channel to a favourite list
1.
In Live TV, press / button to call out the channel list.
2.
Press / button and select the channel(s) you want to add to the
favourite list.
3. Select Add to Favourite, and choose from FAV1-FAV4.
4. Then, a heart-shape icon will appear next to the added channel.
Viewing your favourite list
In Live TV, press / > > Fav to call out the favourite list.
Editing the favourite list
In Live TV, press / > > Fav > to select FAV1-FAV4, then use D-
pad to select Edit.
Alternatively, go to / > Settings > Channel > Channel Edit, and select
FAV1 - FAV4.
10

You can add, move or remove favourite channels.
•
Select Add channels to add the selected channel to the favourite list.
•
Select a channel in a favourite list, and press button to move it.
•
Select a channel in a favourite list, and press button to remove it.
Note:
• These steps should be operated under the TV input.
• Before you edit the favourite lists, Channel Scan must be completed first.
• You can add channels from various reception types to the favourite list.
Guide (EPG)
The Guide (EPG) provides a convenient way to check TV programs for
the upcoming 7 days. The information displayed by the Guide (EPG) is
made available by the commercial television networks for digital channels
only. The Guide (EPG) also provides a simple way to record your favourite
programmes and a reminder function which can switch channel automatically
at scheduled time, so that you will not miss programmes of interest. The
availability and amount of programme information will vary depending on the
particular broadcaster.
Note:
• The Guide (EPG) function is only available for digital channels. Analogue
channels are not supported.
11

In Live TV, press / button, or press / > Guide (EPG) to display
channel information on programme guide list.
• Watch
In Guide (EPG), when a current programme is selected, press >
Watch to switch to the channel you want to see.
• PVR/Reminder
In Guide (EPG), press / button to select the channels. Press /
button to select programme based on the time schedule.
Press button to select PVR or Reminder.
For more information, please refer to Live TV > PVR in this manual.
Note:
• Reminder in the Guide (EPG) is only available for programmes that
haven't been aired yet.
• A storage device (space should be no less than 2G, and transfer
rate should be no less than 4MB/s) must be attached to the TV for
recording purposes. It is strongly recommended to use USB mobile
hard disk drive instead of USB flash drive as the storage device. For
more information, please refer to Connecting USB Devices in this
manual.
• The TV will record the programme even in standby mode.
• The PVR function may not be applicable in some models/countries/
regions.
• Schedule
In Guide (EPG), press [RED] button or press button to call out
the colour menu and select RED, to view a list of scheduled reminders
and recordings.
• Programme Colour
In Guide (EPG), press [GREEN] button or press button to call
out the colour menu and select GREEN, to choose colours to indicate
different genres in the Guide (EPG) for quick and easy viewing.
Note:
• This function may not be applicable in some models/countries/regions.
• 24h−
In Guide (EPG), press [YELLOW] button or press button to call
out the colour menu and select YELLOW, to select programmes of the
previous day.
12
• 24h+
In Guide (EPG), press [BLUE] button or press button to call
out the colour menu and select BLUE, to select programmes of the next
day.
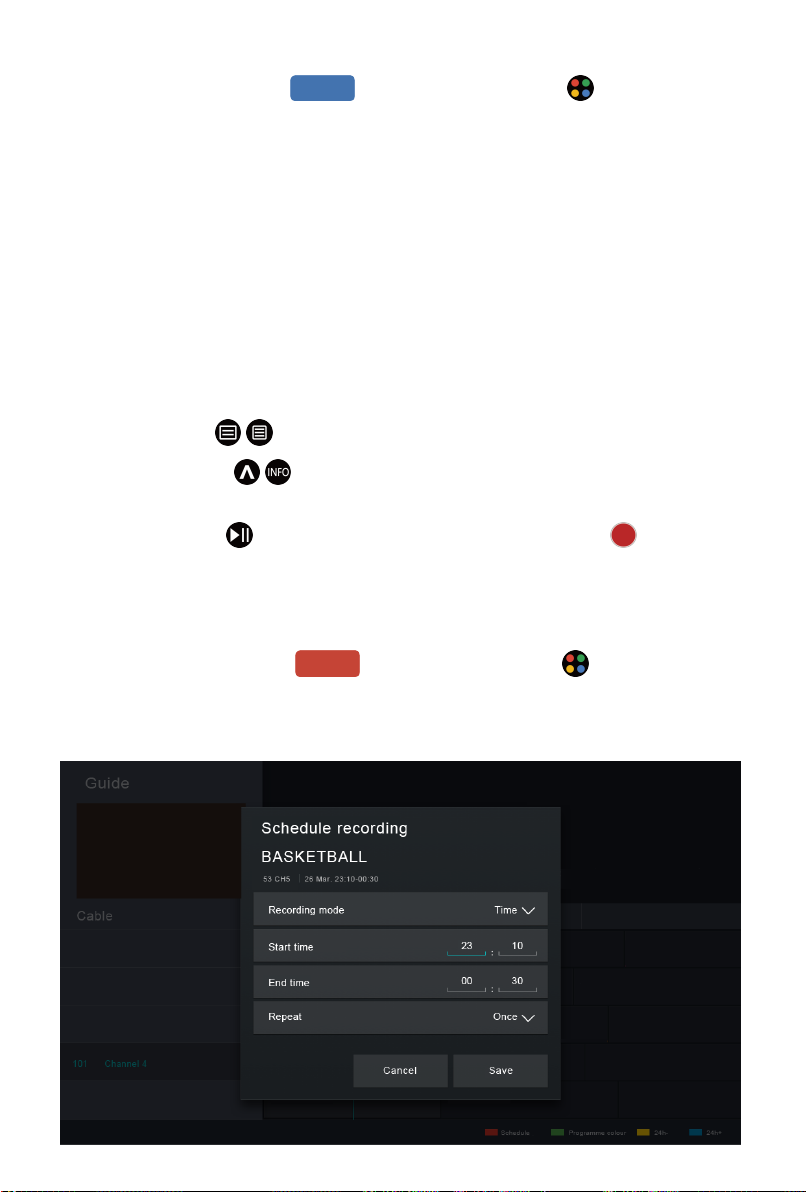
PVR
The PVR function allows you to easily record digital television content for
later viewing. The function is only available for digital channels. To use
PVR, you must connect a storage device for recording. The format of the
storage disk should be NTFS, FAT32. The PVR will not function if a data
storage device has not been connected. For more information, please refer to
Connecting USB Devices in this manual.
Schedule Recording
In Live TV, press / > PVR.
Alternatively, press / to load the info bar, and select a programme and
choose PVR.
If your remote has button, press it and use D-pad to select to set up
PVR.
You can select recording mode from time, manual stop and program.
When you select time, you can set the appointment time and period.
In Guide (EPG), press the [RED] button or press button to call
out the colour menu and select RED, to view the scheduled recording. In
schedule recording list, you can readjust the reservation information that has
been set.
13

Standby Recording
If you press the power button during recording and select Standby
Recording, your TV will go into standby mode but the recording process
is still going on. If you press power button again to wake up the TV, the
recording process will not be affected. After recording, the recorded file will
be automatically saved to the disk.
Note:
• The storage space of your device should be no less than 2G (for 15
minutes high definition video). It is strongly recommended to use USB
mobile hard disk drive instead of USB flash drive as the storage device.
• If the transfer rate of your hard disk is too slow, a pop-up notice will
appear. In this case, you can use another disk with higher speed.
• The PVR function doesn't support analogue channels.
• Some broadcasters may restrict to record the programme.
• During the recording progress, channels locked with Channel Lock
(password needed) are disabled to watch.
• Some channel-related configuration may conflict with background
recording. In this case, a reminding window will pop up.
• The PVR function may not be applicable in some models/countries/
regions.
Recording List
Accessing the recording list
View the list of recorded programmes and scheduled list.
To enter the recording list:
In Live TV, / > Recording List
Managing the recording list
In Live TV, / > Recording List > Recorded
You can watch, sort or delete recorded programmes.
Watch recorded programme
Select a recorded programme in the recording list, and press button to
watch it.
Sort recorded programme
Select All, and you can choose from the list to sort the recorded programme.
Note:
• This function may not be applicable in some models/countries/regions.
14
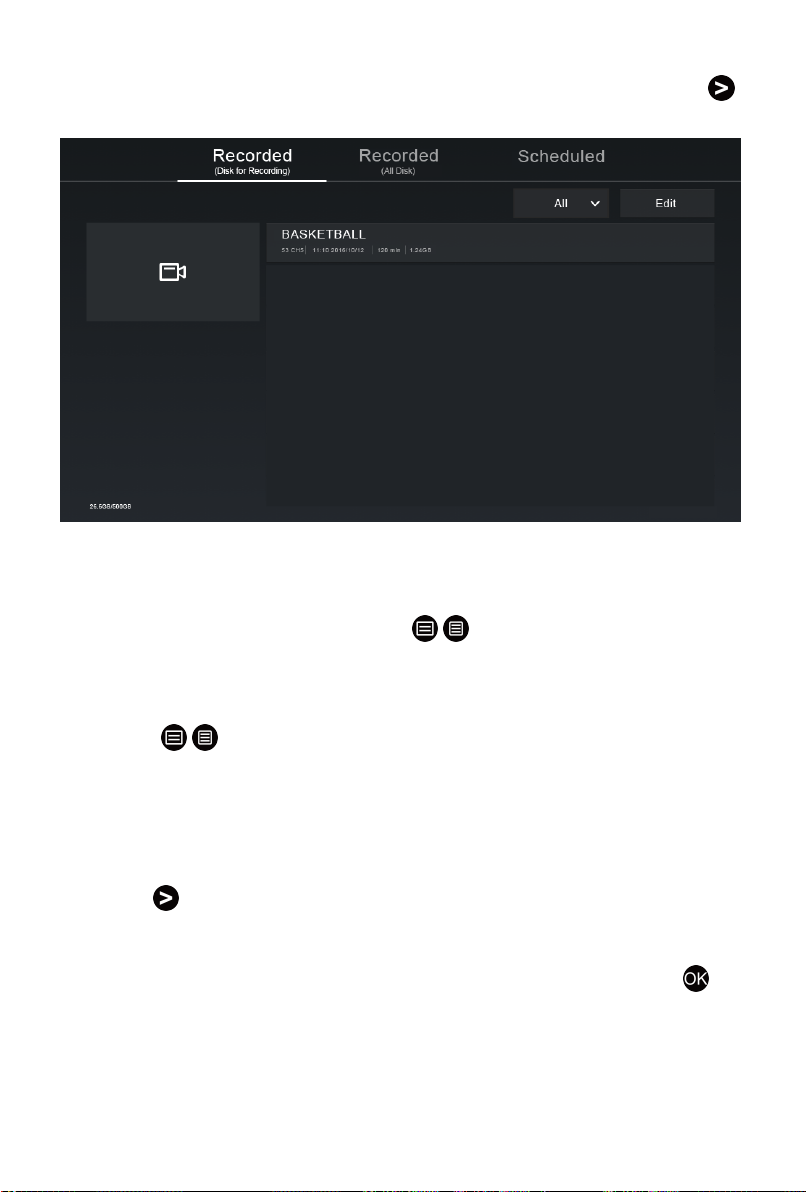
Delete recorded programme
Select Edit, select a recorded programme in the recording list, and press
button to delete it.
If you connect more than one storage devices to the TV, Recorded (Disk for
Recording) and Recorded (All Disk) are available on-screen to select.
In Recorded (Disk for Recording), you can watch recorded programme
of the storage device that is selected at / > Settings > System >
Advanced Settings > PVR & Time Shift > PVR Setup/Time Shift Setup.
Managing the schedule list
In Live TV, / > Recording List > Scheduled
You can change scheduled recording information and reminder information,
or cancel scheduled recordings or reminders.
Delete scheduled recording or reminder
Select Edit, select a scheduled recording or reminder in the schedule list,
and press button to delete it.
Edit scheduled recording or reminder
Select scheduled recording or reminder in the schedule list, and press
button to adjust it.
15
Note:
• The Recording List function may not be applicable in some models/
countries/regions.
Related Topic
• Connecting USB Devices
• Recording/Timeshift Issues
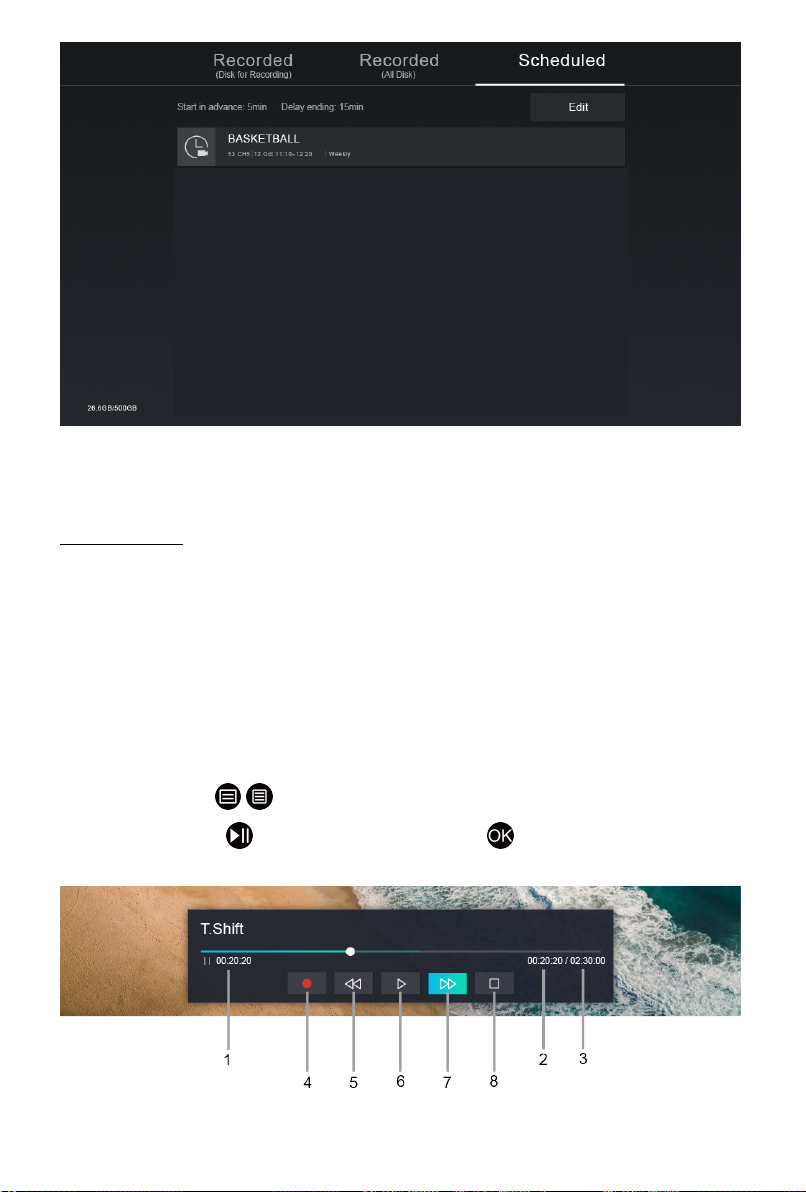
Timeshift
This option allows you to pause and rewind Live TV. This function operates
by recording temporarily to a storage device. Please ensure your storage
device is connected and there is enough free disk space. Otherwise, the
timeshift function will not commence.
In Live TV, press / > Timeshift, and then the playback bar will appear.
If your remote has button, press it and press button to launch
Timeshift.
1 Unwatched time for buffered content
16

2 Current time
3 Total time
4
5
Record: to convert timeshift to live recording of current broadcast channel.
Select and the programme content you've watched in Timeshift before will
also be saved in the storage device.
Fast backward: you can choose 2×, 4×, 8× or 16×.
6
7
8
Pause/ Play
Fast forward: you can choose 2×, 4×, 8× or 16×.
Stop Timeshift: to exit the function and watch the current broadcast.
Note:
• The Timeshift function doesn't support analogue channels.
• The storage space of the device should be no less than 2G. It is strongly
recommended to use USB mobile hard disk drive instead of USB flash
drive as the storage device.
• The Timeshift function may not be applicable in some models/countries/
regions.
Related Topic
• Connecting USB Devices
• Recording/Timeshift Issues
17
Connection
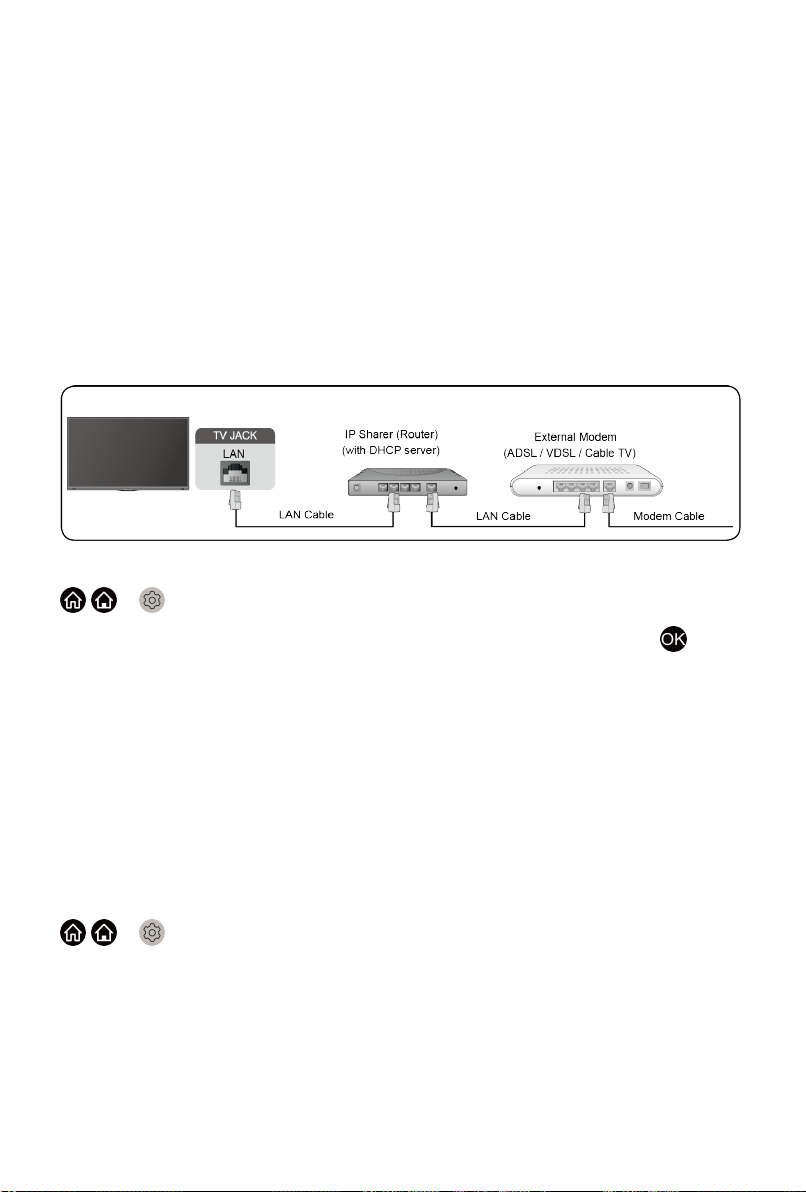
Wired Internet Connection
Connecting to a wired (Ethernet) network
To get access to the Internet in a wired way, it is recommended to use
a modem or router that supports Dynamic Host Configuration Protocol
(DHCP). Modems and routers that support DHCP automatically provide the
IP address, subnet mask, gateway, and DNS, so you don't have to enter
them manually. Most home networks already have DHCP.
See the illustration below.
After connecting to a wired (Ethernet) network:
/ > Settings > Network > Network Configuration
Set the TV network by selecting Network Configuration and press
button to enter the submenu.
• Connection Type
Choose a wired (Ethernet) network connection to access the Internet.
• Ethernet
Display network status.
• IP Settings
Configure the IP setting for your network connection.
Wake on LAN
/ > Settings > Network > Wake on LAN
Using an Ethernet connection and switching on Wake on LAN, this feature
can make you turn on the TV from the standby mode, and push content to be
broadcast on the TV with an app supporting the screencast feature in your
mobile device.
Note:
• To use this function, make sure your TV and mobile device are connected
to the same network environment.
18
• Enabling this function may result in higher energy consumption.
Related Topic
• Network Issues
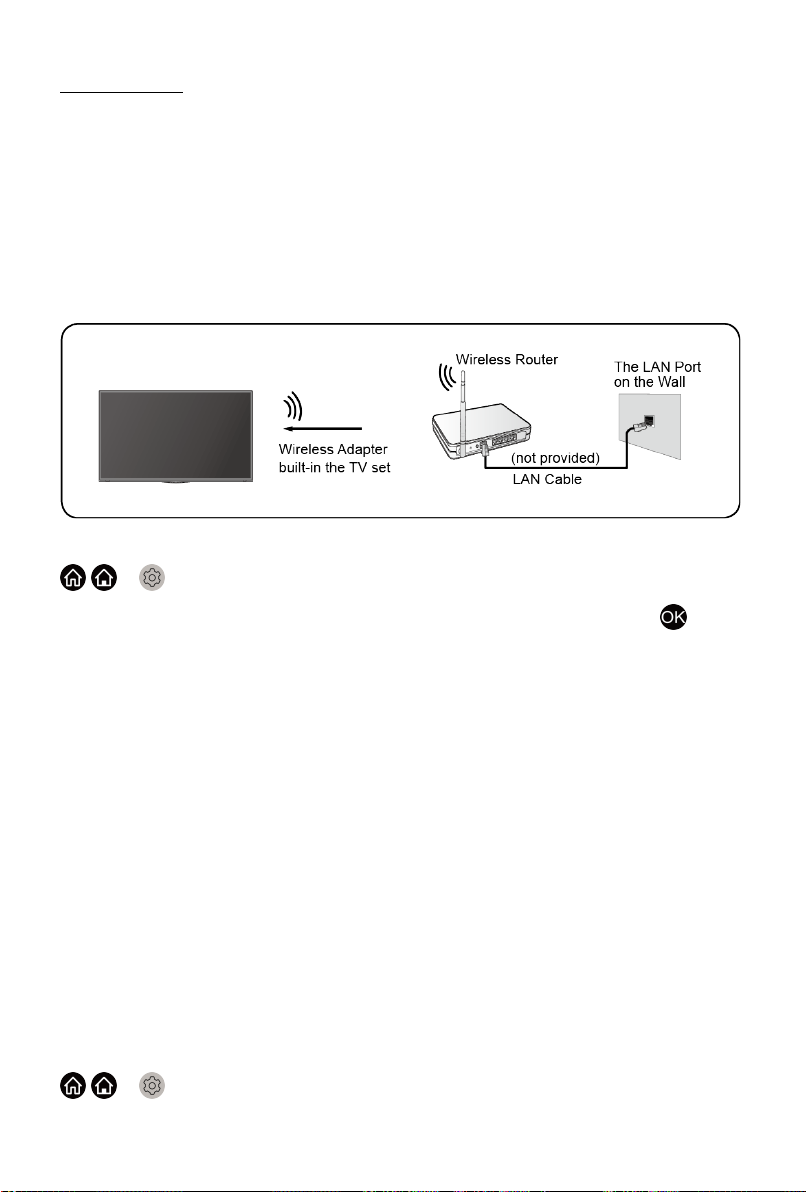
Wireless Internet Connection
Connecting to a wireless network
To connect to an available wireless network, make sure that you turn on your
WiFi and have the wireless router's SSID and password before attempting to
connect.
To get access to the Internet in a wireless way:
/ > Settings > Network > Network Configuration
Set the TV network by selecting Network Configuration and press
button to enter the submenu.
• Connection Type
Choose a wireless network connection to access the Internet.
• Advanced Settings
Configure the advanced wireless network settings for the TV.
• Add
You can add wireless network.
• Refresh
Refresh wireless network.
Note:
• If no wireless router is found, select Add and enter the network name in
the SSID.
• If no wireless router is found, select Refresh.
Wake on wireless network
/ > Settings > Network > Wake on Wireless Network
19

Using a wireless network connection and switching on Wake on Wireless
Network, this feature can make you turn on the TV from the standby mode,
and push content to be broadcast on the TV with an app supporting the
screencast feature in your mobile device.
For more information about screencast feature, please refer to Multi-screen >
Screen Sharing or Content Sharing in this manual.
Note:
• To use this function, make sure your TV and mobile device are connected
to the same network environment.
• Enabling this function may result in higher energy consumption.
Related Topic
• Network Issues
Connecting Bluetooth Devices
You can connect to devices using Bluetooth technology.
/ > Settings > Network > Bluetooth
Note:
• Bluetooth function may not be applicable in some models/countries/
regions.
Connecting a Bluetooth remote
Pair the Bluetooth remote with the TV.
1. Pair the Bluetooth remote to the TV after you power the TV on, and set
/ > Settings > Network > Bluetooth to On.
2. Keep the remote control within 3 metres from the TV. Press any button
(except power and mic button) to pair with the TV.
Note:
•
In special cases, press and hold / button to pair.
• This function may not be applicable in some models/countries/regions.
• If an unknown error occurred with the remote, it could have been caused
by interference. Try to remove what's causing the interference and pair it
again.
• If an unknown error occurred with the remote while the battery power is
normal, you can take out the batteries, press any key for 1~2 seconds,
and insert them back. Then the remote will work normally.
• The remote cannot be paired to the TV while the TV is in standby mode.
20

Connecting a Bluetooth device
To pair a Bluetooth device, such as Bluetooth headphones, speakers,
keyboards, mouse or even mobile devices:
1.
Set / > Settings > Network > Bluetooth to On.
2. Before pairing your Bluetooth devices, make sure they're in pairing mode
and put devices within pairing range. To put your Bluetooth devices in
pairing mode, refer to the manual of devices.
3.
Find the Bluetooth device name in / > Settings > Network >
Bluetooth > Equipment Management and select it. The device will be
automatically connected to the TV.
Note:
• Only one Bluetooth speaker or Bluetooth headphone can be connected to
the TV. If a new Bluetooth speaker or headphone connects to the TV, the
old one will be disconnected automatically.
• Compatibility issues may occur depending on the Bluetooth device.
• The TV and Bluetooth devices may disconnect depending on the distance
between them.
• For more information about Bluetooth headphone settings, please refer to
Picture and Sound > Using Headphones in this manual.
Listening to the audio through Bluetooth devices
Pair the Bluetooth audio devices using the TV's Bluetooth function. Refer to
the user manual for your audio devices, such as Bluetooth speaker or sound
bar, for detailed connection and usage.
After the Bluetooth connection is completed, go to / > Settings >
Sound > Speakers > Audio Output, and then select BT Sound Bar option
to listen to the audio through bluetooth devices.
Note:
• Compatibility issues may occur depending on the Bluetooth device.
• The TV and Bluetooth device may disconnect depending on the distance
between them.
TV Bluetooth speaker
/ > Settings > Network > Bluetooth > TV Bluetooth Speaker
TV Output: Mobile devices are connected to TV with Bluetooth. Sound
outputs via TV speaker.
When your mobile device is connected to the TV via Bluetooth, you can play
your mobile phone's music through TV built-in speakers. This function makes
the TV perform as a speaker.
21

Go to your mobile Settings to enable Bluetooth, and choose the TV to
connect.
To use this function, make sure to select TV Speaker at / > Settings
> Sound > Speakers > Audio Output.
Related Topic
• Speakers Settings
Connecting Headphones
You can connect a pair of headphones (not provided) to the HEADPHONE
port on your TV. While the headphone is connected, the sound from the builtin speakers will be disabled.
Note:
• Headphone port may not be available in some models.
• Headphones with microphones are not supported.
•
If Headphone with Speakers is selected manually in / >
Settings > Sound > Headphone > Headphone Mode, the headphone
and the TV will have sound output at the same time.
• For more information about headphone settings, please refer to Picture
and Sound > Using Headphones in this manual.
Connecting USB Devices
Connect the USB devices, such as hard drives and USB sticks for browsing
photos, or listening to music.
22

Note:
• Support the USB disk 4G, 8G, 16G, 32G, 64G, 128G and other common
market sizes, and 8T hard drive is currently supported.
• Support format: NTFS, FAT32.
• Select the content you want to play or view. For more information, please
refer to Smart Functions > Media in this manual.
Connecting an Antenna
You can connect an antenna cable to your TV.
Using your remote, select Input icon in Home screen and select TV as the
input source.
Related Topic
• Channel Scan
Connecting Audio Visual (AV) Devices
Connecting with a composite video cable
To connect an AV device with a composite video cable (not provided), see
the illustration below.
When the connection is finished, using your remote, select Input icon in
Home screen, and select AV as the input source.
23

Note:
• AV IN port(s) may vary depending on models.
• AV IN port(s) may not be available in some models. Please use other
port(s) to connect AV devices.
Connecting with an HDMI cable
To connect an AV device with an HDMI cable (not provided), see the
illustration below.
When the connection is finished, using your remote, select the Input in
Home screen, and select the corresponding HDMI input.
Note:
• Please refer to the User Manual that came with your device for step-bystep instructions.
• Some devices, such as DVD player, require HDMI signal to be set to
output in the device's settings. Please consult your device's user manual
for instructions.
• If there is no sound from your TV, configure the device's audio settings.
Related Topic
• Using HDMI & CEC
24

Connecting Speakers or Other Audio Receivers
To connect speakers or other audio receivers with an audio cable (not
provided), see the illustration below.
Plug the connected devices into the main power socket before switching on
the TV.
When the connection is finished, go to / > Settings > Sound >
Speakers > Audio Output, and select the SPDIF Only option.
When a digital audio system is connected to the DIGITAL AUDIO OUT port,
decrease the TV volume and your digital audio system volume.
Note:
• If you prefer to use Audio Return Channel/Enhanced Audio Return
Channel, please refer to Connection > Connecting a Digital Audio System
to Use ARC/eARC in this manual.
• You can connect the DIGITAL AUDIO OUT port on the back of the TV to
the optical port on the amplifier. Then go to / > Settings > Sound
> Speakers > Digital Audio Out to select Dolby Digital to receive the
Dolby Digital audio.
Related Topic
• Speakers Settings
Connecting a Digital Audio System to Use ARC/ eARC
If you'd like to use the Audio Return Channel (ARC)/the Enhanced Audio
Return Channel (eARC) feature to send sound from the TV by an HDMI
cable to a digital sound system, you can connect it to the HDMI (ARC/eARC)
port of your TV.
By using this feature, you can also control the sound system with your TV
remote instead of using the remotes for each device.
25

After the connection:
1. Power on the sound system.
2.
Press / button to select Settings icon in the Home screen.
3. Select Sound > Speakers > Audio Output, and select ARC option. If the
device supports eARC function, press / button to select Settings
icon in the Home screen, and select Sound > Speakers > eARC to set
eARC to On.
Note:
• It works only when the TV is connected to the audio receiver that supports
the ARC/eARC function.
• If the device has an Input Selector feature, then make sure to change it to
the TV.
• When this port is used for ARC/eARC function, it can be used as signal
input when a DVD is connected to an amplifier and the amplifier is
connected to the TV at the same time. Some amplifiers may not support
series connection.
• 5.1 CH (channel) audio is available when the TV is connected to an
external device that supports 5.1 channel surround sound. You can press
/ button to select Settings icon in the Home screen, and select
Sound > Digital Audio Out to choose Dolby Digital Plus to receive the
5.1 channel audio.
Related Topic
• Speakers Settings
Using HDMI & CEC
Use the TV remote to control external devices that are connected to the
TV by an HDMI cable. The external devices need to support HDMI & CEC
function.
/ > Settings > System > HDMI & CEC
Connecting an external device through HDMI & CEC function
/ > Settings > System > HDMI & CEC > CEC Control
26

Allow HDMI devices to control each other.
1. Set CEC Control to On.
2. Connect an HDMI & CEC compatible device to the TV.
3. Turn on the connected external device. The device will be connected to
the TV automatically. After connection is finished, you can access the
menu of the connected device on your TV screen using your TV remote
and control the device.
Enabling device auto power off
/ > Settings > System > HDMI & CEC > Device Auto Power Off
Set to On to turn off HDMI & CEC compatible external devices when the TV
is turned off.
Enabling device auto power on
/ > Settings > System > HDMI & CEC > Device Auto Power On
Set to On to turn on HDMI & CEC compatible external devices when the TV
is turned on.
This feature is applicable when TV input source is preset to the
corresponding external device.
Enabling TV auto power on
/ > Settings > System > HDMI & CEC > TV Auto Power On
Set to On to turn on the TV when HDMI & CEC compatible external devices
is turned on.
HDMI format function
/ > Settings > System > HDMI & CEC > HDMI Format
Please select Enhanced format if your HDMI device supports 4K HDR. If
it does not support 4K HDR, please select Standard format. If you are not
sure, please select Auto.
Note:
• HDMI cables must be used to connect HDMI & CEC compatible devices
to your TV.
• The HDMI & CEC feature of the connected device must be turned on.
• If you connect an HDMI device that is not HDMI & CEC compatible, all the
HDMI & CEC control features do not work.
• Depending on the connected HDMI device, the HDMI & CEC control
feature may not work.
27

• The HDMI & CEC feature supports One Touch Play, Routing Control,
System Standby, Device OSD Name Transfer, Remote Control Pass
Through, Give Device Power Status, System Audio Control.
Connecting a PC or a Game Console
PC
You can connect a PC to the TV with an HDMI cable to use your TV as a PC
monitor.
After connecting the PC, press the / button, then select Input icon in
Home screen or press button. Select the connected PC as the input
source.
Note:
• For better image quality, set the PC's resolution, and make sure the
resolution is supported by the TV.
• If there is no sound from your TV, change the PC's audio settings.
• If you want to connect your PC and TV wirelessly, please refer to Multi-
screen > Content Sharing in this manual.
Game console
You can connect your game console with an HDMI cable to the TV.
To start a game from a game console:
1. Switch on your game console.
2.
Press the / button, select Input icon in Home screen or press
button. Select the connected game console as the input source.
3. Start the game.
You can enable the game mode to optimise your TV's settings when playing
games with a game console. For more information, please refer to Picture
and Sound > Game Mode Settings in this manual.
28

Multi-screen
Screen Sharing
Mirror your mobile device screen to the TV.
Before using Screen Sharing, please set your TV to the wireless network
connection.
> Screen Sharing
1. Turn on the casting function of your Android/Windows10 device. The
setting icon may vary depending on the device. The feature may be called
"Wireless display", "Smartview", "Wireless projection", etc.
2. Find the TV name in the searching list of your device and select it. Wait
for the connection progress to complete and the content on your device
will be displayed on the TV.
Note:
• Some mobile devices may not support casting.
Related Topic
• Wireless Internet Connection
Content Sharing
Content Sharing allows you to view media content, like videos, music or
photos saved in your Android/iOS/PC device on your TV screen.
Sharing media content from your Android/iOS/PC device
1. Connect your TV and Android/iOS/PC device to the same network.
29

2.
Turn on Content Sharing at / > Settings > System > Application
Settings > Content Sharing.
3. Turn on the content sharing function in your Android/iOS/PC device.
4. Find the TV name in the searching list of your device and select it. Wait
for the connection progress to complete.
5. In your Android/iOS/PC device, choose the media content you want to
share on your TV.
Playing media content from your Android/iOS/PC device on the TV
You can connect media content saved in your Android/iOS/PC device to your
local network and play the content on your TV.
1. Connect your TV and Android/iOS/PC device to the same network.
2.
Turn on Content Sharing at / > Settings > System > Application
Settings > Content Sharing.
3. Make sure your media content in your Android/iOS/PC device are visible
through local network.
4.
On your TV, select a device with media content at / > Input, or
/ > My Apps > Media. The media content list in your Android/iOS/
PC device appears.
5. Select a media content item from the list to play.
Note:
• Some Android/iOS/PC devices may not support content sharing function.
If your device doesn't support content sharing, you can download an app
that supports the function to connect to your TV. For more information,
please refer to Smart Functions > Installing Mobile App to Control your TV
in this manual.
• The content may not be played depending on the file format.
• The content may not be played smoothly or the function may not work
properly due to the network condition.
Related Topic
• Wired Internet Connection
• Wireless Internet Connection
30

Smart Functions
Getting Familiar with the Home Screen
Press / button on your remote control to enter the Home screen.
The Home screen serves as the central location to run the TV more
conveniently.
To exit the Home screen, press button on your remote or use the
navigation buttons to move the cursor to the Input icon on the top of the
screen, press button to enter, and select your desired input source.
1 Navigation bar
2 Shortcuts
3 Apps
Using the navigation bar
The navigation bar refers to indicators and icons on the top of the Home
screen.
Note:
• Indicators or icons may vary depending on models/countries/regions.
Search
Search the content you want.
Input
Select the Input source depending on the device you have connected to your
TV.
31

Settings
Let you configure the TV.
Notifications
Allow pop-up notifications to appear for useful information and events that
occur with your TV, including: Advertising, New Arrivals, Warnings And
Legal Statements, System Messages and Alexa Notification. You can
enable/disable each of these notifications at Settings in the notification
centre.
You can view the list of event messages generated by the TV.
To delete all notifications, select Clear All.
Note:
• The Alexa Notification may not be applicable in some models/countries/
regions.
• When you sign in your VIDAA account, please find Notifications in VIDAA
Account on the Home screen.
VIDAA Account
Sign in your VIDAA account.
A VIDAA account gives you all the best features of your smart TV and always
keeps it up to date.
For more information about VIDAA account, please refer to Smart Functions
> Using a VIDAA Account in this manual.
Voice
Quick access to Voice Service. For more information, please refer to Smart
Functions > Using Voice Service in this manual.
Time
You can always view the current time at the top of the Home screen.
Network
Connect your TV to the Internet through a wireless connection or an
Ethernet cable , and the corresponding icon will appear.
Using the Shortcuts
You can add inputs, channels and websites to the Home screen to have
quick access to them for your convenience.
Add inputs to the home screen
1.
Press button.
32

2. Move the focus to an input you want to add to the Home screen, and
press / > Add to home > . The input icon will appear in Shortcuts
on the Home screen.
Note:
• Some options in inputs source page cannot be added to the Home
screen.
• To remove inputs from Shortcuts, just move the focus to a shortcut page
and press / button on your remote control.
Add channels to the home screen
1.
In Live TV, press / button to access the channel list.
2.
Press / button and press button to tick channel(s) that you'd like
to add on the Home screen.
3. Select Add to home. The channel icon will appear in Shortcuts on the
Home screen.
Note:
• To remove channels from Shortcuts, just move the focus to a shortcut
page and press / button on your remote control.
Add webpages to the home screen
1. In Browser, visit a website you'd like to add on the Home screen.
2.
Use the D-pad to move the focus to Add to home icon in the top
Browser navigation bar and select it.
3. Select Add, and this webpage will appear in Shortcuts on the Home
screen.
Note:
• To remove webpages from Shortcuts, just move the focus on a shortcut
page and press / button on your remote control.
Managing apps
/ > My Apps
Select the item you want to move, press / button to manage, and press
button to store position.
Note:
• Some app may not be moved.
33

Using a VIDAA Account
Signing into an account
Before signing into your VIDAA account, make sure your TV is connected
to network. For more about network settings, please refer to Connection >
Wired Internet Connection or Wireless Internet Connection in this manual.
1.
After the network is connected, press / button on your remote and
select VIDAA Account icon in the top navigation bar on the Home
screen.
2. Register your device to your VIDAA Account. After entering your email
and password, select Sign In.
Creating a new account
If you don't have a VIDAA account, create a new one to enjoy best features
of your smart TV.
Before creating a new account, make sure your TV is connected to network.
For more about network settings, please refer to Connection > Wired Internet
Connection or Wireless Internet Connection in this manual.
1.
After the network is connected, press / button on your remote and
select VIDAA Account icon in the top navigation bar on the Home
screen.
2. Select Create Account on screen.
3. Enter your first name, last name, email address and password. First
Name and Last Name are optional.
4. Select Create Account.
Using Voice Service
To access the Voice Service, press / button on your remote and select
Voice icon in the navigation bar. Alternatively, just press button on
your remote.
Note:
• Voice Service feature may not be applicable in some models/countries/
regions.
• To use this function, End User License Agreement and corresponding
smart feature privacy policy/terms and conditions may be required to
agree.
Alexa
Interact with Alexa by pressing and hold the microphone button on your
remote. You can ask Alexa to control this TV.
34

Before setting up Amazon Alexa Service, connect your TV to the network and
sign in your VIDAA Account at / > VIDAA Account. About more how
to signing into the VIDAA Account, please refer to Smart Function > Using a
VIDAA Account in this manual.
How to set up Alexa
1.
Press / button to select Settings icon, and select System >
Voice Service > Amazon Alexa.
2. Select Set voice assistant to Alexa and Set up now. If you have
selected Alexa in the Guide when you turn on the TV for the first time, it
will directly guide you to the Set up now step.
3. Now, you are in the step "Connect your Amazon account". Scan the QR
code with your phone, or visit the website on your phone or computer, and
enter the on-screen code. The code will be expired after 10 minutes. If
you don't have an Amazon account, create a new one.
4. After you connect the Amazon account, the TV screen changes into the
next step. You can sign into your VIDAA account. If you have signed in
before, this step will be skipped.
5. Give your TV a name from the list, or you can customise it.
6. Select Authorize and follow on-screen steps in Alexa Skill Setup settings.
Now, Alexa is set up and ready. You can enjoy interacting with Alexa using
your voice by just pressing and holding the button on your remote control.
Ask Alexa after the tone.
Note:
• The Alexa function may not be applicable in some models/countries/
regions.
• The setup steps above may vary. Please refer to the actual product.
• Shipment with voice remote control varies depending on TV models/
countries/regions.
• You can use Alexa without signing in your account by selecting Do it
later. In this case, you can still use your voice to change the channel and
control playback. Sign in your account in the setting in anytime to enjoy
more functions of Alexa.
• This feature requires Alexa built-in service. Otherwise, use external Alexaenabled devices (e.g. Alexa App, Echo) to control your smart TV by using
just your voice.
• Download and install remote control app on your mobile device at
/ > Settings > Support > Mobile App Download. Press the
microphone icon in the app to interact with Alexa on your TV.
•
You can select the language used by Alexa at / > Settings >
System > Voice Service > Amazon Alexa > Alexa Language. This
35

feature requires Alexa built-in service, which varies depending on TV
models and countries/regions.
Hands-free Wake-up
Interacting with Alexa by just using your voice, all hands-free.
Before using hands-free wake-up, connect your TV to the network and sign
in your VIDAA Account at / > VIDAA Account. About more how to
signing into the VIDAA Account, please refer to Smart Function > Using a
VIDAA Account in this manual.
How to use Hands-free Wake-up
1. Turn on the build-in microphone on the TV.
2.
Press / button to select Settings icon, and select System >
Voice Service > Amazon Alexa.
3. Select Set voice assistant to Alexa and Set up now. If you have
selected Alexa in the Guide when you turn on the TV for the first time, it
will directly guide you to the Set up now step.
4. Select Build-in Microphone. And you can select Wake up TV by voice
at the same time. When Wake up TV by voice is turned on, you can
wake up the TV from standby mode by just saying "Alexa". Turn on Wake
up TV by voice function will increase energy consuming.
5. Now, you are in the step "Connect your Amazon account". Scan the QR
code with your phone, or visit the website on your phone or computer, and
enter the on-screen code. The code will be expired after 10 minutes. If
you don't have an Amazon account, create a new one.
6. After you connect the Amazon account, the TV screen changes into the
next step. You can sign into your VIDAA account. If you have signed in
before, this step will be skipped.
7. Give your TV a name from the list, or you can customise it.
8. Select Authorize and follow on-screen steps in Alexa Skill Setup settings.
Now, Hands-free Wake-up is set up and ready. Speak to the TV and just say
"Alexa", then you can wake up Alexa in this TV.
Note:
• The Hands-free Wake-up function may not be applicable in some models/
countries/regions.
• Build-in microphone may not be available in some models.
• The setup steps may vary. Please refer to the actual product.
• This feature requires Alexa built-in service.
36

Google Assistant
Setup Google Assistant, and enjoy Google Assistant service. You can ask for
information, search for your favourite movies, control your TV and more, just
by asking Google Assistant.
Before setting up Google Assistant, connect your TV to the network.
STEP 1: Set up Google Assistant on TV
1.
Press / button on your remote to select Settings icon, and select
System > Voice Service > Google Assistant.
2.
Set voice assistant to Google Assistant and press button to set up. If
you have selected Google Assistant in the Guide when you turn on the TV
for the first time, it will directly guide you to the set up step.
3. Then, read on-screen terms of service and privacy policy, and select I
understand.
4. Next, select Allow to enable information sharing.
STEP 2: Set up in Google Assistant app
Follow the setup instructions on-screen to set up Google Assistant.
1. Download and install the Google Assistant app on your mobile device,
and open the app.
2. Speak to Google Assistant app, "Set up my Assistant device", and follow
the instruction in the app to set up Google Assistant and sign in your
Google account to this TV.
Google Assistant is set up and ready. Control your smart TV using your voice
by just pressing and holding the button on your remote control.
Note:
• The Google Assistant function may not be applicable in some models/
countries/regions.
• The setup steps above may vary. Please refer to the actual product.
• Shipment with voice remote control varies depending on TV models/
countries/regions.
• If you don't choose to set up Google Assistant in the mobile app, just
press button to continue without signing in your Google account. You
can go to TV system settings later to sign in your Google account to enjoy
personal queries by asking Google Assistant, like showing your photos,
calendar and more on this device.
Google Smart Home Service
For some models or when you use the TV in certain countries/regions,
Google Smart Home Service function is available. Set up Google Smart
37

Home Service to control your smart TV with Google Home devices or app.
You can change channels or inputs, adjust volume and more.
Before setting up Google Smart Home Service, connect your TV to the
network and sign in your VIDAA Account at / > VIDAA Account.
About more how to signing into the VIDAA Account, please refer to Smart
Function > Using a VIDAA Account in this manual.
STEP 1: Set up Google Smart Home Service on TV
1.
Press / button on your remote to select Settings icon, and select
System > Voice Service > Google Smart Home Service. Select Set up
now.
2. Sign into your VIDAA account. If you have signed in before, this step will
be skipped.
3. Give your TV a name.
STEP 2: Set up in Google Home app
Follow the setup instructions on-screen to set up Google Smart Home
Service.
1. Download and install the Google Home app on your mobile device, and
open the app.
2. Find and select VIDAA Voice service in the app.
3. Follow the instructions in the app to link your VIDAA account signed in on
your TV to your Google Account.
Google Smart Home Service is set up and ready. Control your smart TV by
using your voice through Google Home device or app.
Note:
• Google Smart Home Service may not be applicable in some models/
countries/regions.
• The setup steps above may vary. Please refer to the actual product.
Yandex Smart Home Service
Yandex Alice voice assistant can obey certain commands to help you change
the TV's configuration.
Before setting up Yandex Smart Home Service, connect your TV to the
network and sign into your VIDAA Account at / > VIDAA Account.
About more how to signing into the VIDAA Account, please refer to Smart
Function > Using a VIDAA Account in this manual.
38

STEP 1: Set up Yandex on TV
1.
Press / button on your remote to select Settings icon, and select
System > Voice Service > Yandex Smart Home Service. Select Set up
now.
2. Sign into your VIDAA account. If you have signed in before, this step will
be skipped.
3. Give your TV a name.
STEP 2: Set up in Yandex App
Follow the instruction on TV to enable Yandex Smart Home Service.
1. Download Yandex app on your mobile device.
2. Open the app and sign in your Yandex account.
3. In the Yandex app, go to "Devices" > "Smart Home", click add device
icon, and select "VIDAA Voice".
4. Perform account linking using the same VIDAA account signed in on your
TV.
Yandex Smart Home Service is set up and ready. Now you can control your
smart TV with Yandex Alice devices or Yandex app to change channel,
change inputs, adjust volume and more, just by asking Alice.
Note:
• The Yandex function may not be applicable in some models/countries/
regions.
• The setup steps above may vary. Please refer to the actual product.
Voice service other issues
If you want to turn on your TV with Alexa-enabled devices (e.g. Echo, Echo
show) or Google Home devices (e.g. Google Home, Google Nest Hub),
please:
1.
Turn on Wake on LAN and Wake on Wireless Network at / >
Settings > Network.
2. Make sure your TV and Alexa-enabled devices/Google Home devices are
connected to the same network environment.
Note:
• Only Alexa (Alexa skill is enabled) and Google Smart Home Service
support turning on your TV with Alexa Echo or Google Home. Google
Assistant (built-in) doesn't support this function.
Related Topic
• Wired Internet Connection
• Wireless Internet Connection
39

Media
/ > My Apps > Media
Media is a central location for you to view or listen to different types of
content, such as photos, music and movies. You can view media content
through the following methods:
• A USB thumb drive or hard drive.
• Compatible mobile phone, tablet or other personal devices: you can
stream movies, music and photos that are stored on compatible personal
device and play or view the content on your TV.
By default, there is Content Sharing displayed on the Media screen. If your
mobile device is connected to the TV, its name also appears on the Media
screen.
For more information about Content Sharing, please refer to Multi-screen >
Content Sharing in this manual.
Playing media contents
/ > My Apps > Media > connected devices
Select the content you want to play on the screen, like pictures, videos and
music.
1 Search the content you want to play.
2 Arrange the content list by Grid, List.
40

3 Sort the content list by Name, Date modified, Size.
4 Filter the content list by All Media, Photo, Video, Music, Recorded.
5 Create a photo, music, or video playlist.
Note:
• Some options in the above table may not be available in some models/
countries/regions.
Playing background music during viewing pictures
1. Choose a picture to display.
2.
Press / button to call out playbar.
3. Select Background Music and choose your music to create a Music
Playlist.
Now you can play the background music during viewing pictures.
Media format list
Due to differences in programming tools and other factors, some of the file
formats that are listed may not be supported.
Video Format
Container Video Codec File Extension
Name
MPG MPEG-2
MPEG MPEG-2
MP4
MOV
MKV
AVI Mpeg2,4 .avi 1920 x 1080p @ 120fps
MPEG4 1920 x 1080p @ 120fps
H.264(AVC) 3840 x 2160p @ 30fps
H.265(HEVC) 3840 x 2160p @ 60fps
AV1
MPEG4 1920 x 1080p @ 120fps
H.264(AVC) 3840 x 2160p @ 30fps
H.265(HEVC)
Mpeg2,4 1920 x 1080p @ 120fps
H.264(AVC) 3840 x 2160p @ 30fps
H.265(HEVC) 3840 x 2160p @ 60fps
AV1
.mpg .mpeg 1920 x 1080p @ 120fps
.mp4
.mov
.mkv
Resolution and Frame Rate
3840 x 2160p @ 60fps
3840 x 2160p @ 60fps
3840 x 2160p @ 60fps
41

Container Video Codec File Extension
Name
H.264(AVC) 3840 x 2160p @ 30fps
Resolution and Frame Rate
WEBM
H.264(AVC) 3840 x 2160p @ 30fpsFLV
H.265(HEVC)
VP8 1920 x 1080p @ 120fps
VP9 3840 x 2160p @ 60fps
AV1
.flv
3840 x 2160p @ 60fps
.webm
3840 x 2160p @ 60fps
Audio Format
Container Audio Codec File Extension Name
LPCMWAV
ADPCM
MP3
FLAC FLAC .flac
Mpeg1-Layer3
Mpeg2-Layer3
Mpeg2.5-Layer3
AAC-LCAAC
HE-AAC(v1/v2)
WMAWMA
WMA Pro
.wav
.mp3
.m4a .aac
.wma
Photo Format
Container File Extension
Name
JPEG .jpg .jpeg -
BMP .bmp -
GIF .gif -
TIF .tiff -
Related Topic
• Connecting USB Devices
42
Mode of Operation Resolution
7680 x 4320
no-interlacePNG .png
interlace

• Media Files
App
/ > My Apps
Numerous factory-installed apps are available for you to choose for your
entertainment preferences.
Installing an app
Even though your TV has numerous factory-installed apps, there may be
others that you'd like to download.
To install an app:
1.
/ > My Apps > APP STORE.
2. Use the navigation buttons on your remote to select the app that you want
to install.
3. Select Install. The selected app is installed on the TV.
Note:
• To use this function, your TV must be connected to the Internet.
• Adding apps is free, but it might cost you money when using some apps.
Sorting apps in My Apps
1.
In My Apps select the app you want to sort, and then press / button
to select Sort.
2.
Press / / / button to move it.
3.
Press button to store position.
Note:
• Some app may not be moved.
Removing an app in My Apps
You can only delete apps that you've installed to the TV. Factory-installed
apps can not be deleted.
1.
In My Apps, select the app you want to remove, and then press /
button to select Remove.
2. Select OK. The selected app is deleted.
Related Topic
• Wired Internet Connection
• Wireless Internet Connection
43

Installing Mobile App to Control your TV
Press / button to select Settings icon, and select Support > Mobile
App Download.
You can scan the Mobile App download QR code on screen to install the app
on your mobile to control your TV, such as turning the TV on or off, typing in
with your mobile's keyboard, and sharing pictures or videos from your mobile
to TV. This app is available on both Android and iOS.
To connect your TV after installing the mobile app:
1. Agree with end user license, and disclaimer and privacy policies on TV. If
you are not sure whether you have agreed, check at / > Settings
> Support > Disclaimer and Privacy.
2. Make sure your mobile phone and TV are connected to the same network
environment.
3.
To use this function, switch on Content Sharing at / > Settings
> System > Application Settings > Content Sharing.
4. Open the mobile app and select the TV device you want to connect.
Related Topic
• Wired Internet Connection
• Wireless Internet Connection
44

Picture and Sound
Adjusting the Picture Quality
Adjust picture mode, picture size and other advanced picture settings.
Choosing a picture mode
/ > Settings > Picture > Picture Mode
Select a preset picture mode to best suit the content you're viewing.
Options may differ depending on models. Please refer to the actual product.
• Standard
Best suited for watching normal content, such as News, Drama or
Documentary.
• Cinema day
Best suited for watching movies in a bright environment.
• Cinema night
Best suited for watching movies with dark environment.
• Dynamic
Best suited for the content that requires vivid picture quality.
• Sports
Optimized picture for watching sports.
• Auto
The picture mode will be adjusted automatically.
Note:
• Auto mode may not be applicable in some models/countries/regions,
and to use this function, you must choose Yes, Enable Enhanced
Viewing in the Enhanced Viewing when you turn the TV on for the first
time, or at / > Settings > System > Advanced Settings >
Enhanced Viewing. For more information, please refer to Accessibility
and System > Enhanced Viewing in this manual.
Low Blue Light
Cinema day and Cinema night are designed to reduce the level of blue light
to protect your eyes.
Go to / > Settings > Picture > Picture Mode, and select Cinema
day/Cinema night.
To reduce the eye strain and protect eyes when you watch TV for a period of
time, you are suggested to:
45

• Take regular and frequent breaks to avoid watching TV for a long period
of time. Long time of watching may cause you eye fatigue. It is not
recommended to watch TV for more than one hour.
• Look away from the TV screen and look at distance objects during the
breaks for at least 10 minutes for eye care.
• Relax yourself during a break by doing eye exercises or outdoor activities.
• The best recommended viewing distance is 3 times the vertical height of
the TV screen.
Proper breaks and exercises are proved excellent help to relieve eye strain
and fatigue.
This feature may not be applicable in some models/countries/regions.
Changing the aspect ratio
/ > Settings > Picture > Aspect Ratio
Adjust the Aspect Ratio to stretch or zoom in on your picture.
• Automatic
Automatically switch Aspect Ratio between 16:9 and 4:3 based on the
signal information.
• 16:9
Best suited for 16:9 Widescreen content. This will also stretch 4:3 content
to Widescreen.
• 4:3
Best suited for 4:3 content.
• Panoramic
Provide a full-screen image by stretching the edges whilst leaving the
middle untouched.
• Movie Zoom
Provide a full-screen image by zooming in on the movie.
• Direct
Point to point display also known as 1:1 Pixel Mapping.
Enabling Smart Scene function
/ > Settings > Picture > Smart Scene
You can turn on the Smart Scene function, and enable your TV to continually
recognize the scene in the content watching and enhance the picture quality
on all input sources.
Note:
• Some specific application has explicit constraints that the content
recognition is not allowed.
46

• When Game Mode is turned on, Smart Scene will be switched off
automatically and is not available to set.
Configuring advanced picture settings
/ > Settings > Picture > Picture Mode Settings
Adjust display settings for each Picture Mode. You can personalize the
picture quality by adjusting the following settings.
• Apply Picture Settings
Adjust current picture mode to apply to all sources or just current source.
• Backlight
Set the overall brightness of the screen.
Note:
• The function name may vary depending on models.
The following option may differ depending on models. Please refer to the
actual product.
Dynamic Backlight Control
Enhance the contrast ratio between light and dark areas of the picture.
This function may not be applicable in some models/countries/regions.
Backlight
Adjust how bright you want images to appear, lower settings create darker
images (only when Dynamic Backlight Control is off).
This function may not be applicable in some models/countries/regions.
Automatic Light Sensor
Enable the TV to automatically adjust the picture settings according to the
amount of ambient light in you room.
This function may not be applicable in some models/countries/regions.
Light Sensor Shift
This feature is adjustable only when Automatic Light Sensor is turned on.
If you feel the picture is brighter than you expect, decrease the value. If
you feel the picture is darker than you expect, increase the value.
This function may not be applicable in some models/countries/regions.
Local Dimming (or Peak Brightness Dynamic Range for some models)
Enable the TV to automatically adjust the backlight by sections according
to the changes in the image and increase the contrast.
This function may not be applicable in some models/countries/regions.
• Brightness
Adjust the Brightness level to generate lighter or darker images.
47

• Contrast
Adjust the Contrast level to increase or decrease how bright images
appear.
• Colour Saturation
Adjust the colour intensity of the picture for a more vibrant image.
• Sharpness
Adjust how sharp or soft edges of images appear.
• Adaptive Contrast
Automatically darken dark areas and lighten light areas of images to see
more details.
• Ultra Smooth Motion
Reduce seeing afterimages that are left on the screen when viewing fastmoving objects.
This function may not be applicable in some models/countries/regions.
• Clear Motion
Making motion look clearer when flicker is desired.
This function may not be applicable in some models/countries/regions.
• Noise Reduction
Improve how clear the picture appears by reducing noise.
• MPEG Noise Reduction
Reduce MPEG block noise and provide clearer edge transitions.
• Colour Temperature
Adjust how warm (red) or cool (blue) the white areas of an image appears.
• Expert Settings
Adjust advanced picture settings based on your viewing preference.
• Overscan
Change the video size settings to slightly crop the edges of the displayed
image.
This function may not be applicable in some models/countries/regions.
• Reset Current Mode
Restore all the picture settings in the current picture mode to the factory
default values.
Configuring expert settings
/ > Settings > Picture > Picture Mode Settings > Expert Settings
Adjust the colour space and Gamma to best suit the content you're viewing.
48

• Colour Gamut
Change the range of colours the TV displays.
This function may not be applicable in some models/countries/regions.
• Colour Tuner
Adjust the Hue, Saturation and Brightness of colour settings.
• White Balance
Adjust the intensity of red, green and blue lights to view the true colours of
all images in the picture.
• Black Level
Adjust the HDMI signal range to be more suitable for the content.
• Gamma Adjustment
Adjust the Gamma to alter how the TV will respond to the grayscale
content. In a dark room choose a higher number like 2.4. In a brighter
area select a lower number like 2.0. In general, 2.2 is normally
recommended.
This function may not be applicable in some models/countries/regions.
• Gamma Calibration
Adjust selected Gamma curve.
This function may not be applicable in some models/countries/regions.
• Viewing Angle
Provide better watching experience with viewing angel.
This function is only available in VAC-supported models.
• RGB Only Mode
View images based on default settings or choose the colour red, blue or
green.
• Low Blue Light
Eyes care: reduce the emission of blue light.
This function may not be applicable in some models/countries/regions.
Panel Refresh
Use Panel Refresh to reduce image retention effects.
Due to the optical characteristics of OLED, image pretension may occur
after the TV has been used for an extended period of time. Panel Refresh is
recommended to correct picture quality issues and prevent image retention.
Do not pull the plug from the socket when you want to turn off the TV. Please
press the power button on the remote to turn the TV off and Panel Refresh
will be operated automatically when TV is in standby mode.
49

Power indicator light will blink when Panel Refresh is in progress. The whole
progress will take about an hour, during the process, the screen will be
turned off and TV will be shut down after the refresh completes.
You could also choose to manually start Panel Refresh.
To manually start Panel Refresh:
/ > Settings > Picture > Panel Refresh
Red flashing light indicates Panel Refresh in progress.
Note:
• This function is only available for OLED models.
Related Topic
• Picture Issues
Game Mode Settings
Enabling game mode
/ > Settings > Picture > Game Mode
You can turn the Game Mode on to optimize the TV's settings for you to
enjoy a comfortable gaming experience with PC or game console connected
to the TV.
In the Game Mode:
• Reducing input lag to make sure every press or click matches what's
happening on the screen;
• Improving responsiveness to produce very little motion blur;
• Processing YUV 4:4:4 format signals precisely to present accurate image
colours.
Note:
• This function may not be applicable in some input sources or applications.
Enabling auto low latency mode
/ > Settings > Picture > Auto Low Latency Mode
You can enjoy a smooth viewing experience with external devices connected
to the TV when Auto Low Latency Mode is turned on.
Note:
• This function may not be applicable in some input sources or applications.
• When Game Mode is turned on, Auto Low Latency Mode will be
switched off automatically and is not available to set.
Related Topic
50

• Connecting a PC or a game console
Adjusting the Sound Quality
Adjust sound mode and other advanced sound settings.
Choosing a sound mode
/ > Settings > Sound > Sound Mode
Select a preset sound mode to suit the type of content you are listening to.
• Standard
In Standard mode, the TV delivers a flat frequency response, which
preserves the natural characteristics of the original sound.
• Theatre
Theatre mode increases the surround sound effect and provides a more
prominent subwoofer response.
• Music
In Music mode, low and high frequencies are emphasized to enhance
musical instrument reproduction.
• Speech
In Speech mode, low and high frequencies are attenuated to improve the
reproduction and clarity of the human voice.
• Late Night
In Late Night mode, the TV will improve the reproduction and clarity of the
human voice with a low volume level.
• Sports
Optimised sound for watching sports programmes.
• Auto
The sound mode will be adjusted automatically.
Note:
• Auto mode may not be applicable in some models/countries/regions,
and to use this function, you must choose Yes, Enable Enhanced
Viewing in the Enhanced Viewing when you turn the TV on for the first
time, or at / > Settings > System > Advanced Settings >
Enhanced Viewing. For more information, please refer to Accessibility
and System > Enhanced Viewing in this manual.
Dolby Atmos
/ > Settings > Sound > Dolby Atmos
Set Dolby Atmos to On to enhance the richness of sound, and you can enjoy
an immersive listening experience.
51

This function may not be applicable in some models/countries/regions.
Audio Enhancement
/ > Settings > Sound > Audio Enhancement
Set Audio Enhancement to have audio experience provided by Dolby
Atmos or DTS Virtual X according to your preference.
This function may not be applicable in some models/countries/regions.
Configuring advanced sound settings
/ > Settings > Sound > Sound Mode Settings
Tune the audio settings of the TV. You can personalise the sound quality by
adjusting the following settings.
• Apply Audio Settings
Adjust current sound mode to apply to all source or just the current
source.
• Total Sonics
Optimize overall sound quality by increasing bass, making dialogue clear
and natural, and widening the sound field.
This function may not be applicable in some models/countries/regions.
• Total Volume
Maintain consistent loudness levels from wide dynamic range
programmes, loud commercials, and channel or input changes.
This function may not be applicable in some models/countries/regions.
• Total Surround
Provide surround sound experience with psycho-acoustic processing to
place sounds beside, behind, and above the viewer. For best results use
with Total Sonics.
This function may not be applicable in some models/countries/regions.
• Bass Boost
Bass Boost uses DTS TruBass™ to enhance the perception of bass
frequencies to provide deep, rich bass response from the TV's internal
speakers.
This function may not be applicable in some models/countries/regions.
• Surround Sound
Surround sound uses DTS TruSurround™ to deliver an immersive
surround sound experience from the TV’s internal speakers.
This function may not be applicable in some models/countries/regions.
52

• Dialogue Clarity
Dialogue Clarity uses DTS Dialogue Clarity™ to boost the frequency
range of the human voice so dialogue is clearly understood and heard
above audio or surround effects.
This function may not be applicable in some models/countries/regions.
• TruVolume
Automatic control over drastic volume changes while watching TV
programs or films, providing a more comfortable and consistent volume.
This function may not be applicable in some models/countries/regions.
• Equalizer
Boost the volume at different frequencies.
This function is only applicable when TV Speakers is selected at / >
Settings > Sound > Speakers > Audio Output.
• Subwoofer
Built-in subwoofer switch.
This function may not be applicable in some models/countries/regions.
• Bass Boost Value
Built-in bass adjustment.
This function may not be applicable in some models/countries/regions.
• Wall Mount Setup
Automatically optimize the sound based on the position of the TV.
This function may not be applicable in some models/countries/regions.
• Auto Volume Control
Activate to prevent the volume from changing when you switch TV
channels.
This function may not be applicable in some models/countries/regions.
• Reset Current Mode
Restore all of the audio settings in the current audio mode to the factory
default values.
Note:
• Some models may not support decoding of DTS CD bitstreams. Playback
of this format may produce undesirable noise.
Related Topic
• Sound Issues
53

Speakers Settings
/ > Settings > Sound > Speakers
Select the speakers which you want to use.
Audio Output
Select the speakers which you want to use.
Digital Audio Out
Select the digital audio output format that best suits the audio device type.
• Auto: the audio device automatically outputs in a supported format.
• Pass Through: the audio device outputs without any processing.
• PCM: the audio device outputs PCM (pulse code modulation) format.
• Dolby Digital: the audio device outputs Dolby Digital audio when
connected to the TV via optical port.
• Dolby Digital Plus: the audio device outputs Dolby Digital Plus audio
when connected to the TV via HDMI (ARC/eARC) port.
Note:
•
This function is only applicable when / > Settings > Sound >
Speakers > Audio Output is set to ARC or SPDIF Only.
• When external audio devices are connected to the TV via optical, PCM
and Dolby Digital are suggested.
Digital Audio Delay
Adjust the digital audio output delay time to sync sound from an external
speaker with the images on the TV.
This function is only applicable when / > Settings > Sound >
Speakers > Audio Output is set to ARC or SPDIF Only.
Lip Sync
Synchronize the displayed image with the audio output.
This function may not be applicable in some Audio Output modes.
Balance
Adjust the left and right speaker strength to optimize audio for a specific
location.
This function may not be applicable in some Audio Ouput modes.
This function is not applicable when Dolby Atmos is turned on.
54

eARC
Connect an audio device that supports eARC via HDMI (eARC), and set
eARC to On to enjoy higher sound quality. This feature is available to set
when / > Settings > Sound > Speakers > Audio Output is set to
ARC.
This function may not be applicable in some models/countries/regions.
Related Topic
• Connecting Speakers or Other Audio Receivers
• Connecting a Digital Audio System to Use ARC/eARC
Using Headphones
/ > Settings > Sound > Headphone
Set the sound output mode through headphones.
After connecting your wireline or Bluetooth headphone, or other external
audio amplifiers, you can set up your TV to your preference.
This function may not be applicable in some models/countries/regions.
Headphone Mode
Change the way audio is sent through the type of device that's connected to
your TV Audio Out port.
When you select Headphone Only, disable the TV speaker when you are
using a headphone, a sound bar, ARC or any other external audio amplifiers.
Only external devices have audio output.
When you select Headphone with Speakers, TV speaker and Headphone
or other connected external devices have audio output.
Headphone Volume
Independently adjust the volume of audio out devices.
In Headphone Only mode, you can adjust the volume with volume button on
your remote or in Headphone Volume menu on screen.
In Headphone with Speakers mode, the TV speaker volume can be
adjusted with volume button on your remote normally. The volume of
headphone can be adjusted in Headphone Volume menu on screen.
Related Topics
• Connecting Bluetooth Devices
• Connecting Headphones
• Connecting Speakers or Other Audio Receivers
55

Accessibility and System
Accessibility
/ > Settings > Accessibility
Accessibility function provides menu options and audio description to aid the
visually or hearing impaired.
• Menu Scheme
Select menu scheme style from Dark, Light.
• High Contrast Menu
Improve contrast for visually impaired.
• Menu Transparency
Select menu transparency from Off, Medium, High.
• Audio Type
Audio Type
Select the audio type of programmes.
Voiceover Volume
Independently adjust the volume of voiceover.
• Subtitle Settings
Adjust Subtitle Settings for digital broadcast content.
Subtitle
Select whether to apply Subtitle to your TV. Select from Off, Subtitle,
Hard of Hearing Subtitles.
Primary Subtitle
Set the default subtitle language for digital broadcast content.
Secondary Subtitle
Set the secondary subtitle language for digital broadcast content.
Note:
• The above functions may not be applicable in some models/countries/
regions.
Setting Time
/ > Settings > System > Time
Set the current time based on your location.
56

• Time Format
Set the time to display in a 12 or 24-hour format.
• Date/Time
Set the Date and Time. You can set the date and time to automatically
sync with Internet/broadcast or manually setup by yourself.
This function may not be applicable in some models/countries/regions.
• Time Zone
Select your time zone.
This function may not be applicable in some models/countries/regions.
• Daylight Savings
Select whether to apply Daylight Savings Time to the TV.
This function may not be applicable in some models/countries/regions.
Using Timer
/ > Settings > System > Timer Settings
Adjust the timer settings to suit your preference.
• Sleep Timer
Set the sleep timer to automatically turn the TV Off within a specified time:
Off, 15 Minutes, 30 Minutes, 60 Minutes, 90 Minutes, 120 Minutes or
User Defined.
• Power On Timer
Set the clock for the time you want the TV to turn on automatically. You
can set the time only once or set the time in specified date by weekly.
• Power Off Timer
Set the clock for the time you want the TV to turn off automatically. You
can set the time only once or set the time in specified date by weekly.
• Menu Timeout
Set the amount of time that you would like for the menu to display: Off,
10s, 20s, 30s, 60s, 5 min.
• Auto Sleep
Set the amount of time that you would like for TV auto power off without
any activity: Off, 3H, 4H.
This function may not be applicable in some models/countries/regions.
• Auto Standby with No Signal
TV will go standby if there is no signal and the timer times out.
57

Using Parental Control
/ > Settings > System > Parental Control
Turn on Parental Control to block children from being able to view certain
programmes.
If you have not set the PIN code before, create and confirm PIN window
displays. Using the D-pad on your remote, create the password.
If you have set the PIN code before, enter PIN window displays.
Set PIN code at / > Settings > System > System PIN.
• Locks
Turn on Locks to enable the Parental Control function.
You will see other Parental Control settings change from a greyed out state
to highlighted. When this occurs, Block Time, Channel Block, Content
Block, Input Block, App Block, or Reset to Default features are available
to set.
• Block Time
Block the whole TV usage for a defined period of time, including Live TV,
HDMI and apps.
• Channel Block
Block TV channels when you turn on the Parental Control feature. To use
this function, please scan channels first.
• Content Block
Certain programme is blocked by age rating. The rating needs to be
provided by the broadcaster.
• Input Block
Block content from devices that are connected to certain TV ports.
• App Block
Block access to certain apps.
• Reset to Default
Restore Parental Control back to the factory default setting.
Setting Language and Location
/ > Settings > System > Language and Location
Select the language used for this TV and your location.
• Location
Choose the location from where you will watch your TV.
58

• Menu Language
Set the default language for the TV menu.
• Primary Audio
Set the default audio output language for the type of digital broadcast
content that you're viewing.
• Secondary Audio
Set the secondary audio output language for digital broadcast content.
• Digital Teletext
Adjust Teletext decoding.
Using Power Indicator
/ > Settings > System > Advanced Settings > Power Indicator
Set the Power Indicator light to stay On or Off when in standby mode.
/ > Settings > System > Advanced Settings > Indicator Light
Setting
Set the indicator light from Power, Always or Off.
Note:
• The above functions may not be applicable in some models/countries/
regions.
Enhanced Viewing
/ > Settings > System > Advanced Settings > Enhanced Viewing
You can turn on Enhanced Viewing features to enhance viewing experience.
• Automatic Content Recognition
Turn on Automatic Content Recognition (ACR) to enjoy amazing picture
quality and audio quality adjustment for the content watching.
Note:
• This function may not be applicable in some models/countries/regions.
• To use this function, you should accept End User License Agreement
and smart feature privacy policy/terms and conditions, and choose
Yes, Enable Enhanced Viewing in the setting process.
You will see the other Enhanced Viewing settings change from a greyed out
state to highlighted. When this occurs, Picture Mode Auto Adaptation and
Sound Mode Auto Adaptation features will be enabled.
59

• Picture Mode Auto Adaptation
Automatically switch to the best picture mode for the content watching.
This function may not be applicable in some models/countries/regions.
• Sound Mode Auto Adaptation
Automatically switch to the best audio mode for the content watching.
This function may not be applicable in some models/countries/regions.
Setting Usage Mode
/ > Settings > System > Advanced Settings > Usage Mode
Set the TV to use in Home or Store mode.
• Home Mode
Select Home Mode for normal TV usage, and use less energy.
If you want to switch to Store Mode when the TV is in Home Mode, press
/ button to select Settings, and select System > Advanced
Settings > Usage Mode, and choose Store Mode.
• Store Mode
Select Store Mode, and the TV will be on display in a retail setting. This
mode effects E-Pos and other demo functions, and is only intended for
use in retail stores.
When Store Mode is selected, press / button on your remote control
to enter store mode settings.
If you want to switch to Home Mode when the TV is in Store Mode, press
/ button to select Settings, and select System > Advanced
Settings > Usage Mode, and choose Home Mode.
Note:
• Enabling Store Mode could increase energy consumption.
Using Remote Control Service
/ > Settings > Support > Remote Control Service
Remote Control Service enables your TV to be controlled from the client
server to let service agent diagnose the problem of your TV and dealing with
the problem online efficiently.
To use this function:
1. Turn on Remote Control Service.
2. Select Agree All and Confirm in End User License Agreement page.
3. Select Generate PIN in Remote Control Service.
60

4. You can initiate a help request to service agent by hotline and provide the
on-screen PIN.
Note:
• This function may not be applicable in some models/countries/regions.
• Steps above may vary. Please refer to the actual product.
• Keep the network connected when the Remote Control Service is running.
Upgrade
/ > Settings > Support > System Upgrade
Set your TV to receive the latest firmware.
• Auto Firmware Upgrade
Set your TV to automatically receive the latest firmware.
• Check Firmware Upgrade
Check to ensure that your TV has received the latest firmware.
Please ensure your TV is connected to the Internet.
• Check OAD Upgrade
Check to ensure that your TV has received the latest firmware via the
tuner.
Note:
• Please ensure your TV is connected to the Internet.
• This function is only applicable when Thailand and Malaysia are
selected in Location.
• System App Auto Upgrade
Set your system applications to automatically upgrade to the latest
version. App auto upgrade will be done in the background. May need your
confirmation on new Privacy Notices to complete upgrade in the progress.
• Upgrade from USB
Upgrade TV software from USB device.
Note:
• Please ensure the USB flash drive insert to USB 2.0 port of the TV.
• The updating files must be available in root directory.
• The format of the USB must be FAT32 and the partition table type
must be MBR.
Related Topic
• Connecting USB Devices
61

Reset to Factory Default
/ > Settings > Support > Reset to Factory Default
Restore your TV to the factory default. Reset will clear your personal setup
and information.
62

Troubleshooting
Picture Issues
When the TV has a picture problem, these steps may help resolve the
problem.
/ > Settings > Support > Self Diagnosis > Picture Test
Before you review the list of problems and solutions below, use Picture Test
to determine if the problem is caused by the TV. Picture Test displays a high
definition picture that you can examine for flaws or faults.
• If the test picture does not appear or there is noise or distortion, the TV
may have a problem. Contact the service company in your country/region.
• If the test picture is displayed properly, there may be a problem with an
external device. Please check the connections.
• If the problem persists, check the signal strength or refer to the external
device's user manual.
Problem Possible Solutions
No picture, or black and
white picture.
The picture is distorted. • The compression of video content may cause picture
The picture is blurry or
flickering, or cuts out
momentarily.
The picture appears
red, purple, pink and
other colours.
• Unplug the TV power cord from AC outlet and re-plug after
60 seconds.
• Check if the Colour Saturation is set to 50 or higher at
/ > Settings > Picture > Picture Mode Settings
> Colour Saturation.
• Try different TV channels.
distortions, especially in fast moving pictures from sports
programmes and action movies.
• If the signal reception is weak or poor, screen distortion
may be visible but it is not a malfunction.
• Mobile phones used close to the TV (within 1m) may
cause noise on analogue and digital channels.
•
/ > Settings > Picture > Picture Mode Settings
> Sharpness. You can try to increase or decrease the
Sharpness.
• If you use an external antenna, check the direction,
position and connection of the antenna.
• Adjust the direction of your antenna, or reset or fine tune
the channel.
•
/ > Settings > Picture > Picture Mode Settings
> Expert Settings > White Balance. You can try to
increase or decrease the White Balance.
63

Problem Possible Solutions
Picture distorted or
appear wavy.
• Some electrical appliances may affect the TV. If you turn
off the appliance and the interference goes away, then
move it further away from TV.
• Insert the power plug of the TV into another power outlet.
Sound Issues
When the TV has a sound problem, these steps may help resolve the
problem.
/ > Settings > Support > Self Diagnosis > Sound Test
If the TV plays the Sound Test melody without distortion, there may be a
problem with an external device or the broadcast signal's strength.
Problem Possible Solutions
There is no sound or
the sound is too low at
maximum volume.
Picture is normal, but no
sound.
The speakers are making
an odd sound.
• Check the volume control of the device (cable or satellite
box, DVD, Blu-ray, etc.) connected to your TV.
• Check the volume settings.
• Check if 'Mute' mode is set to on.
• Make sure that the audio cable is connected to the correct
audio output connector on the external device.
• For antenna or cable connections, check the signal
information.
• A low signal level may cause sound distortions.
Sound distorted or
appears wavy.
Sound is blurry or cuts out
momentarily.
• Some electrical appliances may affect the TV. If you turn
off the appliance and the interference goes away, then
move it further away from TV.
• Insert the power plug of the TV set into another power
outlet.
• If you use an external antenna, check the direction,
position and connection of the antenna.
• Adjust the direction of your antenna or reset or fine tune
the channel.
Network Issues
When the TV has difficulties in connecting to the Internet, these steps may
help resolve the problem.
/ > Settings > Support > Self Diagnosis > Network Test
64

If the TV network is connected, the screen will display Connected
successfully.
Problem Possible Solutions
The TV cannot connect to
your network or apps.
The wireless network
connection failed.
The wireless network
signal is too weak.
• Make sure the TV has a network connection.
•
Run / > Settings > Support > Self Diagnosis >
Network Test.
• Contact your Internet service provider.
• Make sure your wireless modem/router is on and
connected to the Internet.
• Position your wireless router, modem router, or access
point in a central location. Avoid putting it in a corner.
External Device Connection Issues
When the TV has difficulties with external device connection, these solutions
may help resolve the problem.
Problem Possible Solutions
I have connected an
external source to my TV
but I get no picture and/or
sound.
The cable box is no signal
or weak signal.
• Check whether the connection between the external
device and your TV is correct.
• Make sure you have made the correct selection of input
source.
• If there is no signal occasionally, unplug cable from TV
and re-plug after 60 seconds.
• If there is always no signal, or the signal cannot be
restored after plugging and unplugging, you can try
/ > Settings > System > HDMI & CEC > HDMI
Format, to confirm whether the signal can be recognized.
• Change to another HDMI port.
• Change to another HDMI cable.
There is no sound. •
Check whether ARC is selected at / > Settings
> Sound > Speakers > Audio Out. If not, you need to
check whether the external power amplifier device is
connected to the ARC/eARC port or optical port of the TV.
•
/ > Settings > Sound > Speakers > Digital
Audio Out. You can try to select PCM, Dolby Digital, or
Dolby Digital Plus.
• Whether the power amplifier device port is connected
correctly.
•
If you select HDMI as input, you can try / >
Settings > System > HDMI & CEC > HDMI Format.
65
Problem Possible Solutions
The remote control does
not work.
• Confirm that TV still has power and is operational.
• Change the new batteries in the remote control.
• Check if the batteries are correctly installed.
• If some buttons don't work, but the volume buttons can
work normally, it seems there is a problem with the
application.
Apps
When some apps aren't playing, this may help resolve the problem.
Problem Possible Solutions
Netflix can't be played. •
/ > Settings > System > Application Settings
> Netflix > Forced Closure, then reopen to try.
•
You can try to reset to the factory settings at / >
Settings > Support > Reset to Factory Default.
Media Files
When files aren't playing, this may help resolve the problem.
Problem Possible Solutions
Some files can't be
played.
• Most files can be played back, but you might experience
problems with corrupted files or files with high-bitrate,
unsupported resolution, unsupported container or codec
formats.
Related Topic
• Media
Voice Service Issues
When some Voice service aren't playing, this may help resolve the problem.
Problem Possible Solutions
Alexa can't be played. •
For more information about Alexa, please refer to Smart
Functions > Using Voice Service > Alexa in this
manual.
66

Problem Possible Solutions
Google assistant can't be
played.
• You can try to log in Google account.
• If you receive "I don't understand" of the voice recognition,
please change account or log out the account.
• After logging in to the Google account, the recognition
language may be different. You need to log in to the
Google account on the web page to set the voice
language.
• For more information about Google Assistant, please
refer to Smart Functions > Using Voice Service >
Google Assistant in this manual.
TV Status Diagnosis
/ > Settings > Support > Self Diagnosis
Perform self diagnosis to test sound, picture and connections.
Use Picture Test to help diagnose video issues and Sound Test to diagnose
sound issues. You can also view signal strength information for over-theair digital signals by using Network Test and Input Connection Test.
Additionally, you can view the status of the TV by using Status Check.
Recording/Timeshift Issues
When Timeshift or Schedule recording isn't working, these steps may help
resolve the problem.
Problem Possible Solutions
Schedule Recording
cannot be used.
• Check if there is a storage device connected to the TV.
• Check the free space of the storage device. The function
will not work if there isn't enough storage space in the
device.
• Check whether your storage device is damaged. If so, it is
suggested to format your storage device.
• Recording will automatically stop if the signal becomes too
weak.
• Recording or timeshift function may not work because of
the slow speed of read-write for USB flash drive.
• Recording or timeshift function may not work because the
storage format of your device is unsupported.
• The Recording/Timeshift functions may not be applicable in some models/
countries/regions.
Related Topic
• PVR
67

• Timeshift
Other Issues
Use these procedures to resolve other issues that may occur.
Problem Possible Solutions
The TV is hot. • Watching TV for an extended period of time causes
the panel to generate heat. The heat from the panel is
dissipated through internal vents running along the top of
the TV.
• After extended use, you may feel hot when touching it.
This heat, however, is not a defect and does not affect the
TV's functionality.
The TV smells of plastic. • This smell is normal and will dissipate over time.
The plastic cabinet makes
a "clicking" type of sound.
When I turn on my TV,
there is a delay for a
few seconds before the
picture appears. Is this
normal?
• The "clicking" sound can be caused when the temperature
of the TV changes. This change causes the TV cabinet to
expand or contract, which makes the sound. This is normal
and the TV is OK.
• Yes, this is normal. The TV is initializing and searching for
previous setting information.
68

Using the E-Manual
Launching the E-Manual
/ > Settings > Support > E-Manual
View the embedded E-Manual that contains information about your TV's key
features.
• The black background icon stands for the button on the remote control.
• The grey background icon stands for the icons on the TV screen for
selecting.
Disclaimer:
Instructions and images through this manual are only for reference and may
differ from the actual product.
Using the buttons in the E-Manual
Search
Search for the product feature information, and the E-Manual will provide all
the titles and content that contains the search information.
QR Code
Scan the QR Code with your Smart Phone to Open the E-Manual on it.
Try Now button
Select Try Now, and it will guide you to the corresponding TV menu for
running the function.
Guidelines
Note:
• Guidelines content is only applicable in Germany.
How are TV channels sorted and why?
Channel sorting
The availability of individual channel may depend on the selected reception
path, such as satellite (DVB-S/S2), cable (DVB-C) or antenna (DVB-T2) and
the signal strength.
Standard or an operator (Astra 19.2°, Vodafone (NRW, Hessen, BW) or
Pÿur) can be selected for automatic channel search.
69

To sort channels when selecting an operator:
When an operator is selected, the channels are sorted based on the
operator's criteria.
Channel sorting when selecting Standard:
After a successful channel search, the channels are sorted by genre. These
include full programmes, children, sports, documentation or regional and
local programmes.
Broadcasters with less coverage and, if available, international channels are
listed in alphabetical order after the pre-sorted list.
If LCN (Logical Channel Number, only possible with cable reception) is
activated during the channel search, the sorting takes place according to the
criteria of the local cable network operator.
Search by Channel name
The search within Live TV can be opened with the button. Here you can
search for individual channels by name.
Radio Transmitter
Radio channels are listed in alphabetical order after the list of TV channels.
To make finding radio channels easier, the filter function of the channel list is
recommended (please refer to Channal List in this manual).
Sponsored Content
On the basis of bilateral contracts with the respective broadcasters, individual
channels are placed in a position defined by them in the channel list.
Sort Manually
The channel list can be manually sorted at any time. More information can be
found in Channel Edit and Favourite in this manual.
How are apps sorted and why?
The applications on the VIDAA platform are positioned according to the
bellow criteria.
In the Application Docker on the Home Launcher:
To ensure equal representation of apps and provide fair treatment of newly
launched content partners, the applications are ordered based on the (i)
global number of users, (ii) number of users in Germany, (iii) number of
subscribers in Germany, (iv) share of local language content, (v) variety of
content, and (vi) novelty of the platform. At all times the Application launcher
must include:
• the 2 leading global SVOD platforms
• the 2 leading global TVOD platforms
70

• the 2 leading global AVOD platforms
• the leading local sports platform
• at least 4 leading local applications with predominantly German content
• at least 1 leading application with children's content
• at least 2 applications that have launched in the last 6 months
The ordering of applications is reviewed every 6 months and a new
programming table is issued for newly connected devices.
In the My Apps section:
The applications are ordered in alphabetical order.
How can TV channels and apps be customized?
TV channels
In Live TV, press / > to select a Live TV channel category such as
Antenna or Cable, then use D-pad to select Edit.
Alternatively, in Live TV, press / button, select Settings > Channel >
Channel Edit, and select a Live TV channel category such as Antenna or
Cable.
•
Press button on the selected channel, then a checkbox will appear.
You can select multiple channels at the same time to move or delete.
•
Move: Press button to move the selected channel.
Moving the channels could be restricted by the operator. If you want to
be able to move channels, it is not recommended to choose an operator
during channel scan, and LCN should be set to Off.
•
Delete: Press button to delete the selected channel.
•
Restore: Press [RED] button, or press button to call out the
colour menu and select RED to enter the list of deleted channels. Press
button to restore the deleted channel.
•
Filter: Press [YELLOW] button or press button to call out the
colour menu and select YELLOW, the filter screen will pop up. Press
button to select options, and the channel list can be updated.
•
Search: Press [BLUE] button or press button to call out the
colour menu and select BLUE, to search the channel.
Favourite list
Viewing your favourite list
In Live TV, press / > > Fav to call out the favourite list. A heartshaped icon appears next to your favourite channel.
71

Editing the favourite list
In Live TV, press / > > Fav > to select FAV1 - FAV4, then use D-
pad to select Edit.
Alternatively, go to / > Settings > Channel > Channel Edit, and select
FAV1 - FAV4.
You can add, move or remove favourite channels.
•
Select Add channels to add the selected channel to the favourite list.
•
Select a channel in a favourite list, and press button to move it.
•
Select a channel in a favourite list, and press button to remove it.
Apps
/ > My Apps
Select the item you want to move, press / button to manage, and press
button to store position.
Note:
• Some app cannot be moved.
How are recommendations created?
Recommendations on the platform are dependent on the ability and
willingness of partners to provide metadata to the platform. The content is
positioned depending based on the following criteria:
Above applications:
The recommendations originate from the Content partners that are
highlighted. They are in the domain of the end-user.
Bellow applications:
Recommendation rows are created by the editorial team, following these
guidelines:
1. Content variety – Providing a broad selection of content
2. Type of access variety – Providing advertising-supported, subscription,
and transactional content
3. Balance – Providing a balance between global and local content
72
 Loading...