

Page 1
65T810UAD
English
Accessories List....................................... 1
Installing the Stand .................................. 1
TV Rear ................................................... 3
Making Connections ................................ 3
Remote Control .......................................6
Specifications ..........................................8
Contents
QUICK SETUP GUIDE
Before using the TV, please read this guide thoroughly
and retain it for future reference. For more detailed
instructions, please see the User Manual.
ES-A150720-1
Page 2
1
Installing the Stand
User Manual × 1 Quick Setup Guide × 1 Remote Control × 1 Battery × 2
Screw (M5×30) × 4
Accessories List
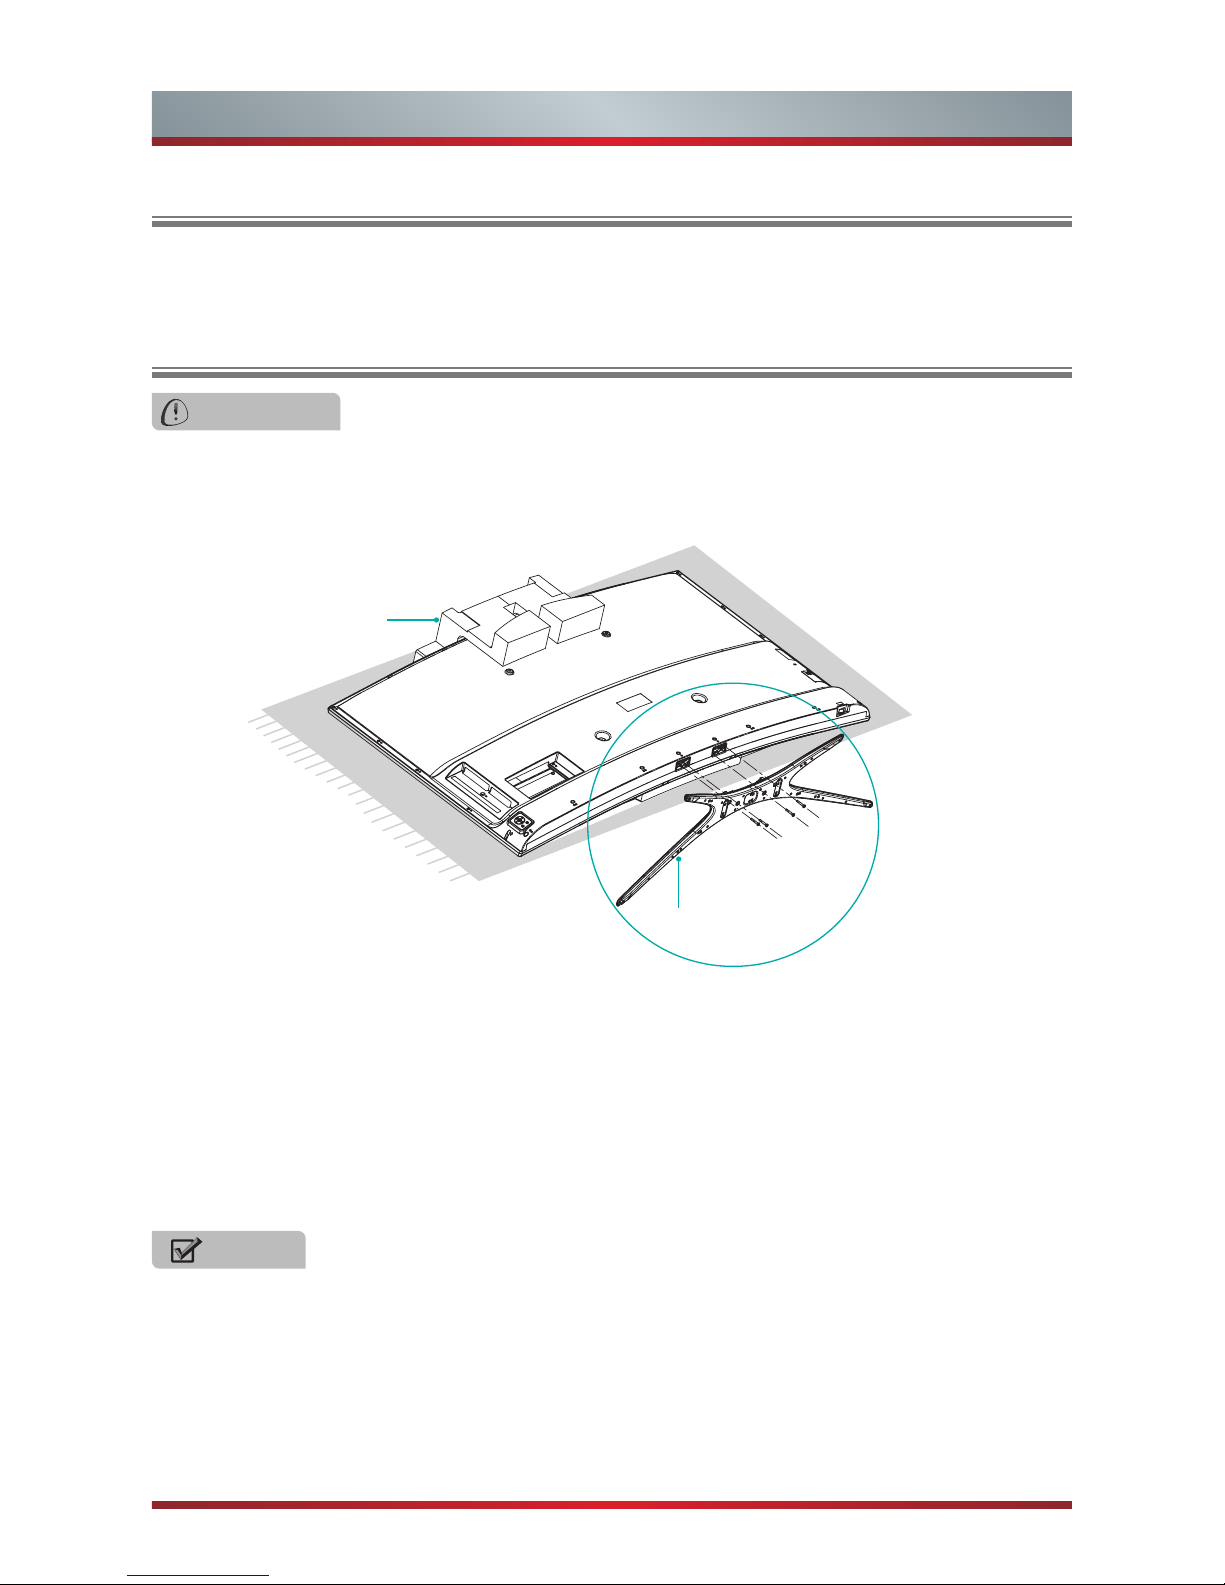
Installing the Stand
• Lay the soft cushion on the table which can hold enough weight of the whole TV in
case of causing damage to TV or person.
• Carefully remove TV and top cushion from the carton box. Put the TV with top
cushion on the cushion, with its back upwards and the LCD downwards.
• To install the base stand, Secure the base stand to the TV with the 4 provided
screws.
CAUTION
Carefully place your TV facedown on a soft, flat surface to prevent damage to the
TV or scratching to the screen.
M5×30
BASE
Top Cushion
NOTES
Product image is only for reference, actual product may vary in appearance.
Page 3
2
Installing the Stand
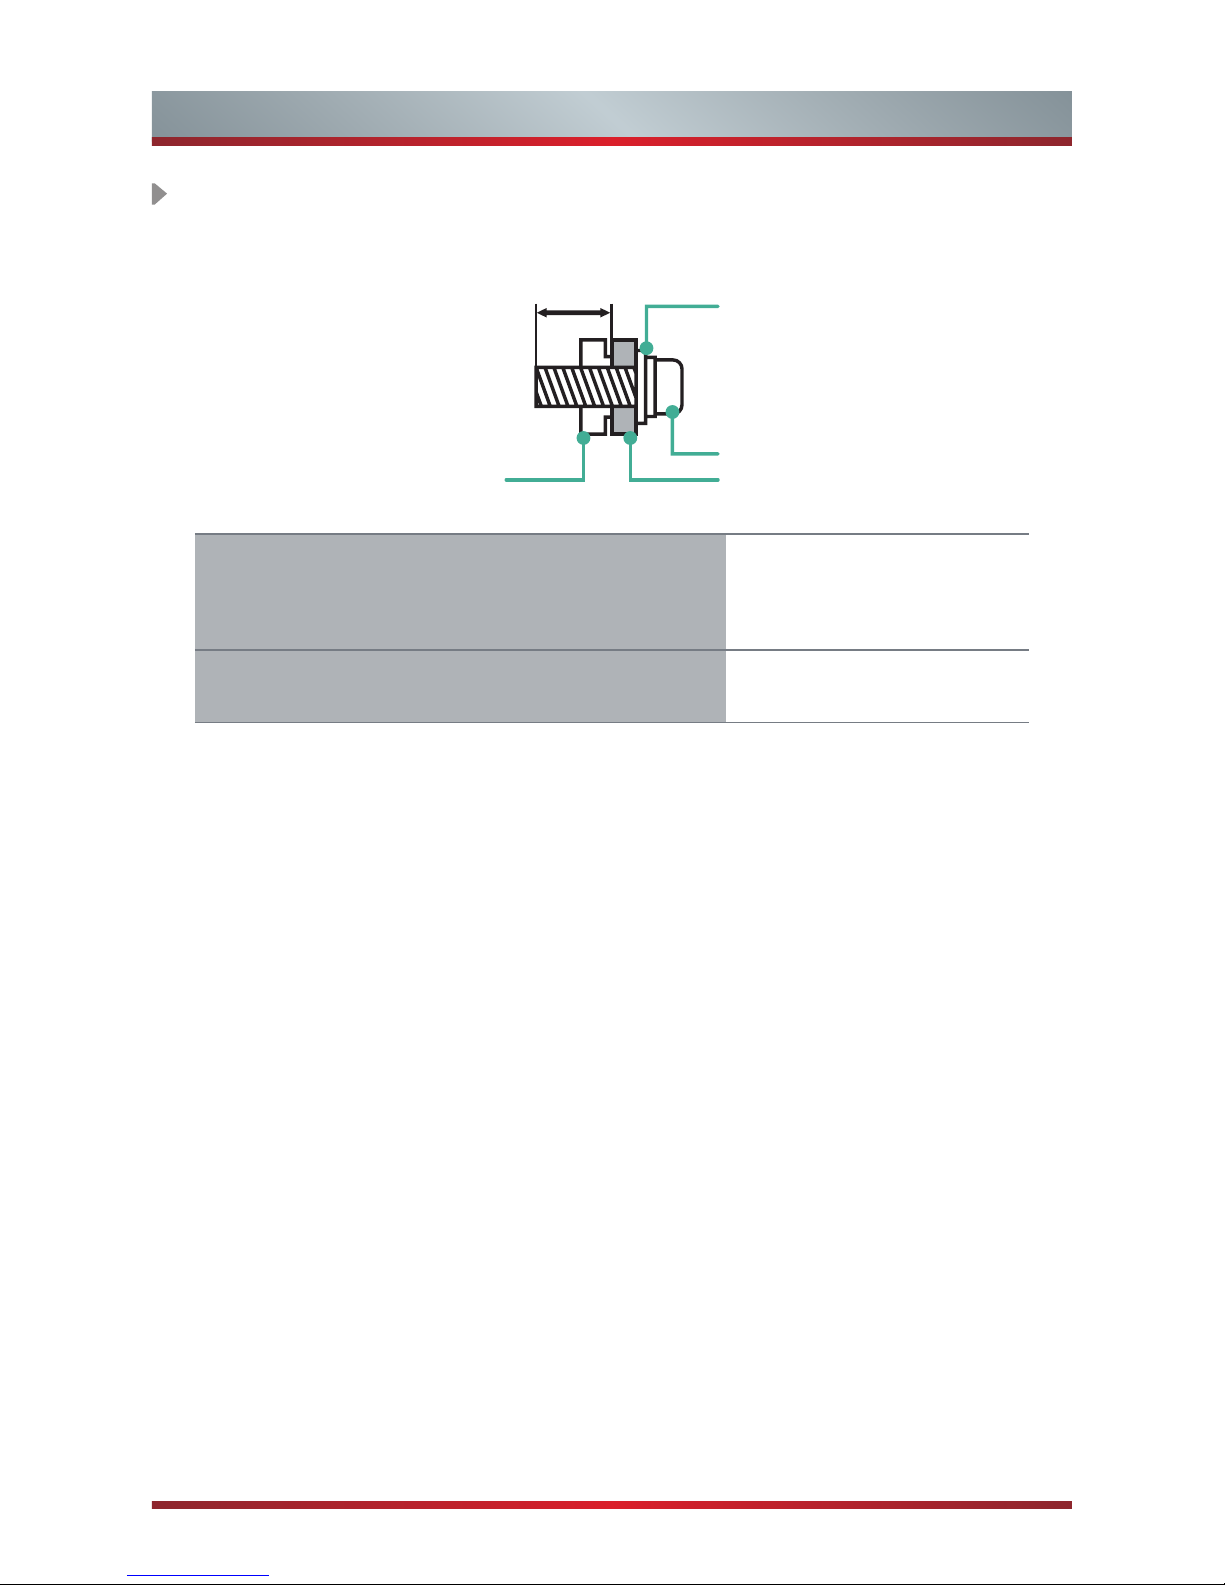
WALL-MOUNT BRACKET (not provided)
9 ~ 11.5 mm
Wall-Mount Bracket
Screw (not provided)
Spacer(not provided)
The TV's rear cover
Wall-Mount hole pattern VESA (mm)
Wall-Mount screw size (mm)
400 × 400
M6
Page 4

3
TV Rear
TV Rear
TV Bottom Panel
Power Switch
TV Back View
TV Side View
ANT OUT
OR
Outdoor
Antenna
VHF/UHF Antenna
Antenna Cable (75Ω)
Connect an outdoor VHF/UHF antenna.
Connect an ethernet cable to access a network or the Internet.
ANT
LAN
NOTES
Image for reference only. Please subject to the actual TV.
Check the jacks' for position and type before making any connections.
Loose connections can result in image or color problems. Make sure that
all connections are tight and secure.
HDMI 4
DIGITAL AUDIO OUT
LAN
HDMI 3 HDMI 2 HDMI 1
PC IN
VGA
PC AUDIO IN
USB
DC 5V
0.5A(MAX)
USBUSB
DC 5V
0.5A(MAX)
ANT
HEADPHONE
VOL +
Power
OK
VOL -
CH +
CH -
VIDEO
L R
AV IN
COMPONENT IN
Y/P
/P
B
R
Page 5

4
Making Connections
Turning the TV On for the First Time
The Installation Guide Menu appears the first time you turn on the TV. The wizard will
guide you step-by-step through the initial setup and configuration of your television.
• Press [POWER] to turn on your TV, it will go straight into Setup Wizard menu.
• Press [▲/▼/◄/►] buttons to navigate the menu and change the settings. Press [OK]
button to confirm.
Language Setting - Select your desired language to be displayed on the menu.
Select region - Select the country where you will operate the TV.
Remote pairing - Pair the remote control with the TV via Bluetooth.
Legal notice - View the legal information, you can send report to Hisense or not.
Connect to the internet - Connect your TV to access the network via Ethernet
cable or WiFi. Please refer to the user manual (Setting > Wi-Fi or Ethernet) for more
information.
Google Account - Log in or register a new Google Account.
Select use mode - Select the TV's usage mode: Home Mode / Retail Mode.
Help Make Google TV better - Select sending report to Google or not.
Chanel installation - Search and store available TV channels according to the input
signal.
HDMI / COMPONET / AV
BEST(HDMI)
Video Effect:
BETTER
(COMP)
GOOD
(AV)
Video Camera/
Set-top Box/
Satellite Receiver
Connect an HDMI cable or COMPONET/AV Adapter from an external A/V equipment.
No sound connection is needed for HDMI to HDMI connection. If the device signal
resolution does not match the specification table you need to change the setting of
device according to the table. Please consult your device user manual for instruction.
• To select the HDMI / Component / AV
Press the
button to diaplay the Setting menu and select Video input, and then
select the source [HDMI] / [Component] / [AV] to connect from the list
AV
Y
P
b
Pr
Component
L
R
Video
L
R
VIDEO
L R
AV IN
COMPONENT IN
Y/P
/P
B
R
Page 6

5
Making Connections
Connect an optical cable from an external digital audio system (Toslink optical cable
is needed).
DIGITAL AUDIO OUT
Connect Headphone for audio out of the TV.
HEADPHONE
Headphone
DIGITAL
AUDIO OUT
Speaker
Connect a VGA cable and an audio cable from the PC.VGA & AUDIO
PCPC
Connect a USB device port for browsing photos, listening music and playing
movies.
• To select the VGA: Press the
button to display the Setting menu and select
Video Input, and then select the source [VGA] to connect from the list.
USB
Portable Storage
Device
PC IN
VGA
PC AUDIO IN
Page 7

6
Remote Control
Power indicator
Receive the voice
Select the next/previous
channel
Returns to the previous
menu or exit the application
Display the teletext in the
Live TV
Launch Home screen
While an application is
running,pressing the button
terminates the application
Mute and restore sound
Power Standby button:
Power on/ Standby
Adjust the volume
Navigation buttons
▲/▼/◄/►: Up/Down/Left/
Right
Press the cute key to
see the available options
anywhere
Select a channel or input
numbers
Dispaly subtitles in the Live TV
Display the Settings menu
Display the Electronic
Programming Guide in DTV
mode
Enter the Live TV screen
Display the applications
recently
Conrm button / Display
the on-screen keyboard
Fast access to the all
applications
Run Voice Search
To speak a voice command
press and hold the VOICE
button and say a voice
command
NOTES
The Picture is Only for Reference.
If the LED is red, the remote has failed to pair with the TV, please repeat the
pairing procedure until succeeding.
Page 8

7
Remote Control
1. Press and lift the back cover to open the battery compartment of the remote
control.
2. Insert two AA size batteries. Make sure to match the (+) and ( - ) ends of the
batteries with the (+) and ( - ) ends indicated in the battery compartment.
3. Close the battery compartment with the cover.
Installing Batteries in the Remote Control
NOTES
Dispose of your batteries in a designated disposal area. Do not throw the batteries
into a fire.
Do not mix battery types or combine used batteries with new ones.
Remove depleted batteries immediately to prevent battery acid from leaking into
the battery compartment.
If you do not intend to use the remote control for a long time, remove the batteries.
1 2 3
• The First Method
The Setup Wizard menu appears the first time you turn on the TV. Step of the
remote pairing, press and hold down the
and buttons simultaneously until
the red LED turns on.
When the red LED lights, release the buttons and wait for the TV to pair with the
remote. The blue LED on the remote control will flash three times when the pairing
is successfully completed.
• The Second Method
1.Enter Settings > Bluetooth to turn on Bluetooth.
2.Press and hold the
and buttons for three seconds simultaneously.
3.Select Find nearby devices to search the remote control, and the remote control
will appear in available devices, then press the [▲/▼] buttons to select the Remote
Control and press the [OK] button to pair.
Pairing the Remote Control
Page 9

8
Specifications
NOTE
Features, appearance and specifications are subject to change without notice.
Model Name 65T810UAD
Size with base (mm) 1452 × 902 × 332
Size without base (mm) 1452 × 841 × 74
Weight with base (kg) 32
Weight without base (kg) 29.2
Active Screen
Size(Diagonal)
65 inches
Screen resolution 3840 × 2160
Sound Output (RMS) 15W + 15W
Power consumption 260 W
Power supply 100V - 240V ~ 50Hz/60Hz
Colour System PAL NTSC SECAM
Television System PAL B/G SECAM D/K DVB-T
Environmental
conditions
Temperature: 5°C - 45°C Humidity: 20% - 80% RH
Atmospheric pressure: 86 kPa - 106 kPa
Component mode
480I/60Hz, 480P/60Hz, 576I/50Hz, 576P/50Hz,
720P/50Hz, 720P/60Hz, 1080I/50Hz, 1080I/60Hz,
1080P/50Hz, 1080P/60Hz
VGA mode 640×480, 800×600, 1024×768, 1280×1024 60Hz
HDMI mode
480I/60Hz, 480P/60Hz, 576I/50Hz, 576P/50Hz,
720P/50Hz, 720P/60Hz, 1080I/50Hz, 1080I/60Hz,
1080P/50Hz, 1080P/60Hz, 640×480, 800×600, 1024×768
3840×2160/24Hz, 3840×2160/25Hz, 3840×2160/30Hz,
If you encountered difficulty when setting up your TV,we suggest you refer to the
Trouble Shooting tips in the User Manual.
 Loading...