

Page 1

32D50
40D50P
English
ES-
QUICK SETUP GUIDE
Before using the TV, please read this guide thoroughly
and retain it for future reference. For more detailed
instructions, please see the User Manual.
NO.1
Page 2
English
1
Contents
Contents
Accessories List..............................................................................................................1
Installing the Stand ......................................................................................................... 2
TV Front..........................................................................................................................4
TV Rear ..........................................................................................................................5
Making Connections ....................................................................................................... 5
Remote Control ..............................................................................................................9
Turning the TV on for the First Time ............................................................................. 11
Specifications ...............................................................................................................13
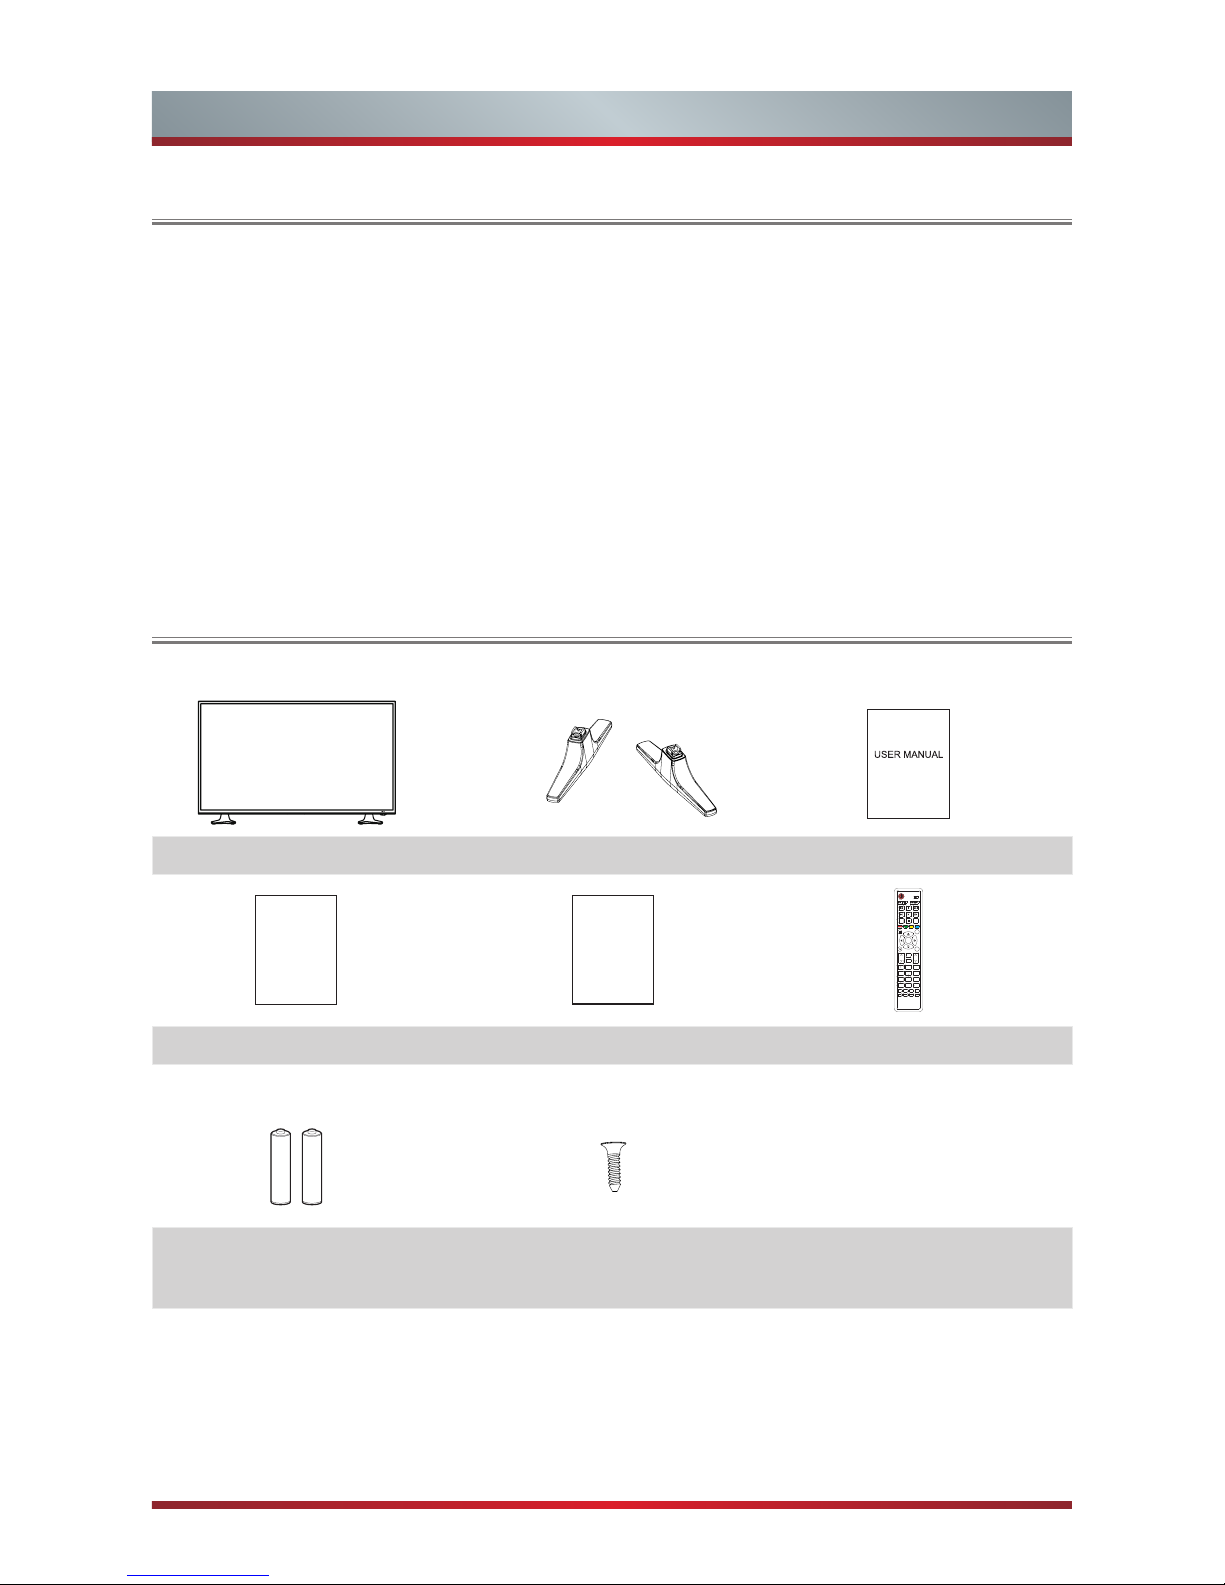
TV Base Stand User Manual
Quick Setup Guide Warranty Card Remote Control
AAA Batteries × 2 (ST4 × 12F) × 4 (32˝)
(ST4 × 14F) × 4 (40˝)
Accessories List
The following accessories are included with TV:
Quick Setup Guide
HiSmart
CH
MENU
RETURN
MUTE
FAV
PRE CH
OFF
ON
DMP
EXIT
CH LIST
SOURCE
LANG.
P.MODE
S.MODE
SIZE
SUBT.
TEXT
INDEX
SUB PAGE
PVR
I/II
Anyview Cast
ER-22654HS
0
1
2
3
4
5
6
7
8 9
OK
VOL
INFO
EPG
Warranty
Card
Page 3
2
English
Installing the Stand
Installing the Stand
NOTES
The TV screen is very fragile,and must be protected at all times when removing the
base stand.Be sure that no hard or sharp object,or anything that could scratch or
damage the screen,come into contact with it.DO NOT exert pressure on the front of
the TV at any time because the screen could crack.
For tabletop use,the TV must be attached to the provided stand as shown on this
page.
Product images are only for reference, actual product may vary in appearance.
WARNING
Be sure to disconnect the AC power cord before installing a stand or wall-mount
brackets.
CAUTION
Carefully place your TV facedown on a soft,cushioned surface to prevent damage
to the TV or scratching to the screen.
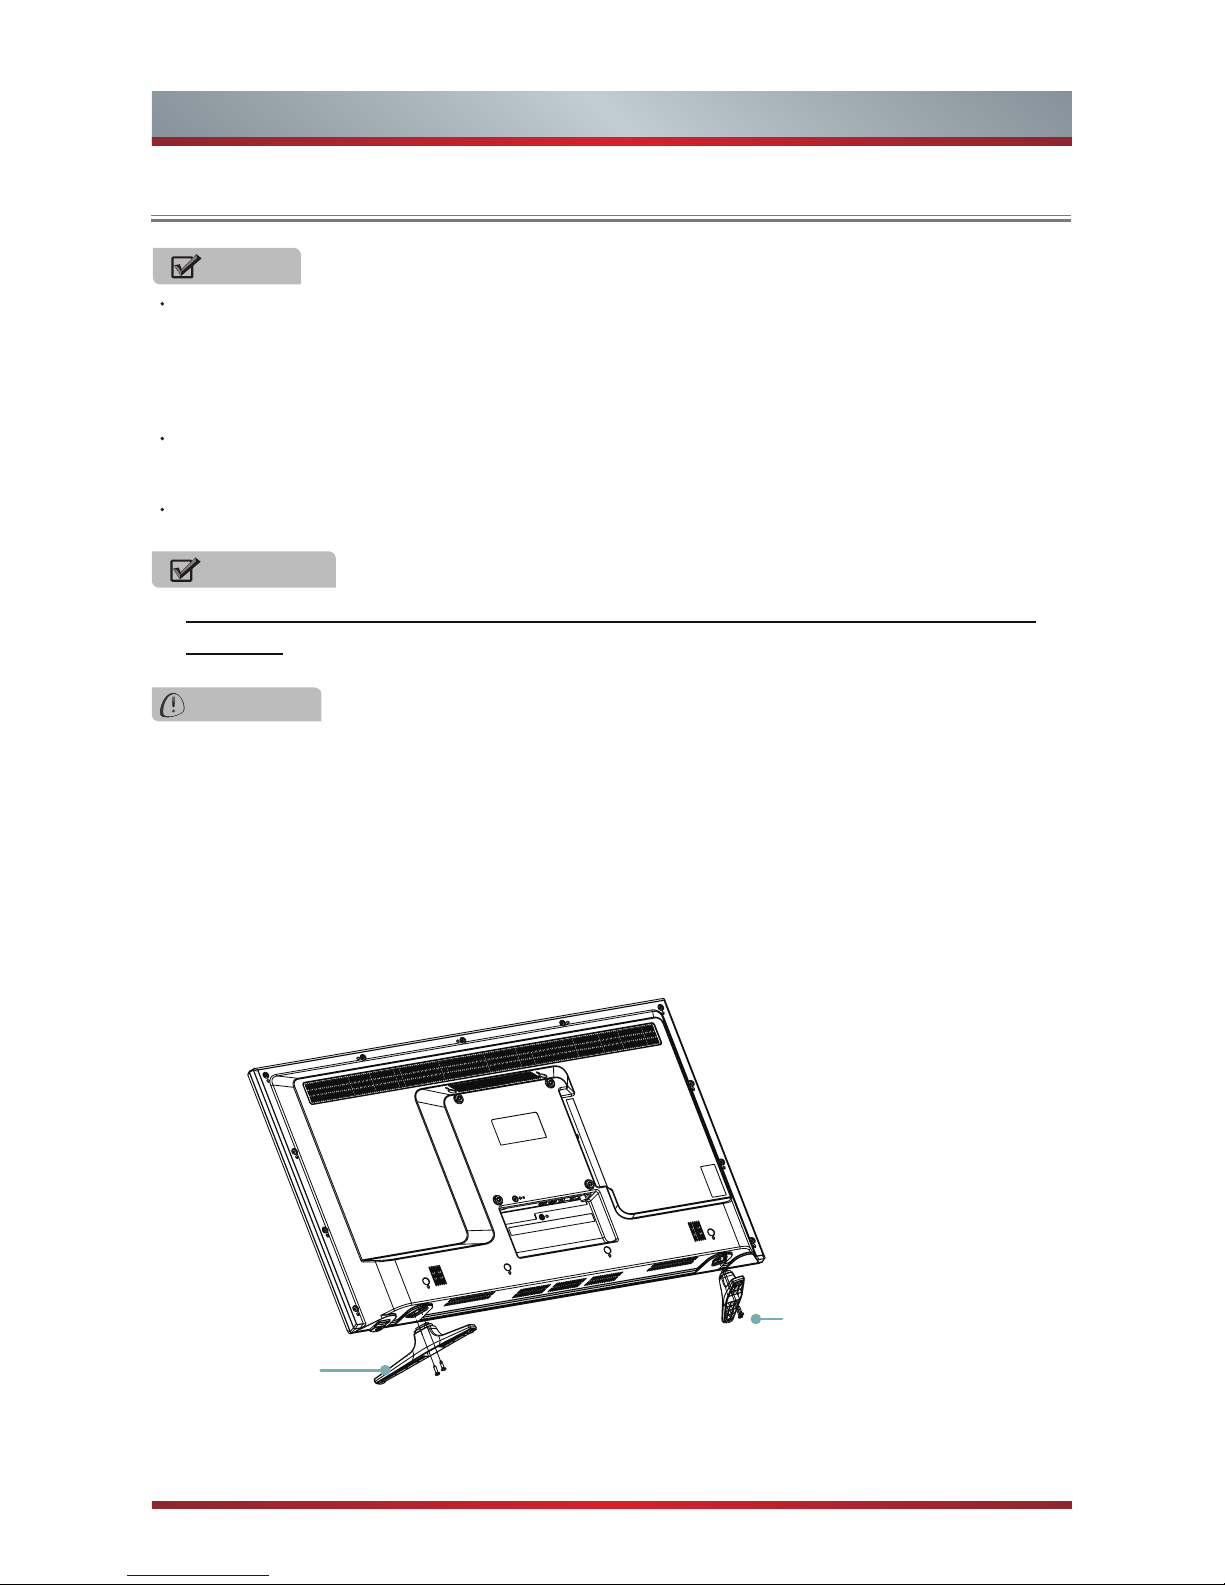
Follow the illustrations and textual instructions below to complete the installation steps:
1. Attach the stand to the TV set as shown in the picture.
2. Use the screws (ST4 × 12F) × 4 (32˝), (ST4 × 14F) × 4 (40˝) to fix the stand tightly.
Screws: ST4 × 12F (32˝)
ST4 × 14F (40˝)
BASE STAND
Page 4

English
3
Installing the Stand
WALL-MOUNT BRACKET
200×100(32˝)
200×200(40˝)
M6
If you need to use the Wall-mount Bracket, please refer to the below information.
Page 5
4
English
TV Front
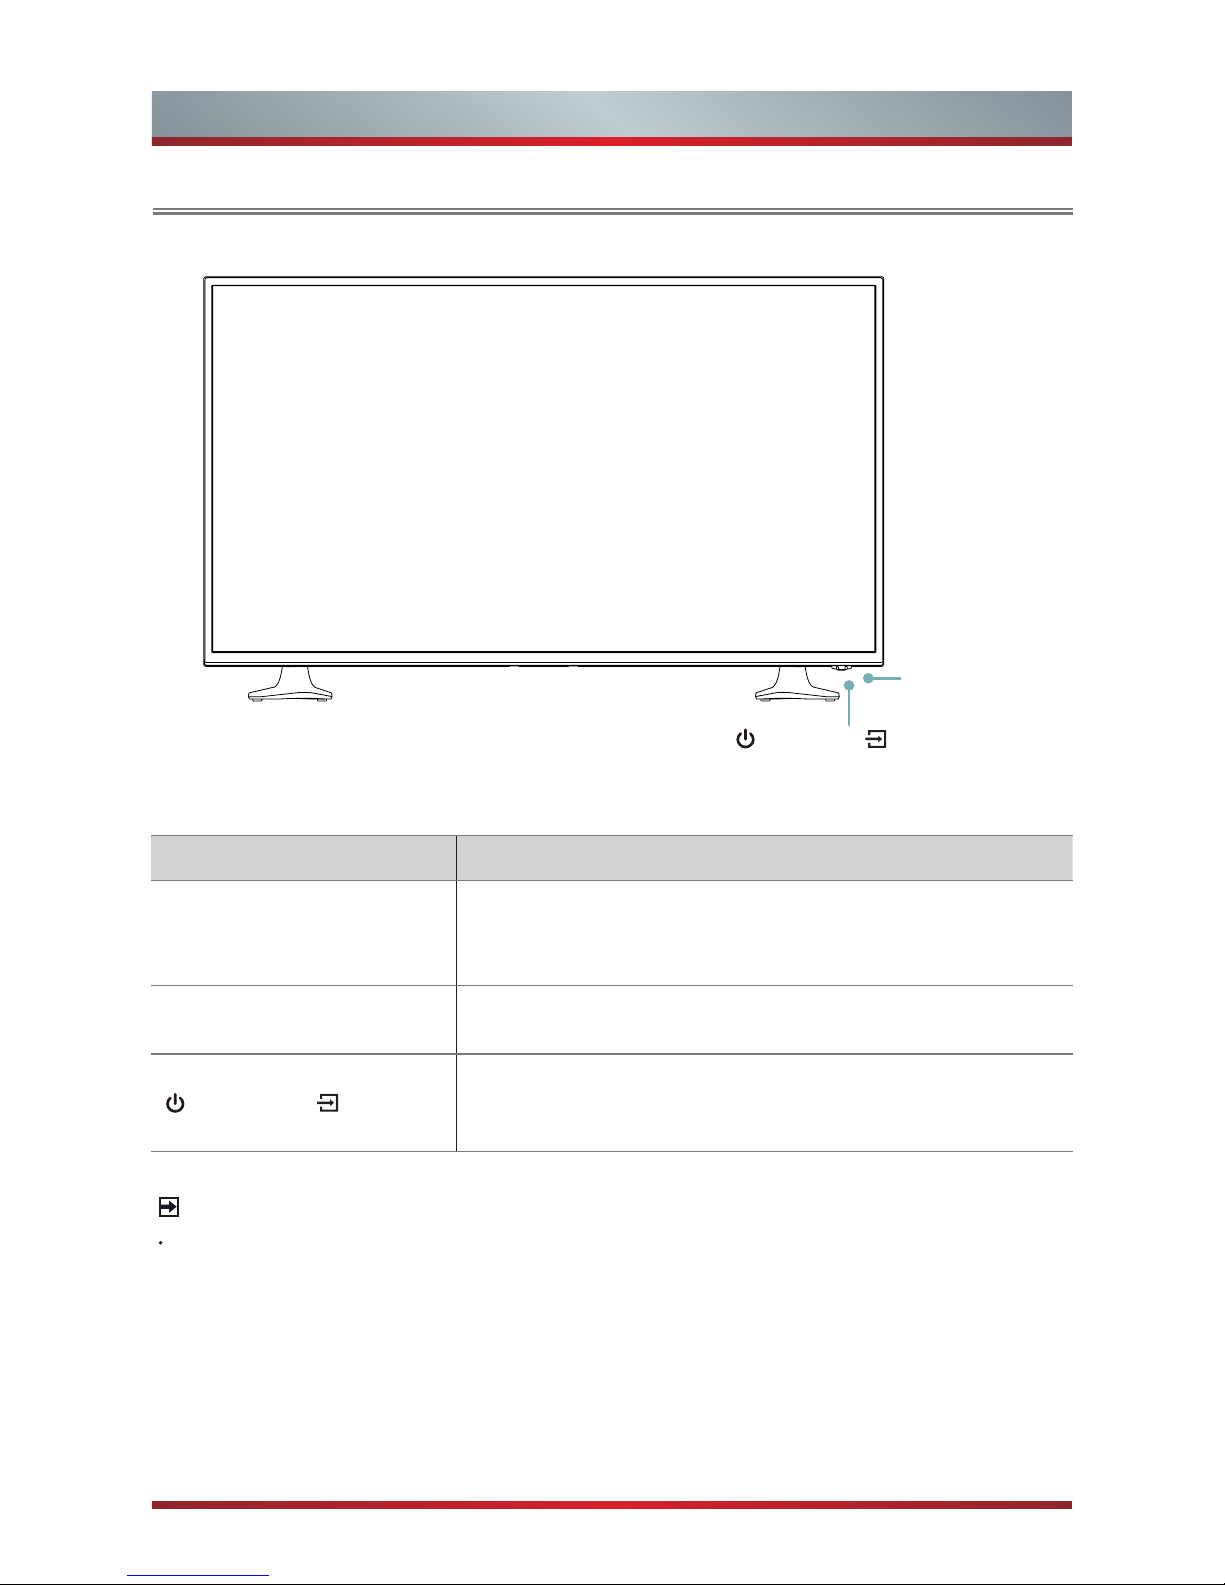
TV Front
Item Description
Remote sensor
Receive remote signals from the remote control.
Do not put anything near the sensor, as its function may
be affected.
Remote Indicator
Red light up in standby mode. Blue light up in power on
mode.
STANDBY/ SOURCE
Press for a few seconds to turn on the TV or put the TV
in standby mode. / Touch to select among the different
signal sources.
Remote Sensor
Remote Indicator
STANDBY / SOURCE
NOTES
The Picture is Only for Reference.
Powering up or down the TV requires several seconds of processing time.Do not
rapidly turn the TV on / off as abnormal operation may occur.
Page 6

English
5
TV Rear & Making Connections
TV Rear
HDMI 3HDMI 2
USB
DC 5V 0.5A(MAX)
L
R
VIDEO
/AUDIO OUT P
Y
COMPONEN T IN PC IN
AUDIO IN
ANT/CABLE IN
PC/DVI
VGA
P
HEADPHONE
Connect Headphone for audio out of the TV.
The built-in speakers will be disabled once the headphone is connected.
TV JACK
(not included)
/AUDIO OUT
B R
AV IN
OPTICAL
NOTES
The Picture is Only for Reference.
AV&COMP AUDIO IN
HDMI 1 (AR C)
Page 7

6
English
Making Connections
HDMI/COMP/AV
Connect a HDMI / Comp / AV cable from an external A/V equipment. No sound
connection is needed for HDMI to HDMI connection. If the signal resolution does not
match the specification table, you need to change the setting of device according to
the table. Please consult your device user manual for instruction.
·
To select the HDMI / Component / AV
Press [Source] button, when the list of input Source appears, press [▲/▼] to select
the source [HDMI] / [YPbPr] / [AV], then press [OK] to connect.
VGA & AUDIO
Connect a VGA cable and an audio cable from the PC.
Press [Source] button, when the list of Input Source appears, press[[▲/▼] to select
the source [PC], then press [OK] to connect.
TV JACK
PC/DVI
AUDIO IN
VGA
COMPONENT IN
AV IN
(not included)
(not included)
Blue(PB/CB)
Green(Y)
(not included)
White(L)
(not included)
Red(PR/CR)
(not included)
Red(R)
AV IN
(not included)
White(L)
(not included)
Yellow(Video)
(not included)
Red(R)
P
R
P
B
Y
R
R
L
L
VIDEO
TV JACK
(not included)
HDMI cable
HDMI
Video Effect:
BEST(HDMI)
BETTER(COMP)
GOOD(AV)
AV&COMP AUDIO INAV&COMP AUDIO IN
Page 8

English
7
OPTICAL
Connect an optical cable from an external digital audio system
Optical S/PDIF—is a type of digital audio interconnect cable used in consumer
audio equipment to output audio over reasonably short distances. The signal is
transmitted over a fibre optical cable.
Before connecting a digital audio system to the OPTICAL jack, you should
decrease the volume of both the TV and the system to avoid that the volume
suddenly become bigger.
TV JACK
OPTICAL cable (not included)
Audio Amplier/Speaker
OPTICAL
Making Connections
USB
Connect the USB devices such as hard drives, USB sticks or digital cameras for
browsing photos, listening music and watching recorded movies. You can record
live TV program (refer to PVR in user Manual). At the same time firmware update is
also an easy thing and can be done just by plugging the USB with the update files
into the USB interface.
TV JACK
USB
DC 5V 0.5A(MAX)
TV JACK
Outdoor
Antenna
Antenna Cable (75Ω)
or
ANT OUT
Cable
VHF/UHF Antenna
ANT
Connect an outdoor VHF/UHF antenna or cable.
ANT/CABLE IN
(not included)
Page 9

8
English
ARC
Connect an HDMI cable from an external digital audio system.
ARC enables the TV to directly output the digital sound through an HDMI cable.
Please note that it works only when the TV is connected to the audio receiver that
supports the ARC (Audio Return Channel) function.
When this port is used as the ARC function, it can't be used as signal input at the
same time.
Making Connections
NOTES
When connecting a hard disk or a USB hub, always connect the mains adapter of
the connected device to the power supply. Exceeding a total current consumption
may result in damage. The maximum current consumption is 500mA.
For individual non-standard high-capacity mobile hard disk, if it's impulse current is
greater than or equal 500mA, it may cause TV-rebooting or self-locking. So the TV
does not support it.
The USB port supports a voltage of 5V.
The maximum supported storage space of the hard disk is 1T.
If you want to store the video streaming of a DTV program, the transfer rate of the
USB storage device must not be less than 5MB/s. At least a mobile storage with
more than 20G is required to Timeshift and record a 2.5 hour HD video.
TV JACK
HDMI cable (not included)
HDMI
HDMI1
(ARC)
Page 10

English
9
Remote Control
Remote sensing Window
Power button
Switch to DTV Radio
program
Available source selection
Zoom image
Mute the sound
Set the sleep time
Select Audio language
Display the subtitle content
of the signal
Fast access to your saved
favorite programs
Red, Green, Yellow and Blue
are used in media mode
Exit: Exit all menu display
Enter or confirm the
operation, ▲/▼/◄/► Up/
Down/Left/Right
Electronic program guide
Picture mode selecting
Volume Up / Volume Down
1,2,...numbers: For
direct channel access
To return to the last
view program
Text, Size, Reveal, Hold,
Index, Subpage (refer to
teletext function)
Play/ Pause, Stop, etc.
are used in media mode
Analog / Digital TV
Start video recorder
Select USB-Digital Media
player mode
Mono/Stereo
operation,Audio select
button
Display the main menu/
Back menu display
Display informations
Channel Up/ Channel
Down
Sound mode selecting
Freeze picture
Time shift in DTV Mode
Video recorder list
Page 11

10
English
Installing Batteries in the Remote Control
NOTES
Product image is only for reference, actual product may vary in appearance.
Dispose of your batteries in a designated disposal area. Do not throw the batteries
into a fire.
Do not mix battery types or combine used batteries with new ones.
Remove depleted batteries immediately to prevent battery acid from leaking into
the battery compartment.
If you do not intend to use the remote control for a long time, remove the batteries.
Batteries should not be exposed to excessive heat, such as sunshine, heat
registers, or fire.
Battery chemicals can cause a rash. If the batteries leak, clean the battery
compartment with a cloth. If chemicals touch your skin, wash immediately.
Remote Control Operation Range
1. Point the remote control
at the TV within no more
than 5 metres from the
remote control sensor on
the TV and within 60° in
front of the TV.
2. The operating distance
may vary depending on
the brightness of the
room.
Remote Control
1. Slide the back cover to open the battery compartment of the remote control.
2. Insert two AAA size batteries. Make sure to match the (+) and ( - ) ends of the
batteries with the (+) and ( - ) ends indicated in the battery compartment.
3. Close the battery compartment cover.
1
Gently push and slide
2
Insert the batteries
3
Gently push and slide
Page 12

English
11
Turning the TV on for the First Time
1. Connect the mains cable to the mains socket after you have completed all the
connections.
2. Switch on at the bottom of the TV.
3. The first time you turn the TV on, it will go straight into the Installation Guide. It will
assist you to specify the OSD Language, Mode Setting, Country, Tuner Type, Auto
Scan, LCN, Auto Channel Update.
NOTE
Always disconnect the TV from the mains socket when it is not in use for a long
period of time. To completely disconnect the mains power, please remove the
mains plug from the mains socket or switch off the power switch.
4. Press the [▲/▼/◄/►] buttons to navigate the menu and change the settings.
Turning the TV on for the First Time
OSD
Language
Select your desired language to be displayed on the menu.
Mode Setting
Select your Mode Setting: Store Mode and Home Mode.
Store Mode: Optimizes the picture for store environments.
Home Mode: Recommended mode for the home use and low
power consumption.
Please note that Use settings are not saved after switching off
the TV when you select Shop Mode.
Country
Select the country where you will operate the TV.
Tuner Type
Select your Tuner Type: Antenna and Cable.
Auto Scan
Select your Auto Scan: ATV, DTV, DTV+ATV.
LCN
Logical Channel Numbers:
In a convenient and familiar way to provide program numbers to
users.
Auto Channel
Update
Select On or
Off
to channel update.
Page 13

12
English
Turning the TV on for the First Time
5.
Select
Start
into
Auto Scan.
After scan, the channels are arranged in a preset
order. If you wish to skip channels, modify the preset order or rename channels,
select Edit Programmes under the Channel menu.
NOTE
If you want to reboot the Installation Guide, you can press the [Menu], and select
Setup
menu, then press [OK] to select
First Time Setup.
Refer to the user manual.
Page 14

English
13
Specifications
Features, appearance and specifications are subject to change without notice.
If you encountered difficulty when setting up your TV, we suggest you refer to the
troubleshooting tips in the User Manual.
Model Name
32D50 40D50P
Dimension
Without
Stand(mm)
Width: 733
Height: 434
Depth: 89
Width: 902
Height: 523
Depth: 86
With Stand
(mm)
Width: 733
Height: 477
Depth: 180
Width: 902
Height: 563
Depth: 204
Weight
Without
Stand(kg)
4.8 8.0
With Stand
(kg)
4.9 8.2
Active Screen
Size(Diagonal)
32 inches 40 inches
Screen resolution
1366×768 1920×1080
Audio power
6W +6W 7W +7W
Power consumption
50W 70W
Power supply
AC 100V - 240V ~ 50/60Hz
Receiving
systems
Analog
PAL-D/K, B/G, I SECAM-D/K, B/G
Digital
DVB-T, DVB-C
Environmental
conditions
Temperature: 5°C - 45°C
Humidity: 20% - 80% RH
Atmospheric pressure: 86 kPa - 106 kPa
Component Input
480 I / 60 Hz, 480 P / 60 Hz, 576 I /50 Hz, 576 P /50 Hz, 720 P /
50 Hz, 720 P / 60 Hz, 1080 I / 50 Hz, 1080 I / 60 Hz, 1080 P / 50
Hz, 1080 P / 60 Hz
HDMI Input
RGB / 60 Hz (640×480, 800×600, 1024×768)
YUV / 60 Hz (480 I, 480 P, 720 P, 1080 I, 1080 P)
YUV / 50 Hz (576 I, 576 P, 720 P, 1080 I, 1080 P)
Dial: 1800 447 367 (Toll Free) http://www.hisense.com.au
 Loading...