

Page 1

HISCO HD DVR
USER’S MANUAL
Page 2

COPYRIGHT AND IMPORTANT INFORMATION
2
COPYRIGHT AND IMPORTANT INFORMATION ............................................................................................. 4
WARNINGS .................................................................................................................................................... 4
INSTALLATION AND PROACTIVE STEPS ......................................................................................................... 5
Pre-Cautions .......................................................................................................................................... 5
Location conditions to avoid for installing Hisco DVR System .............................................................. 5
Installation: ........................................................................................................................................... 5
Installing the DVR .................................................................................................................................. 6
IMPORTANT SAFEGUARD .............................................................................................................................. 7
IMPORTANT NOTICES ................................................................................................................................... 8
1. INTRODUCTION DVR SYSTEM ................................................................................................................... 9
1-1. Digital Video Security System features .............................................................................................. 9
1-2. PROVIDED COMPONENTS ................................................................................................................ 10
2. SETTING UP HISCO DVR SYSTEM ............................................................................................................. 11
2-1. SYSTEM SETTING .............................................................................................................................. 11
2-2. CAMERA SETTING ............................................................................................................................ 14
2-3 Record setup ..................................................................................................................................... 14
2-4. MOTION DETECTION SETTING ......................................................................................................... 16
Motion setup ....................................................................................................................................... 16
Event Notification ............................................................................................................................... 16
Notification Schedule setup ................................................................................................................ 16
Motion area setup .............................................................................................................................. 17
2-5 Display setup ..................................................................................................................................... 18
Display ................................................................................................................................................. 18
Spot monitor setup ............................................................................................................................. 18
2-6 Network setup .................................................................................................................................. 20
2-7. USER SETTING .................................................................................................................................. 21
3. HD DVR Live View interface .................................................................................................................... 22
Manual Backup ................................................................................................................................... 24
CD/DVD Burning .................................................................................................................................. 24
4. HD DVR FOOTAGE REVIEW ..................................................................................................................... 25
4-1 DVR Search ........................................................................................................................................ 25
Page 3

3
HISCO HD DVR User's Manual
4-2 Player button .................................................................................................................................... 26
4-3 Save AVI Function ............................................................................................................................. 27
Save as AVI video file .......................................................................................................................... 27
Saving JPEG image ............................................................................................................................... 27
4-4 Smart Search ..................................................................................................................................... 28
4-5 Image Post production ...................................................................................................................... 29
4-6Book Mark .......................................................................................................................................... 29
4-7Setting................................................................................................................................................ 30
5. Central Management System (CMS) ....................................................................................................... 30
5-1 CMS Installation ................................................................................................................................ 31
CMS client Uninstall ............................................................................................................................ 33
5-2 CMS Main .......................................................................................................................................... 34
5-3 Client Program setting ...................................................................................................................... 35
Local user account .............................................................................................................................. 35
Register New Site, ............................................................................................................................... 36
CMS local Setting ................................................................................................................................ 38
5-4 Live view Feature .............................................................................................................................. 39
Live view Tool Bar ............................................................................................................................... 39
5-5 Remote Search .................................................................................................................................. 40
5-6 Remote HD DVR server Setup ........................................................................................................... 40
5-7 Camera Group ................................................................................................................................... 41
Group setup ........................................................................................................................................ 41
Connect to Camera Group .................................................................................................................. 41
6. iPhone/SmartPhone (Smartview) ........................................................................................................... 42
Page 4
COPYRIGHT AND IMPORTANT INFORMATION
4
COPYRIGHT AND IMPORTANT INFORMATION
Copyright
The contents of this manual may not be copied or reproduced in any manner or form without the prior
written consent of Hisco Technologies Canada, Ltd.
Important Information
Before proceeding, please read and observe all instructions and warnings contained in this manual.
Retain this manual with the original bill of sale for future reference and, if necessary, warranty service.
When unpacking your digital recorder, check for missing or damaged items. If any item is missing, or if
damage is evident, DO NOT INSTALL OR OPERATE THIS PRODUCT. Contact your dealer for assistance.
WARNINGS
TO REDUCE THE RISK OF FIRE OR ELECTRIC SHOCK, DO NOT EXPOSE THIS PRODUCT TO RAIN OR
MOISTURE.DO NOT INSERT ANY METALLIC OBJECT THROUGH VENTILATION GRILLS.
Explanation of Graphical Symbols
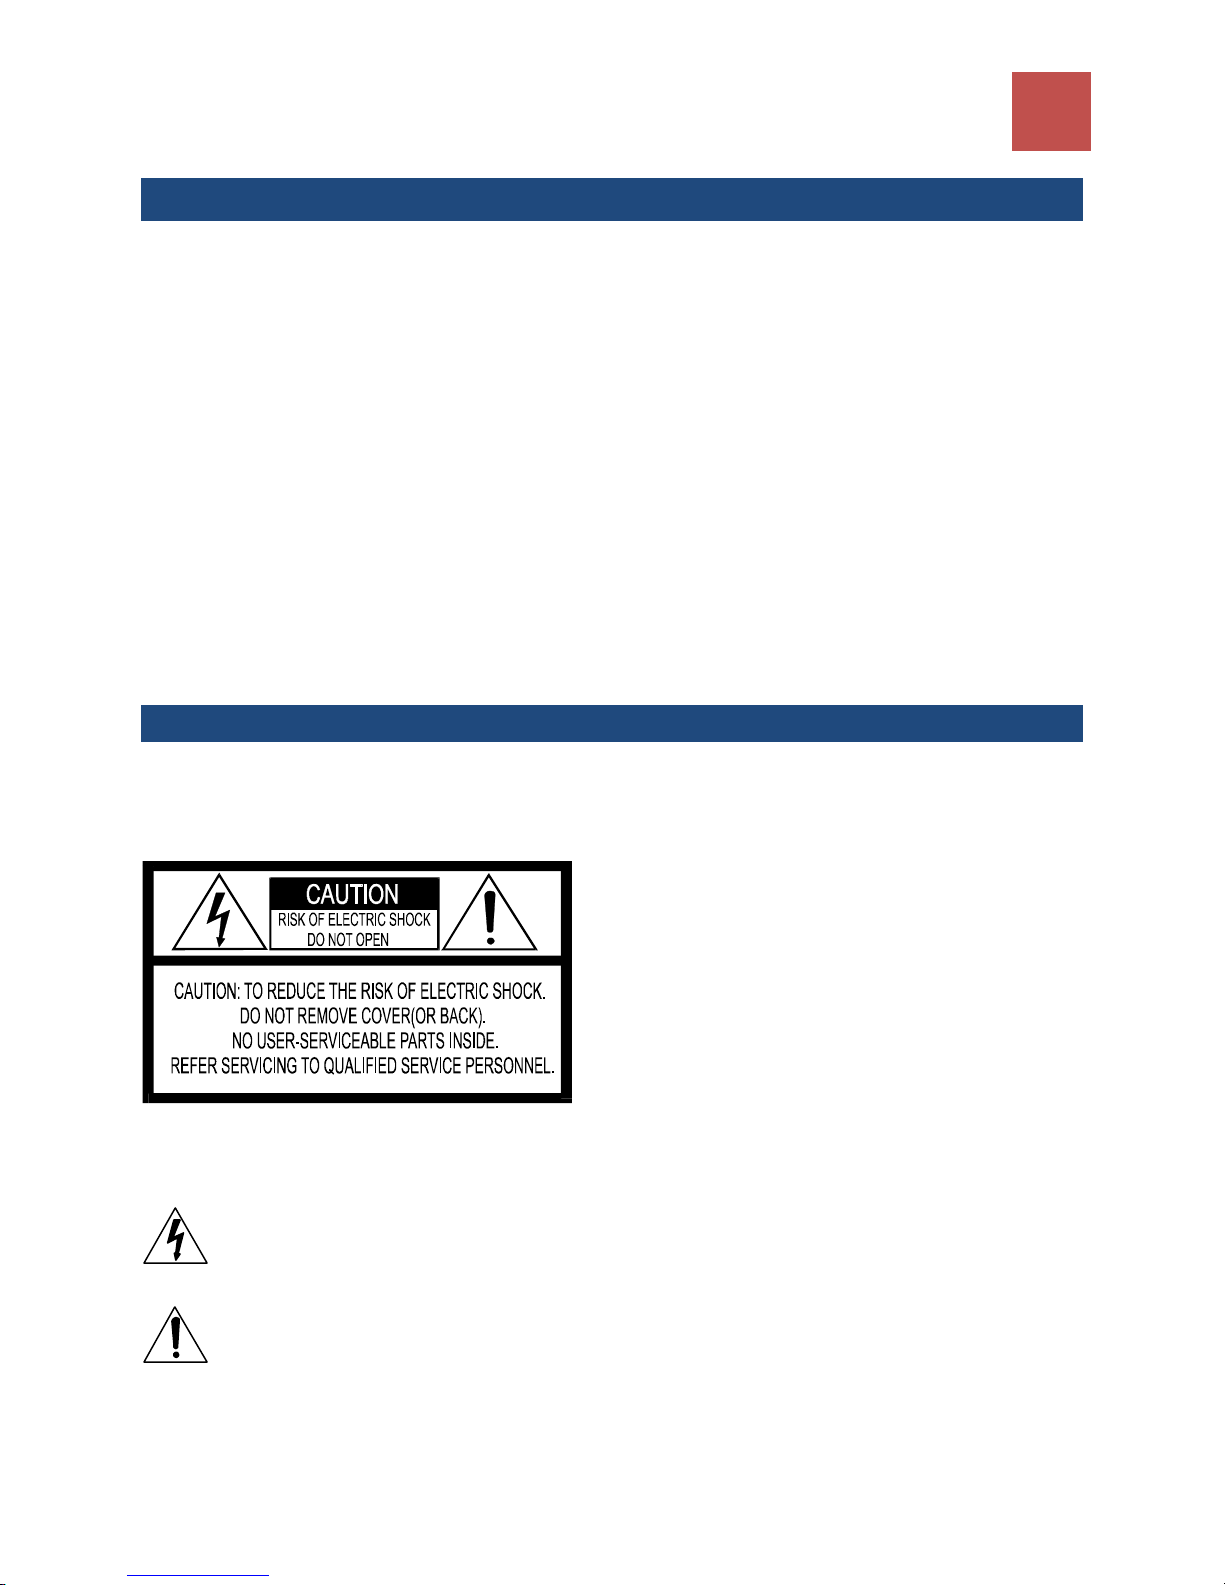
The lightning flash with arrowhead symbol, within an equilateral triangle, is intended to alert
the user to the presence of un-insulated “dangerous voltage” within the product’s enclosure
that may be of sufficient magnitude to constitute a risk of electric shock to persons.
The exclamation point within an equilateral triangle is intended to alert the user to the
presence of important operating and maintenance (servicing) instruction in the literature
accompanying the product.
Page 5

5
HISCO HD DVR User's Manual
INSTALLATION AND PROACTIVE STEPS
Pre-Cautions
• Should any liquid or solid object fall into the cabinet, unplug the unit, and have it checked by the
qualified personnel before operating it any further.
• Unplug the unit from the wall outlet if it is not going to be used for several days or more.
• To disconnect the cord, pull it out by the plug. Never pull the cord itself.
• Allow adequate air circulation to prevent internal heat build-up.
• Do not place the unit on surfaces (rugs, blankets, etc.) or near materials (curtains, draperies)
that may block the ventilation holes.
Location conditions to avoid for installing Hisco DVR System
• Excessive heat, such as direct sunlight or heating appliances
• Surfaces (rugs, blankets, etc.) or near materials (curtains, draperies) that may block the
ventilation holes.
• Moisture, dust, and smoke
• Magnetic fields or electrical waves
• Below freezing temperatures
Installation:
Before installing the system, please ensure that
• The power is switched off
• The unit has adequate air circulation to prevent internal heat build-up
• There is enough room for the unit and its connecting cables
• The unit is placed on an even surface
• The unit is not placed near any electronic equipment (e.g. microwave, radio, or any wireless
equipment such as cell phones)
• The unit is not exposed to rain or water. The unit is not designed to be waterproof
• A UPS(Uninterrupted Power Supply) must be used with the Hisco DVR unit to protects DVR from
surges, spikes, lightning and other power disturbances
Note: An Uninterrupted Power Supply (UPS) must be used to comply with our warranty
Page 6

INSTALLATION AND PROACTIVE STEPS
Installing the DVR
Note: Do not plug in power until all the cables have been connected
1. Once a location has decided. Carefully remove the DVR, Keyboard, mouse and BNC connectors
from the box and place the DVR on an even surface
2. Plug keyboard and mouse into the appropriate plug at the back of the HD DVR
3. Plug in the monitor cable from the monitor into the video graphic card at the back of the DVR.
Don’t forget to plug in the power cord for the monitor.
Note: For HD spot monitor, connect HDMI Cable directly into HD capture card.
For Analog monitor spot out, connect RCA Video Cable directly into analog capture card
4. Plug in BNC HD cameras and connect BNC analog cameras to the back of the DVR.
5. Once all the connections are done. Plug in the power cord to the back of the DVR power supply.
Turn ON the small switch at the back (I). Now plug the power cord into the outlet. This will start
the Hisco HD DVR security software
Cleaning:
6
• Clean the unit with a slightly damp soft cloth.
• Use a mild household detergent. Never use strong solvents such as thinner or benzene as they
might damage the finishing of the unit.
Page 7

7
HISCO HD DVR User's Manual
IMPORTANT SAFEGUARD
1. READ INSTRUCTIONS – All the safety and operating instructions should be read before the
appliance is operated.
2. RETAIN INSTRUCTIONS – The safety and operating instructions should be retained for future
reference.
3. CLEANING – Unplug video monitor or equipment from the wall outlet before cleaning. Do not use
liquid cleaners or aerosol cleaners. Use a damp cloth for cleaning.
4. ATTACHMENTS – Do not use attachments that are not recommended by the video monitor or
equipment manufacturer as they may result in the risk of fire, electric shock or injury to persons.
5. WATER AND MOISTURE – Do not operate video monitor or equipment near water – for example,
near a bathtub, washbowl, kitchen sink, laundry tub, in a wet basement, or near a swimming pool,
or the like.
6. POWER SOURCES – Video monitor or equipment should be operated only from the type of power
source indicated on the marking label. If you are not sure of the type of power supplied to your
home, consult your video monitor or equipment dealer or local power company. For video monitor
or equipment designed to operate from battery power refer to the operating instructions.
7. POWER CORDS – Do not allow anything to rest on the power cord. Do not locate video monitor or
equipment where persons walking on it will abuse the cord.
8. OBJECT AND LIQUID ENTRY -- Never push objects of any kind into video monitor or equipment
through openings as they may touch dangerous voltage points or short-out parts that could result
in a fire or electric shock. Never spill liquid of any kind on the product.
9. SERVICING – Do not attempt to service video monitor or equipment yourself as opening or
removing covers may expose you to dangerous voltage or other hazards. Refer all servicing to
qualified service personnel.
10. DAMAGE REQUIRING SERVICE – Unplug video monitor or equipment from the wall outlet and refer
servicing to qualified service personnel under the following conditions :
A. When the power-supply cord or the plug has been damaged.
B. If liquid has spilled, or objects have fallen into the video product.
C. If the video product has been exposed to rain or water.
D. If the video product does not operate normally by following the operating instructions, adjust
only those controls that are covered by the operating instructions as an improper adjustment
of other controls may result in damage and will often require extensive work by a qualified
technician to restore the video product to its normal operation.
E. If the video product has been dropped, or the cabinet damaged.
Page 8

IMPORTANT NOTICES
F. When the video product exhibits a distinct change in performance – this indicates a need for
service.
REPLACEMENT PARTS – When replacement parts are required, be sure the service technician has used
replacement parts specified by the manufacturer or that have the same characteristics as the original
part. Unauthorized substitutions may result in fire, electric shock or other hazards.
8
IMPORTANT NOTICES
• You can disable the All Power management program (Green PC features) on the BIOS setup in
your unit before run the program.
• You cannot use the screen saver program in your unit.
Page 9

9
HISCO HD DVR User's Manual
1. INTRODUCTION DVR SYSTEM
This system is PC Architecture HD Digital Video Security System digitizing, compressively saving,
retrieving and generating output image information from cameras. Also, this system is Digital Video
Security System of Next Generation improving strong points and significantly complementing defects of
existing analog CCTV.
1-1. Digital Video Security System features
• Video Capture with variable bitrate or constant bitrate compression and recording directly on to
Hard Drive.
• Display Screen: Full screen, 4, 6, 9, 10, 13, 16, 20 split screen.
• Easy selectable for recording image resolution: 352x240, 704x240 and 704x480
• HD camera resolution is auto selected and recording by ratio of 1, 1/4, 1/6 .
• Pentaplex DVR: Live view, record, playback, backup and remote access
• Color Quality control: brightness, contrast, hue, saturation
• Multiple recording:
o Mounting maximum 20 cameras, the system can record images onto HDD in the PC GUI
VCR style playback control. You can quickly retrieve images in files.
• Easy to set up the DVR system configuration:
o On screen setup dialog allows you to set functions easily.
o Examples: the amount of Camera to operate, select camera position onto Screen in the
PC.
• Printing images: You can reproduce the selected images as JPG file, which can be printed out
with the PC printer.
• Archived Images can be backed up on to DVD+/-RW and USB HDD for long-term storage.
• Image recording directory managing (specify the recording directory on the HDD and check
function of the minimum capacity disk storage).
• Sensor/Motion Detector functions:
o When a sensor signal is received by the system or Motion detection is triggered, the
system immediately starts recording images onto the HDD. Sensor recording interval
and frame rate control can be adjusted.
• Optimized File System for image saving:
o File System is to minimize the access time of the Disk and allows the maximum capacity
of the Disk to be utilized preventing the occurrence of Disk fragments. Because of
optimized file system for image saving was self-developed and applied by the DVR s/w,
damaged files can be recovered easily, and increased security is assured.
• Image retrieval:
o Recorded images of each camera can be extracted after retrieval of recorded images
on multiple cameras.
o Partial enlargement of retrieved image is possible and compensation function for image
quality allows sharpening and softening images.
o Images can be printed by a color printer and copied to a Flash drive.
• Supports remote access (Ethernet LAN (TCP/IP) as well as Pan/Tilt, Zoom in/out functions.
Page 10

1-2. PROVIDED COMPONENTS
DVR system consists of:
• DVR system
• DVR Installation CD contains the following
o DVR Client software
o Nero Burning Software
o User’s
• Camera Input BNC connector and accessories
• Keyboard
• Mouse
• Power cord
Manual file (Acrobat PDF type)
1. INTRODUCTION DVR SYSTEM
10
Page 11
11
HISCO HD DVR User's Manual
2. SETTING UP HISCO DVR SYSTEM
2-1. SYSTEM SETTING
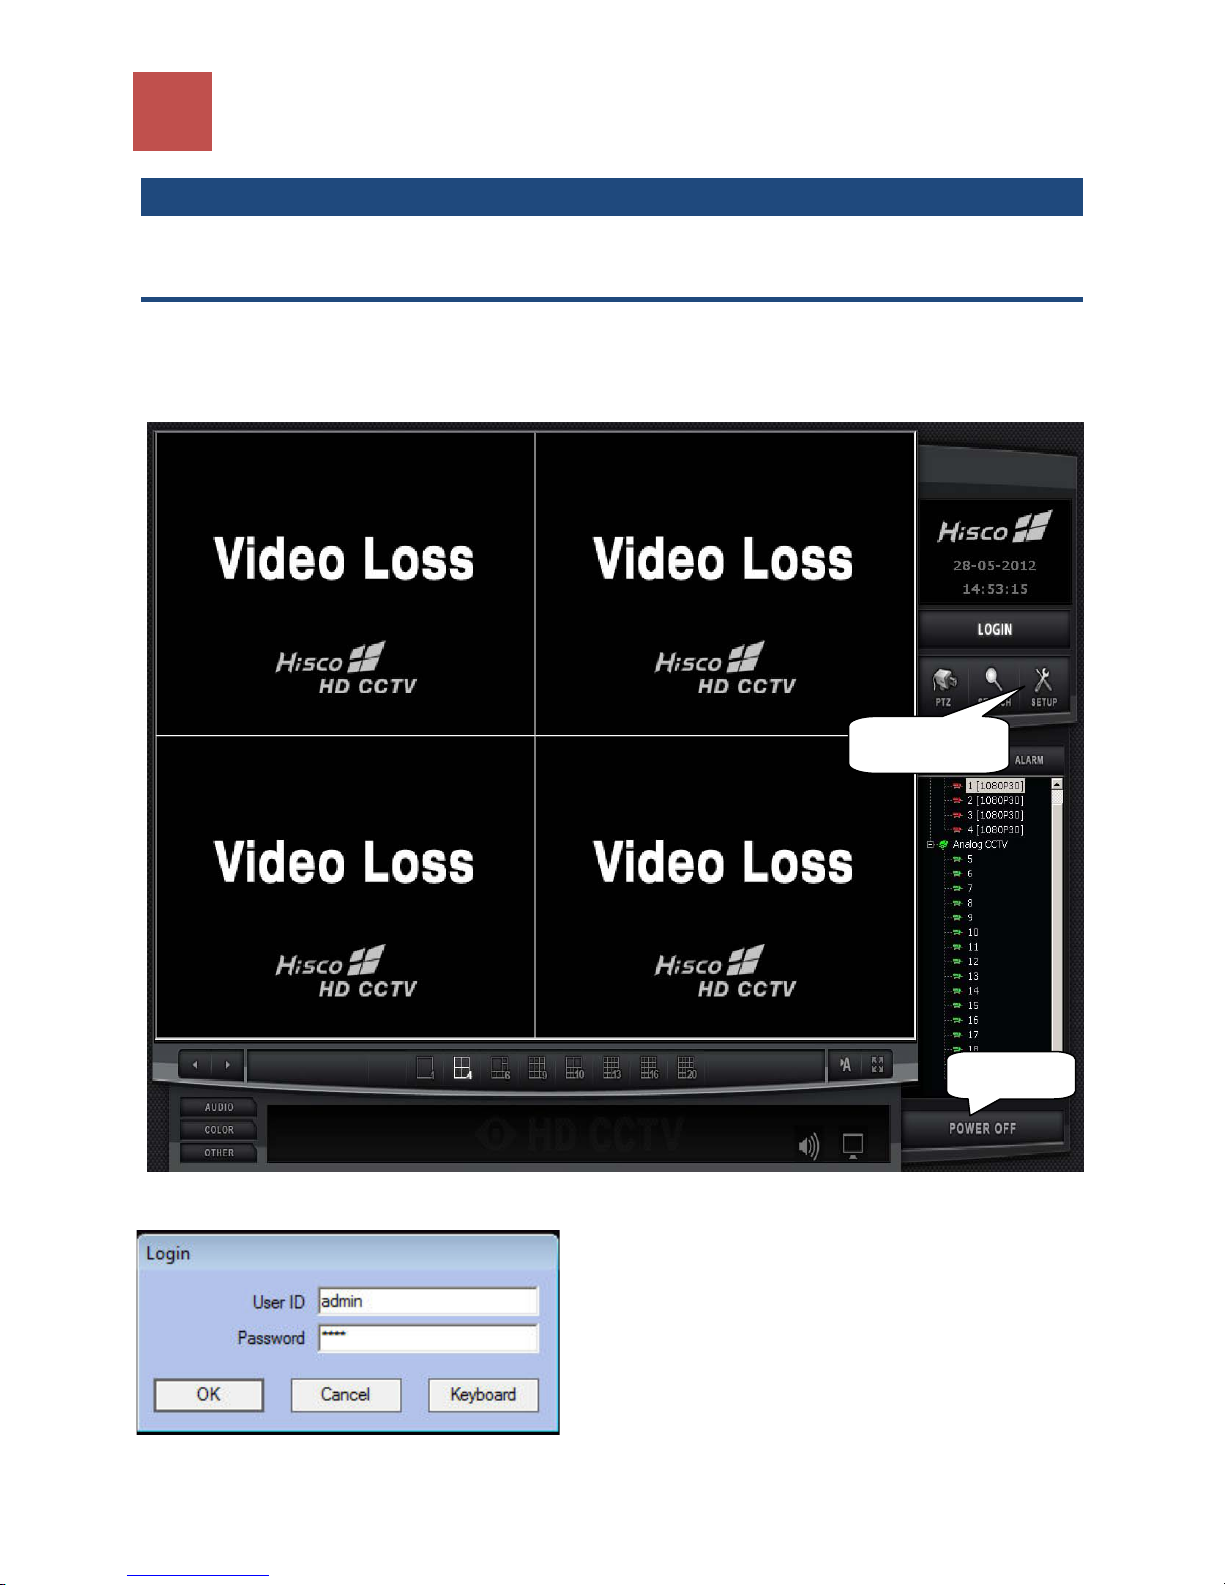
Hisco HD DVR surveillance program starts automatically once the system powers up. User is required to
LOGIN to access HD DVR function
Fill in the User ID and password (Use keyboard or virtual
computer keyboard, by clicking on the keyboard icon).
Setup
Exit HD-DVR
Default User ID: admin
Default User Password: 1111
Page 12
2. SETTING UP HISCO DVR SYSTEM
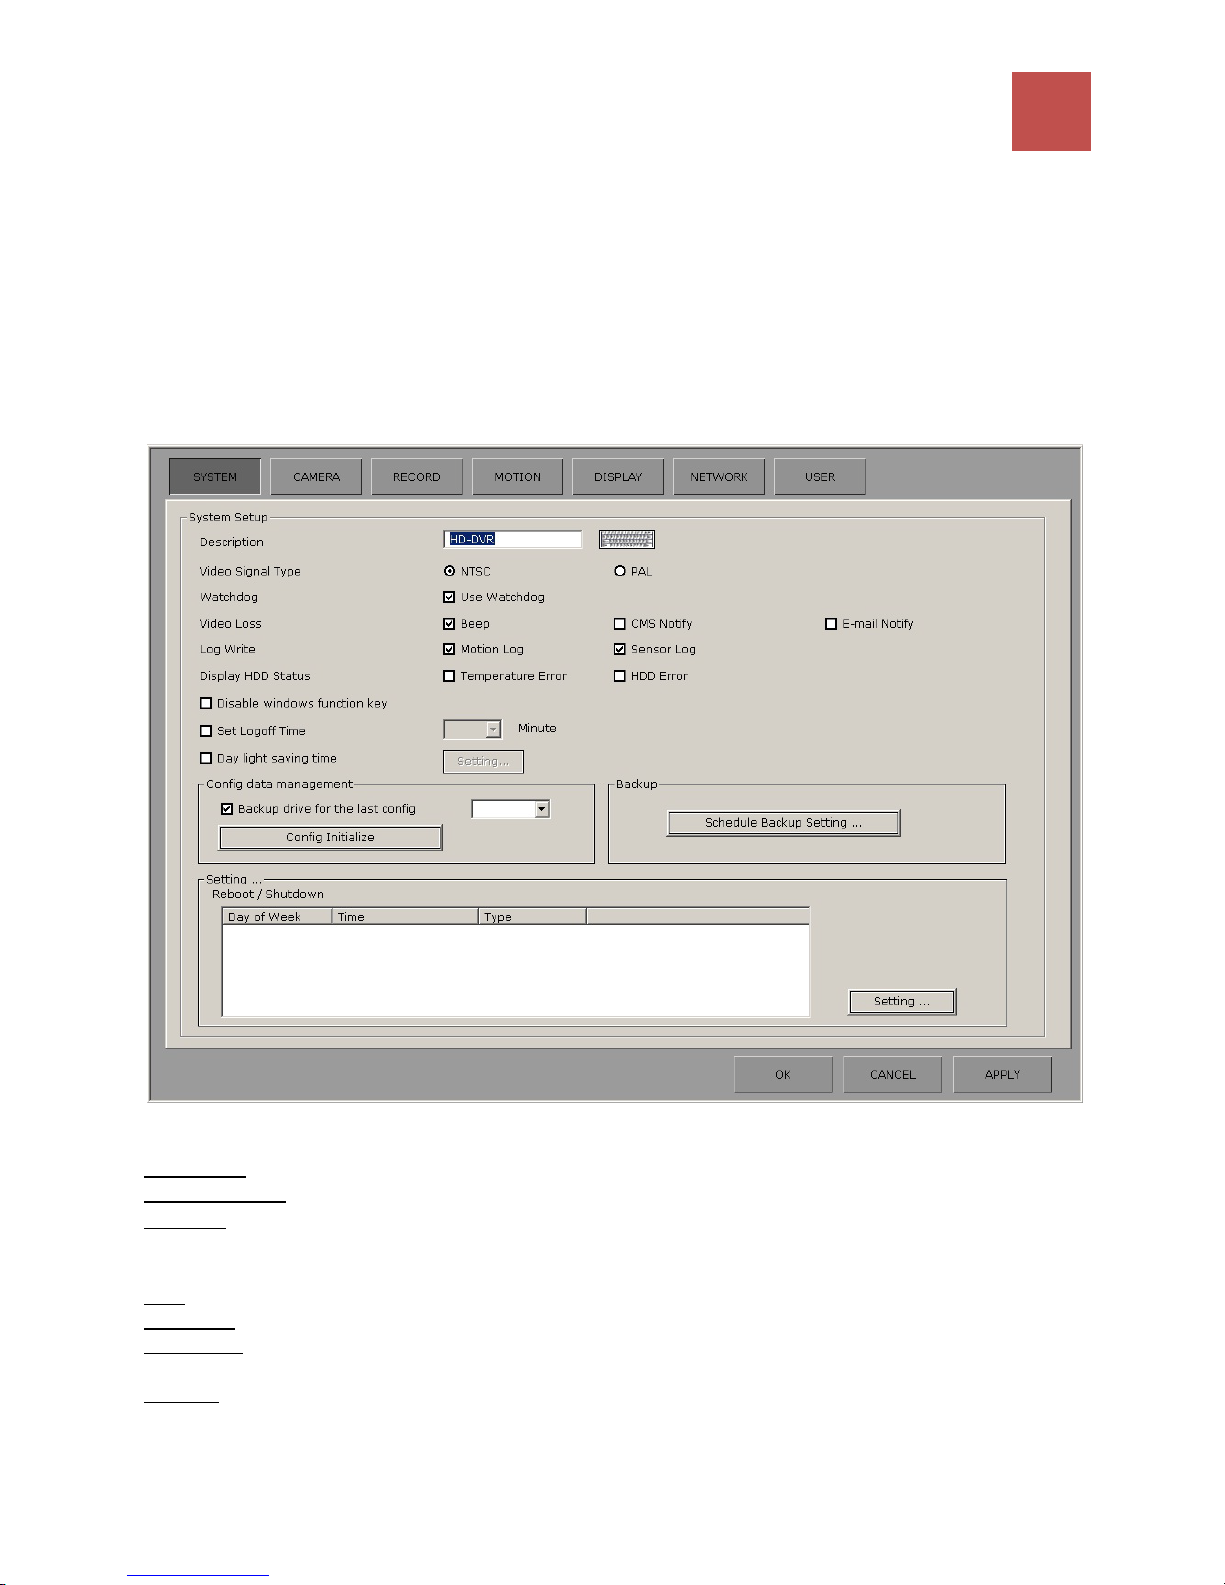
In Setup, user can modify the configuration for cameras, network, user privileges and events.
Click on SETUP button and user authentication prompt will appear.
System setting window will be displayed. (Shown next page)
NOTE: Only users with administrative privilege can log on to modify any setting.
12
System Setup
Description: Enter the System location name
Video Signal Type: NTSC for North America standard
Watchdog
Enable/disable watch-dog function. Enabling this feature will automatically detect a
:
system’s malfunction and restart the system.
Video Loss: Enable/disable notification upon lost of video is detected.
Beep: DVR output continuous beeping sound from speaker
CMS Notify: HD DVR Client receives a notification for video loss
Email Notify
Log write: enable/disable writing motion and sensor status into the log file.
: When SMTP is set up, HD DVR send a email notification to user.
Page 13
13
HISCO HD DVR User's Manual
Display HDD Status: Warning message pops up when there is some problem with HDD if user checks
“Temperature error” or “HDD error”.
Disable windows function key: Lock windows for only server use if user want to prevent from other tasks.
Set Logoff Time: HD DVR system logs out when system is idle after a specific time.
Day Light Saving Time
time reversal occurs to the folder designated. <Note> User has to change the time.
(It doesn’t apply summertime automatically)
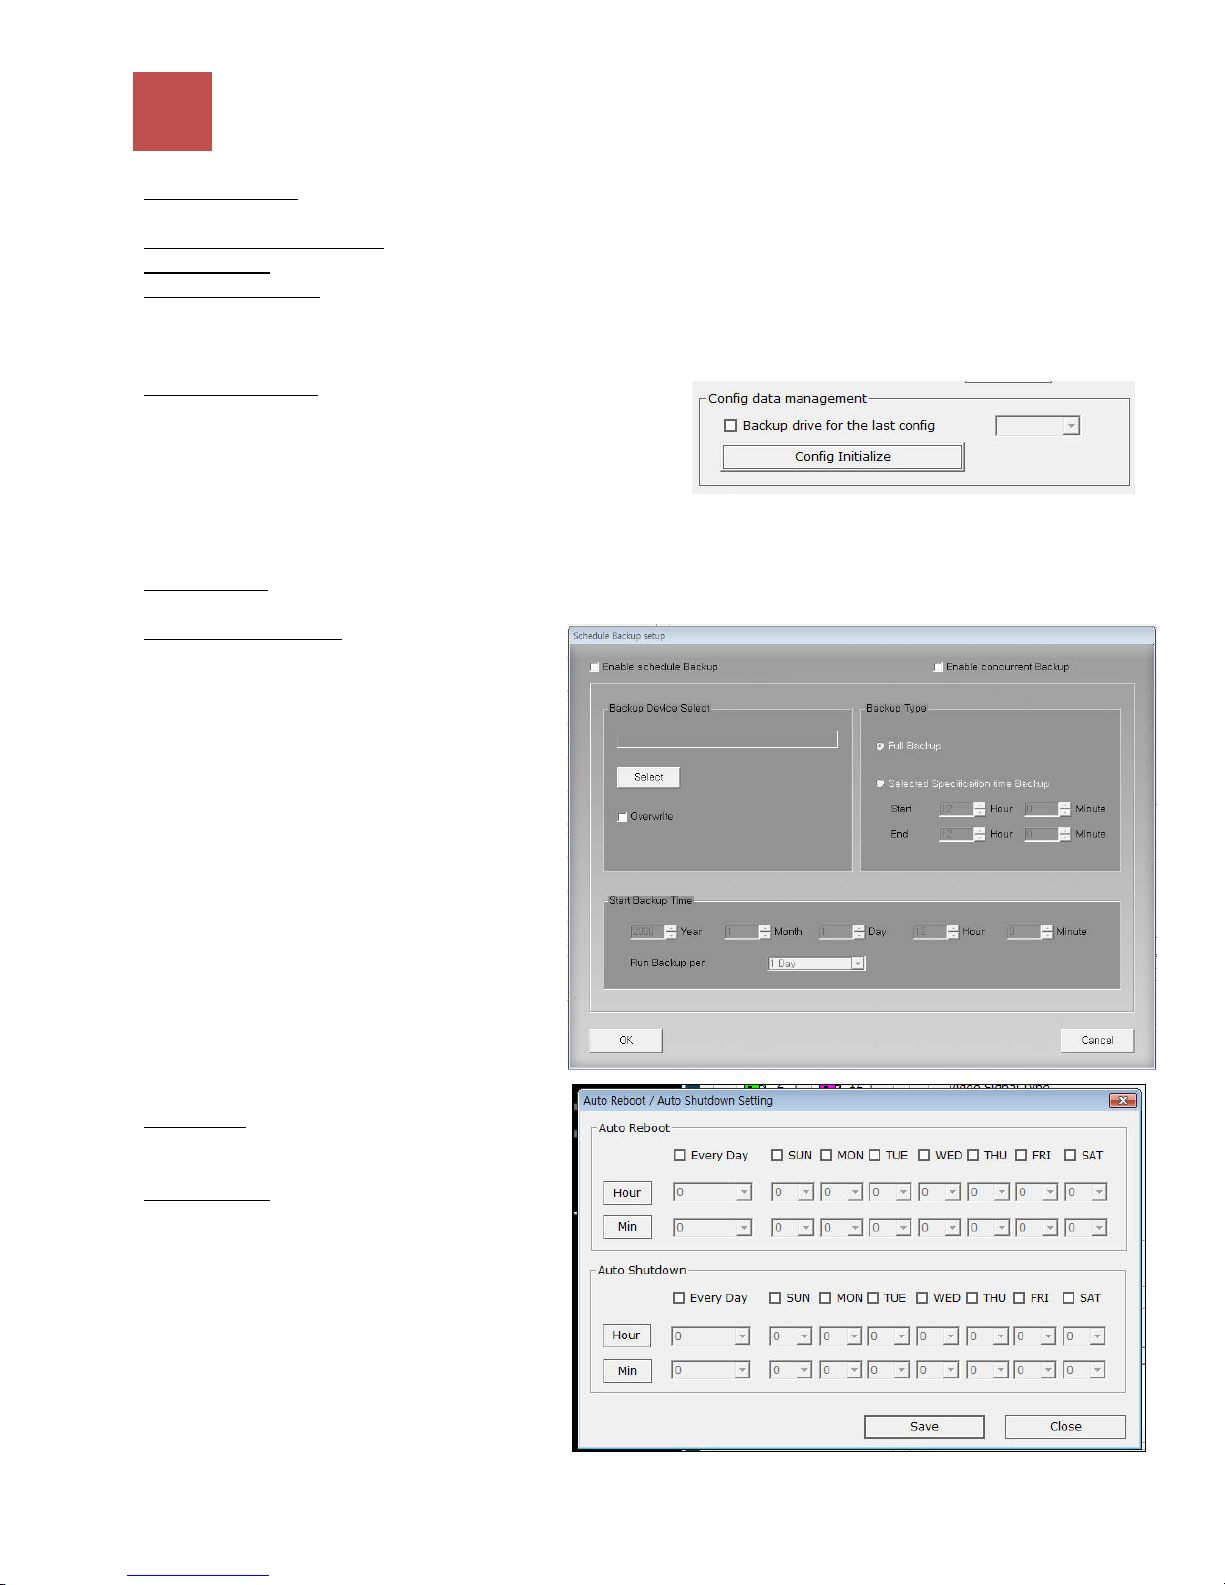
Configuration Backup
configuration file to the drive you choose. When starting DVR
program, the configuration in a particular drive except C drive
would apply.
In case there is a configuration file at other drive than C:
Configuration file at other drive is copied onto C Drive and it applies to DVR operation. In case there is no
configuration file at other drive than C: Configuration at C drive applies to DVR operation.
Config Initialize
Schedule Backup Setting
Schedule backup: Back up video data for a fixed
time in the selected folder at the scheduled time.
Concurrent (Real time) backup: Back up video
data in the selected folder in real time.
<Note> to play backup data on search, user must
disable schedule backup.
Setting:
Auto Reboot: Weekly schedule reboot. Hisco
recommends DVR to be restarted once a week
for maintenance.
Auto Shutdown
: When time reversal occurs according to summer time, it backs up information as long as
: User can back up the current
: Initialize setting to the factory default.
:
: System schedule shutdown.
Page 14
2. SETTING UP HISCO DVR SYSTEM
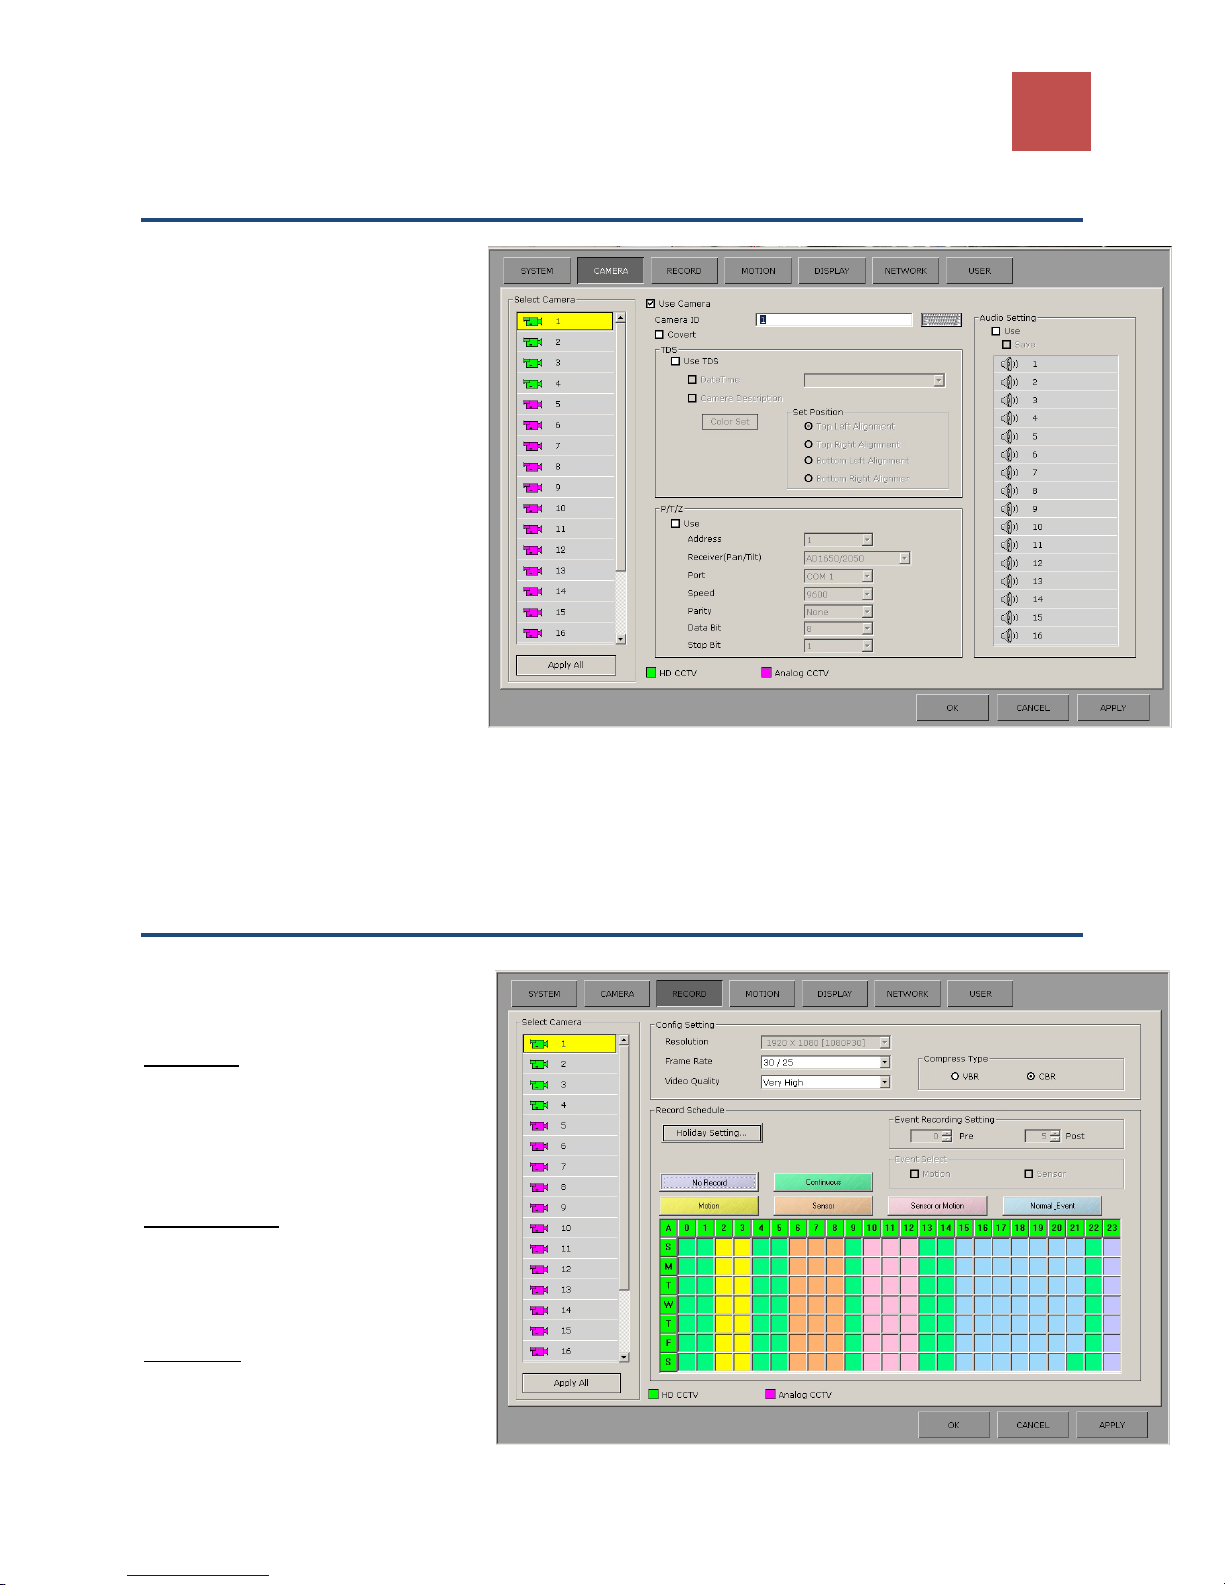
2-2. CAMERA SETTING
Select Camera: Select the camera
to configure.
Use Camera: Camera ON/OFF
Camera ID: Name each camera.
(Max. 17 characters)
Covert: hide camera in live screen
and Search mode.
TDS: Display Data Time and Camera
Description
PTZ: Enable or disable PTZ control.
Clicking “use” allows a user to setup
the PTZ camera’s type and Receiver
protocol, communication port
parameter.
• Select the control type (Panasonic,
Pelco etc)
• Specify the Communication Port, Baud Rate/speed, Parity, Data Bit, and Stop Bit to be used
• Select the PTZ Address to be used
Audio Setting:
Select the audio channel for the camera and click apply.
14
2-3 Record setup
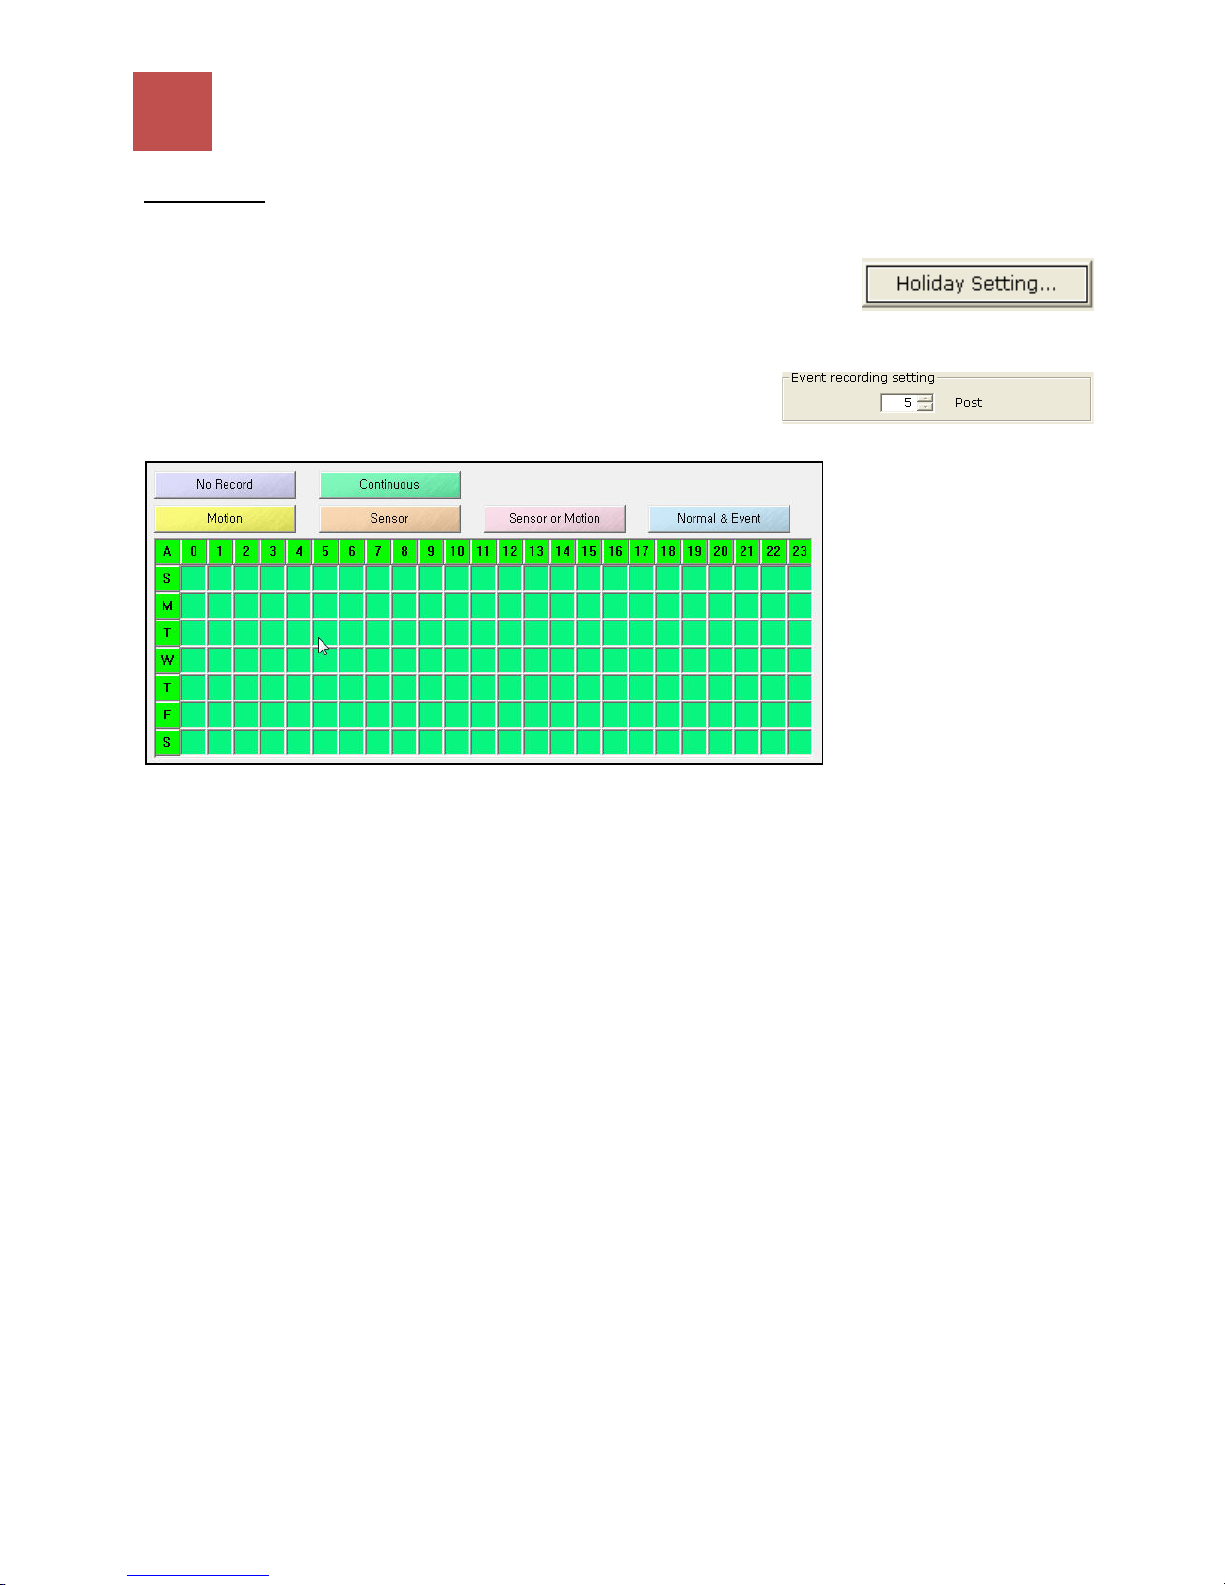
Select Camera: Select the camera
for configuration.
Config Setting:
Resolution
HD camera resolution is
automatically selected.
Analogue camera: user needs to
specify the resolution for each
camera.
Compress Type
Frame rate: Specify recording rate
for each camera.
:
:
VBR: Variable bitrate result in
bigger file
CBR: Constant bitrate smaller file
size
Page 15
15
HISCO HD DVR User's Manual
Video Quality
: video recording quality
Record Schedule:
Holiday setting: Apply recording configuration of Sunday to user defined date.
Recording schedule for holiday is same as the recording schedule for Sunday.
Event recording setting: specify how many frames are recorded after
event is triggered.
Specify the weekly schedule for each camera (hourly)
•No Record: live view only on the monitor with no footage being recorded
• Continuous: Time lapsed recording
• Motion: Recording on motion detection
• Sensor: Recording on sensor operation
• Motion & Sensor: Recording on sensor and motion detection operation
• Normal & Event: recording at 1fps, configured recording frame rate will be activated when
event occurs. (Sensor or motion detected)
Note: motion and sensor needs to be checked.
APPLY ALL: to apply current setting to all HD camera or Analog camera.
Note: Click Apply to save changes before proceeding to change other setting.
Page 16
2-4. MOTION DETECTION SETTING
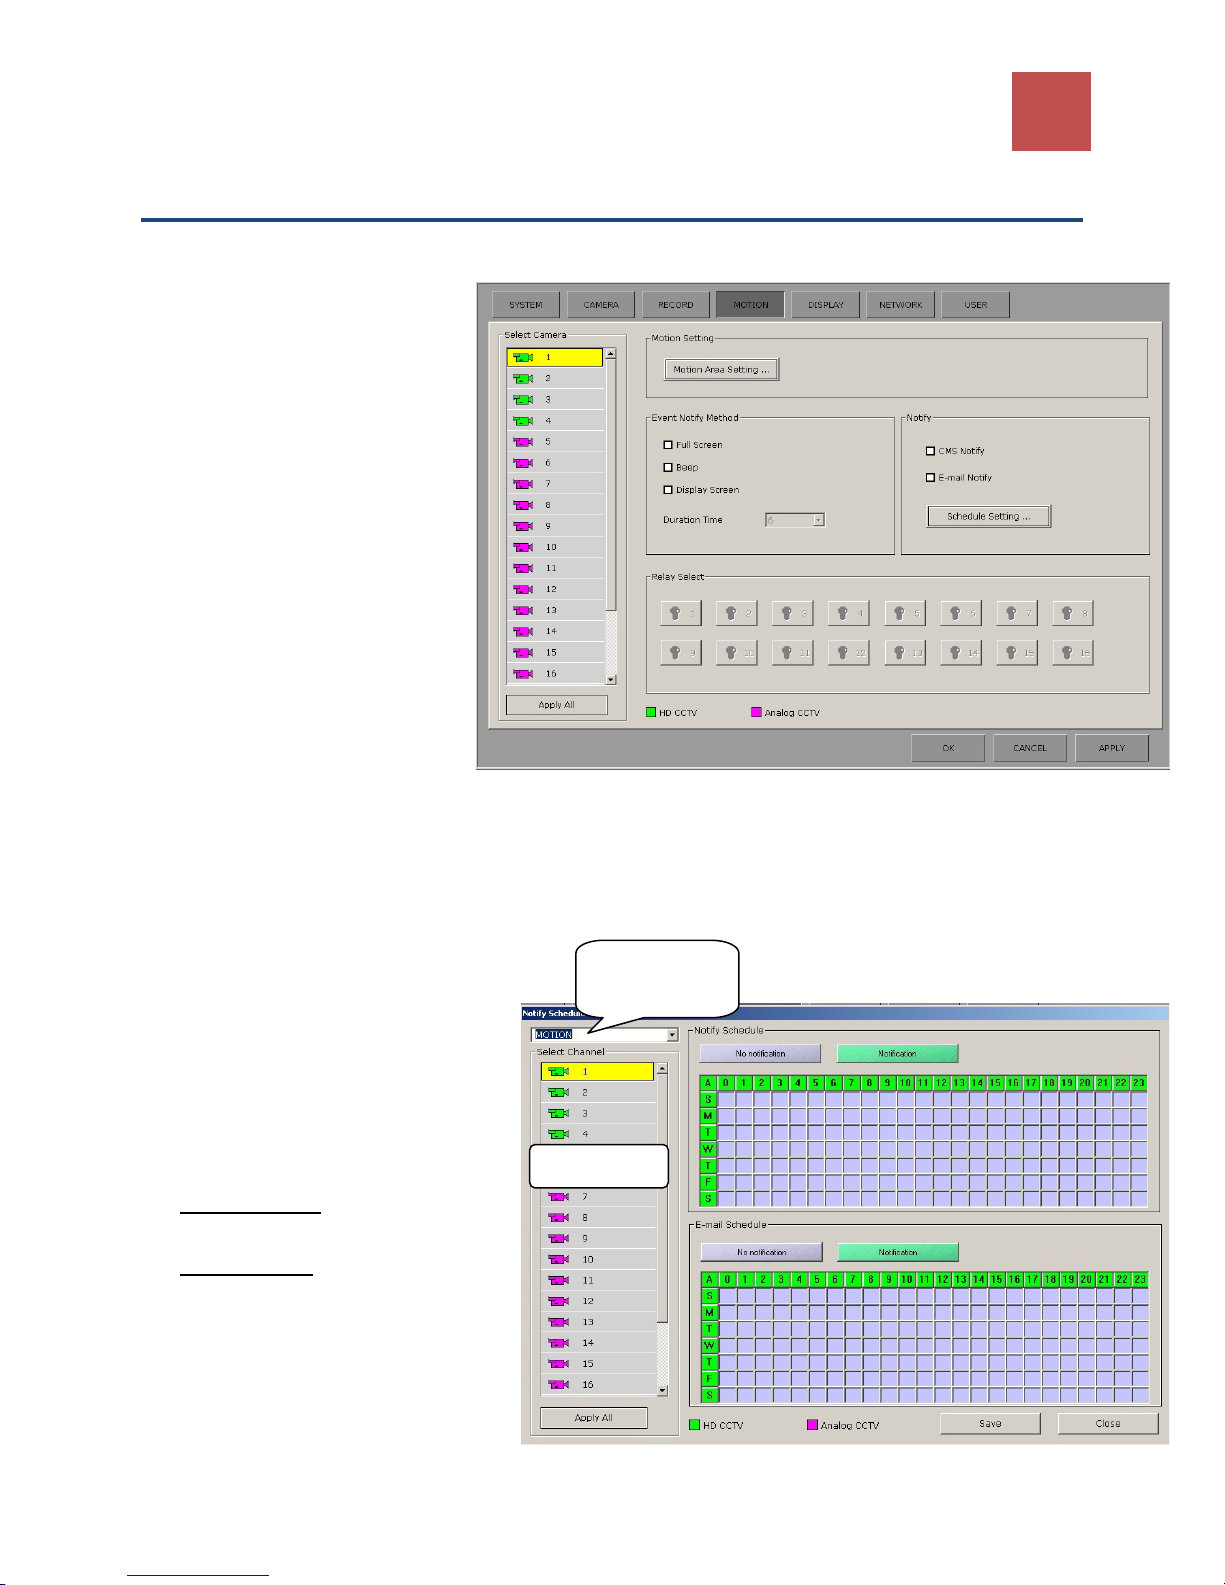
Motion setup
1. Selects camera and customize motion
detect area.( See Motion area setup
P17)
2. Clicks apply all to have the same
setting for all cameras.
Event Notification
1.
Motion event Notification, check
Full Screen, Beep and/or Display
Screen
To increase or decrease the
display time of event camera,
change Duration time.
2. SETTING UP HISCO DVR SYSTEM
16
2. To receive notification on CMS
client software or email, check
CMS notify.
3. User can assign a relay to each camera. When motion event is triggered, HD DVR will trigger digital
output signal.
Notification Schedule setup
Select Motion or
senser
1. Select Motion or Sensor setting
2. Select Channel to set up trigger
notification schedule at remote
location.
Notify Schedule
: specify weekly
Select camera
schedule for each camera
Email schedule
: specify weekly
schedule for each camera.
3. Click Save or Apply all to apply changes
to all HD or Analog cameras.
Page 17
17
HISCO HD DVR User's Manual
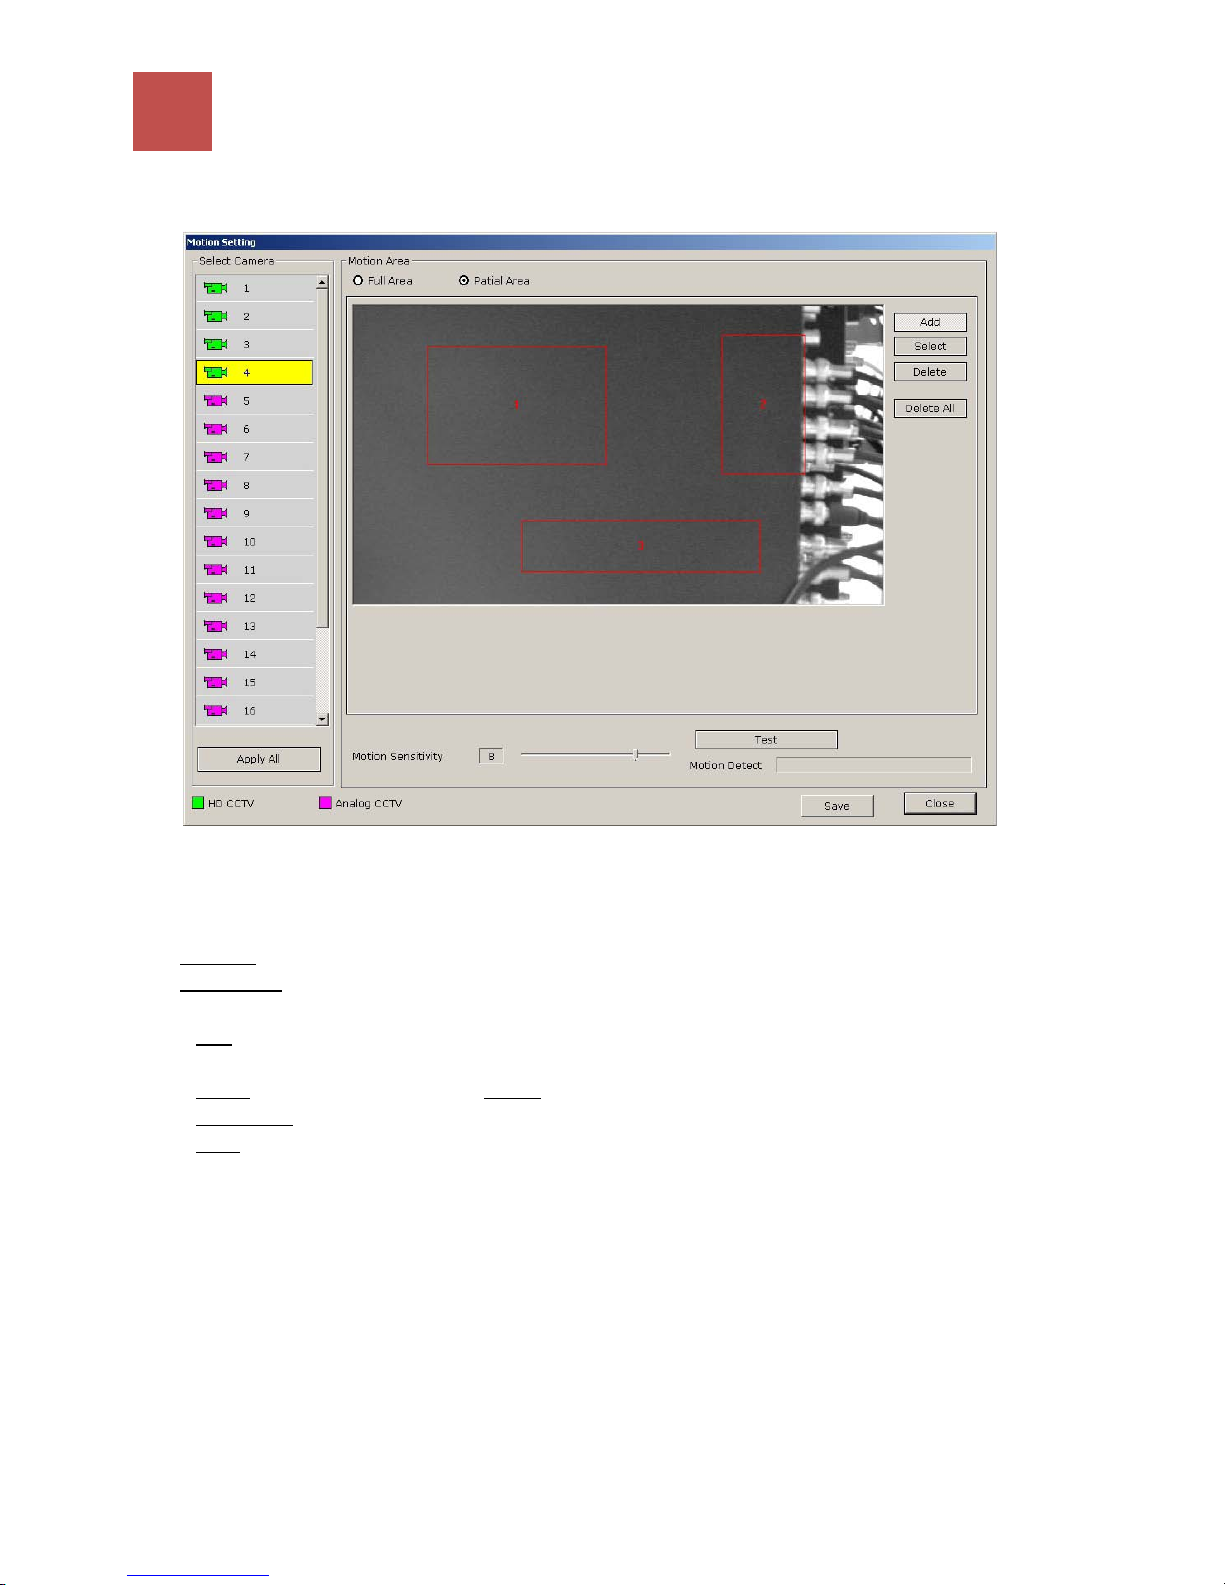
Motion area setup
Select Camera: User can set up motion detection areas for individual camera or click apply all to have the
same setting for all HD cameras or Analog
Area Setting: Set up motion sensitive area (motion grid).
Full area: auto select and monitor the whole screen for motion.
Partial area
: Monitor only Area box specified by user. Max 4 area box.
: Select partial area, left Click and drag to add a motion sensitive area in a camera view. Max.4
Add
•
individual motion sensitive areas can be drawn.
•
Select: select one area and click delete
•
Delete All:
•
Test:
This will delete all detection areas.
After setting the motion grid and sensitivity, user can test if the setting is detecting motion or
to remove motion sensitive area.
not. If a motion is detected, “detected” indication will be displayed in the motion detect box.
Motion Sensitivity: determines motion by number of pixel changes in a given area. Select the
sensitivity of the motion detection area. “1” is least sensitive and “10” is most sensitive
.
Page 18
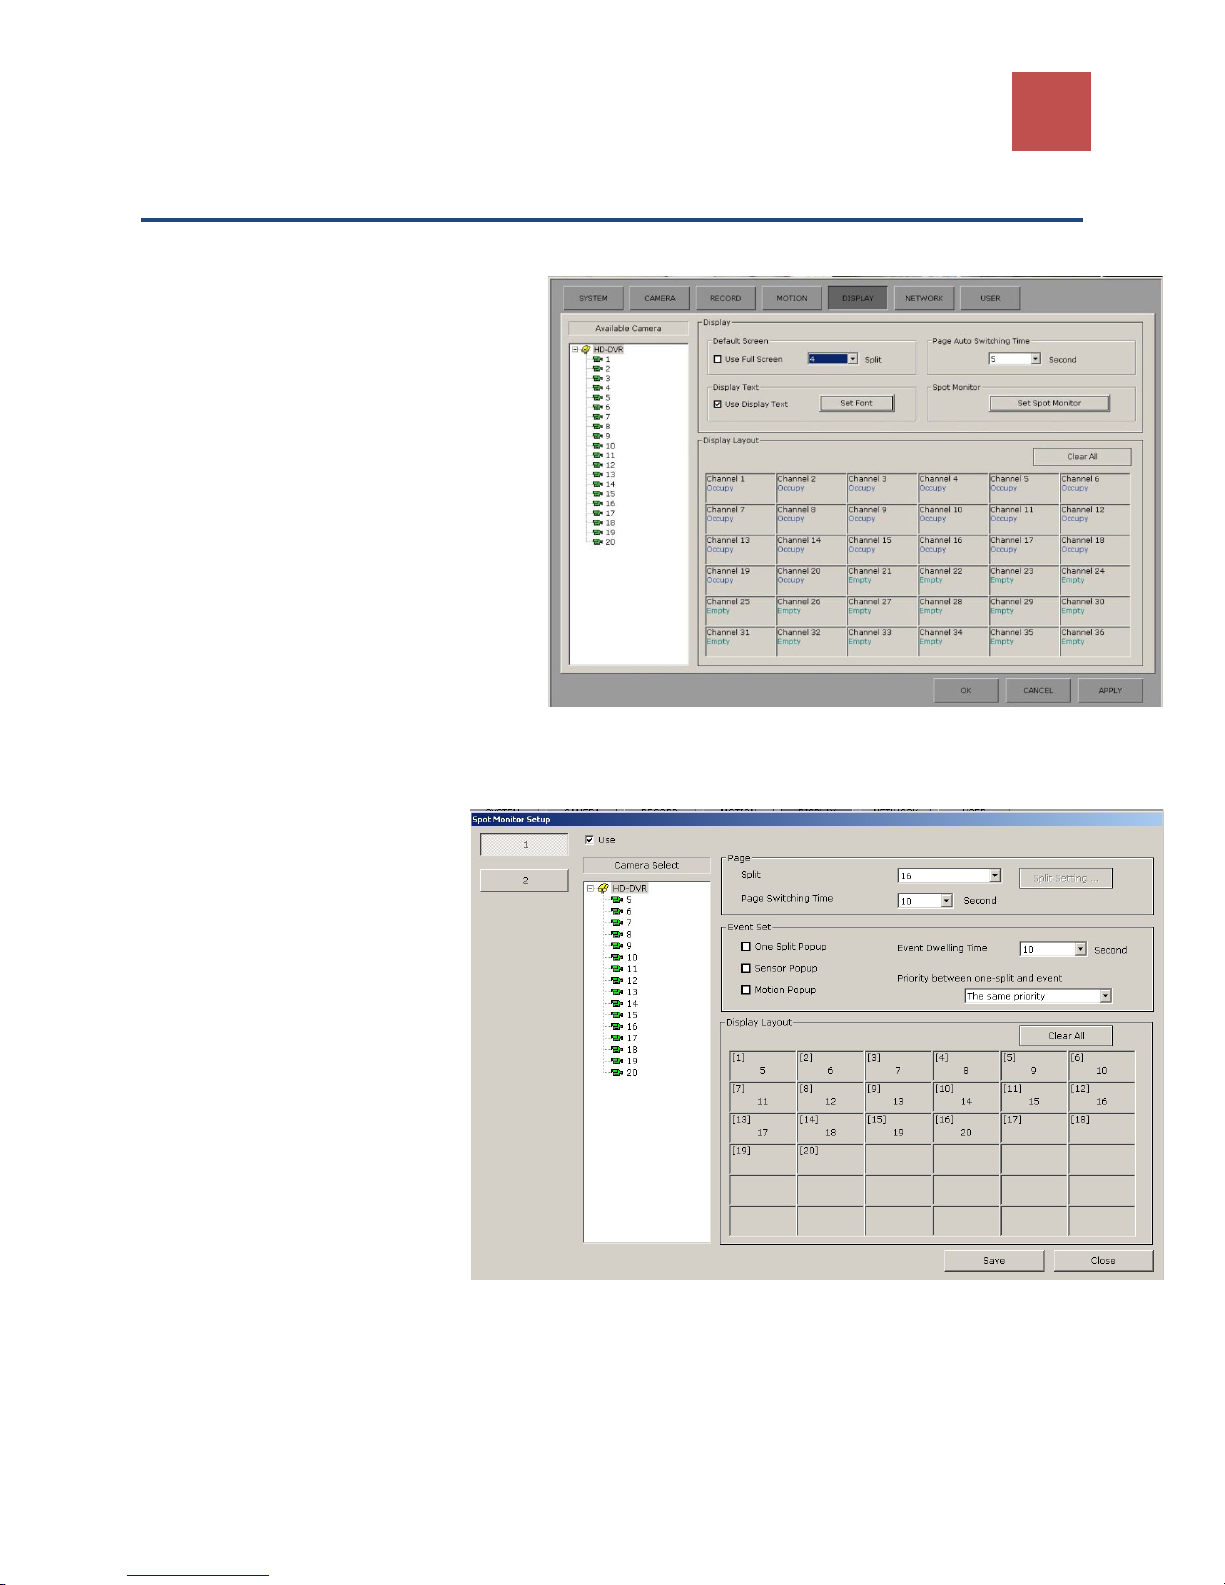
2-5 Display setup
Display
Default Screen: initial start up screen
when HD DVR program is running.
Page Auto Switch time: the amount of
second passes before HD DVR rotate to
next camera
Display Text: Enable/Disable on screen
camera status in live view
Spot Monitor: to setup spot monitor for
analogue cameras refer to Spot monitor
setup.
Display Layout: select camera, drag and
drop it to desire grid in the table.
2. SETTING UP HISCO DVR SYSTEM
18
Spot monitor setup
Select Spot Channel: 1 or 2
Select camera: Select the
camera(s) and drag to Display
Layout to be displayed on spot
monitor. <Note> Press “Clear All”
for the customization.
Split: Select the number of spot
monitor display channels (1 to 36)
or Mixed split
Page Switching Time: display
time of camera image shown on
external display when connected.
Event Set: Enable/Disable Spot
Out monitor to display camera
when selected event is triggered.
Event Dwelling time: amount of time spot out monitor stay on triggered camera.
Page 19
19
HISCO HD DVR User's Manual
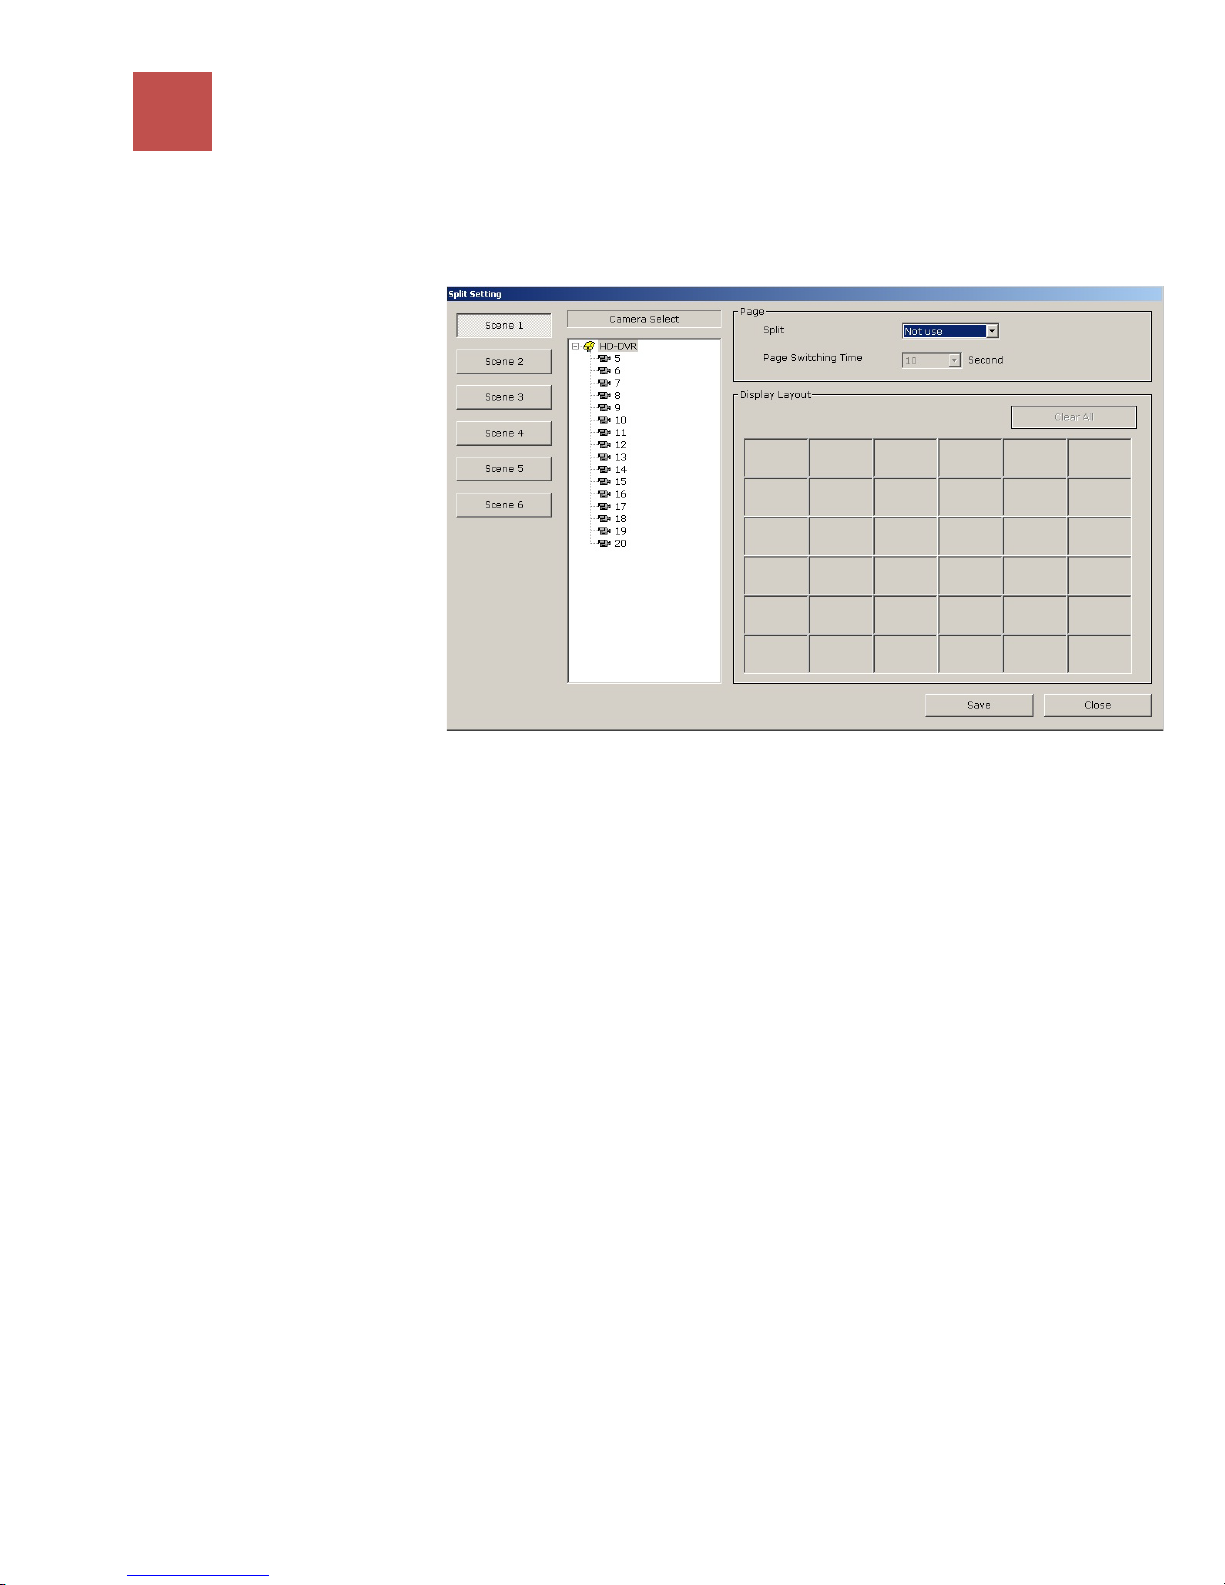
Priority between one-split and event: set up Priority between one-split and event trigger.
Spot monitor will jump to event camera when spot out is set to Event has more priority.
Split Setting: to set up Mixed
split.
Note: user can spot out for analogue camera(s) only.
Page 20
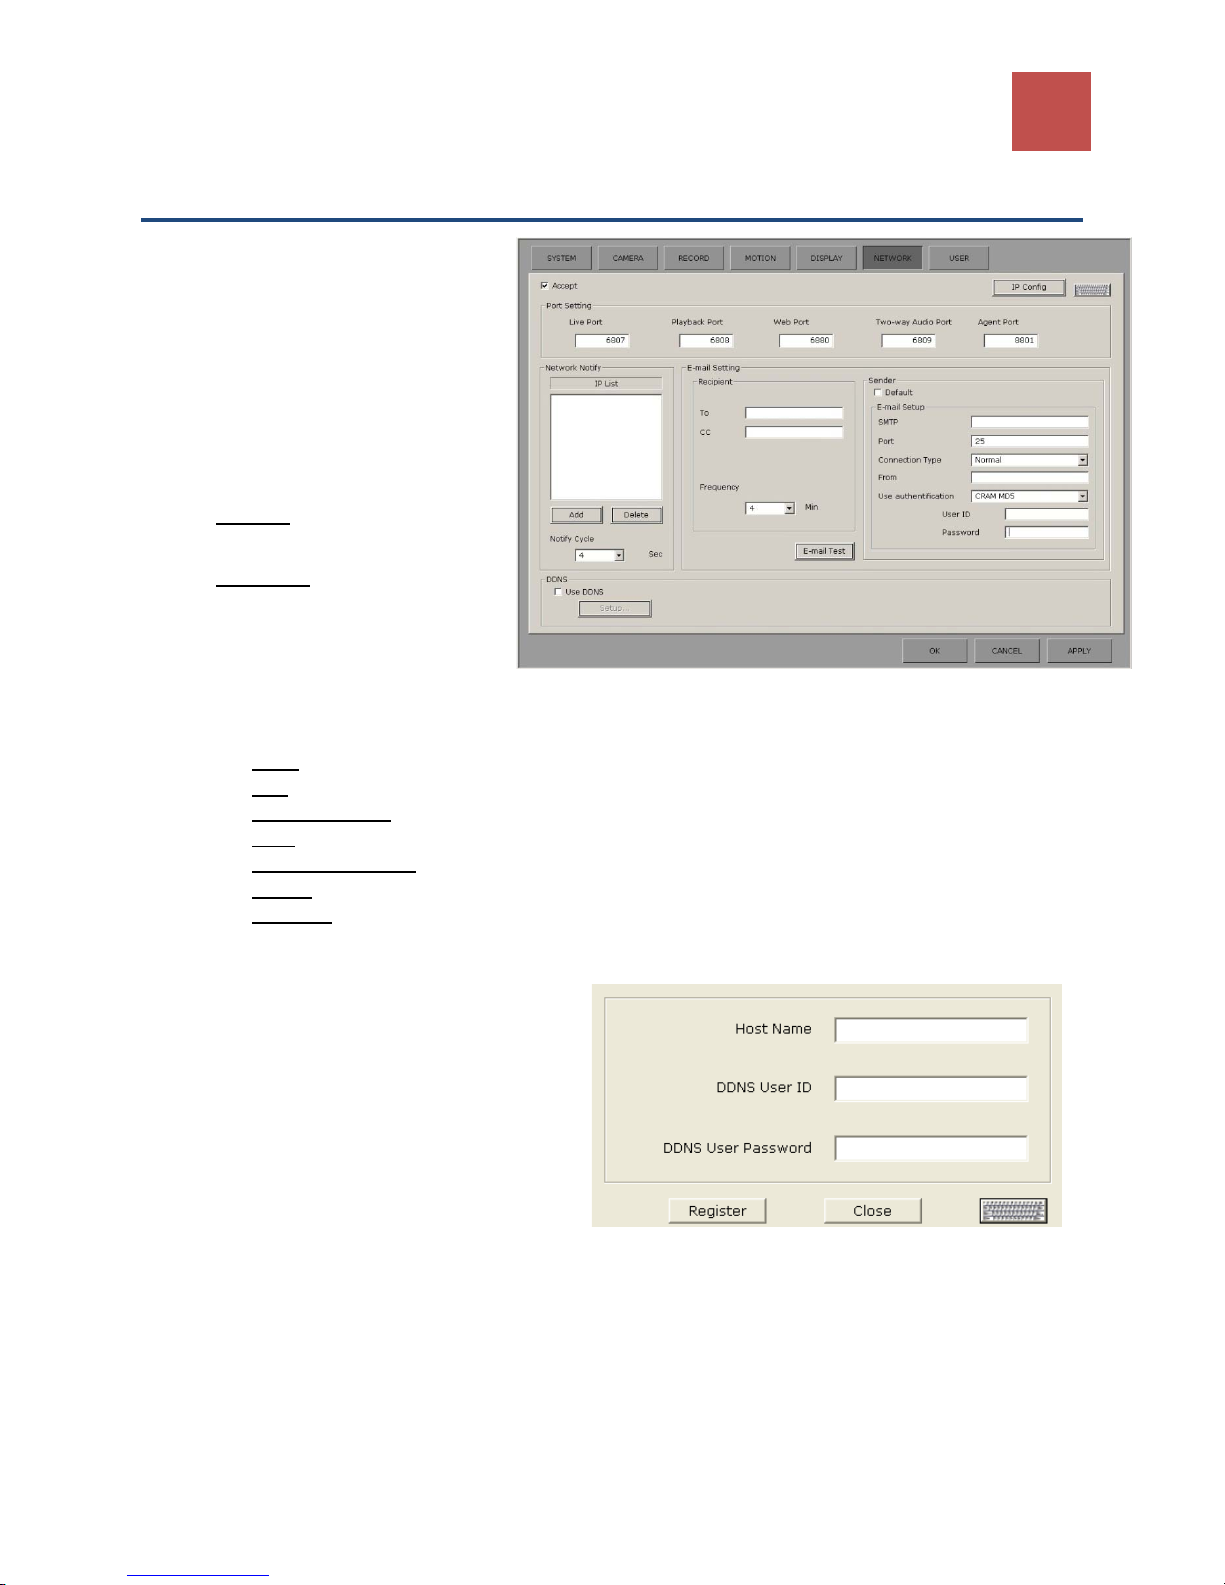
2-6 Network setup
Accept: Enable/Disable CMS and Email
notification.
Port Setting: specify which port does
HD DVR uses for each function.
Network Notify: Specify which stations
receive event notification on CMS.
Email Setting: HD DVR sends Email
notification if event is triggered
Recipient:
address
time between each email is sent out.
Sender:
Default: Hisco recommend
Mail setup: input the correct SMTP information
TO & CC
Frequency
: Recipient’s email
: the Amount of
user to manually set up SMTP service.
• SMTP
•
•
•
•
•
•
: SMTP server address
Port
: SMTP server port (default 25)
Connection Type
From
: Sender’s Email address
Use authentication:
User ID
Password : POP or mail server user password (if mail server doesn’t require user password, leave
blank)
: POP or mail server user ID (if mail server doesn’t require user ID, leave blank)
: Select encrypted connection type (Normal, SSL or TLS)
Select authentication mechanism type
2. SETTING UP HISCO DVR SYSTEM
20
DDNS: Contact DDNS service provider for
proper information.
Host name: IP address
User ID: DDNS account
Page 21
21
HISCO HD DVR User's Manual
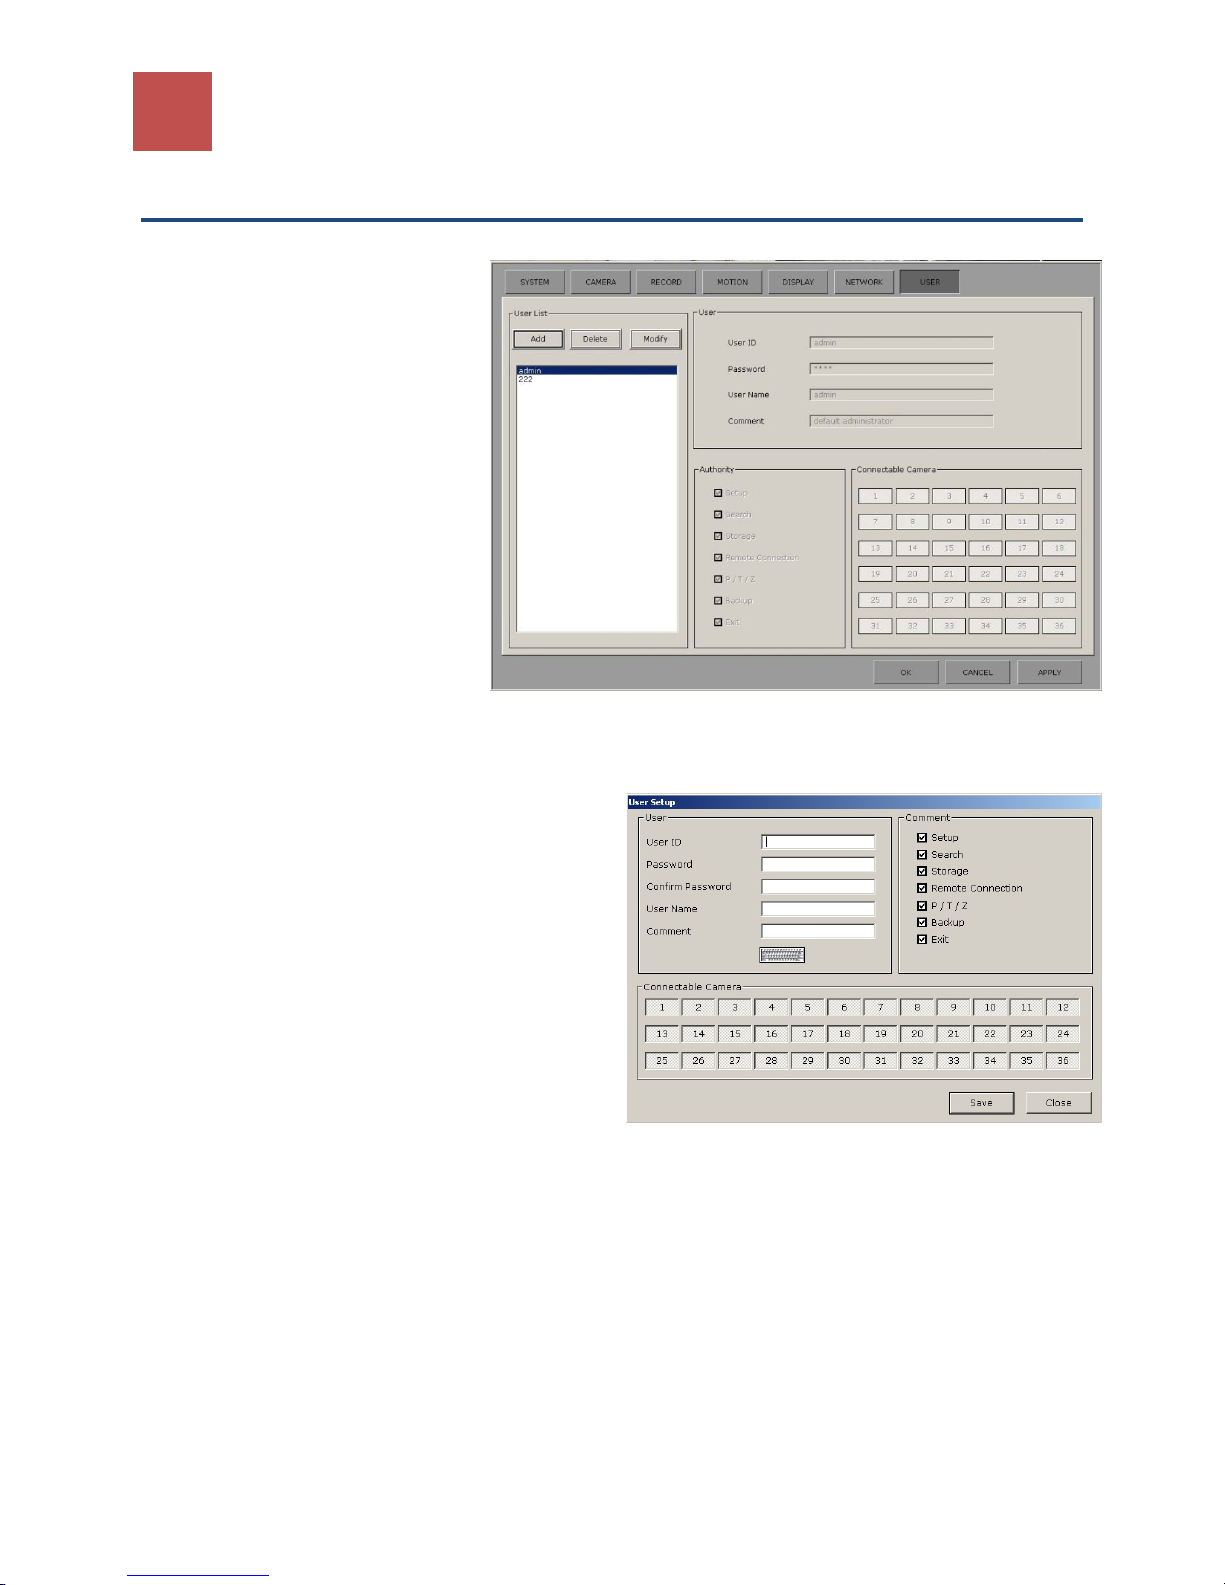
2-7 USER SETTING
User setup
In User setting user can add, modify
or delete users for different access
privileges.
Add: User can add a new user.
Delete: Choose a user from the list
and click DELETE button to delete
the user.
Modify: Choose user from the list
and click MODIFY button to change
any setting in the User Setup menu.
ADD USER
To add a user,
1. Click ADD button
2. Type User ID and Password
3. Comment: Select what DVR function is
available to the user
4. Connectable Camera: Click and select cameras
available remotely to the user for viewing with
client software
Page 22
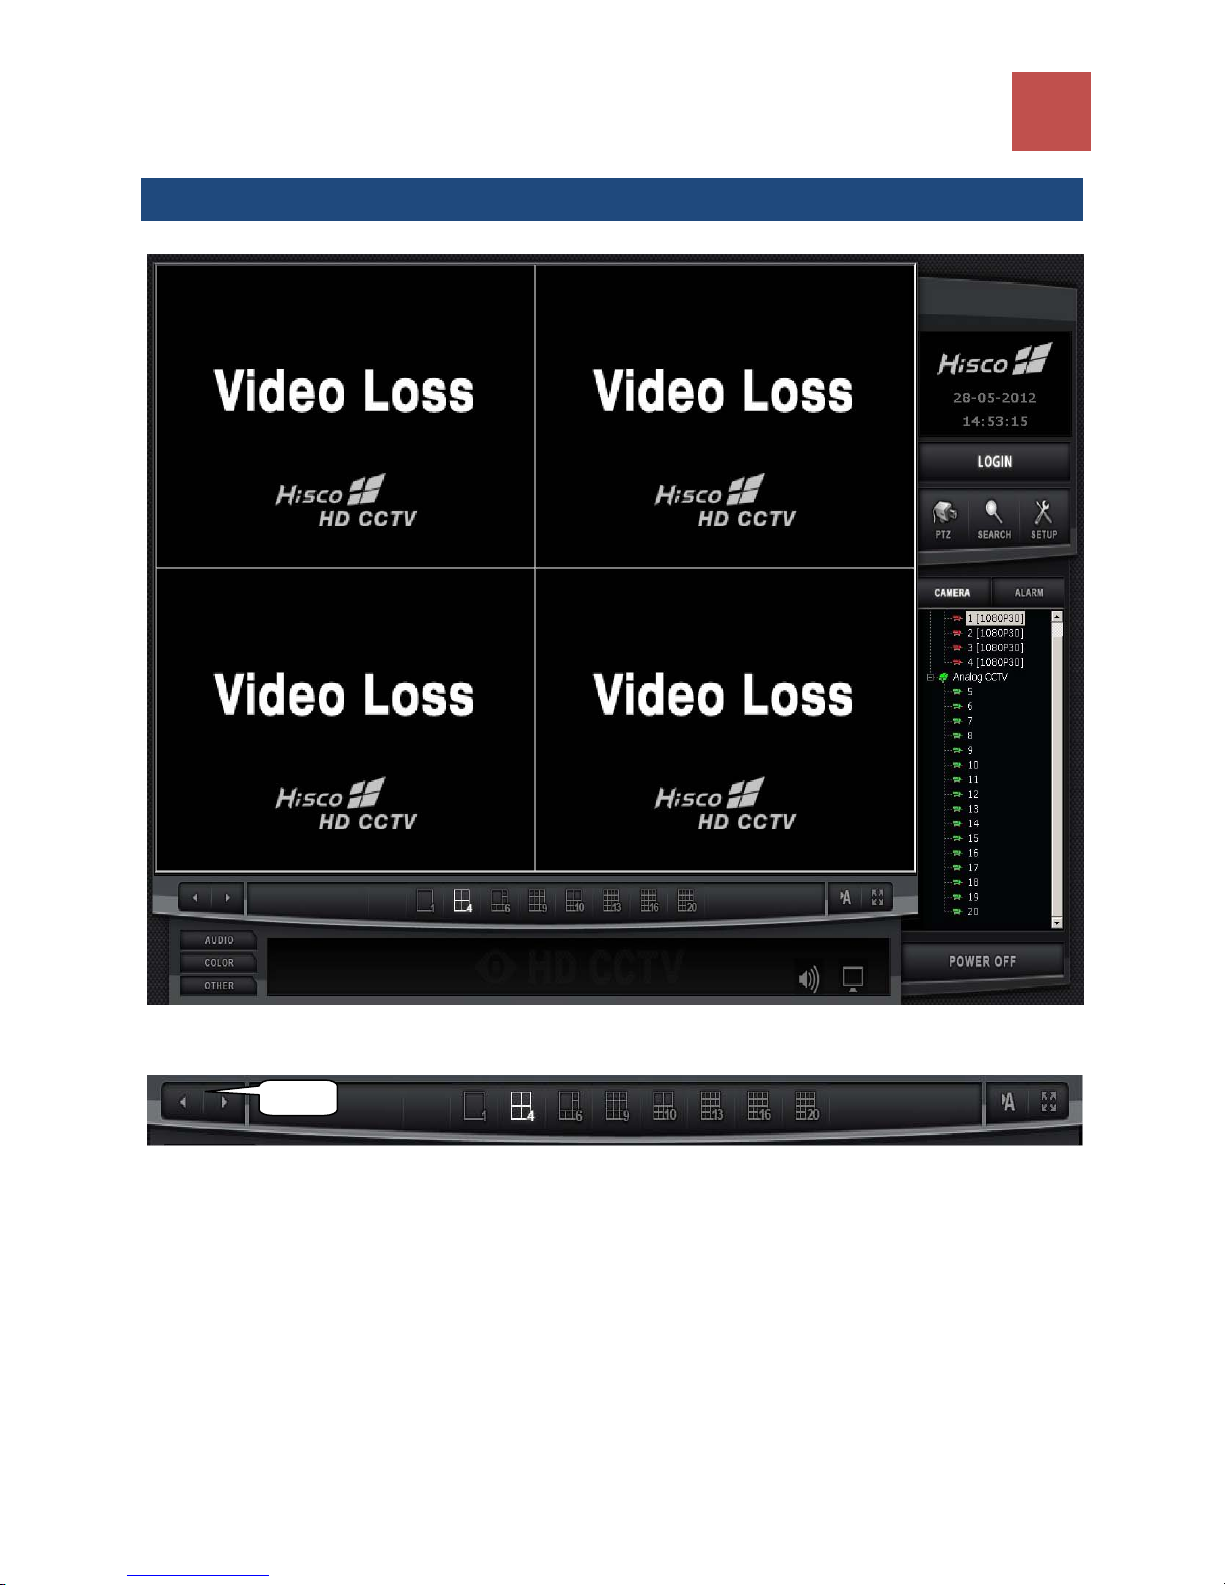
3. HD DVR Live View interface
3. HD DVR Live View interface
22
Split Screen
Arrow
User can switch the Live View mode between X1, X4, X6, X9, X10, X13, or X20 screen split.
To navigate between cameras click Arrows or click A (Auto) for automatic camera rotation.
To monitor Live View in Full screen manner, click FULL.
Page 23
23
HISCO HD DVR User's Manual
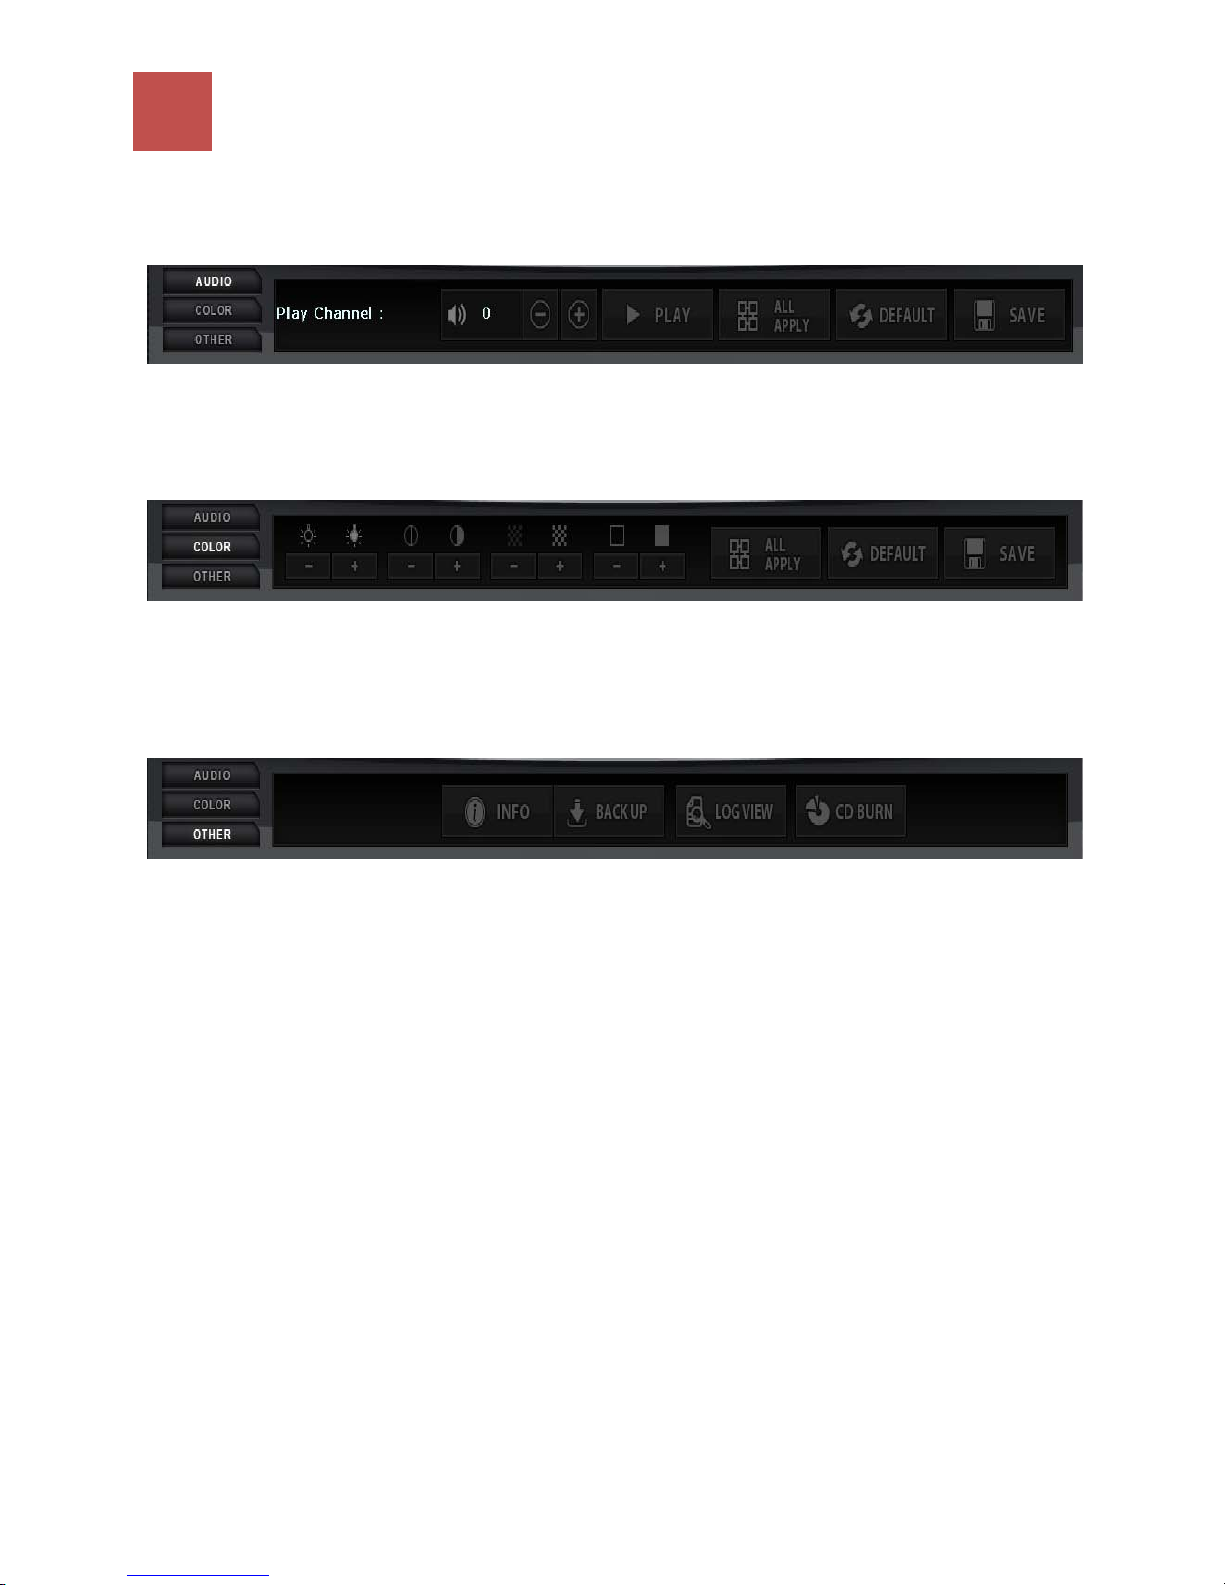
Live Audio
With Audio setup for specific camera, HD DVR user can listen to cameras with audio equipped
To hear live audio, Select a camera channel and click Audio. After audio control interface is activated,
click Play and Audio input from camera is transmitted.
Colour Adjustment
Colour can be adjusted on each individual camera.
Click a camera to adjust the colour setting.
Click the +/- button to adjust the Brightness, Contrast, Hue, and Saturation.
Other HD DVR Function
Other options are listed below:
Info: System information and software version
Back up: manual footage back up
Log View: for reviewing DVR system log
CD Burn: Basic CD/DVD burning Program
Page 24
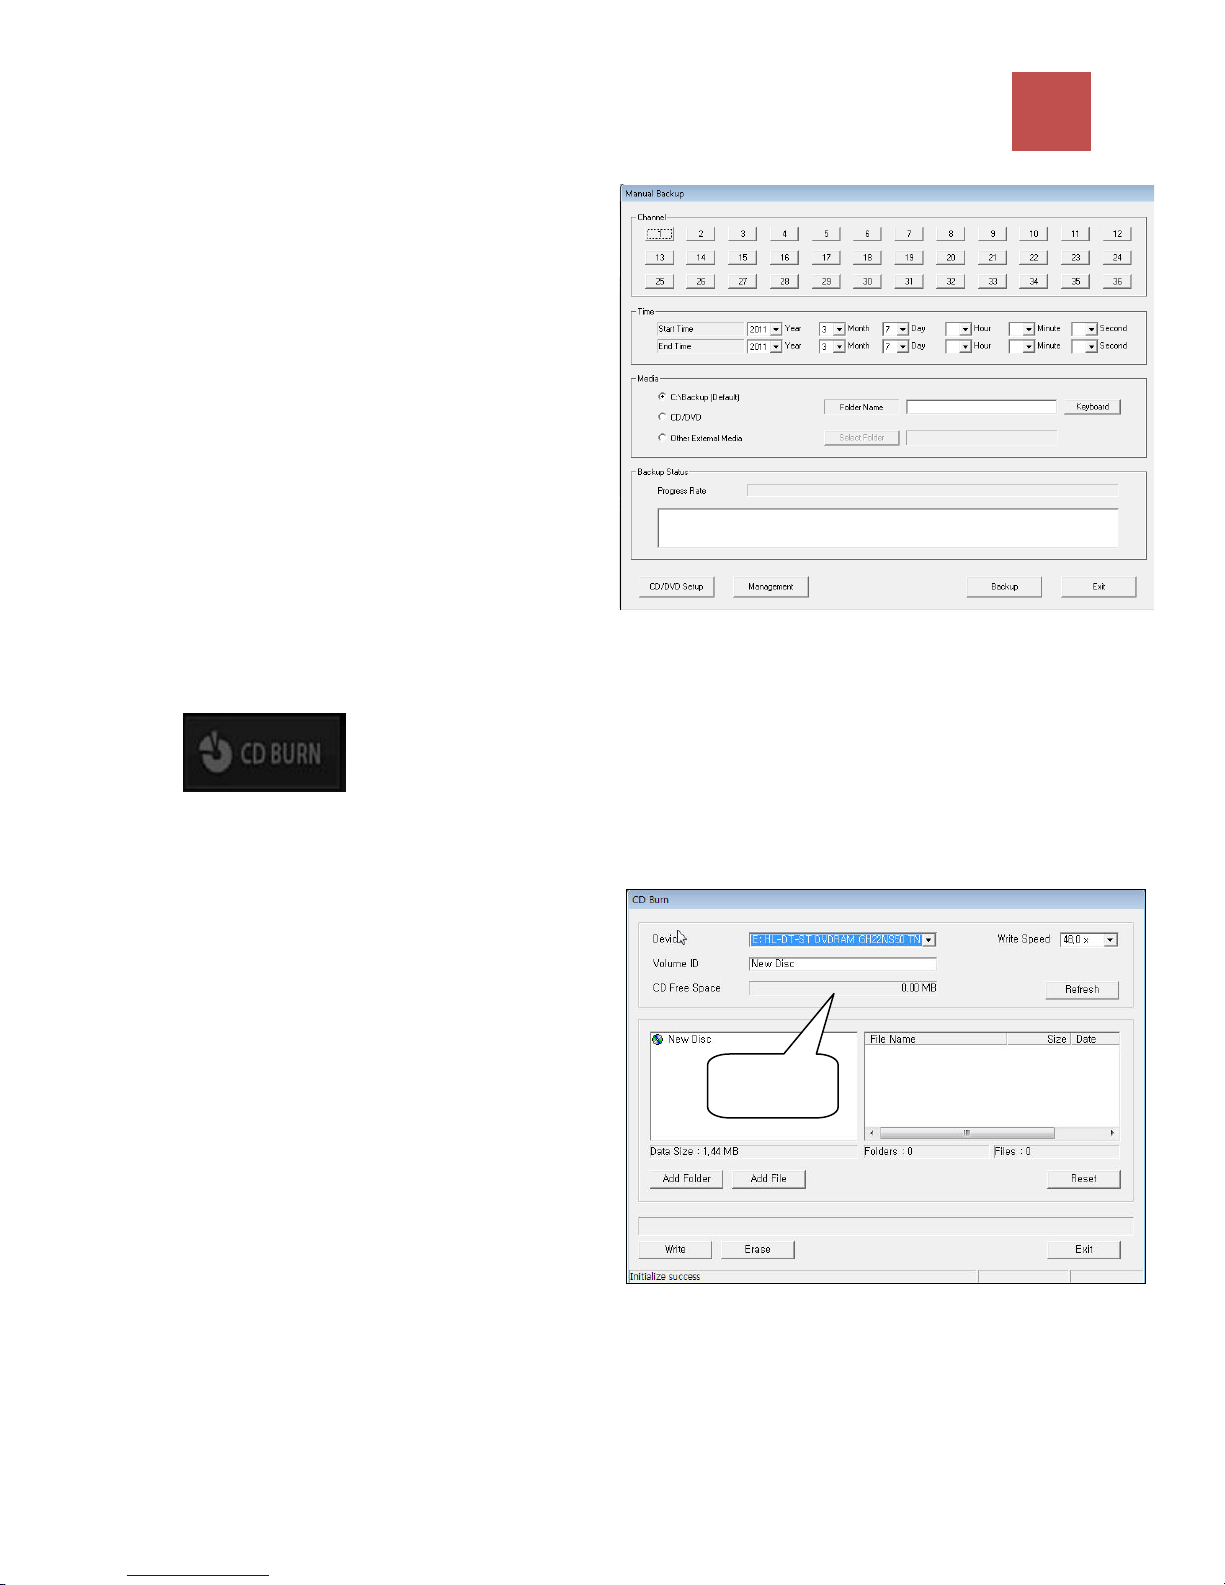
Manual Backup
To do a manual back up of multiple cameras, click
BACK UP.
Select one or multiple camera and set time frame.
Specify the location where you want to save the
file.
Click Backup on the bottom of the screen to start
the back up process.
Wait for the backup complete notification.
To Review the saved footage, open the video
footage folder. There is a folder named
Backupview. Inside this folder is a
RecordViewLite program which is used to
view the Video footage.
Note: saved footage is not AVI format.
CD/DVD Burning
3. HD DVR Live View interface
24
Hisco HD DVR has build in DVD and CD burning utility. Use CD burn to burn multiple JPG, Video
footage and AVI file into a CD or DVD
1. Select DVDRAM drive from Device
2. Name the DVD/CD at Volume ID. This is the
name computer will display when play on other
computer.
3. Click Add Folder to create folders to organize
Video Footage on Disk.
CD/DVD
Free space
4. Click ADD File and Select files to be burnt to
disk
note: Data size cannot be larger than CD Free Space
5. Click
Write to start Disk writing process
Note: If DVD/CD is a rewritable disk, HD DVR can
erase content on the disk and overwrite it.
Page 25
25
HISCO HD DVR User's Manual
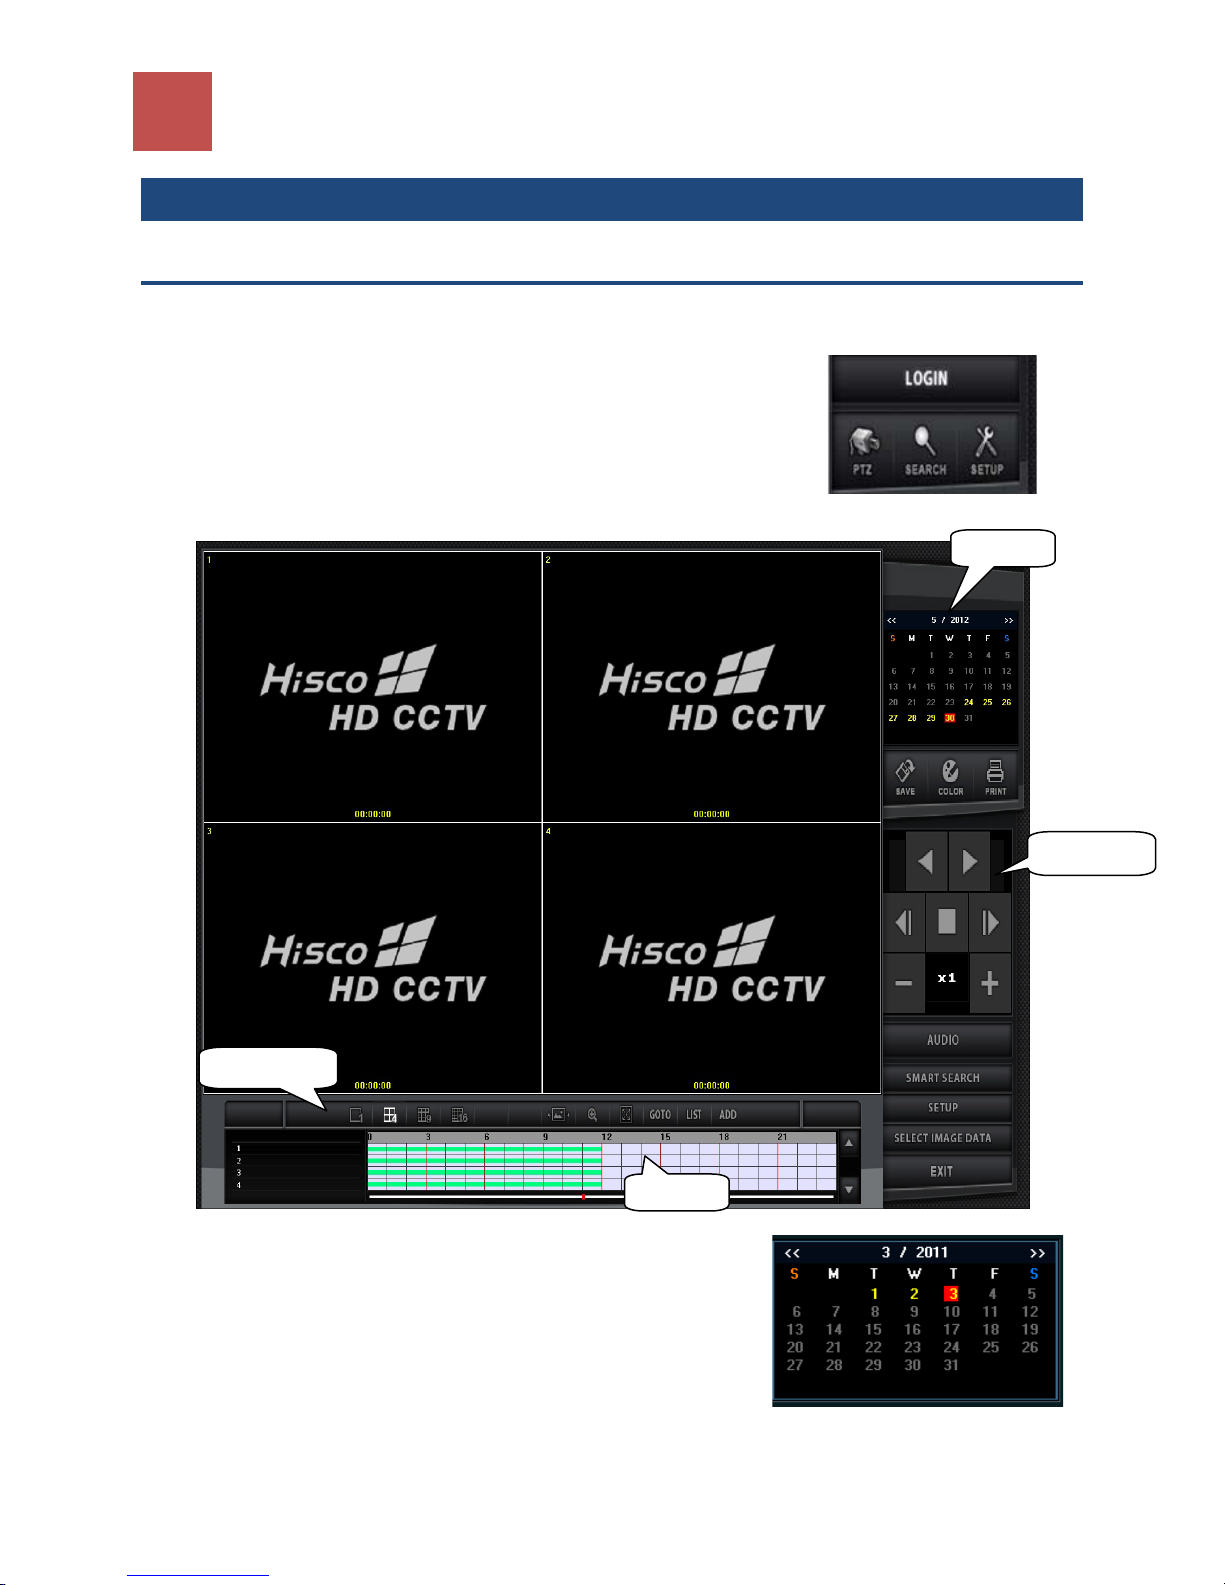
Calendar
4. HD DVR FOOTAGE REVIEW
4-1 DVR Search
Search is a powerful playback program for HD DVR system. It offers various playbacks and searching
option for recorded data.
Click the Search Button on the DVR Main Screen
The Search screen appears as below.
Display Mode
SEARCH PROCEDURE
1. Select month and date on the calendar (On the top right
corner)
2. Select hour and minute on the time line bar (on bottom
center) of the camera and click the PLAY button
Note: user can double click to expand time line to minutes.
Timeline
Play Control
Page 26
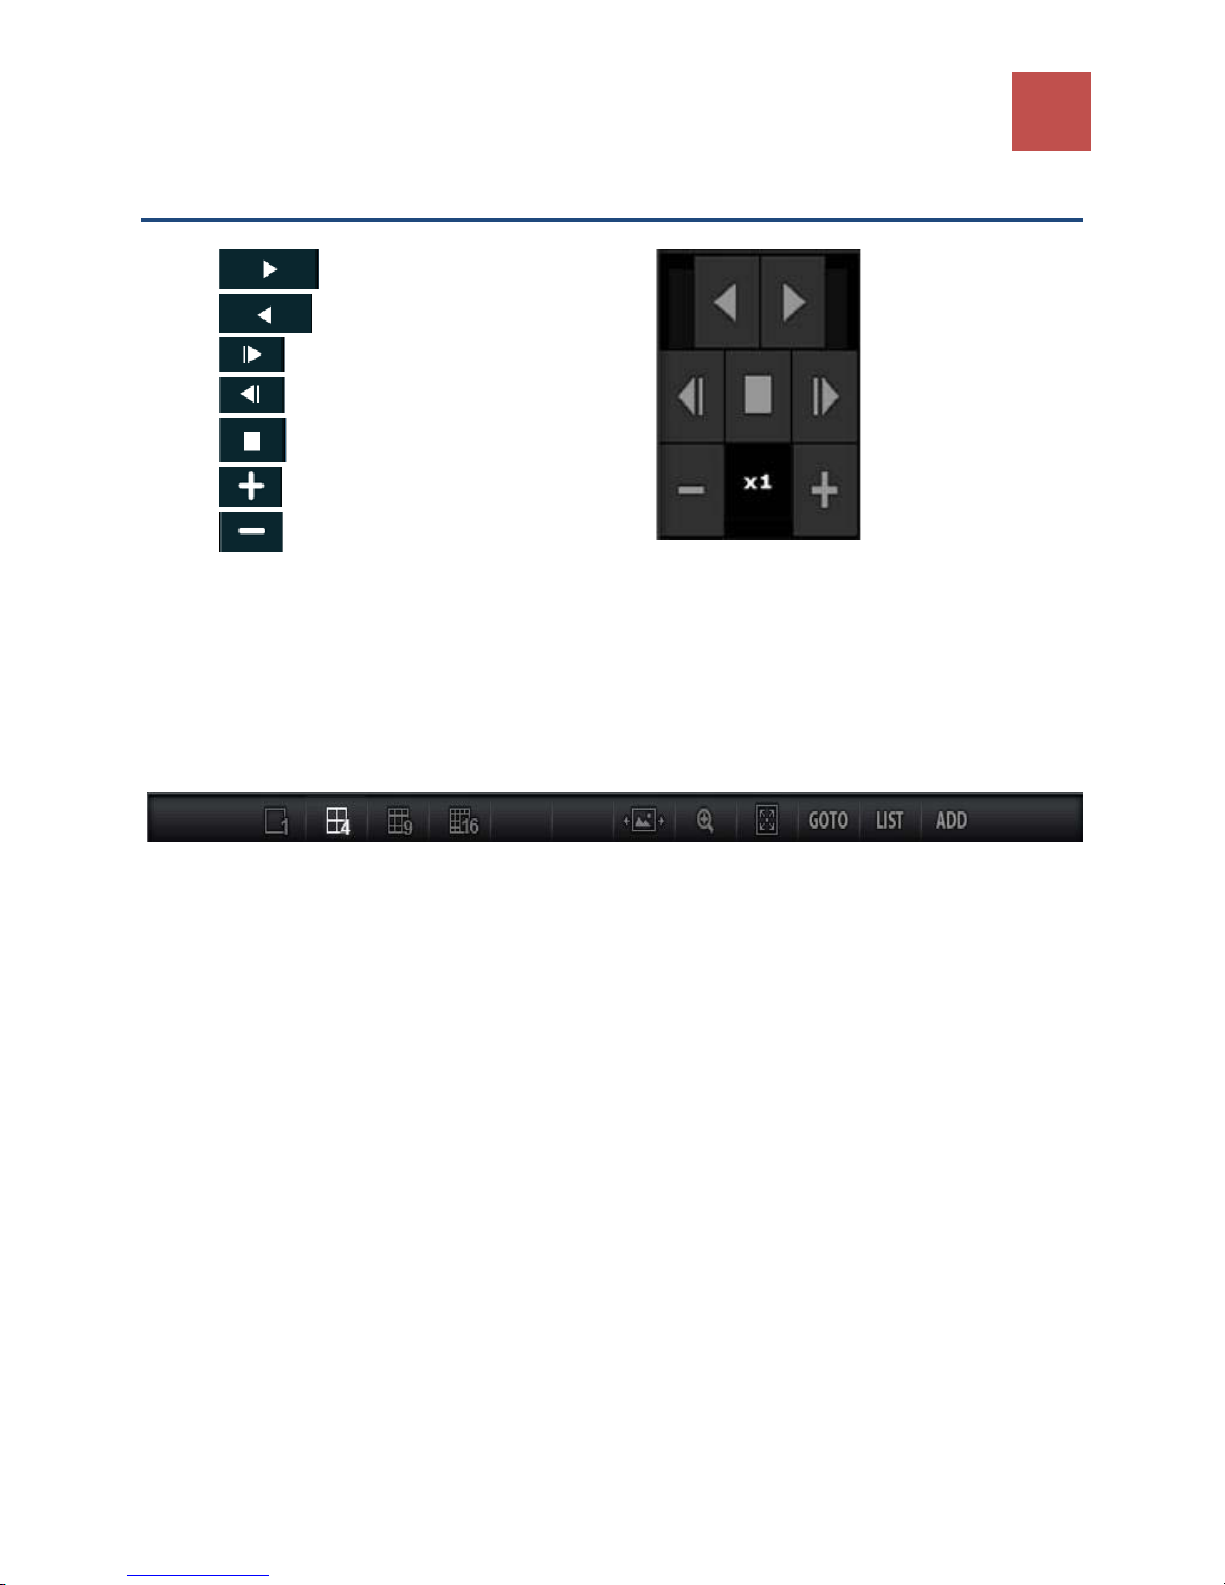
4-2 Player button
• -- Continuous play forward
• -- Continuous reverse play
• ------- 1 frame forward play
• ------- 1 frame reverses play
• ------- Stop
• -------- Speed increase
• ------- Speed decrease
4. HD DVR FOOTAGE REVIEW
26
Search Function button
• SINGLE: Play back single camera
• MULTI: Simultaneous playback of multiple cameras: 1, 4, 6, 9, and 16 screen division
• PANORAMA: Multiple view of single camera playback
• Zoom: On single display, zoom may be used to magnify the image.
• Full: Display footage in a full screen manner.
• GOTO: Goto the specific time (See 4-6 Bookmark P.29)
• LIST: Search on the Bookmark list (See 4-6 Bookmark )
• ADD: Add a bookmark (See 4-6 Bookmark)
Panorama Playback
Allows the user to watch single recorded channel frame by frame sequentially on 15-split screen mode.
Click “PANORAMA” button. The first sec will be viewed on the first division, next second on the second
division and etc. The seventeenth second will be viewed on the first division, completing the cycle.
Page 27
27
HISCO HD DVR User's Manual
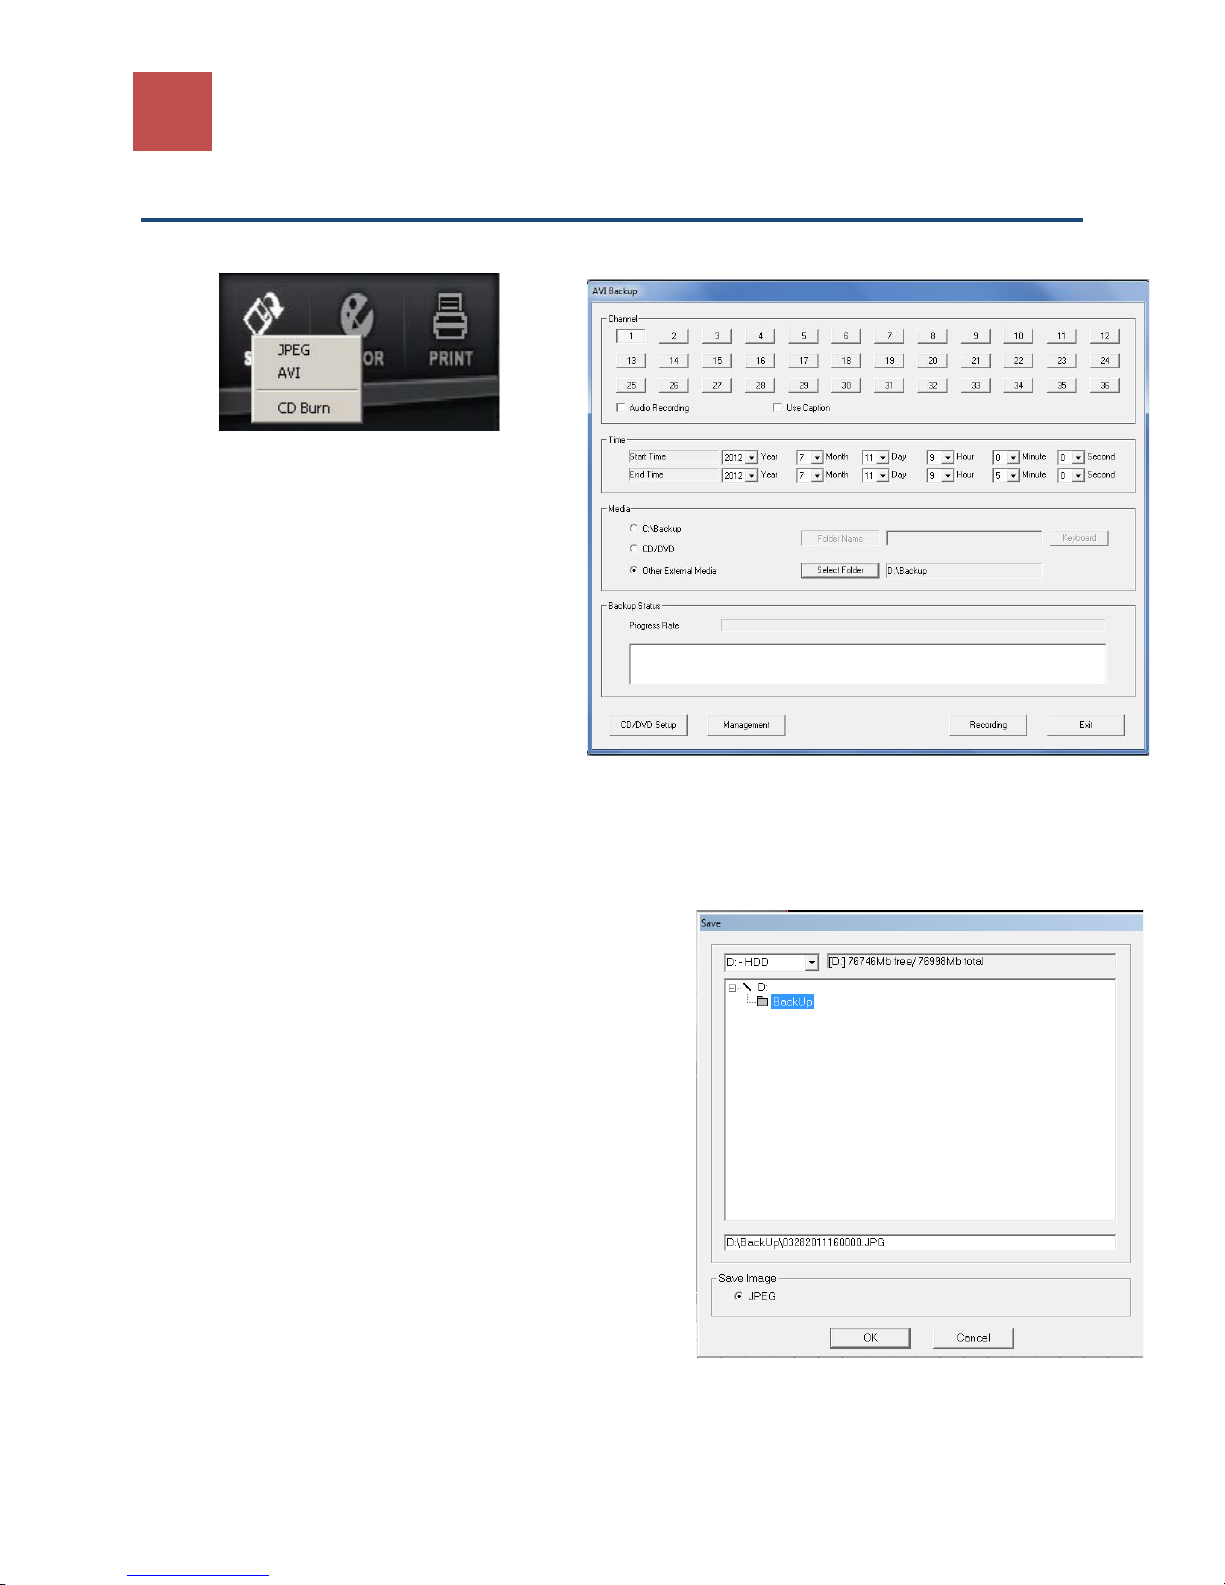
4-3 Save AVI Function
Save function let users save the recorded data as an AVI format file onto CD/DVD or other backup drive.
Save as AVI video file
1. Click “SAVE” button on the Search main
screen and select AVI.
2. Select Cameras and check Audio Recording
if audio is enabled for camera.
3. Specify the correct date and time frame
4. Choose Other External Media to save
footage and create new folder inside Back
Up folder (Recommend D:\Back up).
5. Click Recording to start saving.
Note: User can save footage to CD/DVD or USB flash drive directly
Saving JPEG image
1. Clicking the “JPEG” icon will provide the user to save
the images in the form of JPG files.
2. Choose the "D: -HDD"
3. In the window below choose the "BACK UP" folder
4. JPEG image will be name in the format of
MonthDateYearTime
Page 28
4. HD DVR FOOTAGE REVIEW
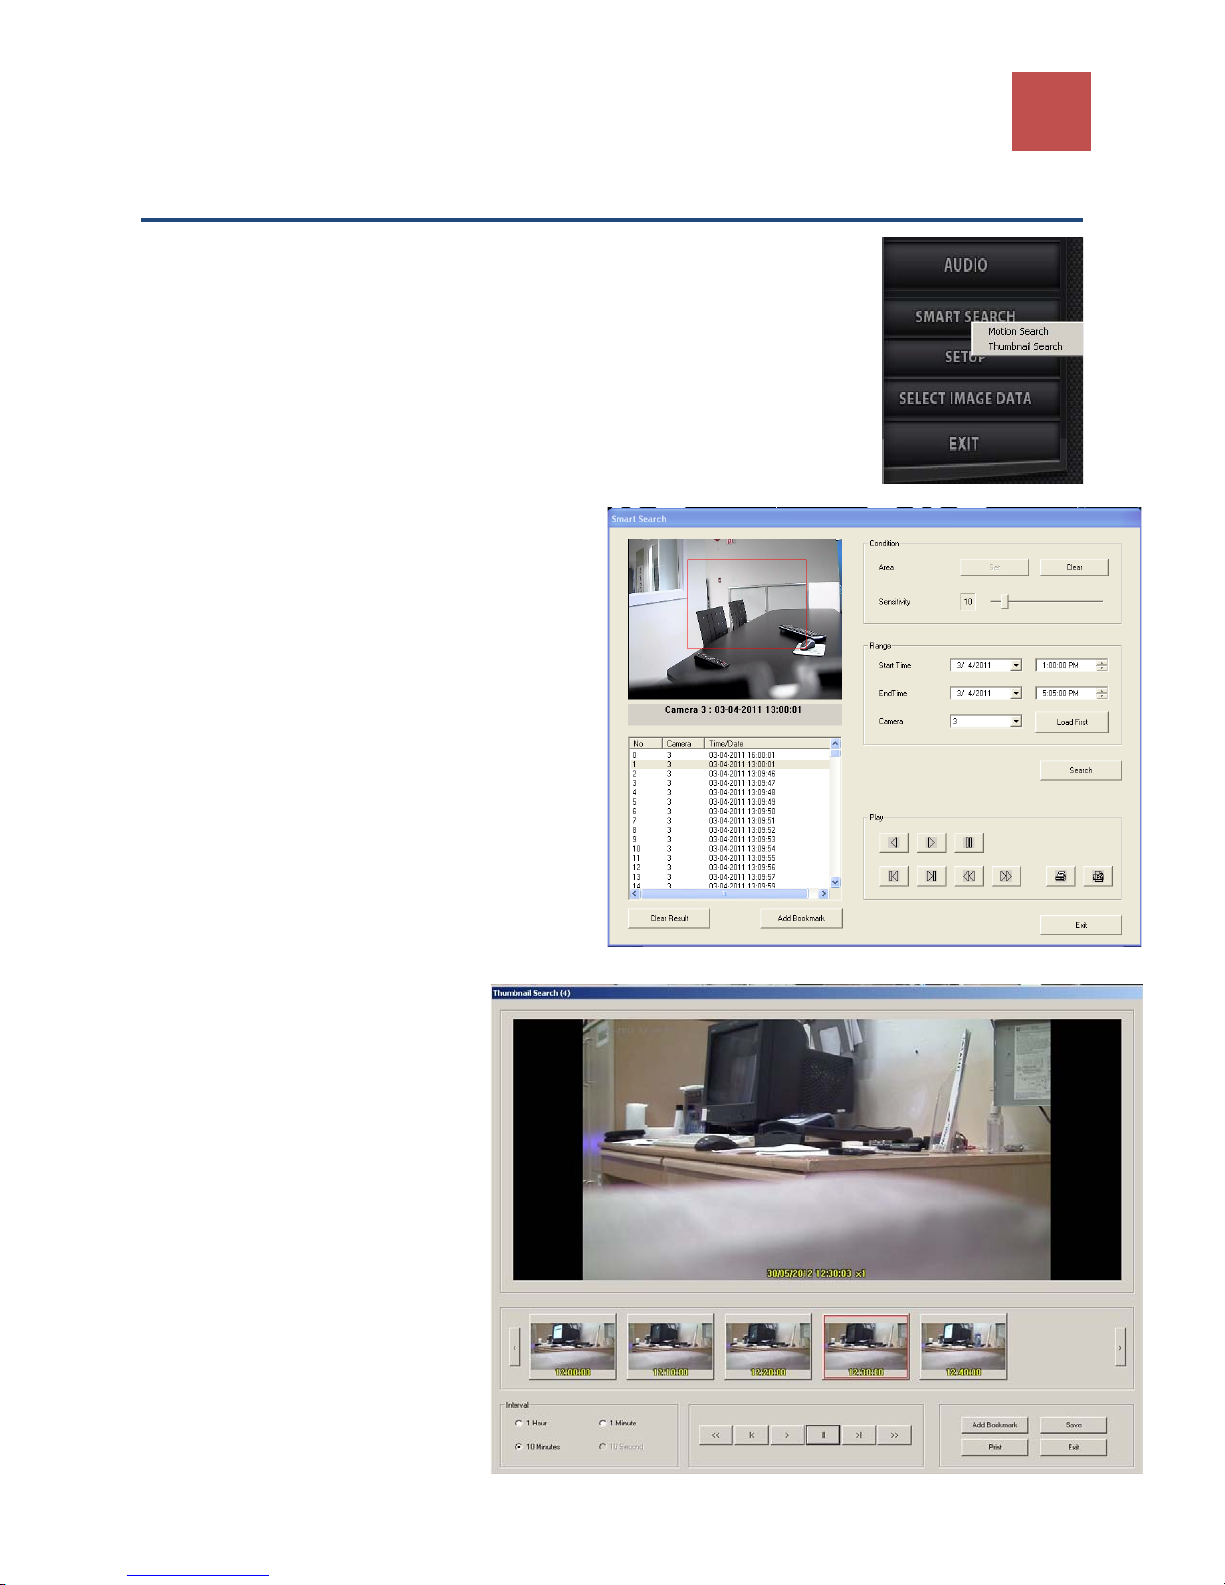
4-4 Smart Search
Smart Search allows users to search recorded data with higher efficiency. To
access this function click the “Smart Search” icon.
Smart Search (Motion Search)
Click Set and draw Motion Detection box by dragging left mouse button.
Click “Search” button and HD DVR will search for
pixel changes in the Area box. Event information
is listed on the left hand side.
Click Add Bookmark to index an event for
reviewing later.
28
Smart Search (Thumbnail Search)
Thumbnail search is a function that
helps users to find the videos they
are look for more easily by showing
every hour, 10 minutes, minute,
and 10 seconds stop images.
Note: Select time interval from
Hour to 10 seconds at a time.
(Hour > 10 Min > 1 Min > 10 Sec)
Page 29
29
HISCO HD DVR User's Manual
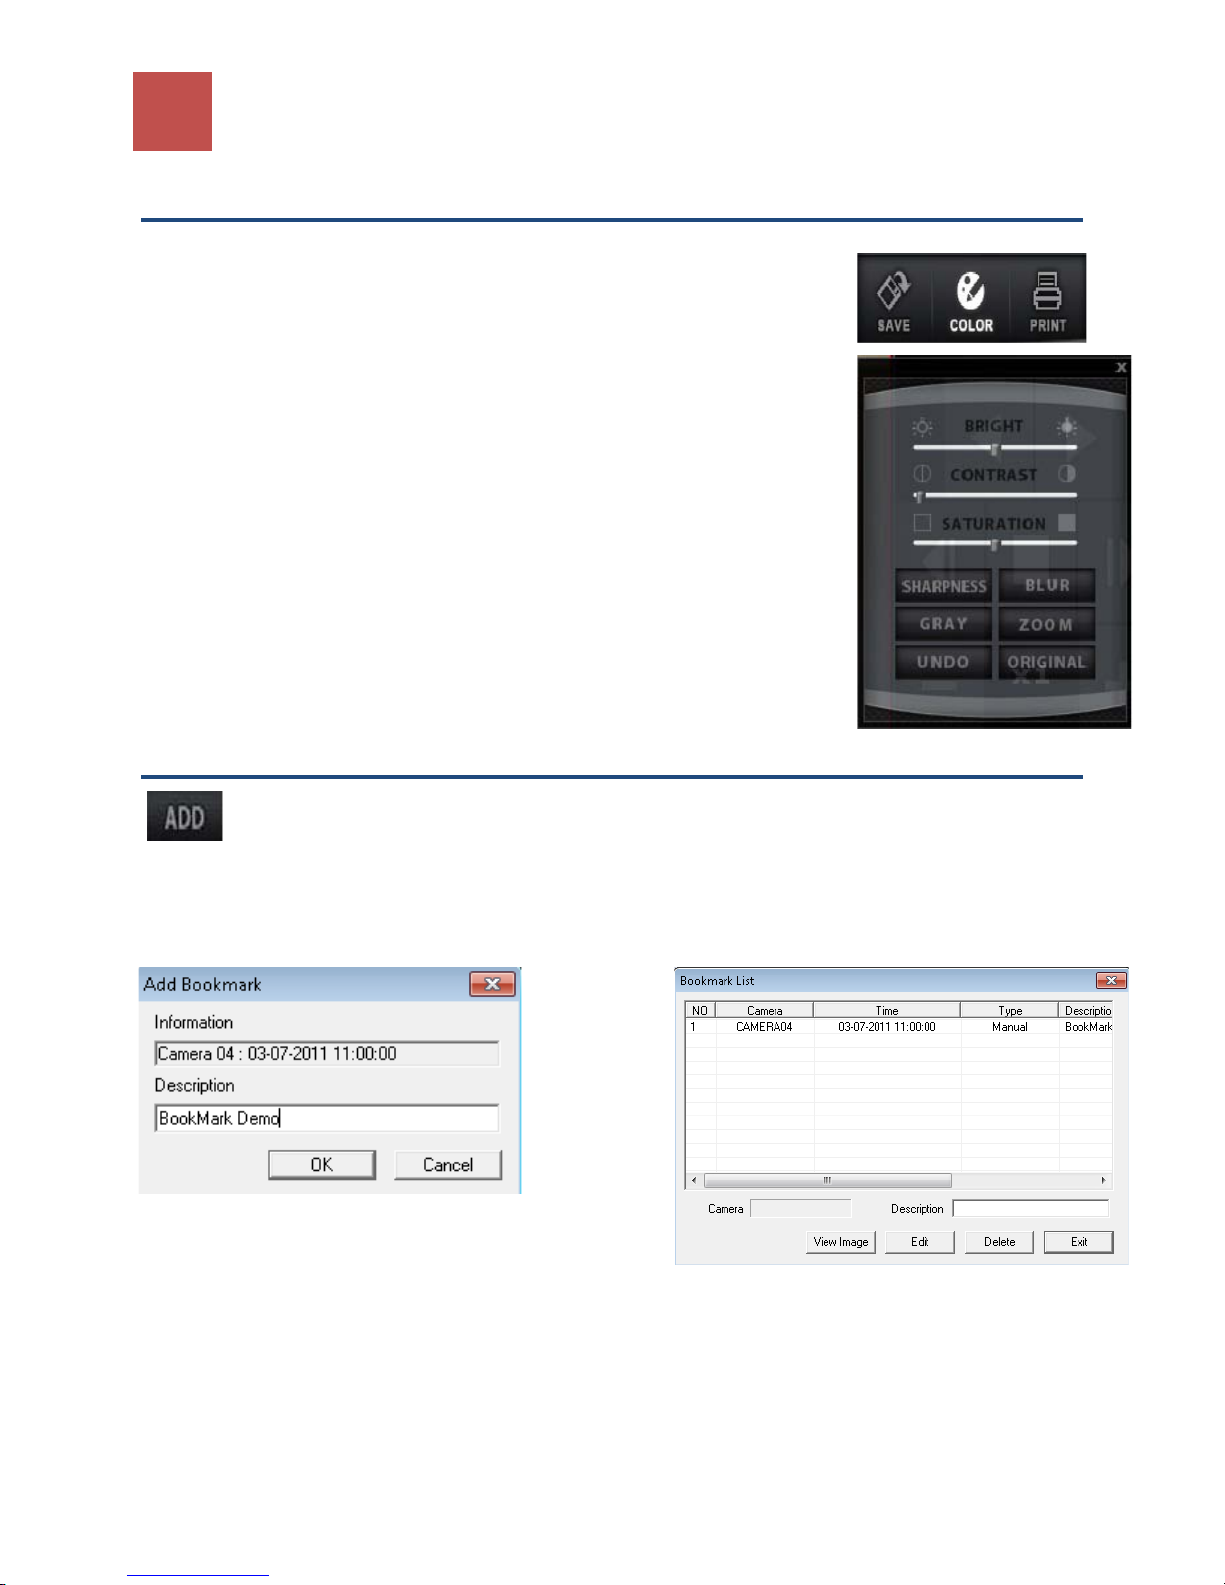
4-5 Image Post production
Colour can be adjusted on each still image before saved as JPG picture.
Stop video and Click COLOR button to show COLOR ADJUST menu
(shown right).
Click and drag left or right to adjust brightness, contrast, and saturation.
HD DVR also has the ability to Sharpen/Blur image, convert color to
Grayscale.
Original: Reverse all changes applied to image.
4-6 Book Mark
Recorded image can be bookmarked using the ADD bookmark function.
Bookmark is a way that specific times and dates can be marked for easy retrieval. To do this,
simply click ADD and fill in the description. This will add that exact time, date, and camera of current
image. At any time you can go back to this point by clicking List, and then double click the Date and Time
stamp.
Page 30
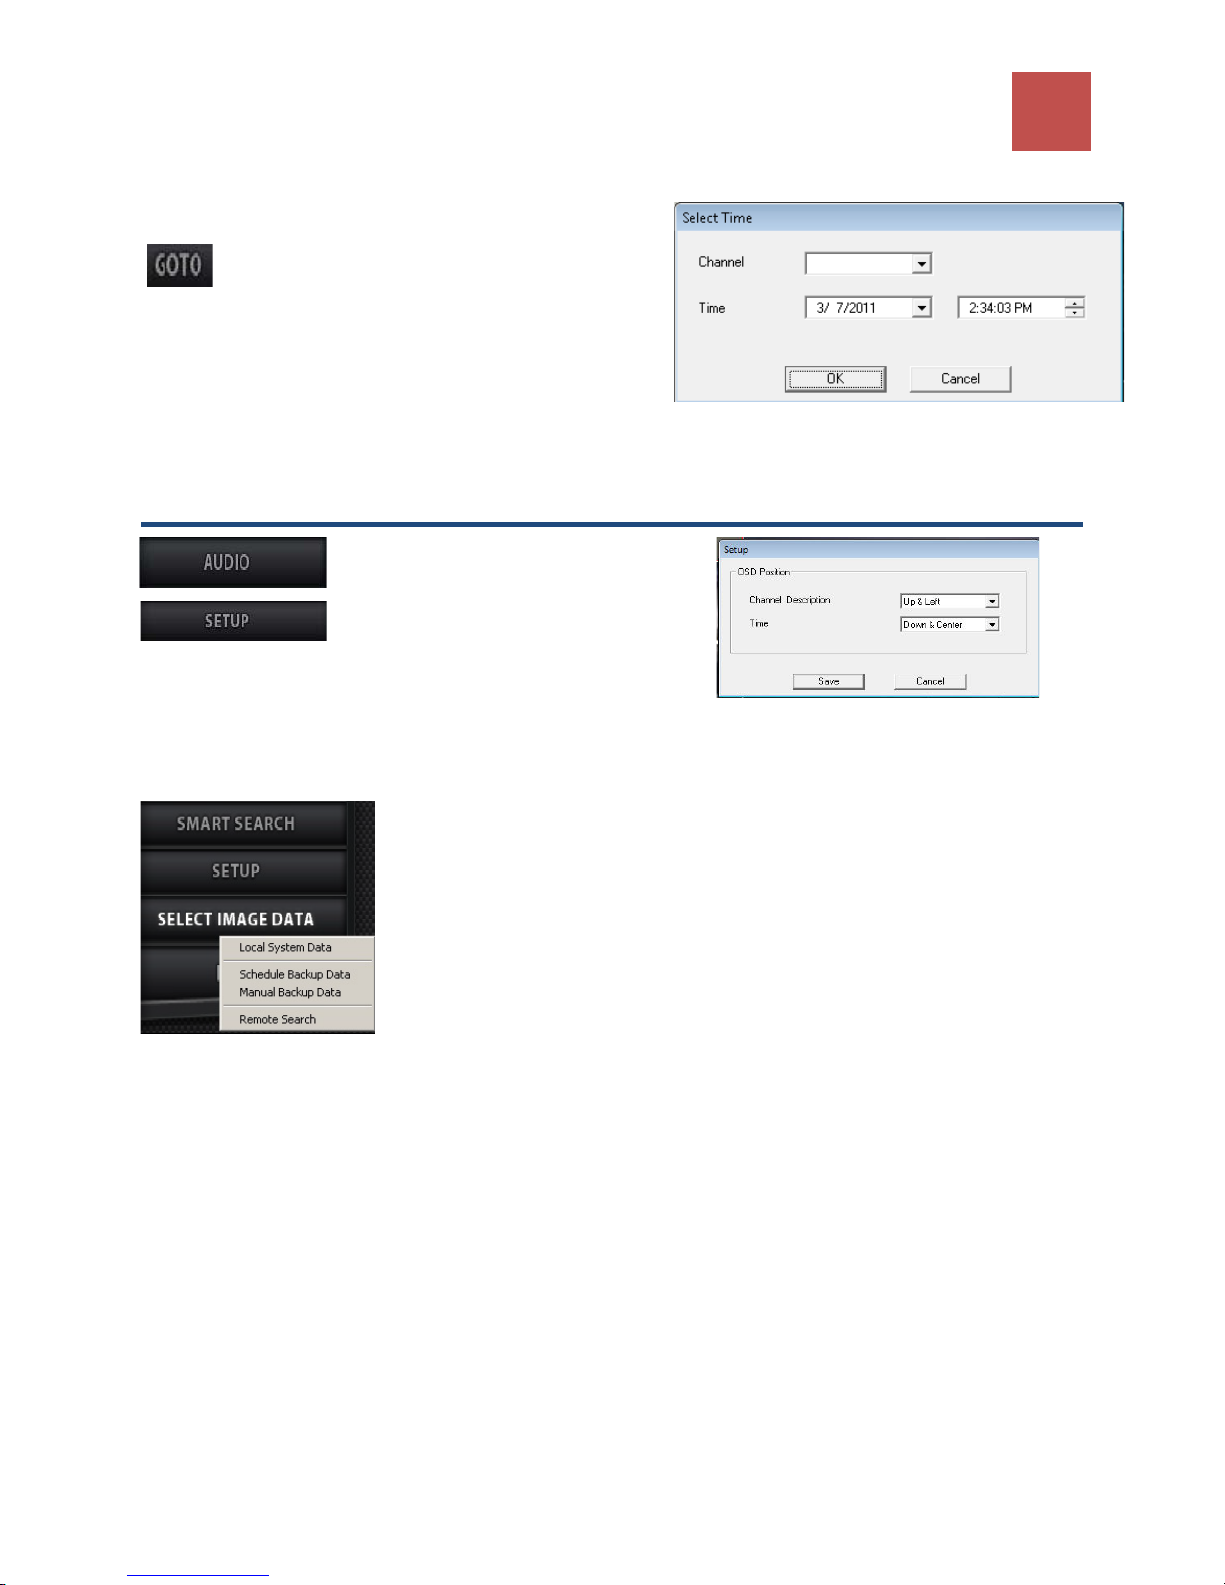
GOTO Function
GOTO function enables user to go to specified
Date and time using following GOTO dialog
box.
The GOTO feature allows user to go to an exact time and
date of a recording. Simply enter the Date, Time, and
Camera, and click the OK button.
4-7 Setting
AUDIO turn ON/OFF
SETUP OSD Position
4. HD DVR FOOTAGE REVIEW
30
SELECT IMAGE DATA
Local System Data: Search data at local system(Default).
Schedule Backup Data: Search data from the scheduled backup folder.
Note: Must disable schedule backup. (See P13)
Manual Backup Data: Search data from the manual backup folder (See P24)
Remote Search: Search data from other system.
Page 31
31
HISCO HD DVR User's Manual
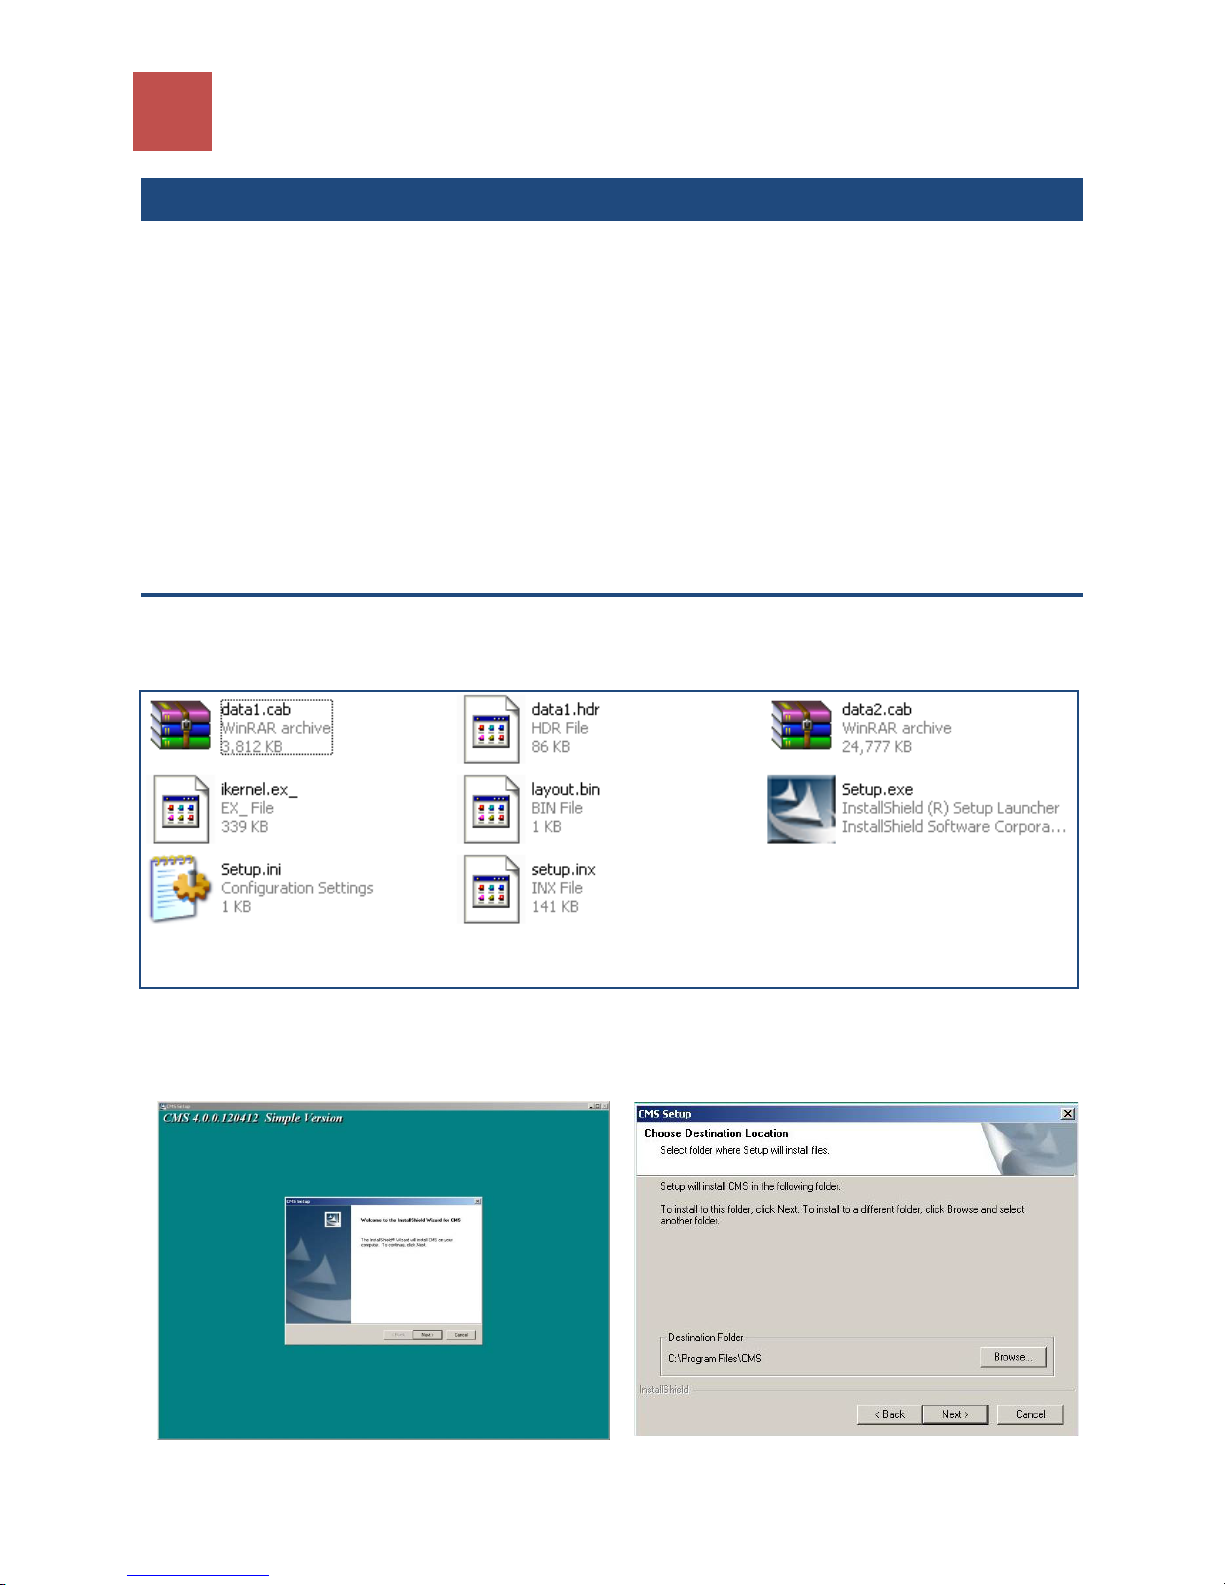
1) Installation program for CMS will launch.
2) Install CMS in default directory and click next
5. Central Management System (CMS)
CMS is the remote management program for the HD DVR system, which is installed on a remote site and
connected to a network.
Major functions are as below:
• Remote monitoring function
• Video retrieval and search function
• Saving onto client local computers (remote location) function
• Remote HD DVR system management function (limited)
• Alarm reception function
5-1 CMS Installation
To install CMS client software double click Setup.exe in the installation folder.
click next to proceed
Page 32
5. Central Management System (CMS)
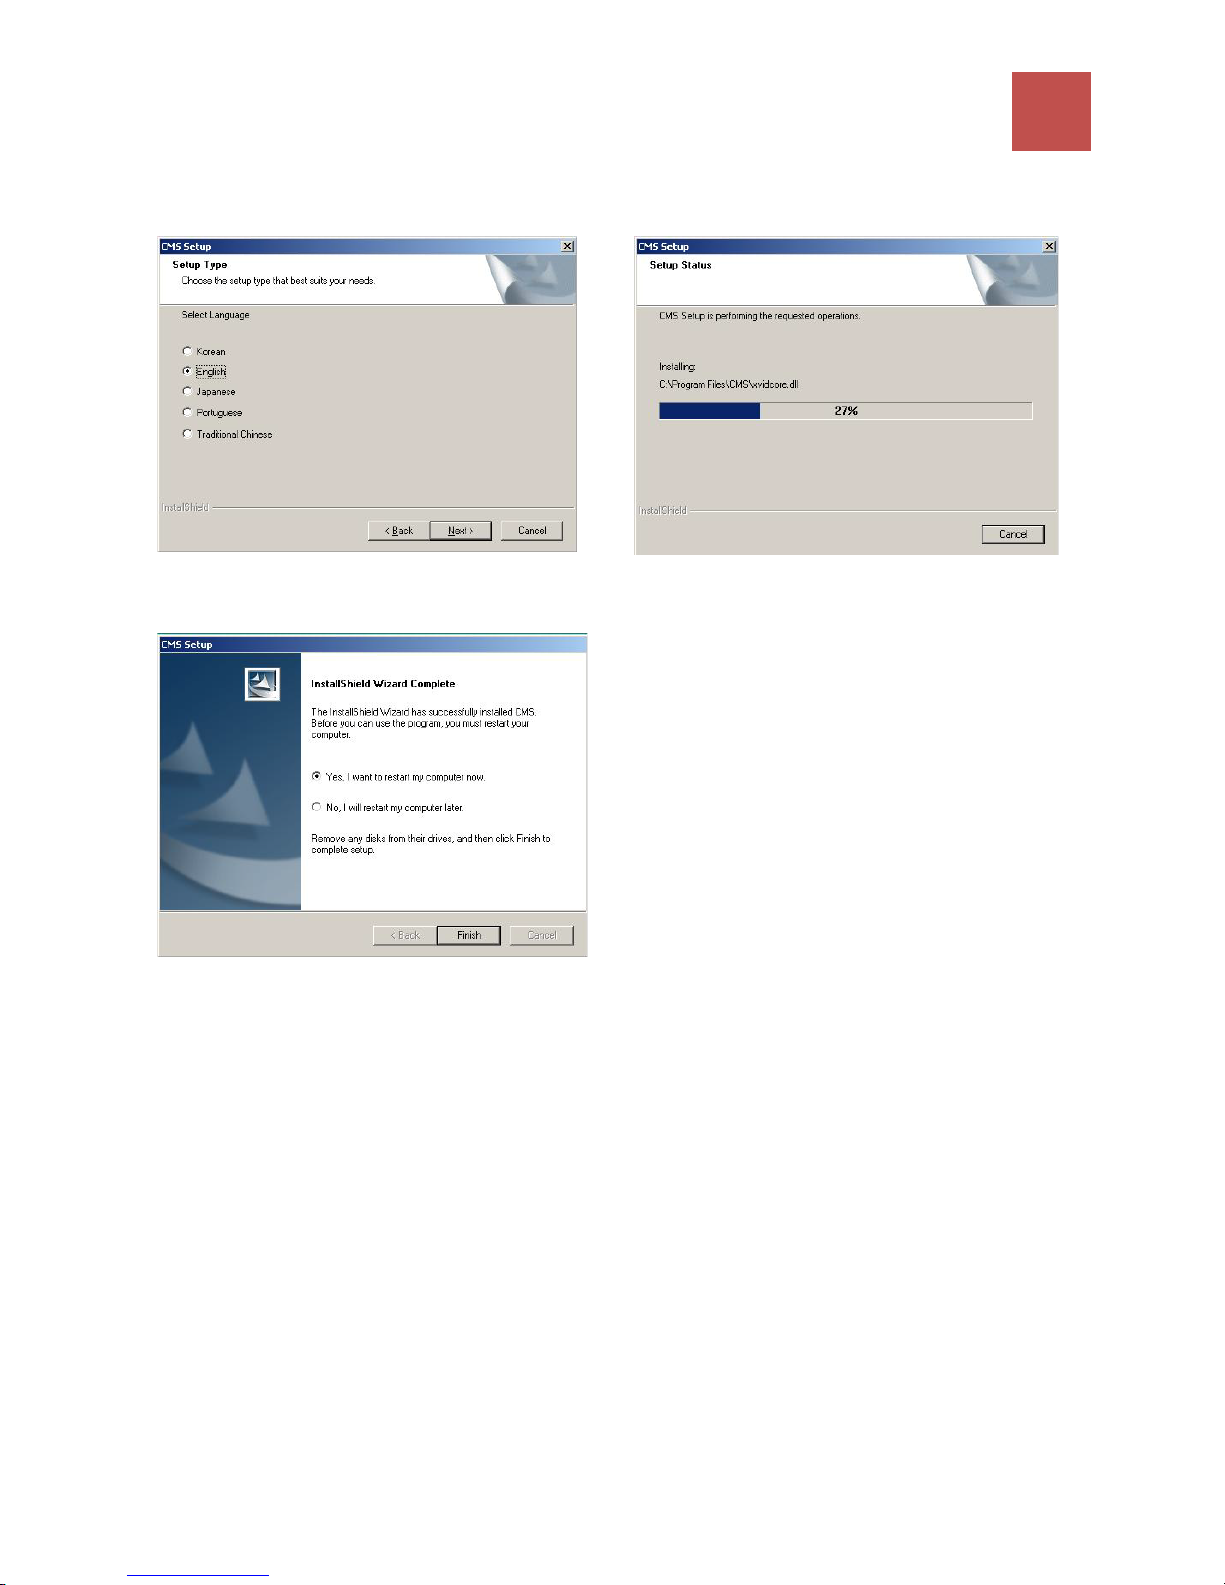
3) Choose English as the language for CMS
4) CMS installation will start and automatically
32
interface.
5) When installation is complete, click Finish to
restart computer
proceed to next step.
Page 33
33
HISCO HD DVR User's Manual
CMS client Uninstall
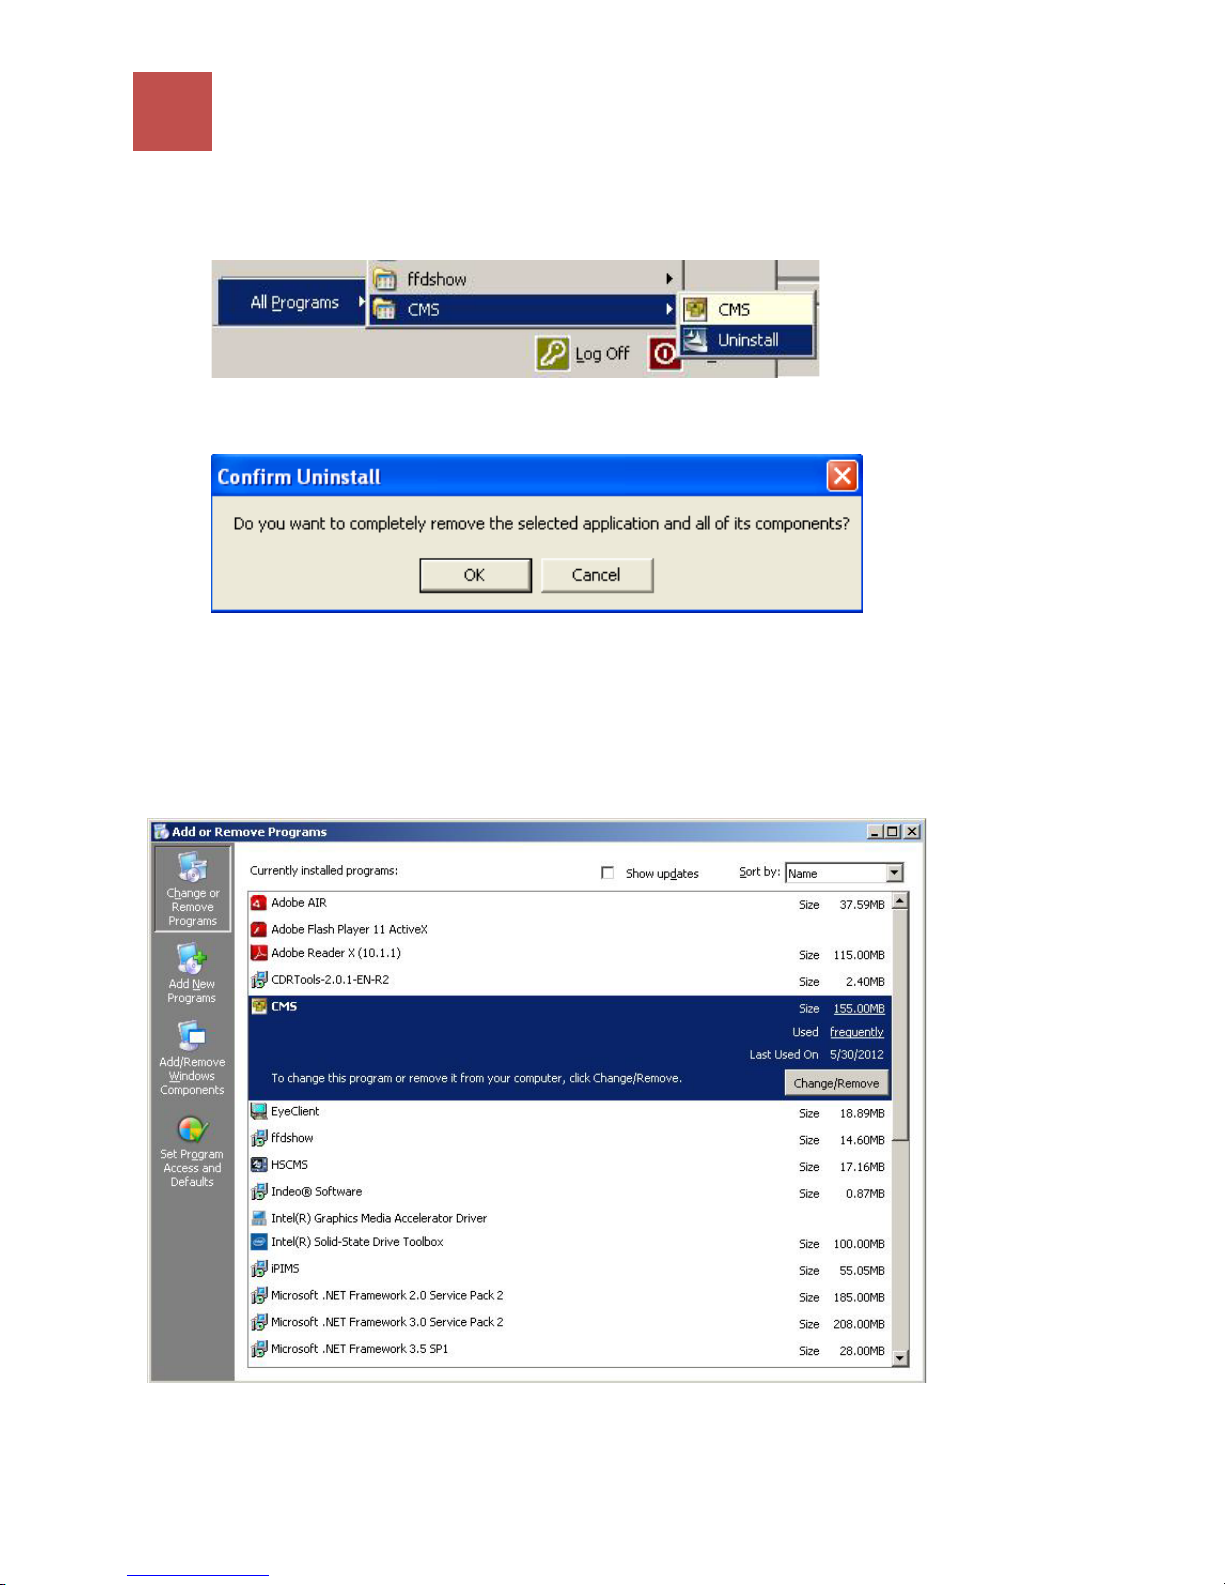
To uninstall CMS Client, click Uninstall and OK to confirm.
1.)
2.)
To Uninstall CMS via Control Panel,
1.) Click Start menu/Control Panel and double click Add or Remove Programs
2.) Click Change/Remove and Ok to confirm Uninstall.
Page 34
5. Central Management System (CMS)
P39
5-2 CMS Main
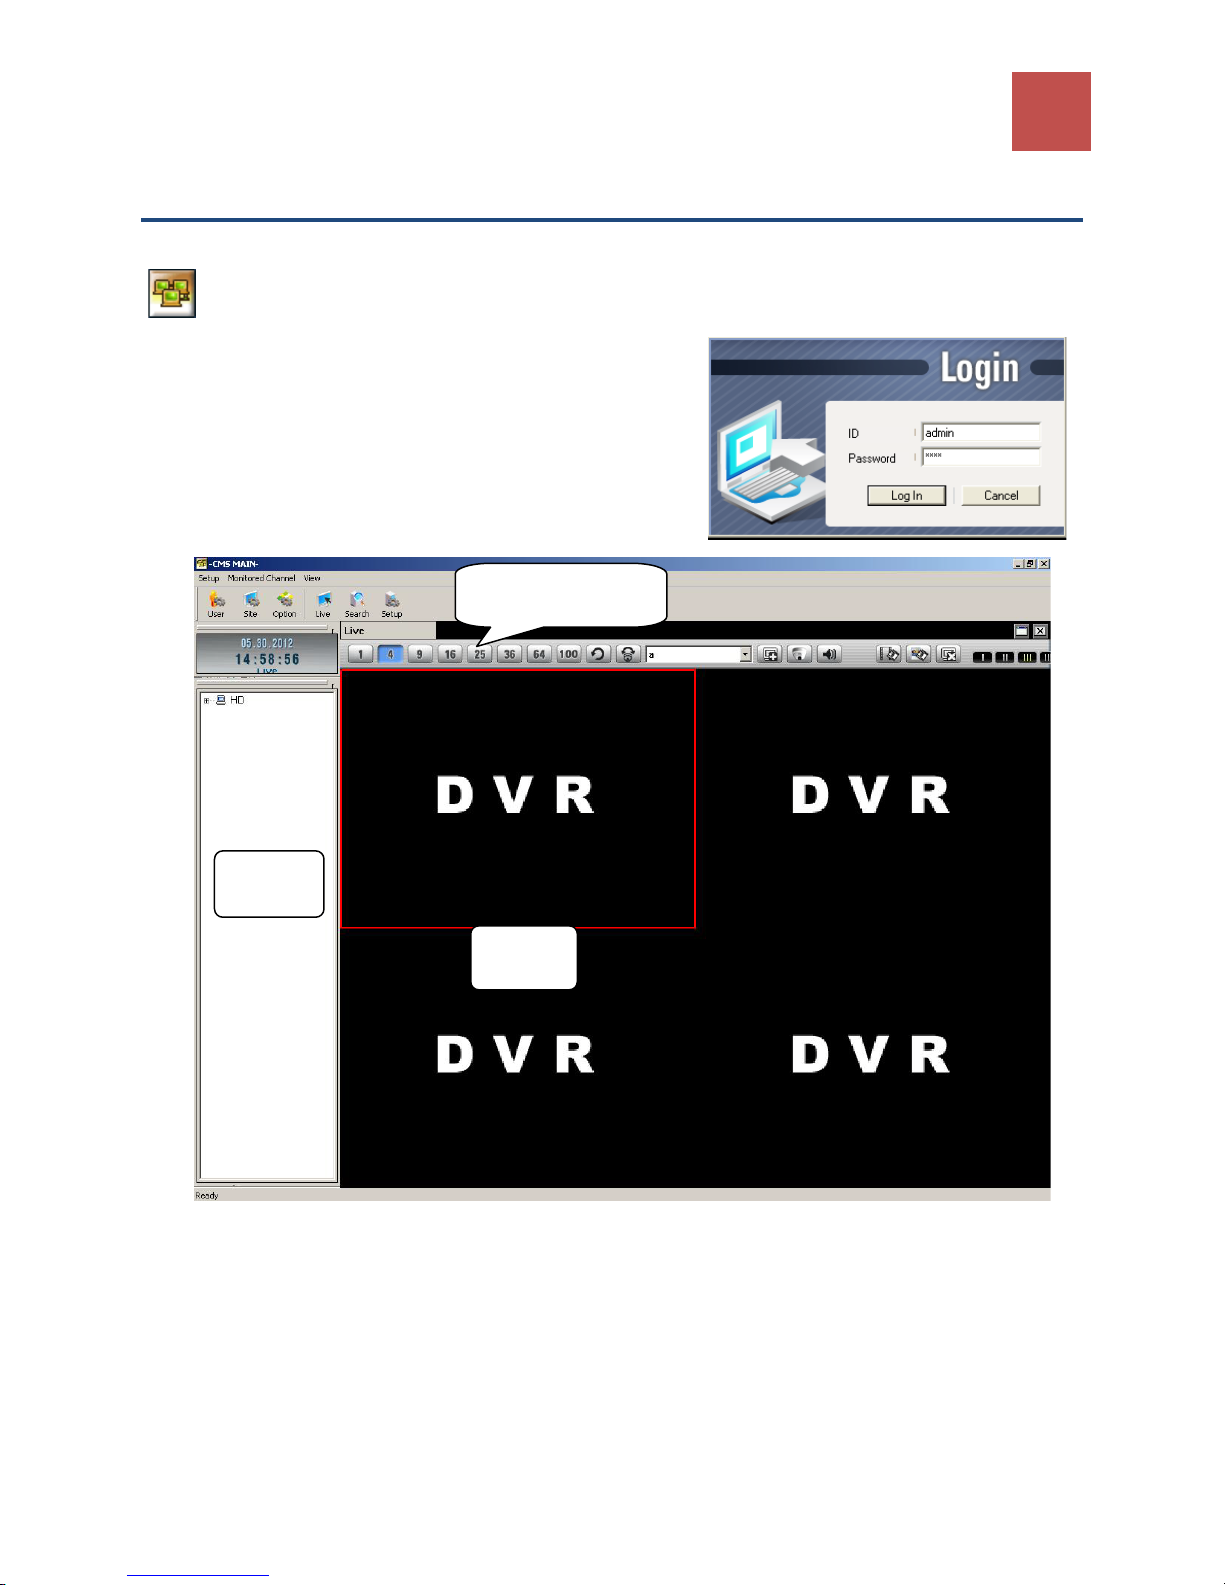
Click on the ‘CMS' icon on the client computer. Client
login screen will appear
Default ID/password is admin/1111
Note: ID/Password is case sensitive
Live View Control bar
34
HD DVR
Site List
Live view
Cameras
Page 35
35
HISCO HD DVR User's Manual
5-3 Client Program setting
Local user account
THIS COMES FIRST
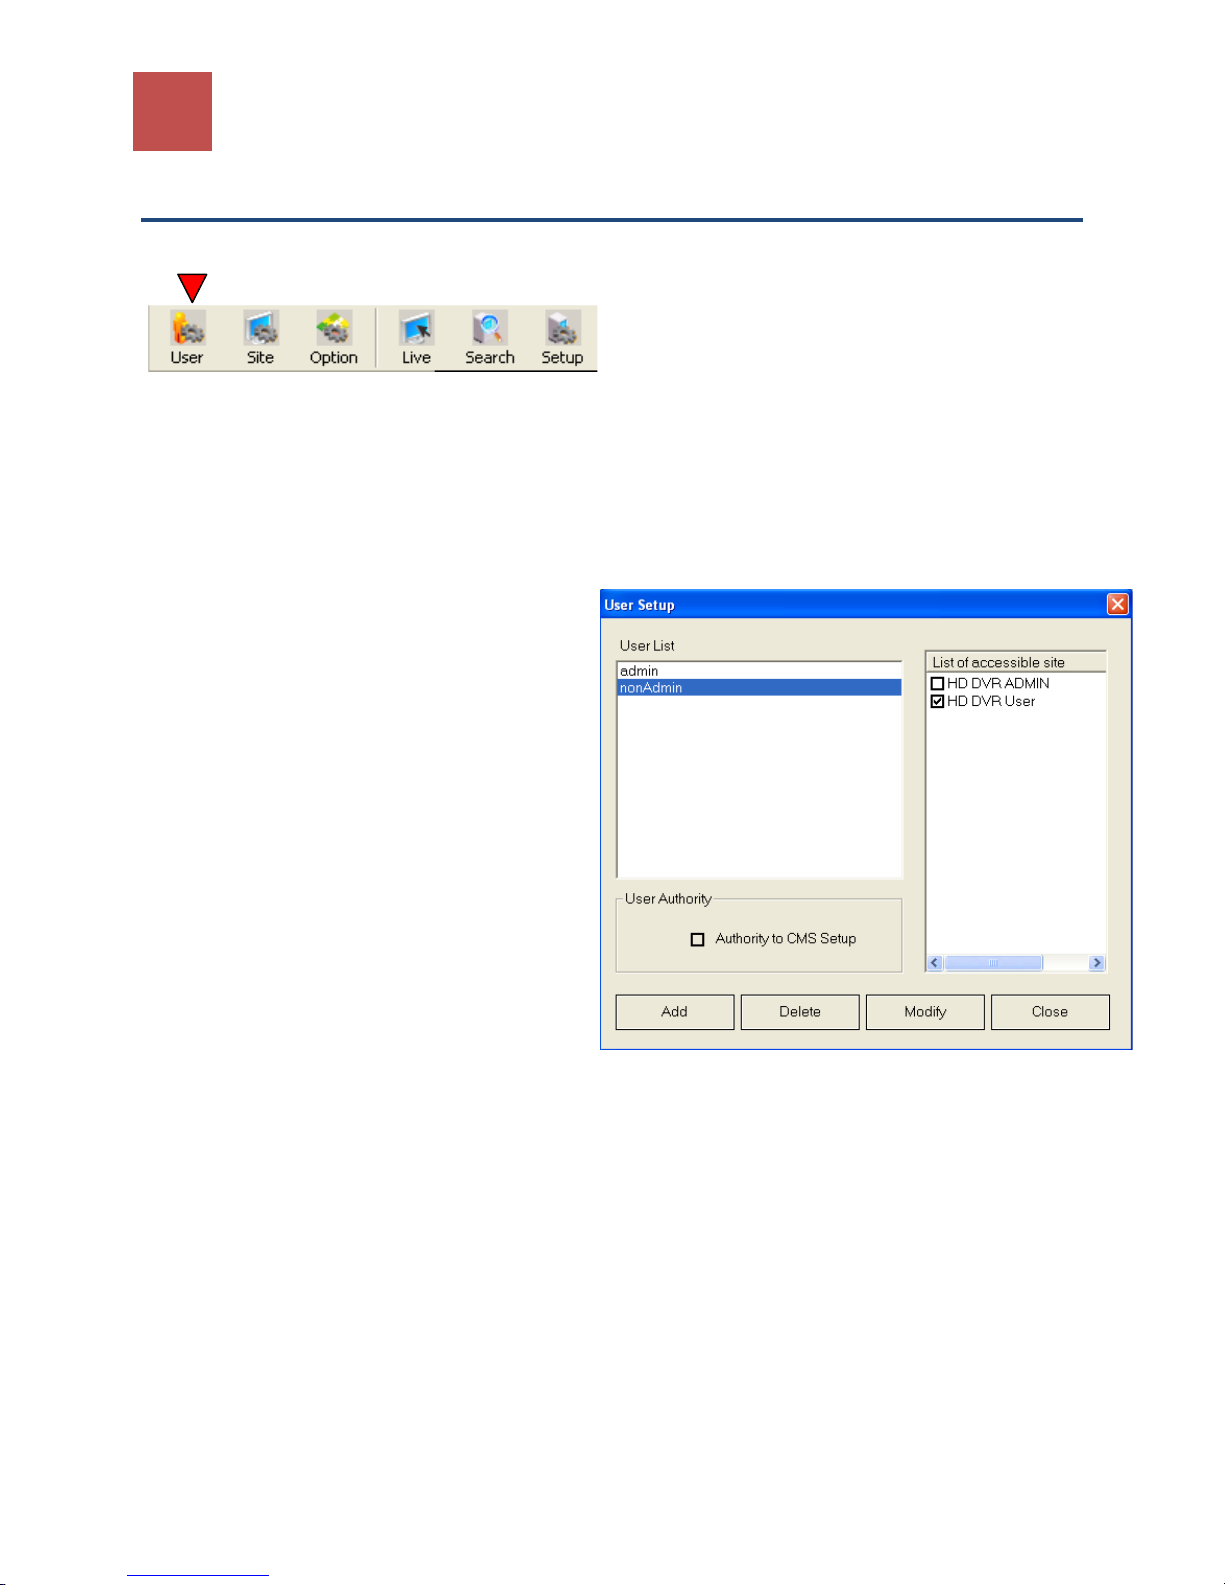
CMS allow user to connect to multiple HD DVR system with one log in ID/password.
Each HD DVR site has different account and password; so HD DVR server can control which content is
accessible by user.
Only admin account has privilege to modify site accessible for each user.
Page 36
5. Central Management System (CMS)
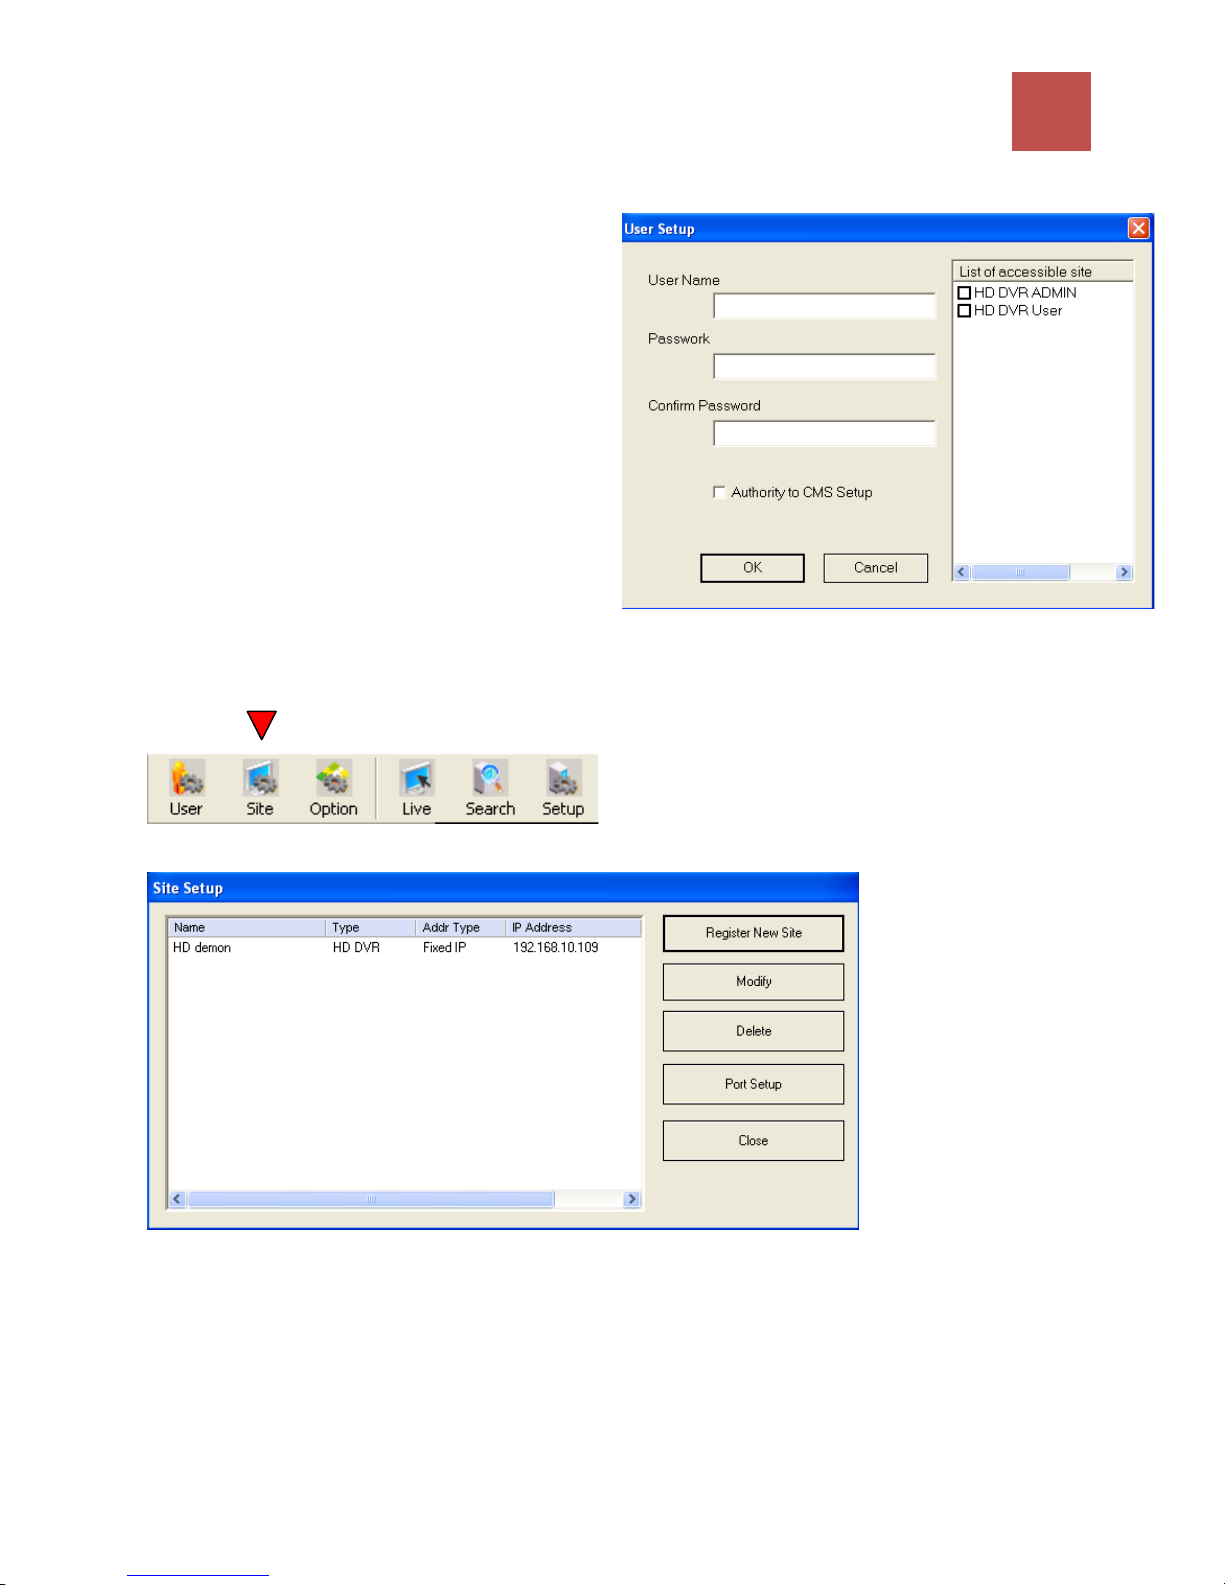
To add user account, log in as admin and click Add in user Setup.
User name: log-in ID
Password: log-in password at CMS start up.
Authority to CMS setup: allow specified user to
change local setting except user set-up
36
Register New Site,
Click on the “Setup” button, the client setting dialog will appear as shown below.
Page 37
37
HISCO HD DVR User's Manual
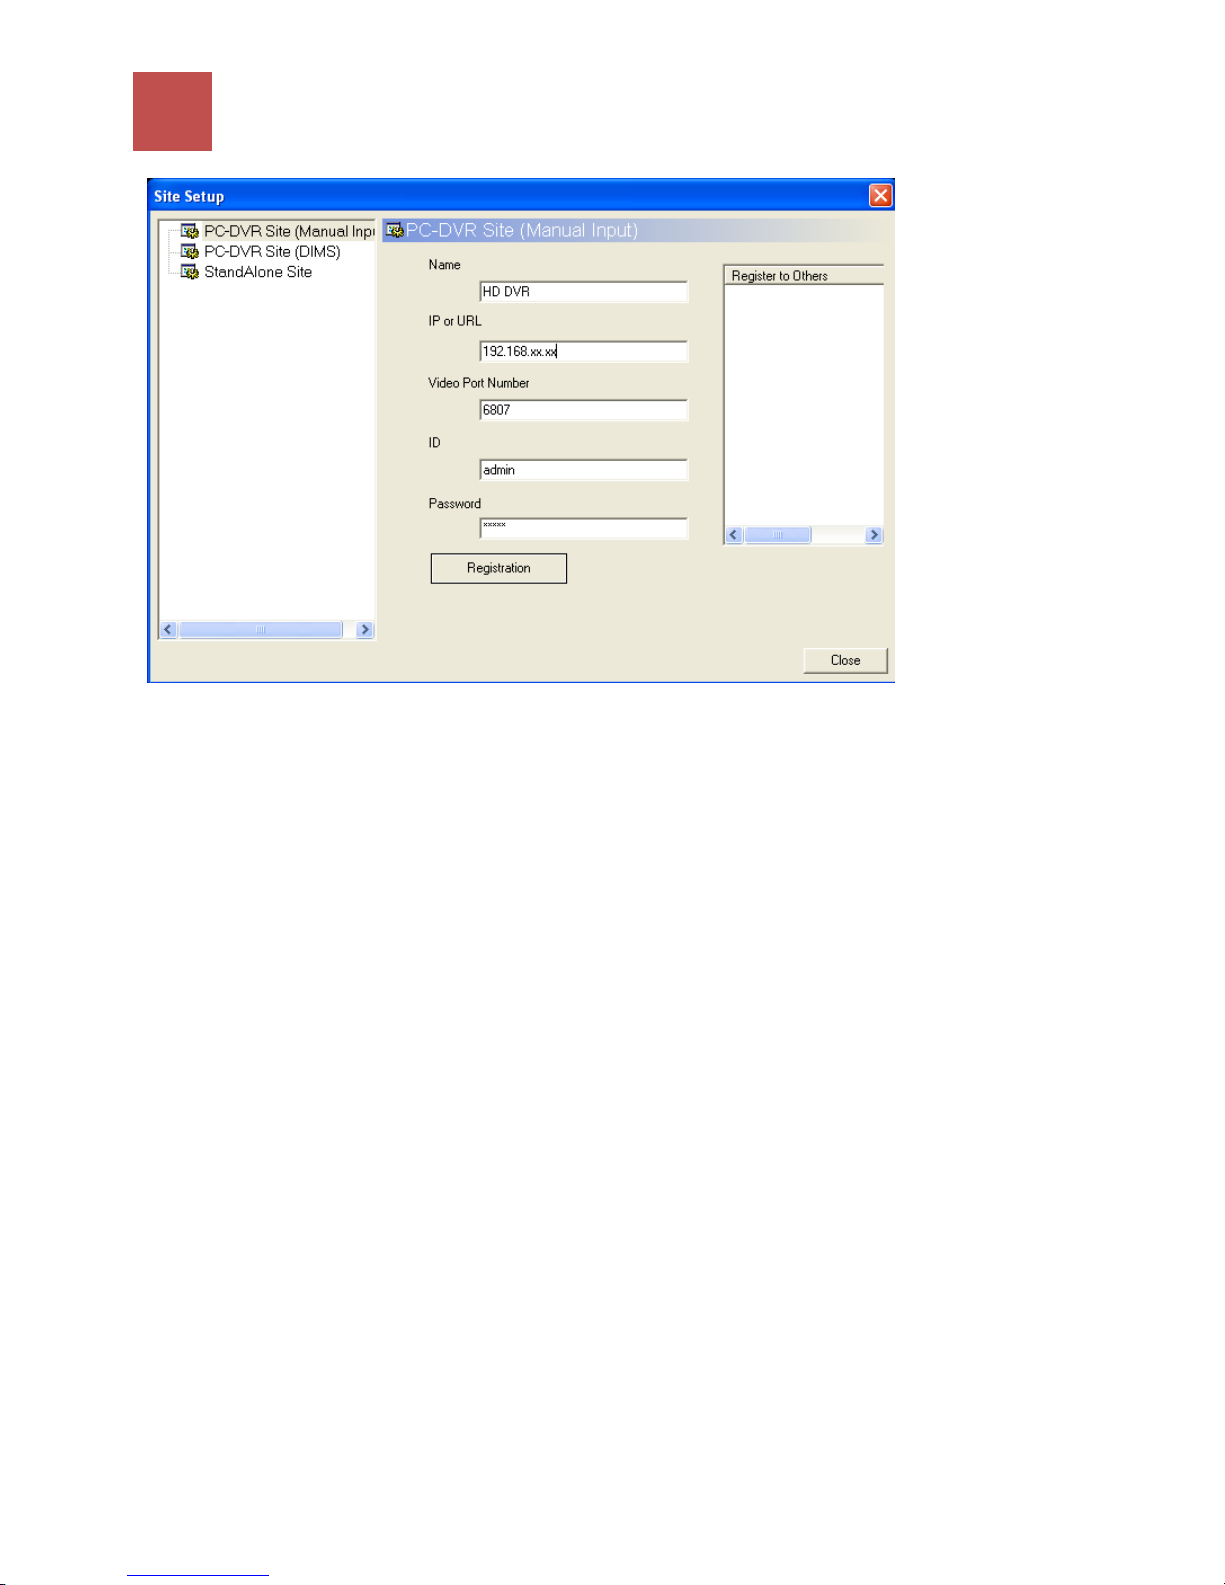
Name: Remote HD DVR ID.
IP or URL: local or public IP address of the HD DVR.
Note: Port forwarding is required for use of public IP address.
Video Port number: default video port is 6807
ID & Password: username and password on HD DVR server with remote access privilege
After inputting information for remote HD DVR server, click Registration to add remote HD DVR. This
information can be edited or deleted using the Modify or Delete button.
Page 38
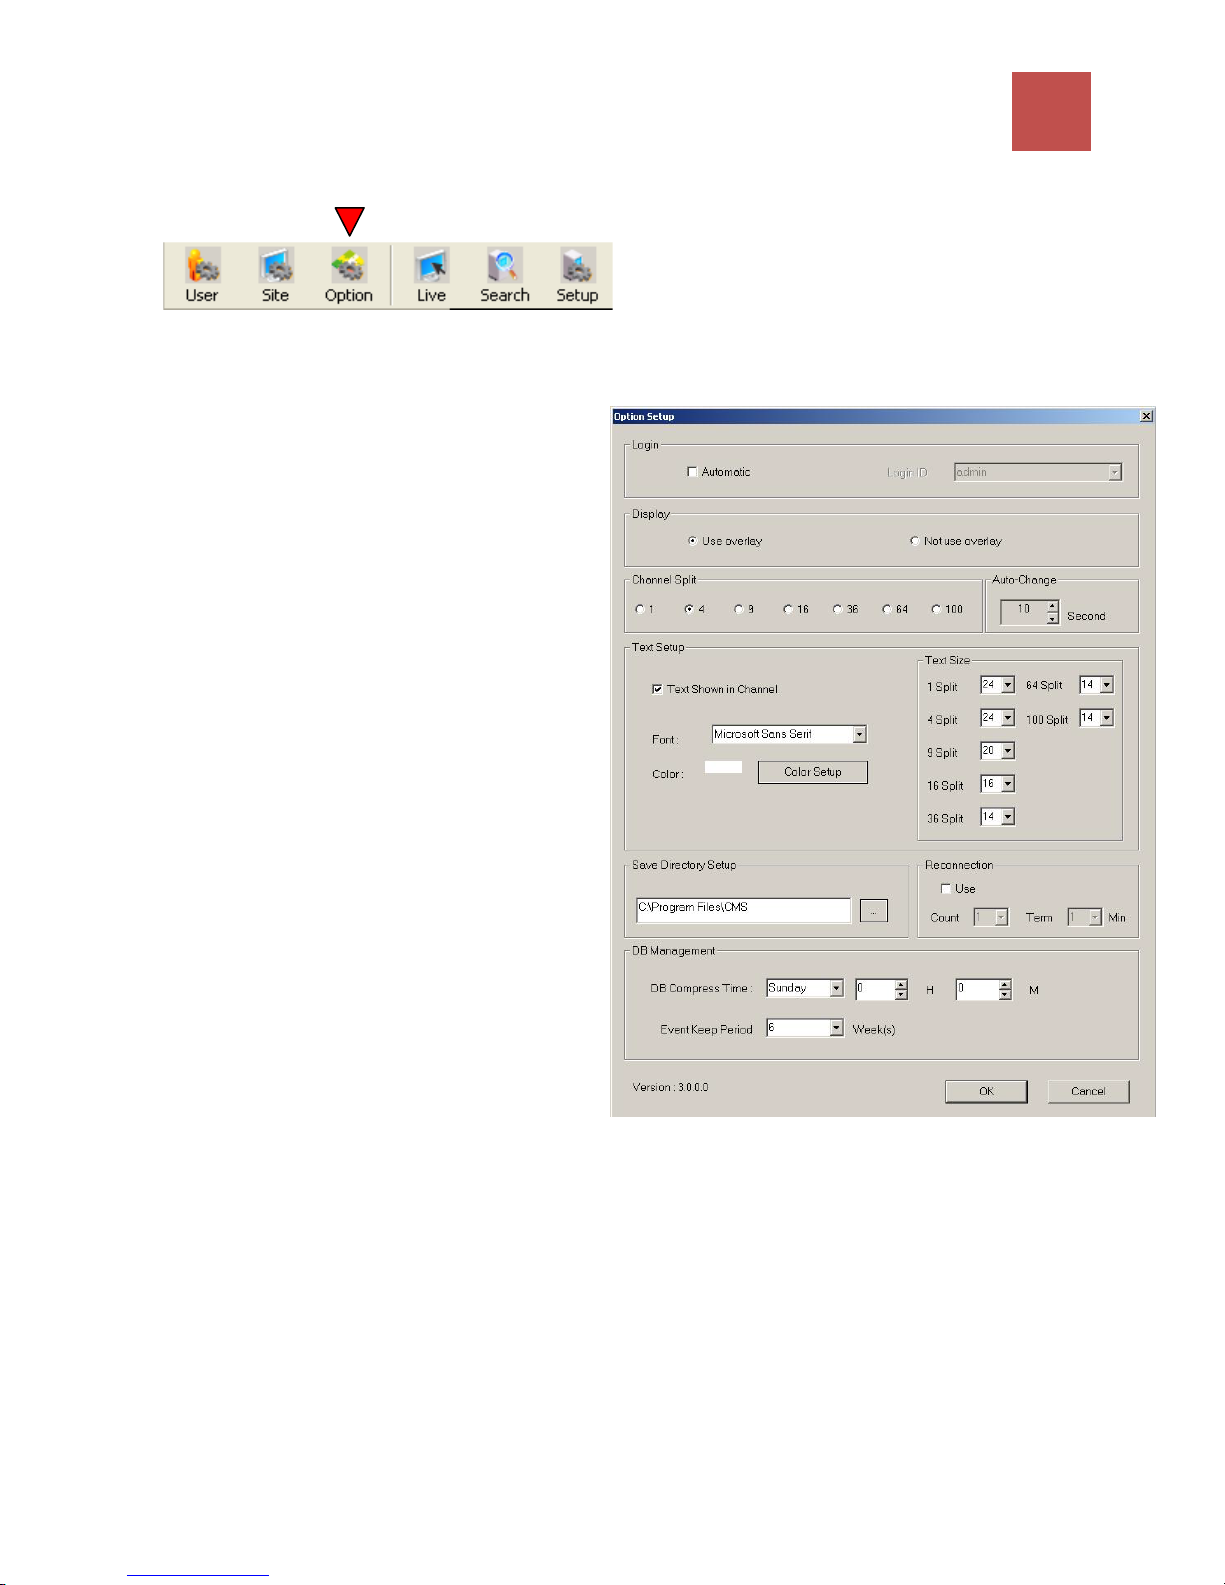
CMS local Setting
Login: set up automatic login when starting CMS
Display:
Channel Split: initial Camera display Mode of the CMS
Text Setup: customizing the text for On-Screen-
if client program is connected to remote HD DVR and no picture for LiveView; disable Overlay use and
restart CMS program.
Display
Save Directory Setup: Specify default directory
for saving files from remote HD DVR.
Reconnection: if DVR server disconnected, CMS
client software will attempt to establish
the connection again according to user
setting.
5. Central Management System (CMS)
38
Page 39
39
HISCO HD DVR User's Manual
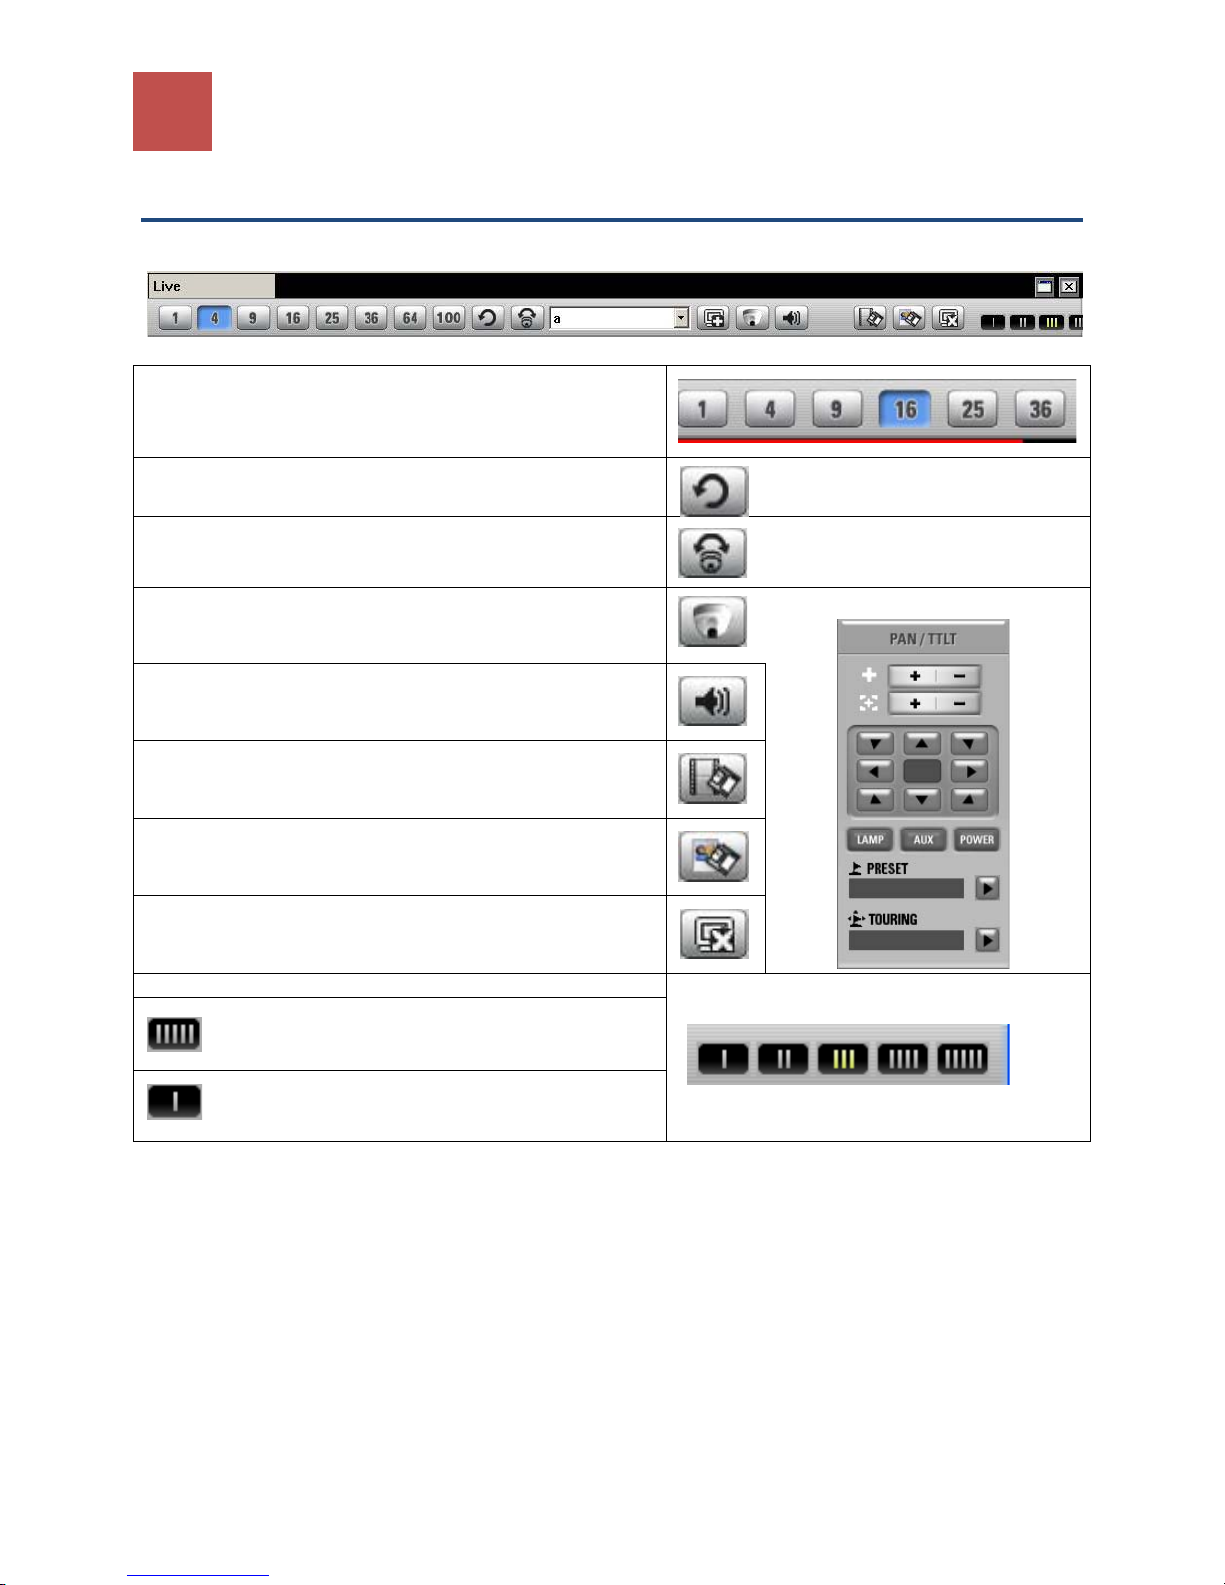
1, 4, 9, 16, 25, 36
User can have up to 36 cameras display live on the
screen.
Manually change display camera to next.
Automatically cycle through camera on live view
PTZ control panel is functional when HD DVR has it enabled
in Setup
CMS user can communicate with HD DVR operator if both
side has audio set up
Save current selected camera in AVI format.
To end video footage clip, click button again.
Save current screen as a image. Click save to confirm.
Disconnect all HD DVR server video streaming.
highest resolution gives the best video quality but
require
more system resources
Lowest resolution uses the least system resource
as it
gives the lowest viewing quality
5-4 Live view Feature
Live view Tool Bar
Split screen:
Display rotation
Auto camera rotation
Pan/Tilt/Zoom camera
Two way audio:
Save .AVI
Snapshot
Disconnect All
Live view Quality
PTZ control panel
Page 40
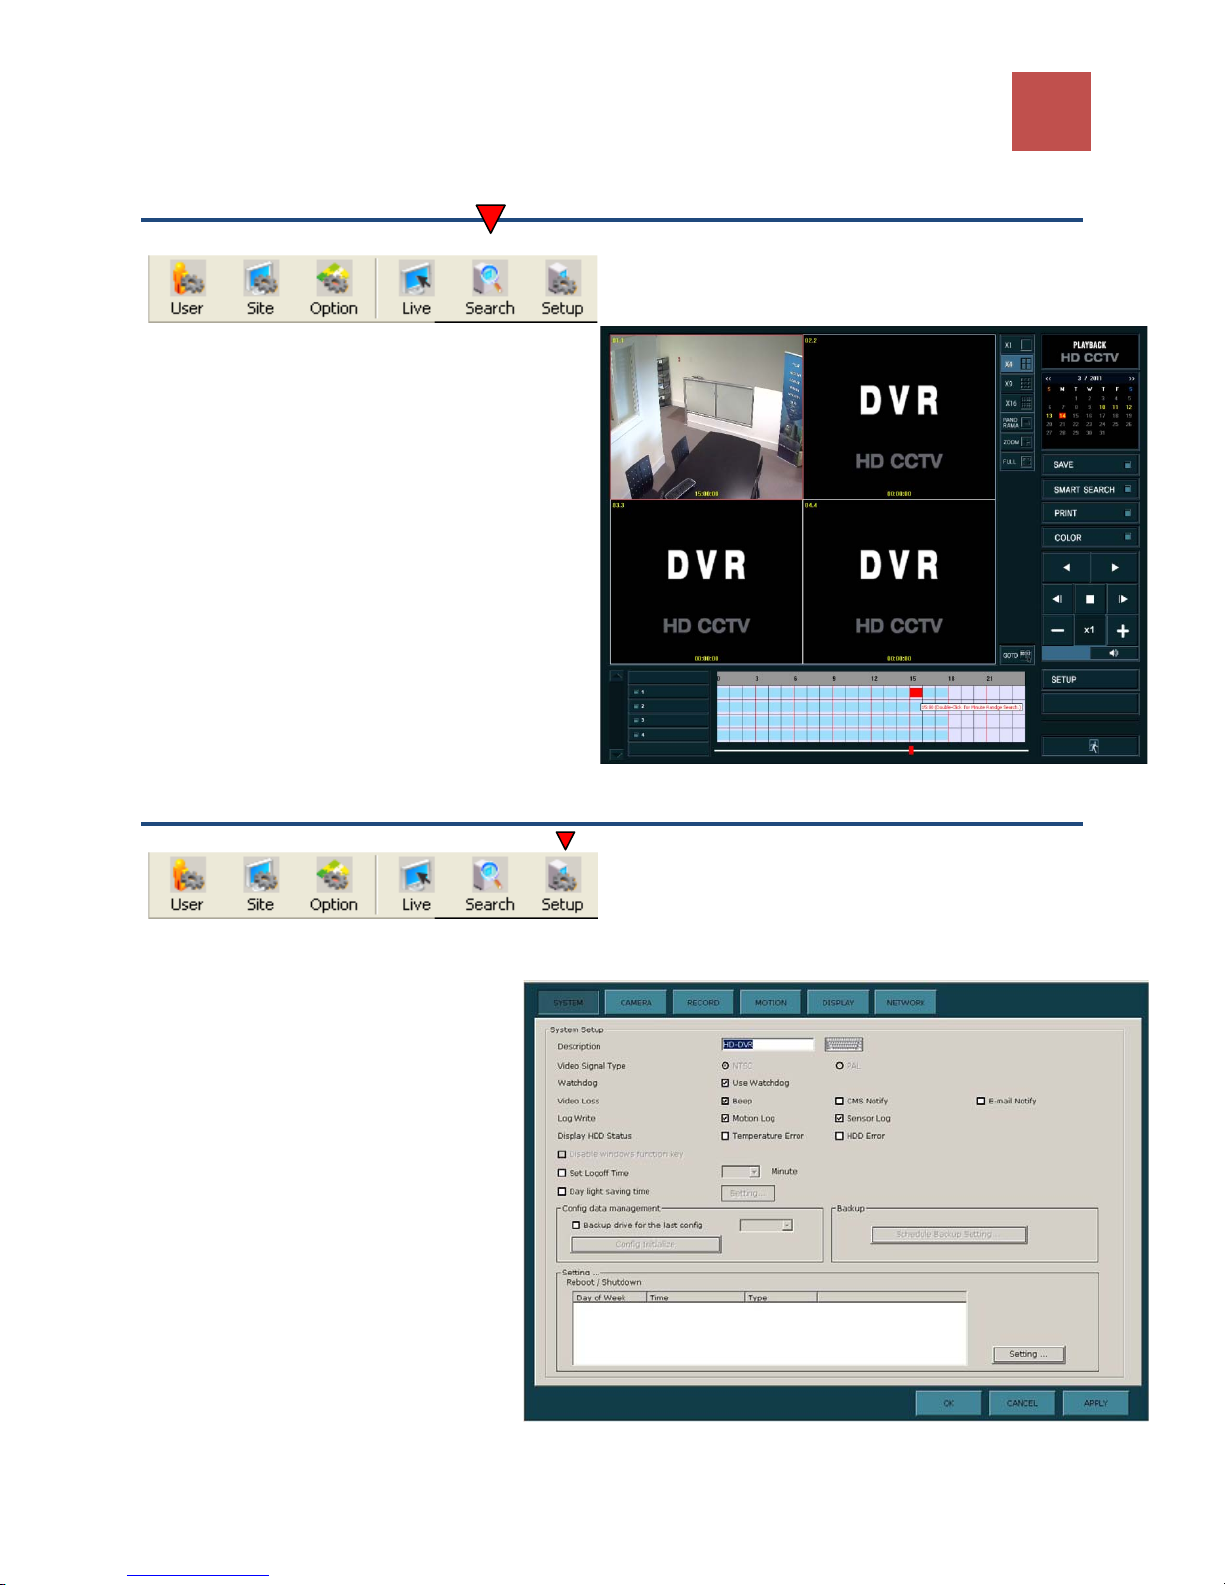
5-5 Remote Search
Click "search" button on the Client Screen.
CMS search offer the same interface as it is on
the HD DVR Server (Page 25).
Note: following function listed below are not
available on CMS client software.
Bookmark
Select Image Data
5. Central Management System (CMS)
40
5-6 Remote HD DVR server Setup
Once connected to remote HD DVR, if you have proper privilege you can manage HD DVR server
remotely.
After logged into CMS client software,
select HD DVR Site and Setup.
Remote Setup offer the same interface
as it is on HD Server (page 12)
Note: option that can't be changed
remotely are grey out; ie/ motion area
setting and user set-up.
Page 41
41
HISCO HD DVR User's Manual
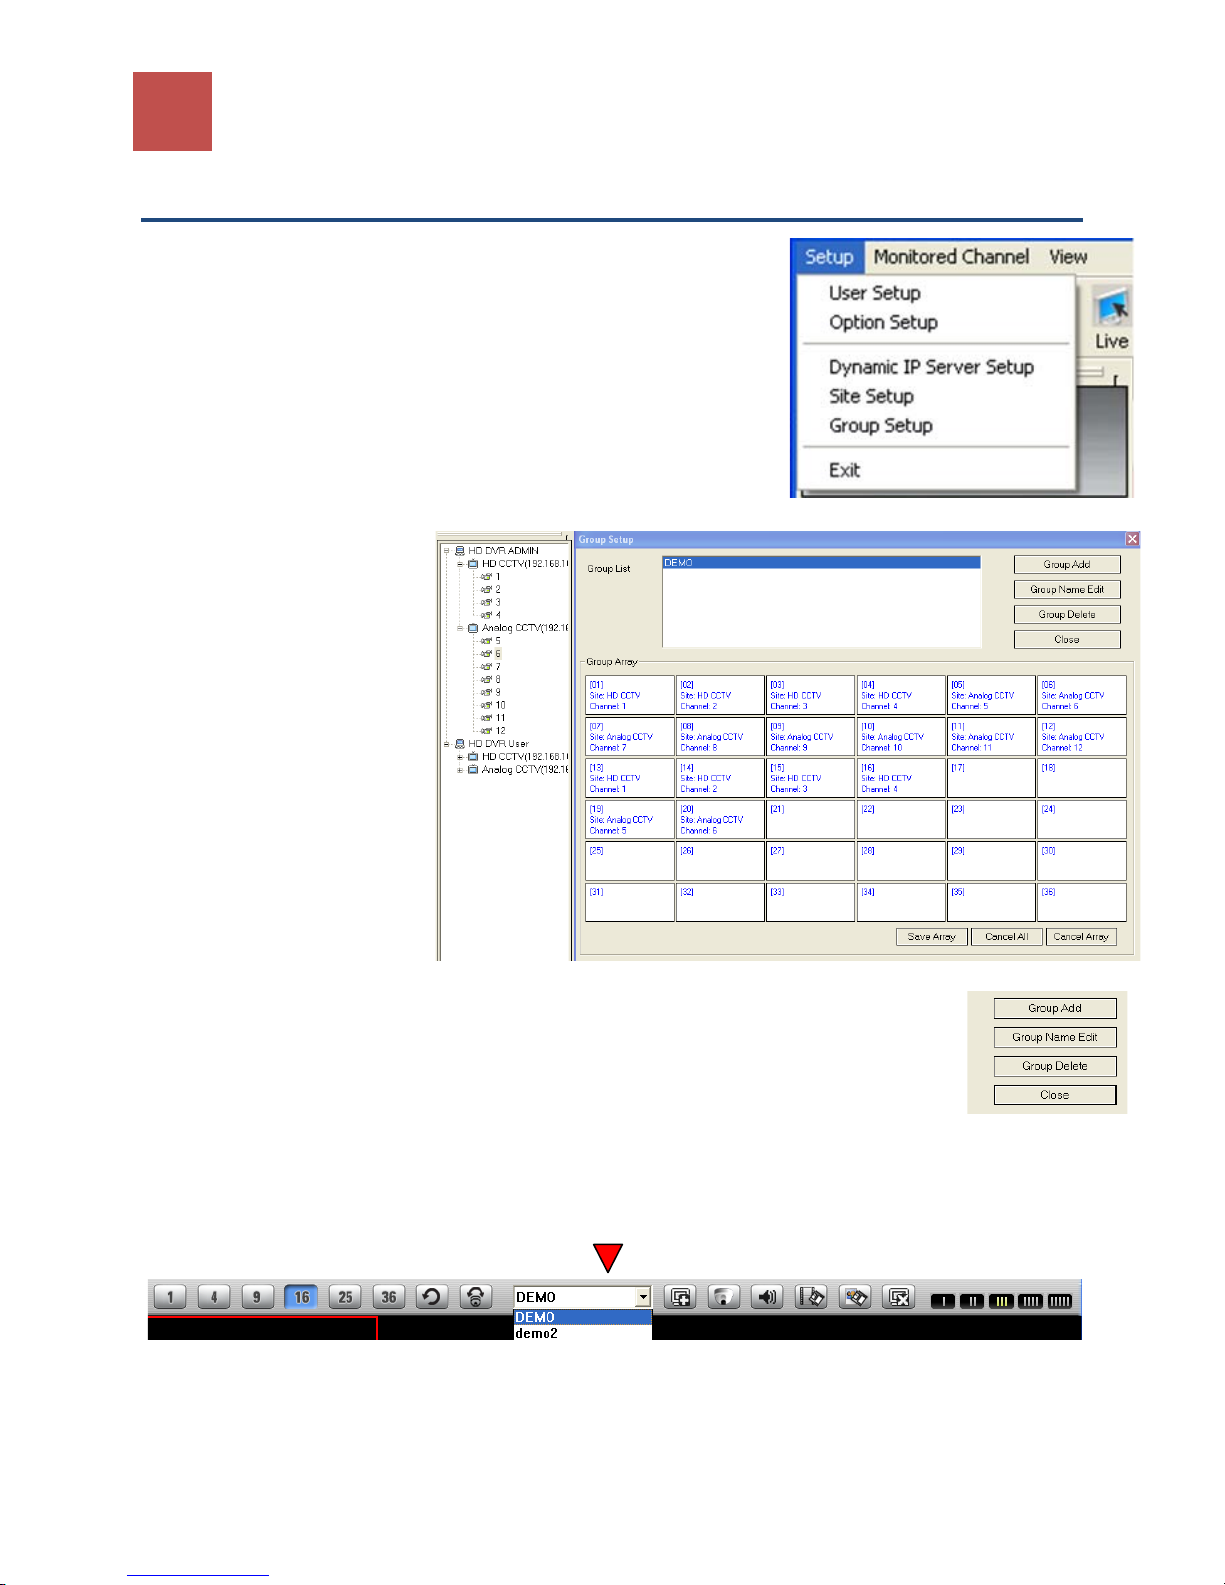
5-7 Camera Group
User can save cameras array from multiple HD DVR system as a group.
Group setup
Click on setup in the menu bar at the top, and select Group Setup.
The Group Setup window is shown below.
Click Group Add to create new camera group.
To modify or delete group, select group name and click "Group Name Edit" or "Group Delete"
Drag and drop camera from different HD DVR in the Group Array from the Site list
of the CMS main screen.
Click Save Array to keep the changes and then click close to exit out of Group setup.
Connect to Camera Group
Click on the Camera group shortcut to display the list of Groups name from the drop down menu.
Select the proper camera group and click yes to confirmation for connection.
Page 42
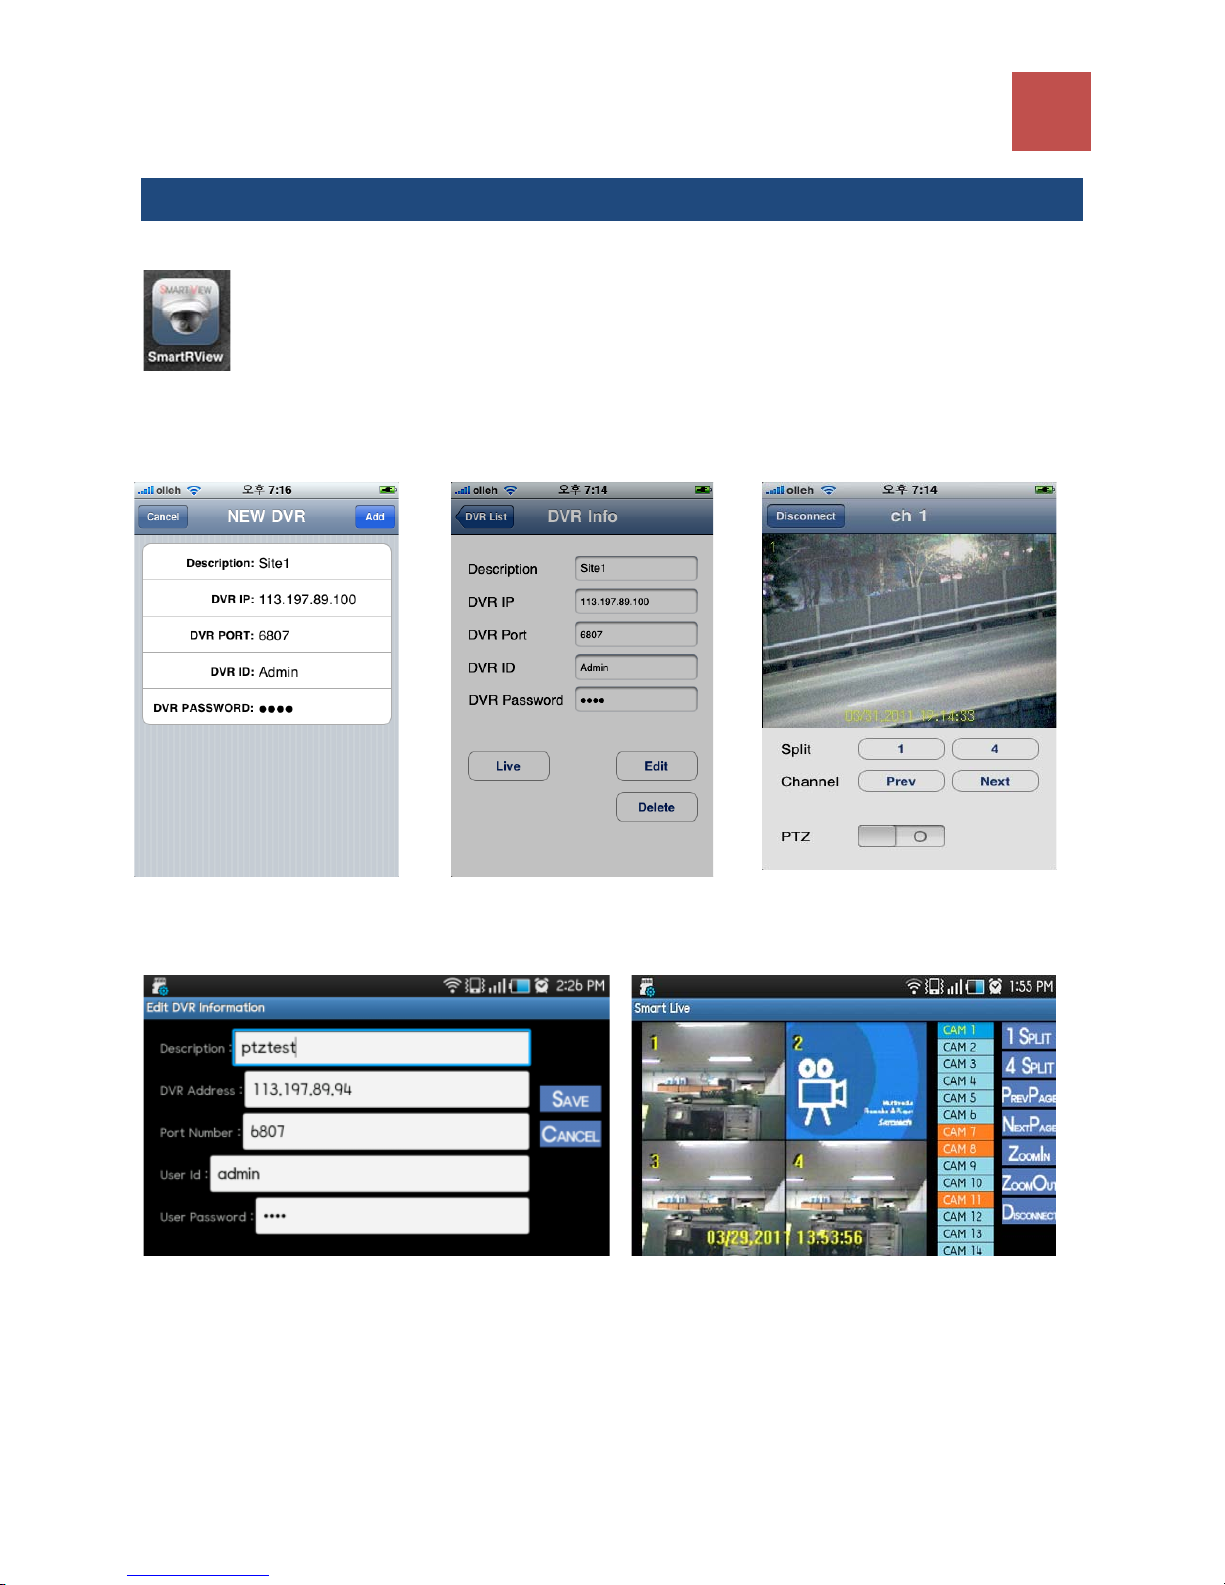
6. iPhone/SmartPhone (Smartview)
1. Access to the App store and search
2. Search and Install “Smartview”
3. Add and Save New DVR info
4. Access DVR
iPhone
6. iPhone/SmartPhone (Smartview)
42
SmartPhone(Android)
 Loading...