

Page 1

Redundanz L2B
Release 5.0 04/09
Technische Unterstützung
User Manual
Redundancy Configuration
Industrial ETHERNET Switch
RS20
Page 2

The naming of copyrighted trademarks in this manual, even when not specially indicated, should
not be taken to mean that these names may be considered as free in the sense of the trademark
and tradename protection law and hence that they may be freely used by anyone.
© 2009 Hirschmann Automation and Control GmbH
Manuals and software are protected by copyright. All rights reserved. The copying, reproduction,
translation, conversion into any electronic medium or machine scannable form is not permitted,
either in whole or in part. An exception is the preparation of a backup copy of the software for
your own use. For devices with embedded software, the end-user license agreement on the enclosed CD applies.
The performance features described here are binding only if they have been expressly guaranteed in the contract. This publication has been created by Hirschmann Automation and Control
GmbH according to the best of our knowledge. Hirschmann reserves the right to change the contents of this manual without prior notice. Hirschmann can give no guarantee in respect of the
correctness or accuracy of the details in this publication.
Hirschmann can accept no responsibility for damages, resulting from the use of the network
components or the associated operating software. In addition, we refer to the conditions of use
specified in the license contract.
Printed in Germany
Hirschmann Automation and Control GmbH
Stuttgarter Str. 45-51
72654 Neckartenzlingen
Germany
Tel.: +49 1805 141538
Rel. 5.0-01-0409 – 23.4.09
Page 3

Content
Redundanz L3P+
Release 5.0 04/09
3
Content
Content 3
About this Manual 5
Key 6
1 Introduction 9
1.1 Overview of Redundancy Procedure 10
2 Ring Redundancy 11
2.1 Example of HIPER-Ring 13
2.1.1 Setting up and configuring the HIPER-Ring 15
2.2 Example of MRP-Ring 17
A Readers’ comments 21
B Index 23
C Further support 25
Page 4

Content
4
Redundanz L3P+
Release 5.0 04/09
Page 5

About this Manual
Redundanz L2B
Release 5.0 04/09
5
About this Manual
The “Redundancy Configuration” user manual contains all the information
you need to select a suitable redundancy procedure and configure it.
The “Basic Configuration” user manual contains all the information you need
to start operating the device. It takes you step by step from the first startup
operation through to the basic settings for operation in your environment.
The “Installation” user manual contains a device description, safety instructions, a description of the display, and all the other information that you need
to install the device before you begin with the configuration of the device.
The "Web-based Interface" reference manual contains detailed information
on using the Web interface to operate the individual functions of the device.
The "Command Line Interface" reference manual contains detailed information on using the Command Line Interface to operate the individual functions
of the device.
The Network Management Software HiVision/Industrial HiVision provides
you with additional options for smooth configuration and monitoring:
X Configuration of multiple devices simultaneously.
X Graphical interface with network layouts.
X Auto-topology discovery.
X Event log.
X Event handling.
X Client / Server structure.
X Browser interface
X ActiveX control for SCADA integration
X SNMP/OPC gateway
Page 6
Key
6
Redundanz L2B
Release 5.0 04/09
Key
The designations used in this manual have the following meanings:
Symbols used:
X List
Work step
Subheading
Link Indicates a cross-reference with a stored link
Note: A note emphasizes an important fact or draws your
attention to a dependency.
Courier ASCII representation in user interface
Execution in the Web-based Interface user interface
Execution in the Command Line Interface user interface
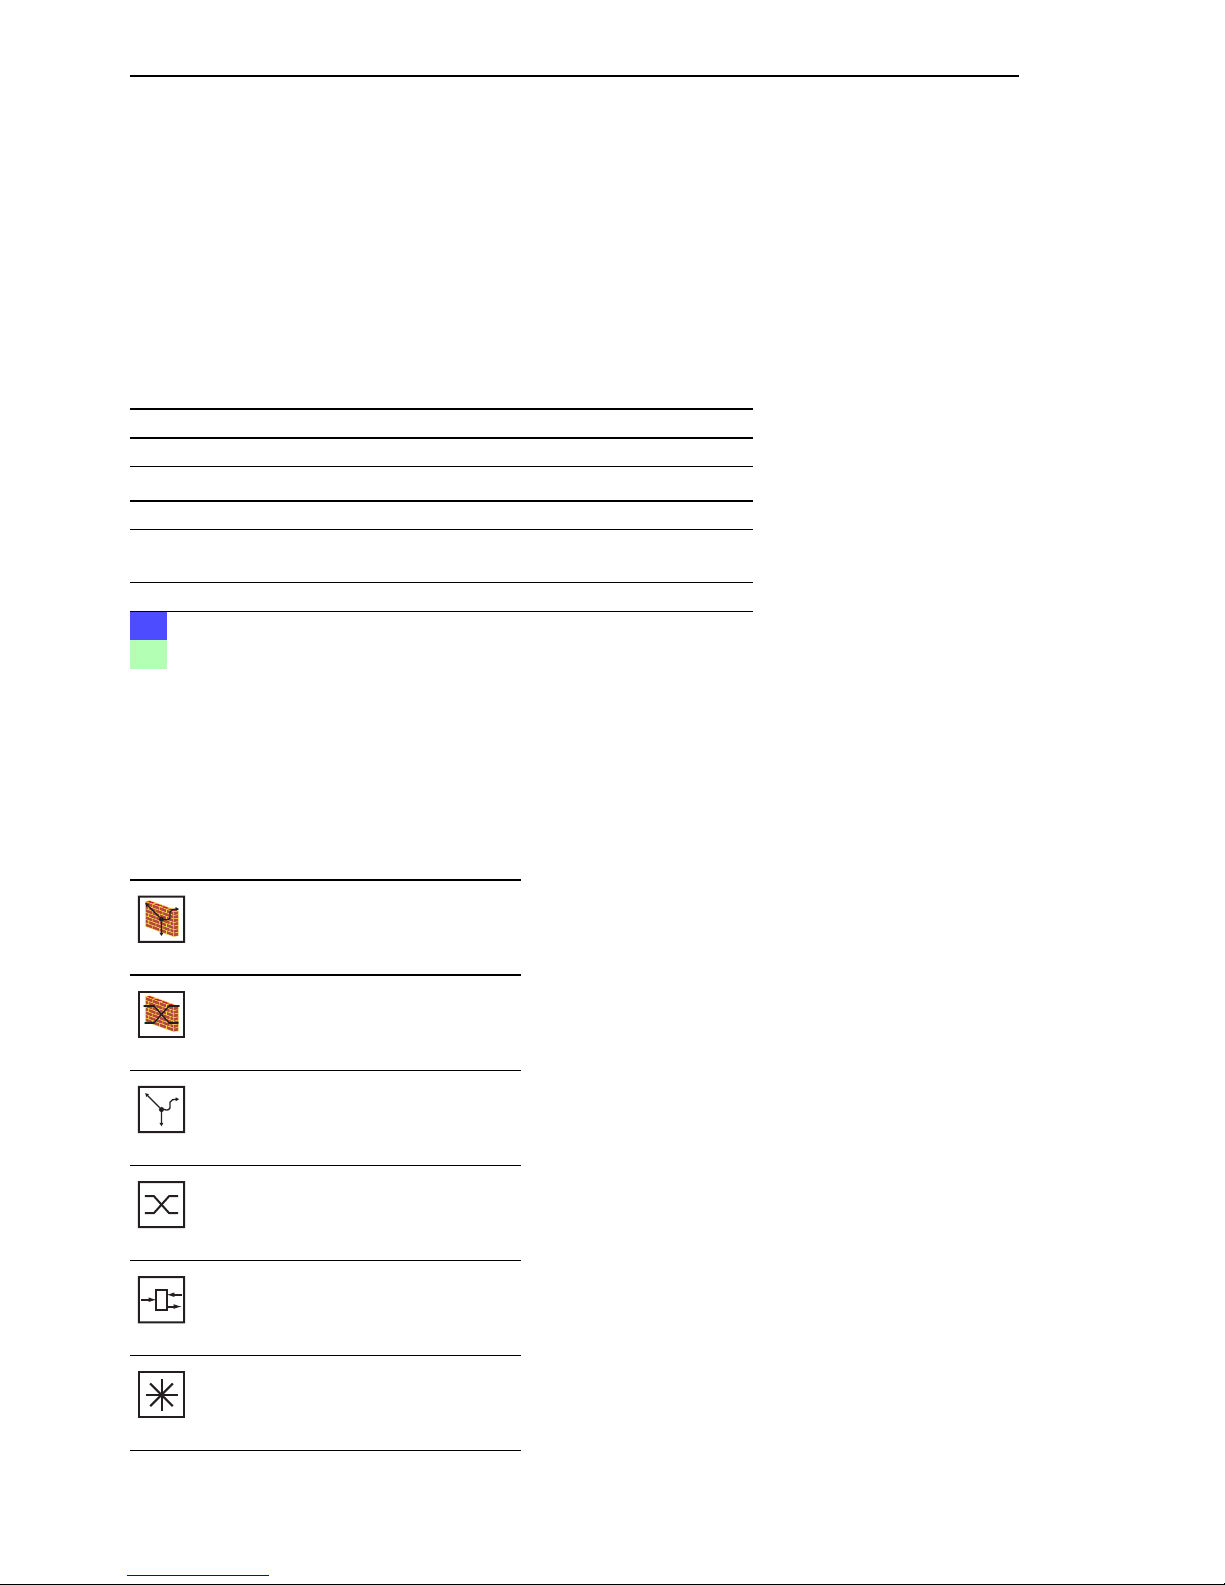
Router with firewall
Switch with firewall
Router
Switch
Bridge
Hub
Page 7
Key
Redundanz L2B
Release 5.0 04/09
7
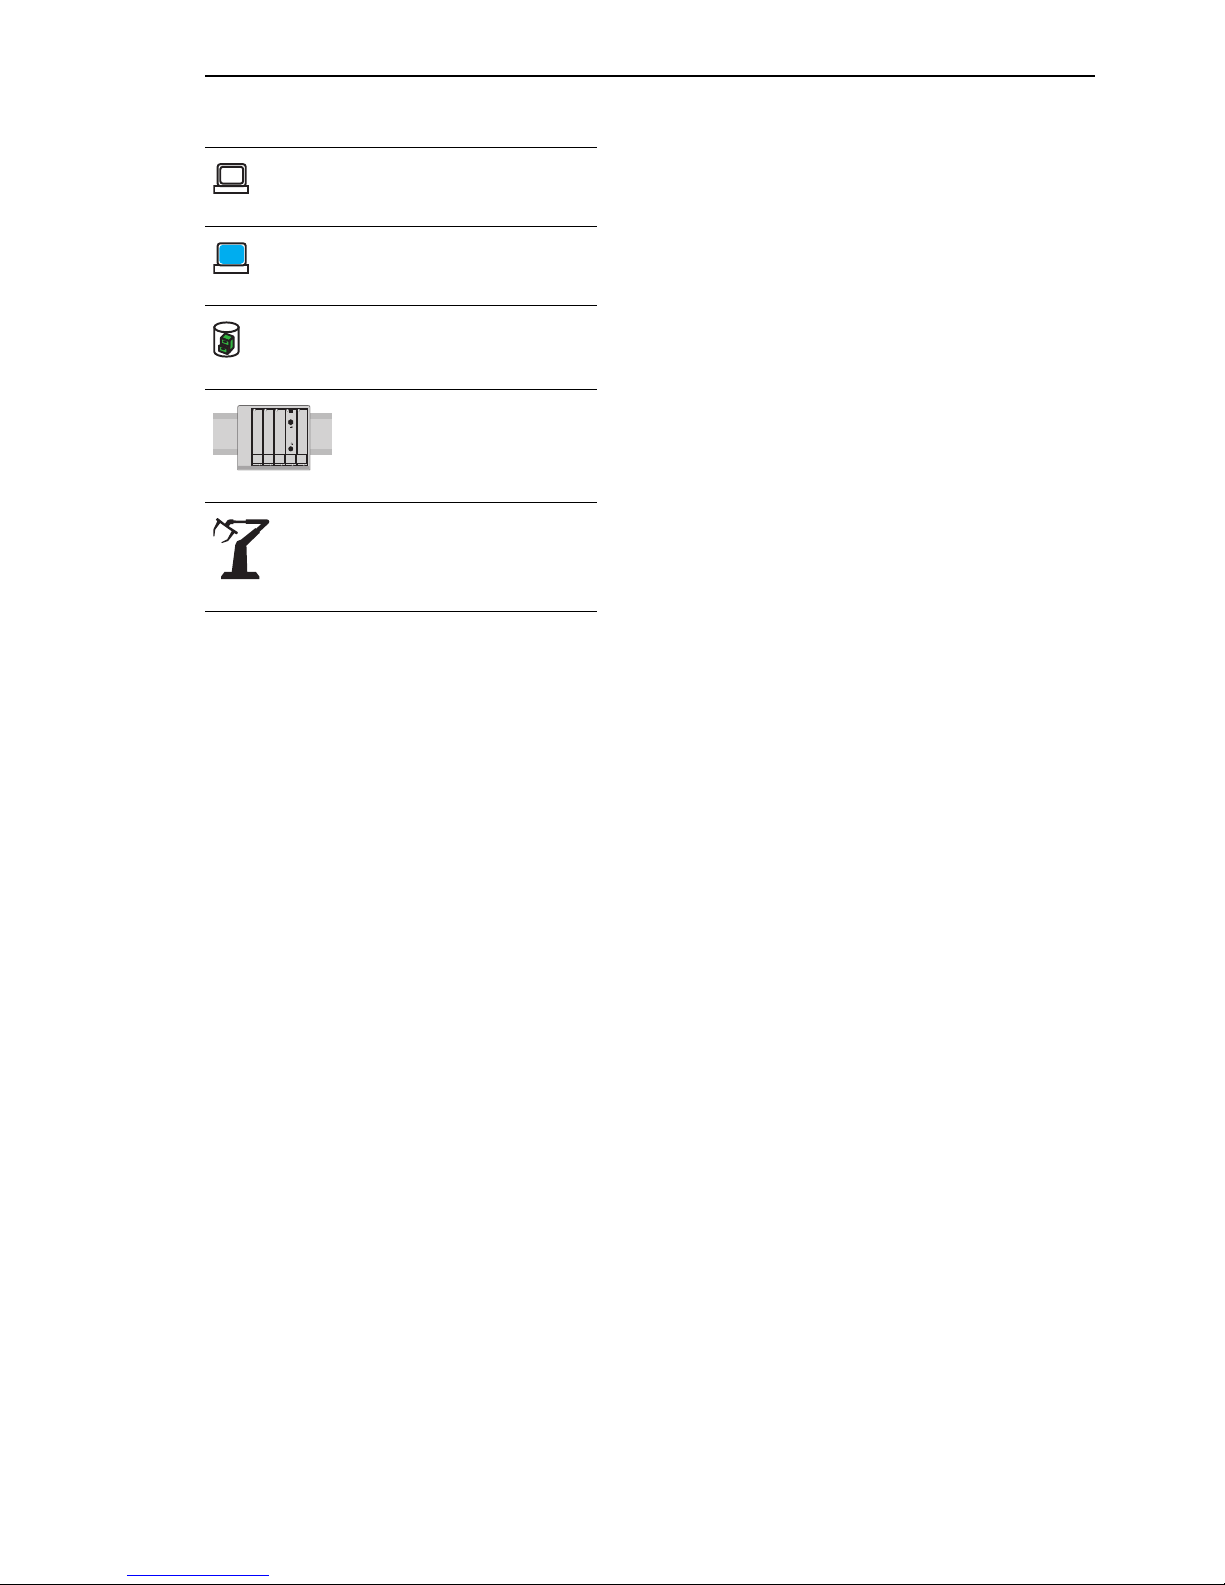
A random computer
Configuration Computer
Server
PLC Programmable logic
controller
I/O Robot
Page 8

Key
8
Redundanz L2B
Release 5.0 04/09
Page 9

Introduction
Redundanz L2B
Release 5.0 04/09
9
1 Introduction
The device contains a range of redundancy functions:
X HIPER-Ring
X MRP-Ring
Page 10

Introduction
10
1.1 Overview of Redundancy Procedure
Redundanz L2B
Release 5.0 04/09
1.1 Overview of
Redundancy Procedure
Redundancy
procedure
Network topology Switching time
HIPER-Ring Ring typically 80 ms, up to < 500 ms - practically indepen-
dently of the number of devices
MRP-Ring Ring typically 80 ms, up to < 500 ms - practically indepen-
dently of the number of devices
Table 1: Comparison of the redundancy procedures
Page 11
Ring Redundancy
Redundanz L2B
Release 5.0 04/09
11
2 Ring Redundancy
The concept of ring redundancy allows the construction of high-availability,
ring-shaped network structures.
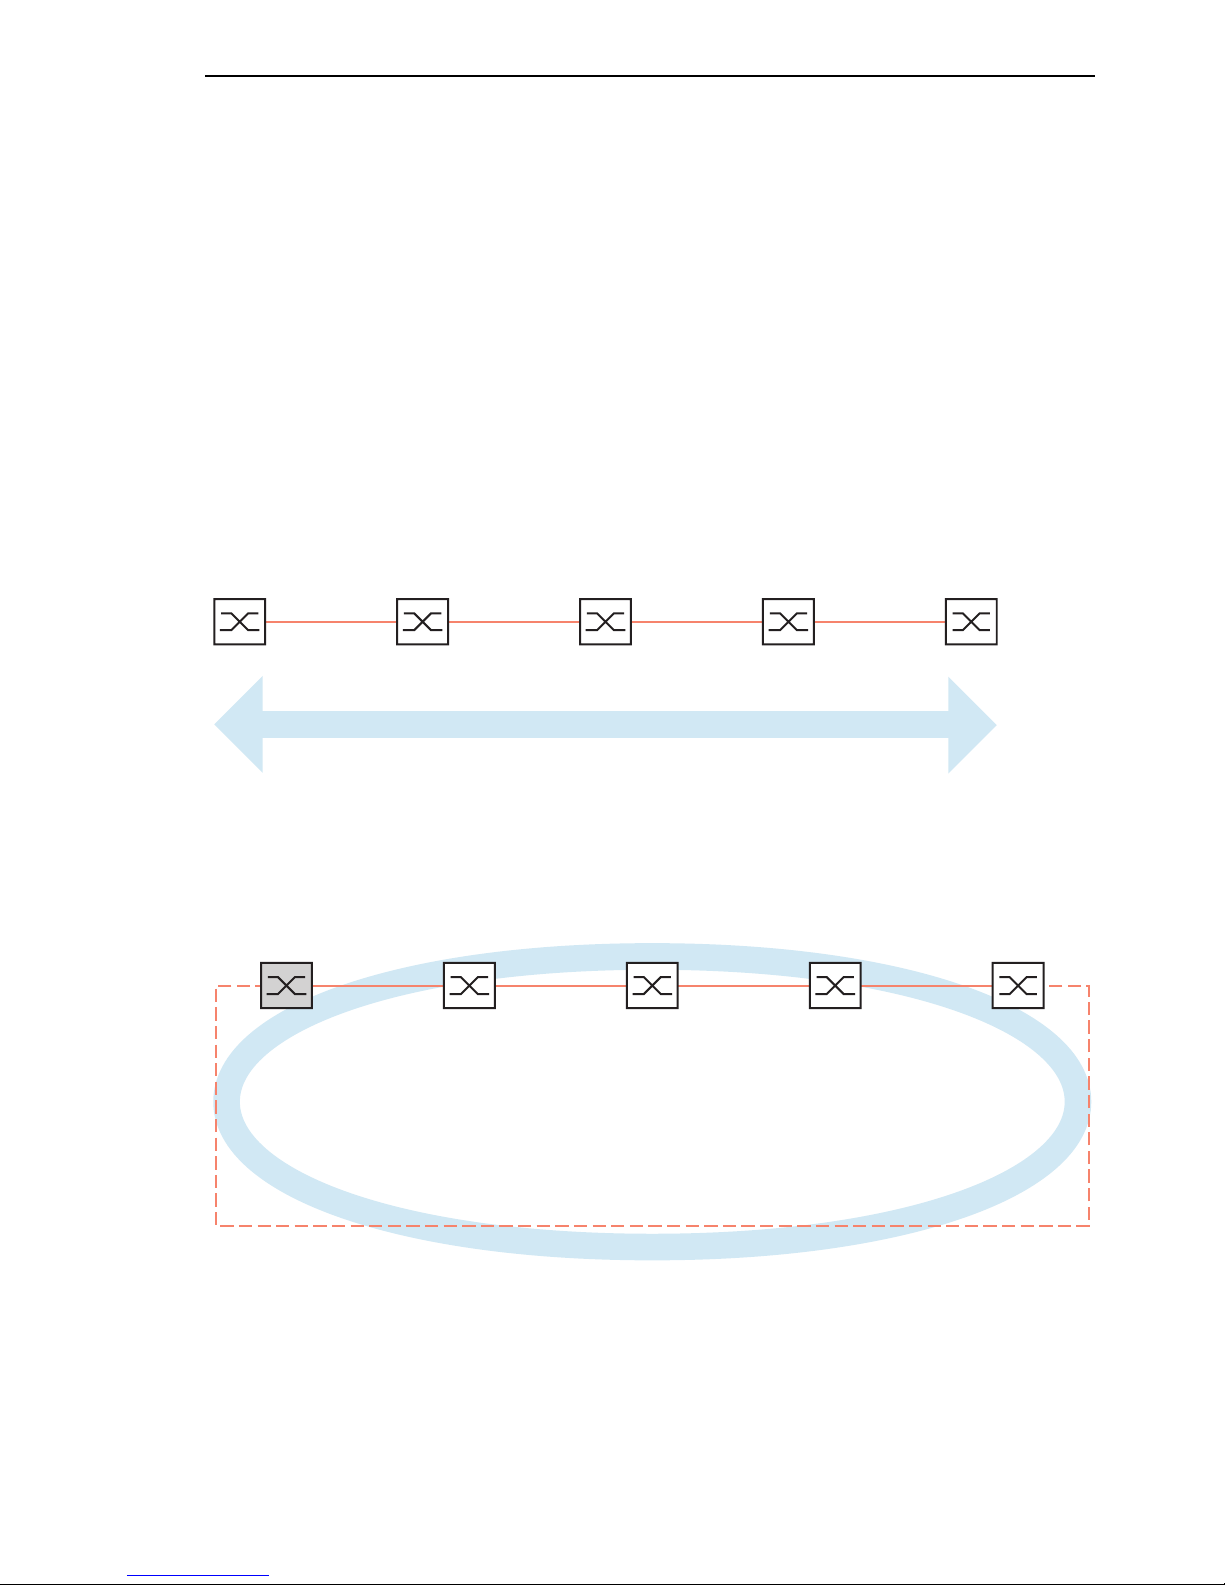
With the help of the RM (Ring Manager) function, the two ends of a backbone
in a line structure can be closed to a redundant ring. The ring manager keeps
the redundant line open as long as the line structure is intact. If a segment
fails, the ring manager immediately closes the redundant line, and line
structure is intact again.
Figure 1: Line structure
Figure 2: Redundant ring structure
RM = Ring Manager
—— main line
- - - redundant line
RM
Page 12

Ring Redundancy
12
Redundanz L2B
Release 5.0 04/09
If a section is down, the ring structure of a
X HIPER-(HIGH PERFORMANCE REDUNDANCY) Ring with up to 50 de-
vices typically transforms back to a line structure within 80 ms (setting:
standard/accelerated).
X MRP (Media Redundancy Protocol) Ring (IEC 62439) of up to 50 devices
typically transforms back to a line structure within 80 ms (adjustable to
max. 200 ms/500 ms).
Device requirements for using the HIPER-Ring function:
X Within a HIPER-Ring, you can use any combination of the following
devices:
–RS1
– RS2-./.
– RS2-16M
–RS2-4R
– RS20, RS30, RS40
– RSR20, RSR30
– OCTOPUS
–MICE
–MS20, MS30
–Power MICE
– MACH 100
– MACH 1000
– MACH 3000
– MACH 4000
X Within an MRP-Ring, you can use devices that support the MRP protocol
based on IEC62439.
Note: Enabled Ring Redundancy methods on a device are mutually exclusive at any one time. When changing to another Ring Redundancy method,
deactivate the function for the time being.
Note: The following usage of the term “ring manager” instead of “redundancy
manager” makes the function easier to understand.
Page 13
Ring Redundancy
Redundanz L2B
Release 5.0 04/09
2.1 Example of HIPER-Ring
13
2.1 Example of HIPER-Ring
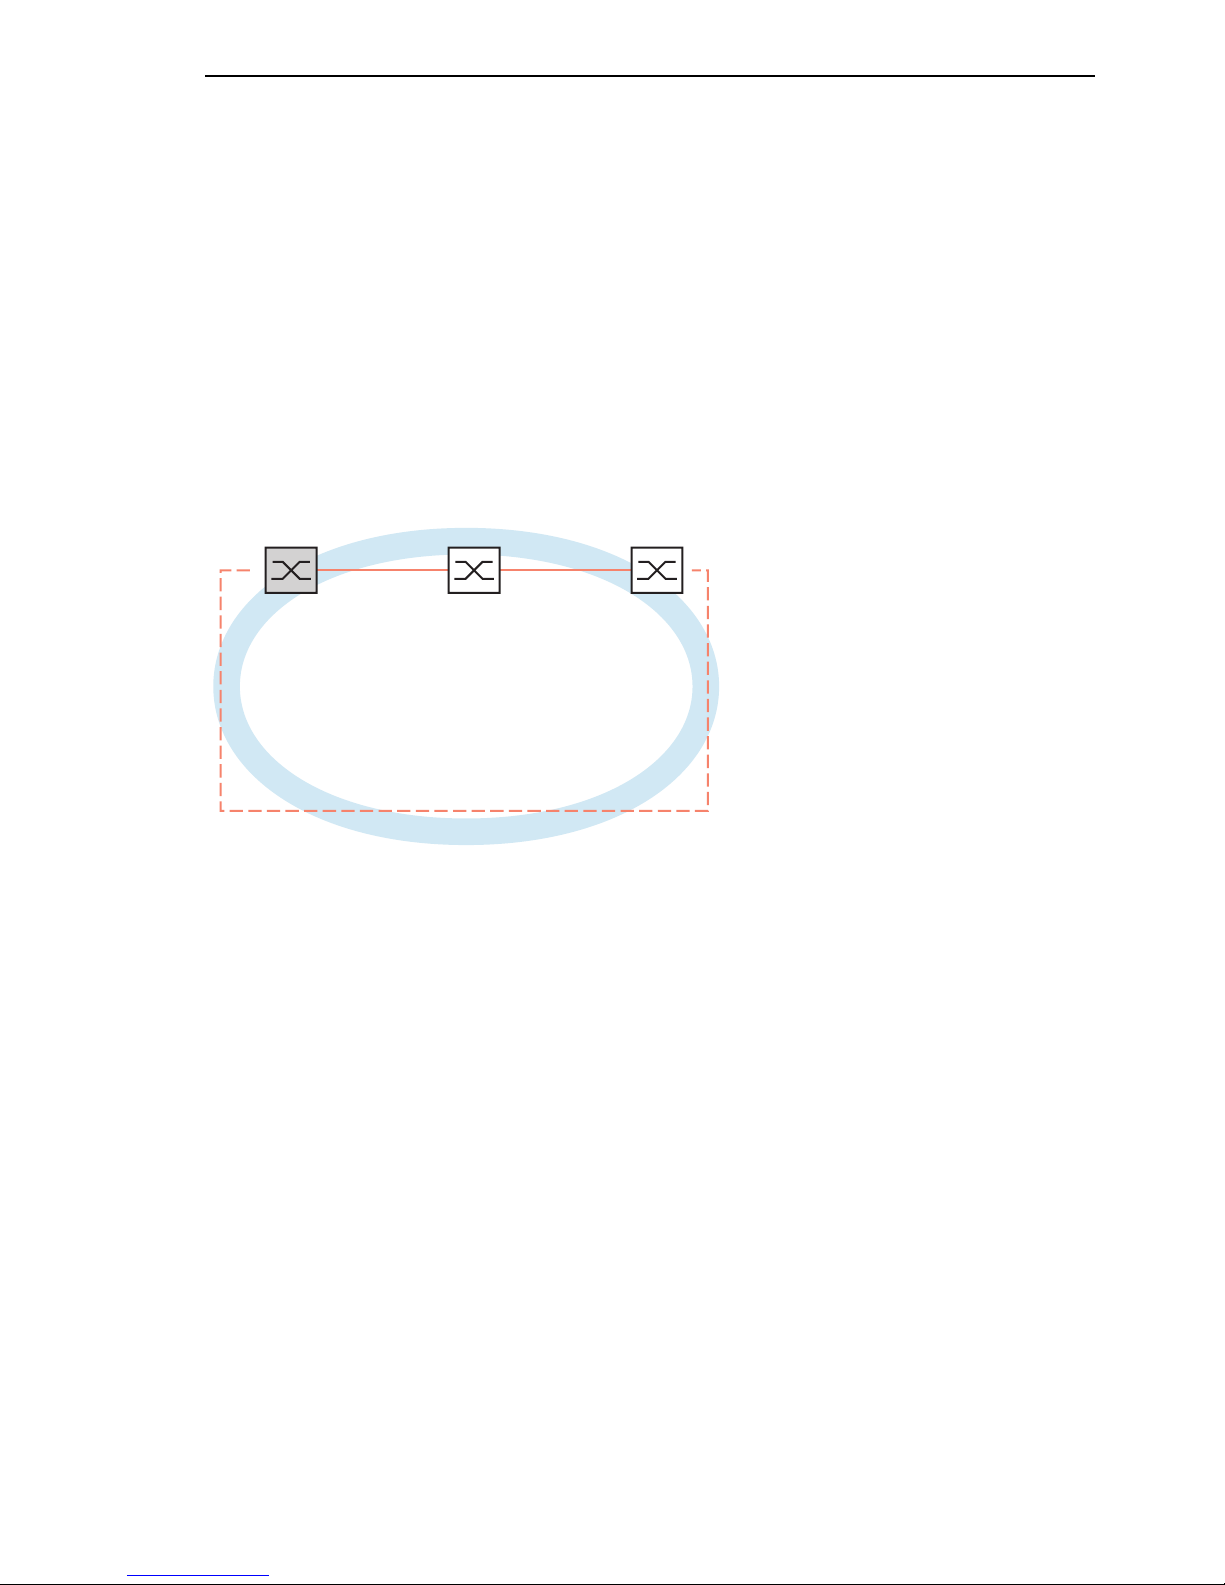
A network contains a backbone in a line structure with 3 devices. To increase
the redundancy reliability of the backbone, you have decided to convert the
line structure to a HIPER-Ring. You use ports 1 and 2 in module 1 of the
devices to connect the lines.
Figure 3: Example of HIPER-Ring
RM = Ring Manager
—— main line
- - - redundant line
The following example configuration describes the configuration of the ring
manager device (1). The two other devices (2 to 3) are configured in the
same way, but without activating the ring manager function. Select the
“Standard” value for the ring recovery, or leave the field empty.
Note: You cannot configure devices with L2B software as ring managers.
You can exlusively use these devices as members of the redundant ring.
RM
12 3
1.1 1.2 1.1 1.2 1.1 1.2
Page 14

Ring Redundancy
14
2.1 Example of HIPER-Ring
Redundanz L2B
Release 5.0 04/09
Note: Configure all the devices of the HIPER-Ring individually. Before you
connect the redundant line, you must complete the configuration of all the
devices of the HIPER-Ring. You thus avoid loops during the configuration
phase.
Page 15

Ring Redundancy
Redundanz L2B
Release 5.0 04/09
2.1 Example of HIPER-Ring
15
2.1.1 Setting up and configuring the HIPER-Ring
Set up the network to meet your requirements.
You configure all 6 ports so that the transmission speed and the duplex
settings of the lines correspond to the following table:
Bit rate 100 Mbit/s 1000 Mbit/s
Autonegotiation
(automatic configuration)
off on
Port on on
Duplex Full –
Table 2: Port settings for ring ports
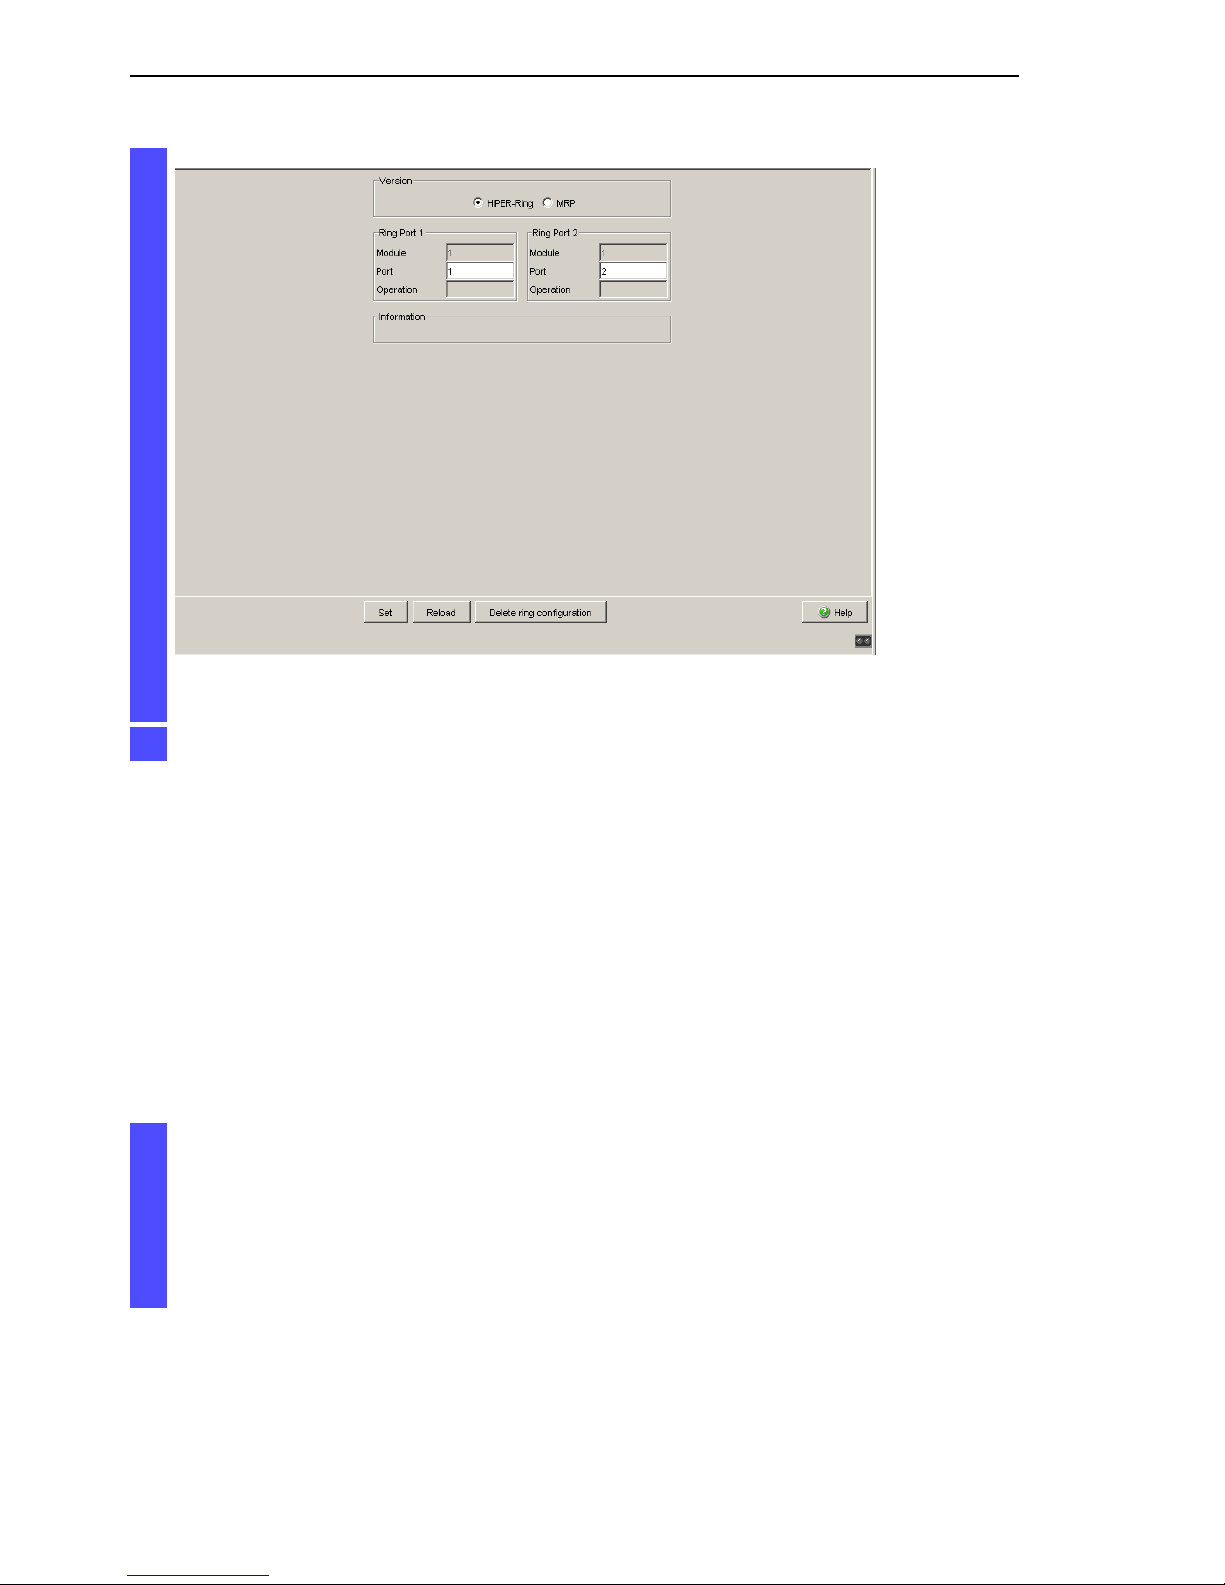
Select the Redundancy:Ring Redundancy dialog.
Under “Version”, select HIPER-Ring.
Define the desired ring ports 1 and 2 by making the corresponding
entries in the module and port fields. If it is not possible to enter a
module, then there is only one module in the device that is taken
over as a default.
Display in “Operation” field:
– active: This port is switched on and has a link.
– inactive: This port is switched off or it has no link.
Page 16
Ring Redundancy
16
2.1 Example of HIPER-Ring
Redundanz L2B
Release 5.0 04/09
Note: Deactivate the Spanning Tree protocol on the ports connected to the
HIPER-Ring because Spanning Tree and Ring Redundancy affect each other. If you enable the HIPER-Ring function by means of the DIP switch,
RSTP will be disabled automatically.
Now you connect the line to the ring. To do this, you connect the two
devices to the ends of the line using their ring ports.
Figure 4: Ring Redundancy dialog
Click on “Set” to temporarily save the entry in the configuration.
The displays in the “Information” frame mean
– “Redundancy existing”: One of the lines affected by the function can
fail, whereby the redundant line will then take over the function of the
failed line.
– “Configuration failure”: The function is incorrectly configured or there
is an error in the ring port connection.
Page 17
Ring Redundancy
Redundanz L2B
Release 5.0 04/09
2.2 Example of MRP-Ring
17
2.2 Example of MRP-Ring
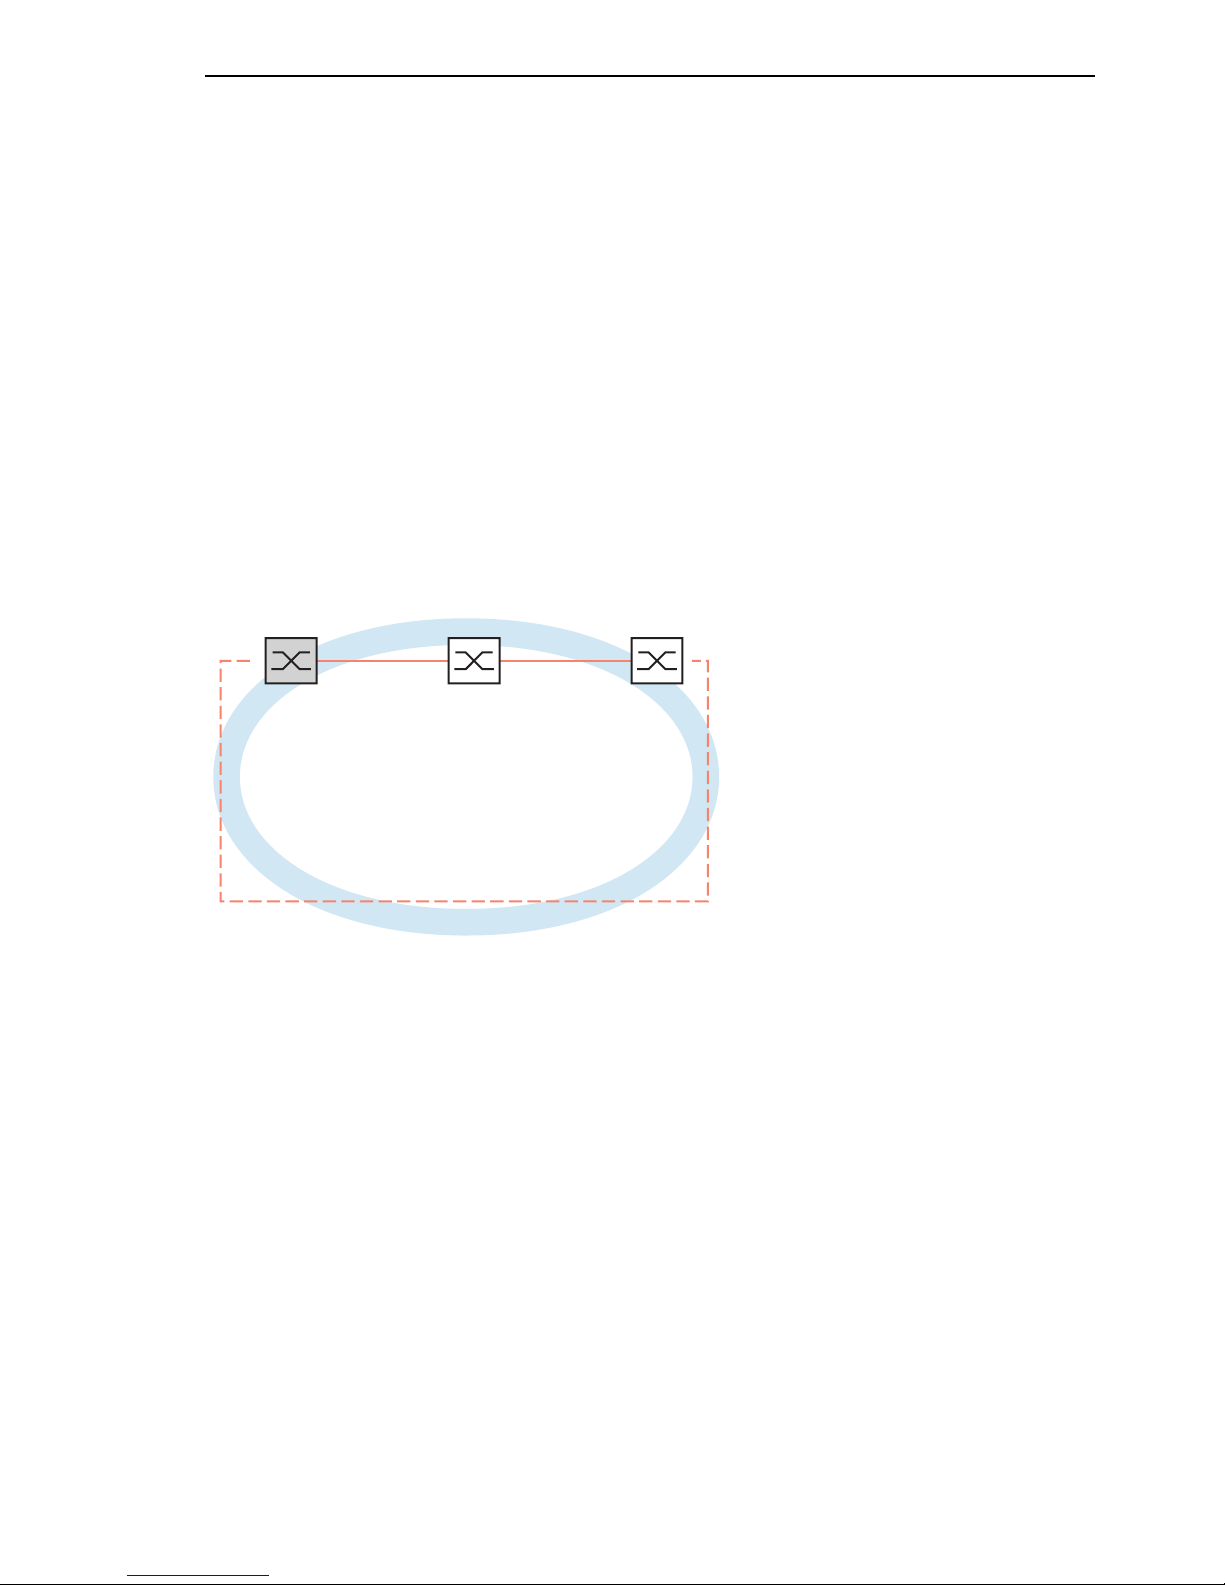
A network contains a backbone in a line structure with 3 devices. To increase
the redundancy reliability of the backbone, you have decided to convert the
line structure to a ring redundancy. In contrast to the previous example,
devices from different manufacturers are being used which do not all support
the HIPER-Ring protocol. All the devices have MRP as the ring redundancy
protocol, so you decide to use MRP. You use ports 1 and 2 in module 1 of
the devices to connect the lines.
Figure 5: Example of MRP-Ring
RM = Ring Manager
—— main line
- - - redundant line
The following example configuration describes the configuration of the ring
manager device (1). You configure the two other devices (2 to 3) in the same
way, but without activating the ring manager function. This example does not
use a VLAN. You have entered 200 ms as the ring recovery time, and all the
devices support the advanced mode of the ring manager.
RM
12 3
1.1 1.2 1.1 1.2 1.1 1.2
Page 18

Ring Redundancy
18
2.2 Example of MRP-Ring
Redundanz L2B
Release 5.0 04/09
Note: You cannot configure devices with L2B software as ring managers.
You can exlusively use these devices as members of the redundant ring.
Note: Configure all the devices of the MRP-Ring individually. Before you
connect the redundant line, you must complete the configuration of all the devices of the MRP-Ring. You thus avoid loops during the configuration phase.
Set up the network to meet your requirements.
You configure all 6 ports so that the transmission speed and the duplex
settings of the lines correspond to the following table:
Bit rate 100 Mbit/s 1000 Mbit/s
Autonegotiation
(automatic configuration)
off on
Port on on
Duplex Full –
Table 3: Port settings for ring ports
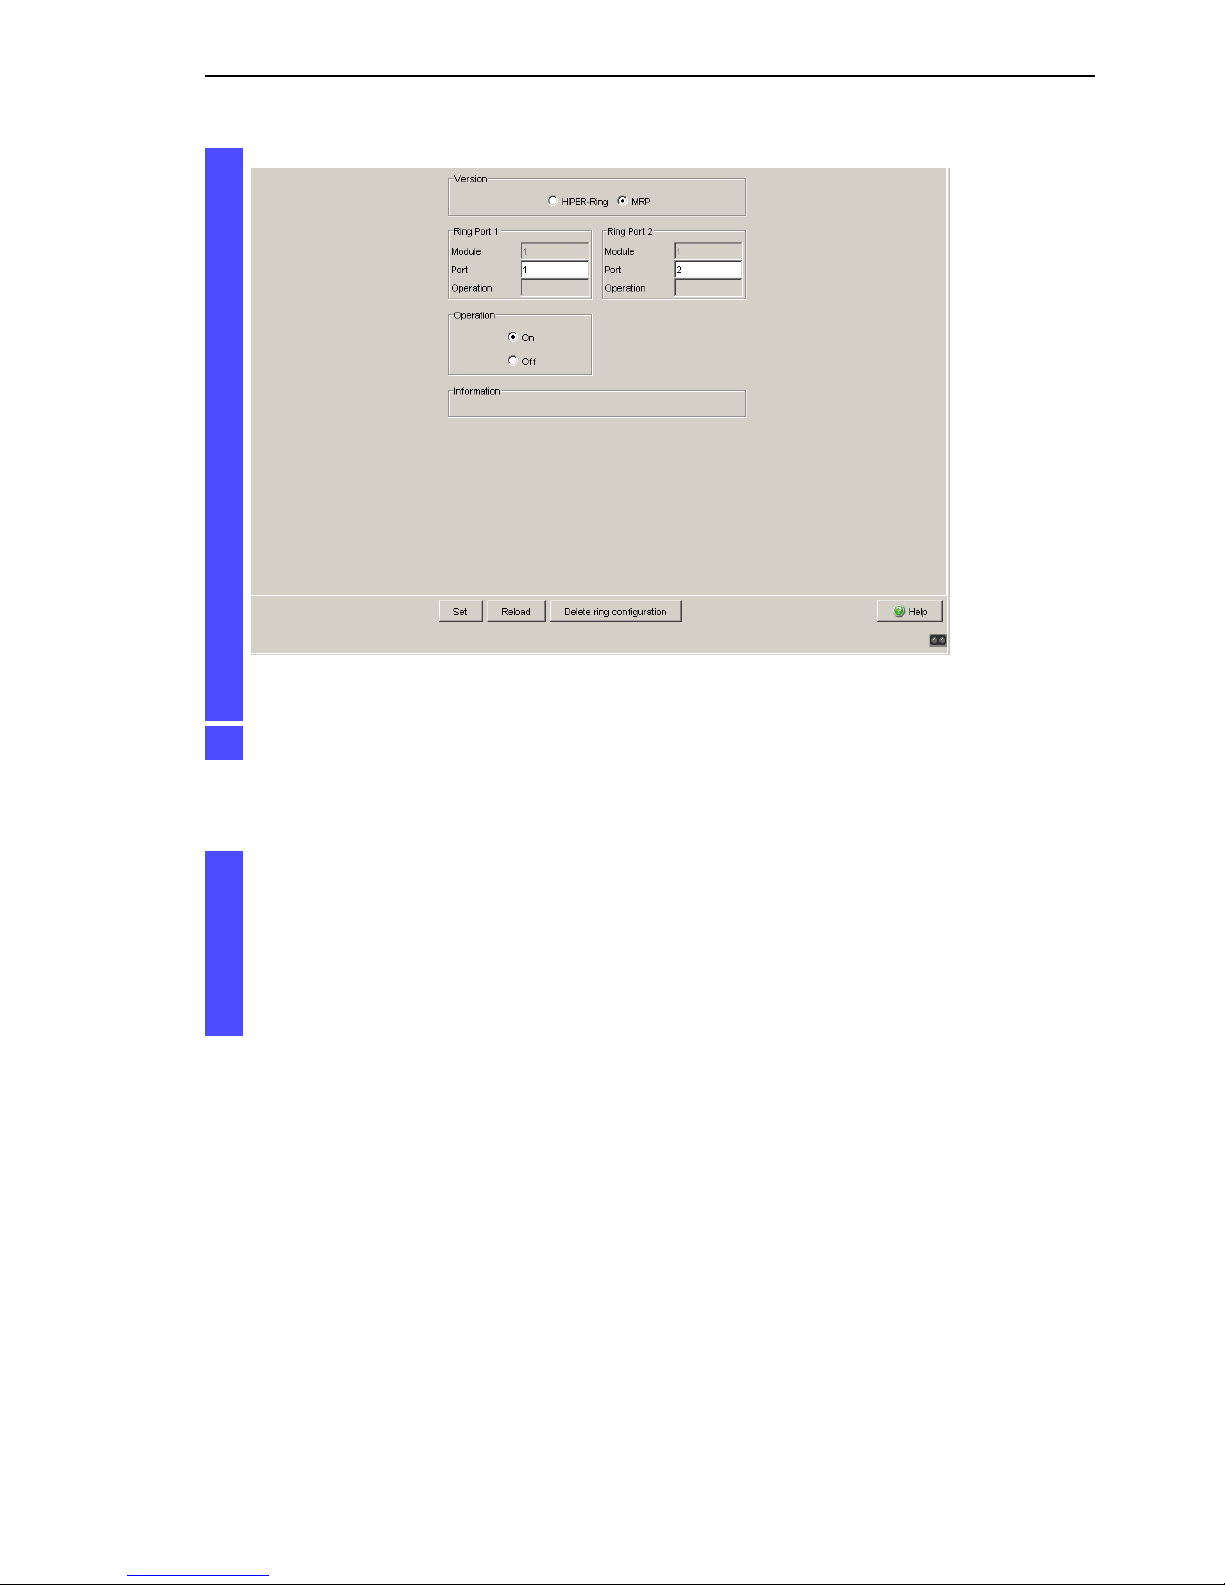
Select the Redundancy:Ring Redundancy dialog.
Under “Version”, select MRP.
Define the desired ring ports 1 and 2 by making the corresponding
entries in the module and port fields. If it is not possible to enter a
module, then there is only one module in the device that is taken
over as a default.
Display in “Operation” field:
forwarding: this port is switched on and has a link.
blocked: this port is blocked and has a link.
disabled: this port is switched off
not connected: this port has no link.
Page 19
Ring Redundancy
Redundanz L2B
Release 5.0 04/09
2.2 Example of MRP-Ring
19
Now you connect the line to the ring. To do this, you connect the two
devices to the ends of the line using their ring ports.
Figure 6: Ring Redundancy dialog
Click on “Set” to temporarily save the entry in the configuration.
The displays in the “Information” frame mean
– “Redundancy existing”: One of the lines affected by the function can
fail, whereby the redundant line will then take over the function of the
failed line.
– “Configuration failure”: The function is incorrectly configured or there
is an error in the ring port connection.
Page 20

Ring Redundancy
20
2.2 Example of MRP-Ring
Redundanz L2B
Release 5.0 04/09
Page 21

Readers’ comments
Redundanz L2B
Release 5.0 04/09
21
A Readers’ comments
What is your opinion of this manual? We are always striving to provide as
comprehensive a description of our product as possible, as well as important
information that will ensure trouble-free operation. Your comments and
suggestions help us to further improve the quality of our documentation.
Your assessment of this manual:
Did you discover any errors in this manual?
If so, on what page?
Very good Good Satisfactory Medio-
cre
Poor
Precise description O O O O O
Readability O O O O O
Understandability O O O O O
Examples O O O O O
Structure O O O O O
Completeness O O O O O
Graphics O O O O O
Drawings O O O O O
Tables O O O O O
Page 22

Readers’ comments
22
Redundanz L2B
Release 5.0 04/09
Suggestions for improvement and additional information:
General comments:
Sender:
Dear User,
Please fill out and return this page
X as a fax to the number +49 (0)7127/14-1600 or
X to
Hirschmann Automation and Control GmbH
Department AED
Stuttgarter Str. 45-51
72654 Neckartenzlingen
Company / Department:
Name / Telephone number:
Street:
Zip code / City:
E-mail:
Date / Signature:
Page 23

Index
23
Redundanz L3P+
Release 5.0 04/09
B Index
A
Advanced Mode 17
C
Configuration error 16, 19
Configuring the HIPER-Ring 14
F
FAQ 25
H
HIPER-Ring 9
HiVision 5
N
Network Management Software 5
R
Redundancy 5
Redundancy existing 16, 19
Redundancy functions 9
Redundancy Manager 12
Redundant 11
Redundant coupling 9
Ring 11
Ring Manager 12
Ring structure 12
S
Symbol 6
T
Technical questions 25
Training courses 25
Page 24

Index
24
Redundanz L3P+
Release 5.0 04/09
Page 25

Further support
Redundanz L2B
Release 5.0 04/09
25
C Further support
Technical questions and training courses
In the event of technical queries, please contact your local Hirschmann
distributor or Hirschmann office.
You can find the addresses of our distributors on the Internet:
www.hirschmann-ac.codrm.
Our support line is also at your disposal:
X Tel. +49 1805 14-1538
X Fax +49 7127 14-1551
Answers to Frequently Asked Questions can be found on the Hirschmann
internet site (www.hirschmann-ac.com) at the end oft the product sites in
the FAQ category.
The current training courses to technology and products can be found
under http://www.hicomcenter.com.
Hirschmann Competence Center
In the long term, excellent products alone do not guarantee a successful
customer relationship. Only comprehensive service makes a difference
worldwide. In the current global competition scenario, the Hirschmann
Competence Center is ahead of its competitors on three counts with its
complete range of innovative services:
X Consulting incorporates comprehensive technical advice, from system
evaludation through network planning to project planing.
X Training offers you an introduction to the basics, product briefing and
user training with certification.
X Support ranges from the first installation through the standby service
to maintenance concepts.
With the Hirschmann Competence Center, you have decided against
making any compromises. Our client-customized package leaves you
free to choose the service components you want to use.
Internet:
http://www.hicomcenter.com.
Page 26

 Loading...