

Hirschmann EAGLE 20, EAGLE 20 TX/TX, EAGLE 20 TX/MM, EAGLE 20 TX/SM, EAGLE 20 MM/TX Reference Manual
...Page 1
RM CLI EAGLE 20
Release 4.3 09/08
Technical Support
HAC-Support@hirschmann.de
Reference Manual
Command Line Interface (CLI)
Industrial ETHERNET Firewall
EAGLE 20
EAGLE 20 TX/TX
EAGLE 20 TX/MM
EAGLE 20 TX/SM
EAGLE 20 MM/TX
EAGLE 20 MM/MM
1
P
21
FAULT
LS/DA
21
k
STATUS
V.24
IP-ADDRESS
V.24
R
EAGLE 20
USB
+24V (P1)
FAULT
+24V (P2)
0V
0V
g
2
Aufkleber MAC-Adresse
1
P
21
FAULT
LS/DA
21
k
STATUS
V.24
IP-ADDRESS
V.24
R
EAGLE 20
USB
+24V (P1)
FAULT
+24V (P2)
0V
0V
g
2
Aufkleber MAC-Adresse
1
P
21
FAULT
LS/DA
21
k
STATUS
V.24
IP-ADDRESS
V.24
R
EAGLE 20
USB
+24V (P1)
FAULT
+24V (P2)
0V
0V
g
2
Aufkleber MAC-Adresse
1
P
21
FAULT
LS/DA
21
k
STATUS
V.24
IP-ADDRESS
V.24
R
EAGLE 20
USB
+24V (P1)
FAULT
+24V (P2)
0V
0V
g
2
Aufkleber MAC-Adresse
_
___________________________________________________________________________
_
Copyright (c) 2007-2008 Hirschmann Automation and Control GmbH
All rights reserved
EAGLE Release SDV-04.3.00
(Build date 2008-08-26 11:46)
System Name: EAGLE-000000
Netw. Mode : transparent
Mgmt-IP : a.b.c.d
Base-MAC : 00:80:63:62:B0:FF
System Time: WED JAN 02 01:26:13 2008
NOTE: Enter '?' for Command Help. Command help displays all options
that are valid .or the particular mode.
.or the syntax of a particular command form, please
consult the documentation.
!*(Hirschmann Eagle) >
_
___________________________________________________________________________
_
Page 2

The naming of copyrighted trademarks in this manual, even when not specially indicated, should
not be taken to mean that these names may be considered as free in the sense of the trademark
and tradename protection law and hence that they may be freely used by anyone.
© 2008 Hirschmann Automation and Control GmbH
Manuals and software are protected by copyright. All rights reserved. The copying, reproduction,
translation, conversion into any electronic medium or machine scannable form is not permitted,
either in whole or in part. An exception is the preparation of a backup copy of the software for
your own use. For devices with embedded software, the end-user license agreement on the enclosed CD applies.
The performance features described here are binding only if they have been expressly guaranteed in the contract. This publication has been created by Hirschmann Automation and Control
GmbH according to the best of our knowledge. Hirschmann reserves the right to change the contents of this manual without prior notice. Hirschmann can give no guarantee in respect of the
correctness or accuracy of the details in this publication.
Hirschmann can accept no responsibility for damages, resulting from the use of the network
components or the associated operating software. In addition, we refer to the conditions of use
specified in the license contract.
Printed in Germany
Hirschmann Automation and Control GmbH
Stuttgarter Str. 45-51
72654 Neckartenzlingen
Germany
Tel.: +49 1805 141538
039 xxx-001-01-0908 – 29.9.08
Page 3

Content
RM CLI EAGLE 20
Release 4.3 09/08
3
Content
About this Manual 5
Key 7
1 Introduction 8
1.1 Industrial ETHERNET Firewall 9
1.1.1 Application areas 9
1.1.2 Operating modes 9
1.2 User interfaces 11
1.3 Command Line Interface 12
2 Access to CLI 13
2.1 Preparing the connection 14
2.2 CLI via SSH (Secure Shell) 15
2.3 CLI via the V.24 port 19
3 Using the CLI 21
3.1 Mode-based command hierarchy 22
3.2 Executing commands 27
3.2.1 Syntax analysis 27
3.2.2 Command tree 27
3.2.3 Structure of a command 28
3.3 Properties of the CLI 31
3.3.1 Input prompt 31
3.3.2 Key combinations 32
3.3.3 Data entry elements 34
3.3.4 Line length 35
4Example 37
A Index 41
B Further support 43
Page 4

Content
4
RM CLI EAGLE 20
Release 4.3 09/08
Page 5

About this Manual
RM CLI EAGLE 20
Release 4.3 09/08
5
About this Manual
The "Command Line Interface" reference manual contains detailed information on using the Command Line Interface to operate the individual functions
of the device.
The “Configuration” user manual contains all the information you need to
start operating the Industrial ETHERNET Firewall EAGLE 20. It takes you
step by step from the first startup operation through to the basic settings for
operation in your environment.
The "Web-based Interface" reference manual contains detailed information
on using the Web interface to operate the individual functions of the device.
The “Installation” user manual contains a device description, safety instructions, a description of the display, and all the other information that you need
to install the device before you begin with the configuration of the device.
The Network Management Software HiVision provides you with additional
options for smooth configuration and monitoring:
X Event logbook.
X Configuration of „System Location“ and „System Name“.
X Configuration of the network address range and SNMP parameters.
X Saving the configuration on the device.
X Simultaneous configuration of multiple devices.
X Configuration of the port display color red for a connection error.
Page 6

About this Manual
6
RM CLI EAGLE 20
Release 4.3 09/08
Page 7

Key
RM CLI EAGLE 20
Release 4.3 09/08
7
Key
The designations used in this manual have the following meanings:
X List
Work step
Subheading
Link Indicates a cross-reference with a stored link
Note: A note emphasizes an important fact or draws your
attention to a dependency.
Courier ASCII representation in user interface
Page 8

Introduction
8
RM CLI EAGLE 20
Release 4.3 09/08
1 Introduction
Page 9

Introduction
RM CLI EAGLE 20
Release 4.3 09/08
1.1 Industrial ETHERNET Firewall
9
1.1 Industrial ETHERNET
Firewall
1.1.1 Application areas
The EAGLE 20 industrial firewall/VPN system ensures the authentication,
security and confidentiality of communication within production networks, but
also beyond company boundaries.
The EAGLE 20 supports the following network modes:
X Transparent Mode
X Router Mode
X PPPoE Mode
1.1.2 Operating modes
This device protects the network to be secured (secure port) from external
influences (non-secure port). These influences can include deliberate attacks
or unauthorized access attempts, as well as interfering network events such
as overloads.
State on delivery
On delivery, the device works in the Transparent Mode. In this mode, no
network settings (e.g., for subnetworks) are required for operation.
Page 10

Introduction
10
1.1 Industrial ETHERNET Firewall
RM CLI EAGLE 20
Release 4.3 09/08
The firewall has been preconfigured so that all IP traffic from the secure
network is possible; however, traffic from the insecure network to the secure one is not possible. Thus, already in the delivery state, external attacks on the secure network are not possible.
Modes
X Transparent Mode
In transparent mode, the Firewall transmits on level 2 of the ISO/OSI
layer model. The IP address ranges before and after the Firewall are
located in the same subnetwork.
In the state on delivery, you can access the device via address
192.168.1.1/24 without configuring the IP address.
X Router Mode
In router mode, the Firewall transmits on level 3 of the ISO/OSI layer
model. The IP address ranges before and after the Firewall are located
in different subnetworks. You will find a detailed description of the IP
configuration in the “Basic Configuration” user manual of the EAGLE
20.
X PPPoE Mode
In PPPoE Mode, the EAGLE 20 works like in the router mode, with the
difference that the PPPoE protocol is used at the external port. This
enables Internet connections via a DSL modem, for example.
Page 11

Introduction
RM CLI EAGLE 20
Release 4.3 09/08
1.2 User interfaces
11
1.2 User interfaces
The device has three user interfaces, which you can access via different
interfaces:
X System monitor via the V.24 interface (out-of-band)
X Command Line Interface (CLI) via the V.24 connection (out-of-band) or
via SSH (in-band)
X Web-based interface via Ethernet (in-band)
Page 12

Introduction
12
1.3 Command Line Interface
RM CLI EAGLE 20
Release 4.3 09/08
1.3 Command Line Interface
The Command Line Interface enables you to use all the functions of the device via a local or remote connection. This enables you to securely administer
the firewall via V.24 or via the Secure Shell (SSH) protocol. You can also define rules to secure the access and the administration.
The Command Line Interface provides IT specialists with a familiar environment for configuring IT devices. As an experienced user or administrator, you
have knowledge about the basics and about using secure shell (SSH)
connections.
The “Command Line Interface” reference manual gives you step-by-step information on using the Command Line Interface (CLI) and its commands.
The commands in the Command Line Interface of the EAGLE 20 Firewall can
be divided into the following areas:
X Authentication
X Delete
X Copy
X Deny Service
X Device Status
X Interface
X Logging
X NAT (Network Address Translation)
X Network
X Packet Filter
X Profiles
X Signal Contact
X SNMP Trap (Simple Network Management Protocol)
X SNTP (Simple Network Time Protocol)
X Users
X Display
Page 13

Access to CLI
RM CLI EAGLE 20
Release 4.3 09/08
1.3 Command Line Interface
13
2 Access to CLI
Page 14

Access to CLI
14
2.1 Preparing the connection
RM CLI EAGLE 20
Release 4.3 09/08
2.1 Preparing the connection
Information for assembling and starting up your EAGLE 20 Industrial
ETHERNET Firewall can be found in the “Installation” user manual.
Information for configuring your EAGLE 20 Industrial ETHERNET Firewall
can be found in the “Configuration” user manual.
Connect your Firewall with the network.
The network parameters must be set correctly for the connection to be
successful.
You can access the user interface of the Command Line Interface with the
freeware program “PuTTY”. This program is located on the product CD.
Make sure that PuTTY is installed on your computer.
If the required programs are not already installed on your PC, please install them.
Page 15

Access to CLI
RM CLI EAGLE 20
Release 4.3 09/08
2.2 CLI via SSH (Secure Shell)
15
2.2 CLI via SSH (Secure Shell)
Start the PuTTY program on your computer.
PuTTY appears with the login screen (see fig. 1).
Figure 1: PuTTY input screen
In the Host Name (or IP address) input field you enter
the IP address of your device.
The IP address (a.b.c.d) consists of four decimal numbers with values
from
0 to 255. The four decimal numbers are separated by a point.
Page 16

Access to CLI
16
2.2 CLI via SSH (Secure Shell)
RM CLI EAGLE 20
Release 4.3 09/08
To select a connection type, click on
SSH under Connection type.
After selecting and setting all the required parameters, you can set up the
connection via SSH.
Click “Open” to set up the connection to your device. Depending on the
device and the time at which SSH was configured, it can take up to a
minute to set up the connection.
When you first login to your device, towards the end of the connection setup,
PuTTY displays a security alert message and gives you
the option of checking the fingerprint of the key.
Figure 2: Security alert prompt for the fingerprint
Check the fingerprint to protect yourself from unwelcome guests.
If the fingerprint matches that of the device key, click “Yes”.
You can read the fingerprints of the device key with the CLI command “show
login” or in the Web interface, in the “SSH access” dialog.
Page 17

Access to CLI
RM CLI EAGLE 20
Release 4.3 09/08
2.2 CLI via SSH (Secure Shell)
17
Note:
The OpenSSH Suite offers experienced network administrators a further option to access your device via SSH. To set up the connection, enter the following command:
ssh admin@149.218.112.53
admin represents the user name.
149.218.112.53 is the IP address of your device.
CLI appears on the screen with a window for entering the user name.
Up to five users can access the Command Line Interface at the same time.
Figure 3: Login window in CLI
a.b.c.d is the IP address of your device.
Enter a user name. The default setting for the user name is admin . Press
the Enter key.
Enter the password. The default setting for the password is private .
Press the Enter key.
You can change the user name and the password later in the Command
Line Interface.
Please note that these entries are case-sensitive.
The start screen appears.
Note: This device is a security-relevant product. For your own security,
change the password during the first startup procedure.
login as: admin
admin@a.b.c.d's password:
Page 18

Access to CLI
18
2.2 CLI via SSH (Secure Shell)
RM CLI EAGLE 20
Release 4.3 09/08
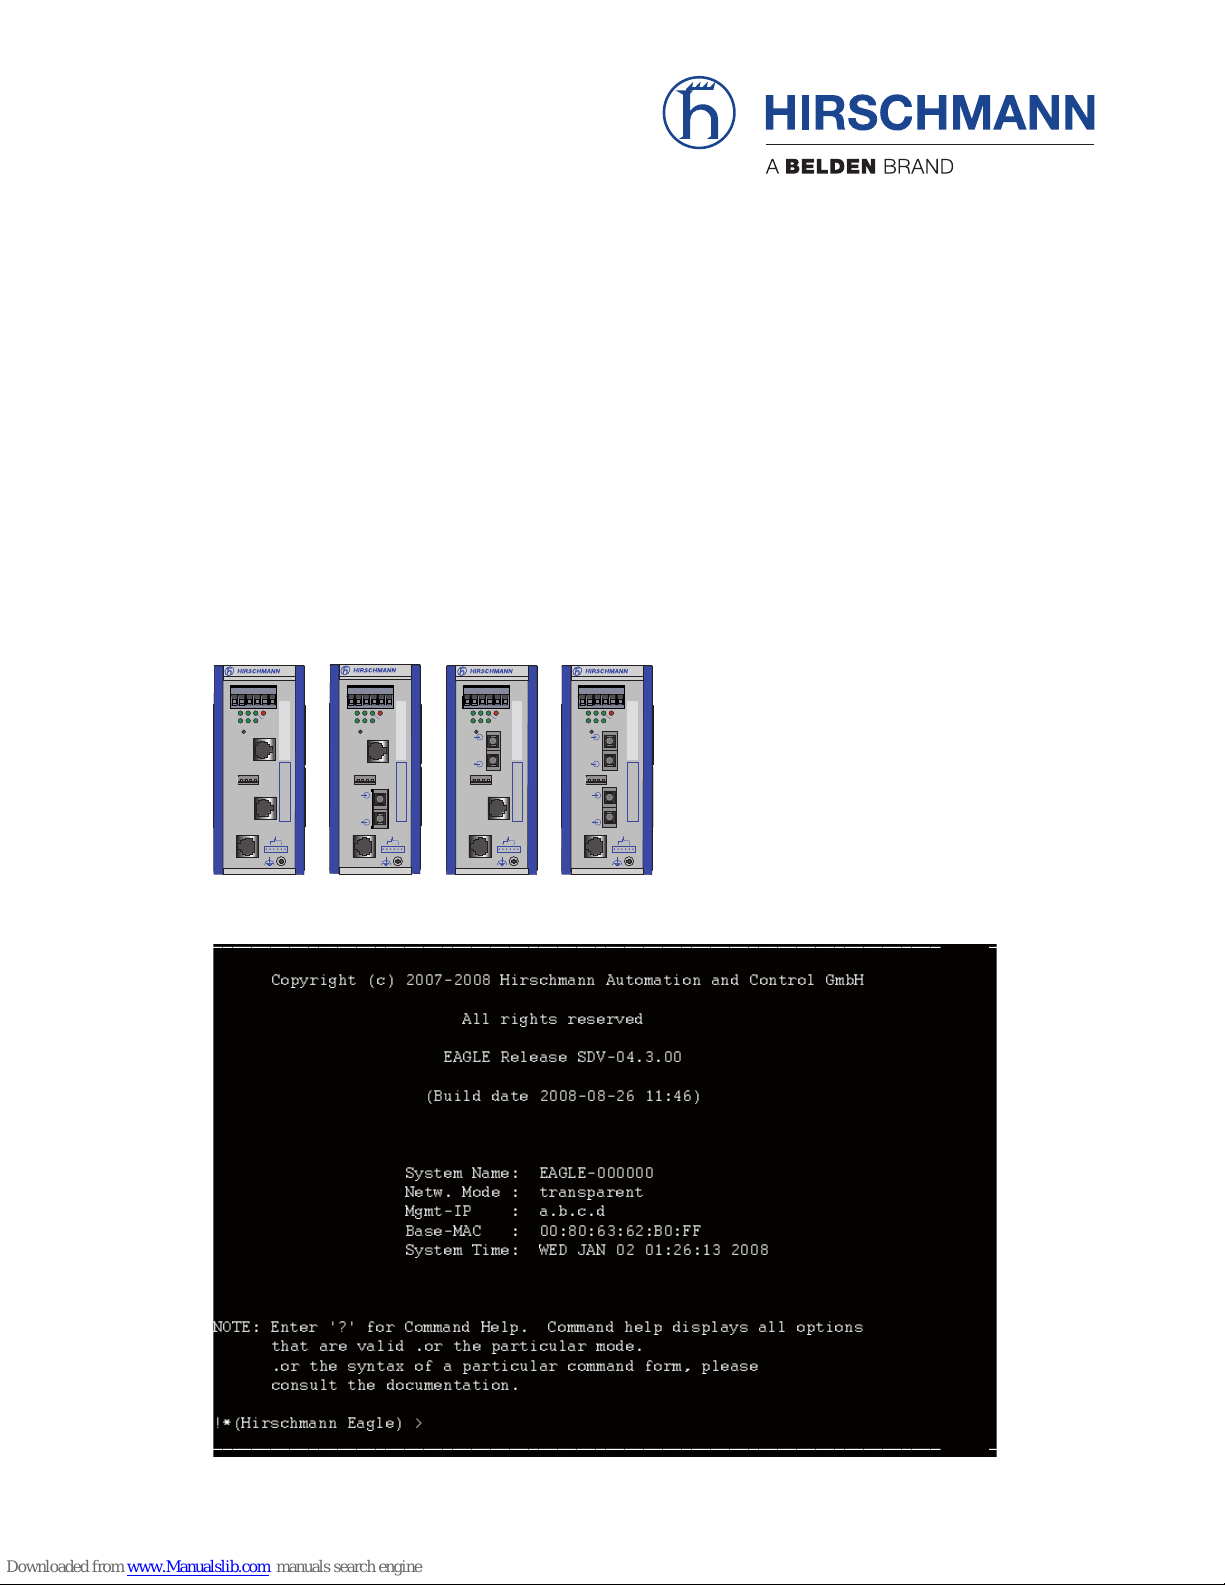
Figure 4: Start screen of CLI.
Your Firewall appears with the input prompt
(Hirschmann Eagle) >
Copyright (c) 2007-2008 Hirschmann Automation and Control GmbH
All rights reserved
EAGLE Release SDV-04.3.00
(Build date 2008-08-26 11:46)
System Name: EAGLE-000000
Netw. Mode : transparent
Mgmt-IP : a.b.c.d
Base-MAC : 00:80:63:62:B0:FF
System Time: WED JAN 02 01:26:13 2008
NOTE: Enter '?' for Command Help. Command help displays all options
that are valid for the particular mode.
For the syntax of a particular command form, please
consult the documentation.
!*(Hirschmann Eagle) >
Page 19

Access to CLI
RM CLI EAGLE 20
Release 4.3 09/08
2.3 CLI via the V.24 port
19
2.3 CLI via the V.24 port
A serial interface is provided on the RJ11 socket (V.24 interface) for the local
connection of an external management station (VT100 terminal or PC with
corresponding terminal emulation). This enables you to set up a connection
to the Command Line Interface (CLI) and to the system monitor.
You will find a description of the V.24 interface in the “User Manual
Installation”.
Connect the device to a terminal via V.24 or to a “COM” port of your PC
using terminal emulation based on VT100, and press any key.
After the connection has been made successfully, a window for entering the
user name appears on the screen.
Figure 5: Logging in to the Command Line Interface program
Enter a user name. The default setting for the user name is admin . Press
the Enter key.
Copyright (c) 2007-2008 Hirschmann Automation and Control GmbH
All rights reserved
Eagle NG Release SDV-04.3.00-A07
(Build date 2008-03-07 18:06)
System Name: EAGLE-000000
Netw. Mode : transparent
Mgmt-IP : 192.168.1.1
Base-MAC : 00:80:63:45:BE:5D
System Time: FRI JAN 02 01:50:47 1970
(Hirschmann Eagle)
User:
Page 20

Access to CLI
20
2.3 CLI via the V.24 port
RM CLI EAGLE 20
Release 4.3 09/08
Enter the password. The default setting for the password is private .
Press the Enter key.
You can change the user name and the password later in the Command
Line Interface.
Please note that these entries are case-sensitive.
The start screen appears.
Figure 6: CLI screen after login
Note: You can configure the V.24 interface either as a modem interface or a
terminal/CLI interface.
However, to be able have at least limited access to the CLI interface in
modem mode, you connect your terminal (setting on terminal: 9600 baud) to
the V.24 interface.
Press any key on your terminal keyboard a number of times until the login
screen indicates the CLI mode.
NOTE: Enter '?' for Command Help. Command help displays all options
that are valid for the particular mode.
For the syntax of a particular command form, please
consult the documentation.
(Hirschmann Eagle) >
Page 21

Using the CLI
RM CLI EAGLE 20
Release 4.3 09/08
2.3 CLI via the V.24 port
21
3 Using the CLI
Page 22

Using the CLI
22
3.1 Mode-based command hierarchy
RM CLI EAGLE 20
Release 4.3 09/08
3.1 Mode-based command
hierarchy
In the CLI, the commands are grouped in the related modes, according to the
type of the command. Every command mode supports specific Hirschmann
software commands.
The commands available to you as a user at a specific time depend on the
mode in which you are currently working. The commands of a specific mode
are only available to you when you switch to this mode as a user.
The User Exec mode commands are an exception to this. You can also execute these in the Privileged Exec mode.
The following figure shows the modes of the Command Line Interface.
Page 23

Using the CLI
RM CLI EAGLE 20
Release 4.3 09/08
3.1 Mode-based command hierarchy
23
Figure 7: Structure of the CLI
The CLI supports the following modes:
X User Exec mode
When you login to CLI, you first enter the User Exec mode. The User Exec
mode contains a limited range of commands.
Command prompt: (Hirschmann Eagle) >
X Privileged Exec mode
To access the entire range of commands, you enter the Privileged Exec
mode. In the Privileged Exec mode, you can proceed as a privileged user
authenticated by the login. From the Privileged Exec mode you can execute every Exec command.
Command prompt: (Hirschmann Eagle) #
User Exec Modus
Privileged Exec Modus
Global Configuration Modus
The User Exec
Commands are also
available in the
Privileged Exec
Mode.
Enable Exit
Configure Exit
Login
Logout
ROOT
Limited
functionality
Basis functions,
basic settings
Extended
configurations
Page 24

Using the CLI
24
3.1 Mode-based command hierarchy
RM CLI EAGLE 20
Release 4.3 09/08
X Global Config mode
This mode allows you to perform modifications to the current configuration. In this mode, general setup commands are grouped together.
Command prompt: (Hirschmann Eagle) (config)#
The following table shows the command modes, the command prompts (input request characters) visible in the corresponding mode, and the option
with which you quit this mode.
If you enter a question mark (?) after the prompt, you receive a list of the
available command and a short description of the commands.
Command
mode
Access method Quit or
start next mode
User Exec mode First access level. Perform basic
tasks and list system information.
To quit you enter Logout:
(Hirschmann Eagle) >logout
Are you sure (Y/N) ?y
Privileged Exec
mode
From the User Exec mode, you enter
the command enable:
(Hirschmann Eagle) >enable
(Hirschmann Eagle) #
To quit the Privileged Exec mode and
return to the User Exec mode, you
enter exit:
(Hirschmann Eagle) #exit
(Hirschmann Eagle) >
Global Configuration mode
From the Privileged Exec mode, you
enter the command configure:
(Hirschmann Eagle) #configure
(Hirschmann Eagle) (config)#
From the User Exec mode, you enter
the command enable, and then in
Privileged Exec mode, enter the
command Configure:
(Hirschmann Eagle) >enable
(Hirschmann Eagle) #configure
(Hirschmann Eagle) (config)#
To quit the Global Configuration
mode and return to the Privileged
Exec mode, you enter exit:
(Hirschmann Eagle) (config)#exit
(Hirschmann Eagle) #
To then quit the Privileged Exec
mode and return to the User Exec
mode, you enter exit again:
(Hirschmann Eagle) #exit
(Hirschmann Eagle) >
Table 1: Command modes
Page 25

Using the CLI
RM CLI EAGLE 20
Release 4.3 09/08
3.1 Mode-based command hierarchy
25
Figure 8: Commands in the User Exec mode
Figure 9: Commands in the Privileged Exec mode
*(Hirschmann Eagle) >?
enable Turn on privileged commands.
help Display help for various special keys.
history Show a list of previously run commands.
logout Exit this session. Any unsaved changes are lost.
ping Send ICMP echo packets to a specified IP address.
show Display device options and settings.
*(Hirschmann Eagle) >enable
*(Hirschmann Eagle) #?
clear Clear several items.
configure Enter into global config mode.
copy Copy different kinds of items.
exit Exit from current mode.
help Display help for various special keys.
history Show a list of previously run commands.
login Set login parameters.
logout Exit this session. Any unsaved changes are lost.
network Modify network parameters.
ping Send ICMP echo packets to a specified IP address.
profile Activate or delete configuration profiles.
reboot Reset the device (cold start).
reload Reset the device (warm start).
save Save configuration.
set Set device parameters.
show Display device options and settings.
Page 26

Using the CLI
26
3.1 Mode-based command hierarchy
RM CLI EAGLE 20
Release 4.3 09/08
Figure 10: Commands in the Global Configuration mode
Note: You will find information on the line feed of the help texts below (see
on page 35 „Line length“).
*(Hirschmann Eagle) #configure
*(Hirschmann Eagle) (config)#?
authentication Configure an authentication list.
denial-of-service Configure denial of service (flood protection)
parameters.
device-status Configure the device status settings.
dhcp-relay Modify DHCP Relay parameters.
dhcp-server Modify DHCP Server parameters.
exit Exit from current mode.
help Display help for various special keys.
history Show a list of previously run commands.
interface Configure the interface parameters.
lldp Configure the LLDP settings.
logging Logging configuration.
nat Configure the NAT settings.
packet-filter Configure the packet-filter.
ping Send ICMP echo packets to a specified IP address.
redundancy Configure the redundancy settings.
save Save configuration.
show Display device options and settings.
signal-contact Configure the Signal Contact settings.
snmptrap Configure SNMPv3 traps.
sntp Configure SNTP settings.
temperature Configure the temperature limits.
user-firewall Configure the user firewall settings.
users Manage Users and User Accounts.
vpn Configure VPN settings.
Page 27

Using the CLI
RM CLI EAGLE 20
Release 4.3 09/08
3.2 Executing commands
27
3.2 Executing commands
3.2.1 Syntax analysis
After you login to the CLI session, you enter the User Exec mode. The (Hirschmann Eagle)> prompt is displayed on the screen.
The CLI always starts the syntax analysis when you enter a command and
press the <ENTER> key. The command tree is searched for the desired command.
If the command is not found, the message displayed informs you of the error.
Example:
The user wants to execute the show system info command, but enters
this command with a misspelling and presses the <Enter> key.
The CLI then outputs an error message:
!(Hirschmann Eagle) >show system ino
Error[1]: Invalid command 'ino'
3.2.2 Command tree
The commands in CLI are organized into a tree structure. The commands,
and the related parameters if applicable, branch all the way down until you
reach the end point. The CLI checks every input to see whether you have entered the command and all parameters completely. Only then can you execute the command with the <Enter> key.
After you have entered the command and all the required parameters, all the
other parameters entered are treated as optional parameters. If one of the
parameters is unknown, the CLI outputs a syntax error message.
Page 28

Using the CLI
28
3.2 Executing commands
RM CLI EAGLE 20
Release 4.3 09/08
The command tree branches for the required parameters until the required
parameters have reached the end point.
With optional parameters, the command tree branches until the required parameters and the optional parameters have reached the end point.
Note: The command “show system commandtree” lists the entire command
tree for you.
3.2.3 Structure of a command
This section describes the syntax, conventions and terminology, and uses
examples to represent them.
Format of commands
Most of the commands are enhanced through parameters.
If the command parameter is missing, CLI informs you that the syntax of
the command is incorrect.
The commands and parameters are displayed in the Courier font in
this manual, and they must be used as they are shown in the manual.
Parameters
You must adhere to the sequence of the parameters shown.
Parameters can be required values, optional values, selections, or a combination of these things. You recognize this from the way they are represented, as follows:
X <parameter>
Pointed brackets indicate a required parameter.
Page 29

Using the CLI
RM CLI EAGLE 20
Release 4.3 09/08
3.2 Executing commands
29
X [parameter]
Square brackets indicate an optional parameter.
An entry can be made, but it is not required.
X Option1 | Option2
The straight slash indicates that one of the options can be selected.
Both values cannot be selected at the same time.
X {list}
The {} curved brackets indicate that one parameter must be selected
from a list of options.
The following list shows the possible parameter values within the Command Line Interface:
Network addresses
Network addresses are required for the connection to a remote work station, a server or another network. You distinguish between IP addresses
and MAC addresses.
The IP address is an address allocated by the network administrator.
Here it is important not to have duplicate addresses in one network area.
The MAC addresses are assigned by the hardware manufacturer. They
are unique worldwide.
The following table shows the representation and the range of the address types:
Value Description
IpAddress This parameter represents a valid IP address. The address consists
of 4 decimal numbers with values from 0 to 255. The 4 decimal numbers are separated by a decimal point. The IP address 0.0.0.0 is a
valid entry.
MacAddress This parameter represents a valid MAC address. The address con-
sists of 6 hexadecimal numbers with values from 0 to FF. The numbers are separated by a colon, for example, 00:F6:29:B2:81:40.
String User-defined text with a length in the specified range, e.g. a maxi-
mum of 32 characters.
Character string Use double quotation marks to indicate a character string, e.g. “Sys-
tem name with space character”.
Number Whole integer in the specified range, e.g. 0...999999.
Table 2: Parameter values in the Command Line Interface
Page 30

Using the CLI
30
3.2 Executing commands
RM CLI EAGLE 20
Release 4.3 09/08
Strings
A string is indicated by quotation marks. For example, “System name with
space character”. Space characters are not valid user-defined strings.
You enter a space character in a parameter between quotation marks.
Examples of commands
Example 1: clear arp-table
Command for deleting dynamic entries in ARP Cash.
clear arp-table is the command name. The command does not re-
quire any other parameters, and can be executed with <Enter>.
Example 2: signal-contact monitor aca-removal
Command for displaying the removal of the AutoConfiguration Adapter.
!(Hirschmann Eagle) (config)#signal-contact monitor aca-removal enable Enable the option. disable (default) Disable
the option.
signal-contact monitor aca-removal is the command name.
The parameter is required. It can have the value enable or disable.
Example 3: nat 1to1 add
Command for adding a 1:1 NAT rule.
!(Hirschmann Eagle) (config)#nat 1to1 add [1..512] NAT
rule number. [internal-net] Internal network address. [external-net] External network address. [netmask] Network
mask. [comment] Rule comment.
“nat 1to1 add” is the command name.
The parameters [1..512] (i.e. the number of the NAT rule to be added), [internal-net], [external-net] , [netmask] and [comment] are optional.
Address Type Format Range
IP Address 192.168.11.110 0.0.0.0 to 255.255.255.255 (decimal)
MAC Address A7:C9:89:DD:A9:B3 Hexadecimal number pairs
Table 3: Format and range of network addresses
Page 31

Using the CLI
RM CLI EAGLE 20
Release 4.3 09/08
3.3 Properties of the CLI
31
3.3 Properties of the CLI
3.3.1 Input prompt
Command mode
With the input prompt, the CLI shows you which of the three modes you
are in:
X (Hirschmann Eagle)>
User Exec mode
X (Hirschmann Eagle)#
Privileged Exec mode
X (Hirschmann Eagle)(config)#
Global Configuration mode
Exclamation mark and asterisk
Exclamation mark “!”
An exclamation mark “!” in the first position of the input prompt shows you
that the password for the user “admin” is still on the default setting.
!*(Hirschmann Eagle) >
Asterisk “*”
An asterisk “*” in the first or second position of the input prompt shows you
that the settings in the volatile memory and the settings in the non-volatile
memory are different.
!*(Hirschmann Eagle)>
*(Hirschmann Eagle)>
Page 32

Using the CLI
32
3.3 Properties of the CLI
RM CLI EAGLE 20
Release 4.3 09/08
3.3.2 Key combinations
The following key combinations make it easier for you to work with the
Command Line Interface:
Key combination Description
CTRL + H,
Backspace
Delete previous character
CTRL + A Go to beginning of line
CTRL + E Go to end of line
CTRL + F Go forward one character
CTRL + B Go backward one character
CTRL + D Delete current character
CTRL + U, X Delete to beginning of line
CTRL + K Delete to end of line
CTRL + W Delete previous word
CTRL + P Go to previous line in history buffer
CTRL + R Rewrite or paste the line
CTRL + N Go to next line in history buffer
CTRL + Q Enable serial flow
CTRL + S Disable serial flow
CTRL + Z Return to root command prompt
Tab, <SPACE> Command line completion
Exit Go to next lower command prompt
? List choices
Table 4: Key combinations in the Command Line Interface
Page 33

Using the CLI
RM CLI EAGLE 20
Release 4.3 09/08
3.3 Properties of the CLI
33
With the Help command you can display the possible key combinations in
CLI on the screen:
Figure 11: Listing the key combinations with the Help command
!*(Hirschmann Eagle) #help
HELP:
Special keys:
Ctrl-H, BkSp delete previous character
Ctrl-A .... go to beginning of line
Ctrl-E .... go to end of line
Ctrl-F .... go forward one character
Ctrl-B .... go backward one character
Ctrl-D .... delete current character
Ctrl-U, X .. delete to beginning of line
Ctrl-K .... delete to end of line
Ctrl-W .... delete previous word
Ctrl-P .... go to previous line in history buffer
Ctrl-R .... rewrites or pastes the line
Ctrl-N .... go to next line in history buffer
Ctrl-Q .... enables serial flow
Ctrl-S .... disables serial flow
Ctrl-Z .... return to root command prompt
Tab, <SPACE> command-line completion
Exit .... go to next lower command prompt
? .... list choices
!*(Hirschmann Eagle) #
Page 34

Using the CLI
34
3.3 Properties of the CLI
RM CLI EAGLE 20
Release 4.3 09/08
3.3.3 Data entry elements
Command completion
To facilitate making entries, CLI gives you the option of command completion (Tab Completion), meaning that you can abbreviate key words.
Type in the beginning of a keyword. If the characters entered identify
a keyword, CLI will complete the keyword when you press the tab key
or the space key.
After the first letters are entered, the Command Line Interface adds the
rest of the possible command or parameter when you press the “Tab” or
“Space” keys. If there is more than one option for completion, the system
does not perform any completion. Only after one or more letters have
been entered which uniquely identify the command or parameter does the
system complete the command or parameter when “Tab” or “Space” is
pressed again.
If you make a non-unique entry and press “Tab” or “Space” twice, the CLI
provides you with a list of options.
Possible commands/parameters
You can obtain a list of the commands or the possible parameters by entering “help” or “?”, for example by entering (Hirschmann Eagle) >show ?.
When you enter the command displayed, you get a list of the parameters
available for the command “show”.
Page 35

Using the CLI
RM CLI EAGLE 20
Release 4.3 09/08
3.3 Properties of the CLI
35
3.3.4 Line length
If you are using a terminal with a line length of 80 characters, the help texts
are split up, as shown in the following screenshot (see fig. 12). For example,
for the help text for “DSA Fingerprint for SSH”, the remainder “01:10:12” appears on the next line.
You can avoid this effect by using a terminal with a line length of 132 characters (see fig. 13).
Figure 12: “Show login” command with a line length of 80 characters
!(Hirschmann Eagle) #show login
Login parameters
----------------
Access per SSH..........................enabled
SSH Access port number..................22
DSA Fingerprint for
SSH................."27:14:2f:f6:88:e8:6a:e6:3c:36:1c:5c:c2:
01:10:12"SRA Fingerprint for
SSH................."b2:ee:4f:af:76:23:80:ba:ef:25:5a:42:a5:
a8:e7:e1"
Access per Web (HTTPS)..................enabled
Web Access port number (HTTPS)..........443
SNMP version 1..........................enabled
SNMP version 2..........................enabled
SNMP port number........................161
Inactivity timeout Web (minutes)........0
Inactivity timeout serial (minutes).....0
Inactivity timeout SSH (minutes)........120
Login prompt............................"Hirschmann Eagle"
Page 36

Using the CLI
36
3.3 Properties of the CLI
RM CLI EAGLE 20
Release 4.3 09/08
Figure 13: “Show login” command with a line length of 132 characters
Login parameters
----------------
Access per SSH..........................enabled
SSH Access port number..................22
DSA Fingerprint for
SSH................."27:14:2f:f6:88:e8:6a:e6:3c:36:1c:5c:c2:01:10:12"
SRA Fingerprint for
SSH................."b2:ee:4f:af:76:23:80:ba:ef:25:5a:42:a5:a8:e7:e1"
Access per Web (HTTPS)..................enabled
Web Access port number (HTTPS)..........443
SNMP version 1..........................enabled
SNMP version 2..........................enabled
SNMP port number........................161
Inactivity timeout Web (minutes)........0
Inactivity timeout serial (minutes).....0
Inactivity timeout SSH (minutes)........120
Login prompt............................"Hirschmann Eagle"
Page 37

Example
RM CLI EAGLE 20
Release 4.3 09/08
3.3 Properties of the CLI
37
4 Example
Task assignment
The following example shows how you find and execute a command for
changing the default setting of the timeout value for your SSH connection.
On delivery, this value is set to 5 minutes. This means that after this time
has elapsed, the CLI terminates the connection if no keys have been
pressed. You can set a value for this timeout in the range from 1 to 120
minutes.
Login to CLI
Login to CLI as described above (see on page 14 „Preparing the con-
nection“).
Finding the command mode
You are in the User Exec mode (see on page 22 „Mode-based command
hierarchy“).
Enter a question mark “?” to get a list of the commands available in this
mode (see fig. 8).
The corresponding command is located in a different mode. The
Privileged Exec mode provides a wider range of commands.
To switch to the Privileged Exec mode quickly and easily, you enter
“en” and a space. The CLI completes the command to “enable” (see
on page 34 „Data entry elements“). Execute the command with <En-
ter>. The command prompt changes from (Hirschmann Eagle) > to
(Hirschmann Eagle) #, thus informing you that you are now in the Privileged Exec mode.
Enter a question mark “?” to get a list of the commands available in this
mode (see fig. 9).
!*(Hirschmann Eagle) >enable
!*(Hirschmann Eagle) #
Page 38

Example
38
3.3 Properties of the CLI
RM CLI EAGLE 20
Release 4.3 09/08
The “login” command is used to perform this task.
Enter “login”.
“lo” and a space character is not sufficient here, as it is not clear whether you want to execute the “login” or “logout” command. However, if
you enter a space again, you get a list of the commands that begin with
“lo”.
Finding, completing and executing commands
After “login” enter a question mark to display the additional branches
of the command.
The “login timeout” command is used to perform this task.
After “login”, enter a “t” and a space. The CLI automatically completes
the command to “login timeout” .
After “login timeout” enter a question mark to display the additional
branches of the command.
The “login timeout ssh” command is used to perform this task.
After “login timeout ssh” enter a question mark to display the possible
parameters for the command.
!(Hirschmann Eagle) #lo
login Set login parameters.
logout Exit this session. Any unsaved changes are lost.
!(Hirschmann Eagle) #login ?
access Set login access parameters.
timeout Set login timeout parameters.
!(Hirschmann Eagle) #login timeout ?
serial Set login timeout for serial line connections.
ssh Set login timeout for SSH connections.
web Set login timeout for web connections.
Page 39

Example
RM CLI EAGLE 20
Release 4.3 09/08
3.3 Properties of the CLI
39
After “login timeout ssh” enter the value desired, in this case 120, to
set the timeout to 120 minutes.
Execute the command by pressing the <Enter> key.
Checking the execution with the Show command
Enter “show” to display all the possible show commands.
Then enter “login” to display your current login settings.
!(Hirschmann Eagle) #login timeout ssh ?
<1..120> Enter a number in the given range.
!(Hirschmann Eagle) #login timeout ssh 120
(Hirschmann Eagle) (config)#show
authentication Display ordered methods for authentication lists.
config Show configuration.
denial-of-service Show denial-of-service parameters.
device-status Show the device status settings and the current
device status itself.
dhcp-relay Show DHCP Relay parameters.
dhcp-server Show DHCP Server parameters.
interfaces Show interface parameters.
lldp Show the LLDP information.
logging Display logging parameters.
login Show login parameters.
nat Display the NAT settings.
network Show network data.
packet-filter Show the packet-filter configuration.
redundancy Show the redundancy settings.
running-config Show the currently running configuration.
signal-contact Display Signal Contact settings.
snmptraps Display SNMPv3 traps.
sntp Show SNTP configuration parameters and information.
system Show system related items.
temperature Show temperature limits.
user-firewall Show the user firewall settings.
users Display users and user accounts information.
vpn Show VPN settings.
Page 40

Example
40
3.3 Properties of the CLI
RM CLI EAGLE 20
Release 4.3 09/08
!(Hirschmann Eagle) #show login
Login parameters
----------------
Access per SSH..........................enabled
SSH Access port number..................22
DSA Fingerprint for
SSH................."27:14:2f:f6:88:e8:6a:e6:3c:36:1c:5c:c2:01:10:12"
SRA Fingerprint for
SSH................."b2:ee:4f:af:76:23:80:ba:ef:25:5a:42:a5:a8:e7:e1"
Access per Web (HTTPS)..................enabled
Web Access port number (HTTPS)..........443
SNMP version 1..........................enabled
SNMP version 2..........................enabled
SNMP port number........................161
Inactivity timeout Web (minutes)........0
Inactivity timeout serial (minutes).....0
Inactivity timeout SSH (minutes)........120
Login prompt............................"Hirschmann Eagle"
!(Hirschmann Eagle) #
Page 41

Index
41
RM CLI EAGLE 20
Release 4.3 09/08
A Index
C
Command tree 27
F
FAQ 43
G
Global Config mode 24
H
HiVision 5
N
Network Management Software 5
O
OpenSSH Suite 17
P
Password 17, 20
PPPoE Mode 10
Privileged Exec mode 23
PuTTY 14
R
Router Mode 10
S
Secure Shell 12, 15, 37
SSH 12, 15, 37
State on delivery 9
T
Tab Completion 34
Technical questions 43
Training courses 43
Transparent Mode 10
U
User Exec mode 23
User name 17, 20
V
V.24 11, 12, 19
VT100 19
Page 42

Index
RM CLI EAGLE 20
Release 4.3 09/08
42
Page 43

Further support
RM CLI EAGLE 20
Release 4.3 09/08
43
B Further support
Technical questions and training courses
In the event of technical queries, please talk to the Hirschmann contract
partner responsible for looking after your account or directly to the
Hirschmann office.
You can find the addresses of our contract partners on the Internet:
www.hirschmann-ac.com.
Our support line is also at your disposal:
X Tel. +49 1805 14-1538
X Fax +49 7127 14-1551
Answers to Frequently Asked Questions can be found on the Hirschmann
internet site (www.hirschmann-ac.com) at the end oft the product sites in
the FAQ category.
The current training courses to technology and products can be found
under http://www.hicomcenter.com.
Hirschmann Competence Center
In the long term, excellent products alone do not guarantee a successful
customer relationship. Only comprehensive service makes a difference
worldwide. In the current global competition scenario, the Hirschmann
Competence Center is ahead of its competitors on three counts with its
complete range of innovative services:
X Consulting incorporates comprehensive technical advice, from system
evaluation through network planning to project planing.
X Training offers you an introduction to the basics, product briefing and
user training with certification.
X Support ranges from the first installation through the standby service
to maintenance concepts.
With the Hirschmann Competence Center, you have decided against
making any compromises. Our client-customized package leaves you
free to choose the service components you want to use.
Internet:
http://www.hicomcenter.com.
Page 44

 Loading...