

Page 1
Ersatz-Versenkantenne
für AUTA 4000 F…
AUTA 4091 LF
Bestell-Nr. / Ord. code / N° de cde.
920 986-011
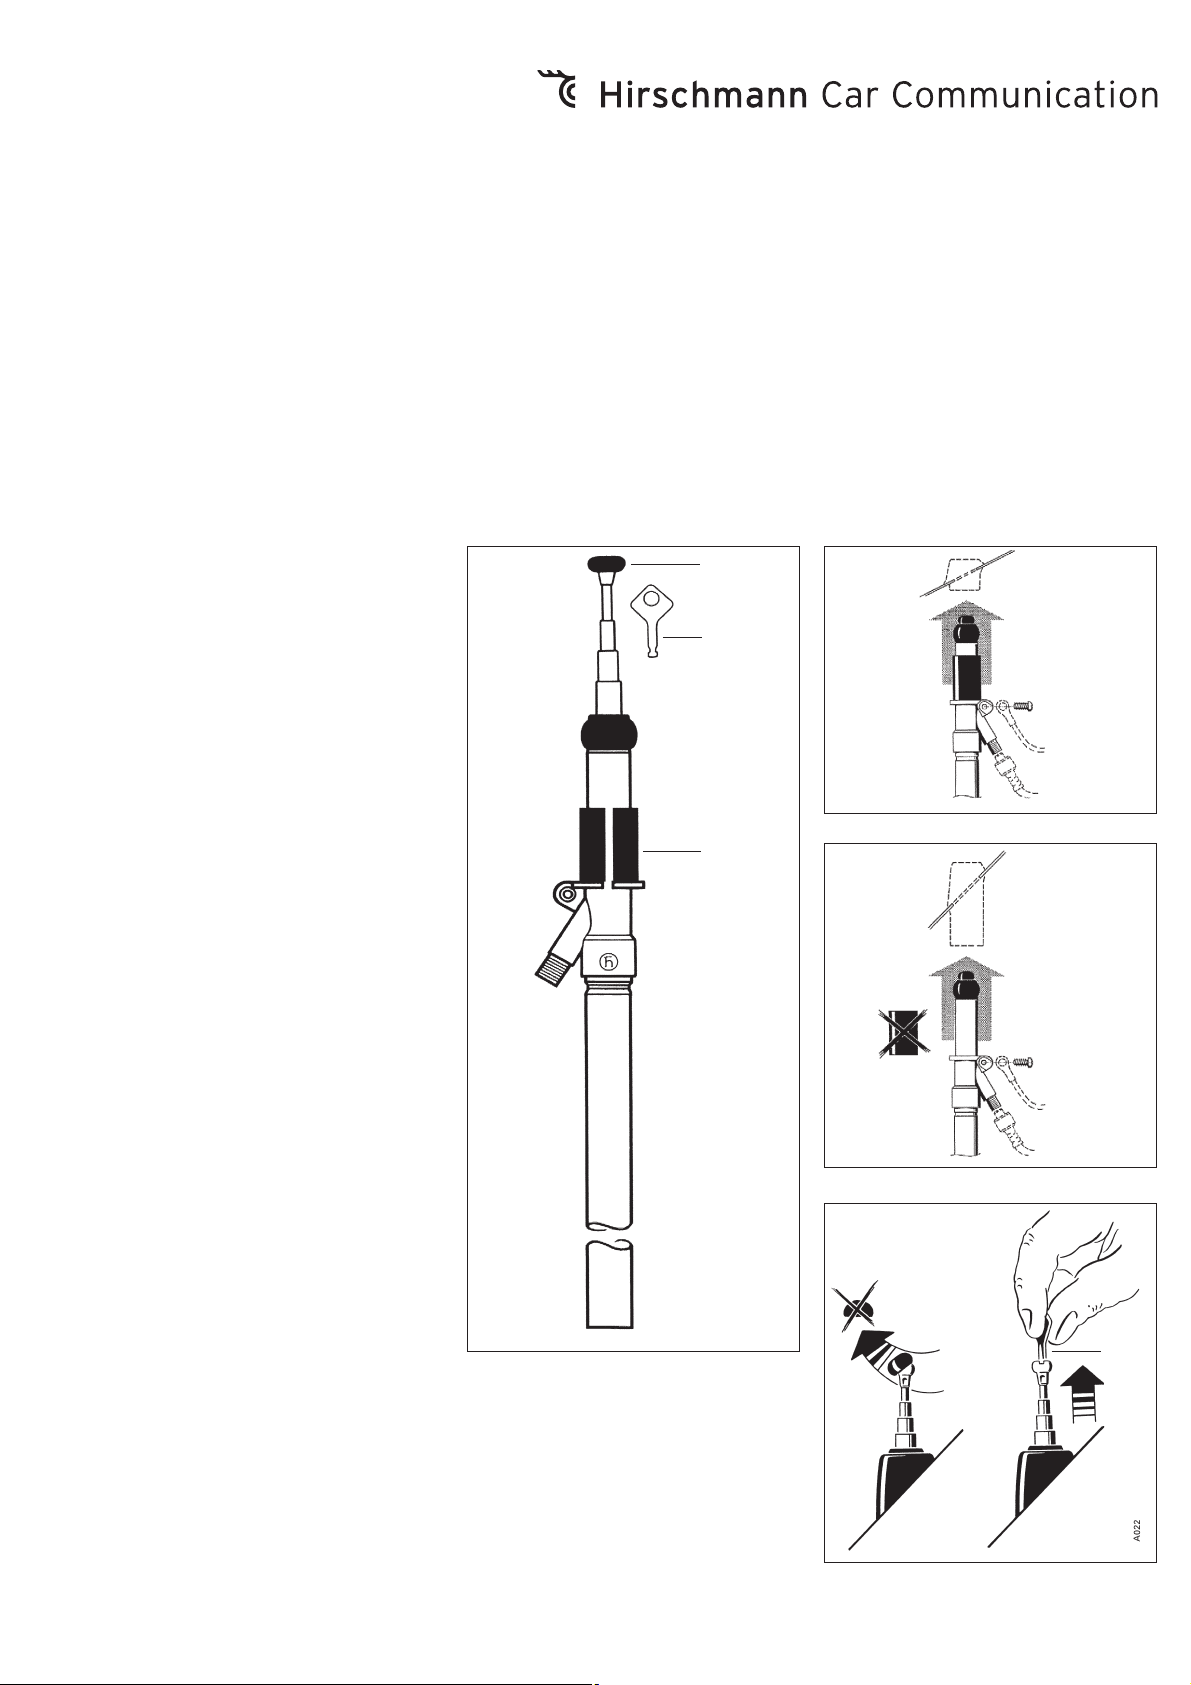
Fig. 1
Einbauanleitung
Die beschädigte Antenne ausbauen.
Halter, Antennenkabel und Masseband an
der Antenne abschrauben. Die Einknöpftülle
verbleibt im Fahrzeug.
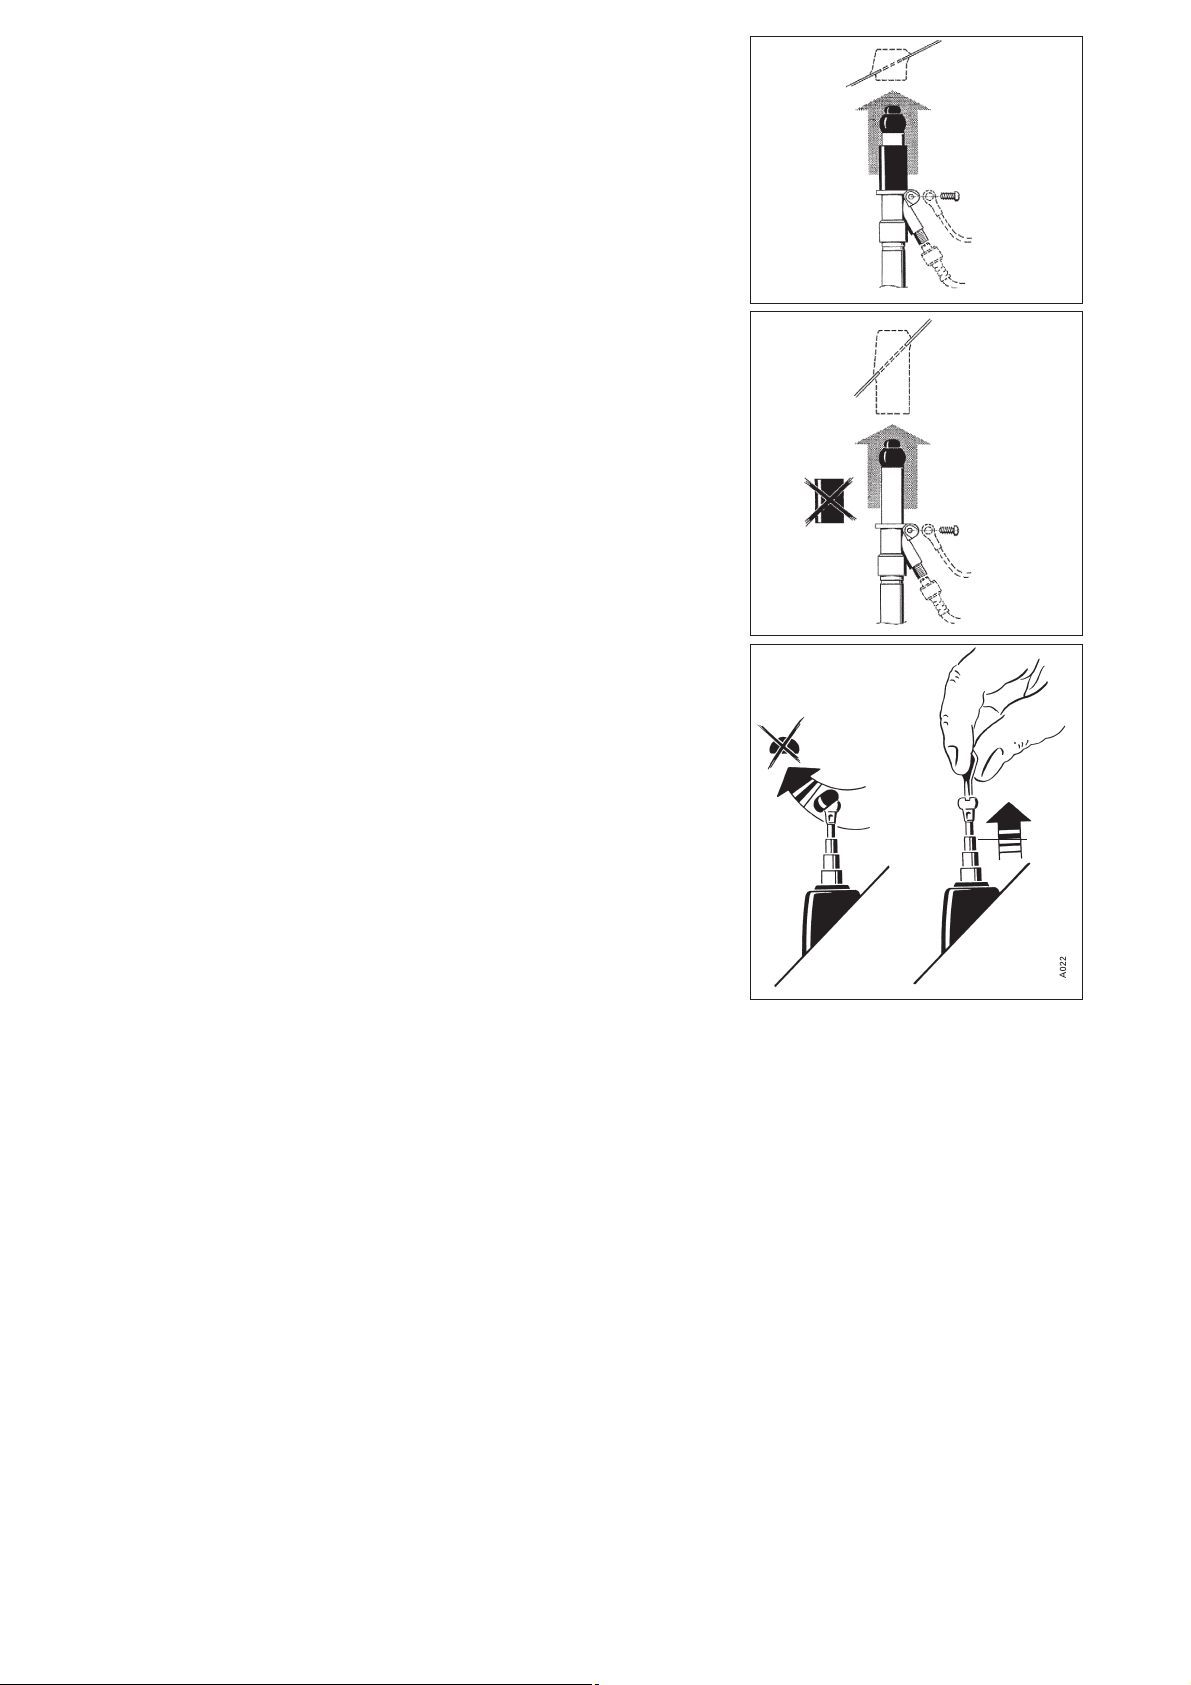
Die Distanzhülse verbleibt bei kurzen Karos-
serietüllen auf dem Antennenstutzen (Fig. 1
und 2).
Bei langen Karosserietüllen die geschlitzte
Distanzhülse
➂
über die Kugel vom Anten-
nenstutzen abziehen (Fig. 3).
Bei der neuen Antenne das Antennenkabel
und das Masseband am Antennenstutzen
festschrauben. Den Kugelstutzen mit etwas
Antennenfett (AUTA 115) bestreichen und die
Antenne von unten in die Karosserietülle eindrücken (Fig. 2 oder 3). Die Antenne mit Halter
am Schutzrohr gegen das vorhandene Langloch am Karosseriesteg anschrauben. Teleskop ausziehen, Neigung kontrollieren (evt.
Karosserietülle etwas drehen); danach
Schrauben am Halter fest anziehen.
Das Teleskop ist mit einem Stülpknopf
➀
ausgerüstet und kann von Hand gegriffen
werden. Mit abgenommenem Stülpknopf
kann das Teleskop vollständig versenkt und
nur mit dem Schlüssel
➁
ausgezogen werden
(Fig. 4).
Das unterste Rohr der Antenne muß stets vollständig ausgezogen werden. Nur so ist ein einwandfreier Empfang gewährleistet.
Reinigen Sie die Antenne von Zeit zu Zeit von
anhaftendem Straßenstaub.
Verwenden Sie nur ganz wenig von unserem
Spezialfett in Tuben AUTA 235 oder benutzen Sie
unser Autoantennen-Pflegetüchlein AUTA 135,
das gleichzeitig reinigt und fettet. Das Teleskop
anschließend mit einem Lappen trocken nachwischen.
Technische Änderungen vorbehalten.
Dieses Produkt ist nach seiner Verwendung
entsprechend den aktuellen Entsorgungsvorschriften Ihres Landkreises / Landes / Staates
als Elektronikschrott einer geordneten Entsorgung zuzuführen.
Die beschriebenen Leistungsmerkmale sind nur
dann verbindlich, wenn sie bei Vertragsabschluss
ausdrücklich vereinbart wurden. Diese Druckschrift
wurde von Hirschmann Car Communication GmbH
Fig. 2
Fig. 3
Fig. 4
➀
➁
➂
➁
Spare antenna
for AUTA 4000 F…
Antenne de rechange
pour AUTA 4000 F…
auf Übereinstimmung mit den beschriebenen
Antennen und Antennenzubehör (Kabel, Stecker
etc.) geprüft. Dennoch können Abweichungen
hinsichtlich der Richtigkeit oder Genauigkeit
nicht ausgeschlossen werden, sodass Hirschmann für die vollständige Übereinstimmung
keine Gewähr übernimmt. Hirschmann behält
sich das Recht vor, den Inhalt dieser Druckschrift
ohne Ankündigung zu ändern.
Page 2
Installation instructions
Dismount the damaged antenna. Screw off
support, antenna cable connection and
earthing strap. The snap-in sleeve remains in
the car body.
The distance piece remains on the antenna
neck with short snap-in sleeves (fig. 1 and 2).
In case of long snap-in sleeves, remove the
slotted distance piece
➂
by pulling it over the
sphere of the antenna neck (fig. 3).
Screw-on the antenna cable connector and
the earthing band at the antenna neck.
Spread the spherical antenna head with special grease (AUTA 115) and insert the antenna
from below into the body sleeve (fig. 2 or 3).
Fix the antenna by fastening the bracket to
the existing oblong hole in the car body bar.
Extend the telescope, check the angle (if
necessary, adjust by turning the body sleeve), then tighten the screws at the bracket.
The telescope is equipped with a plastic
knob
➀
for being extended by hand. After
removing this knob the telescope can be fully
retracted and then only be extended if using
the key
➁
(fig.4).
The lowest tube should be always fully extended
to ensure a perfect reception.
From time to time, clean the antenna from
adhering dust. Use only a little of our special car
antenna grease AUTA 235, supplied in tubes, or
our car antenna tissue AUTA 135 for both, cleaning and greasing. Subsequently wipe the telescope with a dry cloth.
Right of modification reserved.
After its use, this product has to be processed
as electronique scrap to a proper disposal
according to the prevailing waste disposal regulations of your community / district / country /
state.
The performance features described here are
binding only if they have been expressly guaranteed in the contract. This publication has been
created by Hirschmann Car Communication GmbH
according to the best of our knowledge.
Hirschmann reserves the right to change the
contents of this manual without prior notice.
Hirschmann can give no guarantee in respect of
the correctness or accuracy of the details in this
publication.
Instructions de montage
Démonter l'antenne endommagé. Dévisser
support, câble d'antenne et bande de
masse. Le manchon encliquetable reste dans
la carrosserie.
La douille de distance reste sur la rallonge
d'antenne avec manchons courts (fig. 1 et 2).
Concernant des manchons longues, enlever
la douille de distance à fente
➂
en la tirant
au-dessus de la bille de rallonge (fig. 3).
Visser à fond le câble d'antenne et la bande
de masse à la rallonge d'antenne neuve.
Enduire la bille d'un peu de graisse à l'antenne
(AUTA 115) et pousser l'antenne du dessous
dans le manchon d'étanchéité (fig. 2 ou 3).
Visser l'antenne avec support au tube de
protection contre le trou oval existant à la travers de carrosserie. Tirer le télescope, contrôler l'inclinaison (tourner éventuellement un
peu le manchon d'étanchéité); ensuite serrer
à fond les vis au support.
Le télescope est muni d'un bouton plastique
➀
et peut être saisi et sorti à main. Le télescope
peut être complètement noyé avec le bouton
plastique enlevé et ainsi être sorti seulement
avec las clé
➁
(fig.4).
Le tube le plus bas de l'antenne doit toujours
être sorti complètement. Seulement de cette
façon, il est possible d'avoir une réception parfaite.
De temps en temps, veuillez nettoyer votre
antenne des poussières adhérentes. N'utilisez
que très peu de notre graisse spéciale en tube
AUTA 235 ou notre essuie-antenne AUTA 135
qui nettoie et graisse en même temps. Enfin,
essuyer le télescope avec un chiffon sec.
Sous réserve de modifications techniques.
Ce produit doit être éliminé en tant que déchet
électronique conformément au réglement actuel
sur l'élimination des déchets de votre département /région/pays.
La société Hirschmann Car Communication GmbH
ne se porte garante de la véracité des informations
techniques que si elles ont été spécifiées de
manière expresse à la signature du contrat.
Le contenu de ce document a été minutieusement contrôlé afin de s’assurer qu’il corresponde
bien aux antennes et accessoires (câbles,
connecteurs) décrits. Toutefois, Hirschmann ne
peut en aucun cas être tenu responsable de
l’exactitude de ces informations. Hirschmann se
réserve le droit de modifier sans préavis le contenu de ce document.
Fig. 2
Fig. 3
Fig. 4
024 639-000-11-0306-N
Printed in Europe . Imprimé en Europe
➁
Hirschmann Car Communication GmbH
Stuttgarter Strasse 45 - 51
D-72654 Neckartenzlingen
Tel +49-7127-14-1873
Fax +49-7127-14-1428
 Loading...