

HiRO H50212 User Manual
802.11n
WLAN ADSL2+ Router
User’s Manual

802.11n WLAN ADSL2+ Router User’s Guide
Table of Contents
1 Introduction .......................................................... 8
Features ................................................................................ 8
Device Requirements ........................................................... 8
Using this Document ............................................................. 9
Notational conventions .................................................. 9
Typographical conventions ............................................ 9
Special messages .......................................................... 9
Getting Support ..................................................................... 9
2 Getting to know the device ................................ 10
Computer / System requirements ...................................... 10
Package Contents .............................................................. 10
For Annex-B 802.11n WLAN ADSL2+
Router ....................................................................... 10
For Annex-A 802.11n WLAN ADSL2+
Router ....................................................................... 10
Installation & Setup ............................................................. 11
LED meanings & activations .............................................. 13
Back Panel Connectors ............................................... 14
3 Computer configurations under
different OS, to obtain IP address
automatically ................................................... 16
4 Utility CD execution ........................................... 24
Connecting the Hardware ................................................... 24
Wireless Connection ........................................................... 30
5 Getting Started with the Web pages ................. 32
Accessing the Web pages .................................................. 32
Testing your Setup .............................................................. 35
Default device settings ........................................................ 35
6 Overview ........................................................... 37
Internet access settings ...................................................... 39
About Wireless ADSL2+ Router ......................................... 39
7 Status ................................................................ 40
Device Info .......................................................................... 40
ADSL ................................................................................... 42
Statistics .............................................................................. 43
8 Internet Access .................................................. 44
Types of Internet Access .................................................... 45
2

802.11n WLAN ADSL2+ Router User’s Guide
Configuring your PPPoE DSL connection ......................... 46
Configuring your PPPoA DSL connection ......................... 48
Configuring your Bridged DSL connection ......................... 50
Configuring your 1483 MER by DHCP .............................. 51
Configuring your 1483 MER by Fixed IP ........................... 52
ATM Settings ....................................................................... 53
ADSL Settings ..................................................................... 55
9 Local Network Configuration ............................. 57
Changing the LAN IP address and subnet
mask ................................................................................ 57
Adding the Secondary LAN IP address and
subnet mask .................................................................... 62
10 DHCP Settings .................................................. 63
DHCP Server Configuration ............................................... 63
DHCP Relay Configuration ................................................. 65
DHCP None Configuration ................................................. 67
11 DHCP Static Configuration ................................ 68
DHCP Static Configuration ................................................. 68
12 LAN IPv6 Configuration ..................................... 69
DHCP Static Configuration ................................................. 69
13 Wireless Network .............................................. 70
Basic Settings ..................................................................... 70
Security ................................................................................ 72
WEP + Encryption Key ................................................ 74
WEP + Use 802.1x Authentication .............................. 75
WPA/WPA2/WPA2 Mixed + Personal
(Pre-Shared Key)...................................................... 75
WPA/WPA2/WPA2 Mixed + Enterprise
(RADIUS) .................................................................. 77
Wireless Multiple BSSID Settings ...................................... 78
Access Control .................................................................... 80
Allow Listed .................................................................. 81
Deny Listed .................................................................. 81
Advanced Settings .............................................................. 83
WPS .................................................................................... 86
Introduction of WPS ..................................................... 86
Supported WPS features ............................................. 86
AP mode ....................................................................... 87
AP as Enrollee ............................................................. 87
AP as Registrar ............................................................ 87
3

802.11n WLAN ADSL2+ Router User’s Guide
AP as Proxy ................................................................. 87
Infrastructure-Client mode ........................................... 87
Instructions of AP’s and Client’s
operations ................................................................. 88
Operations of AP - AP being an enrollee ........................... 90
Operations of AP - AP being a registrar ........................... 101
AP mode ..................................................................... 101
Push Button method .................................................. 105
14 Routing ............................................................109
Static Route ....................................................................... 109
IPv6 Static Route .............................................................. 111
RIP ..................................................................................... 112
15 DMZ .................................................................114
Configuring DMZ ............................................................... 114
16 Virtual Server ...................................................116
Configuring Virtual Server ................................................. 116
Configuring custom applications ...................................... 117
Virtual Server for FTP ................................................ 118
Port Forwarding for HTTP ......................................... 121
Deleting custom applications ..................................... 124
17 NAT Forwarding ..............................................125
Configuring NAT Forwarding ............................................ 125
18 ALG .................................................................126
Configuring ALG ............................................................... 126
19 NAT Exclude IP ...............................................127
Configuring NAT Exclude IP ............................................. 127
20 Port Trigger .....................................................128
Configuring Port Trigger ................................................... 128
21 FTP ALG Portl .................................................129
Configuring Port Trigger ................................................... 129
22 Nat IP Mapping................................................130
Configuring Port Trigger ................................................... 130
23 IP QoS .............................................................131
IP QoS ............................................................................... 131
24 CWMP Config .................................................133
CWMP Configuration ........................................................ 133
25 Port Mapping ...................................................135
Port Mapping ..................................................................... 135
4

802.11n WLAN ADSL2+ Router User’s Guide
26 Bridging ...........................................................138
Bridging ............................................................................. 138
27 Client Limit .......................................................139
Client Limit ......................................................................... 139
28 Tunnel Configuration .......................................140
Tunnel Configuration ........................................................ 140
29 Others ..............................................................141
Others ................................................................................ 141
30 IGMP Proxy .....................................................142
IGMP Proxy ....................................................................... 142
31 UPnP ...............................................................143
Configuring UPnP ............................................................. 144
UPnP Control Point Software on Windows
ME .................................................................................. 145
UPnP Control Point Software on Windows
XP with Firewall ............................................................. 145
SSDP requirements ................................................... 146
32 SNMP ..............................................................149
SNMP ................................................................................ 149
33 DNS Configuration ..........................................150
DHCP Server Configuration - Attain DNS
Automatically ................................................................. 150
DHCP Server Configuration - Set DNS
Manually ......................................................................... 151
IPv6 DNS........................................................................... 152
34 Dynamic DNS Configuration ...........................153
Overview of Dynamic DNS ............................................... 153
Dynamic DNS Configuration – DynDNS.org ................... 155
Dynamic DNS Configuration – TZO ................................. 157
35 MAC Filtering ...................................................159
Configuring MAC filtering to Deny for
outgoing access ............................................................. 159
36 IP/Port Filtering ................................................161
IP/Port Filtering .................................................................. 161
37 URL Filter ........................................................163
Configuring URL Blocking of Keyword ............................. 163
38 ACL Configuration ...........................................165
ACL Config ........................................................................ 165
39 DoS .................................................................166
DoS Config ........................................................................ 166
5

802.11n WLAN ADSL2+ Router User’s Guide
40 Firmware Update .............................................167
About firmware versions ................................................... 167
Manually updating firmware .............................................. 167
41 Backup/Restore ...............................................171
Backup settings ................................................................. 171
Restore settings ................................................................ 172
42 Password .........................................................173
Setting your username and password ............................. 173
43 Commit/Reboot ...............................................175
Commit .............................................................................. 175
Reboot ............................................................................... 176
Resetting to Defaults ......................................................... 176
44 Time Zone .......................................................178
SNTP Server and SNTP Client
Configuration settings .................................................... 178
45 Log ...................................................................184
Log ..................................................................................... 184
46 Diagnostic ........................................................185
Ping ................................................................................... 185
Ping6 ................................................................................. 186
Tracert ............................................................................... 187
OAM Loopback ................................................................. 187
ADSL Diagnostic ............................................................... 189
Diagnostic Test ................................................................. 190
A Configuring your Computers ...........................193
Configuring Ethernet PCs ................................................. 193
Before you begin ........................................................ 193
Windows® XP PCs .................................................... 193
Windows 2000 PCs ................................................... 193
Windows Me PCs ...................................................... 195
Windows 95, 98 PCs ................................................. 195
Windows NT 4.0 workstations ................................... 196
Assigning static Internet information to
your PCs ................................................................. 197
B IP Addresses, Network Masks, and
Subnets ........................................................198
IP Addresses ..................................................................... 198
Structure of an IP address ......................................... 198
Network classes ......................................................... 198
6

802.11n WLAN ADSL2+ Router User’s Guide
Subnet masks ................................................................... 199
C Troubleshooting ...............................................201
Troubleshooting Suggestions ........................................... 201
Diagnosing Problem using IP Utilities .............................. 203
ping ............................................................................. 203
nslookup ..................................................................... 204
D Glossary ..........................................................205
7

802.11n WLAN ADSL2+ Router User’s Guide
1 Introduction
Congratulations on becoming the owner of the Wireless
ADSL2+ Router. You will now be able to access the Internet
using your high-speed DSL connection.
This User Guide will show you how to connect your Wireless
ADSL2+ Router, and how to customize its configuration to
get the most out of your new product.
Features
The list below contains the main features of the device and
may be useful to users with knowledge of networking
protocols. If you are not an experienced user, the chapters
throughout this guide will provide you with enough
information to get the most out of your device.
Features include:
Internal DSL modem for high-speed Internet access
10/100Base-T Ethernet Router to provide Internet
connectivity to all computers on your LAN
Network address translation (NAT) functions to provide
security for your LAN
Network configuration through DHCP Server and DHCP
Client
Services including IP route and DNS configuration, RIP, and
IP and DSL performance monitoring
User-friendly configuration program accessed via a web
browser
User-friendly configuration program accessed via EasySetup
program
Device Requirements
In order to use the Wireless ADSL2+ Router, you must have
the following:
DSL service up and running on your telephone line
Instructions from your ISP on what type of Internet
access you will be using, and the addresses needed to set
up access
One or more computers each containing an Ethernet
card (10Base-T/100Base-T network interface card (NIC))
For system configuration using the supplied
a. web-based program: a web browser such as Internet
Explorer v4 or later, or Netscape v4 or later. Note that version
4 of each browser is the minimum version requirement – for
optimum display quality, use Internet Explorer v5, or
Netscape v6.1
b. EasySetup program: Graphical User Interface
8
802.11n WLAN ADSL2+ Router User’s Guide
You do not need to use a hub or switch in order to connect more
Note
than one Ethernet PC to your device. Instead, you can connect
up to four Ethernet PCs directly to your device using the ports
labeled Ethernet on the rear panel.
Using this Document
Notational conventions
Acronyms are defined the first time they appear in the
text and also in the glossary.
For brevity, the Wireless ADSL2+ Router is referred to as
“the device”.
The term LAN refers to a group of Ethernet-connected
computers at one site.
Typographical conventions
Italic text is used for items you select from menus and
drop-down lists and the names of displayed web pages.
Bold text is used for text strings that you type when
prompted by the program, and to emphasize important
points.
Special messages
This document uses the following icons to draw your
attention to specific instructions or explanations.
Note
Provides clarifying or non-essential information on the current
topic.
Definition
Explains terms or acronyms that may be unfamiliar to many
readers. These terms are also included in the Glossary.
Provides messages of high importance, including messages
relating to personal safety or system integrity.
WARNING
Getting Support
Supplied by:
Helpdesk Number:
Website:
9

802.11n WLAN ADSL2+ Router User’s Guide
2 Getting to know the device
Computer / System requirements
1. Pentium 200MHZ processor or above
2. Windows 98SE, Windows Me, Windows 2000, Windows
XP, Windows Vista and Windows 7
3. 64MB of RAM or above
4. 25MB free disk space
Package Contents
For Annex-B 802.11n WLAN ADSL2+ Router
1. 802.11n WLAN ADSL2+ Router
2. CD-ROM (Software & Manual)
3. Quick Installation Guide
4. 1 x Telephone Cable (RJ-11)
5. Ethernet Cable (RJ-45)
6. Power Adapter
7. Annex-B Splitter (Optional, with an extra RJ-11
Telephone cable)
For Annex-A 802.11n WLAN ADSL2+ Router
1. 802.11n WLAN ADSL2+ Router
2. CD-ROM (Software & Manual)
3. Quick Installation Guide
4. 1 x Telephone Cable (RJ-11)
5. Ethernet Cable (RJ-45)
6. Power Adapter
7. Annex-A Splitter (Optional, with an extra RJ-11
Telephone cable)
10
802.11n WLAN ADSL2+ Router User’s Guide
Installation & Setup
Follow each STEP carefully and only go to the next step once you have complete the
previous STEP.
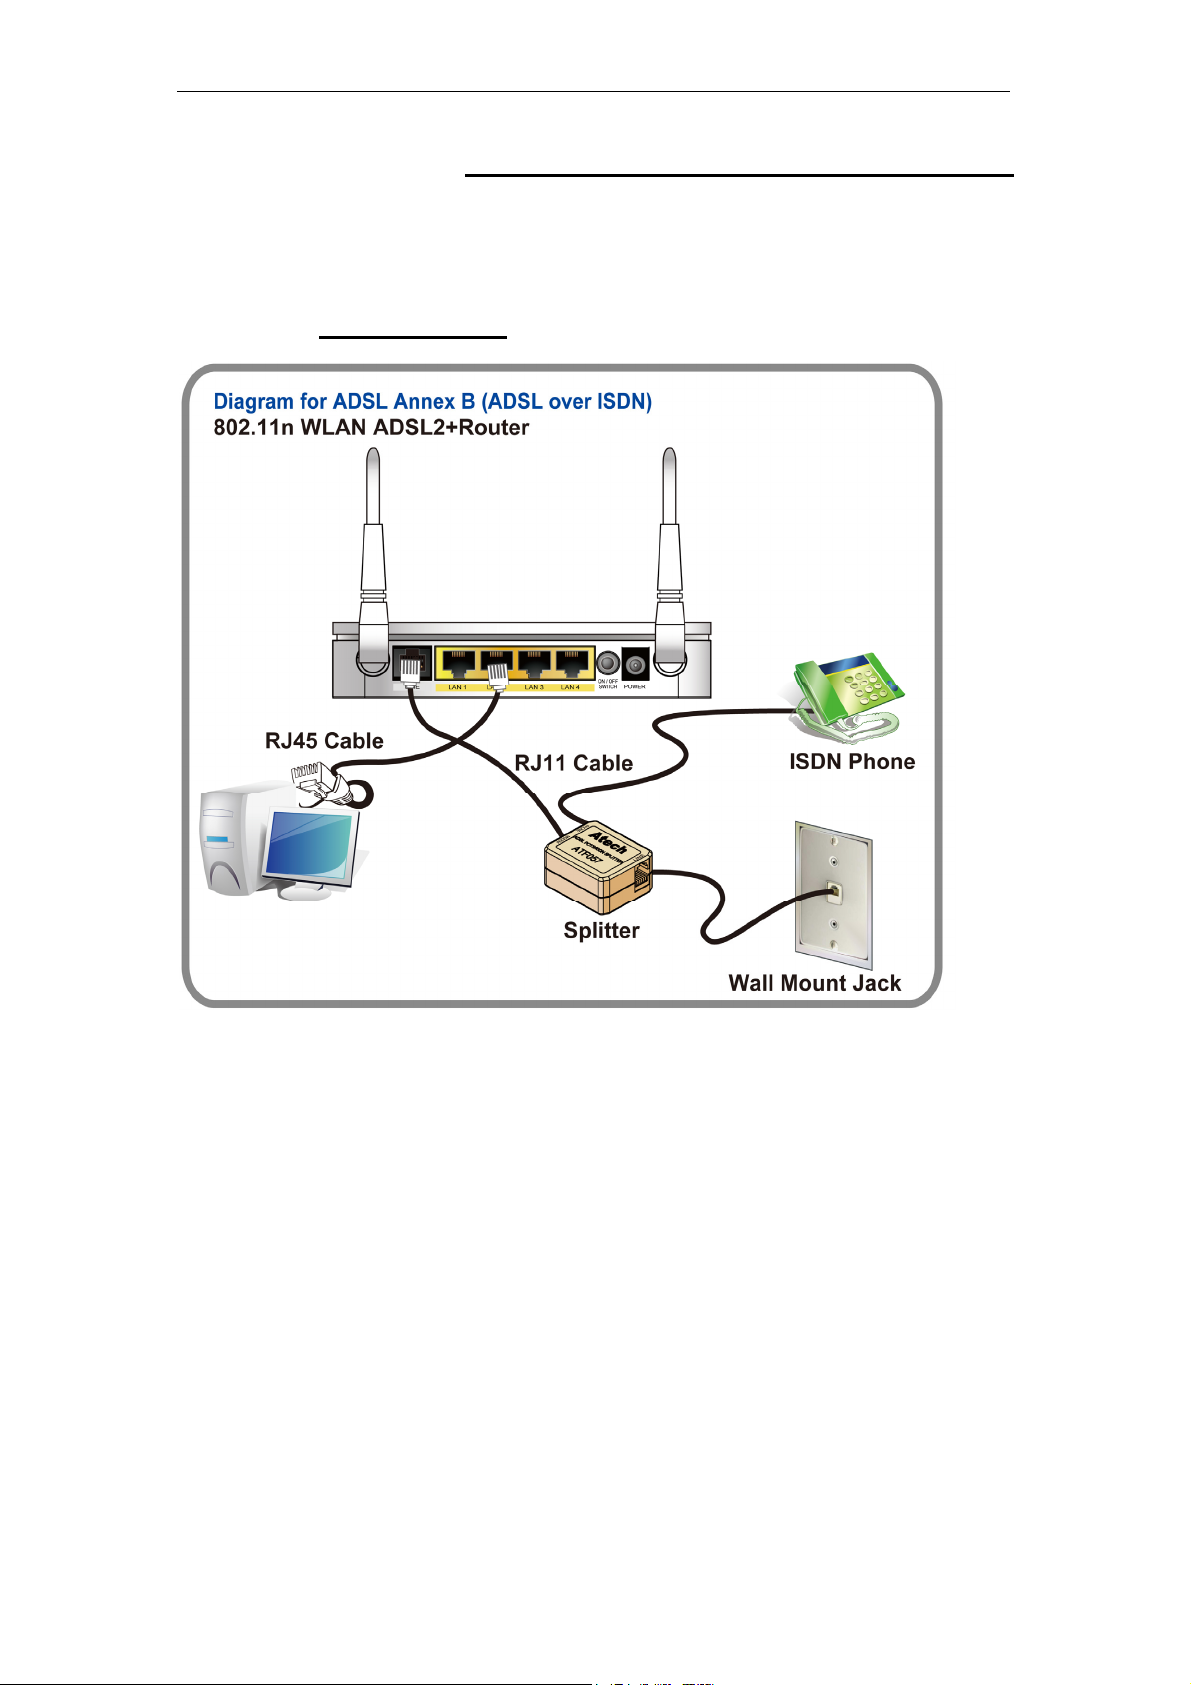
Connection of 802.11n WLAN ADSL2+ Router
If you have an ISDN telephone line
connect the modem router as shown below:
1. Connect the supplied RJ45 Ethernet cable from your PC's Ethernet port to any of the 4
802.11n WLAN ADSL2+ Router's LAN Ports.
2. Connect the supplied RJ11 telephone cable from your home's telephone jack to the
“LINE” port of the supplied splitter. Connect another RJ11 telephone cable to the
“MODEM” port of the splitter and connect the other end of this cable to the LINE port of
your 802.11n WLAN ADSL2+ Router.
supplied RJ11 telephone cable from your home's telephone jack to the “LINE” port of your
802.11n WLAN ADSL2+ Router.)
3. Connect a RJ11 telephone cable to the “PHONE” port of the splitter and connect the other
end to your telephone.
4. Connect the power adapter to the power inlet “POWER” of the 802.11n WLAN ADSL2+
Router and turn the “ON/OFF SWITCH” switch of your 802.11n WLAN ADSL2+ Router on.
(If there is no option Splitter, please connect the
11
802.11n WLAN ADSL2+ Router User’s Guide
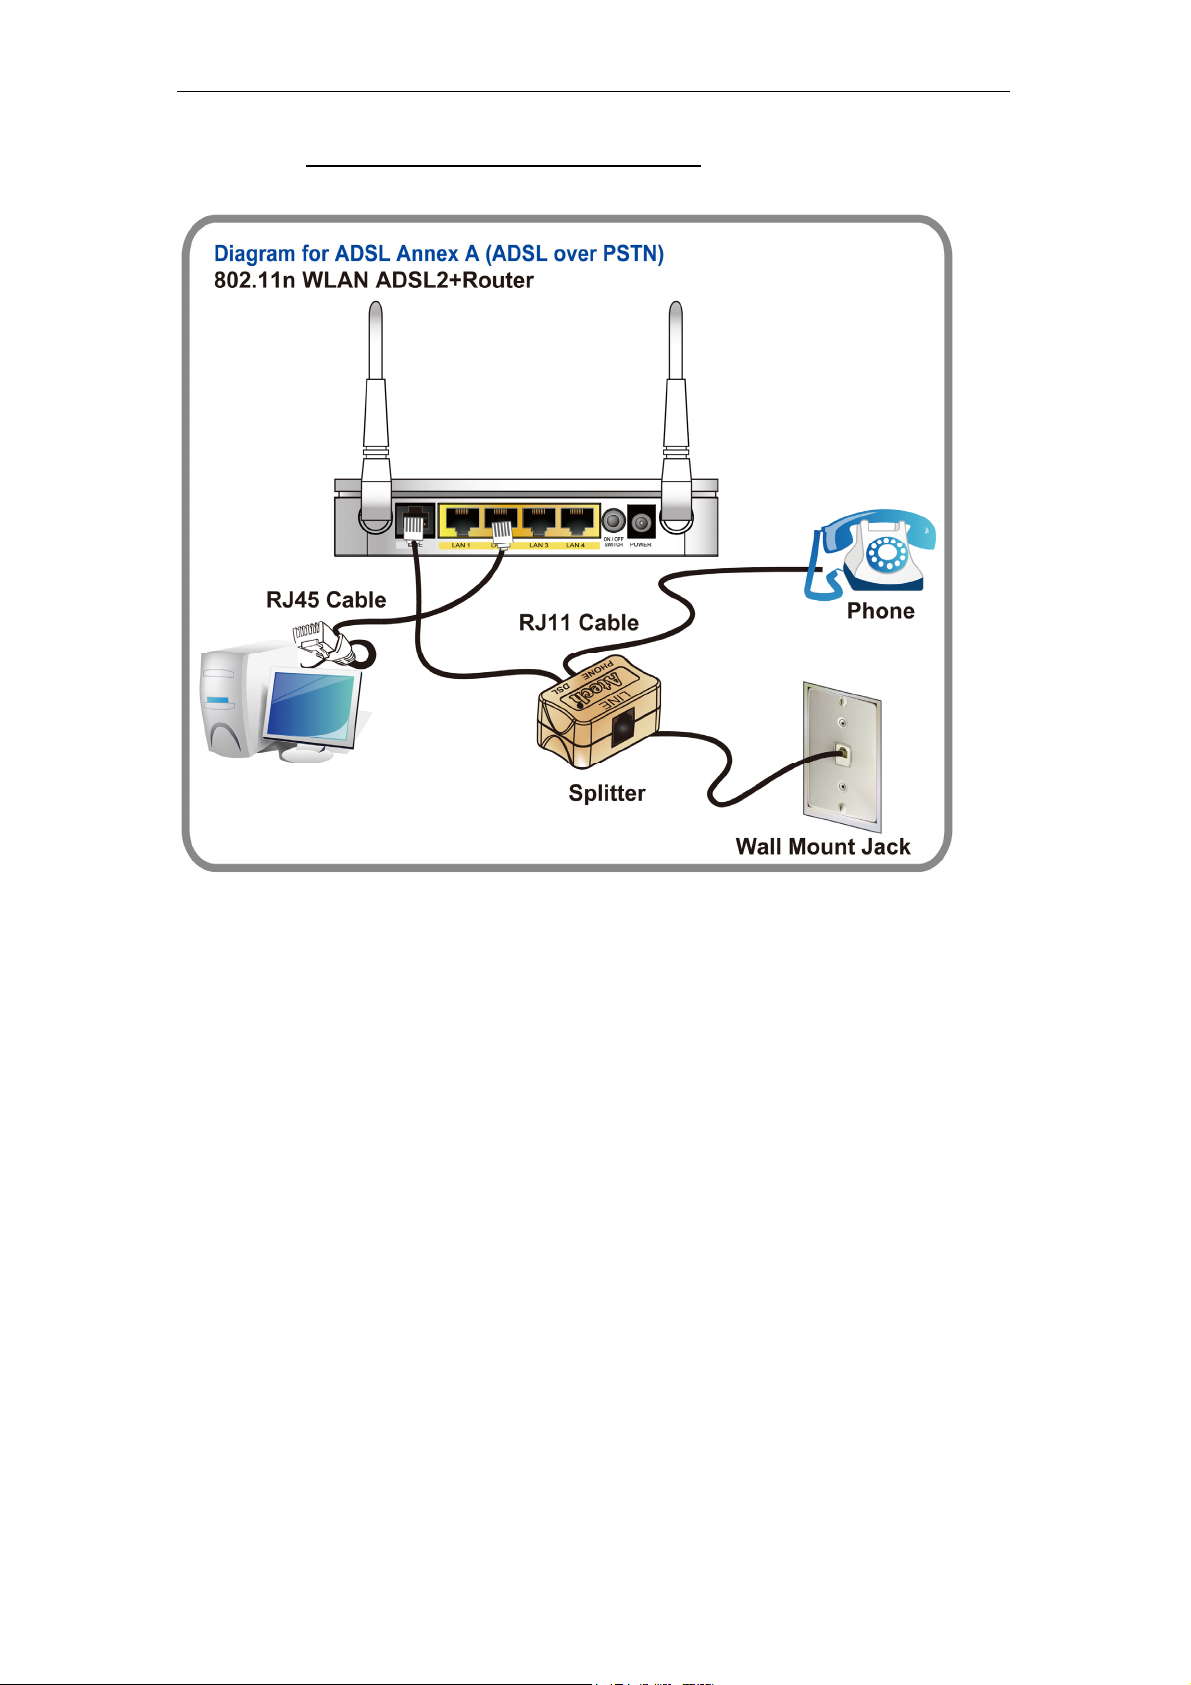
If you have a PSTN telephone line (normal analog line) connect the router as shown
below:
1. Connect the supplied RJ45 Ethernet cable from your PC's Ethernet port to any of the 4
802.11n WLAN ADSL2+ Router's LAN Ports.
2. Connect the supplied RJ11 telephone cable from your home's telephone jack to the
“LINE” port of the supplied splitter. Connect the other supplied RJ11 telephone cable to
the “DSL” port of the splitter and connect the other end of this cable to the “LINE” port of
your 802.11n WLAN ADSL2+ Router. (If there is no option Splitter, please connect the
supplied RJ11 telephone cable from your home's telephone jack to the “LINE” port of your
802.11n WLAN ADSL2+ Router.)
3. Connect a RJ11 telephone cable to the “PHONE” port of the splitter and connect the other
end to your telephone.
4. Connect the power adapter to the power inlet “POWER” of the 802.11n WLAN ADSL2+
Router and turn the “ON/OFF SWITCH” switch of your 802.11n WLAN ADSL2+ Router on.
12
802.11n WLAN ADSL2+ Router User’s Guide
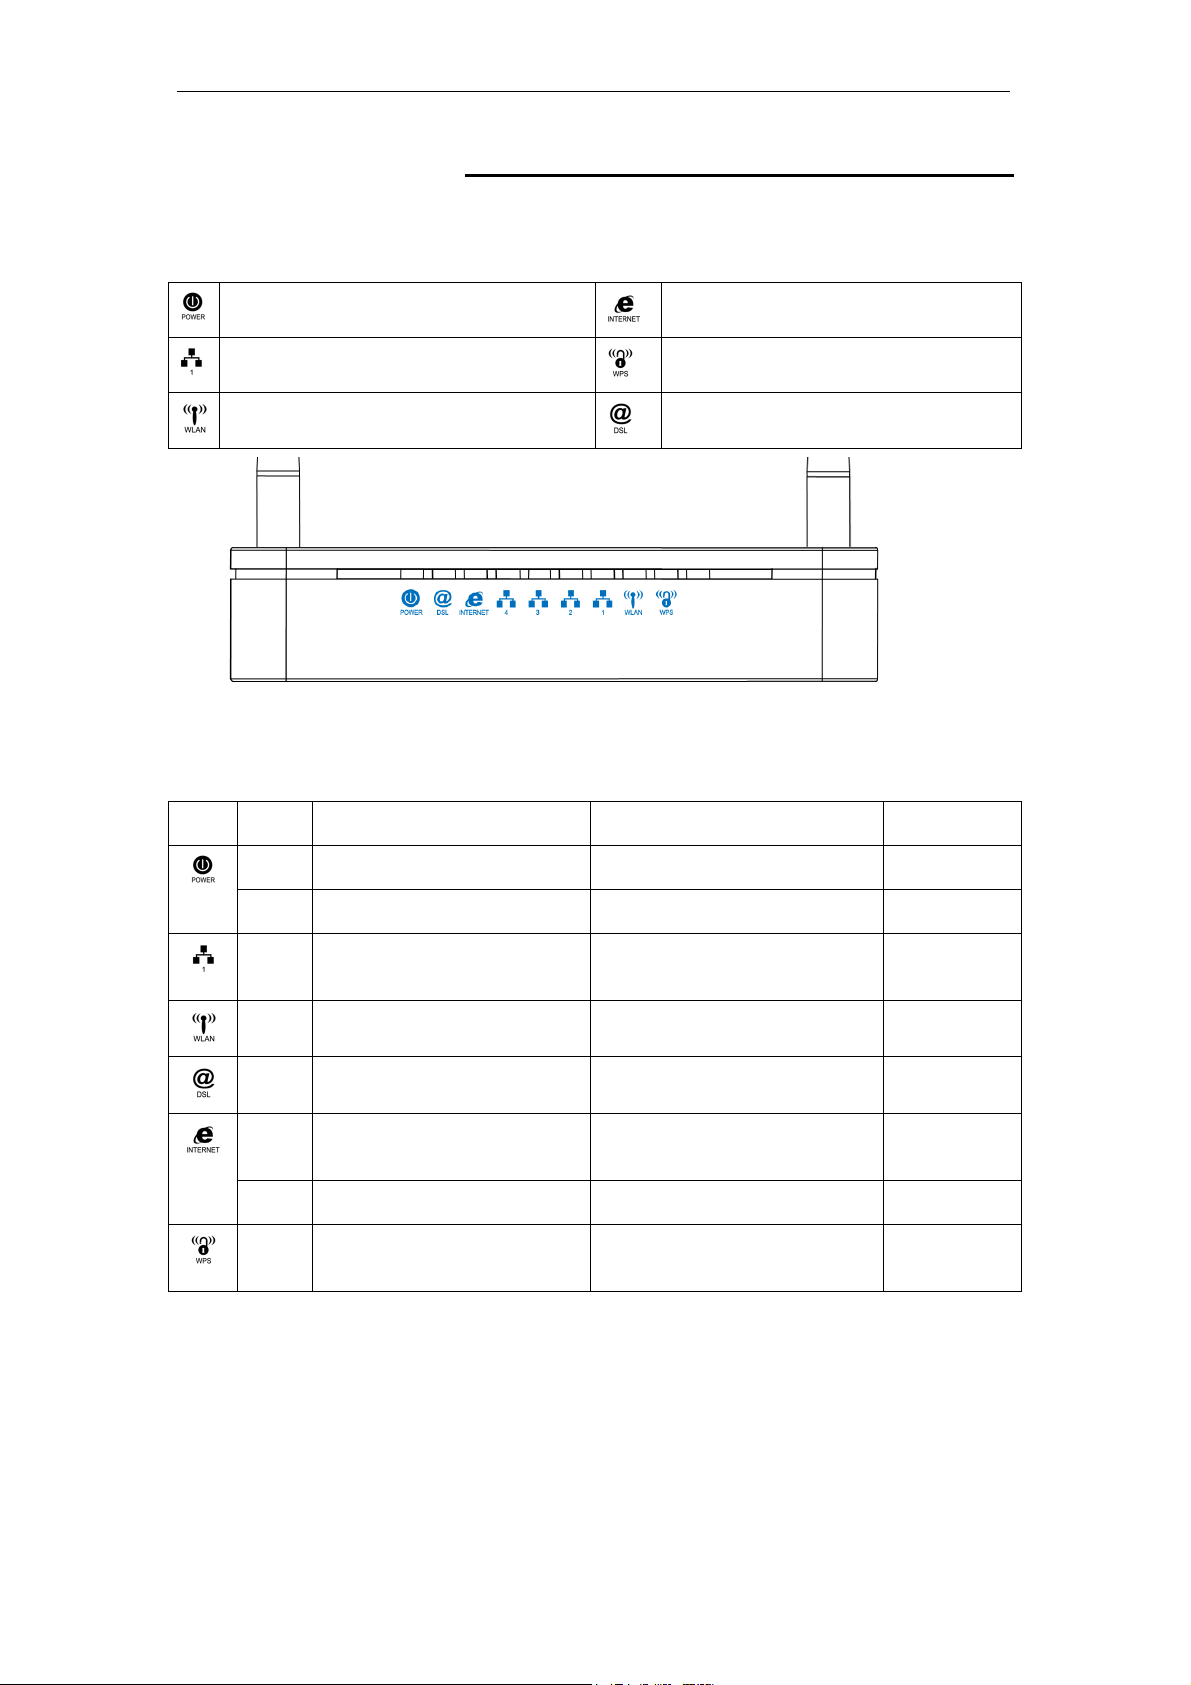
LED meanings & activations
Your 802.11n WLAN ADSL2+ Router has indicator lights on the
front side. Please see below for an explanation of the function of
each indicator light.
Power indicator
Ethernet Active indicator
Wireless Active indicator
Table1. LED function
Label Color On Flash Off
Red Device malfunction Waiting for device ready N/A
Green Ready Waiting for device ready Power Off
Internet Active indicator
WPS Active indicator
ADSL Link indicator
Green Ethernet Connected Transmit / Receive Data Ethernet
Green WLAN Ready Transmit / Receive Data WLAN Off
Green Connect to DSLAM Disconnect to DSLAM N/A
Green The device has a WAN IP
Red No WAN IP address from ISP N/A N/A
Green N/A Start WPS peer within 2
address from ISP
The icons appear on the products are for application indication
only.
The trademark or intellectual property is belonging to their
respective owners.
Transmit / Receive Data N/A
minutes
Disconnected
WPS Idle
13
802.11n WLAN ADSL2+ Router User’s Guide
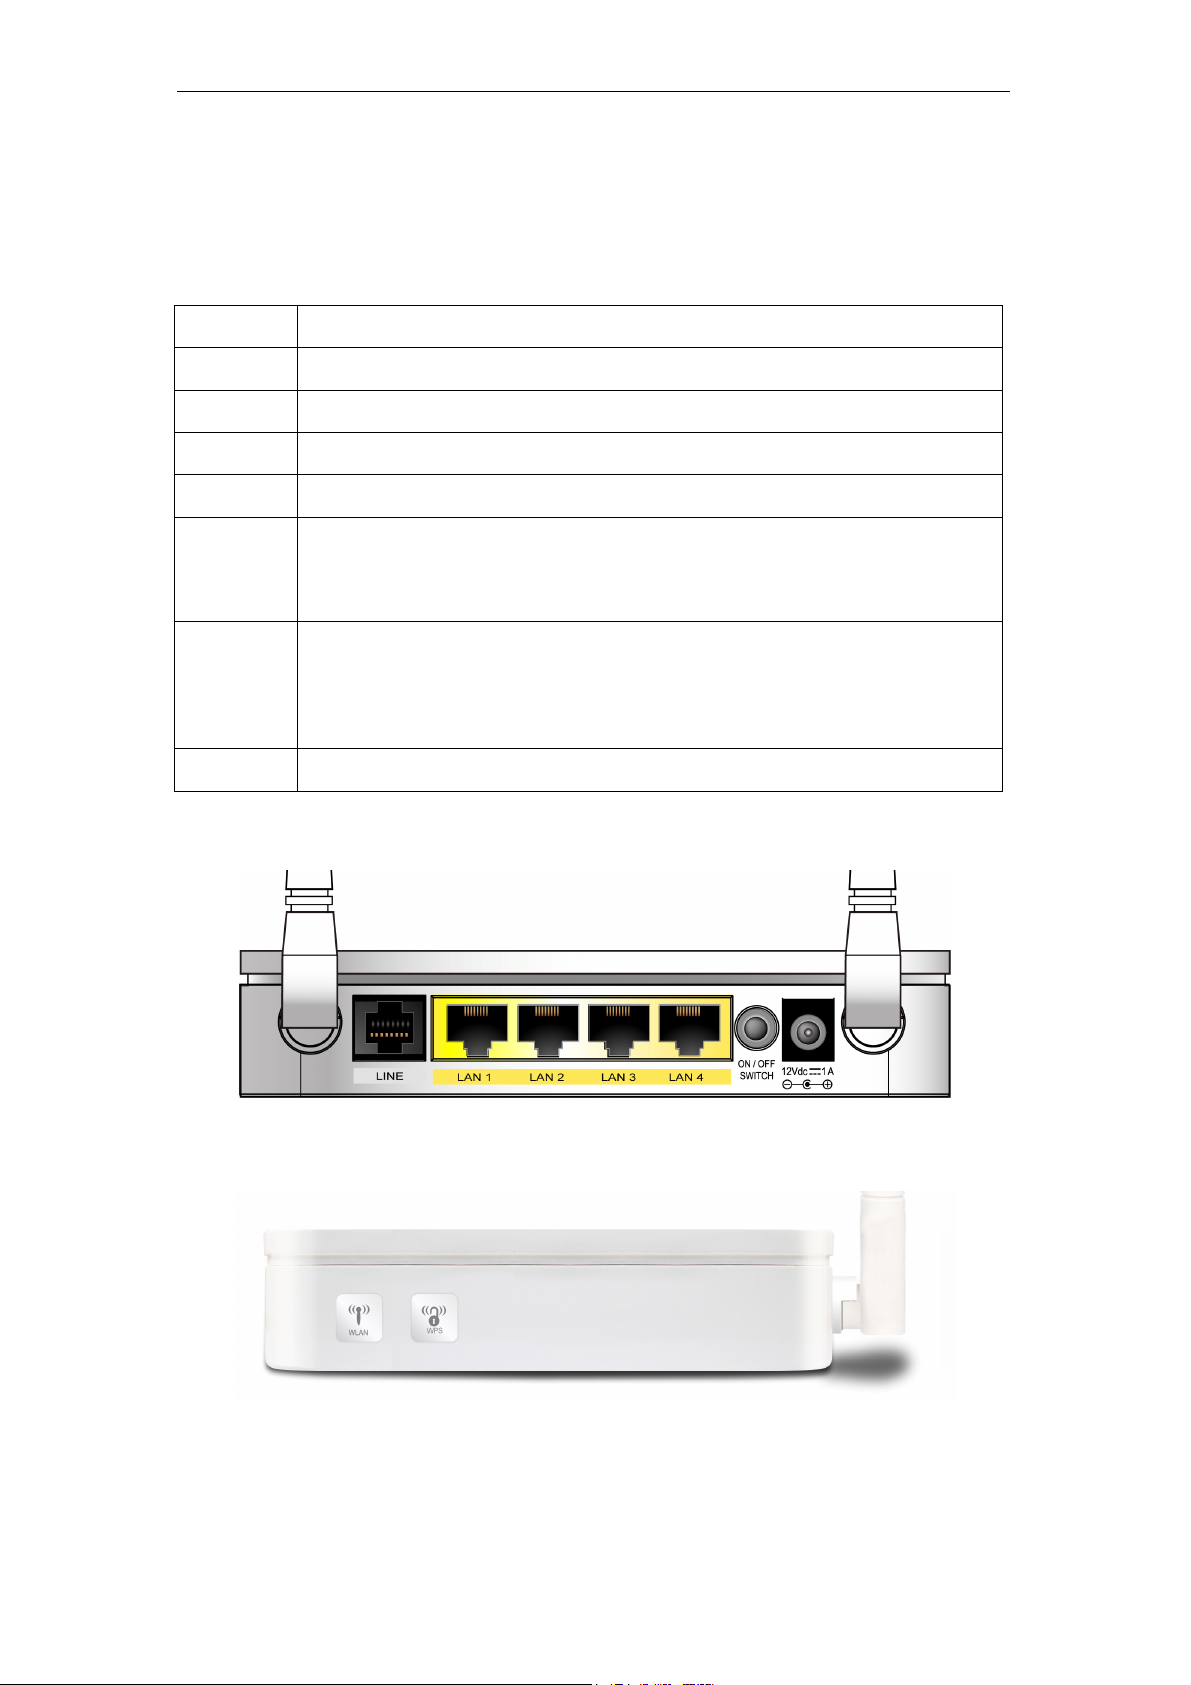
Back Panel Connectors
Table 2 shows the function of each connector and switch of the device.
Table 2. Function / Description of Connectors
Connector Description
POWER
SWITCH
LAN1~4
LINE
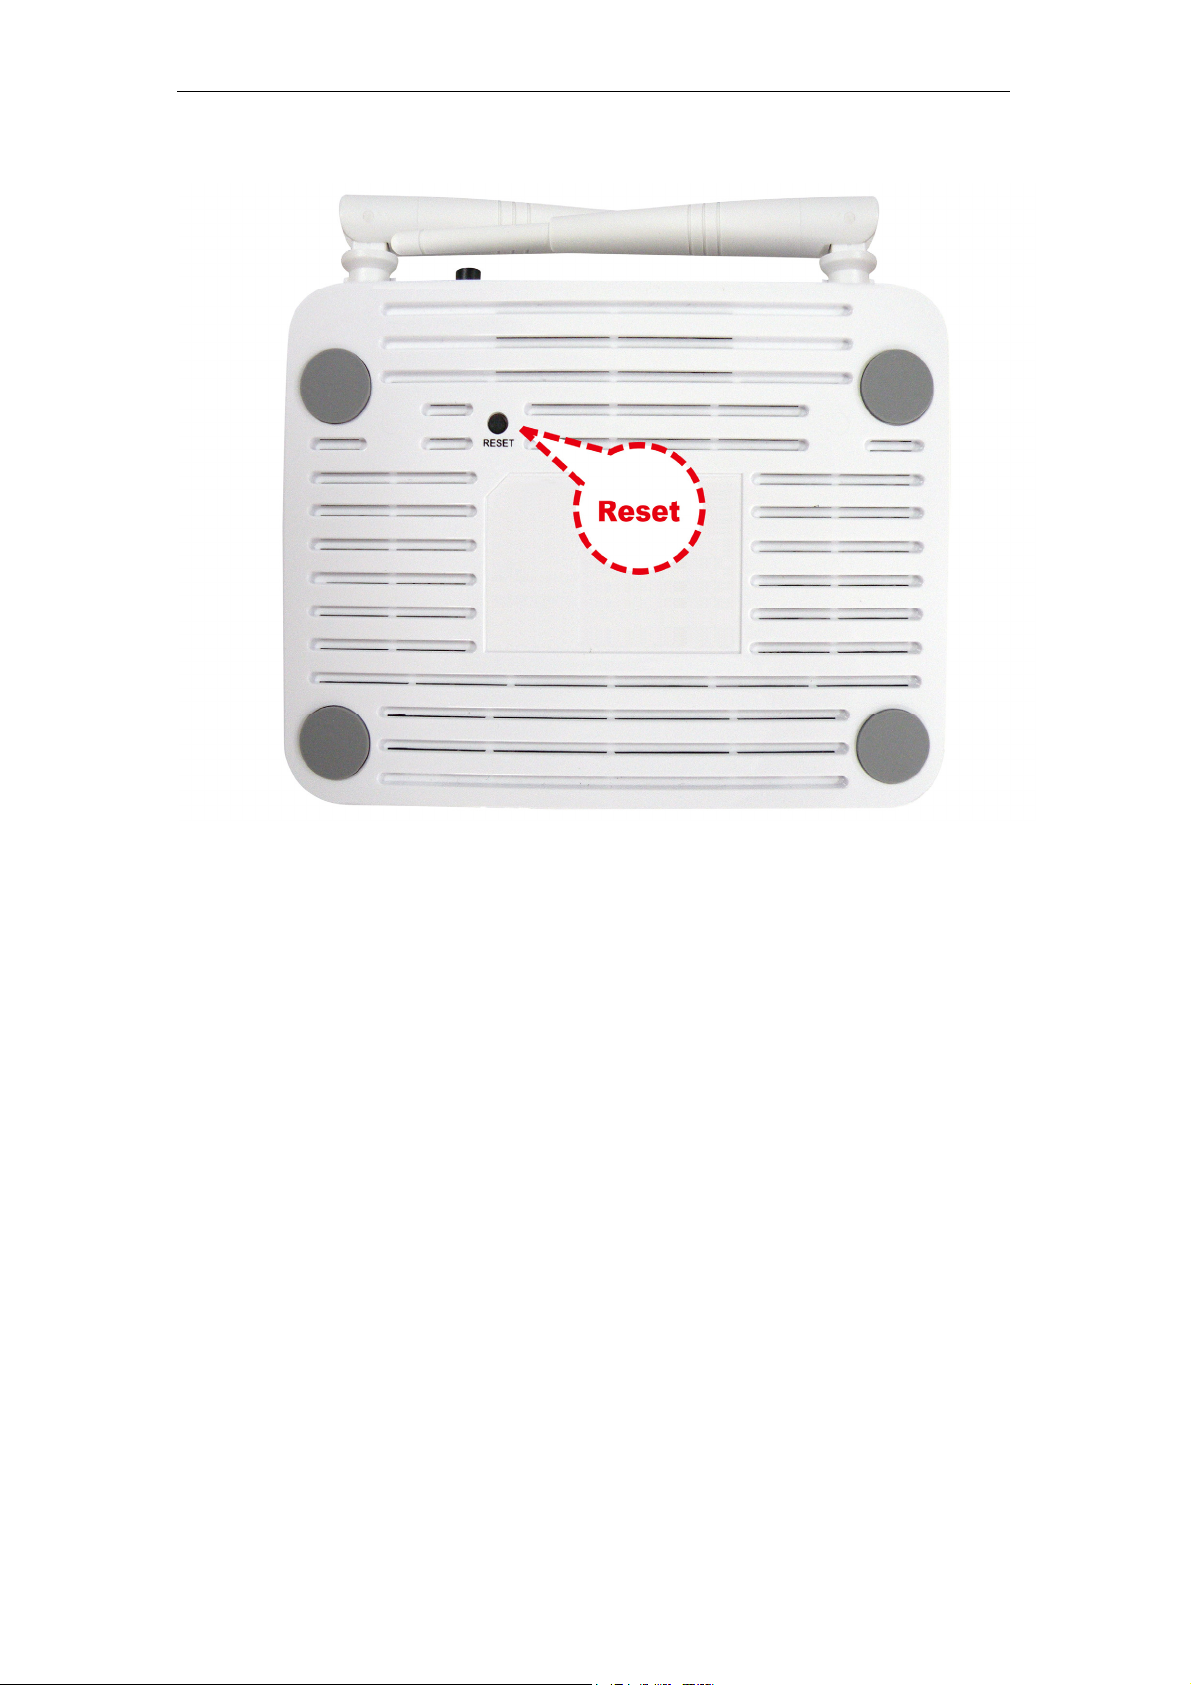
RESET
WPS
WLAN
Connects to your 802.11n WLAN ADSL2+ router 12Vac power Adapter
Power Switch
RJ-45 Jack (Ethernet Cable) connection to your PC, or HUB
Connects to your ADSL2+ line – for ADSL2+ Line input
Reset button. RESET the 802.11n WLAN ADSL2+ router to its default
settings.
Press this button for at least 5 full seconds to start to reset it to its default
settings.
Press this button for at least 3 full seconds and the WPS LED will flash to
start WPS.
Now go to the wireless adapter or device and press its WPS button. Make
sure to press the button within 120 seconds (2 minutes) after pressing the
router's WPS button.
Press this button for at least 3 full second to turn off/on wireless signals
Figure1. Rear View of the 802.11n WLAN ADSL2+ Router
Figure2. WPS and WLAN button
14
802.11n WLAN ADSL2+ Router User’s Guide
Figure3. RESET button
15
802.11n WLAN ADSL2+ Router User’s Guide
3 Computer configurations under different OS,
to obtain IP address automatically
Before starting the 802.11n WLAN ADSL2+ Router
configuration, please kindly configure the PC computer as
below, to have automatic IP address / DNS Server.
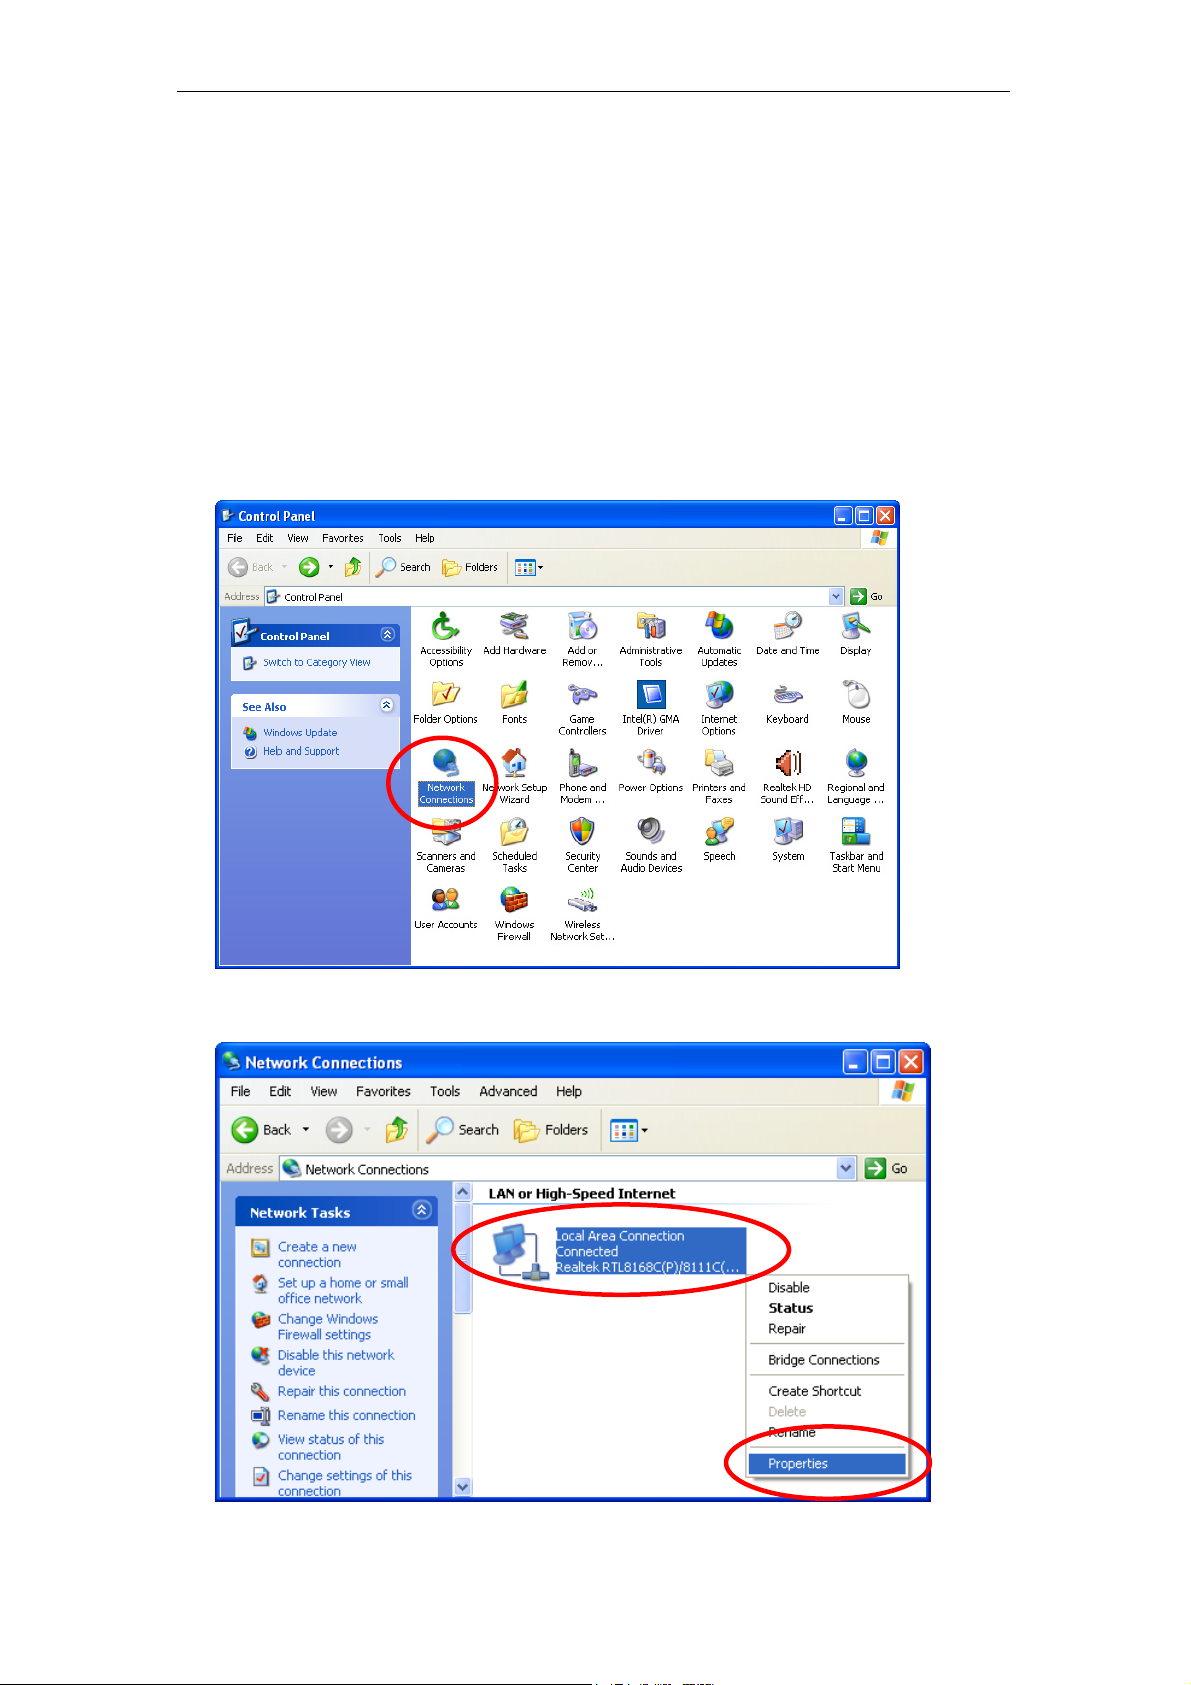
For Windows 98SE / ME / 2000 / XP
1. Click on “Start” -> “Control Panel” (in Classic View). In the Control Panel,
double click on “Network Connections” to continue.
2. Single RIGHT click on “Local Area connection”, then click “Properties”.
16
802.11n WLAN ADSL2+ Router User’s Guide
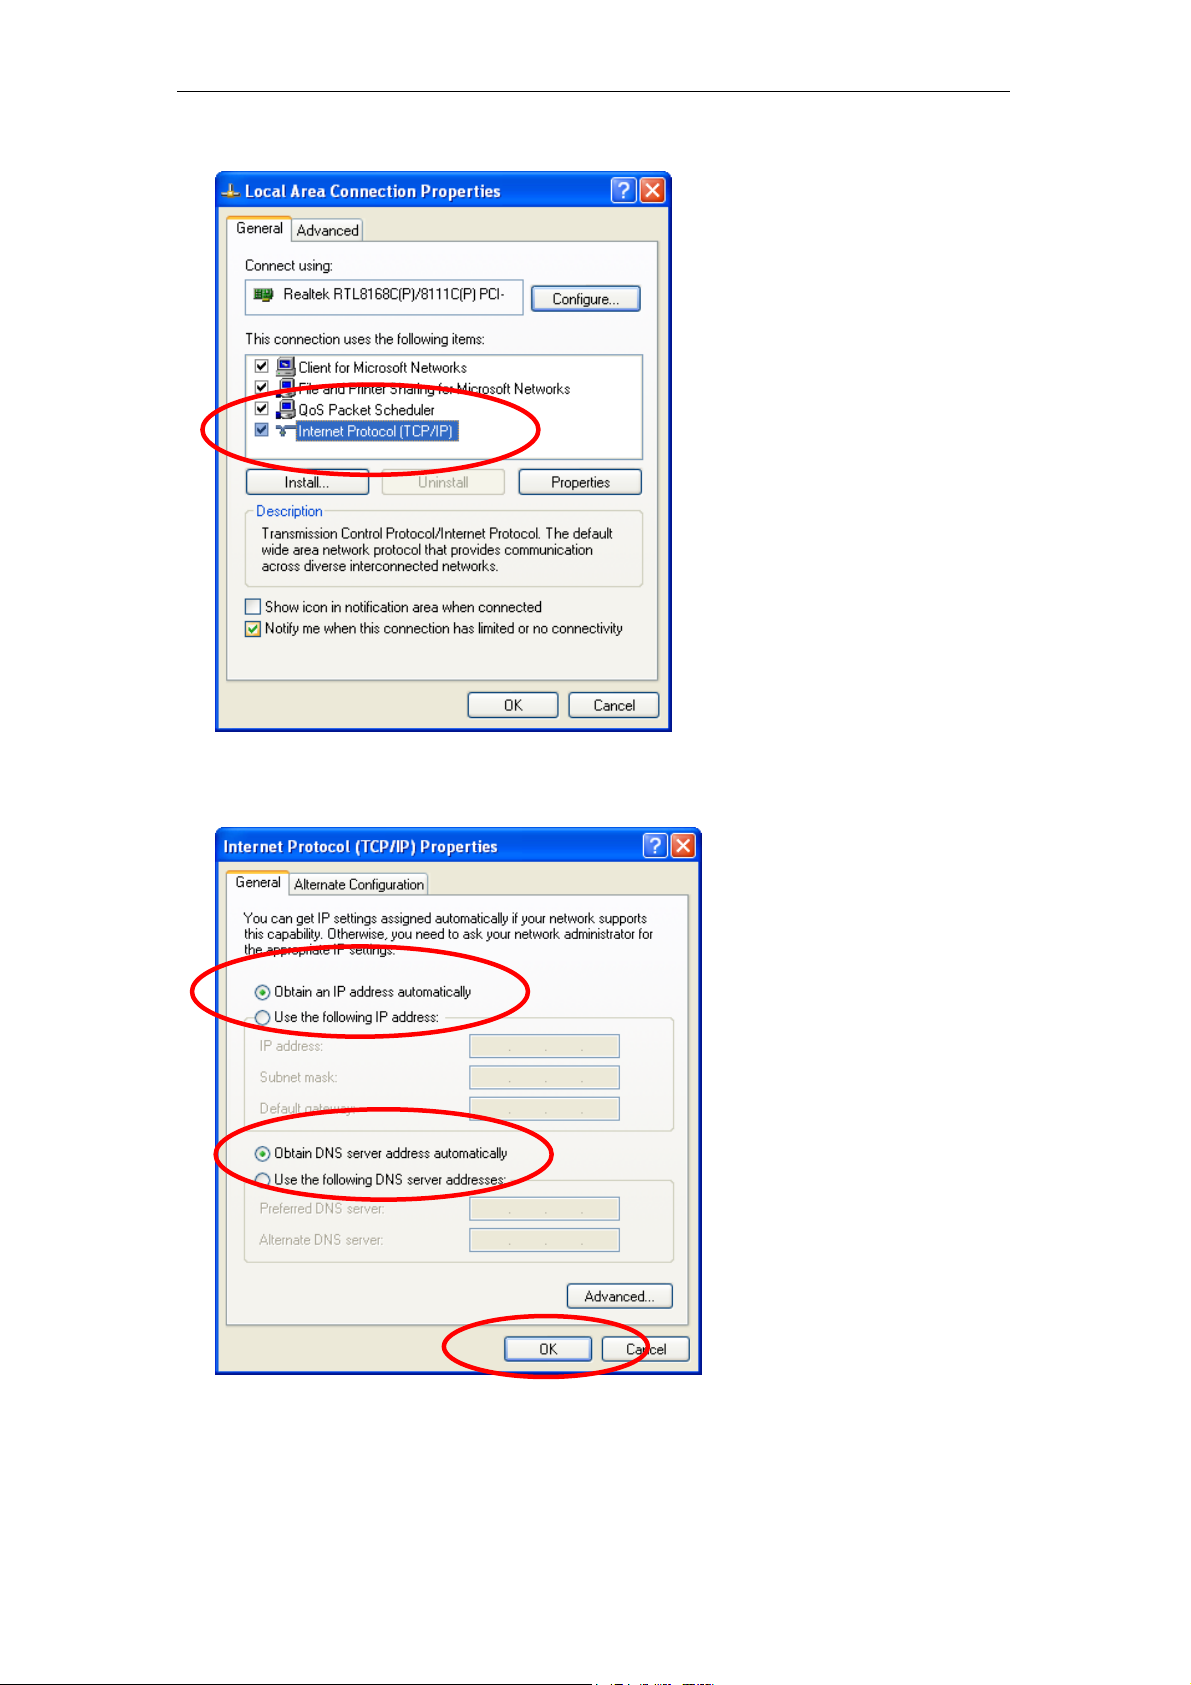
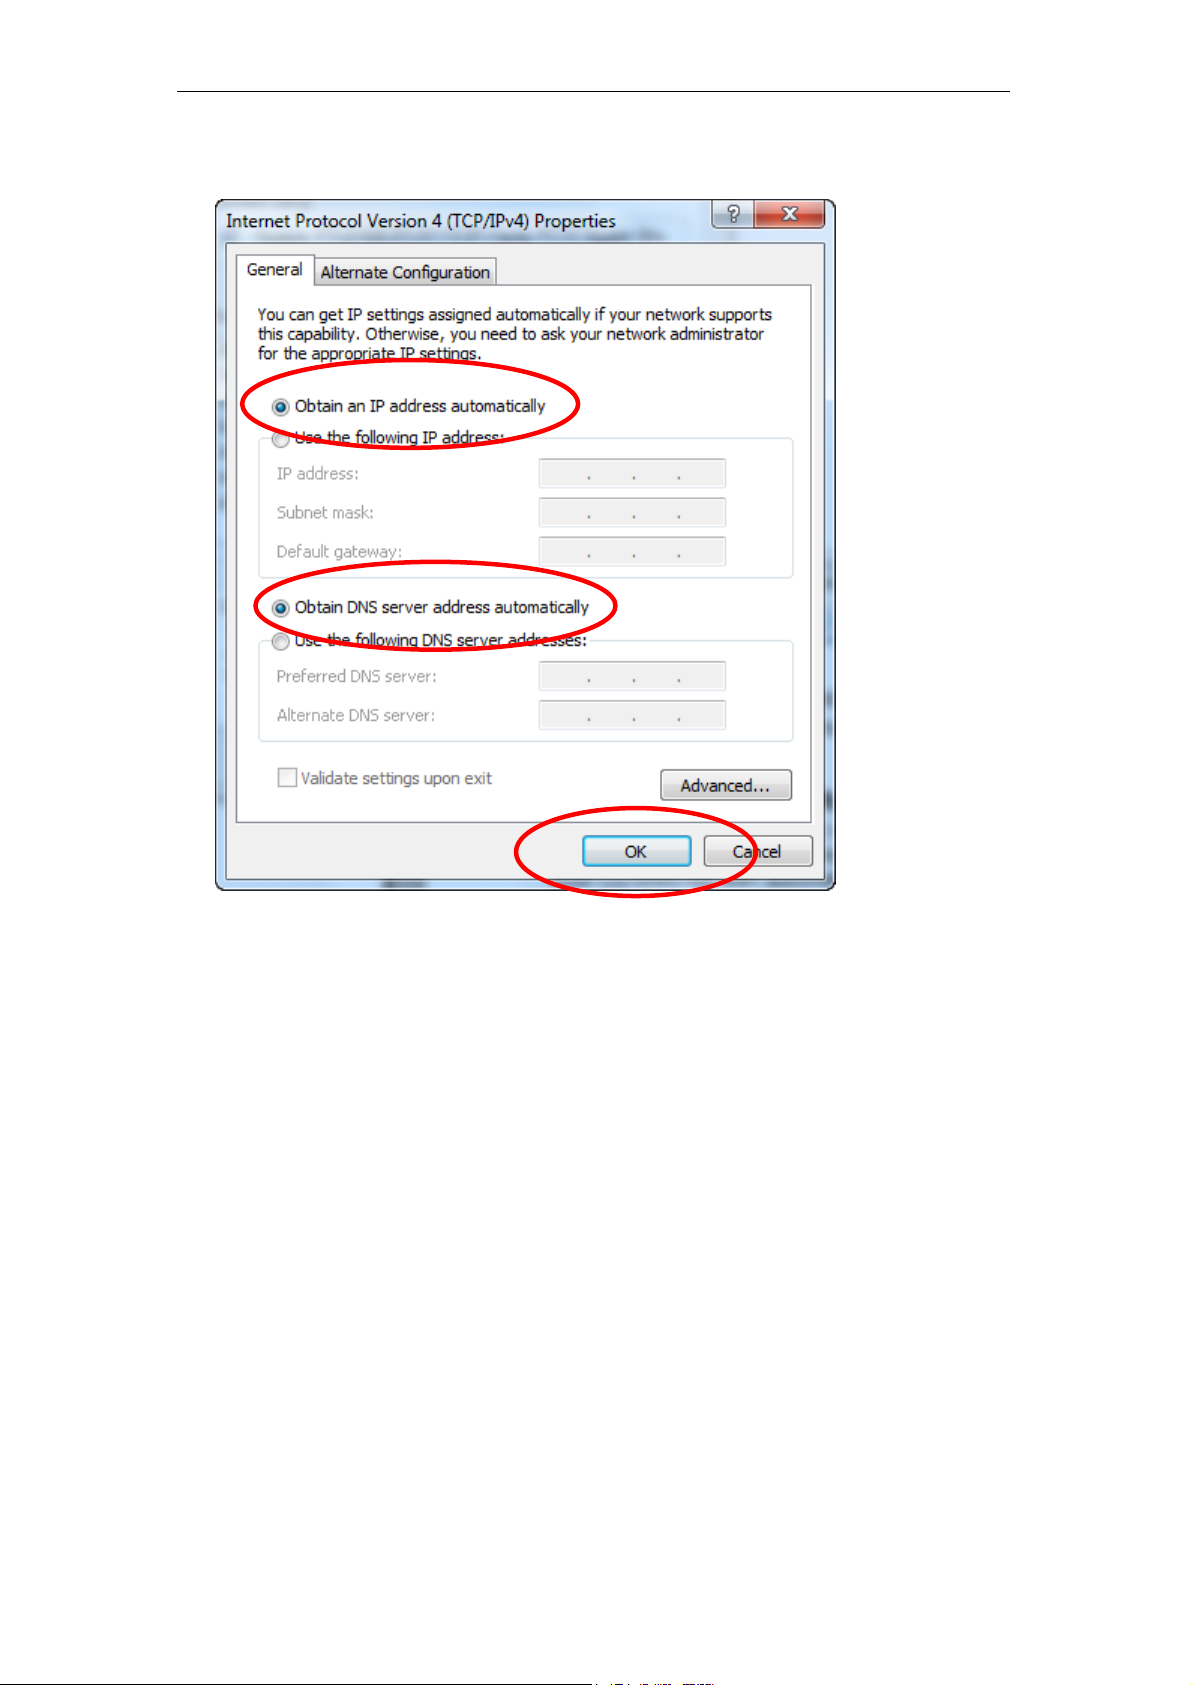
3. Double click on "Internet Protocol (TCP/ IP)".
4. Check "Obtain an IP address automatically" and “Obtain DNS server
address automatically” then click on "OK" to continue.
5. Click "Show icon in notification area when connected" (see screen
image in 3. above) then Click on "OK" to complete the setup procedures.
17
802.11n WLAN ADSL2+ Router User’s Guide
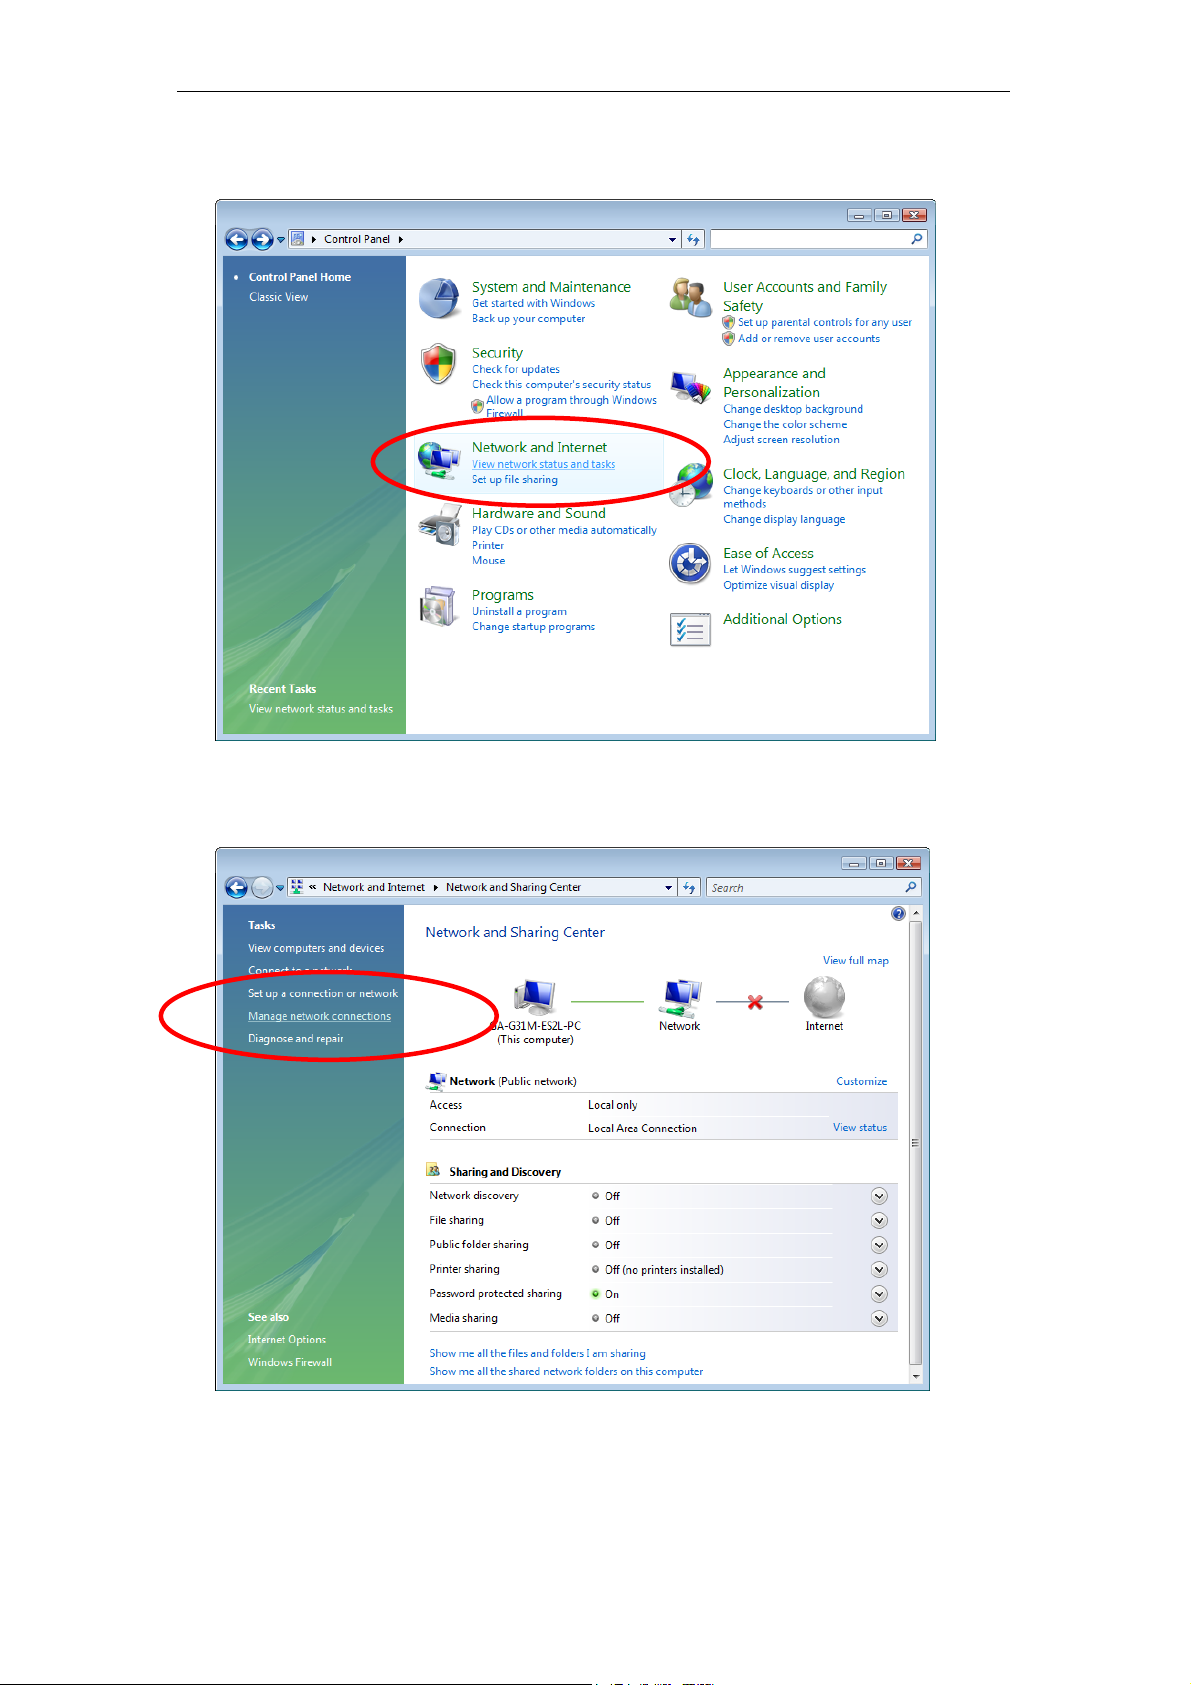
For Windows Vista-32/64
1. Click on “Start” -> “Control Panel” -> “View network status and tasks”.
2. In the Manage network connections, click on “Manage network
connections” to continue.
18
802.11n WLAN ADSL2+ Router User’s Guide
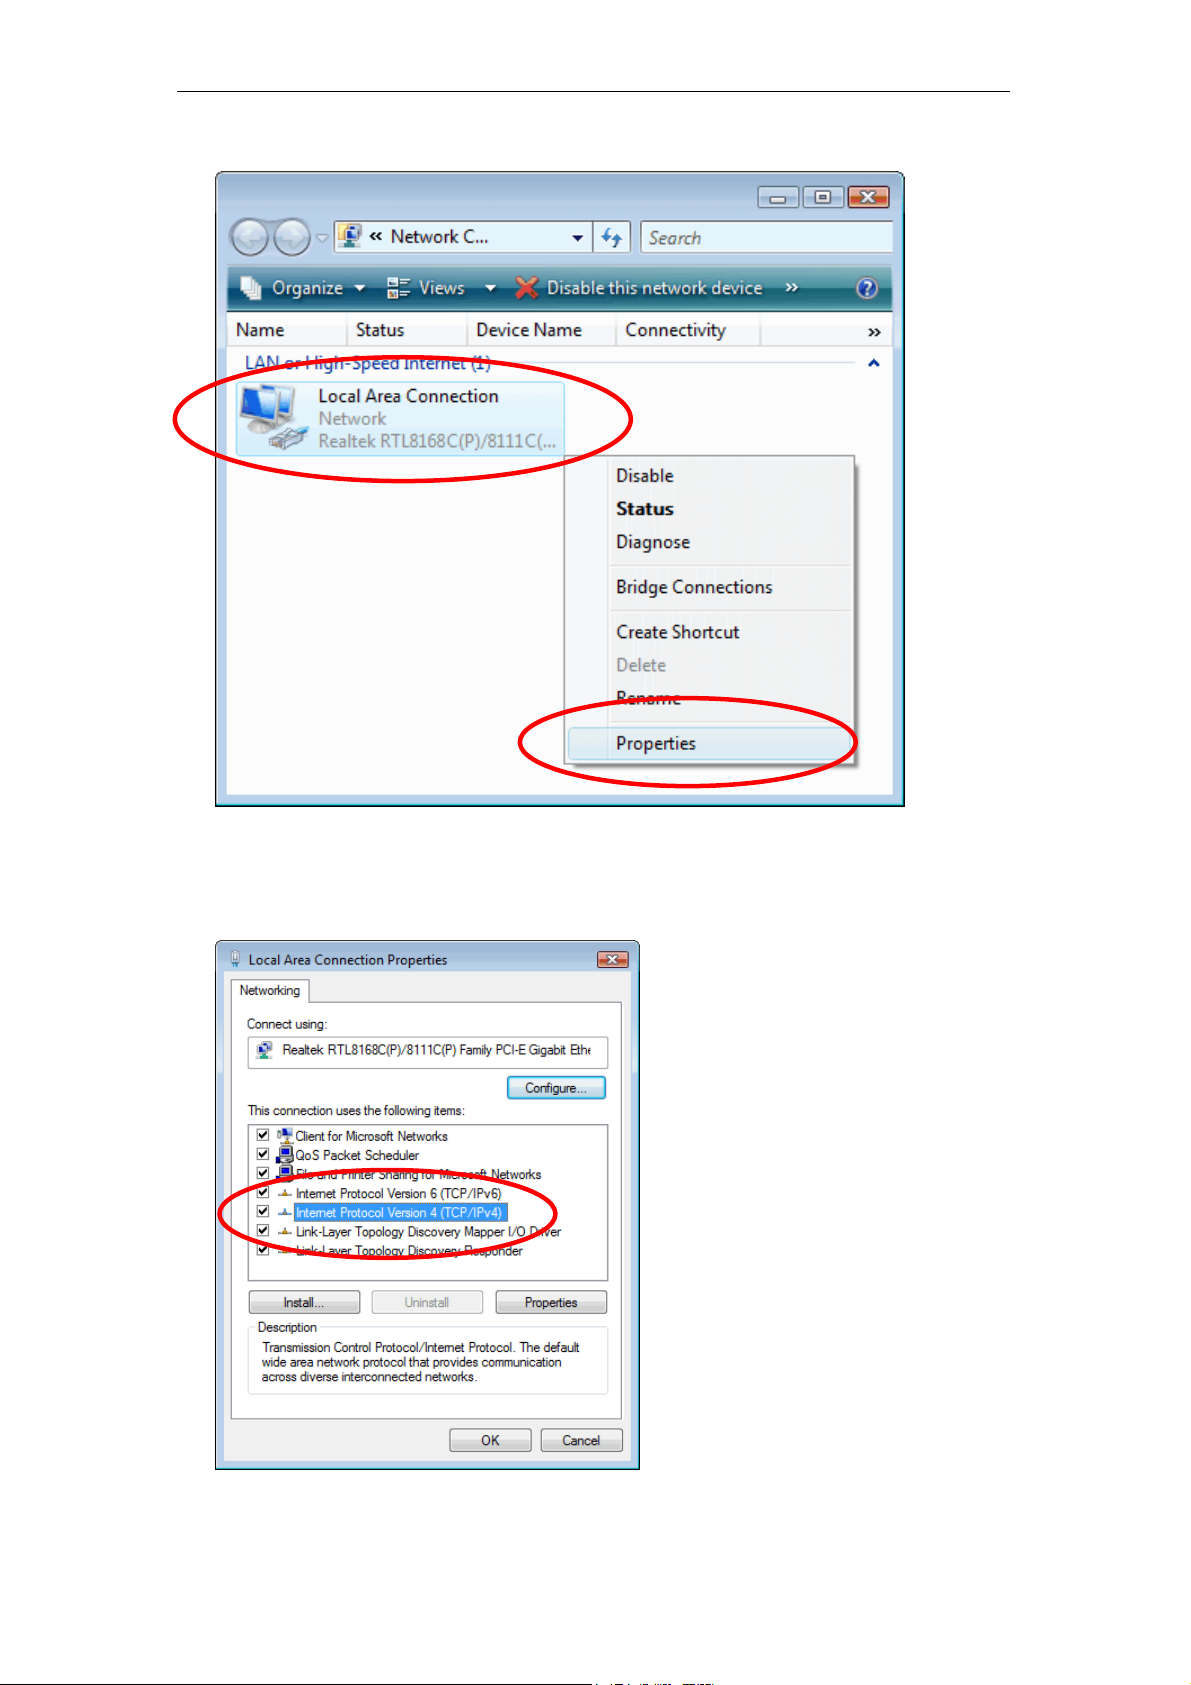
3. Single RIGHT click on “Local Area connection", then click "Properties".
4. The screen will display the information “User Account Control” and click
“Continue” to continue.
5. Double click on "Internet Protocol Version 4 (TCP/IPv4)".
19
802.11n WLAN ADSL2+ Router User’s Guide
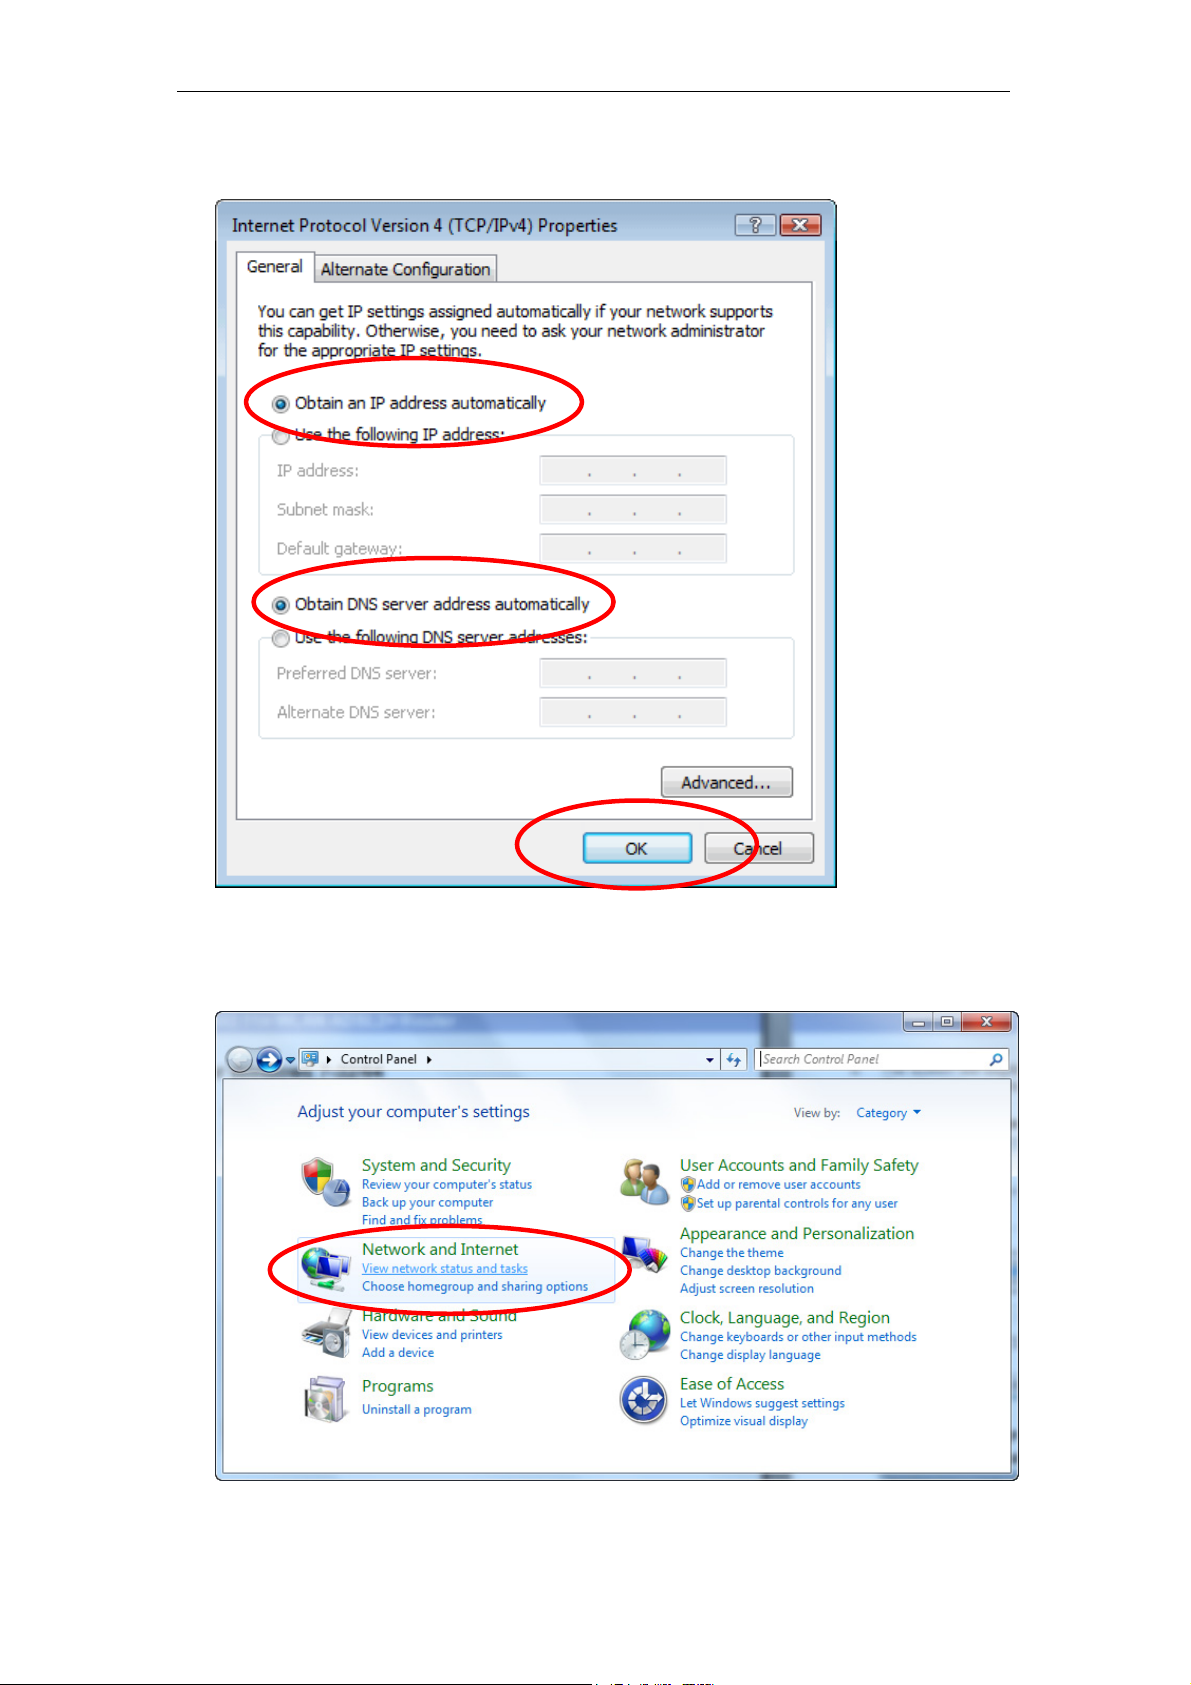
6. Check "Obtain an IP address automatically" and “Obtain DNS server
address automatically” then click on "OK" to continue.
For Windows 7-32/64
1. Click on “Start” -> “Control Panel” (in Category View) -> “View network
status and tasks”.
20

802.11n WLAN ADSL2+ Router User’s Guide
2. In the Control Panel Home, click on “Change adapter settings” to
continue.
3. Single RIGHT click on “Local Area connection", then click "Properties".
21

802.11n WLAN ADSL2+ Router User’s Guide
4. Double click on "Internet Protocol Version 4 (TCP/IPv4)".
22
802.11n WLAN ADSL2+ Router User’s Guide
5. Check "Obtain an IP address automatically" and “Obtain DNS server
address automatically” then click on "OK" to continue.
23
802.11n WLAN ADSL2+ Router User’s Guide
4 Utility CD execution
Connecting the Hardware
This section describes how to connect the device to the wall
phone port, the power outlet and your computer(s) or network.
1. Before you begin to execute utility CD Installations, please
ensure the 802.11n WLAN ADSL2+ Router has been
powered on.
2. Please insert the supplied CD into your CD-ROM drive.
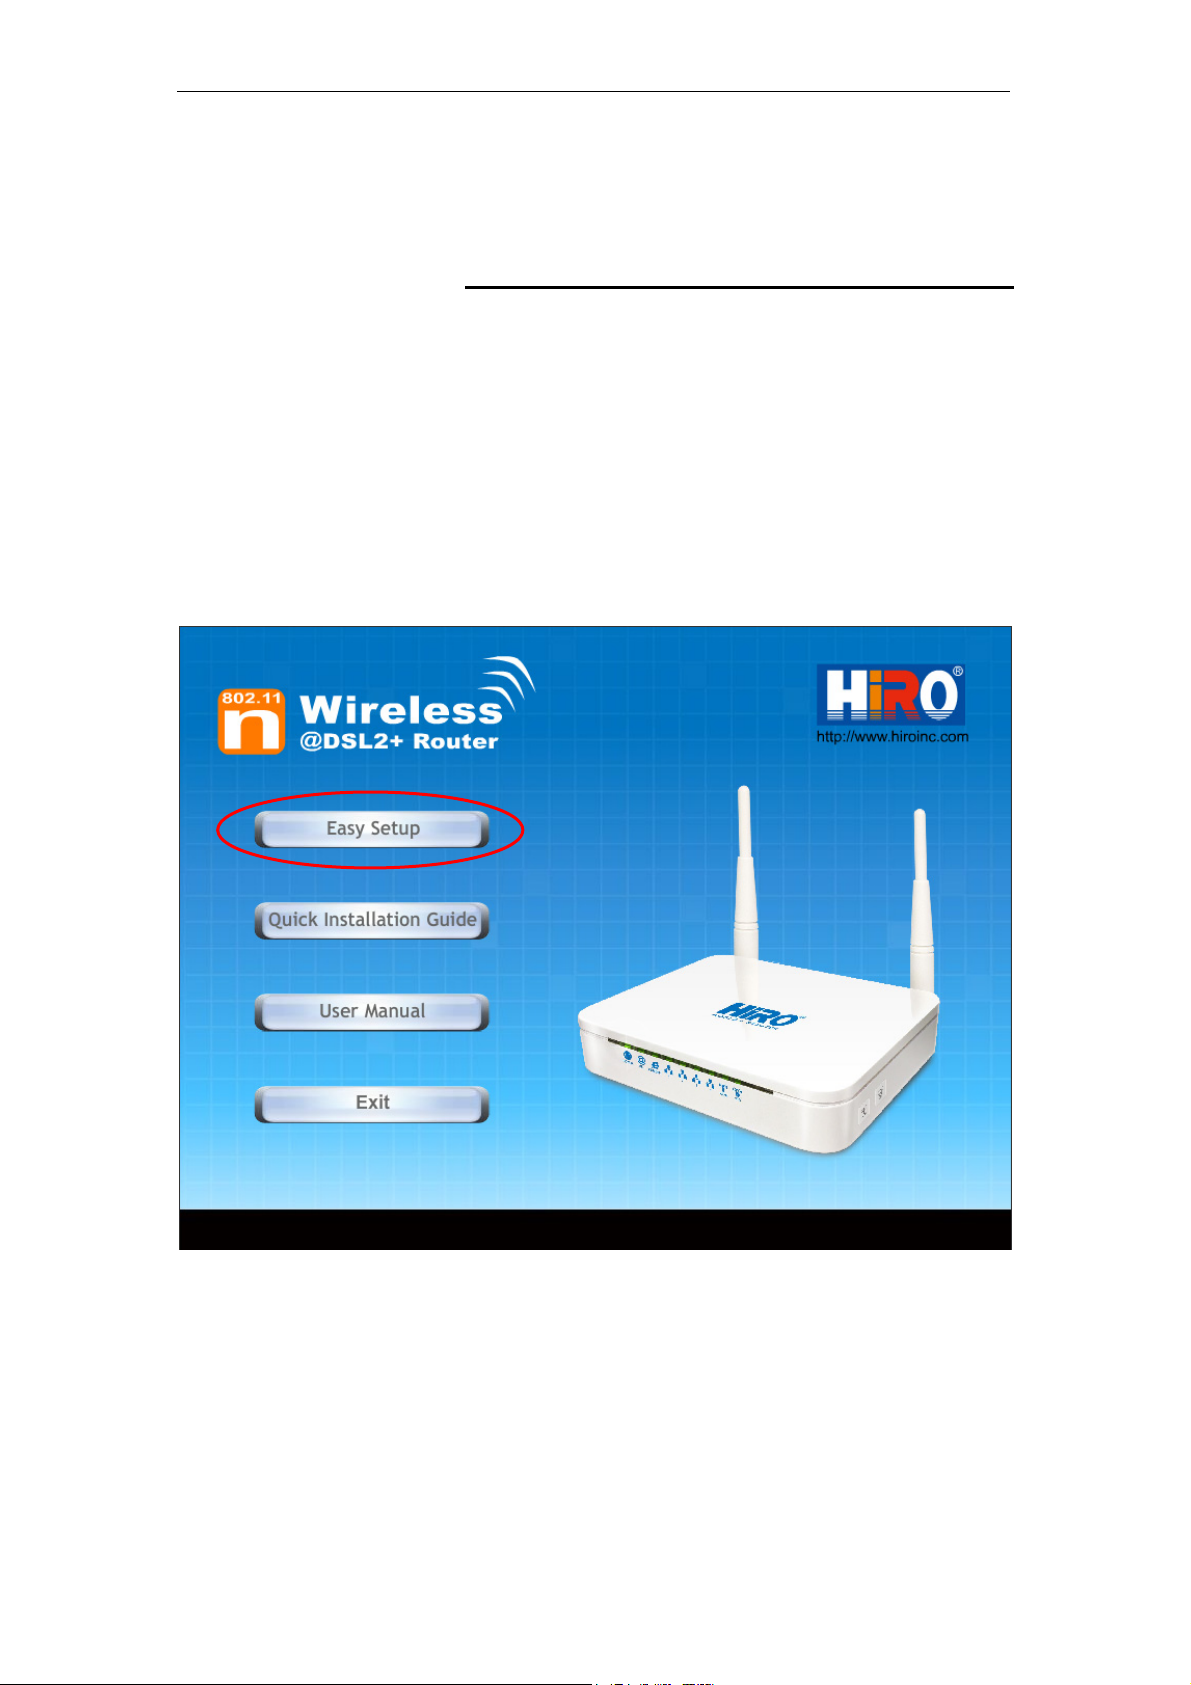
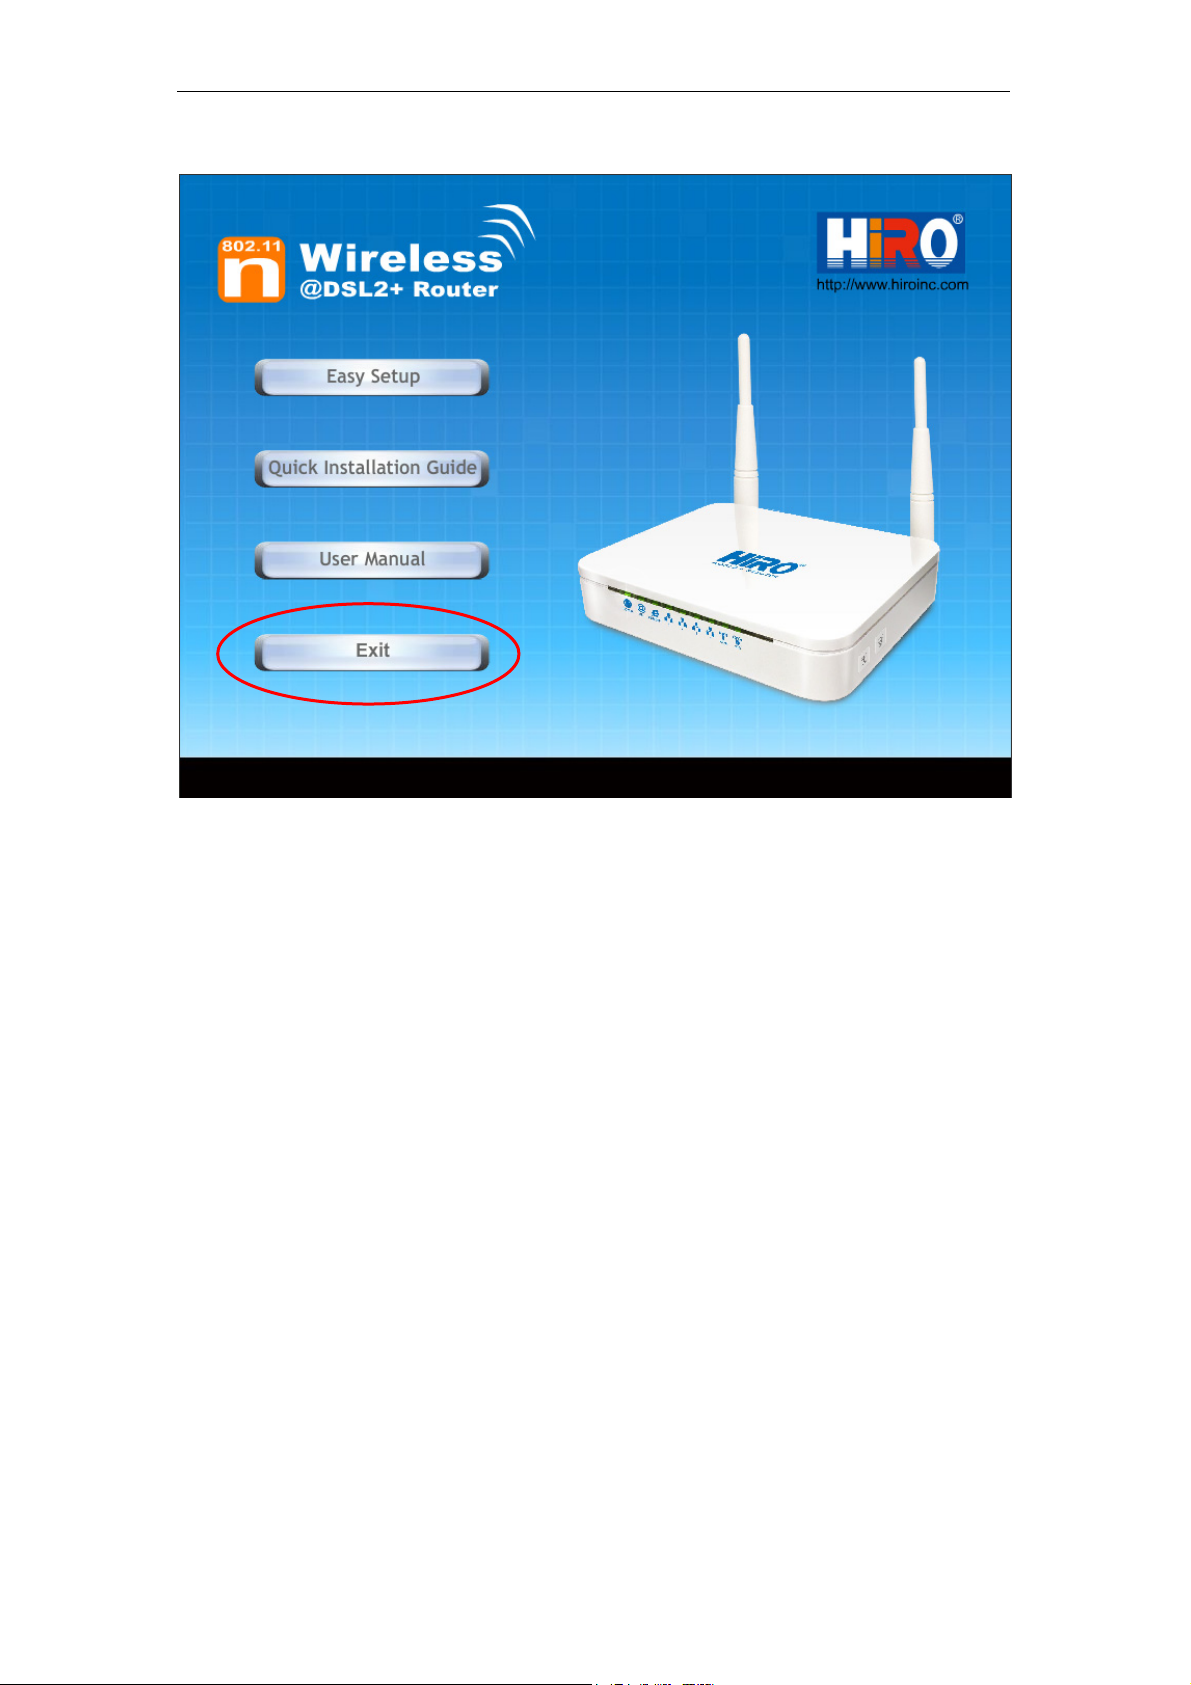
3. The CD should auto-start, displaying the window shown in 4.
below. If your CD does not start automatically, go to
Windows Explorer, Select your CD drive and double click
"Autorun.exe".
4. To configure the Internet and Wireless configuration, please
click the " Easy Setup ".
24
802.11n WLAN ADSL2+ Router User’s Guide
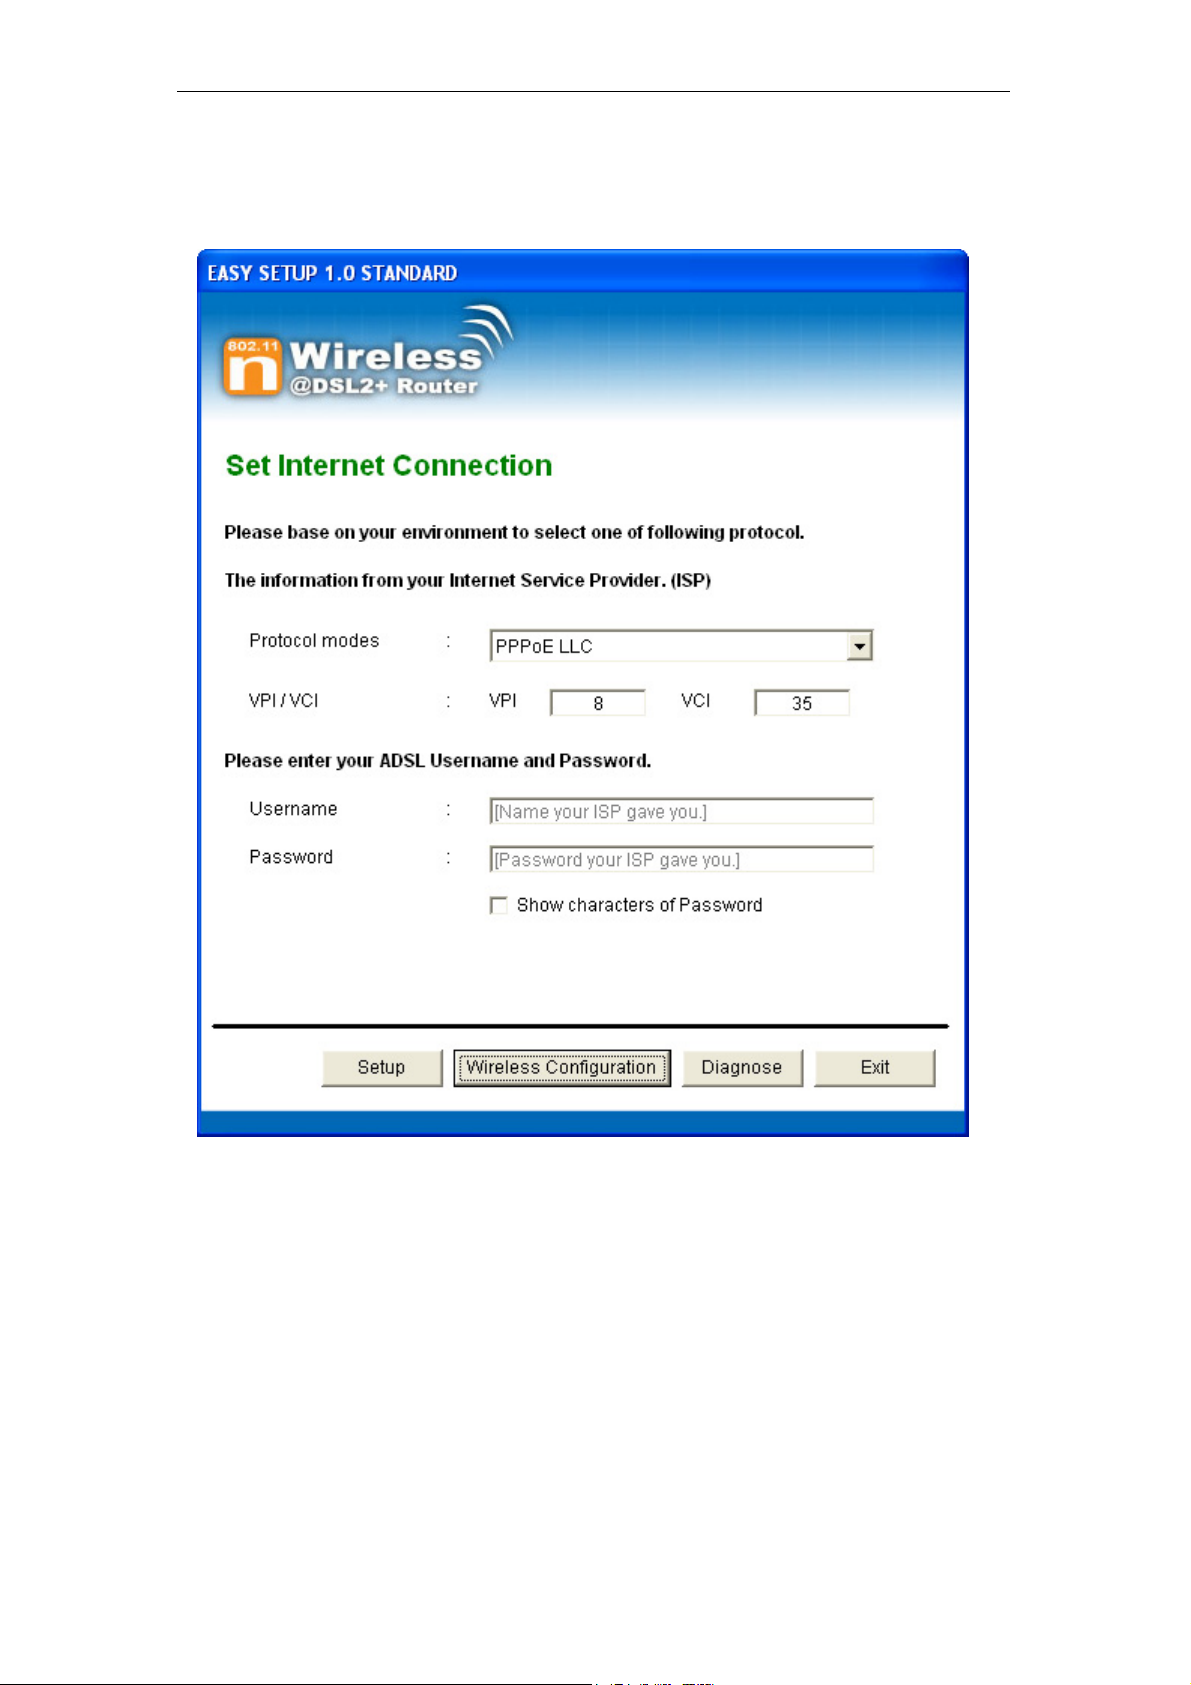
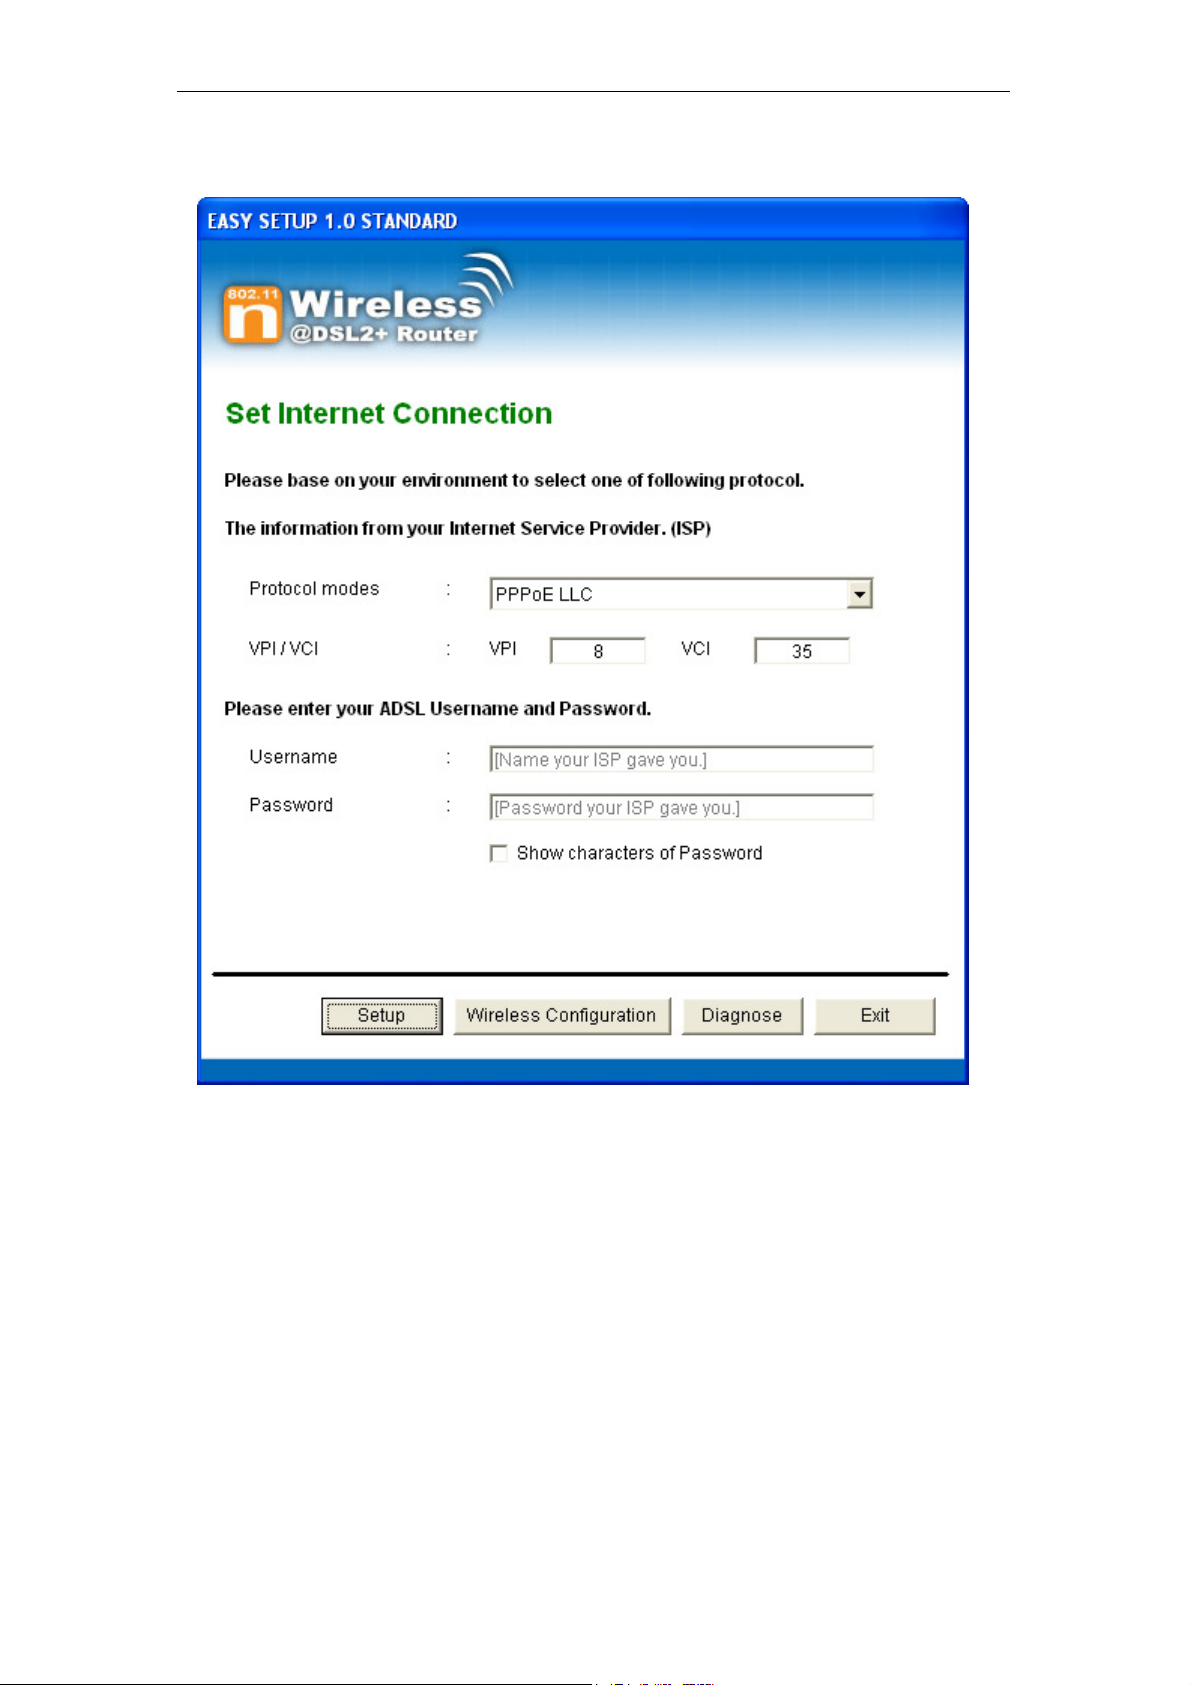
5. Select Protocol mode and enter the VPI, VCI, Username
and Password your ISP (Internet Services Provider)
provided.
6. Please click “ Wireless Configuration ” button.
25
802.11n WLAN ADSL2+ Router User’s Guide
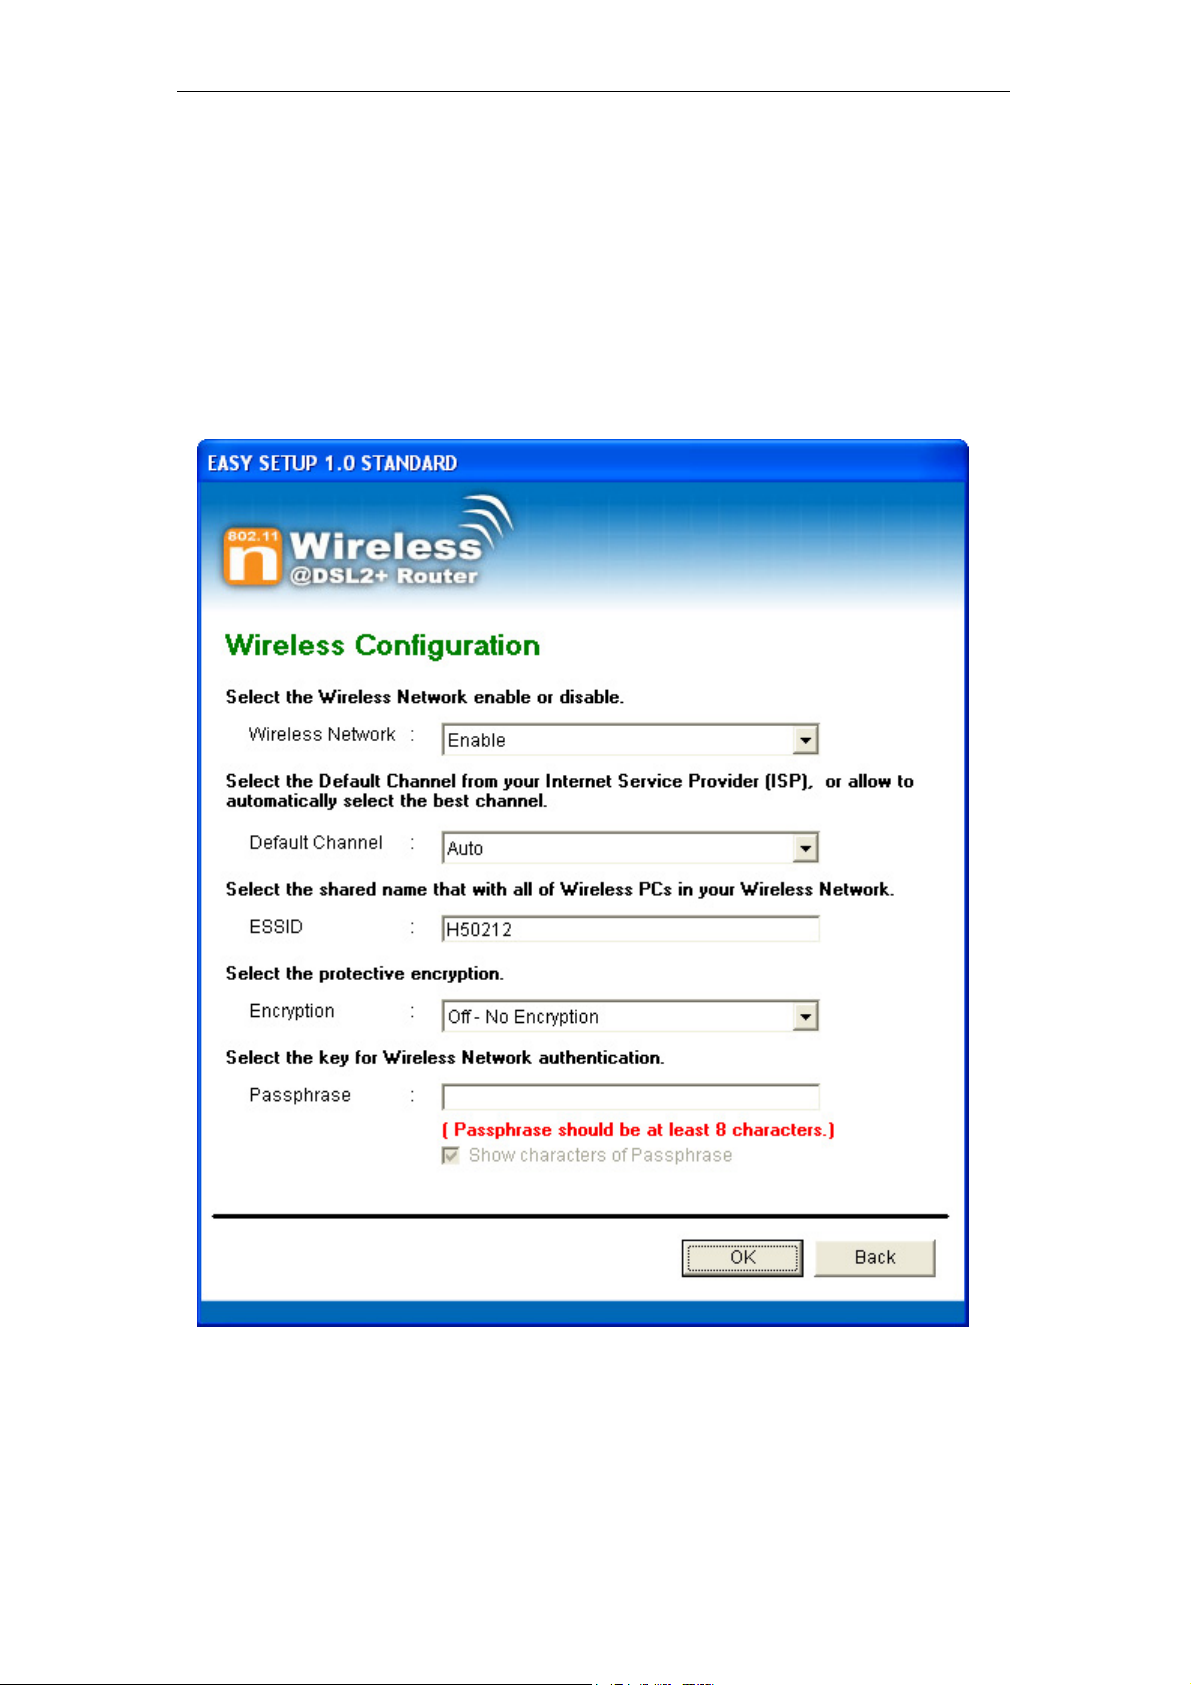
7. Please configure the Wireless Network, Default Channel,
ESSID if you want to change. (Recommended to use
default settings, Wireless Network = Enable, Default
Channel = Auto, ESSID = H50212).
8. Choose the Encryption type if necessary, as Off – No
Encryption / 64 Bit Encryption / 128 Bit Encryption / Wi-Fi
Protected Access2 (AES-CCMP) and WPA Mixed Mode.
(Recommended to use default settings, Encryption
type = Off – No Encryption). For example, you choose
Off – No Encryption.
9. Configure related Wireless Configurations and then click
"OK" button to continue.
26
802.11n WLAN ADSL2+ Router User’s Guide
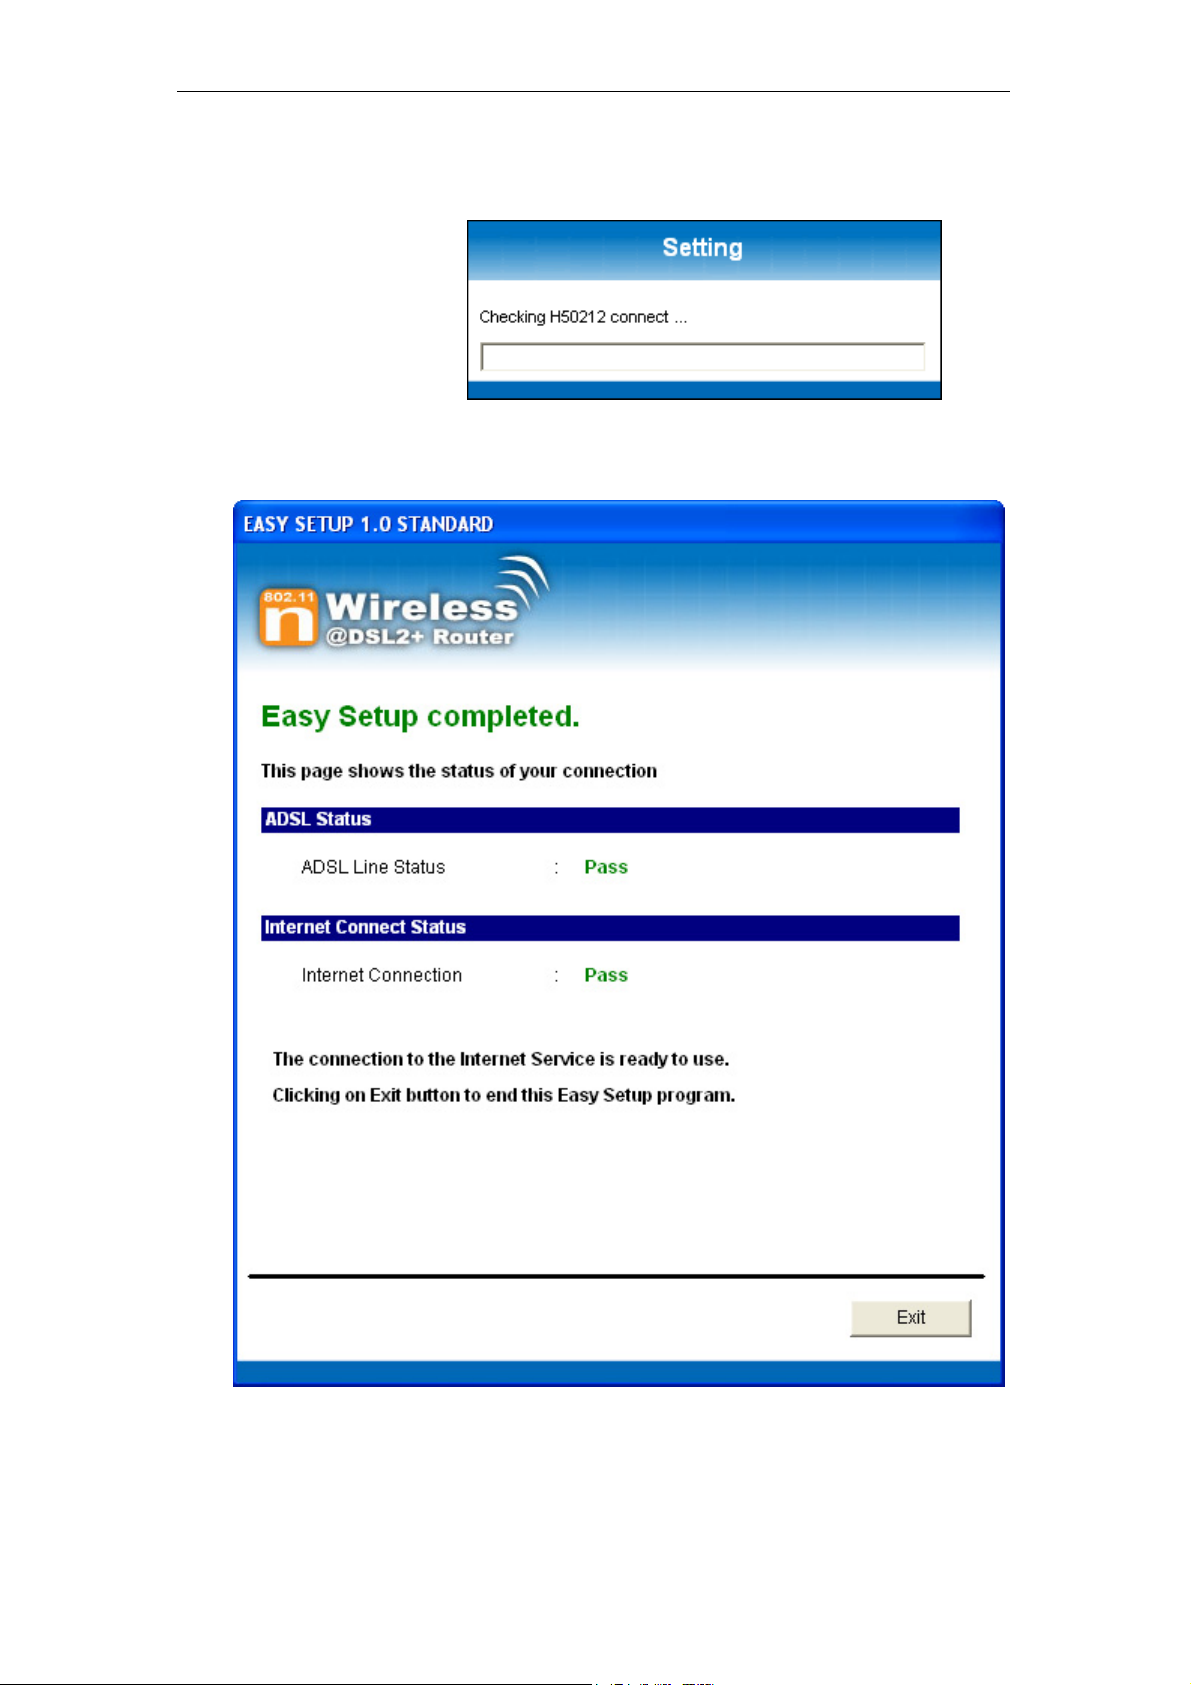
10. Please click “ Setup ” button, when the procedure is
completed, it will start to configure the device for a while.
27
802.11n WLAN ADSL2+ Router User’s Guide
11. Now, checking 802.11n WLAN ADSL 2+ Router hardware
connection, ADSL2+ settings, WLAN settings, and ADSL2+
Line connection status.
12. Easy setup configuration completed. Click on " Exit " to exit
this program.
28
802.11n WLAN ADSL2+ Router User’s Guide
13. Click on " Exit " to exit this program.
14. Now, the 802.11n WLAN ADSL2+ Router has been
configured completely, and suitable for Wireless and
Internet Connections.
29
802.11n WLAN ADSL2+ Router User’s Guide
Wireless Connection
For easy installation it is saved to keep the settings. You can
later change the wireless settings via the wireless configuration
menu. (see user manual on the CD – Chapter 13 and other).
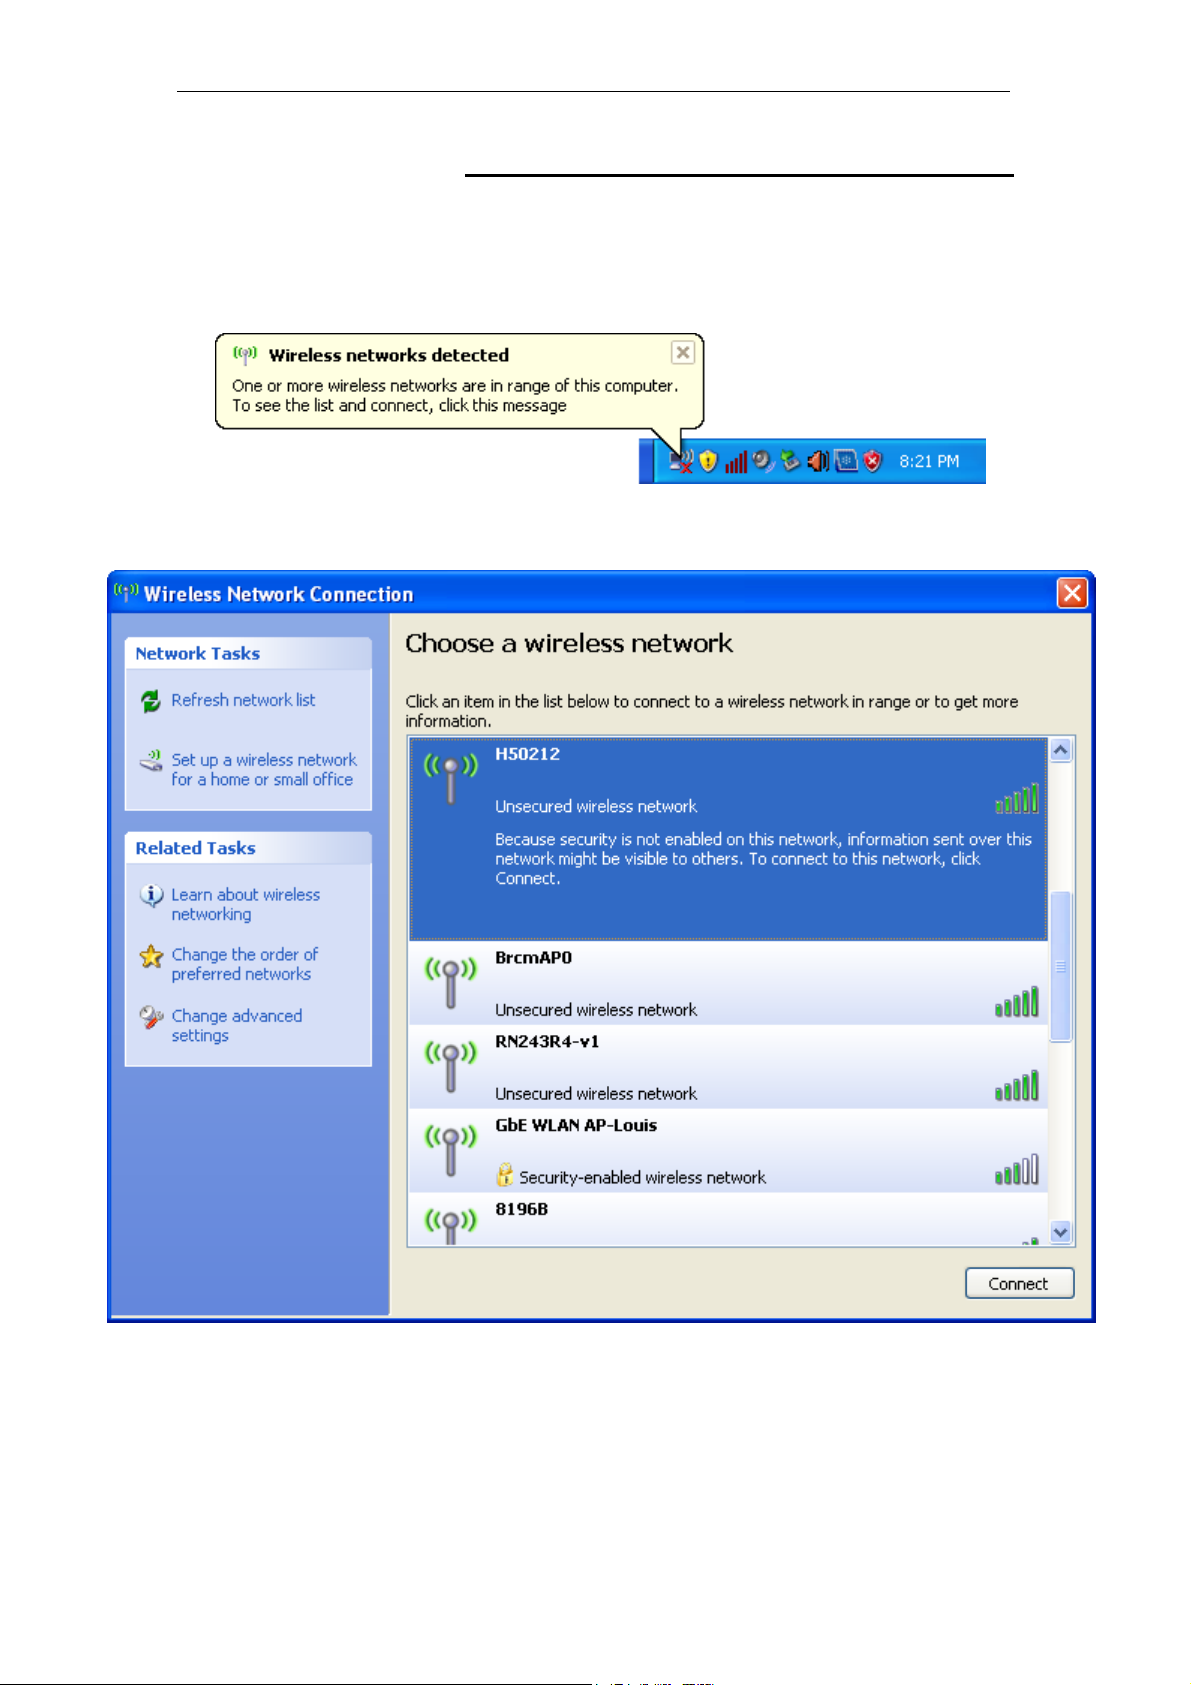
1. Double click on the wireless icon on your computer and
search for the wireless network that you enter ESSID name.
2. Click on the wireless network that you enter ESSID name
(the default setting ESSID = H50212) to connect.
30
 Loading...