

HiRO H50202 User Manual
HiRO 2.4GHz Wireless
(2)
(1)
Keyboard, Mouse,& Touchpad
User's Manual
Be sure t o caref ull y read th is User 's Manu al fo r the pro per use a nd
keep it f or futu re re feren ce.
Thank you f or c hoosing H iR O 2.4GHz Wi reless Keyb oard,
Mouse,& To uchpad. This genui nely palm-s ized 3-in -1 d evice has
four (4) fu nc tion incl ud ing stand ar d American Q WE RTY keyboard,
Laser mou se , Multi-t ou chpad and P re sentati on c ontrol. W it h our
superb 2. 4G Hz techno lo gy, the wi re less cont rol distanc e is up to 70
meters (l in e of sight) w it h extreme l ow p ower cons um ption. Pl ea se
read thro ug h this manu al a nd then sta rt e njoying t he m arvel and
conveni en ce this dev ic e brings at h om e, offi ce or on travel .
©2011 All r ig hts reser ve d.
FE DER AL CO MMU NIC ATIO NS CO MMI SSI ON
Thi s dev ice c omp lie s wit h Par t 15 of t he FC C Rul es. O per ati on is s ubj ect t o the f oll owi ng tw o
condition s : (1) t his d evi ce ma y not c aus e har mfu l int erf ere nce , and ( 2) th is de vic e mus t
accept a ny in ter fer enc e rec eiv ed, i ncl udi ng in ter fer enc e tha t may c aus e und esi red o per ati on.
NOT E
Thi s equ ipm ent h as be en te ste d and f oun d to co mpl y wit h the l imi ts fo r a Cla ss B di git al
device , pur sua nt to P art 1 5 of th e FCC R ule s. Th ese l imi ts ar e des ign ed to p rov ide
reason abl e pro tec tio n aga ins t har mfu l int erf ere nce i n a res ide nti al in sta lla tio n. Th is
equipment g ene rat es, u ses a nd ca n rad iat ed ra dio f req uen cy en erg y and , if no t ins tal led
and used i n acc ord anc e wit h the i nst ruc tio ns, m ay ca use h arm ful i nte rfe ren ce to r adi o
commun ica tio ns. H owe ver, t her e is no g uar ant ee th at in ter fer enc e wil l not o ccu r in a
partic ula r ins tal lat ion I f thi s equ ipm ent d oes c aus e har mfu l int erf ere nce t o rad io or
tel evi sio n rec ept ion , whi ch ca n be de ter min ed by t urn ing t he eq uip men t off a nd on , the u ser
is encou rag ed to t ry to c orr ect t he in ter fer enc e by on e or mo re of t he fo llo win g mea sur es:
- Reorie nt or r elo cat e the r ece ivi ng an ten na.
- Inc rea se th e sep ara tio n bet wee n the e qui pme nt an d rec eiv er.
- Connec t the e qui pme nt in to an o utl et on a c irc uit d iff ere nt fr om th at to w hic h the r ece ive r
is co nne cte d.
- Consul t the d eal er or a n exp eri enc ed ra dio /TV t ech nic ian f or he lp.
Changes or mo dif ica tio ns no t exp res sly a ppr ove d by th e par ty re spo nsi ble f or co mpl ian ce
could vo id th e use r's a uth ori ty to o per ate t he eq uip men t.
EU DECL ARAT ION O F CON FOR MIT Y
Thi s pro duc t: is c arr yin g the C E-M ark i n acc ord anc e wit h the r ela ted E uro pea n Dir ect ive s.
Trademarks
Windo ws are re gis te red t radem ark of Mi cro soft Co rpora tion.
Package Contents
1. HiRO 2.4 GH z Wireles s Ke yboard, M ou se,& Touc hpad....
2. USB Rece iv er ( Emb edded o nto the b att ery cov er).. ......... .....
3. BL-5C Re ch argeabl e Ba ttery... .. ....... .. ....... ......... ....... .. .
4. Mini USB C ha rging Cab le. ....... .. ....... .. ....... ......... ....... .. .
5. User's M an ual..... .. ....... .. ....... ......... ....... .. ....... .. ....... .. ..
RoHS
X1
X1
X1
X1
X1
Low Battery Indication and Charge Battery
1. Low b attery indi cation
When batt er y power is de te cted at low c ap acity, press any key,
button or t ou chpad of ke yb oard mous e, i ts red indi ca tion LED wi ll
light up to r em ind you bat te ry power is l ow. P lease cha rg e the
battery s oo n to have a sta bl e perform an ce.
2. Cha rge battery
Connect s up plied bat te ry chargi ng c able betw ee n this prod uc t and
the USB por t in y our PC to cha rg e the batte ry. During c harging, re d
LED will re gu larly bli nk a nd when the b at tery is ful ly c harged, t he
red LED wil l off.
Note Ba ttery c har ging ti me depe nds on re mai ning ba ttery p ower, op era tion
condi tion an d wor ki ng en viron ment et c. Be sides , the rec harge abl e batte ry
has a cer tain li fe of c hargi ng cycl es and wh en yo u find ch argin g time
becom es extr a lon ge r, you m ay need t o repla ce wi th new re charg eable
batte ry.
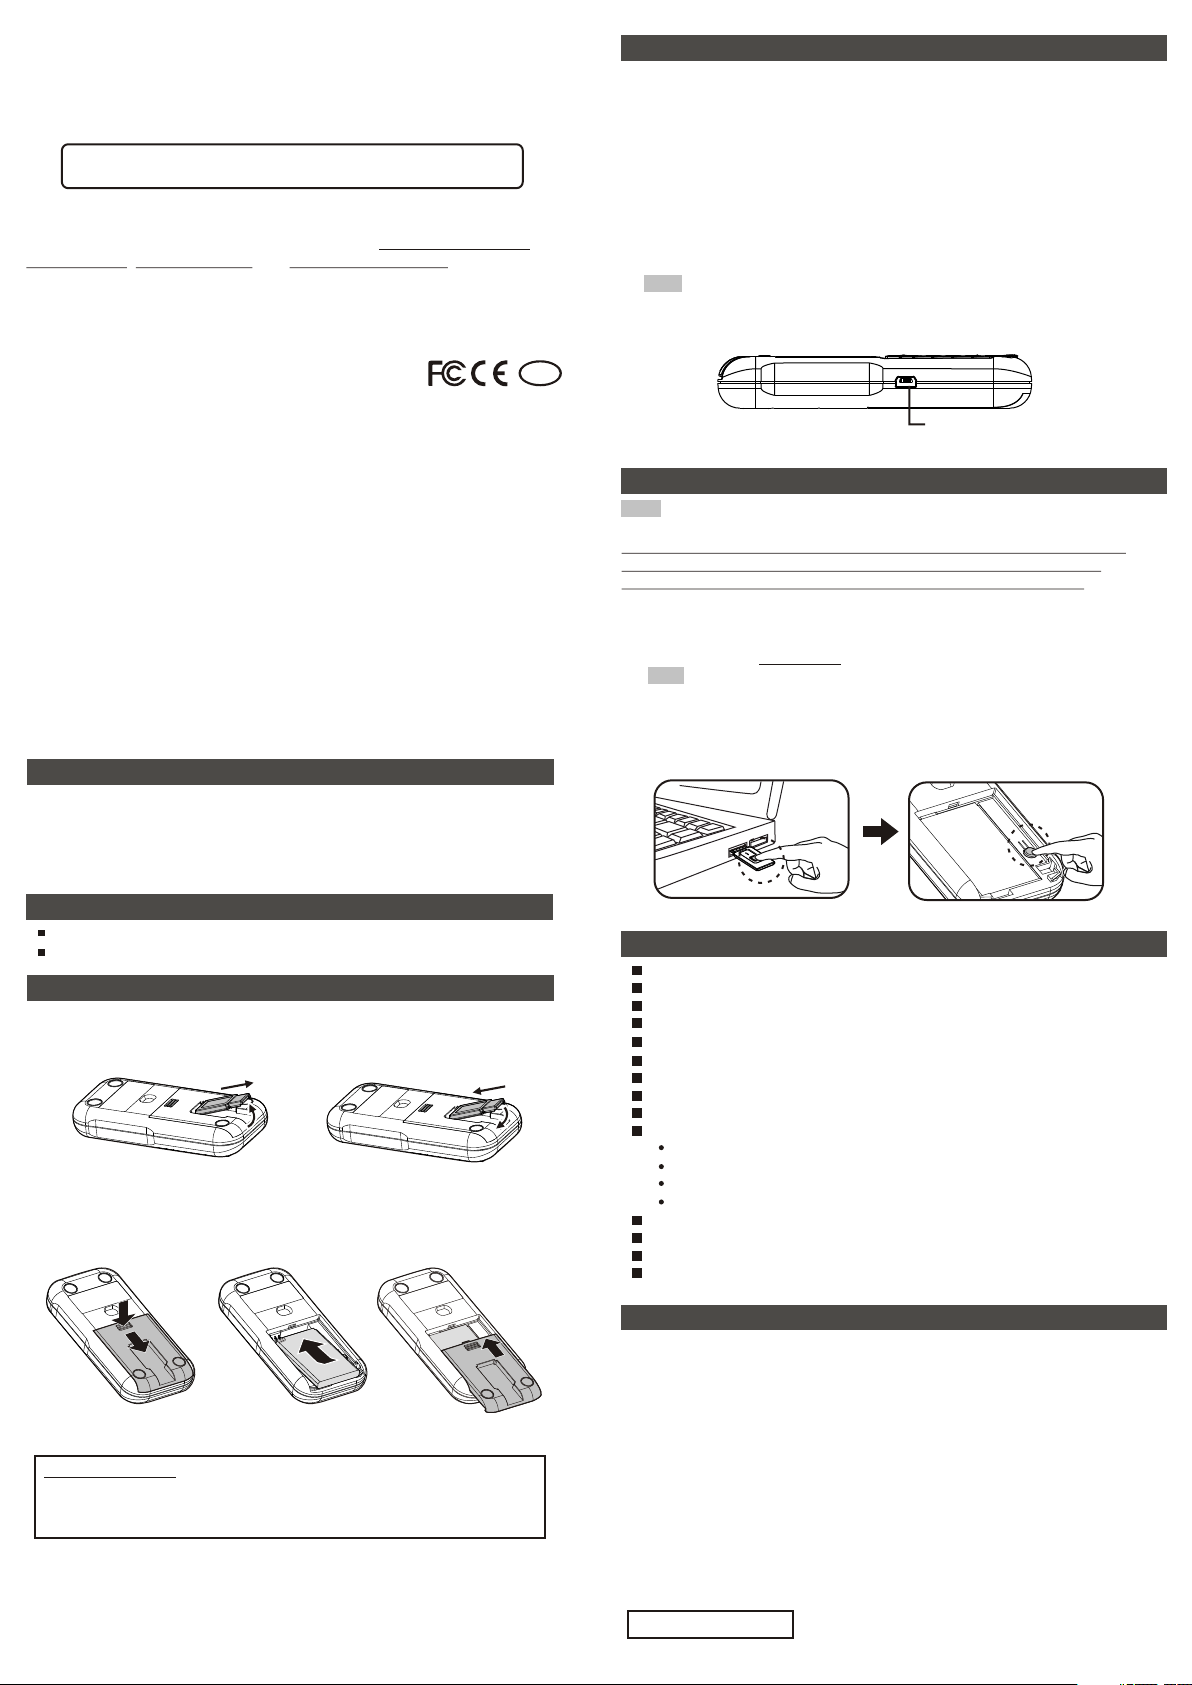
Conne ction p ort f or
batte ry char gin g cable
ID Pairing
Note No nee d to c onduct ID p ai ring when ev er you want t o use this
product , UN LESS foll ow ing opera ti on situat ion.
Battery p ow er is norma l an d keyboar d mo use and USB r ec eiver is
within co nn ection di st ance but th e pr oduct can no t be operat ed O R
when you wa nt t o use plura l of t his produ ct a t the same ti me .
You ne ed to conduct I D pairing wit h following t wo (2) steps to s hun
interfe re nce:
(1) Click t he I D Link butt on o n USB recei ve r and its red L ED w ill light u p
and enter i nt o 20-seco nd I D pairing s ta nd-by tim e.
Note If p ressi ng ag ain the I D Link bu tton du rin g 20-se cond st and-b y tim e, ID
pairi ng acti on wi ll be dis conti nued.
(2) Withi n th e 20-seco nd s tand-by t im e, press th e pa iring but to n in the
battery c ha mber of key bo ard mouse u nt il the red LE D of U SB
receive r be comes bli nk ing for 3 tim es w hich mean s th e ID pairin g
has been su cc essfull y do ne.
System Requirements
Windows ® 20 00 / XP / Vista™ / 7
An availa bl e USB port in P C
Getting Started
1. Plug the USB receiver to PC USB port
Take out the US B re ceiver em be dded onto t he b attery co ve r and
plug the US B re ceiver to y ou r PC USB port .
2
111
Steps o f takin g out U SB rece iver Steps o f inser tin g USB rec eiver
2. Insert the battery
Slightl y pr ess and sli de t he batter y co ver and ins er t the batte ry
firmly wi th t he correc t po larity. Replace the b attery cove r firmly
back into p la ce.
Sligh tly pre ss an d sl ide
the bat tery co ver
Special notice
Before 1s t ti me use, ple as e connect t he b attery ch ar ging cabl e
to charge t he b attery ab ou t 2 hours. Se e th e introdu ct ion of “Low
Battery I nd ication a nd C harge Bat te ry” for bat te ry chargi ng .
Now you can s ta rt to use HiR O 2. 4GHz Wire less Keyboa rd, Mouse ,
& Touchp ad . Please no te that the def ault mode of co mputer mous e is
at Multi- Touc hpad. For d et ails of mou se m ode chang e an d other
functio n an d operati on , please re ad t he introd uc tion of “Fu nc tion
and Opera ti on”.
Inser t the bat ter y Repla ce the ba tte ry
cover
1
222
Specifications
Frequen cy : 2 400 ~ 2483 MH z
Channel num ber : 16
ID number p er C hannel : 65 ,5 35
Modulatio n : GFSK
Antenna t yp e : PCB track
Wireles s ra nge : Up to 230 f ee t (70 meter s) ( line of sig ht )
Worki ng v oltage : DC 3 .0 V ~ 3.8V
Battery : B L- 5C 850mA- ho ur Li-Ion r ec hargeab le b attery
Tra nsmission p ower : 1mW
Power con su mption / Ba tt ery conti nu ous opera ti on hours :
Standby (N on-oper at ion) : 0.4m A / 212 5 hours
Keyboar d mo de : 1mA / 850 hou rs
Touchpad mo de : 1 0mA / 85 hours
Laser mou se & Touchpad m od e : 30mA / 28.3 ho ur s
Weigh t : Abo ut 92 grams ( in cluding b at tery and re ce iver)
Dimensi on : Ap prox. 116 (L ) x 56 (W) x 19.8 ( H) mm
Operati on t emperat ur e : 0°C(32° F) ~60°C(1 40 °F)
Operati on h umidity : 1 0% ~85% RH
FAQ
Q1. Need to i ns tall soft wa re before u si ng this pro duct?
A: No need. Th is is Plug- an d-Play pr od uct.
Q2. Why som et imes touc hp ad can not be o pe rated smo othly?
A: Touchpad is qui te sensit iv e about moi st ness. In or de r to have a
stable pe rf ormance o n to uchpad, p le ase alway s ke ep touch
finger( s) d ry.
Q3. Can not c on trol lase r mo use, touc hp ad and keyb oard
A: It may be cau se d by low batt er y or interf er ence by oth er 2 .4GHz
product . Pl ease see in tr oductio ns “ Low Batte ry I ndicati on a nd
Charge Ba tt ery” and “I D Pa iring” to v er ify and res ol ve.
Q4. Possi bl e to know the m ou se dpi?
A: It is no way to k no w mouse dpi a nd y ou can only f ee l laser mou se
move spee d af ter selec te d dpi.
Pate nt Pending
Function and Operation
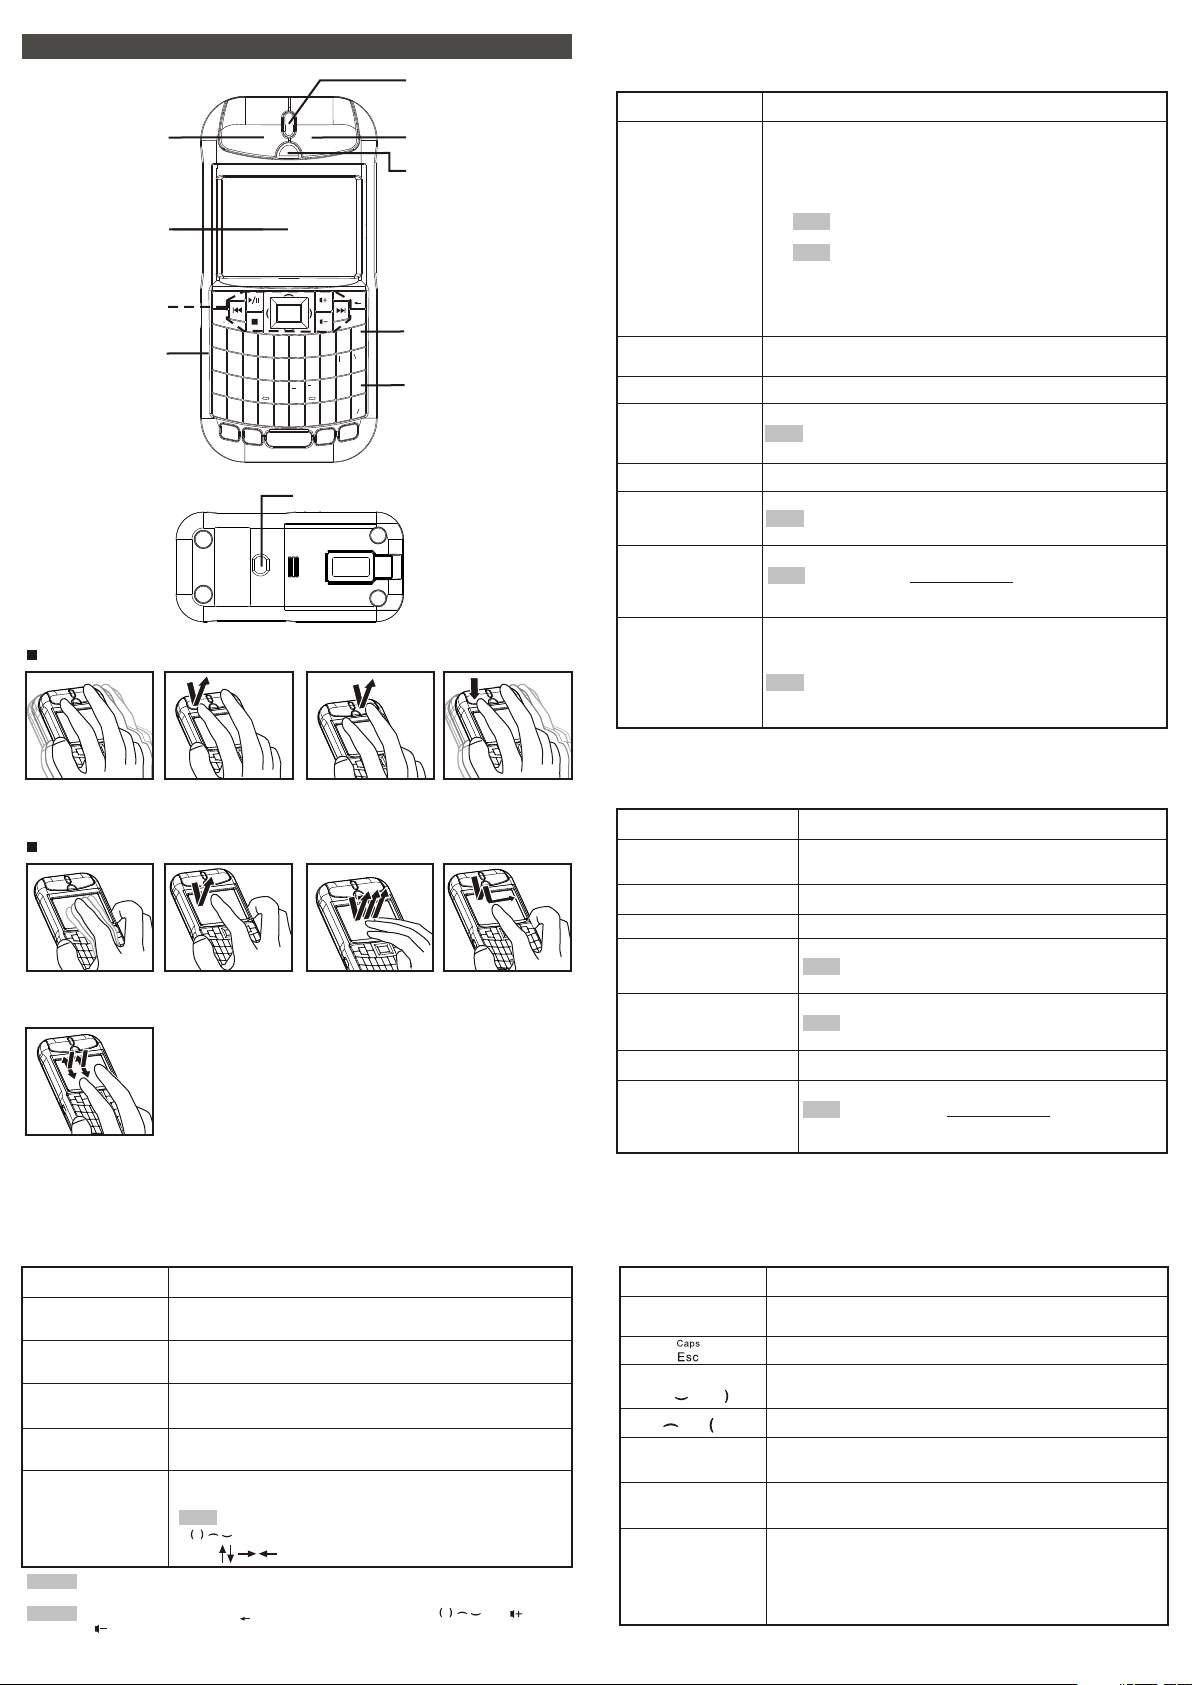
Fron t view
Left mous e bu tton
Multi-t ou chpad
Caps
Hot keys fo r Me dia
playing con trol
Keys with b lu e
print
Rear view
Images of Laser mouse operation
Esc
PrtSc
Tab
!
@
#
$
%
1
2
3
4
~
{
}
[
`
Q
W
E
R
A
S
D
F
Z
X
C
V
Shift
Fn
Enter
5
T
G
B
Spac e
Back
Del
)
(
&
*
^
6
]
Y
H
N
0
9
8
7
"
P
'
O
I
U
:
+
=
;
L
K
J
?
>
<
.
,
M
Ctrl
Alt
Laser mou se s ensor
Blue, Gre en a nd Red
indicat io n LED
Right mou se b utton
Mouse mod e ch ange
button
Keys with w hi te
print on up pe r row
Keys with w hi te
print on ce nt er
2.Laser mouse (Match wit h blue indica tion LED)
When swit ch t o Laser mou se m ode, not on ly m ain / left / ri gh t mouse
but also pa rt o f multi-t ou chpad fun ct ion can be us ed .
Function
Mouse mod e
change
Blue indica tion
LED
Cursor mo ve S ee Fig 1
Left mous e cl ick
Right mou se c lick
Mouse dra g
Scroll
Mouse dpi
selecti on
Operation
(1) Press a nd h old this bu tt on until bl ue a nd green
LEDs both l ig ht up (PS : I t may loo k like wh ite LED )
to turn off m ouse func tion. Click t his button to
activat e mo use funct io n with the de fa ult mode
of Multi- to uchpad.
Note 1~ 2 secon ds is n eeded t o activ ate tou chp ad
funct ion fro m mou se off mo de
Note Ke yboar d fun ction i s still a vaila ble e ven mou se
funct ion is tu rne d off.
(2) When th e mo use funct io n is activa te d, click th e
button to s wi tch modes b et ween Lase r mo use
and Multi -t ouchpad .
Light up wh en m ouse or tou ch pad is unde r us e
See Fig 2 and F ig 6
Note At La ser mou se mo de , lef t click f uncti on ca n be
opera ted by ab ove e it her w ay
See Fig 3
See Fig 4 and F ig 8
Note At La ser mou se mo de , dra g funct ion can b e ope rated
by abov e eithe r way
See Fig 9
Note Two ( 2) fing ers s imult aneou sly sli des ( or one fi nger
puts on t ouchp ad wh il e the o ther fi nger sl ide s) up or do wn
on touc hpad.
Press and h ol d “Fn” key an d th en click th e mo use
mode chan ge b utton to ch an ge mouse dp i am ong
1700, 250 0 an d 3400
Note This dp i selec tion fu nct ion is on ly avai lable a t Las er
mouse m ode. De fau lt d pi is 3 400. Take out an d inser t
batte ry agai n, mo use dpi w ill ret urn to de fau lt figu re.
Move cu rsor
(Fig 1)
Left cl ick
(Fig 2)
Right c lick
(Fig 3)
Drag : Pr ess lef t
mouse a nd
move (F ig 4)
Images of Multi-touchpad operation
Move cu rsor
(Fig 5)
Scrol l (Fig 9)
Left cl ick : One
finge r tap (Fi g 6)
Right c lick: Thre e
finge rs tap
simul taneo usl y
(Fig 7)
Drag :
Tap-and -slid e
(Fig 8)
1.QWE RTY keyboard
QWERT Y keyboar d function is a lways avail able no matte r the
compute r mo use is set at L as er mouse mo de o r Multi-t ou chpad
mode or eve n mo use funct io n is turned o ff.
Key print
White pri nt o n
key cente r
White pri nt o n
upper row
Blue prin ti ng
charact er
F1~F10 fu nc tion
(numer al ke y 1~1 0)
Media pla yi ng
control h ot k eys
Note 1 The “Al t” key is n ormal “ Alt ” funct ion, no t “Alt Gr ” fun ction . You can pre ss
"Ctrl +Alt" t oge ther to h ave "Al t Gr" fun cti on.
Note 2 On ly 8 keys i ncl ud ing " " , "Del" , 4 arc-s hap e keys “ ”, " " a nd
" "have r epeat ed fu nctio n when th ey are pr ess -and- hold.
Function and Operation
Directl y pr ess the key t o ha ve print fu nc tion
Press and h ol d “Shift” k ey a nd then pre ss t he key
to have pri nt f unction
Press and h ol d “Fn” key, th en press th e key to
have prin t fu nction
Press and h ol d “Fn” key, th en press th e numeral
key 1~10 to h av e F1~F10 fu nc tion
When at Med ia p laying ap pl ication , di rectly pr es s
the key to ha ve p rint func ti on
Note 4 arc- sh ape keys ar ou nd “Enter ” ke y i.e.
“ ” have the sa me f unction a s 4 ar row keys
i.e. “ ” on PC ke yb oard.
Bac k
3.Multi-touchpad (Match wi th g reen indi ca tion LED)
When you sw it ch to Multi -t ouchpad m od e, not only t ou chpad but a ls o
left / righ t mo use butto ns c an be used.
Function
Mouse mod e ch ange
Green ind ic ation LED
Operation
Please re fe r to the “Mou se m ode chang e” a t
the intro du ction “2. L as er mouse”
Light up wh en t ouchpad i s un der use
Cursor mo ve See Fig 5
See Fig 2 and F ig 6
Left mous e cl ick
Right mou se c lick
Mouse dra g
Note At Mu lti-t ouc hpad mo de, lef t click f unc tion ca n
be oper ated by a bov e ei the r way
See Fig 3 and F ig 7
Note At Mu lti-t ouc hp ad mo de, rig ht clic k fun ction c an
be oper ated by a bov e ei the r way.
See Fig 8
See Fig 9
Scroll
Note Two ( 2) fing ers s imult aneou sly sli des ( or one
finge r puts on t ouc hp ad wh ile the o ther fi nge r slide s)
up or dow n on touc hpa d.
4.Presentation control device
Use this pr od uct at Powe rP oint slid e sh ow as wirel es s present at ion
remote. Tu rn t o the slide p ag e of PowerP oi nt file you w an t to presen t
and let it at s li de start sc re en (i.e. fu ll s creen). U se f ollowin g ke ys
and butto ns t o enjoy a wir el ess and my- pa ce slide sh ow.
Key or button
Fn + 5
Left mous e bu tton
or or
or
B key
W key
Prt Sc
+ Alt
Tab
Function and Operation
Press and h ol d Fn, then pr es s the numer al k ey "5"
to have "F5 " fu nction to s ta rt the slid e sh ow
Click thi s ke y to exit sli de s how
Click any o f le ft button o r ke y to go to next s li de
Click eit he r key to go to pr ev ious slid e
Click thi s ke y to show bla ck s creen; cl ic k again
to come bac k
Click thi s ke y to show whi te s creen; cl ic k again
to come bac k
Press and h ol d “Alt” key a nd t hen click “ ” k ey
to cruise a ll o pened fil es o ne by one. Wh en
cruisin g at t he file you w an t to switch , ju st
release 2 k ey s and file wi ll b e switche d. U se the
same proc es s to other fi le o r return to s li de show
Doc No.: EB -C 1040-20 1
Prt Sc
Tab
 Loading...