

Your Guide to Duetto
Note: References to DAB/DAB+ apply only to models outside North America.
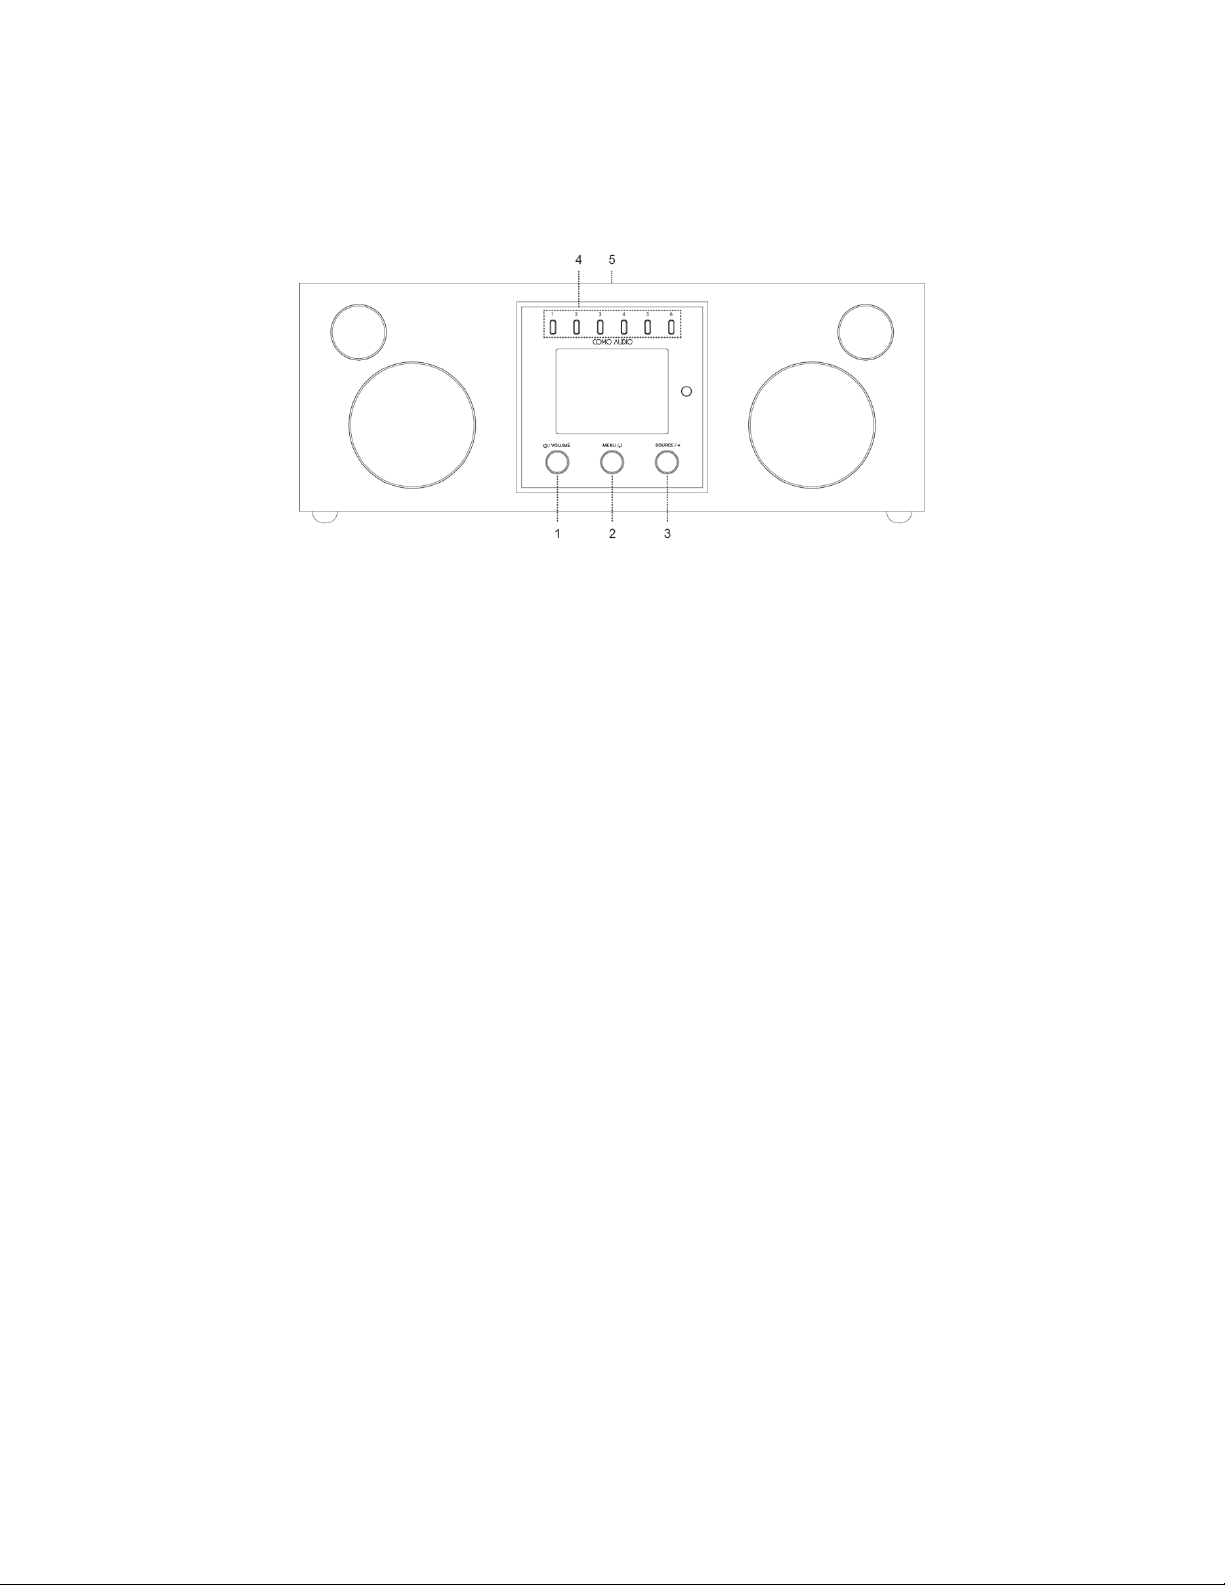
Front
1. Power/Volume: Push in briefly to turn Duetto on or off. Rotate to adjust the volume.
2. Menu: Press and hold to call up the main Menu. Rotate to navigate the Menu and push in briefly to select.
In DAB mode, rotate to call up the DAB station list and push in briefly to select a station.
In FM mode, rotate to manually tune stations or push in briefly to auto seek to the next strongest FM station.
When artwork is displayed, such as an album cover or station logo, push in briefly to expand the image to fill
the display. Push in briefly again to return to the standard display.
When the alarm activates, push in briefly to snooze. Push in briefly again during snooze to reset the snooze
timer.
3. Source: Rotate to call up and navigate the source menu. Push in briefly to select the source. When in the
Menu, push in briefly to go back one page with each push.
4. Presets: Press and hold to save a tuned station or a source. Push in briefly to recall the saved station or
source. The presets are independent and are not restricted to whichever source is playing. The presets will
also turn Duetto on from standby if a station or source has been saved to that preset.
5. NFC (Top of cabinet):
If your Android smartphone has NFC, make sure it is switched on in your device and be sure the display on
your device is unlocked. Change the source to Bluetooth. Touch the NFC area of your smartphone to the NFC
logo on the top of the cabinet. You may need to adjust your smartphone’s position around the cabinet’s NFC
logo until it locates the signal. If your smartphone is in a case, the case might reduce the NFC signal. Once NFC
is established, follow the instructions displayed on your smartphone to establish the Bluetooth connection.
Touch your smartphone to the cabinet’s NFC logo again to disconnect from Bluetooth. If your smart device
does not support NFC, see the section marked “Bluetooth”.
2
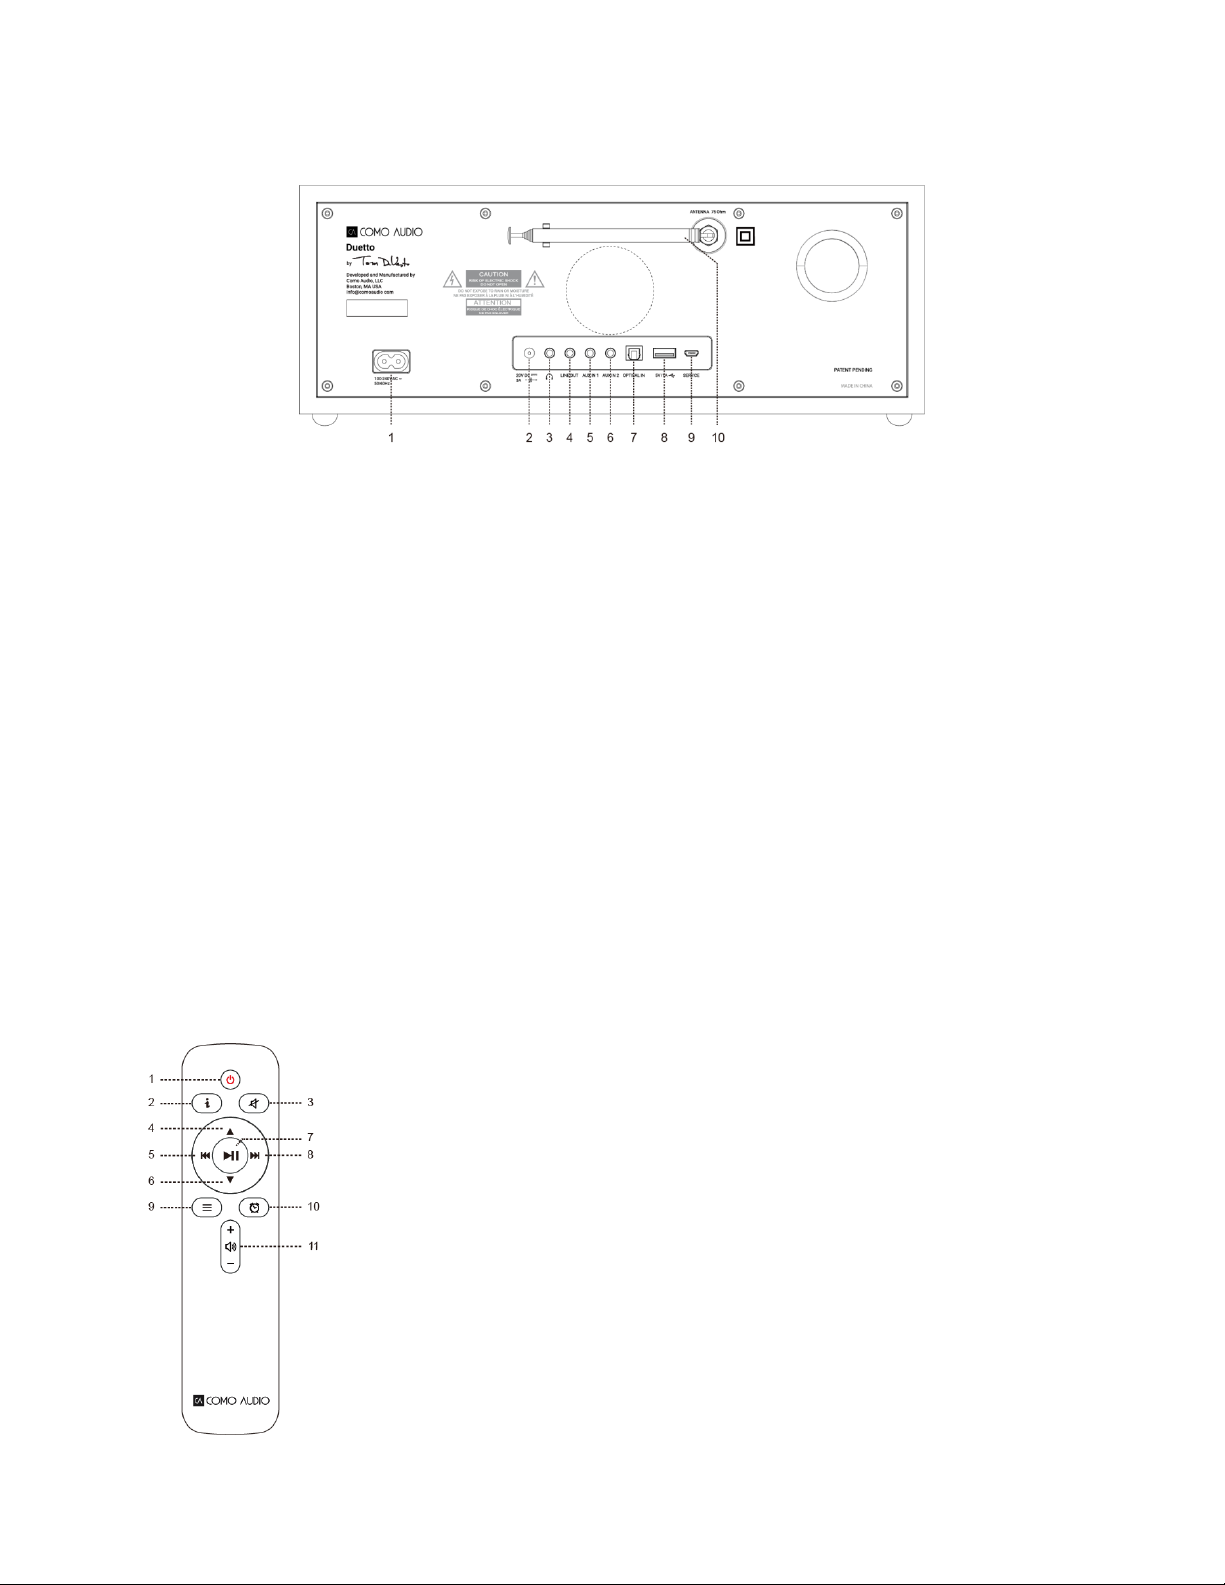
Back
1. Power inlet: Insert the included power cord. The internal switching power supply will automatically detect
the correct voltage.
2. DC: For use with an external 20VDC/3A adapter (not included). Never use an adapter and the power cord
simultaneously.
3. Headphones: Connect a set of stereo headphones.
4. Line out: Fixed level output to connect Duetto’s audio to a home receiver or other device with an analog
audio input.
5. Auxiliary 1 (Hi-Res): Connect the analog audio out from another device.
6. Auxiliary 2 (Hi-Res): Connect the analog audio out from another device.
7. Optical in (Hi-Res): Connect the audio from your television’s optical output using a Toslink cable (not included)
to hear TV sound. You must access your television’s on-screen settings menu and turn ON the PCM output
and turn your TV speakers Off. Your TV may require additional audio settings to be changed. When listening
to audio from your TV, you may prefer to change Duetto’s EQ from “Flat” to “TV Sound”.
8. USB (Hi-Res): Insert a USB flash drive to playback music files, then rotate the source knob and push in briefly
to select ‘My Music’. This jack will also power Google’s Cast for Audio and Amazon’s Dot (a short USB cable is
included). This jack can also trickle charge many smartphones. Do not exceed the jack’s 5V/1A capacity.
9. Service: For use by authorized service representatives only. Do not connect anything into this input.
10. Antenna: Expand and adjust for best FM or DAB reception. This antenna has no effect on WiFi reception.
Remote Control (install the included AAA batteries):
1. Power = Power
2. “I” = Info
3. Speaker X = Mute and Snooze when alarm sounds.
4. Up = Navigate up when in menu. Also acts as seek up when in FM mode. Also
shows station list in DAB mode (use up/down/enter to navigate and select).
5. Right arrow = Track forward.
6. Down = Navigate down when in menu. Also acts as seek down when in FM mode.
Also shows station list in DAB mode (use up/down/enter to navigate and select).
7. Play/Pause= Play/Pause. Long press brings up menu; brief press within menu acts
as Select; brief press in Internet Radio mode saves tuned station to Favorites.
8. Left arrow = Track back.
9. 3 Lines = Source icon menu (use up/down/enter to navigate/select source).
10. Clock = Alarm menu (use up/down/enter to navigate and select); Toggle alarms 1
& 2 on and off in standby.
11. Vol +/Vol- = Volume up/down
Press any key twice except Power and Alarm in standby to toggle the display off/on.
When the display is off, press any key (except Power and Alarm) once to turn the
display on for 7 seconds.
3

Set Up Wizard
After turning Duetto on for the first time, the Como Audio logo will be displayed, followed by the Set Up Wizard.
Follow the on-screen instructions for each step. Rotate the Menu knob and push in briefly to select, or use the
Up/Down arrow and Play (which doubles as “Select”) keys on the included remote control.
If your WiFi network requires a password, select “skip WPS” when prompted and use the keypad to enter your
password, then select “OK” on the right side. You may find the remote keys handier for entering your password
than using the Menu knob.
When prompted, we highly recommend you choose “keep network connected” to maintain accurate time, receive
prompt notification of software updates, and to access Spotify Connect.
If you make a mistake and need to start over again from the beginning, press and hold the Menu knob, select
System Settings, Network, and Network Wizard. If your WiFi network is not shown, press and hold the Menu knob,
select System Settings, then Factory Reset, and start the Set Up Wizard again.
For more detailed information, visit www.comoaudio.com to view the latest, complete user manual and help
videos.
How to use Spotify Connect
You’ll need Spotify Premium to use Connect –
see details overleaf.
1. Add your speakers to your wifi network (see product user instructions for details).
2. Fire up the Spotify app on your phone, tablet or PC using the same wifi network as above.
3. Play a song on Spotify and hit ‘DEVICES AVAILABLE’.
4. Choose your speakers and your music will start playing out loud.
Happy listening.
For more information on how to set up and use Spotify Connect please visit:
www.spotify.com/connect
Alarms:
Press and hold the Menu knob. Select Main Menu, then Alarms, then select Alarm 1 or 2. Set each category as
desired and be sure to select “Save” when you are done or else none of your settings will be saved and the alarm
will not be set. If you choose to wake to one of the Aux inputs, you must have your Aux device playing, such as an
MP3 player, as Duetto cannot activate your source device.
To Snooze, press the Menu knob or the Snooze key on the remote. Snooze will re-set each time it is pressed.
To stop the alarm, press the power button or the Alarm key on the remote.
Bluetooth:
Rotate the source knob to Bluetooth and push in briefly to select. Open Bluetooth on your device and search/scan
for the “Como Duetto” name, then pair and connect. Once you’ve paired and connected you shouldn’t need to do
it again. If your device prompts you to enter a passcode, enter “0000”.
My Music: UPnP
If you have music on other devices on your WiFi network you wish to stream to Duetto (most commonly using
Windows Media Player (WMP), open Windows Media Player on your device and make it the default player. Under
the “Stream” tab, select “Turn on media streaming”, and next to “CA Duetto”, tic “Allowed”.
On your Duetto, Press and hold the menu knob and select System Settings, then select Music player, and Shared
media. Be sure your device and Duetto are both connected to the same WiFi network.
Duetto will scan your network and present a list of device names. Select the device you wish to play music from.
Use the track and play/pause keys on the included remote control to control the audio tracks.
4

Note Duetto’s display cannot play videos or show pictures from another device.
If you are streaming from a MAC, you will need to use a third party UPnP server app.
DLNA:
You can stream audio from a DLNA media server.
Multi-room:
Set up and control of multi-room is done through Como Audio’s Como Control app.
Download the free Como Control iOS or Android app from iTunes or the Google Play store. The Como Control
app will allow you to control many functions along with multi-room.
Warranty
Como Audio, LLC provides a two year parts and labor warranty to the original owner from the date of purchase.
This warranty does not cover accidental damage, cosmetic damage, normal wear and tear, improper installation,
negligence, commercial applications, acts of God, lightening/power surges, unauthorized modifications, or service
by unauthorized facilities.
Como Audio will repair or replace the defective product at its discretion. Please retain the original receipt and
packing materials.
Contact your point of purchase for warranty service. Please contact Como Audio for an authorization number
before returning any product to us at: info@comoaudio.com
Specifications:
Model name: Como Audio Duetto
Power output: 30 watts per channel RMS x 2
Power consumption: 9 watts maximum (<1 watt in standby)
Power input: 100-240V, 50-60Hz
Transducers configuration: 2 x ¾” Soft dome tweeters and 2 x 3” Woofers (long throw, 4-layer voice coil, treated
paper cone, rubber surround)
Dimensions: 142mm H x 370mm W x 140mm D
Weight: 6.6 lbs./2.99kg
This document, as well as all specifications and features, are subject to change without notice.
Como Audio, LLC is not liable for operational, technical, or editorial errors/omissions.
Como Audio, the Como Audio logo, Solo, Duetto, Ambiente, and Como Control are trademarks or registered
trademarks of Como Audio, LLC.
Thompson Licensing: MP3 audio decoder
MPEG Layer-3 audio coding technology licensed from Fraunhofer IIS and Thomson.
Fraunhofer: MPEG-4 HE AAC Audio decoder
MPEG-4 HE-AAC audio coding technology licensed by Fraunhofer IIS. http://www.iis.fraunhofer.de/amm/
The Spotify Software is subject to third party licenses found here:
https://developer.spotify.com/esdk-third-party-licenses/
“The Bluetooth® word mark and logos are registered trademarks owned by the Bluetooth SIG, Inc. and any use of
such marks by Como Audio is under license. Other trademarks and trade names are those of their respective
owners.”
5

Qualcomm aptX is a product of Qualcomm Technologies International, Ltd.
The N-Mark is a trademark or registered trademark of NFC Forum, Inc. in the United States and in other countries.
This product is protected by certain intellectual property rights of Microsoft. Use or distribution of such technology
outside of this product is prohibited without a license from Microsoft.
For more information and to view the latest, complete instruction manual, visit: www.comoaudio.com
Como Audio, LLC.
Boston, MA USA
info@comoaudio.com
Important Safety Instructions:
1. Read these instructions.
2. Keep these instructions.
3. Heed all warnings.
4. Follow all instructions.
5. CAUTION- Danger of explosion if remote control’s batteries are incorrectly replaced. Replace only with the
same or equivalent type.
6. Warning: Batteries shall not be exposed to excessive heat such as sunshine, fire, or the like.
7. WARNING- To reduce the risk of fire or electric shock, do not expose this apparatus to rain or moisture.
8. Apparatus shall not be exposed to dripping or splashing and no objects filled with liquids, such as vases,
shall be placed on the apparatus.
9. Clean only with a dry cloth.
10. Do not block any ventilation openings. Install in accordance with the manufacturer’s instructions.
11. Do not install near any heat sources such as radiators, heat registers, stoves, or other apparatus (including
amplifies) that produce heat.
12. Only use attachments/accessories specified by the manufacturer.
13. Use only with the cart, stand, tripod, bracket, or table, specified by the manufacturer, or sold with the
apparatus. When a cart is used, use caution when moving the cart/apparatus combination to avoid injury
from tip-over. >>>>SHOW CART ICON HERE>>>>
14. Operate this product only from the type of power source indicated on the rear panel. For products using
an external power supply, use an exact replacement if lost or damaged.
15. For added protection for this product during a lightning storm, or when it is left unattended and unused
for long periods of time, unplug it from the wall outlet. This will prevent damage to the product from
lightning storms and power line surges.
16. Unplug this product from the wall outlet and refer servicing to qualified personnel under the following
conditions:
a. When the power supply cord or plug is damaged.
b. If liquid has been spilled or objects have fallen into the product.
c. If the product has been exposed to water or rain.
d. If the product does not operate normally by following the operating instructions.
e. If the product has been dropped or damaged in any way.
f. When the product exhibits a distinctive change in performance.
17. When replacement parts are required, be sure your service technician has used replacement parts
specified by the manufacturer or have the same characteristics as the original part. Unauthorized
substitutions may result in fire, electric shock, or other hazards.
18. Upon completion of any service, ask the service technician to perform safety checks to confirm the
product is in proper operating condition.
19. Keep this product a safe distance away from naked flame.
20. The recommended operating temperature range is 5C – 40 C (41 F – 104 F).
6

21. Complies with Canadian ICES-003 & RSS-210.
22. (North America) This product has been tested and found to comply with the limits for Part 15 of the FCC
rules. These limits are designed to provide reasonable protection against harmful interference in a
residential installation. This product generates, uses, and can radiate radio frequency energy and, if not
installed and used in accordance with the instructions, may cause harmful interference with radio
communications. However, there is no guarantee that interference will not occur in a particular
installation. If this equipment does cause harmful interference to radio or television reception which can
be determined by turning the product on and off, the user is encouraged to try to correct the interference
by one or more of the following measures:
A. Reorient or relocate receiving antennas.
B. Increase the separation between the equipment and receiver.
C. Connect the equipment to an outlet on a circuit different from that to which the receiver is
connected.
23. Protect the power cord from being walked on or pinched particularly at plugs, convenience receptacles,
and the point where they exit from the apparatus.
24. The power cord plug serves as the disconnect device and should remain readily accessible.
25. WARNING- The mains are not disconnected in the standby position, but the circuits are de-powered.
WEEE
Outside North America, when the user decides to discard this product, it must be sent to a separate collection
facility for recycling. Please contact your point of purchase for more details.
DQSG0716
Federal Communication Commission (FCC) Interference Statement
FCC Part 15: This equipment has been tested and found to comply with the limits for a Class B digital device,
pursuant to Part 15 of the FCC Rules. These limits are designed to provide reasonable protection against harmful
interference in a residential installation. This equipment generates, uses and can radiate radio frequency energy
and, if not installed and used in accordance with the instructions, may cause harmful interference to radio
communications. However,there is no guarantee that interference will not occur in a particular installation.
If this equipment does cause harmful interference to radio or television reception, which can be determined by
turning the equipment off and on, the user is encouraged to try to correct the interference by one or more of the
following measures:
· Reorient or relocate the receiving antenna.
· Increase the separation between the equipment and receiver.
· Connect the equipment into an outlet on a circuit different from that to which the receiver is connected.
· Consult the dealer or an experienced radio/TV technician for help.
Caution: Any changes or modifications not expressly approved by the party responsible for compliance could void
the user’s authority to operate the equipment.
7

Warning statement regarding §15.19 has to be as follow: This device complies with part 15 of the FCC Rules.
Operation is subject to the following two conditions: (1) This device may not cause harmful interference, and (2)
this device must accept any interference received, including interference that may cause undesired operation.
FCC Radiation Exposure Statement: This equipment complies with FCC radiation exposure limits set forth for an
uncontrolled environment. This equipment should be installed and operated with minimum distance 20cm
between the radiator & your body.
8
 Loading...