

DIGITAL RADIO
WiFi, LAN, FM with Docking for iPod®
Instruction Manual
Safety Information
WARNING: TO REDUCE THE RISK OF FIRE OR
ELECTRIC SHOCK, DO NOT EXPOSE THIS
APPLIANCE TO RAIN OR MOISTURE.
IMPORTANT SAFETY INSTRUCTIONS
To reduce the risk of electrical shock, fire,
etc.:
1. Read these instructions.
2. Keep these Instructions.
3. Heed all Warnings.
4. Follow all instructions.
5. Do not use this apparatus near water.
6. Clean only with dry cloth. For stubborn
stains, use a soft cloth dampened with a
weak solution of mild detergent and
water. Dry the apparatus immediately
afterwards with a clean cloth. Do not use
abrasive clothes, thinners, alcohol, or
other chemical solvents, because they
may damage the finish or remove the
panel lettering.
The lightning flash with arrowhead
symbol within an equilateral triangle
is intended to alert the user to the
presence of uninsulated "dangerous
voltage" within the product's
enclosure that may be of sufficient
magnitude to constitute a risk of
electric shock to persons.
The exclamation point within an
equilateral triangle is intended to alert
the user to the presence of important
operating and maintenance
(servicing) instructions in the
literature accompanying the
appliance.
7. Do not block any ventilation openings.
The ventilation shall not be impeded by
covering the ventilation openings with
items, such as newspapers, table
clothes, curtains, etc.
8. Do not install near any heat source
such as radiators, heat registers,
stoves, or other apparatus (including
amplifiers) that produce heat.
9. Do not defeat the safety purpose of the
polarized or grounding - type plug. A
polarized plug has two blades with one
wider than the other. A grounding type
plug has two blades and a third
grounding prong. The wide blade or
the third prong are provided for your
safety. If the provided plug does not fit
into your outlet, consult an electrician
for replacement of the obsolete outlet.
10. Protect the power cord from being
walked on or pinched particularly at
plugs, convenience receptacles, and
the point where they exit from the
apparatus. If the power cord is
damaged, it must be repaired by a
qualified repairer.
11. Only use attachments/accessories
specified by the manufacturer.
12. Use only with the cart, stand, tripod,
bracket or table specified by the
manufacturer, or sold with the
apparatus. When a cart is used, use
caution when moving the
cart/apparatus combination to avoid
injury from tip-over.
Contents page

13. Unplug this apparatus during lightning
storms or when unused for long
periods of time.
14. Refer all servicing to qualified service
personnel. Servicing is required when
the apparatus has been damaged in
any way, such as power-supply cord
or plug is damaged, liquid has been
spilled or objects have fallen into the
apparatus, the apparatus has been
exposed to rain or moisture, does not
operate normally, or has been
dropped.
15. The apparatus shall not be exposed to
dripping or splashing and no objects
filled with liquids, such as vases, shall
be placed on the apparatus.
16. The mains plug or an appliance coupler
is used as the disconnect device, the
disconnect device shall remain readily
operable.
17. Please read Rating Labels at the
bottom of the Sender and Receiver for
power input and other safety
information.
FCC
This device complies with Part 15 of the
FCC Rules Operation that is subject to
following two conditions:
(1) This device may not cause harmful
interference and,
(2) This device must accept any
interference received, including
interference that may cause
undesired operation.
Warning 1 : Changes or modifications
to this unit not expressly approved by
the party responsible for compliance
could void the user authority to
operate the equipment.
Warning 2 : When using this product,
it should be installed and operated
with a minimum distance of 7.9 in.(20
cm) for 2.4 GHz operations between
the radiator and your body. This
transmitter must not be collocated or
operate in conjunction with any other
antenna or transmitter.

Contents
Safety Information iii
Contents v
Package Content 2
Internet Radio Quick start Guide 3
What you need before you can use your Internet Radio......................................................3
Controls Overview (a) .........................................................................................................4
Controls Overview (b).........................................................................................................5
Connecting to wired network...............................................................................................6
Step 1 - Power up Radio........................................................................................6
Step 2 – Choose LAN Setting................................................................................6
Step 3 – Enter Internet Radio mode.......................................................................7
Step 4 – Enter Network .........................................................................................7
Connecting to wireless network...........................................................................................8
Step 1 – Choose Wlan Setting...............................................................................8
Step 2 – Select Your Region..................................................................................8
Step 3 – Enter Network .........................................................................................8
Choosing a station..............................................................................................................10
Station Updates..................................................................................................................10
FM Operation Mode..........................................................................................................11
Setting Station Presets .......................................................................................................11
Selecting a Preset station...................................................................................................11
AUX IN Operation Mode..................................................................................................12
Docking and playing your iPod.........................................................................................13
Setting Clock .....................................................................................................................14
Setting Alarm.....................................................................................................................17
Sleep Function...................................................................................................................19
Software Updates...............................................................................................................20
Factory reset ......................................................................................................................20
General Operation 21
Network setup....................................................................................................................21
SW Version and Radio ID.................................................................................................21
Register..............................................................................................................................21
Requesting a Station..........................................................................................................21
Returning To Main Menu..................................................................................................21
Changing Volume..............................................................................................................21
Appendix 22
Step 1: Set Up Media Sharing in Windows Media Player 11............................................22
Step 2: Play Music on the Internet Radio. .........................................................................23
Set Up Media Sharing in MAC OS....................................................................................24
Set up Windows File Sharing on a MAC............................................................24
Accounts Setup....................................................................................................24
Directory Setup....................................................................................................24
Troubleshooting 25
Specification 26
Contents page

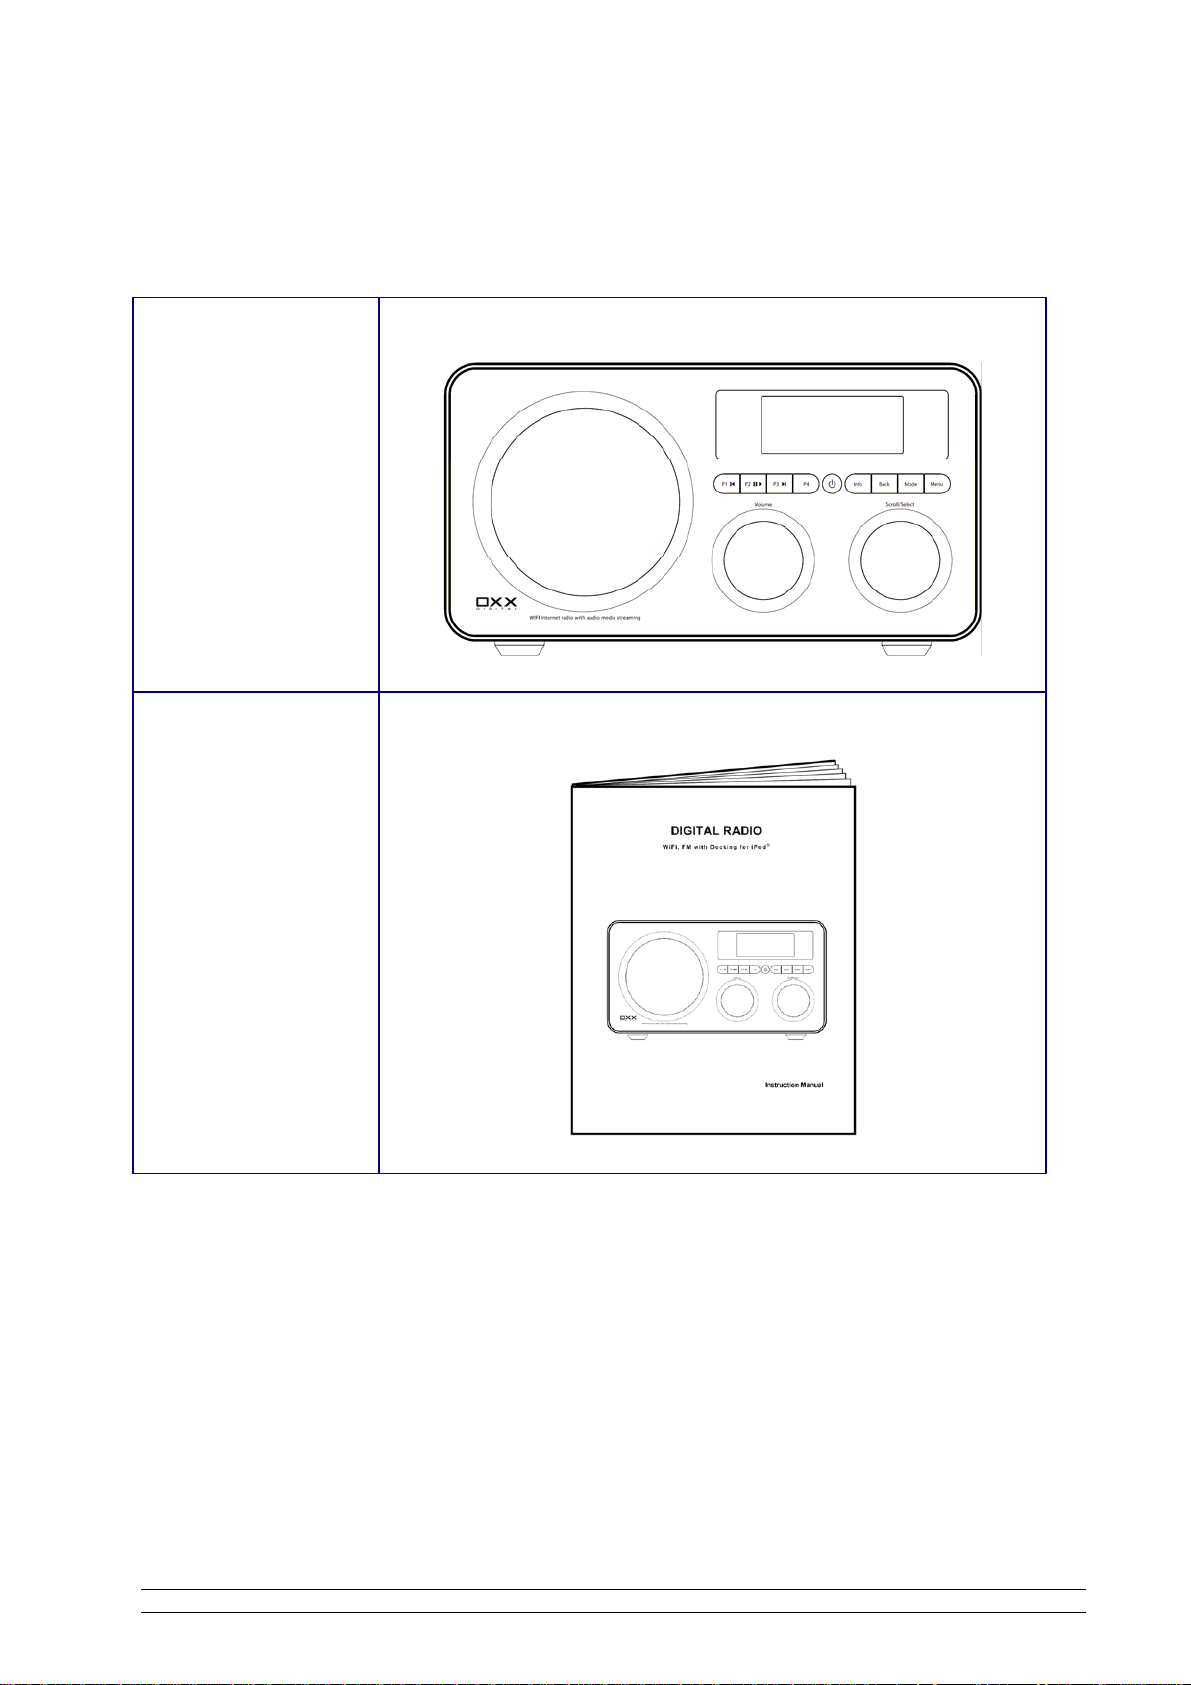
Package Content
Main unit
Instruction manual
2

Internet Radio Quick start Guide
What you need before you can use your Internet Radio
Before you use your Internet Radio, you need the following:
LAN Setting:
• Make sure the internet environment is ready and the network settings is available for LAN (ADSL
or Cable Modems is highly recommended).
• To find the Radio’s LAN MAC address, Please follow:
Main menu System setup Internet setup View settings MAC Address
Wireless LAN Setting:
• A broadband Internet connection.
• A wireless access point (Wi-Fi) connected to your broadband Internet, preferably via a router.
• If your wireless network is configured to use Wired Equivalent Privacy (WEP) or Wi-Fi Protected
Access (WPA) data encryption then you need to know the WEP or WPA code so you can get the
Internet Radio to communicate with the network.
• If your wireless network is configured for trusted stations you will need to enter the Radio’s MAC
address into your wireless access point. To find the Radio’s MAC address use menu items as
follows:
Main menu System setup Internet setup View settings MAC Address
• To enter the MAC address into your wireless access point, you must read the instructions
supplied with the wireless access point.
Before you continue, make sure that your wireless access point is powered up and connected to your
broadband Internet, or your LAN cable is setting well. To get this part of the system working you must
read the instructions supplied with the wireless access point and LAN connecting.
3
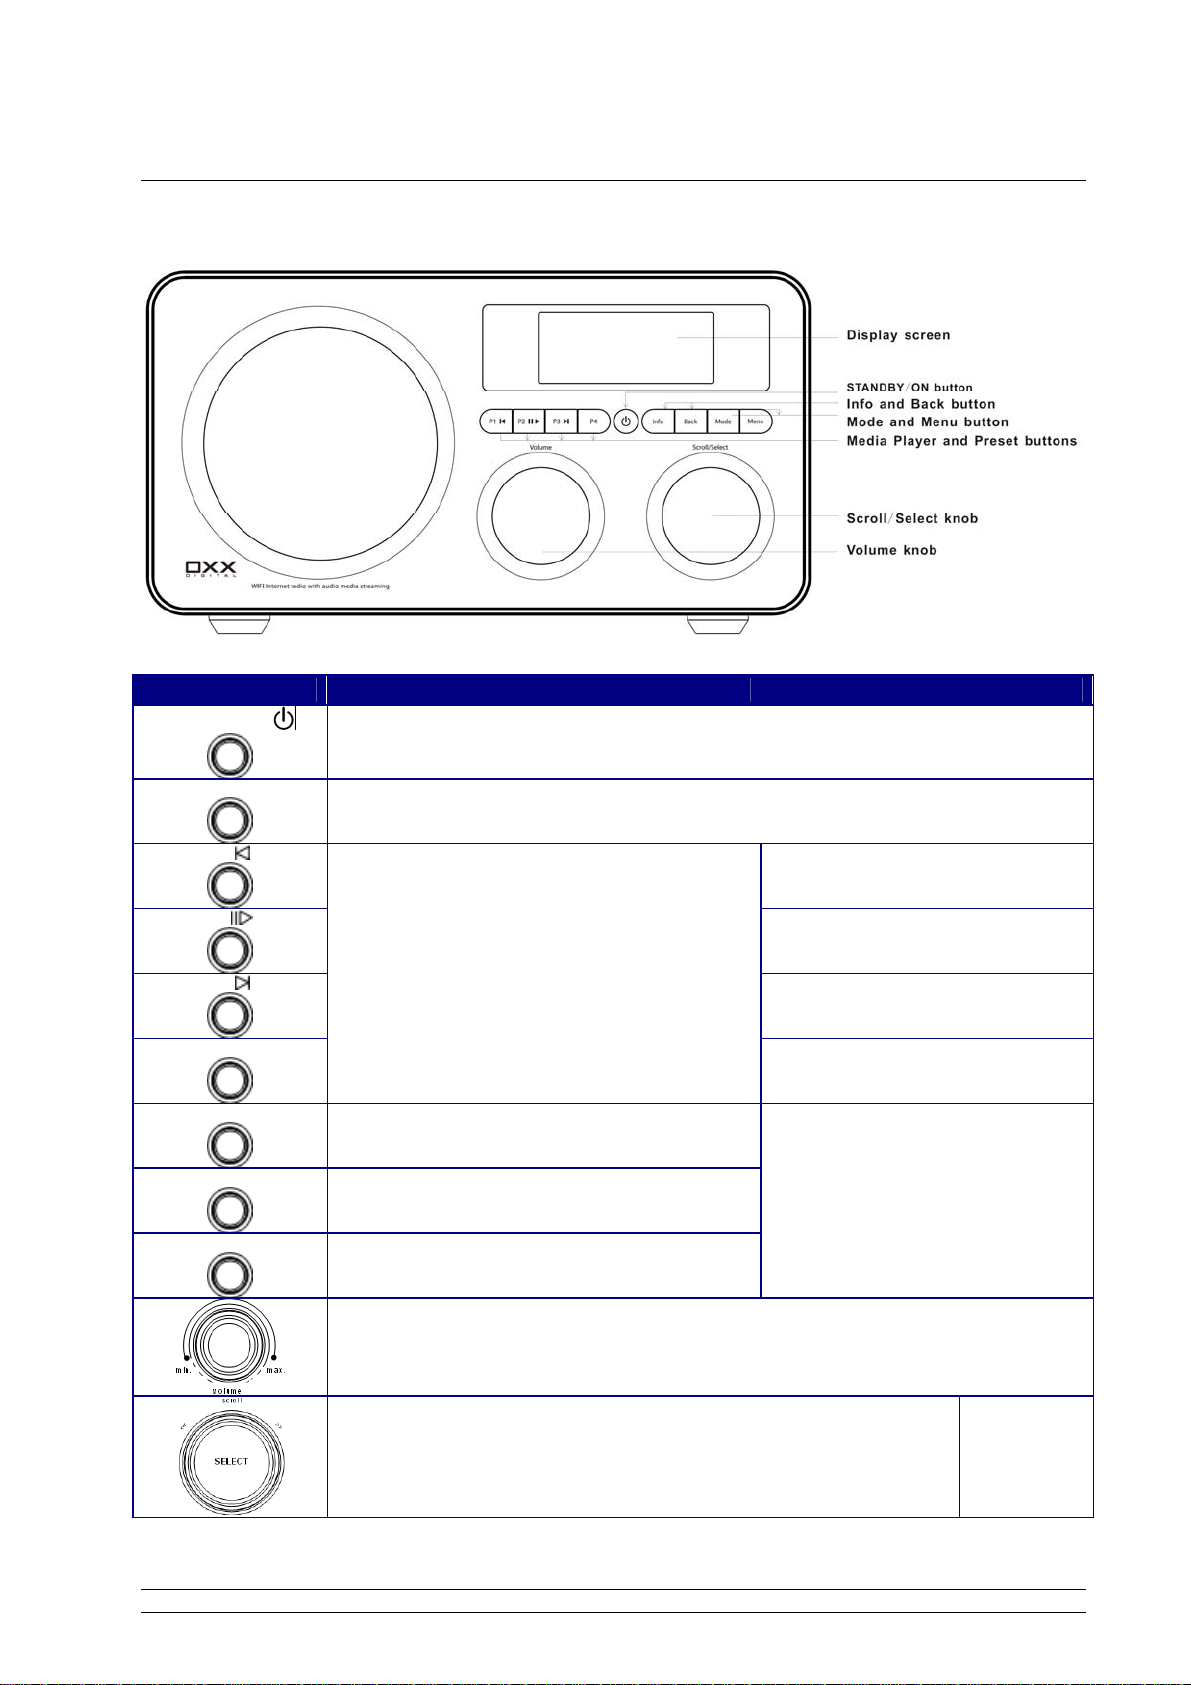
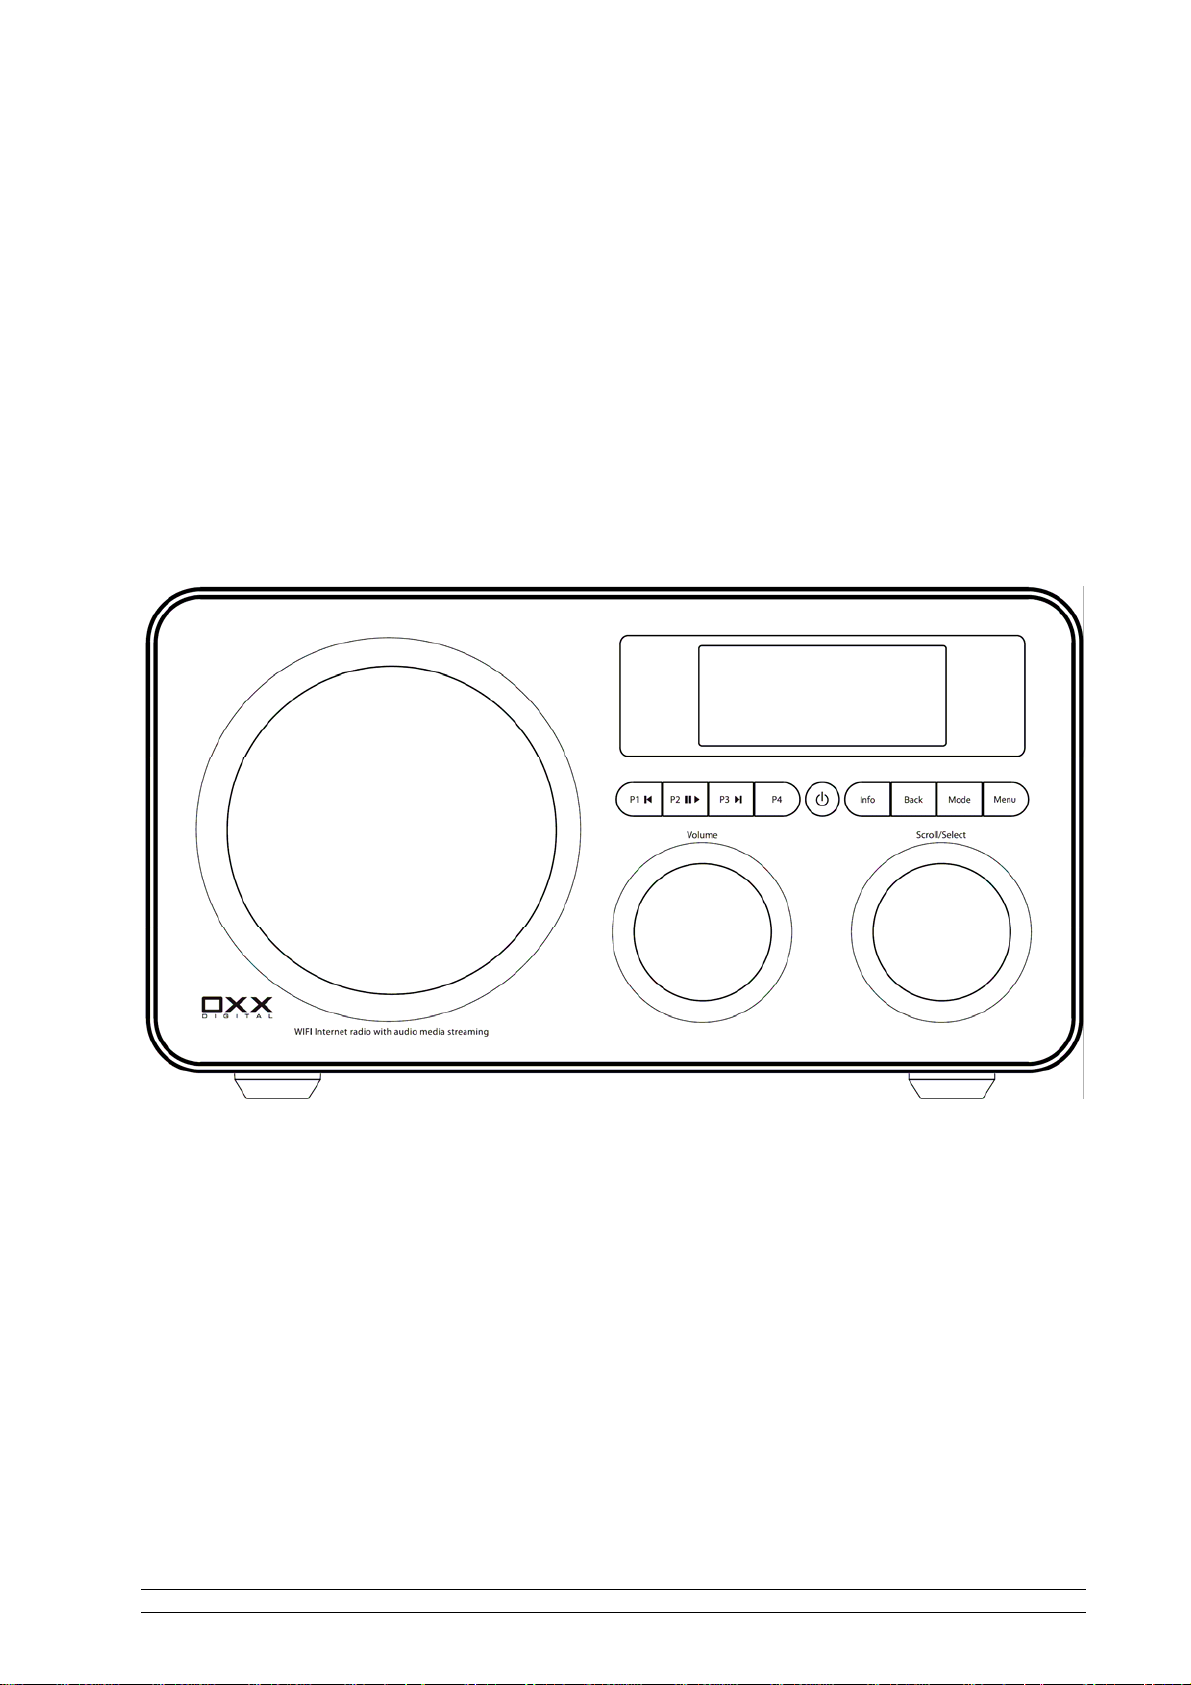
Controls Overview (a)
Digital Radio Front view
Control Internet Radio FM mode Media Player iPod mode
STANDBY/ON
Mode
Press to convert among Internet Radio, Music Player, FM, Auxiliary Input and iPod Mode.
P1
P2
P3
P4
Info
Menu
Back
Press and hold to save Preset station
P1, P2, P3 or P4;
Press to load Preset station
P1, P2, P3 or P4.
Display Queue information
Press to Main menu and other options
Go back to previous menu page
Press to turn on/off Radio
Previous Track
Play/Pause
Next Track
No function
No function
Increase volume by turning the knob clockwise
Decrease volume by turning the knob anti-clockwise
a. Turn the knob to change options, press the knob to select
b. In FM Mode, press the button to searching next available
station
No function
4
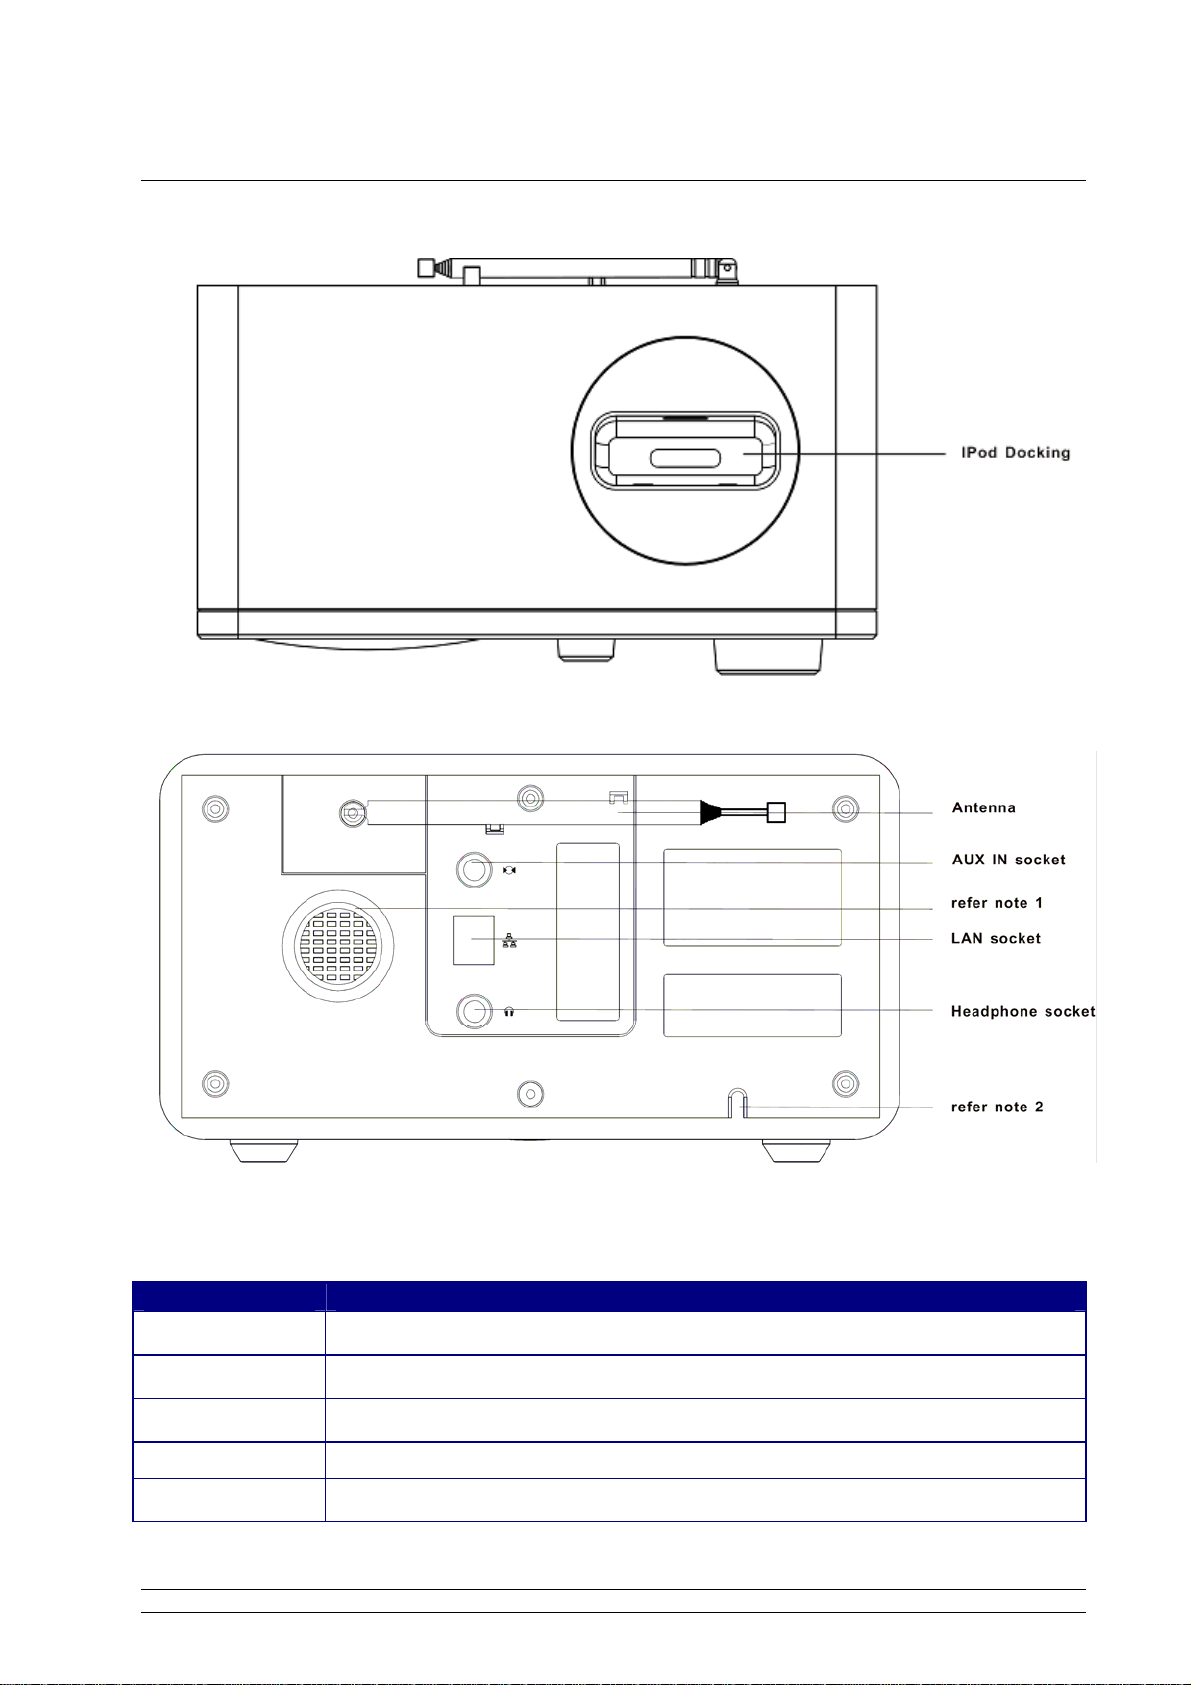
Controls Overview (b)
Digital Radio Top View
Digital Radio Back View
Socket Connection
AUX IN Connects to the external audio device
Headphone Connects to the headphone
LAN Connects to the LAN cable
note 1:
note 2:
To help Loudspeaker air comes out from rear of your Radio.
AC power cord input.
5

Connecting to wired network
Step 1 - Power up Radio
First, connect to your Internet Radio adaptor and ensure the Power LED is light up. In use, Radio can
be switched on or off with the STANDBY/ON
Note: Make sure LAN cable connecting to LAN socket already.
button.
Step 2 – Choose LAN Setting
After a few seconds, this will change to show:
Rotate the Scroll knob to <SYSTEM SETUP>, press to confirm.
Rotate the Scroll knob to <INTERNET SETUP>, press to confirm.
Rotate the Scroll knob to <MANUAL SETTINGS>, press to confirm.
Rotate the Scroll knob to <WIRED>, press to confirm.
Rotate the Scroll knob to <DHCP ENABLE>, press to confirm.
The Wired setting is available now!
6

Step 3 – Enter Internet Radio mode
Repeat press the BACK button to go back to enter this mode, or follow either of below methods:
a. Simply press MODE button to enter Internet Radio mode.
or
b. Press MENU button first, and then rotate the Scroll knob to <MAIN MENU>, press to confirm.
Note: a. Main Menu Mode offer Internet Radio, Music Player, FM, Auxiliary Input, iPod, Sleep, Alarms, system
setup and Info option items.
b. Press MODE button, Internet Radio, Music player, FM , Auxiliary Input and iPod mode are available.
Step 4 – Enter Network
After step 3 completed, radio will connecting to Network automatically.
Few seconds later, Display say:
Or
If this happens, please follow:
a. Check your router, see it working normally or not;
b. Check your LAN cable, make sure it hasn’t damaged, and the port of cable which insert to LAN
socket touched well.
7

Connecting to wireless network
Step 1 – Choose Wlan Setting
a. Refer page 6 “choose LAN setting”, rotate the Scroll knob to <WIRELESS>, press to confirm.
or
Rotate the Scroll knob to <DHCP ENABLE>, press this knob to confirm.
Alternatively, simply take off LAN line from the LAN socket before connecting to network is also
recommend.
Step 2 – Select Your Region
Rotate the Scroll knob to <INTERNET RADIO>, and press to confirm.
Note: If you make a mistake at any point, press the BACK button to go back to the previous screen.
Then the display will show a list of region for your choice.
Rotate the Scroll knob to your region, press to confirm. Radio will save it in memory.
For initially use, waiting for a few minutes, the Radio will ask you to enter network.
Step 3 – Enter Network
In some cases Radio may find more than one network. Rotate the Scroll knob to cycle through the
name list, and then press this knob when the name of your own network is displayed
If your network is not configured to request a password (WEP/WPA), Radio will connect
to the network and display:
8

If a WEP/WPA key (password) is required, Radio will display as following:
After a few seconds, Radio will ask you to input the WEP/WPA code and will display the password
entry screen as follows:
a. Rotate the Scroll knob to cycle through the alpha-numeric character list. Press to
select an appointed character.
Note: WEP/WPA pass codes are case-sensitive
b. If you make a mistake while enter your password, select ‘ ’ icon to delete a
character.
c. Press BACK button scroll up or down
d. Select
icon return to previous track.
e. After selecting the final character of your password, scroll to the ‘
to last or next line.
’ icon and press
Scroll knob to enter your code.
It should now successfully connect to your network.
Note
: a. Radio will automatically remember the WEP/WPA code for your network, and other networks you have
used previously.
b. There is no need to re-enter these codes once more, unless perform a <FACTORY RESET>.
Rotate the Scroll knob to cycle through menu list, Radio will display the following:
Select <HELP>, Radio will provide you access code and FAQ solutions.
9

Choosing a station
When Radio has connected to your network, you are now ready to select a station.
a. Rotate the Scroll knob to <STATIONS>;
b. Press to confirm. There are five options available for select a station.
Note: a. You can move back to the previous screen at any time by pressing the BACK button.
b. The five options are Location, Genre, Search Stations, Popular stations and New stations.
c. Rotate the Scroll knob to your search method, and then press to confirm.
d. Choose <LOCATION> will give you an alphabetical list of region broadcast programs.
Rotate the Scroll knob to your desired location, press to confirm. For example:
Radio will now loading the station list.
e. Or choose <GENRE> will give you an alphabetical list of station types, rotate the Scroll knob to
view, and press to confirm.
Station Updates
Occasionally, Radio will tell you that it is receiving an updated station list. It does this automatically and
periodically, ensuring your Radio always has the latest station directory on-board.
10

FM Operation Mode
a. To listen to FM Radio stations switch Radio on and press the MODE button repeatedly until <FM
MODE> is appeared.
Or enter <MAIN MENU>, and then rotate the Scroll knob to <FM>.
For initial use, it will start at the beginning of the FM frequency range (87.50MHz). Otherwise, the
last FM station you were listening to will be selected.
b. Rotate the Scroll knob to increase or decrease the frequency by 0.05MHz per step;
c. Press the Scroll knob to ‘SEEK’ active station automatically, or simply press this knob.
d. To ‘seeking’ the next active station automatically, simply press Scroll knob again.
e. The unit will display the frequency changing until it stops on the next station.
f. After it running to the end of the frequency range, it will restart search.
Setting Station Presets
Your Radio can store 4 Internet stations and 4 FM stations preset.
To store the current station:
a. Press and hold either one of the 1-4 buttons for 2 sec., and it will display:
stand for current station frequency.
Selecting a Preset station
To select a stored Internet or FM station, enter corresponding mode, then simply press the
corresponding preset button.
11

AUX IN Operation Mode
a. To listen to FM Radio stations switch Radio on and press the MODE button repeatedly until
<AUXILIARY INPUT MODE> is appeared.
Or enter <MAIN MENU>, and then rotate the Scroll knob to < AUXILIARY INPUT >.
b. Using the connection lead supplied, you radio is transformed into a high quality digital audio
speaker system.
c. Connect one end of the supplied audio lead to the headphone (or auxiliary out) socket of your
source device, the other end connect to AUX IN socket on the rear of your radio.
The radio display will now show:
d. To gain optimal volume levels, adjust the output volume level on both the source device and on
radio itself is recommend.
Note: AUX IN allows for quick and easy connection an MP3 player or other external sound
sources.
12

Docking and playing your iPod
Dock can play music files stored on your iPod through the stereo speakers.
Docking your iPod
1. Insert your iPod into the iPod docking on the top of the unit.
Dock will begin to charge your iPod if necessary.
Charging will stop when the iPod is fully charged (check the iPod screen).
2. Press the MODE button until the audio source is ‘iPod Mode’.
3. Select and play a track using your iPod or press the ‘ ’ or ‘ ’ buttons. Or press ‘ ’ to
pause.
4. Adjust the playback volume by turning the VOLUME knob. Do not adjust the volume on the iPod.
13

Setting Clock
a. After enter <MAIN MENU>, rotate the Scroll knob to <SYSTEM SETUP>, press to confirm.
b. Rotate the Scroll knob to <TIME SETUP>, press to confirm.
Note: a. time setup mode, <Auto update>, <Set Time Zone> and <Set 12/24 hour> are also
available.
b. Choice <Auto update>, please ensure your Radio connecting to internet successfully.
c. Choice <Set Time Zone>, please find out Your Local Timezone
please refer following page.
c. Rotate the Scroll knob to <SET CLOCK>, and then press to confirm.
= GMT ± _?_ hour, for detail ,
Radio will now ask you to set the hour.
d. Rotate the Scroll knob to change the hour, press to confirm. You Radio will now ask you to set
the minutes.
e. Set the minutes by using the same method.
f. Rotate the Scroll knob to <Set date>, using the same method.
14

Until now, the Time setting is perfect!
g. Radio also recommending you another method for time setup, which associate with Greenwich
Mean Time (GMT).
Turn you Radio to below mode:
Rotate the Scroll knob to <SET TIME ZONE>, press to confirm.
To obtain Your Local Timezone = GMT ± _?_ hour. Please Visit website:
http://wwp.greenwichmeantime.com
Take Germany - Time Zone for instance, visit above website at first, then choose Europe,
German, Current time in German Zone now is appeared.
Rotate the Scroll knob clockwise or anti-clockwise to increase 0.5 hour or decrease 0.5 hour per
step.
or
15

After adjust to accurate time, press Scroll knob to confirm.
To browse time setting, press STANDBY/ON
button.
Or alternatively, during playing a station program, press INFO button to brown current time.
16

Setting Alarm
Note: Setting Alarm, make sure Setting Time at first.
a. Press the
subdirectory to set it.
b. Press Scroll knob, and then rotate this knob to choose one alarm, press to confirm.
STANDBY/ON button to switch on your Radio, and then enter <MAIN MENU>
c. Rotate the Scroll knob to set Time, press to confirm. Refer above <set time> method.
d. Rotate the Scroll knob to set days, Once/Daily/Weekdays/weekends is available. Press to confirm.
e. Rotate the Scroll knob to OFF option, press this knob to turn it on.
f. Rotate the Scroll knob to set mode, press to confirm.
Note: a. Mode offer Buzzer, Internet Radio and FM mode alarm sound are available.
b. Last listened offer preset programs for your choice.
c. Radio will store alarm setting in its memory.
17

g. Finally, Rotate the Scroll knob to <SAVE>, press to confirm.
The display will show “Alarm Saved” for 3 seconds, then returns to current Radio station display.
When Radio is in standby mode, the Alarm icon ( ) will be displayed on-screen.
h. Press the Scroll knob or STANDBY/ON
button to deactivate the Alarm.
j. To cancel Alarm you need to convert alarm on to off. Or factory reset.
Note:
a. Alarm volume level can be adjust to your desired level before turning OFF the unit, and stored it
in memory, if you set Volume knob to min., when alarm is coming, perhaps you won’t hear it.
18

Sleep Function
a. After enter <MAIN MENU>, rotate the Scroll knob to <SLEEP>, press to confirm.
b. Rotate the Scroll knob to define the Sleep period which between 0 – 90 minutes, press to confirm.
Note:
c. Select <SLEEP> option again, and then press Scroll knob to show that how long it will be expired.
d. Radio will now automatically put itself into standby mode after it has elapsed.
e. To continue enjoying your program, press STANDBY/ON
a. The interval time is 15 minutes per step.
b. The program will turn off after a pre-defined period of time.
button.
19

Software Updates
a. Software updates can be activated from <MAIN MENU> --> <SYSTEM SETUP>, and then press
Scroll knob to confirm.
b. Rotate the Scroll knob to < SOFTWARE UPDATE >, press to confirm.
It’s perfect now!
software update can take several minutes do not switch Radio off until this procedure has been completed.
Note:
Otherwise, may cause permanently damaged.
Factory reset
Performing a factory reset will completely reset your Radio’s memory, clearing all WEP/WPA codes
and user settings. This will effectively return to its default factory settings.
a. Factory Reset can be activated from <MAIN MENU> --> <SYSTEM SETUP>, and then press
Scroll knob to confirm.
b. Rotate the Scroll knob to < FACTORY RESET >, then press to confirm.
c. The display will ask you as follow,
d. Press the INFO button to reset.
Note: If you do not wish to reset the Radio, pressing any buttons except ‘INFO’ to cancel this order,
Radio will revert to its previous operating condition immediately.
20

General Operation
Network setup
Enable you to scan again for connection to another wireless network, or to manually configure the
network parameters. Use this if you take the Internet Radio to another building where you want to
use it.
The Network setup menu also allows you to view settings and choice W-LAN region.
SW Version and Radio ID
After enter INFO subdirectory, your Radio will display such information as your device serial number
and hardware/software version numbers. This information may be requested when dealing with
technical support issues.
Register
This will display a key code that can be used to register your Radio on the Frontier customer portal:
http://www.wifiRadio-frontier.com
Requesting a Station
If you want to listen to a Radio station that is currently not listed in station list, you can visit the Frontier
website at http://www.wifiRadio-frontier.com
and make a request to add the station to the list.
Returning To Main Menu
a. Simply press MENU button. Then
b. Alternatively, you can move back to
BACK button.
rotate the Scroll knob to <MAIN MENU>.
Radio’s top-line <MAIN MENU> at any time by pressing the
Changing Volume
To change volume by rotate the Volume knob;
Radio will remember its previous volume level.
21

Appendix
Step 1: Set Up Media Sharing in Windows Media
Player 11
After you download and install Windows Media Player 11 for Windows XP and connect your Radio to the
network, you need to set up media sharing so that you can share music with your Radio.
The following steps describe how to set up media sharing in Windows Media Player 11.
1. In Windows Media Player 11, click the small arrow below the Library tab, and then
click Media Sharing.
2. In the Media Sharing dialogue box, select the Share my media check box.
22

3. Check the “share my media to” box. In the list, click your Radio *, click Allow, the
selected device will now show a green tick and then click OK.
* If your device does not appear in the list of devices, perform the following steps;
From the "Media Player" menu of your internet Radio select "UPNP Servers"
A list of available computers will appear.
Select the required computer.
Your device will now appear in the list. If you want to check that this is your Radio,
right click on the device and select “Properties”: your Radio's MAC address will be
shown.
Step 2: Play Music on the Internet Radio.
After installing and configuring your Radio and Windows Media Player 11, you are now ready to play
music via a wireless connection.
The following steps describe how to play music with your Radio.
1. Select "UPNP Servers" in the "Media Player" menu.
2. Select the computer you wish to play the music files from.
3. Use the controls to browse according to the following criteria: All Music, Genre, All
Artists, Contributing Artists, Album Artists, Composers, Albums, Playlists, Folders or
Star Ratings and then press the SELECT button to confirm.
4. Select the tracks you want to play, then press the Select button. Enjoy the music!
23

Set Up Media Sharing in MAC OS
Using the Radio with a MAC will require Windows File Sharing. MAC OS 9 and earlier
versions of the OS will need extra software to use Windows File Sharing, but MAC OS X
10.2 and later versions have Windows File Sharing built into the OS.
Set up Windows File Sharing on a MAC
- From the 'Dock', click on 'System Preferences'. From the 'System Preferences'
window, under the 'Internet & Network' section, click on 'Sharing'.
- From the 'Sharing' window, do the following:
Under the 'Services' section, enable 'Personal File Sharing' and 'Windows
Sharing'. In order to do this, tick the corresponding boxes or click on 'Start' for
each of these services.
Under the 'Firewall' section, switch off the firewall.
Under the 'Internet' section, switch off 'Internet Sharing'.
Accounts Setup
- From the 'System Preferences' window, in the 'System' section, click on 'Accounts'.
Select an account and remember its 'Short Name' and password. This will be used
for the Radio to connect to the MAC.
Directory Setup
- From the 'Dock', click on 'Finder'. From 'Finder', click on 'Applications then ‘Utilities'.
Click on 'More Info' for 'Directory Access' and ensure that the 'Read/Write' option is
enabled. Double-click on 'Directory Access' and enable the following:
AppleTalk
LDAPv3
SLP
SMB/CIFS
- For 'SMB/CIFS', click on 'Configure' and select an appropriate workgroup.
- Copy and paste the mp3 files to 'Documents' in the 'Finder' window.
- Turn on 'AirPort' (wireless sharing).
- Wait for a few minutes.
In the 'Media Player’ > ‘Windows Shares' menu, enter the MAC account's short name
and password. The Radio should then be able to connect to the MAC.
24

Troubleshooting
If you experience any trouble with your wireless Internet Radio, then you may find it useful to visit the help
section on our webpage:
If you have trouble connecting the Radio to your wireless network, these steps may help to resolve the
problem:
1. Confirm that a Wi-Fi connected PC can access the Internet (i.e. can browse the web) using the same
network.
2. Check that a DHCP server is available, or that you have configured a static IP address on the Radio.
You can configure a static IP address on the Radio using the menu item ‘System setup -> Internet setup > Manual setting-> Wireless’, and then select ‘DHCP disable’.
3. Check your access point does not restrict connections to particular MAC addresses. You can view the
Radio’s MAC address using the menu item ‘System setup -> Internet setup -> View setting-> MAC
address’.
4. If you have an encrypted network, check that you have entered the correct key or password into the
Radio. Remember that text-format keys are case sensitive. If, when attempting to connect to an
http://www.wifiRadio-frontier.com
encrypted network, your Radio displays: ‘Wireless error’ followed by a 5-digit number, then please ensure
that you enter the correct passphrase for the network. If the problem persists, then you may need to
consult your network configuration.
5. If your Radio can connect to the network successfully, but is unable to play particular stations, it may be
due to one of the following causes:
a. The station is not broadcasting at this time of the day (remember it may be located in a different time
zone).
b. The station has reached the maximum allowed number of simultaneous listeners.
c. The station is not broadcasting anymore.
d. The link on the Radio is out of date.
e. The Internet connection between the server (often located in a different country) and you is slow.
Try using a PC to play back the stream via the broadcaster’s web site.
6. If you can play back the station with a PC, use the form at http://www.wifiRadio-frontier.com
so that we can change the station data that is used by the Radio.
to notify us
25

Specification
ITEMS DESCRIPTION
Specifications: WiFi, LAN, FM with Docking for iPod®
Power Requirements:
Frequency Range:
Rated Output Power: 5W
Speaker: 8 ohm
Headphone Jack: 32 ohm
Dimension: 250x 130 x 130mm
AC Power Input: 100-240VAC, 50-60HZ
for use, please refer rear panel silk-screen
(FM) 87.5-108MHz
26
 Loading...