

Page 1

CSW Ambiance Touch Radio_EN_ric2.fm Page 1 Wednesday, August 31, 2011 4:18 PM
1 Read these instructions.
2 Keep these instructions.
3 Heed all warnings.
4 Follow all instructions.
5 Do not use this apparatus near water.
6 Clean only with dry cloth.
7 Do not block any ventilation openings. Install in accordance with the manufacturer’s instructions.
8 Do not install near heat sources such as radiators, heat registers, stoves, or other apparatus (including amplifiers) that produce
heat.
9 Do not defeat the safety purpose of the polarized or grounding-type plug. A polarized plug has two blades with one wider than the
other. A grounding type plug has two blades and a third grounding prong. The wide blade or the third prong are provided for your
safety. If the provided plug does not fit into your outlet, consult an electrician for replacement of the obsolete outlet.
10 Protect the power cord from being walked on or pinched, particularly at the point where they exit from the apparatus.
11 Only use attachments/accessories specified by the manufacturer.
12 Use only with the cart, stand, tripod, bracket or table specified by the manufacturer, or sold with the apparatus. When a cart is used,
use caution when moving the cart/apparatus combination to avoid injury from tip-over.
13 Unplug this apparatus during lightning storms or when unused for long periods of time.
14 Refer all servicing to qualified service personnel. Servicing is required when the apparatus has been damaged in any way, such as
power-supply cord or plug is damaged, liquid has been spilled or objects have fallen into the apparatus, the apparatus has been
exposed to rain or moisture, does not operate normally, or has been dropped.
15 Do not expose this apparatus to drips or splashes.
16 Do not place any object filled with liquids, such as vases, on the apparatus.
17 Do not install this apparatus in a confined space such as a book case or similar unit.
18 The apparatus draws nominal non-operating power from the AC outlet with its STANDBY/ON switch in standby position.
19 The apparatus should be located close enough to the AC outlet so that you can easily grasp the power cord plug at any time.
20 Disconnect the product from the AC mains power by removing the product’s AC power plug from the AC power outlet.
IMPORTANT SAFETY INSTRUCTIONS
Removable Battery
21 The battery must be recycled or disposed of properly. Contact local agencies for recycling and disposal information.
22 Do not allow metal objects to touch the terminals of your battery.
23 If there is leakage, an offensive odor, discoloration or deformation during charging or use, remove the battery and do not use it
again. Clean your hands well before touching food or sensitive areas, for example, your eyes.
Wireless Device
24 Switch off the device where it is prohibited, or when its use may cause danger or inteference such as inside an aircraft, hospitals, or
near refuelling points.
Radio Frequency
Operation Frequency Range ---- 2412-2484MHz
Channel Number or List ----Ch1 to Ch14 (refer to the link for the channel frequency)
Channel Separated ----Overlap
Modulated Type ---- OFDM/DSSS
Antenna Type --- integrated PIFA antenna.
Operating RF distance: normal 30-50m, many factors will affect this parameter.
RF transmitter power output: 15dBm
CAUTION
• DO NOT REMOVE THE EXTERNAL CASES OR CABINETS TO EXPOSE THE ELECTRONICS. NO USER SERVICEABLE PARTS
ARE INSIDE.
• IF YOU ARE EXPERIENCING PROBLEMS WITH THIS PRODUCT, CONTACT CAMBRIDGE SOUNDWORKS FOR A SERVICE
REFERRAL. DO NOT USE THE PRODUCT UNTIL IT HAS BEEN REPAIRED.
For CANADA
AC POWER CORD CONNECTION
CAUTION: TO PREVENT ELECTRIC SHOCK, MATCH WIDE BLADE OF PLUG TO WIDE SLOT, FULLY INSERT.
Pour le CANADA
CORDE DE CONNEXION CA
ATTENTION: POUR EVITER LES CHOCS ELECTRICQUES, INTRODUIRE LA LAME LA PLUS LARGE DE LA FICHE
DANS LA BORNE CORRESPONDANTE DE LA PRISE ET POUSSET JUSQU'AU FOND.
WARNING: TO PREVENT FIRE OR SHOCK HAZARD, DO NOT EXPOSE THIS APPLIANCE TO RAIN OR MOISTURE.
All cables used to connect to the computer and peripherals must be shielded and grounded. Operation with non-certified computers or
non-shielded cables may result in interference to radio or television reception.
Page 2

CSW Ambiance Touch Radio_EN_ric2.fm Page 2 Wednesday, August 31, 2011 4:18 PM
Federal Communication Commission (FCC) Interference Statement
FCC Part 15: This equipment has been tested and found to comply with the limits for a Class B digital device, pursuant to Part 15 of the
FCC Rules. These limits are designed to provide reasonable protection against harmful interference in a residential installation. This
equipment generates, uses and can radiate radio frequency energy and, if not installed and used in accordance with the instructions,
may cause harmful interference to radio communications. However, there is no guarantee that interference will not occur in a
particular installation. If this equipment does cause harmful interference to radio or television reception, which can be determined by
turning the equipment off and on, the user is encouraged to try to correct the interference by one or more of the following measures:
· Reorient or relocate the receiving antenna.
· Increase the separation between the equipment and receiver.
· Connect the equipment into an outlet on a circuit different from that to which the receiver is connected.
· Consult the dealer or an experienced radio/TV technician for help.
This device complies with part 15 of the FCC Rules. Operation is subject to the following two conditions:
1. This device may not cause harmful interference, and
2. This device must accept any interference received, including interference that may cause undesired operation.
CAUTION: To comply with the limits of the Class B digital device, pursuant to Part 15 of the FCC Rules, this device must be installed
with computer equipment certified to comply with Class B limits.
MODIFICATION: THE MANUFACTURER IS NOT RESPONSIBLE FOR ANY RADIO OR TV INTERFERENCE CAUSED BY UNAUTHORIZED
MODIFICATIONS TO THIS EQUIPMENT. SUCH MODIFICATIONS COULD VOID THE USER AUTHORITY TO OPERATE THE EQUIPMENT.
California Proposition 65 Statement
WARNING: Handling this product may expose you to chemicals known to the State of California to cause cancer and birth defects or
other reproductive harm.
Wash hands after handling.
Explanatory Note: California Safe Drinking Water and Toxic Enforcement Act of 1986 (Proposition 65) requires special product labeling
for products containing certain chemicals known to the State of California to cause cancer, birth defects or other reproductive harm.
Creative has chosen to provide a warning based on its knowledge about the presence of one or more listed chemicals without
attempting to evaluate the level of exposure. With Creative's products, the exposure may be below the Proposition 65 level of concern,
or could even be zero. However, out of an abundance of caution, Creative has elected to place the Proposition 65 warning on its
products.
Déclaration de la Proposition 65 de la Californie
AVERTISSEMENT: La manipulation de ce produit peut vous exposer à des produits chimiques qui sont reconnus par l'État de la
Californie comme pouvant provoquer le cancer, des anomalies congénitales ou d'autres effets nuisibles à la reproduction.
Veuillez vous laver les mains après l'avoir manipuler.
Note explicative: La Proposition 65 (California Safe Drinking Water and Toxic Enforcement Act of 1986) de la Californie sur les matières
dangereuses et l'eau potable exige un étiquetage spécial pour les produits contenant certains produits chimiques qui sont reconnus
par l'État de la Californie comme pouvant provoquer le cancer, des anomalies congénitales ou d'autres effets nuisibles à la
reproduction. Creative a choisi d'inclure une mise en garde s'appuyant sur sa connaissance de la présence d'un ou de plusieurs de ces
produits chimiques sans essayer d'en évaluer le niveau d'exposition. Pour les produits de Creative, le niveau d'exposition peut être
inférieur au niveau critique établi par la Proposition 65 ou même être nul. Néanmoins, par souci extrême de prudence, Creative a
choisi de placer l'avertissement de la Proposition 65 sur ses produits.
Copyright © 2011 Creative Technology Ltd. All rights reserved. Cambridge SoundWorks and the Cambridge SoundWorks logo are
trademarks or registered trademarks of Creative Technology Ltd. in the United States and/or other countries.
Page 3

CSW Ambiance Touch Radio_EN_ric2.fm Page 3 Wednesday, August 31, 2011 4:18 PM
Table of Contents
About Your Radio -------------------------------------4
Introduction ------------------------------------------6
Using the Touchscreen Interface ---------------------7
Setup wizard -----------------------------------------8
Navigating Around -----------------------------------10
Internet Setup ---------------------------------------10
Radio Mode (AM/FM)---------------------------------11
Pandora Mode ---------------------------------------12
Internet Radio Mode ---------------------------------13
Settings ---------------------------------------------14
Auxiliary Mode --------------------------------------16
iPod Mode -------------------------------------------17
Music Player Mode ----------------------------------19
Alarm Settings --------------------------------------20
Other Information -----------------------------------21
3
Page 4
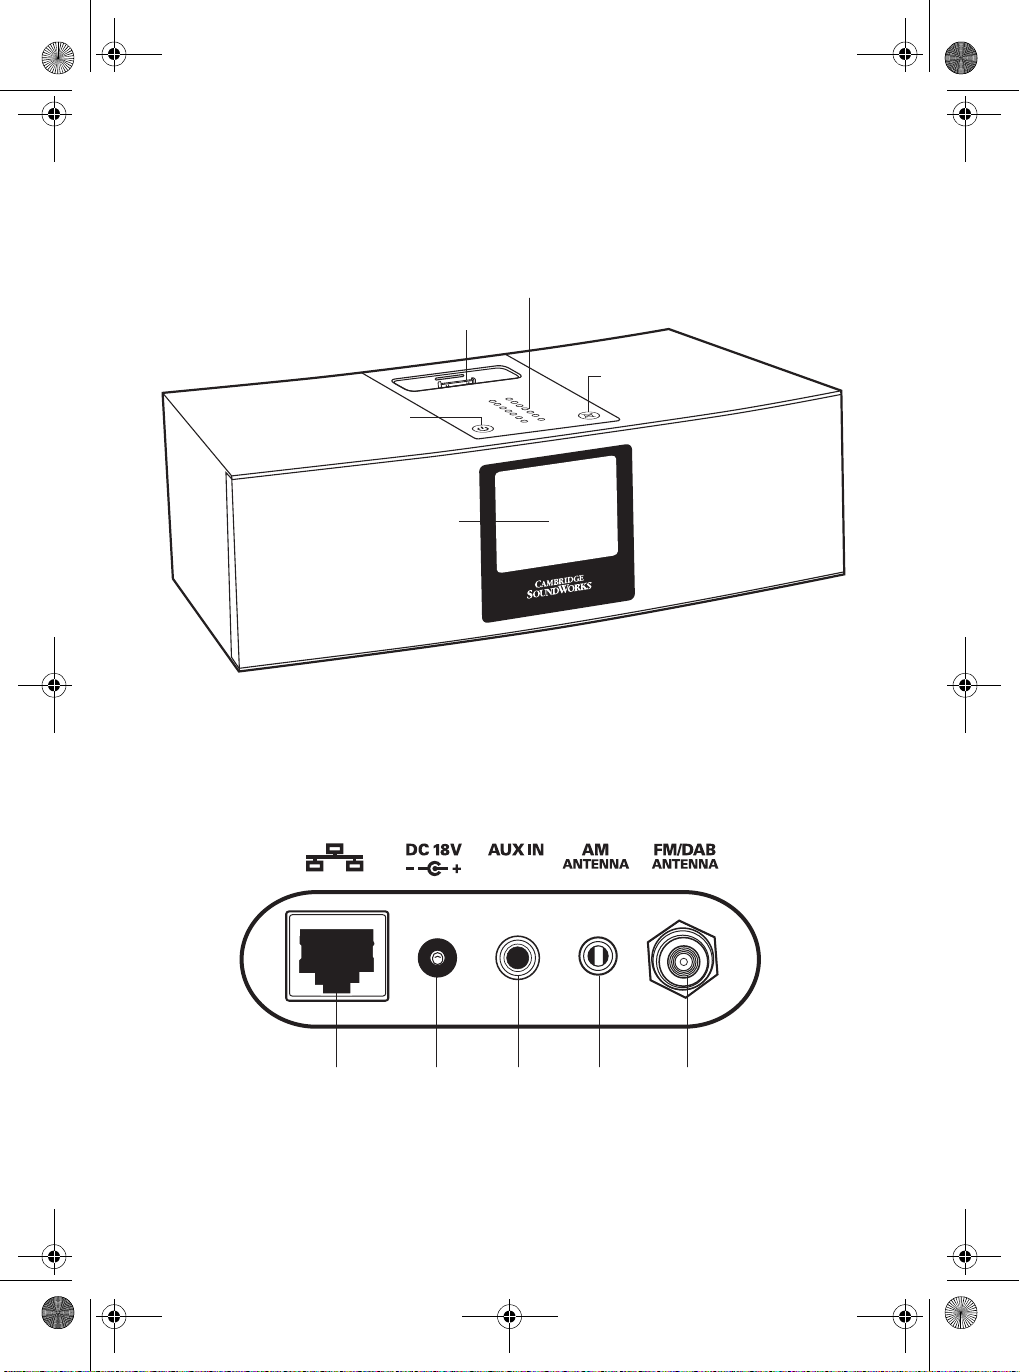
Power On/Off
18V DC
Power In
iPod/iPhone dock cover
Auxiliary
Line In
Ethernet LAN
connector
FM/DAB
Antenna
connector
Front / Top
Back
Mute On/Off
Color touchscreen
Volume touch panel
AM Antenna
jack
CSW Ambiance Touch Radio_EN_ric2.fm Page 4 Wednesday, August 31, 2011 4:18 PM
4
About Your Radio
Page 5
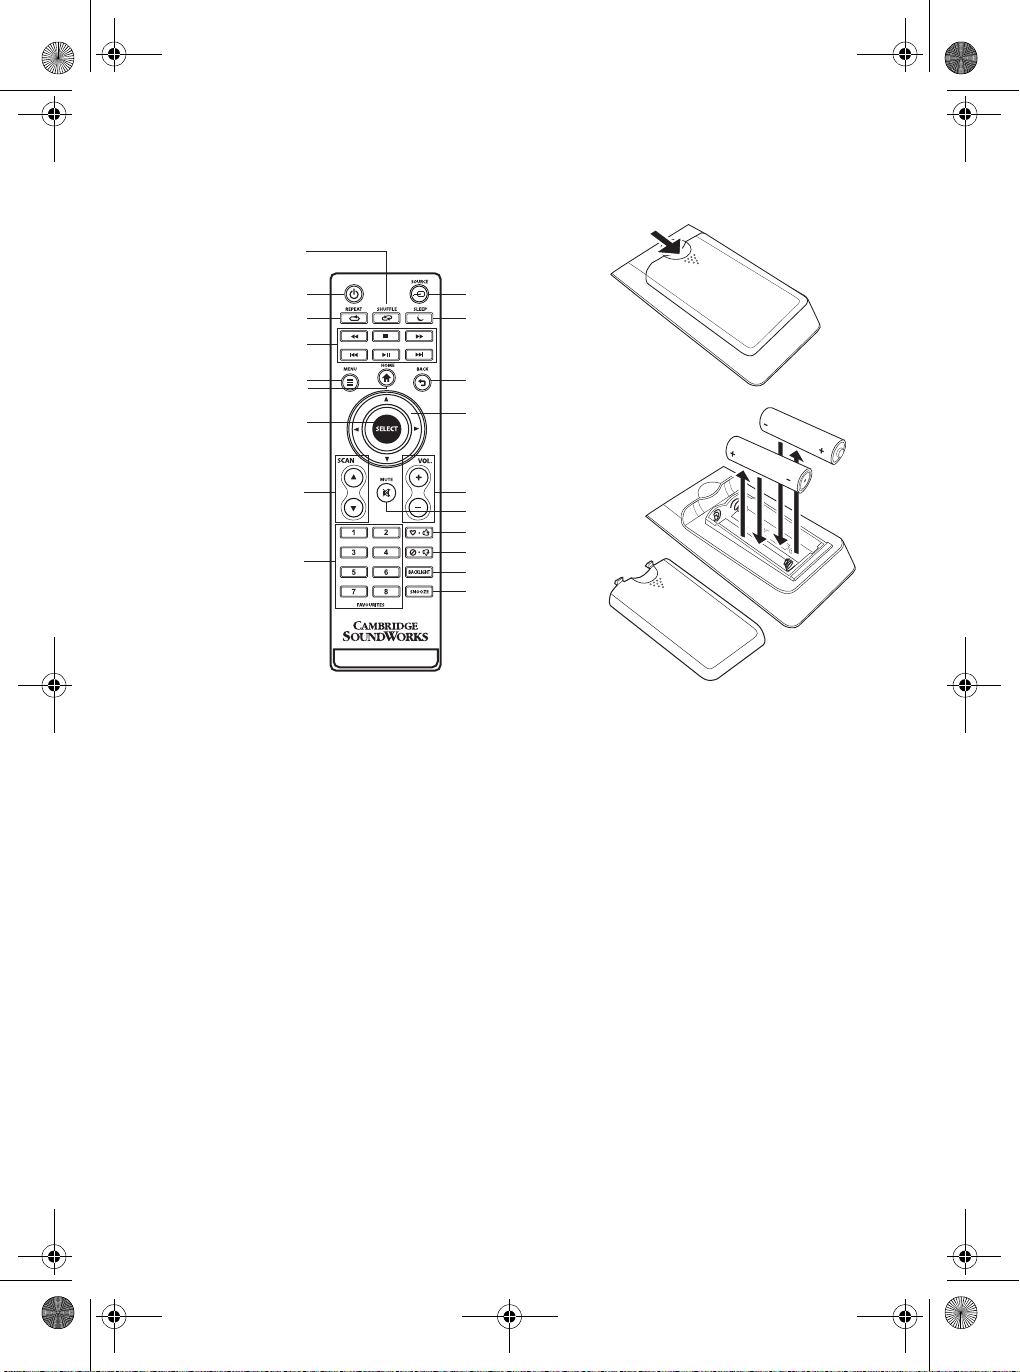
Power On/Standby
Source
Repeat
Shuffle
Sleep
Playback
Menu
Home
Back
Directional Pad
Select
Scan Up/Down
Mute
Volume Up/Down
Favorites 1 to 8
Love It/Like
Ban It/Don’t like
Backlight
Snooze
Remote Control Inserting Batteries
CSW Ambiance Touch Radio_EN_ric2.fm Page 5 Wednesday, August 31, 2011 4:18 PM
5
Page 6

CSW Ambiance Touch Radio_EN_ric2.fm Page 6 Wednesday, August 31, 2011 4:18 PM
6
Congratulations!
Thank you for purchasing Cambridge SoundWorks®
Ambiance Touch Radio! We are sure that it will provide
you with years of enjoyment and entertainment!
The Ambiance Touch Radio is a cutting-edge, multiformat digital audio system, featuring Wi-Fi internet
streaming capabilities and an innovative, color
touchscreen interface.
Introduction
As a standalone device, your radio functions as a AM/
FM receiver, as well as an iPod/iPhone docking station
and alarm clock.
Connected to a wireless broadband network, your radio
can receive thousands of internet radio stations and
podcasts from around the globe.
On the same wireless network as your computer, your
radio can also act as a remote streaming device for
your music collection. You can also use Frontier Silicon
internet radio portal from your computer to tailor the
content received by your radio.
Page 7
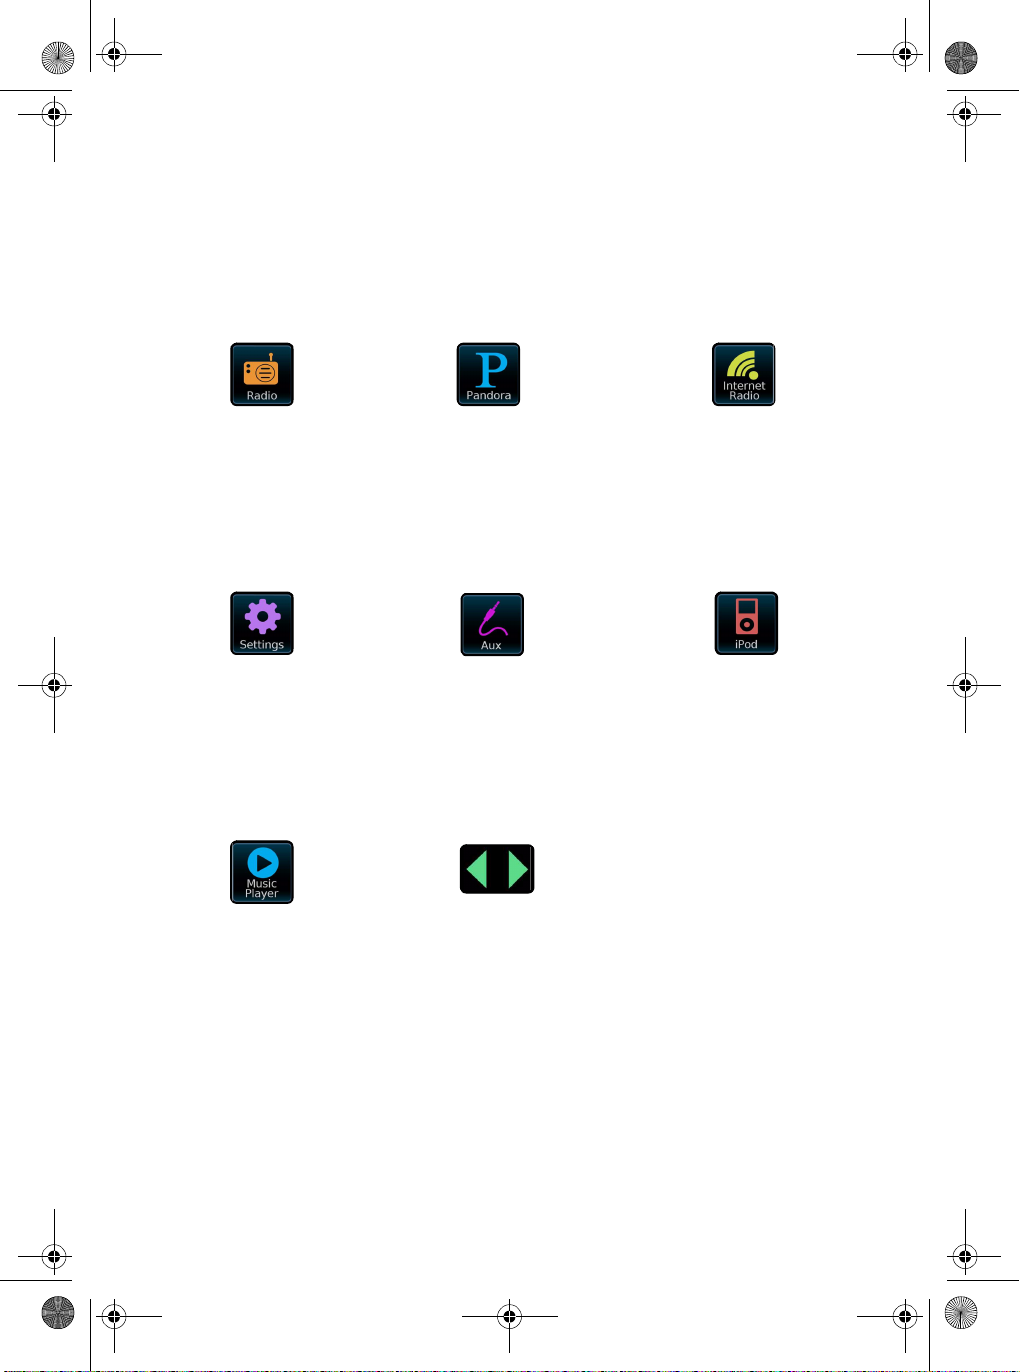
Internet Radio
Allows access thousands
of online radio stations
and podcasts from around
the world. See page 13
Radio (AM/FM)
Receives AM and FM
broadcasts, including RDS
data. See page 11
iPod Mode
Provides docking,
charging, control and
playback for your Apple
iPod and iPhone. See
page 17
Auxiliary Mode
Use the radio to play audio
from any external source
via a standard 3.5mm
audio cable. See page 16
Settings
Allows you to configure
Network settings, sound
EQ levels, software
updates, timing
preferences and many
more. See page 13
Pandora (US only)
Personalized interactive
radio stations based on your
choice of artists and songs,
similar music analysis.
Music Player
Lets you stream audio
files across your network
from PC or MAC. See
page 12
Navigation Arrows
Tap to reveal other main
menu icons.
CSW Ambiance Touch Radio_EN_ric2.fm Page 7 Wednesday, August 31, 2011 4:18 PM
Using the Touchscreen Interface
The touchscreen is the key point of interaction with
Ambiance Touch Radio. The radio’s many functions can
be controlled simply by tapping gently on the icons and
buttons you see on the screen. Some of these icons and
buttons allow you to tap and hold to change a value
while you keep your finger on it (e.g. increasing
volume).
Main Menu
The Main Menu is the primary screen to navigate
around the main radio functions and settings. Gently
tap an icon to access the relevant modes as described
below:
7
Page 8

CSW Ambiance Touch Radio_EN_ric2.fm Page 8 Wednesday, August 31, 2011 4:18 PM
8
Setup Wizard
When you power up your radio for the first time, the
setup wizard will guide you to configure the radio
settings.
Step 1: Select ‘YES’ to start setup wizard. If you select
‘NO’, and later when you wish to start setup wizard, you
can go to the ‘settings’->’Setup Wizard’
Step 2: Select the language
Step 4: Select source to sync Time
Step 5: Select time Zone
Step 3: Select the time format 24hr or 12h
Step 6: Select Turn on or off Daylight Saving
Page 9

CSW Ambiance Touch Radio_EN_ric2.fm Page 9 Wednesday, August 31, 2011 4:18 PM
Step 7: Select WLAN Region
Step 10: Press ‘OK’ to complete the setup
Stap 8: Select your preferred network from the list of
available networks
9
Step 9: If the selected network is password protected,
enter it in using the on-screen keyboard, followed by
Confrim
Page 10

This upper area is not touch-activated but provides
quick summary information on Time, Alarm, Sleep
and Network status.
This central area displays information on the
selected mode.
This bottom area holds the navigation buttons for
the selected mode.
This bottom area holds the navigation buttons for
the selected mode.
CSW Ambiance Touch Radio_EN_ric2.fm Page 10 Wednesday, August 31, 2011 4:18 PM
10
Navigating Around
Tapping on a mode will take you to the main screen of
that mode. Each mode will have its own set of buttons
that you can interact with. An example is shown below:
Internet Setup
Ambiance Touch Radio makes use of your local wired
or wireless network to connect to the Internet and the
setup is very straightforward.
To easiest way to get started is to simply enter Internet
Radio mode, where you will be led through the process
of connecting to your network and getting online.
Step 1: Select your WLAN region from the list to begin
scanning.
Step 2: Select your preferred network from the list of
Step 3: If the selected network is password protected,
available networks.
enter it in using the on-screen keyboard, followed
by Confirm
Page 11

CSW Ambiance Touch Radio_EN_ric2.fm Page 11 Wednesday, August 31, 2011 4:18 PM
Radio Mode (AM/FM)
Radio Mode recieves analog radio from the AM or FM
band and displays Radio Data System (RDS)
information about the station and show being
broadcast.
Before entering Radio mode, connect both the AM and
FM aerials to their respective Antenna connector at the
rear of the radio and fully extend the aerial.
From the main menu, tap:
You’ll see the following screen, with your last selected
AM or FM frequency displayed.
Navigating Radio Stations
You can use the frequency scale across the center of
the screen to search for radio stations. Simply tap any
part of this scale to tune the radio to the corresponding
radio frequency.
The following actions are available on this screen.
Select the AM radio frequency band.
Select the FM radio frequency band.
Tune the radio frequency up one step at a
time.
Tune the radio frequency down one step at
a time.
Scan up the radio frequency till the next
available station is found.
Scan down the radio frequency till the
next available station is found.
Favorite Station Presets
You can store up to 10 favorite station presets in Radio
Mode.
Add the station you’re listening to as a
new favorite. Select a slot in your
Favorites list to save to. If there is an
existing favorite in the slot you selected, it
will be replaced automatically.
Review your Favorites list. Select the
favorite station you want by tapping the
corresponding slot.
Current settings
This displays the full details of your currently active
network profile. This can be useful for troubleshooting,
WLAN region
This lets you change the global location of your radio.
The currently selected location is outlined.
Miscellaneous Settings
Lets you set a range of preferences for your radio.
Language
The default language is English. To change, just pick an
option fro m the available list.
Alarm Snooze
Lets you specify the delay interval between alarms.
Configurable from 1 to 30 minutes.
Idle Timeout
This setting lets you to specific the time interval where
there is no interaction with the radio before switching
to a screensaver mode.
Sleep
This is a handy function which automatically switches
the radio into standby mode after a specified time
period.
The default setting is “Off”.
You can adjust the specified time by tapping the Sleep
button on the screen or the remote control multiple
times to cyle through the options of 15, 30, 45, 60, 75,
90, 105 or 120 minutes.
If Sleep mode is activated, a crescent moon icon with
the time remaining will be displayed on the top part of
the screen.
Software Update
Software updates for maintenance or added features
for your radio will become available from time to time.
If this option is enabled, the radio will automatically
check for new software every time it connects to the
internet. If an update is available, it will ask for your
confirmation before commencing download. Software
updates may take a few moments to download and
require you to restart the radio.
11
For stations with good signal strength which broadcast
RDS (Radio Data System) information, the screen will
display the RDS data.
Page 12

CSW Ambiance Touch Radio_EN_ric2.fm Page 12 Wednesday, August 31, 2011 4:18 PM
12
Pandora Mode
Pandora is a personalized Internet radio that is
designed to help you discover new music you’ll love
mixed in with music you already know.You start a
Pandora station by entering an artist name or song title
that is similar to the kind of music you’ll like to hear
and Pandora will find and play similar songs from a
related corner of the musical universe.
Before using Pandora, you need to create an account
with them by visiting www.pandora.com. Pandora is a
free service with the option to pay for additional
features.
From the menu, tap:
The first time you start Pandora, you’ll be asked to
sign-up for a new account. If you already have one, tap
OK and you’ll be asked to enter your account username
and password. Type these in using the onscreen
keyboard, followed by Confirm
Using Pandora
Once you have started playing a radio station using one
of the options listed earlier, you will see a screen
similar to the one below on your display.
The following actions are available on this screen.
View information about the song that you
are listening to.
Once you have logged in successfully, your details will
be saved so that you don’t have to enter them again.
You can save serveral Pandora accounts, see <?> for
details
Navigating Pandora Radio Stations
There are serveral different types of streams and radio
stations available via Pandora. If you are new to
Pandora, it is best to use the first two options listed
below as they let you search Pandora’s enormous
music database for tracks that you can use to build up
your profile.
My Stations
Displays your list of stations that you have already
saved to your Pandora account.
Genre Stations
Displays a list of music genres. Some genres may
contain sub-genres.
Create Station
Create a station by entering all or part of an artist or
band name using the onscreen keyboard, followed by
the search <?> button. Select your choice from the list
of results, then tap OK.
View technical information about the
station that you are listening to.
Plays the currently selected song.
Stops playing the currently selected song.
Page 13

CSW Ambiance Touch Radio_EN_ric2.fm Page 13 Wednesday, August 31, 2011 4:18 PM
Internet Radio Mode
Ambiance Touch Radio can play radio broadcasts from
stations all around the world using your broadband
Internet connection. Listen to thousands of radio
stations and podcasts and discover music from
different countries.
From the main menu, tap:
??The first time you enter Internet Radio mode, you’ll
be taken to the main Station Directory menu screen.??
When entering Internet Radio mode, the last-listened
to station is selected automatically.
Using Internet Radio
Once you have started playing a radio station using one
of the options listed earlier, you will see a screen
similar to the one below on your display.
Podcasts
Browse for podcasts sorted by location or genre. You
can also search for podcasts.
My added stations
Displays a list of stations that you have added to your
station list by accessing the Frontier Silicon Radio
Portal. Refer to page ?? for details.
Help
Get your Ambiance Touch Radio’s unique access code
or listen to some troubleshooting tips.
Submenu Options
Browse station list
Displays the Radio Station menu.
Return to playing screen
Exits the Submenu and returns to the Now Playing
screen.
Last Listened
Display a list of recently listened to stations. The most
recent station will appear at the top of the list.
Searching for Stations and Podcasts
In the Station Directory menu, you can search for radio
stations and podcasts by name or by a keyword in its
title or description.
Type in the keyword or part of the station name using
the onscreen keyboard, followed by the Search
button. Any matching results will be displayed, simply
select a station from the list to begin playing it.
13
The following actions are available on this screen.
Display the Station Directory menu screen.
Display technical information about the
station that is currently playing.
Add the station you’re listening to as a new
favorite. Select a slot in your Favorites list
to save to. If there is an existing favorite in
the slot you selected, it will be replaced
automatically.
Navigating Internet Radio Stations
My Favorites
Displays a list of your favorite radio stations and
podcasts that you have saved.
Local <Country>
Browse through the radio stations that are available in
your country. To change country, refer to <???>
Stations
Browse for radio stations sorted by location or genre.
You can also search for radio stations.
Page 14

CSW Ambiance Touch Radio_EN_ric2.fm Page 14 Wednesday, August 31, 2011 4:18 PM
14
Settings
The System Settings menu provides a convenient place
to configure all the radio settings. The following options
are available:
• Alarms
• Time and Date
• Equalizer (Equaliser?)
• X-Fi
• Network
• Miscellaneous
• Setup Wizard
From the main menu, tap:
Alarms Settings
This is an alternative method to access your radio’s
alarm clock settings, which is directly accessible from
the main menu screen. To learn more about
configuring your radio’s alarms, refer to ???
Time and Date Settings
By default, the radio will automatically set its time and
date when you connect to the internet. However if you
do need to set or change it yourself, the Time Settings
menu includes the following options:
Time Zone
This setting displays a list of global time zones to
choose from. The current setting is highlighted in
yellow.
Use Analog Clock
Tap to select whether to show the time using an
analog clock display when the radio is on standby.
Turn on/off Daylight Saving
Tap to toggle daylight saving on or off.
Time Source
Lets you specify where the radio should sync its clock
from. By default, this is set to fetch time from the
internet.
You can select the time to sync source to “None” if you
wish to set if yourself. For “DAB” or “FM-RDS” modes,
you need to receive a good station signal for several
seconds to extract the time data.
Set Time Manually
Lets you set the time and date yourself. Use the Up/
Down buttons to adjust the time. Tap the Back button to
save your changes and take you to the previous screen.
Select 12h/24h
Tap to toggle between the 12 or 24 hour clock display
format.
Equaliser Settings
By default, the radio is set to “Normal” EQ, which is an
all-around, relatively neutral option. You can choose
from a range of alternative presets suited for the
following musical styles:
• Classic
• Jazz
• Pop
• Rock
• Speech
You can also select “Custom” to set your own
preferences Bass, Treble and Loudness.
Tap the Back button to save your settings and return to
the previous screen.
X-Fi Settings
Lets you enhance your audio listening experience with
the following options:
Surround
Control the level of audio immersion in your music.
Crystalizer
Enhance music to make them sound livelier.
Bass
Enhance the sound quality and bass of any speaker
system for a better listening experience
Dialog Plus
Enhance the vocals in music for better clarity.
Smart Volume
Adjust the loudness of your audio playback
automatically to minimize sudden volume changes.
Network Settings
Ambiance Touch Radio is able to remember the last
four wireless networks that you have connected to, and
automatically tries to connect to whichever one that it
can find. You can configure these settings using the
following options:
Network Wizard
This setting lets you scan the area for any available
wireless network. To connect, just select the network
from the list, followed by the type of security you want
to use: PIN number, Push button or no WPS
If you are using a wired internet connection, you can
select it here.
For advanced users, you can setup the network
yourself by selecting Manual settings which will walk
you through a detailed multiple-step process.
WPS push button setup...
Setup the radio with your network using the Wi-Fi
Protected Setup (WPS) security protocol.
Network profiles
This displays a list of your saved network profiles.
Switch to any one of your profiles by selecting it. You
can delete an existing profile by tapping the Delete
button next to it.
NOTE
You cannot delete the currently active
network profile.
You can also run the Network Wizard as explained
above.
Manual settings
For advanced users, you can setup the network
yourself using the multiple-step process.
Page 15

CSW Ambiance Touch Radio_EN_ric2.fm Page 15 Wednesday, August 31, 2011 4:18 PM
Current settings
This displays the full details of your currently active
network profile. This can be useful for troubleshooting,
WLAN region
This lets you change the global location of your radio.
The currently selected location is outlined.
Setup Wizard
Please refer to the section on “Setup Wizard” on page 8
Miscellaneous Settings
Lets you set a range of preferences for your radio.
Language
The default language is English. To change, just pick an
option fro m the available list.
Alarm Snooze
Lets you specify the delay interval between alarms.
Configurable from 1 to 30 minutes.
Idle Timeout
This setting lets you to specific the time interval where
there is no interaction with the radio before switching
to a screensaver mode.
Sleep
This is a handy function which automatically switches
the radio into standby mode after a specified time
period.
The default setting is “Off”.
You can adjust the specified time by tapping the Sleep
button on the screen or the remote control multiple
times to cyle through the options of 15, 30, 45, 60, 75,
90, 105 or 120 minutes.
If Sleep mode is activated, a crescent moon icon with
the time remaining will be displayed on the top part of
the screen.
Software Update
Software updates for maintenance or added features
for your radio will become available from time to time.
If this option is enabled, the radio will automatically
check for new software every time it connects to the
internet. If an update is available, it will ask for your
confirmation before commencing download. Software
updates may take a few moments to download and
require you to restart the radio.
Check for Updates
If you do not want the radi to automatically check for
new software, select this option to check for updates
on-demand. If there is new software available, you will
be asked to confirm whether your wish to proceed to
download.
Standby Backlight
This setting lets you adjust the brightness of the radio’s
display by using a sliding bar. Default setting is
maximum. Tap the Back button to save your changes.
Software Verison
Displays your radio’s current software installation
version.
Factory Reset
This option resets the radio to its default factory values,
erasing any personal settings which may have been
configured.
You will be asked for confirmation before factory reset
is carried out.
15
Page 16

CSW Ambiance Touch Radio_EN_ric2.fm Page 16 Wednesday, August 31, 2011 4:18 PM
16
Auxiliary Mode
Auxiliary mode allows you to play audio from almost
any external source (e.g. MP3 player) through your
Ambiance Touch Radio.
Turn the volume of both Ambiance Touch Radio and
your external device low before connecting.
Connect your external device using a cable to the
3.5mm Aux Input jack of Ambiance Touch Radio
From the main menu, tap:
Adjust the volume of Ambiance Touch Radio and your
external device to the desired level.
NOTE
Ambiance Touch Radio only provides
amplfication audio for your external device.
Use the controls on your external device to
handle playback.
Page 17

iPhone 4
16GB 32GB
iPhone 3GS
8GB 16GB 32GB
iPhone 3G
8GB 16GB
iPhone
4GB 8GB 16GB
4th generation
8GB 32GB 64GB
3rd generation
32GB 64GB
iPod touch
iPod touch
2nd generation
8GB 16GB 32GB
iPod touch
1st generation
8GB 16GB 32GB
iPod touch
CSW Ambiance Touch Radio_EN_ric2.fm Page 17 Wednesday, August 31, 2011 4:18 PM
iPod Mode
Ambiance Touch radio has a dock that is effortless to
setup with your iPod or iPhone. You can use Ambiance
Touch Radio as a high quality amplifier and even charge
your device while it is docked.
Docking your iPod/iPhone
Remove the dock cover at the top of the radio with your
fingernail.
Note: Retain the cover in order to conceal the dock
when it is not in use, especially for long periods of time.
Mount your iPod or iPhone carefully onto the dock,
Ambiance Touch Radio will ask if you want to switch to
iPod mode. Ta[ Yes. You can also enter iPod mode from
the main menu by tapping:
Using iPod Mode
The track title, artist name, album title, current
position and track duration information are displayed
on screen when the track is being played.
Control and Playback
You can use Ambiance Touch Radio’s touchscreen
interface or the remote control to operate the basic
playback features of your device.
You can access other features and controls of your iPod
or iPhone as normal while it is docked on the radio.
Only the volume control will be disabled. Use the radio
‘s volume control to adjust the volume.
Submenu Options
Play similar artist in Last.fm
Search Last.fm for artists similar to the one of your
currently playing track. ??Requires Last.fm account/
subscription.??See Last.fm chapter for more
information.
Models compatible with your radio
17
The following actions are available on this screen.
Cycle between the Repeat Once, Repeat All
and No Repeat options.
Turn on or off shuffled playback of your
playlist.
Skip to the next song in the playlist.
Tap and hold to fast forward the currently
playing song.
Skip to the previous song in the playlist.
Tap and hold to rewind the currently playing
song.
Plays the currently selected song.
Stops playing the currently selected song.
Page 18

6th generation
8GB 16GB
5th generation
8GB 16GB
iPod nano
iPod nano
(video camera)
4th generation
8GB 16GB
iPod nano
(video)
3rd generation
4GB 8GB
iPod nano
(video)
2nd generation
2GB 4GB 8GB
iPod nano
(aluminium)
1st generation
iPod nano
1GB 2GB 4GB
iPod classic
160GB (2009)
iPod classic
160GB (2007)
iPod classic
80GB
iPod mini
4GB 8GB
5th generation
60GB 80GB
iPod
(video)
5th generation
30GB
iPod
(video)
4th generation
40GB 60GB
iPod
(color display)
4th generation
20GB 30GB
iPod
(color display)
4th generation
iPod
40GB
4th generation
iPod
20GB
3th generation
iPod
30GB 40GB
3rd generation
iPod
10GB 15GB 20GB
1st + 2nd generation
iPod
5GB 10GB 20GB
CSW Ambiance Touch Radio_EN_ric2.fm Page 18 Wednesday, August 31, 2011 4:18 PM
18
Page 19

CSW Ambiance Touch Radio_EN_ric2.fm Page 19 Wednesday, August 31, 2011 4:18 PM
Music Player Mode
In Music Player mode, you can browse and play audio
files wirelessly from any PC or Mac computers across
your network. Once you’ve set up your computer for
sharing, you can browse your digital music collection
via different categories such as Artist Name, Album
Title or Genre.
From the main menu, tap:
You will see the following screen
The following actions are available on this screen
View information about the song that you
are listening to.
View technical information about the
station that you are listening to.
Submenu Options
Repeat
Toggle repeat playback on/off.
Shuffle
Toggle shuffled playback on/off.
Add to My Playlist
Add the current song to your playlist.
Clear My Playlist
Remove all songs from the current playlist.
Return to playing screen
Exits the Submenu and returns to the Now Playing
screen.
Streaming Audio Setup
Touch Radio uses the UPnP (Universal Plug and Play)
protocol to play digital music files from your PC or Mac
computer. First you must configure your computer for
media sharing.
These are the recommended system requirements:
• For a Windows PC, use Windows Media Player (WMP)
version 11 or higher.
• For a Mac computer, it should be running OS X or later
with a UPnP application installed to access an iTunes
library.
NOTE
• There are alternative UPnP platforms
which can be used, but the following
instructions are for WMP.
• iTunes does not currently operate a UPnP
media server, but there are a number of
third-party software applications (many of
them free) which can enable you to access
your iTunes library.
19
Add the station you are listening to as a
new favorite. Select a slot in your
Favorites list to save to. If there is an
existing favorite in the slot you selected, it
will be replaced automatically.
Cycle between the Repeat Once, Repeat
All and No Repeat options.
Turn on or off shuffled playback of your
playlist.
Skip to the previous song in the playlist.
Tap and hold to rewind the currently
playing song.
Skip to the next song in the playlist.
Tap and hold to fast forward the currently
playing song.
Plays the currently selected song.
Stops playing the currently selected song.
Page 20

CSW Ambiance Touch Radio_EN_ric2.fm Page 20 Wednesday, August 31, 2011 4:18 PM
20
Alarm Settings
The radio comes with two alarm clocks and each of
these can be programmed differently. To configure the
alarm settings, from the main menu screen, tap one of
the alarm icons.
Each alarm has an on/off toggle button and four
adjustable settings. Tap any setting to review or edit it.
Enable
Set the alarm to go off Daily, Once, Each Weekday or
Each Weekend Days. If you select “Once”, you will also
need to set a specific date. You can also turn the alarm
Off.
NOTE
When setting the alarm to Off, use the Back
button after selecting it instead of the Next
and Prev buttons, otherwise the Off setting
will not be saved.
Time (and Date if applicable)
Set the alarm to go off at your desired time.
Source
Set the alarm to wake you with audio from one of the
following modes: DAB Radio, Radio, iPod, Internet
Radio, Last.fm, Pandora or Buzzer.
Volume
Set the volume level of the alarm from 0-30.
Alarm Snooze
When an alarm goes off, you’ll see the following screen
flashing
Tap anywhere on the touchscreen to “Snooze” the
alarm. This puts the radio back into standby mode with
the following screen displayed.
Tap the Alarm Off button at the top of the screen to turn
the alarm off.
The snooze time remaining is displayed at the bottom
of the screen. Tap it once to reset the countdown. Tap it
multiple times to increase the duration by an additional
five minutes each time.
The initial snooze duration can be set in the System
Settings menu.
Tap “Miscellaneous Settings”, then “Alarm Snooze”.
The Snooze interval can be set from between 1 to 30
minutes.
Page 21

CSW Ambiance Touch Radio_EN_ric2.fm Page 21 Wednesday, August 31, 2011 4:18 PM
Other Information
Product Registration
Registering your product ensures you receive the most
appropriate service and product support available. You
can register your product at www.creative.com/
register. Please note that your warranty rights are not
dependent on registration.
Technical & Customer Support Services
Go to www.creative.com/support to resolve and
troubleshoot technical queries at Creative’s 24-hour
self-help Knowledge Base. You can also find Customer
Support Services and other helpful information here.
Warranty
Warranty information is supplied with your product.
Please keep your Proof of Purchase for
the duration of the Warranty period.
21
 Loading...