


Important Safety Instructions
1. Read these instructions.
2. Keep these Instructions.
3. Heed all Warnings.
4. Follow all instructions.
5. Do not use the speaker near water.
6. Clean only with dry cloth.
WARNING: TO REDUCE THE RISK OF FIRE OR ELECTRIC SHOCK, DO NOT EXPOSE THIS SPEAKER
TO RAIN OR MOISTURE.
To reduce the risk of electrical shock, fire, etc.:
1. Do not place unit near any heat source such as radiators, heat registers, stoves, or other apparatus
(including amplifiers) that produce heat.
2. Do not block any ventilation openings of unit.
3. The unit shall not be exposed to dripping or splashing and no objects filled with liquids, such a s vase s,
shall be placed on the unit.
4. Do not place any heavy loads onto the unit, and do not step on it, the load may fall and cause serious
injury to the unit.
5. Please read Rating Labels at the back of unit for power input and other safety information.
6. This unit is intended to be used only with the power supply provided.
7. Protect the power cord from being walked on or pinched particularly at the plugs, convenience
receptacles, and at any point where they exit from the unit.
8. Never unplug your unit by pulling on the power cord. Always grasp the plug firmly and pull straight out
from the outlet.
9. Repair or replace all electric service cords that have become frayed or otherwise damaged immediately.
Do not use a cord that shows cracks or abrasion damage along its length, the plug, or the connector end.
10. To prevent fire or shock hazard, do not use this plug with an extension cord or other outlet unless the
blades can be fully inserted to prevent blade exposure.
11. During lightning or raining days, unplug the unit for additional protection during thunderstorms or whe n
the unit is not used for prolonged periods. This will prevent damage to the unit from lightning and power
surges.
12. Do not attempt to carry out any service work yourself. By opening or removing the cabinet, you may be
exposed to dangerous voltage or other hazards. Any service work should be carried out by qualified
technicians.
13. The normal function of the unit may be disturbed by strong Electro-Magnetic Interference. If so, simply
reset the unit to resume normal operation by following the instruction manual. In case the function could
not resume, please use the unit in other location.
14. The means of disconnecting this apparatus from the mains supply is plug of power cord. The disconnect
device shall remain readily operable.
15. In the interests of safety and to avoid unnecessary energy consumption, never leave the unit switched on
while unattended for long periods of time, e.g. overnight, while on holiday or while out of the house.
Switch it off and disconnect the mains plug from the mains socket.
16. Danger of explosion if battery is incorrectly replaced. Replace only with the type which produced by the
manufacturer.
17. The battery is only intended for use with the power supply provided with the unit.
18. Do not attempt to charge the battery in temperatures outside the range of 0℃~40℃.
19. Keep battery out of the reach of children and pets.
20. If the battery begins to leak, do not allow the liquid to come in contact with your skin or eyes. If contact
has been made, wash the affected area with plenty of water and seek medical advice immediately.
21. Do not expose the unit or battery to excessive heat, including direct sunlight or fire and storage or use
2

inside cars in hot weather, where it can be exposed to temperatures in excess of 60℃. Doing so may
cause the battery and power supply to generate heat, rupture, or ignite. Using the unit in this manner also
may result in a loss of performance and a shortened life expectancy.
22. If the battery is damaged and ignites, do not use water to extinguish flame. Instead, use a functioning fire
extinguisher.
23. Do not step on, throw, or drop battery or the power supply or expose them to a strong shock. Do not
pierce, crush, dent, or deform the batteries or power supply in any way. If either becomes deformed,
properly dispose of it.
24. Do not shout-circuit battery. Avoid storing them around metal objects such as keys, pocket change, paper
clips and jewelry.
25. Do not dismantle, open or shred the battery.
26. Do not attempt to use the battery to power other electronics. Doing so may result in permanent damage
to your system and/or personal injury.
27. Please dispose of a used or damaged battery promptly and properly, following all local regulations. Do
not incinerate.
FCC Part 15: This equipment has been tested and found to comply with the limits for a Class B digital device,
pursuant to Part 15 of the FCC Rules. These limits are designed to provide reasonable protection against
harmful inter residential installation. This equipment generates, uses and can radiate frequency energy
and, if not installed and used in accordance with the instructions, may cause harmful interference to radio
communication there is no guarantee that interference will not occur in a particular installation If this
equipment does cause harmful interference to radio or tele which can be determined by turning the
equipment off and on, the user is encouraged to try to correct the interference by one or more of the
measures:
· Reorient or relocate the receiving antenna.
· Increase the separation between the equipment and receiver.
· Connect the equipment into an outlet on a circuit different from that to receiver is connected.
· Consult the dealer or an experienced radio/TV technician for help.
Caution: Any changes or modifications not expressly approved by the responsible for compliance could void
the user’s authority to opera Warning statement regarding §15.19 has to be as follow:
This device complies with part 15 of the FCC Rules. Operation is subject to the following two conditions:
(1) This device may not cause harmful interference, and (2) this device must accept any interference
received, including interference that may cause undesired operation.
FCC Radiation Exposure Statement
This equipment complies with FCC radiation exposure limits set forth for an uncontrolled environment.
This equipment should be installed and operated with minimum distance 20cm between the radiator &
your body.
3

Contents
Important Safety Instructions ............................................................................................................................... 2
Contents .............................................................................................................................................................. 4
Getting Started ..................................................................................................................................................... 5
Buttons and Indicators ..................................................................................................................................... 8
Connecters ...................................................................................................................................................... 9
Remote Control ............................................................................................................................................... 9
Setting Speaker ................................................................................................................................................. 11
Internet radio Mode ............................................................................................................................................ 14
My Favourites ................................................................................................................................................ 14
Local ‘Country’ ............................................................................................................................................... 15
Stations .......................................................................................................................................................... 15
Podcasts ........................................................................................................................................................ 16
My Added Stations ........................................................................................................................................ 16
Help ............................................................................................................................................................... 17
Presets Station .............................................................................................................................................. 17
Spotify Mode ...................................................................................................................................................... 18
What is Spotify .............................................................................................................................................. 18
Using Spotify Connect ................................................................................................................................... 18
Controlling Spotify Connect ........................................................................................................................... 20
Using another Spotify account with your speaker ......................................................................................... 20
Music player Mode ............................................................................................................................................. 20
Sharing Media with Windows Media Player .................................................................................................. 21
Playing Shared Media ................................................................................................................................... 22
USB Playback ............................................................................................................................................... 23
Aux in Mode ....................................................................................................................................................... 23
Bluetooth Mode .................................................................................................................................................. 24
Multi-room .......................................................................................................................................................... 25
Specification ...................................................................................................................................................... 27
4
Getting Started
Carefully remove your speaker from the box. You may
wish to store the packaging for future use.
What you can find inside of your package
Main unit
Power adapter
Remote control
Sling
Screw driver
Peg (male + female)
Plastic spacer x 1 + Screw (30mm) x 1
Instruction manual
Positioning your Speaker
You can place your speaker on the table or hang on the
wall.
Placing your speaker on the table:
Pick the speaker from package and then put on a flat /
stable surface that is not subject to vibrations.
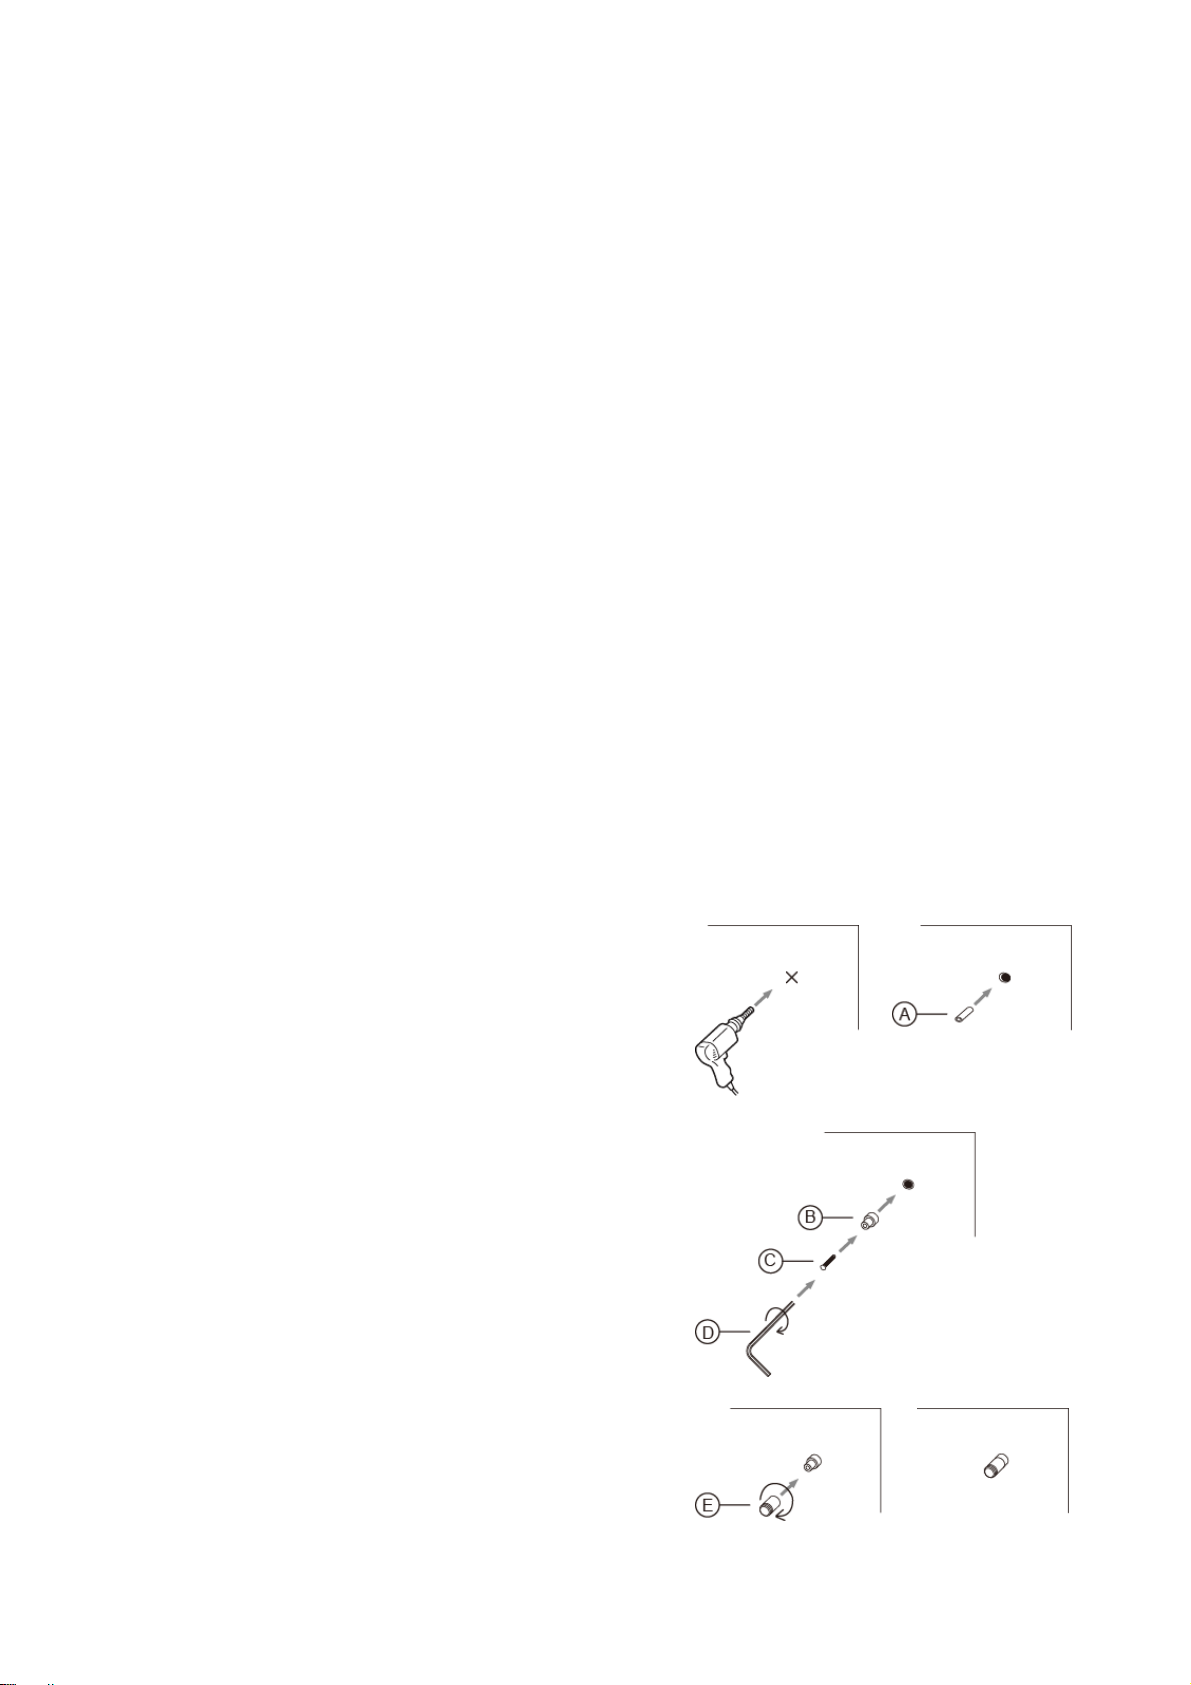
Hanging your speaker on the wall:
1) Drill a hole in the wall and insert the Plastic spacer
(A) to the hole.
2) Hold Peg (B) on the wall and make the hole to hole,
and then insert Screw (C) into Peg (B) and screw
in the wall by using Screw driver (D) to fix Peg (B)
firmly.
3) Screw Peg (E) onto Peg (B).
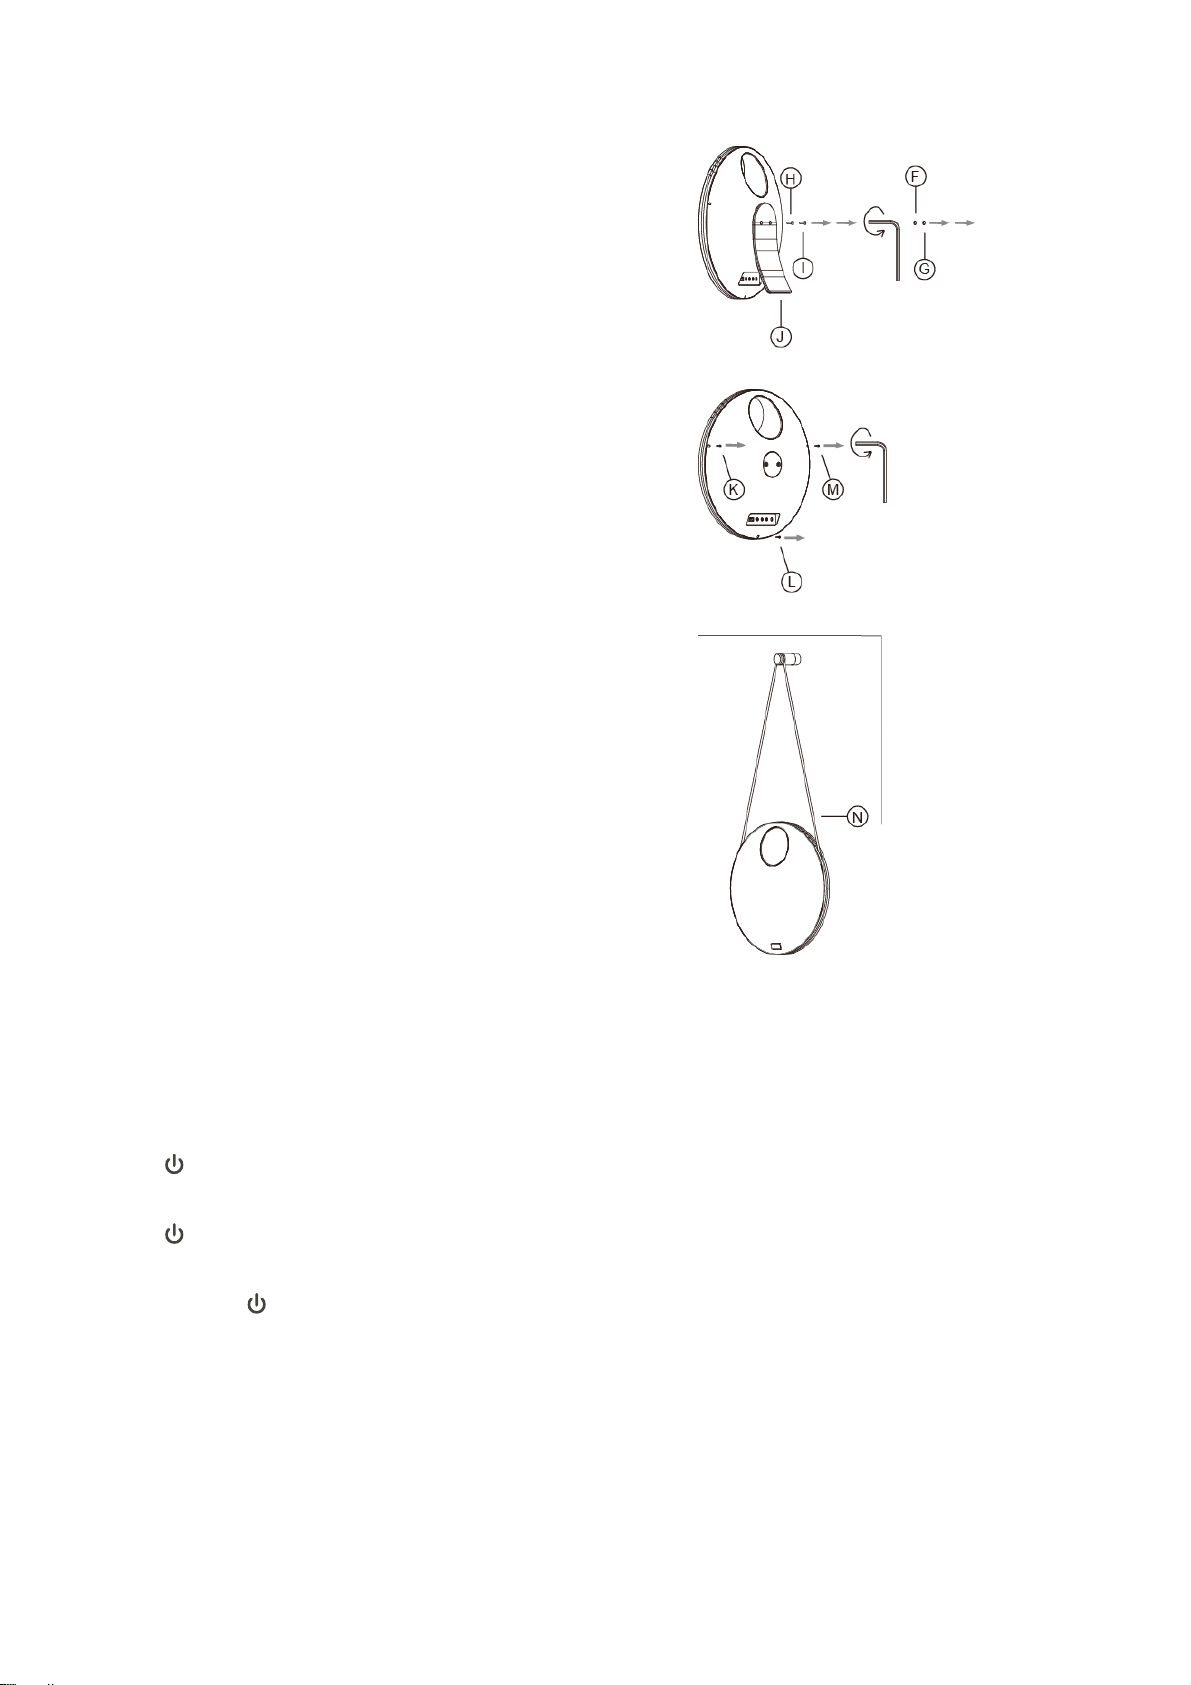
4) Take out the Rubber covers (F, G), and then screw
Screws (H, I) out by using Screw driver to detach
the Stand (J) from unit.
5) Screw Screws (K, L, M) out by using Screw driver.
6) Put the Sling (N) into the groove on the unit, and
then screw Screws (K, L, M) in by using Screw
driver.
7) Put the Sling into the groove on the Peg (E) and
hang the speaker on the peg.
# Note: don’t hang other objects on the peg to
avoid objects dropping down.
Turning the Unit On/Off
Connect the plug at the end of power adapter cable to the
DC IN socket on the back of the unit. Then insert the
power adapter into the mains socket.
Press
indicator lights green.
Press
standby. The POWER indicator lights red.
Press and hold
POWER button to switch unit on. The POWER
POWER button a second time to switch unit
POWER button for 3 seconds to switch
unit off. The POWER indicator is off.
Your speaker includes a built-in battery, once connected
speaker to mains supply, the battery will be automatically
charged and automatically stop charging once fully
charged.
When battery is charging, the POWER indicator flash
6

green light slowly.
Battery is still charging even speaker is switched off but
connecting to mains supply. To switch the unit off
completely, unplug the power cord from the mains socket.
When speaker doesn’t connect to mains supply, it will run
by battery power. Press
on or standby. Press and hold
POWER button to turn the unit
POWER button for 3
seconds to switch unit off.
Volume Control
Adjust the speaker volume by pressing VOL- and VOL+
buttons.
Using Headphones
You will require headphones fitted with a 3.5 mm diameter
stereo plug. The Headphones socket is located on the
back of this unit. Headphones are not supplied with this
speaker.
Turn down the volume before connecting headphones.
Slowly raise the volume with the headphones on until you
reach your desired level.
Caution: long-term exposure to loud music may cause
hearing damage. It is best to avoid extreme volume when
using headphones, especially for extended periods of time.
7
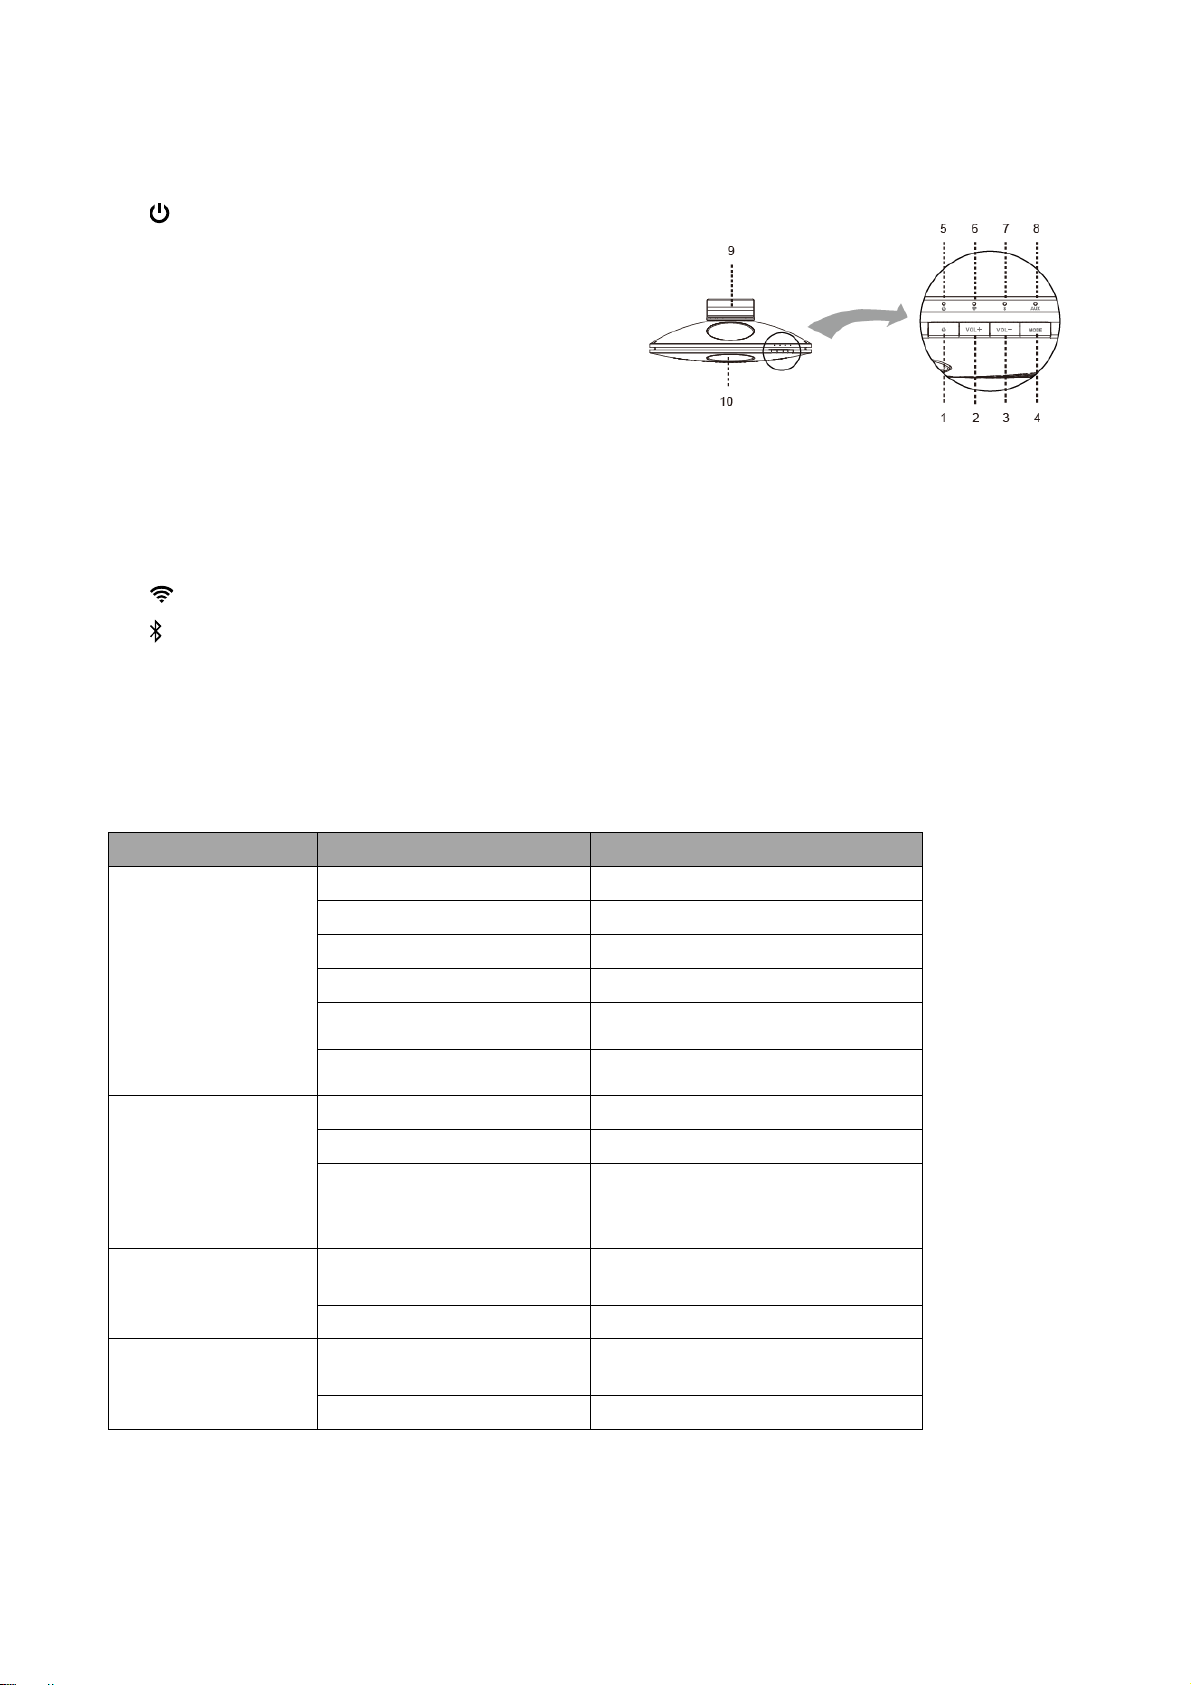
Buttons and Indicators
1. POWER button
Press to switch unit on or standby by.
Press and hold for 3 seconds to switch unit off.
2. VOL+ button
Press to increase volume.
3. VOL- button
Press to decrease volume.
4. MODE button
Press to switch among Internet radio, Spotify Connect,
Music player, Bluetooth and Aux in mode.
5. POWER indicator
6.
7.
8. Aux indicator
9. Stand
10. Handle Hole
What’s the indicator indicates
WiFi indicator
Bluetooth indicator
Indictors Indicator status Indications
POWER indicator
WiFi indicator
Off Off
Lights red Standby
Lights green On
Flashes green light slowly Battery is charging
Flashes green light fast
Flashes green light very fast
Flashes white light slowly Waiting for network
Lights white WiFi connected
Battery power is low. Advise
charging.
Battery power is very low. Require
charging.
Bluetooth indicator
Aux indicator
Switch mode among Internet -
Flashes white light once
Flashes blue light
Lights blue Bluetooth connected
Flashes white light
Lights white Audio cable connected
Spotify Connect - Music player in
turn
Waiting for pairing with Bluetooth
device
Waiting for connecting to audio
device
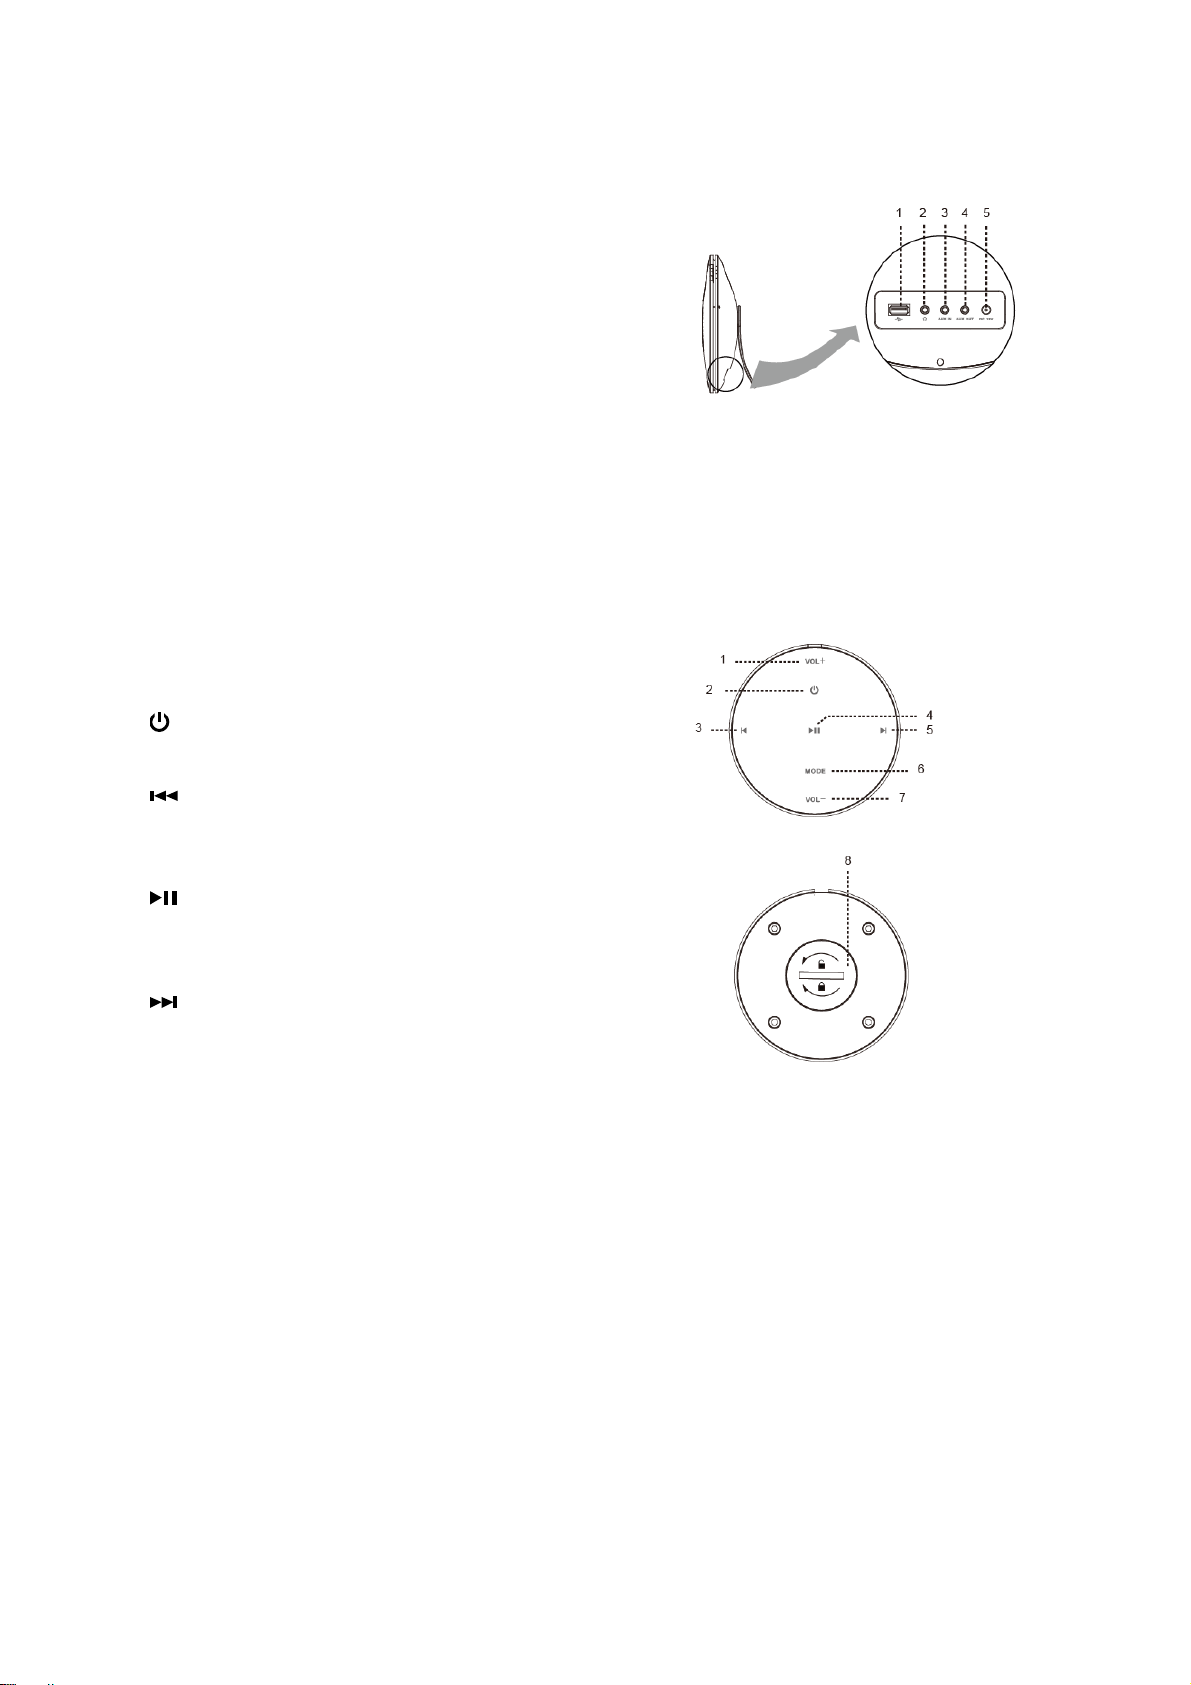
Connecters
1. USB port
For USB playback when inserts a USB disk.
For charging mobile device when connects USB cable
between speaker and mobile device.
2. Headphones socket
3. AUX IN socket
4. AUX OUT socket
It’s for streaming music to external speaker by using
an audio cable.
5. DC IN 12V socket
Remote Control
1. VOL+ button
Press to increase volume.
2.
3.
4.
5.
6. MODE button
7. VOL- button
8. Battery compartment cover
button
Press to switch unit on or standby.
button
Press to skip to previous track in Spotify, Music player
and Bluetooth modes.
button
Press to pause or play music in Spotify, Music player
and Bluetooth modes.
button
Press to skip to next track in Spotify, Music player and
Bluetooth modes.
Press to switch among Internet radio, Spotify Connect,
Music player, Bluetooth and Aux in mode.
Press to decrease volume.

Replacing battery
1. Put your both thumbs on battery compartment cover
and then push and turn anticlockwise to open the
battery compartment cover.
2. Insert battery cell and note the positive pole (+
marking).
3. Cover the battery compartment cover and make sure
the snap joints are corresponding.
4. Push and turn clockwise by using your both thumbs to
close the battery compartment cover.
10

Setting Speaker
For first time switch the speaker on, WiFi indicator is
flashing white light slowly. The speaker is waiting for
establishing network.
1. Go to ‘Settings’ on your smartphone or t ablet, select
Wi-Fi and then choose ‘ADCOM-Luna’.
2. Start
(Using iPhone for example), and then tap ‘Set up
audio system’ at bottom left corner of screen.
3. Tap ‘Next’.
UNDOK app on your smartphone or tablet

4. It will ask you to ‘Go to the Settings app on this
iPhone/iPad, select Wi-Fi, choose the network of your
audio system. Once selected return to the UNDOK.’.
If you have done step 1, tap ‘Next’.
5. You can rename your speaker, E.g. My ADCOM-Luna.
Tap ‘Next’.
6. Tap to select ‘Wi-Fi’, it will search for Wi-Fi networks.
7. Select your preferred network and then type in
password. Tap ‘Next’.

8. Tap ‘Skip checking’.
9. The
speaker connected to network.
Tap ‘Start using my audio system’ to find your speaker
in the list. Make sure your smart phone connect to the
same WiFi network as the speaker.
Select “ADCOM-Luna xxxxxxxxxxxx” (the 12 digit
alphanumeric code is the MAC address of your
speaker) from list, now playing screen will show.
WiFi indicator will light white once your
# Note: if you desire changing to use another WiFi
network, press and hold MODE button on the unit
for about 10 seconds to do a factory reset.
Speaker will restart and reset to initial status and
you can set the network again.
10. For initial use, you need to tap SOURCE tab to select
a play mode.

Internet radio Mode
1. Tap Internet radio from SOURCE tab to select
Internet radio mode. The
2. Tap BROWSE tab, you will see:-
My Favourites
Local ‘Country’
Stations
Podcasts
My Added Stations
Help
WiFi indicator lights white.
My Favourites
You can add your favorite stations to “My Favourites” list. It
makes you easier to find the stations that you like.
1. To register your speaker with the portal:
www.wifiradio-frontier.com
2. Create account login, enter Access code is required.
Access code can be found by tapping BROWSE tab >
Help > Get access code.
3. To add a Favourite Station, first find a station and then
click the “Add” icon.
4. After you added the stations, in order to have your
speaker access your new settings, get your speaker
power off for several minutes is necessary.
5. The added stations are accessible by tapping
BROWSE tab > My favourites.
# Note: doing a ‘factory reset’ cannot erase ‘my
favourites stations’.

Local ‘Country’
Local "Country" will change according to your current
location (e.g. Local China). It displays local stations of your
current location.
1. Tap BROWSE tab > Local "Country", station genres
are listed.
2. Tap your desired genre, and then the station.
3. Now playing screen shows.
Stations
Stations enables you to select a station from categories:
Location, Genre, Popular stations or New stations, or
search stations.
To choose a station, tap BROWSE tab > Stations, station
classifications are listed: ‘Location’ enables you to choose from the radio
stations provided by any country which you choose
from a list.
1. Tap Location.
2. Select your desired region.
3. Select your desired country.
4. Select your desired station. And then the station
will be broadcast.
‘Genre’ enables you to choose radio stations
according to their content, for example Classic Rock,
Sport, News, etc.
1. Tap Genre.
2. Select your desired genre.
3. Select your desired classification of your selected
genre.
4. Select your desired station. And then the station
will be broadcast.
‘Search stations’ enables you to enter all or part of
station name to find a station.
‘Popular stations’ lists the stations that have the
most listeners.
‘New stations’ lists the stations that have recently
joined the Internet radio network.
# Note: Some radio stations do not broadcast 24 hours per
day, and some stations are not always on-line.
15

Podcasts
Podcasts enables you to select a podcast from categories:
Location or Genre, or search podcasts.
To choose a podcast, tap BROWSE tab > Podcasts,
podcast classifications are listed: ‘Location’ enables you to choose from the podcasts
provided by any country which you choose from a list.
1. Tap Location.
2. Select your desired region.
3. Select your desired country.
4. Select your desired classification.
5. Select your desired podcast and program.
‘Genre’ enables you to choose radio stations
according to their content, for example Classic Rock,
Sport, News, etc.
1. Tap Genre.
2. Select your desired genre.
3. Select your desired podcast and program.
‘Search stations’ enables you to enter all or part of
podcast name to find a podcast.
My Added Stations
Even though the Internet radio portal contains thousands
of stations, you may want to listen to stations not listed.
You can add your own stations via the portal (www.
wifiradio-frontier.com).
1. Visit portal www. wifiradio-frontier.com and login as a
member as you registered when adding station to ‘My
favourites’.
2. To add your own station, click the arrow icon.
3. After you added the stations, in order to have your
speaker access your new settings, get your speaker
power off for several minutes is necessary.
4. The added stations are accessible by tapping
BROWSE tab > My added stations.
# Note: doing a ‘factory reset’ cannot erase ‘my added
stations’’.
16

Help
Help enables you get access code and listen FAQ.
Tap BROWSE tab > Help, you will see:-
Get access code: it uses for creating an account when
registering your speaker on portal www.wifiradiofrontier.com (Refer to section ‘My Favourites’.)
FAQ (
Frequently Asked Questions): tap a question
to listen.
Presets Station
Presets enables you to save up to 20 of your favourite
stations and you can access your favourite stations quickly
and easily.
1. Now playing screen will be shown once a program is
selected.
2. Tap
icon on now playing screen to set preset
station.
3. Tap
4. Tap station name to play the preset station.
icon to save preset station.
17

Spotify Mode
What is Spotify
Spotify gives you millions of songs at your fingertips. The
artists you love, the readymade playlists for every mood
and genre, the latest hits and new discoveries just for you.
With Spotify Connect feature, you can play and control all
this music wirelessly. Choose music on your smartphone
or tablet, and listen on your speaker.
*For service availability in your country, check
www.spotify.com
Using Spotify Connect
Your speaker has Spotify Connect built in. This lets you
control the music playing on your speaker using the Spotify
app on your smartphone or tablet.
Listening is seamless – you can take calls, play games,
watch a video, even switch your smartphone off, all without
interrupting the music. It’s a better way to listen at home.
You’ll need a Spotify Premium account to use Spotify
Connect. If you don’t have it, just go to
www.spotify.com/freetrial for your free 30-day trial.
1. Download Spotify app for your smartphone (iOS or
Android).
2. Ensure your speaker connected to the same WiFi
network as your smartphone.
3. In UNDOK app, tap Spotify from SOURCE tab to
select Spotify mode. The
will flash white light once and lights on.
WiFi indicator of speaker
18

4. Tap “Open Spotify” on BROWSE tab to quickly open
Spotify app on you smartphone.
5. Play any song in Spotify app. Tap the square image of
the song’s cover art in the bottom left of the screen.
Then tap the Connect icon
.
6. Tap ‘ADCOM-Luna’ from the list. If you can’t see it,
just check it’s connected to the same WiFi network as
your smartphone.
You will notice that your speaker is currently listed as
‘ADCOM-Luna xxxxxxxxxxxx’ (the 12 digit
alphanumeric code is the MAC address of your
speaker) in the Spotify app.
7. The Connect icon will turn green to signify that your
speaker is now selected and being used for audio
playback.
8. Return to UNDOK app, you can:
Save your favourite Spotify playlist or recall saved
playlist.
Sharing
Shuffle play
Repeat play
Skip to previous track
Skip to next track
Play/pause current playing track
*For information on how to set up and use Spotify Connect
please visit www.spotify.com/connect
19

Controlling Spotify Connect
You can now control Spotify from the app like normal;
search for and play your tracks, change the volume and
add to playlists even though playback is through your
speaker. The next time you open the Spotify app, playback
will continue through your speaker.
Spotify Connect is a cloud-based service, therefore after
activation on your speaker, your smartphone no longer
needs to be on the same WiFi network to control audio
playback.
Using another Spotify account with
your speaker
Your Spotify account details are now stored on your
speaker. To overwrite this with another Spotify account,
simply follow the activation steps again whilst running the
Spotify app using your desired account. Please remember
that both your smartphone and your speaker need to be on
the same WiFi network for the overwriting to occur.
Music player Mode
In order for your speaker to play music files from a
computer, the computer must be set up to share files or
media.
The built-in Music player allows devices like this speaker to
play unprotected audio files (AAC, MP3, WMA) from a
shared media library, navigating through tag menus such
as Artist, Album or Genre.
If you are running a suitable server system such as a PC
with Windows Media Player10 or later (WMP), and your
music library is well-tagged, then it is recommended to use
media sharing.
Only the UPnP (Universal Plug and Play) server needs to
be set up. (iTunes does not currently work as a UPnP
media server.)

Sharing Media with Windows Media
Player
The most common UPnP server is Windows Media Player
(10 or later. Viewing version from Help > About Windows
Media Player). Alternatively, other UPnP platforms and
servers may be used. To set up WMP for media sharing,
perform the following steps:
1. Ensure that the PC is connected to the network.
2. Ensure that the speaker is powered on and connected
to the same network.
3. In WMP, add to the media library the audio files and
folders you want to share with your speaker by
selecting Organize > Manage Libraries > Music /
Videos / Pictures / Recorded TV, click Add to add
audio files and folders and then click OK to finish
adding.
4. In WMP, enable media sharing (Stream > More
streaming options…).
21

5. Make sure that the speaker has access to the shared
media by selecting it and clicking Allow. You can also
set a name for the shared media in the box of Name
your media library. Click OK to close the dialogue
boxes.
6. The PC is now ready to stream the music to the
speaker. The WMP UPnP service runs in the
background; there is no need to start WMP explicitly.
Playing Shared Media
1. In UNDOK app, tap Music player from SOURCE tab
to select Music player mode. The
will flash white light once and lights on.
2. Tap BROWSE tab and then select Shared Media,
available media servers will be listed.
WiFi indicator

3. Select you desired UPnP (Universal Plug and Play)
media server - Music/Video Library - Music/Video.
When playing music/video, you can:
Sharing
Shuffle play
Repeat play
Skip to previous track
Skip to next track
Play/pause current playing track
USB Playback
The USB playback feature enables you to play music of
MP3, WMA and AAC formats in your USB disk.
1. Insert USB disk to USB port on the unit.
2. Tap BROWSE tab and then select USB Playback.
3. Step by step to find your desired music.
Aux in Mode
AUX IN allows for quick and easy connection to an MP3
player or other external audio sources.
1. Before connecting to the mains socket, use a 3.5mm
audio cable (not supplied) to connect to your external
audio device through the AUX IN socket on the back
of unit.
2. Connect power adapter to mains socket, press
POWER button to switch unit on.
3. Tap Auxiliary Input from SOURCE tab to select AUX
in mode. The Aux indicator lights white.
4. In Aux in mode, you may operate your audio device
directly for playback features.
5. To gain optimal volume levels, adjusting the output
volume level on the audio device as well is
recommended.
23

Bluetooth Mode
1. Tap Bluetooth from SOURCE tab to select Bluetooth
mode. The
2. Activate your Bluetooth device and select the search
mode.
3. “ADCOM-Luna” will appear on your Bluetooth device.
4. Select “ADCOM-Luna” from device list and enter
“0000” for the password if necessary.
5. The
Bluetooth indicator lights blue once Bluetooth
connected. You can operate your Bluetooth device
directly for playback features.
Bluetooth indicator flashes blue light.
24

Multi-room
Multi-room is a feature that enables you control your
speakers (one or group) via UNDOK app for playback.
You can enjoy music by using your smartphone which has
UNDOK app to control the speakers (multi-room capable
devices) in the kitchen, bedroom or living room. Of course
you also can control the speakers playing together.
1. If you have more than one speaker (multi-room
capable device), you can group them to play
synchronously.
2. Create group, taping the edit icon
following device name on My Home screen, and then
‘Group Setup’ screen will be shown.
a. Tap the grey circle before device name which is
under ‘Sharing with’ option on ‘Group setup’ screen
and make it turn green to add the device to group.
b. Tap ‘Rename’ under ‘Group name’ optio n on
‘Group Setup’ screen to enter a group na me or
select one usual name from the list, and then
select ‘Done’ to create group.
which is

c. Device list will appears again and the group will be
shown with group name and the devices in the
group. Tap on group name to select the group.
d. All clients in the group will synchronously play the
program which the master device is playing. You
can drag the volume control bar to change the
master volume for all grouped devices. You also
can tap on the volume control and then change
volume for each device respectively.
# Note: master device is which you selected
from device list for editing group; client is the
device you selected sharing with on ‘Group
Setup’ screen.
# Note: Aux in and Bluetooth modes are
incompatible multi-room playback. Switch to
it will remove the master radio from the
group.
e. You may need to dissolve the group if you don’t
26
want to group play your speakers, tap ‘Delete
group’ to delete the group on ‘Group Setup’ screen.

Specification
ITEMS SPECIFICATIONS
Description:
Power Adapter:
Battery
Requirements:
Audio Output
Power:
Power
Consumption:
Dimension
(W x D x H):
Multimedia speaker
AC Input: 100-240V~, 50/60Hz
DC Output: 12V, 2000mA
10000mAh, 7.4V
10W rms x 2
24W (Max)
345mm x 108mm x 345mm
This symbol on the product or in the instructions means
that your electrical and electronic equipment should be
disposed at the end of its life separately from your
household waste. There are separate collection systems
for recycling in the EU.

28
 Loading...