

Page 1
HIOTH
1
CAP-HOMEY
Smart Home Network Control System
Quick Install Manual
Version: V1.3
Page 2

HIOTH
2
1.
Packing List
Host1
Power adapter 1
User Manual 1
Page 3
HIOTH
3
2.
Panel
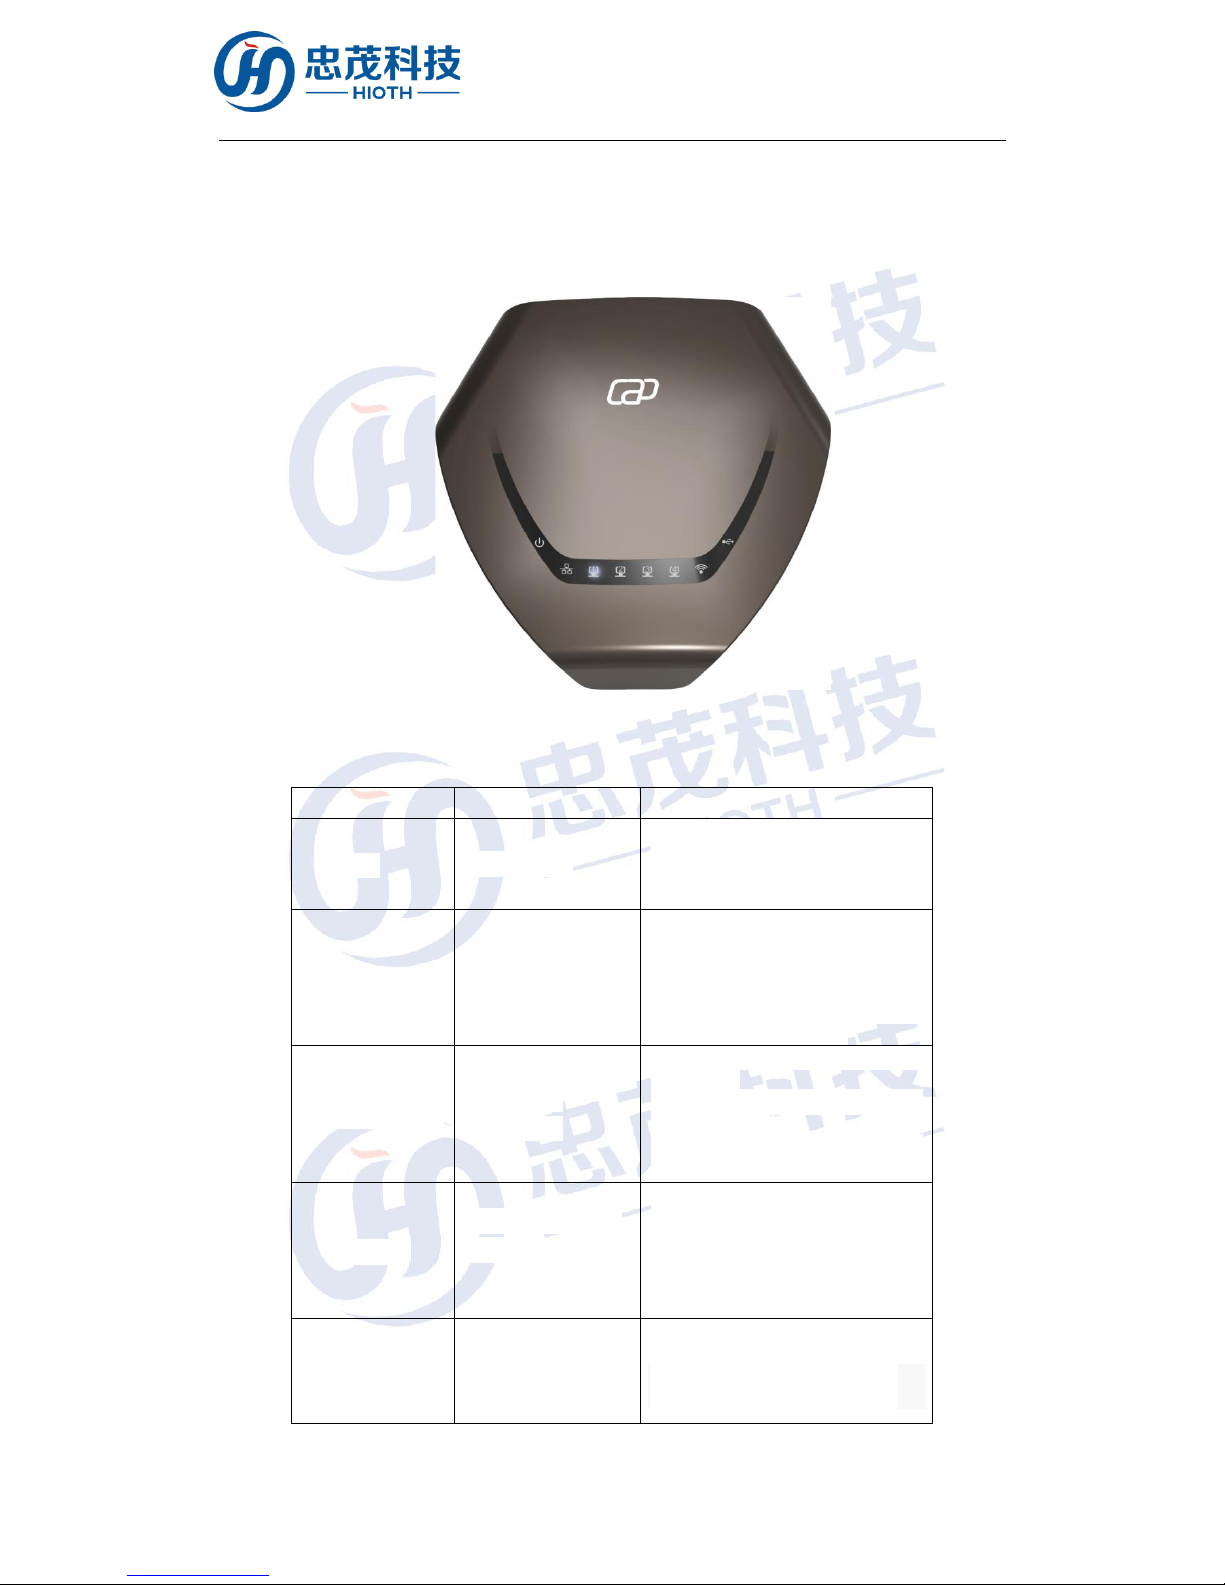
Front panel:
Fig2.1 The front panel schematic
Indicator light
Description
Function
PWR
power light
Often out - without access to
electricity
Normally on - have access to
electricity
WAN
Wan status
indicators
Often out – port is not
connected
Normally on – port is
connected to
Flashing - corresponding port
data is transmitted
LAN (1, 2, 3, 4)
LAN status
indicators
Often out – port is not
connected
Normally on - port is
connected to
Flashing - corresponding port
data is transmitted
WIFI
Wireless signal
lamp
Often out –wireless function
is not enabled
Normally on – wireless is
enabled
Flashing - corresponding port
data is transmitted
USB
The USB LED
Often out - not connected USB
devices
Normally on - USB device
connection is successful
Page 4
HIOTH
4
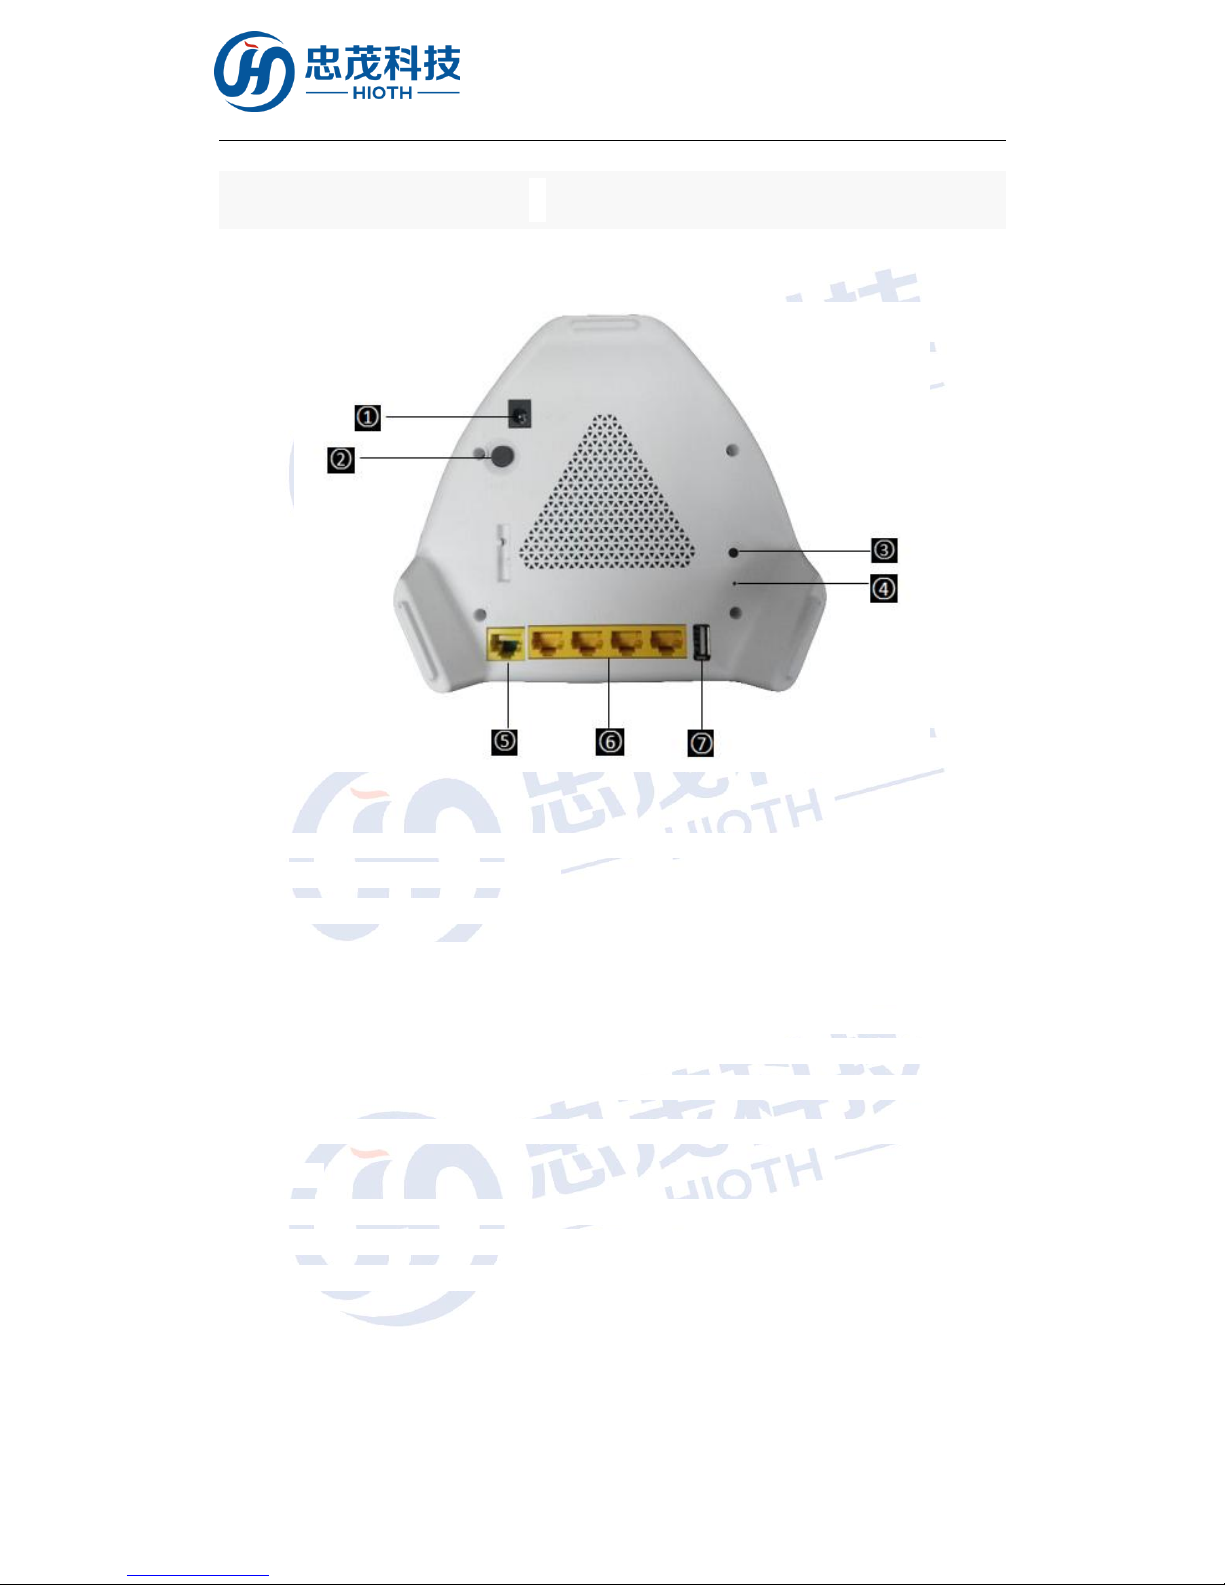
Rear panel schematic :
Fig2.2 Rear panel schematic
① POWER:The PWR port connects to a power adapter. Please use the supplied power
adapter in the product package.
② ON/OFF Button:Concave is ON, Convex is OFF.
③ WPS Button:Flash in WPS mode is certification consultation with the client.
④ Reset Button:A button for reset all configurations of the control system. Press
and hold the button for 25 seconds and release it. The system will automatically
restart, delete all the previous settings and restore factory default settings.
⑤ WAN Port: 1 Ethernet (10/100Mbps) port connects to MODEM. It is often used to
connect to DSL MODEM, Cable MODEM and ISP direct connect network for Internet
access.
⑥ LAN Port:4 Ethernet (10/100Mbps) ports for connecting to Ethernet switch, user
computer network card and so on.
⑦ USB Port:The USB is used to connect the USB storage devices.
Page 5
HIOTH
5
3.
Installation
Before system configuration, please follow the steps below for proper hardware
connection. To ensure the wireless network performance of the control system, place the
Smart Host in the middle of the coverage area.
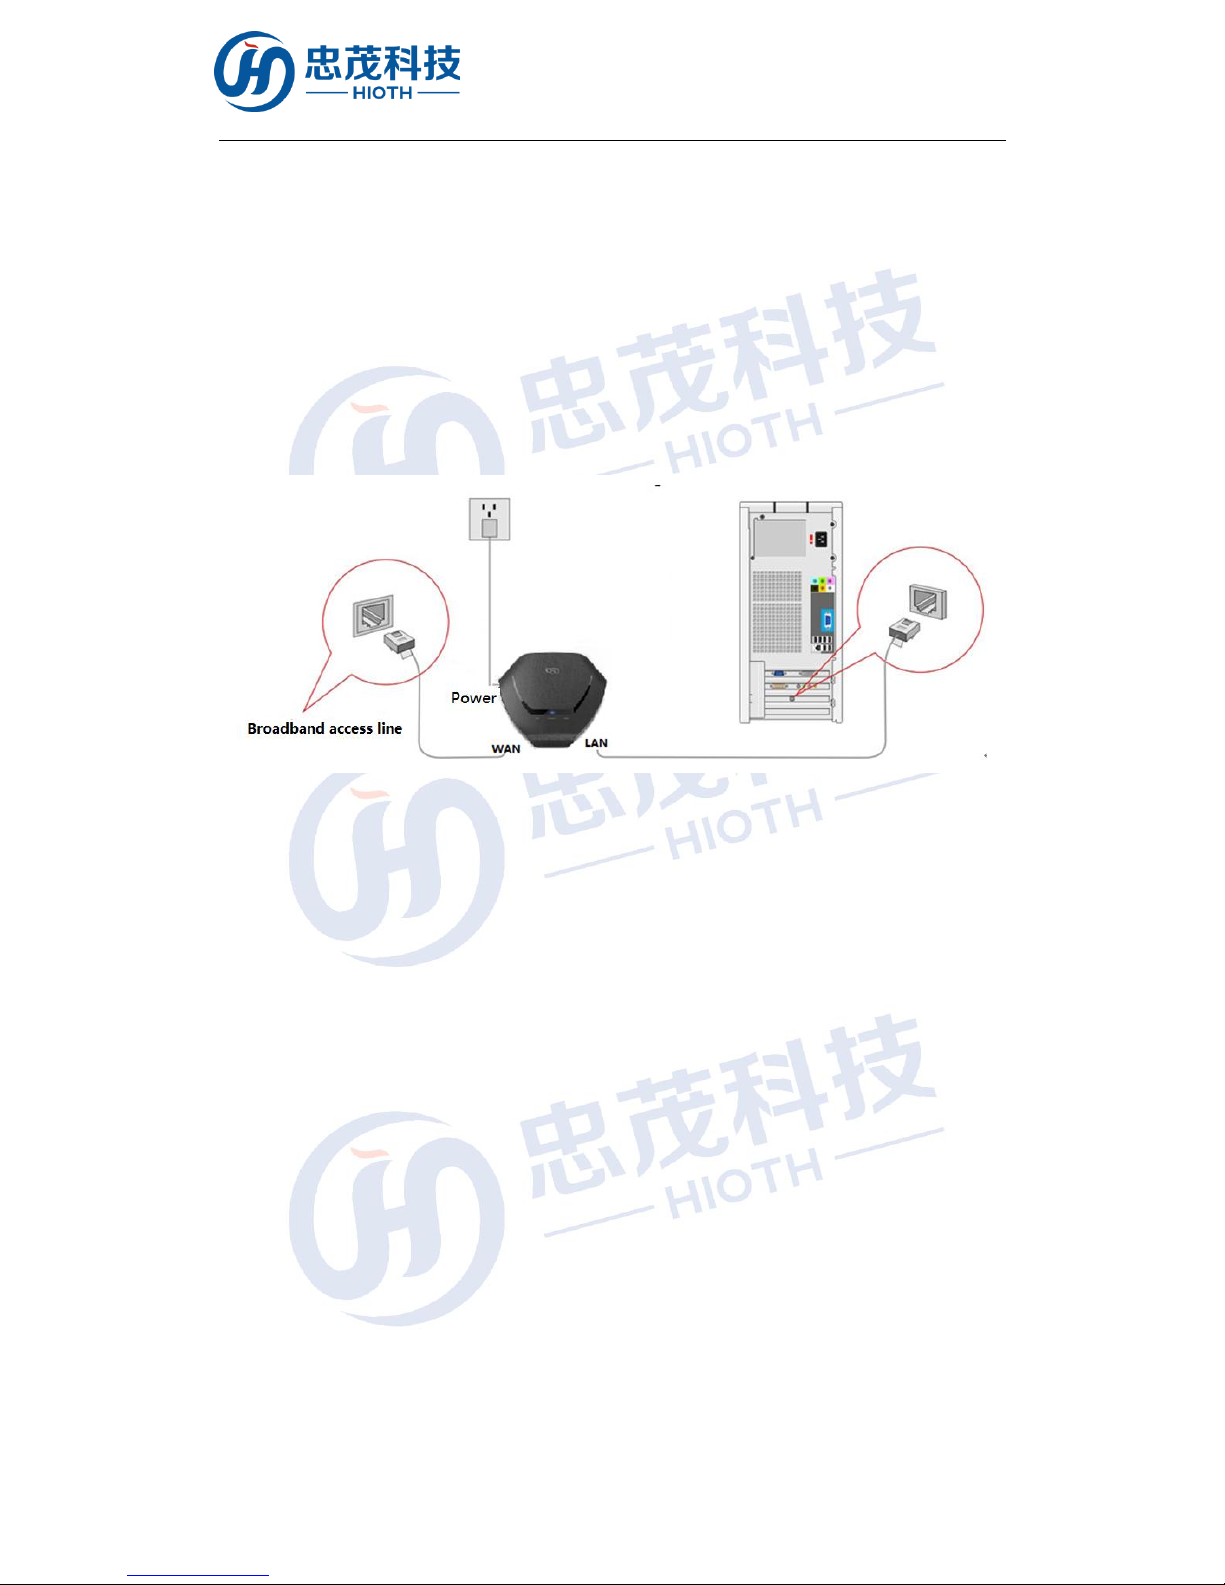
Use Ethernet cables to connect the Smart Host with the WAN and the PCs in the LAN as
illustrated below.
Fig3.1 LAN and wan connections
Page 6
HIOTH
6
4
Setting up Your Computer Network
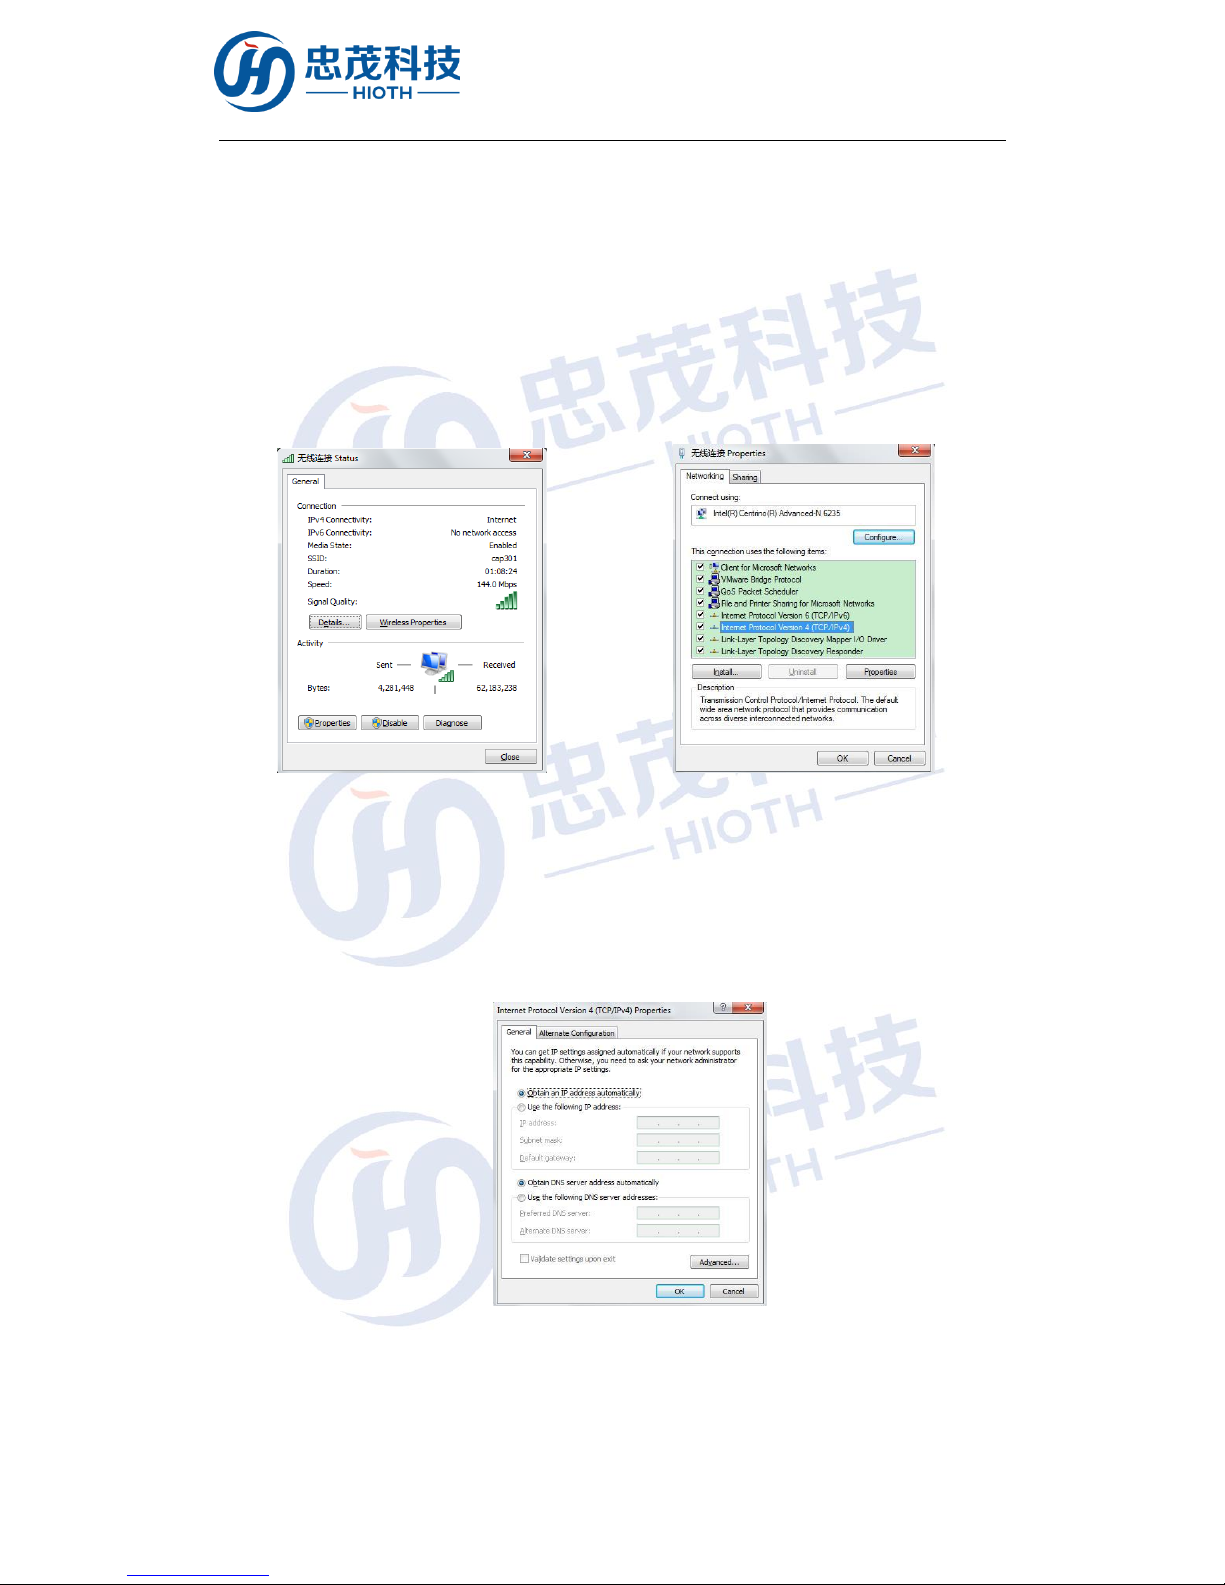
1. On the lower-right corner of the desktop,
right-click the Network icon and select
Open Network and Sharing Center. In
the pop-up window, select Local Area
Connection and click Properties.
2. In the pop-up dialog box, select
Internet Protocol Version 4
(TCP/IPv4) and double-click it.
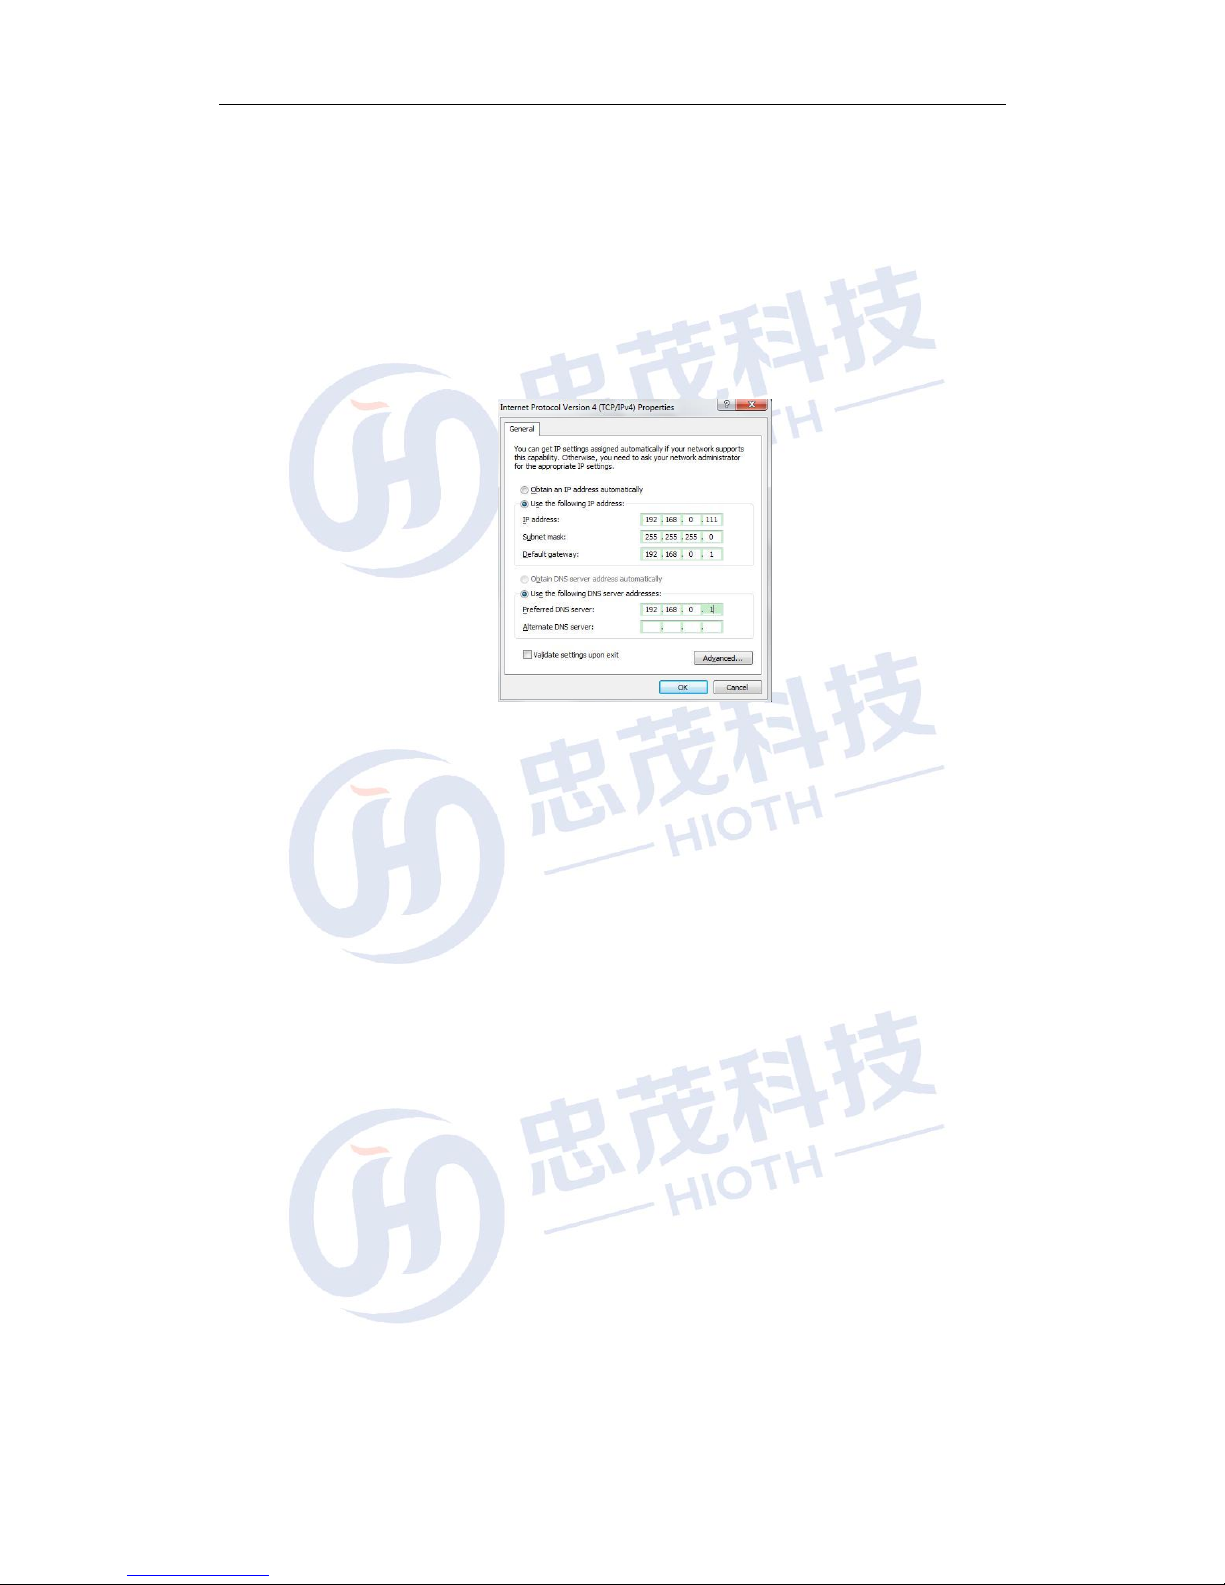
3. In the appeared window, select obtain an IP address automatically or Use the following IP
address.
a. Obtain an IP address automatically
b. Use the following IP address (Make sure your computer is under the same
LAN subnet with the Smart Host. The Smart Host automatically assigns an IP
address 192.168.0.1. Change will be applied with additional notice.)
IP Address: 192.168.0.XXX (XXX ranges from 2 to 254)
Page 7
www.cap-homey.com
7
Subnet Mask: 255.255.255.0
Gateway: 192.168.0.1
DNS Server: Type a local DNS server address (contact your ISP provider
for details), or use the Smart Host as the proxy server (192.168.0.1).
After completing the settings, click OK. Go back to the dialog box in step 2 and
click OK to save the settings.
Page 8
www.cap-homey.com
8
5
Logging in the Smart Host
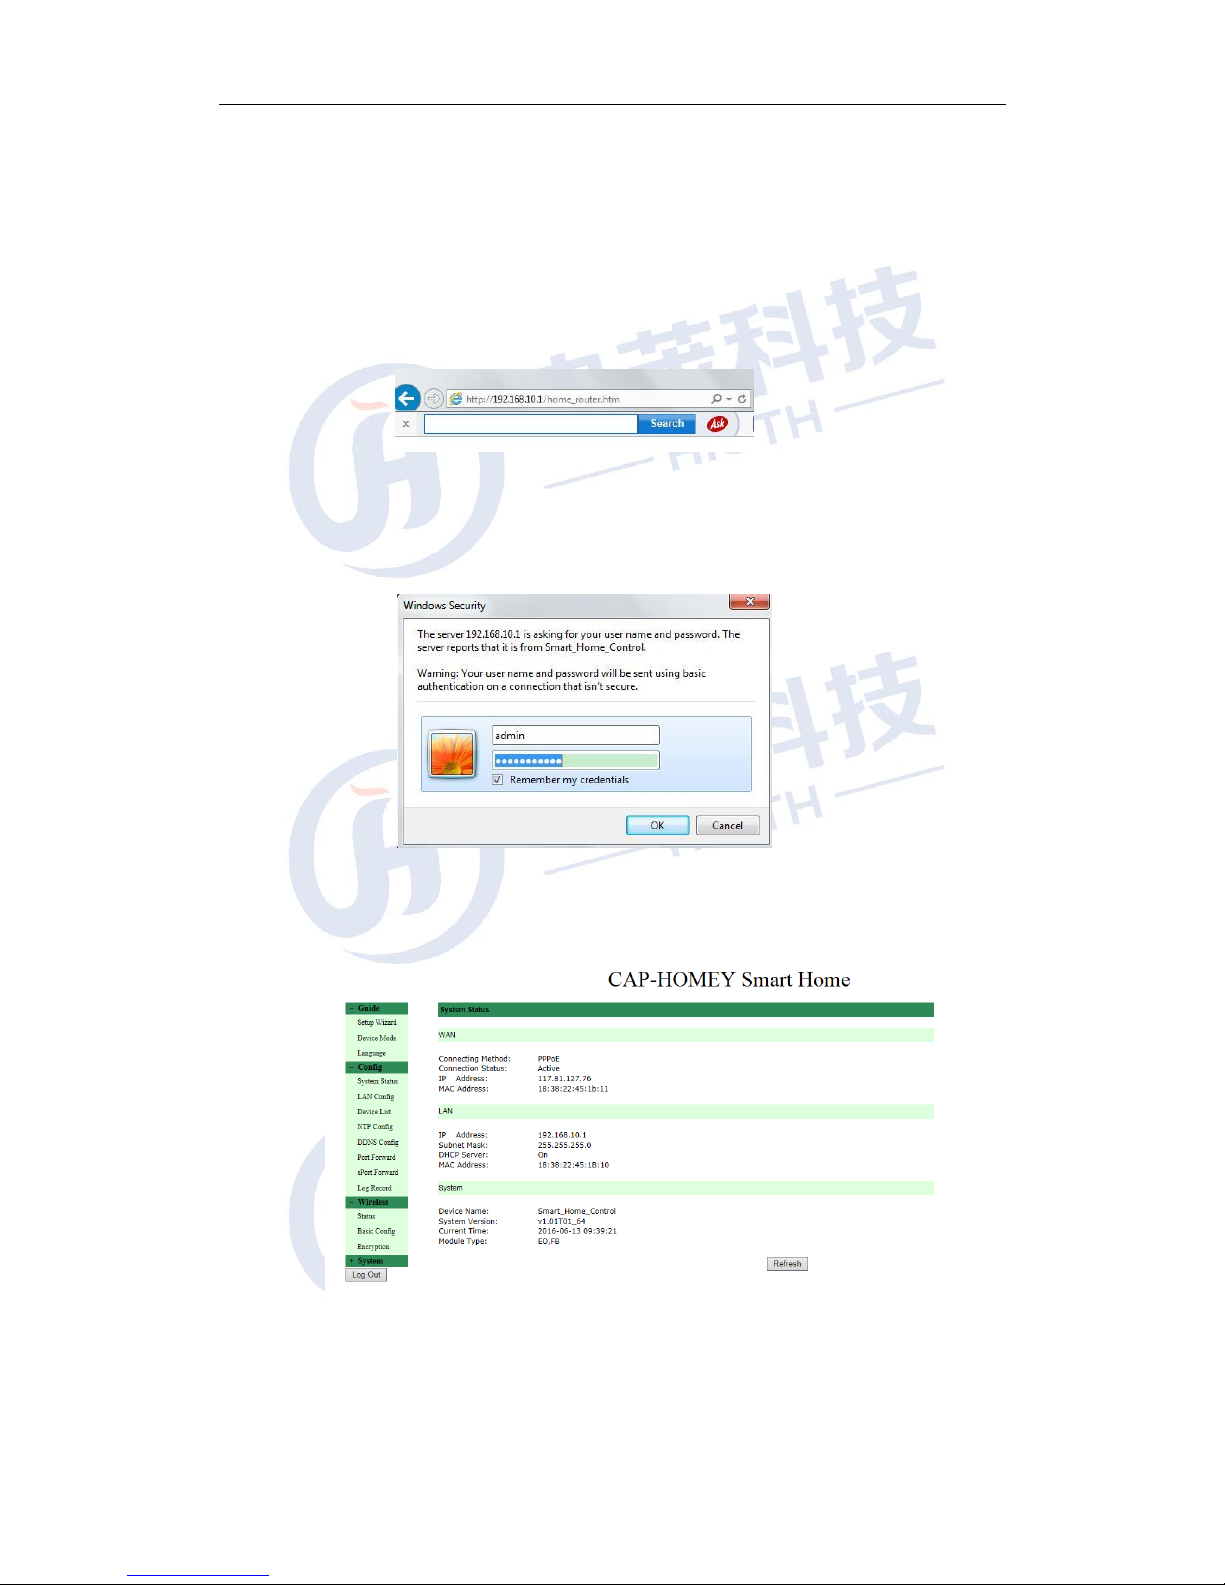
1. Open the Web browser, type http://192.168.0.1 and press Enter.
2. In the pop-up window, type the user name admin and the password caphomey,
and then click ok.
3. With the valid username and password, you can access the Smart Host main page
under administrator mode.
Page 9

www.cap-homey.com
9
4. The installation wizard
As shown below, the Smart Host supports 3 common types of IP
Configuration (PPPoE, Dynamic IP and Static IP). Please select one as desired.
How to judge what Internet connection?
Opened a network operators to provide
parameters online
Outgoing Connection
Settings
user name and password
PPPoE
Fixed IP address, subnet mask, gateway and
DSA
Static IP
Without any parameters, the computer
does not need to do any setting
Dynamic IP
Page 10
www.cap-homey.com
10
5. Basic Settings
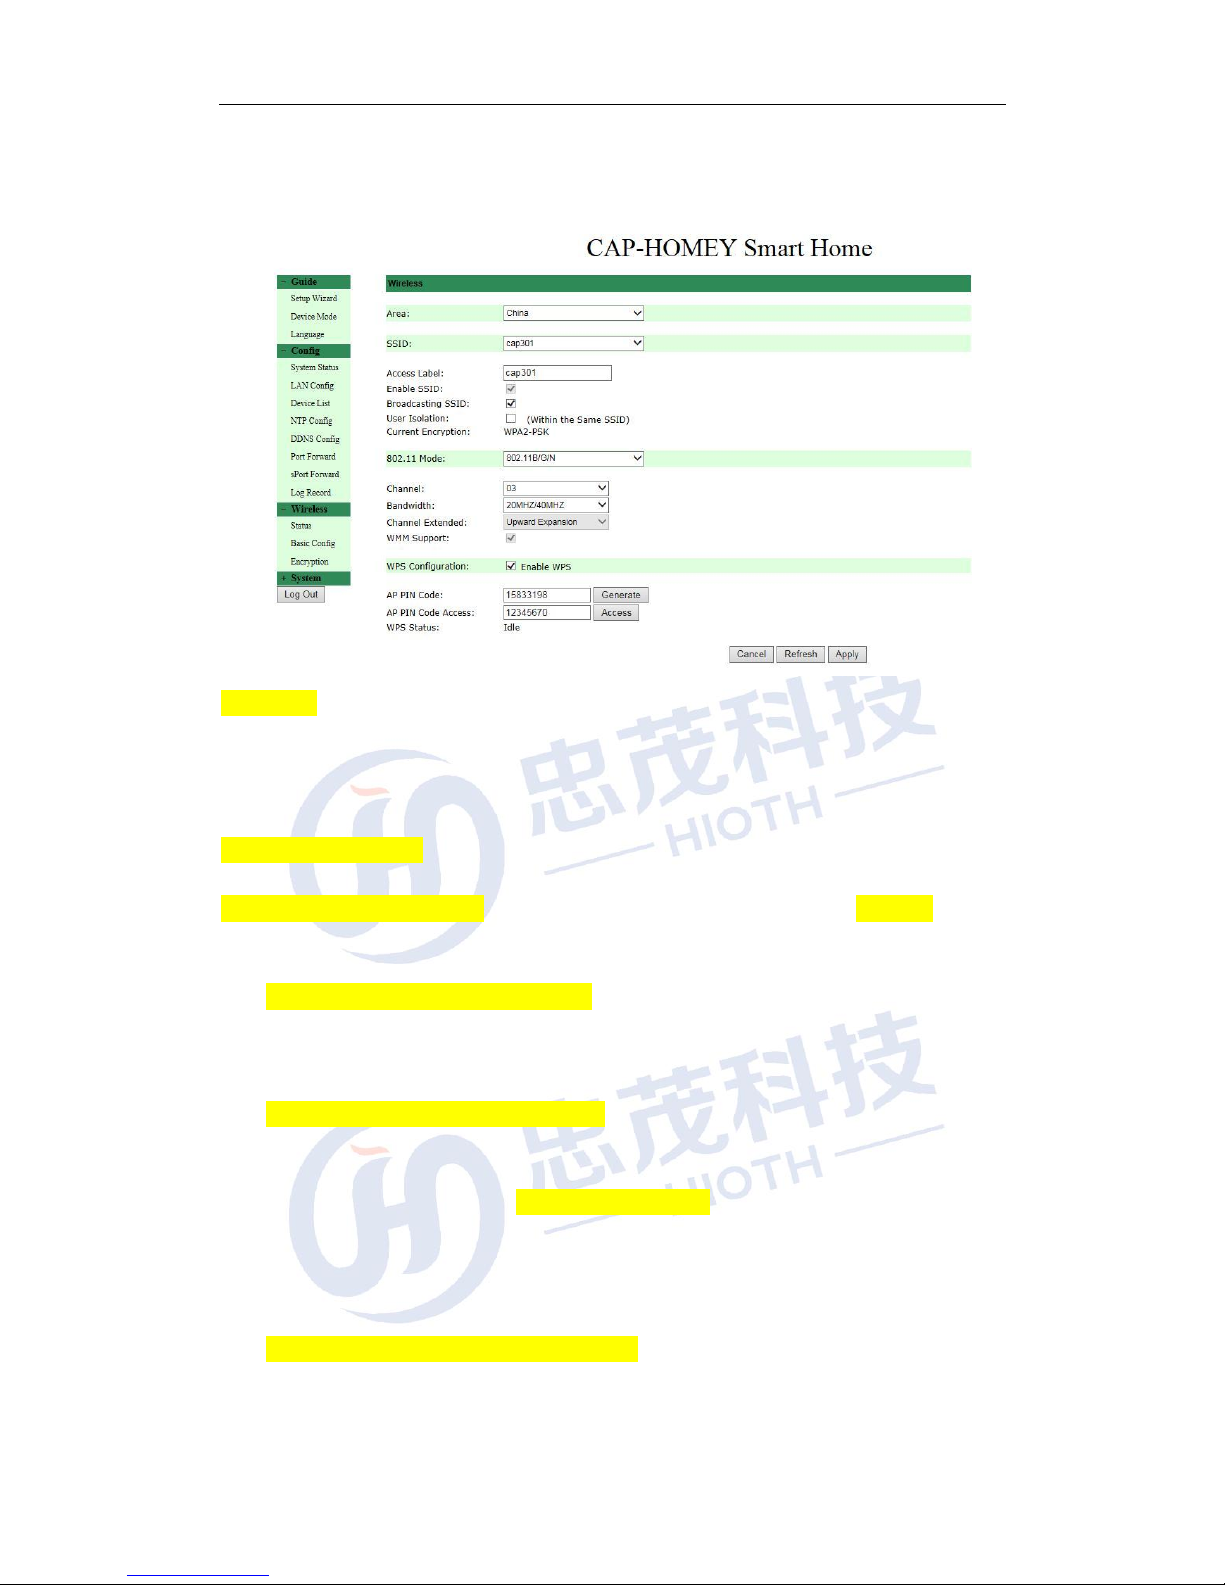
Area: Select your current area.
Primary SSID: Service Set Identifier, a unique name that identifies a particular
wireless network. It is a required field that can be modified.
Secondary SSID: The secondary Service Set Identifier. It is an optional field that
can be modified.
Whether Enable: Tick to enable wireless connection. Un-tick if you want to disable
the wireless connection functions.
Whether Broadcasting: The function is enabled by default. Select Turn Off to
disallow the Smart Host to broadcast SSID. In this way, the wireless clients must
know the Smart Host’s SSID in order to connect to the Smart Host.
User Isolation with the same SSID: Enable this function to strengthen wireless
network security. To apply communication isolation between all the wireless clients
on the AP, please enable this function for the clients of the same or different SSIDs.
User Isolation with the same SSID: If enabled, the wireless clients of the same
SSID cannot connect to each other.
For example, if you set the primary and secondary SSID as AP1 and AP2
respectively and enable the user isolation function, with PC1 and PC2 being on the
same network segment and connecting to AP1 via wireless network card, PC1 and
PC2 cannot connect to each other. However, they can connect to the wireless clients
on AP2. This function is for the isolation between the wireless clients of the same
SSID.
User Isolation between different SSIDs: If enabled, the wireless clients of primary
SSID cannot connect to the clients of secondary SSID.
For example, if you set the primary and secondary SSID as AP1 and AP2
Page 11
www.cap-homey.com
11
respectively and enable the user isolation function, with PC1 connecting to AP1 via
wireless network card and PC2 connecting to AP2, PC1 and PC2 cannot connect to
each other. This function is for the isolation between the wireless clients of different
SSIDs.
802.11 Mode: Select a mode according to the type of wireless client.
Turn Off: Disable all of the wireless connection functions.
11b Mode: Select this mode if there is only 11b mode client existing in your wireless
network.
11g Mode: Select this mode if there is only 11g mode client existing in your wireless
network.
11b/g/n Mixed Mode: Select this mode if there are 11b, 11g and 11n clients existing
in your wireless network.
Channel: The channel used by the Smart Host. User the drop-down list to select
other valid channel ranging from 1 to 13.
Channel Bandwidth: Set up the bandwidth to improve wireless performance. When
there are 11b/g and 11n clients in the wireless network, select 802.11n mode (wide)
with 40M bandwidth; when there is only 11n client absent in the wireless network,
select 20M bandwidth. If the wireless network is in 11n mode, select 20/40M
bandwidth to facilitate the transmission.
Channel Extended: Set up the operation frequency of the wireless network
under 11n mode.
Wireless Connection Security
WPA2 (Wi-Fi Protected Access version 2) provides higher security than
Wireless Equivalent Privacy (WEP) or Wi-Fi Protected Access (WPA).
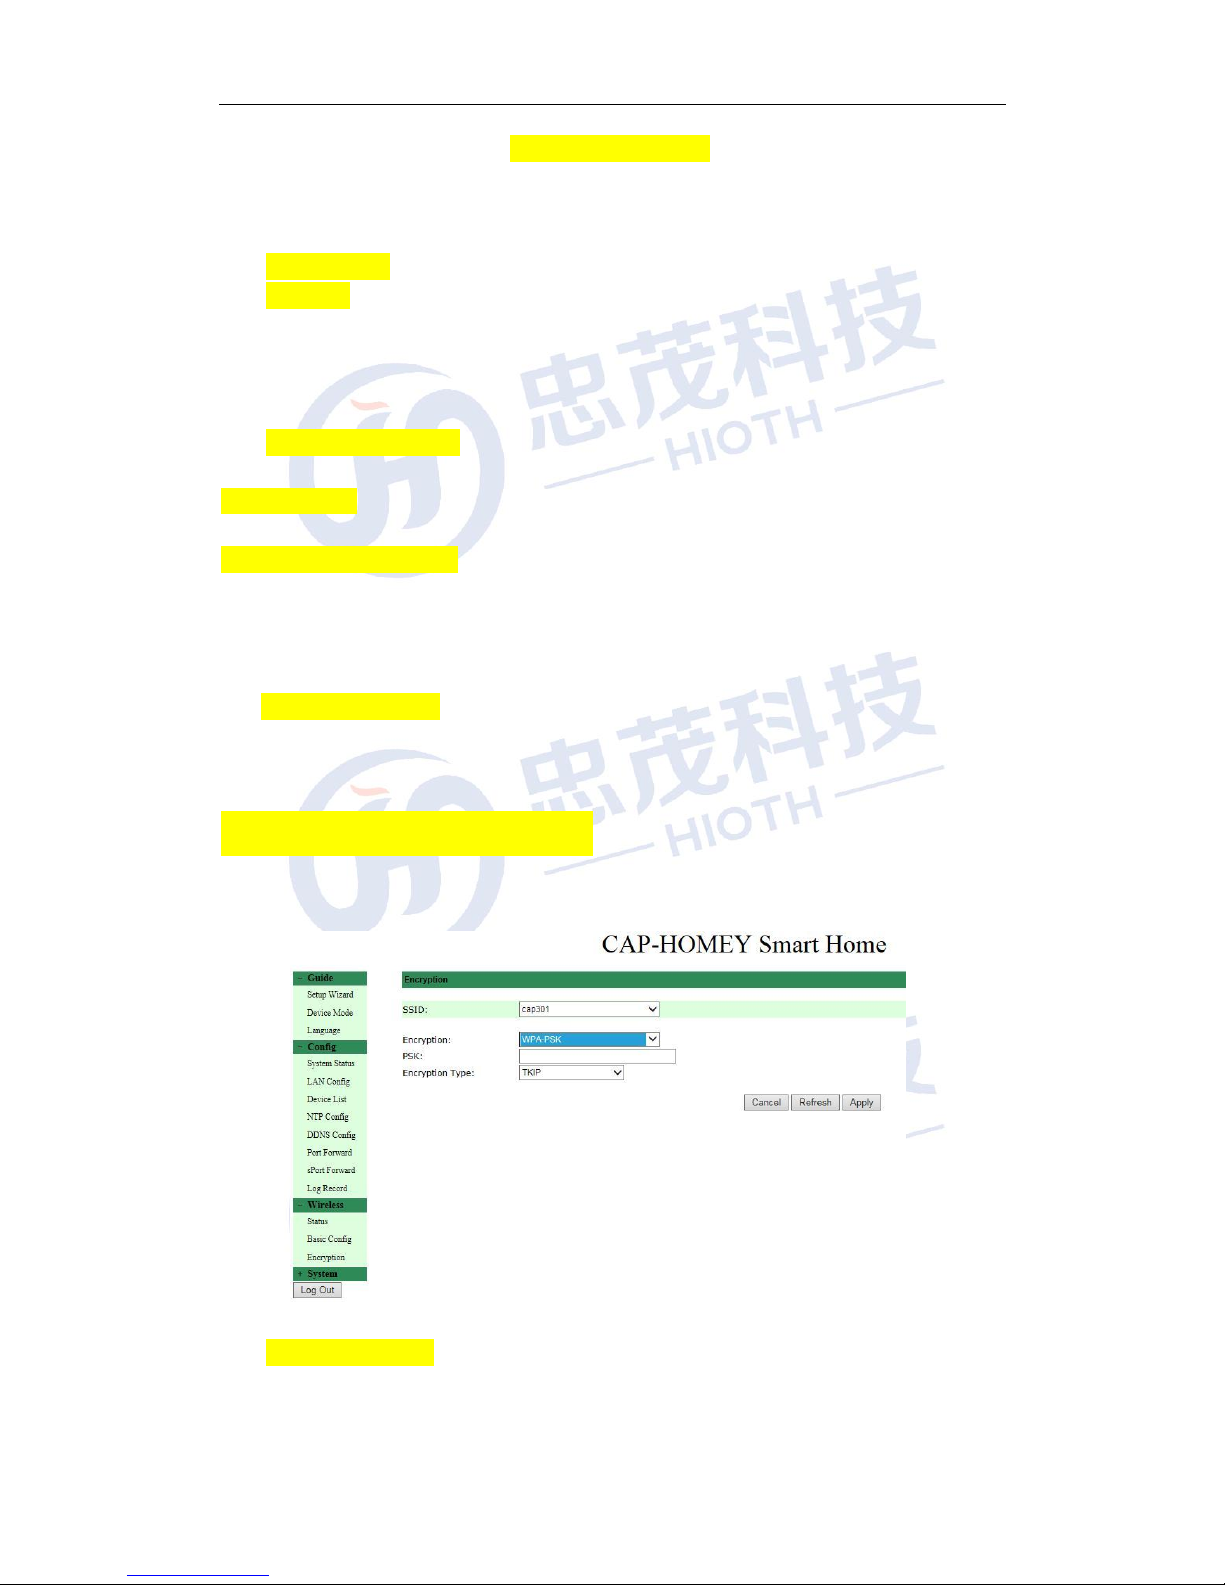
Encryption Mode: Select a correspondent encryption mode for the SSID. Here you
select WPA2-PSK.
PSK: Type a string of 8 to 63 characters in ASCII format or 64 hexadecimal
Page 12

www.cap-homey.com
12
characters for data encryption.
WPA Encryption Type: Select AES (Advanced Encryption Standard) or TKIP
(Temporal Key Integrity Protocol) mode.
6. SMS Configuration
As the Smart Host is designed for the control of smart home App, the text
Message function can alert the user to an emergency, such as the detection
of unidentified visitor.
NOTE: Text message ISP includes DIYI Information, SMS Country, SMS King, Easygo,
Mitake and Smse. User can select one of the ISPs and type his/her username, password
and mobile phone number.
Page 13
www.cap-homey.com
13
6
Configure the Camera
In the configuration before the camera, please follow these steps to correct
connection configuration.
1. LAN connections
Use a network cable to connect the smart host (LAN port) with the camera
network port
2. Log in Smart host web interface
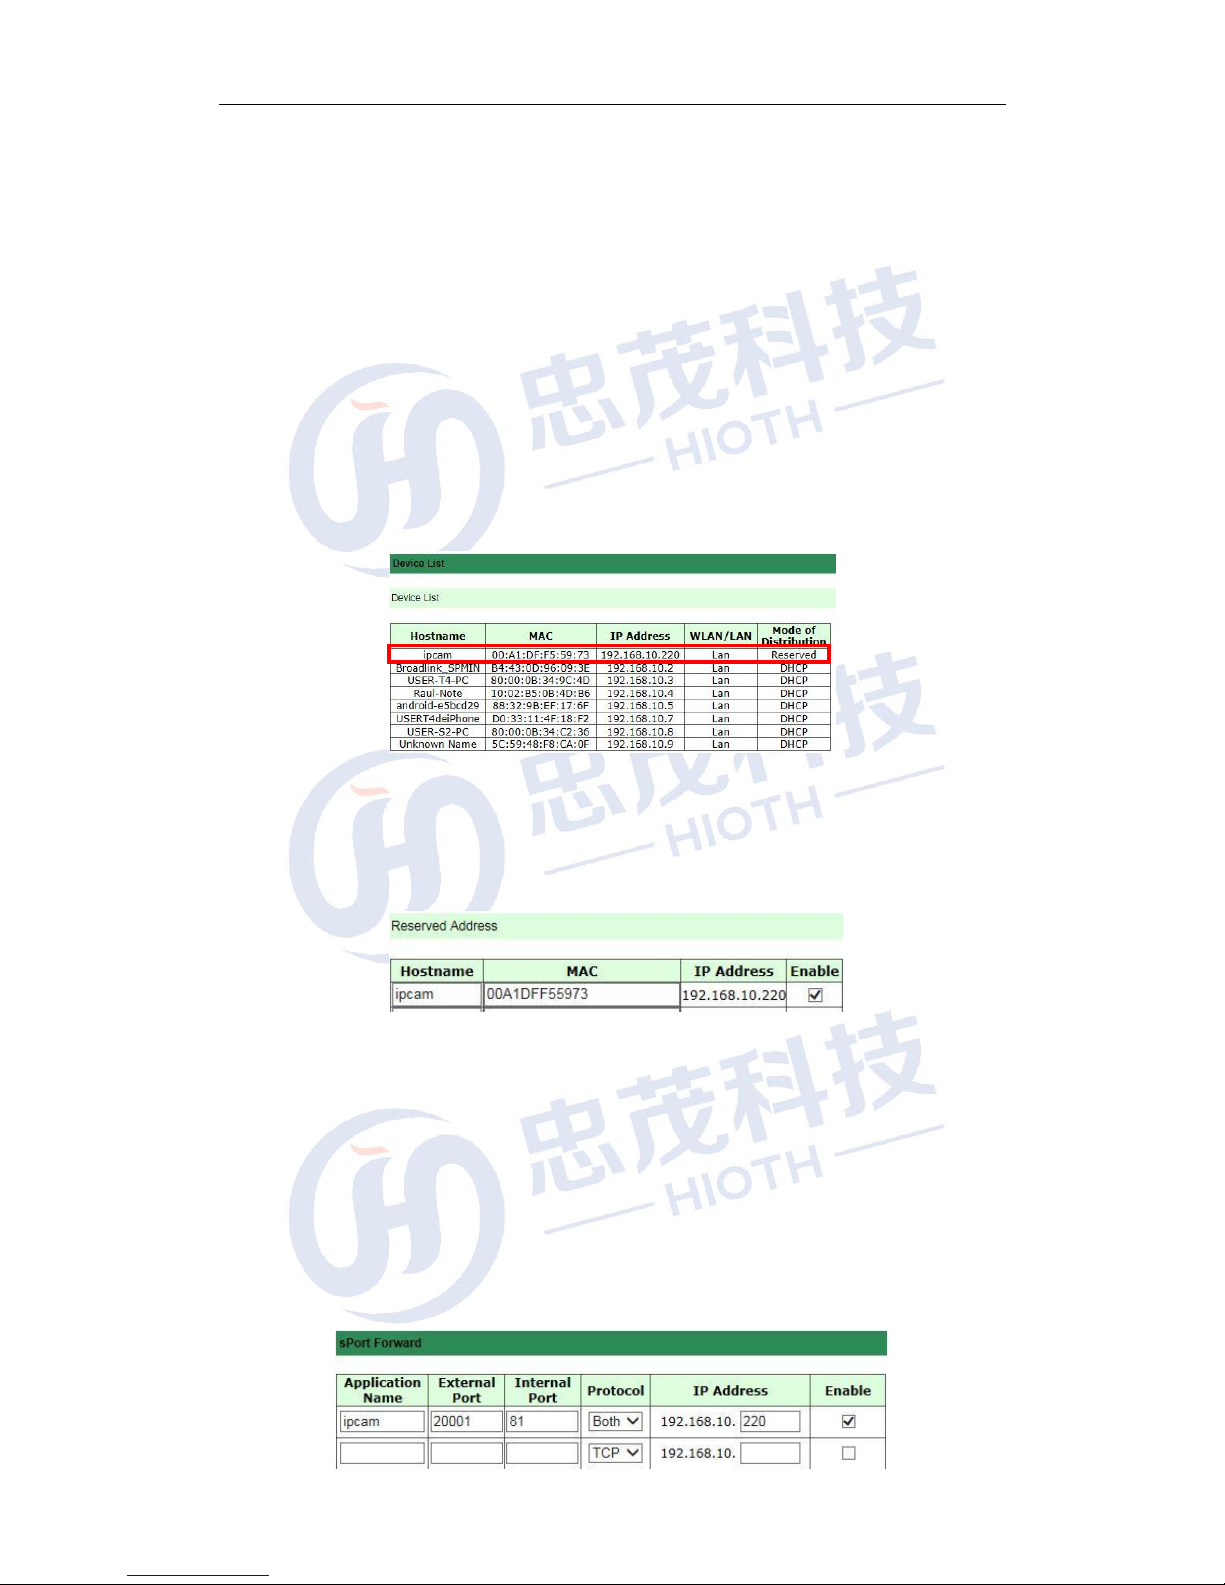
Go to the "Basic configuration" - > "Equipment list", check the camera IP
and Mac address
3. Reserved Address
Go to the "Basic configuration" - > "LAN configuration," MAC and reserve
the HOST address binding up the camera.
Note: 1. If the user use wired connection HOST, then connect the cable
MAC and HOST the reserved address binding, if the user HOST using a
wireless connection, then connect the wireless MAC binding reserve and
HOST addresses.
2. Configure the need to restart the camera.
4. sPort Forward
Go to the "Basic configuration" - > "Port forwarding/single port forwarding",
to configure port forwarding (for remote monitoring) .
Page 14
www.cap-homey.com
14
7
Appendix 2 FAQ
This section lists some common questions of Smart Host operation and correspondent
solutions. If you cannot find feasible solutions for the problems you encounter, please visit
our Website http://www.hioth.com/. We will provide assistance as soon as possible.
1. Why can’t I access the Smart Host main page after entering the IP address on a
browser?
1) Please check if your Smart Host is properly operated. The PWR LED should
show constant green after the Smart Host is turned on. If not, the Smart Host
might be broken. Please contact us for repair.
2) Please check if the Smart Host is successfully connected to the Internet and if
the correspondent LED is on. Under certain situation, the network connection
may fail even if the LED is on.
3) Please Ping the IP address 192.168.0.1 of the Smart Host in the LAN. If you can
access the IP address, check if your browser is connecting to the Internet
through a proxy server. If yes, please disable the function. If you fail to access
the IP address, please press and hold the RESET button to restore the Smart
Host to factory default settings, and then ping the IP address 192.168.0.1 again.
If the above solutions could not work, please contact us for further support.
2. What should I do if I forget the logging password for accessing the main page of
Smart Host?
Please restore the Smart Host to factory default settings by pressing and holding the
RESET button for at least 25 seconds. After you release the button, the system will
automatically restart and restore its default settings.
3. What should I do if the PC connected with the Smart Host encounters IP
address conflict after start-up?
Please turn off other DHCP servers in the LAN if any. The default IP address of Smart
Host is 192.168.0.1. Please make sure the IP address is not used by other PCs or
devices in the LAN. Change the IP address of other devices that use the same IP with
the Smart Host. If there are two PCs using a same IP address, change the IP address
for one of them.
4. How to connect the Smart Host to the Internet with a dynamic IP address?
To enable the connection, on the main page of Smart Host, find Quick Configuration,
select Dynamic IP Connection and click Save. Some ISPs would register the MAC
address of client’s network card. In this case, you need to set the MAC address of the
Smart Host in the WAN as the registered MAC address.
5. How to allow the users on the Internet to access my PC through the Smart
Page 15
www.cap-homey.com
15
Host?
To allow the users on the Internet to access the servers in your LAN, including mail
server, WEB and FTP, you have to establish a Virtual Server. Follow the steps to
configure the Smart Host.
1) Establish a server in your LAN and make sure it can be accessed by other users
in the LAN. Meanwhile, you need to know the port numbers of the servers, such
as Port 80 for WEB server, Port 25 for SMTP and Port 110 for POPS mail server.
2) On the main page of Smart Host, select Port Forwarding.
3) Type the service ports in the LAN and WAN, such as 80 for the Start Port and the
End Port.
4) Type the IP address of the server in the LAN. If the IP address of your WEB
server is 192.168.0.1, type 192.168.0.1.
5) Confirm the protocols used by the servers, such as TCP, UDP or ICMP. If you are
not sure about the protocol, select Both.
6) Click Enable to save and activate the settings.
8
Technical specifications
Power Supply
12V~ 1.5A
Operational
Environment
Temperature range:0℃~50℃
Operating humidity:10%~90% RH No condensation
Accessories
Smart Host
Adapter
Quick start guide
Technical
Support
Support the wireless AP, routers, and four switches
Support standard of IEEE802.11n, backward compatibility
IEEE802.11b, IEEE802.11g
WPA/WPA2, WEP,NONE Security
1x 10/100M WAN Port
4x 10/100M Ethernet (LAN) interface,
support hidden wireless SSID function
System security logs
DDNS
Port Forward(Single Port Forward and Range Port Forward)
support simple network time protocol (NTP)
supports the automatic selection of wireless channels
supports ZigBee, WiFi,, Enocean, Z-Wave protocols of smart home
terminal management, etc
support Android, IOS version APP remote management
Page 16
[键入文字]
16
9
Announcements
Security
Only use the attachments/accessories specified by the manufacturer.
Only use the power adapter provided in the package.
Do not expose the product to dew or splashing water environment.
Do not put any hazards on this product.
As far as possible away from the heating device.
Warning
Please do not hurt our products shell
Please do not arbitrarily change the configuration of this product
Please do not casually plug the power adapter
 Loading...