

Hioki LR5092-20 Operation Manual
-1-
-2-
LR5092-20
DATA COLLECTOR
Operation Manual
February 2011 Edition 1 Printed in Japan
LR5092B981-00 11-02H
Read First
Thank you for purchasing the HIOKI LR5092-20
Data Collector.
This guide introduces the Data Collector's basic
measurement procedure to first-time users.
Before using the instrument, be sure to read the Ins truction
Manual carefully.
2
Preparations
1
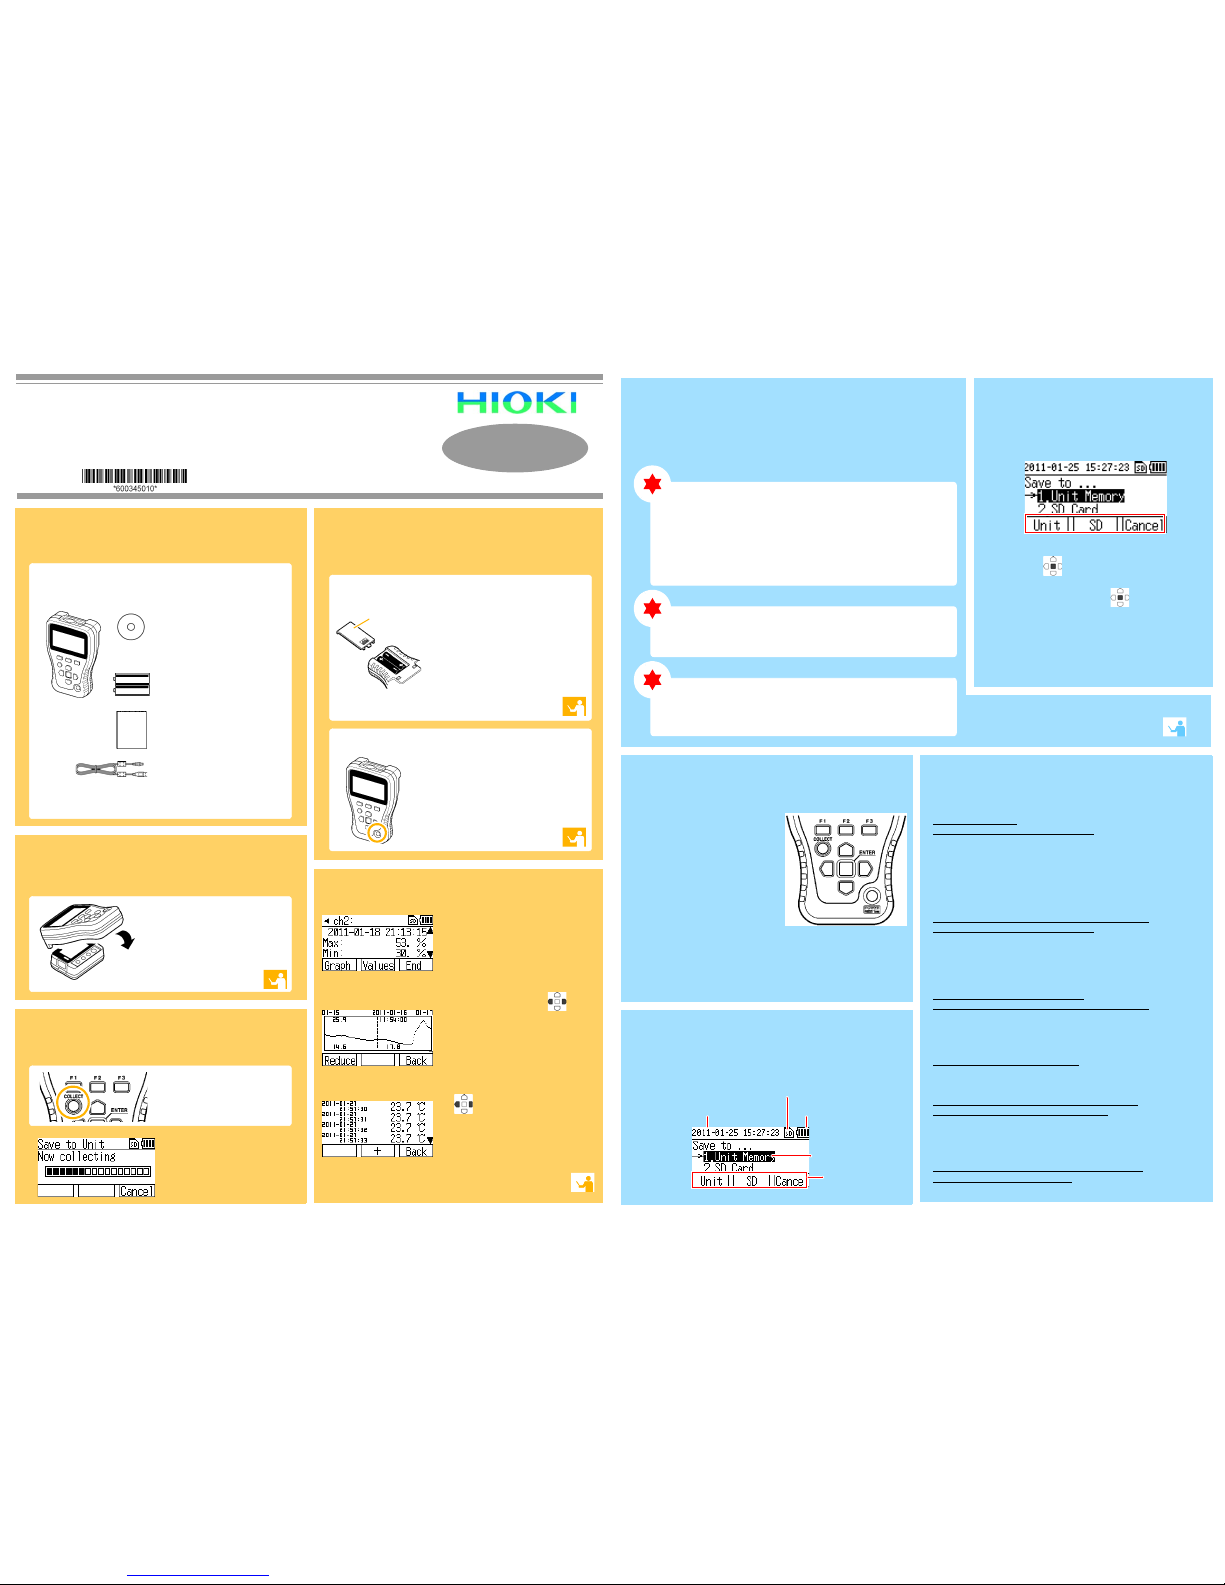
Confirmation
Confirm package contents, and prepare needed items.
Two LR6 alkaline batteries
Instruction Manual
Refer to this manual for operating proce dure details, or when problems occur.
USB Cable
Use this cable when connecting the collector and a computer to configure the
collector's settings or transfer the collector’s data to the computer.
See the Instruction Manual for details.
LR5092-20
3
Connecting
Data Collector and Accessories
Installing the Battery
Turning the Power On
Install the batteries in the collector, and then
turn on the power.
1
Remove the battery cover from
the back of the collector.
Install the batteries as shown.
Close the battery cover.
2
3
Take care to ensure the orientation of the + and - is correct
when you install the batteries.
Press the POWER button. (Long
press for approximately 1 second)
After use, always turn OFF the power.
5
Browsing Data
Data can be collected without stopping measurement on the logger. Data is
collected up until the point in time when data collection was performed.
By d efault, the collected data is saved to internal memory.
Connect the Data Logger and Data Collector.
LR5000 Utility Program CD (PC
application software)
Use this program when connecting the
collector and a computer to configure the
collector's settings or transfer the collector’s data to the computer
Place the logger and collector
so that their IR ports are
aligned.
4
Collecting Data
Press the COLLECT
button.
The display on the left is shown
during data collection.
When you want cancel data collection part way through:
Press the F3 button to return to
the top display.
Waveform Graph Display
Numerical Value Display
Collection Data Display
Battery
Cover
When collection is completed, the collected
data appears on the display.
Displayed items:
Channel, comment, data count, recording interval,
serial number, recording start time, recording stop
time, maximum value, minimum value, and av erage value
When the data of a logger which recorded on
two channels is collected, use to switch
channels.
Press the F1 button to switch to waveform
graph display, and F2 button to switch the
numerical value display.
(To return to the previous display, press the
F3 button.)
Waveform Graph Display
Press the F1 button to reduce the waveform,
and the F2 button to magnify the waveform.
Use to scroll the waveform.
(To return to the previous display, press the
F3 button.)
NumericaLl Value Display
Use the F1 and F2 buttons to decimate the data.
(To return to the previous display, press the
F3 button.)
Perform the pre-measurement inspections
before you use the collector.
(See the Instruction Manual for details.)
No indications appear on the display when the POWER button is
pressed.
Are batteries installed?
Did you press and hold the POWER button?
• Check that batteries are installed properly.
• Press and hold the POWER button for 1 second.
If the screen is not displayed after performing the above steps, the power
protection element may be damaged. Contact the place of purchase or your
nearest Hioki sales office because replacement and repairs cannot be performed by customers.
The power does not turn off when the POWER button is pressed.
Is the collector connected to a computer with a USB cable?
Did you press and hold the POWER button?
• The power will not turn off if the collector is connected to a computer with a
USB cable. Disconnect the USB cable and then press the POWER button.
• Press and hold the POWER button for 1 second.
The power turned on even though the POWER button was not
pressed.
Is the POWER button in a pressed state?
Is the collector connected to a computer with a USB cable?
• Check the POWER button.
• When the collector is connected to a computer with a USB cable, the power
turns on even if the POWER button is not pressed.
Button operation is not possible.
Is one of the buttons in a pressed state?
Check the operation buttons.
Cannot collect data from a logger
Are the collector and logger placed correctly in position?
Is the communication IR port dirty or scratched?
• Place them correctly in position.
• Clean the IR port. If there is significant damage, the collector needs to be
repaired. Contact the place of purchase or your nearest Hioki sales office.
The batteries are depleted too quickly.
Are the batteries supplied with the logger still being used?
Are manganese batteries being used?
Use new LR6 alkaline battery.
TroubleshootingOperating Buttons
F1, F2, F3 button
Executes the F button menu.
COLLECT button
Collects the recorded data from the
logger.
ENTER button
Executes the selected menu.
Cursor button
Moves the cursor.
POWER button
Press and hold this button (for approximately 1 second) to turn the power on/off.
The power is turned off automatically
(auto power off) when no operation is performed for approximately 1 minute.
Indicators
Battery Status Indicator
Cursor
F button menus
SD Memory Card Indicator
Lit when an SD memory card is inserted.
Current Date
For the setting procedure,
see the Instruction Manual.
Configure the Data Logger settings,
check the recording/setting state, and
control starting/stopping of recording
You can configure the settings of the LR5000 Data Logger series and control
the starting and stopping of recording. (The settings can also be received
from a Data Logger.)
You can check the recording/setting state of the logger, too.
Organizing Data
You can display a list of data, delete data, and format an SD memory card.
Self Checks
You can check whether there is a problem with the firmware, LCD,
keys, buzzer, and SD memory card.
Basic Button
1
Move the cursor and select menus and items
with the buttons.
Execute items with the (ENTER button)
buttons.
And (Or)
Execute F button menus with the F buttons.
2
See the Instruction Manual for details.
Operations
Capabilities in
Addition to Collection
-3-
-4-
5
Importing and Displaying Data on a
Computer
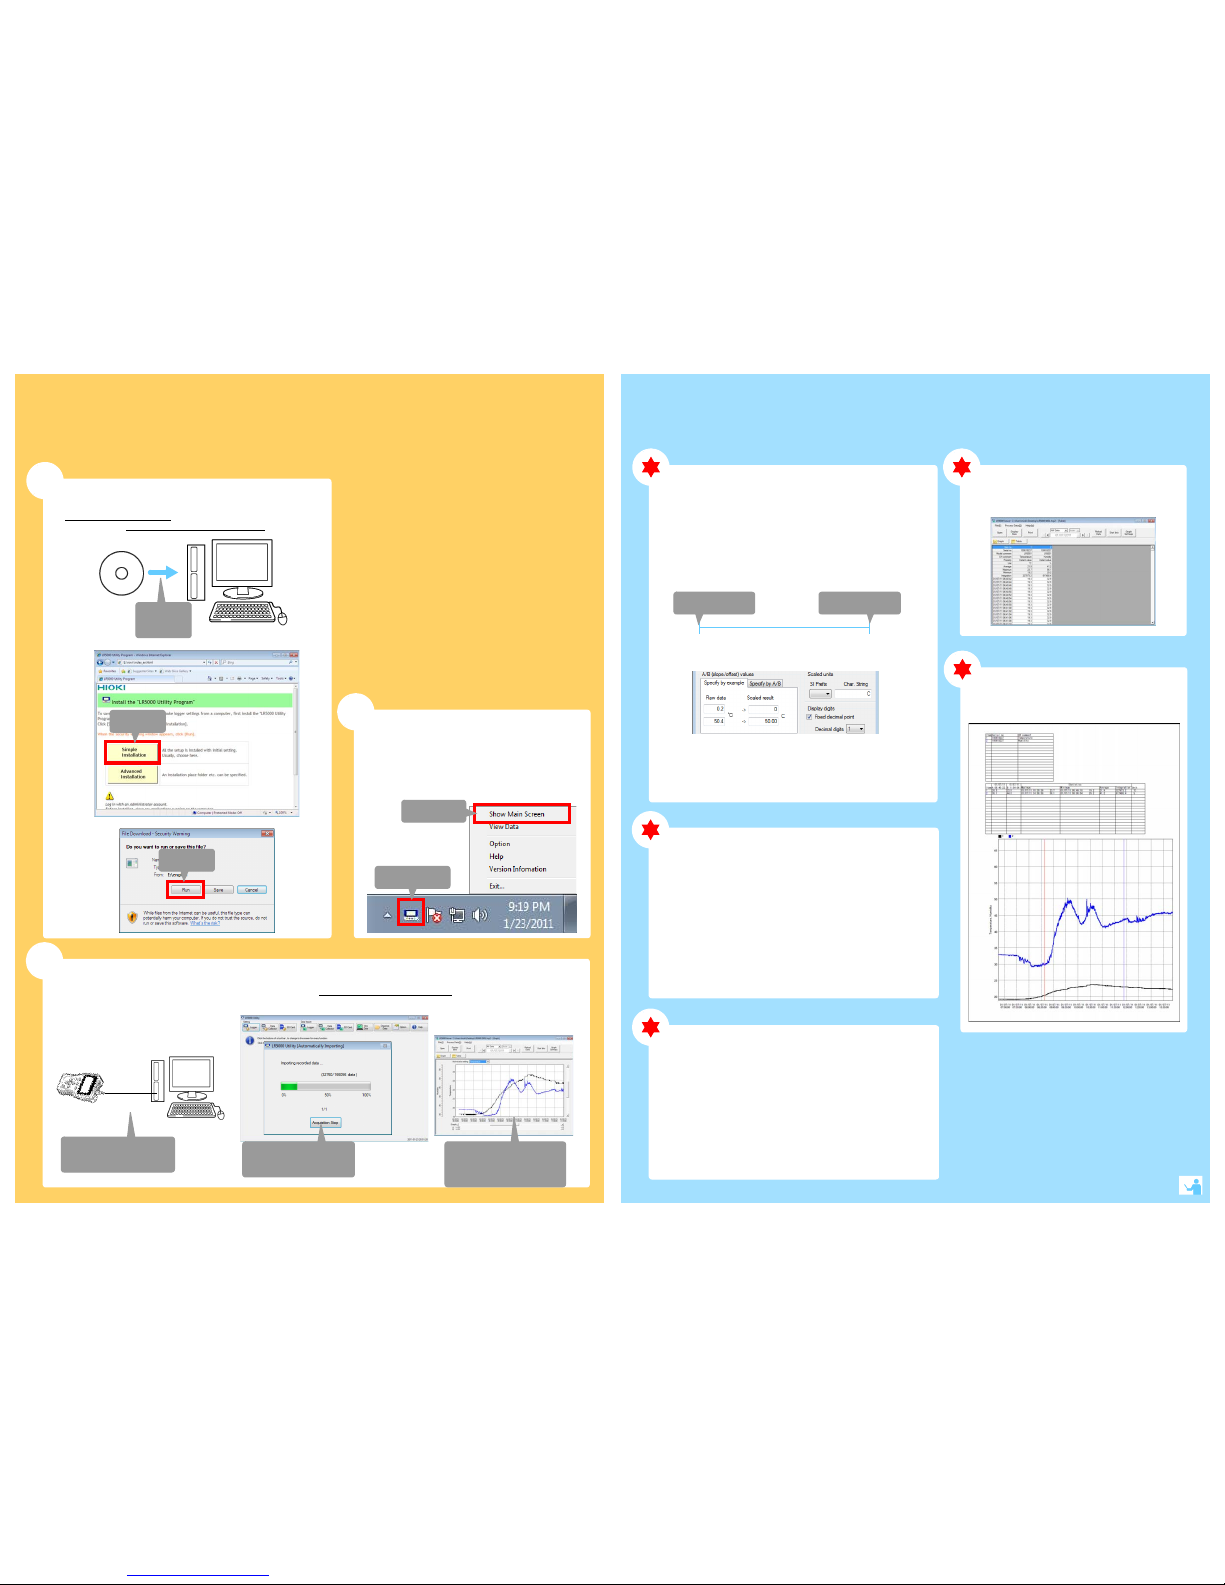
1
Installing the PC Application
Program
1
3
2
Click
Insert the
CD
Click
LR5000 Utility Program Operating Requirements
• CPU 1 GHz or faster processor clock
• RAM At least 512 MB
• OS Windows XP SP2 or later
Windows Vista SP1 or later
Windows 7
• Library .NET Framework 2.0/3.5
• Interface USB
• Monitor Resolution 1024 × 768 or higher
• Hard Disk At least 30 MB free space
(Additional space is required for storing
recorded data. Another 500 MB may be
required if .NET Framework 2.0 or 3.5 is not
yet installed.)
What if the PC Utility program cannot be installed?
• Be sure that the computer meets the above operating require-
ments.
• Carefully read "Installing the PC Application Program" in the
Instruction Manual, and reinstall. Pay special attention to the following items.
1. Be sure to log in using an Administrator account.
2. Before installing, be sure to close any programs running on
the computer.
2
Starting the PC Utility Program
Required Items: Supplied CD
(for Windows XP) Supplied USB cable
From the Windows [Start] menu, select [All Pro-
grams]-[HIOKI]-[LR5000 Utility Software]-[LR5000
Utility] to start the program.
The program starts automatically from the next Windows
logon, and the icon appears in the task tray (notification
area).
2. Click
3
Importing (Saving) Recorded Data to a Computer, and Graph Display
1
Required Items: Supplied USB cable
Connect to the com-
puter via USB cable
2
Data importing
begins automatically
Data is saved to
a file.
3
The viewer starts up
automatically with a
graph displayed
1. Click
PC Utility Program Features
Making Detailed Settings
Displaying Recorded Data
in a Table
Configure settings on the LR5000 "Data Logger" series loggers, and
on the LR5092-20 Data Collector.
The PC utility program can access settings that cannot be accessed
from the logger itself.
For example,
Set recording start/stop method and timing to start and stop
recording automatically at scheduled times (Timer Measurements).
Measurement data can be freely scaled for display (Scaling).
Set upper and lower thresholds so that measurements outside
of the range cause [AL] (Alarm) to appear on the logger
screen (Alarm Judgment).
Add comments to measurement data.
Processing Recorded Data
2010/8/1 9:00 2010/8/3 17:00
Recording Start Recording Stop
Printing Recorded Data
Example Graph Printout
Organizing Recorded Data
Process data imported to the computer.
Freely scale for display (Scaling)
Calculate electric power easily (using clamp logger measurement
values)
Calculate energy cost easily (using clamp logger measurement
values)
Calculate duty cycle
Integration
Calculate dew-point temperature (using temperature/humidity
logger measurement values)
Sort data imported to the computer.
Copy (files between folders)
Move (selected files between folders)
Delete (selected files)
Combine
(multiple recording files into one, and save with new file name)
Extract
(data for a specified period, and save with new file name)
See the Instruction Manual for details.
 Loading...