

Page 1
FREDRICK RAMOND FREDRICK RAMOND FREDRICK RAMOND
Item No. FR42284
replacement parts: K42280WDPENT, R42284GL piezas de recambio: K42280WDPENT, R42284GL pièces de rechange: K42280WDPENT, R42284GL
*** Assembly of this fixture will be accomplished by first preparing the main body
for installation, installing the mounting hardware, hanging the fixture, installing the
glass, and then completing assembly.
SAFETY WARNING: READ WIRING AND GROUNDING INSTRUCTIONS
(I.S. 18) AND ANY ADDITIONAL DIRECTIONS. TURN POWER SUPPLY
OFF DURING INSTALLATION. IF NEW WIRING IS REQUIRED,
CONSULT A QUALIFIED ELECTRICIAN OR LOCAL AUTHORITIES
FOR CODE REQUIREMENTS.
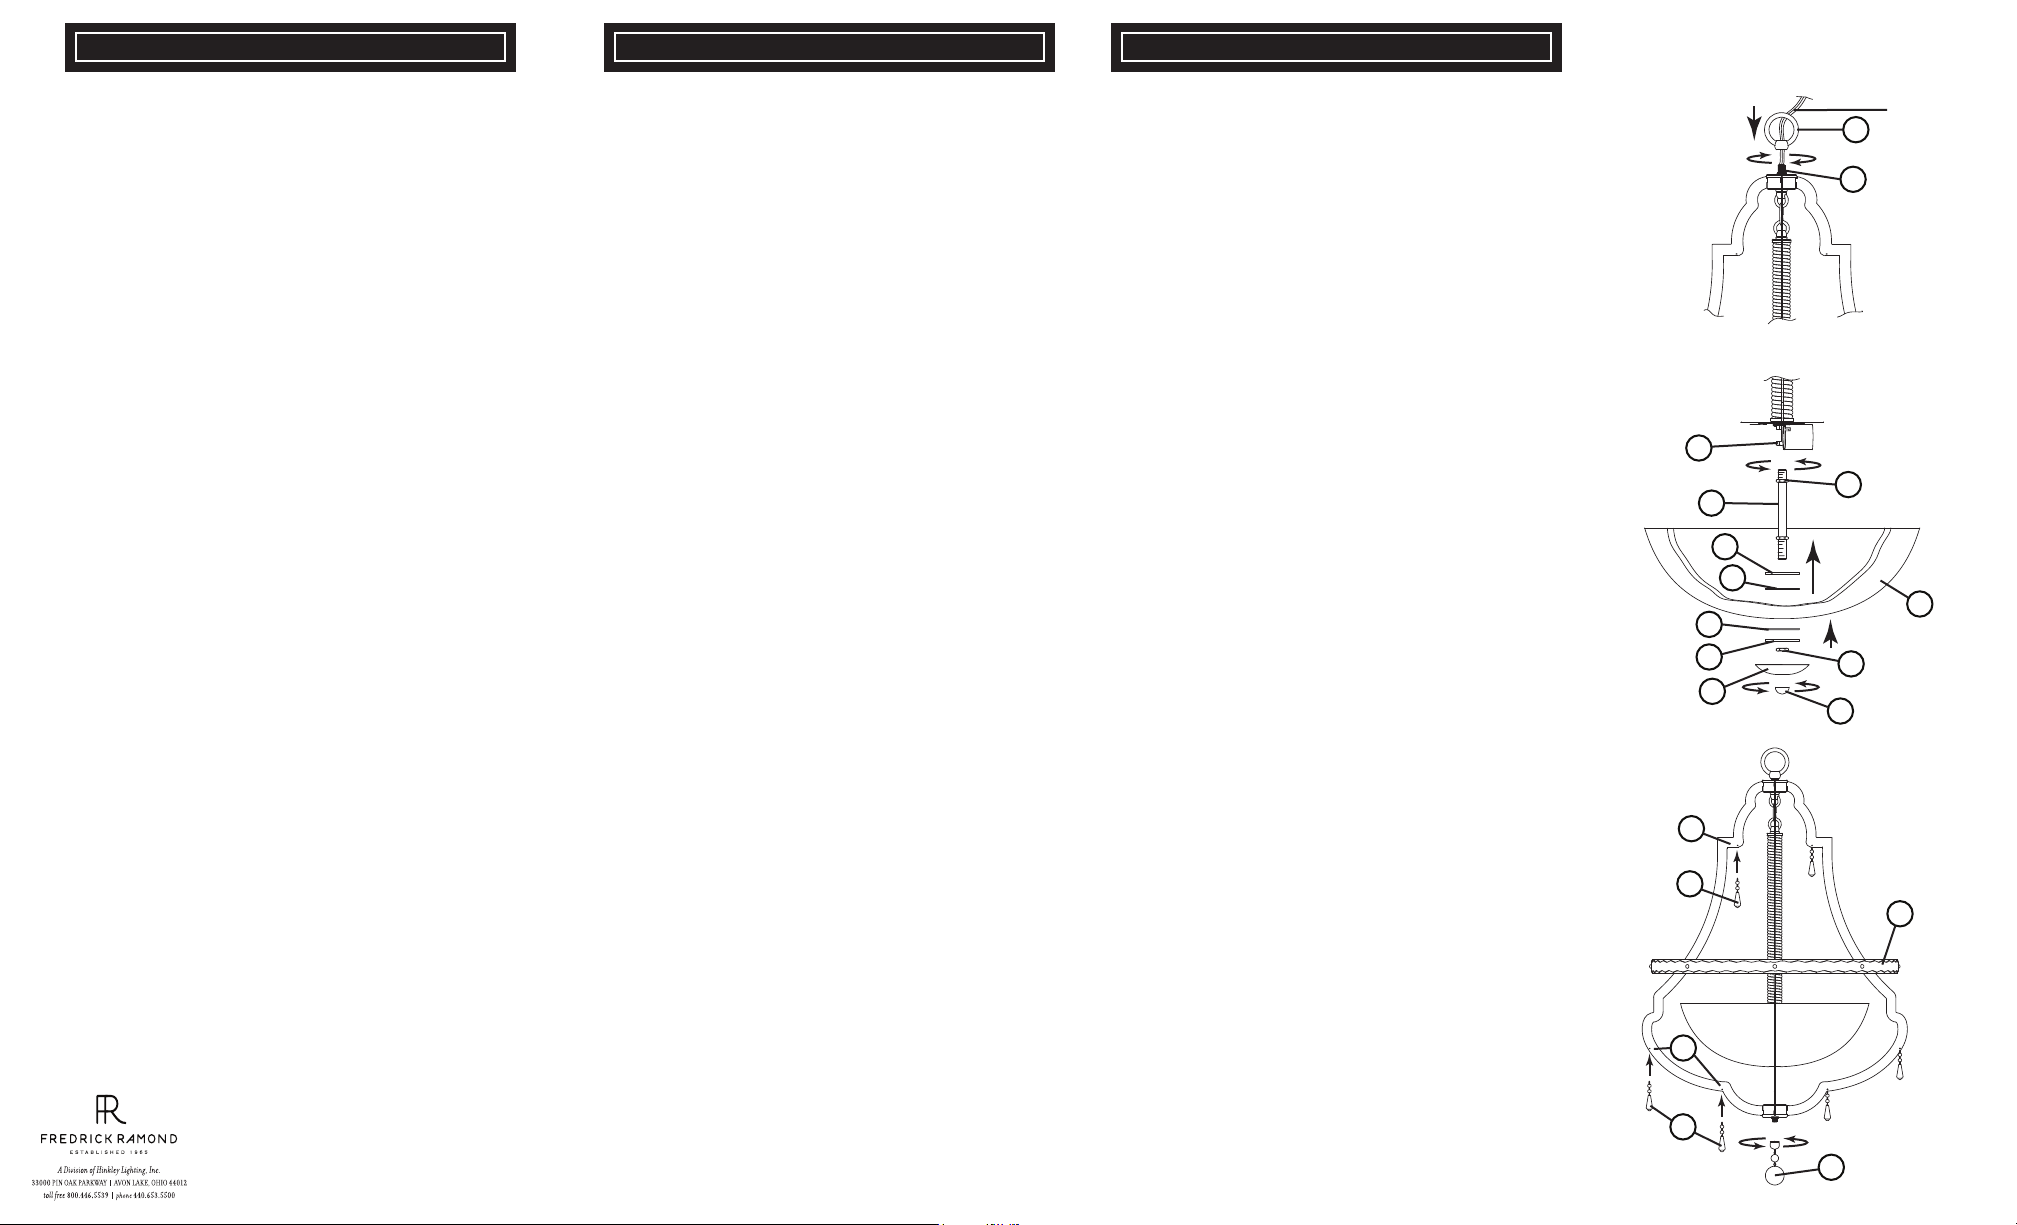
STEP 1
1. Prior to installation the fixture loop (L) must be threaded onto the top of the fixture.
This is accomplished by slipping the loop (L) along the fixture lead wire and
thread it onto, threaded tube (A) on the top of the fixture, and tightening - see
Drawing 1.
2. Fixture is ready for installation. Please read through instruction sheet (FRIS19)
and all additional instructions provided prior to installation.
NOTE: prior to hanging fixture make sure decorative ring (R) is slipped over
main body of fixture. It will be difficult to install after fixture is hung - see
Drawing 3.
3. After fixture is installed please return to this sheet for instructions on how to
complete fixture assembly.
STEP 2
NOTE: fixture can be lamped accordingly prior to installing the glass.
1. Next to install the glass first thread center stem (C) into coupler (B), located in the
center of the socket assembly, approximately 1/2”. Tighten hex nut (H1) on center
stem up against coupler (B) to secure center stem - see Drawing 2.
2. Next slip metal flat washer (W1) onto bottom center stem (C), followed by plastic
washer (P1), hold parts in position while slipping center hole of glass (G) over
center stem (C) and hold in position.
3. Now slip second plastic washer (P2) over center stem (C), followed by second metal
washer (W2). Hold glass and parts in position and thread on hex nut (H2) and
tighten to secure glass to fixture.
4.
To complete glass installation, slip decorative cap (D) onto center stem (C) and
then thread on decorative knob (K), and tighten to secure parts.
STEP 3
1. After glass has been installed decorative ring (R) can be slipped into the proper
position - see Drawing 3.
2. To complete assembly the wood penatalogs (WP) can be attached to the main
fixture body at points (X).
3. Thread bottom finial (BF) onto bottom of fixture.
4. Fixture is complete and power can now be restored.
english spanish
ADVERTENCIA DE SEGURIDAD: INSTRUCCIONES DE CABLEADO
Y CONEXIÓN A TIERRA LEA (I.S. 18), E INSTRUCCIONES ADICIONALES.
CORTAR EL SUMINISTRO ELÉCTRICO DURANTE LA INSTALACIÓN.
SI NUEVO CABLEADO SE REQUIERE, CONSTULT CON UN
ELECTRICISTA O ATUORIDADES LOCALES PARA REQUISITOS DEL
CÓDIGO.
PASO 1
1. Antes de la instalación del bucle de fijación (L) debe ser roscada sobre la
parte superior de la luminaria. esto se logra por el deslizamiento del bucle
(L) a lo largo del alambre de plomo y accesorio roscándola sobre, tubo
roscado (A), en la parte superior de la luminaria, y el endurecimiento
- ver dibujo 1.
2. Fixture está listo para la instalación. Por favor, lea la instrucción shee
(FRIS19) y todas instrucción adicional proporcionada antes de la instalación.
NOTA: antes de colgar el accesorio haga anillo decorativo seguro (R) se
desliza sobre el principal el cuerpo del portalámparas. Será difícil para
instalar después de que se colgó fixture - ver dibujo 3.
3. Después de instalar luminaria por favor regrese a esta hoja para obtener
instrucciones sobre cómo llevar a cabo el montaje del accesorio.
PASO 2
NOTA: fixture puede lamped en consecuencia antes de instalar el vidrio.
1. Siguiente para instalar el vidrio primero vástago central hilo (C) en el
acoplador (B), ubicada en la centro del conjunto de enchufe,
aproximadamente 1/2 ". Apretar la tuerca hexagonal (H1) en el centro
madre contra acoplador (B) para asegurar vástago central - ver dibujo 2.
2. Siguiente deslizamiento de metal arandela plana (W1) en el vástago
inferior central (C), seguido por el plástico arandela (P1), mantener las
piezas en su posición mientras se deslice el agujero central de vidrio (G)
sobre vástago central (C) y mantenga en su posición.
3. Ahora deslizarse segunda arandela de plástico (P2) sobre el vástago
central (C), seguido por segundo metal arandela (W2). Sostenga el vidrio
y las piezas en su posición y enroscar la tuerca hexagonal (H2) y apriete
para asegurar el vidrio al accesorio.
4. Para completar la instalación de vidrio, deslice embellecedor (D) en el
vástago central (C) y luego enrosque la perilla decorativa (K), y apriete
para fijar las piezas.
PASO 3
1. Después de cristal se ha instalado anillo decorativo (R) se puede llevar en
el buen posición - ver dibujo 3.
2. Para completar el montaje de los penatalogs madera (WP) se pueden unir
a la principal cuerpo de la luminaria en los puntos (X).
3. Pase remate inferior (BF) en el fondo del aparato.
4. Fixture está completo y poder ahora se puede restaurar.
Numéro d’article: FR42284 Número del artículo: FR42284
AVERTISSEMENT DE SÉCURITÉ: LIRE RACCORDEMENT ET MISE
À LA TERRE (I.S. 18) ET TOUTE AUTRE INSTRUCTION. COUPER
L'ALIMENTATION ÉLECTRIQUE EN COURS D'INSTALLATION. SI
DE NOUVELLES CÂBLAGE N'EST NÉCESSAIRE, CONSULTEZ
UN ÉLECTRICIEN QUALIFIÉ OU LES AUTORITÉS LOCALES
POUR LES EXIGENCES DE CODE.
ÉTAPE 1
Une. Avant le montage de la boucle de fixation (L) doit être vissé sur la partie
supérieure de l'appareil. ceci est obtenu par le glissement de la boucle (L) le
long du fil de plomb et de fixation vissant sur tube fileté (A), sur le dessus de
l'appareil, et le resserrement - voir schéma 1.
2. Luminaire est prêt pour l'installation. S'il vous plaît lire l'instruction shee
(FRIS19) et toutes les instructions supplémentaires fournies avant
l'installation.
REMARQUE: avant de suspendre l'appareil assurez-vous que l'anneau
décoratif (R) est glissé sur principale le corps du dispositif. Il sera
difficile à installer après luminaire est suspendu - voir schéma 3.
3. Après appareil est installé s'il vous plaît revenir à cette feuille pour obtenir
des instructions sur la façon de termi ner l'assemblage du luminaire.
ÉTAPE 2
REMARQUE: appareil peut être lamped conséquence avant d'installer le
verre.
Une. Suivant pour installer la vitre premier centre de filetage tige (C) dans
le coupleur (B), situé à l' le centre de l'ensemble de douille, d'environ
1/2 ". Serrer l'écrou hexagonal (H1) sur le centre
souches contre coupleur (B) pour fixer la tige centre - voir schéma 2.
2. Suivant glissement métal rondelle plate (W1) dans le fond de la tige
centrale (C), suivie d'une matière plastique rondelle (P1), maintenir les
pièces en position tout en glissant le trou central de verre (G) sur la tige
centrale (C) et le maintenir en position.
3. Maintenant glisser seconde rondelle de plastique (P2) sur le centre tige
(C), suivi par un second métal la rondelle (W2). Tenez verre et des pièces
en position et enfiler l'écrou hexagonal (H2) et serrer pour sécuriser
verre au montage.
4. Pour terminer l'installation de verre, glisser enjoliveur (D) sur la tige
centrale (C) et puis enfilez le bouton décoratif (K), et serrer de fixer
les éléments.
ETAPE 3
Une. Après le verre a été installé anneau décoratif (R) peut être glissé dans le
bon situation - voir schéma 3.
2. Pour terminer l'assemblage des penatalogs de bois (WP) peuvent être
attachés à la principale corps du montage en des points (X).
3. Enfilez fleuron inférieur (BF) sur fond de montage.
4. Luminaire est complète et la puissance peut maintenant être restauré.
french
B
P2
W2
X
WP
X
WP
Drawing 1
Drawing 2
C
W1
P1
D
Drawing 3
FIXTURE
LEAD
WIRE
L
A
H1
G
H2
K
R
BF
 Loading...