

Page 1
Instrucciones De Montaje
Número del artículo: 53350
empezar aquí
1. Busque un lugar claro en el que se puede trabajar.
2. Desembale accesorio de la caja.
3. Revise cuidadosamente la Instrucciones antes del montaje.
*** La construcción de este dispositivo se logra mediante el montaje de
la primera correa de montaje a la caja de conexiones, por lo que todas
las conexions eléctricas necesarias, el montaje del cuerpo principal del
dispositivo de fijación, el accesorio de montaje a la pared y luego
instalar el cristal.
trasera (B) retirando los cuatro tornillos de cabeza plana (C) –
Véase la Figura 1.
1. Retire la placa principal de montaje (A) de la placa de fijación
2. Deslice los cables de la caja de conexiones, a través del agujero
central más grande, hacienda ranuras curvadas seguro (D) se
alinean con los orificios roscados (E) en la caja de conexiones.
(A) a la caja de conexiones, por lo que parte de la placa de
3. El uso de dos tornillos de 8-32 (F) fijar la placa de montaje principal
montaje (A) es la plaza hasta el techo.
INSTALACIÓN. SI SE REQUIERE NUEVO CABLEADO, CONSULTE CON
CABLEADO Y LA TIERRA (I.S.18), E INSTRUCCIONES ADICIONALES.
APAUGE LA ALIMENTACIÓN DE CORRIENTE DURANTE LA
ADVERTENCIA DE SEGURIDAD: LE LAS INSTRUCCIONES DE
UN ELECTRICISTA O AUTHORIDADES LOCALES PARA REQUISTOS
DEL CÓDIGO.
Effectuez les connexions électriques du cable d’alimentation à fils de
connexion du projecteur. Reportez-vous à la feuille d’instruction (I.S.
18) et suivez toutes les instructions pour effectuer tous les
branchements nécessaires.
1. Monte el aparato deslizando la placa de montaje (B) sobre la placa
de montaje (A) – Véase la Figura 1.
(C).
2. Fije la placa posterior (B) a la placa de montaje (A) con los tornillos
1. Pour retirer le connecteur anneau de verre installation (3) de la
douille (1).
2. À bague d'amortissement (R) sur la douille (2).
3. Slip verre (1) sur la douille (2). Note: extrémité ouverte du
verre peut être orienté vers le haut, vers le bas ou à côté. Tenez verre
en postion.
4. Bague filetée de la prise (3) sur la douille (2) et serrer jusqu'à ce que
confortable.
5. Fixture peut être lamped en conséquence à ce moment.
6. Après lamping bouclier ampoule de fil (4) sur la douille (2).
commencez ici
Les Instructions D’assemblage
Numéro d’article: 53350
1. Trouvez un espave libre dans lequel vous pouvez travailler.
2. Déballlez appareil de la boîte.
3. Examinez attentivement les instructions avant le montage.
junction box, making sure side of mounting plate (A) is square to
fixation (B) en retirant les quatre vis à tête plate (C) – Voir Schéma
1.
centre, faisant que les fentes courbes (D) s’alignent avec les trous
*** La construction de ce dispositif sera réalisé selon la première de
montage de la bride de montage de la boîte de jonction, toutes les
connexions électriques nécessaires, l’assemblage du corps principal du
dispositif de fixation, le montage de la fixation à la paroi, puis
l’installation du verre.
1. Retirer la plaque de montage principal (A) de la plaque arrière de
taraud’es
2. Glissez les fils de la boîte de junction, à travers le grand trou au
ceiling.
3. Using two 8-32 screws (f) attach the main mounting plate (A) to the
MISE (I.S.18), ET TOUTE AUTRE INSTRUCTION. COUPER
AVERTISSEMENT DE SECURITE: LIRE CABLAGE ET INSTRUCTIONS DE
CODE.
L’ALIMENTATION ELECTRIQUE PENDANT L’INSTALLATION. SI DE
NOUVELLES CABLAGE N’EST NECESSAIRE, CONSULTEZ UN
ELECTRICIEN QUALIFIE OU AUTORITES LOCALES POUR EXIGENCES DU
branchements nécessaires.
Effectuez les connexions électriques du cable d’alimentation à fils de
connexion du projecteur. Reportez-vous à la feuille d’instruction
(I.S. 18) et suivez toutes les instructions pour effectuer tous les
plaque de montage (A) – Voir Schéma 1.
1. Monter le dispositif en faisant glisser la plaque arrière (B) sur la
(C).
2. Fixer la plaque arrière (B) à la plaque de montage (A) à l’aide des vis
1. Para instalar vidrio quitar el anillo conector (3) del casquillo (1).
2. Deslice el anillo de amortiguación (R) a través de socket (2).
3. Resbalón de vidrio (1) más de socket (2). Nota: El extremo abierto de
vidrio puede ser orientado hacia arriba, hacia abajo o hacia los lados.
Mantenga vidrio postion.
4. Anillo de rosca hembra (3) en el conector (2) y apriete hasta que
estén ajustados.
5. Accesorio se puede lamped en consecuencia en este momento.
6. Después lamping hilo bombilla escudo (4) en el conector (2).
H I N K L E Y L I G H T I N G 33000 Pin Oak Parkway Avon Lake, OH 44012 800.446.5539 / 440.653.5500 hinkleylighting.com
Assembly Instructions
start here
1. Find a clear area in which you can work.
2. Unpack fixture from carton.
Item No. 53350
3. Carefully review instructions prior to assembly.
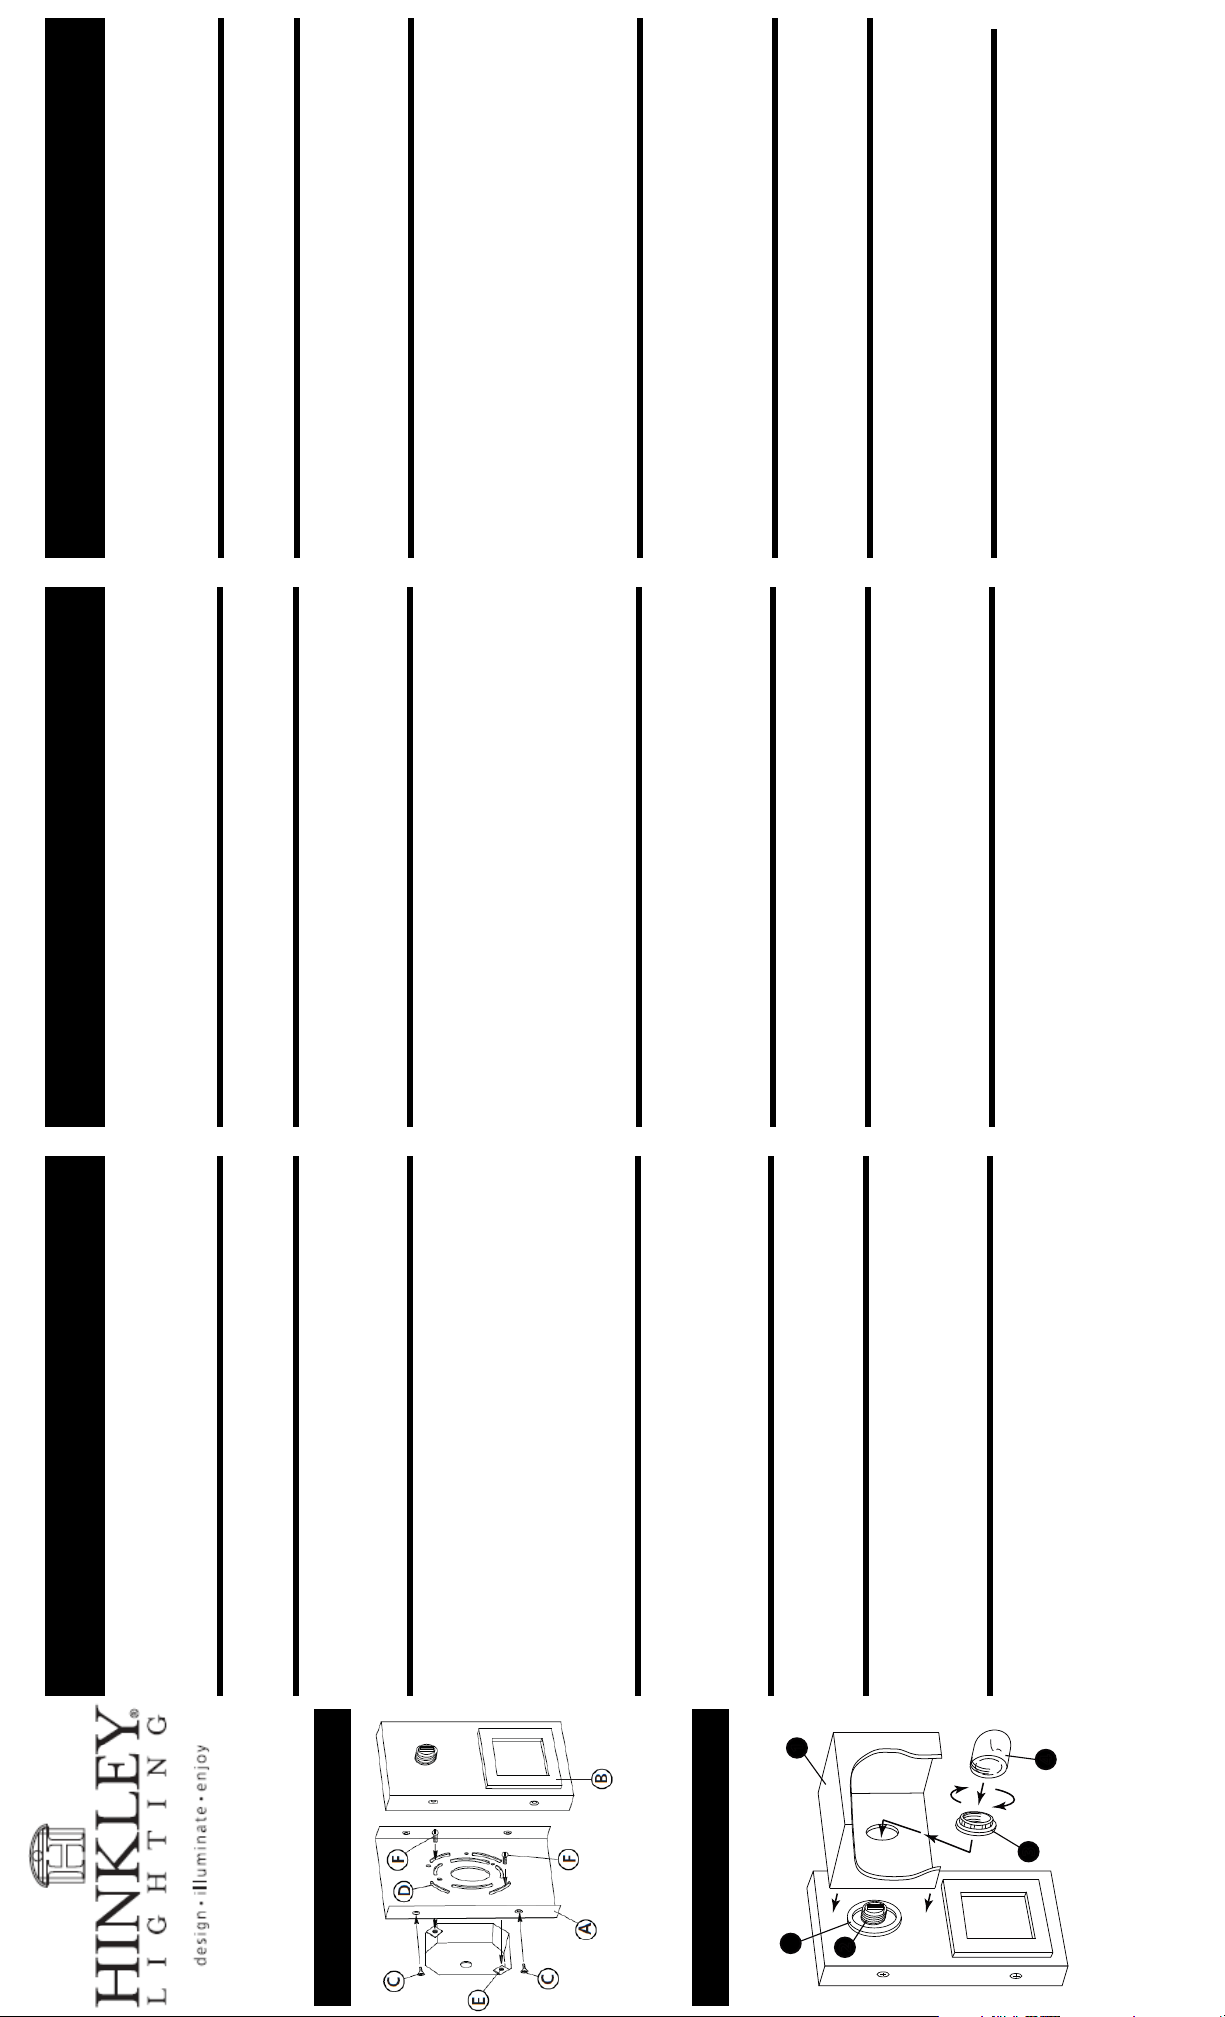
*** The construction of this fixture will be accomplished by first
mounting the mounting strap to the junction box, making all necessary
Fixture Mounting
Drawing 1
electrical connections, assembling the main body of the fixture,
mounting the fixture to the wall and then installing the glass.
making sure curved slots (D) line up with the threaded holes (E) in
the junction box.
junction box, making sure side of mounting plate (A) is square to
removing the four flat head screws (C) – see Drawing 1.
2. Slide the wires from the junction box, through the large center hole,
1. Remove the main mounting plate (A) from fixture back plate (B) by
ceiling.
3. Using two 8-32 screws (f) attach the main mounting plate (A) to the
SAFTEY WARNING: READ WIRING AND GROUND INSTRUIONS (I.S.18)
REQUIREMENTS.
AND ANY ADDITIONAL DIRECTIONS. TURN POWER SUPPLY OFF
DURING INSTALLATION. IF NEW WIRING IS REQUIRED, CONSULT A
Glass Installation
Drawing 2
QUALIFIED ELECTRICIAN OR LOCAL AUTHORITIES FOR CODE
Refer to instruction sheet (I.S. 18) and follow all instructions to
make all necessary wiring connections.
Make electrical connections from supply wire to fixture lead wires.
1
R
2
1. Mount the fixture by sliding the back plate (B) over mounting plate
(C).
(A) – see Drawing 1.
2. Attach the back plate (B) to the mounting plate (A) using the screws
1. To install glass remove socket ring (3) from socket (1).
3
4. Thread socket ring (3) onto socket (2) and tighten until snug.
5. Fixture can be lamped accordingly at this time.
2. Slip cushion ring (R) over socket (2).
3. Slip glass (1) over socket (2). Note: open end of glass can be oriented
4
6. After lamping thread bulb shield (4) onto socket (2).
up, down or to either side. Hold glass in postion.
 Loading...