

Page 1
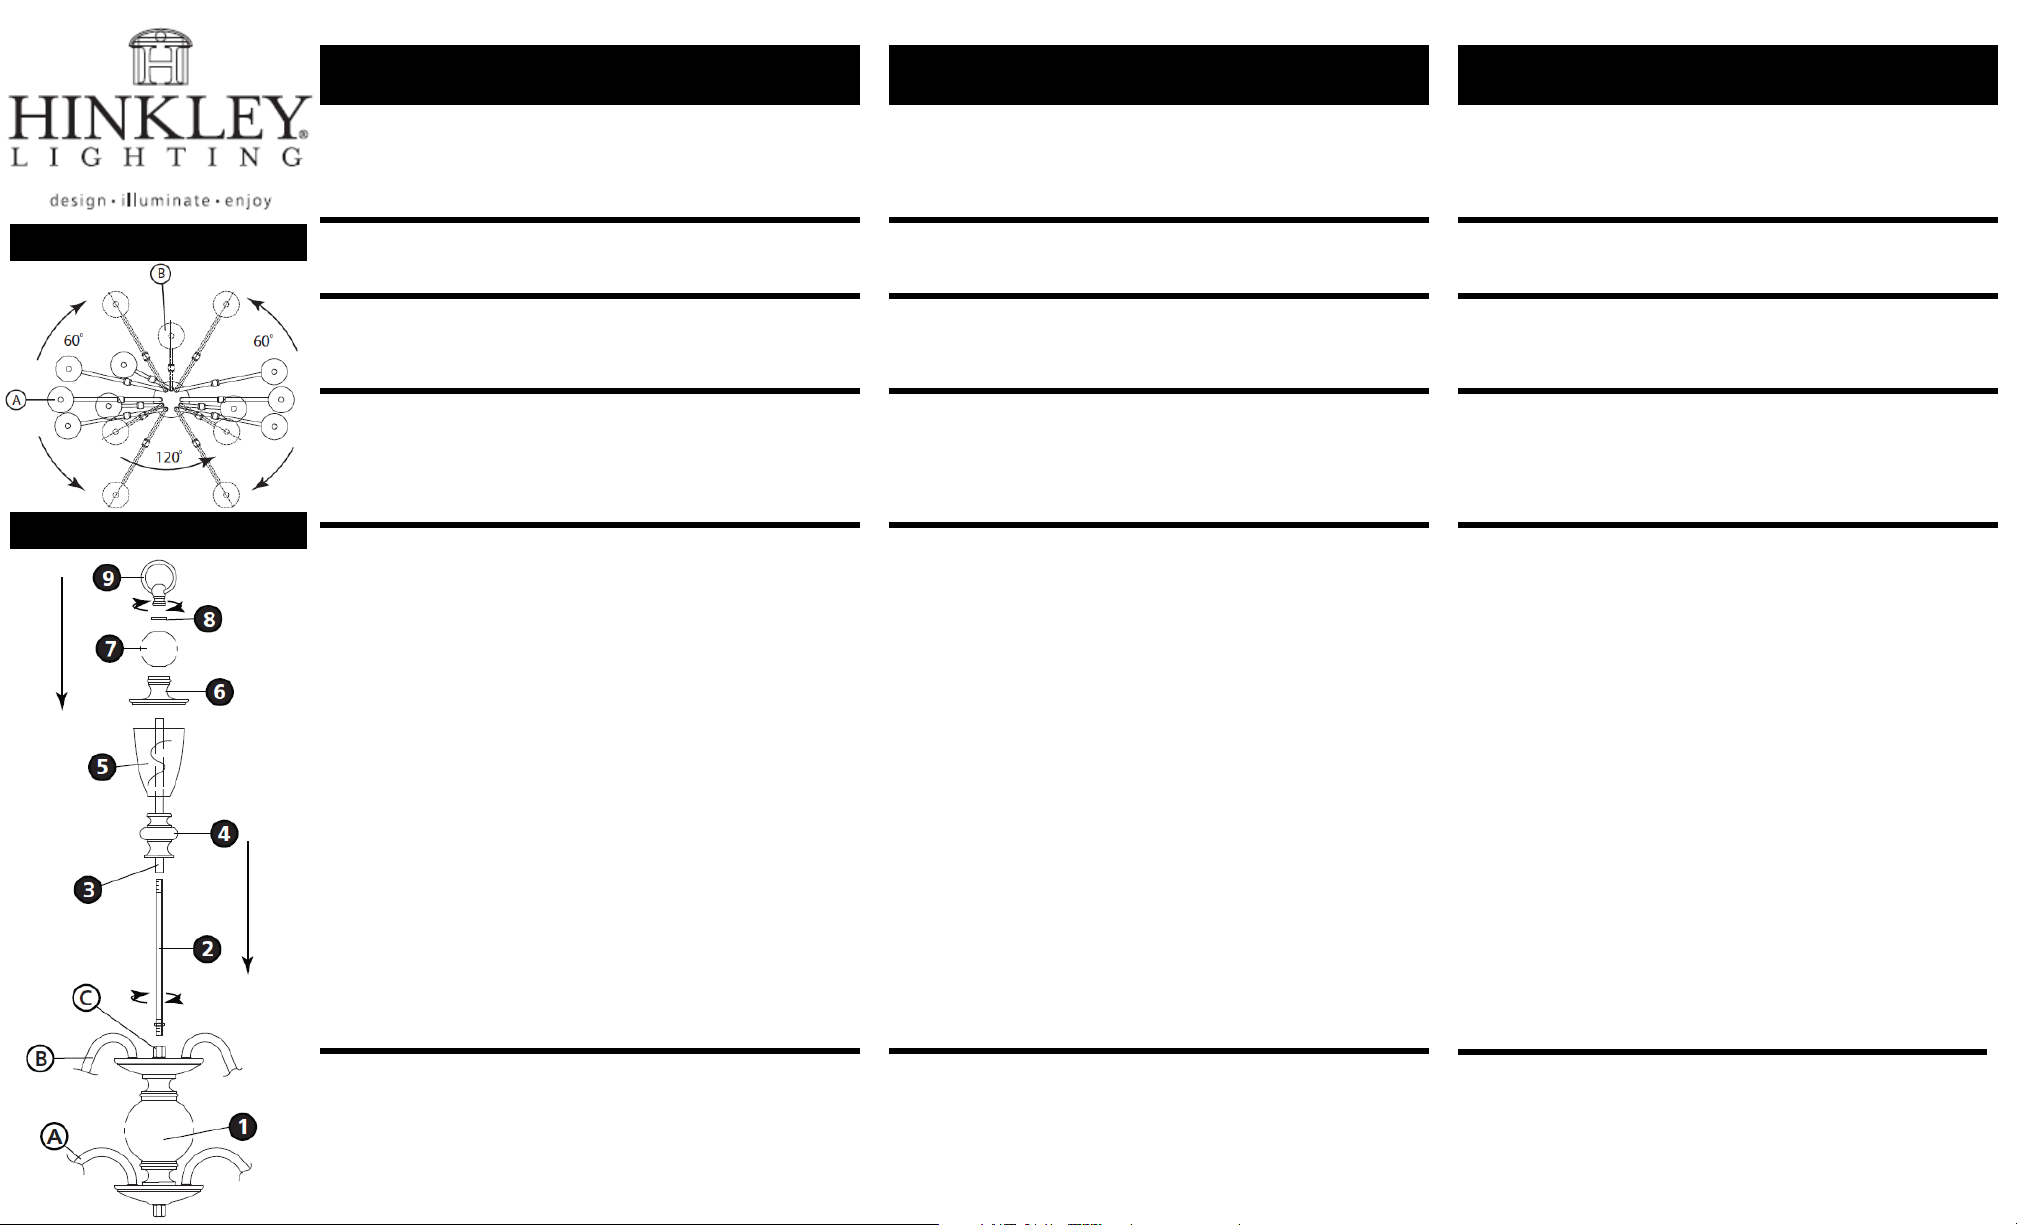
Drawing 1 – Arm Assembly
Drawing 2 – Fixture Assembly
Item No. 4958 / Page 1
start here
1. Find a clear area in which you can work.
2. Unpack fixture from carton.
3. Carefully review instructions prior to assembly.
*** The construction of this fixture will be accomplished by first
assembling the main body, installing the mounting hardware, making
all necessary electrical connections, hanging the fixture from the
ceiling and then installing the fixture shades.
SAFTEY WARNING: READ WIRING AND GROUND INSTRUIONS (I.S.18)
AND ANY ADDITIONAL DIRECTIONS. TURN POWER SUPPLY OFF
DURING INSTALLATION. IF NEW WIRING IS REQUIRED, CONSULT A
QUALIFIED ELECTRICIAN OR LOCAL AUTHORITIES FOR CODE
REQUIREMENTS.
1. To assemble fixture, first spread the six lower arms (A) apart until
they are equally spaced 60 degrees apart, next rotate the upper
three arms (B) until they are equally spaced 120 degrees apart and
evenly spaced between two lower arms.
2. Slip center tube (2) along fixture supply wire and thread into
coupler (C) approximately ½”. Tighten hex nut (H) on center tube
against coupler (C) to lock center tube in place.
3. Now slip polished outside tube (3) over center tube (2).
4. Next slip decorative break (4) over polished tube (3) being careful
not to scratch the finish.
5. Slip large crystal center column (5) over polished tube until it rest on
top of decorative break (4).
6. Slip decorative cap (6) over polished tube (3) until it rests on top of
crystal center column (5).
7. Slip crystal ball (7) along wire and over polished tube (3), this is
followed by small check ring (8).
8. To complete center column assembly slip loop (9) along wire and
thread onto exposed threaded end of center tube (2) installed
earlier and tighten.
To continue assembly of this fixture see page 2 of the instructions
H I N K L E Y L I G H T I N G 33000 Pin Oak Parkway Avon Lake, OH 44012 800.446.5539 / 440.653.5500 hinkleylighting.com
Assembly Instructions
Les Instructions D’assemblage
Numéro d’article: 4958 / Page 1
commencez ici
1. Trouvez un espave libre dans lequel vous pouvez travailler.
2. Déballlez appareil de la boîte.
3. Examinez attentivement les instructions avant le montage.
*** La construction de cet appareil sera réalisé par l’assemblage de la
première partie principale, l’installation du matériel de montage, ce
qui rend toutes les connexions électriques nécessaires, le luminaire
suspendu au plafond et ensuite installer les nuances de fixation.
AVERTISSEMENT DE SECURITE: LIRE CABLAGE ET INSTRUCTIONS DE
MISE (I.S.18), ET TOUTE AUTRE INSTRUCTION. COUPER
L’ALIMENTATION ELECTRIQUE PENDANT L’ONSTALLATION. SI DE
NOUVELLES CABLAGE N’EST NECESSAIRE, CONSULTEZ UN
ELECTRICIEN QUALIFIE OU AUTORITES LOCALES POUR EXIGENCES DU
CODE.
1. Pour assembler luminaire, premier diffuser les six bras inférieurs (A)
en dehors jusqu’à ce qu’ils soient également espacés de 60 degrés
dehors, à côté tourner les trois bras supérieur (B) jusqu’à ce qu’ils
soient également espacées de 120 degrés et régulièrement espacées
entre deux bras inférieurs.
2. Slip tube central (2) le log du fil d’alimentation du luminaire et du
fil dans le coupleur (C) d’environ 12.7 mm. Serrer l’écrou hexagonal
(H) sur le tube de centre contre coupleur (C) pour verrouiller tube
central en place.
3. Maintenant glisser poli à l’exérieur tube (3) sur le tube central (2).
4. Glissez prochaine pause décoratif (4) sur le tube poli (3) en prenant
soin de ne pas égratigner le fini.
5. Glissez grande colonne centrale en cristal (5) sur le tube poli jusqu’à
ce qu’il repose sur le dessus de pause décoratif (4).
6. Glissez capuchin decorative (6) sur le tube poli (3) jusqu’à ce qu’il
repose sur le dessus de la colonne centrale en cristal (5).
7. Slip boule de cristal (7) le long du fil et sure le tube poli (3), il est
suivi par la petite bague de contrôle (8).
8. Pour completer la colonne centrale assemblage boucle de glissement
(9) le long du fil et du fil sur l’extrémité filetée exposée du tube
central (2) installé précédemment et serrer.
Pour poursuivre l’assemblage de cet accessoire voir page 2 des instructions
Instrucciones De Montaje
Número del artículo: 4958 / Página 1
empezar aquí
1. Busque un lugar claro en el que se puede trabajar.
2. Desembale accesorio de la caja.
3. Revise cuidadosamente la Instrucciones antes del montaje.
*** La construcción de este aparato se llevará a cabo, en primer lugar
el montaje del cuerpo principal, la instalación de las piezas de montaje,
por lo que todas las conexiones eléctricas necesarias, que cuelga la
lámpara del techo y luego instalar los tonos accesorio.
ADVERTENCIA DE SEGURIDAD: LE LAS INSTRUCCIONES DE
CABLEADO Y LA TIERRA (I.S.18), E INSTRUCCIONES ADICIONALES.
APAUGE LA ALIMENTACIÓN DE CORRIENTE DURANTE LA
INSTALACIÓN. SI SE REQUIERE NUEVO CABLEADO, CONSULTE CON
UN ELECTRICISTA O AUTHORIDADES LOCALES PARA REQUISTOS
DEL CÓDIGO.
1. Para el montaje de a ccesorio, se extendió primero los seis brazos
inferiores (A) de separación hasta que están igualmente espaciadas
60 grados de distancia, junto girar los tres brazos superiores (B) hasta
que están igualmente espaciados 120 grados de separación y
espaciados de manera uniforme entre los dos brazos inferiores.
2. Deslice tubo central (2) a lo largo de cable de alimentación accesorio
y el hilo en el acoplador (C) aproximadamente 12.7 mm. Apretar la
tuerca hexagonal (H) en el tubo central contra acoplador (C) para
fijar el tubo central en su lugar.
3. Sacar hacia fuera del tubo pulido (3) sobre el tubo central (2).
4. Siguiente deslizamiento descanso decorative (4) sobre el tubo pulido
(3) con cuidado de no rayar el acabado.
5. Deslice la columna central de cristal de gran tamaño (5) sobre el tubo
puido hasta que descanse en la parte superior de las cavaviones de
decoración (4).
6. Deslice la tapa decorative (6) sobre el tubo pulido (3) hasta que
descanse en la parte superior de la columna de centro de cristal (5).
7. Deslice la bola de cristal (7) a lo largo del alambre y sobre el tubo
pulido (3), esto es seguido por el anillo de control pequeñas (8).
8. Para completer la columna central circular de deslizamiento de
montaje (9) a lo largo del alambre e hilo sobre el extremo roscado
expuesta del tubo central (2) instalado anteriormente y apriete.
Para continuar con el montaje de este accesorio ver página 2 de las
instrucciones
Page 2
–
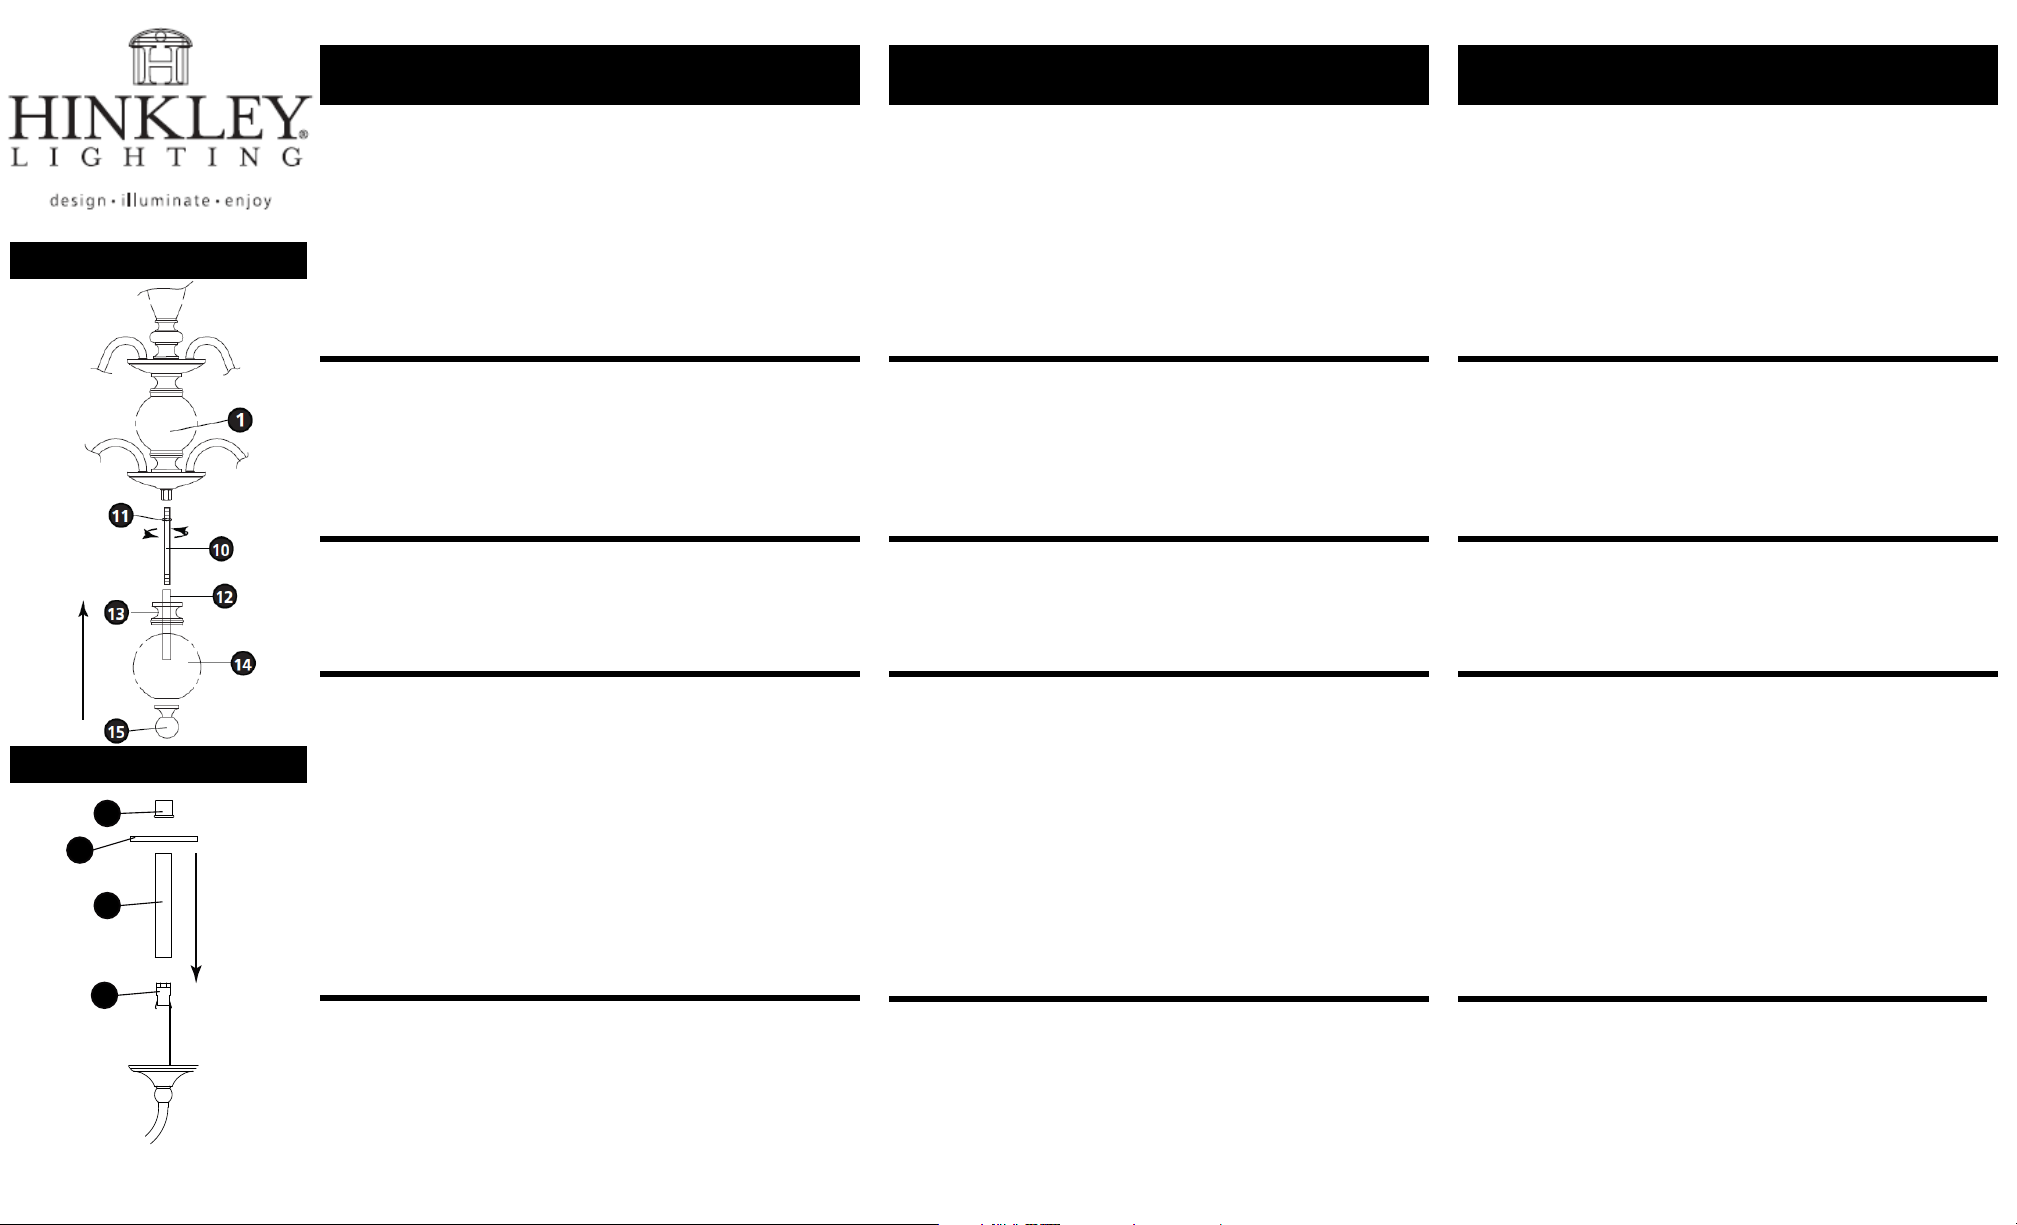
Drawing 1 – Bottom Assembly
Drawing 2
18
Socket Assembly
19
17
16
Item No. 4958 / Page 2
Assembly Instructions
1. The fixture at this point can be mounted to the ceiling. Please
follow instruction sheet (I.S. 19-50) provided. Please read through
the instructions prior to starting installation and observe all
warning.
2. After fixture is installed please return to this portion of the
instruction sheet to continue assembly and observe all warnings.
SAFTEY WARNING: READ WIRING AND GROUND INSTRUIONS (I.S.18)
AND ANY ADDITIONAL DIRECTIONS. TURN POWER SUPPLY OFF
DURING INSTALLATION. IF NEW WIRING IS REQUIRED, CONSULT A
QUALIFIED ELECTRICIAN OR LOCAL AUTHORITIES FOR CODE
REQUIREMENTS.
1. To construct bottom assembly of the fixture, first thread center tube
(10) into coupler (C), located at the bottom of the main body
assembly (1), approximately ½”.
2. Next use hexnut (11) and tighten it against coupler (C) to lock
center tube (10) in place.
3. Slip polished tube (12) over center tube (11) and hold in position.
4. Slip decorative break (13) over center tube and hold in position.
5. Slip large crystal ball (14) over polished tube and hold part in
position while threading on decorative final (15). Tighten to secure
bottom assembly.
1. After fixture is mounted to wall, slip candle sleeve (17) (16)
2. Next slip bobesche cover (18) over candle sleeve (17) lip edge down.
3. Then slip candle chaser (19) over candle sleeve (17).
4. Fixture can now be lamped accordingly.
start here
H I N K L E Y L I G H T I N G 33000 Pin Oak Parkway Avon Lake, OH 44012 800.446.5539 / 440.653.5500 hinkleylighting.com
over socket
Les Instructions D’assemblage
Numéro d’article: 4958 / Page 2
1. La fixation à ce point peut être monté au plafond. S’il vous plait
suivez feuille d’instruction (I.S. 19-50) fourni. S’il vous plaît lire les
instructions avant de commencer l’installation et observer tous les
avertissements.
2. Après appareil est installé s’il vous plait retour à cette partie de la
feuille d’instruction pour suivre l’assemblage et respecter tous les
avertissements.
AVERTISSEMENT DE SECURITE: LIRE CABLAGE ET INSTRUCTIONS DE
MISE (I.S.18), ET TOUTE AUTRE INSTRUCTION. COUPER
L’ALIMENTATION ELECTRIQUE PENDANT L’ONSTALLATION. SI DE
NOUVELLES CABLAGE N’EST NECESSAIRE, CONSULTEZ UN
ELECTRICIEN QUALIFIE OU AUTORITES LOCALES POUR EXIGENCES DU
CODE.
1. Pour construire l’assemblage fond de l’appareil, le premier tube
central de fil (10) dans le coupleur (C), situé à la partie inférieure de
l’assemblage de corps principal (1), à environ 12.7 mm.
2. Ensuite, utilisez hexnut (11) et le serer contre coupleur (C) pour
verrouiller tube central (10) en place.
3. Glissez le tube poli (12) sur le tube central (11) et le maintenir en
position.
4. Glissez pause decorative (13) sur le tube central et maintenir en
position.
5. Glissez grande boule de cristal (14) sur le tube poli et détenir une
partie en poition pendant le vissage sur décoratif final (15). Serrez
pour fixer l’assemblage de fond.
1. Después aparato está montado en la pared, deslice la manga
de vela (17) sobre el zócalo (16).
2. Siguiente cubreobjetos bobesche (18) sobre el manguito de
vela (17) del borde del labio hacia abajo.
3. Luego deslice cazador vela (19) sobre el manguito vela
4. Aparato ahora se puede lamped en consecuencia.
commencez ici
Instrucciones De Montaje
Número del artículo: 4958 / Página 2
1. La fijación, en este punto se puede montar en el techo. Por Favor,
siga la hoja de instrucciones (I.S. 19-50) proporcionado. Lea
atentamente las instrucciones antes de la instalación inicial y
observar todas las advertencias.
2. Después de instalar luminaria por favor regrese a esta parte de la
hoja de instrucciones para continuar el montaje y siga todas las
advertencies.
ADVERTENCIA DE SEGURIDAD: LE LAS INSTRUCCIONES DE
CABLEADO Y LA TIERRA (I.S.18), E INSTRUCCIONES ADICIONALES.
APAUGE LA ALIMENTACIÓN DE CORRIENTE DURANTE LA
INSTALACIÓN. SI SE REQUIERE NUEVO CABLEADO, CONSULTE CON
UN ELECTRICISTA O AUTHORIDADES LOCALES PARA REQUISTOS
DEL CÓDIGO.
1. Para construer el conjunto de fondo de la luminaria, primero tubo
de centro de rosca (10) en el acoplador (C), situado en la parte
inferior del conjunto del cuerpo principal (1), aproximadamente
12.7 mm.
2. Utilización siguiente hexnut (11) y apretarlo contra el acoplador
(C) para fijar el tubo central (10) en su lugar.
3. Deslice tubo pulido (12) sobre el tubo central (11) y mantenerlo en
su posición.
4. Deslice descanso decorative (13) sobre el tubo central y mantenga
en su posición.
5. Deslice gran bola de cristal (14) sobre el tubo pulido y mantenga
parte en la posición mientras se enrosca en definitiva (15). Apriete
a asegurar el conjunto inferior.
1. Après fixation est montée au mur, glisser douille de bougie (17)
sur la douille (16).
2. Suivant bobesche glissement couvercle (18) sur le manchon de la
bougie (17) bord de la lèvre vers le bas.
3. Faites ensuite glisser chasseur de bougie (19) sur le manchon de
bougie (17).
4. Fixture peut maintenant être lamped conséquence.
empezar aquí
Page 3

Drawing 1 – Fixture Assembly
Drawing 2 – Installation Example
I.S.19-50
Hanging instructions for fixtures that weigh more than 50lbs
start here
1. Shut off electrical current before starting. If the fixture you are replacing
is turned on and off by a wall switch, simply turn the switch off. If not,
remove the appropriate fuse (or open the circuit breakers) until the
fixture is dead.
• DO NOT RESTORE CURRENT – EITHER BY FUSE, BREAKER, OR
SWITCH – UNTIL THE NEW FIXTURE IS COMPLETELY WIRED AND
IN PLACE.
2. Supply wires shall enter the outlet box (A) through any knockout except
the top center knockout – see Drawing 1.
1. Fixture is to be mounted by a 3/8 steel pipe with 3/8 – 18 NPSM thread,
¾” threads at both ends (not supplied). Pipe should be anchored to
structure or bridging member with sufficient strength to support 4 times
the fixtures weight – see Drawing 2.
2. Adjust pipe so ½” of 3/8 steel pipe extends into the junction box, at the
center knock out.
3. Please refer to the back of this sheet to the safety cable installation
instructions and ONLY complete steps 1 and 2 at this time.
1. Thread pipe coupler (B) onto protruding pipe inside outlet box. Secure in
place by tightening allen head screw (C) – see Drawing 1.
2. Thread hexnut (D) onto thread nipple (E). Thread nipple (E) into coupler
(B). Secure in place by tightening hexnut (D) against coupler (B) and then
tightening allen screw (F).
3. Thread hexnut (G) onto nipple (E). Slip ground wire lip (H) over nipple (E)
and thread hexnut (J) onto nipple (E). DO NOT tighten hexnuts (G) and
(J) at this time.
4. Thread screw collar loop (K). Adjust loop height so the half of the exterior
thread on screw collar loop (K) is exposed when canopy (L) is held up to
the ceiling.
1. Determine length of chain you will require. Attach one end of length of
chain to fixture.
2. Slip threaded ring (M) and canopy (L) onto chain – see Drawing 1.
3. Attach fixture with chain to screw collar loop (K). Please get assistance,
weight and size of fixture is difficult to manage alone.
4. Weave ground wire, supply wire, and safety cable through chain, up
through center of screw collar loop (K), through center of nipple (E), and
out the opening on the side of coupler (B).
5. Please refer back to safety cable installation instructions on the back of
this sheet and complete step 4.
hanging instructions
I.S.19-50 instructions suspendues
Instructions suspendues pour les appareils qui pèsent plus de 23kgs
commencez ici
1. Couper le courant électrique avant de commencer. Si l’appareil vous
remplacez est activé et désactivé par un interrupteur mural, il suffit de
tourner l’interrupteur. Sinon, retirez le fusible approprié (ou ouvrez les
disjoncteurs) jusqu’à ce que l’appareil est mort.
• NE PAS RESTORATION EN COURS – SOIT PAR FUSE, COUPE OU
SWITCH – TANT QUE LE NOUVEAU LUMINAIRE EST ENTIEREMENT
CABLE ET EN PLACE.
2. Fils d’alimentation doivent entrer dans la boîte de sortie (A) à travers un
KO à l’exception de la partie centrale supérieure KO – Voir Schéma 1.
1. Luminaire doit être monté par un tuyau de 3/8 en acier avec 3/8-18
NPSM, fils 19.05 mm aux deux extrémités (non fourni). Tuyau doit être
ancrée à la structure ou organe de liaison avec une résistance suffisante
pour supporter 4 fois le poids des appareils – Voir Schéma 2.
2. Réglez tuyau afin de 12.7 mm 3/8 tuyau d’acier s’étend dans la boîte de
jonction, au centre assommer.
3. S’il vous plait se referrer au verso de cette feuille pour les consignes de
sécurité des cables d’installation et seulement les étapes 1 et 2 en ce
moment.
1. Coupleur de tuyau de fil (B) sur saillant tuyau intérieur de la boîte de
sortie. Fixez en place en serrant la vis à tête hexagonale (C) – Voir
Schéma 1.
2. Hexnut de filetage (D) sur le mamelon fileté (E) dans le coupleur (B).
Fixez en place en serrant hexnut (D) contre coupleur (B) puis en serrant la
vis allen (F).
3. Discussion hexnut (G) sur le mamelon (E). Slip lèvre de fil de masse (M)
par rapport à mamelon (E). NE PAS serrer écrous hexagonaux (G) et (J) à
ce moment.
4. Filetage boucle de collier (K). Réglez la hauteur de la boucle de sorte que
la moitié du filetage extérieur de la vis boucle de collier (K) est exposée
lors de canopée (L) est maintenu jusqu’au plafond.
1. Dérerminer la longueur de la chaîne dont vous aurez besoin. Fexez une
extrémité de la longueur de la chaîne de montage.
2. Glissez la bague filetée (M) et de la canopée (L) sur la chaîne – Voir
Schéma 1.
3. Fixez la lampe avec la chaîne de visser boucle col (K). Veuillez obtenir de
l’aide, le poids et la taille du dispoitif est difficile à gérer seul.
4. Fil armure de base, le fil d’alimentation, et le câble de sécurité à travers la
chaîne, vers le haut à travers le centre de la vis boucle de col (K), à travers
le centre du mamelon (E), et hors de l’ouverture sur le côté du raccord
(B).
5. S’il vous plaît se référer aux instructions d’installation de câbles de séciroté
sur le dos de cette feuille et complète l’étape 4.
I.S.19-50 instrucciones que cuelgan
Instrucciontes colgantes para los accesorios que pesan más de 23kgs
empezar aquí
1. Apague la corriente eléctrica antes de comenzar. Si el apparato va a
susitituir se enciende y se apaga por un interruptor de pared, simplemente
gire el interruptor. Si no es así, quite el fuible adecuando (o abra los
interruptores de circuito) hasta que el aparato está muerto.
• NO RESTAURACIÓN ACTUAL – YA SEA POR FUSIBLE, EL
INTERRUPTOR O UN CONMUTADOR – HASTA QUE EL NUEVO
APARATO ESTÁ COMPLETAMENTE CONECTADO EN SU LUGAR.
2. Los cables de alimentación deberán entrar en la caja de salida (A) a través
de cualquier nocaut excepto el nocentral superior – Véase la Figura 1.
1. Fixture se va a montar en un tubo de 3/8 de acero con rosca 3/8-18 NPSM,
19.05 mm roscas en ambos extremos (no suministrado). Tubo debe ser
anclado a la estructura o elemento de puente con resistencia suficiente
para soportar 4 veces el peso accesorios – Véase la Figura 2.
2. Ajuste el tubo de manera 12.7 mm de 3/8 de tubos de acero se extiende
hasta la caja de conexiones, en el centro de noquear.
3. Por favor, consulte el reverse de esta hoja con las instrucciones de
seguridad del cables de instalación y solo siga los pasos 1 y 2 en este
momento.
1. Acoplador de tubos de rosca (B) en la tubería que sobresale dentro de la
caja de salida. Asegure en su lugar apretando tornillos de cabeza allen (C)
– Véase la Figura 1.
2. Hexnut tema (D) en el niple de rosca (E). Tema pezón (E) en el acoplador
(B). Asegure en su lugar apretando hexnut (D) contra el acoplador (B) y
luego apretar los tornillos allen (F).
3. Tema hexnut (G) en la boquilla (E). Slip labio cable de tierra (H) sobre la
boquilla (E) y la tuerca jexagonal rosca (J) en el niple (E). NO apriete
tuercas hexagonales (G) y (J) en este momento.
4. Tema anillo de cuello roscado (K). Ajuste la altura del bucle para que el
medio de la rosca exterior en el anillo de cuello roscado (K) está expuesta
al follaje (L) se lleva a cabo hasta el techo.
1. Determinación de la longitude de la cadena que sera necesario. Conecte
un extremo de la longitud de la cadena de sujeción.
2. Deslice el anillo roscado (M) y la cubierta (L) en la cadena – Véase la
Figura 1.
3. Conecte las lámparas con la cadena para atornillar el anillo de cuello (K).
Por favor, obtener ayuda, el peso y el tamaño del dispositivo es dificil de
manjar solo.
4. Alambre de la armadura de tierra, cable de alimentación, y el cable de
seguridad a través de la cadena, hacia arriba a través del centro de anillo
de cuello roscado (K), a través del centro de la boquilla (E), y fuera de la
abertura en el lado del acoplador (B).
5. Por favor refiérase a las instrucciones de instalación de cable de
seguridad en la parte posterior de esta hoja y completer el paso 4.
H I N K L E Y L I G H T I N G 33000 Pin Oak Parkway Avon Lake, OH 44012 800.446.5539 / 440.653.5500 hinkleylighting.com
Page 4

Drawing 3 – Safety Cable Installation
Safety Cable Installation
WARNING: TO AVOID ELECTRICAL SHOCK, THIS SECTION OF THE
INSTRUCTION SHEET IS FOR THE SOLE PURPOSE OF SAFETY
CABLE INSTALLATION, AND IS NOT TO BE USED TO MAKE ANY
ELECTRICAL CONNECTIONS.
• The safety cable must be attached to a ceiling joist or other
permanent structure independent of the junction box.
1. Using a 1/8” diameter, drill a pilot hole (1). It must be drilled into
the permanent structure or through the junction box on joist side
where the safety cable is to be attached – see Drawing 3.
2. Insert and thread a ¼” hex head lag screw (2) (not included) into
pilot hole.
3. Continue back to previous I.S. 19-50 to continue installation of this
fixture.
4. Wrap safety cable (3) around hex head lag screw (2) and tighten to
secure cable.
SAFTEY WARNING: READ WIRING AND GROUND INSTRUIONS (I.S.18)
AND ANY ADDITIONAL DIRECTIONS. TURN POWER SUPPLY OFF
DURING INSTALLATION. IF NEW WIRING IS REQUIRED, CONSULT A
QUALIFIED ELECTRICIAN OR LOCAL AUTHORITIES FOR CODE
REQUIREMENTS.
Make electrical connections from supply wire to fixture lead wires.
Refer to instruction sheet (I.S. 18) and follow all instructions to
make all necessary wiring connections.
Installation D’un Câble De Sécurité
ATTENTION: POUR ÉVITER UNE ÉLECTROCUTION, CETTE
SECTION DE LA FEUILLE D’INSTRUCTIONS EST DANS LE SEUL
BUT DE L’INSTALLATION DE CABLES DE SÉCURITÉ ET NE DOIT
PAS ÊTRE UTILISÉ POUR FAIRE LES CONNEXIONES ÉLECTRIQUES
• Le cable de sécurité doit être fixé à une solive de plafond ou une
autre structure permanente et indéndante de la boîte de jonction.
1. L’utilisation d’un diameter de 3.175 mm, percez un trou (1). Ll doit
être foré dans la structure permanente ou par le biais de la boîte de
jonction sur le côté solive où le câble de sécurité doit être fixée –
Voir Schéma 3.
2. Insérez et vissez une vis de 6.35 mm à tête hexagonale de latence (2)
(no inclus) dans le trou pilote.
3. Continuer retour à la précédente I.S. 19-50 pour continuer
l’installation de cet accessoire.
4. Câble de sécurité wrap (3) autour de la vis de retard à tête
hexagonale (2) et serrer pour fixer le câble.
AVERTISSEMENT DE SECURITE: LIRE CABLAGE ET INSTRUCTIONS DE
MISE (I.S.18), ET TOUTE AUTRE INSTRUCTION. COUPER
L’ALIMENTATION ELECTRIQUE PENDANT L’ONSTALLATION. SI DE
NOUVELLES CABLAGE N’EST NECESSAIRE, CONSULTEZ UN
ELECTRICIEN QUALIFIE OU AUTORITES LOCALES POUR EXIGENCES DU
CODE.
Effectuez les connexions électriques du cable d’alimentation à fils de
connexion du projecteur. Reportez-vous à la feuille d’instruction
(I.S. 18) et suivez toutes les instructions pour effectuer tous les
branchements nécessaires.
Seguridad Instalación Del Cable
ADVERTENCIA: PARA EVITAR CHOQUE ELÉCTRICO, ESTA
SECCIÓN DE LA HOJA DE INSTRUCCIONES ES EL ÚNICO
PROPÓSITO DE CABLE DE SEGURIDAD DE LA INSTALACIÓN, Y
NO DEBE SER UTILIZADO PARA REALIZAR LAS CONEXIONES
ELÉCTRICAS
• El Cable de seguridad debe estar conectada a una vigueta de
techo u otra estructura permanente, independiente de la caja de
conexiones.
1. Con un diámetro de 3.175 mm, perfore un agujero piloto (1). Debe
ser perforado en la estructura permanente oa través de la caja de
conexiones en el lado de la viga en el cable de seguridad debe ser
adjunto – Véase la Figura 3.
2. Inserte y enrosque un tornillo de fijación de cabeza hexagonal de
6,35 mm (2) (no incluido) en el orificio piloto.
3. Continuar de nuevo a anterior I.S. 19-50 para continuar la
instalación de este accesorio.
4. Envuelva el cable de seguridad (3) alrededor de tirafondo de
cabeza hexagonal (2) y apriete para fijar cable.
ADVERTENCIA DE SEGURIDAD: LE LAS INSTRUCCIONES DE
CABLEADO Y LA TIERRA (I.S.18), E INSTRUCCIONES ADICIONALES.
APAUGE LA ALIMENTACIÓN DE CORRIENTE DURANTE LA
INSTALACIÓN. SI SE REQUIERE NUEVO CABLEADO, CONSULTE CON
UN ELECTRICISTA O AUTHORIDADES LOCALES PARA REQUISTOS
DEL CÓDIGO.
Hag alas conexiones eléctricas de los cables de alimentación a los
cables conductors accesorio. Consulte hoja de instrucciones (I.S 18)
y siga las instrucciones para haver todas las conexiones necesarias.
H I N K L E Y L I G H T I N G 33000 Pin Oak Parkway Avon Lake, OH 44012 800.446.5539 / 440.653.5500 hinkleylighting.com
Page 5

Drawing 1 – Flush Mount
Drawing 2 – Chain Hung
Drawing 3 – Post-Mount
I.S. 18
wiring grounding instructions
SAFETY WARNING: READ WIRING AND GROUNDING
INSTRUCTIONS (IS 18) AND ANY ADDITIONAL DIRECTIONS.
TURN POWER SUPPLY OFF DURING INSTALLATION. IF NEW
WIRING IS REQUIRED, CONSULT A QUALIFIED ELECTRICIAN OR
LOCAL AUTHORITIES FOR CODE REQUIREMENTS
I.S. 18
câblage échouage instructions
AVERTISSEMENT DE SECURITE: LIRE CABLAGE ET INSTRUCTIONS DE
MISE (IS 18), ET TOUTE AUTRE INSTRUCTION. COUPER L’ALIMENTATION
ELECTRIQUE PENDANT L’ONSTALLATION. SI DE NOUVELLES CABLAGE
N’EST NECESSAIRE, CONSULTEZ UN ELECTRICIEN QUALIFIE OU
AUTORITES LOCALES POUR EXIGENCES DU CODE.
wiring instructions
Indoor Fixtures
1. Connect positive supply wire (A) (typically black or the smooth,
unmarked side of the two-conductor cord) to positive fixture lead (B)
with appropriately sized twist on connector - see Drawings 1 or 2.
2. Connect negative supply wire (C) (typically white or the ribbed, marked
side of the two-conductor cord) to negative fixture lead (D).
3. Please refer to the grounding instructions below to complete all
electrical connections
Outdoor Fixtures
1. Connect positive supply wire (A) (typically black or the smooth
unmarked side of the two-conductor cord) to positive fixture lead (B)
with appropriately sized twist on connector --- see Drawings 2 or 3.
2. Connect negative supply wire (C) (typically white or the ribbed, marked
side of the two-conductor cord) to negative fixture lead (D).
3. Cover open end of connectors with silicone sealant to form a
watertight seal.
If installing a wall mount fixture, use caulk to seal gaps between the
fixture mounting plate (backplate) and the wall. This will help prevent
water from entering the outlet box. If the wall surface is lap siding, use
caulk and a fixture mounting platform specially.
4. Please refer to the grounding instructions below to complete all
electrical connections.
instructions de câblage
Luminaires Itérieurs
1. Brancher le fil d’alimentation positive (A) (généralement noir ou, côté lisse
banalisée de la corde á deux conducteurs) á plob de fixation positive (B) avec
la torsion de taille appropriée sur le connecteur --- Voir Schéma 1 ou 2.
2. Connecter le fil d’alimentation négative (C) (généralement blanc ou l’, côté
marqué nervurée du fil á deux conducteurs) au conducteur négatif de
l’appareil (D).
3. S’il vous plaît se référer á la mise á la terre instructions ci-dessous pour
terminer toutes les connexions électriques.
Luminaires Extérieurs
1. Brancher le fil d’alimentation positive (A) (généralement noir ou le côté lisse
banalisée de la corde á deux conducteurs) á plomb de fixation positive (B)
avec la torsion approrpriately taille du connecteur --- Voir Schéma 2 ou 3.
2. Connecter le fil d’alimentation négative (C) (généralement blanc ou l’, côté
marqué nervurée du fil á deux conducteurs) au conducteur négatif de
l’appareild (D).
3. Couvrir extrémité ouverte de connecteurs acex du silicone pour former un
joint étenche á l’eau.
Si l’installation d’un luminaire de montage mural, utiliser calfeutrage pour
sceller l’espace entre la plaque de montage de fixation (plaque arriére) et la
paroi. Cela aidera á empêcher l’eau de pénétrer dans le boc sortie. Si la
surface du mur est bardage á clin, utiliser caldeutrage et une plate-forme de
montage d’appareils spécialement.
4. S’il vous plait se referrer auc instructions ci-dessous pour terminer la terre
toutes les connexions électrques.
grounding instructions
Flush Mount Fixtures
For positive grounding in a 3-wire electrical system, fasten the fixture
ground wire (E) (typically copper or green plastic coated) to the fixture
mounting strap (M) with the ground screw (S) - see Drawing 1.
Note: On straps for screw supported fixtures, first install the two mounting
screws in strap. Any remaining tapped hole may be used for the ground screw.
Chain Hung Fixtures
Loop fixture ground wire (E) (typically copper or green plastic coated)
under the head of the ground screw (S) on fixture mounting strap (M)
and connect to the loose end of the fixture ground wire directly to the
ground wire of the building system with appropriately sized twist-on
connectors - see Drawing 2.
Post-Mount Fixtures
Connect fixture ground wire (E) (typically copper or green plastic coated)
to power supply ground with appropriately sized twist-on connector
inside post. Cover open end of connector with silicone sealant to form a
watertight seal - see Drawing 3.
instructions de mise
Montage Encastré Fixtures
Pour la terre positive dans un systéme électrique á 3 fils, fixez le fil de terre du
luminaire (E) (généralement en cuivre ou vert recouvert de plastique) á la sangle
de fixation de fixation (M) avec la vis de terre (S) --- Voir Schéma 1.
Remarque: Sur les sangles pour les appareils pris en charge á vis, installez d’abord les
deux vis de fixation á sangle. Tout trou taraudé restante peut être utilisée pour la vis de
terre.
Chaîne Accroché Luminaires
Boucle fil du luminaire au sol (E) (généralement en cuivre ou vert recouvert de
plastique) sous la tête de la vis de terre (S) sur la sangle de fixation de fixation
(M) et se connecter á l’extrémitré libre du fil de terre du luminaire directement
sur le fil de terre du systéme de construction avec une taille appropriée
connecteurs á visser --- Voir Schéma 2.
Luminaires Aprés Montage
Brancher le fil de terre du luminaire (E) (généralement en cuivre ou vert
recouvert de plastique) á la masse de l’alimentation avec une taille appropriée
torsion sur le connecteur á l’intérieur de la poste. Couvrir extrémité ouverte du
connecteur avec du mastic silicone pour former un joint étache á l’eau --- Voir
Schéma 3.
I.S. 18 tierra cableado instrucciones
ADVERTENCIA DE SEGURIDAD: LEA LAS INSTRUCCIONES DE CABLEADO
Y LA TIERRA (IS 18), E INSTRUCCIONES ADICIONALES. APAUGE LA
ALIMENTACIÓN DE CORRIENTE DURANTE LA INSTALACIÓN. SI SE
REQUIERE NUEVO CABLEADO, CONSULTE CON UN ELECTRICISTA O
AUTHORIDADES LOCALES PARA REQUISITOS DEL CÓDIGO
Instrucciones de cableado
Acesorios Cubierta
1. Conecte el cable de alimentación positive (A) (normalmente negro o la cara
lisa, sin marcas del cable de dos conductores) de plomo accesorio positivo (B)
con un giro de tamaño adecuado en el conector --- Véase la Figura 1 y 2.
2. Conecte el cable de alimentación negativa (C) (por lo general de color
blanco o el lado marcado estriado del cable de dos conductores) de plomo
accesorio negativo (D).
3. Por favor, consulte las instrucciones de puesta a tierra-a continuación para
completar todas las conexiones eléctricas.
Accesorios Exterior
1. Conecte el cable de alimentación positiva (A) (normalmente negro el lado no
marcado suave del cable de dos conductores) de plomo accesorio positivo (B)
con un giro de tamaño approrpriately conector --- Véase la Figura 2 y 3.
2. Conecte el cable de alimentación negative (C) (por lo general de color
blanco o el lado marcado estriado del cable de dos conductores) de plomo
accesorio negativo (D).
3. Cubra el extreme abierto de conectores con sellador de silicona poara formar
un sello hermético.
Si va a instalar un soporte de fijación mural, use masilla para sella los
espacios entre la placa de montaje del aparato (placa) y la pared. Esto
ayudará a evitar que el agua entre en la boc salida. Si la superficie de la
pared es de revestimiento solapado, utilice masilla y una plataforma de
montaje accesorio especial.
4. Por favor, consulte las Instrucciones de puesta a tierra-a continuación para
completar todas las conexiones eléctricas.
instrucciones puesta a tierra
Montaje Embutido Accesorios
Para conectar a tierra en un sistema eléctrico de 3 hilos, fije el cable de tierra
del artefacto (E) (generalmente de cobre o verde recubierto de plástico) a la
brida de montaje accesorio (M) con el tornillo de tierra (S) --- Véase la Figura 1.
Nota : En las correas de accesorios compatibles tornillos, primero instale los dos
tornillos de montaje de la correa. Cualquier agujero roscado restante puede ser
utilizado para el tornillo de tierra.
Cadena Hung Accesorios
Loop alambre de tierra (E) (generalmente de cobre o verde recubierto de
plático) debajo de la cabeza del tornillo de tierra (S) en la brida de montaje
accesorio (M) y conectar con el extremo suelto del cable de tierra luminaria
directamente al cable de tierra del sistema de construcción con un tamaño
adecuado twist-conectores --- Véase la Figura 2.
Accesorios Posterior Monte
Conecte el cable de tierra del artefacto (E) (generalmente de cobre o verde
recubierto de plástico) a tierra de la fuente de alimentacón con conector de
tamanño adecuado en el interior puesto enlaces en forma. Cubra el extremo
abierto del conector con sellador de silicona para formar un sello hermético --Véase la Figura 3.
H I N K L E Y L I G H T I N G 33000 Pin Oak Parkway Avon Lake, OH 44012 800.446.5539 / 440.653.5500 hinkleylighting.com
 Loading...