

Page 1
HINKLEY
LIGHTING
Drawing 1 - General Assembly
2
4
1
5
Detail - 1
2
H2
H1
1
Detail - 2
3
4
Item No.
1. Find a clear area in which you can work.
2. Unpack fixture and glass from carton.
3. Carefully review instructions prior to assembly.
*** THE CONSTRUCTION OF THIS FIXTURE WILL BE ACCOMPLISHED
BY FIRST ASSEMBLING THE FIXTURE, INSTALLING THE GLASS, AND
THEN HANGING IT FROM THE CEILING.
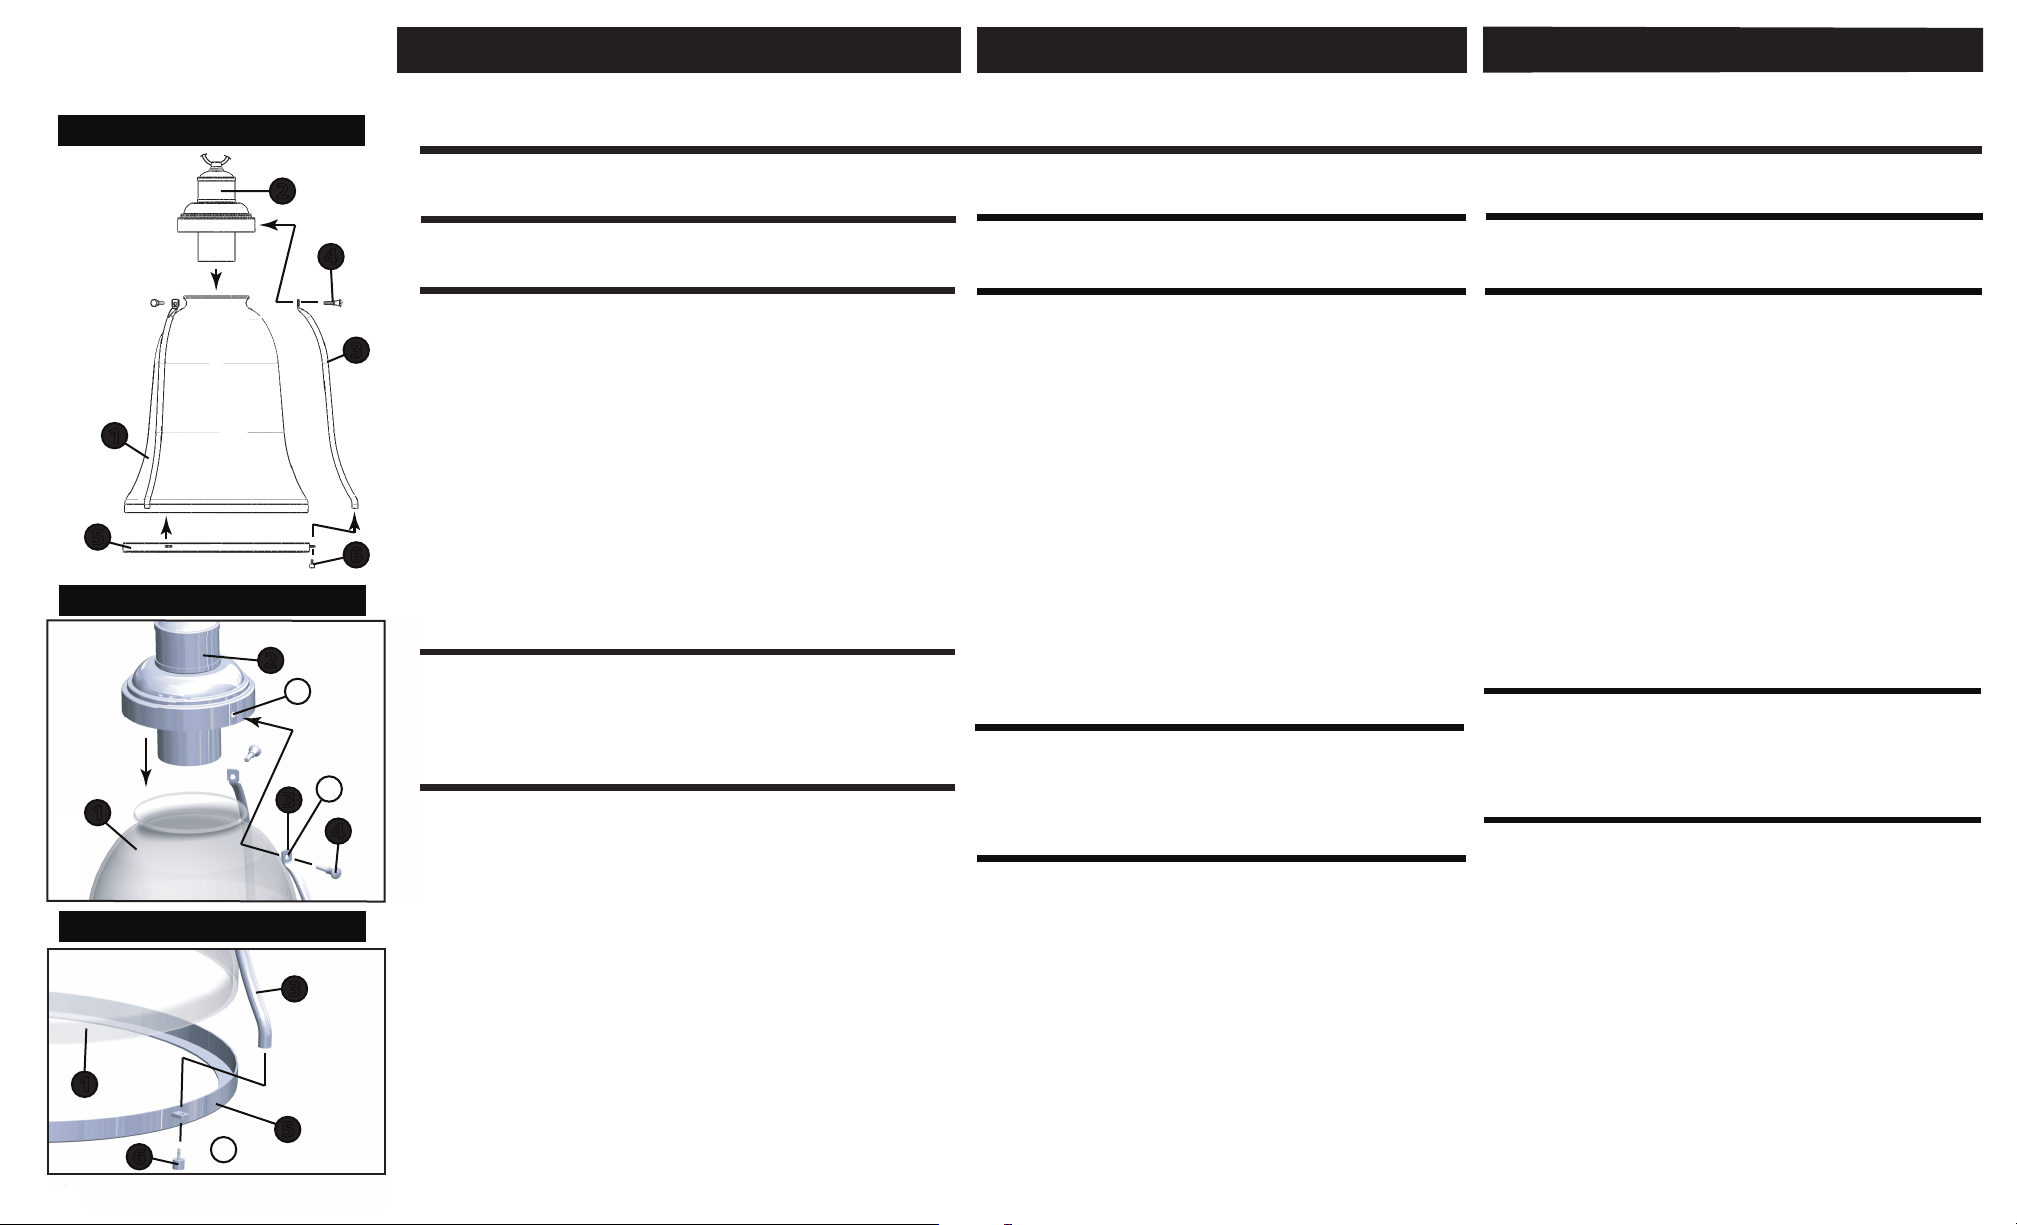
1. To begin assembly, first set glass (1) on a table with small hole in top
upward, now slip the socket fitter assembly (2) into the top of the glass
3
6
- see Drawing 1 and Detail 1.
2. Next take one upright (3) and align hole (H1) in flat tab on the top of the
upright, with one of the threaded holes (H2) in the side of the socket fitter
assembly (2). Now slip threaded portion of decorative knob (4) through
hole in flat tab and thread it into hole in side of socket fitter to secure top
of upright.
3. Repeat this process with the two remaining uprights.
4. Now lay the socket fitter assembly (2) and glass (1) with uprights (3) on
its side, and slip ring (5) onto bottom of glass (1) - see Drawing 1 and
Detail 2.
5. Now align the threaded hole in the bottom of upright (3) with hole in tab
(T) on ring (5).
6. Slip threaded portion on barrel knob (6) through hole in tab and thread
into hole on bottom of upright (3).
7. Repeat this process with the two remaining upright.
8. Fixture is ready for installation.
SAFETY WARNING: READ WIRING AND GROUNDING INSTRUCTIONS
(I.S. 18) AND ANY ADDITIONAL DIRECTIONS. TURN POWER SUPPLY
OFF DURING INSTALLATION. IF NEW WIRING IS REQUIRED,
CONSULT A QUALIFIED ELECTRICIAN OR LOCAL AUTHORITIES
FOR CODE REQUIREMENTS.
To hang fixture from the ceiling follow instruction sheet (IS19-36) provided.
Please read all instruction sheet prior to installing this fixture. Make sure
all power to the fixture is shut off prior to starting installation.
Assembly Instructions
start here
English Spanish
Instrucciones De Montaje
Numéro d’article:
empezar aquí
1. Busque un lugar claro en el que se puede trabajar.
2. Desempaque la luminaria y el vidrio de la caja.
3. Revise cuidadosamente las instrucciones antes de asamblea.
*** LA CONSTRUCCIÓN DE ESTE ARTEFACTO SE LOGRARÁ
POR PRIMERA MONTAJE DEL ARTEFACTO, INSTALAR EL
VIDRIO, Y LUEGO COLGANDO DEL TECHO.
1 . Para comenzar el montaje, sistema de cristal de primera (1)
en una mesa con pequeño agujero en la parte superior hacia arriba,
ahora deslizarse el zócalo de montaje ajustador (2) en la parte
superior de la copa - Ver dibujo 1 y del detalle 1.
2 . A continuación, tomar una posición vertical (3) y alinear el
agujero (H1) en la pestaña de plano sobre la parte superior de la
en posición vertical , con uno de los orificios roscados (H2) en el
lado de la toma de ajustadormontaje (2) . Ahora deslizarse porción
roscada del mando decorativa (4) a través agujero en la pestaña
plana y pase la cuerda en el agujero del lado del ajustador de tubo
para fijar la parte superior de posición vertical .
3 . Repita este proceso con los dos montantes restantes.
4 . Ahora coloque el zócalo de montaje ajustador (2) y vidrio (1)
con los montantes (3) en anillo de su lado , y el deslizamiento (5)
en la parte inferior de vidrio (1) - ver dibujo 1 y Detalle 2 .
5 . Ahora alinee el orificio roscado en la parte inferior del montante
(3) con el agujero en la pestaña (T) en el anillo (5) .
6 . Deslice parte roscada del mando de cañón (6) a través del
agujero en la pestaña y el hilo en el orificio en la parte inferior de la
vertical (3 ) .
7 . Repita este proceso con los dos en posición vertical restante.
8 . Aparato está listo para la instalación .
ADVERTENCIA DE SEGURIDAD: INSTRUCCIONES DE CABLEADO
Y CONEXIÓN A TIERRA LEA (I.S. 18), E INSTRUCCIONES
ADICIONALES. CORTAR EL SUMINISTRO ELÉCTRICO
DURANTE LA INSTALACIÓN. SI NUEVO CABLEADO SE
REQUIERE, CONSULTE CON UN ELECTRICISTA O
AUTORIDADES LOCALES PARA REQUISITOS DEL CÓDIGO.
Para colgar accesorio de la hoja de techo seguimiento de
instrucciones (19-36-IS), siempre. Por favor, lea toda la hoja de
instrucciones antes de instalar este aparato. cerciorarse todo el
poder para el aparato esté apagado antes de iniciar la instalación.
Les Instructions D’assemblage
Número del artículo:
commencez ici
Une. Allez dans un endroit dans lequel vous pouvez travailler.
2. Déballez luminaire et le verre de boîte.
3. Examinez attentivement les instructions avant le montage.
*** LA CONSTRUCTION DE L 'APPAREIL SERA ACCOMPLIE
EN ASSEMBLANT ABORD LA FIXATION, INSTALLATION DU
VERRE ET ALORS ACCROCHER AU PLAFOND.
1 . Pour commencer l'assemblage , définissez d'abord le verre (1)
sur une table avec un petit trou dans le haut vers le haut , maintenant
glisser la prise assemblage installateur dans le haut de la vitre (2)
- Voir schéma 1 et de détail 1 .
2 . Prenez ensuite un montant (3) et l'alignement du trou (H1) dans
l'onglet à plat sur le haut de la en position verticale , avec l'un des
trous filetés (H2) dans le côté de la douille d' ajusteur Ensemble (2) .
Maintenant glisser partie filetée du bouton décoratif (4) par trou dans
l'onglet plat et enfiler dans le trou du côté de la prise installateur pour
garantir haut de droite .
3 . Répétez ce processus avec les deux montants restants .
4 . Posez maintenant la prise assemblage installateur (2) et le verre
(1) avec des montants (3) anneau de son côté , et le glissement (5)
sur fond de verre (1) - voir schéma 1 et Détail 2 .
5 . Maintenant aligner le trou fileté dans le fond de montant (3) avec
le trou dans l'onglet (T) sur l'anneau (5) .
6 . Glissez partie filetée sur le bouton de canon (6) dans le trou
dans l'onglet et le fil dans le trou sur le fond du droit (3) .
7 . Répétez ce processus avec les deux debout restant .
8 . Fixture est prêt pour l'installation.
AVERTISSEMENT DE SÉCURITÉ: LIRE RACCORDEMENT ET MISE
À LA TERRE (I.S. 18) ET TOUTE AUTRE INSTRUCTION. COUPER
L'ALIMENTATION ÉLECTRIQUE EN COURS D'INSTALLATION. SI
DE NOUVELLES CÂBLAGE N'EST NÉCESSAIRE, CONSULTEZ
UN ÉLECTRICIEN QUALIFIÉ OU LES AUTORITÉS LOCALES
POUR LES EXIGENCES DE CODE.
Pour accrocher fixation de la feuille de plafond de suivi de l'instruction
(IS19-36) fourni. S'il vous plaît lire tous feuille d'instructions avant
d'installer ce luminaire. s'assurer tout le pouvoir à l'appareil est éteint
avant de commencer l'installation.
French
3
1
5
6
T
HINKLEY LIGHTING 33000 Pin Oak Parkway, Avon Lake, OH 44012 800.446.5539 / 440.653.5500 hinkleylighting.com
Page 2
HINKLEY
LIGHTING
Drawing 1 - Mounting Detail
2
5
1
2223
4
b
c
a
Hanging Instructions IS19-36
1. Find a clear area in which you can work.
2. Unpack fixture and glass from carton.
3. Carefully review instructions prior to assembly.
SAFETY WARNING: READ WIRING AND GROUNDING INSTRUCTIONS
(I.S. 18) AND ANY ADDITIONAL DIRECTIONS. TURN POWER SUPPLY
OFF DURING INSTALLATION. IF NEW WIRING IS REQUIRED,
CONSULT A QUALIFIED ELECTRICIAN OR LOCAL AUTHORITIES
FOR CODE REQUIREMENTS.
1. Shut off electrical current before starting. If the fixture you are replacing
is turned on and off by a wall switch, simply turn the switch off . If not,
remove the appropriate fuse (or open the circuit breakers) until the
fixture is dead.
• DO NOT restore current - either by fuse, breaker or switch - until the
new fixture is completely wired and in place.
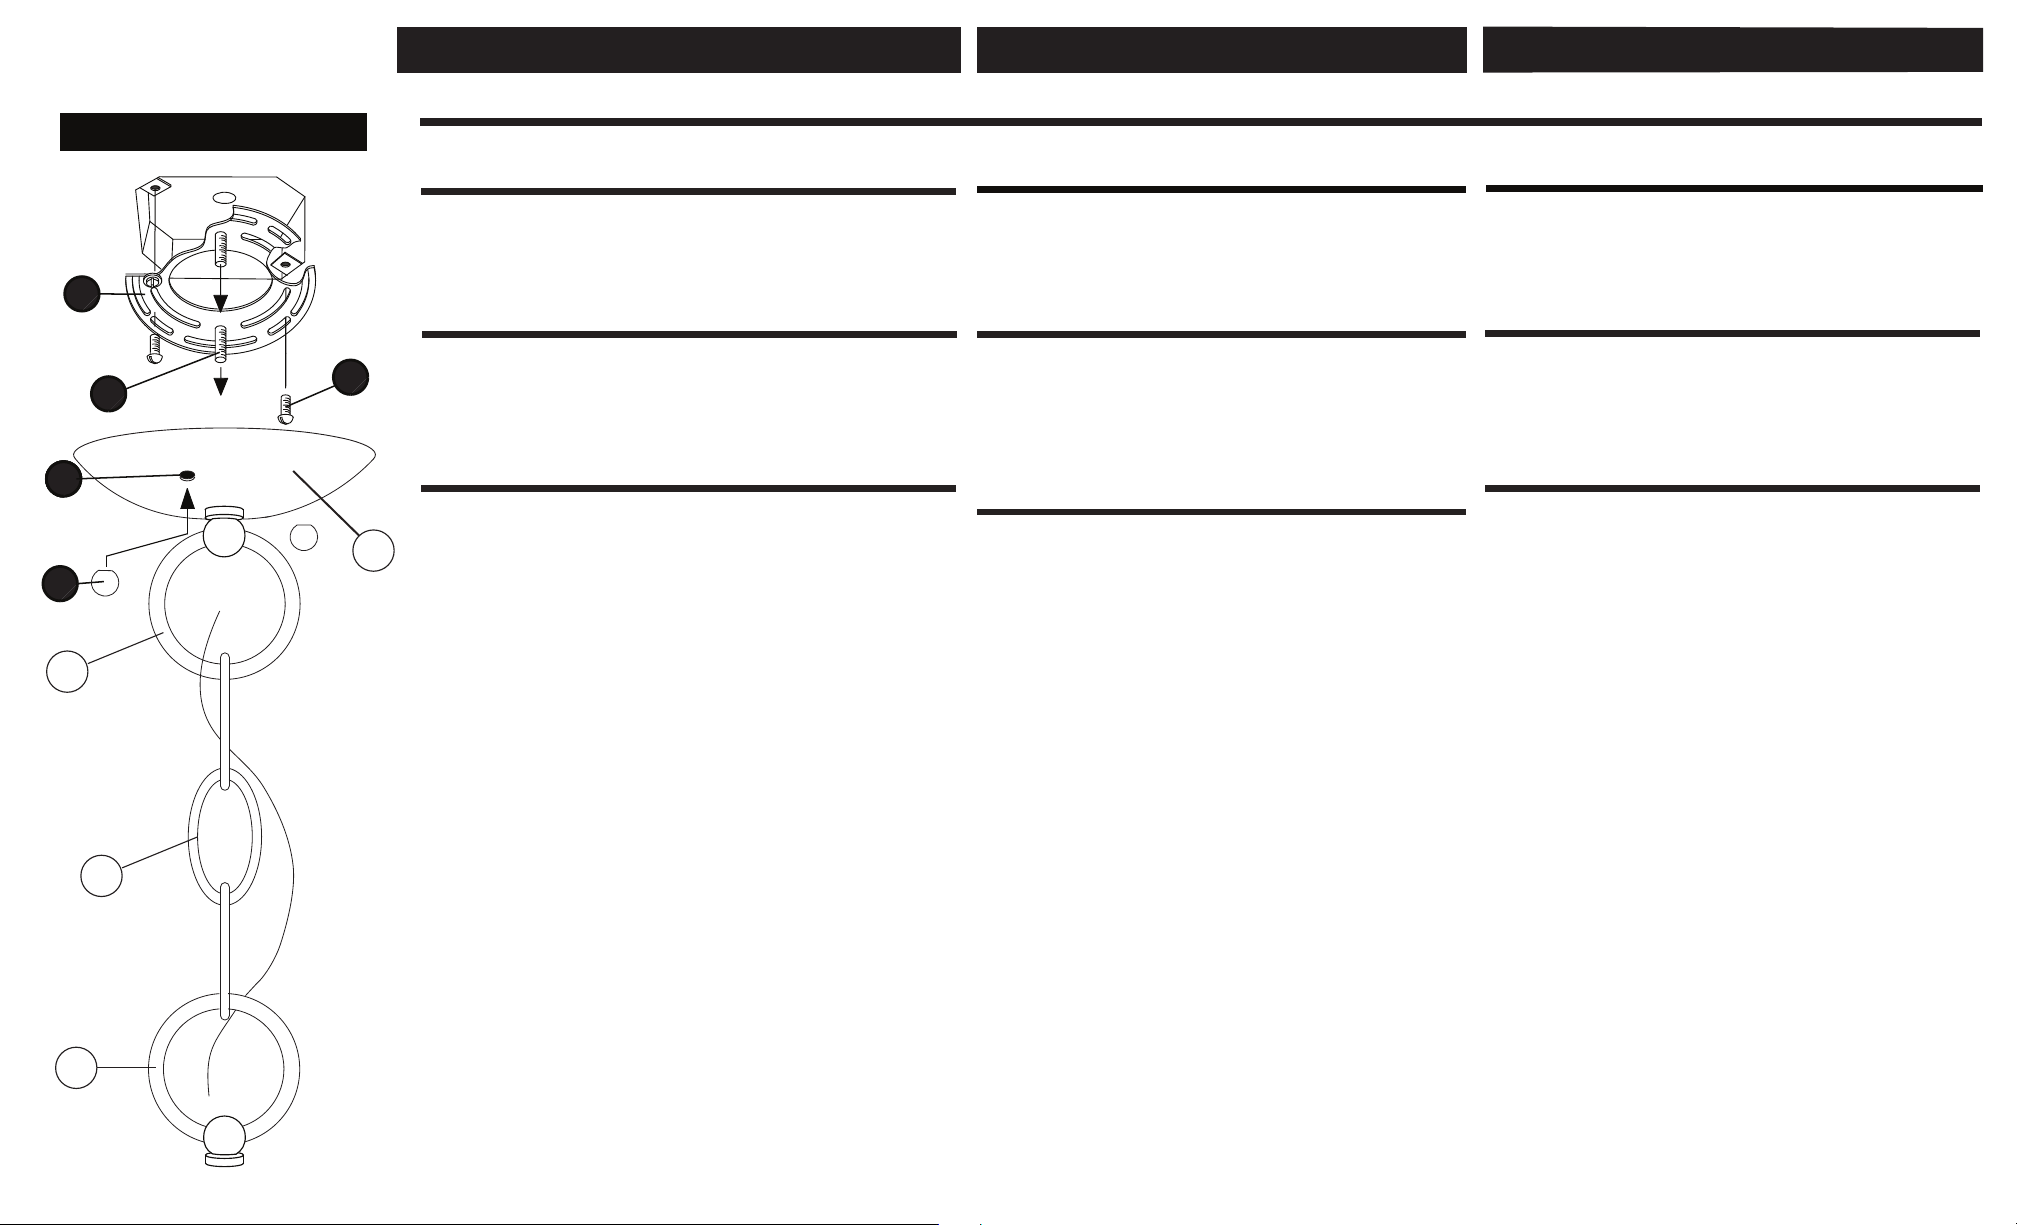
1 Determine the length of chain (c) that will be required to mount your
fixture at the height you have determined.
d
2 Attach chain (c) to loop (a) on top of the fixture.
3 Attach other end of chain to loop (b) on the canopy (d).
4 Thread screws (1) into mounting plate (2) from the back. (head of
ground screw should be on the opposite side of mounting plate).
5 Attach mounting plate to junction box using two 8-32 screws (5).
6 Weave supply wire through chain and through center hole in loop (b).
7 With assistance lift fixture and make all necessary electrical connections
following instruction sheet [IS 18] provided.
8 After connections are made slip the two mounting holes (3) in
canopy over screws (1) installed in mounting plate (2) earlier, and hold
fixture in position.
9 Thread ball knobs (4) onto end of screws and tighten to secure
fixture to the ceiling.
10 Fixture is complete and power can be restored.
start here
Instrucciones colgantes IS19-36 Instructions suspendus IS19-36
English Spanish
empezar aquí
1. Busque un lugar claro en el que se puede trabajar.
2. Desempaque la luminaria y el vidrio de la caja.
3. Revise cuidadosamente las instrucciones antes de asamblea.
ADVERTENCIA DE SEGURIDAD: INSTRUCCIONES DE CABLEADO
Y CONEXIÓN A TIERRA LEA (I.S. 18), E INSTRUCCIONES
ADICIONALES. CORTAR EL SUMINISTRO ELÉCTRICO
DURANTE LA INSTALACIÓN. SI NUEVO CABLEADO SE
REQUIERE, CONSULTE CON UN ELECTRICISTA O
AUTORIDADES LOCALES PARA REQUISITOS DEL CÓDIGO.
1. Apague la corriente eléctrica antes de comenzar. Si el aparato va
a sustituir se enciende encendido y apagado mediante un
interruptor, gire smiply el interruptor, si no, quite el fusible apropiado
(o abra los interruptores de circuito) hasta que el aparato
esté muerto.
• NO NO restaurar actual-ya sea mediante fusible, disyuntor o
interruptor-hasta que el nuevo dispositivo está completamente
cableado en su lugar.
1 Determinar la longitud de la cadena (c) que se requiere para
montar el dispositivo en la altura que haya determinado.
2 Fije la cadena (c) a lazo (a) en la parte superior del aparato.
3 Conecte el otro extremo de la cadena de bucle (b) en el dosel (d).
4 tornillos de rosca (1) en la placa de montaje (2) de la parte
posterior. (cabeza de tornillo de tierra debe estar en el lado opuesto
de la placa de montaje).
5 Fije la placa de montaje a la caja de conexiones utilizando dos
tornillos 8-32 (5) [ NO PROPORCIONADO ].
6. Cable de alimentación 6 armadura a través de la cadena y por el
orificio central en el bucle (b).
7 Con accesorio de elevación asistencia y hacer que todas las
conexiones eléctricas necesarias siguiente hoja de instrucciones
[ES 18] proporcionada.
8 Después de las conexiones se realizan de deslizamiento de los
dos agujeros de montaje (3) en la cubierta sobre los tornillos (1)
instalado en la placa de montaje (2) anterior , y mantenga fijo en
su posición.
9 botones de bola de hilo (4) en el extremo de los tornillos y apriete
para asegurar aparato a la techo.
10 Fixture está completa y el poder puede ser restaurado.
French
commencez ici
Une. Allez dans un endroit dans lequel vous pouvez travailler.
2. Déballez luminaire et le verre de boîte.
3. Examinez attentivement les instructions avant le montage.
AVERTISSEMENT DE SÉCURITÉ: LIRE RACCORDEMENT ET MISE
À LA TERRE (I.S. 18) ET TOUTE AUTRE INSTRUCTION. COUPER
L'ALIMENTATION ÉLECTRIQUE EN COURS D'INSTALLATION. SI
DE NOUVELLES CÂBLAGE N'EST NÉCESSAIRE, CONSULTEZ
UN ÉLECTRICIEN QUALIFIÉ OU LES AUTORITÉS LOCALES
POUR LES EXIGENCES DE CODE.
1. Couper le courant électrique avant de commencer. Si l'appareil
vous remplacez est activée sur et en dehors par un interrupteur,
mettre smiply l'interrupteur, sinon, retirez le fusible approprié (ou
ouvrez les disjoncteurs) jusqu'à ce que l'appareil est mort.
• NE PAS restaurer courant soit par fusible, disjoncteur ou
interrupteur-jusqu'à ce que le nouvel appareil est entièrement
câblé en place.
1 Déterminer la longueur de la chaîne (c) qui sera nécessaire pour
monter votre appareil à la hauteur que vous avez déterminé.
2 Fixez la chaîne (c) à la boucle (a) sur le dessus de l'appareil.
3 Attacher autre extrémité de la chaîne à boucle (b) sur la voilure (d).
4 vis du sujet (1) dans la plaque de montage (2) à partir de l'arrière.
(tête de vis de terre devrait se retrouver sur le côté opposé de la
plaque de montage ).
5 Fixez la plaque de montage de la boîte de jonction à l'aide de
deux vis 8-32 (5) [ NON FOURNIE ].
6. Fil d'alimentation 6 Weave par chaîne et par le trou central dans
la boucle ( b ) .
7 Avec fixation assistance de levage et de faire toutes les connexions
électriques nécessaires suivant feuille d'instruction [ EST 18 ] fourni.
8 Une fois les connexions faites glisser les deux trous de fixation (3)
dans la canopée sur les vis (1) installé dans la plaque de montage
(2) plus tôt , et tenir l 'appareil en position.
9 boutons de boule de fil (4) sur l'extrémité de vis et les serrer pour
fixer la lampe au plafond.
10 Mobilier est terminée et la puissance peut être restauré .
HINKLEY LIGHTING 33000 Pin Oak Parkway, Avon Lake, OH 44012 800.446.5539 / 440.653.5500 hinkleylighting.com
Page 3

g
g
Drawing 1 – Flush Mount
Drawin
Drawin
2 – Chain Hung
3 – Post-Mount
I.S. 18
wiring grounding instructions
SAFETY WARNING: READ WIRING AND GROUNDING
INSTRUCTIONS (IS 18) AND ANY ADDITIONAL DIRECTIONS.
TURN POWER SUPPLY OFF DURING INSTALLATION. IF NEW
WIRING IS REQUIRED, CONSULT A QUALIFIED ELECTRICIAN OR
LOCAL AUTHORITIES FOR CODE REQUIREMENTS
wiring instructions
Indoor Fixtures
1. Connect positive supply wire (A) (typically black or the smooth,
unmarked side of the two-conductor cord) to positive fixture lead (B)
with appropriately sized twist on connector - see Drawings 1 or 2.
2. Connect negative supply wire (C
side of the two-conductor cord) to negative fixture lead (
3. Please refer to the ground
electrical connections
Outdoor Fixtures
(typically white or the ribbed, marked
)
in
g in
struct
io
below to complete all
ns
1. Connect positive supply wire (A) (typically black or the smooth
unmarked side of the two-conductor cord) to positive fixture lead (
with appropriately sized twist on connector --- see D
2. Connect negative supply wire (C
side of the two-conductor cord) to negative fixture lead (
(typically white or the ribbed, marked
)
r
awi
3. Cover open end of connectors with silicone sealant to form a
watertight seal.
If installing a wall mount fixture, use caulk to seal gaps between the
fixture mounting plate (backplate) and the wall. This will help prevent
water from entering the outlet box. If the wall surface is lap siding, use
caulk and a fixture mounting platform specially.
4. Please refer to the gr
electrical connections.
o
und
in
g
instruct
io
s below to complete all
n
D).
ngs
D
).
2 o
I.S. 18
AVERTISSEMENT DE SECURITE: LIRE CABLAGE ET INSTRUCTIONS DE
MISE (IS 18), ET TOUTE AUTRE INSTRUCTION. COUPER L’ALIMENTATION
ELECTRIQUE PENDANT L’ONSTALLATION. SI DE NOUVELLES CABLAGE
N’EST NECESSAIRE, CONSULTEZ UN ELECTRICIEN QUALIFIE OU
AUTORITES
instructions de câblage
Luminaires Itérieurs
1. Brancher le fil d’alimentation positive (A)
banalisée de la corde á deux conducteurs) á plob de fixation positive (
la torsion de taille appropriée sur le connecteur --- V
2. Connecter le fil d’alimentation négative (C
marqué nervurée du fil á deux conducteurs) au conducteur négatif de
l’appareil (
3. S’il vous plaît se référer á la m
terminer toutes les connexions électriques.
Luminaires Extérieurs
1. Brancher le fil d’alimentation positive (A) (généralement noir ou le côté lisse
B)
3
r
.
banalisée de la corde á deux conducteurs) á plomb de fixation positive (
avec la torsion approrpriately taille du connecteur --- V
2. Connecter le fil d’alimentation négative (C) (généralement blanc ou l’, côté
marqué nervurée du fil á deux conducteurs) au conducteur négatif de
l’appareild (
3. Couvrir extrémité ouverte de connecteurs acex du silicone pour former un
joint étenche á l’eau.
Si l’installation d’un luminaire de montage mural, utiliser calfeutrage pour
sceller l’espace entre la plaque de montage de fixation (plaque arriére) et la
paroi. Cela aidera á empêcher l’eau de pénétrer dans le boc sortie. Si la
surface du mur est bardage á clin, utiliser caldeutrage et une plate-forme de
montage d’appareils spécialement.
4. S’il vous plait se referrer auc instructions ci-dessous pour terminer la terre
toutes
les connexions électrques.
câblage échouage instructions
LOCALES POUR EXIGENCES DU CODE.
(généralement noir ou, côté lisse
Schéma 1 ou 2.
oir
) (généralement blanc ou l’, côté
D)
.
se á la terre instructions ci-dessous pour
i
oir Schéma 2 ou 3
.
D)
B) avec
B
)
.
grounding instructions
Flush Mount Fixtures
For positive grounding in a 3-wire electrical system, fasten the fixture
ground wire (E) (typically copper or green plastic coated) to the fixture
mounting strap (M) with the ground screw (S) - see Drawing 1.
Note: On straps for screw supported fixtures, first install the two mounting
screws in strap. Any remaining tapped hole may be used for the ground screw.
Chain Hung Fixtures
Loop fixture ground wire (E) (typically copper or green plastic coated)
under the head of the ground screw (S) on fixture mounting strap (M)
and connect to the loose end of the fixture ground wire directly to the
ground w
connectors - see Drawing 2.
ire of the building system with appropriately sized twist-on
Post-Mount Fixtures
Connect fixture ground wire (E) (typically copper or green plastic coated)
to power supply ground with appropriately sized twist-on connector
inside post. Cover open end of connector with silicone sealant to form a
watertight seal - see Drawing 3.
instructions de mise
Montage Encastré Fixtures
Pour la terre positive dans un systéme électrique á 3 fils, fixez le fil de terre du
luminaire (
de fixation de fixation (
Remarque: Sur les sangles pour les appareils pris en charge á vis, installez d’abord les
deux vis de fixation á sangle. Tout trou taraudé restante peut être utilisée pour la vis de
terre.
E) (généralement en cuivre ou vert recouvert de plastique) á la sangle
) avec la vis de terre (S) --- Voi
M
r Schém
a 1.
Chaîne Accroché Luminaires
Boucle fil du luminaire au sol (E) (généralement en cuivre ou vert recouvert de
plastique) sous la tête de la vis de terre (
(
M) et se connecter á l’extrémitré libre du fil de terre du luminaire directement
sur le fil de terre du systéme de construction avec une taille appropriée
connecteurs á visser --- V
oir Schéma 2.
S) sur la sangle de fixation de fixation
Luminaires Aprés Montage
Brancher le fil de terre du luminaire (E)
recouvert de plastique) á la masse de l’alimentation avec une taille appropriée
torsion sur le connecteur á l’intérieur de la poste. Couvrir extrémité ouverte du
connecteur avec du mastic silicone pour former un joint étache á l’eau --- V
ma
S
ch
3.
é
(généralement en cuivre ou vert
oir
I.S. 18
ADVERTENCIA DE SEGURIDAD: LEA LAS INSTRUCCIONES DE CABLEADO
Y LA TIERRA (IS 18), E INSTRUCCIONES ADICIONALES. APAUGE LA
ALIMENTACIÓN DE CORRIENTE DURANTE LA INSTALACIÓN. SI SE
REQUIERE NUEVO CABLEADO, CONSULTE CON UN ELECTRICISTA O
AUTHORIDADES LOCALES PARA REQUISITOS DEL CÓDIGO
Instrucciones de cableado
Acesorios Cubierta
1. Conecte el cable de alimentación positive (A
lisa, sin marcas del cable de dos conductores) de plomo accesorio positivo (
con un giro de tamaño adecuado en el conector --- V
2. Conecte el cable de alimentación negativa (
blanco o el lado marcado estriado del cable de dos conductores) de plomo
accesorio negativo (
3. Por favor, consulte las instrucciones de puesta a tierra-a continuación para
completar todas las conexiones eléctricas.
Accesorios Exterior
1. Conecte el cable de alimentación positiva (A) (normalmente negro el lado no
marcado suave del cable de dos conductores) de plomo accesorio positivo (
con un giro de tamaño approrpriately conector --- V
2. Conecte el cable de alimentación negative (C) (por lo general de color
blanco o el lado marcado estriado del cable de dos conductores) de plomo
accesorio negativo (
3. Cubra el extreme abierto de conectores con sellador de silicona poara formar
un sello hermético.
Si va a instalar un soporte de fijación mural, use masilla para sella los
espacios entre la placa de montaje del aparato (placa) y la pared. Esto
ayudará a evitar que el agua entre en la boc salida. Si la superficie de la
pared es de revestimiento solapado, utilice masilla y una plataforma de
montaje accesorio especial.
4. Por favor, consulte las Ins
completar todas las conexiones eléctricas.
instrucciones puesta a tierra
Montaje Embutido Accesorios
Para conectar a tierra en un sistema eléctrico de 3 hilos, fije el cable de tierra
del artefacto (
brida de montaje accesorio (
Nota : En las correas de accesorios compatibles tornillos, primero instale los dos
tornillos de montaje de la correa. Cualquier agujero roscado restante puede ser
utilizado para el tornillo de tierra.
Cadena Hung Accesorios
Loop alambre de tierra (E) (generalmente de cobre o verde recubierto de
plático) debajo de la cabeza del tornillo de tierra (
accesorio (
directamente al cable de tierra del sistema de construcción con un tamaño
adecuado twist-conectores --- V
Accesorios Posterior Monte
Conecte el cable de tierra del artefacto (E
recubierto de plástico) a tierra de la fuente de alimentacón con conector de
tamanño adecuado en el interior puesto enlaces en forma. Cubra el extremo
abierto del conector con sellador de silicona para formar un sello hermético ---
é
ase la Figura 3.
V
tierra cableado instrucciones
(normalmente negro o la cara
)
é
ase la Figura 1 y 2.
(por lo general de color
C)
D).
ase la
é
D).
r
t
E) (generalmente de cobre o verde recubierto de plástico) a la
M
)
y conectar con el extremo suelto del cable de tierra luminaria
M) con el tornillo de tierra (S) --- Véase la
ucciones
éase l
d
puesta a tierra-a continuación para
e
en la brida de montaje
S)
a Figura 2.
) (generalmente de cobre o verde
Figura 2 y 3.
Figura
B)
1.
B)
H I N K L E Y L I G H T I N G 33000 Pin Oak Parkway Avon Lake, OH 44012 800.446.5539 / 440.653.5500 hinkleylighting.com
 Loading...