

Page 1
Drawing 1 - Fixture Mounting
assembly instructions
Family: Luna Item No. 1664/1660
1664
1660
5
A
D
J
7
Drawing 2 - Fixture Mounting
9
8B8
E
1. Find a clear area in which you can work.
2. Unpack fixture and glass from carton.
3. Carefully review instructions prior to assembly.
*** The construction of this fixture will be accomplished by first attaching the
C
3
mounting strap to the junction box, making all necessary electrical connections,
mounting the fixture to the wall, and then lamping the fixture.
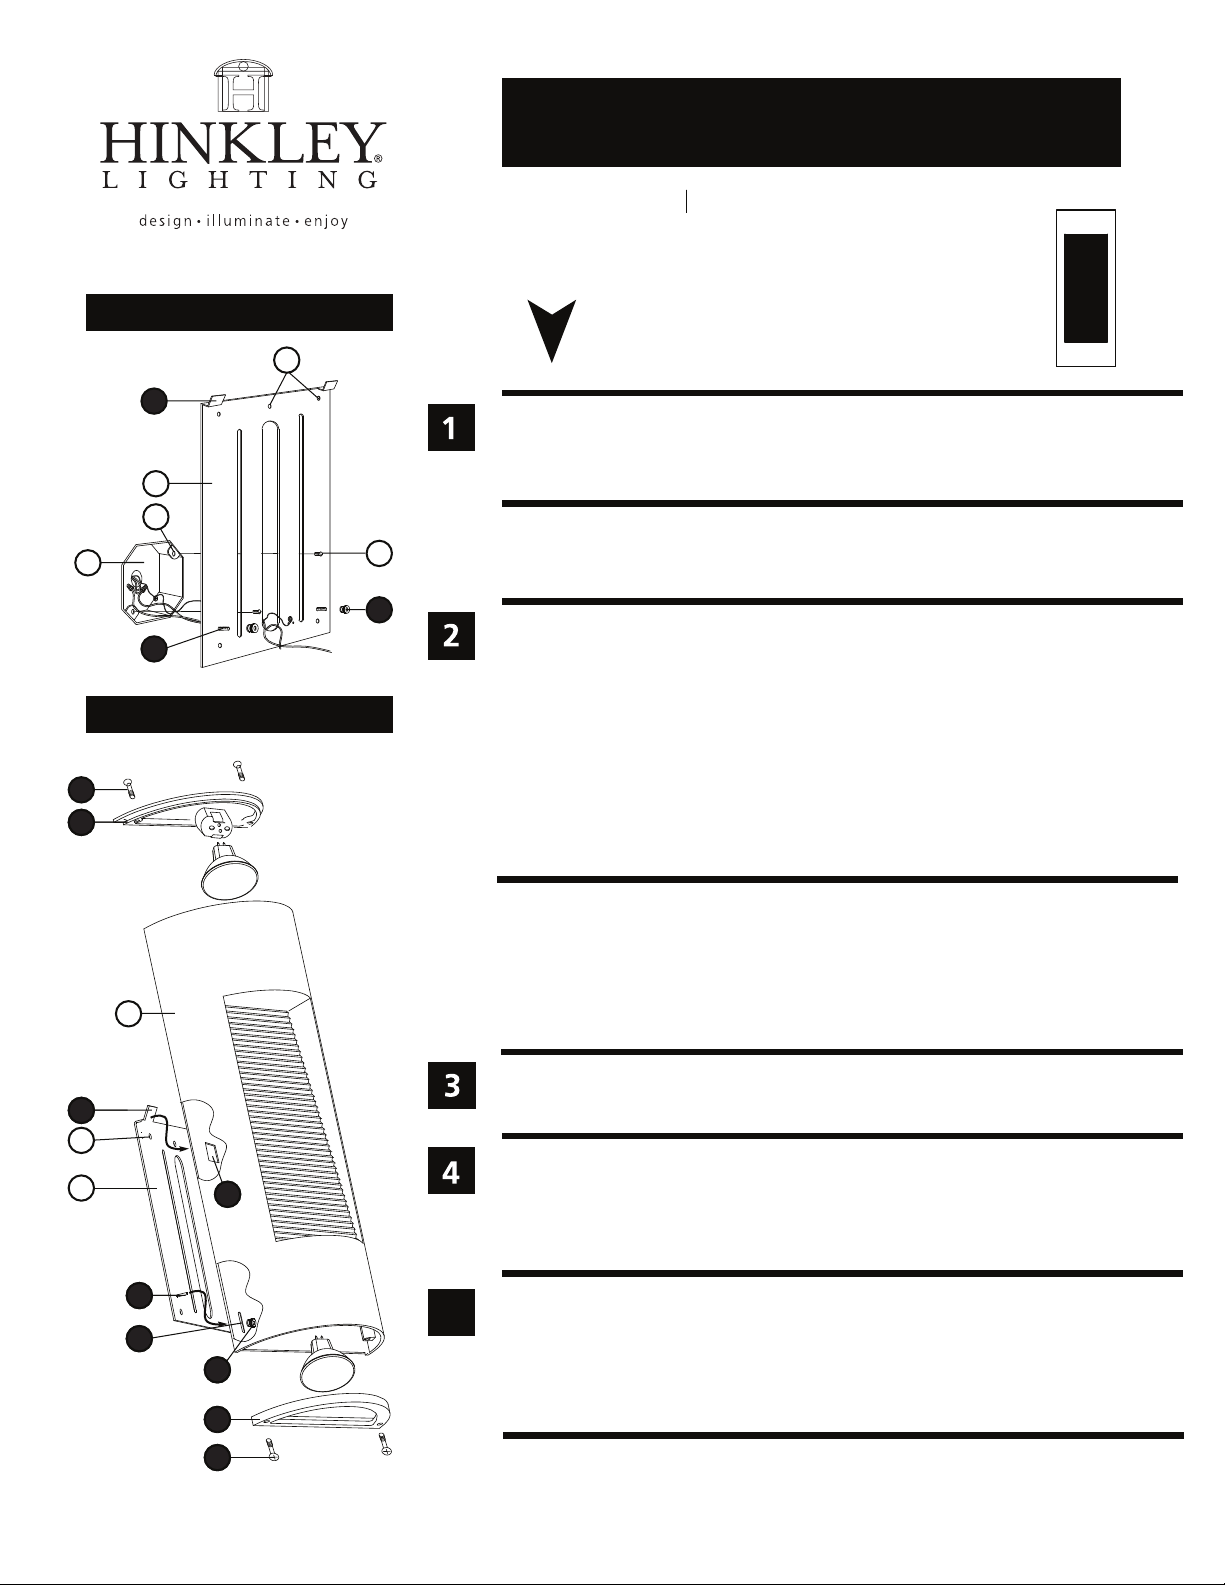
1. Remove mounting bracket (A) from back of fixture (B) by unthreading the 2 screws
(1) from the bottom lens cover (2) and remove lens cover (2). Unthread the two 8-32
battery nuts (3) from inside the lamp compartment - see Drawing 2.
2. Pull the bottom of the mounting bracket (A) away from the fixture, then slide it
down to remove.
3. Determine the desired height of fixture (B) and mounting bracket (A).
Note: The top of the fixture is 9 inches(1664) / 7 1/2 inches(1660) from the top of the
mounting bracket (A).
4. Attach mounting bracket (A) to junction box (J) by threading 2 screws (C) provided
into holes (D) of junction box (J) - see Drawing 1.
5. Secure mounting bracket using hole(s) (E) with self provided screws.
SAFETY WARNING: READ WIRING AND GROUNDING INSTRUCTIONS (I.S. 18)
AND ANY ADDITIONAL DIRECTIONS. TURN POWER SUPPLY OFF DURING
INSTALLATION. IF NEW WIRING IS REQUIRED, CONSULT A QUALIFIED
ELECTRICIAN OR LOCAL AUTHORITIES FOR CODE REQUIREMENTS.
Note: This fixture requires two grounds to be connected. One on mounting
bracket(A) and another on the back of fixture(B).
start here
Make electrical connections from supply wire to fixture lead wires. Refer to instruction
85
E
8
A
8
4
8
87
5
86
83
2
8
8
1
HINKLEY LIGHTING 12600 Berea Road Cleveland, OH 44111 800.446.5539 / 216.671.3300 www.hinkleylighting.com
sheet (I.S. 18) and follow all instructions to make all necessary wiring connections.
Then refer back to this sheet to continue installation of this fixture.
1. To mount fixture, line up rectangular cut outs (4) on back of fixture (B) with
hooks (5) on the top of mounting bracket (A). Holding the fixture at a slight angle
slide cut outs (4) over both hooks (5), then slide slots (6) from the bottom back of
fixture (B) over screws (7) on mounting bracket (A). - see Drawing 2.
2. Thread the two 8-32 battery nuts (3) provided onto screws (7).
1. Bottom of fixture can now be lamped accordingly.
2. Re-place bottom lens cover (2) and secure with the 2 screws (1) - see Drawing 2.
3. To lamp top of fixture. remove lens cover (8) by un-threading 2 screws (9).
4. Top of fixture can now be lamped accordingly.
5. Replace lens cover (8) and secure with the 2 screws (9).
Note: Maximum wattage for the 1664/1660 is GU-10, 20 watt MR-16
2.7.08
 Loading...