

Hiniker VERSAPLOW 4208, VERSAPLOW 4210 Operator's Manual

SKID STEER LOADER VERSAPLOW
MODELS 4208, 4210
OPERATOR’S MANUAL
DO NOT USE OR OPERATE THIS EQUIPMENT UNTIL THIS MANUAL
HAS BEEN READ AND THOROUGHLY UNDERSTOOD
PART NUMBER 27000355


Table of Contents 1
TABLE OF CONTENTS
27000355 9/19 MANUALS/27000355
TO THE PURCHASER .................................................................................................................. 2
SAFETY ......................................................................................................................................... 3
OPERATING PROCEDURES .................................................................................................... 4-8
MAINTENANCE ....................................................................................................................... 9-10
TROUBLE SHOOTING ................................................................................................................11
VERSAPLOW ASSEMBLY ..................................................................................................... 12-15
SPECIFICATIONS ....................................................................................................................... 16
WIRING DIAGRAM ..................................................................................................................... 17
HYDRAULIC DIAGRAMS ............................................................................................................ 18
ELECTRICAL PIN LAYOUT ........................................................................................................ 19
WARRANTY ................................................................................................................................ 21
2 To The Purchaser
TO THE PURCHASER
This product is designed and manufactured to
give years of dependable service when properly
maintained and used for the purpose for which
it is intended. Never allow anyone to operate
this equipment until they fully understand the
complete contents of this manual. It is the
responsibility of owners who do not operate this
equipment to ensure the operator is properly
instructed and understands the contents of this
manual. It is also the owner’s responsibility to
ensure that anyone operating this equipment is
mentally and physically capable of so doing.
Important information is contained in this
manual to help ensure safe and efficient
operation.
If you have any questions about this manual, or
the equipment discussed herein, contact your
snowplow dealer.
TAKE NOTE! THIS SAFETY ALERT
SYMBOL FOUND THROUGHOUT THIS
MANUAL IS USED TO CALL YOUR
ATTENTION TO INSTRUCTIONS INVOLVING
YOUR PERSONAL SAFETY AND THE SAFETY
OF OTHERS. FAILURE TO FOLLOW THESE
INSTRUCTIONS CAN RESULT IN INJURY OR
DEATH.
All references to Left or Right are defined as
viewing the plow from the cab of the machine.
This Operator’s Manual is shipped with this
equipment. Contact your dealer for additional
copies.
Always obtain original factory service parts.
Substitute parts could adversely affect
equipment performance and warranty.
Check that your dealer has forwarded the delivery
report form along with the plow identification
number because it helps maintain maximum
service and warranty benefits. This does not put
you on any mailing list, and information thereon
is not available to others.
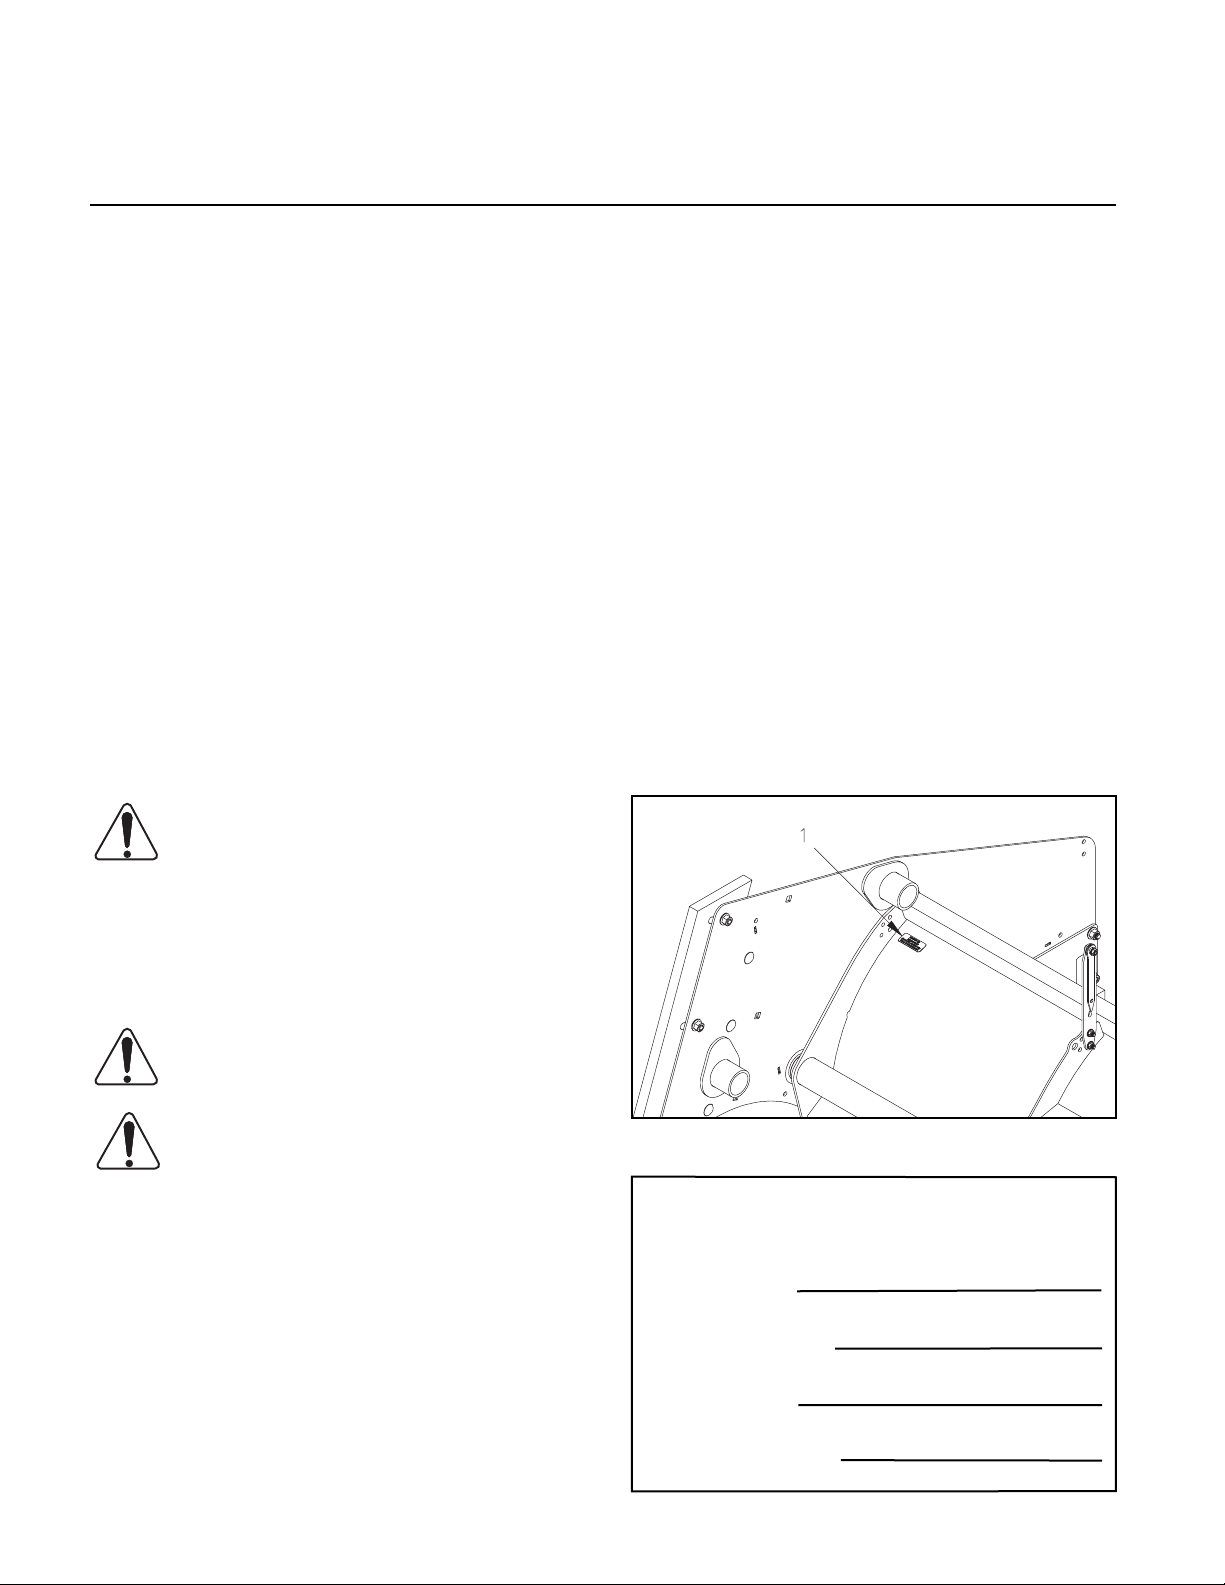
Your plow’s identification number plate is at
location (1) in the following illustration.
THIS SYMBOL MEANS:
- ATTENTION!
- BECOME ALERT!
- YOUR SAFETY IS INVOLVED!
SAFETY SIGNAL WORDS:
DANGER: Indicates an imminently hazardous
situation that, if not avoided, will result in death or
serious injury.
WARNING: Indicates a potentially hazardous
situation that, if not avoided, could result in death
or serious injury.
CAUTION: Indicates a potentially hazardous
situation that, if not avoided, may result in minor or
moderate injury, or damage to components.
NOTE: Addresses safety practices not related to
personal safety.
DWG NO. 7602
Record the following information for later
reference when obtaining service parts:
Purchase Date
Purchaser’s Name
Dealer’s Name
Machine I.D. No.

SAFETY
Safety 3
This is a safety alert symbol. It alerts
an operator to information concerning
personal safety. Always observe
and heed these symbols and instructions,
otherwise death or serious injury can result.
Operator safety is a principle concern in
equipment design and distribution. However,
many accidents occur because a few seconds
of thought, and a more careful approach
to handling, were ignored. Accidents can
be avoided by knowing and following the
precautions cited in this manual.
GENERAL SAFETY
1. Read this manual thoroughly. Make sure
the operator understands it and knows
how to operate this equipment safely. This
equipment can kill or injure an untrained or
careless operator and bystanders. If you
sell this equipment, ensure the new owner
acknowledges receipt of this manual.
BEFORE OPERATION
1. Discipline yourself to visually check for
worn, damaged or cracked parts before
starting use. Replace these with genuine
factory service parts.
2. Escaping hydraulic oil under pressure can
penetrate the skin, causing serious injury.
Do not use your hand to check for leaks.
Use a piece of paper or cardboard to ! nd
suspected leaks. Tighten all connections
before pressurizing hydraulic lines. If " uid is
injected into the skin, get medical attention
immediately to prevent serious infection.
3. Check all controls and operating functions
of the machine in a safe area before starting
to work.
DURING OPERATION
2. This manual Does Not instruct the operation
or maintenance of the skid steer loader.
Obtain training on control and function
of the skid steer loader from your loader
dealer.
3. This plow is intended for plowing snow
only. Plowing gravel, rocks, etc., or using
the plow for any purpose other than plowing
snow could result in harm to the operator
or bystanders or cause damage to the plow
and will void the warranty.
4. Do not attempt to handle or service this
equipment, or direct others to do the same,
unless you know how to do it safely and
have the proper tools for the job.
5. Do not service or otherwise handle a plow
in the raised position unless it is securely
blocked against unexpected falling.
6. Keep hands, feet, hair, and clothing away
from moving parts.
1. Always wear the seat belt and lower the
seat bar, if equipped, when operating the
loader.
2. Make sure all controls are in the neutral
position before starting the loader.
3. Ensure everyone is clear of the machine,
especially away from blind areas of the
operator, before actuating hydraulics or
operating this equipment.
4. Do not plow snow at excessively high
speeds.
5. Avoid hitting objects that will damage your
plow.
6. Set the brakes and stop the loader’s engine
before adjusting or servicing your plow.
AFTER OPERATION
7. Do not alter the equipment to the extent of
compromising safety or performance.
1. Park the plow on a solid, level surface.
4 Operating Procedures
OPERATING PROCEDURES
IMPORTANT: To prevent damage to
snowplow components, skid steer
loaders with a “High Flow/Low Flow”
hydraulic system must be operated in the
Low Flow setting when the plow is attached.
ATTACHING PLOW
Mount the plow on the skid steer loader by
driving the loader into the mount frame, then
set the brakes and relieve hydraulic pressure
before exiting the cab. Secure the plow frame
to the loader as instructed in the loader
manual. Make sure all latches are fully locked
in place to prevent the plow from detaching.
Clean quick couplers of dirt before making
hydraulic connections. Make sure quick
couplers are fully engaged. If quick couplers
do not fully engage, check that the couplers
are the same size and type. Check also to see
that hydraulic pressure has been relieved.
See your loader or attachment dealer for
coupler information.
When using a 7 or 14 pin harness that operates
the plow through the base machines internal
controls operators need to push and hold the
joystick button speci! c to each manufacturer
which will activate a solenoid valve.
Rotate the box ends (forward or backward) by
pushing and holding the appropriate joystick
button speci! c to each machine while directing
oil through the auxiliary ports. Reverse rotation
by pushing and holding the appropriate joystick
button speci! c to each machine while reversing
the oil " ow direction through the auxiliary ports.
Clean electrical connections then check that
the pins and receptacles are aligned before
plugging the connector on the plow into the
connector on the loader.
Test the angling and rotating box end functions
in a safe area before using the plow.
CONTROLLING PLOW FUNCTIONS
Raise and lower the plow by operating the
loader arms as you would for any other
attachment. Avoid tipping the mount plate
forward to apply down pressure on the plow.
Angle the plow left and right by directing oil
through the auxiliary hydraulic ports on the
skid steer loader. Reverse oil flow to angle
the blade the opposite direction.
Release the hydraulic flow controller to hold
the blade at an angle position between full
left or full right. If the plow angles opposite
from what is expected, switch couplers on the
two feed hoses that connect to the loader.
DWG NO. 7603
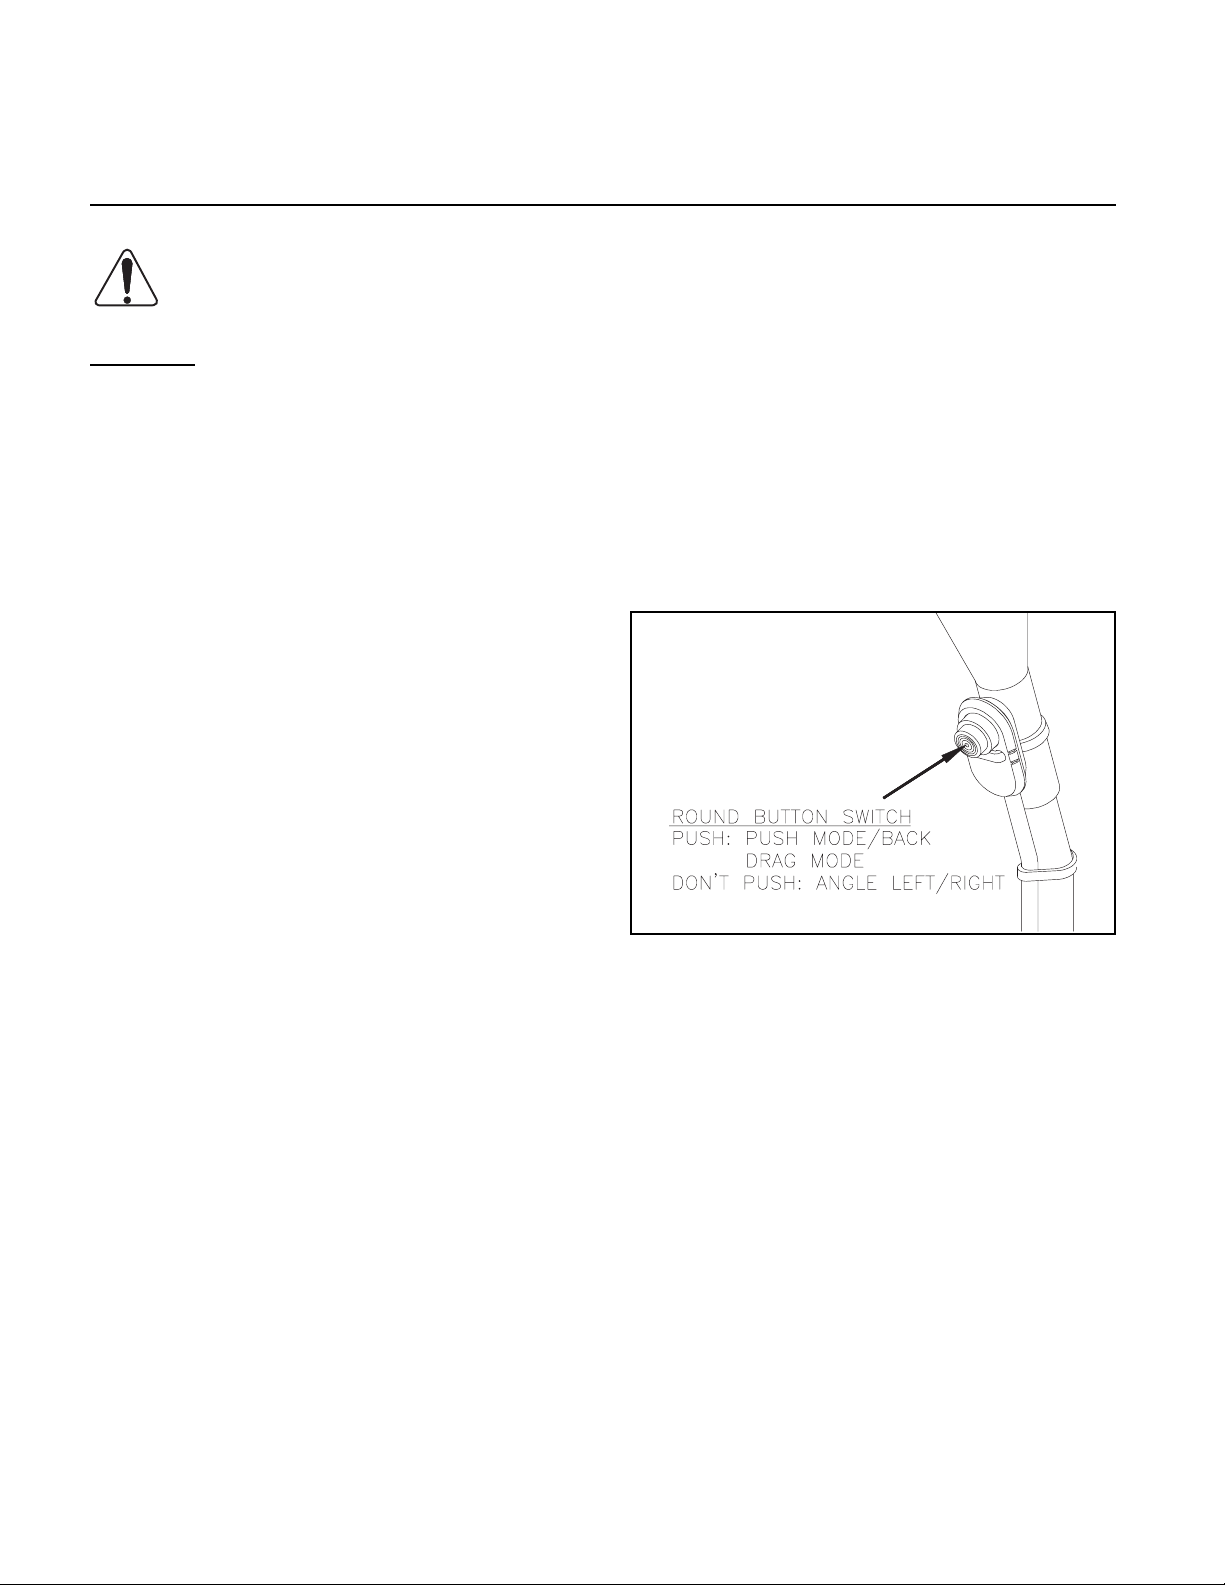
When using a Fox universal controller rotate
box ends rearward by pushing and holding the
round button switch while directing oil to the
auxiliary ports on the skid steer loader putting
the plow in back drag mode.
Rotate box ends forward by pushing and holding
the round button switch while reversing the oil
flow direction to the auxiliary hydraulic ports on
the loader to put plow in push mode.
To hold box ends at an intermediate position
between full forward or full back, release
hydraulic flow controller, then release round
button switch.
Box ends will move more freely if rotating box
end functions are done with plow in raised
position to avoid resistance from ground.
TRANSPORTING PLOW
Raise plow to a position where it does not block
your view forward. Transport plow with hydraulic
flow off or in neutral to prevent accidental
lowering of plow. Never adjust blade position
while driving.
PLOWING SNOW
WARNING: Always wear seat belt
and lower seat bar, if equipped, when
plowing snow. Sudden contact with a
hidden object can result in serious personal
injury.
Inspect areas to be plowed before snowfall for
potential hazards, and mark obstructions with
stakes that will be seen when snow covers the
ground. Identify any emergency equipment and
utility outlets that may need to be cleared in the
event of a storm. Prepare a plan beforehand for
clearing snow from tight or enclosed areas and
locate sites for stacking snow.
Operating Procedures 5
DWG NO. 7742
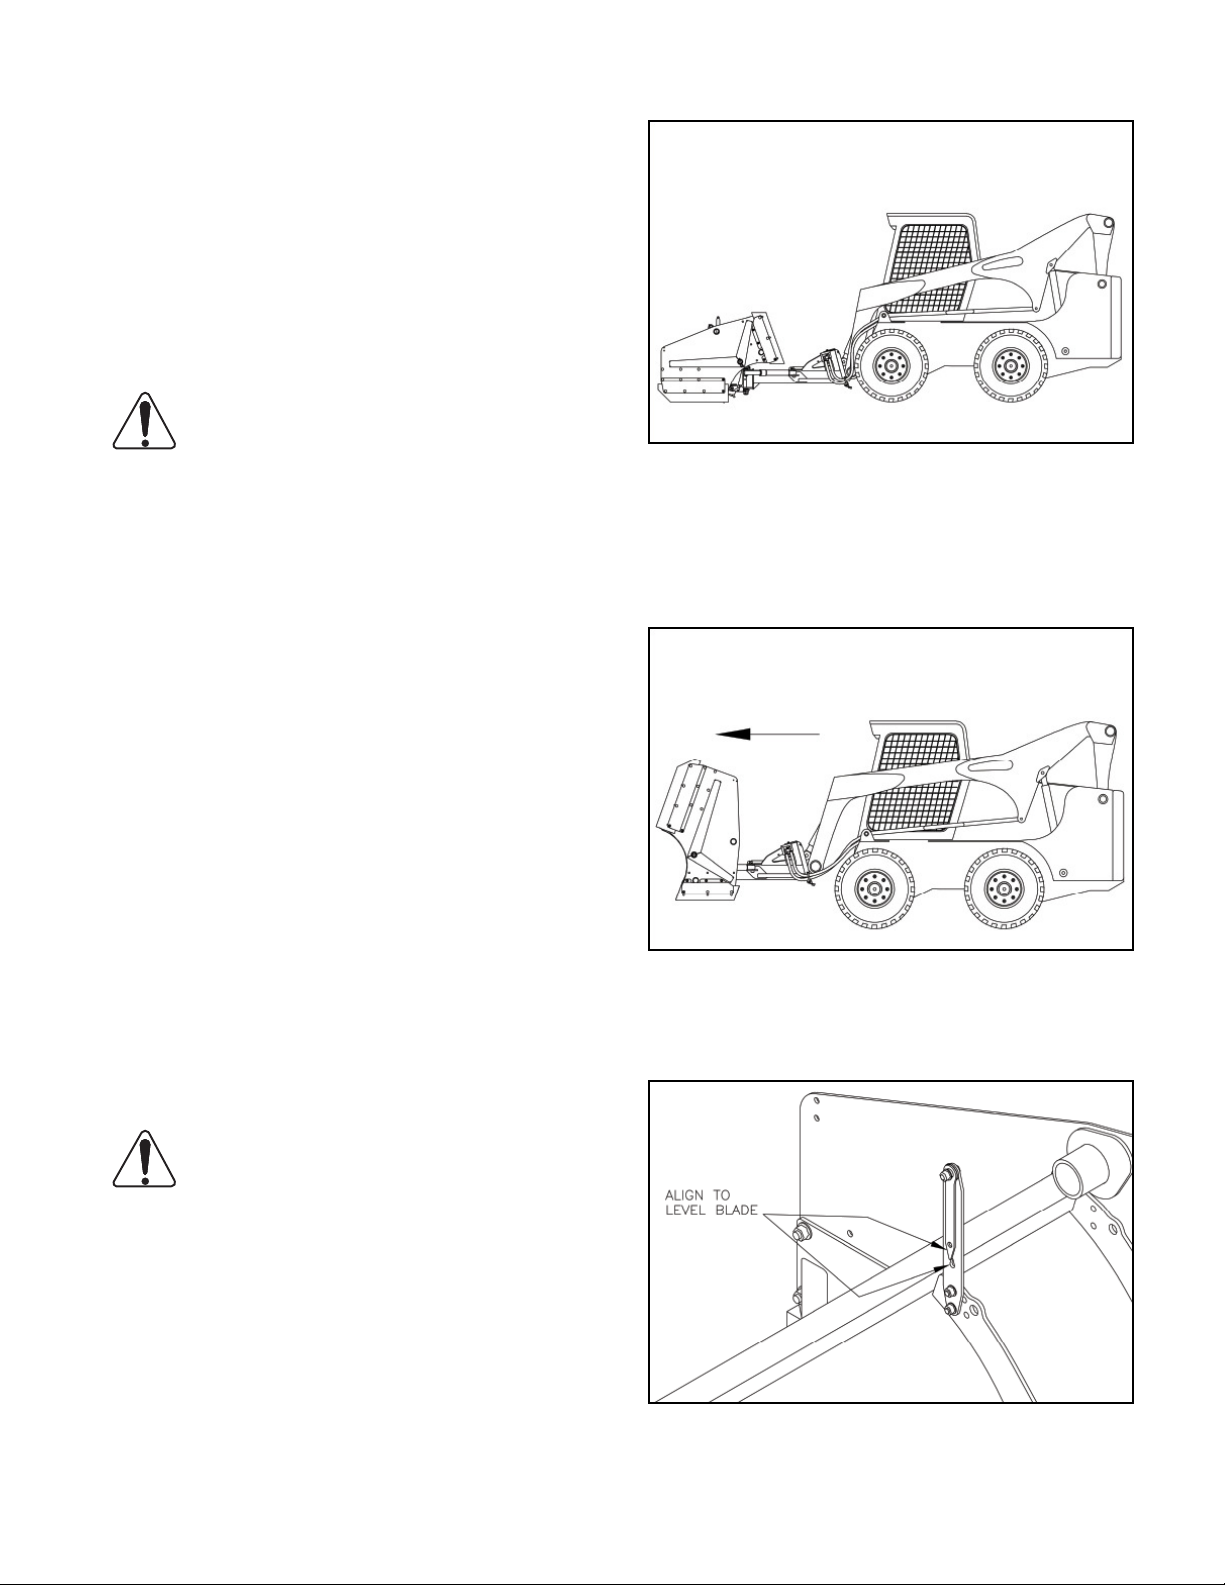
To back drag snow away from a parking stall or
building, lift plow up off of ground and straighten
plow across loader. Rotate box ends all the way
rearward.
Set the loader lift arms into the float mode so
the plow can follow the contour of the ground
and clean up low areas while plowing snow.
Always plow snow as it is accumulating. Wet
snow may weigh about 12 pounds per cubic
foot. The weight of snow being pushed by your
plow may increase to several tons.
Allowing snow depth to grow to unmanageable
levels can cause difficult removal problems and
can be costly in terms of wear on equipment.
WARNING: Serious personal injury
can result from plowing at excessive
speeds, as well as costly damage to
equipment and property, if an obstruction is
encountered while plowing. Do not exceed
10 mph while plowing.
DWG NO. 7743
Slowly drive into area to be cleaned out lower
cutting edge to ground.
DWG NO. 7744
Tilt plow blade to align level indicators.
 Loading...