

Hindware EWC, EWC MATRIX, EWC STUDIO, EWC CLEO, EWC VENUS Installation Instructions Manual
...
INSTALLATION INSTRUCTIONS FOR
EWC COUPLED P/S WITH CISTERN
S. No.
1. EWC STUDIO with Cistern
2. EWC MATRIX with Cistern
3. EWC CLEO with Cistern
4. EWC PLUTO with Cistern
5. EWC VENUS with Cistern
6. EWC CLIPPER with Cistern (S-220)
7. EWC FLORENCE with Cistern
8. EWC GRACIA with Cistern
9. EWC CLIPPER with Cistern (S-100)
Catalogue No.
20041 & 21028
20049 & 21030
20050 & 21034/21033
20065 & 21045
20066 & 21044
92026 &92106
92058 & 92122
92077 & 92128
92073 & 92126
Item Description
RECOMMENDED STANDARD SPECIFICATION TABLE FOR EWC P/S WITH CISTERN
S. No. Cat. No. Description Centre of outlet Dist. Between For S-Trap For S-Trap
1. 20041 & 21028 EWC STUDIO/ VISTA with Cistern 190 mm ±5 mm 135 mm 110 mm ±10 mm 20 mm ±5 mm
2. 20049 & 21030 EWC MATRIX with Cistern 180 mm ±5 mm 125 mm 110 mm ±10 mm 20 mm ±5 mm
3. 20050 & 21034/21033 EWC CLEO with Cistern Not Applicable Not Applicable 220 mm ±10 mm 20 mm ±5 mm
4. 20065 & 21045 EWC PLUTO with Cistern Not Applicable Not Applicable 110 mm ±10 mm 20 mm ±5 mm
5. 20066 & 21044 EWC VENUS with Cistern 190 mm ±5 mm 125 mm 110 mm ±10 mm 20 mm ±5 mm
6. 92026 &92106 EWC CLIPPER with Cistern (S-200) Not Applicable Not Applicable 220 mm ±10 mm 20 mm ±5 mm
7. 92058 & 92122 EWC FLORENCE WITH CISTERN Not Applicable Not Applicable 220 mm ±10 mm 20 mm ±5 mm
8. 92077 & 92128 EWC GRACIA WITH CISTERN Not Applicable Not Applicable 110 mm ±10 mm 20 mm ±5 mm
9. 92073 & 92126 EWC CLIPPER WITH CISTERN (S-100) Not Applicable Not Applicable 100 mm ±10 mm 20 mm ±5 mm
to floor For P-Trap (A) face of outlet to Dist between face of outlet to
finished wall (B) centre of outlet floor (D)
to wall (C)
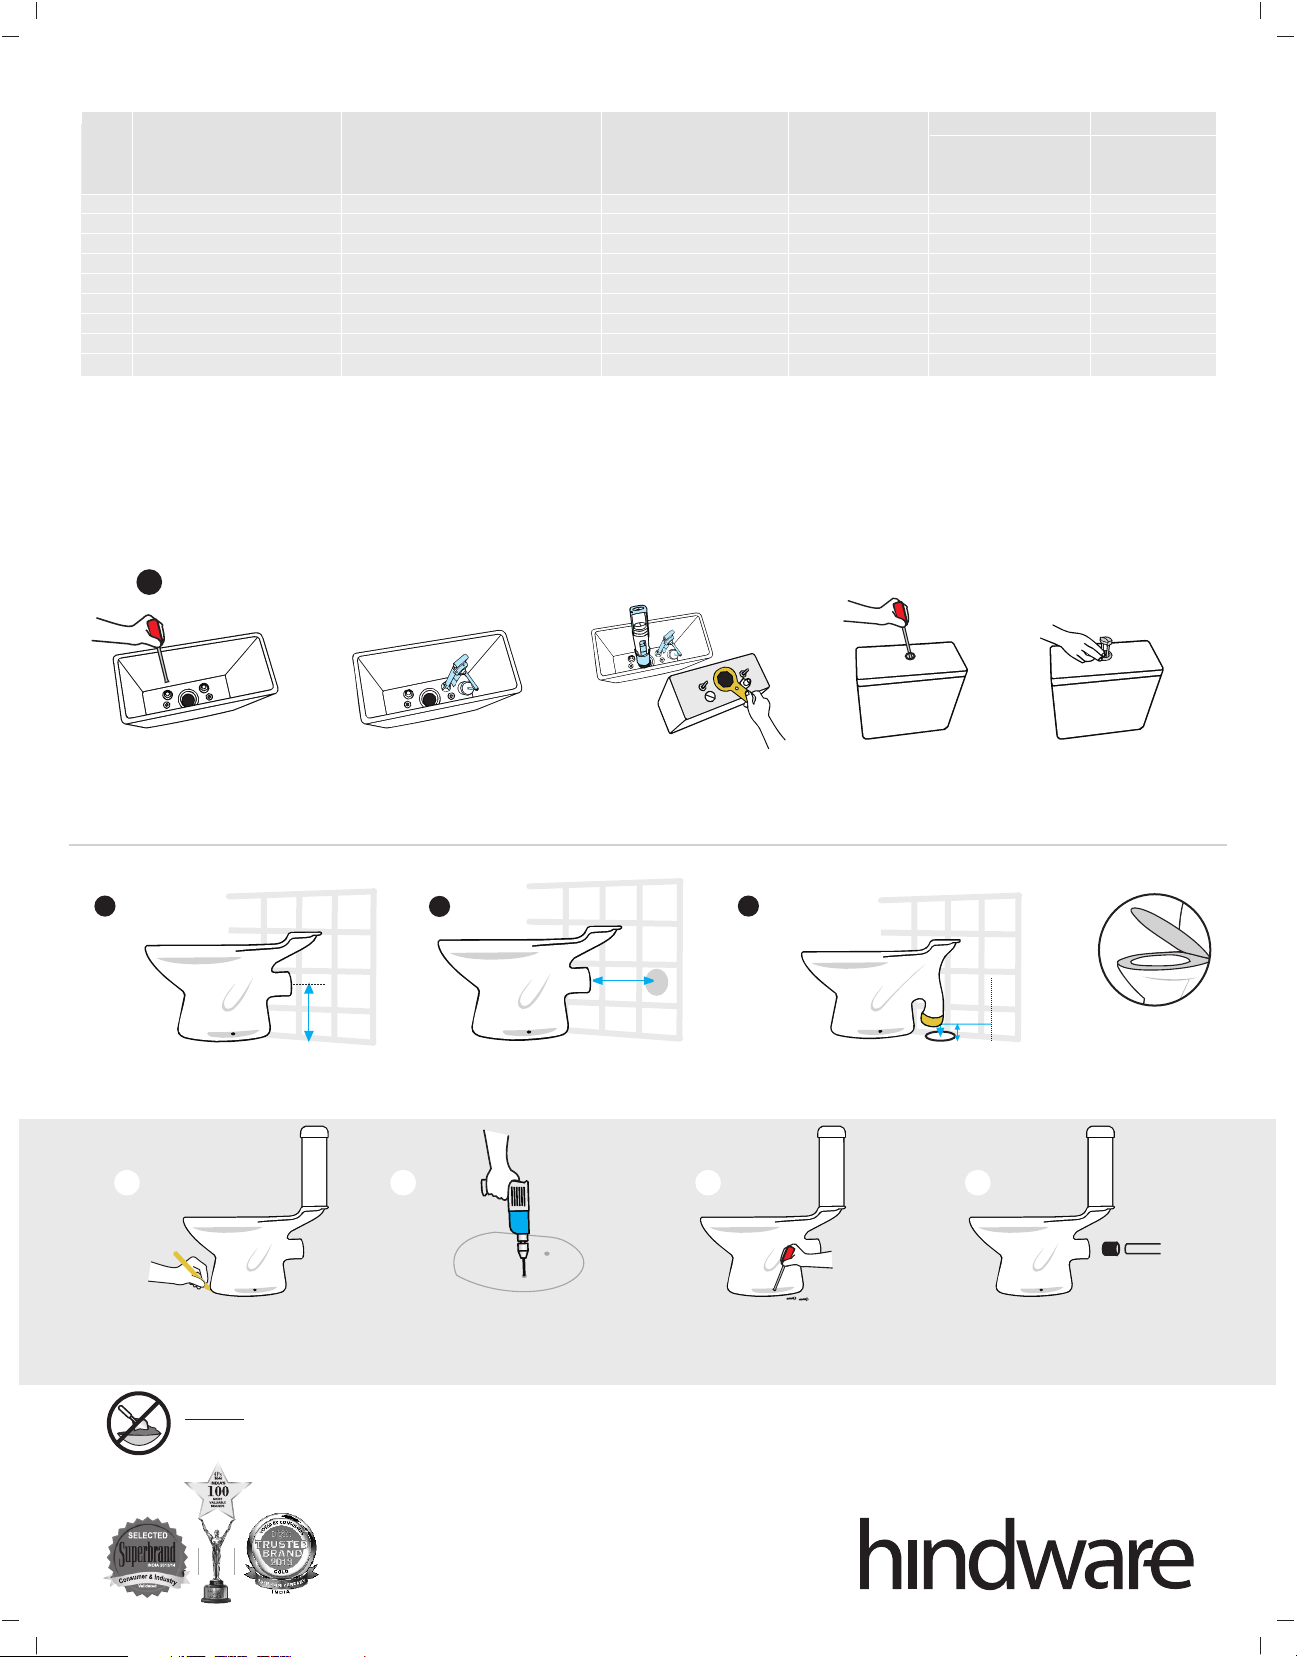
STEPS FOR INSTALLATION
All the fitting components should be fitted as mentioned below.
1
i) Fit the brass bolt in the
holes of Cistern with washer
& nut to couple the Cistern
with EWC.
ii) Fit the bottom inlet ball valve in left
or right side (depends upon the water
connection line) & other side hole
should be plugged with PVC plug.
iii) Fit the beta valve in the
central outlet hole & tight
the checknut at the bottom
of cistern.
iv) Fit the dual flush knob
on lid & screw with the
beta valve bracket for the
fitment of lid on Cistern
shell.
STEPS FOR INSTALLING 'P' TRAP STEPS FOR INSTALLING 'S' TRAP
2 4
A
Height of centre of outlet to floor to
be made as mentioned in (A)
(It is recommended to check with sanitaryware physically.)
3
B
Distance between face of outlet pipe to
wall as mentioned in (B) Accordingly
outlet to be provided in the wall.
C
D
The outlet hole should be made on floor
as mentioned in (C )
FLOOR FIXING
1 2 3
Make the outlet line of EWC and
fixing hole postions on the floor
with marker pen after placement of
complete set.
Remove the EWC set and make the
hole on marked postion with the help
of 5 mm drill bit and put sleeves into
the drilled hole.
marked position and fit t he screw
Again place the EWC set on
in the hole s o that it can be
tightened inside the sleeves .
4
Rubber gasket should be used
with waste outlet Connect the water
connection with the flexible
connecting pipe.
v) Put both the buttons
(6L/3L) inside the dual
flush Knob.
It is suggested to fit
the seat cover
before
installation
CAUTION
Do not fill cement mortar inside the bottom of EWC otherwise due to expansion of cement, crack may develop in the closet foot.
 Loading...