

Himsa NOAHlink User Manual

www. h i m s a . c o m

NOAHlink Users Manual
Language Versions
NOAHlink Users Manual ............................................................. 1
Manual del usuario NOAHlink .................................................. 39
Manual do Usuário NOAHlink .................................................. 77
Manuel d’utilisation de NOAHlink ......................................... 115
Manuale per l’utente NOAHlink ............................................. 153
7-26-66401/07
2010-503100 (R10)


1
NOAHlink Users Manual

2
NOAHlink is manufactured for HIMSA by:
GN Otometrics A/S
Hørskætten 9
DK-2630 Taastrup
Denmark
Trademarks
NOAHlink is a trademark of HIMSA A/S.
Windows is a registered trademark of Microsoft Corporation.
MPEG Layer-3 audio decoding technology licensed from Fraunhofer IIS and
Thomson.
Copyright
This manual is copyrighted by HIMSA A/S with all rights reserved. Under
copyright laws, this manual cannot be reproduced in any form without written
permission of HIMSA A/S.
© 2001 by HIMSA A/S. All rights reserved.
Information in this document is subject to change without notice.

3
Contents
1 Introduction .......................................................................... 5
1.1 ABOUT THIS MANUAL ......................................................................................... 5
2 Safety Issues .......................................................................... 6
2.1 MANUFACTURER RESPONSIBILITY ....................................................................... 6
2.2 SYMBOLS ............................................................................................................ 6
2.2.1 NOAHlink Symbols ............................................................................ 6
2.2.2 Charger Unit Symbols ....................................................................... 7
2.3 WARNING NOTES ................................................................................................ 7
2.3.1 NOAHlink Warning Notes ................................................................. 7
2.3.2 Charger Unit Warning Notes ............................................................ 9
3 Description .......................................................................... 10
3.1 STANDARD ELEMENTS ...................................................................................... 10
3.2 OPTIONAL ACCESSORIES ................................................................................... 11
3.3 OVERVIEW ........................................................................................................ 11
4 Maintenance ........................................................................ 12
4.1 UNPACKING AND INSPECTION ............................................................................ 12
4.2 STORAGE AND SHIPMENT .................................................................................. 12
4.3 CARE AND MAINTENANCE ................................................................................. 13
4.4 SERVICE AND REPAIR ........................................................................................ 13
5 Installation .......................................................................... 14
6 Battery Usage ...................................................................... 16
6.1 ALKALINE BATTERY ......................................................................................... 16
6.2 RECHARGEABLE BATTERY ................................................................................ 17
6.2.1 Discharging and Recharging .......................................................... 18
7 Using NOAHlink ................................................................. 19
8 Configuring NOAHlink ..................................................... 22
8.1 GENERAL APPLICATIONS ................................................................................... 24
8.1.1 Connecting to NOAHlink ................................................................ 24
8.1.2 Setting Power, Battery and Language Options ............................... 26
8.2 ADVANCED APPLICATIONS ................................................................................ 28
8.2.1 Displaying Errors in NOAHlink and Bluetooth .............................. 28
8.2.2 Status Settings and User Preferences .............................................. 29
8.2.3 Testing Data Transfer Rates ........................................................... 31
8.2.4 Version Numbers and Kernel Upgrade ........................................... 32
8.2.5 Viewing and Setting the Log ............................................................ 33

NOAHlink Users Manual
4
A NOAHlink Troubleshooting ............................................. 35
B Technical Specifications .................................................... 36
B.1 NOAHLINK UNIT ................................................................ .............................. 36
B.1.1 Battery ............................................................................................. 36
B.1.2 Dimensions and Weight ................................................................... 36
B.1.3 Patient Safety .................................................................................. 36
B.2 CHARGER UNIT .................................................................................................. 37
B.2.1 Power Supply .................................................................................. 37
B.2.2 Dimensions and Weight ................................................................... 37
B.3 POWER ADAPTOR .............................................................................................. 37
B.3.1 Power Supply .................................................................................. 37
B.4 TRANSPORT AND STORAGE ................................................................................ 37
B.5 OPERATING ENVIRONMENT ................................................................................ 37
B.6 STANDARD AND OPTIONAL ACCESSORIES .......................................................... 37
NOAHlink Users Manual
5
1 Introduction
Your NOAHlink is a wireless Bluetooth communication device
optimized for use with NOAH 3. NOAHlink allows you to program
hearing instruments with ease, both in your office and on location.
You can use rechargeable or alkaline batteries to power your unit.
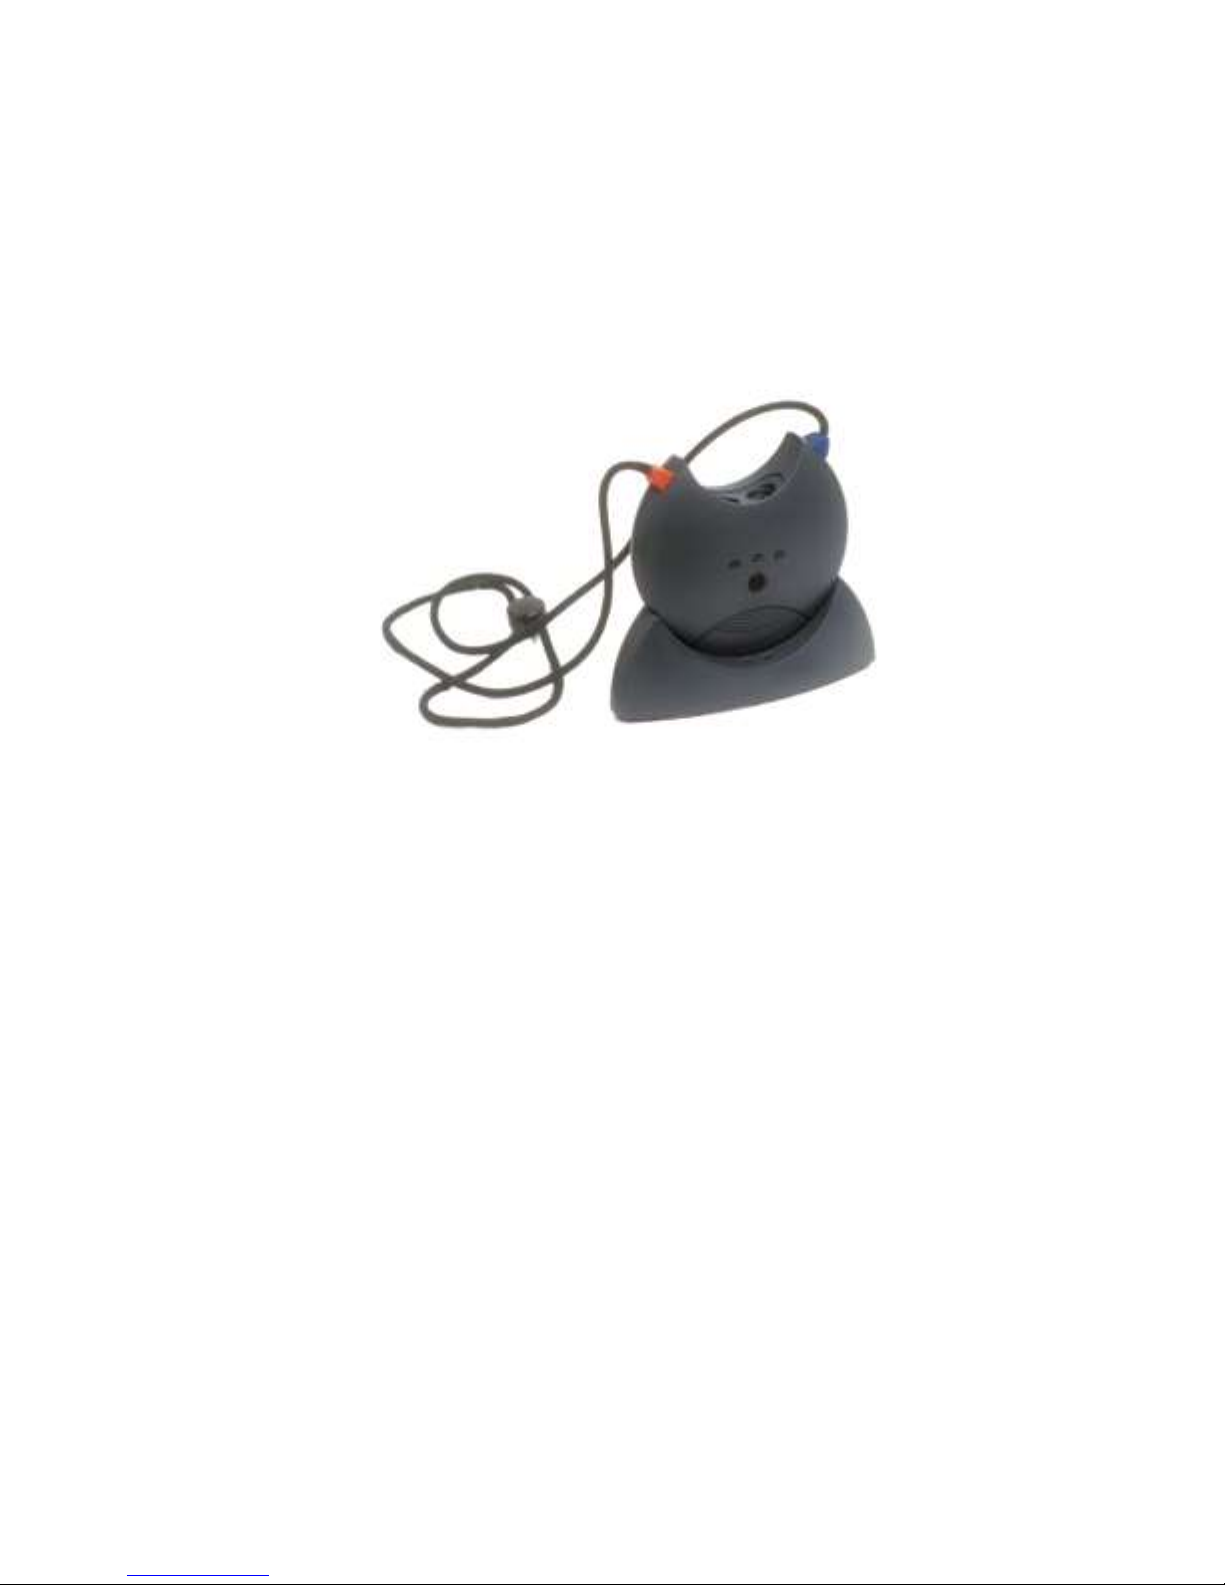
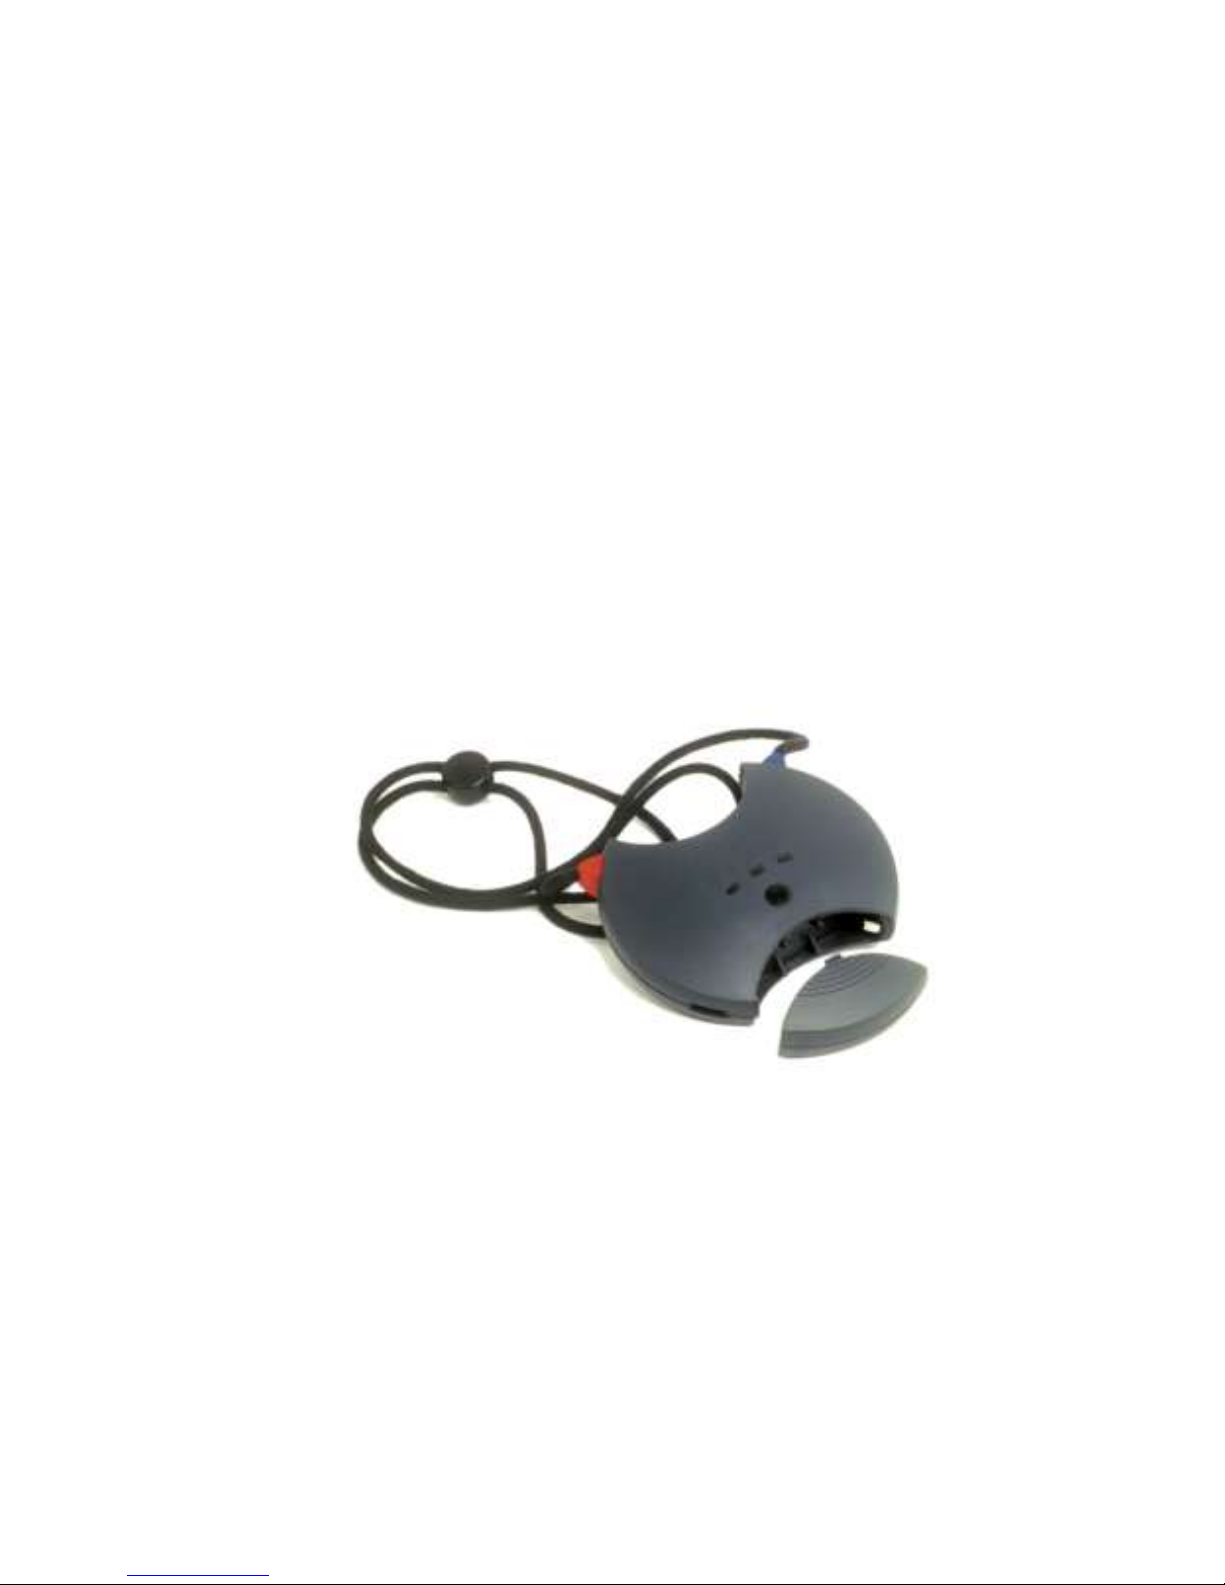
Figure 1: NOAHlink, Neck String and Charger Cradle
1.1 About this Manual
This manual provides a detailed description of the following
NOAHlink procedures:
installation
daily use
charging/discharging
configuration
In addition, the following relevant areas are addressed:
safety
maintenance
technical specifications
NOAHlink Users Manual
6
2 Safety Issues
2.1 Manufacturer Responsibility
The manufacturer is to be considered responsible for effects on
safety, reliability, and performance of the equipment ONLY IF:
all assembly operations, extensions, re-adjustments,
modifications or repairs are carried out by the equipment
manufacturer or personnel authorized by the manufacturer
the electrical installation to which the equipment is connected
complies with EN/IEC requirements
the programming cable and connection to the hearing
instrument comply with the requirements in Section B.1.3 –
Patient Safety
the equipment is used in accordance with the instructions for use
2.2 Symbols
2.2.1 NOAHlink Symbols
SYMBOL
DESCRIPTION
NOAHlink carries this symbol to indicate compliance with Type BF
of EN 60601-1.
NOAHlink carries this symbol when it is important that the user
refer to associated warnings in this guide.
NOAHlink and this manual are CE-marked according to the Medical
Devices Directive 93/42/EEC.
Classified with respect to electrical shock, fire, mechanical and other
specified hazards in accordance with UL2601-1 and CAN/CSAC22.2 NO 601.1-90.
NOAHlink carries this symbol to identify the positioning of the
battery inside the battery compartment.
NOAHlink carries this symbol to indicate that, in France, it is only
permitted to use the device indoors.

NOAHlink Users Manual
7
SYMBOL
DESCRIPTION
FCC
This device complies with part 15 of the FCC rules. Operation is
subject to the following two conditions:
1. This device may not cause harmful interference.
2. This device must accept any interference received, including
interference that may cause undesired operation.
Refer to Notes 5 through 7, Section 2.3.1, for more details.
IC
The term "IC:" before the equipment certification number only
signifies that the Industry Canada technical specifications were met.
The instrument is marked with this symbol to indicate that it is
electronic equipment covered by the Directive 2002/96/EC on waste
electrical and electronic equipment (WEEE).
2.2.2 Charger Unit Symbols
SYMBOL
DESCRIPTION
The charger unit carries this symbol when it is important
that the user refer to associated warnings in this guide.
The charger unit is CE-marked according to the EMC
Directive 89/336/EEC.
The charger unit carries this symbol to indicate that it is
suitable for direct current only.
2.3 Warning Notes
IMPORTANT: Keep your unit away from liquids.
Do not allow moisture inside your unit.
2.3.1 NOAHlink Warning Notes
SYMBOL
DESCRIPTION
1
Place the battery as indicated in the battery compartment.
Use only rechargeable batteries when NOAHlink is placed
in the charger unit. If you are using alkaline batteries, do not
attempt to charge your NOAHlink. Your alkaline batteries
may be damaged and leak, and this may in turn cause
damage to your NOAHlink unit. Damage caused by such
misuse will not be covered by the NOAHlink warranty.

NOAHlink Users Manual
8
Note 1: There are no user-serviceable parts inside the NOAHlink
cabinets. For the sake of safety, and in order not to void
the warranty, the cabinets should only be opened and
serviced by authorized service personnel. In case of
defects, please make a detailed description of the defect(s)
and contact your supplier. Do not use a defective
instrument.
Note 2: Do not use the instrument in the presence of flammable
anesthetics (gases).
Note 3: NOAHlink may be disposed of as normal electronic waste,
according to local regulations. Please investigate local
regulations concerning the disposal of rechargeable and
alkaline batteries.
Note 4: Unwanted noise may occur if NOAHlink is exposed to a
strong radio field. Such noise may interfere with the
process of fitting a hearing instrument. Many types of
electrical devices, e.g. mobile telephones, may generate
radio fields. We recommend that the use of such devices in
the vicinity of NOAHlink is restricted as much as possible.
Note 5: Changes or modifications not expressly approved by the
manufacturer could void the user’s authority to operate the
equipment.
Note 6: This equipment has been tested and found to comply with
the limits for a Class B digital device, pursuant to part 15
of the FCC Rules. These limits are designed to provide
reasonable protection against harmful interference in a
residential installation. This equipment generates, uses and
can radiate radio frequency energy and, if not installed and
used in accordance with the instructions, may cause
harmful interference to radio communications. However,
there is no guarantee that interference will not occur in a
particular installation. If this equipment does cause
harmful interference to radio or television reception,
which can be determined by turning the equipment off and
on, the user is encouraged to try to correct the interference
by one or more of the following measures:
NOAHlink Users Manual
9
Reorient or relocate the receiving antenna.
Increase the separation between the equipment and
receiver.
Connect the equipment into an outlet on a circuit
different from that to which the receiver is connected.
Consult the dealer or an experienced radio/TV technician
for help.
Note 7: For use in Canada: To prevent radio interference to the
licensed service, this device is intended to be operated indoors
and away from windows to provide maximum shielding.
Equipment (or its transmit antenna) that is installed outdoors is
subject to licensing.
2.3.2 Charger Unit Warning Notes
SYMBOL
DESCRIPTION
2
Do not use NOAHlink with patients while it is placed in
the charger unit. Use only rechargeable batteries when
NOAHlink is placed in the charger unit. If you are using
alkaline batteries, do not attempt to charge your
NOAHlink. Your alkaline batteries may be damaged and
leak, and this may in turn cause damage to your
NOAHlink unit. Damage caused by such misuse will not
be covered by the NOAHlink warranty.
Note 1: The charger unit should be kept away from the patient area.
Note 2: There are no user-serviceable parts inside the charger unit
cabinets. For the sake of safety, and in order not to void the
warranty, the cabinets should only be opened and serviced by
authorized service personnel. In case of defects, please make a
detailed description of the defect(s) and contact your supplier.
Do not use a defective instrument.
Note 3: The charger may be disposed of as normal electronic waste,
according to local regulations.
NOAHlink Users Manual
10
3 Description
Your complete NOAHlink system consists of both standard
elements and optional accessories.
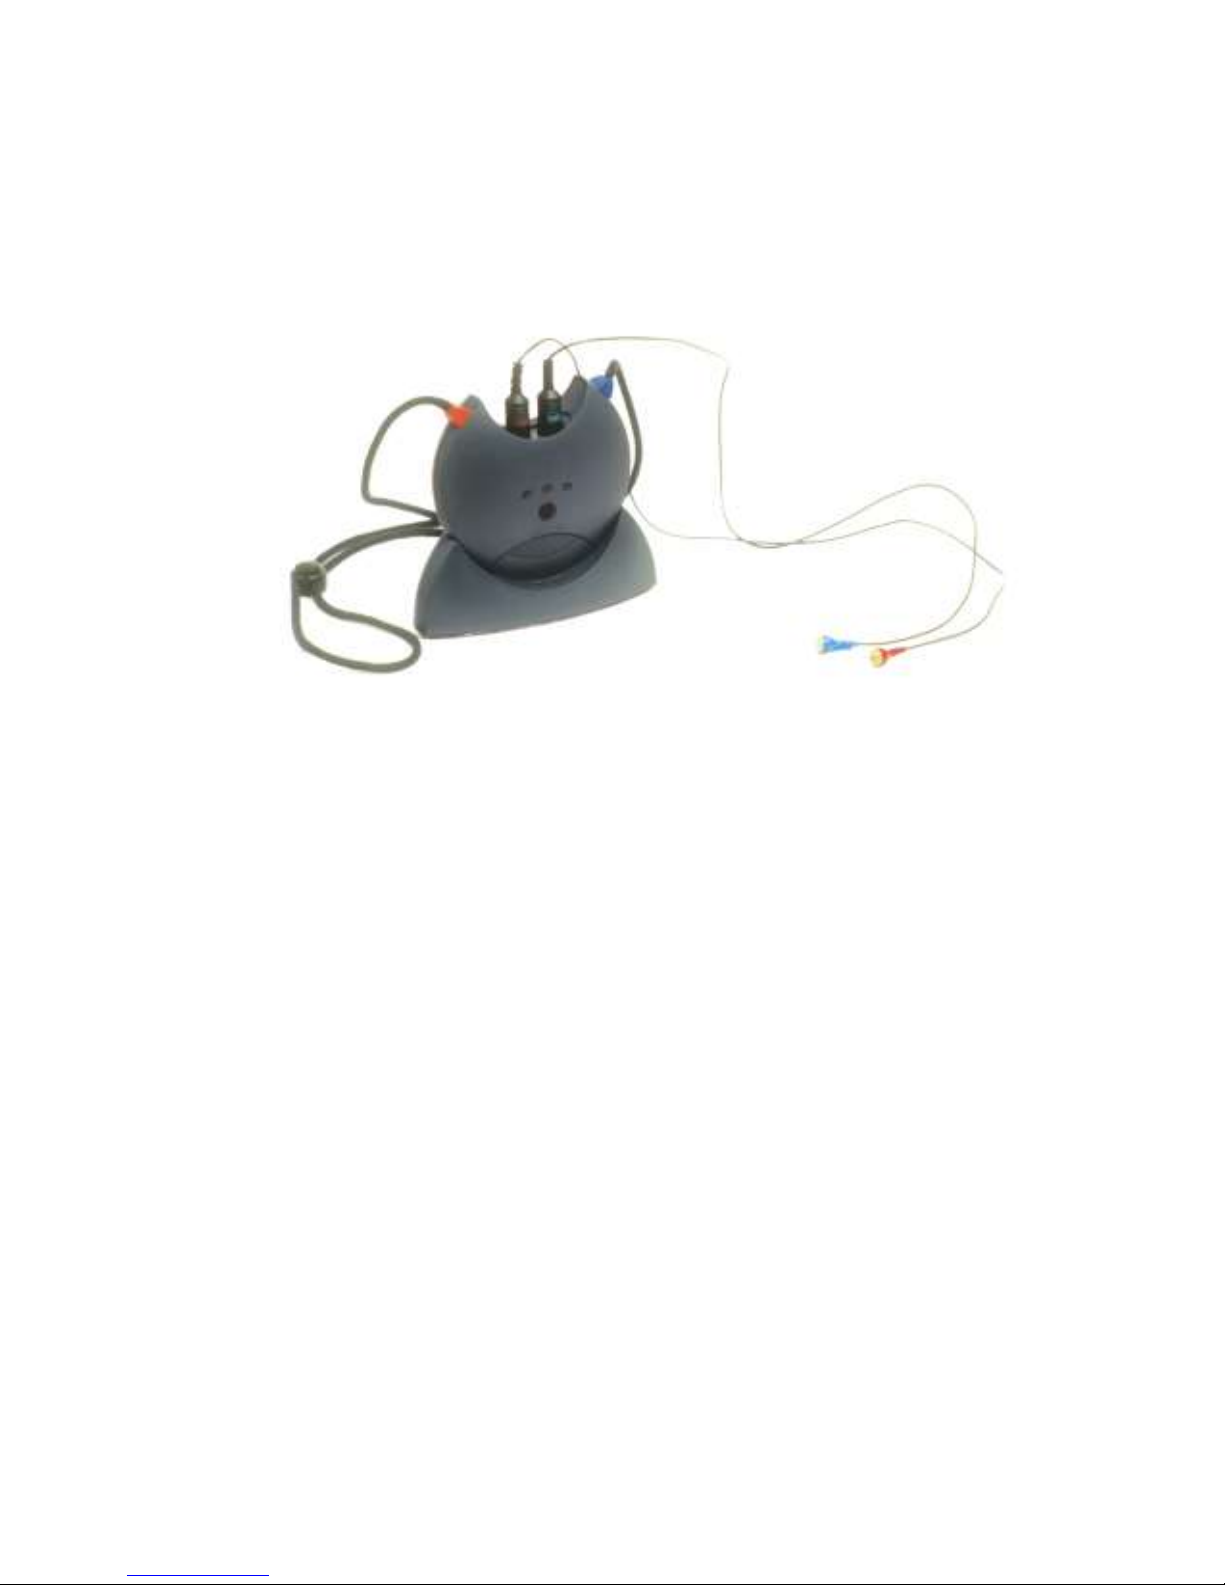
Figure 2: NOAHlink, Neck String and Cables
3.1 Standard Elements
The following standard elements comprise your NOAHlink system:
NOAHlink unit
Charger cradle
Rechargeable battery
Power adaptor
Users manual
Installation disk
Name labels
Neck string
Ezurio Bluetooth

NOAHlink Users Manual
11
3.2 Optional Accessories
You can obtain the following optional accessories from your
distributor:
Spare rechargeable batteries
Spare neck strings
Soft-sided case to hold NOAHlink, cables and spare batteries
3.3 Overview
The NOAHlink hardware serves as a standardized interface between
a PC and programmable hearing instruments – or a remote control
for programmable hearing instruments.
The top of the NOAHlink unit contains two connectors (6-pole
mini-DIN) for the cables to the programmable hearing instruments
(or remote control). This allows both a left and a right hearing
instrument to be programmed simultaneously.
The PC sends information about the communication protocol (for
example, communication type, voltage levels, clock frequency, etc.)
to NOAHlink, and asks NOAHlink to read data from, or write data
to, the programmable hearing instrument. The PC software for
programming the hearing instrument is made by the hearing
instrument manufacturer.
The cables for connecting hearing instruments to NOAHlink are
supplied by the hearing instrument manufacturer.

NOAHlink Users Manual
12
4 Maintenance
4.1 Unpacking and Inspection
NOAHlink is shipped in its own custom-made carton.
We recommend that you keep this carton in case you need to return
NOAHlink to your local distributor for service or repair.
You should notify your local distributor in the following
circumstances:
The packaging on your NOAHlink is damaged (contact your
carrier also)
Your NOAHlink is damaged
Your NOAHlink package does not contain all the standard
elements listed in Section 3.1
Your power adaptor is not the correct country version
Your NOAHlink fails to function
NOTE: If your NOAHlink needs to be repaired or replaced in a
case in which the carrier is liable, the distributor will
arrange for this without waiting for the claim against the
carrier to be settled.
4.2 Storage and Shipment
Always pack your NOAHlink with great care when storing or
shipping the instrument. Use the original carton if you need to return
NOAHlink to your local distributor for repair.
Remove the battery when storing or shipping your NOAHlink.
Always store your NOAHlink in a clean, dry environment. Ensure
the power has been turned off when the instrument is placed in an
enclosed container.

NOAHlink Users Manual
13
Remember to ensure the following when shipping your NOAHlink:
Seal the shipping container securely
Mark the container Fragile to ensure careful handling
In any correspondence, refer to your NOAHlink by serial
number
4.3 Care and Maintenance
Your NOAHlink and charger unit should be kept clean and free
from dust. Use a soft, slightly damp cloth with a small amount of
detergent to clean the unit and the cradle.
IMPORTANT: Keep your unit away from liquids.
Do not allow moisture inside the unit.
4.4 Service and Repair
Service and repair of electro-medical equipment should only be
carried out by the equipment manufacturer or by authorized
representatives.
The manufacturer reserves the right to disclaim all responsibility for
the operating safety, reliability and performance of equipment
serviced or repaired by other parties. Following repair, the safety of
all equipment should be verified by a qualified electronics engineer.

NOAHlink Users Manual
14
5 Installation
1. Select one of the following options:
a. Use the Ezurio Bluetooth device supplied with NOAHlink:
Do NOT attach the Ezurio device until advised to in the
following steps.
b. Use an ALREADY installed Bluetooth device other than
the Ezurio device supplied with NOAHlink:
In the following steps, use your own Bluetooth device
instead of Ezurio.
2. Place a rechargeable/alkaline battery in NOAHlink. Refer to
Chapter 6 for further details. (NOTE: If you are using a
rechargeable battery, you will first need to charge it.)
3. Remove NOAHlink from its charger cradle (if you have placed it
there while charging the battery).
4. Place your NOAHlink unit not more than five meters from your
PC to ensure adequate wireless communication.
5. Turn on your NOAHlink. Turn on your PC.
6. An installation CD is provided with NOAHlink. Put this into your
disk drive. If the program does not begin running straightaway, use
Windows Explorer to locate the Installation folder and doubleclick on Setup.exe.
7. Select your setup language and click Next.
8. After preparation completes, click Next.
9. The Install Shield Wizard Complete window appears. Click
Finish.
10. Follow the guidelines on the screen and plug your Bluetooth
device into your PC. Position the Bluetooth device at PC height,
and vertically, to ensure optimum performance.
11. The Found New Hardware Wizard may appear. If so, click Next
to install the software automatically.

NOAHlink Users Manual
15
12. Ensure that NOAHlink is still turned on. (If NOAHlink remains
idle for more than 30 minutes, it will automatically turn off.)
13. The NOAHlink Pairing Wizard window appears. Press Search to
search for NOAHlink devices.
14. The program searches for your NOAHlink. When a list of devices
appears, select the NOAHlink you wish to use. Click Pair
NOAHlink.
15. A window appears stating The NOAHlink device was
successfully paired. Click OK.
16. Refer to Chapter 8 in order to configure your NOAHlink unit.
17. NOTE: If you have more than one NOAHlink unit, it is
recommended that you attach one of the name labels that are
included in your NOAHlink package to the back of your
NOAHlink and write a suitable name on this label. Refer to
Section 8.1.1 for details on naming NOAHlink via your PC.
18. Refer to the NOAHlink site at www.himsa.com for:
a list of fitting modules that support NOAHlink. These
modules can use NOAHlink for programming hearing
instruments.
support and troubleshooting
NOAHlink Users Manual
16
6 Battery Usage
When installing your NOAHlink, you can use either rechargeable or
alkaline batteries. This section describes the procedure to use for
each battery type.
NOTE: It is recommended that you keep alkaline batteries
available when using your NOAHlink in case you forget
to recharge your rechargeable battery and it runs down
during a patient session.
NOAHlink is powered by battery – rechargeable or alkaline. The
battery is placed in the compartment at the bottom of the unit, as
illustrated below:
Figure 3: NOAHlink and Battery Lid
6.1 Alkaline Battery
Simply open the battery compartment of your NOAHlink unit and
place one alkaline AA (R6) 1.5V battery inside in the correct
position by matching the symbols on the battery to those on
NOAHlink.
NOAHlink Users Manual
17
6.2 Rechargeable Battery
The rechargeable battery is a NiMH battery.
IMPORTANT: You will first need to charge the rechargeable
battery (described below). This takes
approximately 13 – 15 hours. Thus, you will need
to charge the battery overnight before you can
install NOAHlink.
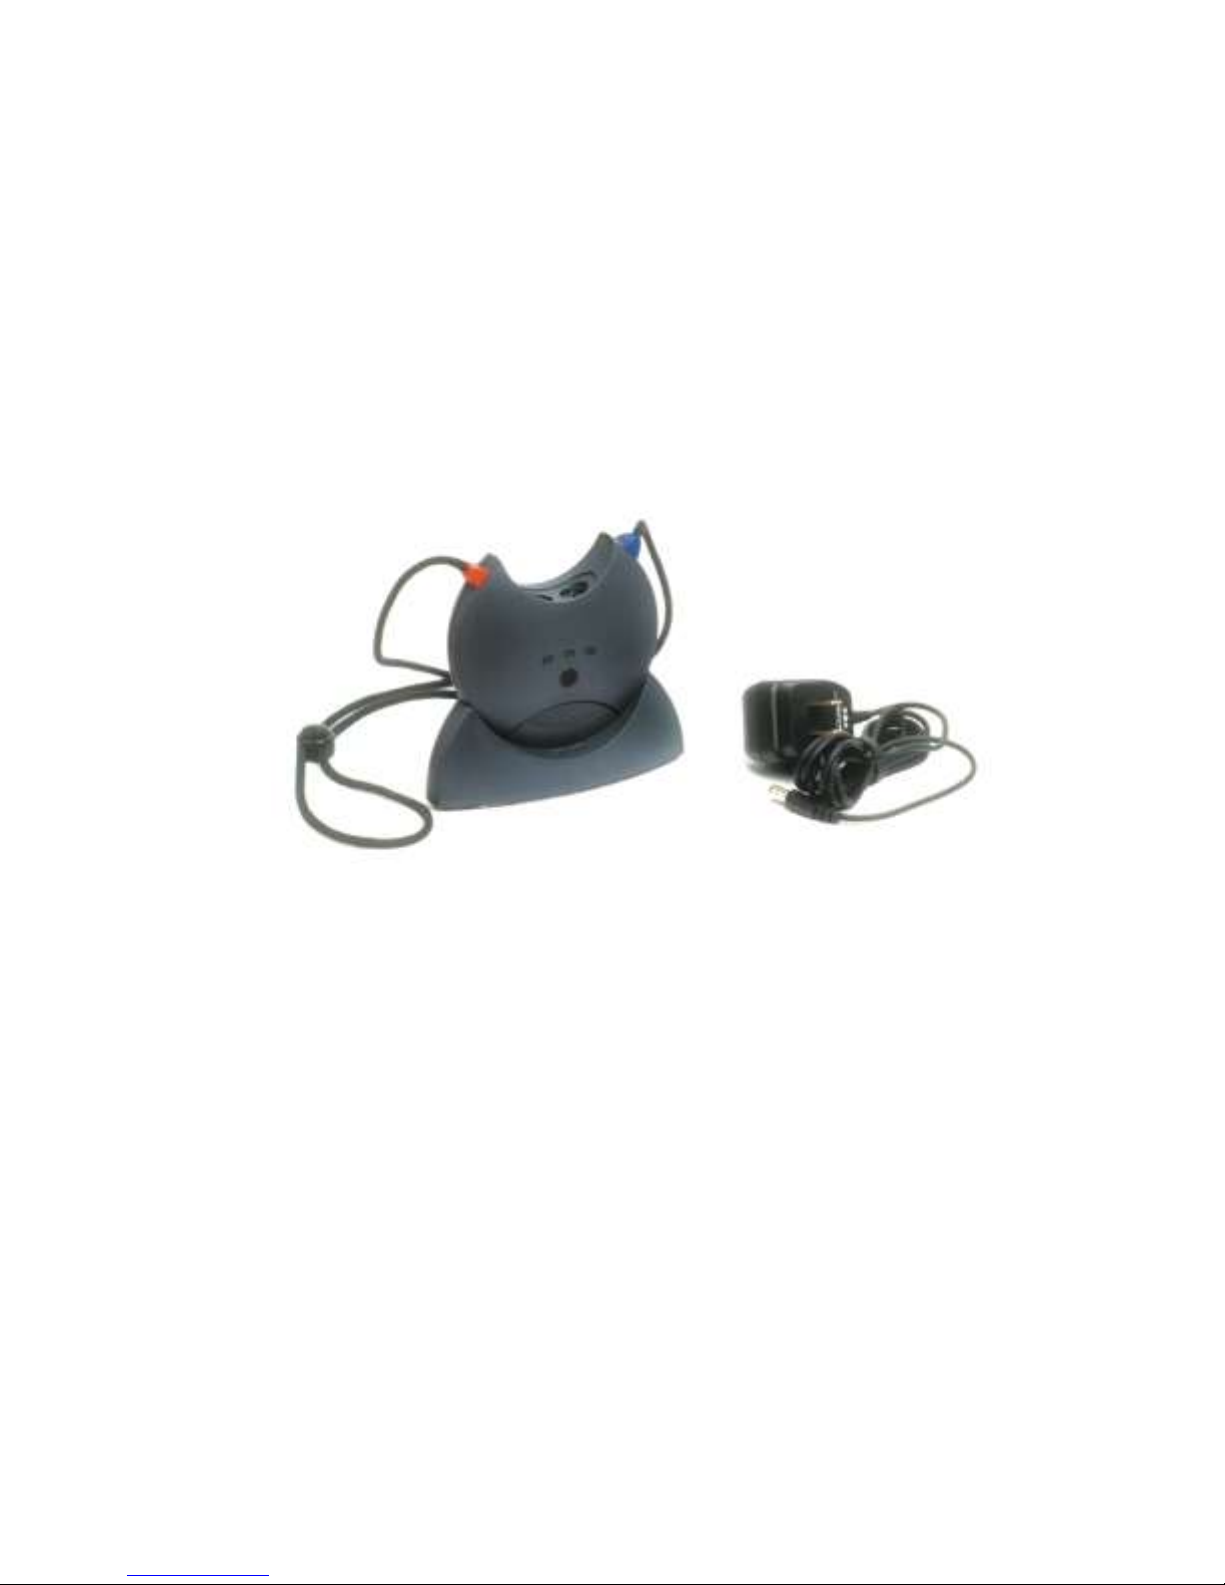
Figure 4: NOAHlink, Charger Cradle and Power Adaptor
The following describes how to charge your rechargeable battery:
Open the battery compartment of your NOAHlink unit. Place
the rechargeable battery in your unit in the correct direction
by matching the symbols on the battery to those on
NOAHlink.
Place your NOAHlink in its charger cradle, matching the
front of the cradle to the front of your NOAHlink.
Attach the charger cradle to the power adaptor and plug this
into a socket. Your battery automatically begins to charge
and a green light is displayed. This procedure takes
approximately 13 – 15 hours.

NOAHlink Users Manual
18
6.2.1 Discharging and Recharging
Your rechargeable battery – a NiMH battery – automatically
charges whenever it is placed in the charger cradle. However,
approximately once every three months, it is recommended that you
completely discharge, and then recharge, your battery. This ensures
that the rechargeable battery is always working to its fullest
capacity, and also helps to extend its lifetime.
NOTE: The entire process will take approximately 15 – 17 hours.
You will be unable to turn on your NOAHlink while
charging or discharging the unit’s battery.
IMPORTANT: Use only rechargeable batteries when NOAHlink is
placed in the charger unit. If you are using alkaline
batteries, do not attempt to charge your NOAHlink.
Your alkaline batteries may be damaged and leak,
and this may in turn cause damage to your
NOAHlink unit. Damage caused by such misuse will
not be covered by the NOAHlink warranty.
The following describes the discharging and recharging procedure:
Place your NOAHlink unit in its charger cradle, matching
the front of the cradle to the front of your unit.
Attach the charger cradle to the power adaptor and plug this
into a socket.
Press the discharging button on the charger cradle. A red
light at the front of the unit remains lit while discharging
takes place.
As soon as discharging is complete, the charger cradle automatically
begins to recharge your NOAHlink and a green light is displayed.
NOAHlink Users Manual
19
7 Using NOAHlink
The following procedure describes how to use your NOAHlink to
program a hearing instrument:
WARNING: Always remove NOAHlink from its charger cradle
before you begin to program a hearing instrument, as
the unit switches off automatically when placed in
the charger.
Always keep the charger cradle away from the
patient area.
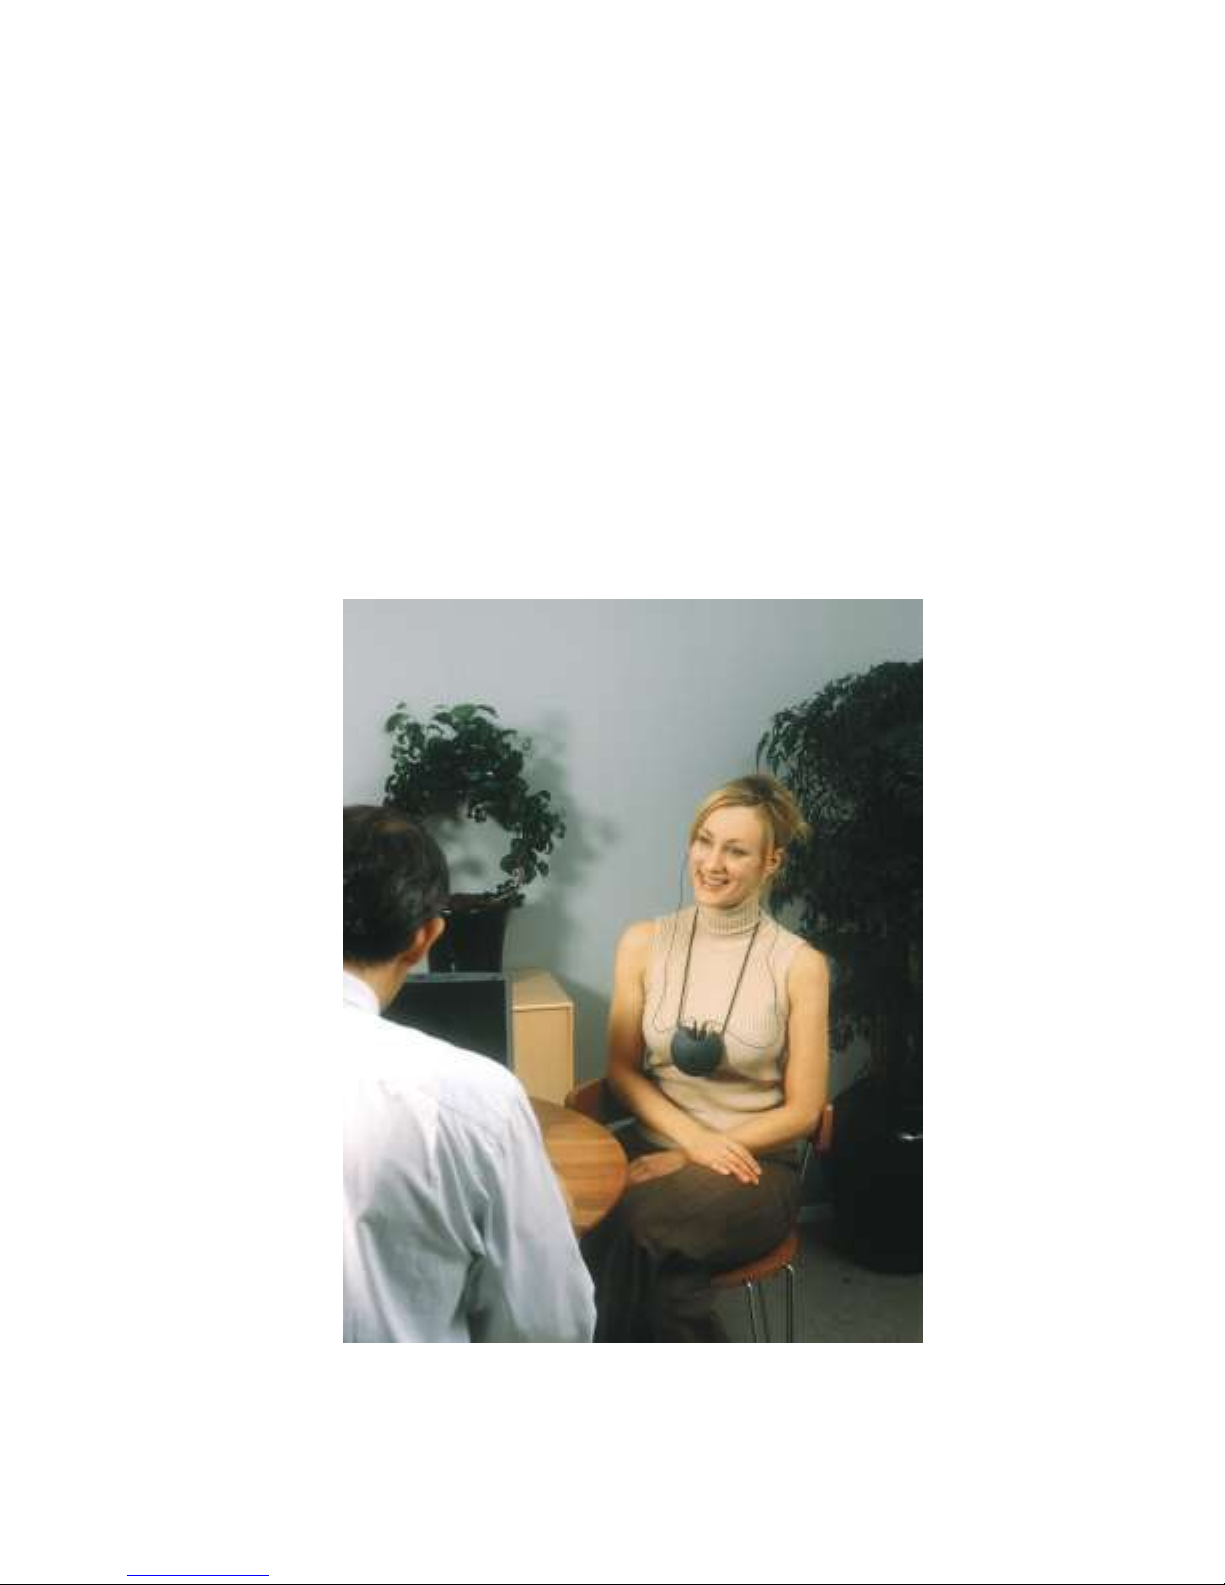
Figure 5: Using NOAHlink to program Hearing Instruments

NOAHlink Users Manual
20
Switch on your NOAHlink by pressing the button at the
front of the unit until the middle light displays. A self-test
occurs every time you do this. The following table explains
the different LED (light-emitting diode) displays that may
occur during the self-test, depending on the power status of
the battery:
POWER STATUS
LED DISPLAY
OK
Continuous green light for
five seconds
Low (battery low)
Flashing yellow/orange light
for five seconds
Error
Flashing red light for 30
seconds, then NOAHlink
powers off
Once the self-test has been completed, your NOAHlink will
display different LEDs depending on:
the power status
whether the unit is communicating with your PC
The following table outlines the different possibilities:
COMMUNICATING
WITH PC
POWER STATUS
LED DISPLAY
Yes
OK
Quickly flashing green
light
Low (battery low)
Quickly flashing
yellow/orange light
No
OK
Flashing green light
every three seconds
Low (battery low)
Flashing yellow/orange
light every three seconds

NOAHlink Users Manual
21
Attach the cable/s (recommended by the hearing instrument
manufacturers) for the programmable hearing instrument/s to
the connector/s at the top of the NOAHlink unit.
Connect the ends of the neck string to the attachment points
of your NOAHlink according to the color of their plastic
connections (red and blue). Hang the NOAHlink from the
neck of your patient with this string.
OR:
Attach one plastic attachment button of the neck string to
your NOAHlink. Place the string around the neck of your
patient and attach the remaining neck string to the empty
attachment point on your NOAHlink.
Adjust the length of the neck string if necessary to ensure a
comfortable fit on the patient.
Connect NOAHlink to the hearing instruments via the cables
attached to the top of the unit.
Ensure the patient is not more than five meters from your
PC.
Start the fitting module on your PC and refer to this program
for details on programming the hearing instruments.
When programming a hearing instrument the LED on your
NOAHlink, nearest the ear containing the instrument, flashes
with a green light. This indicates that NOAHlink is
communicating with the cable attached to the hearing
instrument and, therefore, programming the instrument as
required.
Switch off your NOAHlink when you have finished using
the device by pressing the button at the front of the unit until
all lights no longer display.
(NOTE: If your NOAHlink remains idle for more than 30
minutes, or if it is placed in the charger, it will
automatically turn itself off.)
NOAHlink Users Manual
22
8 Configuring NOAHlink
This chapter describes how to configure your NOAHlink using the
NOAHlink Properties window.
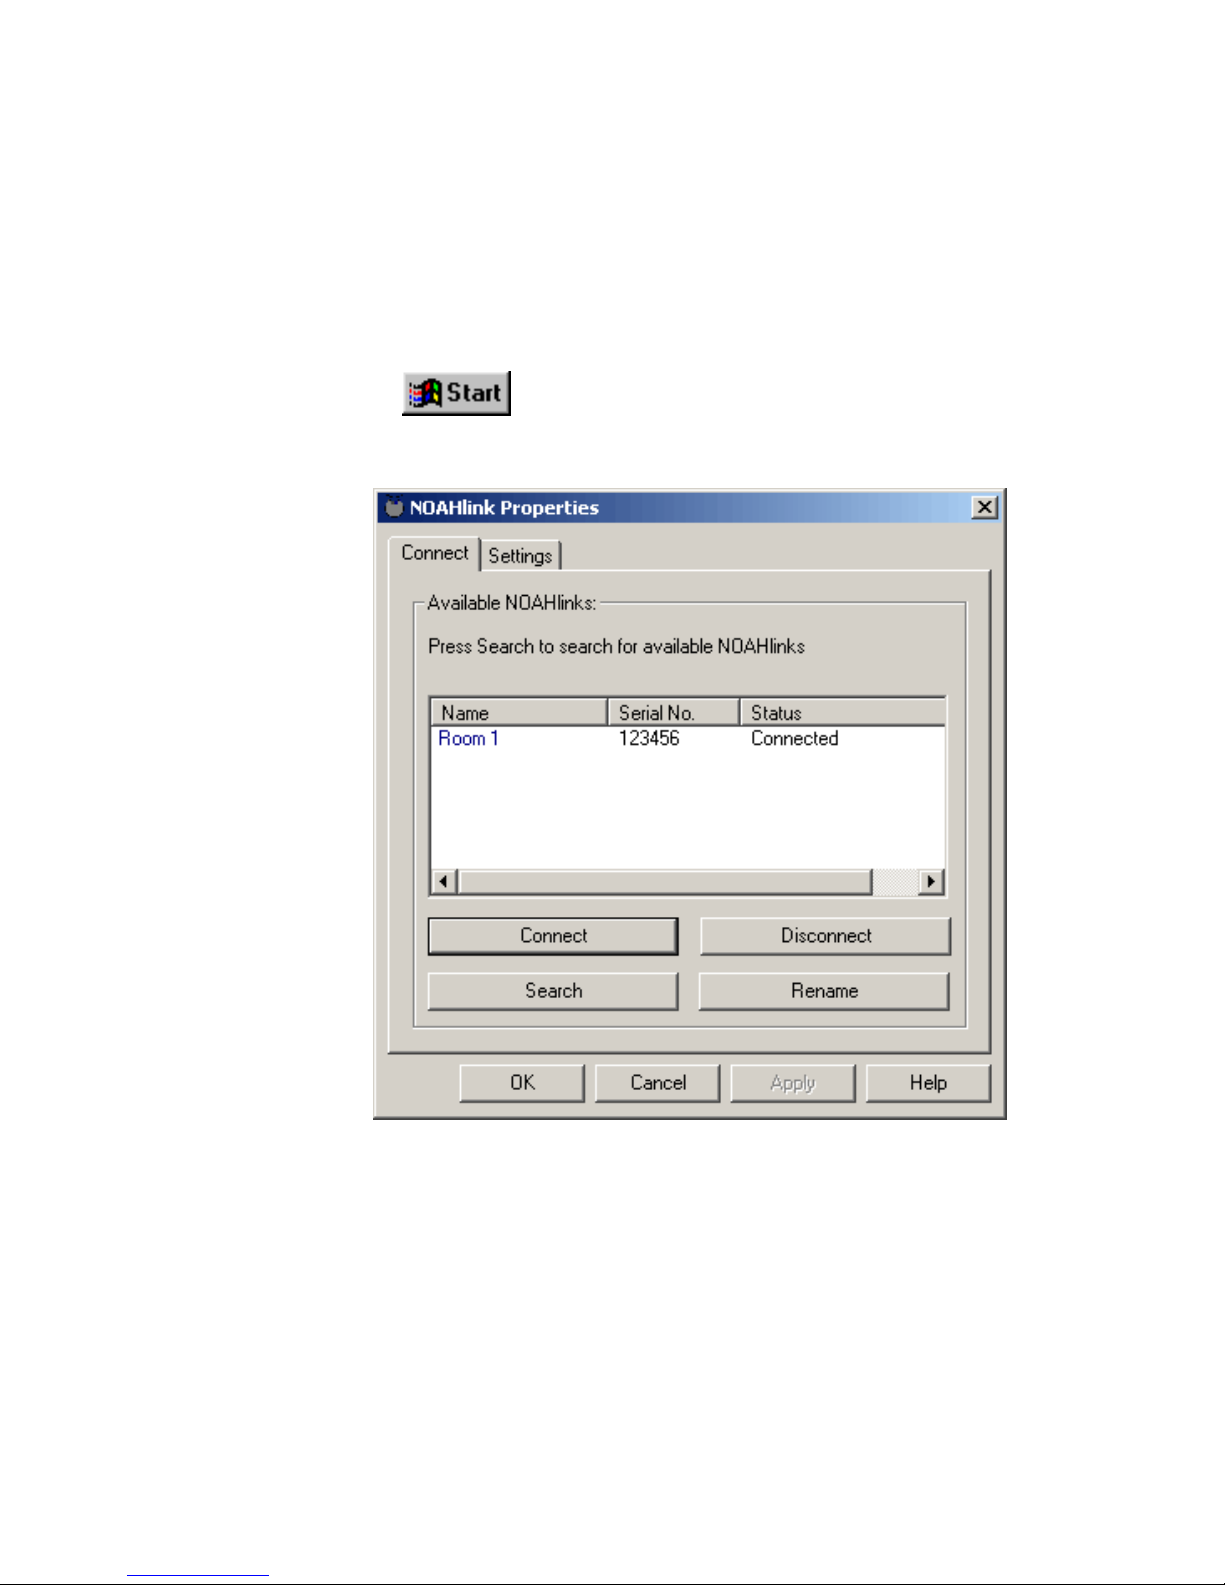
To start this window:
Click , point to Programs, then NOAHlink, and
click NOAHlink Properties.
Figure 6: The NOAHlink Properties Window

NOAHlink Users Manual
23
The following table lists the tabs within the NOAHlink Properties
window and the actions they allow you to perform:
NOTE: Your NOAHlink must be connected before the Diagnostic,
Performance and parts of the Settings tabs can be used.
The Advanced tabs can be accessed from the Settings tab.
It is necessary for you to configure the General tabs, but
you need only deal with the Advanced tabs if you wish to
address more specialized issues.
TAB
LEVEL
TAB
ACTION
General
Connect
Connect to a different NOAHlink
Disconnect your NOAHlink
Search for all NOAHlinks
Rename your NOAHlink
Settings
Set the battery type
Set a low battery warning
Set your preferred language
Access the advanced tabs
Advanced
Diagnostic
Display errors in NOAHlink and
Bluetooth self-tests
Advanced
Settings
Set user preferences
Change the Bluetooth driver
Change the COM port settings
Performance
Test the transfer rate of data from
your PC to your NOAHlink
Versions
Change the kernel
Log
Change the location of the log file
View entries in the log
Clear entries in the log
Set the level of information in the log
NOAHlink Users Manual
24
8.1 General Applications
8.1.1 Connecting to NOAHlink
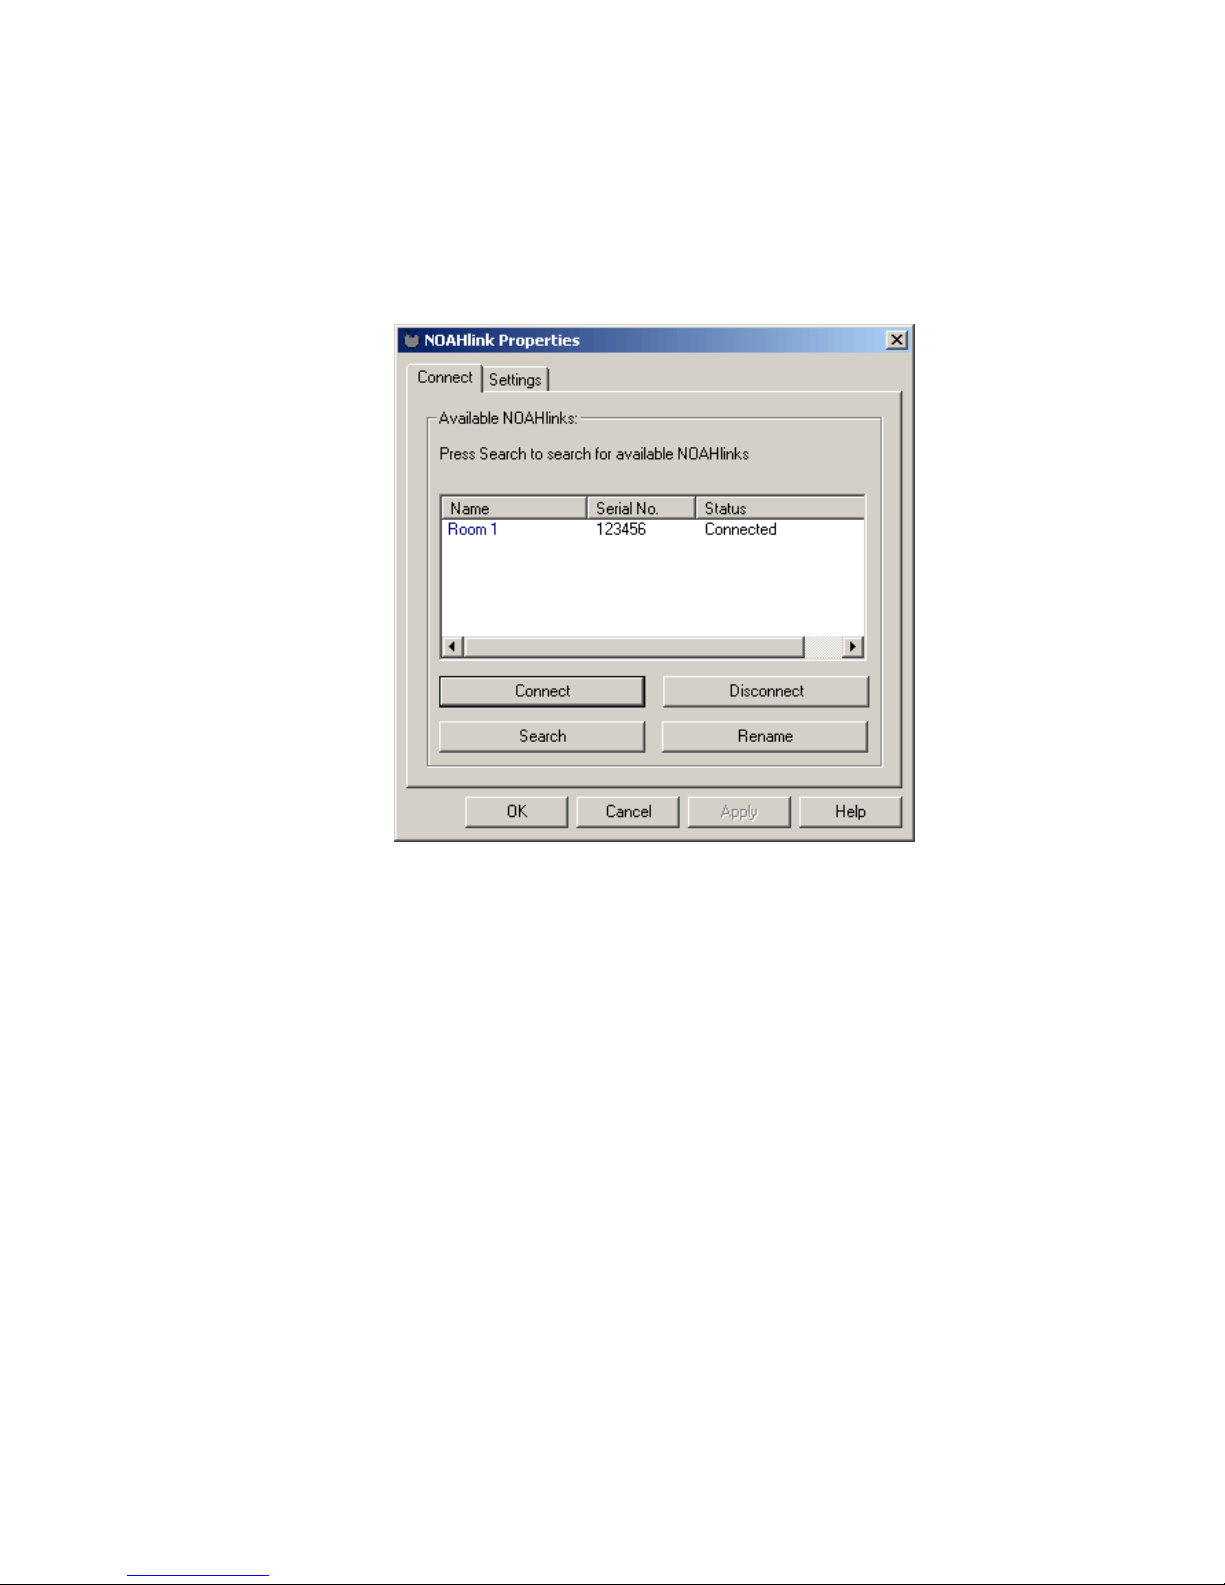
The Connect tab allows you to connect to, disconnect from, search
for, or rename a NOAHlink.
Figure 7: The Connect tab
Each NOAHlink is displayed together with its user-defined alias
name, serial number and connection status. The last NOAHlink
connected to your PC is highlighted.
The connection status of a NOAHlink can be one of the following:
In range: Located but actual status unknown
Available: Located but not connected to any user
Connected: Located and connected to the
NOAHlink Properties program
Connected by
another program: Located and connected to another
program on this PC
In use: Located and connected to another PC
Known: Not located, but the last NOAHlink
connected to your PC

NOAHlink Users Manual
25
NOTE: When connecting to another NOAHlink, your current
NOAHlink connection is automatically disconnected.
You may wish to disconnect your NOAHlink if you
require your PC’s full power, or your Bluetooth
connection, for another task.
The following table describes how to use the Connect tab:
COMMAND
USE
PROCEDURE
Connect
Connect to
NOAHlink
Highlight a NOAHlink
Click Connect
Disconnect
Disconnect
from
NOAHlink
Click Disconnect to disconnect your
currently connected NOAHlink
Search
Search for
other
NOAHlinks
Click Search to search for all
NOAHlinks
Note: The Search option may take
several seconds to complete
Rename
Rename
your
NOAHlink
Highlight a NOAHlink
Click Rename. This places the cursor
at the name, allowing you to overwrite.
Press Return when you have written
the new name
Tip: It is a good idea to name your
NOAHlink after its location or user.
Use one of the name labels in the
NOAHlink package and attach it to
the back of the device.
NOAHlink Users Manual
26
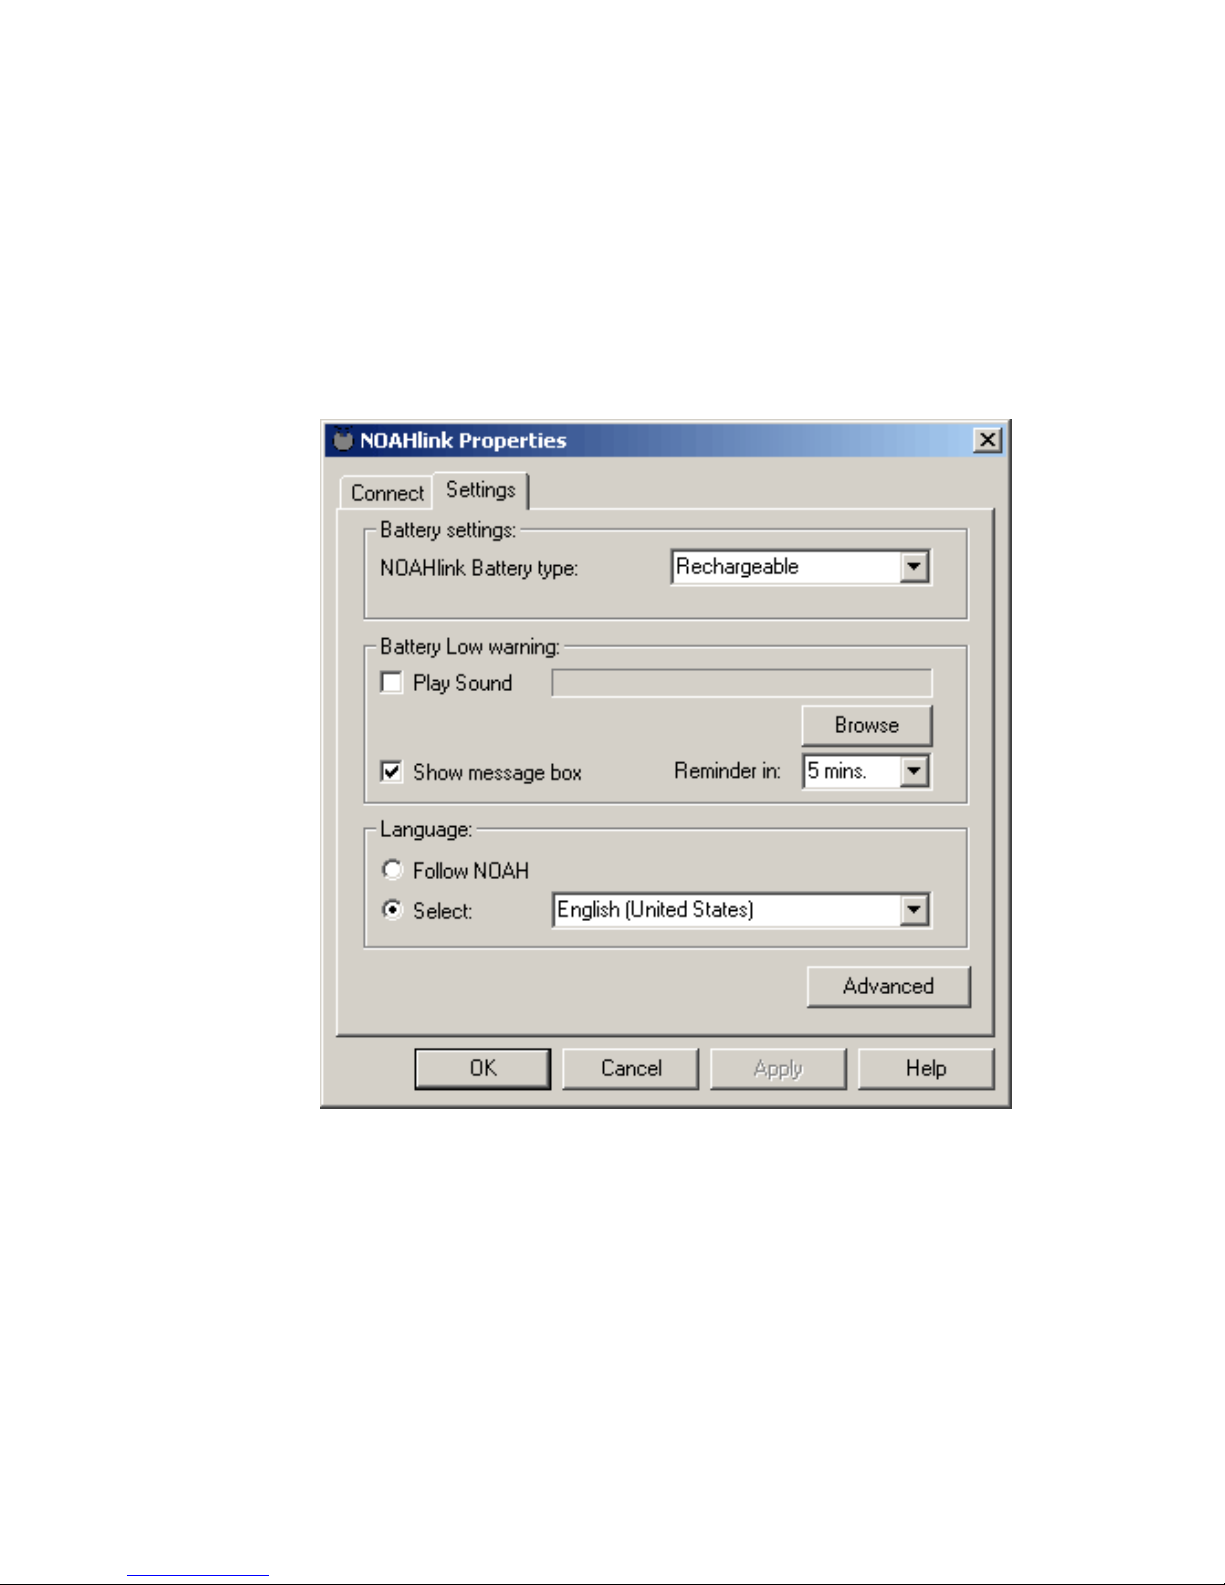
8.1.2 Setting Power, Battery and Language Options
The Settings tab allows you to set battery options and to create a
battery warning. In addition, you can select your preferred language
from a list of available NOAH 3 languages.
The Advanced button on the Settings tab allows you to access the
Diagnostic, Advanced Settings, Performance, Versions and Log
tabs.
Figure 8: The Settings tab
IMPORTANT: If you do not set the correct battery type, the
battery-warning settings will be incorrect. Thus,
you may receive a warning even though the
battery is working correctly, or you may receive
no warning, even though the battery is low.
 Loading...