

Page 1
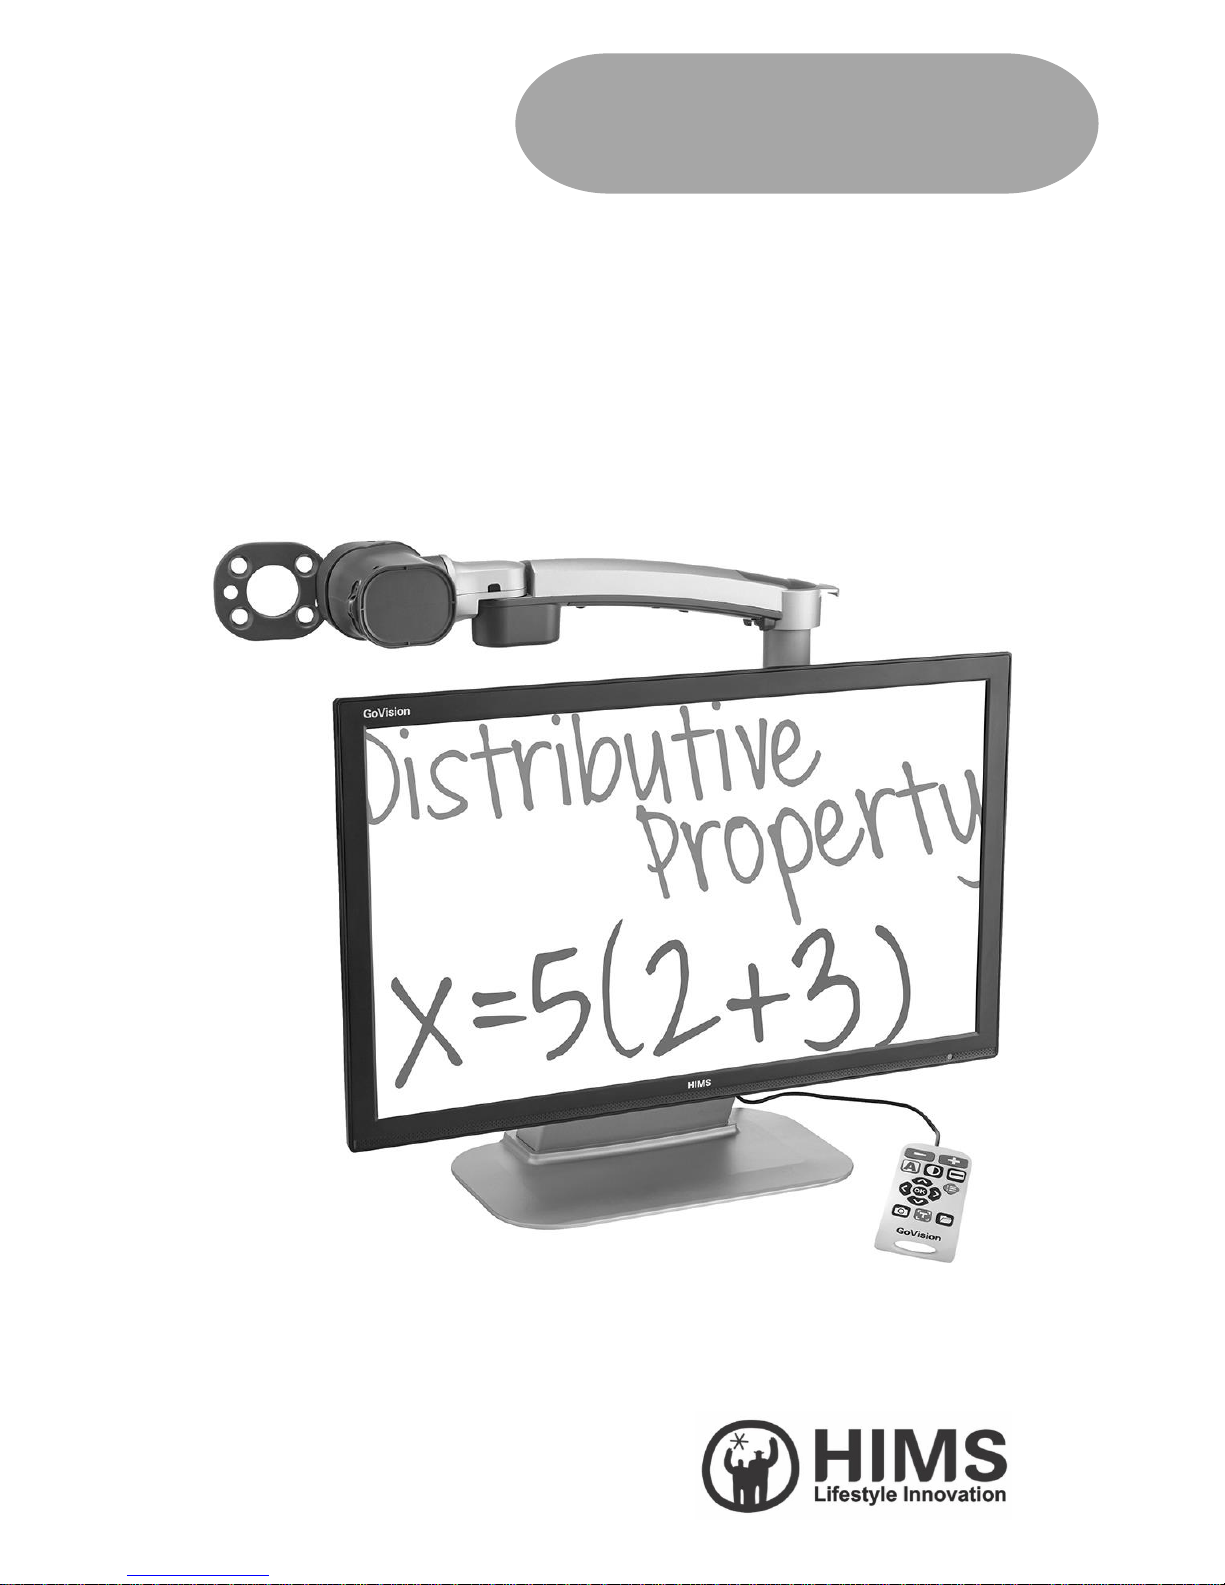
GoVision PRO
User Manual
Page 2

Page 3

3 Copyright© 2018 SELVAS Healthcare, Inc.
Introduction
This manual describes the features and functions of the HIMS
GoVision PRO transportable electronic magnifier. Please read
this manual thoroughly before using your GoVision PRO, and
keep it in a safe place for easy access should you need to
refer to it at a later time.
This user's guide also includes product warranty information
and safety precautions. If there are any updates to the
GoVision PRO specifications or features, this manual will be
updated to reflect these changes and placed on the GoVision
PRO section of the www.himsintl.com website.
Page 4

GoVision PRO User Manual
Copyright© 2018 SELVAS Healthcare, Inc. 4
Copyright
GoVision PRO products and intellectual property, including
documentation copyrights, are protected by copyright laws,
with copyright belonging to SELVAS Healthcare, Inc. and
HIMS Inc., and may not be used without expressed
permission from SELVAS Healthcare, Inc. This User Guide
may not be copied in whole or part, without permission.
SELVAS Healthcare, Inc. is the developer and manufacturer
of all HIMS brand products for the blind and visually impaired.
SELVAS Healthcare is the parent company of HIMS Inc., a
wholly-owned subsidiary based in Austin, TX.
Copyrightⓒ2018 SELVAS Healthcare, Inc. All rights reserved.
Page 5

5 Copyright© 2018 SELVAS Healthcare, Inc.
Contents
Introduction ............................................................................... 3
Copyright ................................................................................... 4
Contents .................................................................................... 5
Product Features ........................................................................ 7
Safety Precautions ...................................................................... 8
Precautions in the manual .................................................. 8
WARNING! For Your Safety ................................................ 9
Safety Precautions ........................................................... 10
Product Information ................................................................. 11
Package Contents ............................................................ 11
Physical Orientation ......................................................... 13
Set up GoVision PRO ................................................................ 16
Powering Up .................................................................... 16
Remote Control Setup ..................................................... 17
Connecting Headphones .................................................. 17
Basic Functions ......................................................................... 19
Camera Setup .................................................................. 20
Using the Remote Control ................................................ 27
Advanced Functions ................................................................. 30
User Preferences .............................................................. 30
Set LED ............................................................................ 32
Screen Magnification ....................................................... 34
Page 6

GoVision PRO User Manual
Copyright© 2018 SELVAS Healthcare, Inc. 6
Color Mode ..................................................................... 37
Contrast Control .............................................................. 40
Markers ........................................................................... 41
Screen Capture ................................................................ 45
OCR (Optical Character Recognition) ............................... 47
File Viewer ....................................................................... 56
Document View Settings .................................................. 62
Video Playback Settings ................................................... 72
Voice Guide ..................................................................... 79
Focus Lock ....................................................................... 82
Camera Frequency ........................................................... 83
Add-Ons................................................................................... 85
Digital Photo Frames ........................................................ 85
Digital Clock .................................................................... 87
Screen Savers ................................................................... 89
My settings ...................................................................... 91
Initialization ..................................................................... 93
GoVision PRO as a Computer Display ............................... 95
Maintenance ............................................................................ 97
Transporting the Product ................................................. 97
Storage ............................................................................ 99
Appendices ............................................................................ 101
Troubleshooting ............................................................. 101
Service Information ........................................................ 102
Service Inquiries and Purchase Parts . 오류! 책갈피가 정의되어
있지 않습니다.
Page 7

7 Copyright© 2018 SELVAS Healthcare, Inc.
Page 8
GoVision PRO User Manual
Copyright© 2018 SELVAS Healthcare, Inc. 8
Product Features
Thank you for purchasing the HIMS GoVision PRO.
GoVision PRO offers a variety of features to assist the visually
impaired, including state-of-the-art technology for enlarged
viewing of documents and images, while providing a
convenient, flexible and powerful interface to its users.
Various Camera Modes
Near View Mode / Distance View Mode / Self View Mode
OCR (Text To Speech)
Quickly recognize full page documents and read them
aloud.
File Browser
View documents and images via a connected USB drive
with the benefit of magnification, color and contrast
adjustment
User-friendly Interface
Remote control designed so that the user can see and
use the main features at a glance.
Intuitive voice guide support for all menus and
prompts.
Quick access to many settings and features through the
convenient Jog Switch.
Portable, storable and easy folding design.
Contains a convenient carrying handle on the back of
the unit.
Easy to store with the folding camera arm.
Page 9

Page 10
GoVision PRO User Manual
Safety Precautions
To ensure your personal safety and the proper use of the
product as well as to prevent accidental damage, please be
aware of and abide by the following safety precautions.
Precautions in the manual
Safety Symbols
Failing to follow these warnings could result in death or
serious injury.
Caution
Failing to follow the precautions marked with this sign, may
result in personal injury or property damage.
Note
Refers to helpful hints and notices to which the user should
pay special attention.
Page 11

WARNING! For Your Safety
Failing to follow the below precautions may cause serious
injury or death.
Please keep the GoVision PRO away from extreme
temperatures or humid conditions. Do not use the
GoVision PRO in environments above 104 degrees
Fahrenheit (40 degrees Celsius) or lower than minus 50
degrees Fahrenheit (10 degrees Celsius).
Do not connect the GoVision PRO to ANY electronic
devices not indicated in this manual.
Do not use excessive force when adjusting the camera
and camera arm.
Install the product on a flat, level surface.
Keep GoVision PRO and its accessories away from infants,
small children or pets.
Page 12

GoVision PRO User Manual
Safety Precautions
Failing to follow the precautions marked with this sign, may
result in personal injury or property damage.
Do not attempt to disassemble or repair the product
yourself. Only authorized repair technicians should
disassemble or repair the GoVision PRO, Unauthorized
disassembly or repair of the GoVision PRO will void the
warranty of the product.
Handle the GoVision PRO with care, as it contains
delicate parts. Damage caused by dropping, or external
force or shock is not covered by the warranty.
Do not use loose power outlets, or a damaged power
connector or cord.
Do not touch the product, the power connectors, or a
wall outlet with wet hands.
Do not plug multiple power devices into the same outlet
as GoVision PRO.
Do not bend or pull the cord to move the unit.
Use only the power supply provided with the product by
the manufacturer, or a power supply meeting the
electrical specifications provided by the company.
Please keep GoVision PRO away from hazardous or
flammable substances.
Always consult our service personnel or an electrician
before using an adapter that did not come with the
product.
Page 13
Product Information
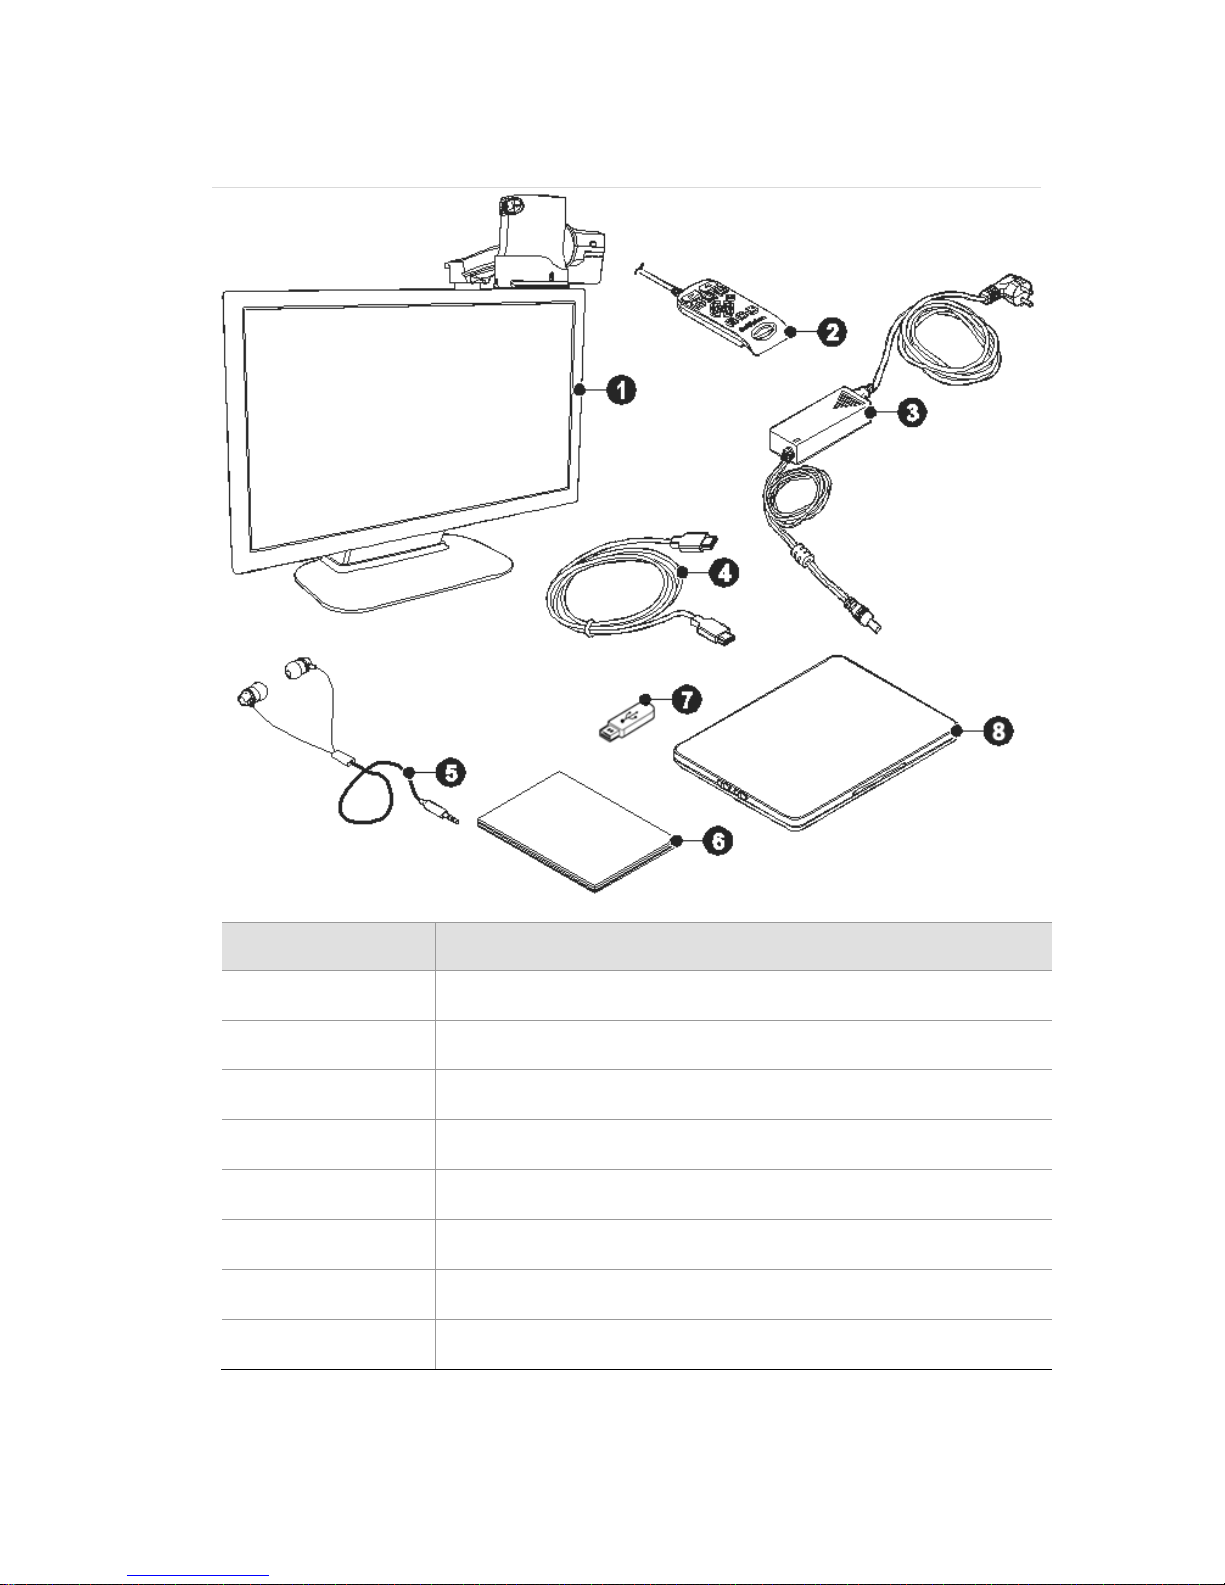
Package Contents
Please ensure all of the following items are included in your
packing box. If any items are missing, please contact the
dealer from whom you purchased the product.
Note
Content may differ slightly from the actual components, as
items are subject to change without prior notice to improve
the quality of the product.
Page 14
GoVision PRO User Manual
Number
Name
①
GoVision PRO
②
Remote control
③
Power adapter
④
HDMI cable
⑤
Earbuds
⑥
Quick Start Guide
⑦
USB memory stick
⑧
Optional X/Y moving table
Page 15
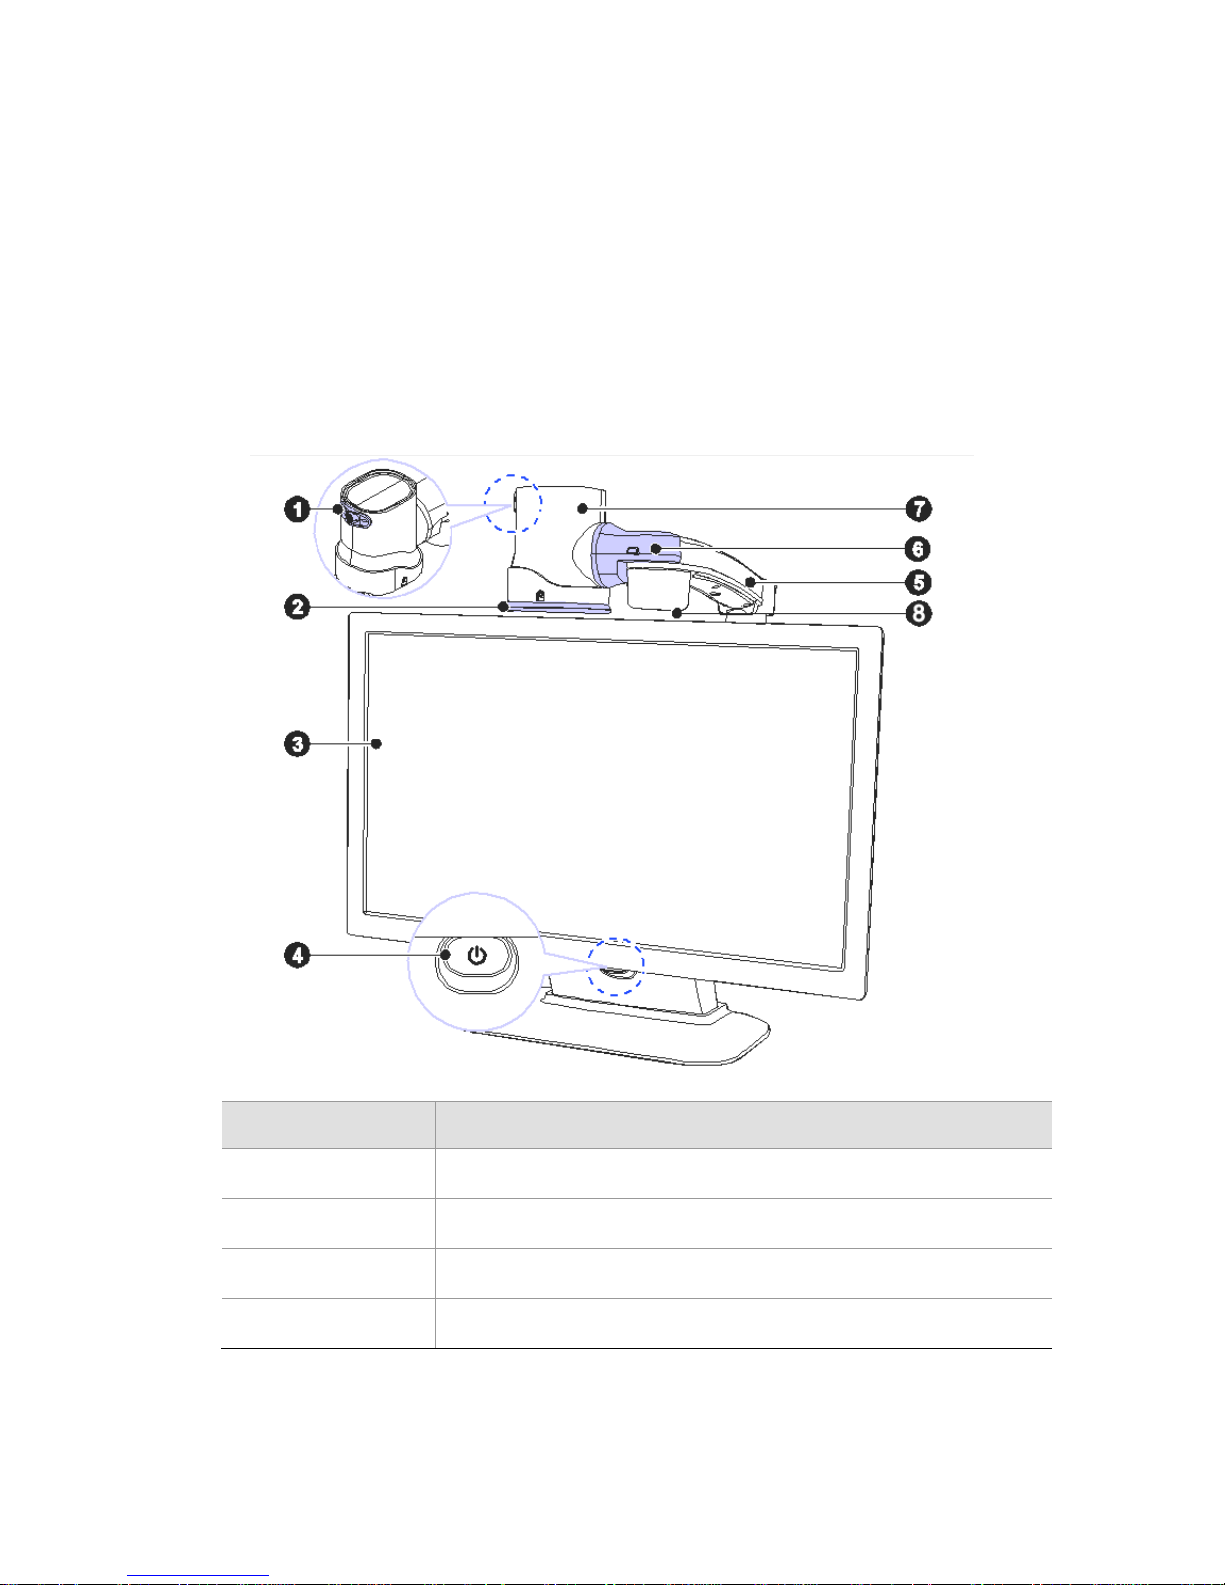
Physical Orientation
Please take a moment to familiarize yourself with the
various parts and controls of the GoVision PRO.
Front Face
Number
Name
①
Jog Switch
②
Near View Mode Lens
③
Monitor
④
Power Switch
Page 16
GoVision PRO User Manual
⑤
Camera Arm
⑥
Camera Connector
⑦
Main Camera
⑧
Full-page OCR camera
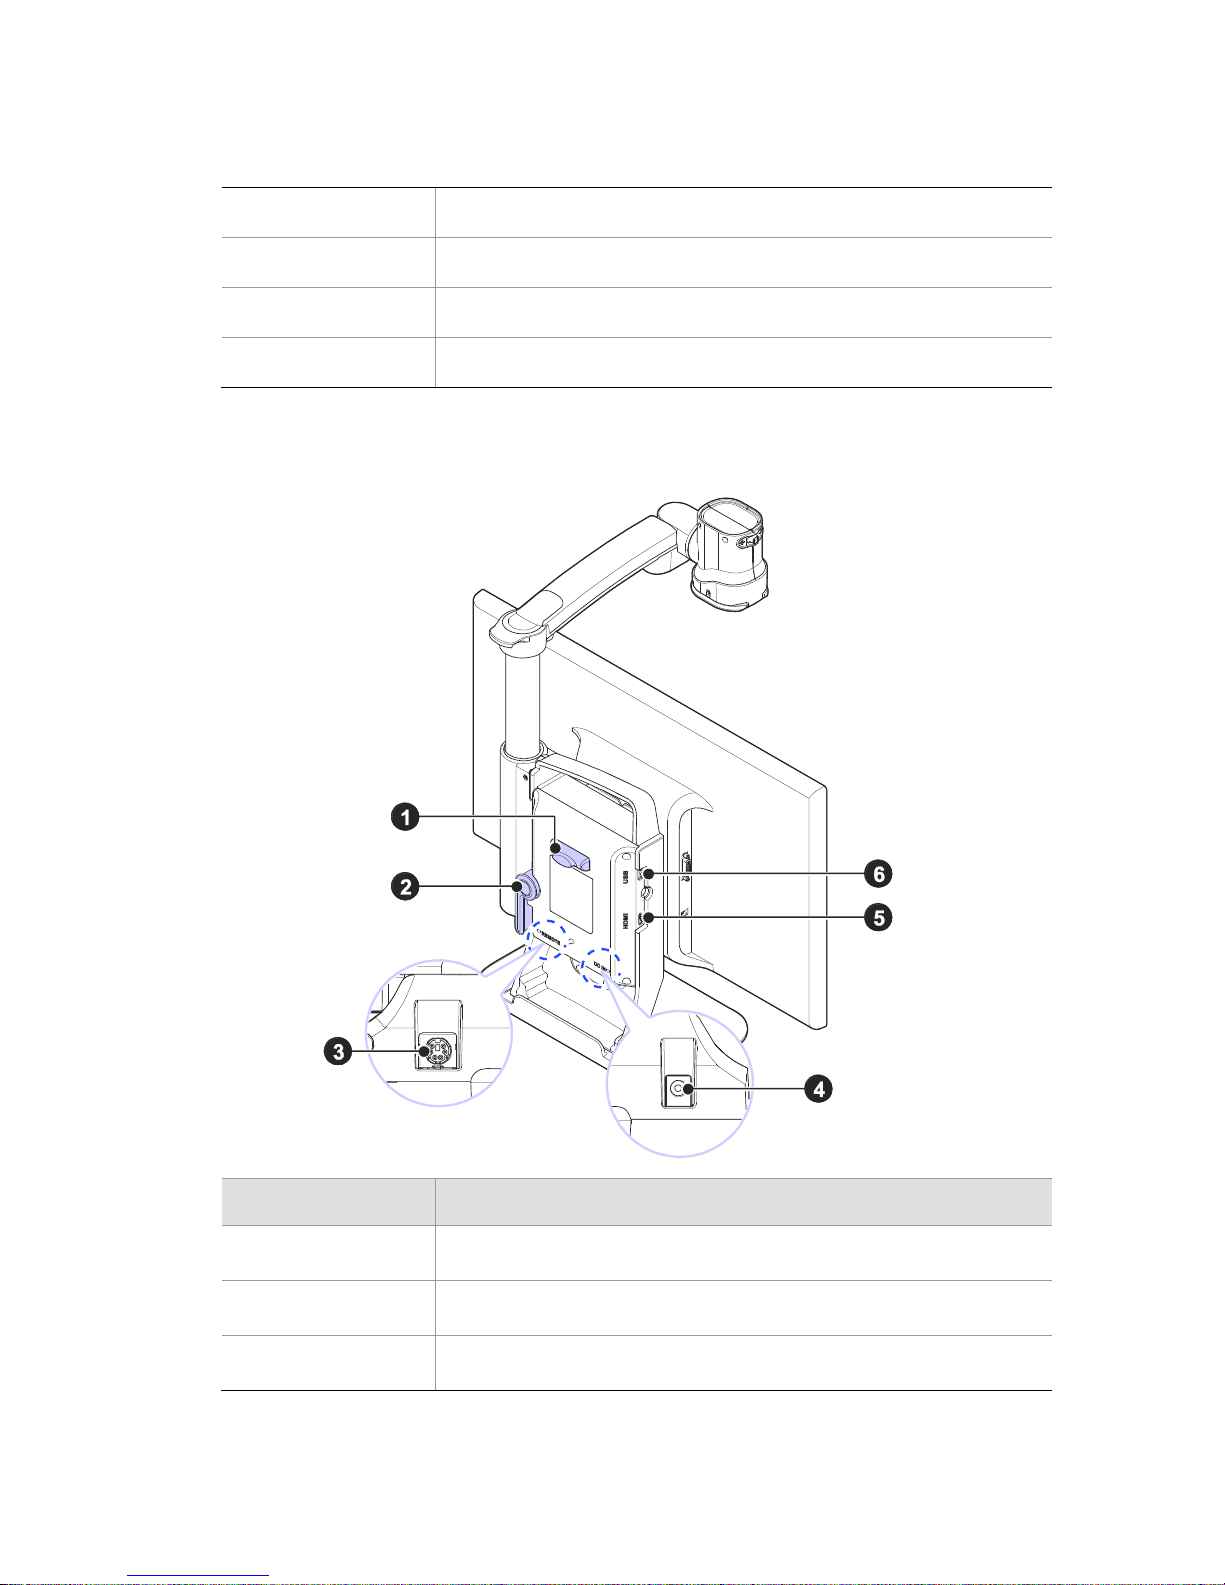
Back Face
Number
Name
①
Remote Control Holder
②
Lock Lever
③
Remote Control Port
Page 17

④
Power Port
⑤
HDMI Port
⑥
USB Port
Page 18
GoVision PRO User Manual
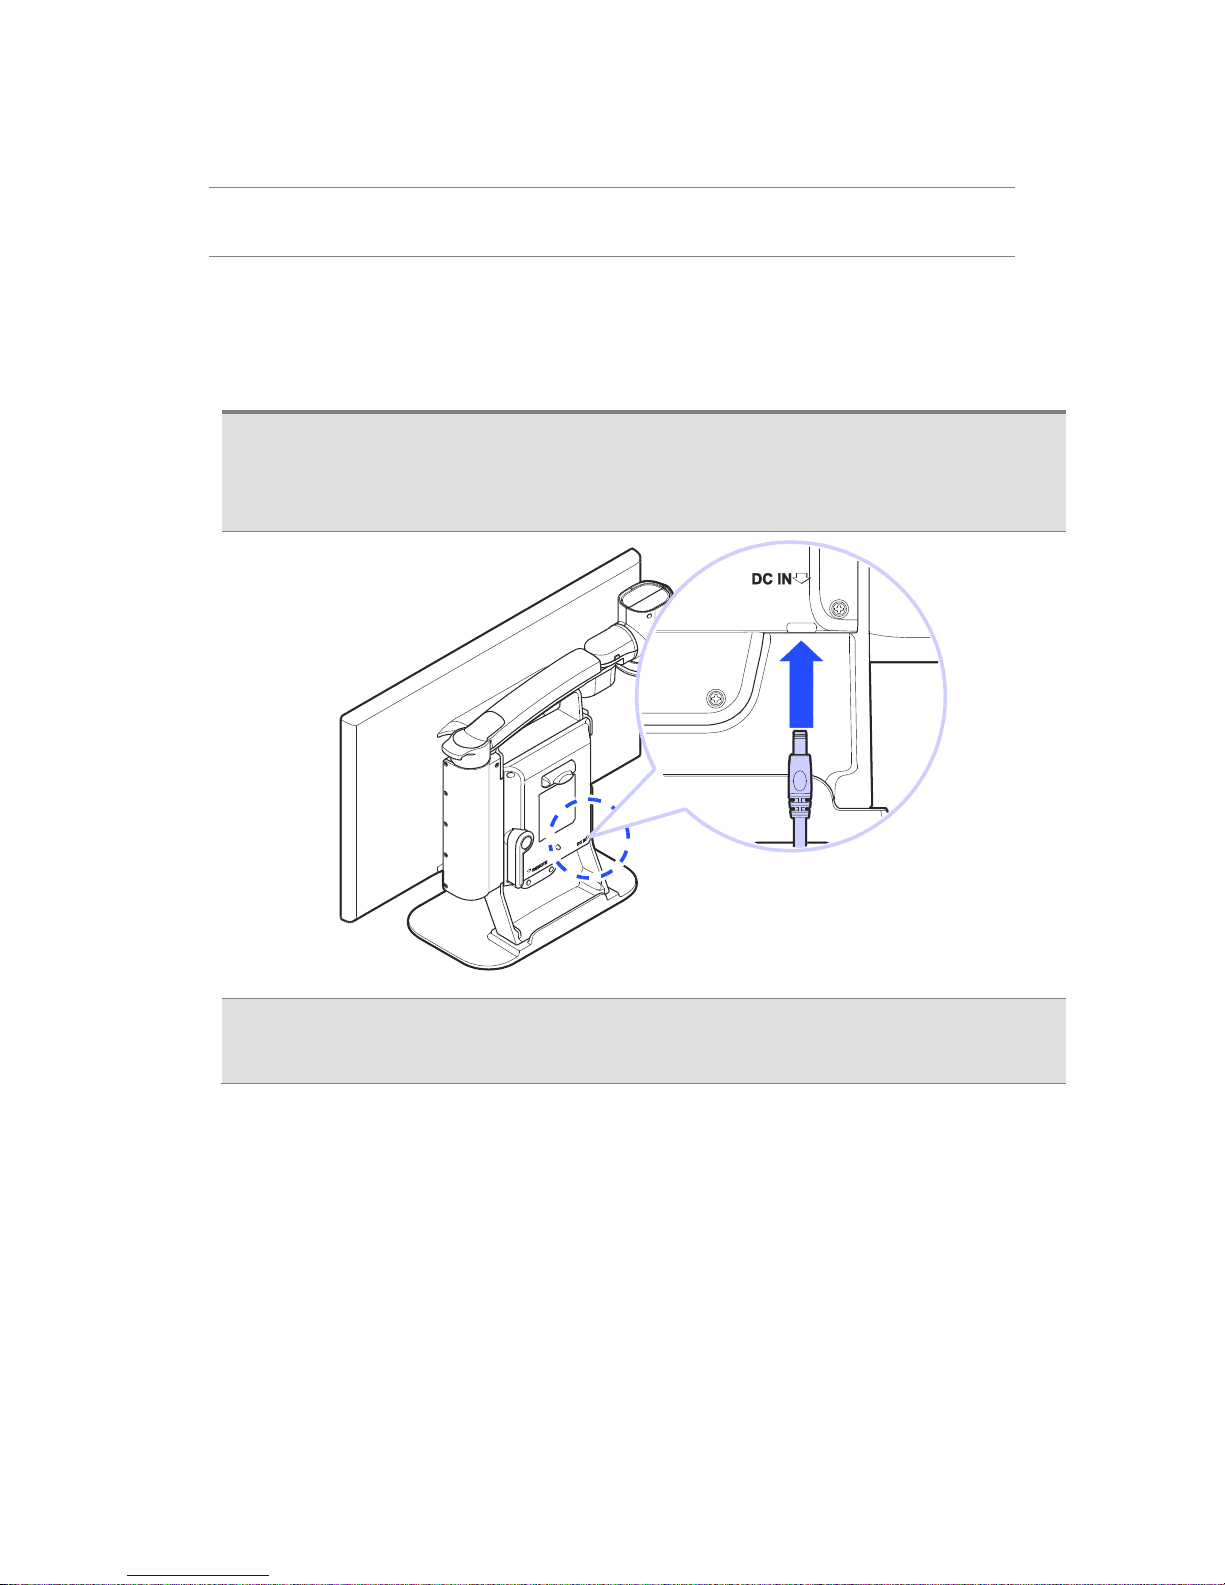
Set up GoVision PRO
Powering Up
1. Connect the power adapter to the power port on the back
of the product.
2. Connect the power cord to a wall outlet.
Page 19

Remote Control Setup
Connect the end of the remote control's cable to the Remote
Port on the back of the GoVision PRO. The remote control is
ready to use.
Connecting Headphones
It may be advantageous to use earphones in noisy
environments or in environments where you do not wish to
disturb those around you.
Page 20
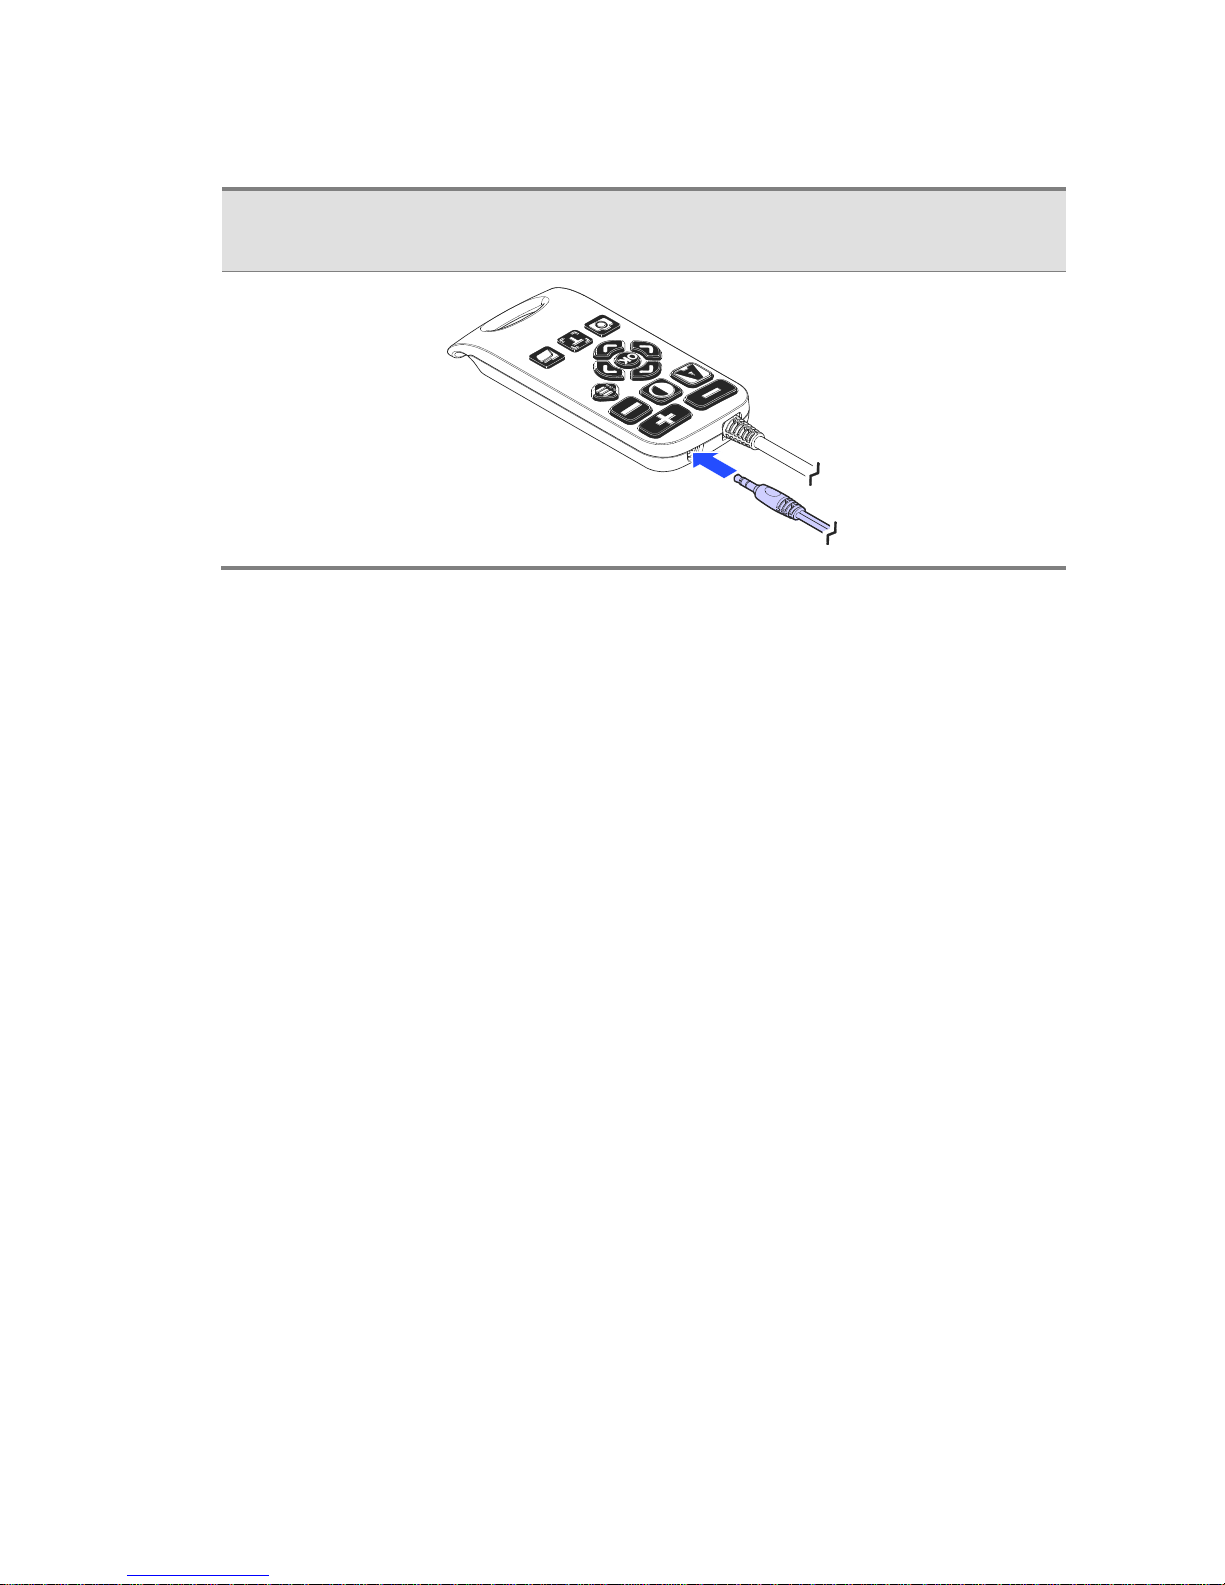
GoVision PRO User Manual
Connect the earphone to the headphone jack located on the
right side of the top of the remote control.
Page 21
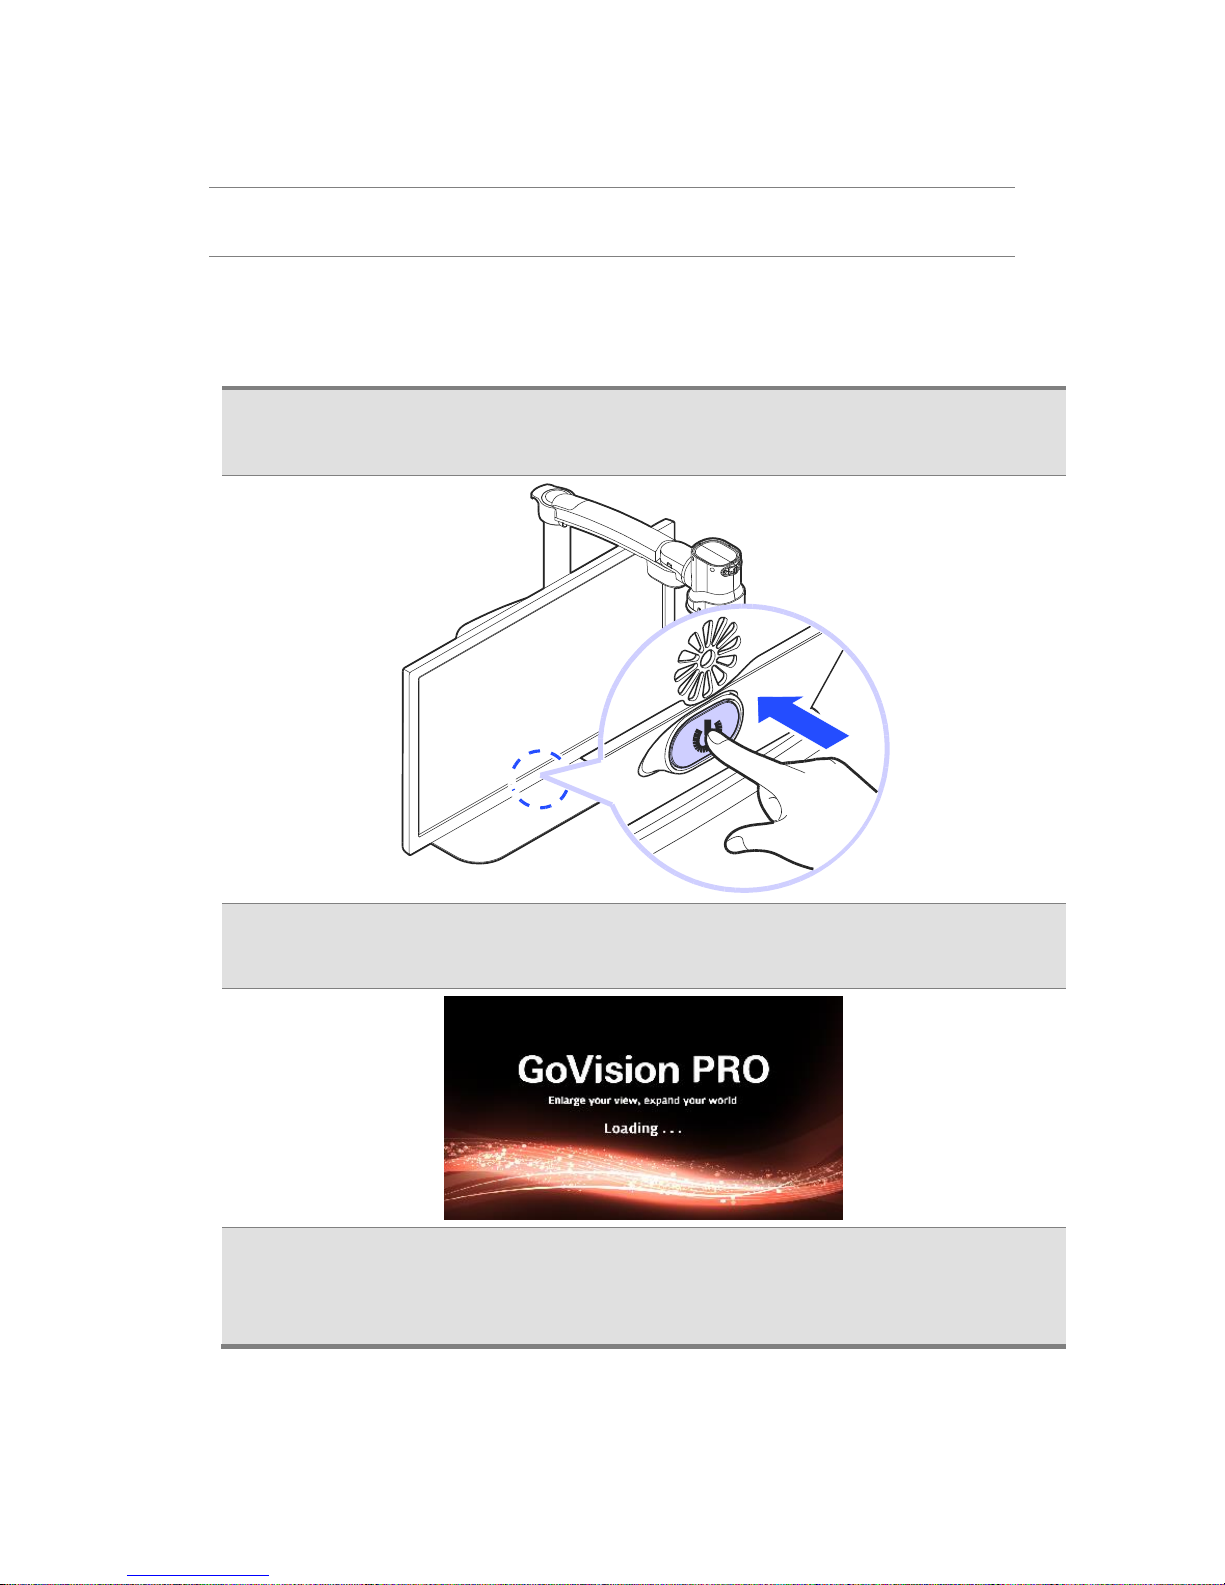
Basic Functions
Power ON / OFF
1. Press and hold the Power button for more than 3 seconds.
2. The standby screen appears, then the unit powers on.
3. To turn the power off, press the Power button again for
more than 3 seconds.
Page 22
GoVision PRO User Manual
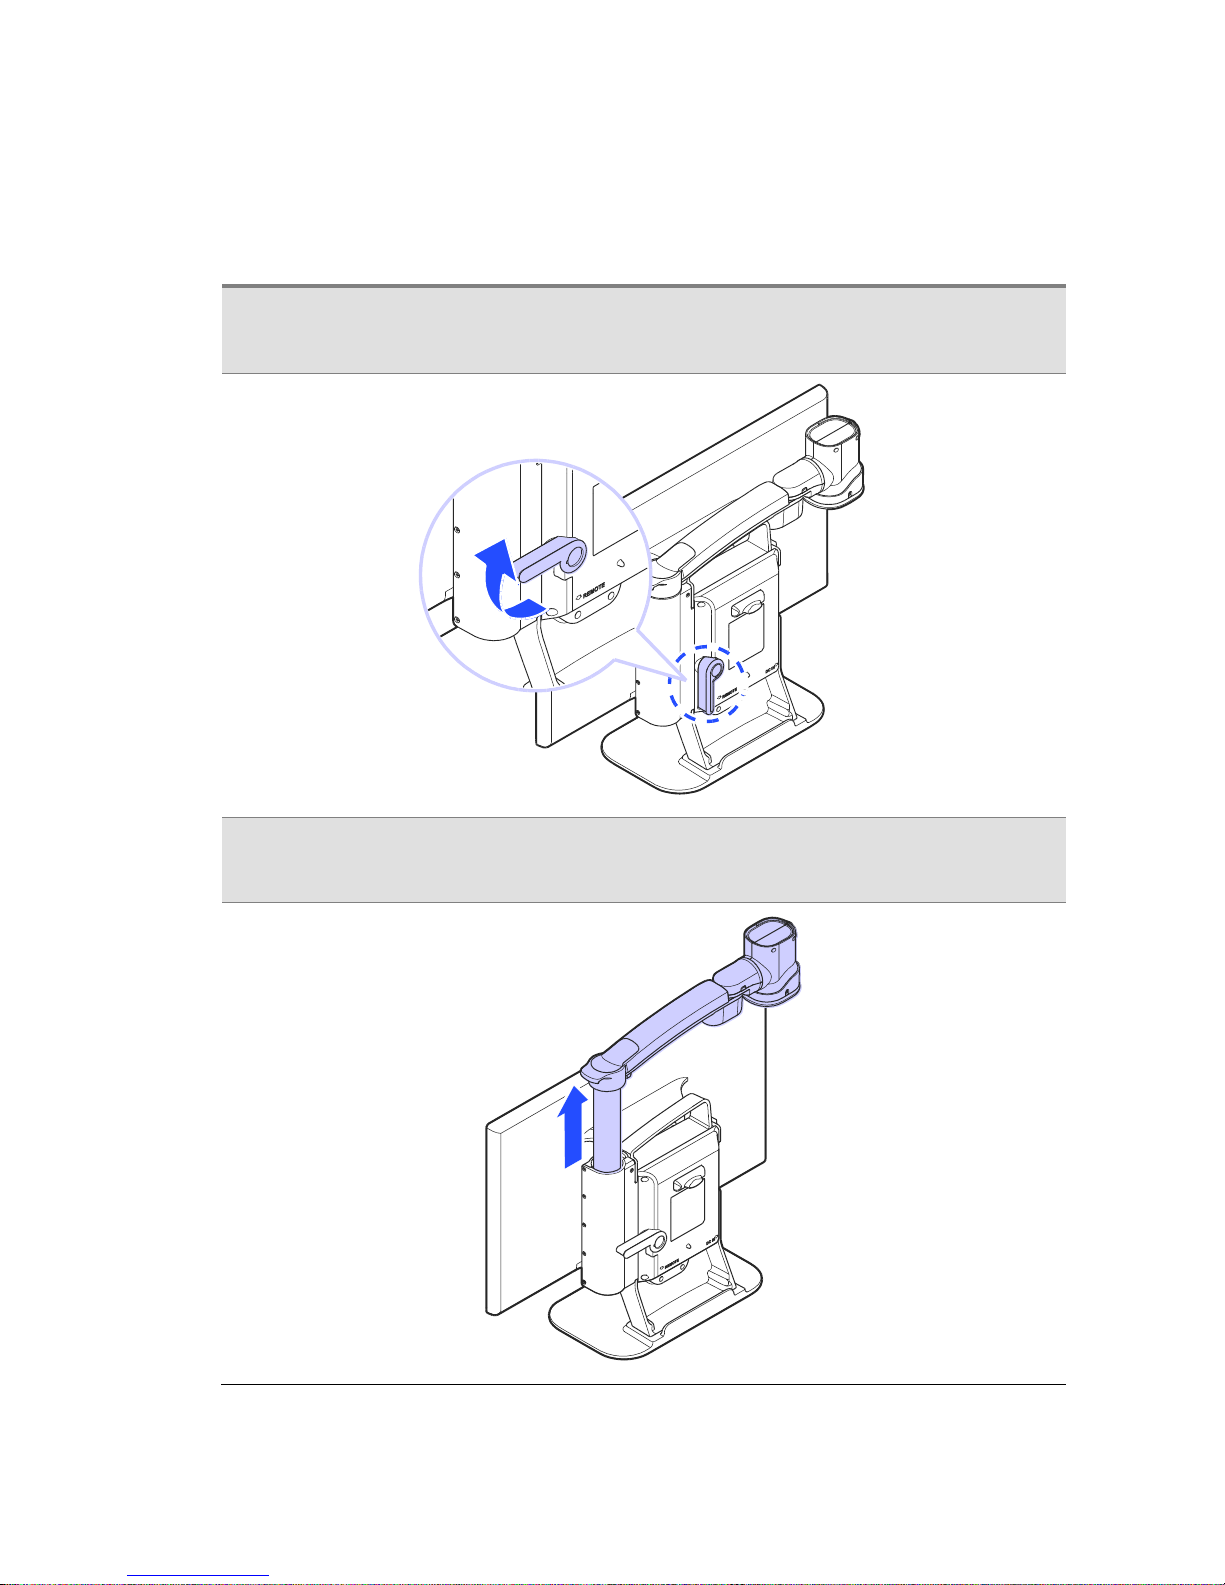
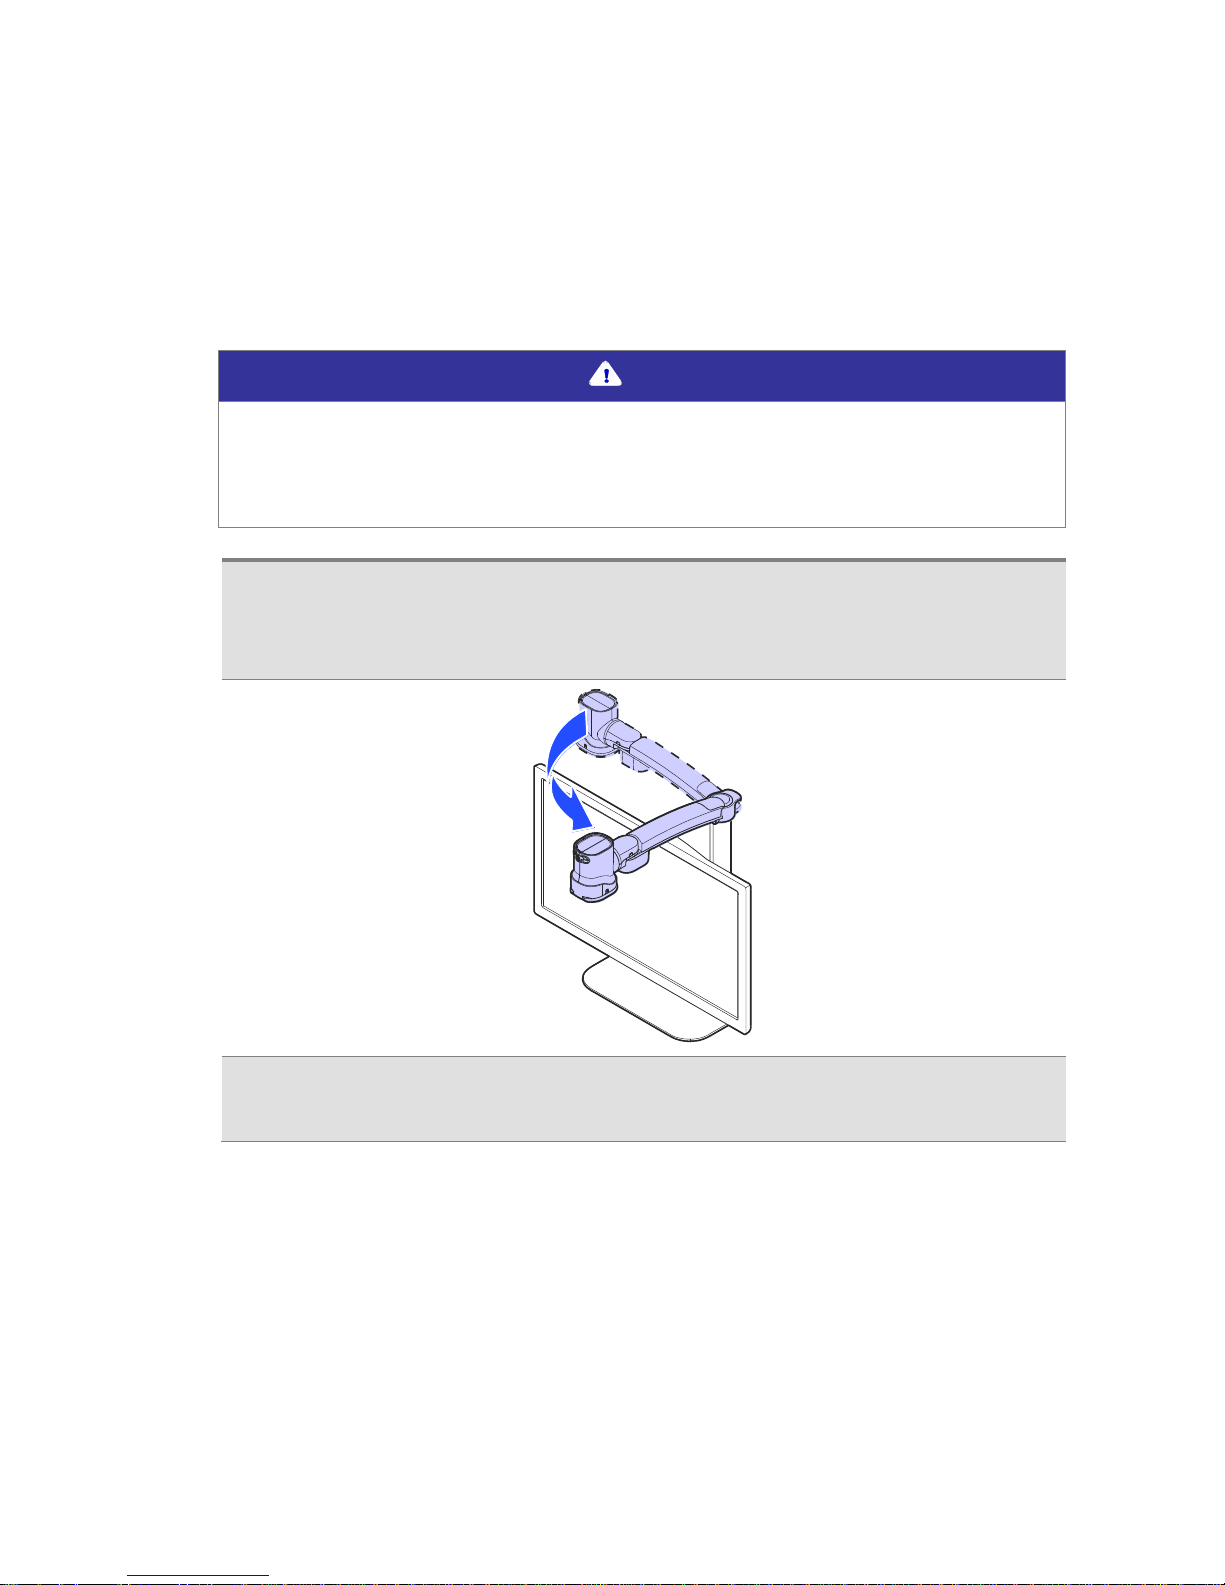
Camera Setup
1. Place the lock lever in the horizontal position.
2. Pull up on the camera arm to adjust the height.
Page 23
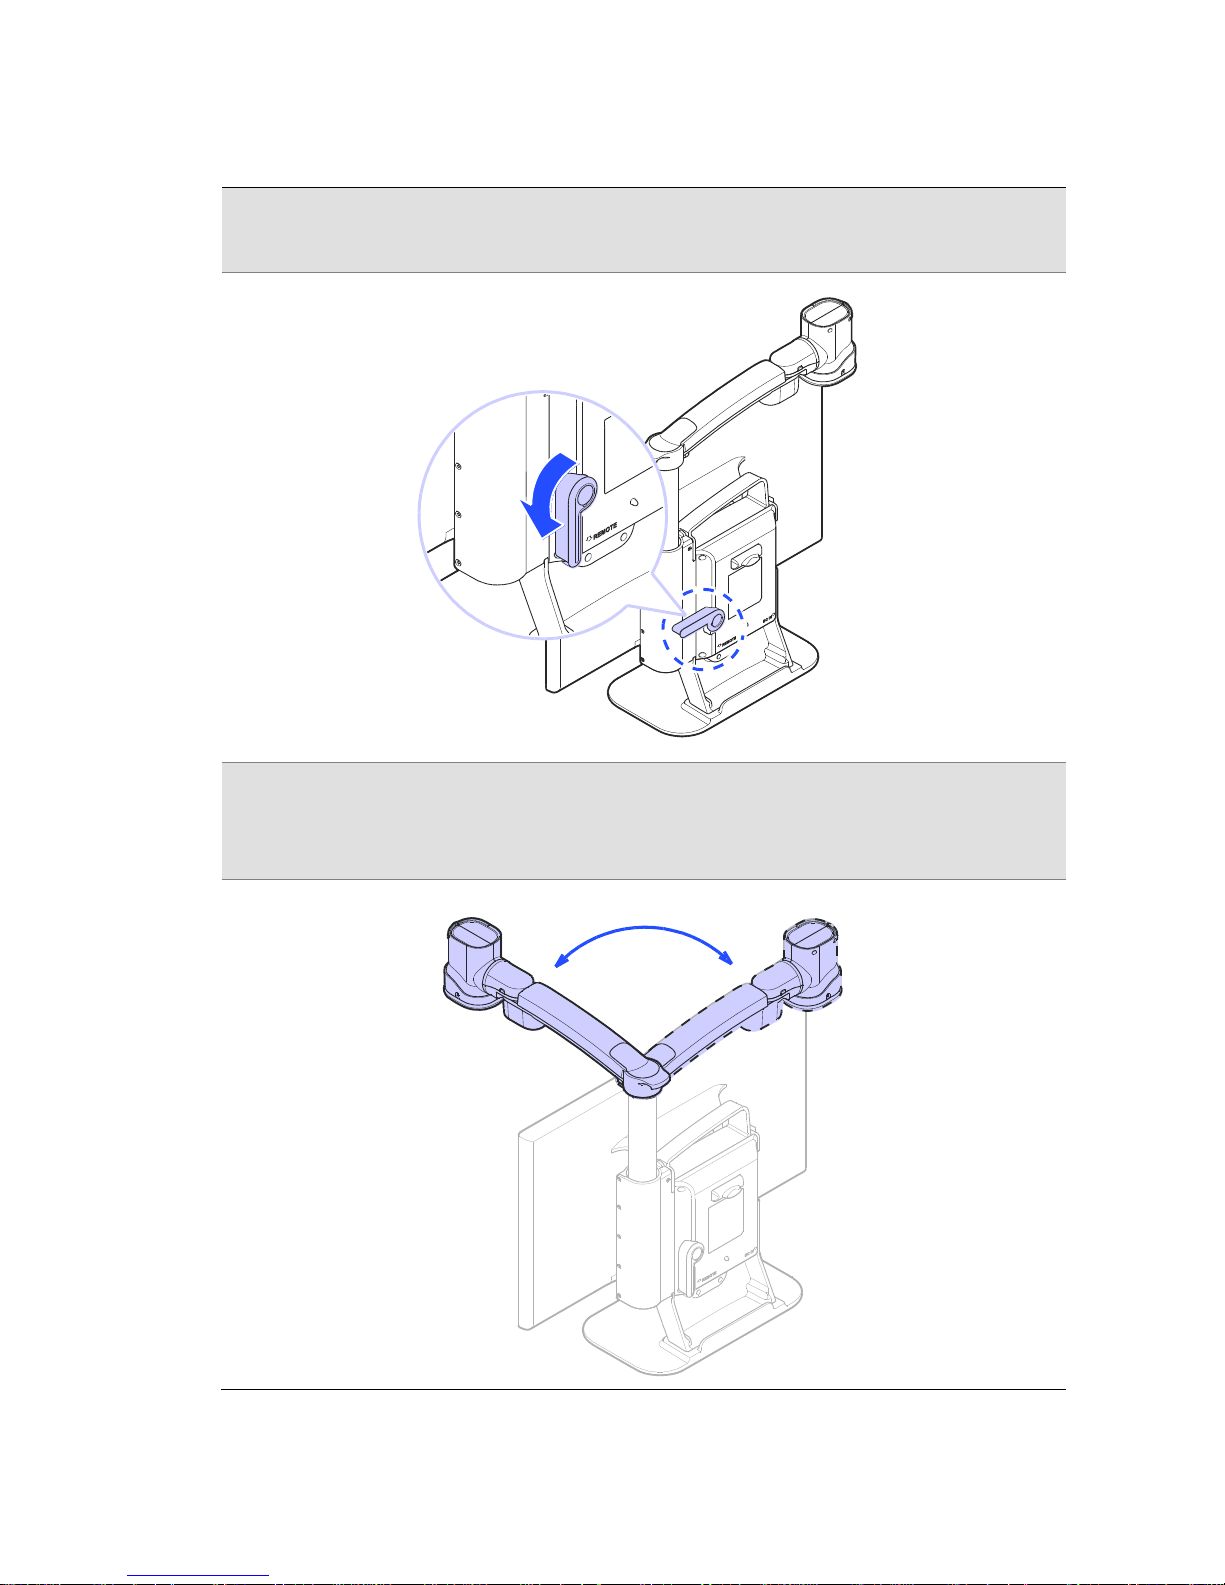
3. Return the lock lever back to the vertical position.
4. Adjust the location of the camera by rotating the camera
arm.
Page 24
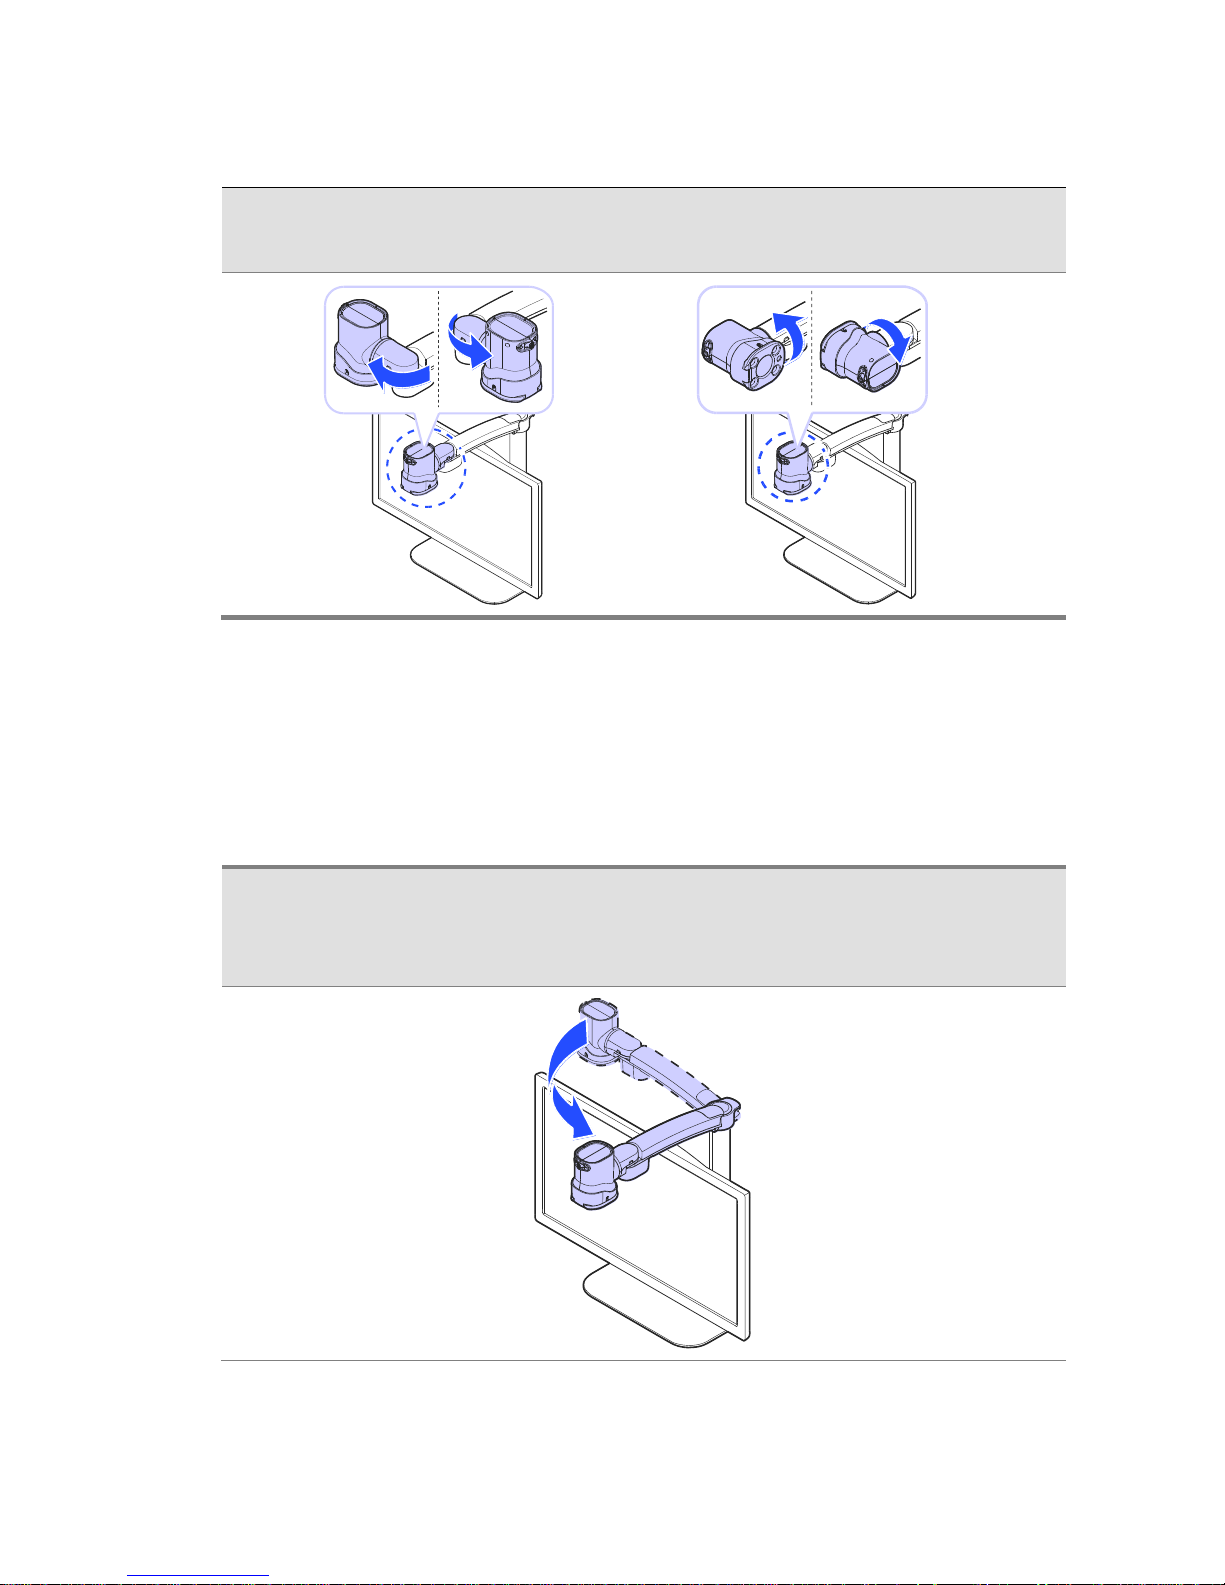
GoVision PRO User Manual
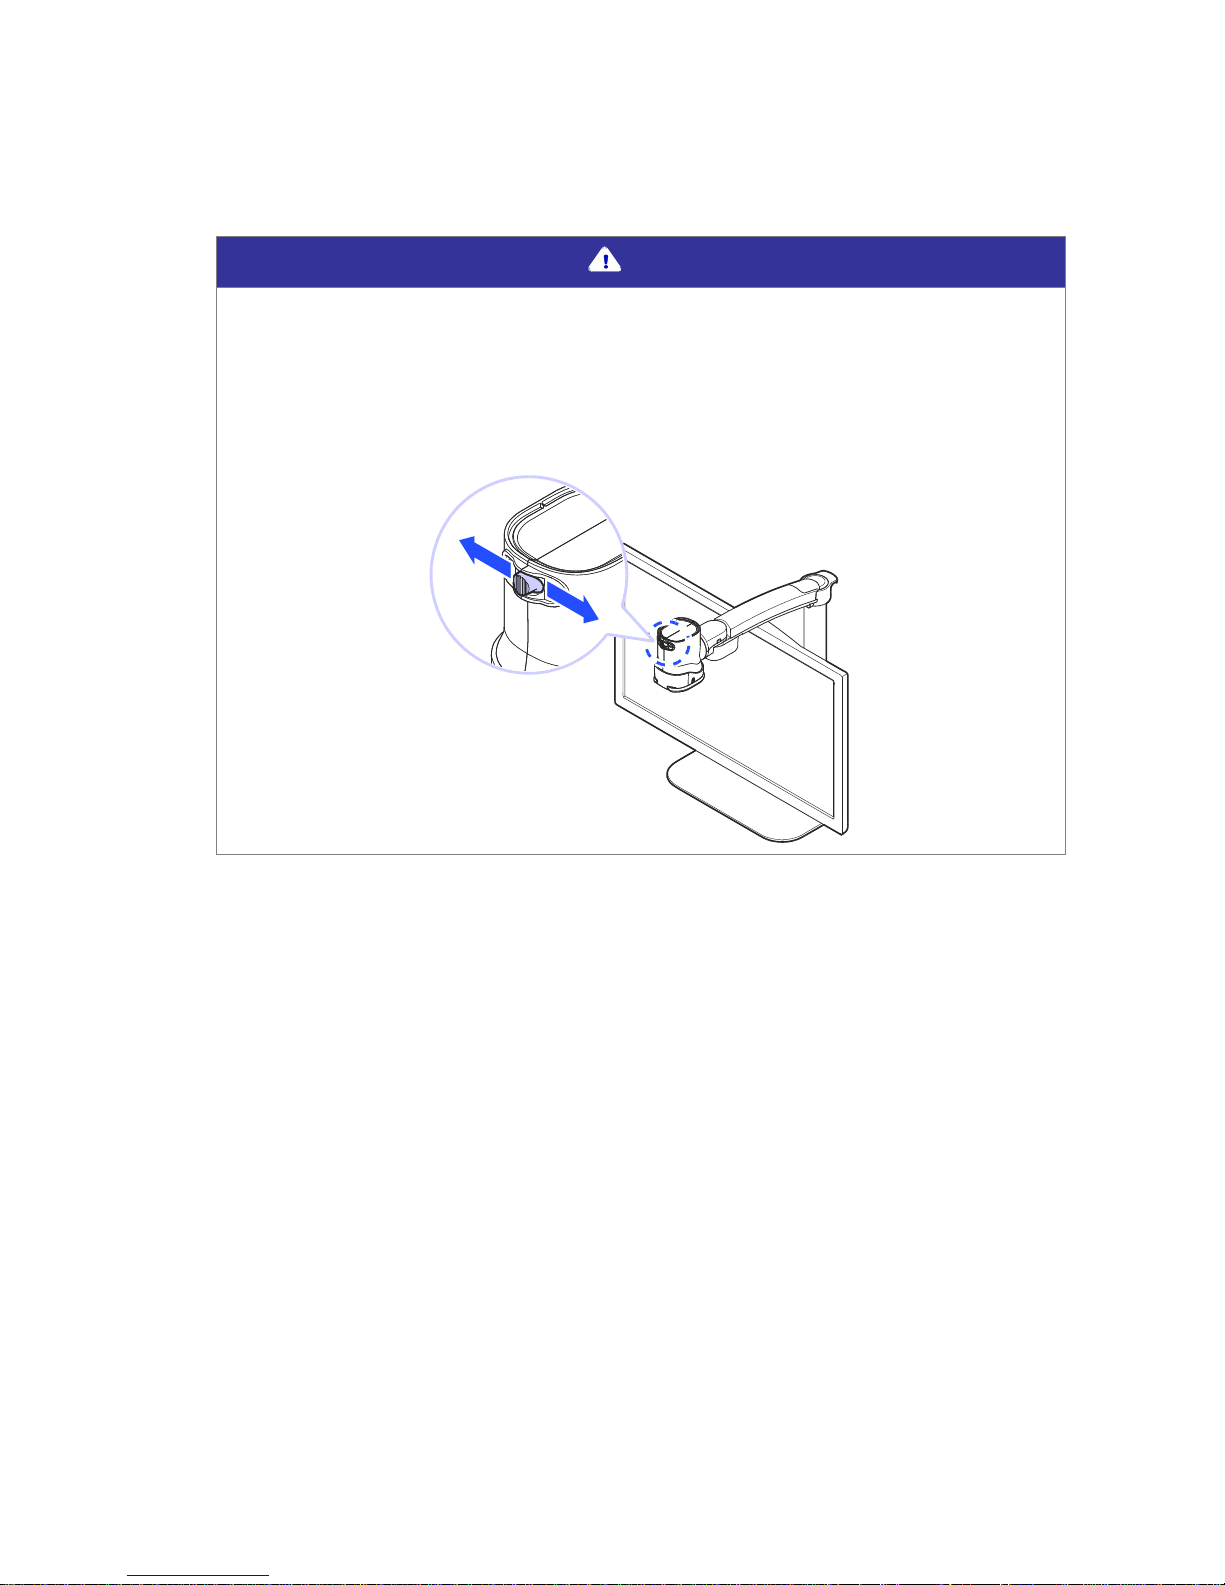
5. You may move the camera left, right, up or down.
Using Near View Mode
Use Near View to read or view things at close range, such
assigning a check or viewing a photo.
1. Rotate the camera arm so that the camera faces the front
of the product.
Page 25
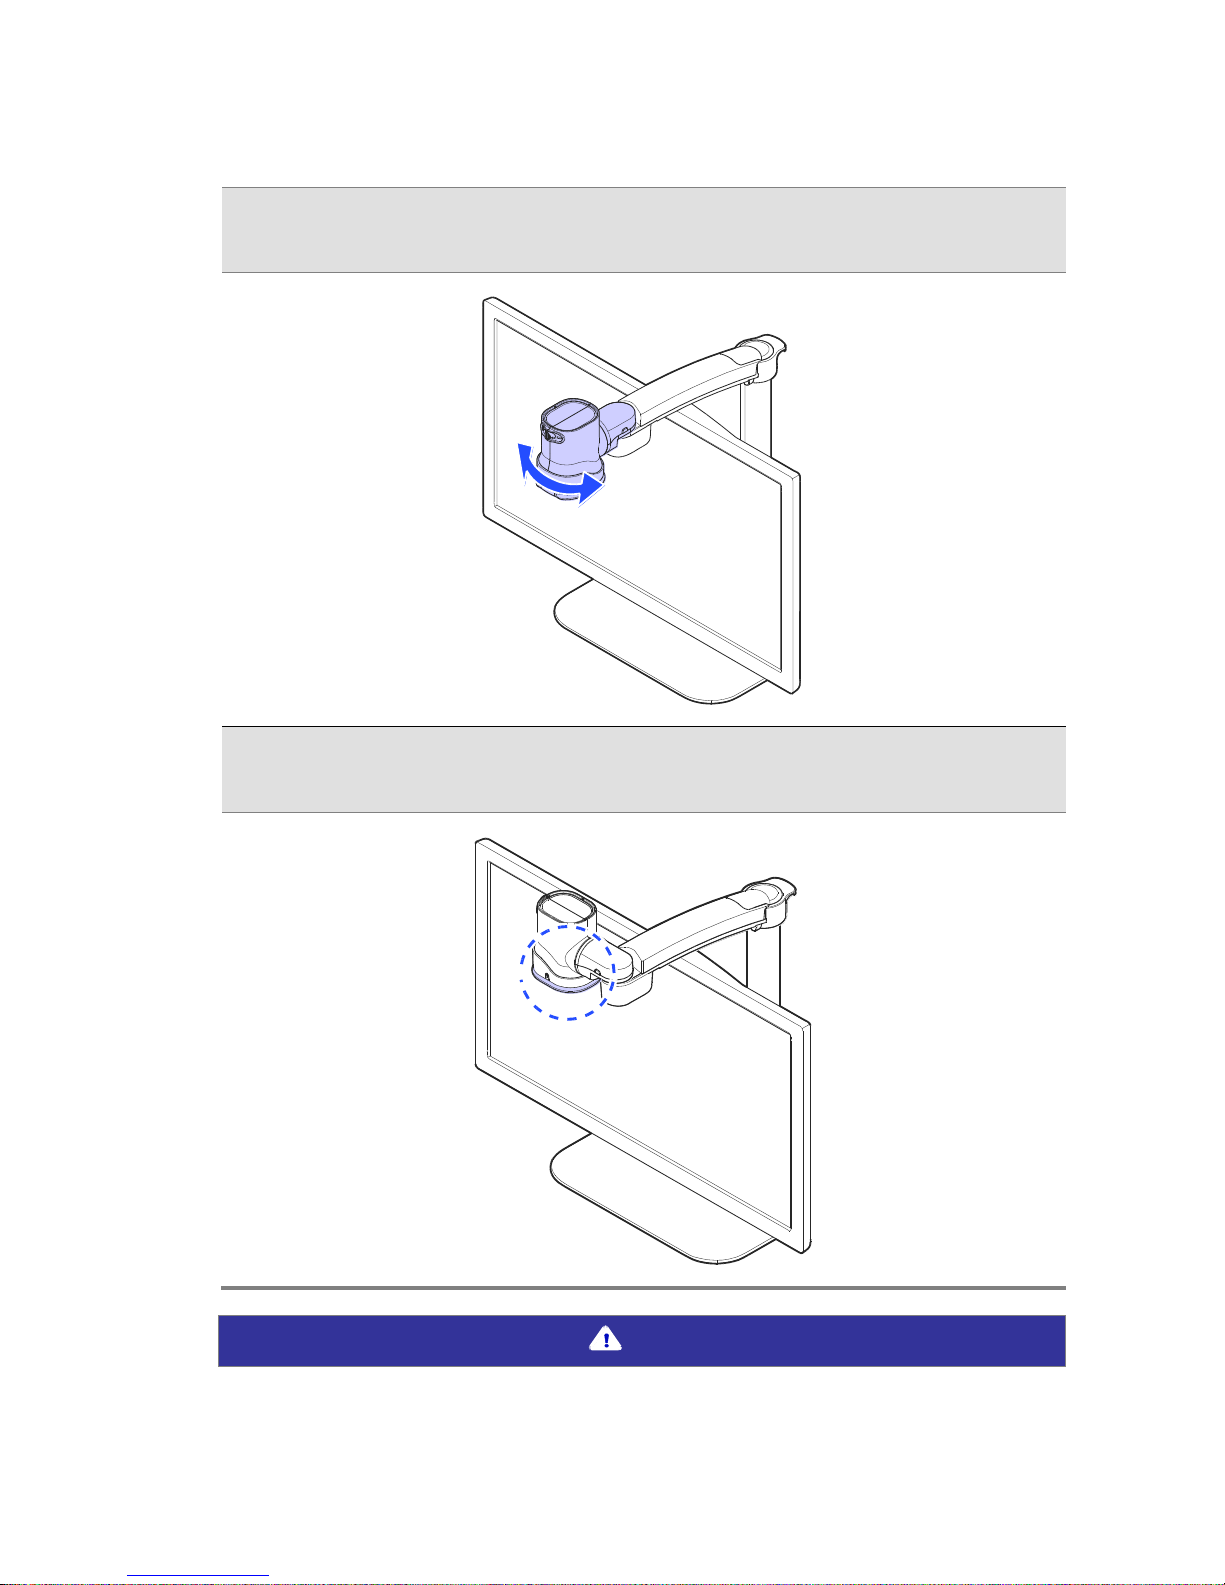
2. Make sure the camera is pointed downward.
3. Ensure the Near View lens is closed.
Note
Page 26
GoVision PRO User Manual
The Near View Mode uses the main camera. The Full-page
OCR camera cannot be used in Near View Mode.
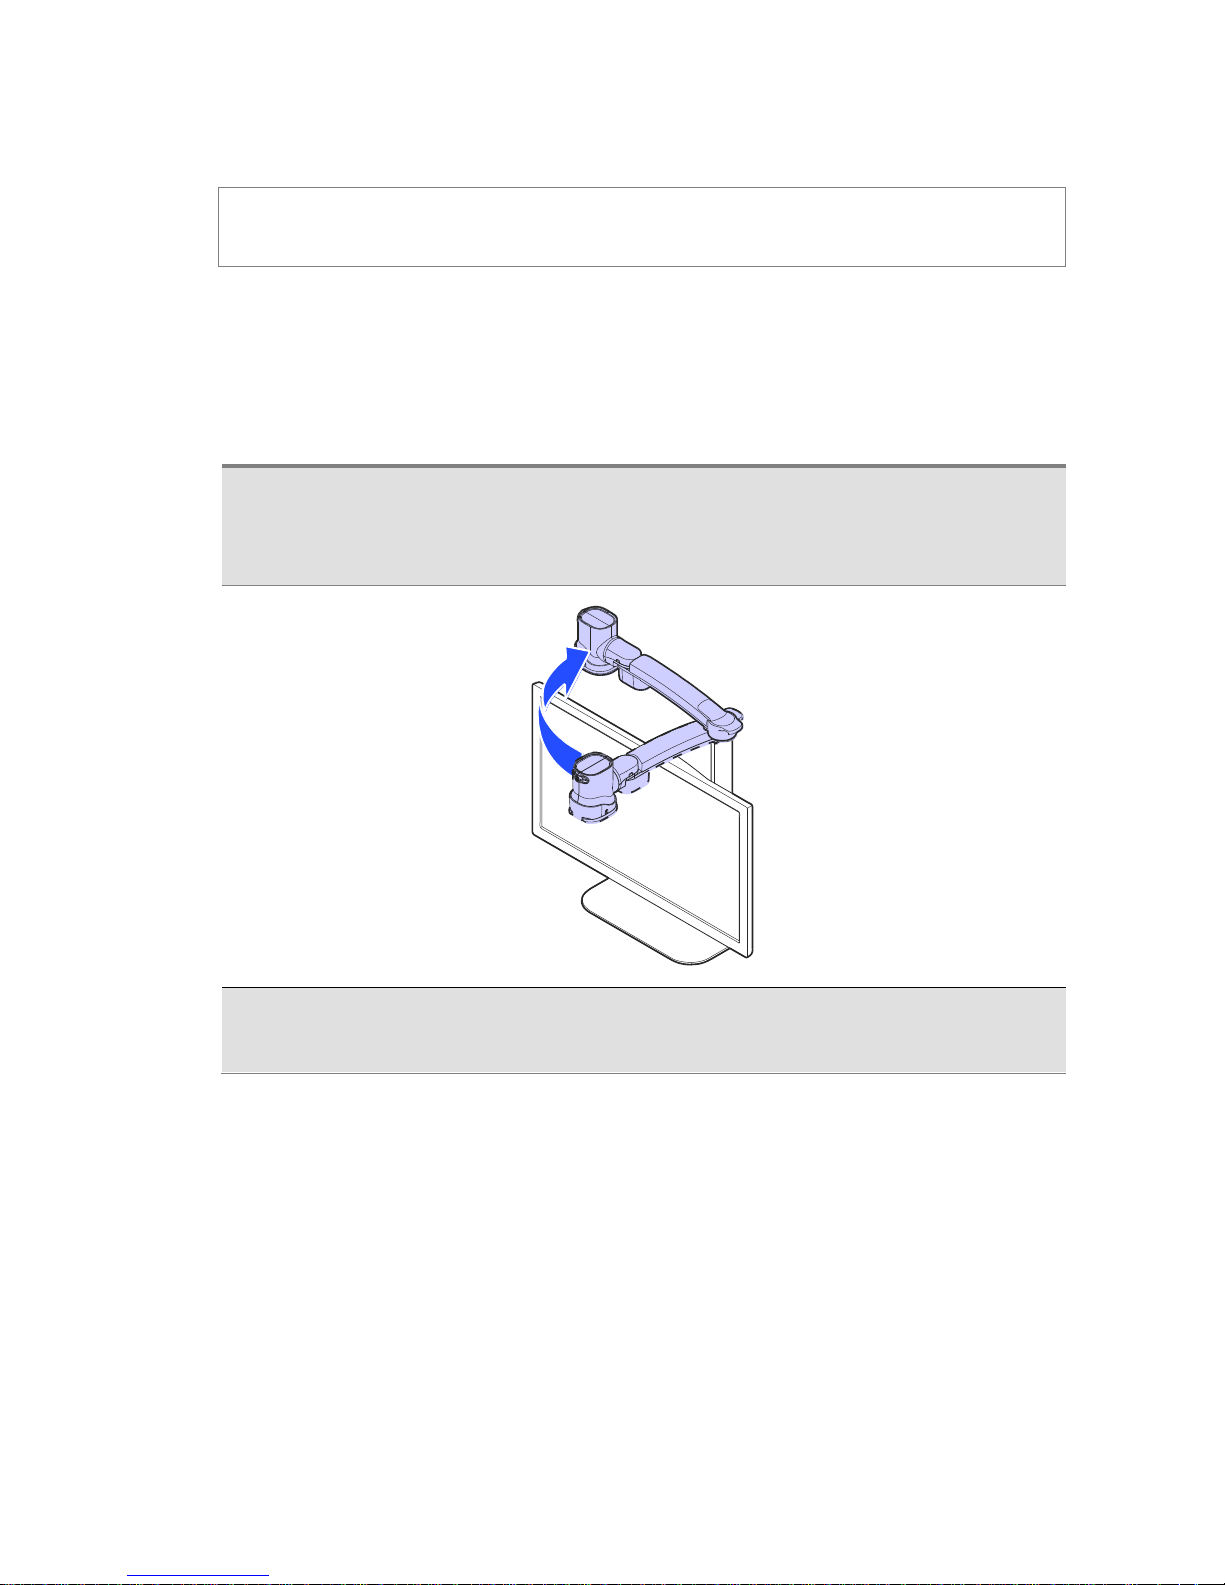
Using Distance View Mode
Use when viewing distant objects, such as a blackboard in a
classroom.
1. Rotate the camera arm so that it faces the back of the
product.
2. Point the camera so that it is facing the distant target.
Page 27
3. Open the Near View lens.
Page 28
GoVision PRO User Manual
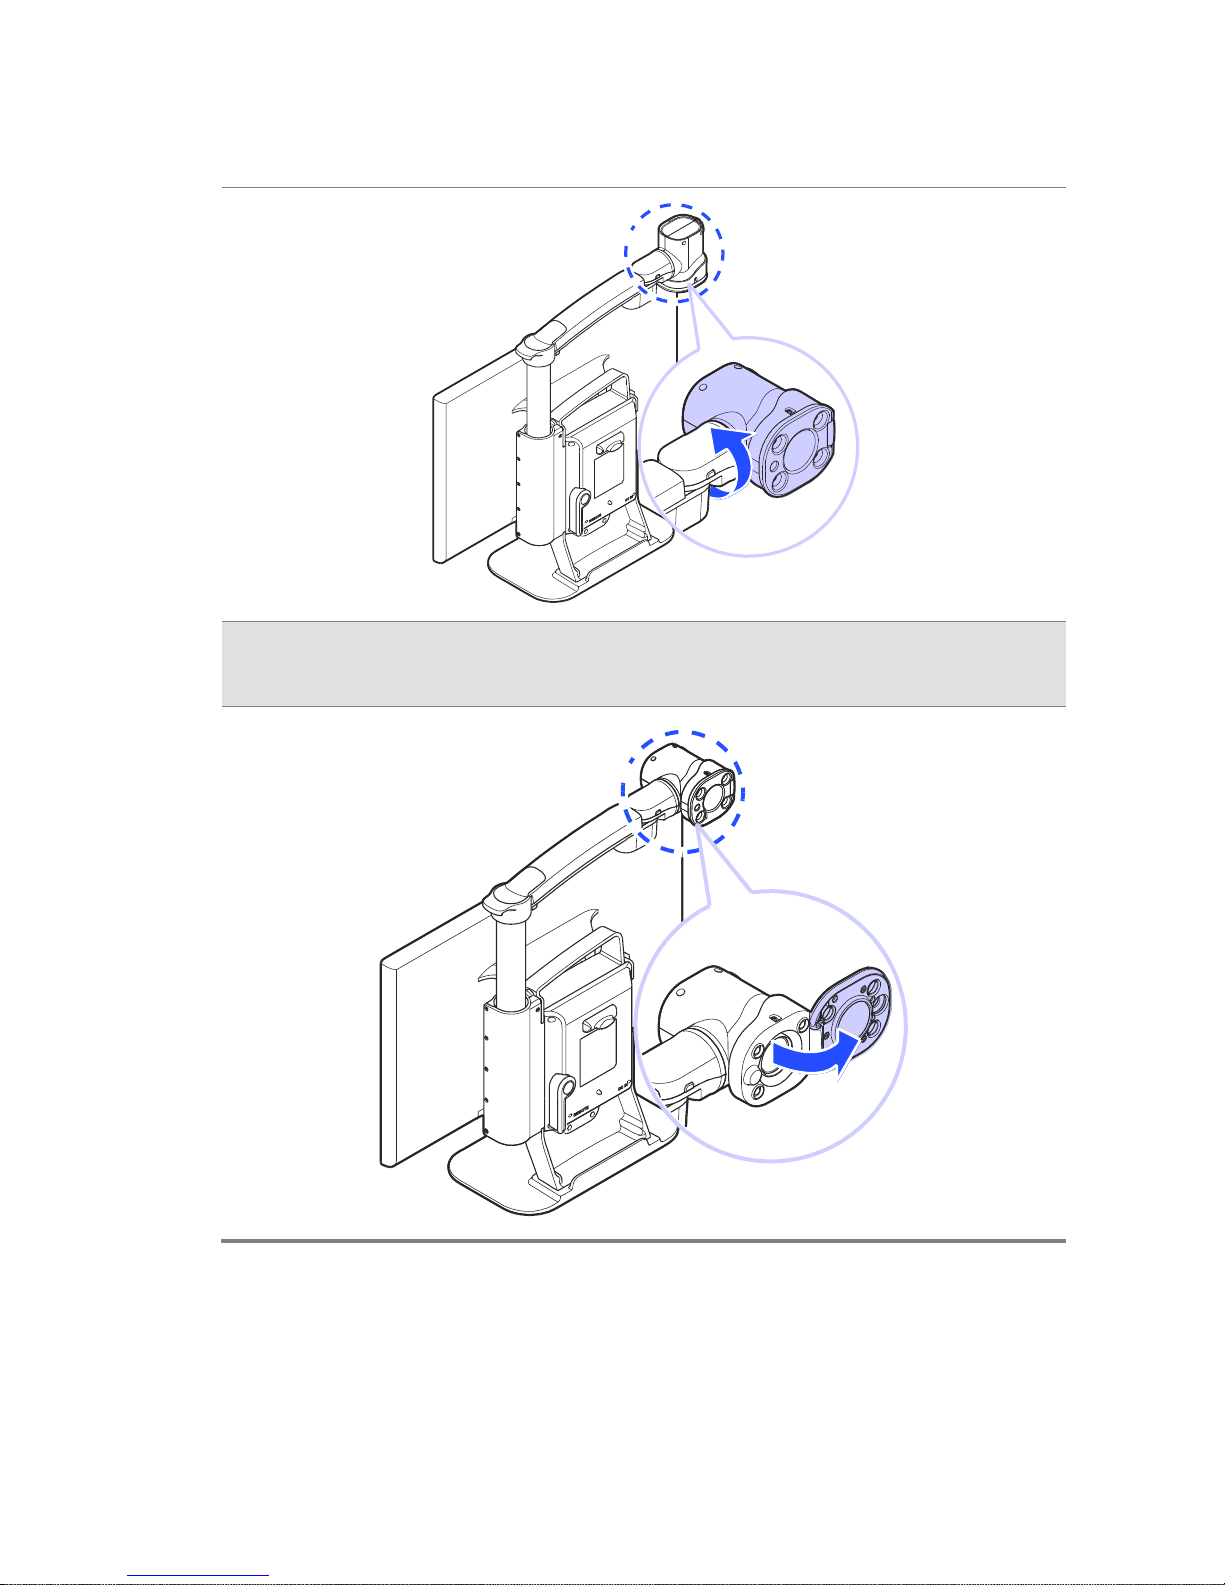
Using Self View Mode
Use as a mirror with the added benefit of magnification
when applying makeup or performing other facial grooming.
Note
The maximum distance for Self-View Mode is 45 cm from the
camera. Keep in mind that images further than that distance
will likely appear out of focus.
1. Rotate the camera so that it is facing the front of the
product.
2. Point the camera toward your face.
Page 29
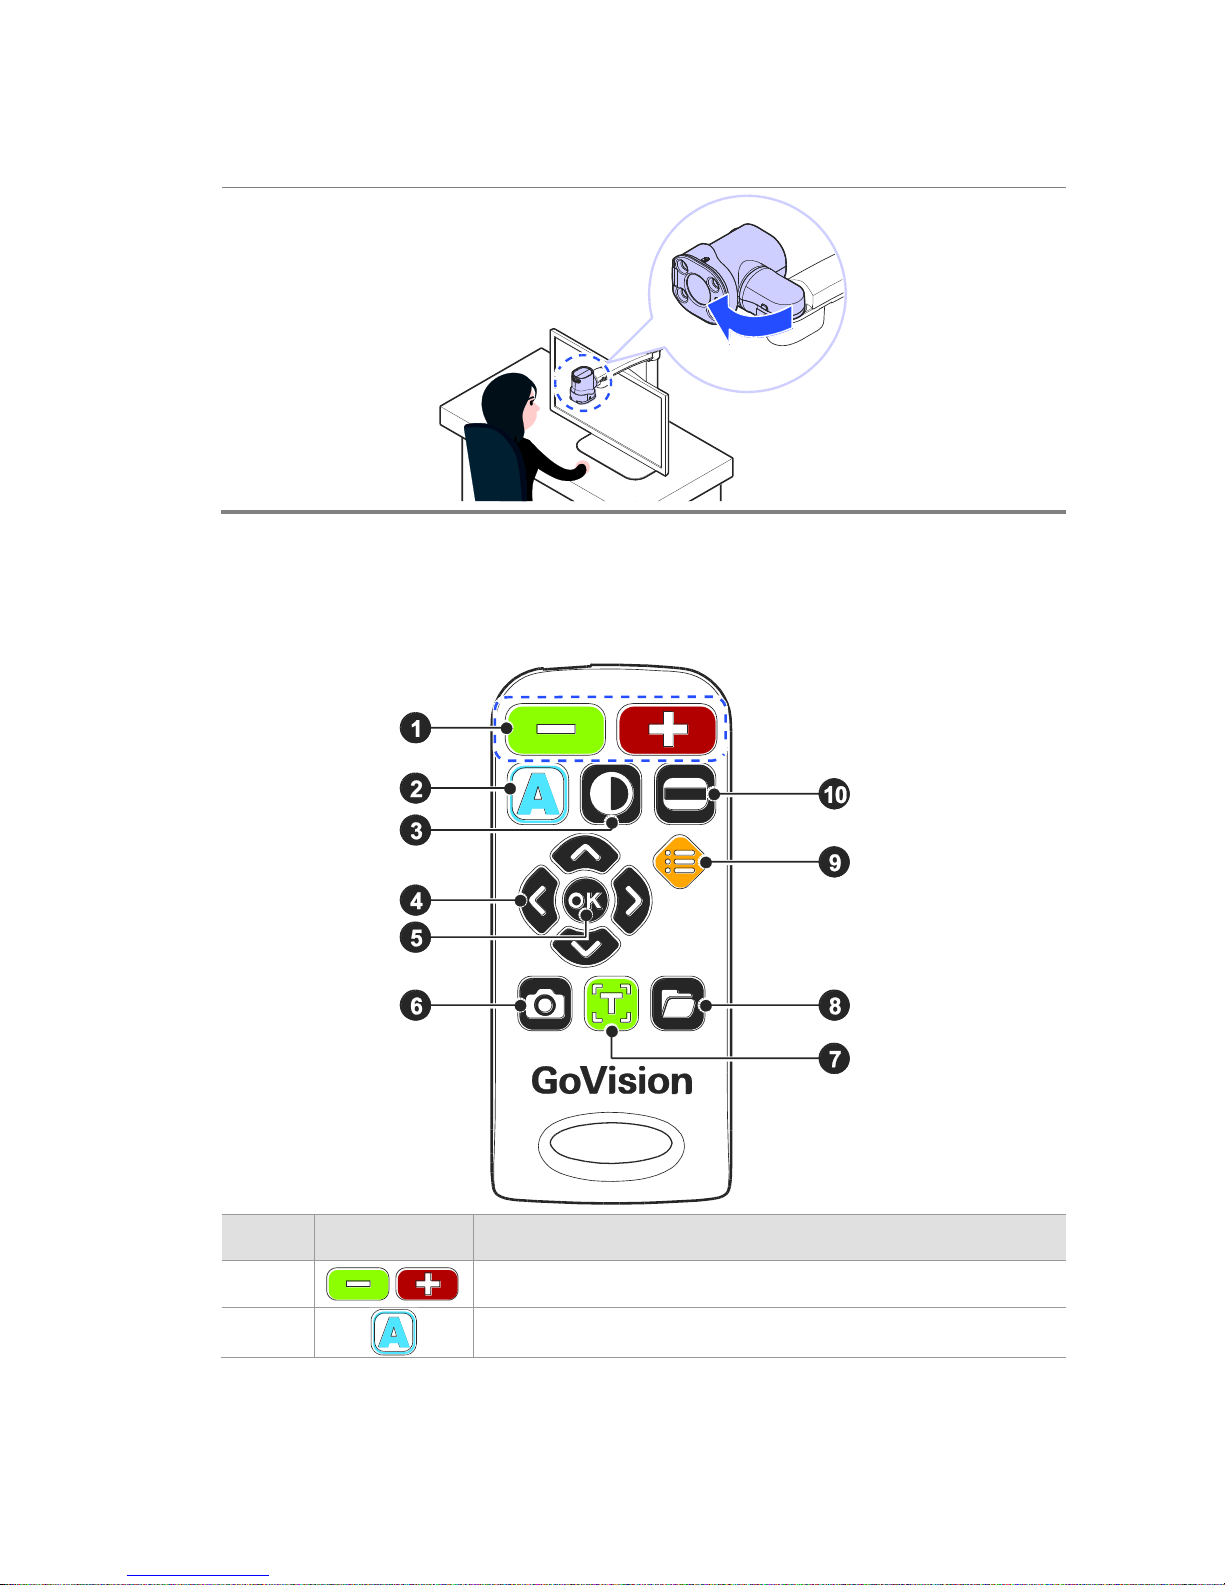
Using the Remote Control
Order
Button
Function
①
Increase and Decrease Magnification
②
Adjust Color Mode
Page 30

GoVision PRO User Manual
③
Contrast Adjustment
④
Move Up, Down, Left, and Right
⑤
Select
⑥
Screen capture
⑦
Execute OCR (Optical Character Recognition)
⑧
File Browser
⑨
Menu for User Preferences
⑩
Set Marker
Quick Start Buttons
Button
Function
Press ,
simultaneously
Increase the contrast
Press ,
simultaneously
Decrease the contrast
Press for more than 2
seconds
Enable and disable focus lock
Press or
Adjust the voice volume
Press or
Adjust the voice speed
Press
Save the current OCR result
Press ,
simultaneously
Check the current date and time
Page 31

Press , ,
simultaneously
Activate the screen saver
Press ,
simultaneously
Activate the digital photo frame
Press ,
simultaneously
Change screen refresh rate 60Hz
Press ,
simultaneously
Change screen refresh rate 50Hz
Note
The Quick Start buttons are only active when main camera
mode.
Page 32

GoVision PRO User Manual
Advanced Functions
User Preferences
You can use the menu to customize many of the features of
GoVision PRO.
To open the menu, press [ ] on the remote control.
Selecting Options
Button
Functions
① Activate the current menu item
② Toggle a check box
or
① Enter or Exit menu
② Adjust the value of the current
setting
or
① Move among menu and list items
Page 33

Menu Items
Order
Items
1
Brightness
2
Focus Lock
3
OCR Language
4
Digital Photo Frame
5
Digital Clock
6
Advanced options
Color Mode Settings
Marker Settings
Voice Settings
OCR Settings
Language Settings
Digital Photo Frame Settings
Digital Clock Settings
Screen Saver settings
Camera Frequency
My Settings
Initialization
Product Information
Page 34

GoVision PRO User Manual
Set LED
Note
This setting applies only in in Near View Mode. LED Lights turn
off automatically when switching to Distance View Mode or
Self View mode.
1) LED ON/OFF
1. Press and hold the center of the Jog Switch for more than
2 seconds.
2. Each time you press this command, it toggles the LED on
and off.
Page 35

2) Set the Brightness of the backlighting
Gloss coated paper may cause a glare if the light level is
too high, and may interfere with your comfortable viewing
and recognition of text and objects. You can adjust the
brightness of the light to suit the situation.
1. Press [ ] on the Remote control.
2. Select [Brightness], then press [ ]
3. Select your desired option and press [ ] or [ ]
4. To return to the previous screen, press [ ] or [ ]
Page 36

GoVision PRO User Manual
Screen Magnification
1) Increase and Decrease Magnification
You can adjust the screen magnification in 68 increments.
1. Press [ ] to increase magnification, and [ ]
decrease it.
2. The current level is displayed on the screen.
Page 37
Note
In Near View mode, you can adjust the magnification in 68
increments. In Distance View Mode, you can adjust the
screen magnification to step 74.
You can also adjust the screen magnification by pressing
the Jog Switch to the left or right.
Page 38

GoVision PRO User Manual
2) Check Current Reading Position
1. Press and hold [ ] simultaneously.
2. The document is reduced to normal size, and your current
position is marked with a cross shape [ + ].
3. Release the Zoom buttons and you are returned to your
previous position and magnification level.
Page 39

Color Mode
Note
In addition to changing the general color modes, you can use
the menu to define 4 of the color modes with text and
background colors of your choosing.
1) Selecting a Color Mode
Cycle through the enabled color modes.
To change the Color Mode on the current screen, press [ ]
Page 40

GoVision PRO User Manual
2) Enabling and Disabling Color Modes
You can deactivate up to 4 of the 7 color modes for easier
cycling through your most frequently used combinations.
Note
[Natural], [Black Letters on White Background], and
[White text with Black Background] are default color
modes, and cannot be disabled.
1. Press [ ] on the Remote control, and select [Advanced
options].
2. Select the [Color mode settings] and press [ ] or
[ ]
3. Press [ ] or [ ] on the desired color mode.
4. Press [ ] or [ ] to enable or disable the color mode,
then press [ ] to confirm your choice.
5. Please verify your color mode choices, then press [ ].
Page 41

3) Defining the Color Mode
4 of the 7 color modes are user definable, allowing you to
choose the specific text and background colors for each,
giving you color modes best suited to your visual condition
and viewing needs.
1. Press [ ] on the remote control, and select [Advanced
options].
2. Select the [Color mode settings] and press [ ] or
[ ]
3. Press [ ] or [ ] to change the desired color mode.
4. Use [ ] or [ ] to choose [Enable] and press [ ].
5. Use [ ] or [ ] to change the text color, and [ ] or
[ ] to change the background color.
6. When you have chosen your desired color combination,
press [ ] to save it.
7. Your new color combination is now available when
changing color modes.
Note
Colors set in Color mode also apply to the OCR column guide
colors.
Page 42

GoVision PRO User Manual
Contrast Control
Due to variations in paper type, text type and color and the
background color of documents or books that you are
reading, you may need to adjust the contrast from 1 to 40
steps to read the documents or books clearly.
1. Press [ ] on the remote control.
2. To increase contrast press [ ]. To decrease contrast
press [ ].
Page 43

3. To save the contrast setting, press [ ].
Note
To adjust the contrast, press and hold [ ] while pressing
[ ] or [ ] on the remote control
Markers
Markers help you to focus on the text that you are reading
by narrowing the display area with window markers or by
underlining the sentence that you are reading.
1) Setting Markers
Use [ ] on the remote control to cycle through the
available markers: [Horizontal Line Marker], [Vertical
Line Marker], [Horizontal Window Marker] and
[Vertical Window Marker].
Page 44

GoVision PRO User Manual
2) Change the color of the Line Marker
When the line marker is displayed on the screen, you can
change the color for easier viewing.
1. Press [ ] while holding down [ ] to change the color
mode of the current line marker.
2. As you hold [ ], continued presses of [ ]cycle
through the available colors for the line marker
Note
The available color options for the line marker are: Texture,
White, Black, Yellow, Cyan, Green, Magenta, Red, Blue
Note
You cannot change the color of the Window marker.
Page 45

3) Adjust marker type and size
① Horizontal line marker
② Vertical line marker
Press [ ] or [ ] to move
the marker position
horizontally.
Press [ ] or [ ] to move the
marker vertically.
③ Horizontal window marker
④ Vertical window marker
Press [ ] or [ ] to
expand or reduce size of the
Window marker horizontally.
Press [ ] or [ ] to expand or
reduce size of the window
marker vertically.
Page 46

GoVision PRO User Manual
4) Marker Settings
You can also use the menu to choose any of the 4 marker
types, or you can choose to use no markers.
1. Select [Marker settings], then press [ ] or [ ]
2. Select a marker type and press [ ] or [ ]
3. If you choose “No Marker” using the check box, the
current marker is disabled and no marker appears.
Page 47

Screen Capture
To display a still image for a closer look at the content, or
to save an image for later viewing, you can capture an
image and save the content to a USB flash drive.
1) Screen Capture
1. Press the [ ], and the current image is frozen on the
screen [ ] and a camera snapshot sound is heard.
2. When the image is frozen, you may adjust magnification
or color modes, just as with the live view.
3. To return to live viewing, press [ ] again.
Page 48

GoVision PRO User Manual
2) Saving a Still Image
1. Connect the USB cable to the USB port on the back of the
product.
2. When the image is frozen, press and hold [ ] for more
than 2 seconds.
3. When “Save photo done” [ ] is displayed and spoken,
the image is saved to the USB drive.
Note
If the USB drive is not connected correctly, the message
"Save file failed" is displayed on the screen.
The image is saved to the USB as
/GoVisionPRO/Image/MMDDYYYYhhmm.png.
Page 49

OCR (Optical Character Recognition)
OCR allows you to read text material aloud using the builtin text-to-speech.
1) Executing OCR
1. If you are in near view mode, press [ ] to switch to Full
Page OCR mode.
2. When the document is displayed on the monitor in Full
Page OCR mode, press [ ].
3. After loading, the text of the document is analyzed and
begins reading aloud.
4. Use [ ] or [ ] to read the next and previous sentence,
Page 50

GoVision PRO User Manual
use the [ ] or [ ] to move by paragraph.
5. Press [ ] while reading and playback is paused,
pressing [ ] again resumes reading.
6. To exit the OCR function, press [ ]
7. To switching to near view mode from OCR mode, press
[ ]
Note
OCR is accomplished using the Full-page OCR camera. In Full page OCR mode, most functions cannot be used except for
some functions such as reading mode, voice settings or column
guide settings.
2) OCR Activation
You can set up OCR Activation. If you set it inactive, the
OCR function will not work with ‘OCR disabled’ message.
1. Press [ ] on the remote control, and select [Advanced
options]
2. Select [OCR settings], then press [ ] or [ ].
Page 51

3. Select [OCR enabled] and press [ ] or [ ].
3) OCR Languages
You can add one secondary language in addition to the
system configuration language, for recognition of documents
containing 2 languages.
1. Press [ ] on the remote control.
2. Select [OCR language], then
3. Select your language and press [ ] or [ ].
Note
To adjust the pitch, volume and speed of the voice output,
refer to voice settings.
4) OCR angle correction
If you are finding OCR not to be accurate, it may be due to
the text not being perfectly aligned.
1. Press [ ] on the remote control, and select [Advanced
options]
Page 52

GoVision PRO User Manual
2. Select [OCR settings], then press [ ] or [ ].
3. Select [Page angle correction] and press [ ] or
[ ].
Note
If problems occur, such as the document appearing upside
down, terminate the function and start again.
5) Set OCR Reading Mode
After the OCR scan is complete, you can customize how the
text is displayed and spoken.
1. Press [ ] on the remote control, and select [Advanced
options]
2. Select [OCR settings], then press [ ] or [ ].
3. Select [OCR reading modes] and press [ ] or [ ].
Page 53

OCR reading modes options
① Image: The scanned
image in its original form
② Whole text: The text
result of the OCR analysis
③ Line: each line is
displayed individually as it
is spoken
④ Word: each word is
shown individually as it is
spoken
6) Set Highlight Color
When the original OCR image is displayed, the text being
read aloud through TTS is highlighted with a doublebordered square box. The color change function allows you
to change the color of the inner and outer borders.
Page 54

GoVision PRO User Manual
1. Press [ ] on the remote control, and select [Advanced
options]
2. Select [OCR settings], then press [ ] or [ ].
3. Select [Set highlight color] and press [ ] or [ ].
4. Press [ ] or [ ] to change the color of the outer border,
or press [ ] and [ ] to change the color of the inner
border of the highlight.
5. When you have chosen your desired color combination,
press [ ] to save it.
6. The corresponding color combination is used to highlight
when viewing the original OCR image.
Note
The available color options for the highlight color are: White,
Black, Yellow, Cyan, Green, Magenta, Red, Blue
7) OCR Guide Frame
GoVision PRO supports full screen OCR. You can set
whether or not to use the OCR guide frame. The guide
frame gives you a focused area under which to place the
document, and can be adjusted to fit the size of the page
you are scanning.
Page 55

When the guide frame is used, the viewing area outside the
frame is processed in black, and only what is inside the
frame is recognized.
When the OCR guide frame is disabled, the entire viewing
area undergoes character recognition.
1. Press [ ] on the remote control, and select [Advanced
options]
2. Select [OCR settings], then press [ ] or [ ].
3. Select [Guide frame] and press [ ] or [ ].
4. Select [Guide frame on] and press [ ] or [ ].
8) OCR Guide Frame
You can select the OCR Guide frame size from among A4,
Letter, or A3 paper.
1. Press [ ] on the remote control, and select [Advanced
options]
2. Select [OCR settings], then press [ ] or [ ].
3. Select [Guide frame] and press [ ] or [ ].
Page 56

GoVision PRO User Manual
4. Select [Guide frame size] and press [ ] or [ ].
5. Press [ ] or [ ] to change the desired OCR guide frame
size.
6. When you have chosen your desired OCR guide frame size,
press [ ] to save it.
9) Defining the OCR Guide frame color
You can change the color of the OCR guide frame for better
contrast, etc.
1. Press [ ] on the remote control, and select [Advanced
options]
2. Select [OCR settings], then press [ ] or [ ].
3. Select [Guide frame] and press [ ] or [ ].
4. Select [Guide frame color] and press [ ] or [ ].
5. Press [ ] or [ ] to change the desired guide frame color
and press [ ] to save it.
Page 57

Note
The available color options for the OCR guide frame color are:
White, Black, Yellow, Cyan, Green, Magenta, Red and Blue.
10) Turning on the Column guide7
The Column guide is a function that divides recognized text
by paragraph when using OCR. Paragraph division can be
enabled or disabled.
1. Press [ ] on the remote control, and select [Advanced
options]
2. Select [OCR settings], then press [ ] or [ ].
3. Select [Column guide on], then press [ ] or [ ].
11) Column guide auto Numbering
This function automatically detects recognized paragraphs
and gives them numeric order.
If you select the automatic setting for the column guide,
the function will be activated and will read paragraphs in
order from left to right, then top to bottom.
When disabled, the TTS will read paragraphs in the order
the user specifies.
1. Press [ ] on the remote control, and select [Advanced
Page 58

GoVision PRO User Manual
options]
2. Select [OCR settings], then press [ ] or [ ].
3. Select [Column guide order auto], then press [ ] or
[ ].
File Viewer
You can use the File Viewer to view saved images, OCR
scans, videos, or text-based files.
Supported File Formats
Option
Format
Document
MS Word 97~2014 (.doc, .docx, .dot, .dotx),
Text (.txt), Rich Text (.rtf), PDF(.pdf),
ASCII(.asc)
Image
PNG, BMP, JPG(JPEG)
Video (Codec)
MP4(H.263, H.264), 3GP
Subtitles
smi, srt
1) Connect the USB
Connect the USB cable to the USB port on the back of the
product.
Page 59

Note
If the USB drive is not connected properly, an error message
is displayed on the monitor.
2) File Management
Moving Files
1. Press [ ] on the remote control.
Page 60

GoVision PRO User Manual
2. Image, video, and document files and folders appear on
the screen.
3. Press [ ] to open the file menu, and select [Selection
modes].
4. Press [ ] or [ ] to select files and folders you want to
move.
5. To move the selected items, press [ ], and then select
Page 61

[Copy] or [Cut].
6. Move to the location where you want to place the files or
folders, then press [ ] again. Select [Paste].
7. To close the file menu, select [Exit].
Note
When copying USB files, please note that overwriting existing
files is not supported.
Page 62

GoVision PRO User Manual
Filtering Files
Use the following commands to browse only the files in
specific formats.
Button
Function
Press ,
simultaneously
To show only video and image files
Press ,
simultaneously
To show only OCR files
Press ,
simultaneously
To show only document files
Deleting Files
1. Press [ ] on the remote control.
2. Image, video, and document files and folders appear on
the screen.
Page 63

3. Press [ ] to open the file menu, and select, [Selection
modes].
4. Press [ ] or [ ] to select files or folders.
5. Press [ ] and select [Delete].
6. To confirm deletion of the file, select [Yes] in the
message screen.
7. To close the document, press [Exit].
3) Viewing Files
1. Press [ ] on the remote control.
2. Image, video, and document files and folders appear on
the screen.
Page 64

GoVision PRO User Manual
3. Use [ ] or [ ] to navigate to your desired file, then
press [ ].
4. To close the document, press [ ].
Document View Settings
1) To adjust the document magnification
When a document on the USB drive is displayed, press
[ ] on the remote control to adjust the font size.
2) To change the color of the document
1. When a document on the USB drive is displayed, press [ ]
to change the text color and background color of the
document.
Page 65

2. GoVision PRO cycles through the available color modes each
time you press [ ].
3) Scrolling documents
Scroll functions
Button
Navigate by line
Press [ ] or [ ]
Navigate by page
Press [ ] or [ ] twice in quick
succession
Navigate by first
character
Press [ ]
4) Line Mode
When Line Mode is on, each line is displayed individually as
it is read aloud, with the current word highlighted. Also, when
Reflow Mode is on, rearranges the text in lines the width of
the screen, thus scrolling up and down is all that is necessary
to view the entire document.
1. Press [ ] on the remote control while a document is
displayed on the monitor.
Page 66

GoVision PRO User Manual
2. In the menu, select [Document type], then press [ ]
or [ ].
3. Select the desired document mode, then press [ ] or
[ ].
4. To return to the previous screen, press [ ] or [ ].
5. The document is displayed on the screen in the selected
mode.
Document type mode
Mode
Screen
Function
Normal
Mode
Text remains in its
original position, no
matter how much it is
magnified, and you can
scroll up, down, left or
right to view it in its
entirety.
Page 67

Reflow
Mode
Rearranges the text in
lines the width of the
screen, thus scrolling up
and down is all that is
necessary or available.
Note
Text Reflow mode is not supported when viewing PDF files.
5) Auto-scroll Setting
Allows you to view the content of the document without
manually moving the reading position with the remote
control.
1. Press [ ] on the remote control while a document is
displayed on monitor.
2. The document automatically begins scrolling.
3. Press the [ ] on the remote control to adjust the
scrolling speed.
4. Select [Auto scroll speed] then You can adjust the speed
using [ ] or [ ]
Page 68

GoVision PRO User Manual
5. To return to the previous screen, press [ ].
6) Document View Mode Type
1. Press [ ] on the remote control while a document is
displayed on the monitor.
2. From the menu window, select [View mode], then press
[ ] or [ ].
3. Select the desired view mode, then press [ ] or [ ].
4. To return to the previous screen, press [ ] or [ ].
Page 69

5. The document is displayed on the screen in the selected
mode.
View Mode Type
Mode
Screen
Function
Origin
al
View
mode
The document is displayed
in its original form
Line
Mode
Each line of the document is
displayed individually as it
is read aloud
7) Reading documents aloud
When a document on the USB drive is displayed, press [ ]
on the remote control. The document is then read aloud with
the built-in text-to-speech.
Page 70

GoVision PRO User Manual
Note
Press [ ] in the image file to proceed OCR.
If you press and hold the [ ] more than 2 seconds in the
OCR status or OCR file, the file is saved according to the
value set in 'Save as'.
8) Set Bookmark
You can bookmark a location in the document, so that you
can easily return to it later.
Saving Bookmark
1. Press [ ] on the remote control while a document is
displayed on the monitor.
2. From the menu window, select [Bookmark], then press
[ ] or [ ].
Page 71

3. Select [Saving bookmark] and press [ ] or [ ].
4. Press [ ] or [ ] to move to the position you want to
bookmark, and press [ ]. Choose a bookmark number
from 1 to 5.
5. To return to the previous screen, press [ ] or [ ].
Moving to Bookmarks
1. Press [ ] on the remote control while a document is
displayed on the monitor.
2. From the menu window, select [Bookmark], then press
[ ] or [ ].
Page 72

GoVision PRO User Manual
3. Select [Open bookmark], and press [ ] or [ ].
4. Press the [ ] on the desired bookmarked position.
5. You are placed at the bookmarked position in your
document.
6. To return to the previous screen, press [ ] or [ ].
Page 73

9) File Information
Displays file information including: file name, file type, file
path, and file size.
1. Press [ ] on the remote control while a document is
displayed on the monitor.
2. From the menu window, select [File information], then
press [ ] or [ ].
3. Information for the current document is displayed.
4. To return to the previous screen, press [ ] or [ ].
Page 74

GoVision PRO User Manual
10) Marks
GoVision PRO automatically saves a mark in your document
when you close the file. The next time you open it, GoVision
PRO will prompt you whether to return to your last position
or pace you at the top of the document.
Select [Yes] to return to your previous position. Select
[No] to return to the beginning of the document.
Note
In large documents, this message may be delayed.
Video Playback Settings
1) Playback
While a video is running, use the following functions.
Button
Function
Play / Pause
You can change the color of the
subtitles.
Page 75

or
Move the playback section
or
Adjust voice volume
2) Repeat
The Repeat function allows you to select and repeat a specific
section of a video as many times as you wish.
1. Press [ ] on the remote control at the point to start the
repetition, then continue playback.
2. Use [ ] or [ ] to move to the point where you want to
end the repetition.
3. Press [ ] to play the section for repetition.
Page 76

GoVision PRO User Manual
4. To end the AB repeat, during playback, press [ ] again.
Note
For some low-quality videos, the repeat function may not work
properly.
3) Subtitle Settings
When a video containing subtitles is running, open the
subtitle settings and you can control the sync and adjust the
size and color of the subtitles.
Run Subtitles
1. Press [ ] on the remote control during video playback.
2. From the menu, select [Subtitle settings], then press
[ ] or [ ].
3. Press [ ] or [ ] to run or exit the [Subtitles]
Page 77

4. To return to the previous screen, press [ ] or [ ].
Subtitles Synchronization
If, for some reason, the subtitle and the currently playing
video do not match, you can adjust the synchronicity of the
subtitles.
1. Press [ ] on the remote control during video playback.
2. From the menu, select [Subtitle settings], then press
[ ] or [ ].
3. Select [Subtitle sync], then press [ ] or [ ].
4. Use [ ] or [ ] to make adjustments, then press
[ ].
5. To return to the previous screen, press [ ] or [ ].
Page 78

GoVision PRO User Manual
Subtitle Size / Position / Color settings
1. Press [ ] on the remote control during video playback.
2. From the menu, select [Subtitle settings], then press
[ ] or [ ].
3. Select the item you want to change.
4. Use [ ] or [ ] to change the value of the current
setting.
5. To return to the previous screen, press [ ] or [ ].
Note
Using [ ] on the remote control, you can change the
subtitle color in real time. Using [ ] and [ ] on the
remote control, you can also change the subtitle size in real
time.
Page 79

4) Bookmark Settings
Save Bookmarks
1. Press the [ ] on the remote control at the position you
want to place a bookmark.
2. From the menu, select [Bookmark settings], then press
[ ] or [ ].
3. Select [Save bookmark] and press [ ] or [ ].
4. Choose a bookmark number from 1 to 5, then press [ ]
or [ ].
5. To return to the previous screen, press [ ] or [ ].
Moving to Bookmarks
1. Press [ ] on the remote control during video playback.
Page 80

GoVision PRO User Manual
2. From the menu, select [Bookmark settings], then press
[ ] or [ ].
3. Select [Open bookmark] and press [ ] or [ ].
4. Select the bookmarked location you want to go to, and
press [ ] or [ ].
5. The video begins playing from the bookmarked position.
6. To return to the previous screen, press [ ] or [ ].
5) Information
This option displays information such as Playing Time, File
Name, File Type, File Path and File Size.
1. Press [ ] on the remote control during video playback.
2. From the menu, select [Information], then press [ ]
Page 81

or [ ].
3. The file information for the currently playing video is
displayed.
4. To return to the previous screen, press [ ] or [ ].
Voice Guide
1) Product Languages
You can select the language for the menus and prompts
displayed on the screen and spoken by the voice guide.
1. Press [ ] on the remote control and select [Advanced
options].
2. Select [Language settings], then press [ ] or [ ].
Page 82

GoVision PRO User Manual
3. Select your desired languages and press, [ ] or [ ].
2) Running the Voice Guide
You can adjust speed, volume and pitch of the voice guide
as well as turn it on and off.
1. Press [ ] on the remote control and select [Advanced
options].
2. Select [Voice settings], then press [ ] or [ ].
Page 83

3. Select [Voice guide], then press [ ] or [ ].
Note
While in Near View Mode, adjust the volume using the [ ]
and [ ], and adjust the speed using the [ ] and [ ].
3) Voice Settings
1. Select any of the settings, and press [ ] or [ ] to
adjust the voice volume, speed or pitch.
Page 84

GoVision PRO User Manual
2. Select [Voice selection], then press [ ] or [ ].
3. Select the type, then press [ ] or [ ].
4. To return to the previous screen, press [ ] or [ ].
Focus Lock
If there is movement in the camera view, such as when you
are writing under it, you may wish to lock the focus so that
it doesn't try to follow your hand or pen.
Page 85

1. Press [ ] on the remote control.
2. Select [Focus lock], then press [ ] or [ ].
3. The lock symbol [ ] appears on the screen.
4. To turn off, Focus Lock, press [ ] or [ ]. The lock
symbol [ ] disappears.
Camera Frequency
If the screen is not displaying correctly or you experience a
black line, check the frequency.
Page 86

GoVision PRO User Manual
1. Press [ ] on the remote control and select [Advanced
options].
2. Select [Camera frequency], then press [ ] or [ ].
3. Select the frequency, press [ ] or [ ].
Page 87

Add-Ons
Digital Photo Frames
You can view images on a USB drive on GoVision PRO's
monitor as a slide show.
Note
The first time you connect a USB drive to the product, a
[GoVisionPRO] folder is automatically created. If the folder
does not exist, disconnect and reconnect the USB drive.
1) Digital Frame Playback
1. Save the images in the [Slide] folder of the
[GoVisionPRO] folder on the USB drive.
2. Connect the drive containing the photos to the USB port
on the back of the product.
Page 88

GoVision PRO User Manual
3. Press [ ] on the remote control.
4. Select [Digital Photo Frame], then press [ ] or [ ].
5. Pictures in the [GoVisionPRO] folder are sequentially
displayed on the monitor.
Note
Press [ ] and [ ] simultaneously to start, and press any
button to stop the Digital Photo Frame.
2) Digital Photo Frame Settings
1. Press [ ] on the remote control and select [Advanced
options].
2. Select [Digital photo frame settings], then press [ ]
or [ ].
3. Select Photo Transition Time, then press [ ] or [ ].
Page 89

4. Select [Digital photo frame], then press [ ] or [ ].
5. To return to the previous screen, press [ ] or [ ].
Digital Clock
While using GoVision PRO, you can easily check the time
with the full-screen digital clock.
1) Digital Clock Display
1. Press [ ] on the remote control.
2. Select [Digital clock], then press [ ] or [ ].
Page 90

GoVision PRO User Manual
3. To return to the previous screen, press [ ] or [ ].
Note
Press [ ] and [ ] simultaneously and the Digital Clock
appears on the screen.
While viewing the digital clock, pressing the [ ] on the
Remote Control cycles the seven color modes that are set.
While Viewing the Digital Clock, pressing the [ ] on the
remote control announces the Time and Date aloud.
2) Digital Clock Settings
If GoVision PRO's clock is not correct, you can reset it to
the current time.
1. Press [ ] on the remote control and select [Advanced
options].
2. Select [Digital clock settings], then press [ ] or
[ ].
Page 91

3. Select [Set time and date], then press [ ] or [ ].
4. Use [ ] or [ ] and [ ] or [ ] to modify the date
and time.
5. When the setting is complete, press [ ].
Note
To change the time format to 12 hours or 24 hours, select [12
hour time format] or [24 hour time format] in [Digital
clock settings] and press [ ] or [ ].
Screen Savers
In order to protect the screen of the product, you may use
the clock or your digital photos as a screen saver.
1. Press [ ] on the remote control and select [Advanced
options].
2. Select [Screen saver settings], then press [ ] or
Page 92

GoVision PRO User Manual
[ ].
3. Select [Digital Clock] or [Digital photo frame], then
press [ ] or [ ].
4. Select [Timer settings], then press [ ] or [ ].
5. Select screen saver operation based on time, then press
[ ] or [ ].
Page 93

Note
To activate the screen saver, press [ ], [ ], [ ]
simultaneously.
If you press any button on the camera or remote control, or if
the camera detects movement while the screen saver is in
operation, the screen saver will be canceled.
My settings
You can set and save your user settings, and easily restore
them later.
1) Save My Settings
1. Press [ ] on the remote control and select
[Advanced options].
2. Select [My settings], then press [ ] or [ ].
Page 94

GoVision PRO User Manual
3. Select [Save my settings], then press [ ] or [ ].
4. Press [ ] or [ ] at the desired position.
Page 95

2) Load Settings
1. Select [Retrieve my Options], then press [ ] or
[ ].
2. Press the [ ] or [ ] on the desired settings, and
select [Yes].
Initialization
If something doesn't seem to be operating as you think it
should, you can restore all settings to the factory defaults.
Page 96

GoVision PRO User Manual
1. Press [ ] on the remote control and select
[Advanced options].
2. Select [Initialization], then press [ ] or [ ].
3. Select [Yes], and press [ ].
4. [Reset done] is displayed on the screen when the
rest is complete.
Note
When GoVision PRO is powered off, hold the center of the
Jog switch and press and release the Power button. Hold
the Jog Switch until the unit reboots, and all settings
should be restored to the factory defaults.
Page 97

GoVision PRO as a Computer
Display
You can use the HDMI cable included in the product
packaging to connect your GoVision PRO to a PC or Mac and
use it as a monitor.
1. Connect the HDMI cable to the HDMI port of the
GoVision PRO.
2. Connect the HDMI / DVI adapter to the computer
monitor port.
Page 98

GoVision PRO User Manual
3. While GoVision PRO is powered on, briefly press and
release the Power button.
4. The computer image is shown on the GoVision PRO
screen.
Note
When the GoVision PRO is connected to a computer, the
screen saver will not be activated, even if no activity
occurs for the period of time you set in the Screen Saver
Settings.
To change the setting, on the remote control, press [ ],
[ ], [ ] simultaneously.
Note
If your computer supports only DVI port, use the
HDMI/DVI converter.
Page 99

Maintenance
Caution
While transporting and storing the GoVision PRO, be careful
not to damage the LCD monitor.
Transporting the Product
The back of the unit is designed with a handle for easy
carry and transport. Please use the mobile handle and other
precautions to transport the unit properly to avoid damage
or undue stress to the GoVision PRO.
1. Make sure that the Near View Lens is closed.
Page 100

GoVision PRO User Manual
2. Raise the locking lever fold the camera arm.
3. Return the locking lever to the lock position.
 Loading...