

Page 1

HIMS CO., LTD. BookSense XT – User Manual
BookSense XT
User Manual
English Manual
For Software Version 1.0
June, 2009.
HIMS Co., Ltd.
139-9, Gajung-dong, Yuseong-gu, Daejeon, Korea 305-350
Phone: +82-42-864-4601
Fax: +82-42-864-4462
Email: hims@himsintl.com
Website: www.himsintl.com
Page 2

HIMS CO., LTD. BookSense XT – User Manual
About BookSense XT
Congratulations on the purchase of your new BookSense XT. This guide contains all
the information you will need to get started with your new BookSense XT.
HIMS is proud to introduce BookSense XT, the powerful digital talking book portable
device.
BookSense XT is designed as an advanced high performance daisy player.
BookSense XT is a digital audio player which is made by HIMS Co., LTD. who is
well known manufacturer of SENSE products. It is very convenient portable device
which can play digital books, audio files, text files, and DAISY content. You can
record live voice such as lecture, FM radio and even record external audio source
using line-in mode.
BookSense XT is advanced model and has built-in internal 4GB storage space in it
so that user can save various content without using external memory and it has built
in FM radio and Bluetooth capability.
With BookSense XT, if you use Bluetooth headset, you can be free from annoying
wire connection between BookSense XT and your ears.
Copyright 2009. All RIGHTS reserved, HIMS Co., LTD.
This User Manual is protected by copyright belonging to HIMS, with all rights
reserved. The User Manual may not be copied in whole or part, without consent from
HIMS.
Page 3

HIMS CO., LTD. BookSense XT – User Manual
TABLE OF CONTENTS
1. Overview BookSense XT ............................................................................................... 1
1.1 What’s in the package? ............................................................................................ 1
1.2. Hardware Specifications .......................................................................................... 1
1.3. Physical Description of BookSense XT .................................................................... 2
1.3.1 Front Face of the Device .................................................................................... 3
1.3.2 Back of the Device ............................................................................................. 3
1.3.3 Left Side of the Device ....................................................................................... 3
1.3.4 Right Side of the Device ..................................................................................... 3
1.3.5 Top Side of the Device ....................................................................................... 3
1.3.6 Bottom Side of the Device .................................................................................. 3
1.4 Turning the Device On after purchasing .................................................................... 4
1.5 Inserting or Removing the Battery ............................................................................. 4
1.6 Turning the Device On/Off ........................................................................................ 4
1.7 Charging BookSense XT .......................................................................................... 4
1.8 Inserting or Removing the SD CARD/USB Memory/USB CD-ROM ............................ 5
1.8.1 Inserting or Removing the SD CARD .................................................................. 5
1.8.2 Inserting or Removing the USB Memory/CD-ROM .............................................. 5
1.9 Connecting to PC ..................................................................................................... 5
2. Basic Functions and Structures ..................................................................................... 6
2.1 Folders used in the BookSense XT ........................................................................... 6
2.2 Switching Mode ....................................................................................................... 6
2.3 Changing Volume .................................................................................................... 6
Page 4

HIMS CO., LTD. BookSense XT – User Manual
2.4 Navigating Through Files and Folder ........................................................................ 7
2.5 Deleting File or Folder .............................................................................................. 7
2.6 Using Menu, Dialog, Combo Box, Edit Box ............................................................... 8
2.7 Checking Battery Status ........................................................................................... 8
2.8 Checking Date &Time .............................................................................................. 9
2.9 Changing Voice ....................................................................................................... 9
2.10 Hold Switch ........................................................................................................... 9
3. Using Help Mode .......................................................................................................... 9
4. Media ......................................................................................................................... 10
4.1 What is supported in the Media? ............................................................................ 10
4.2 Playing Audio Files ................................................................................................ 10
4.3 Pause .................................................................................................................... 10
4.4 Changing Moving Unit ............................................................................................ 10
4.5 Moving by 1 track ................................................................................................... 10
4.6 Moving by 5 tracks ................................................................................................. 10
4.7 Moving to First or Last track ................................................................................... 11
4.8 Moving by Time ..................................................................................................... 11
4.9 Section Repetition .................................................................................................. 11
4.10 Mark .................................................................................................................... 11
4.10.1 Inserting Mark ................................................................................................ 11
4.10.2 Moving to Mark .............................................................................................. 12
4.10.3 Deleting Mark ................................................................................................ 12
4.11 Adjusting Playing Speed ...................................................................................... 13
4.11.1 Play Slowly .................................................................................................... 13
Page 5

HIMS CO., LTD. BookSense XT – User Manual
4.11.2 Normal speed ................................................................................................ 13
4.11.3 Play Fast ....................................................................................................... 13
4.12 Setting Moving Mode as Time .............................................................................. 13
4.13 Shuffle ................................................................................................................. 13
4.14 Setting Moving Mode as Percentage ..................................................................... 14
4.15 Repetition ............................................................................................................ 14
4.16 Equalizer Setting .................................................................................................. 14
4.17 Saving the Playlist ................................................................................................ 14
4.18 Checking the File Information of Playing ............................................................... 15
4.19 Checking the Tag Information of Playing ............................................................... 15
4.20 Using Menu in the Media ...................................................................................... 15
4.20.1 Equalizer Setting ........................................................................................... 15
4.20.2 Playback Settings .......................................................................................... 15
4.20.3 Selecting Playlist ........................................................................................... 17
4.20.4 Saving Playlist ............................................................................................... 18
5. DAISY ........................................................................................................................ 19
5.1 What is supported in the Daisy? ............................................................................. 19
5.2 How to play DAISY content .................................................................................... 19
5.3 Pause .................................................................................................................... 19
5.4 Changing Moving Unit ............................................................................................ 20
5.5 Moving by Phrase .................................................................................................. 20
5.6 Moving by Paragraph ............................................................................................. 20
5.7 Moving by Heading ................................................................................................ 20
5.8 Moving to Home/End ............................................................................................. 20
Page 6

HIMS CO., LTD. BookSense XT – User Manual
5.9 Moving by Time ..................................................................................................... 20
5.10 Moving by Mark ................................................................................................... 20
5.11 Moving by Level ................................................................................................... 21
5.12 Moving by Page ................................................................................................... 21
5.13 Mark .................................................................................................................... 21
5.13.1 Inserting Mark ................................................................................................ 21
5.13.2 Moving to Mark .............................................................................................. 22
5.13.3 Deleting Mark ................................................................................................ 22
5.14 Adjusting Playing Speed ...................................................................................... 23
5.14.1 Play Slowly .................................................................................................... 23
5.14.2 Normal Speed ............................................................................................... 23
5.14.3 Play Fast ....................................................................................................... 23
5.15 Setting Moving Mode as Time .............................................................................. 23
5.16 Moving to Page .................................................................................................... 23
5.17 Moving to Heading ............................................................................................... 24
5.18 Checking Content Information .............................................................................. 24
5.19 Checking the Status of Content Information .......................................................... 25
6. Book Reader ............................................................................................................... 25
6.1 What is supported in the Book Reader? ................................................................. 25
6.2 Playing the Document File ...................................................................................... 25
6.3 Pause .................................................................................................................... 26
6.4 Changing Moving Mode ......................................................................................... 26
6.5 Moving by Page ..................................................................................................... 26
6.6 Moving by Paragraph ............................................................................................. 26
Page 7

HIMS CO., LTD. BookSense XT – User Manual
6.7 Moving by Line ...................................................................................................... 26
6.8 Moving by Sentence .............................................................................................. 26
6.9 Moving by Word ..................................................................................................... 26
6.10 Moving by Character ............................................................................................ 27
6.11 Moving by Phonetic .............................................................................................. 27
6.12 Moving by Mark ................................................................................................... 27
6.13 Search Word ....................................................................................................... 27
6.14 Mark and Voice Memo ......................................................................................... 27
6.14.1 Switching Mode between Mark & Voice Memo ................................................ 27
6.14.2 Inserting Mark ................................................................................................ 28
6.14.3 Inserting Voice Memo .................................................................................... 28
6.14.4 Going to Mark and Voice Memo ..................................................................... 29
6.14.5 Deleting Mark and Voice Memo ...................................................................... 29
6.15 Adjusting Playing Speed ...................................................................................... 30
6.15.1 Play Slowly .................................................................................................... 30
6.15.2 Normal Speed ............................................................................................... 30
6.15.3 Play Fast ....................................................................................................... 30
6.16 Moving to Page .................................................................................................... 30
6.17 Moving by Percent ............................................................................................... 30
6.18 Checking the Status of Content Information .......................................................... 31
6.19 Using Menu in the Book Reader ........................................................................... 31
6.19.1 Recently Documents ...................................................................................... 31
6.19.2 Mark Information ............................................................................................ 31
6.19.3 Page Settings ................................................................................................ 32
Page 8

HIMS CO., LTD. BookSense XT – User Manual
7. Radio .......................................................................................................................... 32
7.1 Tuning to the Previous Frequency .......................................................................... 33
7.2 Tuning to the Next Frequency ................................................................................ 33
7.3 Moving to the Previous Frequency by 0.1MHz ........................................................ 33
7.4 Moving to the Next Frequency by 0.1MHz ............................................................... 33
7.5 Mute/Unmute ......................................................................................................... 33
7.6 Moving to the Previous Registered Channel ............................................................ 33
7.7 Moving to the Next Registered Channel .................................................................. 33
7.8 Registering Channels and quick move to Channel ................................................... 33
7.9 Changing the Sensitivity of Channel Scan ............................................................... 34
7.10 Deleting Registered Channel ................................................................................ 34
7.11 Listening to the Radio via Internal Speakers .......................................................... 34
7.12 Checking Channel Status Information ................................................................... 35
7.13 Recording Radio Broadcasting ............................................................................. 35
7.14 How to use Radio Menu ....................................................................................... 36
7.14.1 How to set the Internal speakers .................................................................... 36
7.14.2 Channel Recording Setting............................................................................. 36
7.14.3 Preset ........................................................................................................... 37
7.14.4 Channel Scanning Sensitivity ......................................................................... 38
8. Recording ................................................................................................................... 38
8.1 Recording via Internal Microphone ......................................................................... 38
8.2 Recording via External Microphone ........................................................................ 39
8.3 Recording via Line-in ............................................................................................. 39
8.4 Adding Marks during Recording .............................................................................. 40
Page 9

HIMS CO., LTD. BookSense XT – User Manual
9. Global Options ............................................................................................................ 40
9.1 Alarm Settings ....................................................................................................... 41
9.1.1 Checking the Set Alarm ................................................................................... 41
9.1.2 Set Alarm ........................................................................................................ 41
9.1.3 Delete Alarm ................................................................................................... 42
9.2 Date & Time Settings ............................................................................................. 43
9.2.1 Check Date & Time .......................................................................................... 43
9.2.2 Set Date & Time .............................................................................................. 43
9.3 Voice Settings ....................................................................................................... 44
9.4 Recording Settings................................................................................................. 45
9.5 Check System Status ............................................................................................. 46
9.6 Bluetooth Options .................................................................................................. 46
9.7 Set Sleep Timer ..................................................................................................... 47
9.8 Power Saving Time ................................................................................................ 48
9.9 Format Storage Device .......................................................................................... 48
9.10 Set Current Storage Device .................................................................................. 49
10. Firmware Update the BookSense XT ......................................................................... 49
11. Trouble Shooting Guide ............................................................................................. 50
11.1 The BookSense XT will not Turn on ...................................................................... 50
11.2 If the BookSense XT stops Executing ................................................................... 50
11.3 Having trouble with Scanning Radio Channel ........................................................ 50
11.4 No Pairing while using Bluetooth Headset ............................................................. 51
11.5 Disappeared Registered channel .......................................................................... 51
11.6 No Sound from Internal Speaker or Earphone ....................................................... 51
Page 10

HIMS CO., LTD. BookSense XT – User Manual
12. Warranty ................................................................................................................... 51
13. Contact Information ................................................................................................... 51
Page 11

HIMS CO., LTD. BookSense XT – User Manual
1
1. Overview BookSense XT
1.1 What’s in the package?
The package contains following items:
BookSense XT
Battery pack
AC adaptor ( 5V DC, 2A)
Earphone
SD Card (8GB)
USB Cable for connecting to PC
USB Cable for using USB thumb drive
Pouch
Necklace
User Manual CD
1.2. Hardware Specifications
CPU : S3C2443X
RAM : 128MB
MP3 Recording (Internal, External, Line-In, FM)
USB OTG (Mini AB type connector)
SD Card Slot
Internal Memory : 4GB
FM Radio
Bluetooth 2.0 (Support stereo Bluetooth headset)
Stereo Earphone Jack (3.5 pie)
Stereo Microphone Jack (3.5 pie, available for Line-In or External)
Internal Stereo Speaker
Internal Mono Microphone
Detachable battery (Lithium Polymer, 3.7V)
1) 12-hour continuous use.
2) 2.5 -hour charging time using AC adapter, 5-hour charging time using USB
cable.
DC-Jack(3.5 pie)
Size: 47mm(W) x 108mm(L) x 18.5mm(H)
Weight: 115g
Page 12
HIMS CO., LTD. BookSense XT – User Manual
2
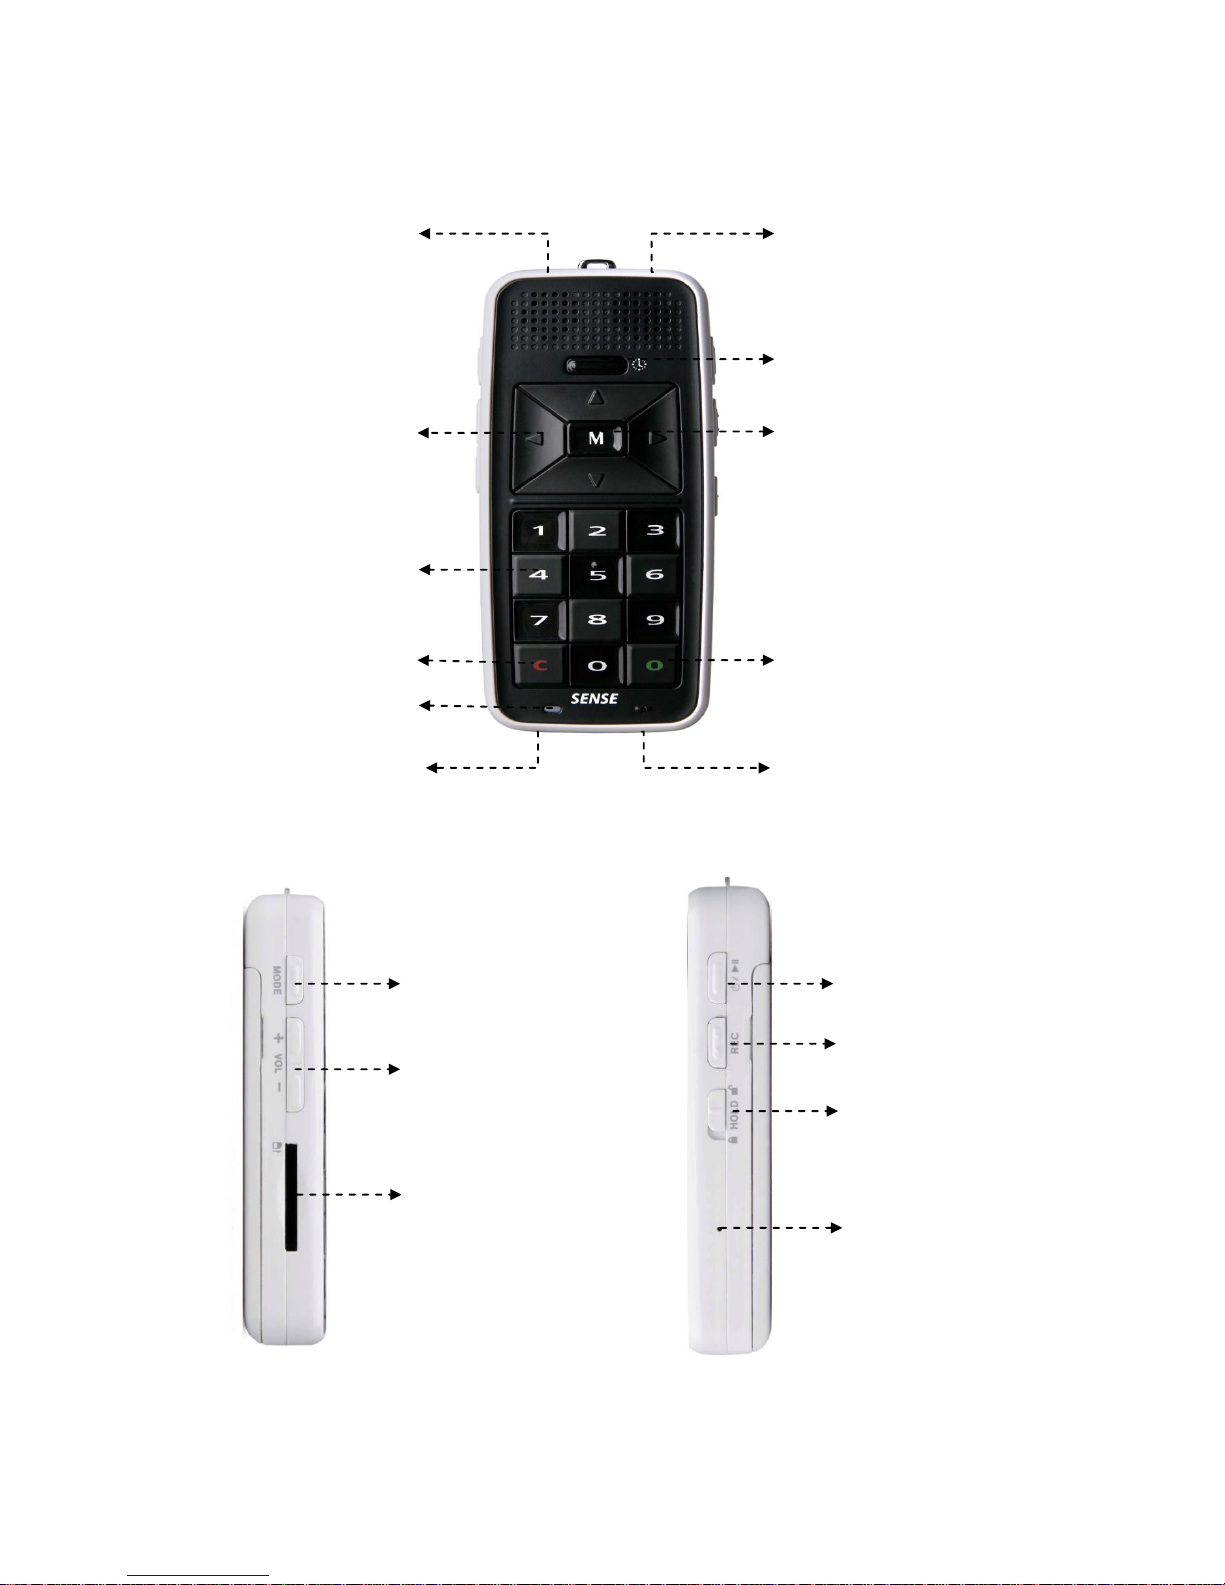
1.3. Physical Description of BookSense XT
DATE & TIME Button
MENU Button
Side
MODE Button
VOLUME Button
SD Card
Front
OK (Confirm) Button
CANCEL Button
Navigation Button
Numeric Button
LED
Microphone jack
Ear phone jack
USB OTG
AC Adapter jack
PLAY button
RECORD Button
Hold Switch
RESET
Page 13

HIMS CO., LTD. BookSense XT – User Manual
3
1.3.1 Front Face of the Device
The rough section in the upper part of the face is the speaker and right below it is the „DATE
& TIME‟ button. The navigation buttons are located below the „DATE & TIME‟ button which
has four UP, DOWN, LEFT, and RIGHT buttons with MENU button on the center. Beneath
the navigation buttons, there‟s a numeric key pad, 4 columns and 3 rows, with a raised dot
on the number 5 button. The left key in the last row is CANCEL button and right key is OK
button. Battery status LED is under the CANCEL button, and built-in internal microphone is
under the OK button.
1.3.2 Back of the Device
The battery compartment is located on the back of the device. To insert the battery please
refer to 1.5 Inserting and Removing the Battery. „Battery Lock Switch‟ is on the top center of
the battery compartment.
1.3.3 Left Side of the Device
Starting from the top, „MODE‟, „Volume UP‟, and „Volume DOWN‟ button are located on the
left side of the device. SD memory slot is located beneath these three buttons.
1.3.4 Right Side of the Device
The top two buttons are „PLAY‟ and „RECORD‟ buttons and „Hold‟ switch is right beneath it.
The „PLAY‟ button is also use for „Power‟ button. Using „PLAY‟ button to turning on and off
the device, please refer to 1.6 Turning the Device On/Off.
Under the „Hold‟ switch, there‟s a small hole for the „RESET‟ button which is used when the
device malfunctions or stops working. If you have difficulty pressing „RESET‟ button, you can
also reset the device by removing and re-inserting the battery. When you remove and reinsert the battery, you must insert the battery after at least 10 seconds.
1.3.5 Top Side of the Device
The Headphone and Microphone jacks (3.5 pie) are located on right and left side of the
center clip holder.
1.3.6 Bottom Side of the Device
AC Adapter jack is located on the left and USB OTG port is located on the right. Plug in end
of the power adapter into the power input jack and the other into an electrical outlet to
recharge the battery. USB OTG port is can be used to access USB memory, transfer files
Page 14

HIMS CO., LTD. BookSense XT – User Manual
4
between PC, external USB CD-ROM, and charging the device using USB.
1.4 Turning the Device On after purchasing
To turn on the device for the first time after purchasing the BookSense XT, you need to
connect AC adapter to the device. Once you connect the BookSense XT to AC adapter, you
will hear the booting sound and the Media will be executing after 20 seconds. On successful
booting, you will hear booting completion sound. Once powered on, insert the battery and
start using the BookSense XT. Please refer to 1.6 Turning the Device On/Off.
1.5 Inserting or Removing the Battery
To insert the battery, find the proper battery orientation. Front side has smooth surface with
company logo engrave on it. The back side has rough surface with two tabs on either side at
the bottom. Insert the bottom edge of battery first, making certain the bump fits in the
appropriate opening, and snap the top edge in place. The smooth front side surface must be
facing up.
The battery is designed to fit in only the correct orientation. If you feel any resistance it is
likely you have the battery upside down. Secure the battery compartment by sliding the door
back on, ensuring it locks in place.
To remove the battery, find „Battery Lock Switch‟ on the top center of the battery
compartment and hold pushing up the switch; pull the battery out compartment by sliding the
door.
1.6 Turning the Device On/Off
To turn on the device, press and hold down the PLAY button for more than 2 seconds, which
is located on the right side of the device, near the top corner, and then you will hear a sound.
To turn off the device, press and hold down the PLAY button for more than 2 seconds again,
then you will hear a sound.
1.7 Charging BookSense XT
In order to charge the battery, you need to connect BookSense XT to the main adapter or to
a computer using the supplied USB cable. Follow these steps:
1) To charge the battery using main adapter, plug the supplied AC adapter into the AC
adapter jack on the bottom left edge of the device. A full recharge takes about 2.5
hours.
2) To charge the battery using the USB connection, plug the USB OTG cable into the
Page 15

HIMS CO., LTD. BookSense XT – User Manual
5
USB OTG port on the bottom right edge of the device. Then the wider end of the
cable should be connected into USB port on your computer. If the BookSense XT is
turned on, a full recharge takes about 10 hours and when it is turned off, a full
recharge takes about 5 hours.
3) While charging, LED located below the CANCEL button will glow red and when it‟s
fully charged, it will glow green and you will hear “Charging completed” sound.
1.8 Inserting or Removing the SD CARD/USB Memory/USB CD-ROM
1.8.1 Inserting or Removing the SD CARD
To insert and remove the SD card, follow these steps:
1) Hold the device facing you. The SD card slot is located on the left side of the device.
2) One corner of the SD card is cut at a 45 degree angle.
3) This cut corner should be at the top right when you insert the card into the device
slot. If the card is not oriented properly it will resist insertion.
4) Gently push the card into the slot until it clicks into place. Do not use excessive force.
Only slight pressure is required to lock the SD card into place. Once its lock in place,
you will hear a sound.
5) To remove the card, push right on the left bottom edge to release it. Then pull it out.
1.8.2 Inserting or Removing the USB Memory/CD-ROM
To insert and remove the USB Memory/CD-ROM, follow these steps:
1) Connect USB to USB gender, USB gender to USB OTG port.
2) To connect USB CD-ROM drives, procedure are same as USB Memories. However,
device can recognize CD containing Daisy content only. CD media with other content
cannot be recognized by the device.
1.9 Connecting to PC
To connect BookSense XT to your PC, connect one end of the long USB cable to the USB
OTG port on the bottom right edge of the BookSense XT and the other end to your PC‟s
USB port. Windows will recognize the BookSense XT flashdisk and SD card as a USB drive.
You can then use Windows Explorer to transfer files back and forth. If the SD card is not
inserted, the second drive will not be displayed. When you enter the „BookSense‟ drive,
there will be „RECORD‟, „RADIO‟, „AUDIO BOOKS‟, „POD CASTS‟, „MUSIC‟, „BOOKS‟, and
„DAISY‟ folders. Please refer to 2.1 Folders used in the BookSense XT. While transferring file,
the BookSense XT cannot be used. (Note: But the charging will be proceeded automatically.)
Page 16

HIMS CO., LTD. BookSense XT – User Manual
6
Each folder contains „Playlist‟, and „Mark‟ folders. These folders cannot be shown at the
BookSense XT. So do not save any files into these folders and you can‟t edit or cut files from
these folders.
2. Basic Functions and Structures
2.1 Folders used in the BookSense XT
Following folders are shown in the flashdisk:
RECORD: Folder which contain the recorded files of voice or Line-in through the
“Media” program.
RADIO: Folder which contains the recorded files of live radio channel recordings
through the “Media” program.
AUDIO BOOKS: Folder which contains the audio book and other audio files.
POD CASTS: Folder which contains the audio file from the Internet through the
“Media” program.
MUSIC: Folder which contains music file that you want to play through the “Media”
program.
BOOKS: Folder which contains files that you can read through the “Book Reader”
program.
DAISY: Folder which contains daisy file to use with the “Daisy” program, you must
make folders for each daisy files. But „NewsLine‟, „NLS‟, and „Bookshare‟ folders are
located under the DAISY. If you save other content without making folders, device
won‟t be able to locate the files.
2.2 Switching Mode
When the BookSense XT is on, pressing MODE button to toggle through Media, Daisy, Book
Reader, and Radio. Once you change the Mode, file lists for each folder can be shown. If
you change to different mode while in action, action will resume when you come back to
previous mode.
2.3 Changing Volume
Use volume UP or DOWN button to raise or lower the volume between 1~ 21. Default setting
is 15. When you adjust the volume while playing, volume will be adjusted without any
notification. Only when it‟s adjusted to default setting (15), it will notify the user by beep
sound. However, device will announce the volume status when you are pause or idle stage.
Page 17

HIMS CO., LTD. BookSense XT – User Manual
7
The BookSense XT allows you to adjust volume both earphone and internal speaker. When
you connect earphone to the device, you can adjust the volume which comes from earphone.
Removing earphone, you can adjust the volume which comes from internal speaker.
2.4 Navigating Through Files and Folder
Each mode has different names for the file list. Media uses “Audio List”, Daisy uses “Content
List”, and Book Reader uses “Book List”.
Move to next file or folder: Press DOWN button.
Move to previous file or folder: Press UP button.
Entering sub folder: Press RIGHT button.
Previous folder: Press LEFT button.
Play file: Press PLAY or OK button.
Toggle between male and female voice: Press number 5 button more than 2
seconds.
Go to previous 5th object from current list: Press number 1 button.
Go to next 5th object from current list: Press number 4 button.
Go to previous 10th object from current list: Press number 2 button.
Go to next 10th object from current list: Press number 5 button.
Go to top of the list: Press number 3 button.
Go to end of the list: Press number 6 button.
Select all from the file list (only functional in Media): Press number 7 button.
Select file or cancel selected file (only functional in Media): Press number 9 button.
Cancel all selected lists (only functional in Media): Press CANCEL button.
Delete file or folder: Press number 8 button.
Change the disk: Press number 0 button more than 2 seconds.
2.5 Deleting File or Folder
To delete the file or folder in file list, follow these steps:
1) Move to file or folder that you want to delete.
2) Press number 8 button. Then “Delete (file or folder name)? Yes” will be announced.
3) Press OK or MENU button. Then “Delete completed” will be announced.
If you don‟t want to delete it, press LEFT or RIGHT button to select „No‟ then press OK
button.
Page 18

HIMS CO., LTD. BookSense XT – User Manual
8
2.6 Using Menu, Dialog, Combo Box, Edit Box
Each mode has its own corresponding menus. Press MENU button to activate it.
Next/Previous MENU: UP/DOWN button.
Execute Menu/Open sub Menu: RIGHT, OK or MENU button.
Previous Menu: LEFT button.
Close Menu: CANCEL button.
Some menus have sub menu while you navigating through them. Use procedure 2 and 3 to
select or move back. However, when there is no sub menu and if you press buttons
indicated on second procedure, it will execute the function instead of opening the sub menu.
When Dialog opens up when you execute the Menu.
Within Dialog Next/Previous object: UP or DOWN button.
Within Dialog Changing Setting: LEFT or RIGHT button.
Save setting and Close Dialog: MENU or OK button.
Close Dialog without save setting: CANCEL button.
When you use navigation buttons during Menu, Dialog, and Combo Box, it will cycle through
the items.
Entering data into edit box
Entering data: Numeric buttons.
Deleting Data: CANCEL button.
Confirming Data: LEFT or RIGHT button.
Close Edit Box: Press CANCEL button until the last data and press CANCEL button
one more time.
2.7 Checking Battery Status
To check the battery status, the BookSense XT should be turned on first. Press and hold
down OK button for more than 2 seconds and it will announce the battery status (1 to 10). If
you press OK button while charging it will announce “Battery charging, using AC POWER”.
Note that if you charge using PC, the BookSense XT will not be operated, so the message
will not be announced. You should check LED.
Page 19

HIMS CO., LTD. BookSense XT – User Manual
9
2.8 Checking Date &Time
To check date & time, you need to press „DATE & TIME‟ button which is located above
Navigation buttons. You can check date & time anytime even the device is turned off. If you
press the button while announcing, announcement will just stops.
To set date & time before checking, please refer to 9.2.2 Set Date & Time.
2.9 Changing Voice
BookSense XT has 2 voices, „Female (Kate)‟ which is the default, and „Male (Paul)‟. It
toggles between female and male by pressing number 5 button more than 2 seconds. But
this toggle will not work in the „Radio‟. You can also change the voice from the Global
Options, please refer to 9.3 Voice Settings.
2.10 Hold Switch
Hold switch allows you to lock the BookSense XT. It is located at the right side of the device.
Pull this switch down if you want to put the device in hold status. If the BookSense XT is on
hold status, buttons will not function regardless the device is on/off. Just push up the Hold
switch when you want to unlock them.
3. Using Help Mode
Help Mode has the function that gives you the instruction of operation when you press each
button. Each Mode has its own Help Mode to be announced, and Help Mode is not an actual
operating function.
To operate Help Mode, follow these steps.
1) Press MENU button.
2) Press UP or DOWN button and move to Help Mode.
3) Then press RIGHT or MENU button.
4) Now Help Mode will be operated. Once Help Mode is operated, Help Mode will
instruct the function of each button whenever you press each button.
Help Mode will be operated easily by pressing MENU button more than 2 seconds. When
you need to exit the help mode, you need to press MENU button one more time more than 2
seconds.
Page 20

HIMS CO., LTD. BookSense XT – User Manual
10
4. Media
This chapter covers features that are specific to playing audio files.
4.1 What is supported in the Media?
BookSense XT supports these files in the Media.
MP3, MP4, OGG, WAV, WMV, FLAC, WMA, ASF file format.
Audible audio(.aa, .aax)
4.2 Playing Audio Files
To play audio file, you need to press MODE button changing to Media. When you turn the
BookSense XT on first time, the default is Media. Audio lists are shown in the Media. Please
refer to 2.1 Folders used in the BookSense XT.
To play the file or folder that you want, by using the buttons explained 2.4 Navigating through
Files and Folder. If the file is over 10 minutes, it will play from the point where you played it
last time.
4.3 Pause
If you press PLAY button one more time while playing, it goes to pause status. Press one
more time then it returns to play.
4.4 Changing Moving Unit
If you want to move to the previous or next file while playing or in pause status, you can
change moving unit either 1 track or time that user preference. To change moving unit, press
UP or DOWN button to toggle 1 track, 5 tracks, first or last track, and time. For the „Audible
audio‟ file, „section‟ will be added to moving unit. So you can set moving unit as „section‟.
After changing moving unit, press LEFT or RIGHT button to move to previous or next
location set as the moving unit.
4.5 Moving by 1 track
You can change to „1 track‟ mode by pressing UP or DOWN button. Afterwards, if you press
LEFT or RIGHT button, it shifts to previous or next track.
4.6 Moving by 5 tracks
You can change to „5 tracks‟ mode by pressing UP or DOWN button. Afterwards, if you press
LEFT or RIGHT button, it shifts to previous or next 5 tracks.
Page 21

HIMS CO., LTD. BookSense XT – User Manual
11
4.7 Moving to First or Last track
You can change to „first or last track‟ mode by pressing UP or DOWN button. Afterwards, if
you press LEFT or RIGHT button, it shifts to beginning or end of track.
4.8 Moving by Time
You can change to „time‟ mode by pressing UP or DOWN button. Afterwards, if you press
LEFT or RIGHT button, it shifts to previous or next location set as time. Please refer to 4.12
Setting Moving Mode as Time.
4.9 Section Repetition
Section Repetition is the function that is specifically to playing the interval. To set section
repetition, follow these steps:
1) While playing, you need to press RECORD button that you want to start the section.
2) “Set start point” will be announced and it keeps playing.
3) Press RECORD button that you want to end the section.
4) Then “Set end point” will be announced and sets end point of section.
Section repetition repeats that user sets, please refer to 4.20.2 Playback Setting.
While playing section repetition, you need to press PLAY button to cancel section repetition.
Section repetition only works within one file. If you set starting point not setting end point
then it cancels section repetition.
4.10 Mark
To insert mark or if the mark has already existed, then it is possible move to the mark and
delete the mark. Once the mark has been inserted file, even cancel playing the file
information of mark will be stored.
4.10.1 Inserting Mark
To insert mark currently playing file, follow these steps:
1) Press number 1 button while playing or in pause status.
2) Then “Enter mark number, edit box” will be announced, then enter the number
between 1~1,000.
1) Press OK button. Then “Mark has been inserted” will be announced and return to
play or pause status.
Up to 1,000 marks can be inserted and mark number should be inserted between 1 ~ 1,000.
Page 22

HIMS CO., LTD. BookSense XT – User Manual
12
If you enter the number beyond range, “Enter range 1 to 1,000, edit box” will be announced.
To cancel inserting the mark, press CANCEL button instead of OK button in step 3. Or press
CANCEL button to delete all the numbers that has been entered, then press CANCEL button
one more time in step 2.
If you enter the number already existed and pressing OK button, then “This mark already
exists. Move? Yes” will be announced. Press OK or MENU button to set mark current
location. If you want to cancel inserting the mark, pressing LEFT or RIGHT button to move to
„No‟ then press OK or MENU button. And it keeps original location.
4.10.2 Moving to Mark
If any mark has been inserted to currently playing file, you can move to location of the mark
and play. To move to the mark, follow these steps:
1) Press number 2 button while playing or in pause status.
2) Then “Enter mark number to move to, edit box” will be announced and enter the
number that you want to move to.
3) Press OK button. Then it shifts to selected mark and play.
But if you enter the number not existed or beyond range (1~1,000), “There is no mark to
move to” or “Enter range 1 to 1,000, edit box” will be announced.
If you want to cancel moving the mark, press CANCEL button instead of OK button in step 3.
Or press CANCEL button continuously to delete all the numbers have been entered, then
press CANCEL button one more time in step 2.
4.10.3 Deleting Mark
If any mark has been inserted to currently playing file, you can delete inserted mark as you
needed. Refer to following step to delete the mark:
1) Press number 3 button while playing or in pause status.
2) Then “Enter mark number to delete, edit box” will be announced, then enter the
number want to delete.
3) Press OK button. Then “Mark ## has been deleted” will be announced and return to
play or pause status.
But if you enter the number not existed or beyond range (1~1,000), “There is no mark to
delete” or “Enter range 1 to 1,000, edit box” will be announced.
Page 23

HIMS CO., LTD. BookSense XT – User Manual
13
If you want to cancel deleting the mark, press CANCEL button instead of OK button in step 3.
Or press CANCEL button to delete all the numbers have been entered, then press CANCEL
button one more time in step 2.
4.11 Adjusting Playing Speed
While playing or in pause status, you can adjust playing speed by using numeric buttons.
Pitch might be up or down while playing MP4, OGG if sample rate is over 44,100 Hz.
Also, pitch changing could be occurred regardless of sample rate if you change playing
speed while playing WMV, ASF.
4.11.1 Play Slowly
If you want to slow down the speed, press number 4 button. Every time you press this button,
the speed goes down by 1 level. It goes from normal to level 2.
4.11.2 Normal speed
If you want to return to normal speed, press number 5 button. The beep sound will be
announced and it returns to normal speed.
4.11.3 Play Fast
If you want to increase the speed, press number 6 button. Every time you press this button,
the speed goes up by l level. It goes from normal to level 4.
4.12 Setting Moving Mode as Time
By pressing UP or DOWN button, you need to change “Time” mode. By pressing LEFT or
RIGHT button, it shifts to the point by time moving unit. Press number 9 button to change
time moving unit. Every time you press number 9 button, it toggles to 5 sec, 10 sec, 30 sec,
1 min, 5 min, 10 min, 30 min and 1 hour. The default is 5 sec. By pressing number 9 button,
you can just stop where you want to set as time mode. In the other words, if you want to set
„30 sec‟ as time mode, press number 9 button continuously and stop when “Time index
mode, 30 seconds” will be announced.
4.13 Shuffle
While playing, you can select either play according to play list or randomly.
The default is play according to play list. If you want to change to random play, press number
9 button more than 2 seconds. Then “Shuffle Play On” will be announced and play randomly.
Page 24

HIMS CO., LTD. BookSense XT – User Manual
14
Press number 9 button one more time more than 2 seconds, then “Shuffle Play Off” will be
announced and return to play according to play list. You can also change play mode by
pressing MENU button. Please refer to 4.20.2 Playback Settings.
4.14 Setting Moving Mode as Percentage
While playing the file, you can move to the point as percentage.
1) Press number 8 button while playing or in pause status.
2) Then “##% playing, enter the percentage, edit box” will be announced, and enter the
percentage that you want to move to. Number should be entered between 0~99.
3) Press OK button. It will move to the point of percentage has been entered.
If you play the file for 100 minutes, press number 8 button. And enter “10” when “Go to
Percentage, edit box” is announced and press OK button. Then it will be moved to the 10
minutes of the file and it keeps playing.
4.15 Repetition
You can select either one time or unlimited. The default is one time.
1) Press number 8 button more than 2 seconds, it will be announced “Repeat on”.
2) Press number 8 button one more time more than 2 seconds, it will be announced
“Repeat off” and return to play. You can also set repetition by using the menu. Please
refer to 4.20.2.4 Repeat.
4.16 Equalizer Setting
BookSense XT will provide 4 equalizer settings. To change Equalizer setting, press number
7 button. It toggles to Normal, Pop, Classic and Rock. The default is Normal. You can also
set equalizer by using the menu. Please refer to 4.20.1 Equalizer Settings.
4.17 Saving the Playlist
To store the playlist, follow these steps:
1) Press number 7 button more than 2 seconds while playing or in pause status.
2) Then “Successfully saved playlist” will be announced and keep playing.
3) It can be saved as “PLAYLIST-001.m3u” in the Music Folder. By using PC you can
change the file type.
You can also save the playlist from the menu. Please refer to 4.20.4 Saving Playlist.
To check playlist and to play, please refer to 4.20.3.1 My Playlist.
Page 25

HIMS CO., LTD. BookSense XT – User Manual
15
4.18 Checking the File Information of Playing
You need to press number 0 button to check the file information while playing or in pause
status.
To press number 0 button, it will be announced media information as follows; current file
name, current playing time, total playing time, current track/total track, status. After
announcing the information, it keeps playing or in pause status.
4.19 Checking the Tag Information of Playing
To check the tag information while playing, follow these steps:
1) Press number 0 button more than 2 seconds. Then “Media Info dialog” will be
announced.
2) By pressing UP or DOWN button, you can check „Title, Artist, Album, and Genre‟
You can check each character by pressing LEFT or RIGHT button. If you want to close
“Media Info dialog,” press OK or CANCEL button. Then it will return to play.
4.20 Using Menu in the Media
Press MENU button in the Media, you can see menu lists as follows: it toggles to Equalizer
Settings, Playback Settings, Select Playlist, Help mode, and Global Options. You can use
the menu in the Media while playing or in pause status. Help Mode (Please refer to 3. Using
Help Mode) and Global Options (Please refer to 9. Global Options) are used all modes.
4.20.1 Equalizer Setting
You can set “Equalizer Settings” by pressing number 7 button as described on 4.16
Equalizer Settings. To set using menu, follow these steps:
1) Press MENU button while playing or in the audio list.
2) Press one of RIGHT, OK or MENU button when “Equalizer Setting dialog” is
announced.
3) Then “Equalizer Settings dialog, Equalizer Mode” will be announced. Each mode can
be moved by pressing LEFT or RIGHT button. It toggles to “Normal, Pop, Classic,
and Rock”.
4) Select one item and press OK or MENU button to change a value.
If you want to cancel “Equalizer Settings”, press CANCEL button in step 4.
4.20.2 Playback Settings
You can set variety options while playing through by “Playback Settings” menu.
Page 26

HIMS CO., LTD. BookSense XT – User Manual
16
1) Press MENU button while playing or in the audio list.
2) Press DOWN button, move to “Playback Settings dialog.”
3) Press one of RIGHT, OK or MENU button.
4) Then “Media playback setting dialog, read file name, NO” will be announced.
By pressing UP or DOWN button, it toggles to “Read file name”, “Times to repeat the
specified track”, “Shuffle play”, “Repeat”, and each option of combo box can be changed by
pressing LEFT or RIGHT button.
After changing value of each option, press OK or MENU button. Then „media playback
setting dialog‟ closed, “Option saved” will be announced. It will return to play or the audio list.
If you press CANCEL button instead of OK button, setting value will not be applied and close
edit box. It will return play or the audio list. To set completely, press OK or MENU button.
4.20.2.1 Read File Name
You can select either read file name or not while playing. Please follow step 1 to 3 described
on 4.20.2 Playback Settings and press UP or DOWN button to move to “Read file name.”
Then select either Yes or No by pressing LEFT or RIGHT button. If you set as “Yes”, it will be
announced file name before playing next song. The default is „No‟; this setting will not be
announced file name.
4.20.2.2 Times to Repeat the Specified Track
You can set section repetition count as described on 4.9 Section Repetition.
To set section repetition count, follow these steps:
1) Please refer to 4.20.2 Playback Settings and move to “Times to repeat the specified
track, 3, combo box” by pressing UP or DOWN button.
2) Select the value from 1 to 10 times and unlimited by pressing LEFT or RIGHT button.
If you select „unlimited‟, it will play „section repetition‟ continuously until you cancel
section repetition by pressing PLAY button.
4.20.2.3 Shuffle Play
You can set either shuffle on or off by pressing number 9 button as described on 4.13 Shuffle.
To set shuffle play, follow these steps:
1) Please refer to 4.20.2 Playback Settings and move to “Shuffle play Off, combo box”
by pressing UP or DOWN button.
2) Select either Shuffle „ON‟ or „OFF‟ by pressing LEFT or RIGHT button.
Page 27

HIMS CO., LTD. BookSense XT – User Manual
17
4.20.2.4 Repeat
You can set play all files in the playing list once or repetition by pressing number 8 button as
described on 4.15 Repetition. To repeat, follow these steps:
1) Please refer to 4.20.2 Playback Settings and move to “Repeat Off, combo box” by
pressing UP or DOWN button.
2) Select either „On‟ or „Off‟ by pressing LEFT or RIGHT button.
4.20.3 Selecting Playlist
Select playlist includes as follows; it toggles to my playlist, artist, album, and genre by
pressing UP or DOWN button.
4.20.3.1 My Playlist
Playing the save list from 4.17 Saving the playlist, follow these steps:
1) Press MENU button.
2) By pressing UP or DOWN button, move to “Select playlist, pull down” and press one
of RIGHT, OK or MENU button.
3) It will be announced “My playlist, dialog.” Press one of RIGHT, OK or MENU button.
4) Then “My playlist dialog box, my playlist” will be announced. (File name: PLAYLIST-
001.m3u, PLAYLIST-002.m3u, etc) If you changed file name, you can see that file
name in the list.)
5) Press UP or DOWN button, move to the file that you want to play. Then press OK,
MENU or PLAY button.
6) It will automatically play the list that you have saved.
If you have not saved any list, in step 4 “No list” will be announced.
4.20.3.2 Searching File List using Tag
The BookSense XT has the tag, information of the audio file; includes title, artist, album,
genre, etc. Analyzing tag you can listen to the music search by artist, album, and genre. You
can only search in the „Music‟ folder. If there is no tag, it will be shown as “Unknown.” Also if
the tag is not existed or not correct, you can edit tag information using PC through the Media.
Each media player is different from one another, so please refer to medial player manual.
4.20.3.2.1 Searching by Artist
If you want to listen to the songs by artist, follow these steps:
1) Press MENU button and move to “Equalizer Setting dialog”
Page 28

HIMS CO., LTD. BookSense XT – User Manual
18
2) By pressing UP or DOWN button; move to “Select playlist pull down menu.” Press
one of RIGHT, OK or MENU button.
3) Then it will be announced “My playlist” and by pressing DOWN button to move to
“Artist Dialog” and press RIGHT, OK or MENU button.
4) Then it will be announced “Artist list dialog box (Name of artist- number of files).” By
pressing UP or DOWN button to change artist.
5) Press OK, MENU or PLAY button.
Note: If the song does not have any tag information, the file will be shown as “Unknown.”
4.20.3.2.2 Searching by Album
If you want to listen to the songs by album, follow these steps:
1) Press MENU button and move to “Equalizer Setting dialog”
2) By pressing UP or DOWN button; move to “Select playlist, pull down.” Press one of
RIGHT, OK or MENU button.
3) Then it will be announced “My playlist” and by pressing DOWN button to move to
“Album Dialog” and press RIGHT, OK or MENU button.
4) Then it will be announced “Album list dialog box (Name of album- number of files).”
By pressing UP or DOWN button to change album.
5) Press OK, MENU or PLAY button.
Note: If the song does not have any tag information, the file will be shown as “Unknown.”
4.20.3.2.3 Searching by Genre
If you want to listen to the songs by genre, follow these steps:
1) Press MENU button and move to “Equalizer Setting dialog”
2) By pressing UP or DOWN button; move to “Select playlist, pull down.” Press one of
RIGHT, OK or MENU button.
3) Then it will be announced “My playlist” and by pressing DOWN button to move to
“Genre Dialog” and press RIGHT, OK or MENU button.
4) Then it will be announced “Genre list dialog box (Name of genre- number of files).”
By pressing UP or DOWN button to change genre.
5) Press OK, MENU or PLAY button.
Note: If the song does not have any tag information, the file will be saved into “Unknown.”
4.20.4 Saving Playlist
To save play list, follow these steps:
Page 29

HIMS CO., LTD. BookSense XT – User Manual
19
1) Press MENU button.
2) By pressing UP or DOWN button, move to “Save playlist” and press one of RIGHT,
OK or MENU button.
3) Then “Successfully saved playlist” will be announced.
5. DAISY
Daisy is the mode which can play daisy content.
5.1 What is supported in the Daisy?
BookSense supports these files in the Daisy.
DAISY 2.0/2.02/3.0, DAISY XML/Digital Talking Book.
ANSI/NISO Z39.86 2002, 2005.
NLS content. (3gp, AMR-WB+)
RFB&D content. (AudioPlus, AudioAccess-Protected WMA)
Bookshare.org DAISY content.
NIMAS 1.1
DRM: support 2006 PDTB2 authentication.
5.2 How to play DAISY content
If you want to play DAISY content, move to „DAISY‟ mode by pressing MODE button first.
After that, content list will be announced and you can find content in the “DAISY” folder. It will
announce the title of each DAISY content not folder name.
Move to the content which you want to play in the content list using buttons which was
described in 2.4 Navigating Through Files and Folders, and you can play the content by
pressing “PLAY” or “OK” button. If you play the content which has played before, it will play
from the point where you played it last time.
If you want to stop playing the current content and play other content, press CANCEL button.
Playing will be canceled and move you back to the content list. Move to a new content in the
content list and press OK or PLAY button to play the new content.
5.3 Pause
If you press PLAY button one more time while playing of the file, playing will go to pause
status. Press one more time to resume playing.
Page 30

HIMS CO., LTD. BookSense XT – User Manual
20
5.4 Changing Moving Unit
Change moving unit to move to previous or next paragraph, heading or level while playing.
To change the moving unit, press UP or DOWN button to toggle phrase, paragraph, heading,
home/end, time, mark, level 1 ~ level 6 and page. After changing the moving unit, press
LEFT or RIGHT button to move to previous or next. “MARK”, “TIME”, and “PAGE” will be
announced as moving unit while playing the content that has information of mark, time and
page. Also, “Level 1 ~ Level 6” will be announced up to specific level which playing content
can support. In the other words, if the current content supports up to level 2, “Level 1” and
“Level 2” will be announced as moving unit.
5.5 Moving by Phrase
You can change to „Phrase‟ mode by pressing UP or DOWN button. Afterwards, if you press
LEFT or RIGHT button, it shifts to previous phrase or next phrase. Please be noted that
phrase will be different from each content and it is up to the content producer. In the other
words, one sentence can be phrased and about 5 sentences can be phrased.
5.6 Moving by Paragraph
You can change to „Paragraph‟ mode by pressing UP or DOWN button. Afterwards, if you
press LEFT or RIGHT button, it shifts to previous or next paragraph.
5.7 Moving by Heading
You can change to „Heading‟ mode by pressing UP or DOWN button. Afterwards, if you
press LEFT or RIGHT button, it shifts to previous or next Heading.
5.8 Moving to Home/End
You can change to „Home/End‟ mode by pressing UP or DOWN button. Afterwards, if you
press LEFT or RIGHT button, it shifts to beginning or end of content.
5.9 Moving by Time
You can change to „Time‟ mode by pressing UP or DOWN button. Afterwards, if you press
LEFT or RIGHT button, it shifts to previous or next location set as time. Please refer to 5.15
Setting Moving Mode as Time.
5.10 Moving by Mark
If you have setup Mark in content, you can press UP or DOWN button to change to Moving
Page 31

HIMS CO., LTD. BookSense XT – User Manual
21
by Mark and by pressing LEFT or RIGHT button, it shifts to previous or next Mark. Note that
you cannot change to Moving by Mark if there is no Mark in the content, regardless of
pressing UP or DOWN button.
5.11 Moving by Level
„Moving by Level‟ supports from level 1 to level 6. If currently playing file has level
information up to Level 3, “Level 1, Level 2, and Level 3” will be announced on the moving
unit when you press UP or DOWN button to change moving unit. If playing file has level
information up to Level 6, it will announce Level 1 to Level 6 on the moving unit when you
press UP or DOWN button to change moving unit. Select level that you want to move by
pressing UP or DOWN button. Then if you press LEFT or RIGHT button, it shifts to previous
or next Level from selected level. If “Level 3 “ was selected, you can move to any Level,
including Level 1 and Level 2, by pressing LEFT or RIGHT button.
5.12 Moving by Page
You can change to „Page‟ mode by pressing UP or DOWN button. Afterwards, if you press
LEFT or RIGHT button, it shifts to previous or next page.
5.13 Mark
If you insert the mark or mark already exists, you can shift to mark and/or delete it in content
that you are playing. Even if you cancel playing the content, mark information will not be
deleted.
5.13.1 Inserting Mark
„Inserting Mark‟ will mark the current location while playing.
Refer to following steps in order to insert the mark:
1) Press number 1 button while playing or in pause status to insert the mark.
2) Then “Total mark ##, enter mark number, edit box” will be announced. And enter the
number between 1 ~ 1,000.
3) Press OK button. Then “Mark has been inserted.” will be announced and return to
play or pause status.
Up to 1,000 marks can be inserted and mark number should be inserted between 1 ~ 1,000.
If you enter the number beyond range, “Enter range 1 to 1,000, edit box” will be announced.
To cancel inserting the mark, press CANCEL button instead of OK button in step 3. Or press
Page 32

HIMS CO., LTD. BookSense XT – User Manual
22
CANCEL button to delete all the numbers that has been entered, then press CANCEL button
one more time in step 2.
If you enter the number already existed and pressing OK button, then “This mark already
exists. Move? Yes” will be announced. Press OK or MENU button to set mark current
location. If you want to cancel inserting the mark, pressing LEFT or RIGHT button to move to
„No‟ then press OK or MENU button. And it keeps original location.
Note: Only one mark can be inserted for each phrase. If you try to insert current phrase that
already has mark, then “Mark ## exists at current phrase” will be announced.
5.13.2 Moving to Mark
You can shift to mark location if there‟s mark in the currently playing content. Refer to
following steps to move to mark;
1) Press number 2 button while playing or in pause status.
2) Then “Enter mark number to move to, edit box” will be announced. Then enter the
number you want to move to.
3) Press OK button. Then it will shift to selected mark and play.
But if you enter the number that does not exist or beyond the range of 1~1,000, “There is no
mark to move to” or “Enter range 1 to 1,000, edit box” will be announced.
If you want to cancel moving to mark, press CANCEL button instead of OK button in step 3.
Or press CANCEL button continuously to delete all the numbers that has been entered, then
press CANCEL button one more time in step 2.
5.13.3 Deleting Mark
Marks can be deleted as needed in currently playing content which has mark.
4) Press number 3 button while playing or in pause status.
5) Then “Enter mark number to delete, edit box” will be announced, then enter the
number you want to delete.
6) Press OK button. Then “Mark ## has been deleted” will be announced and return to
play or pause status.
However, if you enter the number that does not exist or beyond the range of 1~1,000, “There
is no mark to delete” or “Enter range 1 to 1,000, edit box” will be announced.
If you want to cancel deleting the mark, press CANCEL button instead of OK button in step 3.
Or press CANCEL button continuously to delete all the numbers that has been entered, then
press CANCEL button one more time in step 2.
Page 33

HIMS CO., LTD. BookSense XT – User Manual
23
5.14 Adjusting Playing Speed
While playing or in pause status, you can adjust playing speed by using numeric buttons.
5.14.1 Play Slowly
If you want to slow down the speed, press number 4 button. Every time you press this button,
the speed goes down 1 level. The speed can be slowed down up to 2 levels.
In case of text daisy content, the speed level will be adjusted same as TTS speed level
because it plays by TTS. The speed level ranges from 1 to 21 and normal speed is 7. In
other words, the speed can be slowed down up to 6 levels.
5.14.2 Normal Speed
If you want to return to normal speed, press number 5 button. Then the beep sound will be
announced and it returns to normal speed.
5.14.3 Play Fast
If you want to increase the speed, press number 6 button. Every time you press this button,
the speed goes up 1 level. The speed can be increased up to 4 levels.
In case of text daisy content, the speed level will be adjusted same as TTS speed level
because it plays by TTS. The speed level ranges from 1 to 21 and normal speed is 7. In
other words, the speed can be increased up to 14 levels.
5.15 Setting Moving Mode as Time
By pressing UP or DOWN button, you need to change “Time” mode. By pressing LEFT or
RIGHT button, it shifts to the point by time moving unit. Press number 9 button to change
time moving unit. Every time you press number 9 button, it toggles to 1 min, 3 min, 5 min, 10
min, 15 min, 20 min, and 30 min. The default is 1 min. By pressing number 9 button, you can
just stop where you want to set as time mode. In the other words, if you want to set „5 min‟
as time mode, press number 9 button continuously and stop when “Time index mode, 5
minutes” will be announced.
5.16 Moving to Page
While playing daisy content, you can move to page.
Please refer to following steps in order to move to page:
1) Press number 7 button while playing or in pause status.
Page 34

HIMS CO., LTD. BookSense XT – User Manual
24
2) Then “Current page ##, total page ##, enter page number to move to, edit box” will
be announced, then enter the page number that you want to move to.
3) Press OK button then it will shift to selected page and play.
If you press the number which excesses page number, “Entered value has out of a
permissible range. Please enter the value from ## to ##” will be announced and return to
play or pause status.
To cancel moving to the page, press CANCEL button instead of OK button in step 3. Or
press CANCEL button to delete all the numbers that has been entered, then press CANCEL
button one more time in step 2.
If there is no page info, “There is no page information” will be announced.
5.17 Moving to Heading
While playing daisy content, you can move to heading. Refer to following steps in order to
move to heading;
1) Press number 8 button while playing or in pause status.
2) Then “Current heading ##, total heading ##, enter heading number to move to, edit
box” will be announced, then enter the heading number that you want to move to.
3) Press OK button then it will shift to the selected heading and play.
If you press the number which excesses heading number, “Entered value has out of a
permissible range. Please enter the value from ## to ##” will be announced and return to
play status.
To cancel moving to heading, press CANCEL button instead of OK button in step 3. Or press
CANCEL button to delete all the numbers that has been entered, then press CANCEL button
one more time in step 2.
5.18 Checking Content Information
If you want to check content information while playing, press number 0 button more than 2
seconds. Then “Daisy info dialog” will be announced.
You can check „Mark‟, „Heading‟, „Page‟, and „Total playing time‟ through „Daisy info dialog‟.
Please refer to following steps to check „Daisy info dialog‟;
1) Press number 0 button more than 2 seconds, then “Daisy info dialog, current mark
##, total mark ##” will be announced. If there‟s no mark inserted in current phrase,
“Daisy info dialog, total mark ##” will be announced.
2) After checking mark information, press DONW button. Then “## of ## headings” will
be announced.
Page 35

HIMS CO., LTD. BookSense XT – User Manual
25
3) After checking heading information, press DONW button. Then “## of ## pages” will
be announced.
4) After checking page information, press DONW button. Then “Total time: ## hours ##
minutes ## seconds” will be announced.
When you press UP or DOWN button in dialog, it will be announced each listing. You can
check each character by pressing LEFT or RIGHT button.
If you want to close „Daisy info dialog‟, you need to press OK or CANCEL button. Then it will
return to play status.
5.19 Checking the Status of Content Information
If you want to check the status of content information while playing, press number 0 button.
Then you can check the content title, page, heading, playing time of current playing file. If
there‟s mark inserted in the current location (phrase), you can also check mark. It will return
to play status after announcing the information. To cancel, press CANCEL button.
6. Book Reader
Book Reader is the function that reads the file using regular PC. One of the most strength
points is that you can read document files whenever you want.
6.1 What is supported in the Book Reader?
BookSense XT supports these files in the Book Reader.
txt, rtf, doc, docx, html, xml, brl, brf.
Bookshare Braille files.
6.2 Playing the Document File
To read the document file, you need to change to Book Reader.
When you get into the Book Reader you‟ll see the Book Lists which contain BOOKS folder.
Please refer to 2.4 Navigating Through Files and Folder. Using these buttons to move to the
file that you want to read to press PLAY or OK button. If you want to open reading different
file you need to press CANCEL button. Then it stops current reading and return to Book Lists.
To move to new file, press PLAY or OK button to read the new file. Also you can read the file
that you have read recently using menu. Please refer to 6.19.1 Recently Documents.
If you read the document file which has read before, it will play from the point where you
read it last time.
Page 36

HIMS CO., LTD. BookSense XT – User Manual
26
6.3 Pause
If you press PLAY button while reading the file, it stops reading. Press one more time it
returns to play.
6.4 Changing Moving Mode
Press UP or DOWN button and then modes are toggle to Page, Paragraph (Default), Line,
Sentence, Word, Character, Phonetic, Mark, Search word.
Move by mode: Press LEFT or RIGHT button while playing or in pause status.
Note: Move by page or paragraph, even you can scroll by pressing LEFT or RIGHT button,
reading will not be stopped.
Move by other mode options, if it is Sentence mode, by pressing LEFT or RIGHT button it
will be stopped after reading next sentence. But it will continue to keep reading by pressing
LEFT or RIGHT button.
6.5 Moving by Page
You can change to „Page‟ mode by pressing UP or DOWN button. Afterwards, if you press
LEFT or RIGHT button, it shifts to previous or next page.
6.6 Moving by Paragraph
You can change to „Paragraph‟ mode by pressing UP or DOWN button. Afterwards, if you
press LEFT or RIGHT button, it shifts to previous or next paragraph.
6.7 Moving by Line
You can change to „Line‟ mode by pressing UP or DOWN button. Afterwards, if you press
LEFT or RIGHT button, it shifts to previous or next line.
6.8 Moving by Sentence
You can change to „Sentence‟ mode by pressing UP or DOWN button. Afterwards, if you
press LEFT or RIGHT button, it shifts to previous or next sentence.
6.9 Moving by Word
You can change to „Word‟ mode by pressing UP or DOWN button. Afterwards, if you press
LEFT or RIGHT button, it shifts to previous or next word.
Page 37

HIMS CO., LTD. BookSense XT – User Manual
27
6.10 Moving by Character
You can change to „Character‟ mode by pressing UP or DOWN button. Afterwards, if you
press LEFT or RIGHT button, it shifts to previous or next character.
6.11 Moving by Phonetic
You can change to „Phonetic‟ mode by pressing UP or DOWN button. Afterwards, if you
press LEFT or RIGHT button, it shifts to previous or next phonetic.
6.12 Moving by Mark
You can change to „Mark‟ mode by pressing UP or DOWN button. Afterwards, if you press
LEFT or RIGHT button, it shifts to previous or next mark.
6.13 Search Word
You can change to „Word‟ mode by pressing UP or DOWN button. You can search specific
word while reading current file. To search word, follow these steps:
1) If you need to search the word, by pressing UP or DOWN button to change the
moving unit as Word. Press LEFT or RIGHT button and move to the word that you
want to search.
2) Press UP or DOWN button changing the moving unit as Search Word.
3) Every time you press RIGHT button, it can be read to the right side; press LEFT
button, it can be read to the left side.
If there are no same words, pressing LEFT or RIGHT button it will be announced “Not
found.”
6.14 Mark and Voice Memo
You can insert mark while reading file or delete and move to the mark that you have already
inserted. Once you insert the mark, even cancel reading, the mark information has been
existed. Also mark can be inserted by voice called „Voice Memo.‟ Voice memo can be
inserted, moved, and deleted like mark. Mark indicates as number for the specific location,
voice memo indicates as number and voice for the specific location.
6.14.1 Switching Mode between Mark & Voice Memo
The BookSense XT can be inserted, deleted, and moved for mark and voice memo.
Following buttons are used in the Book Reader and this part.
Button 1: Set mark or voice memo. The default is set mark.
Page 38

HIMS CO., LTD. BookSense XT – User Manual
28
Button 2: Go to mark or voice memo.
Button 3: Delete mark or voice memo.
Button 9: Switch mode between mark and voice memo.
When you press number 9 button, “Switch to voice memo setting” will be announced.
Pressing number 9 button one more time, “Switch to mark setting” will be announced.
6.14.2 Inserting Mark
If you need to put the mark while reading, you can use this function.
To insert mark, follow these steps:
1) Press number 1 button, if you need to insert while reading or in pause status.
2) “Enter the mark number, edit box” will be announced and enter the number that you
want.
3) Press OK or MENU button, then “Mark has been inserted” will be announced and
return to play or pause status.
Up to 1,000 marks can be inserted and mark number should be inserted between 1 ~ 1,000.
If you enter the number beyond range, “Enter range 1 to 1,000, edit box” will be announced.
To cancel inserting the mark, press CANCEL button instead of OK button in step 3. Or press
CANCEL button continuously to delete all the numbers that has been entered, then press
CANCEL button one more time in step 2.
If you enter the number already existed and pressing OK button, then “This mark already
exists. Move? Yes” will be announced. Press OK or MENU button to set mark current
location. If you want to cancel inserting the mark, pressing LEFT or RIGHT button to move to
„No‟ then press OK or MENU button. And it keeps original location.
6.14.3 Inserting Voice Memo
If you need to put the voice mark while reading, you can use this function.
To insert voice memo, follow these steps:
1) Press number 9 button to switch to voice memo while reading or in pause status file.
2) Press number 1 button, then “Start voice memo recording” will be announced. Start
recording and press OK button.
3) Then “Stop recording, enter the voice memo number, edit box” will be announced
and enter the number that you want.
Page 39

HIMS CO., LTD. BookSense XT – User Manual
29
4) Press OK or MENU button, then “Voice memo has been inserted” will be announced
and return to play or pause status.
Note: Voice memo only can be recorded up to 40 seconds, if it is over 40 seconds then “Stop
voice memo recording, enter the voice memo number, edit box” will be announced and enter
the number that you want.
If you enter the number already existed and pressing OK button, then “This mark already
exists. Move? Yes” will be announced. Press OK or MENU button to set mark current
location. If you want to cancel inserting the mark, pressing LEFT or RIGHT button to move to
„No‟ then press OK or MENU button. And it keeps original location.
Also mark and voice memo are used same number, so number should not be duplicated.
6.14.4 Going to Mark and Voice Memo
If the mark or voice memo has been inserted while reading file, you can move to the place.
Move to mark and voice memo as follow;
1) Press number 2 button while reading or in pause status.
2) It will ask you “Go to mark number, edit box?” Enter the mark number that you want
to move to.
3) Press OK button then it will go to the place and start reading.
Currently if it is „voice memo‟ press number 2 button directly, When you go to the voice
memo, sound will not be announced, just go to the place and start reading. If you want to
check voice, please refer to 6.19.2 Mark Information.
But if you enter the number that does not exist or beyond the range of 1~1,000, “There is no
mark to move to” or “Enter range 1 to 1,000, edit box” will be announced.
To cancel going to mark or voice memo, press CANCEL button.
6.14.5 Deleting Mark and Voice Memo
When you need to delete the mark and voice memo which has been inserted, follow these
steps:
1) Press number 3 button while reading or in pause status. If it is „voice memo‟ then you
should press number 9 button to switch to „mark‟ then press number 3 button.
2) It will ask you “Delete mark number, edit box?” Enter the mark number that you want
to delete.
3) Press OK button then “Mark ## has been deleted” will be announced and return to
play or pause status.
Page 40

HIMS CO., LTD. BookSense XT – User Manual
30
But if you enter the number that does not exist or beyond the range of 1~1,000, “There is no
mark to delete” or “Enter range 1 to 1,000, edit box” will be announced. To cancel deleting
the mark or voice memo, press CANCEL button.
6.15 Adjusting Playing Speed
While playing or in pause status, you can adjust playing speed by using numeric buttons.
6.15.1 Play Slowly
If you want to slow down the speed, press number 4 button. Every time you press this button,
the speed goes down by 1 level. The speed level ranges from 1 to 21 and normal speed is 7.
In other words, the speed can be slowed down up to 6 levels.
6.15.2 Normal Speed
If you want to return to normal speed, press number 5 button. Then the beep sound will be
announced and it returns to normal speed.
6.15.3 Play Fast
If you want to increase the speed, press number 6 button. Every time you press this button,
the speed goes up by 1 level. The speed level ranges from 1 to 21 and normal speed is 7. In
other words, the speed can be increased up to 14 levels.
6.16 Moving to Page
While reading the file, you can move to the page and play.
1) Press number 7 button while playing or in pause status.
2) Then “current page ##, total pages ##,” “Enter page number to move to” will be
announced and enter the page number.
3) Press OK button. It will move to the page and read.
If you enter the number bigger than total page, “Entered value has out of a permissible range.
Please enter the value from ## to ##” will be announced. And you need to enter valid number.
To cancel moving the page, press CANCEL button.
6.17 Moving by Percent
While reading the file, you can move to the page by percent.
1) Press number 8 button while playing or in pause status.
Page 41

HIMS CO., LTD. BookSense XT – User Manual
31
2) Then “##% reading. Enter the percentage, edit box” will be announced, and enter
percentage.
3) Press OK button. It will move to the location of percentage.
6.18 Checking the Status of Content Information
If you want to check the status of content information while playing, press number 0 button.
Then you can check the file name, current page, number of mark, number of voice memo,
and percent of current playing file. To press number 0 button while playing, it will be
announced the status of content information and return to current location. To cancel, press
CANCEL button.
6.19 Using Menu in the Book Reader
Pressing MENU button in the Book Reader, you can see menu lists as follows: it toggles to
Recently Documents, Mark Info, Page Settings, Help mode, and Global Options. Help Mode
(Please refer to 3. Using Help Mode) and Global Options (Please refer to 9. Global Options)
are used all modes.
6.19.1 Recently Documents
You can check the list of file that you read recently by using “Recently Documents.” You can
see the Recently Documents up to 20. The latest one will be located for the first. If it is over
20, then the oldest file will be removed.
1) Press MENU button and move to “Recently Documents” menu by pressing UP or
DOWN button and then press OK or RIGHT button.
2) If this menu is activated, current reading will be stopped and recent book lists will be
displayed then you can move through books by pressing UP or DOWN button and
select book that you want to read by pressing OK button.
If you press CANCLE button while reading from „Recently Documents‟, it returns to „Recently
Documents‟. If you want to return to „Book List‟, you need to press CANCEL button one more
time or press MENU button to execute „Book List‟ from the menu.
6.19.2 Mark Information
This menu only can be shown if you open a file that has mark or voice memo.
To check mark information, follow these steps:
1) Press MENU button, then “Recently Documents” will be announced.
Page 42

HIMS CO., LTD. BookSense XT – User Manual
32
2) Press DOWN button, move to “Mark info.” And press one of RIGHT, OK or MENU
button.
3) Then “Mark and memo information, mark ## position ## byte” will be announced. If it
is voice memo “memo ##, position ## byte” will be announced then play the content.
6.19.3 Page Settings
This menu only can be shown on the „Book List‟ and „Recently Documents‟. Once you open
the book, this menu will not be shown.
To set page, follow these steps:
1) Press MENU button and move to “Page Settings, dialog” menu by pressing UP or
DOWN button.
2) Press one of RIGHT, OK or MENU button then “Page Settings dialog, Character per
line 80 edit box” will be announced. Enter the number that you want to change. The
value is from 60 to 100, the default is 80.
3) Press DOWN button, then “Line per page 25, edit box” will be announced. Enter the
number that you want to change. The value is from 18 to 40, the default is 25.
4) Press DOWN button, it will ask you “Alert separate page by formfeed character,
alert? Combo box.” Select either “Ignore” or “Alert” by pressing LEFT or RIGHT
button.
5) Then press OK or MENU button to save options. Press CANCEL button to cancel
saving options.
7. Radio
In order to listen to the radio in the BookSense XT, please connect earphone to the
earphone jack. You cannot listen to the radio if you do not connect the earphone to the
device.
Followings are the features of BookSense XT radio.
You can listen to the radio via internal speakers or earphone.
You can record radio.
You can register 6 channels and move along the channel.
You can search next and previous frequency.
The frequency range of the radio that you can listen to is from 87.5MHz to 108MHz. Please
read this user manual before you start using the radio feature.
Page 43

HIMS CO., LTD. BookSense XT – User Manual
33
7.1 Tuning to the Previous Frequency
Pressing the LEFT button for more than 2 seconds will tune to the previous broadcast
frequency. Every time you press the LEFT button for more than 2 seconds, it tunes to the
previous broadcasting frequency.
7.2 Tuning to the Next Frequency
Pressing the RIGHT button for more than 2 seconds will tune to the next broadcast
frequency. Every time you press the RIGHT button for more than 2 seconds, it tunes to the
next broadcasting frequency.
7.3 Moving to the Previous Frequency by 0.1MHz
Every time you press the LEFT button, the frequency will decrease by 0.1MHz. If „Tune to‟
functions that were explained in the previous sections does not tune to any specified
broadcasting, use this function to search the desired broadcasting frequency.
7.4 Moving to the Next Frequency by 0.1MHz
Every time you press the RIGHT button, the frequency will increase by 0.1MHz. If „Tune to‟
functions that were explained in the previous sections does not tune to any specified
broadcasting, use this function to search the desired broadcasting frequency.
7.5 Mute/Unmute
If you press PLAY button while listening to the radio, it goes to mute. Press one more time
then it returns to unmute.
7.6 Moving to the Previous Registered Channel
If you register channels, you can move among the registered channels. You can move to
previous channel by pressing UP button.
7.7 Moving to the Next Registered Channel
If you register channels, you can move among the registered channels. You can move to
next channel by pressing DOWN button.
7.8 Registering Channels and quick move to Channel
In order to use the functions explained in the Sections 7.6 and 7.7, the channels have to be
registered. While you are listening to the radio, press desired button number from 1 to 6 for
Page 44

HIMS CO., LTD. BookSense XT – User Manual
34
more than 2 seconds in order to register the broadcast which you are listening to. For
example, if you press number 1 button for more than 2 seconds while listening to a
broadcast with the frequency 95.7MHz, the 95.7MHz will be registered to channel number 1.
You can register up to 6 channels by pressing number from 1 to 6.
If you try to register any broadcast to a channel that has been registered already, the
BookSense XT will announce “Preset ## is already registered” and return to the radio.
You can also register the channels by pressing MENU button. Please refer to 7.14.3.1
Registering Channel.
In order to move to the desired channel, you can press the UP or DOWN button as
explained in the Sections 7.6 and 7.7. Or you can move to the desired channel by pressing
the number button. For example, of you want to listen to a broadcast at 102.8MHz which is
registered to channel number 1, simply press number 1 button.
7.9 Changing the Sensitivity of Channel Scan
If the channel scanning is not good while listening to the radio, you can adjust the sensitivity
of channel scan.
To change sensitivity of channel scan, press number 7 button. You can change the range
between 1~10 and beep sound will be announced at the default setting 4.
The higher number of the sensitivity, the more channels you can search. You can also
change the sensitivity of channel scan by pressing MENU button. Please refer to 7.14.4
Channel Scanning Sensitivity.
7.10 Deleting Registered Channel
To delete channel registered, follow these steps:
1) Press number 8 button while listening to the radio.
2) Then “Enter the presets number to delete, edit box” will be announced. Enter the
preset number that you want to delete.
3) Press OK button then “preset ## has been deleted” will be announced.
7.11 Listening to the Radio via Internal Speakers
You can listen to a radio via internal speakers as well as the earphone.
While listening to the radio, press number 9 button, then the BookSense XT will announce
“Output to internal speaker” and you can listen to the radio via internal speakers. In this
mode, sound will not be outputted to earphone.
If you press number 9 button again, the BookSense XT will announce “Cancel internal
Page 45

HIMS CO., LTD. BookSense XT – User Manual
35
speaker setting” and you can hear the radio from earphone, not from internal speakers.
While listening to radio via internal speakers, please do not remove the earphone from the
BookSense XT, because the earphone works as a radio antenna. Listening to the radio via
speaker can be also set by using MENU button. Please refer to 7.14.1 How to set the
internal speakers.
7.12 Checking Channel Status Information
If you want to check channel status of the radio while listening to the radio, press number 0
button. Then the BookSense XT will announce the frequency of the current broadcast and
mono/stereo information.
After announcing the information, it will return to radio broadcast. To stop playing the channel
status information, press CANCEL button.
7.13 Recording Radio Broadcasting
If you want to record the radio broadcasting, please follow following steps:
1) Press the RECORD button that is located on the right side of the device for more
than 2 seconds. “Start recording” will be announced and it will start recording the
radio broadcasting.
2) If you press RECORD button again during recording, “Pause recording” will be
announced and it will pause the recording. If you want to continue, press RECORD
button again. “Restart” will be announced and it will resume recording.
3) In order to stop recording, press PLAY button. “Stop recording” will be announced
and it will stop recording and save recorded audio file.
You can still listen to radio broadcasting while you record them. The recorded files are saved
in the “RADIO” folder with file name “Frequency_year_month_day_time (hour minute
second).mp3” format. If you record in wave file format, the file name will be
“Frequency_year_month_day_time (hour minute second).wav”. The number will increase if
you record the same frequency broadcast again. To select the recording file format, please
refer to 7.14.2 Channel Recording Setting.
If you want to cancel recording during recording or pause status, press the CANCEL button.
“Cancel recording” will be announced and it will cancel the recording. You can listen to
recorded file in the Media of the BookSense XT.
Page 46

HIMS CO., LTD. BookSense XT – User Manual
36
7.14 How to use Radio Menu
While listening to the radio, you can access menu by pressing MENU button. You can set
internal speaker settings, channel recording settings, preset management, help mode and
global option settings. You can move among those menu items by pressing UP or DOWN
button.
“Help Mode” and “Global Options” are the common menus that are the same menus used in
the other program of BookSense XT. Please refer to 3. Using Help Mode and 9. Global
options.
7.14.1 How to set the Internal speakers
This is the same function as the function explained in the Section 7.11. In order to listen to
the radio via internal speakers, please follow following steps:
1) Press MENU button. “Internal speaker setting dialog” will be announced.
2) Press one of RIGHT, OK or MENU button. “Output internal speakers disable combo
box” will be announced.
3) Press LEFT or RIGHT button to change „disable‟ to „enable‟ and press OK or MENU
button to confirm the change.
If you want to listen via earphone again, follow above procedure again and set „enable‟ to
„disable‟.
7.14.2 Channel Recording Setting
You can select recording file format, sampling rate and mono/stereo settings. Followings are
how to set those settings.
1) Press MENU button.
2) Press DOWN button to move to “Channel recording setting, dialog”.
3) Press one of RIGHT, OK or MENU button to enter the dialog box. “Channel
recording setting dialog, recording type mp3 combo box” will be announced. Press
LEFT or RIGHT button to change the recording file type to wave file.
4) After selecting the recording file type, press DOWN button, “Sample rate 16000 hertz,
combo box” will be announced. Press LEFT or RIGHT button to select the desired
sampling rate. The sampling rates can be selected from 16000Hz, 22050Hz,
24000Hz, 32000Hz and 44100Hz if you set to mp3 mode in the previous setting. If
you have selected wave file in the previous setting, sampling rates can be selected
form 8000Hz, 11025Hz, 22050Hz and 44100Hz.
5) After selecting sampling rate, press DOWN button to move to selecting the number
Page 47

HIMS CO., LTD. BookSense XT – User Manual
37
of audio channels. “Channel stereo, combo box” will be announced. Press LEFT or
RIGHT button to select „mono‟ or „stereo‟. If you select „stereo‟ and the radio
broadcast is in stereo mode, then the broadcast will be recorded in stereo.
In order to save the settings, press OK button. Or to cancel the setting, press CANCEL
button.
7.14.3 Preset
You can register and delete radio channels in this menu.
7.14.3.1 Registering Channel
As explained in the Section 7.8, you can register the radio channels using the menus.
Followings are the procedure for registering channels.
1) Press MENU button.
2) Press DOWN button two times to move to Preset. “Preset pull down” will be
announced.
3) Press one of RIGHT, OK or MENU button to select Preset. “Register preset dialog”
will be announced.
4) Press RIGHT, OK or MENU button. “Preset registration dialog, Select preset, 1,
(frequency), combo box” will be announced. If there is no registered channel in the
channel number 1, “select preset, 1, empty, combo box” will be announced.
5) Press LEFT or RIGHT button to move to the channel number that you want to
register the frequency. Every time you move to any channel, it will announce channel
number and frequency. If there is any empty channel, it will announce the channel
number and announce “empty”.
6) Move to the desired channel number and press OK or MENU button. “Preset ## has
been registered” will be announced.
7.14.3.2 Deleting Channel
In order to delete the registered channel, please follow steps:
1) Press MENU button.
2) Press DOWN button two times to move to “Preset, pull down”.
3) Press one of RIGHT, OK or MENU button. “Add preset, dialog” will be announced.
4) Press DOWN button to move to “Delete preset, dialog”. And press one of RIGHT, OK
or MENU button. “Delete preset dialog, Delete preset, 1, (frequency), combo box”
will be announced. If nothing has been registered in the preset number 1, “Delete
Page 48

HIMS CO., LTD. BookSense XT – User Manual
38
preset, 1, empty, combo box” will be announced.
5) Press LEFT or RIGHT button to move to the channel that you want to delete.
6) Press OK or MENU button at the channel that you want to delete. “Preset## has
been deleted” will be announced and it will delete the selected channel information,
and return to radio.
7.14.4 Channel Scanning Sensitivity
In order to change the sensitivity of channel scan, please follow steps:
1) Press MENU button.
2) Press UP or DOWN button to move to “Channel Scanning Sensitivity Setting, dialog”.
3) Press one of RIGHT, OK or MENU button. “Current channel scanning sensitivity 4,
combo box” will be announced.
4) By pressing LEFT or RIGHT button to select 1 to 10.
5) Press OK or MENU button to save the option.
8. Recording
Using BookSense XT, you can record your voice, lectures, meetings, and etc. Recording
time is up to the storage space in the internal flash memory or SD memory that you are
using.
You can also record from other audio players, like CD players, cassette players or personal
computers by plugging in audio cable into Microphone jack.
And you can select the file format between mp3 or wave files. Default file type is mp3. How
to change the recording file type will be explained in the Section 9.4.
8.1 Recording via Internal Microphone
The BookSense XT uses internal microphone to record voice as default.
Followings are the procedure to record voice.
1) Press Record button for more than 2 seconds while using other function than Radio.
“Start recording” will be announced and it will start recording. If you start recording,
Media, Daisy or Book Reader, the Media, Daisy or book reader will stop playing.
2) In order to stop recording, press PLAY button. “Stop, play recording? Yes” will be
announced. If you want to listen to the recorded file, press PLAY, OK or MENU
button. Then the BookSense XT will play the recorded file. After finishing playing the
recorded file, it returns to the function that you were using before start recording.
Page 49

HIMS CO., LTD. BookSense XT – User Manual
39
3) When it announces “Stop, play recording? Yes”, and you do not want to listen to the
recorded file, press LEFT or RIGHT button to change „yes‟ to „no‟, and press one of
PLAY, OK or MENU button. Then it will not play the recorded file and return to the
function that you were using before start recording.
To pause recording, press RECORD button during recording. “Pause” will be announced and
it will pause recording. Pressing RECORD button again will resume recording after it
announces “Restart recording”.
The recorded file will be saved in the RECORD folder automatically. The file name will be
“year_month_day_time (hour minute second).mp3”. The number will be increased every time
you record voices.
If the record file type is set to wave file, the file name will be “year_month_day_time (hour
minute second).wav”.
To cancel recording, press CANCEL button during recording or in pause status.
8.2 Recording via External Microphone
To record via external microphone, you just need to connect external microphone to the
device without any special setting. After connecting, it is same as 8.1 Recording via internal
microphone. If device is in record via line-in mode, you need to set recording mode as
„microphone‟ and connect the microphone to the device. Please refer to 9.4 Recording
Settings.
8.3 Recording via Line-in
If you want to record audios from the external audio sources like CD players, cassette
players or personal computers, connect the audio output of these audio sources to
microphone jack of the BookSense XT using line-in cable. And you have to change the audio
recording mode to „line in‟ mode. Following is how to change to line-in mode.
1) Press MENU button.
2) Press UP or DOWN button to move to “Global Option Settings, pull down”.
3) Press one of RIGHT, OK, or MENU button. “Alarm setting, pull down” will be
announced.
4) Press DOWN button repeatedly until it announces “Recording Settings, dialog”
5) Press one of RIGHT, OK or MENU button. “Recording Settings, dialog, recording
type, mp3, combo box” will be announced.
Page 50

HIMS CO., LTD. BookSense XT – User Manual
40
6) Press UP or DOWN button repeatedly to move to “Recording source, microphone,
combo box”.
7) Press LEFT or RIGHT button to move to “line in” and press OK or MENU button.
Then the dialog box will be closed and it returns to the previous function that you
were using before calling menu.
After setting the record mode to „line in‟, the recording method is the same as the method of
voice recording explained in the Section 8.1 Recording via internal microphone.
8.4 Adding Marks during Recording
During recording, you can add marks. For example, in the classroom, if the teacher explains
very important thing, you can add marks and you can find those marked location very easily
while playing the recorded file.
To add marks during recording, press number 1 button when you want to add a mark. Then
the mark will be added automatically. When adding the mark, there will be no messages or
announcement from the BookSense XT.
You can add up to 20 marks, and the number of mark will be increased automatically from 1
to 20. When you listen to the recorded files with marks, you can move to the mark or delete
the mark as explained in the Sections 5.13.2 and 5.13.3.
9. Global Options
Global Options are used to set TTS speed, Pitch, Volume or Date & Time, Alarm etc.
You can use “Global options” menu in each program. First, press MENU button for each
MENU and move to “Global options” by pressing UP or DOWN button. And select each
setting MENU by pressing RIGHT or OK button.
BookSense XT supports these follow settings:
Alarm Settings include check alarm, set alarm, and delete alarm.
Date and Time Settings include check date and time, set date and time.
Voice Settings.
Recording Settings.
Check System Status.
Bluetooth Options.
Set Sleep Timer.
Power Saving Time.
Message Sound Setting.
Page 51

HIMS CO., LTD. BookSense XT – User Manual
41
Format Storage Device.
Set Current Storage Device.
9.1 Alarm Settings
Alarm settings include „Check Alarm,‟ „Set Alarm,‟ and „Delete Alarm.” If you have deleted or
not set the alarm, BookSense XT only has „Set Alarm.‟ So „Check Alarm‟ and „Delete Alarm‟
can be announced if you have set the alarm in advanced.
9.1.1 Checking the Set Alarm
To check the set alarm, follow these steps:
1) Press MENU button. By pressing UP or DOWN button, move to “Global Options pull
down.”
2) Press one of RIGHT, MENU or OK button. Then “Alarm Settings pull down” will be
announced.
3) Press one of RIGHT, MENU or OK button. It will be announced “Check Alarm Time,
dialog.”
4) Press one of RIGHT, MENU or OK button. It will be announced “Check Alarm dialog,
current alarm time is HH:MM (Term)”.
If you have not set the alarm, it will be announced “Set Alarm dialog” instead of “Check
Alarm dialog.” In this case, you can‟t see the list of checking the set alarm from alarm
settings.
Note: From dialog, „Hour‟, „Minute‟, you can check each character by pressing LEFT or
RIGHT button.
9.1.2 Set Alarm
If you have not set the alarm you cannot check the alarm. To set alarm, follow these steps:
1) Press the MENU button. By pressing UP or DOWN button, move to “Global Options
pull down.”
2) Press one of RIGHT, OK or MENU button. Then “Alarm Settings pull down” will be
announced.
3) Press one of RIGHT, OK or MENU button. It will be announced “Set Alarm dialog.”
4) Press one of RIGHT, OK or MENU button then “Set Alarm dialog,
5) Press one of RIGHT, OK or MENU button, move to „Hour‟ edit box.
Page 52

HIMS CO., LTD. BookSense XT – User Manual
42
6) If you are in „Hour‟ edit box, “Enter 2 digits for the hour, edit box” will be announced
and enter the number by using numeric key. Press DOWN button and move to
„Minute‟ edit box.
7) If you are in „Minute‟ edit box, “Enter 2 digits for the minute, edit box” will be
announced and enter the number by using numeric key. Press DOWN button and
move to „Select AM or PM‟ combo box.
8) If you are in „Select AM or PM‟ edit box, “Select AM or PM, combo box” will be
announced and select by pressing LEFT or RIGHT button. Press DOWN button and
move to „Alarm Bell‟ combo box.
9) If you are in „Melody‟ combo box, “Alarm bell, melody 1, combo box” will be
announced. You can select alarm melody that you want by pressing LEFT or RIGHT
button. Press DOWN button and move to „Term‟ combo box.
10) If you are in „Term‟ combo box, “Term, once, combo box” will be announced. The
default is once and select alarm period that you want by pressing LEFT or RIGHT
button to switch „Monday ~ Friday‟, „Monday ~ Saturday‟, „Weekend‟, and „Everyday‟.
Press DOWN button and move to „Duration‟ combo box.
11) If you are in „Duration‟ combo box, “Duration, 5 min, combo box” will be announced.
The default is 5 min and select alarm duration by pressing LEFT or RIGHT button to
switch 1 min to 10 min. If you set completely, press OK or MENU button to apply
setting. If you want to cancel setting, press CANCEL button.
Note: From edit box, „Hour‟, „Minute‟, you can check each character by pressing LEFT or
RIGHT button. And Press CANCEL button to delete previous character. If all the characters
are deleted, the beep sound will be announced. If you press CANCEL button one more time
after beep sound, alarm setting will be canceled.
9.1.3 Delete Alarm
To delete alarm, follow these steps:
1) Press the MENU button. By pressing UP or DOWN button, move to “Global Options
pull down.”
2) Press one of RIGHT, OK or MENU button. Then “Alarm Settings pull down” will be
announced.
3) Press one of RIGHT, OK or MENU button. It will be announced “Check Alarm Time,
dialog.”
Page 53

HIMS CO., LTD. BookSense XT – User Manual
43
4) Press UP or DOWN button, move to “Delete Alarm.” Press one of RIGHT, OK, or
MENU button.
5) “Alarm deleted” will be announced and return to before this progress.
If you have not set the alarm, you can‟t see the list of delete alarm from alarm settings.
9.2 Date & Time Settings
After purchasing the BookSense XT, you need to set date & time first using this chapter. Also
you can check date & time using this menu instead of pressing „DATE & TIME‟ button.
9.2.1 Check Date & Time
You can also check date & time using the MENU. By using the MENU, follow these steps:
1) Press the MENU button. By pressing UP or DOWN button, move to “Global Options
pull down.”
2) Press one of RIGHT, OK or MENU button. Then “Alarm Settings pull down” will be
announced.
3) Press DOWN button, move to “Date & Time settings pull down.” And press one of
RIGHT, OK or MENU button, then “Check Date & Time dialog” will be announced.
4) Press one of RIGHT, OK or MENU button. It will be announced “Check date & time
dialog, xxxx/MM/DD/YYYY.”
5) Press DOWN button then it will be announced “HH/MM/SS, AM or PM.” If you have
set the date & time for 24-hour mode, it will be announced “HH/MM/SS”
6) Press CANCEL button once you completed checking, then it returns to the location
before calling the menu.
Note: From dialog, „Month‟, „Day‟, „Year‟, „Hour‟, „Minute‟, you can check each character by
pressing LEFT or RIGHT button.
9.2.2 Set Date & Time
To set date and time, follow these steps:
1) Press MENU button. By pressing UP or DOWN button, move to “Global Options pull
down”
2) Press one of RIGHT, OK or MENU button. Then “Alarm Settings pull down” will be
announced.
Page 54

HIMS CO., LTD. BookSense XT – User Manual
44
3) Press DOWN button, move to “Date & Time Settings pull down.” And press one of
RIGHT, OK or MENU button, then “Check date & time dialog” will be announced.
4) Press DOWN button, move to “Set date & time dialog.” „Month‟, „Day‟, „Year‟, „Time
Format‟, „Hour‟, and „Minute‟; each menu can be moved by pressing UP or DOWN
button.
5) And press one of RIGHT, OK or MENU button. Then “Enter 2 digits for Month, edit
box” will be announced and enter the number by using numeric key.
6) Press DOWN button and move to „Date‟ edit box. “Enter 2 digits for Day, edit box”
will be announced and enter the number by using numeric key.
7) Press DOWN button and move to „Year‟ edit box. “Enter 4 digits for Year, edit box”
will be announced and enter the number by using numeric key.
8) Press DOWN button and “Time format” will be announced. You can select either 12hour mode or 24-hour mode by pressing LEFT or RIGHT button.
9) Press DOWN button and move to „Hour‟ edit box. “Enter 2 digits for the Hour, edit
box” will be announced and enter the number by using numeric key.
10) Press DOWN button and move to „Minute‟ edit box. “Enter 2 digits for the Minute,
edit box” will be announced and enter the number by using numeric key.
11) Press DOWN button and “Select AM or PM” will be announced. You can select either
AM or PM by pressing LEFT or RIGHT button. If you select 24-hour mode, “select
AM or PM” will not be announced.
12) Press OK button to apply setting. If you want to cancel setting, press CANCEL
button.
If you select 12-hour clock mode, you need to enter the number range between 0~12. And
for 24-hour clock mode, you need to enter the number range between 0~23. The default is
12.
Note: From edit box, „Month‟, „Date‟, „Year‟, „Hour‟, „Minute‟, you can check each character
by pressing LEFT or RIGHT button. And Press CANCEL button to delete previous character.
If all the characters are deleted, the beep sound will be announced. If you press CANCEL
button one more time after beep sound, time setting will be canceled.
9.3 Voice Settings
To do Voice Settings, follow these steps:
1) Press MENU button. By pressing UP or DOWN button, move to “Global Options pull
down”
Page 55

HIMS CO., LTD. BookSense XT – User Manual
45
2) Press one of RIGHT, OK or MENU button. Then “Alarm Settings pull down” will be
announced.
3) Press DOWN button, move to “Voice Settings dialog.” And press one of RIGHT, OK
or MENU button.” Then “Voice Settings dialog volume 15 combo box” will be
announced. By pressing LEFT or RIGHT button to select between 1~21. Every time
you press the button it will change the value and stop to select.
4) Press DOWN button, “Rate 7 combo box” will be announced. By pressing LEFT or
RIGHT button to select between 1~21. Every time you press the button it will change
the value and stop to select.
5) Press DOWN button, “Pitch 8 combo box” will be announced. By pressing LEFT or
RIGHT button to select between 1~20. Every time you press the button it will change
the value and stop to select.
6) Press DOWN button, “Voice female combo box” will be announced. By pressing
LEFT or RIGHT button to select either female or male.
7) And press OK button to save options.
9.4 Recording Settings
To set voice recording, follow these steps:
1) Press the MENU button. By pressing UP or DOWN button, move to “Global Options
pull down”
2) Press one of RIGHT, OK or MENU button. Then “Alarm Settings pull down” will be
announced.
3) Press DOWN button, move to “Recording Settings dialog.” And press one of RIGHT,
OK or MENU button.” Then it will be announced “Recording Settings dialog,
recording type mp3, combo box.” By pressing LEFT or RIGHT button to change to
wave.
4) After selecting recording type, press DOWN button. Then “Recording Source
microphone” will be announced. By pressing LEFT or RIGHT button to change either
microphone or line-in.
5) Press DOWN button and move to “Sample Rate.” Select either WAV (8000~44100
Hz) or MP3 (16000~44100 Hz) by pressing LEFT or RIGHT button.
6) Press DOWN button and move to “Channel.” Select either Mono or Stereo by
pressing LEFT or RIGHT button.
Page 56

HIMS CO., LTD. BookSense XT – User Manual
46
7) Press DOWN button and move to “Microphone Sensitivity.” This is the option
function which control the sensitivity of microphone by pressing LEFT or RIGHT
button to select 1~4.
8) And press OK button to save options, press CANCEL button to cancel savings.
Note: When you want to record stereo, you need to use external microphone for supporting
stereo. Also channel option should be set for stereo.
9.5 Check System Status
To check system status, follow these steps:
1) Press MENU button. By pressing UP or DOWN button, move to “Global Options pull
down”
2) Press one of RIGHT, OK or MENU button. Then “Alarm Settings pull down” will be
announced.
3) Press DOWN button, move to “Check System Status dialog battery level ##.” While
charging the battery, “Battery Charging, using AC power” will be announced.
4) After checking battery level, press DOWN button then “Flashdisk free space ## GB,
Total space ## GB” will be announced. If SD card inserted, you can check its space
by pressing down button.
5) Press DOWN button to check firmware version and date.
6) Press DOWN button to check the key number.
Note: You can check system status by pressing UP or DOWN button and check each
character by pressing LEFT or RIGHT button.
9.6 Bluetooth Options
The BookSense XT allows you to connect Bluetooth headset or receive files from PC using
FTP.
Bluetooth settings include following lists below:
1) Turn on Bluetooth: Bluetooth off now, Press OK or MENU button to turn it on.
2) Turn off Bluetooth: Bluetooth is activated now, Press OK or MENU button to turn it off.
3) Connect headset: This option is provided with scan the headset that you want to use
and connect to the headset.
4) Disconnecting headset: This option is provided with disconnecting the connected
headset.
Page 57

HIMS CO., LTD. BookSense XT – User Manual
47
5) Unpair Headset: Remove connecting headset Information.
To use FTP service, you need to press OK or MENU button to select „Turn on Bluetooth.‟
To connect Bluetooth headset, follow these steps:
1) By pressing MENU button and move to “Global Options” menu.
2) Press RIGHT, OK or MENU button and move to “Bluetooth Options” by pressing UP
or DOWN button. And then press RIGHT, OK or MENU button.
3) Turn on the Bluetooth headset.
4) Press RIGHT, OK or MENU button to turn on the Bluetooth.
5) Repeat in step 1 and 2.
6) Move to „Connect headset‟ by pressing UP or DOWN button.
7) Press one of RIGHT, OK, or MENU button to scan for audio device.
8) From the scanned list, move to headset device by pressing UP or DOWN button.
And then press RIGHT, OK or MENU button.
9) Enter the pin code number and press OK button.
Note: You can find the pin code number when you check the headset information.
10) If the valid pin code number is entered, “Successfully connected” will be announced.
In a few seconds, you can hear all the outputs from the BookSense XT.
Note: We highly recommend using Bluetooth 2.0 headset. If you use below Bluetooth 2.0
headset, discontinuous playing might be occurred.
9.7 Set Sleep Timer
To set sleep timer, follow these steps:
1) Press the MENU button. By pressing UP or DOWN button, move to “Global Options
pull down”
2) Press one of RIGHT, OK or MENU button. Then “Alarm Settings pull down” will be
announced.
3) Press UP or DOWN button, move to “Set Sleep Timer dialog.”
4) Press one of RIGHT, OK or MENU button then “Set Sleep Timer dialog, Sleep Timer
Time disabled” will be announced. You can change “Set Sleep Timer” by pressing
LEFT or RIGHT button to select 10, 20, 30 minutes, 1, 2, 3 hours and then press OK
or MENU button. The Default is disabled.
Note: This option is to reserve sleep time. Once the sleep timer is set, even the device is
Page 58

HIMS CO., LTD. BookSense XT – User Manual
48
activated it will be shut off. In case of not activating the device, power saving time setting will
apply first priority. Thant means if you set 30 min for Set Sleep Timer and set 5 min for power
saving time setting, the device will be turned off after 5 min.
9.8 Power Saving Time
When the device is turned on without any activating, it will be turned off automatically.
To set power saving time, follow these steps:
1) Press the MENU button. By pressing UP or DOWN button, move to “Global Options
pull down”
2) Press one of RIGHT, OK or MENU button. Then “Alarm Settings pull down” will be
announced.
3) Press UP or DOWN button, move to “Power Saving Time dialog.” Press one of
RIGHT, OK or MENU button then “Power Saving Time Setting dialog, power saving
mode 5 min combo box” will be announced. You can change “Power Saving Time
Setting” by pressing LEFT or RIGHT button to select off, 5, 10, 15, 20 minutes and
then press OK or MENU button. The Default is 5 min.
Note: Power saving mode will not affect the device follow these cases; while playing music,
listening to radio, connecting AC adapter, or using mobile disc. Without any activating the
device, it will kick in the power saving mode.
9.9 Format Storage Device
This option is to format the flashdisk, SD card, and USB stick.
To format flashdisk, follow these steps:
1) Press the MENU button. By pressing UP or DOWN button, move to “Global Options
pull down”
2) Press one of RIGHT, OK or MENU button. Then “Alarm Settings pull down” will be
announced.
3) Press UP or DOWN button, move to “Format Storage Device pull down.” Press one
of RIGHT, OK or MENU button then “Format flash disk” will be announced. If the
external memory card inserted, you can change “Format SD card” or “Format USB
stick” by pressing UP or DOWN button to select.
4) After focusing device that you want to format, press one of RIGHT, OK, or MENU
button. Then “Do you want to format XXXX? Yes” will be announced.
5) Press OK or MENU button. Then “All the data will be deleted. Continue? Yes.”
Page 59

HIMS CO., LTD. BookSense XT – User Manual
49
6) Press OK or MENU button to format. “Starting format of XXXX” and in a while
“Successfully formatted XXXX” will be announced.
If you want to cancel formatting, press LEFT or RIGHT button to select „No.‟
9.10 Set Current Storage Device
To set current storage device, follow these steps:
1) Press the MENU button. By pressing UP or DOWN button, move to “Global Options
pull down”
2) Press one of RIGHT, OK or MENU button. Then “Alarm Settings pull down” will be
announced.
3) Press UP or DOWN button, move to “Set current storage device dialog.” Press one
of RIGHT, OK or MENU button then “Storage device setting dialog, current storage
device: Flash disk, combo box” will be announced. You can change to SD card or
USB Stick if they are connected to the device by using LEFT or RIGHT button.
4) Press OK button that you want to set. Content should be stored in the folder which it
can be used in the BookSense XT. Please refer to 2.1 Folders used in the
BookSense XT.
Note: You can change your preference work place. By pressing LEFT or RIGHT button, you
can change to each work place; Flash disk (Current), SD, USB. And then press OK or MENU
button to apply setting. If the external memory card is not connected, you can just check
Flash disk.
10. Firmware Update the BookSense XT
HIMS may from time to time offer new versions of the BookSense XT firmware. You can
download from HIMS‟s website.
To update the BookSense XT, follow these steps:
1) Copy the update file to the root of an SD card.
2) Connect to AC power. The BookSense XT needs to be connected to AC power in
order for the update to be possible.
3) Power on the device and insert the SD card.
4) Press MENU button and move to „Advanced‟ by pressing UP or DOWN button.
5) Press one of RIGHT, OK or MENU button then „Upgrade‟ will be announced.
Page 60

HIMS CO., LTD. BookSense XT – User Manual
50
6) Press OK or MENU button. “Do you want to upgrade? Yes” will be announced.
7) Press OK or MENU button.
8) The update will start and report the new version number is being installed. The
installation takes about 1.5 minutes.
9) After update is done, the device will be started automatically.
10) If you copy wrong file or route, “Cannot find executable file” will be announced and
cancel to update.
11. Trouble Shooting Guide
If you are having trouble with the BookSense XT, please try the following suggestions
according to your problem.
11.1 The BookSense XT will not Turn on
1. Check to make sure that the battery is inserted in to its compartment properly.
2. If the battery is inserted properly, connect the AC adapter, and plug the AC adapter in to
an electronic outlet. The battery may need to be charged.
3. Or, check the location of key lock switch. If this switch put on “lock,” the BookSense XT
will not be turned on.
11.2 If the BookSense XT stops Executing
1. Press RESET button.
2. Do Hard Reset.
- Hard Reset: While the number 4 button is being held down, press and release the
Reset button at the same time. Continue to hold the number 4 button down until the
signal comes out.
3. Take out the battery and reinsert it after 10 seconds.
11.3 Having trouble with Scanning Radio Channel
If the channel scanning is not good while listening to the radio, you can adjust the sensitivity
of channel scan. To change sensitivity of channel scan, press number 7 button. You can
change the range between 1~10 and the default setting is 4. The higher number of the
sensitivity, the more channels you can search. And also we highly recommend using
earphone not using internal speaker.
Page 61

HIMS CO., LTD. BookSense XT – User Manual
51
11.4 No Pairing while using Bluetooth Headset
Please check if the Bluetooth headset supporting A2DP, Since the BookSense XT only
supports A2DP.
11.5 Disappeared Registered channel
If you did Hard RESET, all the channels will be deleted. So if registered channel disappeared,
you need to check if you did Hard RESET.
11.6 No Sound from Internal Speaker or Earphone
The BookSense XT allows you to adjust volume both earphone and internal speaker. When
you connect earphone to the device, you can adjust the volume which comes from earphone.
Removing earphone, you can adjust the volume which comes from internal speaker. So if
you can‟t hear any sound from earphone even the internal speaker say something, you need
to increase the volume while connecting earphone to the device. If you can‟t hear any sound
from internal speaker, you need to increase the internal speaker volume as well.
12. Warranty
Do not take apart the BookSense XT by yourself. Do not have anyone else who is not
authorized by HIMS take apart the BookSense XT. If an unqualified person disassembles the
device, serious damage may occur to the BookSense XT. If an unauthorized person
disassembles the BookSense XT, the device will be excluded from any free maintenance,
and the warranty will become void. If any liquid or external force damages the device, it may
also be excluded from free maintenance, even if the damage occurred during the warranty
period.
13. Contact Information
If you are having any problems with BookSense XT, please contact the dealer where you
purchased from your unit. If you need to require further assistance, please contact us at
hims@himsintl.com. Or, you can contact HIMS by phone at +82-42-864-4601.
 Loading...