

Himoto mxb-2s, mtr-3, mxb-3, mtr-2s Instruction Manual

VIPER X2SVIPER X2S
Monster Truck
BUGGY
mega p mtr-2smega p mtr-2s
mega p mtr-3
mega p mtr-3
mega p mxb-2s
mega p mxb-2s
mega p mxb-3
mega p mxb-3
TRUGGY

1/10 4WD NITRO-POWERED OFF-ROAD TRUGGY
HI903T 2-Speed Transmissions
HI933T Three Differential Case
MEGA P MTR-2S
MEGA P MTR-3
1/10 4WD NITRO-POWERED OFF-ROAD MONSTER TRUCK
VIPER X2S
HI908T 2-Speed Transmissions
1/10 4WD NITRO-POWERED OFF-ROAD BUGGY
MEGA P MXB-2S
MEGA P MXB-3
HI905T 2-Speed Transmissions
HI935T Three Differential Case
01
Features
- 4WD Drive System.
- 18CXP powerful SH engine with two valve needles and slide carb.
- Waterproof dustproof sealed gearbox.
- Sealed superduty plastic driveshaft.
- Fast easy assembly and disassembly receiver and battery cover.
- Quality differential with four bevel gear.
- Blue anodized 6061T chassis.
- Sealed gearbox waterproof durable and stable,
- Adjustable threaded long Oil-filled shock absorber.
- Fuel tank 75CC.
- Precise sealed ball bearing for the whole model.
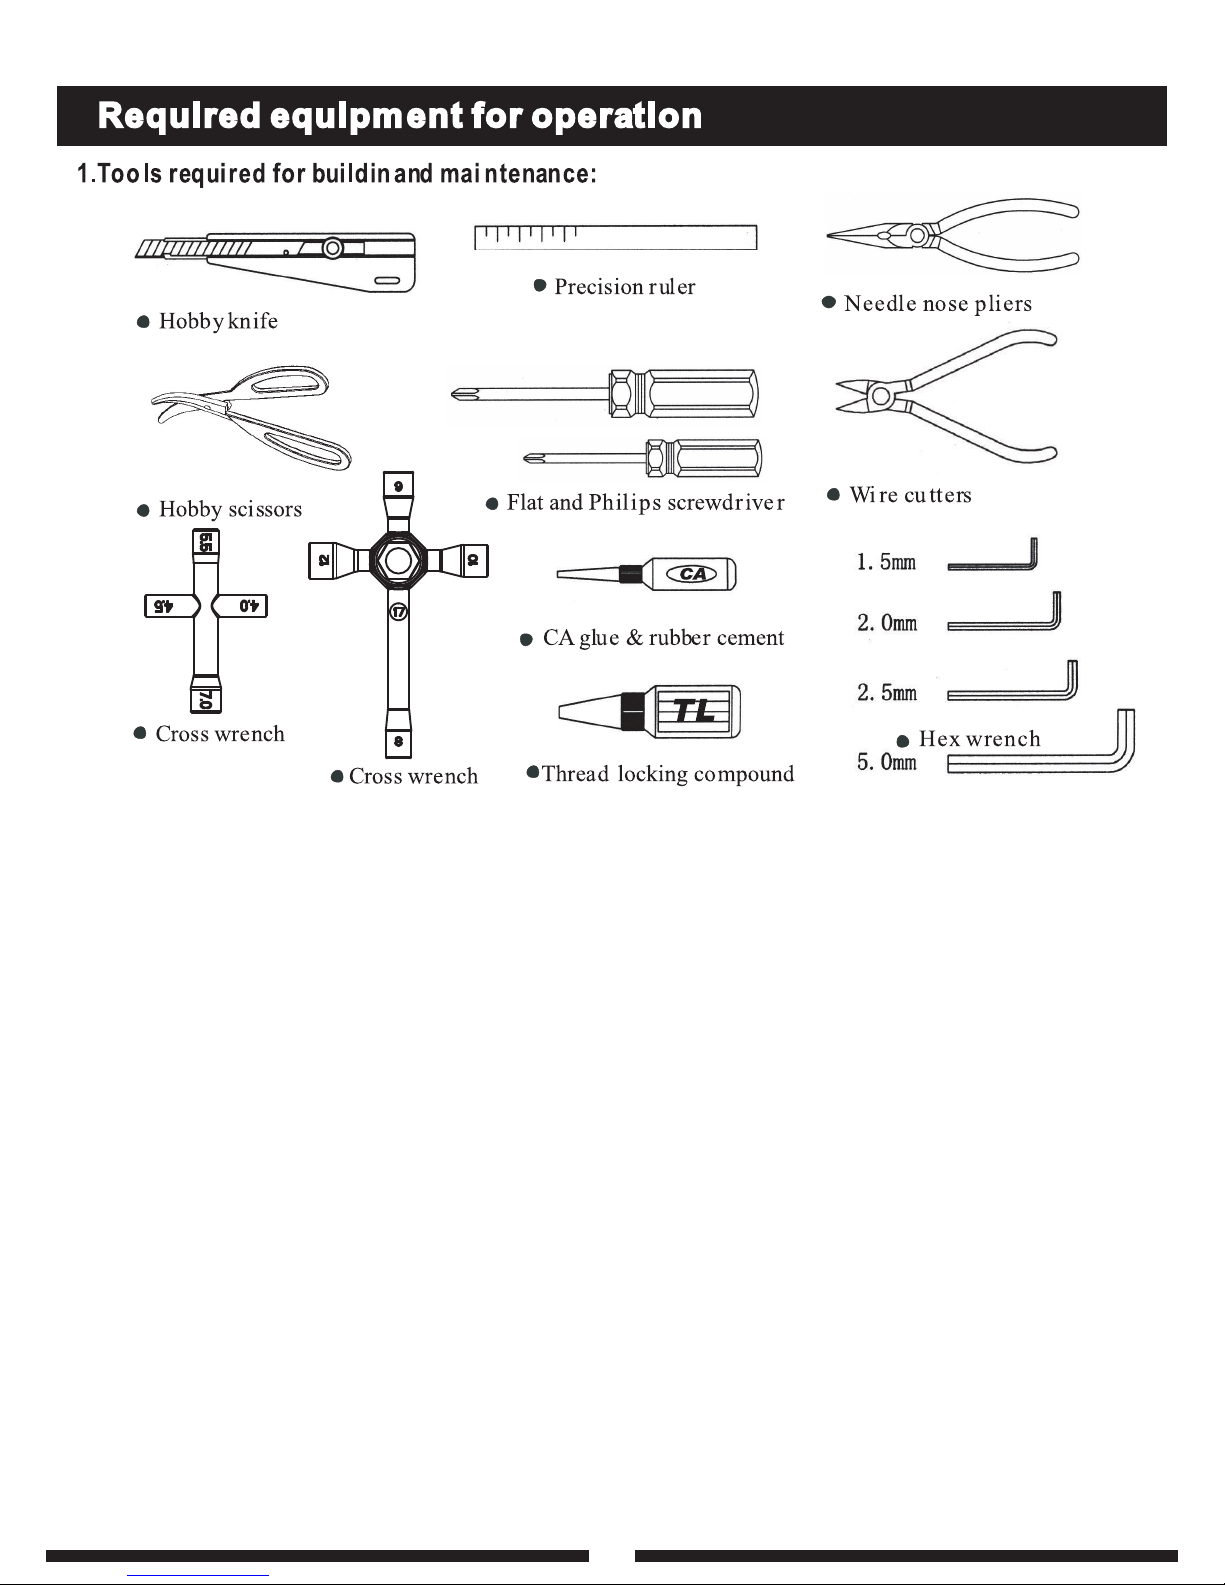
Instruction Manual
Length Width Height Wheelbase Tires size EngineModel no
453mm 320mm 183mm 305mm 100*51mm 18cxp25mm
450mm 320mm 210mm 305mm 100*51mm 18cxp25mm
HI908T
HI905T
HI935T
410mm 320mm 165mm 305mm 100*51mm 18cxp25mm
HI903T
HI933T
Ground
clearance
Warning!
Do not use a power screw driver to install screws into nylon or plastic materials. The fast
locking may heat up the screws being installed that may break the molded parts or strip
the threads during installion.
IMPORTANT!!!
Check all the screw are tight before playing the car!
Use thread lock on all screws that work loose.
02
03
(Not Included)
HTX-242
HTX-RX
04
05
RC Operating Procedures
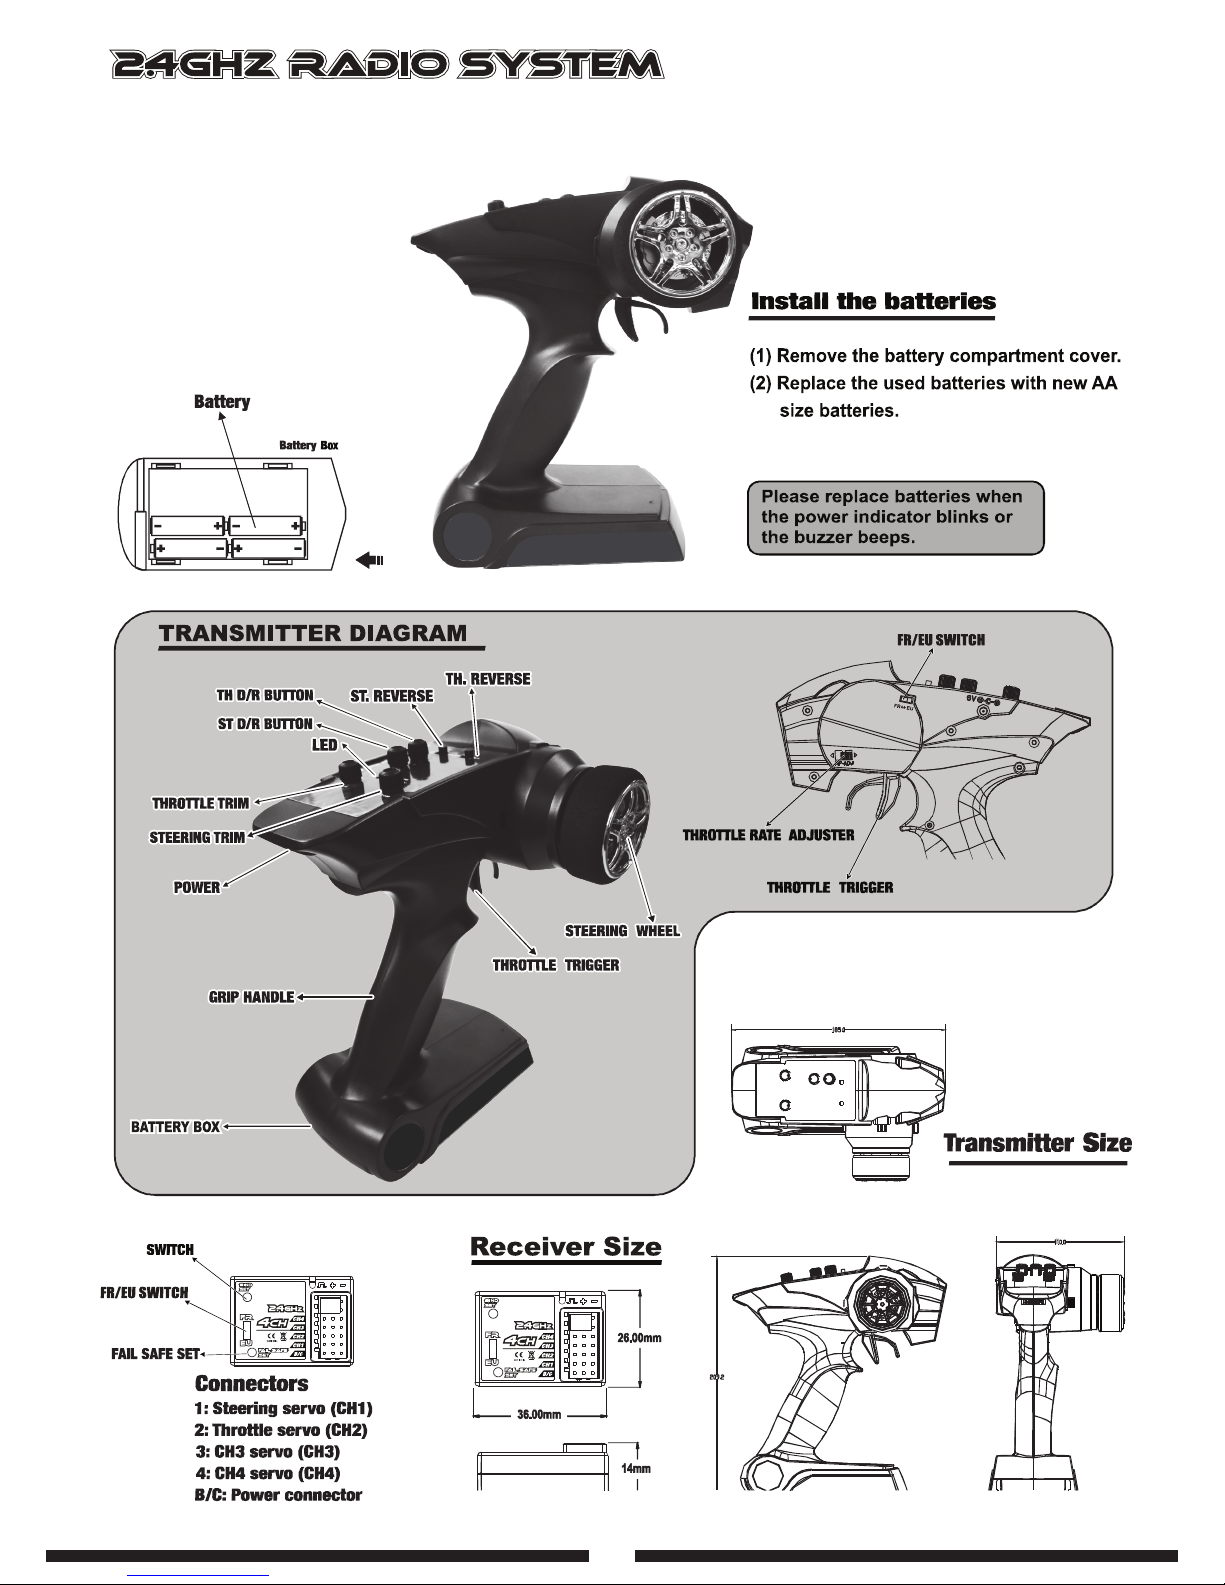
1. Load the battery on the transmitter.
2. Install the charged battery on the car.
3. Turn on the power switch before turning on the receiver.
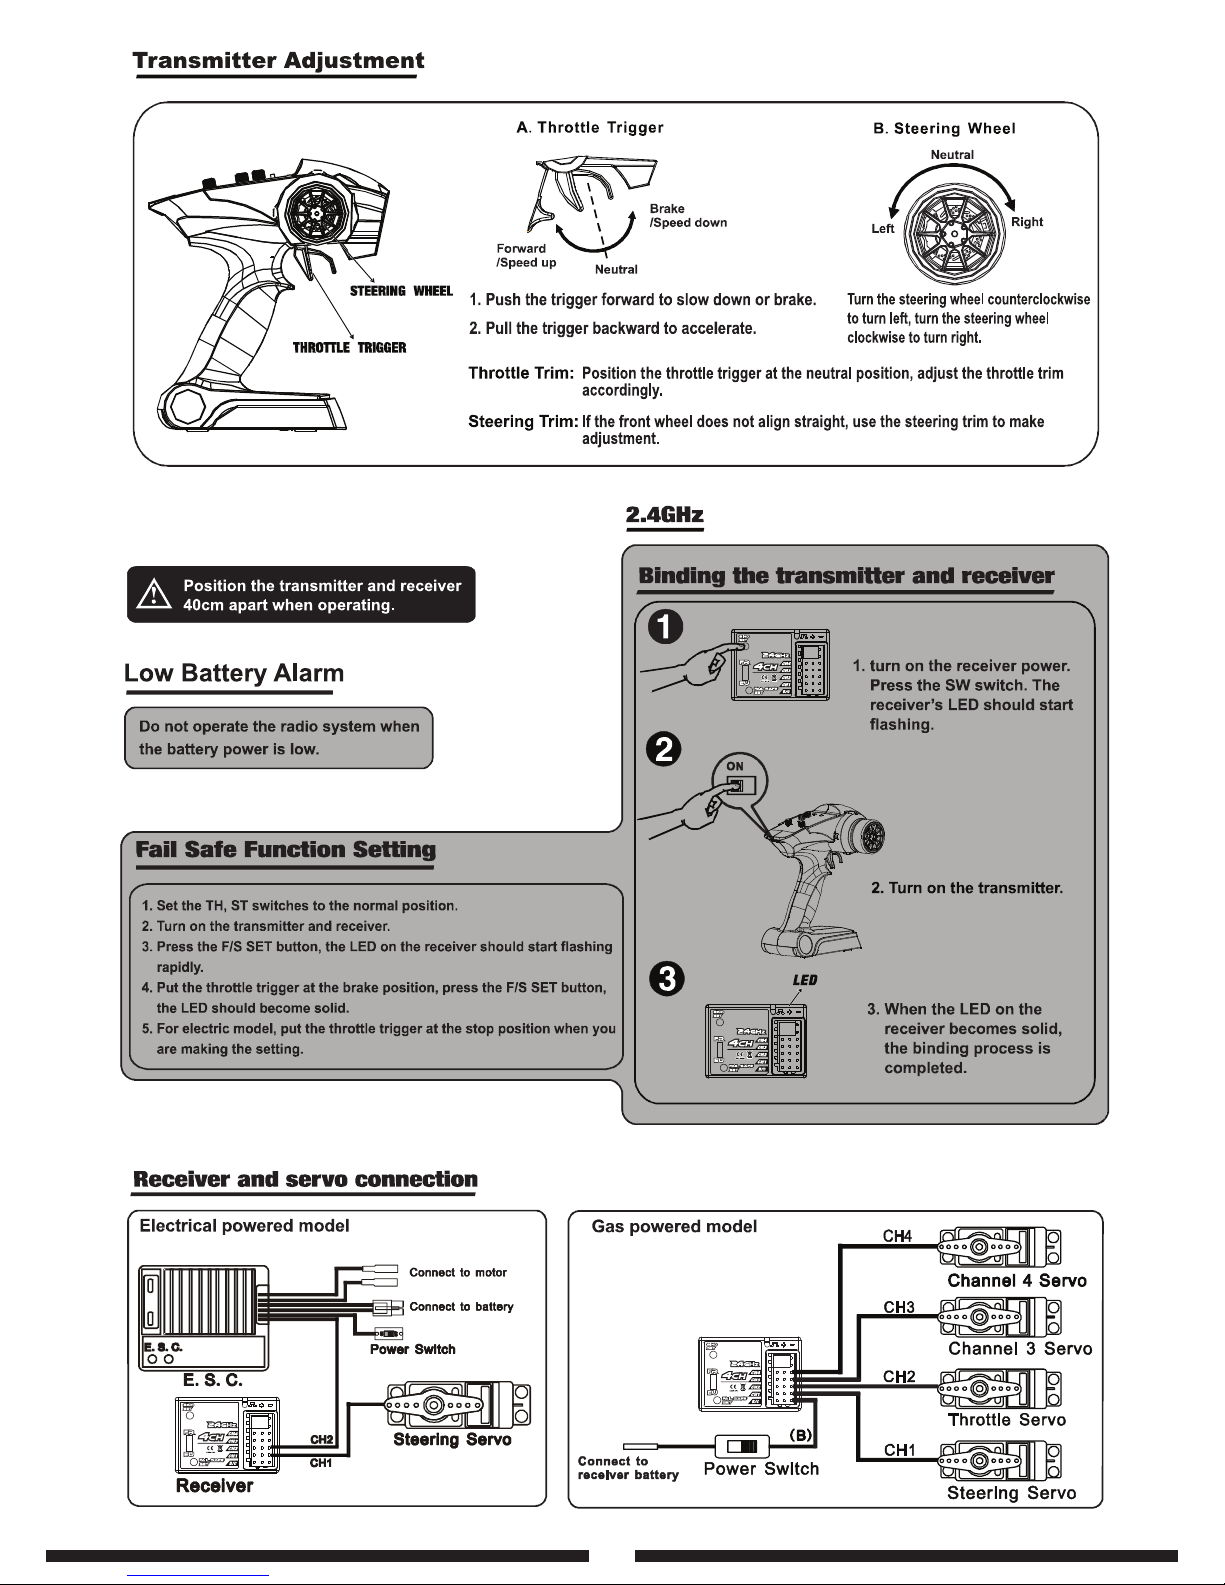
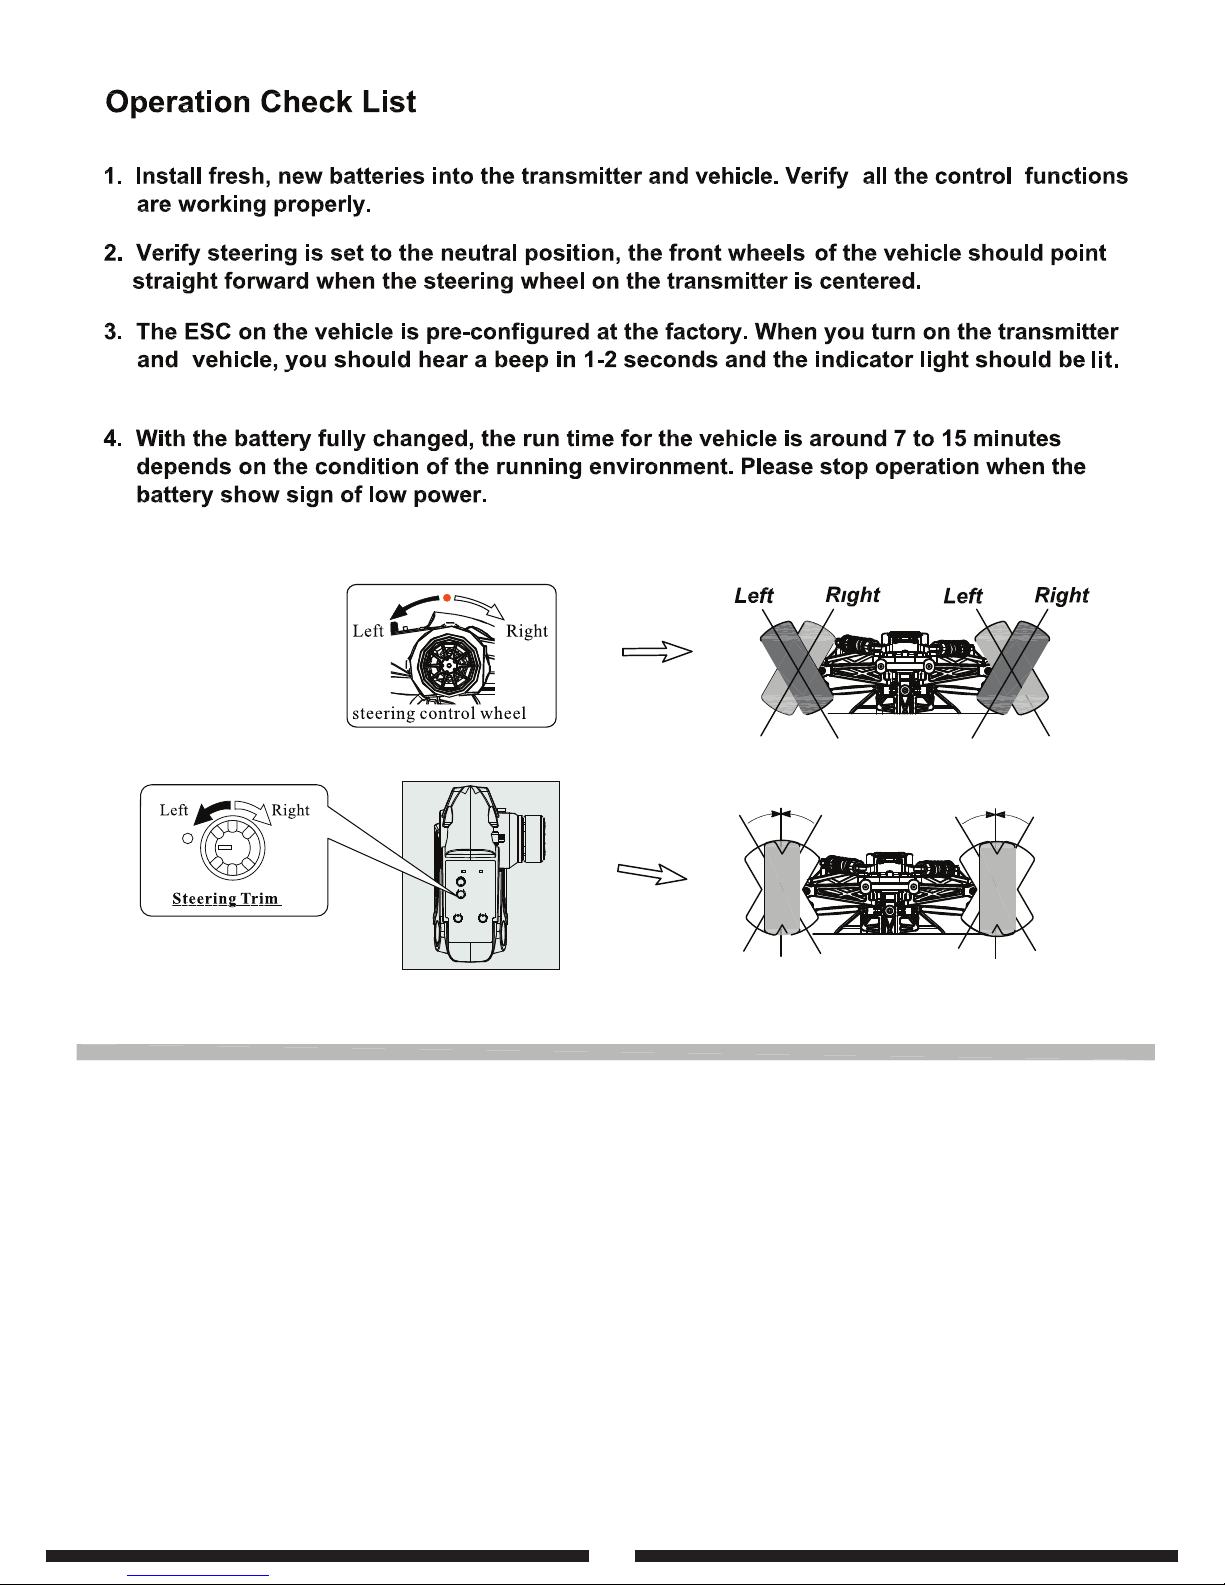
4. Please raise the tires off the ground and check if the control is responding.
5. Hold the throttle trigger to let the car run. If it doesn’t work, please adjust the throttle
servo and trim.
6. Please replace the battery when the speed drops down.
7. When you finish the racing, please switch off the receiver first, and then the transmitter.
8. Please make sure the battery is disconnected and remove it after racing.
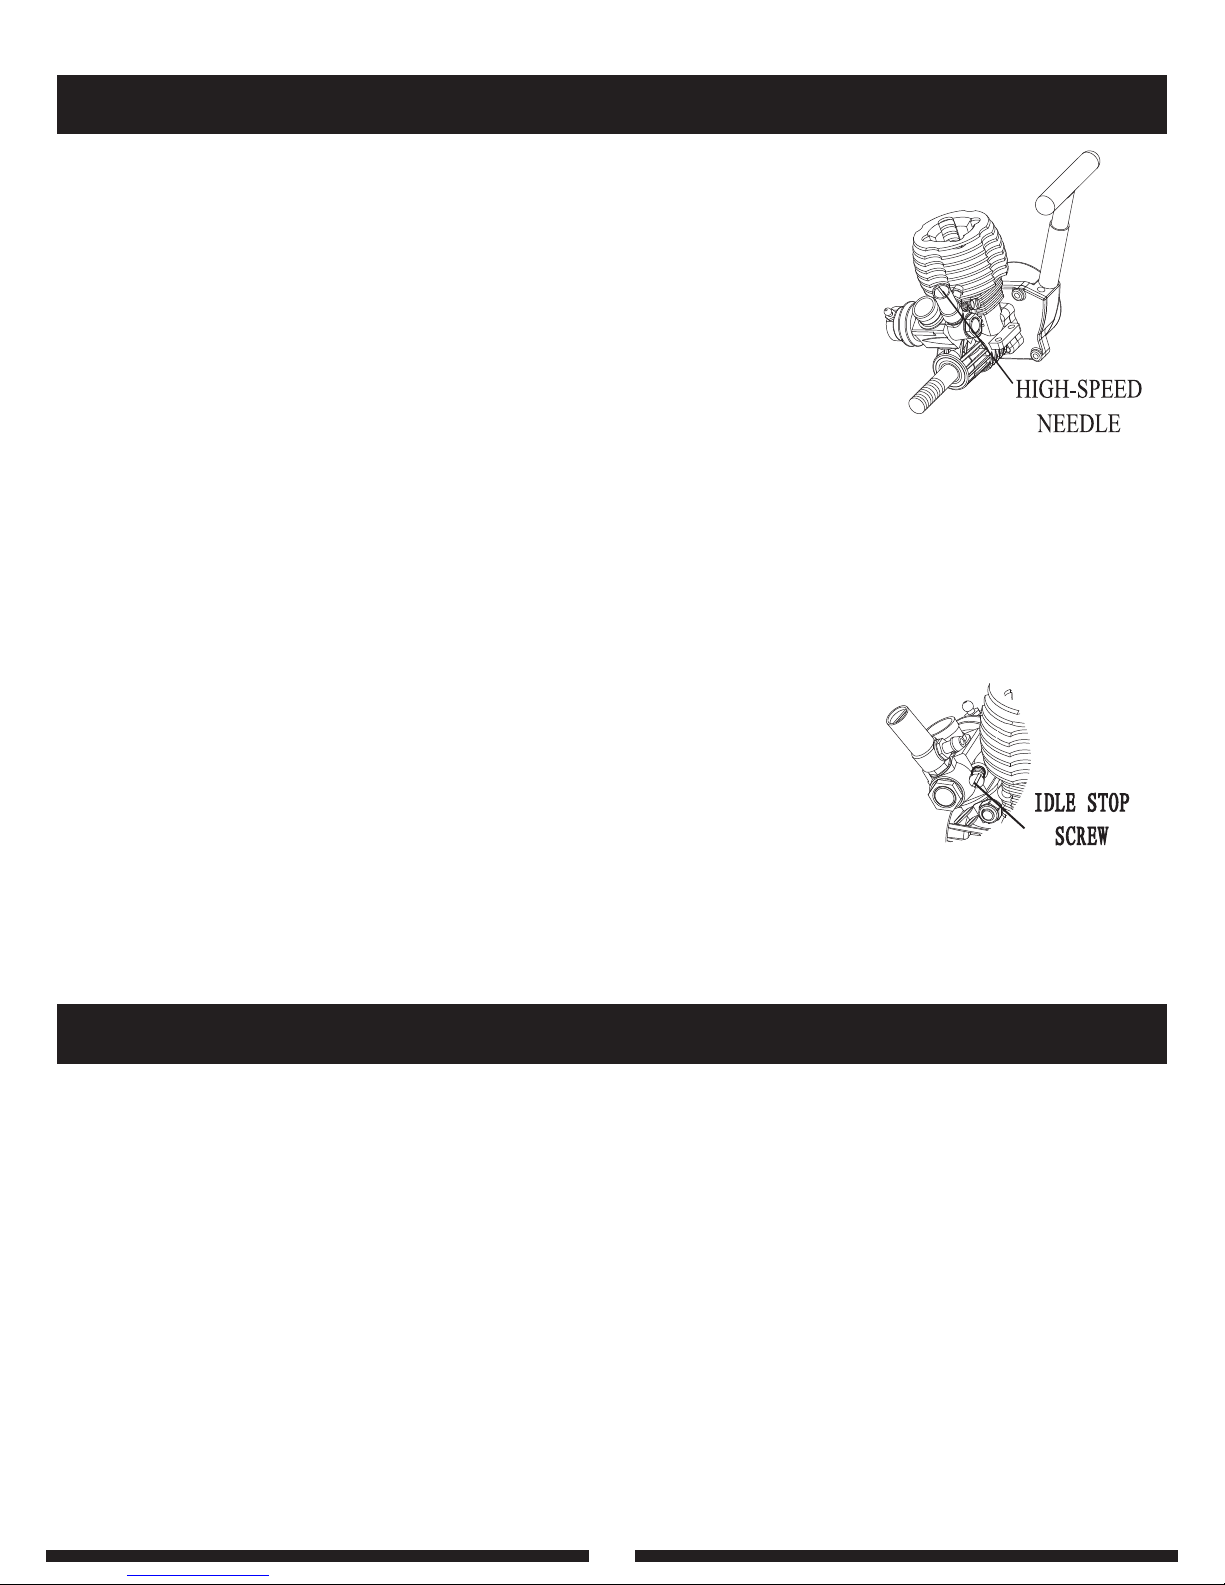
High-speed Needle
The “high-speed” needle is sticking up from the carburetor, This controls
the fuel air mixture of the carburetor. The needle is pre-set for break-in
from the factory at 2-1/2 turns out from fully closed,. Once the engine is
broken-in, the high speed needle would typically run from 2 to 2-1/2 turns
out from closed, depending on the weather, humidity and altitude above
sea level.
To richen the mixture turn the needle counterclockwise, To learn it, turn the
needle clockwise.
The Low- Speed Needle (For 18# engine)
The low-speed needle is the screw in the carb body opposite the throttle arm. It controls the fuel to
air mixture at low throttle settings, There is a simple way of adjusting the low-speed needle correctly
called the ‘pinch test’. With the engine at idle , pinch the fuel line and listen to how the engine speeds
up or slow down. If the engine increases its speed for about 2 or 3 seconds and then loses speed,
The needles is set correctly. If the engine loses RPM quickly, it is set too lean and the lowspeed
needle needs to be opened (counterclockwise) to richen the mixture. Pinch again to check the
mixture. If the engine takes longer than 4 seconds to slow down, lean (clockwise) the low-speed
needle and then pinch again to check the mixture.
Important
To insure long life and good performance from your engine, you MUST break-in the engine. The
break-in period is critical for long life of the internal parts of the engine. This should be done over
the first 5 tanks of fuel.
Starting the Engine
IMPORTANT! Your radio system must ALWAYS be turned on and the transmitter antenna fully
extended when running the engine.
1. Fill th fuel tank.
2. Prepare to start the engine while it is cool, place your finger over the tuned pipe’s exhaust hole
and pull the recoil gently several times. Do not over-prime! Stop when you see fuel in the fuel
line at the crab.
3. Install a “C” alkaline into the glow starter and attach the starter to the glow plug.
4. With the throttle at idle, start the engine by pulling the recoil using short, quick pulls. Do NOT pull
the recoil starter’s string to the end. You only need 10 to 12 inches of pull to start the engine with
the throttle at idle.
Sometimes it is helpful to start the engine at around half throttle. When the engine Starts, immediately
return the throttle to idle. If this is not done the engine can overheat and cause engine damage.
ldle Stop Screw
The ‘idle stop’ screw is located on the backside of the carburetor. This
increases or decreases the idle speed without changing the fuel mixture.
The barrel should be approximately 1mm from fully closed.
Engine Tuning Guide
IRunning The Engine
06

STOPPING THE ENGINE
Pinch the fuel line that runs to the carburetor. Pinching this line will restrict fuel flow and the
engine will quit within a few seconds. Never place your finger over the exhaust to stop the engine.
This could result in serious burns on your finger. It also causes fuel to back up in the engine,
making it harder to start the next time you run your truck,.
IMPORTANT! FIXING A FLOODED ENGINE
If the engine is difficult to turn over with the recoil starter, especially if it is brand new, loosen
the glow plug a half turn before starting the engine. This allows some compression to escape ,
but the engine will still start. Make sure you tighten the glow plug after the engine has started.
If the recoil starter is still difficult to pull, the engine is flooded-there is too much fuel inside the engine.
Remove the glow plug, then turn the buggy upside down and pull the recoil 5 or 6 times. This will
clear the engine of fuel, and you will notice the recoil pulls easier. Place the glow plug and repeat
the starting procedure.
BREAK IN PROCEDURE
SOMETHINGS TO REMEMBER DURING BREAK-IN
1. Run with the body off. This will keep the engine cooler.
2. Keep the air cleaner on at ALL time.
3. Run on a smooth, hard surface. An empty parking lot is Perfect.
4. Use the same fuel that you will use for normal running.
5. Resist the urge to accelerate and decelerate quickly.
6. Break-in puts stress on the glow plug or two on hand.
7. DO NOT overheat the engine. You can check the head temperature
by using one of the temperature gauges.
TANK 1
Your first tank of fuel should be running the truck at a very rich needle valve setting. This allows the
fuelto carry as much oil as possible into the engine to properly lubricate the internal parts during
the break-in.
1. Open the high speed needle valve 4-1/2 turns from fully closed (counterclockwise).
This is factory set already . But check it to make sure. When closing the high-speed needle,
close until you feel some resistance. DO NOT Overtighten it will damage the engine.
2. Fill the fuel tank and start the engine.
3. Run the buggy on smooth surface with the body off.
4. Run back and forth at medium speeds accelerating and decelerating the car.
5. Run the buggy until the tank is almost out of the fuel. Do not allow the tank to run out of fuel
during break-in. This leans out the engine and can cause overheating.
6. Stop the engine and allow it too cool. This noumally takes around 10-15 minutes.
NOTE: if your engine does not stay running consistently, increase the idle speed by turning the idle
stop screw clockwise.
TANK 2
Lean the high-speed needle 1/2 from ‘tank 1’ Run the car for the complete tank and then let it cool.
07
 Loading...