

Page 1

Printed: 20.09.2019 | Doc-Nr: PUB / 5514237 / 000 / 00
BX 3-BT
עברית 1
English 12
Page 2
1
Printed: 20.09.2019 | Doc-Nr: PUB / 5514237 / 000 / 00
Page 3
2
3
4
5
Printed: 20.09.2019 | Doc-Nr: PUB / 5514237 / 000 / 00
Page 4

Printed: 20.09.2019 | Doc-Nr: PUB / 5514237 / 000 / 00
Page 5

BX 3-BT
Printed: 20.09.2019 | Doc-Nr: PUB / 5514237 / 000 / 00
Page 6

he הוראותהפעלהמקוריות . . . . . . . . . . . . . . . . . . . . . . . . . . . . . . . . . . . . . . . . . . . . . 1
en Original operating instructions . . . . . . . . . . . . . . . . . . . . . . . . . . . . . . . . . . . . . . 12
Printed: 20.09.2019 | Doc-Nr: PUB / 5514237 / 000 / 00
Page 7
הוראותהפעלהמקוריות
1נתוניםעלהתיעוד
1.1עלאודותתיעודזה
•קראאתתיעודזהבמלואולפניהשימושהראשון.רקכךניתןלהבטיחעבודהבטוחהונטולתתקלות.
•צייתלהוראותהבטיחותוהאזהרותשבתיעודזהולאלההמצוינותעלהמוצר.
•שמוראתהוראותההפעלהתמידבצמודלמוצר,והקפדלהעביראותןלאדםשאליואתהמעביראתהמוצר.
1.2הסברהסימנים
1.2.1אזהרות
האזהרותמזהירותמפניסכנותבשימושבמוצר.במדריךזהמופיעותמילותהמפתחהבאות:
סכנה
סכנה!
◀מציינתסכנהמיידית,המובילהלפציעותגוףקשותאולמוות.
אזהרה
אזהרה!
◀מציינתסכנהאפשרית,שיכולהלהוביללפציעותגוףקשותאולמוות.
זהירות
זהירות!
◀מציינתמצבשעלוללהיותמסוכןולהוביללפציעותאולנזקיםלרכוש.
1.2.2סמליםבמסמךזה
הסמליםהבאיםמופיעיםבתיעודזה:
קראאתהוראותההפעלהלפניהשימוש
Printed: 20.09.2019 | Doc-Nr: PUB / 5514237 / 000 / 00
*2209576*
הנחיותלשימושומידעשימושינוסף
טיפולנכוןבחומריםלמיחזור
איןלהשליךלפסולתהביתיתמכשיריםחשמלייםוסוללות
1.2.3סמליםבאיורים
הסמליםהבאיםמשמשיםבאיורים:
מספריםאלהמפניםלאיורהמתאיםבתחילתחוברתההוראות
המספריםבאיוריםמשקפיםאתרצףהפעולות,והםעשוייםלהיותשוניםמרצףהפעולותהמצוינותבטקסט
מספריהפריטיםמופיעיםבאיורסקירהותואמיםאתהמספריםבמקראבפרקסקירתהמוצר
סימןזהאמורלעורראתתשומתלבךהמיוחדתבעתהשימושבמוצר.
1.3סמליםספציפייםלמוצר
1.3.1סמליםעלהמוצר
הסמליםהבאיםעשוייםלהופיעעלהמוצר:
סימןפעולתחובה
השתמשבמגניעיניים
2209576 עברית 1
Page 8
השתמשבמגנישמיעה
השתמשבקסדתמגן
זרםישר
המכשירתומךבטכנולוגייתNFC,התואמתאתפלטפורמותiOSו-Android.
סדרתדגמיסוללותליתיום-יוןשלHiltiשבשימוש.שיםלבלנתוניםבפרקשימושבהתאםלייעוד.
לעולםאיןלהשתמשבסוללהכפטיש.
איןלהפילאתהסוללה.איןלהשתמשבסוללהשנחבטהאושניזוקהבאופןאחר.
1.4פרטיהמוצר
נתוניהמוצר
דגם:BX 3-BT
דור:02
מספרסידורי:
1.5הצהרתתאימות
Hilti Entwicklungsgesellschaft mbH | Zulassung Geräte | Hiltistraße 6 | 86916 Kaufering, DE
המוצריםשלמיועדיםלמשתמשהמקצועי,ורקאנשיםמורשים,שעברוהכשרהמתאימה,רשאיםלתפעל,לתחזק
ולתקןאותם.אנשיםאלהחייביםללמודבאופןמיוחדאתהסכנותהאפשריות.המוצרהמתוארוהעזריםשלועלוליםלהיותמסוכנים
כאשראנשיםשלאעברוהכשרהמתאימהמשתמשיםבהםבאופןלאמקצועיאוכאשרמשתמשיםבהםשלאבהתאםלייעוד.
שםהדגםוהמספרהסידורימצויניםעללוחיתהדגם.
◀רשוםאתהמספרהסידוריבטבלההבאה.בכלפנייהלנציגינואולמעבדתשירותישלצייןאתנתוניהמוצר.
אנומצהיריםבאחריותנוהבלעדיתכיהמוצרהמתוארכאןתואםאתהתקנותוהתקניםהתקפים.בסוףתיעודזהישנוצילוםשל
הצהרתהתאימות.
התיעודהטכנישמורכאן:
2 עברית 2209576
Printed: 20.09.2019 | Doc-Nr: PUB / 5514237 / 000 / 00
2בטיחות
2.1הוראותבטיחותכלליותלכליעבודהחשמליים
אזהרה!קראאתכלההנחיותוהוראותהבטיחות.איציותלהוראותהבטיחותולהנחיותעלוללהוביללהתחשמלות,לשרפה
ו/אולפציעותקשות.
שמוראתכלהוראותהבטיחותוההנחיותלעיוןבעתיד.
בטיחותבמקוםהעבודה
◀שמורעלאזורהעבודהשלךנקיודאגלתאורהמספקת.חוסרסדראותאורהלקויהבמקוםהעבודהעלוליםלגרום
לתאונות.
◀איןלהפעילאתכליהעבודההחשמליבסביבהשקיימתבהסכנתפיצוץאושישנםבהנוזלים,גזיםאואבקדליקים.
כליעבודהחשמלייםיוצריםניצוצות,שעלוליםלהציתאתהאבקאוהאדים.
◀הרחקילדיםואנשיםאחריםמכליהעבודההחשמליבמהלךהשימושבו.אםדעתךתוסחאתהעלוללאבדאתהשליטה
במכשיר.
בטיחותבחשמל
◀מנעמגעשלהגוףבמשטחיםמוארקים,כגוןצינורות,גופיחימום,תנוריםומקררים.קיימתסכנהגבוההלהתחשמלות
כאשרהגוףשלךמוארק.
◀הרחקכליעבודהחשמלייםמגשםאורטיבות.חדירתמיםלכליהעבודההחשמלימגדילהאתהסיכוןלהתחשמלות.
בטיחותשלאנשים
◀היהערני,שיםלבלמהשאתהעושה,ופעלבתבונהכאשראתהעובדעםכליעבודהחשמלי.אלתפעילכליעבודה
חשמלייםכשאתהעייףאותחתהשפעתסמים,אלכוהולאותרופות.דיברגעאחדשלחוסרתשומת-לבבזמןהשימוש
בכליהעבודההחשמליכדילגרוםפציעותקשות.
*2209576*
Page 9

◀לבשתמידציודמגןומשקפימגן.לבישתציודמגןאישי,כגוןמסכתאבק,נעליבטיחותמונעותהחלקה,קסדתמגןאו
מגנישמיעה–בהתאםלסוגהשימושבכליהעבודההחשמלי–מקטינהאתהסיכוןלפציעות.
◀מנעהפעלהבשוגג.לפנישאתהמחבראתהסוללה,מריםאונושאאתכליהעבודההחשמליודאשהואכבוי.אלתניח
אתאצבעךעלהמתגבזמןשאתהנושאאתהמכשירואלתחבראותולאספקתהחשמלכאשרהואמופעל,אחרתעלולות
להיגרםתאונות.
◀הרחקכליכוונוןאומפתחותברגיםלפנישאתהמפעילאתכליהעבודההחשמלי.כליעבודהאומפתחותהנמצאים
בקרבתחלקיםמסתובביםעלוליםלגרוםפציעות.
◀הימנעמתנוחותגוףלאנכונות.עמודבאופןיציבושמורתמידעלשיווימשקל.כךתוכללשלוטטוביותרבכליהעבודה
החשמליבמצביםלאצפויים.
◀לבשבגדיםמתאימים.אלתלבשבגדיםרחביםאותכשיטים.הרחקאתהשער,הבגדיםוכפפותמחלקיםנעים.בגדים
רופפים,תכשיטיםושיערארוךעלוליםלהיתפסבחלקיםנעים.
◀כאשרניתןלהתקיןהתקנישאיבתאבקולכידהישלוודאשהםמחובריםלחשמל,וישלהקפידלהשתמשבהםבצורה
נכונה.שימושבהתקןשאיבתאבקמקטיןאתהסכנותהנובעותמהאבק.
שימושוטיפולבכליהעבודההחשמלי
◀אלתפעילעומסרבמדיעלהמכשיר.השתמשבכליהעבודההחשמליהמתאיםלעבודהשאתהמבצע.כליהעבודה
החשמליהמתאיםמבטיחלךעבודהטובהובטוחהיותרבתחוםההספקהנקוב.
◀אלתשתמשבכליהעבודהאםהמתגשלואינותקין.כליעבודהחשמלישלאניתןעודלהפעילאולכבותאותומהווה
סכנהוישלתקנו.
◀לפניביצועכווניםבמכשיר,החלפתאביזראואפסוןהמכשירהקפדלהסיראתהסוללה.אמצעיזהירותזהמונע
הפעלהבשוגגשלכליהעבודההחשמלי.
◀שמורכליעבודהחשמלייםשאינםבשימושהרחקמהישגידםשלילדים.אלתאפשרלאנשיםשאינםיודעיםכיצד
להשתמשבמכשיראושלאקראואתההוראותלהשתמשבמכשיר.כליעבודהחשמלייםהםמסוכניםכאשרמשתמשים
בהםאנשיםחסריניסיון.
◀טפלבכליהעבודההחשמליבקפדנות.בדוקאםהחלקיםהנעיםפועליםבצורהחלקהואינםנתקעים,אםישנםחלקים
שבוריםאומקולקליםהמשבשיםאתהפעולההתקינהשלכליהעבודההחשמלי.לפניהשימושבמכשירדאגלתיקון
חלקיםלאתקינים.תאונותרבותנגרמועקבתחזוקהלקויהשלכליעבודהחשמליים.
◀שמורעלכליהחיתוךחדיםונקיים.כליחיתוךמטופליםהיטב,שלהביהםחדיםנתקעיםפחותוקליםיותרלתפעול.
◀השתמשבכליהעבודההחשמלי,באביזרים,בכליהעבודההנוספיםוכןהלאהבהתאםלהוראותאלה.התחשבבתנאי
העבודהובפעולהשעליךלבצע.שימושבכליהעבודההחשמלילמטרותאחרותמאלהשלשמןהואמיועדעלוללהיות
מסוכן.
שימושוטיפולבכליעבודהנטענים
◀טעןאתהסוללותרקבמטעניםשהומלצועלידיהיצרן.טעינהשלסוללהבמטעןהמיועדלטעינהשלסוללותמסוגאחר
עלולהלגרוםלשרפה.
◀השתמשלשםכךרקבסוללותהמתאימותלכליהעבודההחשמלי.שימושבסוללותאחרותעלוללגרוםלשרפות.
◀שמורסוללותשאינןבשימושהרחקממהדקיניירמשרדיים,ממטבעות,מפתחות,מסמרים,ברגיםאוחפציםמתכתיים
קטניםאחריםשיכוליםלגשרביןהמגעים.קצרביןמגעיהסוללהעלוללגרוםלכוויותאולשרפה.
◀שימוששגויעלוללגרוםלדליפתנוזליםמהסוללה.אלתיגעבנוזליםאלה.נוזלסוללותשדלףעלוללגרוםלגירוייםבעור
ולכוויות.אםנגעתבובמקרה,שטוףאתהאזורבמים.אםהנוזלנוגעבעיניים,פנהלרופא.
שירות
◀דאגלתיקוןכליהעבודההחשמלישלךרקבידיטכנאיםמוסמכים,המשתמשיםבחלקיחילוףמקורייםבלבד.כךתבטיח
שמירהעלבטיחותהעבודהבמכשיר.
Printed: 20.09.2019 | Doc-Nr: PUB / 5514237 / 000 / 00
*2209576*
2.2הוראותבטיחותעבוראקדחיחיבור
◀עליךלהניחתמידכיישנןסיכותבכליהעבודההחשמלי.שימושקלדעתבאקדחהחיבורעלוללגרוםליריבלתיצפוישל
סיכותולפציעות.
◀אלתכווןאתכליהעבודההחשמלילכיוונךאולכיווןאנשיםאחרים.יריבשוגגיגרוםלשחרורהסיכה,מהשעלוללגרום
לפציעות.
◀איןלהפעילאתכליהעבודההחשמלילפנישהואמוצמדבחוזקהלחלקשבעבודה.אםאיןמגעביןכליהעבודההחשמלי
לחלקשבעבודה,הסיכהעלולהלהיהדףמהמקום.
◀אםנתקעהסיכהבכליהעבודההחשמליישלנתקאתכליהעבודההחשמלימהחשמלאומהסוללה.בעתהוצאתסיכה
תקועהמהאקדחבזמןשהואמחוברלאספקתחשמלעלולהלהתרחשירייהבשוגג.
◀היהזהירבעתהוצאתסיכהתקועה.המערכתעשויהלהיותדרוכה,כךשהסיכהתיפלטבעוצמהבזמןשאתהמנסה
לשחרראתההיתקעות.
◀בעתחיבורקוויחשמלישלוודאשהמתחאליהםמנותק.אחוזרקבאזוריהאחיזההמבודדיםבאקדחהעבודה.השתמש
רקבסיכותהמתאימותלהתקנתקוויחשמל.ודאשהסיכהאינהפוגעתבבידודשלקוהחשמל.סיכהשפגעהבבידוד
שלכבלהחשמלעלולהלגרוםלהתחשמלותולשרפה.
2209576 עברית 3
Page 10
2.3הוראותבטיחות
הערותבטיחותבסיסיות
אזהרה!קראאתכלההנחיותוהוראותהבטיחות.איציותלהוראותהבטיחותולהנחיותעלוללהוביללהתחשמלות,לשרפה
ו/אולפציעותקשות.
שמוראתכלהוראותהבטיחותוההנחיותלעיוןבעתיד.
דרישותמהמשתמש
◀
רקמישהוסמךלכךועברהכשרהמתאימהרשאילתפעלולתחזקאתהמכשיר.
ציודמגןאישי
◀אתהוהאנשיםבקרבתמקוםצריכיםללבושמשקפימגןוקסדהבזמןהשימוש.
◀לבשבמגנישמיעה.
⇦רעשיםחזקיםמדיעלוליםלפגועבשמיעה.
בטיחותשלאנשים
◀צייתלהנחיותההפעלה,הטיפולוהתחזוקההמצוינותבהוראותההפעלה.
◀היהערני,שיםלבלמהשאתהעושה,ופעלבתבונהכאשראתהעובדעםאקדחימסמרים.אלתשתמשבמכשירכאשראתה
עייףאותחתהשפעתסמים,אלכוהולאותרופות.הפסקלעבודאםאינךחשבטובאושישלךכאבים.דיברגעאחדשל
חוסרתשומתלבבעתהשימושבמכשירכדילגרוםלפציעותקשות.
◀עבודתמידבתנוחהנוחה.עמודבאופןיציבושמורתמידעלשיווימשקל.
◀ערוךהפסקותבעבודהכמוגםתרגיליהרפיהותרגיליאצבעותכדילשפראתזרימתהדםלאצבעותיך.
◀לבשנעליעבודהמונעותהחלקה.
◀שמורעלזרועותמכופפות)לאמתוחות(בזמןהעבודהבמכשיר.
◀הרחקאנשיםאחרים,ובמיוחדילדים,מטווחהפעולהבמהלךהעבודה.
טיפולושימושקפדנייםבכליעבודהלהתקנות
אזהרה!סכנהעקבבורגשחודרלגמריאתהחומר!לפניההחדרהשלבורגימתכתישלוודאשאישאינונמצאמאחורי
החלקשאליומחדיריםאתבורגהמתכת.
◀השתמשבמכשירהמתאיםלעבודהשלך.איןלהשתמשבמכשירלמטרותשלאלשמןהואיועד,אלארקבהתאםלייעודו
וכשהואתקיןלגמרי.
◀איןלהשאירמכשירטעוןללאהשגחה.
◀ישלהובילאולאחסןאתהמכשיררקבמזוודהמאובטחת.
◀ישלהקפידלכבותאתהמכשירלפניביצועעבודותניקוי,טיפולותחזוקה,לפניהחלפתמוליךהמסמריםוכןלאחרהפסקת
העבודהאולפניאחסון.
◀מכשיריםשאינםבשימושישלאחסןפרוקיםבמקוםסגור,הרחקמהישגידשלילדים.
◀ישלבדוקאתהמכשירוהאביזריםלאיתורנזקיםאפשריים.בדוקשהחלקיםהנעיםפועליםבצורהתקינהלגמריואינם
נתקעיםאופגומים.
⇦כדילהבטיחעבודהתקינהשלהמכשירכלהחלקיםחייביםלהיותמותקניםבצורהנכונהוכלהתנאיםחייביםלהתמלא.
חלקיםשניזוקוישלהביאלתיקוןאולהחלפהבמעבדתשירותשלHilti,אלאאםצויןאחרתבהוראותההפעלה.
◀לפניתחילתהעבודהבדוקאתאזורהעבודהכדילאתרקוויחשמלוצינורותגזאומיםמוסתרים;השתמשלכך,לדוגמה,
בגלאימתכות.חלקיםמתכתייםחיצונייםשלהמכשירעלוליםלהוליךחשמלבמקרהשתפגעבטעותכבלחשמל.
◀איןלהחדירבורגימתכתלחומרשאינומתאים.
⇦חומריםלאמתאימיםהםזכוכית,שיש,פלסטיק,ארד,פליז,נחושת,חומריבידוד,לבניםחלולות,לבניקרמיקה,פחים
דקים)>4מ"מ(ובטוןגז)איטונג(.החדרהלחומריםאלהעלולהלגרוםלשבירה,לפיצוץשלהחומראולחדירהמלאה
דרךהחומר.
◀לחץעלההדקרקכאשרהמכשירמוצמדבזוויתישרהלגמרילחומר.
◀בעתהחדרהישלהחזיקאתאקדחהמסמריםבזוויתישרהלחומר,כדילמנועסטייהשלבורגיהמתכתמהחומר.
◀שמורעלידיותהאחיזהיבשות,נקיותוללאשמןאוגריז.
◀מנענפילהשלהמכשיר.
◀איןלהשתמשבמכשירבמקומותשקיימתבהםסכנהלשרפהאולפיצוץ,אלאאםהתקבלאישורמיוחד.
◀חבראתרכיביX-BTרקבקדחיםשנקדחומראש.
מקוםהעבודה
◀שמורעלסדרבמקוםהעבודהשלך.הרחקמסביבתהעבודהחפציםשעלוליםלפצועאותך.
⇦אי-סדרבמקוםהעבודהעלוללגרוםלתאונות.
◀דאגלתאורהטובהולאוורורטובבאזורהעבודה.
אמצעיבטיחותמכניים
◀איןלבצעכלמניפולציהאושינויבמכשיר,ובמיוחדלאבבריח.
◀ישלהשתמשרקבבורגימתכתשאושרוויועדולמכשירזה.
4 עברית 2209576
Printed: 20.09.2019 | Doc-Nr: PUB / 5514237 / 000 / 00
*2209576*
Page 11

אמצעיבטיחותתרמיים
◀איןלחרוגמתדירותההחדרההמרביתהמומלצת)ראההפרקנתוניםטכניים(.
◀אםהמכשירהתחמםמדי,ישלאפשרלולהתקרר.
◀איןלפרקאתהמכשירכאשרהואחם.אפשרלמכשירלהתקרר.
2.4טיפולושימושקפדנייםבסוללותנטענות
◀צייתלתקנותהנוגעותלהובלה,אחסוןוהפעלהשלסוללותנטענותמסוגליתיום-יון.
◀הרחקאתהסוללותממקומותחמיםמאוד,מקרינתשמשישירהומאש.
◀איןלפרק,למעוך,לחמםלטמפרטורהגבוההמ-80°Cאולשרוףאתהסוללותהנטענות.
◀אןלהשתמשאולטעוןסוללותשקיבלומכה,שנפלומגובהגבוהממטראושניזוקובאופןאחר.במקרהכזהישליצורקשר
עםהשירותשלHilti.
◀אםהסוללהחמהכלכךשלאניתןלגעתבה,ייתכןשהיאאינהתקינה.העמדאתהמוצרבמקוםלאדליקבמרחקמספיק
מחומריםדליקים,כךשתוכללהשגיחעלהסוללה,ואפשרלהלהתקרר.במקרהכזהישליצורקשרעםהשירותשלHilti.
3תיאור
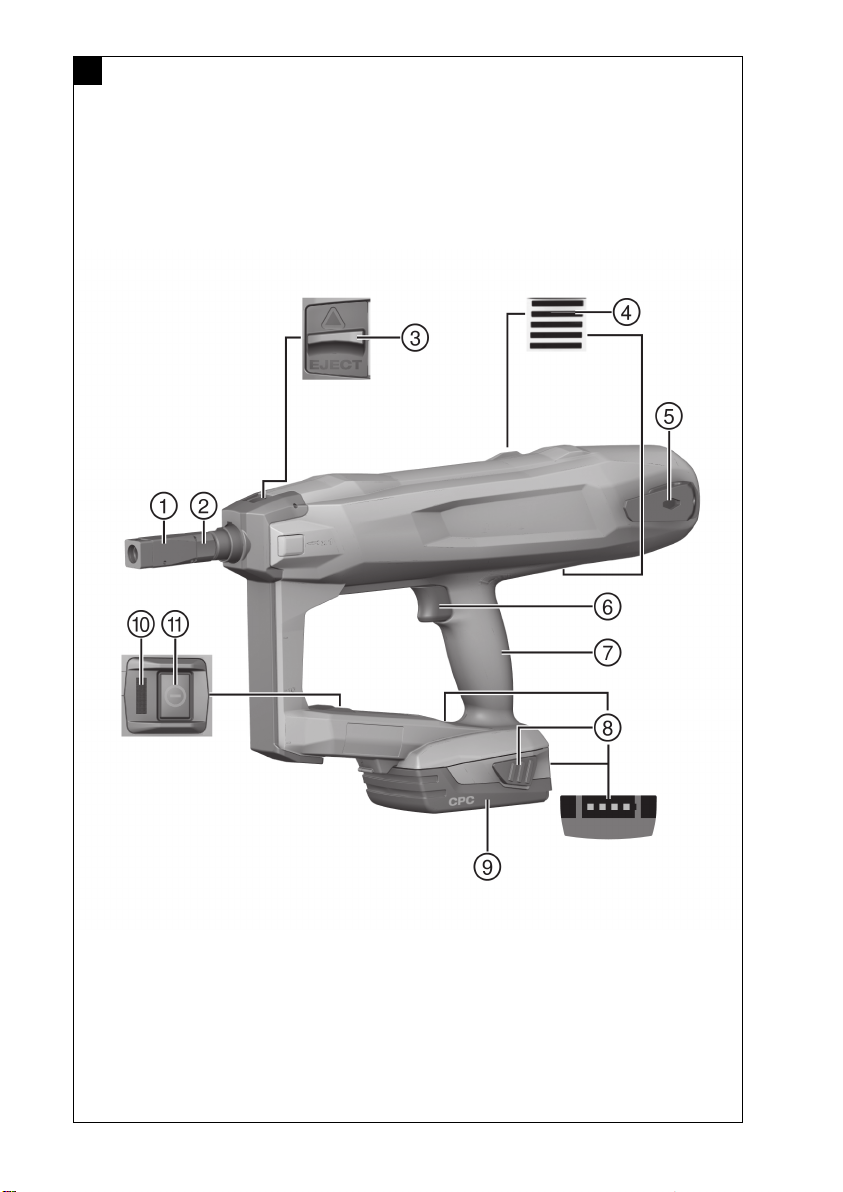
3.1סקירתהמוצר1
מוליךמסמרים)סדרהXFG B3(
@
הגדרתעומקהחדרה
;
נעילתמוליךהמסמרים
=
חריציאוורור
%
תפסלחגורה
&
הדק
(
ידיתאחיזה
)
לחצנישחרורעםפונקציהנוספתשלחיווימצב
+
טעינה
סוללתליתיום-יון
§
חיווימצב
/
לחצןהדלקה/כיבוי
:
Printed: 20.09.2019 | Doc-Nr: PUB / 5514237 / 000 / 00
*2209576*
3.2שימושבהתאםלייעוד
מוצרזההואאקדחמסמריםידני,המופעלבאמצעותסוללה.הואמיועדלהחדרתבורגימתכת)X-BT(בפלדה.השתמשרק
במוטותתבריגבשילובעםמוליךהמסמריםהייעודי.
אקדחהמסמרים,הסוללההנטענתובורגיהמתכתמהוויםיחידהטכניתאחת.השתמשבמוטותהתבריגשלHiltiשיוצרובמיוחד
עבורמכשירזהובמטעניםובסוללותהמומלציםשלHilti.המלצותהעבודהוהשימוששלHiltiתקפותרקכשמקפידיםעל
תנאיםאלה.
◀אקדחהמסמריםמיועדלשימושידניבלבד.
◀ישלמנועשימוששגוי.כאשריוריםבאקדחכשאיןרכביXBTבמוליךהמסמריםזהנחשבלשימוששגוי.
◀השתמשעבורמוצרזהרקבסוללותליתיוםיוןשלHiltiמסדרתהדגמיםB 22.
◀השתמשעבורסוללהזורקבמטעניםשלHiltiמסדרתהדגמיםC 4/36.
3.3Bluetooth
המוצרכוללממשקBluetooth.כאשרישנהסוללהבמכשירוהמכשירמופעל,תתאפשרתקשורתBluetooth.
מרגעשהמכשירעוברלמצבהמתנהאולאחרשאקדחהמסמריםכובהבאמצעותלחצןההפעלה/כיבוי,תקשורתהנתוניםתמשיך
עודשלוששעות.
כדילבטלבאופןיזוםאתBluetoothישללחוץעללחצןההפעלה/כיבוילמשך5שניותרצופותלפחות,עדשהנוריתמהבהבת
פעמייםבכחול.
לאחרהוצאתהסוללהלאישודרועודנתונים.
Bluetoothאינוזמיןבכלהשווקים.
2209576 עברית 5
Page 12

3.4חיווימצב
חיוויהמצבמציגמידעעלמצביאקדחהמסמרים.
מצבמשמעות
כבויאקדחהמסמריםכבוי
הנוריתמאירהבירוק.אקדחהמסמריםדולקומוכןלהחדרה
תפעילאתהמכשיר
התקלות
הנוריתמהבהבתכל3שניותבירוק.אקדחהמסמריםנמצאבמצבהמתנה,לחיצתקנההמכשיר
הנוריתמהבהבתללאהפסקהבירוק.אקדחהמסמריםחםמדיאוהסוללהחלשה,ראהטבלת
הנוריתמהבהבתבאדום.תקלהבמכשיר,ראהטבלתהתקלות
הנוריתמאירהבאדום.תקלהבמכשיר,ראהטבלתהתקלות
הנוריתמהבהבתבצהוב.הבאאתהמכשירלמעבדתשירותשלHilti.
3.5חיווירמתטעינתהסוללה
בעתלחיצהעללחצןשחרורהסוללהתוצגרמתהטעינהשלהסוללה.
במהלךהחדרהומידלאחריההמידעעלרמתהטעינהלאיהיהאמין.
מצבמשמעות
כלארבעהנוריותמאירותבירוק.רמתהטעינההיא75%עד100%.
שלושנוריותמאירותבירוק.רמתהטעינההיא50%עד75%.
שתינוריותמאירותבירוק.רמתהטעינההיא25%עד50%.
נוריתאחתמאירהבירוק.רמתהטעינההיא10%עד25%.
נוריתאחתמהבהבתבירוק.רמתהטעינהנמוכהמ-10%.
3.6מפרטאספקה
אקדחמסמריםBX 3-BT,מוליךמסמריםXFG B3סטנדרטי,הוראותהפעלה.
מוצריםנוספיםהמאושריםעבורהמוצרשלךתמצאבמרכזשיווקשלHiltiאובאינטרנטבכתובת:www.hilti.com
4.0ק"ג
4.1ק"ג
B 22/3.0 LiIon (01)
4.2ק"ג
4.3ק"ג
4.6ק"ג
31מ"מ
12מ"מ
50ניוטון…70ניוטון
650/שעה
21.6וולט
2,400מגההרץ…
2,483.5מגההרץ
dBm−11.9
6 עברית 2209576
Printed: 20.09.2019 | Doc-Nr: PUB / 5514237 / 000 / 00
B 22/4.0 Li-Ion
B 22/5.2 Li-Ion (01)
B 22/8.0 Li-Ion
8מ"מ…10מ"מ
℃−15…℃50
℃−10…℃50
4נתוניםטכניים
4.1אקדחמסמרים
משקללפיEPTA Procedure 01כוללסוללהB 22/2.6 LiIon (02)
אורךפין/בורג
קוטרתבריג
מהלךלחיצה
כוחלחיצה
טמפרטורתעבודה)טמפרטורתסביבה(
טמפרטורתעבודהפיניםוברגים
תדירותהחדרהמומלצת
מתחנקוב
תדר
הספקשידורמקסימלי
*2209576*
Page 13

4.2סוללה
21.6וולט
℃−17…℃60
℃−20…℃40
℃−10…℃45
dB105
dB94
dB3
2.2מ'/שנ'²
1.5מ'/שנ'²
מתחעבודהעםסוללהנטענת
טמפרטורתסביבהבעבודה
טמפרטורתאחסון
טמפרטורתהסוללהבתחילתהטעינה
4.3מידעעלרעשיםוערכירעידות
ערכילחץהקולוהרעידותהמצויניםבהוראותאלהנמדדובהתאםלהליךהמדידההתקני,וניתןלהשתמשבהםלצורךהשוואה
ביןכליעבודהחשמליים.הםמתאימיםגםלהערכהזמניתשלהעומסים.הנתוניםהמצויניםתקפיםלשימושיםהעיקרייםבכלי
העבודההחשמלי.אולםאםמשתמשיםבכליהעבודההחשמלילשימושיםאחרים,בשילובאביזריםאחריםאואםהמכשיראינו
עוברתחזוקהמספקת,הנתוניםעשוייםלהשתנות.בעקבותזאתהחשיפהלעומסיםבמשךזמןהעבודההכוללעשויהלהיות
גבוההבאופןמשמעותי.לצורךהערכהמדויקתשלהעומסיםישלקחתבחשבוןגםאתהזמניםשבהםהמכשירכבויאושבהם
הואאמנםפועלאךאינובשימושבפועל.בעקבותזאתפריסתהעומסיםלמשךזמןהעבודהכולועשויהלהיותנמוכהבאופן
משמעותי.ישלקבועהנחיותבטיחותנוספותלהגנהעלהמשתמשמפניההשפעותשלקולו/אורעידות,כגון:תחזוקהשלכלי
העבודההחשמליושלכליהעבודההמחוברים,שמירהעלידייםחמות,ארגוןתהליכיהעבודה.
מידעעלרעשיםורעידות)נמדדבהסתמךעלEN 60745216(
רמתהספקקולאופייניתבדירוגA,LWA)בהחדרתמסמריםלפלדה(
שיםלבלרמתלחץהקולהאופייניתבדירוגA,LpA)בהחדרתמסמריםלפלדה(
אי-ודאותברמותהקולהמצוינות,K
ערכירעידותחד-צירייםמרביים)בכיווןz(
ערךרעידות,ah)בהחדרתמסמריםלפלדה(
איודאות,K
5עבודותהתקנהוהכנה
5.1חיבורהסוללה
זהירות
סכנתפציעהעקבקצראונפילתסוללה!
◀לפניחיבורהסוללהודאשהמגעיםשלהסוללהושלהמוצרנקייםמגופיםזרים.
◀ודאתמידשהסוללהתפוסההיטב.
1.טעןאתהסוללהלמצבמלאלגמרילפניהשימושהראשון.
2.הכנסאתהסוללהלמחזיקבמכשירעדשאתהשומעאותהננעלת.
3.ודאשהסוללהיושבתהיטב.
Printed: 20.09.2019 | Doc-Nr: PUB / 5514237 / 000 / 00
*2209576*
5.2הסרתהסוללה
1.לחץעללחצניהשחרורשלהסוללה.
2.הסראתהסוללהמהמכשיר.
5.3טעינתסוללה
1.קראאתהוראותההפעלהשלהמטעןלפניהטעינה.
2.ודאשהמגעיםשלהסוללהושלהמטעןנקייםויבשים.
3.טעןאתהסוללהבמטעןמאושר.
5.4הסרתמוליךהמסמרים
1.כבהאתאקדחהמסמרים.
2.הסראתהסוללה.
3.הוצאאתבורגהמתכתממוליךהמסמרים.
4.דחףאתנעילתמוליךהמסמריםבכיווןהחץעדהסוף.
⇦מוליךהמסמריםישתחרר.
5.הסראתמוליךהמסמרים.
2209576 עברית 7
Page 14

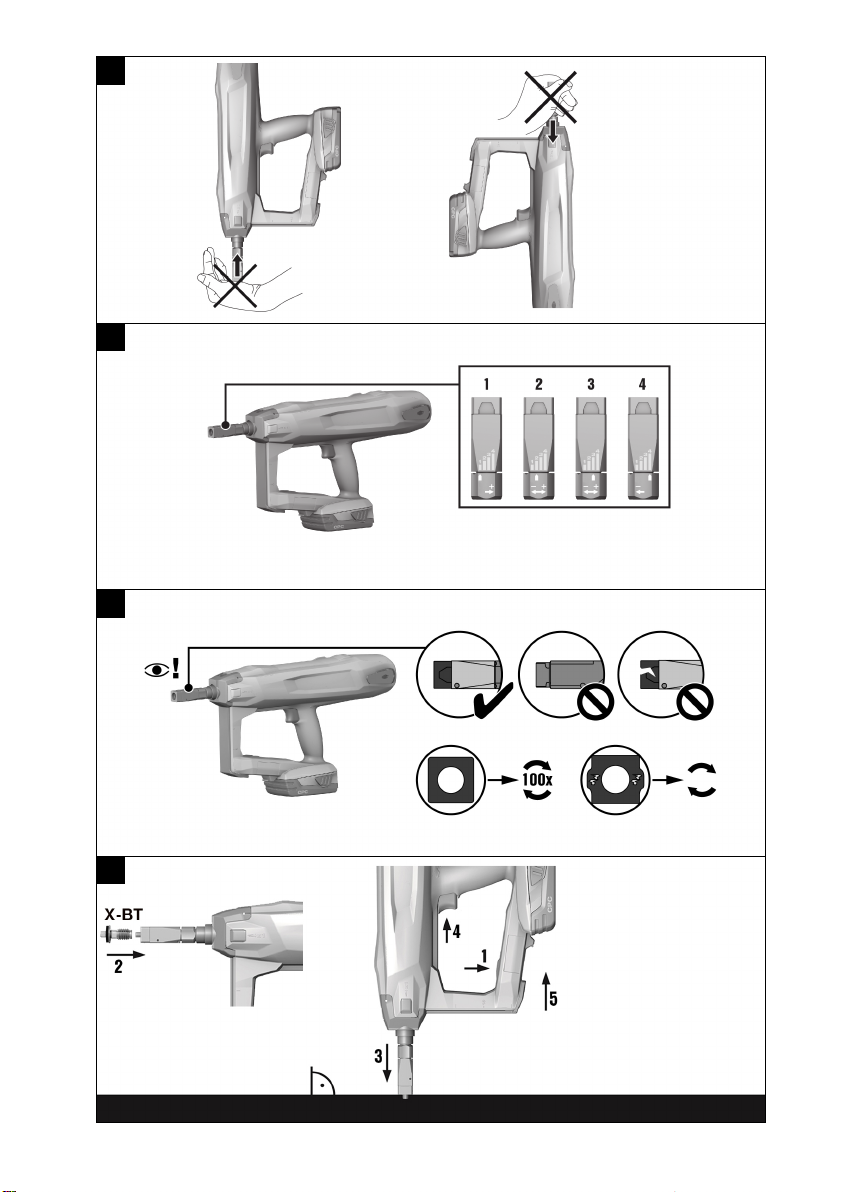
5.5חיבורמוליךהמסמרים4
1.כבהאתאקדחהמסמרים.
2.הסראתהסוללה.
3.דחףאתנעילתמוליךהמסמריםבכיווןהחץעדהסוף,והחזקאותהבמצבזה.
4.דחףאתמוליךהמסמריםבכיווןקנההמכשיר,עדשאתהשומעאותוננעל.
בדוקאםכיסויהמגןהשחורעלמוליךהמסמריםתקין.החלףאתכיסויהמגןהשחורבמקרההצורך.
5.שחרראתנעילתמוליךהמסמרים.
⇦נעילתמוליךהמסמריםתקפוץלעמדההאמצעית.
6.משוךאתמוליךהמסמריםלצורךבדיקהשהואיושביציב.
5.6כוונוןעומקהחדרה3
1.סובבאתכוונוןעומקההחדרהכדילקבועאתעומקההחדרההדרוש.
2.בדוקאתאיכותההחדרהבהתאםלהנחיותהמצורפותלרכיבהחיבור.
בחראתדרגתהעוצמהלפיסוגהשימוש.
אםאיןלךניסיוןבעבודהבמכשירזה,התחלתמידבעוצמתהנמוכהביותר.
6תפעול
6.1הדלקתאקדחהמסמרים2
אזהרה
סכנתפציעה!בעקבותלחיצתאקדחהמסמריםלאברגוףעלולהלהשתחררירייהבשוגגוכךלגרוםלפציעותקשות.
◀לעולםאלתלחץאתאקדחהמסמריםכנגדכףידךאואברגוףאחר.
אזהרה
סכנתפציעה!משיכהידניתלאחורשלמוליךהמסמריםעשויהלהעביראתהמכשירלמצבמוכןלירי.מצבזהמאפשרהחדרה
גםלאבריגוף.
◀לעולםאיןלמשוךבחזרהאתמוליךהמסמריםלאחורידנית.
◀לחץעללחצןההדלקה/כיבוי.
⇦ניתןלשמועאתהרכיבהקפיצינמתח,וחיוויהמצבמאירבירוק.
כשהטמפרטורהנמוכהיורדיםביצועיהסוללה.
כאשרהספקהסוללהנמוך,מתיחתהרכיבהקפיציאטיתיותרמאשרכאשרהסוללהמלאה.
כאשרהספקהסוללהיורדמאודיכבהאקדחהמסמריםלפנישייגרםנזקלתאיהסוללה.
8 עברית 2209576
Printed: 20.09.2019 | Doc-Nr: PUB / 5514237 / 000 / 00
6.2כיבויאקדחהמסמרים
◀לחץעללחצןההדלקה/כיבוי.
⇦ניתןלשמועאתשחרורהרכיבהקפיצי,וחיוויהמצבנכבה.
6.3ביצועהחדרה5
אזהרה
סכנתפציעהעקבחלקיםמתעופפים!במהלךהחדרהישנהסכנתפציעה,ובמיוחדסכנהלפגיעהבעינייםעקבשבבים
הניתזיםמהחומרהמעובדכאשרישנוגוףזרבאזורמוליךהמסמרים.
◀לבשתמידציודמגןאישיומשקפימגןוכפפותהגנה.גםאנשיםאחריםבקרבתמקוםצריכיםללבושמשקפימגןוקסדת
מגן.
◀לעולםאיןלנסותלתקןתקלהבמכשירבאמצעותירייהנוספת!
אזהרה
סכנתפציעה!בעקבותלחיצתאקדחהמסמריםלאברגוףעלולהלהשתחררירייהבשוגגוכךלגרוםלפציעותקשות.
◀לעולםאלתלחץאתאקדחהמסמריםכנגדכףידךאואברגוףאחר.
*2209576*
Page 15

זהירות
סכנתפציעהונזקלאקדחהמסמרים!שימושבחומריםובאביזריםלאמתאימיםעלוללגרוםפציעותולהוביללנזקיםלאקדח
המסמרים.
◀השתמשעבורמכשירזהרקבאביזריםמקורייםשלחברתHilti.
1.הדלקאתאקדחהמסמרים.←עמוד8
2.החדראתמוטהתבריג.
3.הצמדאתאקדחהמסמריםבזוויתישרהלחומר,ולחץאתמוליךהמסמרים–כאשרישבובורגמתכתמתאים–מעלמרכז
הקדחשנקדחמראש,עדמעצורהגבול.
4.לחץעלההדקכדילהחדיראתרכיבהחיבור.
5.הרחקאתאקדחהמסמריםבמלואומהחומרלאחרההחדרה.
לחיצתמוליךהמסמריםלחומרלמשךיותרמ-6שניותבלישתתבצעהחדרהתגרוםלכיבויאוטומטישלאקדח
המסמרים.ניתןללחוץעלמתגההדלקה/כיבויכדילהדליקמחדשאתאקדחהמסמרים.
לאחר6דקותשבהןאקדחהמסמריםלאהיהבשימושהואיכבהאוטומטית.
6.4כיבויBluetooth
◀לחץעללחצןההפעלה/כיבוילמשך5שניותרצופותלפחות,עדשהנוריתמאירהפעמייםבכחול.
⇦לאתתאפשרעודהעברתנתונים.
⇦Bluetoothאינוזמיןבכלהשווקים
כשאתהנמצאבסביבהרגישה)כגוןביתחולים(,שבהאסורלהשתמשב-Bluetooth,אפשרלבטלאתה-Bluetooth.
7טיפולותחזוקה
7.1טיפולותחזוקה
אזהרה
סכנתפציעהכאשרהסוללהמחוברת!
◀לפניביצועעבודותטיפולותחזוקהכלשהןישלהקפידלהסיראתהסוללה!
Printed: 20.09.2019 | Doc-Nr: PUB / 5514237 / 000 / 00
*2209576*
טיפולבמכשיר
•כבהאתאקדחהמסמרים.
•הסראתהסוללה.
•הוצאאתרכיבהחיבורממוליךהמסמרים.
•הסרבזהירותלכלוךשנדבק.
•נקהבזהירותאתחריציהאוורורבאמצעותמברשתיבשה.
•נקהאתגוףהמכשיררקבעזרתמטליתלחהמעט.איןלהשתמשבחומריטיפולהמכיליםסיליקון,מאחרשהםעלולים
לפגועבחלקיהפלסטיק.
טיפולבסוללותליתיום-יון
•שמורעלהסוללהנקייהמלכלוך,שמןוגריז.
•נקהאתגוףהמכשיררקבעזרתמטליתלחהמעט.איןלהשתמשבחומריטיפולהמכיליםסיליקון,מאחרשהםעלולים
לפגועבחלקיהפלסטיק.
•מנעחדירתלחות.
תחזוקה
•ישלבדוקבאופןסדיראתכלהחלקיםהגלוייםכדילאתרנזקיםולוודאשכלהרכיביםפועליםבאופןתקין.
•אםישנםנזקיםו/אותקלותאיןלהפעילאתהמוצר.הבאמידאתהמכשירלתיקוןבמעבדתשירותשלHilti.
•לאחרעבודותטיפולותחזוקהישלהקפידולחבראתכלהתקניההגנהולבדוקאתתפקודהמכשיר.
לצורךהפעלהבטוחהשלהמכשירישלהשתמשרקבחלקיחילוףוחומריםמתכליםמקוריים.אתחלקיהחילוף,החומרים
המתכליםוהאביזריםשאושרועל-ידנועבורהמוצרשלךתמצאב-Hilti Storeשלךאובכתובת:www.hilti.group.
2209576 עברית 9
Page 16

8הובלהואחסוןשלמכשיריםנטענים
הובלה
◀כבהאתאקדחהמסמרים.
זהירות
התחלתפעולהבשוגגבמהלךהובלה!
◀
ישלהובילאתהמכשירכשהסוללהמנותקתממנו!
◀הסראתהסוללה.
◀הוצאאתרכיבהחיבורממוליךהמסמרים.
◀בשוםאופןאיןלהובילסוללותכשהןנמצאותביןעצמיםלאארוזים.
◀לפניהשימושבמכשירלאחרהובלהממושכתישלבדוקאותוואתהסוללהלאיתורנזקים.
אחסון
זהירות
נזקלאמכווןכשהסוללותפגומותאודולפות!
◀ישלאחסןאתהמכשירכשהסוללהמנותקתממנו!
◀ישלאחסןאתהמכשירוהסוללהבמקוםקרירויבש.
◀לעולםאיןלהניחסוללותבשמש,עלמקורחוםאומאחורישמשה.
◀ישלאחסןאתהמכשירוהסוללההרחקמהישגידםשלילדיםאואנשיםלאמורשים.
◀לפניהשימושבמכשירבתוםאחסוןממושךישלבדוקאותוואתהסוללהלאיתורנזקים.
9תיקוןתקלות
אםמתרחשתתקלהשאינהמוסברתבטבלהזהאושאינךיכוללתקןבעצמך,פנהלשירותשלHilti.
תקלהסיבהאפשריתפתרון
סוללהריקה.◀החלףאתהסוללה.
הסוללהאינהמחוברתנכון.◀חבראתהסוללה.←עמוד7
סוללהריקה.◀החלףאתהסוללה.
לטמפרטורתהחדר.
◀חבראתהסוללה.←עמוד7
◀הצמדאתהמכשירלחומרתוךהפעלת
לחץנמוך.
באמצעותאזורהאחיזהבצדהאחורי
שלהמכשיר.
טמפרטורתהסוללהנמוכהמדי.◀אפשרלסוללהלהתחמםבהדרגה
טמפרטורהגבוההמדיבאקדחהמסמרים.◀אפשרלאקדחהמסמריםלהתקרר.
מוליךהמסמריםאינומחוברנכון.◀חבראתמוליךהמסמרים.←עמוד8
תקלהבמכשיר◀הסראתהסוללה.←עמוד7
האחיזה.
המכשירנלחץבזוויתלאישרה.◀לחץאתהמכשירבזוויתישרה
הרכיבהקפיציאינונמתח;איןחיווי
מצב.
הרכיבהקפיציאינונמתח,חיווי
המצבמהבהבבירוקונוריתאחת
שלחיווירמתהטעינהמהבהבת.
הרכיבהקפיציאינונמתח,נורית
חיוויהמצבמהבהבתבירוק,וארבע
הנוריותשלחיווירמתהטעינה
מהבהבות.
הרכיבהקפיציאינונמתחוחיווי
המצבמהבהבבאדום.
הרכיבהקפיציאינונמתחוחיווי
המצבמאירבאדום.
רכיבהוכנסעקום.המכשירנלחץחזקמדיבאמצעותידית
10 עברית 2209576
Printed: 20.09.2019 | Doc-Nr: PUB / 5514237 / 000 / 00
10סילוק
המוצריםשלHiltiמיוצריםבחלקםהגדולמחומריםניתניםלמיחזור.כדישניתןיהיהלמחזרםדרושההפרדתחומרים
מקצועית.במדינותרבותHiltiתקבלאתהמכשירהישןשלךבחזרהלצורךמיחזור.פנהלשירותשלHiltiאולמשווק.
סילוקסוללות
סילוקלאתקיןשלסוללותמסכןאתהבריאותעקבדליפתגזיםאונוזלים.
◀איןלשלוחסוללותפגומות!
◀כסהאתהחיבוריםבאמצעותחומרלאמוליך,כדילמנועקצר.
◀סלקסוללותכךשהןלאיוכלולהגיעלידיהםשלילדים.
◀סלקאתהסוללהב-Hilti Storeאופנהלחברתהמיחזורהאחראית.
*2209576*
Page 17

◀איןלהשליךכליעבודהחשמליים,כליםאלקטרונייםוסוללותלפסולתהביתית!
11אחריותיצרן
◀אםישלךשאלותבנושאתנאיהאחריות,פנהלמשווקHiltiהקרובאליך.
12RoHS)תקנהלהגבלתהשימושבחומריםמסוכנים(
בקישורהבאתמצאאתטבלתהחומריםהמסוכנים:BX 3BT qr.hilti.com/r9808595.
קישורלטבלתRoHSתמצאבסוףתיעודזה,בצורתקודQR.
Printed: 20.09.2019 | Doc-Nr: PUB / 5514237 / 000 / 00
*2209576*
2209576 עברית 11
Page 18

Original operating instructions
1 Information about the documentation
1.1 About this documentation
• Read this documentation before initial operation or use. This is a prerequisite for safe, trouble-free
handling and use of the product.
• Observe the safety instructions and warnings in this documentation and on the product.
• Always keep the operating instructions with the product and make sure that the operating instructions
are with the product when it is given to other persons.
1.2 Explanation of symbols used
1.2.1 Warnings
Warnings alert persons to hazards that occur when handling or using the product. The following signal words
are used:
DANGER
DANGER !
▶ Draws attention to imminent danger that will lead to serious personal injury or fatality.
WARNING
WARNING !
▶ Draws attention to a potential threat of danger that can lead to serious injury or fatality.
CAUTION
CAUTION !
▶ Draws attention to a potentially dangerous situation that could lead to slight personal injury or damage
to the equipment or other property.
1.2.2 Symbols in the documentation
The following symbols are used in this document:
Read the operating instructions before use.
Instructions for use and other useful information
Dealing with recyclable materials
Do not dispose of electric equipment and batteries as household waste
1.2.3 Symbols in the illustrations
The following symbols are used in illustrations:
These numbers refer to the corresponding illustrations found at the beginning of these operating
instructions
The numbering reflects the sequence of operations shown in the illustrations and may deviate
from the steps described in the text
Item reference numbers are used in the overview illustrations and refer to the numbers used in
the product overview section
This symbol is intended to draw special attention to certain points when handling the product.
12 English 2209576
Printed: 20.09.2019 | Doc-Nr: PUB / 5514237 / 000 / 00
*2209576*
Page 19

1.3 Product-dependent symbols
1.3.1 Symbols on the product
The following symbols can be used on the product:
General symbol for "must do"
Wear eye protection
Wear hearing protection
Wear a hard hat
Direct current (DC)
The power tool supports near-field communication (NFC) technology, which is compatible with
iOS and Android platforms.
Hilti Li-ion battery type series used. Observe the information given in the section headed Intended use.
Never use the battery as a striking tool.
Do not drop the battery. Never use a battery that has suffered an impact or is damaged in any
other way.
1.4 Product information
permitted to operate, service and maintain the products. This personnel must be specifically informed about
the possible hazards. The product and its ancillary equipment can present hazards if used incorrectly by
untrained personnel or if used not in accordance with the intended use.
The type designation and serial number are printed on the rating plate.
▶ Write down the serial number in the table below. You will be required to state the product details when
products are designed for professional users and only trained, authorized personnel are
contacting Hilti Service or your local Hilti organization to inquire about the product.
Product information
Type: BX 3-BT
Generation: 02
Serial number:
1.5 Declaration of conformity
We declare, on our sole responsibility, that the product described here complies with the applicable directives
and standards. A copy of the declaration of conformity can be found at the end of this documentation.
The technical documentation is filed here:
Hilti Entwicklungsgesellschaft mbH | Tool Certification | Hiltistrasse 6 | 86916 Kaufering, Germany
2 Safety
2.1 General power tool safety warnings
WARNING
Read all safety warnings and all instructions. Failure to follow the warnings and instructions may result in
electric shock, fire and/or serious injury.
Save all warnings and instructions for future reference.
Work area safety
▶ Keep work area clean and well lit. Cluttered or dark areas invite accidents.
▶ Do not operate power tools in explosive atmospheres, such as in the presence of flammable
liquids, gases or dust. Power tools create sparks which may ignite the dust or fumes.
2209576 English 13
*2209576*
Printed: 20.09.2019 | Doc-Nr: PUB / 5514237 / 000 / 00
Page 20

▶ Keep children and bystanders away while operating a power tool. Distractions can cause you to lose
control.
Electrical safety
▶ Avoid body contact with earthed or grounded surfaces, such as pipes, radiators, ranges and
refrigerators. There is an increased risk of electric shock if your body is earthed or grounded.
▶ Do not expose power tools to rain or wet conditions. Water entering a power tool will increase the
risk of electric shock.
Personal safety
▶ Stay alert, watch what you are doing and use common sense when operating a power tool. Do
not use a power tool while you are tired or under the influence of drugs, alcohol or medication. A
moment of inattention while operating power tools may result in serious personal injury.
▶ Use personal protective equipment. Always wear eye protection. Protective equipment such as dust
mask, non-skid safety shoes, hard hat, or hearing protection used for appropriate conditions will reduce
personal injuries.
▶ Prevent unintentional starting. Ensure the switch is in the off‐position before connecting to battery
pack, picking up or carrying the tool. Carrying power tools with your finger on the switch or energising
power tools that have the switch on invites accidents.
▶ Remove any adjusting key or wrench before turning the power tool on. A wrench or a key left
attached to a rotating part of the power tool may result in personal injury.
▶ Do not overreach. Keep proper footing and balance at all times. This enables better control of the
power tool in unexpected situations.
▶ Dress properly. Do not wear loose clothing or jewellery. Keep your hair, clothing and gloves away
from moving parts. Loose clothes, jewellery or long hair can be caught in moving parts.
▶ If devices are provided for the connection of dust extraction and collection facilities, ensure these
are connected and properly used. Use of dust collection can reduce dust-related hazards.
Power tool use and care
▶ Do not force the power tool. Use the correct power tool for your application. The correct power tool
will do the job better and safer at the rate for which it was designed.
▶ Do not use the power tool if the switch does not turn it on and off. Any power tool that cannot be
controlled with the switch is dangerous and must be repaired.
▶ Disconnect the battery pack from the power tool before making any adjustments, changing
accessories, or storing power tools. Such preventive safety measures reduce the risk of starting the
power tool accidentally.
▶ Store idle power tools out of the reach of children and do not allow persons unfamiliar with the
power tool or these instructions to operate the power tool. Power tools are dangerous in the hands
of untrained users.
▶ Maintain power tools. Check for misalignment or binding of moving parts, breakage of parts and
any other condition that may affect the power tool’s operation. If damaged, have the power tool
repaired before use. Many accidents are caused by poorly maintained power tools.
▶ Keep cutting tools sharp and clean. Properly maintained cutting tools with sharp cutting edges are
less likely to bind and are easier to control.
▶ Use the power tool, accessories and tool bits etc. in accordance with these instructions, taking
into account the working conditions and the work to be performed. Use of the power tool for
operations different from those intended could result in a hazardous situation.
Battery tool use and care
▶ Recharge only with the charger specified by the manufacturer. A charger that is suitable for one type
of battery pack may create a risk of fire when used with another battery pack.
▶ Use power tools only with specifically designated battery packs. Use of any other battery packs may
create a risk of injury and fire.
▶ When battery pack is not in use, keep it away from other metal objects, like paper clips, coins,
keys, nails, screws or other small metal objects, that can make a connection from one terminal to
another. Shorting the battery terminals together may cause burns or a fire.
▶ Under abusive conditions, liquid may be ejected from the battery; avoid contact. If contact
accidentally occurs, flush with water. If liquid contacts eyes, additionally seek medical help. Liquid
ejected from the battery may cause irritation or burns.
Service
▶ Have your power tool serviced by a qualified repair person using only identical replacement parts.
This will ensure that the safety of the power tool is maintained.
14 English 2209576
Printed: 20.09.2019 | Doc-Nr: PUB / 5514237 / 000 / 00
*2209576*
Page 21

2.2 Tacker safety warnings
▶ Always assume that the tool contains fasteners. Careless handling of the tacker can result in
unexpected firing of fasteners and personal injury.
▶ Do not point the tool towards yourself or anyone nearby. Unexpected triggering will discharge the
fastener causing an injury.
▶ Do not actuate the tool unless the tool is placed firmly against the workpiece. If the tool is not in
contact with the workpiece, the fastener may be deflected away from your target.
▶ Disconnect the tool from the power source when the fastener jams in the tool. While removing a
jammed fastener, the tacker may be accidentally activated if it is plugged in.
▶ Use caution while removing a jammed fastener. The mechanism may be under compression and the
fastener may be forcefully discharged while attempting to free a jammed condition.
▶ When fastening electrical cables, make sure the cables are not energized. Hold the tacker only by
insulated gripping surfaces. Use only fasteners designed for electrical cable installations. Inspect
that the fastener has not damaged the insulation of the electrical cables. A fastener that damages
the insulation of electric cables can lead to electric shock and fire hazards.
2.3 Safety instructions
Basic information concerning safety
WARNING! Read all safety precautions and other instructions. Failure to observe the safety
precautions and other instructions may result in electric shock, fire and/or serious injury.
Keep all safety precautions and instructions for future reference.
Requirements to be met by users
▶ Only authorized, appropriately trained persons may operate or service this tool.
Personal protective equipment
▶ You and all other persons in the vicinity must wear suitable eye protection and a hard hat while the tool
is in use.
▶ Wear hearing protection.
➥ Exposure to noise can cause hearing loss.
Personal safety
▶ Observe the information printed in the operating instructions concerning operation, care and maintenance.
▶ Stay alert, watch what you are doing and use common sense when operating a direct fastening tool. Do
not use the tool when you are tired or under the influence of drugs, alcohol or medication. Take a break
if you experience pain or feel unwell. A moment of inattention while operating tools may result in serious
personal injury.
▶ Avoid awkward postures. Make sure you work from a safe stance and stay in balance at all times.
▶
Take breaks between working and do relaxation and finger exercises to improve the blood circulation in
your fingers.
▶ Wear non-skid shoes.
▶ Keep the arms slightly bent while operating the tool (do not straighten the arms).
▶ Keep other people away from the working area, especially children.
Use and care of direct fastening tools
WARNING! Danger of threaded studs penetrating right through! Before driving threaded studs, check
to make sure that no one is present behind or below the object into which the threaded stud is to be driven.
▶ Use the right tool for the work you are carrying out. Do not use the tool for purposes for which it was not
intended. Use it only as directed and when in faultless condition.
▶ Never leave a loaded tool unattended.
▶ Transport and store the tool in a secured toolbox.
▶
Always switch the tool off before cleaning, maintenance, changing the fastener guide, before work breaks
and before storing the tool.
▶ When not in use, the tool should be unloaded and stored in a locked, dry place where it is inaccessible
to children.
▶ Check the tool and the accessories for any damage. Check that moving parts function faultlessly, without
sticking, and that no parts are damaged.
➥ All parts must be fitted correctly and fulfill all conditions necessary for correct operation of the tool.
Damaged parts must be properly repaired or replaced by Hilti Service unless otherwise stated in the
operating instructions.
*2209576*
Printed: 20.09.2019 | Doc-Nr: PUB / 5514237 / 000 / 00
2209576 English 15
Page 22

▶ Before beginning work, check the working area (e.g. using a metal detector) to ensure that no concealed
electric cables or gas and water pipes are present. External metal parts of the power tool may become
live, for example, when an electric cable is damaged accidentally.
▶ Do not attempt to drive threaded studs into unsuitable materials.
➥ Unsuitable materials are glass, marble, plastic, bronze, brass, copper, insulating material, hollow
brick, ceramic brick, thin sheet metal (< 4 mm) and cellular concrete. Driving a fastener into these
materials may cause the fastener to break, splinter the material or to be driven right through.
▶ Pull the trigger only when the tool is fully pressed against the working surface at right angles.
▶ When driving fasteners, always hold the fastening tool at right angles to the working surface in order to
prevent the threaded stud being deflected by the surface.
▶
Keep the grips dry, clean and free from oil and grease.
▶ Never drop the tool.
▶ Do not use the tool in places where there is a risk of fire or explosion unless the tool is specially approved
for this type of use.
▶ Secure X-BT fasteners only in holes specially pre-drilled for this purpose.
Workplace
▶ Keep the workplace tidy. Clear the work zone of objects that could cause injury.
➥ Untidiness in the working area can lead to accidents.
▶
Make sure that the working area is well lit and well ventilated.
Mechanical safety rules
▶ Do not tamper with or modify the tool or parts of it, especially the piston.
▶ Use only threaded studs of a type approved for use with the tool.
Thermal safety rules
▶ Do not exceed the recommended maximum fastener driving rate (see the section headed "Technical
data").
▶ If the tool has overheated, allow it to cool down.
▶ Do not dismantle the tool while it is hot. Allow the tool to cool down.
2.4 Battery use and care
▶ Observe the special regulations and instructions applicable to the transport, storage and use of Li-ion
batteries.
▶ Do not expose batteries to high temperatures, direct sunlight or fire.
▶ Do not disassemble, crush or incinerate batteries and do not subject them to temperatures over 80 °C.
▶ Do not use or charge batteries that have suffered mechanical impact, have been dropped from a height
or show signs of damage. In this case, always contact your Hilti Service.
▶ If the battery is too hot to touch it may be defective. In this case, place the product in a non-flammable
location, well away from flammable materials, where it can be kept under observation and allowed to
cool down. In this case, always contact your Hilti Service.
16 English 2209576
Printed: 20.09.2019 | Doc-Nr: PUB / 5514237 / 000 / 00
*2209576*
Page 23

3 Description
3.1 Overview of the product 1
Fastener guide (XFG B3 series)
@
Fastener driving depth adjuster
;
Fastener guide locking catch
=
Air vents
%
Belt hook
&
Trigger
(
Grip
)
Release buttons (also used to activate the
+
charge status indicator)
Liion battery
§
Status indicator
/
On/off button
:
3.2 Intended use
The product is a hand-held, cordless fastening tool. It is designed for driving threaded studs (X-BT) into
steel. Use only approved threaded studs in combination with the corresponding fastener guide.
The fastening tool, battery and threaded studs together form a technical entity. Use the Hilti threaded studs
specially manufactured for the tool and the batteries and chargers recommended by Hilti. The fastening and
application recommendations made by Hilti apply only when these conditions are observed.
▶ The fastening tool is for hand-held use only.
▶ Misuse of the fastening tool must be ruled out. Misuse includes triggering without an XBT fastener
inserted in the fastener guide.
▶ Use only Hilti Liion batteries of the B 22 series with this product.
▶ Use only Hilti battery chargers of the C 4/36 series to charge these batteries.
3.3 Bluetooth
The product has a Bluetooth interface. Wireless communication via Bluetooth is possible as soon as the
battery has been fitted and the fastening tool switched on at the on/off button.
Data transfer continues for three hours after the tool has switched to standby mode or after the tool has
been switched off at the on/off button.
To deactivate Bluetooth manually, press and hold down the on/off button for at least 5 seconds until the LED
shows blue twice.
When the battery is removed, no further data are transferred.
Bluetooth is not available in all markets.
3.4 Status indicator
The status indicator provides information about the status of the fastening tool.
Status Meaning
Off The fastening tool is switched off
The LED shows green. The fastening tool is switched on and ready for use
The LED flashes green every 3 seconds. The fastening tool is in stand-by mode. Press the
The LED flashes steadily green. The fastening tool is too hot or the battery has in-
The LED flashes red. Malfunction; see “Troubleshooting”
2209576 English 17
*2209576*
Printed: 20.09.2019 | Doc-Nr: PUB / 5514237 / 000 / 00
nose of the tool against the working surface to
switch it on
sufficient power; see “Troubleshooting”
Page 24

Status Meaning
The LED shows red. Malfunction; see “Troubleshooting”
The LED flashes yellow. Bring the fastening tool to Hilti Service.
3.5 Indication of battery charge status
When one of the battery release buttons is pressed, the display indicates the battery’s state of charge.
Reliable indication of the charge status is not possible while a fastener is being driven or immediately
after a fastener is driven.
Status Meaning
All four LEDs show green. Charge status is 75 % to 100 %.
Three LEDs show green. Charge status is 50 % to 75 %.
Two LEDs show green. Charge status is 25 % to 50 %.
One LED shows green. Charge status is 10 % to 25 %.
One LED flashes green. Charge status is below 10 %.
3.6 Items supplied
BX 3-BT fastening tool, XFG B3 series fastener guide, operating instructions.
You can find other system products approved for your product at your local Hilti Center or online at:
www.hilti.com
4 Technical data
4.1 Fastening tool
Weight in accordance with EPTA Procedure 01
including battery
Threaded-stud length
Thread diameter
Compression stroke
Contact pressure
Application temperature (ambient temperature)
Application temperature, threaded studs
Recommended maximum driving rate
Rated voltage
Frequency
Maximum emitted transmission power
B 22/2.6 Li-Ion (02)
B 22/3.0 Li-Ion (01)
B 22/4.0 Li-Ion
B 22/5.2 Li-Ion (01)
B 22/8.0 Li-Ion
4.0 kg
4.1 kg
4.2 kg
4.3 kg
4.6 kg
31 mm
8 mm … 10 mm
12 mm
50 N … 70 N
−15 ℃ … 50 ℃
−10 ℃ … 50 ℃
650/h
21.6 V
2,400 MHz … 2,483.5 MHz
−11.9 dBm
4.2 Battery
Battery operating voltage
Ambient temperature for operation
Storage temperature
Battery charging starting temperature
4.3 Noise information and vibration values
The sound pressure and vibration values given in these instructions have been measured in accordance
with a standardized test and may be used to compare one power tool with another. They may be used
18 English 2209576
Printed: 20.09.2019 | Doc-Nr: PUB / 5514237 / 000 / 00
21.6 V
−17 ℃ … 60 ℃
−20 ℃ … 40 ℃
−10 ℃ … 45 ℃
*2209576*
Page 25

for a preliminary assessment of exposure. The data given represents the main applications of the power
tool. However, if the power tool is used for different applications, with different accessories or is poorly
maintained, the data may vary. This may significantly increase exposure over the total working period. An
accurate estimation of exposure should also take into account the times when the tool is switched off, or
when it is running but not actually being used for a job. This may significantly reduce exposure over the total
working period. Set out additional safety measures to protect the operator from the effects of noise and/or
vibration, such as: Maintaining the power tool and accessories, keeping the hands warm, reorganization of
work patterns.
Noise and vibration information (measured in accordance with EN 60745-216)
Typical A-weighted sound power level, LWA(driving nails into steel)
Typical Aweighted emission sound pressure level, LpA(driving nails
into steel)
Uncertainty for the specified sound levels, K
Total uniaxial vibration values (in z-direction)
Vibration emission value, ah(driving nails into steel)
Uncertainty, K
105 dB
94 dB
3 dB
2.2 m/s²
1.5 m/s²
5 Preparing the tool for use
5.1 Inserting the battery
CAUTION
Risk of injury by short circuit or falling battery!
▶ Before inserting the battery, make sure that the contacts on the battery and the contacts on the product
are free of foreign matter.
▶ Make sure that the battery always engages correctly.
1. Charge the battery fully before using it for the first time.
2. Push the battery into the battery holder until it engages with an audible click.
3. Check that the battery is seated securely.
5.2 Removing the battery
1. Press the battery release buttons.
2. Remove the battery from the tool.
5.3 Charging the battery
1. Before charging the battery, read the operating instructions for the charger.
2. Make sure that the contacts on the battery and the contacts on the charger are clean and dry.
3. Use an approved charger to charge the battery.
5.4 Removing the fastener guide
1. Switch off the fastening tool.
2. Remove the battery.
3. Remove the threaded stud from the fastener guide.
4. Slide the fastener guide locking catch as far as it will go in the direction of the arrow.
➥ The fastener guide will be released.
5. Remove the fastener guide.
5.5 Inserting the fastener guide 4
1. Switch off the fastening tool.
2. Remove the battery.
3. Slide the fastener guide locking catch as far as it will go in the direction of the arrow and hold it in this
position.
2209576 English 19
*2209576*
Printed: 20.09.2019 | Doc-Nr: PUB / 5514237 / 000 / 00
Page 26

4. Slide the fastener guide into the nosepiece until it engages with an audible click.
Check that the black protective cap on the fastener guide is in full working order. Replace the
black protective cap if it is not in full working order.
5. Release the fastener guide locking catch.
➥ The fastener guide locking catch jumps to the middle position.
6. Grip and pull the fastener guide to check that it is securely seated.
5.6 Setting fastener driving depth 3
1. Turn the fastener driving depth adjuster to the required driving depth.
2. Check the quality of the fastening in accordance with the instructions supplied with the fasteners.
Select the power level that suits the application.
If you have no previous experience of using the tool, always begin with the lowest power.
6 Operation
6.1 Switching on the fastening tool 2
WARNING
Risk of injury! Pressing the nosepiece of the fastening tool against a part of the body may lead to serious
injury due to inadvertent firing and release of a fastener.
▶ Never press the nosepiece of the tool against your hand or any other part of the body.
WARNING
Risk of injury! Under certain circumstances, pulling the fastener guide back by hand could make the tool
ready to fire. When the tool is ready to fire, fasteners or the piston could be driven inadvertently into parts of
the body.
▶ Never attempt to pull the fastener guide back by hand.
▶ Press the on/off button.
➥ The spring mechanism audibly builds up tension and the status indicator shows green.
Battery performance drops at low temperatures.
When battery performance drops, tensioning of the spring mechanism takes longer than with a
fully charged battery.
If you continue to operate the fastening tool after battery performance drops, the fastening tool
will switch itself off automatically before damage to the battery cells occurs.
6.2 Switching off the fastening tool
▶ Press the on/off button.
➥ The spring mechanism audibly relieves its tension and the status indicator goes out.
6.3 Driving a fastener 5
WARNING
Risk of injury by flying parts! When fasteners are being driven, there is a risk of injury to the body and eyes
caused by material splintering off the working surface and also if there are foreign bodies in the area of the
fastener guide.
▶ Wear personal protective equipment and always wear protective glasses and protective gloves.
Other persons in the vicinity must also wear eye protection and a hard hat.
▶ Never attempt to remedy tool malfunctions by continuing to trigger the tool.
WARNING
Risk of injury! Pressing the nosepiece of the fastening tool against a part of the body may lead to serious
injury due to inadvertent firing and release of a fastener.
▶ Never press the nosepiece of the tool against your hand or any other part of the body.
20 English 2209576
Printed: 20.09.2019 | Doc-Nr: PUB / 5514237 / 000 / 00
*2209576*
Page 27

CAUTION
Risk of injury and risk of damage to the fastening tool. The use of unsuitable material and accessories
can lead to injuries and damage the fastening tool.
▶ Use only approved, genuine Hilti accessories with this tool.
1. Switch on the fastening tool. → page 20
2. Insert the threaded stud.
3. Hold the fastening tool perpendicular to the working surface, center the fastener guide, loaded with a
suitable threaded stud, over the pre-drilled hole and apply pressure to seat the fastener guide against
the working surface.
4. Drive the fastener by pulling the trigger.
5. Lift the fastening tool completely clear of the working surface after driving a fastener.
The fastening tool switches itself off automatically if the fastener guide is pressed against the
working surface for longer than 6 seconds without a fastener being driven. The fastening tool can
be switched on again by pressing the on/off button.
The fastening tool switches itself off automatically if it is not used for 6 minutes.
6.4 Switching off Bluetooth
▶ Press the on/off button for at least 5 seconds until the LED shows blue twice.
➥ No further data transfer is possible.
➥ Bluetooth is not available in all markets
Bluetooth can be deactivated if you are in a sensitive environment (e.g. a hospital) where use of
Bluetooth is prohibited.
7 Care and maintenance
7.1 Care and maintenance
WARNING
Risk of injury with battery inserted !
▶ Always remove the battery before carrying out care and maintenance tasks!
Care and maintenance of the tool
• Switch off the fastening tool.
• Remove the battery.
• Remove the fastener from the fastener guide.
• Carefully remove any dirt that may be adhering to parts.
• Clean the air vents carefully with a dry brush.
• Use only a slightly damp cloth to clean the casing. Do not use cleaning agents containing silicone as
these can attack the plastic parts.
Care of the lithiumion batteries
• Keep the battery free from oil and grease.
• Use only a slightly damp cloth to clean the casing. Do not use cleaning agents containing silicone as
these may attack the plastic parts.
• Avoid ingress of moisture.
Maintenance
• Check all visible parts and controls for signs of damage at regular intervals and make sure that they all
function correctly.
• Do not operate the product if signs of damage are found or if parts malfunction. Have it repaired
immediately by Hilti Service.
• After cleaning and maintenance, fit all guards or protective devices and check that they function correctly.
2209576 English 21
*2209576*
Printed: 20.09.2019 | Doc-Nr: PUB / 5514237 / 000 / 00
Page 28

To help ensure safe and reliable operation, use only genuine Hilti spare parts and consumables. Spare
parts, consumables and accessories approved by Hilti for use with the product can be found at your
local Hilti Store or online at: www.hilti.group.
8 Transport and storage of cordless tools
Transport
▶ Switch off the fastening tool.
CAUTION
Accidental starting during transport !
▶ Always transport your products with the batteries removed!
▶ Remove the battery.
▶ Remove the fastener from the fastener guide.
▶ Never transport batteries in bulk form (loose, unprotected).
▶ Check the tool and batteries for damage before use after long periods of transport.
Storage
CAUTION
Accidental damage caused by defective or leaking batteries !
▶ Always store your products with the batteries removed!
▶ Store the tool and batteries in a place that is as cool and dry as possible.
▶ Never leave batteries in direct sunlight, near sources of heat or behind glass.
▶ Store the tool and batteries in a place where they cannot be accessed by children or unauthorized
persons.
▶ Check the tool and batteries for damage before use after long periods of storage.
9 Troubleshooting
If the trouble you are experiencing is not listed in this table or you are unable to remedy the problem by
yourself, please contact Hilti Service.
Trouble or fault Possible cause Action to be taken
The spring element is not tensioned; no status indication.
The spring element is not tensioned, the status indicator
blinks green and 1 battery
charge status LED blinks.
The spring element is not retensioned, the status indicator blinks green and 4 battery
charge status LEDs blink.
The spring element is not tensioned and the status indicator blinks red.
The spring element is not tensioned and the status indicator lights red.
Fastener driven at an angle. Too much contact pressure ap-
The battery is empty. ▶ Change the battery.
The battery is not fitted correctly. ▶ Insert the battery. → page 19
The battery is empty. ▶ Change the battery.
Battery temperature too low. ▶ Allow the battery to warm up
The fastening tool has overheated. ▶ Allow the fastening tool to cool
The fastener guide is not fitted
correctly.
System fault ▶ Remove the battery. → page 19
plied through the grip to the fastening tool.
Fastening tool was angled off the
driving axis when pressed against
the surface.
slowly to room temperature.
down.
▶ Insert the fastener guide.
→ page 19
▶ Insert the battery. → page 19
▶ Apply less pressure to press
the fastening tool against the
surface.
▶ Press the fastening tool at right
angles against the surface,
applying pressure to the grip
surface on the back of the
fastening tool.
22 English 2209576
Printed: 20.09.2019 | Doc-Nr: PUB / 5514237 / 000 / 00
*2209576*
Page 29

10 Disposal
Most of the materials from which Hilti tools and appliances are manufactured can be recycled. The
materials must be correctly separated before they can be recycled. In many countries, your old tools,
machines or appliances can be returned to Hilti for recycling. Ask Hilti Service or your Hilti representative
for further information.
Battery disposal
Improper disposal of batteries can result in health hazards from leaking gases or fluids.
▶ DO NOT send batteries through the mail!
▶ Cover the terminals with a non-conductive material (such as electrical tape) to prevent short circuiting.
▶ Dispose of your battery out of the reach of children.
▶ Dispose of the battery at your Hilti Store, or consult your local governmental garbage disposal or public
health and safety resources for disposal instructions.
▶ Do not dispose of power tools, electronic equipment or batteries as household waste!
11 Manufacturer’s warranty
▶ Please contact your local Hilti representative if you have questions about the warranty conditions.
12 RoHS (Restriction of Hazardous Substances)
Click on the link to go to the table of hazardous substances: BX 3BT qr.hilti.com/r9808595.
There is a link to the RoHS table, in the form of a QR code, at the end of this document.
*2209576*
Printed: 20.09.2019 | Doc-Nr: PUB / 5514237 / 000 / 00
2209576 English 23
Page 30

24 English 2209576
Printed: 20.09.2019 | Doc-Nr: PUB / 5514237 / 000 / 00
*2209576*
Page 31

Printed: 20.09.2019 | Doc-Nr: PUB / 5514237 / 000 / 00
Page 32

*2209576*
2209576
Hilti = registered trademark of Hilti Corp., Schaan Pos. HEB | 20190913
Printed: 20.09.2019 | Doc-Nr: PUB / 5514237 / 000 / 00
 Loading...