

Page 1

Migration Guide
netX 50 to netX 51/52
Hilscher Gesellschaft für Systemautomation mbH
www.hilscher.com
DOC120109MG05EN | Revision 5 | English | 2013-08 | Released | Public
Page 2

Introduction 2/56
Table of Contents
1 Introduction.............................................................................................................................................3
1.1 Migration from netX 50 to netX 51/52............................................................................................3
1.2 List of Revisions.............................................................................................................. ...............5
1.3 Terms, Abbreviations and Definitions............................................................................................5
1.3.1 netX Signal Description.....................................................................................................................6
1.4 Legal Notes..................................................................................................................................10
1.4.1 Copyright.........................................................................................................................................10
1.4.2 Important Notes...............................................................................................................................10
1.4.3 Exclusion of Liability........................................................................................................................ 11
1.4.4 Export..............................................................................................................................................11
2 Comparison netX 50 with netX 51/52 .................................................................................................12
2.1 Overview ......................................................................................................................................12
2.1.1 Block Diagrams...............................................................................................................................12
2.1.2 Key Features...................................................................................................................................13
2.1.3 Enhancements of netX 51/52 against netX 50 ................................................................................14
3 Package, Pinning, Pad Cells ...............................................................................................................15
3.1 netX 52.........................................................................................................................................15
3.1.1 netX 52 Package............................................................................................................................. 15
3.1.2 netX 52 Pinning............................................................................................................................... 16
3.2 Alternative Function at Host Interface..........................................................................................22
3.3 netX 51.........................................................................................................................................24
3.3.1 Differences in Pinning and Pad Cells .............................................................................................. 24
3.4 MMIO Signals...............................................................................................................................32
4 General Changing ................................................................................................................................34
4.1 CPUs............................................................................................................................................34
4.1.1 Core CPU........................................................................................................................................34
4.1.2 Additional CPU................................................................................................................................ 34
4.2 Memory ........................................................................................................................................35
4.2.1 Layout..............................................................................................................................................35
4.3 Peripherals...................................................................................................................................36
4.4 Improved Memory Access Performance......................................................................................38
4.5 Activating 256 KByte as Dual-Port Memory and Detection of netX 51 or netX 52 Mode............39
4.6 Host Interface Modes...................................................................................................................40
4.7 Miscellaneous ..............................................................................................................................41
4.7.1 Operating Conditions....................................................................................................................... 41
4.7.2 Effects to existing Software............................................................................................................. 41
4.7.3 Effects to existing Development Tools ............................................................................................ 41
5 Erratas...................................................................................................................................................42
5.1 Fixed Erratas of netX 50 ..............................................................................................................42
5.2 New Errata for netX 51 / 52..........................................................................................................43
5.2.1 SYS LED lights doesn’t light correctly during active Boot Loader.................................................... 43
5.2.2 Simultaneous Operation of SDRAM and parallel Flash Memory at the Memory Interface ..............44
6 Design Examples..................................................................................................................................45
6.1 Design Example netX 51..............................................................................................................45
6.2 Design Example netX 52..............................................................................................................50
7 Appendix...............................................................................................................................................55
7.1 List of Tables................................................................................................................................55
7.2 List of Figures...............................................................................................................................55
7.3 Contacts.......................................................................................................................................56
netX 50 to netX 51/52 | Migration Guide
DOC120109MG05EN | Revision 5 | English | 2013-08 | Released | Public 2012-2013
Page 3
Introduction 3/56
1 Introduction
1.1 Migration from netX 50 to netX 51/52
This manual describes the differences between the netX 50 and netX 51/52 with the aim to support
and lead you during the migration from netX 50 to netX 51/52.
Real-Time-Ethernet / Fieldbus
8x IO-Link
3x UART
Peripherals
SPI / QSPI
Memory
Controller
Memory*
MEM
CAN
MAC
USB
2x I2C
672 KB
SRAM
64kB
ROM
Switch
EXT
PHY PHY
xC ALUs
Channel 1
xPIC RISC CPU
Data
netX 51 / 52
* netX 52:
None external Memory Bus
DPM
100 MHz
ARM 966
100 MHz
SPM
MAC PIO
xC ALUs
Channel 2
CPUs
Host-Interface
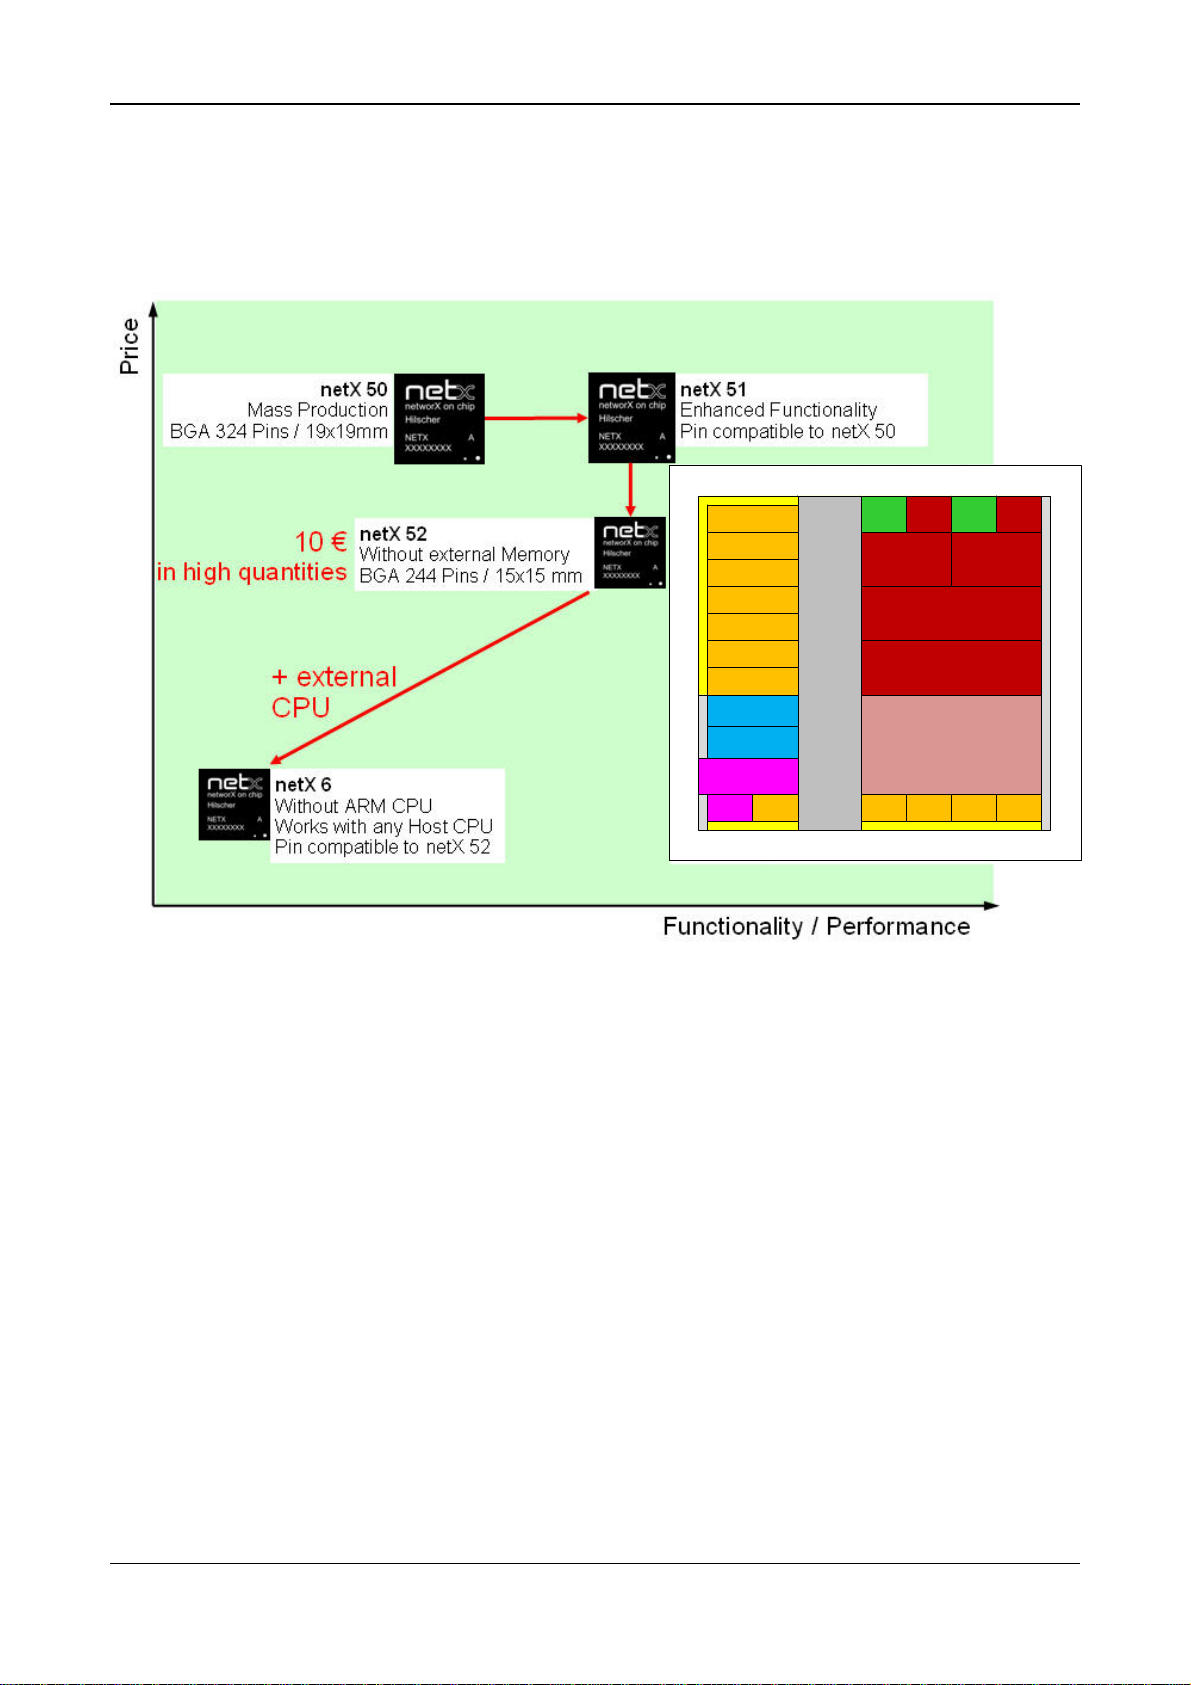
Figure 1: Functionality and Price of netX 6/50/51/52
Within the netX network controller family the netX 50 support all Real-Time-Ethernet systems. After
a few years in the market it was necessary to upgrade the communication functionality to support
PROFINET in the version 2.3. Together with some other enhancement we are offering the pin
compatible controller netX 51. This can be placed on already existing netX 50 PCBs without
modifications. It also supports IO-Link version 1.1 and includes much more RAM and an additional
32-Bit Risc Controller, CAN controller and a MAC.
The same functionality is available as netX 52 without an external memory bus in a smaller
package for a lower price.
The netX 6 with the same housing as the netX 52 is designed as network access controller. This
means it needs additional a host CPU to run the protocol stack. It includes only the 32-Bit Risc
controller and less memory to realize only the Real-Time-Switch functionality.
netX 50 to netX 51/52 | Migration Guide
DOC120109MG05EN | Revision 5 | English | 2013-08 | Released | Public 2012-2013
Page 4
Introduction 4/56
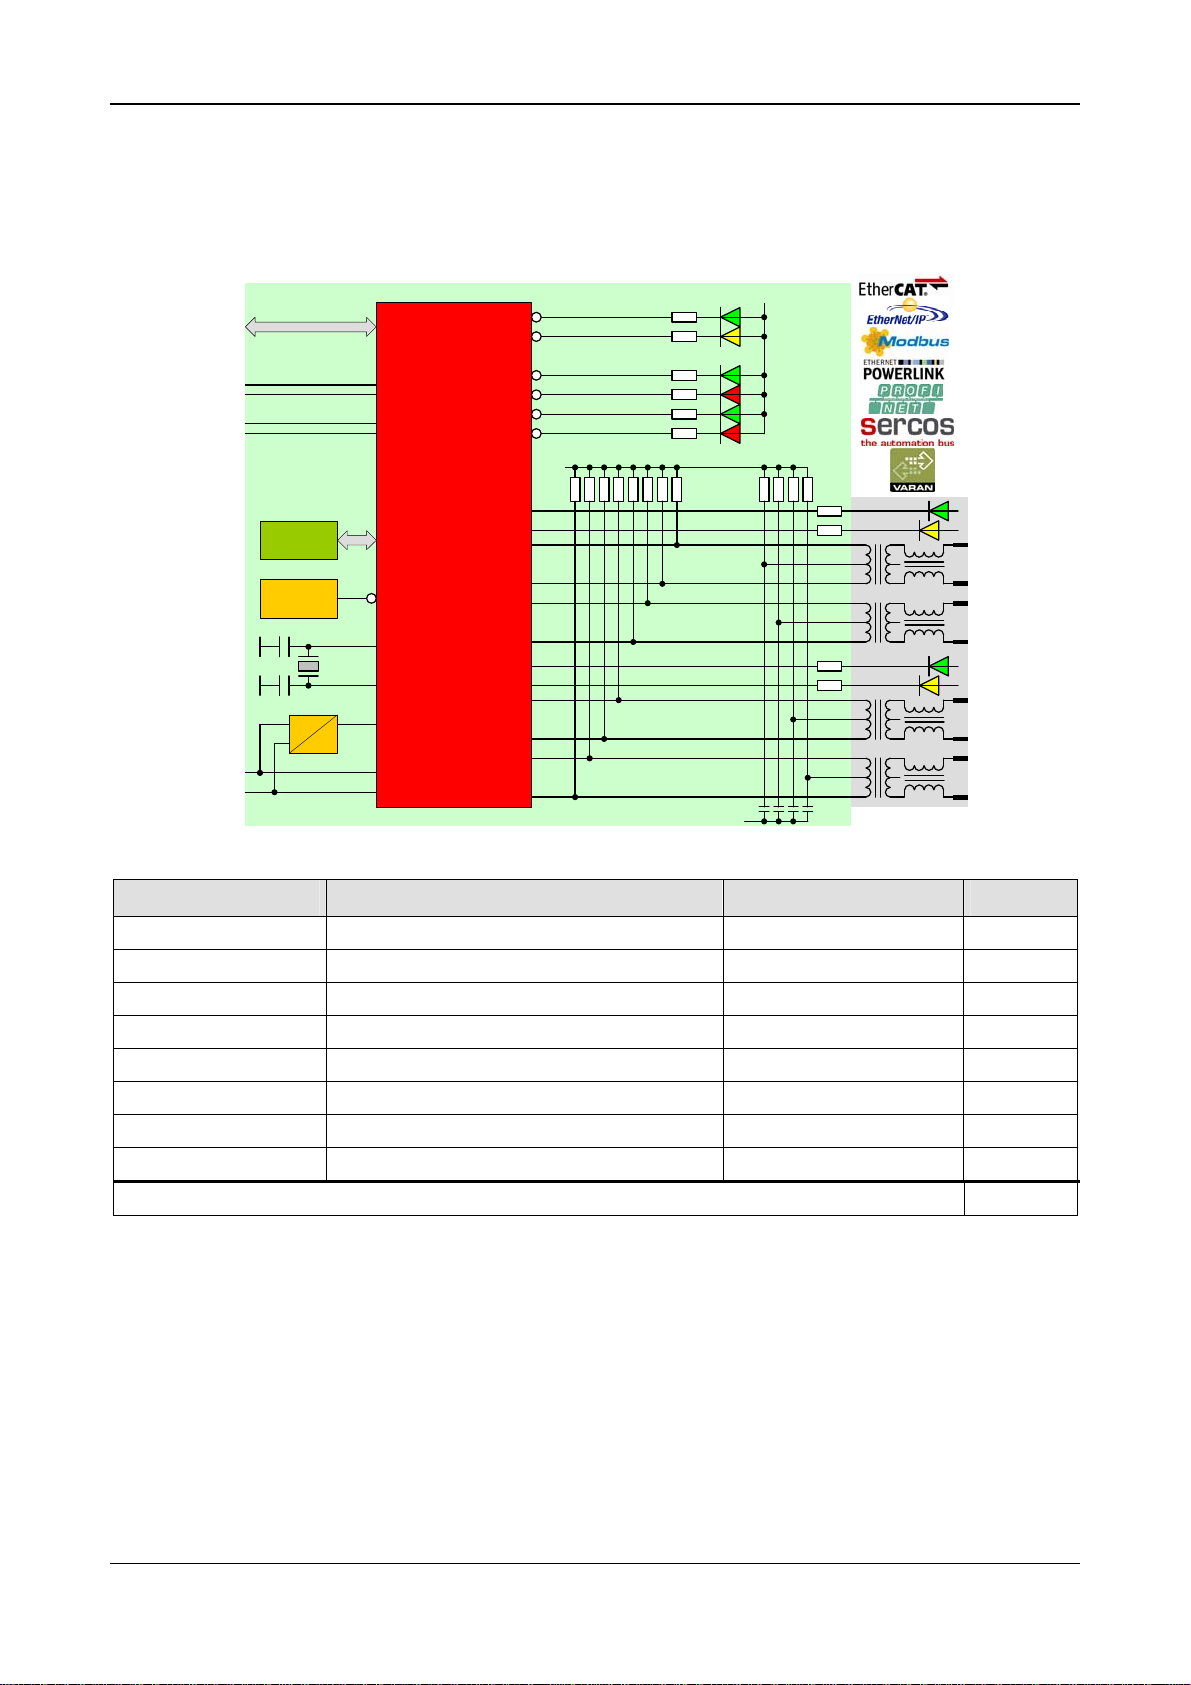
With the netX 52 you can build up a very compact (30 x 30 mm) 2-Port Real-Time-Ethernet
Interfaces for a very low price. With the loadable firmware the whole interface works a black box
with a configurable 8-/16-/32-Bit Dual-Port-Memory or a SPI slave interface.
The following block diagram gives you an overview. The detailed schematic you will find in the
annex of this Migration Guide.
Host-DPM
Host-SPI
UART or
Synchronization
USB
3.3V
GND
RDY
RUN
MMIO28
MMIO29
MMIO30
MMIO31
MMIO12
MMIO13
PHY0_TXP
PHY0_TXN
PHY0_RXP
PHY0_RXN
MMIO14
MMIO15
PHY1_TXP
PHY1_TXN
PHY1_RXP
PHY1_RXN
3.3V
4 MB
SPI Flash
Power on
Reset
3.3V
1.5V
DPM / SPM / PIO
RXD / SYNC0
TXD / SYNC1
USB
netX 52
SPI
POR
XTI
25 MHz
XTO
VDDC
VDDIO
VSS
Figure 2: Design Example with netX 51
3.3V
SYS
COM0
COM1
LINK
ACT
Ethernet
Channel 0
LINK
ACT
Ethernet
Channel 1
GND
Component Description Manufacturer Price
netX 52 Network Controller Hilscher 10,00 €
W25Q32VSSIG QSPI Flash Windbond 0,70 €
MAX811SEUS-T Reset Generator Maxim 0,20 €
EN5312Q DC/DC Converter 3,3 V/1,5 V Enpirion 1,20 €
25 MHz Crystal div. 0,30 €
3x LED Dual Color div. 0,30 €
Dual RJ45 with Magnetics / LEDs div. 2,80 €
Rs / Cs / Ls div. 0,50 €
Material Cost per Interface in quantities of 10.000 pcs. without PCB 16,00 €
Table 1: Material Costs
netX 50 to netX 51/52 | Migration Guide
DOC120109MG05EN | Revision 5 | English | 2013-08 | Released | Public 2012-2013
Page 5
Introduction 5/56
1.2 List of Revisions
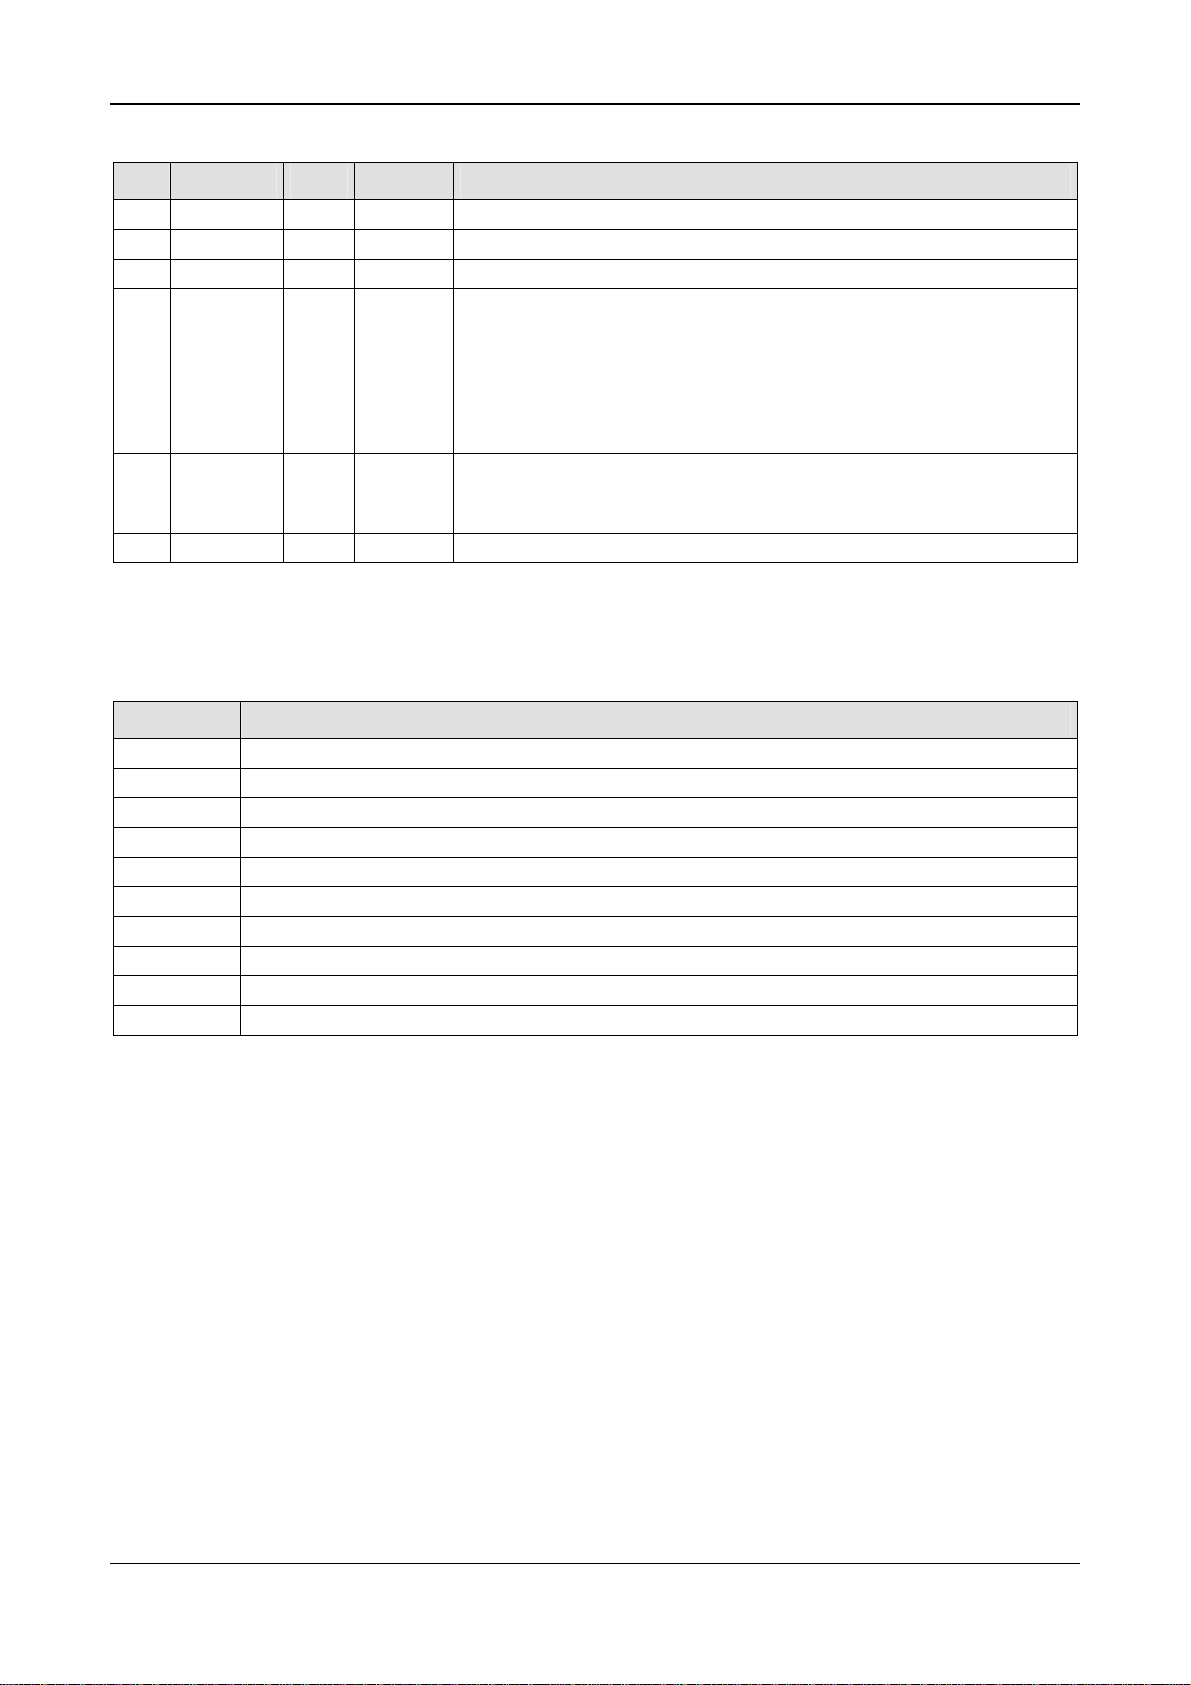
Rev Date Name Chapter Revision
0 2012-02-01 AO All Created.
1 2012-02-08 HJH All Reviewed.
2 2012-04-25 HJH Added some additional explanation.
3 2012-11-28 HH 1.3.1 Signal name for MII interface starts with MII (instead of ETH) in Table 4.
2.1.1 Figure 4: MAC (to PHY) mappable into Host Interface.
3.1.2 Corrections
3.2 Section Alternative Function at Host Interface added.
5.2.2
4 2013-03-26 HH
4.6 Section Host Interface Modes updated. Table 22 revised.
5 2013-08-26 HH 4.5 Correction: 10 Kbyte to 10 kOhm
Table 2: List of Revisions
2.1.1,
2.1.2
Section Simultaneous Operation of SDRAM and parallel Flash Memory at
the Memory Interface ad
Correctio
n: 1x I2C for netX 50
ded
1.3 Terms, Abbreviations and Definitions
Term Description
DPM
DFP
FTS Fast-Track Switching
HIF
INTRAM
PBGA
XiP
xMAC
xPEC
xPIC
Table 3: Terms, Abbreviations and Definitions
All variables, parameters, and data used in this manual have the LSB/MSB (“Intel”) data format.
This corresponds to the convention of the Microsoft C Compiler.
All IP addresses in this document have host byte order.
Dual-Port Memory
Dynamic Frame Packing
Host InterFace
INTernal SRAM
Plastic Ball Grid Array
EXecution in Place
Flexible Media Access Controller
Flexible Protocol Execution Controller
Flexible Peripheral Interface Controller
netX 50 to netX 51/52 | Migration Guide
DOC120109MG05EN | Revision 5 | English | 2013-08 | Released | Public 2012-2013
Page 6

Introduction 6/56
1.3.1 netX Signal Description
General
PORn Power on Reset
RSTINn Reset Input
RSTOUTn Reset Output
RDYn RDY-LED / Boot option
RUNn RUN-LED / Boot option
CLKOUT Clock out
WDGACT Watchdog active
Oscillator
OSC_XTI 25 MHz Crystal Input
OSC_XTO 25 MHz Crystal Output
OSC_VSS Oscillator Power Supply Ground
OSC_VDDC Oscillator Power Supply Core 1.5V
JTAG
JT_TRSTn JTAG Test Reset
JT_TMS JTAG Test Mode Select
JT_TCLK JTAG Test Clock
JT_TDI JTAG Test Data Input
JT_TDO JTAG Test Data Output
SPI
SPI0_CLK SPI 0 Clock
SPI0_CS0n SPI 0 Chip Select 0
SPI0_CS1n SPI 0 Chip Select 1
SPI0_MISO SPI 0 Master Input Slave Output Data
SPI0_MOSI SPI 0 Master Output Slave Input Data
QSPI_CLK XiP / QSPI Clock
QSPI_CSn XiP / QSPI Chip Select
QSPI_SIO0...3 XiP / QSPI Serial IO Data 0…3
I2C
I2C_SCL I2C Serial Clock Line
I2C_SDA I2C Serial Data Line
USB
USB_DNEG USB D- Line
USB_DPOS USB D+ Line
USB_VDDC USB Power Supply Core 1.5 V
USB_VDDIO USB Power Supply IO 3.3 V
Test
BSCAN_TRST Reset Boundary Scan Controller
TEST Activate Test Mode (left open)
TMC1 Test Mode 1 (left open)
TMC2 Test Mode 2 (left open)
netX 50 to netX 51/52 | Migration Guide
DOC120109MG05EN | Revision 5 | English | 2013-08 | Released | Public 2012-2013
Page 7

Introduction 7/56
TACT_TRST Reset Test Controller
MEM_IF_OM Memory Interface Output Mode, Connect to GND for normal operating mode
MMIO
MMIO0...48 Multiplex Matrix IO 0...48
Fieldbus Interface
XM0_TX XMAC0 Transmit Data
XM0_ECLK External Clock input for XM0_TX / output from XMAC0
XM0_TX_ECLK XMAC0 Transmit Data, clocked with external clock
FB0_CLK Clock output of fb0_clk
XM1_TX XMAC1 Transmit Data
XM1_ECLK External Clock input for XM1_TX / output from XMAC1
XM1_TX_ECLK XMAC1 Transmit Data, clocked with external clock
FB1_CLK Clock output of fb1_clk
Ethernet MAC MII Interface
MII_RXCLK Ethernet MAC Rx Clock
MII_RXD0...3 Ethernet MAC Rx Data 0...3
MII_RXDV Ethernet MAC Rx Data Valid
MII_RXER Ethernet MAC Rx Error
MII_TXCLK Ethernet MAC Tx Clock
MII_TXD0...3 Ethernet MAC Tx Data 0...3
MII_TXEN Ethernet MAC Tx Enable
MII_TXER Ethernet MAC Tx Error
MII_COL Ethernet MAC Collision
MII_CRS Ethernet MAC Carrier Sense
Memory Interface
MEMSR_CS0...2n SRAM Chip Select 0...2
MEMSR_OEn SRAM Output Enable
MEMSR_WEn SRAM Write Enable
MEMDR_CSn SDRAM Chip Select
MEMDR_WEn SDRAM Write Enable
MEMDR_RASn SDRAM RAS
MEMDR_CASn SDRAM CAS
MEMDR_CKE SDRAM Clock Enable
MEMDR_CLK SDRAM Clock
MEM_DQM0 Memory Data Qualifier Mask D0-7
MEM_DQM1 Memory Data Qualifier Mask D8-15
MEM_DQM2 Memory Data Qualifier Mask D16-23
MEM_DQM3 Memory Data Qualifier Mask D24-31
MEM_D0...31 Memory Data 0-31
MEM_A0...23 Memory Addre ss 0-23
Host Interface
DPM_A00...15 Dual-Port Memory Address 0..15
DPM_BE1n Dual-Port Memory Byte High Enable
netX 50 to netX 51/52 | Migration Guide
DOC120109MG05EN | Revision 5 | English | 2013-08 | Released | Public 2012-2013
Page 8

Introduction 8/56
DPM_BE3n Dual-Port Memory Byte Enable 3
DPM_CSn Dual-Port Memory Chip Select
DPM_D0...31 Dual-Port Memory Data 0...31
DPM_DIRQn Dual-Port Memory Data Interrupt
DPM_SIRQn Dual-Port Memory Sync Interrupt
DPM_RDn Dual-Port Memory Read
DPM_WAITn Dual-Port Memory Wait
DPM_WRn Dual-Port Memory Write
SPM_MISO Serial-Port Memory (SPI) Master Input Slave Output Data
SPM_MOSI Serial-Port Memory (SPI) Master Output Slave Input Data
SPM_CSN Serial-Port Memory (SPI) Chip Select
SPM_CLK Serial-Port Memory (SPI) Clock
SPM_DIRQ Serial-Port-Memory Interrupt Source 1
SPM_SIRQ Serial-Port-Memory Interrupt Source 2
PHY0, PHY1
PHY0_RXN PHY 0 Receive Input negative
PHY0_RXP PHY 0 Receive Input positive
PHY0_TXN PHY 0 Transmit Output negative
PHY0_TXP PHY 0 Transmit Output positive
FO0_RD Fiberoptic Ethernet channel 0, Receive Data
FO0_TD Fiberoptic Ethernet channel 0, Transmit Data
FO0_EN Fiberoptic Ethernet channel 0, Enable
FO0_SD Fiberoptic Ethernet channe l 0, Signal Detect
PHY0_VSSAT1 PHY 0 Analog Ground Supply
PHY0_VSSAT2 PHY 0 Analog Ground Supply
PHY0_VSSAR PHY 0 Analog Ground Supply
PHY0_VDDCART PHY 0 Analog TX/RX Power Supply 1.5 V
PHY1_RXN PHY 1 Receive Input negative
PHY1_RXP PHY 1 Receive Input positive
PHY1_TXN PHY 1 Transmit Output negative
PHY1_TXP PHY 1 Transmit Output positive
FO1_RD Fiberoptic Ethernet channel 1, Receive Data
FO1_TD Fiberoptic Ethernet channel 1, Transmit Data
FO1_EN Fiberoptic Ethernet channel 1, Enable
FO1_SD Fiberoptic Ethernet channe l 1, Signal Detect
PHY1_VSSAT1 PHY 1 Analog Ground Supply
PHY1_VSSAT2 PHY 1 Analog Ground Supply
PHY1_VSSAR PHY 1 Analog Ground Supply
PHY1_VDDCART PHY 1 Analog TX/RX Power Supply 1.5 V
PHY_EXTRES Reference Resistor 12.4 k / 1%
PHY_ATP Leave open!
PHY_VSSACP PHY Analog Central Ground Supply
PHY_VDDCAP PHY Analog Central Power Supply 1.5 V
netX 50 to netX 51/52 | Migration Guide
DOC120109MG05EN | Revision 5 | English | 2013-08 | Released | Public 2012-2013
Page 9

Introduction 9/56
PHY_VDDIOAC PHY Analog Central Power Supply 3.3 V
PHY_VSSAT PHY Analog Test Ground Supply
PHY_VDDIOAT PHY Analog Test Power Supply 3.3 V
Power
VSS Ground Supply (except PHY and Oscillator)
VDDC Power Supply, Core 1.5 V (except PHY and Oscillator)
VDDIO Power Supply, IO Buffer 3.3 V (except PHY and USB)
ETM
ETM_TCLK ETM Trace clock
ETM_TSYNC ETM Trace synchronization
ETM_DRQ ETM Debug request
ETM_DACK ETM Debug acknowledge
ETM_PSTAT0 ETM Pipe status 0
ETM_PSTAT1 ETM Pipe status 1
ETM_PSTAT2 ETM Pipe status 2
ETM_TPKT00 ETM Trace packet 0
ETM_TPKT01 ETM Trace packet 1
ETM_TPKT02 ETM Trace packet 2
ETM_TPKT03 ETM Trace packet 3
ETM_TPKT04 ETM Trace packet 4
ETM_TPKT05 ETM Trace packet 5
ETM_TPKT06 ETM Trace packet 6
ETM_TPKT07 ETM Trace packet 7
ETM_TPKT08 ETM Trace packet 8
ETM_TPKT09 ETM Trace packet 9
ETM_TPKT10 ETM Trace packet 10
ETM_TPKT11 ETM Trace packet 11
ETM_TPKT12 ETM Trace packet 12
ETM_TPKT13 ETM Trace packet 13
ETM_TPKT14 ETM Trace packet 14
ETM_TPKT15 ETM Trace packet 15
Table 4: Signal Description
netX 50 to netX 51/52 | Migration Guide
DOC120109MG05EN | Revision 5 | English | 2013-08 | Released | Public 2012-2013
Page 10

Introduction 10/56
1.4 Legal Notes
1.4.1 Copyright
2012-2013, Hilscher Gesellschaft für Systemautomation mbH
All rights reserved.
The images, photographs and texts in the accompanying material (user manual, accompanying
texts, documentation, etc.) are protected by German and international copyright law as well as
international trade and protection provisions. You are not authorized to duplicate these in whole or
in part using technical or mechanical methods (printing, photocopying or other methods), to
manipulate or transfer using electronic systems without prior written consent. You are not permitted
to make changes to copyright notices, markings, trademarks or ownership declarations. The
included diagrams do not take the patent situation into account. The company names and product
descriptions included in this document may be trademarks or brands of the respective owners and
may be trademarked or patented. Any form of further use requires the explicit consent of the
respective rights owner.
1.4.2 Important Notes
The user manual, accompanying texts and the documentation were created for the use of the
products by qualified experts, however, errors cannot be ruled out. For this reason, no guarantee
can be made and neither juristic responsibility for erroneous information nor any liability can be
assumed. Descriptions, accompanying texts and documentation included in the user manual do
not present a guarantee nor any information about proper use as stipulated in the contract or a
warranted feature. It cannot be ruled out that the user manual, the accompanying texts and the
documentation do not correspond exactly to the described features, standards or other data of the
delivered product. No warranty or guarantee regarding the correctness or accuracy of the
information is assumed.
We reserve the right to change our products and their specification as well as related user
manuals, accompanying texts and documentation at all times and without advance notice, without
obligation to report the change. Changes will be included in future manuals and do not constitute
any obligations. There is no entitlement to revisions of delivered documents. The manual delivered
with the product applies.
Hilscher Gesellschaft für Systemautomation mbH is not liable under any circumstances for direct,
indirect, incidental or follow-on damage or loss of earnings resulting from the use of the information
contained in this publication.
netX 50 to netX 51/52 | Migration Guide
DOC120109MG05EN | Revision 5 | English | 2013-08 | Released | Public 2012-2013
Page 11

Introduction 11/56
1.4.3 Exclusion of Liability
The software was produced and tested with utmost care by Hilscher Gesellschaft für
Systemautomation mbH and is made available as is. No warranty can be assumed for the
performance and flawlessness of the software for all usage conditions and cases and for the
results produced when utilized by the user. Liability for any damages that may result from the use
of the hardware or software or related documents, is limited to cases of intent or grossly negligent
violation of significant contractual obligations. Indemnity claims for the violation of significant
contractual obligations are limited to damages that are foreseeable and typical for this type of
contract.
It is strictly prohibited to use the software in the following areas:
for military purposes or in weapon systems;
for the design, construction, maintenance or operation of nuclear facilities;
in air traffic control systems, air traffic or air traffic communication systems;
in life support systems;
in systems in which failures in the software could lead to personal injury or injuries leading to
death.
We inform you that the software was not developed for use in dangerous environments requiring
fail-proof control mechanisms. Use of the software in such an environment occurs at your own risk.
No liability is assumed for damages or losses due to unauthorized use.
1.4.4 Export
The delivered product (including the technical data) is subject to export or import laws as well as
the associated regulations of different counters, in particular those of Germany and the USA. The
software may not be exported to countries where this is prohibited by the United States Export
Administration Act and its additional provisions. You are obligated to comply with the regulations at
your personal responsibility. We wish to inform you that you may require permission from state
authorities to export, re-export or import the product.
netX 50 to netX 51/52 | Migration Guide
DOC120109MG05EN | Revision 5 | English | 2013-08 | Released | Public 2012-2013
Page 12
Comparison netX 50 with netX 51/52 12/56
2 Comparison netX 50 with netX 51/52
2.1 Overview
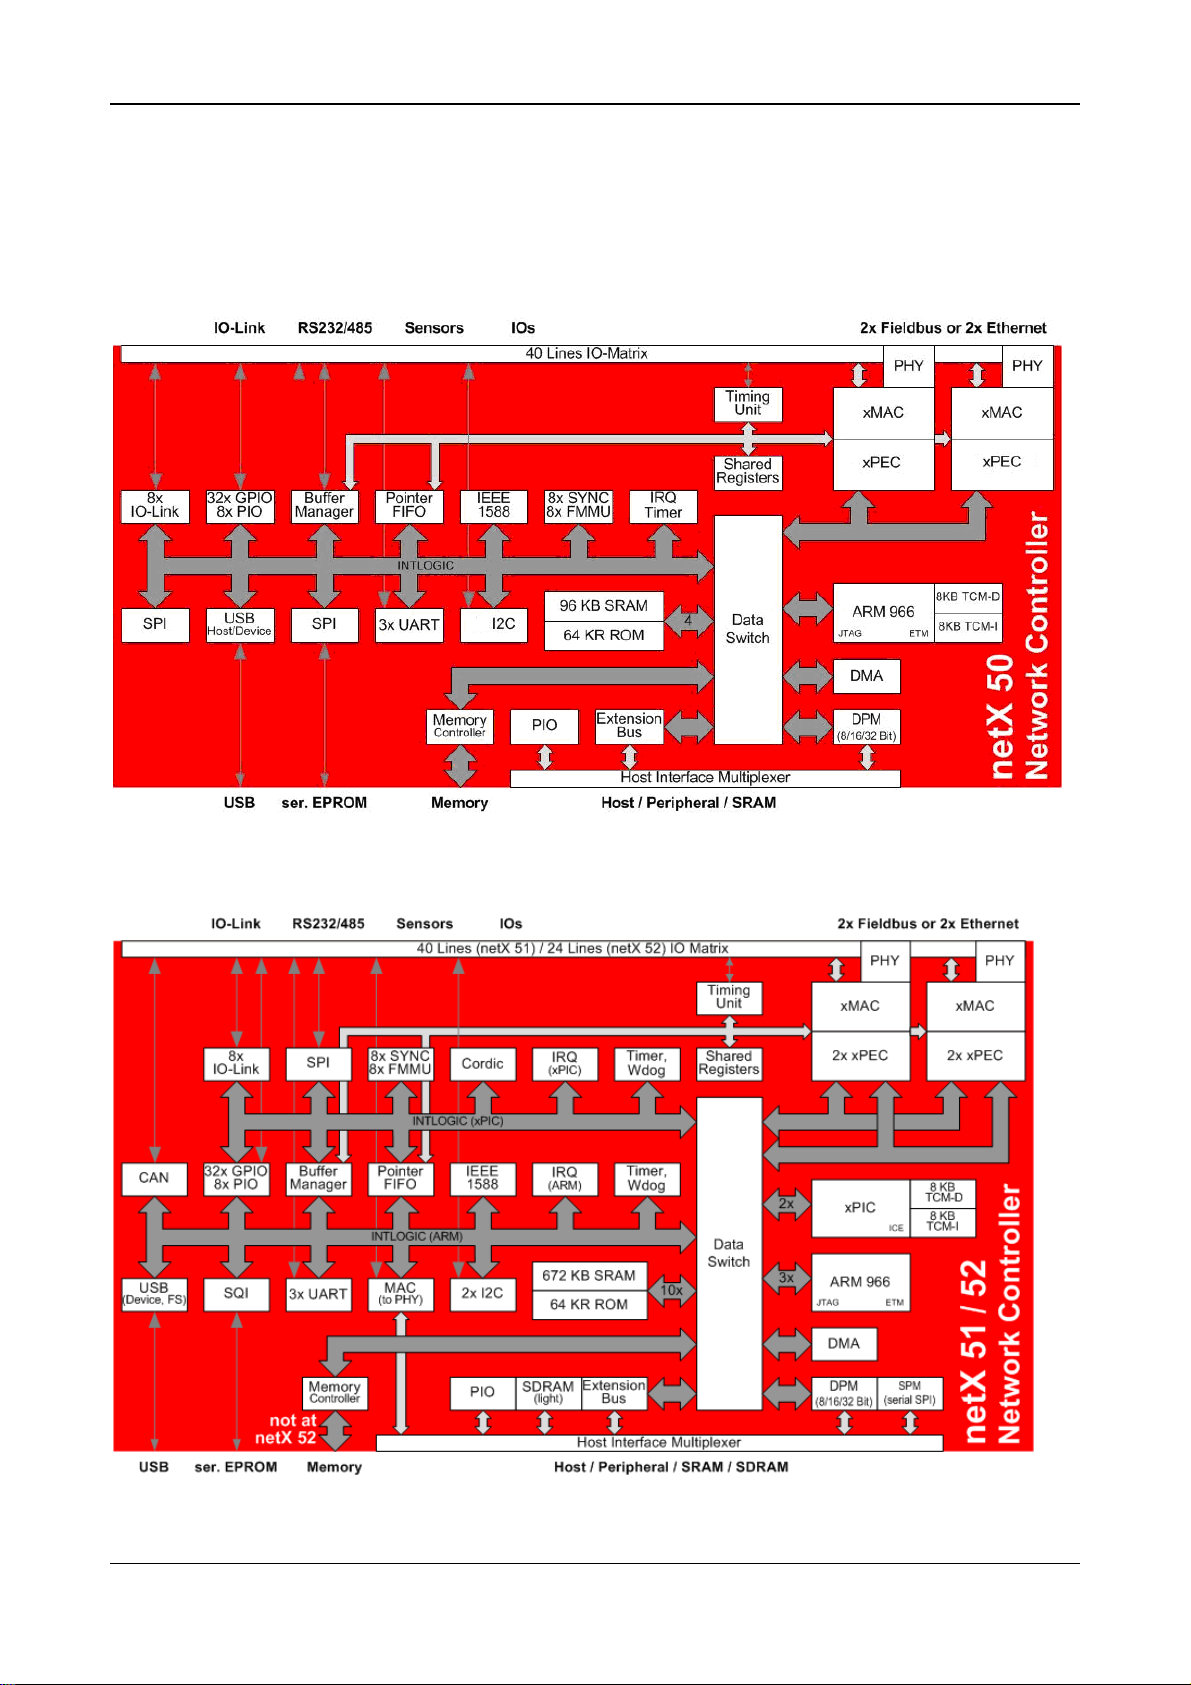
2.1.1 Block Diagrams
Block Diagram netX 50
Figure 3: Block Diagram of netX 50
Block Diagram netX 51/52
Figure 4: Block Diagram of netX 51/52
netX 50 to netX 51/52 | Migration Guide
DOC120109MG05EN | Revision 5 | English | 2013-08 | Released | Public 2012-2013
Page 13
Comparison netX 50 with netX 51/52 13/56
2.1.2 Key Features
The netX 51 and netX 52 is an enhancement of the existing netX 50 to fulfil the increasing
demands of performance and functionality of industrial networks. These controllers are supporting
the PROFINET Specification 2.3 with the new option of Dynamic Frame Packaging and the IO-Link
Version 1.1 with long telegrams.
We followed the successful strategy of the netX 10 controllers and implemented a second RISC
CPU. This can be programmed by the user to work parallel with the ARM CPU handling very fast
IO signals without interfering the communication tasks.
Further more we increased the application interface with a dedicated CAN Controller and an
Ethernet MAC. Very often these communication lines were the reason to use the more expensive
three channel controller netX 100.
To increase the over all performance of the netX 51 / 52 and to allow real single chip solutions the
internal memory is dramatically enlarged from 96 KByte to 672 KByte.
netX 50 51 52
CPU ARM 966-200 MHz ARM 966-100 MHz
Secondary CPU xPIC-100 MHz
SRAM / ROM / ITCM / DTCM [kByte] 96 / 64 / 8 / 8 672 / 64 / - / Separate External Memory Bus X X DPM parallel [Data Width] 8 / 16 / 32
DPM serial - X
Host Interface PIOs 54 58
Host Interface usable as
ExtMemBus / SDRAM / MAC
Communication Channels 2
Internal PHYs 2
CAN Controller / Ethernet MAC - / - X / X
IO-Link: Channels/Version 8 / V1.0 8 / V1.0, V1.1
USB Host / Device X / X - / X
UARTs / I2C / SPI / QSPI 3 / 1 / 2 / - 3 / 2 / 1 / 1
IEEE 1588 System Time X
IOs (without Host Interface PIOs) 32 40 24
Pins / Package 324 / PBGA 244 / PBGA
Grid / size [mm] 1.0 mm / 19x19 0.8 mm / 15x15
Fieldbus / RTE (w/o PN IRT with DFP and FTS) X / X
Support PROFINET IRT with DFP - X
Support Fast Track Switching (FTS) - X
Table 5: Key Features
- / - / -
X / - / X
X / X / X
netX 50 to netX 51/52 | Migration Guide
DOC120109MG05EN | Revision 5 | English | 2013-08 | Released | Public 2012-2013
Page 14

Comparison netX 50 with netX 51/52 14/56
2.1.3 Enhancements of netX 51/52 against netX 50
Significant more internal memory available to accelerate tasks
High performance access to INTRAM blocks via TCM channels of ARM CPU
Reduced Power Consumption with higher Performance based on lower System Clock with
ARM CPU high speed Memory Access via two TCM channels
Improved ARM performance on SDRAM
Performance of communication channel doubled to support high performance RTE-systems
as PROFINET IRT with Dynamic Frame Packing or Fast-Track-Switching
xPIC as additional 100 MHz RISC CPU for time-critical tasks
Separate CAN Controller in addition to two communication channels
Separate Ethernet MAC in addition to two communication channels (Datalink layer done by
xPIC)
New generation of Renesas’ internal PHYs for shortening cut-through delays
Dual-Port Memory: minimized access times, can run without Wait / Busy-line
Serial access to internal DPM via SPI/QSPI Slave interface without interfering of ARM CPU
Support IO-Link V1.1 specification
Dedicated Quad SPI Controller instead using internal communication controller for fast
loading of program code
Support of XiP (Execution in Place). Execution of program code directly out of serial flash
netX 50 to netX 51/52 | Migration Guide
DOC120109MG05EN | Revision 5 | English | 2013-08 | Released | Public 2012-2013
Page 15
Package, Pinning, Pad Cells 15/56
3 Package, Pinning, Pad Cells
The netX 51 comes in a 324 pin PBGA package and has the same pinning and size as the netX 50
has. It is designed to replace the netX 50 without changing the PCB (drop-in-replacement).
The netX 52 comes in a smaller 244 pin PBGA package with 0.8mm grid.
3.1 netX 52
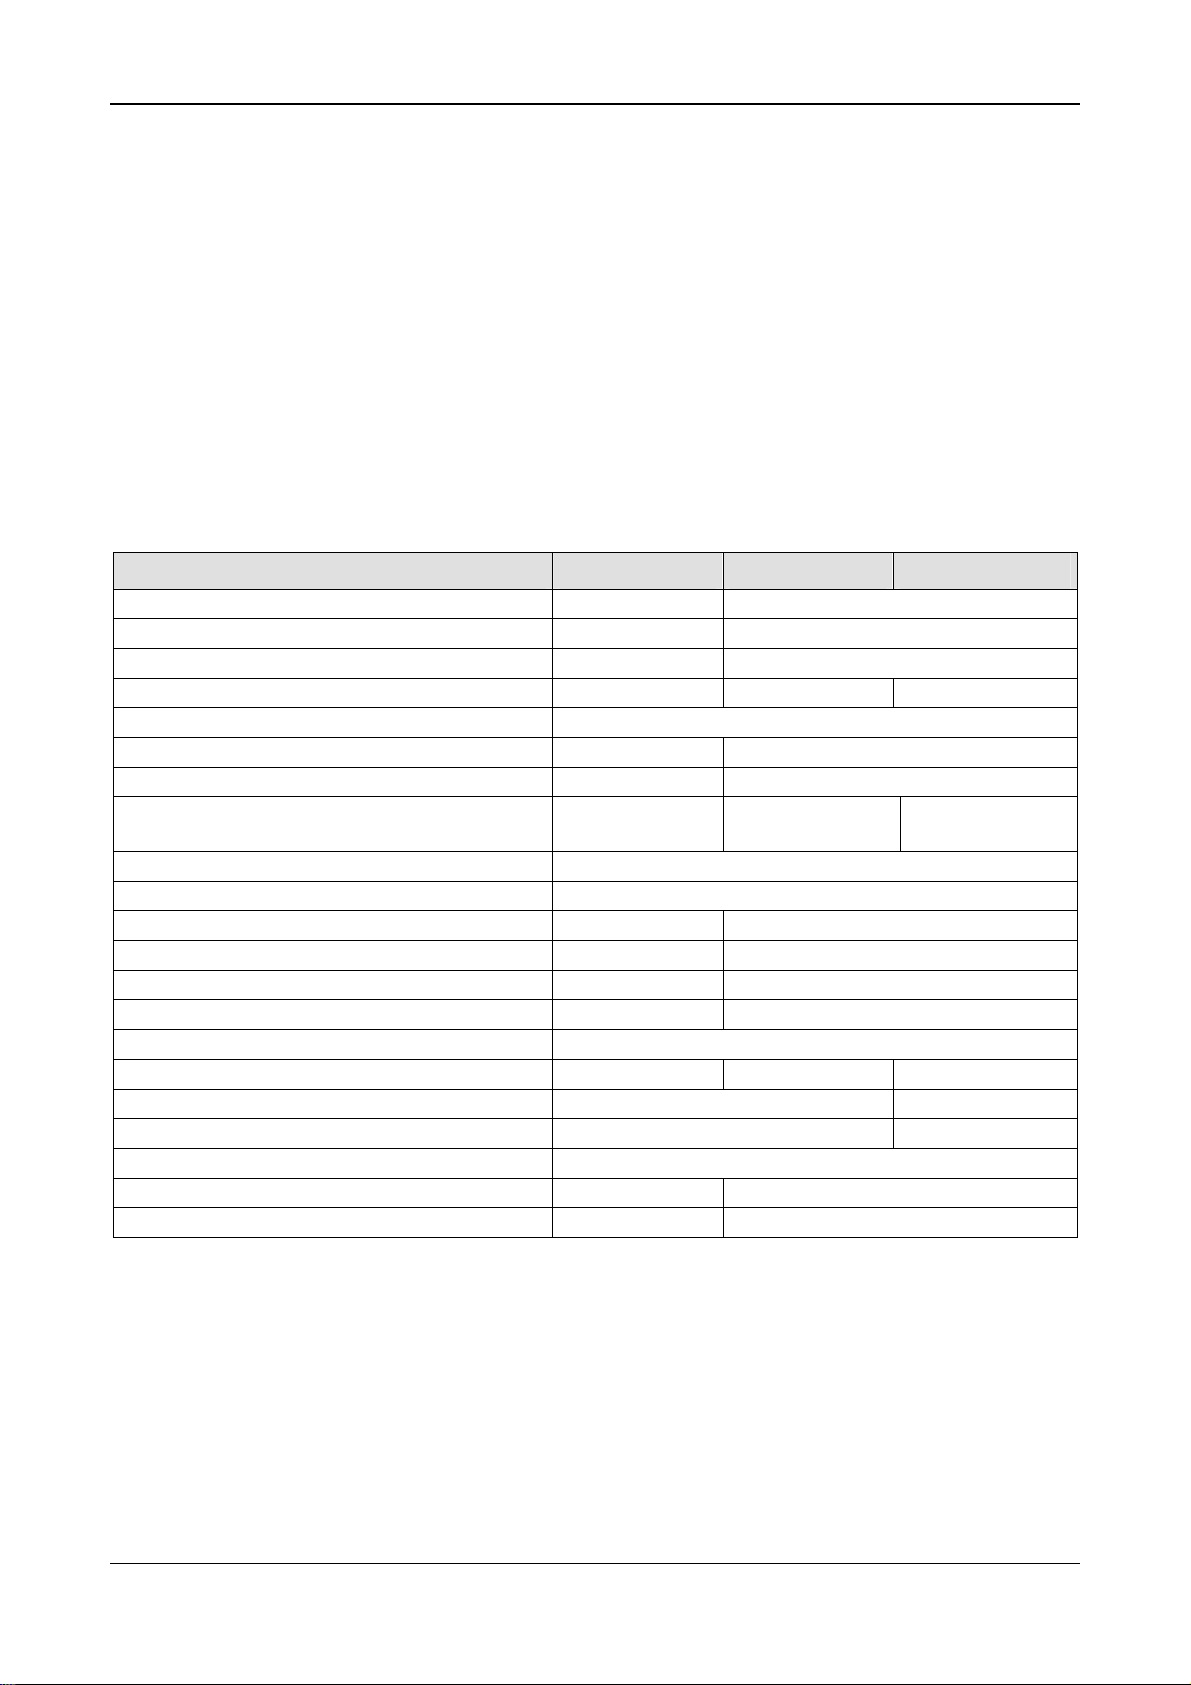
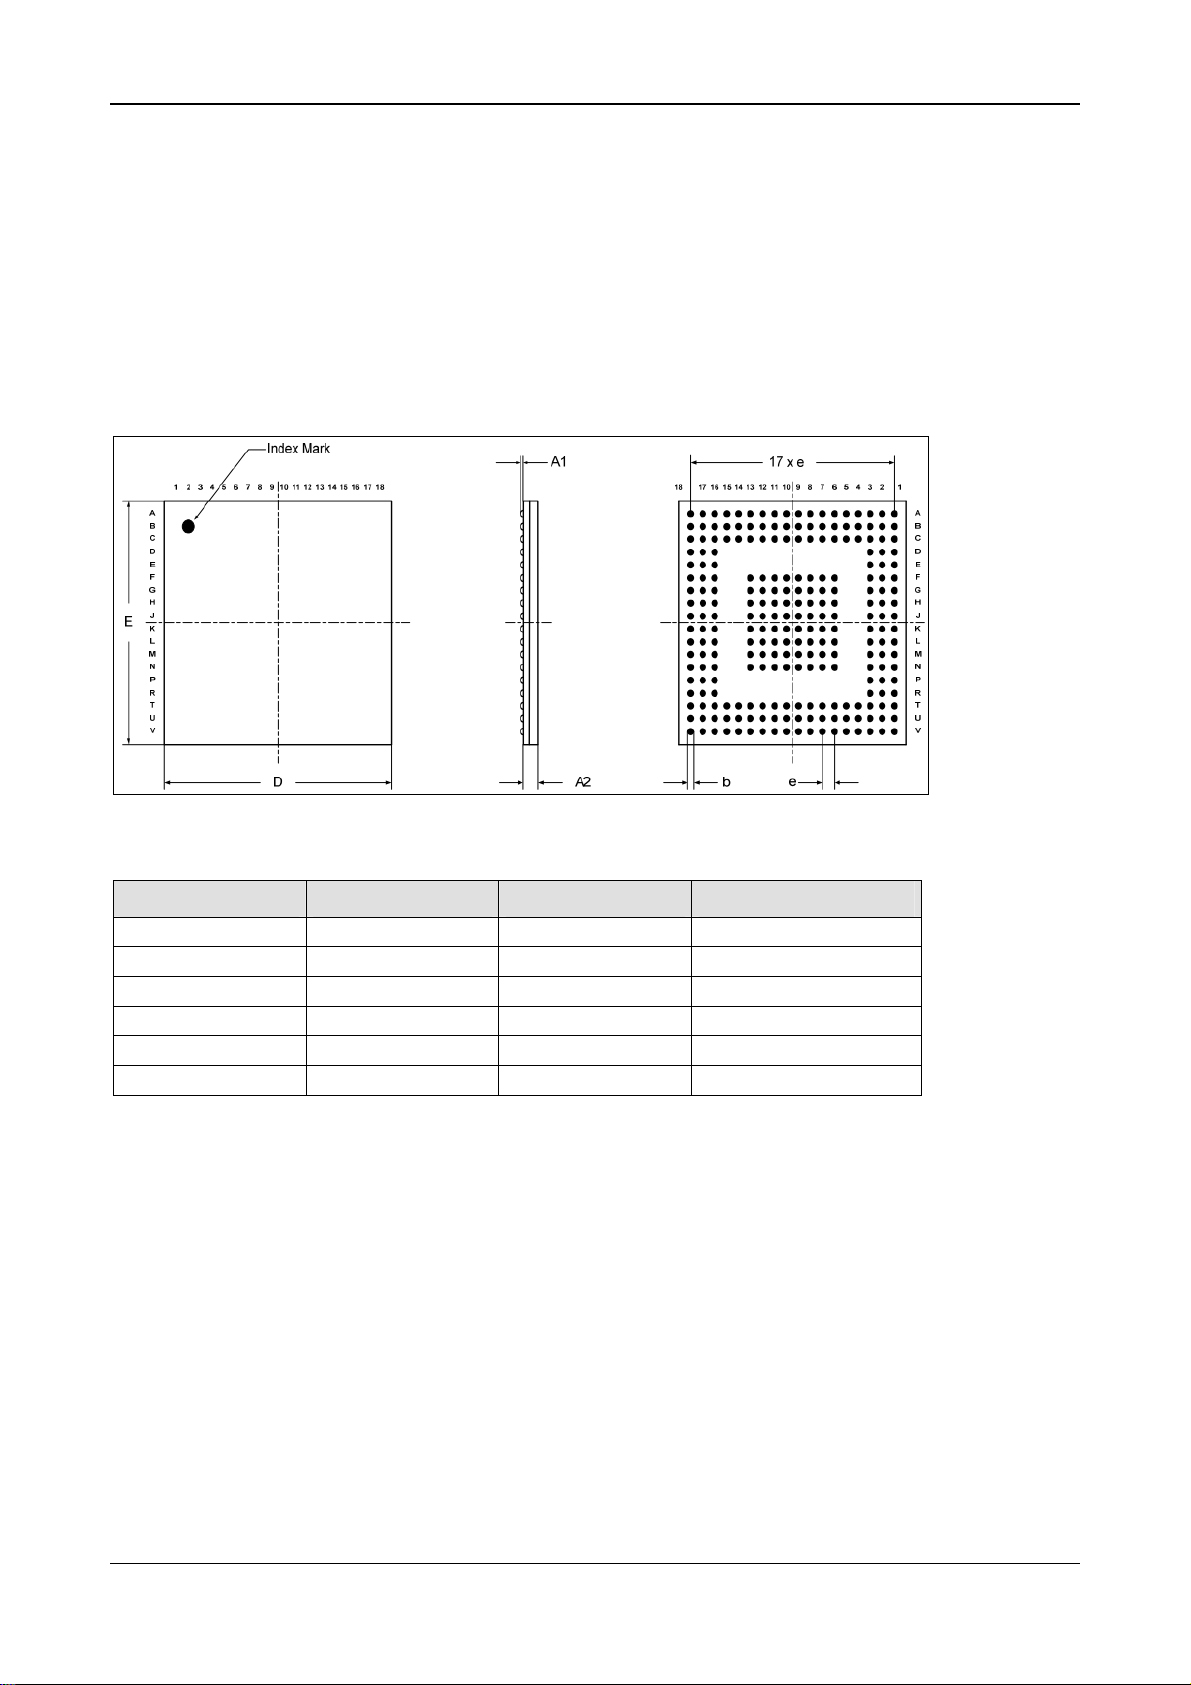
3.1.1 netX 52 Package
Figure 5: Mechanical Dimensions of the netX 52
Symbol Min Type Max
A1 0.29 mm 0.35 mm 0.41 mm
A2 1.11 mm
b 0.40 mm 0.50 mm 0.55 mm
E 14.90 mm 15.00 mm 15.10 mm
e 0.80 mm
D 14.90 mm 15.00 mm 15.10 mm
Table 6: Mechanical Dimensions of the netX 52
netX 50 to netX 51/52 | Migration Guide
DOC120109MG05EN | Revision 5 | English | 2013-08 | Released | Public 2012-2013
Page 16

Package, Pinning, Pad Cells 16/56
3.1.2 netX 52 Pinning
Pin Pad
A03 IOU9 IO DPM_A0/BE0n DPM Dual-Port Memory Address 0
B06 IOU9 IO DPM_A1/BE2n DPM Dual-Port Memory Address 1
B12 IOU9 IO DPM_A10 DPM Dual-Port Memory Address 10
A14 IOU9 IO DPM_A11 DPM Dual-Port Memory Address 11
B13 IOU9 IO DPM_A12 DPM Dual-Port Memory Address 12
A13 IOU9 IO DPM_A13 DPM Dual-Port Memory Address 13
A12 IOU9 IO DPM_A14 DPM Dual-Port Memory Address 14
B11 IOU9 IO DPM_A15 DPM Dual-Port Memory Address 15
A17 IOU9 IO DPM_A16 DPM Dual-Port Memory Address 16
A18 IOU9 IO DPM_A17 DPM Dual-Port Memory Address 17
C06 IOU9 IO DPM_A2 DPM Dual-Port Memory Address 2
C07 IOU9 IO DPM_A3 DPM Dual-Port Memory Address 3
B08 IOU9 IO DPM_A4 DPM Dual-Port Memory Address 4
A07 IOU9 IO DPM_A5 DPM Dual-Port Memory Address 5
B09 IOU9 IO DPM_A6 DPM Dual-Port Memory Address 6
C09 IOU9 IO DPM_A7 DPM Dual-Port Memory Address 7
C13 IOU9 IO DPM_A8 DPM Dual-Port Memory Address 8
A10 IOU9 IO DPM_A9 DPM Dual-Port Memory Address 9
A16 IOU9 IO DPM_BHEn/BE1n DPM Dual-Port Memory Byte Enable 1
A15 IOU9 IO DPM_CSn DPM Dual-Port Memory Chip Select
A01 IOU9 IO DPM_D0 DPM Dual-Port Memory Data 0
C02 IOU9 IO DPM_D1 DPM Dual-Port Memor y Data 1
D02 IOU9 IO DPM_D2 DPM Dual-Port Memor y Data 2
B03 IOU9 IO DPM_D3 DPM Dual-Port Memory Data 3
B04 IOU9 IO DPM_D4 DPM Dual-Port Memory Data 4
B02 IOU9 IO DPM_D5 DPM Dual-Port Memory Data 5
A05 IOU9 IO DPM_D6 DPM Dual-Port Memory Data 6
B05 IOU9 IO DPM_D7 DPM Dual-Port Memory Data 7
G18 IOU9 IO DPM_D8 DPM Dual-Port Memory Data 8
G16 IOU9 IO DPM_D9 DPM Dual-Port Memory Data 9
F17 IOU9 IO DPM_D10 DPM Dual-Port Memory Data 10
D18 IOU9 IO DPM_D11 DPM Dual-Port Memory Data 11
C18 IOU9 IO DPM_D12 DPM Dual-Port Memory Data 12
B18 IOU9 IO DPM_D13 DPM Dual-Port Memory Data 13
C17 IOU9 IO DPM_D14 DPM Dual-Port Memory Data 14
B17 IOU9 IO DPM_D15 DPM Dual-Port Memory Data 15
G17 IOU9 IO DPM_D16 DPM Dual-Port Memory Data 16
F18 IOU9 IO DPM_D17 DPM Dual-Port Memory Data 17
E18 IOU9 IO DPM_D18 DPM Dual-Port Memory Data 18
E17 IOU9 IO DPM_D19 DPM Dual-Port Memory Data 19
C12 IOU9 IO DPM_D20 DPM Dual-Port Memory Data 20
C11 IOU9 IO DPM_D21 DPM Dual-Port Memory Data 21
A11 IOU9 IO DPM_D22 DPM Dual-Port Memory Data 22
C10 IOU9 IO DPM_D23 DPM Dual-Port Memory Data 23
In
Signal Group Description
Out
netX 50 to netX 51/52 | Migration Guide
DOC120109MG05EN | Revision 5 | English | 2013-08 | Released | Public 2012-2013
Page 17

Package, Pinning, Pad Cells 17/56
Pin Pad
A09 IOU9 IO DPM_D24 DPM Dual-Port Memory Data 24
A08 IOU9 IO DPM_D25 DPM Dual-Port Memory Data 25
A06 IOU9 IO DPM_D26 DPM Dual-Port Memory Data 26
B07 IOU9 IO DPM_D27 DPM Dual-Port Memory Data 27
A02 IOU9 IO DPM_D28 DPM Dual-Port Memory Data 28
A04 IOU9 IO DPM_D29 DPM Dual-Port Memory Data 29
D03 IOU9 IO DPM_D30 DPM Dual-Port Memory Data 30
H17 IOU9 IO DPM_D31 DPM Dual-Port Memory Data 31
D16 IOU9 IO DPM_DIRQn DPM Dual-Port Memory Data Interrupt
B15 IOU9 IO DPM_RDn DPM Dual-Port Memory Read
C15 IOU9 IO DPM_WAITn DPM Dual-Port Memory Wait
C08 IOD9 IO DPM_SIRQn DPM Dual-Port Memory Sync Interrupt
B16 IOU9 IO DPM_WRHn/BE3n DPM Dual-Port Memory Byte Enable 3
B14 IOU9 IO DPM_WRn/WRLn DPM Dual-Port Memory Write
E03 IDS I BSCAN_TRST GENERAL Reset Boundary Scan Controller
V07 PLL power supply I OSC_VDDC GENERAL Oscillator Power Supply Core 1.5V
U07 PLL power supply I OSC_VSS GENERAL Oscillator Power Supply Ground
U08 Ocsillator pad I OSC_XTI GENERAL 25 MHz Crystal Input
V08 Ocsillator pad O OSC_XTO GENERAL 25 MHz Crystal Output
C01 IUS I PORn GENERAL Power on Reset
F01 IOD6 IO RDYn GENERAL RDY-LED / Boot start option
D01 OZ6 O RSTOUTn GENERAL Reset Output
F02 IOD6 IO RUNn GENERAL RUN-LED / Boot start option
G02 IDS I TACT_TRST GENERAL Reset Test Controller
B10 ID I TEST GENERAL Activate Test Mode (left open)
F03 Internal Test pin, tmc1 I TMC1 GENERAL Test Mode 1 (left open)
G03 Internal Test pin, tmc2 I TMC2 GENERAL Test Mode 2 (left open)
H18 IOZUS9 (5K pull up) IO I2C_SCL I2C I2C Serial Clock Line
H16 IOZUS9 (5K pull up) IO I2C_SDA I2C I2C Serial Data Line
H01 IUS I JT_TCLK JTAG JTAG Test Clock
J03 IUS I JT_TDI JT AG JTAG Test Data Input
M03 OZ6 O JT_TDO JTAG JTAG Test Data Output
K03 IUS I JT_TMS JTAG JTAG Test Mode Select
H03 IDS I JT_TRSTn JTAG JTAG Test Reset
T13 - - n. c. - Reserved
T10 1,5V Core Power VDDC POWER Power Supply Core 1.5V
T12 1,5V Core Power VDDC POWER Power Supply Core 1.5V
T11 3,3V IO Power VDDIO POWER Power Supply IO 3.3V
U14 3,3V IO Power VDDIO POWER Power Supply IO 3.3V
U10 - - n. c. - Reserved
V10 - - n. c. - Reserved
U12 - - n. c. - Reserved
V12 - - n. c. - Reserved
U11 - - n. c. - Reserved
V11 - - n. c. - Reserved
U13 - I- n. c. - Reserved
In
Signal Group Description
Out
netX 50 to netX 51/52 | Migration Guide
DOC120109MG05EN | Revision 5 | English | 2013-08 | Released | Public 2012-2013
Page 18

Package, Pinning, Pad Cells 18/56
Pin Pad
V13 - I- n. c. - Reserved
H02 IODS6 IO MMIO0 MMIO Multiplex Matrix IO 0
K02 IODS6 IO MMIO1 MMIO Multiplex Matrix IO 1
J02 IODS6 IO MMIO2 MMIO Multiplex Matrix IO 2
L03 IODS6 IO MMIO3 MMIO Multiplex Matrix IO 3
L01 IODS6 IO MMIO4 MMIO Multiplex Matrix IO 4
M01 IODS6 IO MMIO5 MMIO Multiplex Matrix IO 5
M02 IODS6 IO MMIO6 MMIO Multiplex Matrix IO 6
N01 IODS6 IO MMIO7 MMIO Multiplex Matrix IO 7
N02 IODS6 IO MMIO8 MMIO Multiplex Matrix IO 8
P02 IODS6 IO MMIO9 MMIO Multiplex Matrix IO 9
R01 IODS6 IO MMIO10 MMIO Multiplex Matrix IO 10
T01 IODS6 IO MMIO11 MMIO Multiplex Matrix IO 11
R02 IODS6 IO MMIO12 MMIO Multiplex Matrix IO 12
U02 IODS6 IO MMIO13 MMIO Multiplex Matrix IO 13
T02 IODS6 IO MMIO14 MMIO Multiplex Matrix IO 14
R03 IODS6 IO MMIO15 MMIO Multiplex Matrix IO 15
T04 IODS6 IO MMIO16 MMIO Multiplex Matrix IO 16
V01 IODS6 IO MMIO17 MMIO Multiplex Matrix IO 17
U04 IODS6 IO MMIO18 MMIO Multiplex Matrix IO 18
U03 IODS6 IO MMIO19 MMIO Multiplex Matrix IO 19
T05 IODS6 IO MMIO20 MMIO Multiplex Matrix IO 20
V03 IODS6 IO MMIO21 MMIO Multiplex Matrix IO 21
T06 IODS6 IO MMIO22 MMIO Multiplex Matrix IO 22
U05 IODS6 IO MMIO23 MMIO Multiplex Matrix IO 23
N16 ANA PHY_ATP PHY
N17 ANA PHY_EXTRES PHY PHY Reference Resistor 12.4K 1%
M16 APWR PHY_VDDCAP PHY PHY Power Supply Core 1.5V
N18 APWR PHY_VDDIOAC PHY PHY Power Supply IO 3.3V
T17 APWR PHY_VDDIOAT PHY PHY Power Supply IO 3.3V
L16 AGND PHY_VSSACP PHY PHY Power Supply Ground
M12 AGND PHY_VSSAT PHY PHY Po wer Supply Ground
R17 PHY Receiver I PHY0_RXN PHY PHY 0 Receive Input negative
R18 PHY Receiver I PHY0_RXP PHY PHY 0 Receive Input positive
P17 PHY Transceiver O PHY0_TXN PHY PHY 0 Transmit Output negative
P18 PHY Transceiver O PHY0_TXP PHY PHY 0 Transmit Output positive
U18 APWR PHY0_VDDCART PHY PHY 0 Power Supply Core 1.5V
P16 AGND PHY0_VSSA R PHY PHY 0 Power Supply Ground
L10 AGND PHY0_VSSAT1 PHY PHY 0 Power Supply Ground
L11 AGND PHY0_VSSAT2 PHY PHY 0 Power Supply Ground
K17 PHY Receiver I PHY1_RXN PHY PHY 0 Receive Input positive
K18 PHY Receiver I PHY1_RXP PHY PHY 0 Receive Input negative
L17 PHY Transceiver O PHY1_TXN PHY PHY 1 Transmit Output positive
L18 PHY Transceiver O PHY1_TXP PHY PHY 1 Transmit Output negative
K16 APWR PHY1_VDDCART PHY PHY 1 Power Supply Core 1.5V
In
Signal Group Description
Out
PHY Analog Test Point
(leave open)
netX 50 to netX 51/52 | Migration Guide
DOC120109MG05EN | Revision 5 | English | 2013-08 | Released | Public 2012-2013
Page 19

Package, Pinning, Pad Cells 19/56
Pin Pad
L12 AGND PHY1_VSSAR PHY PHY 1 Power Supply Ground
M18 AGND PHY1_VSSAT1 PHY PHY 1 Power Supply Ground
M17 AGND PHY1_VSSAT2 PHY PHY 1 Power Supply Ground
F06 1,5V Core Power VDDC POWER Power Supply Core 1.5V
F07 1,5V Core Power VDDC POWER Power Supply Core 1.5V
F08 1,5V Core Power VDDC POWER Power Supply Core 1.5V
F09 1,5V Core Power VDDC POWER Power Supply Core 1.5V
F10 1,5V Core Power VDDC POWER Power Supply Core 1.5V
F11 1,5V Core Power VDDC POWER Power Supply Core 1.5V
F12 1,5V Core Power VDDC POWER Power Supply Core 1.5V
F13 1,5V Core Power VDDC POWER Power Supply Core 1.5V
G06 1,5V Core Power VDDC POWER Power Supply Core 1.5V
G13 1,5V Core Power VDDC POWER Power Supply Core 1.5V
H06 1,5V Core Power VDDC POWER Power Supply Core 1.5V
H13 1,5V Core Power VDDC POWER Power Supply Core 1.5V
J06 1,5V Core Power VDDC POWER Power Supply Core 1.5V
J13 1,5V Core Power VDDC POWER Power Supply Core 1.5V
J17 1,5V Core Power VDDC POWER Power Supply Core 1.5V
J18 1,5V Core Power VDDC POWER Power Supply Core 1.5V
K06 1,5V Core Power VDDC POWER Power Supply Core 1.5V
K13 1,5V Core Power VDDC POWER Power Supply Core 1.5V
L06 1,5V Core Power VDDC POWER Power Supply Core 1.5V
L13 1,5V Core Power VDDC POWER Power Supply Core 1.5V
M06 1,5V Core Power VDDC POWER Power Supply Core 1.5V
M13 1,5V Core Power VDDC POWER Power Supply Core 1.5V
N06 1,5V Core Power VDDC POWER Power Supply Core 1.5V
N07 1,5V Core Power VDDC POWER Power Supply Core 1.5V
N08 1,5V Core Power VDDC POWER Power Supply Core 1.5V
N09 1,5V Core Power VDDC POWER Power Supply Core 1.5V
N10 1,5V Core Power VDDC POWER Power Supply Core 1.5V
N11 1,5V Core Power VDDC POWER Power Supply Core 1.5V
N12 1,5V Core Power VDDC POWER Power Supply Core 1.5V
N13 1,5V Core Power VDDC POWER Power Supply Core 1.5V
R16 1,5V Core Power VDDC POWER Power Supply Core 1.5V
T16 1,5V Core Power VDDC POWER Power Supply Core 1.5V
C03 3,3V IO Power VDDIO POWER Power Supply IO 3.3V
C04 3,3V IO Power VDDIO POWER Power Supply IO 3.3V
C14 3,3V IO Power VDDIO POWER Power Supply IO 3.3V
D17 3,3V IO Power VDDIO POWER Power Supply IO 3.3V
E01 3,3V IO Power VDDIO POWER Power Supply IO 3.3V
E02 3,3V IO Power VDDIO POWER Power Supply IO 3.3V
E16 3,3V IO Power VDDIO POWER Power Supply IO 3.3V
K01 3,3V IO Power VDDIO POWER Power Supply IO 3.3V
L02 3,3V IO Power VDDIO POWER Power Supply IO 3.3V
P03 3,3V IO Power VDDIO POWER Power Supply IO 3.3V
T03 3,3V IO Power VDDIO POWER Power Supply IO 3.3V
In
Signal Group Description
Out
netX 50 to netX 51/52 | Migration Guide
DOC120109MG05EN | Revision 5 | English | 2013-08 | Released | Public 2012-2013
Page 20

Package, Pinning, Pad Cells 20/56
Pin Pad
T09 3,3V IO Power VDDIO POWER Power Supply IO 3.3V
U17 3,3V IO Power VDDIO POWER Power Supply IO 3.3V
V04 3,3V IO Power VDDIO POWER Power Supply IO 3.3V
B01 Ground VSS POWER Power Supply Ground
C05 Ground VSS POWER Power Supply Ground
C16 Ground VSS POWER Power Supply Ground
F16 Ground VSS POWER Power Supply Ground
G01 Ground VSS POWER Power Supply Ground
G07 Ground VSS POWER Power Supply Ground
G08 Ground VSS POWER Power Supply Ground
G09 Ground VSS POWER Power Supply Ground
G10 Ground VSS POWER Power Supply Ground
G11 Ground VSS POWER Power Supply Ground
G12 Ground VSS POWER Power Supply Ground
H07 Ground VSS POWER Power Supply Ground
H08 Ground VSS POWER Power Supply Ground
H09 Ground VSS POWER Power Supply Ground
H10 Ground VSS POWER Power Supply Ground
H11 Ground VSS POWER Power Supply Ground
H12 Ground VSS POWER Power Supply Ground
J01 Ground VSS POWER Power Supply Ground
J07 Ground VSS POWER Power Supply Ground
J08 Ground VSS POWER Power Supply Ground
J09 Ground VSS POWER Power Supply Ground
J10 Ground VSS POWER Power Supply Ground
J11 Ground VSS POWER Power Supply Ground
J12 Ground VSS POWER Power Supply Ground
J16 Ground VSS POWER Power Supply Ground
K07 Ground VSS POWER Power Supply Ground
K08 Ground VSS POWER Power Supply Ground
K09 Ground VSS POWER Power Supply Ground
K10 Ground VSS POWER Power Supply Ground
K11 Ground VSS POWER Power Supply Ground
K12 Ground VSS POWER Power Supply Ground
L07 Ground VSS POWER Power Supply Ground
L08 Ground VSS POWER Power Supply Ground
L09 Ground VSS POWER Power Supply Ground
M07 Ground VSS POWER Power Supply Ground
M08 Ground VSS POWER Power Supply Ground
M09 Ground VSS POWER Power Supply Ground
M10 Ground VSS POWER Power Supply Ground
M11 Ground VSS POWER Power Supply Ground
N03 Ground VSS POWER Power Supply Ground
P01 Ground VSS POWER Power Supply Ground
T18 Ground VSS POWER Power Supply Ground
U01 Ground VSS POWER Power Supply Ground
In
Signal Group Description
Out
netX 50 to netX 51/52 | Migration Guide
DOC120109MG05EN | Revision 5 | English | 2013-08 | Released | Public 2012-2013
Page 21

Package, Pinning, Pad Cells 21/56
Pin Pad
U09 Ground VSS POWER Power Supply Ground
V02 Ground VSS POWER Power Supply Ground
V05 Ground VSS POWER Power Supply Ground
V09 Ground VSS POWER Power Supply Ground
V14 Ground VSS POWER Power Supply Ground
V17 Ground VSS POWER Power Supply Ground
V18 Ground VSS POWER Power Supply Ground
V16 IOD6 IO
U15 IOU6 IO
T15 IOD6 IO
U16 IOD6 IO
T14 IOD6 O QSPI_SIO2 SPI QSPI Serial IO Data 2
V15 IOD6 O QSPI_SIO3 SPI QSPI Serial IO Data 3
U06 USB IO USB_DNEG USB USB D- Line
V06 USB IO USB_DPOS USB USB D+ Line
T08 PWR USB_VDDC USB USB Power Supply Core 1.5 V
T07 PWR USB_VDDIO USB USB Power Supply IO 3.3 V
Table 7: netX 52 Pinning
In
Signal Group Description
Out
SPI0_CLK /
QSPI_CLK
SPI0_CS0n /
QSPI_CSn
SPI0_MISO /
QSPI_SIO1
SPI0_MOSI /
QSPI_SIO0
SPI
SPI
SPI
SPI
SPI Clock /
QSPI Clock
SPI Chip Select 0 /
QSPI Chip Select
SPI Master Input Slave Output Data /
QSPI Serial IO Data 1
SPI Master Output Slave Input Data /
QSPI Serial IO Data 0
netX 50 to netX 51/52 | Migration Guide
DOC120109MG05EN | Revision 5 | English | 2013-08 | Released | Public 2012-2013
Page 22

Package, Pinning, Pad Cells 22/56
3.2 Alternative Function at Host Interface
Alternatively, the Host Interface can be configured as a 16 Bit SDRAM Controller working in
parallel with a MII Interface for a third Ethernet channel.
Pin Pad
A01 IOU9 IO SD_D0 SD SDRAM Data 0
C02 IOU9 IO SD_D1 SD SDRAM Data 1
D02 IOU9 IO SD_D2 SD SDRAM Data 2
B03 IOU9 IO SD_D3 SD SDRAM Data 3
B04 IOU9 IO SD_D4 SD SDRAM Data 4
B02 IOU9 IO SD_D5 SD SDRAM Data 5
A05 IOU9 IO SD_D6 SD SDRAM Data 6
B05 IOU9 IO SD_D7 SD SDRAM Data 7
G17 IOU9 IO SD_D8 SD SDRAM Data 8
F18 IOU9 IO SD_D9 SD SDRAM Data 9
E18 IOU9 IO SD_D10 SD SDRAM Data 10
E17 IOU9 IO SD_D11 SD SDRAM Data 11
A06 IOU9 IO SD_D12 SD SDRAM Data 12
B07 IOU9 IO SD_D13 SD SDRAM Data 13
D03 IOU9 IO SD_D14 SD SDRAM Data 14
H17 IOU9 IO SD_D15 SD SDRAM Data 15
A03 IOU9 IO SD_A0 SD SDRAM Address 0
B06 IOU9 IO SD_A1 SD SDRAM Address 1
C06 IOU9 IO SD_A2 SD SDRAM Address 2
C07 IOU9 IO SD_A3 SD SDRAM Address 3
B08 IOU9 IO SD_A4 SD SDRAM Address 4
A07 IOU9 IO SD_A5 SD SDRAM Address 5
B09 IOU9 IO SD_A6 SD SDRAM Address 6
C09 IOU9 IO SD_A7 SD SDRAM Address 7
C13 IOU9 IO SD_A8 SD SDRAM Address 8
A10 IOU9 IO SD_A9 SD SDRAM Address 9
B12 IOU9 IO SD_A10 SD SDRAM Address 10
A14 IOU9 IO SD_A11 SD SDRAM Address 11
B13 IOU9 IO SD_A12 SD SDRAM Address 12
A12 IOU9 IO SD_BA0 SD SDRAM Bank Address 0
B11 IOU9 IO SD_BA1 SD SDRAM Bank Address 1
A13 IOU9 IO SD_DQM0n SD SDRAM Data Qualifier 0
A16 IOU9 IO SD_DQM1n SD SDRAM Data Qualifier 1
A15 IOU9 IO SD_CSn SD SDRAM Chip Select
A17 IOU9 IO SD_RASn SD SDRAM Row Address Select
A18 IOU9 IO SD_CASn SD SDRAM Colum Address Select
B14 IOU9 IO SD_WEn SD SDRAM Write
C08 IOD9 IO SD_CLK SD SDRAM Clock
C15 IOU9 IO SD_CKE SD SDRAM Clock Enable
D16 IOU9 IO MII_RXD0 MII MII Data Interrupt
B18 IOU9 IO MII_RXD1 MII MII Data 13
In
Signal Group Description
Out
netX 50 to netX 51/52 | Migration Guide
DOC120109MG05EN | Revision 5 | English | 2013-08 | Released | Public 2012-2013
Page 23

Package, Pinning, Pad Cells 23/56
Pin Pad
C17 IOU9 IO MII_RXD2 MII MII Data 14
B17 IOU9 IO MII_RXD3 MII MII Data 15
B16 IOU9 IO MII_RXDV MII MII Byte Enable 3
A02 IOU9 IO MII_RXCLK MII MII Receive Clock
A04 IOU9 IO MII_RXER MII MII Receive Error
C11 IOU9 IO MII_TXD0 MII MII Transmit Data 0
A11 IOU9 IO MII_TXD1 MII MII Transmit Data 1
C10 IOU9 IO MII_TXD2 MII MII Transmit Data 2
A09 IOU9 IO MII_TXD3 MII MII Transmit Data 3
A08 IOU9 IO MII_TXEN MII MII Transmit Enable
F17 IOU9 IO MII_TXER MII MII Transmit Error
C12 IOU9 IO MII_TXCLK MII MII Transmit Clock
G18 IOU9 IO MII_COL MII MII Transmit
G16 IOU9 IO MII_CRS MII MII
D18 IOU9 IO MII_MDIO MII MII Data 11
C18 IOU9 IO MII_MDC MII MII Data 12
B15 IOU9 IO PIO52 PIO Peripheral IO
Table 8: Alternative Function at Host Interface
In
Signal Group Description
Out
netX 50 to netX 51/52 | Migration Guide
DOC120109MG05EN | Revision 5 | English | 2013-08 | Released | Public 2012-2013
Page 24

Package, Pinning, Pad Cells 24/56
3.3 netX 51
3.3.1 Differences in Pinning and Pad Cells
For some of the new features there are some additional external signals necessary. This is done
by sharing the pins with existing functions. This new functions are disabled after power up or reset
that the netX 51 has the same behaviour as the netX 50. To use these features these have to be
enabled by software.
For some reason we had to change some few pad cells with small details which should not create
any problems.
These enhancements and differences are documented in the following chapters.
3.3.1.1 General
Ball Pos Signal Pad Type MUX-Func1
netX netX netX netX
50/51 52 50 51/52 50 51/52 50 51/52
D1 - CLKOUT OZ6 IOD6 MMIO48
Table 9: Differences in Pinning and Pad Cells – General
The Clock Signal CLKOUT can now also be configured as additional MMIO Input.
3.3.1.2 Test
Ball Pos Signal Pad Type
netX netX netX
50/51 52 50 51/52 50 51/52
G5 E3 TEST
A12 B10 MEM_IF_OM TEST IUS ID
Table 10: Differences in Pinning and Pad Cells – Test
BSCAN_TRST
For the netX 50 it was quite difficult to activate the Boundary Scan Test Function. The TEST signal
had to be activated and a few MMIO signals must be unconnected or tied at defined logic level.
Now the TEST pin becomes the BSCAN_TRST signal and Boundary Scan can activate with this
signal only. To be backward compatible the original TEST signal is moved to the former
MEM_IF_OM pin which was a reserved signal for an optional System in Package design and was
never used.
The BSCAN_TRST signal has the same level and function to switch on and off as the former TEST
signal.
The netX 50 Technical Reference Manual said about MEM_IF_OM “Connect to GND for normal
operation”. This means for netX 51/52 the TEST signal is disabled. If the former MEM_IF_OM is
not connected to GND this works as well, because this Pad is now changed from a internal pull up
to an pull down Resistor.
ID IDS
netX 50 to netX 51/52 | Migration Guide
DOC120109MG05EN | Revision 5 | English | 2013-08 | Released | Public 2012-2013
Page 25

Package, Pinning, Pad Cells 25/56
3.3.1.3 Memory Interface
Ball Pos Signal Pad Type MUX-Func1
netX netX netX netX
50/51 52 50 51/52 50 51/52 50 51/52
P12 T14 MEM_A18 O6 IOD6 QSPI_SIO2
R13 V15 MEM_A19 O6 IOD6 QSPI_SIO3
J14 - MEM_A22 O6 IOD6 MEM_A18
J15 - MEM_A23 O6 IOD6 MEM_A19
All Memory Signals without
Table 11: Differences in Pinning and Pad Cells – Memory Interface
MEMDR_CLK and
MEM_D0-32
O6 IOD6
All Memory Signals without the SDRAM Clock and the Data lines can be used as inputs with a
default value of zero because internal pull down resistors. This allows reading in at start time a
configuration value which is defined by external pull up resistors at the other memory signals.
Two additional lines are needed to run the SPI controller in Quad SPI mode. Normally the memory
signals MEM_A18 and MEM_A19 are not used by SDRAM.
An internal multiplex can be activated to change these address lines into the SIO2 and SIO3
signals for the Quad SPI mode and the MEM_A18 and MEM_A19 functionality moves to the
highest address lines.
netX 50 to netX 51/52 | Migration Guide
DOC120109MG05EN | Revision 5 | English | 2013-08 | Released | Public 2012-2013
Page 26

Package, Pinning, Pad Cells 26/56
3.3.1.4 SPI and QSPI
Ball Pos Signal Pad Type MUX-Func1
netX netX netX netX
50/51 52 50 51/52 50 51/52 50 51/52
V15 V16 SPI0_CLK IOD6 QSPI_CLK
U14 U15 SPI0_CS0n IOD6 IOU6 QSPI_CSn
T14 - SPI0_CS1n IOD6 IOU6
V16 U16 SPI0_MOSI IOD6 QSPI_SIO0
U15 T15 SPI0_MISO IOD6 QSPI_SIO1
P12 T14 MEM_A18 IOD6 QSPI_SIO2
R13 V15 MEM_A19 IOD6 QSPI_SIO3
Table 12: Differences in Pinning and Pad Cells – SPI
If a Quad SPI flash is used for fast start up at netX 50 the already published workaround via the
communication controller is working also with netX 51.
In addition the netx 51 includes a very fast Quad SPI controller which also support “execution in
place” to run program code directly out of the Quad SPI flash. This option can be used only if a
new PCB is designed because the signal MEM_A18 is used as SPI_SIO2 and MEM_A19 as
SPI_SIO3.
The schematic shows an example how to set up the configuration of the Host Interface by the
strapping options and how to connect a Quad SPI flash.
netX 50 to netX 51/52 | Migration Guide
DOC120109MG05EN | Revision 5 | English | 2013-08 | Released | Public 2012-2013
Page 27

Package, Pinning, Pad Cells 27/56
3.3.1.5 USB
Ball Pos Signal Pad Type
netX netX netX
50/51 52 50 51/52 50 51/52
V8 U6 USB_DNEG USB
USB_DPOS
U8 V6 USB_DPOS
Table 13: Differences in Pinning and Pad Cells – USB
or
+3.3V pull up
USB
In USB device mode the netX 50 requires an external resistor to connect USB hosts.
This resistor is activated either using a MMIO in software or via jumper during bootstrap situation.
With netX 51/52 this external resistor is not required anymore because it is included within the pad
cell and switched automatically by the USB core.
USB with
switch able
pull up
resistor
Note: Existing designs may work together with the external resistor if activation of the internal
resistor by software is avoided. New designs should omit external resistors.
netX 50 to netX 51/52 | Migration Guide
DOC120109MG05EN | Revision 5 | English | 2013-08 | Released | Public 2012-2013
Page 28

Package, Pinning, Pad Cells 28/56
3.3.1.6 Host Interface
Ball Pos Signal Pad Type MUX-Func1 MUX-Func2
netX netX netX netX netX
50/51 52 50 51/52 50 51/52 50 51/52 50 51/52
C7 A3 DPM_A00/BE0n IOU9 MII_TXER
B8 B6 DPM_A01/BE2n IOU9 MII_COL
C8 C6 DPM_A02 IOU9 MII_CRS
C10 C7 DPM_A03 IOU9 MII_RXD0
A10 B8 DPM_A04 IOU9 MII_RXD1
B9 A7 DPM_A05 IOU9 MII_RXD2
C11 B9 DPM_A06 IOU9 MII_RXD3
D11 C9 DPM_A07 IOU9 MII_RXDV
C13 C13 DPM_A08 IOU9 MII_TXD0
B12 A10 DPM_A09 IOU9 MII_TXD1
C14 B12 DPM_A10 IOU9 MII_TXD2
A17 A14 DPM_A11 IOU9 MII_TXD3
B15 B13 DPM_A12 IOU9 MII_TXEN
A16 A13 DPM_A13 IOU9 MII_TXCLK
B14 A12 DPM_A14 IOU9
A15 B11 DPM_A15 IOU9
E14 A17 VDDC DPM_A16 PWR IOU9
D14 A18 VSS DPM_A17 PWR IOU9
A18 A16 DPM_BHEn/BE1n IOU9 MII_RXER
C15 B16 DPM_WRHn/BE3n IOU9
B16 A15 DPM_CSn IOU9
A1 A1 DPM_D0 IOU9
B2 C2 DPM_D1 IOU9
C2 D2 DPM_D2 IOU9
C6 B3 DPM_D3 IOU9
A6 B4 DPM_D4 IOU9
A3 B2 DPM_D5 IOU9
A8 A5 DPM_D6 IOU9
B7 B5 DPM_D7 IOU9
J16 G18 DPM_D8 IOU9 SPM_MISO/SIO1 MMIO40
H15 G16 DPM_D9 IOU9 SPM_MOSI/SIO0 MMIO41
H16 F17 DPM_D10 IOU9 SPM_CSn MMIO42
G16 D18 DPM_D11 IOU9 SPM_CLK MMIO43
G18 C18 DPM_D12 IOU9 SPM_DIRQn MMIO44
G15 B18 DPM_D13 IOU9 SPM_SIRQn MMIO45
D18 C17 DPM_D14 IOU9 SPM_SIO2 MMIO46
C18 B17 DPM_D15 IOU9 SPM_SIO3 MMIO47
J18 G17 DPM_D16 IOU9
H17 F18 DPM_D17 IOU9
netX 50 to netX 51/52 | Migration Guide
DOC120109MG05EN | Revision 5 | English | 2013-08 | Released | Public 2012-2013
Page 29

Package, Pinning, Pad Cells 29/56
Ball Pos Signal Pad Type MUX-Func1 MUX-Func2
netX netX netX netX netX
50/51 52 50 51/52 50 51/52 50 51/52 50 51/52
H18 E18 DPM_D18 IOU9
G17 E17 DPM_D19/WDGACT IOU9
B13 C12 DPM_D20 IOU9
A14 C11 DPM_D21 IOU9
A13 A11 DPM_D22 IOU9
C12 C10 DPM_D23 IOU9
B10 A9 DPM_D24 IOU9
A11 A8 DPM_D25 IOU9
A9 A6 DPM_D26 IOU9
C9 B7 DPM_D27 IOU9
B6 A2 DPM_D28 IOU9
A7 A4 DPM_D29 IOU9
A2 D3 DPM_D30 IOU9
J17 H17 DPM_D31 IOU9
C17 D16
DPM_INT*
DPM_DIRQn* IOU9
B17 B15 DPM_RDn IOU9
B18 C15
DPM_RDY* DPM_BUSYn*
IOU9 MII_RXCLK
C16 B14 DPM_WRn/WRLn IOU9
B11 C8 TCLK DPM_SIRQn IOU9
Table 14: Differences in Pinning and Pad Cells – Host Interface
Note: * Only the name of these signals changed to be consistent with the configuration as
active low signals on Hilscher boards.
The Host Interface becomes two additional functions for serial data transfer between netX and
Host system. These are a very fast SPI slave interface and a MII interface. Both options are
activated by software and use an internal multiplexer to change the Host Interface signals. There
fore the signals are fixed and can not move to other pins.
The SPI slave works as Serial Port Memory means it can be read and write the internal Dual-Port
Memory without interfering the internal ARM CPU.
The Ethernet signals emulate a PHY with a MII Interface in the way that every CPU with an
integrated MAC can be used for data transfer.
netX 50 to netX 51/52 | Migration Guide
DOC120109MG05EN | Revision 5 | English | 2013-08 | Released | Public 2012-2013
Page 30

Package, Pinning, Pad Cells 30/56
3.3.1.7 MMIO
Ball Pos Signal Pad Type MUX-Func1 MUX-Func2 MUX-Func3
netX Netx netX netX netX netX
50/51 52 50 51/52 50 51/52 50 51/52 50 51/52 50 51/52
H1 H2 MMIO0 IODS6 FO0_RD
J1 K2 MMIO1 IODS6 XM0_TX XM0_TX_ECLK FO0_TD
J2 J2 MMIO2 IODS6 XM0_ECLK FB0_CLK FO0_EN
L2 L3 MMIO3 IODS6 FO1_RD
K2 L1 MMIO4 IODS6 XM1_TX XM1_TX_ECLK FO1_TD
K1 M1 MMIO5 IODS6 XM1_ECLK FB1_CLK FO1_EN
L1 M2 MMIO6 IODS6 FB0_CLK FO0_SD
M2 N1 MMIO7 IODS6 FB1_CLK FO1_SD
M1 N2 MMIO8 IODS6 MII_RXCLK
N1 P2 MMIO9 IODS6 MII_RXD0
N2 R1 MMIO10 IODS6 MII_RXD1
P1 T1 MMIO11 IODS6 MII_RXD2
R1 R2 MMIO12 IODS6 MII_RXD3
U1 U2 MMIO13 IODS6 MII_RXDV
T1 T2 MMIO14 IODS6 MII_RXER
V1 R3 MMIO15 IODS6 MII_TXCLK
U2 T4 MMIO16 IODS6 MII_TXD0
V2 V1 MMIO17 IODS6 ETM_TCLK MII_TXD1
V3 U4 MMIO18 IODS6 ETM_TSYNC MII_TXD2
T6 U3 MMIO19 IODS6 ETM_DRQ MII_TXD3
V6 T5 MMIO20 IODS6 ETM_DACK MII_TXEN
U6 V3 MMIO21 IODS6 ETM_PSTAT0 MII_TXER
T7 T6 MMIO22 IODS6 ETM_PSTAT1 MII_COL
V7 U5 MMIO23 IODS6 ETM_PSTAT2 MII_CRS
U7 - MMIO24 IODS6 ETM_TPKT00
R8 - MMIO25 IODS6 ETM_TPKT01
V9 - MMIO26 IODS6 ETM_TPKT02
U9 - MMIO27 IODS6 ETM_TPKT03
T9 - MMIO28 IODS6 ETM_TPKT04
U10 - MMIO29 IODS6 ETM_TPKT05
T10 - MMIO30 IODS6 ETM_TPKT06
U11 - MMIO31 IODS6 ETM_TPKT07
V12 - MMIO32 IODS6 ETM_TPKT08 FO0_EN
T11 - MMIO33 IODS6 ETM_TPKT09 FO0_RD
U12 - MMIO34 IODS6 ETM_TPKT10 FO0_SD
T12 - MMIO35 IODS6 ETM_TPKT11 FO0_TD
V13 - MMIO36 IODS6 ETM_TPKT12 FO1_EN
U13 - MMIO37 IODS6 ETM_TPKT13 FO1_RD
T13 - MMIO38 IODS6 ETM_TPKT14 FO1_SD
netX 50 to netX 51/52 | Migration Guide
DOC120109MG05EN | Revision 5 | English | 2013-08 | Released | Public 2012-2013
Page 31

Package, Pinning, Pad Cells 31/56
Ball Pos Signal Pad Type MUX-Func1 MUX-Func2 MUX-Func3
netX Netx netX netX netX netX
50/51 52 50 51/52 50 51/52 50 51/52 50 51/52 50 51/52
V14 - MMIO39 IODS6 ETM_TPKT15 FO1_TD
Table 15: Differences in Pinning and Pad Cells – MMIO
Note: The MMIOs 40...47 are shared with Host interface pins. The MMIO 48 is shared with
CLKOUT pin.
Note: In addition the MII interface of the third MAC controller can be multiplexed with the MII
signals. The MMIO can not be changed.
Symbol Description
I Input
O Output
Z Output is tristateable or open drain
S Input provides Schmitt trigger
U Internal pull-up 50 k (I2C pins: pull-up 5k)
D Internal pull-down 50 k
6 Output buffer can source / sink 6 mA
9 Output buffer can source / sink 9 mA
XTAL Crystal input or output
USB USB pad
PHY PHY pad
ANA Analog pin
PWR 1.5 V (Core) or 3.3 V (I/O)
GND Digital Ground (0 V)
APWR Analog power (1.5V or 3.3V)
AGND Analog ground (0 V)
Table 16: Pad Type Explanation
netX 50 to netX 51/52 | Migration Guide
DOC120109MG05EN | Revision 5 | English | 2013-08 | Released | Public 2012-2013
Page 32

Package, Pinning, Pad Cells 32/56
3.4 MMIO Signals
Function Signal Type Functional Group nx50 nx51/52
XM0_IO0...5 In/out Fieldbus0
XM0_RX Input Fieldbus0
XM0_TX_OE Non-tristatable output Fieldbus0
XM0_TX_OUT Tristatable output Fieldbus0
XM1_IO0...5 In/out Fieldbus1
XM1_RX Input Fieldbus1
XM1_TX_OE Non-tristatable output Fieldbus1
XM1_TX_OUT Tristatable output Fieldbus1
GPIO0...31 In/out GPIO/IO-Link
PHY0_LED0 Always driven output INT_PHY0
PHY0_LED1 Always driven output INT_PHY0
PHY0_LED2 Always driven output INT_PHY0
PHY0_LED3 Always driven output INT_PHY0
PHY1_LED0 Always driven output INT_PHY1
PHY1_LED1 Always driven output INT_PHY1
PHY1_LED2 Always driven output INT_PHY1
PHY1_LED3 Always driven output INT_PHY1
MII_MDC Always driven output MDIO
MII_MDIO In/out MDIO
MII0_COL Input MII0
MII0_CRS Input MII0
MII0_LED0...3 Input MII0
MII0_RXCLK Input MII0
MII0_RXD0...3 Input MII0
MII0_RXDV Input MII0
MII0_RXER Input MII0
MII0_TXCLK Input MII0
MII0_TXD0...3 Tristate able output MII0
MII0_TXEN Tristate able output MII0
MII0_TXER Tristate able output MII0
MII1_COL Input MII1
MII1_CRS Input MII1
MII1_LED0...3 Input MII1
MII1_RXCLK Input MII1
MII1_RXD0...3 Input MII1
MII1_RXDV Input MII1
MII1_RXER Input MII1
MII1_TXCLK Input MII1
MII1_TXD0...3 Tristate able output MII1
MII1_TXEN Tristate able output MII1
MII1_TXER Tristate able output MII1
X X
X X
X X X
X X
X X
X X X
X X
X X
X X
X X
X X
X X
X X
X X
X X
X X
X X
X X X X X X X X X X X X X X X X X X X X X X -
netX 50 to netX 51/52 | Migration Guide
DOC120109MG05EN | Revision 5 | English | 2013-08 | Released | Public 2012-2013
Page 33

Package, Pinning, Pad Cells 33/56
Function Signal Type Functional Group nx50 nx51/52
PIO0...7 In/out PIO
SPI0_CS2N In/out SPI0
SPI1_CLK In/out SPI1
SPI1_CS0N In/out SPI1
SPI1_CS1N In/out SPI1
SPI1_CS2N In/out SPI1
SPI1_MISO In/out SPI1
SPI1_MOSI In/out SPI1
I2C0_SCL In/out I2C0
I2C0_SDA In/out I2C0
I2C1_SCL In/out I2C1
I2C1_SDA In/out I2C1
XC_SAMPLE0 Input Trigger/Latch Unit
XC_SAMPLE1 Input Trigger/Latch Unit
XC_TRIGGER0 Tristate able output Trigger/Latch Unit
XC_TRIGGER1 Tristate able output Trigger/Latch Unit
UART0...2_CTSN Input UART 0...2
UART0...2_RTSN Tristate able output UART 0...2
UART0...2_RXD Input UART 0...2
UART0...2_TXD Tristate able output UART 0...2
USB_ID_DIG Input USB
USB_ID_PULLUP_CTRL Non-tristate able output USB
USB_RPD_ENA Non-tristate able output USB
USB_RPU_ENA Non-tristate able output USB
CCD_DATA0...7 Input CCD-Sensor
CCD_PIXCLK Input CCD-Sensor
CCD_LINE_VALID Input CCD-Sensor
CCD_FRAME_VALID Input CCD-Sensor
CAN_RX Input CAN
CAN_TX Always driven output CAN
MEM_RDY Input MEM IF ready/busy input
Table 17: Multiplex-Matrix Signals
X X
X X
X X
X X
X X
X X
X X
X X
X X
X X
- X
- X
X X
X X
X X
X X
X X
X X
X X
X X
X X X X X X X X -
- X
- X
- X
The internal functions which can be mapped at the MMIO signals change as following:
The internal CCD Controller is not implemented anymore
The internal MII signals for the internal PHYs can not be mapped anymore
A second I2C controller is implemented special for accessing the fiber optic transceiver in
PROFINET communication
The additional USB signals are no more necessary because netX 50 has only s USB device
and the USB pin becomes a function to pull the USB line high.
The signals of the dedicated CAN controller are also available at the MMIO pins.
netX 50 to netX 51/52 | Migration Guide
DOC120109MG05EN | Revision 5 | English | 2013-08 | Released | Public 2012-2013
Page 34

General Changing 34/56
4 General Changing
4.1 CPUs
4.1.1 Core CPU
Feature netX 50 netX 51/52
Core ARM 966 ARM 966
Speed 200MHz 100 MHz
I-TCM 8 kB -
Internal SRAMs via TCM interface
accessible without wait states
D-TCM 8 kB -
Internal SRAMs via TCM interface
accessible without wait states
Code execution
Table 18: Core CPU Comparison
Internal SRAM (if not used by XC
channels or external host)
External memories (via extension
bus, SDRAM interface)
Internal SRAM
External memories (via extension
bus, SDRAM interface)
Serial flash via QSPI (Execution in
Place)
4.1.2 Additional CPU
xPIC
The netX 51 has an additional CPU called xPIC. This CPU runs with a frequency of 100 MHz and
is designed to process fast IO signals in parallel to the ARM CPU with a latency time of down till
five clock cycles.
The xPIC is also used for the IO-Link controller and the additional third Ethernet MAC channel. In
this cases the xPIC not available user applications.
netX 50 to netX 51/52 | Migration Guide
DOC120109MG05EN | Revision 5 | English | 2013-08 | Released | Public 2012-2013
Page 35

General Changing 35/56
4.2 Memory
4.2.1 Layout
Memory netX 50
Assigned to …
INTRAM0 32 KByte (XC0) 0x08000000 128 KB yte (ARM) 0x08000000
INTRAM1 32 KByte (XC1) 0x08008000 128 KB yte (ARM) 0x08020000
INTRAM2 32 KByte (DPM) 0x08010000 64 KByte (ARM) 0x08040000
INTRAM3 - 64 KByte (ARM) 0x08050000
INTRAM4 - 64 KByte (ARM) 0x08060000
INTRAM5 - 32 KByte (xPIC Instr.) 0x08 070000
INTRAM6 - 32 KByte (xPIC Data) 0x08078000
INTRAM7 - 64 KByte (XC0) 0x08080000
INTRAM8 - 64 KByte (XC1) 0x08090000
INTRAMHS - 32 KByte (DPM) 0x080a0000
HIF_SDRAM - - 256 MByte (ARM, xPIC) 0x40000000
HIF_EXTSRAM0 - - 64 MByte (ARM, xPIC) 0x60000000
HIF_EXTSRAM1 - - 64 MByte (ARM, xPIC) 0x64000000
HIF_EXTSRAM2 - - 64 MByte (ARM, xPIC) 0x68000000
HIF_EXTSRAM3 - - 64 MByte (ARM, xPIC) 0x6c000000
SDRAM 256 MByte (AR M) 0x80000000 256 MByte (ARM, xPIC) 0x80000000
EXTSRAM0 64 MByte (ARM) 0xc0000000 64 MByte (ARM, xPIC) 0xc0000000
EXTSRAM1 64 MByte (ARM) 0xc8000000 64 MByte (ARM, xPIC) 0xc4000000
EXTSRAM2 64 MByte (ARM) 0xd000000 0 64 MByte (ARM, xPIC) 0xc8000000
BOOT-ROM 64 KByte (Bootloader) 0x08200000 64 KByte (Bootloader) 0x080f0000
QSPI-ROM (XiP) - 16 MByte (ARM, xPIC) 0x0c000000
Table 19: Memory Layout
Start Address netX 51/52
(Assigned to …)
Start Address
netX 51: All INTRAM block start addresses shown are addresses via standard ARM966 system
interface (segment address 0x08000000). All INTRAM blocks are also accessible via ITCM (segment address 0x00000000) and D-TCM (segment address 0x04000000)
interface of ARM966 core. To realize that all INTRAM blocks have mirror start
addresses. For example to access INTRAM1 via I-TCM interface the start address is
0x00020000 and via D-TCM interface is 0x04020000.
netX 50 to netX 51/52 | Migration Guide
DOC120109MG05EN | Revision 5 | English | 2013-08 | Released | Public 2012-2013
Page 36

General Changing 36/56
4.3 Peripherals
Peripheral netX 50 netX 51/52
VIC Interrupt table changed
DMAC 4 channels, no SDRAM access 3 channels, SDRAM access supported
GPIO IO-Link function moved to separate module
systime-compare function doubled and moved to new ARM Timer / xPIC Timer modules
PIO No differences
MMIO 40 MMIOs (MMIO0...39)
148 functional signals mappable
No PIO functionality
Pointer FIFO 32 FIFOs
1024 Entries overall
Default depth per FIFO = 32
ARM Timer -
Systime / IEEE1588 No differences
New: netX 51 includes 2nd indepen dent systime unit (systime_uc)
FMMU / SyncManager /
BufferManager
Trigger Sample Unit No differences
IO-Link Channels: 8, Version: 1.0 only
SPI SPI0:
I2C One I2C module only
UART 0...2 No differences
USB Host and Device Device only
CAN Controller - SJA1000 compatible
Ethernet MAC - MII Interface
No differences (8 FMMUs, 8 SyncMan, 8 BufMan)
New: netX 51 includes improvement for Sercos 3 DIVCLK generation
Master and Slave
no Quad support
SPI1:
Master and Slave
no Quad support
Multiplexable to different MMIO pins
netX 51: 40 MMIOs (MMIO0...39)
netX 52: 24 MMIOs (MMIO0...23)
Additional MMIO40...47 multiplexed with
DPM pins
Additional MMIO48 multiplexed with
CLKOUT
98 functional signals mappable (s.
chapter 2.6)
Each unused MMIO usable as PIO
32 FIFOs
3200 Entries overall
Default depth per FIFO = 100
New module with 2 ARM dedicated 32-bit
timers
systime read and compare
IRQ support
Channels: 8, Version: V1.0/1.1
Datalink Layer realized via xPIC
SPI0:
Master only (SPI or QSPI)
Quad-Support used for XiP
SPI1:
Master and Slave
no Quad support
Two I2C modules
PIO mode for I2C pins
USB2JTAG integrated
Note: Completely new core, not register
compatible
Pelican Mode only (no Basic CAN mode)
Supports 10/100 Mbit FD/HD
MAC-Mode: connect to ext. PHY
PHY-Mode: direct connection to Host via
MII w/o ext. PHY
Datalink Layer realized via xPIC
Multiplexed to MMIO and HIF pins
netX 50 to netX 51/52 | Migration Guide
DOC120109MG05EN | Revision 5 | English | 2013-08 | Released | Public 2012-2013
Page 37

General Changing 37/56
Peripheral netX 50 netX 51/52
Internal Dual-PHY No differences
New: netX 51-PHY with optimized latency (round-trip latency 230ns)
MIIMU (MDIO) 1 MDIO interface for both internal PHYs
CRC unit No differences
Watchdog No differences
CCD-Sensor X removed
CORDIC -
Memory Controller No differences
New: SRAM based device features:
Asynchronous-Page-Mode (APM)
Optional ready/wait signal for external wait state generation providing signal filtering an
timeout logic
Host Interface Following DPM-Modes supported:
INTEL_8BIT_SRAM
INTEL_8BIT_MULTIPLEXED
INTEL_16BIT_SRAM
INTEL_16BIT_BYTE_WRITE
INTEL_16BIT_MUL_NO_BES
INTEL_32BIT_SRAM
MOTOROLA_8BIT_MULTIPLEXED
MOTOROLA_16BIT
MOTOROLA_16BIT_68000
Table 20: Peripheral Comparison
Separate MDIO interfaces for internal and
external PHYs
New module for fast coordinate
transformation
Following netX 50 compatible DPM-Modes:
INTEL_8BIT_SRAM
INTEL_8BIT_MULTIPLEXED
INTEL_16BIT_SRAM
INTEL_16BIT_BYTE_WRITE
INTEL_16BIT_MUL_NO_BES
INTEL_32BIT_SRAM
MOTOROLA_8BIT_MULTIPLEXED
MOTOROLA_16BIT
MOTOROLA_16BIT_68000
Additionally supported DPM-Modes:
INTEL_16BIT_MUL_BYTE_WRITE
INTEL_16BIT_MUL_2BE
INTEL_16BIT_MUL_BYTE_ADDR
INTEL_32BIT_BYTE_WRITE
INTEL_32BIT_MUL_BYTE_ADDR
INTEL_32BIT_MUL_DWORD_ADDR
INTEL_32BIT_MUL_4BE
INTEL_32BIT_MUL_4BE_BYTE_ADDR
MOTOROLA_8BIT_6800
MOTOROLA_16BIT_MUL_BYTE_ADDR
MOTOROLA_16BIT_MUL_WORD_ADDR
MOTOROLA_32BIT
MOTOROLA_32BIT_MUL_BYTE_ADDR
MOTOROLA_32BIT_MUL_DWORD_ADD
R
TIOMAP_16BIT_NON_MULTIPLEXED
TIOMAP_16BIT_MULTIPLEXED
ISA_8BIT
ISA_16BIT
Additionally supported serial DPM via
SPI/QSPI
SPI modes 0...3, up to 125 MBaud
Integrated SDRAM Controller
netX 50 to netX 51/52 | Migration Guide
DOC120109MG05EN | Revision 5 | English | 2013-08 | Released | Public 2012-2013
Page 38

General Changing 38/56
4.4 Improved Memory Access Performance
Improvement
The netX 50 has following disadvantages:
ARM966 has no Level 1 – Cache included
Tightly Coupled Memories (8K/8K Instruction/Data) are often too small for applications
Only 96 KByte internal SRAM
64 KByte internal SRAM used for data exchange between xPEC and ARM966
32 KByte internal SRAM used as Dual-Port Memory to exchange data between
ARM966 and external Host
One combined channel for data and instruction of ARM966 on SDRAM
So the user application has to run non-cached out of external memory which leads to a weak
access performance (see benchmark table below).
The netX 51/52 has following changes regarding to netX 50:
Internal SRAM enlarged from 96 KByte to 672 KByte
Tightly Coupled Memories removed and remaining two TCM Instruction/Data channels
connected to internal SRAM
Two separated channels for data and instruction of ARM966 on SDRAM
Advantage of the new ARM integration in netX 51/52 is that full internal SRAM can be reached by
TCM channels. Furthermore ARM can run accesses in parallel now:
Access can be performed on both TCM channels (e.g. instruction fetch and data store) and even
ARM AHB channel (e.g. peripheral access) simultaneously. Additionally some ARM-TCM features
(e.g. data buffering) lead to better performance than using standard AHB interface. That leads to
an increased total ARM performance even when operating frequency is decreased to 100MHz.
Decreased operating frequency leads to less power consumption. On SDRAM the ARM
performance benefits from separated channels for data and instructions.
Benchmark
CoreMark, an open source benchmark program for embedded processors, was used to visualize
the improvements.
Instruction code and data are located in different memory regions. The call stack is located within
internal RAM. The data area is static, no heap is used.
The following table shows the CoreMark Processing times (smaller values are better) in clock
cycles of 10ns under ARM Compiler Optimization –O2.
Instruction / Data Memory netX 50 (200 MHz ARM966) netX 51/52 (100 MHz ARM 966)
INTRAM / INTRAM 152.233 96.590
ITCM / DTCM 61.541 SDRAM 32 bit 454.253 392.966
XiP (Execution in Place) QSPI Clock =
80 MHz
Table 21: Memory Access Performance Results
netX 50 to netX 51/52 | Migration Guide
DOC120109MG05EN | Revision 5 | English | 2013-08 | Released | Public 2012-2013
- 1.240.979
Page 39

General Changing 39/56
4.5 Activating 256 KByte as Dual-Port Memory and Detection of netX 51 or netX 52 Mode
A chip can be roughly divided into 2 components: the integrated circuit die (this is the little silicon
piece) and the surrounding package. The package includes the plastic housing and the connection
from the die to the outer pins. This is the pinning. It determines which signals from the die are
routed to a pin on the surface of the package. Note that not all signals from the die must be
connected to a pin. A pinning can leave some of the signals unconnected. The netX 51 and
netX 52 share the same die, but the netX 52 have less bond wires and less pins to the pins to fit in
a smaller housing and reduce the component costs.
For netX 51 and netX 52 the firmware must be updated in any case!
The netX 51 provides all signals from the die. The pinning is identical to the netX 50 and the chip
can be placed instead of a netX 50 on the PCB.
For some special application it is necessary to enlarge the size of the Dual-Port Memory up to 256
KByte. One Power pad and one Ground pad of the netX 50 is used as additional address lines
DPM_A16 and DPM_A17. For safety reason this has to be activated by a pull up resistor of
10 kOhm at MEM_A18 or MEM_A19 according the following table:
MEM_A18 = 10 kOhm to activate DPM_16 and DPM_A17 in netX 51 designs
MEM_A19 = 10 kOhm to activate DPM_16 and DPM_A17 in netX 52 designs
These two bits can be read out of Bit 10 and Bit 11 of the netX Version register to determine if the
netX is running as netX 51 or netX 52 designs. In case of netX 52 mode the USB Device ID
changes from 0x18 to 0x19.
netX 50 to netX 51/52 | Migration Guide
DOC120109MG05EN | Revision 5 | English | 2013-08 | Released | Public 2012-2013
Page 40

General Changing 40/56
4.6 Host Interface Modes
The selection of the Host Interface Mode is a new feature of netX 51/52 compared to netX 50.
These options are a simple way to configure the host interface if the Security Memory is not used.
The strapping options are selected with one, two or three 1.5 KOhm pull up resistors on the pins
SPI0_CLK, SPI0_MOSI and SPI0_MISO. The ROM code reads these signals and uses them to
initialize the Host Interface during the boot process.
Description SPI0_MOSI SPI0_CLK SPI0_MISO
netX boots from the connected Memory
None Host Interface configuration 0 (open) 0 (open) 0 (open)
SDRAM on Host Interface with 16 bit data bus and up to 4MByte
address range
SRAM on Host Interface with 16 bit data bus and 22 address lines
on chip select 0, 1, 2 and 3
SDRAM on Host Interface with 32 bit data bus and up to 4 MByte
address range
Host CPU supported: Host CPU boots netX via Dual-Port Memory
Dual-Port Memory with 8 bit data bus and 11 address lines 1 (pull up) 0 (open) 0 (open)
Serial access over SPM lines 0 (open) 1 (pull up) 1 (pull up)
Dual-Port Memory with 8 bit data bus and 16 address lines 1 (pull up) 1 (pull up) 1 (pull up)
0 (open) 0 (open) 1 (pull up)
0 (open) 1 (pull up) 0 (open)
1 (pull up) 0 (open) 1 (pull up)
Reserved
Reserved 1 (pull up) 1 (pull up) 0 (open)
Table 22: Host Interface Modes
The host interface mode only allow a certain Host Interface Configuration. The usage depends on
the selected boot source devices and the destination device from the bootable image.
An example is shown in section SPI and QSPI on
26.
netX 50 to netX 51/52 | Migration Guide
DOC120109MG05EN | Revision 5 | English | 2013-08 | Released | Public 2012-2013
Page 41

General Changing 41/56
4.7 Miscellaneous
4.7.1 Operating Conditions
netX 50 netX 51 netX 52
Operating temperature
without heat sink
Operating temperature
with heat sink (10°/W)
Storage temperature 65...+150°C 65...+150°C 65...+150°C
Power consumption with
PHYs disabled
Power consumption with
PHYs enabled
Table 23: Operating Conditions
4.7.2 Effects to existing Software
Due the netX 51/52 is not software-compatible to the netX 50 (different memory and register
outlet) please note:
new Security Memory content required
-40...+70 °C -40...+70 °C tbd
-40..+85 °C -40..+85 °C tbd
0.8 W tbd tbd
1.3 W tbd tbd
new Software is required like
Loadable Firmware (Protocol-Stacks, …)
Linkable Objects
Operating Systems compilations
4.7.3 Effects to existing Development Tools
Due the netX 51/52 has another netX version and is not software-compatible to the netX 50
(different memory and register outlet) please note:
New Hitop-PlugIn required
New Lauterbach-PlugIn required
netX 50 to netX 51/52 | Migration Guide
DOC120109MG05EN | Revision 5 | English | 2013-08 | Released | Public 2012-2013
Page 42

Erratas 42/56
5 Erratas
5.1 Fixed Erratas of netX 50
netX 50 Errata
Number
1 DMA Controller: Controller can not write to SDRAM Yes
2 SDRAM: Access to offset 0xDEAD0 – DEADF fails after Power On Reset Yes
3 SPI: Setting the clock divider to 0 and starting a transfer causes SPI core to hang Yes
4 SPI: Legacy Register “CR_NCPHA” Bit appears inverted when read Yes
5 I2C: Signal timing can cause problems with some components Yes
6 Reset Control Register: Register not protected by netX locking mechanis m Yes
8 SPI Master: Transmit FIFO may loose data in 16 bit mode Yes
9 UARTs: Using Transmit FIFO may result in wrong transmit data Yes
10 Host interface: Watchdog Output / DPM_D19 signal is driven low after Reset Yes
11 Host interface: Error in configu r ation register regarding DPM ISA mode Yes
12 GPIO module: Interrupts may be lost Yes
13 Internal PHYs: Error in 10 Mbit half duplex mode Yes
14 Host Interface: DPM access time with Hilscher standard DPM layout is unpredictable Yes
Table 24: Fixed Erratas of netX 50
Desciption
Fixed in
netX 51/52
netX 50 to netX 51/52 | Migration Guide
DOC120109MG05EN | Revision 5 | English | 2013-08 | Released | Public 2012-2013
Page 43

Erratas 43/56
5.2 New Errata for netX 51 / 52
5.2.1 SYS LED lights doesn’t light correctly during active Boot
Loader
Due a bug in the Boot Loader the signals for controlling the SYS LED are inverted.
This happens only if there is no firmware on the netX 51 board or during the boot phase till the
firmware is started.
In new designs this can be compensated by connecting the Cathode of the SYS LED instead the
Anode according the schematic below. This LED interface is exactly the same as for the netX 10.
netX 50 to netX 51/52 | Migration Guide
DOC120109MG05EN | Revision 5 | English | 2013-08 | Released | Public 2012-2013
Page 44

Erratas 44/56
5.2.2 Simultaneous Operation of SDRAM and parallel Flash Memory
at the Memory Interface
For the netX 51, the following maximum load capacity applies for operation of SDRAM at the
Memory Interface:
Signal Maximum Load Capacity
MEM_D0 … D31 15 pF
All other signals 10 pF
Important: This means never connect parallel Flash memory to the Memory Interface when using
SDRAM memory.
Operating one or more parallel flash memories – given that at the same time no SDRAM memory
is connected - is possible at the Memory Interface, even if the maximum load capacity is thereby
exceeded.
The SDRAM controller in the netX must be deactivated when operating flash memory, to avoid
wrong address mapping causing data errors.
Note: The limitations described above do not apply for the Host Interface. It is possible to
operate SDRAM memory and parallel Flash Memory at the Host Interface at the same.
time. Maximum load capacity for SDRAM at the Host Interface is 30 pF.
netX 50 to netX 51/52 | Migration Guide
DOC120109MG05EN | Revision 5 | English | 2013-08 | Released | Public 2012-2013
Page 45

Design Examples 45/56
6 Design Examples
6.1 Design Example netX 51
Figure 6: Design Example netX 51 – COM Interfaces
netX 50 to netX 51/52 | Migration Guide
DOC120109MG05EN | Revision 5 | English | 2013-08 | Released | Public 2012-2013
Page 46

Design Examples 46/56
Figure 7: Design Example netX 51 – Core/Memory
netX 50 to netX 51/52 | Migration Guide
DOC120109MG05EN | Revision 5 | English | 2013-08 | Released | Public 2012-2013
Page 47

Design Examples 47/56
Figure 8: Design Example netX 51 – Ethernet - Diagport
netX 50 to netX 51/52 | Migration Guide
DOC120109MG05EN | Revision 5 | English | 2013-08 | Released | Public 2012-2013
Page 48

Design Examples 48/56
Figure 9: Design Example netX 51 – 2-Port Ethernet
netX 50 to netX 51/52 | Migration Guide
DOC120109MG05EN | Revision 5 | English | 2013-08 | Released | Public 2012-2013
Page 49

Design Examples 49/56
Figure 10: Design Example netX 51 – Power Supply
netX 50 to netX 51/52 | Migration Guide
DOC120109MG05EN | Revision 5 | English | 2013-08 | Released | Public 2012-2013
Page 50

Design Examples 50/56
6.2 Design Example netX 52
Figure 11: Design Example netX 52 – Top View
netX 50 to netX 51/52 | Migration Guide
DOC120109MG05EN | Revision 5 | English | 2013-08 | Released | Public 2012-2013
Page 51

Design Examples 51/56
Figure 12: Design Example netX 52 – Host Interface
netX 50 to netX 51/52 | Migration Guide
DOC120109MG05EN | Revision 5 | English | 2013-08 | Released | Public 2012-2013
Page 52

Design Examples 52/56
Figure 13: Design Example netX 52 – CPU Core
netX 50 to netX 51/52 | Migration Guide
DOC120109MG05EN | Revision 5 | English | 2013-08 | Released | Public 2012-2013
Page 53

Design Examples 53/56
Figure 14: Design Example netX 52 – Ethernet Interface
netX 50 to netX 51/52 | Migration Guide
DOC120109MG05EN | Revision 5 | English | 2013-08 | Released | Public 2012-2013
Page 54

Design Examples 54/56
Figure 15: Design Example netX 52 – Power Supply
netX 50 to netX 51/52 | Migration Guide
DOC120109MG05EN | Revision 5 | English | 2013-08 | Released | Public 2012-2013
Page 55

Appendix 55/56
7 Appendix
7.1 List of Tables
Table 1: Material Costs .......................................................................................................................................................4
Table 2: List of Revisions....................................................................................................................................................5
Table 3: Terms, Abbreviations and Definitions....................................................................................................................5
Table 4: Signal Description .................................................................................................................................................9
Table 5: Key Features.......................................................................................................................................................13
Table 6: Mechanical Dimensions of the netX 52 ...............................................................................................................15
Table 7: netX 52 Pinning...................................................................................................................................................21
Table 8: Alternative Function at Host Interface .................................................................................................................23
Table 9: Differences in Pinning and Pad Cells – General .................................................................................................24
Table 10: Differences in Pinning and Pad Cells – Test .....................................................................................................24
Table 11: Differences in Pinning and Pad Cells – Memory Interface ................................................................................25
Table 12: Differences in Pinning and Pad Cells – SPI ......................................................................................................26
Table 13: Differences in Pinning and Pad Cells – USB.....................................................................................................27
Table 14: Differences in Pinning and Pad Cells – Host Interface......................................................................................29
Table 15: Differences in Pinning and Pad Cells – MMIO ..................................................................................................31
Table 16: Pad Type Explanation.......................................................................................................................................31
Table 17: Multiplex-Matrix Signals ....................................................................................................................................33
Table 18: Core CPU Comparison......................................................................................................................................34
Table 19: Memory Layout..................................................................................................................................................35
Table 20: Peripheral Comparison......................................................................................................................................37
Table 21: Memory Access Performance Results ..............................................................................................................38
Table 22: Host Interface Modes........................................................................................................................................40
Table 23: Operating Conditions.........................................................................................................................................41
Table 24: Fixed Erratas of netX 50....................................................................................................................................42
7.2 List of Figures
Figure 1: Functionality and Price of netX 6/50/51/52...........................................................................................................3
Figure 2: Design Example with netX 51..............................................................................................................................4
Figure 3: Block Diagram of netX 50 ..................................................................................................................................12
Figure 4: Block Diagram of netX 51/52 .............................................................................................................................12
Figure 5: Mechanical Dimensions of the netX 52..............................................................................................................15
Figure 6: Design Example netX 51 – COM Interfaces.......................................................................................................45
Figure 7: Design Example netX 51 – Core/Memory..........................................................................................................46
Figure 8: Design Example netX 51 – Ethernet - Diagport .................................................................................................47
Figure 9: Design Example netX 51 – 2-Port Ethernet .......................................................................................................48
Figure 10: Design Example netX 51 – Power Supply........................................................................................................49
Figure 11: Design Example netX 52 – Top View...............................................................................................................50
Figure 12: Design Example netX 52 – Host Interface .......................................................................................................51
Figure 13: Design Example netX 52 – CPU Core .............................................................................................................52
Figure 14: Design Example netX 52 – Ethernet Interface.................................................................................................53
Figure 15: Design Example netX 52 – Power Supply........................................................................................................54
netX 50 to netX 51/52 | Migration Guide
DOC120109MG05EN | Revision 5 | English | 2013-08 | Released | Public 2012-2013
Page 56

Appendix 56/56
7.3 Contacts
Headquarters
Germany
Hilscher Gesellschaft für
Systemautomation mbH
Rheinstrasse 15
65795 Hattersheim
Phone: +49 (0) 6190 9907-0
Fax: +49 (0) 6190 9907-50
E-Mail: info@hilscher.com
Support
Phone: +49 (0) 6190 9907-99
E-Mail: de.support@hilscher.com
Subsidiaries
China
Hilscher Systemautomation (Shanghai) Co. Ltd.
200010 Shanghai
Phone: +86 (0) 21-6355-5161
E-Mail: info@hilscher.cn
Support
Phone: +86 (0) 21-6355-5161
E-Mail: cn.support@hilscher.com
France
Hilscher France S.a.r.l.
69500 Bron
Phone: +33 (0) 4 72 37 98 40
E-Mail: info@hilscher.fr
Support
Phone: +33 (0) 4 72 37 98 40
E-Mail: fr.support@hilscher.com
India
Hilscher India Pvt. Ltd.
New Delhi - 110 065
Phone: +91 11 26915430
E-Mail: info@hilscher.in
Italy
Hilscher Italia S.r.l.
20090 Vimodrone (MI)
Phone: +39 02 25007068
E-Mail: info@hilscher.it
Support
Phone: +39 02 25007068
E-Mail: it.support@hilscher.com
Japan
Hilscher Japan KK
Tokyo, 160-0022
Phone: +81 (0) 3-5362-0521
E-Mail: info@hilscher.jp
Support
Phone: +81 (0) 3-5362-0521
E-Mail: jp.support@hilscher.com
Korea
Hilscher Korea Inc.
Seongnam, Gyeonggi, 463-400
Phone: +82 (0) 31-789-3715
E-Mail: info@hilscher.kr
Switzerland
Hilscher Swiss GmbH
4500 Solothurn
Phone: +41 (0) 32 623 6633
E-Mail: info@hilscher.ch
Support
Phone: +49 (0) 6190 9907-99
E-Mail: ch.support@hilscher.com
USA
Hilscher North America, Inc.
Lisle, IL 60532
Phone: +1 630-505-5301
E-Mail: info@hilscher.us
Support
Phone: +1 630-505-5301
E-Mail: us.support@hilscher.com
netX 50 to netX 51/52 | Migration Guide
DOC120109MG05EN | Revision 5 | English | 2013-08 | Released | Public 2012-2013
 Loading...