

Page 1

Blower
Model RB 27EAP / RB 27EP
Handling instructions
RB 27EAP
Note:
Before using this machine, carefully read through these HANDLING INSTRUCTIONS
to ensure effi cient, safe operation. It is recommended that these INSTRUCTIONS be
kept readily available as an important reference when using this machine.
Page 2

MEANINGS OF SYMBOLS
NOTE: Some unit s do not carry them.
Symbols
WARNING
The foll owing show symb ols used fo r the mach ine. Be sure that you understand their me aning before us e.
Blower Idle speed adjustment
It is important that you rea d, fully un dersta nd before
use, and o bserve t he follow ing safet y precau tions an d
warnin gs. Careless or imp roper us e of the unit m ay
cause serious or fatal inj ury.
Read, un dersta nd and foll ow all warn ings and
instr uction s in this manual and on the unit.
Priming pump
Guaranteed sou nd power leve l
Always wear eye, head and ear protectors when using
this unit.
Choke – Run position (Open) Spark plug
Choke – St art pos ition (Clo sed) Fuel tank capacit y
START
Befor e using you r machine
• Read th e manual c arefull y.
• Check t hat the cutti ng equipment is cor rectly asse mbled and adjusted.
• Star t the unit and check the carburetor adjustm ent. See “ MAINTENANCE”.
NOTE: Equi valent no ise level / v ibratio n level are c alculat ed as the ti me-weighted ene rgy total for noise / vibratio n levels under various
* 1/7 Idle, 6 /7 racing.
On/Start Dry weight (without fuel, with all p ipe)
Off /Stop
STOP
WARNING DANGER
Keep hands off from r otating f an.
WARNING DANGER
Hot sur faces; Th e muffl er and surroundi ng cover may
becom e extreme ly hot. Alw ays keep clea r of exhaust
and muffl er area, oth erwise serious personal injur y
may occur.
Keep all children , bystand ers and he lpers 15 m away
from the unit. If anyone approaches you, stop the
engine immediately.
Fuel and oil mixtu re
working condit ions with the fo llowing t ime distribution:
L
ISO22868
L
WA, Ra( M)
2000/14/EC
L
WA, Ra(G)
2000/14/EC
a
Displacement
pA, eq
Sound pressure l evel LpA by ISO 2 2868 Equivale nt*
Measured sound p ower level LwA by 2000/14/EC
Racing
Guaranteed sound power leve l LwA by 2000/14/EC
Racing
Vibration level by ISO 22867
hv, eq
Equivalent*
Uncertainty
K
2
Page 3

WHAT IS WHAT?
Since t his manual covers several mod els, the re may be som e
diff erenc e between picture s and your un it. Use th e instru ctions t hat
apply to your unit.
A. Fuel cap
B. Throttle trigger
C. Starter handle
D. Fuel tank
E. Carburetor
F. Air clean er
G. Handle
H. Ignition switch
I. Straight pipe
J. Conic pipe
K. Guar d net
L. Spark plug
M. Choke lever
N. Priming bulb
O. Reco il sta rter
P. Fan-headed pipe
Q. Cruise lever
R. Combi b ox spanner
S. Handling instructions
T. K no b vo lt
U. Vacuum pipe
V. B en t pi p e
W. Du st bag
X. Anti-static-electricity pad
B
F
M
N
A
F
M
N
A
R
O
D
C
B
C
D
L
E
L
E
O
S U
J
RB 27EAP
P
RB 27EP
I
Q
I
T
H
K
H
K
V
G
G
W
X
3
Page 4

WARNINGS AND SAFETY INSTRUCTIONS
Pay spec ial attention to st atement s preced ed by the following
words:
WARNING
Indicates a strong possibility of severe personal injur y or loss of
life, if instructions are n ot followed.
CAUTION
Indicates a possibility of personal injur y or equip ment damage,
if instructio ns are not fo llowed.
NOTE
Helpf ul inform ation for c orrect f unctio n and use.
Operator safety
○ Wear head protec tion (1). (Fig. 1)
○ Always we ar a safety face s hield or g oggles (2). (Fig. 1)
○ Wear approved hearing protection (3). (Fig. 1)
Long- term exposure to noi se can result in perm anent he aring
impairment.
Pay attention to you r surroundings. B e aware of any by stande rs
who may be s ignali ng a problem.
Remove safety equipment immediately upon shutting off
engine.
○ Always wear heav y, long-sl eeved shirts (4) and lon g pants (5)
and non -slip bo ots (6) and gl oves (7). (Fig. 1)
Do not wear loos e clothing, jewelr y, short pants, san dals or go
barefoot.
Secur e hair so it i s above shoulder len gth.
2
6
Fig.1
○ D o not operate this too l when you are tired, il l or under t he
infl uen ce of alcohol, drug s or medicatio n.
○ Do not op erate the tool at nigh t or under ba d weather c onditions
when vi sibility is poor. An d do not oper ate the too l when it is
raining or right after it has been raining.
Working on slippery ground could lead to an accident if you
lose your balance.
○ Never le t a child or inexperi enced pe rson ope rate the machine.
○ D o not star t the eng ine if there are any fl ammables such as dry
leaves, waste pape r or fuel in the vicinity.
○ Never start or run the en gine ins ide a clos ed room or building.
Breath ing exhaust fum es can kill.
○ Keep han dles free of oil and fu el.
○ Keep han ds away from m oving par t or heated area .
○ Do not gr ab or hold the unit by th e blow pipe.
○ When the unit is turned off make sure th e engine has stoppe d
before t he unit is set down.
○ When operation is prolonged, take a break periodically so that
you may avoi d possib le Hand- Arm Vibr ation Syndrome (HAVS)
which i s caused by v ibration.
1
3
4
7
5
WARNING
○ Always operate the tool with proper protective equipment and
clothing. Failure to do so may re sult in acc idents s uch as bur ns
or injuries. (Fig. 1)
○ Do not touc h the spar k plug area or high vol tage during
operation. Doi ng so may res ult in electric sh ock.
○ Do not al low child ren near the tool dur ing operation.
○ Do not touch the engine, top cove r or exhaus t vent duri ng or
shor tly afte r operation. Doin g so may result in burn or injury.
○ Antivi bration systems do n ot guaran tee that you will not su stain
Hand-Arm Vibration Syndrome or carpal tunnel syndrome.
Therefore, cont inual and regular u sers sho uld monitor close ly
the con dition of their han ds and fi ngers . If any of the a bove
sympto ms appear, seek medic al advic e immediately.
○ Sinc e this product is engine driven, make sure to wear the
proper protective equipment to minimize the eff ects of vibration
and sound to your body. Limit a sin gle continuous op eration
betwe en 30 to 40 minutes, and rest for 10 to 20 mi nutes. Al so,
limit yo ur day’s work t ime to 80 minutes.
○ If you are usi ng any medical electric/e lectro nic devic es such
as a pacemaker, consult your physi cian as well as the dev ice
manufacturer p rior to operating a ny power equ ipment.
○ If trash or collected waste includ ing falle n leaves be come
trapped in the mac hine, make s ure to cut th e engine and
remove the debris b efore res uming use. Using the machine
witho ut removi ng the obstructi ons may res ult in dama ge.
Unit/machine safety
○ Inspect the entire unit/machine before each use. Replace
damaged parts . Check for f uel leaks and make sur e all
fasten ers are in p lace and securely t ightened.
○ Replace par ts that a re cracked , chipped or damage d in any
way before using the u nit/m achine. Fau lty par ts may inc rease
the ris k of accidents and may lead to an injury.
○ Keep oth ers away whe n making c arburet or adjust ments.
○ Use onl y access ories as recommended for th is unit /machin e by
the man ufactur er.
○ Before operation, make sure that there are no tools such as the
adjust ment key or spanne r still at tached to t he unit.
WARNING
○ Never modify the u nit/m achine in a ny way. Do not use yo ur unit /
machine for any job except that for which it is intended.
○ Non-authorized modifi cations and/or acc essori es may resu lt in
serio us perso nal injury or the death of the operator o r others.
○ The guard net mus t be fi rmly fi xed in place.
Fuel saf ety
○ Mix and p our fuel o utdoors and where t here are no sparks or
fl ames.
○ Use a con tainer a pproved fo r fuel.
○ Move at least 3 m away from fueling s ite before starting engin e.
○ Stop engine before removing fuel cap. Do not remove the fuel
cap during operation.
○ Empty th e fuel tan k before storing the unit/m achine. I t is
recom mended that the fue l be empti ed after each use. If fuel is
left in t he tank, store s o fuel will n ot leak.
WARNING
○ Fuel is easy to ignite or get explosion or inhale fumes, so that
pay spec ial atte ntion when handli ng or fi lling fuel.
○ Do not smoke or allow smoking near fuel or the unit/machine or
while using the un it/machin e.
○ Wipe up a ll fuel sp ills before starting engi ne.
○ Store unit/ma chine an d fuel in are a where fuel vapors c annot
reach sparks or open fl ames from water heaters, electric
motors o r switches, fur naces. etc.
○ When using the uni t in dry areas, make su re that fi re
extin guishing equipm ent is readily ava ilable.
○ If you s hut off the engine for refuel ing, make sure the uni t has
cooled down before adding fuel.
4
Page 5
Blowing safety
○ Operate unit/mac hine onl y at reason able hou rs – not
early i n the morn ing or late at night whe n people m ight be
disturbed. Com ply with t imes listed in loca l ordinances. Usu al
recommendati ons are 9:00 a .m. to 5:00 p.m., Monday throu gh
Saturday.
○ Never direct discharge of a ir toward bystanders nor allow
anyone near the area of operation. Use care in directing
disch arge to avoi d glass en closures, automobil es, etc.
○ Check the work area and surroundin gs for empt y cans, metal
piece s and other obstruc tions wh ich coul d cause in jury,
accid ent or dama ge. If there are any of th ese obje cts in the
area, remove them i n advance.
○ Stay aler t for uneve n sidewal ks, holes i n terrain or other
unsta ble condition when using th e tool.
○ Take all possib le precautions wh en leavin g the tool unattend ed
such as s topping t he engine.
○ Never ope rate the tool withou t blow pipes or other p rotecti ve
device in place. (I f so equipp ed.)
○ Keep others including children, animals, bystanders and
helpe rs outsi de the 15 m haza rd zone. Sto p the engi ne
immediately if yo u are approached.
○ Please exercise c aution a s engine startup may be delaye d after
pulling the star ter handle.
○ Always keep the engi ne on the ri ght side of your body.
○ Keep fi rm footing and bal ance. Do no t over-reac h.
Losin g your bala nce duri ng work may lead to an injury.
○ Keep all par ts of your bo dy away from t he muffl er when the
engine is running.
○ Always carry a fi rst-aid kit when operatin g any power
equipment.
○ Avoid pro longed u se at low spe ed range i n which vi bration i s
high. Doing so may re sult in engine d amage.
○ When relocating to a new work ar ea, or inspecting, adjust ing or
exchanging the unit's accessories, etc., be sure to shut off the
machine.
○ Never pl ace the machine on th e ground when ru nning.
○ If you accidental ly bump or d rop the unit, inspe ct it imme diately
to make sur e there are n o damage, crack s or deform ations.
○ If the tool i s operat ing poor ly and produces str ange noi se or
vibrations, tu rn off the engine immedi ately and a sk your dealer
to have it in specte d and repai red.
Continu ed use und er these c onditions could l ead to inju ry or
tool damage.
○ Use in ac cordan ce with lo cal laws an d regulat ions.
○ Loosen deposits wit h a rake or a broom before st artin g any
exhaus t or vacuum wo rk.
WARNING
Work from l adders or high pla ce (such as roofs) is
prohibited an d could re sult in seve re injur y.
Maintenance safety
○ Maintain the unit/machine according to recommended
procedures.
○ Disconnect the spark plug before performing maintenance
except for carbure tor adjus tments.
○ Keep oth ers away whe n making c arburet or adjust ments.
○ Us e only gen uine HiKOKI r eplace ment par ts as recommende d
by the man ufacturer.
CAUTION
Do not di sassem ble the re coil sta rter. Ther e is a possibility o f
personal injury with recoil spring.
WARNING
Improper maintenance could result in serious engine damage
or in ser ious per sonal injury.
Transpor t and sto rage
○ Carry the unit/machine by hand with the engine stopped and
the muffl er away from your body.
○ Allow the engine to cool, empty the fu el tank, a nd secure the
unit/machine before storing or transporting. Failure to do so
may resu lt in fi re or accidents.
○ Empty th e fuel tan k before storing the unit/m achine. I t is
recom mended that the fue l be empti ed after each use. If fuel is
left in t he tank, store s o fuel will n ot leak.
○ Store unit/ma chine ou t of the reac h of children.
○ Clean a nd maint ain the unit carefu lly and sto re it in a dry place.
○ Make sur e engine sw itch is off when transporting or storing.
○ You have to secure t he machine during transpo rt to prevent
loss of fuel, dama ge or injury.
○ If a warning label ca nnot be read, peels off or becomes
indistinct, replace it w ith a new one. To purchase new labels,
contact HiKOKI Aut horized S ervice Center s.
If situations oc cur whic h are not cove red in thi s manual, t ake care
and use c ommon sense. Cont act HiKOKI Au thorize d Servi ce
Center s if you need assi stance.
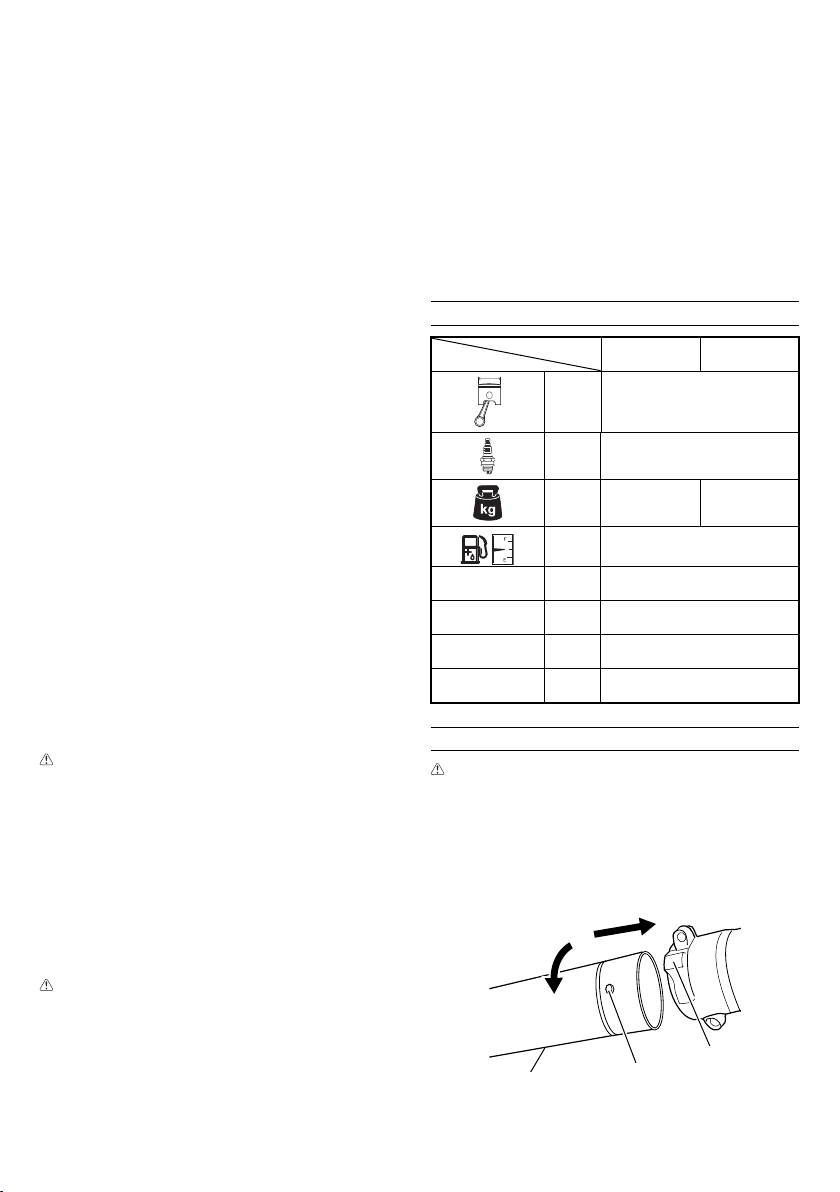
SPECIFICATIONS
Model RB27EAP RB27EP
(cm3)26.9
— TORCH L7RTC (NG K BPMR7A)
(kg) 4.2 4.4
(cm3)400
L
/ K
pA, eq
L
WA, Ra(M)
L
WA, Ra(G)
a
hv, eq
(dB(A)) 97 / 1.8
(dB(A )) 107
(dB(A )) 108
(m/s2) 12.0 / 1.0
/ K
ASSEMBLY PROCEDURES
WARNING
Make sure the eng ine is turned off /st opped and not hot be fore
assembly.
Blow pip es to main b ody (Fig. 2)
Inspe ct the mai n body and accessories.
Conne ct strai ght pipe (8) s ecurel y. Align projectio n (9) in strai ght
pipe with groove (10) on blower housing and slid e the pipe i nto the
blower housing.
Rotate the pipe clockwise to lock it i nto place.
2
8
1
Fig. 2
10
9
5
Page 6

Nozzle to straight pipe (Fig. 3 - 4)
[RB27EAP]
○ Align groove (12) on the co nic pipe (13) and projecti on (11) on
strai ght pipe (8) and rotate th e conic pipe in place.
1
2
• Alig n the arrow(21) on the vacuum pipe (20) and th e arrow (18)
on the fan case (17) as shown Fig. 6. (Fig . 6, 7)
17 18 19
13
[RB27EP]
○ Align groove (12) on the Fan- Headed p ipe (14) and projection
(11) on straight pipe (8) and rotate the Fan- Headed pipe in
place.
12
Fig. 3
11
8
1
2
1214
11
Fig. 4
Vacuu m asse mbly [RB27 EP]
NOTE ; Sa fety fut ure
If you tr y to open th e guard net (15) when engine is running , it will
automa ticall y stop the en gine. (Fig. 5)
But neve r try to ope n the guar d net (15) when engi ne is runn ing
even with this futu re, other wise seriou s person al injur y may occur.
Vacuum pi pe to main b ody
• Lo osen knob bolt (16). (Fig. 5)
16
15
8
Fig. 6
17
20
21
Fig. 7
• Slide( 1) the vacu um pipe into the fan ca se, and the n rotate(2 )
the vacu um pipe cl ockwi se(19) as shown Fig. 6 until i t clicks.
(Fig. 8)
1
2
Fig. 8
Bent pi pe and dus t bag to mai n body
• Connec t bent pip e (22), Align projection (23) in ben t pipe wit h
groove (10) on blower housi ng and slide the pipe o nto the
blower housing. Rotate the pipe clockwise to lock it into place.
(Fig. 9)
1
2
Fig. 5
23
Fig. 9
10
22
6
Page 7
• Co nnect th e dust bag to t he insta lled ben t pipe (22) by in serti ng
the thinner part of the pipe into the opening of the bag. Fasten
the adjuster (24) securely by ta ping the e nd of the saw n strap.
(Fig. 10)
22
24
Fig. 10
WARNING
Always connect dust bag (26) to bent pipe (22) .
Never tr y to connect direc tly to mai n body (25), oth erwis e dust bag
might approach near exhaust of muffl er and it might c ause fi res or
injur ies. (Fig. 11)
25
26
22
Fig. 11
CAUTION
Static electri city may b e generated while va cuumin g. Prior to
engag ing in the t ask, attach the anti-st atic- electr icity pad (27)
to the han dle and make sure to g rip the pad when va cuuming.
• Connec t the term inal ext ending from the engine (28) to the
terminal of the anti-st atic- electr icity pad (29). Next , attach the
anti- static -elec trici ty pad (27) to the handl e as shown i n the
Fig. 12.
27
29
OPERATING PROCEDURES
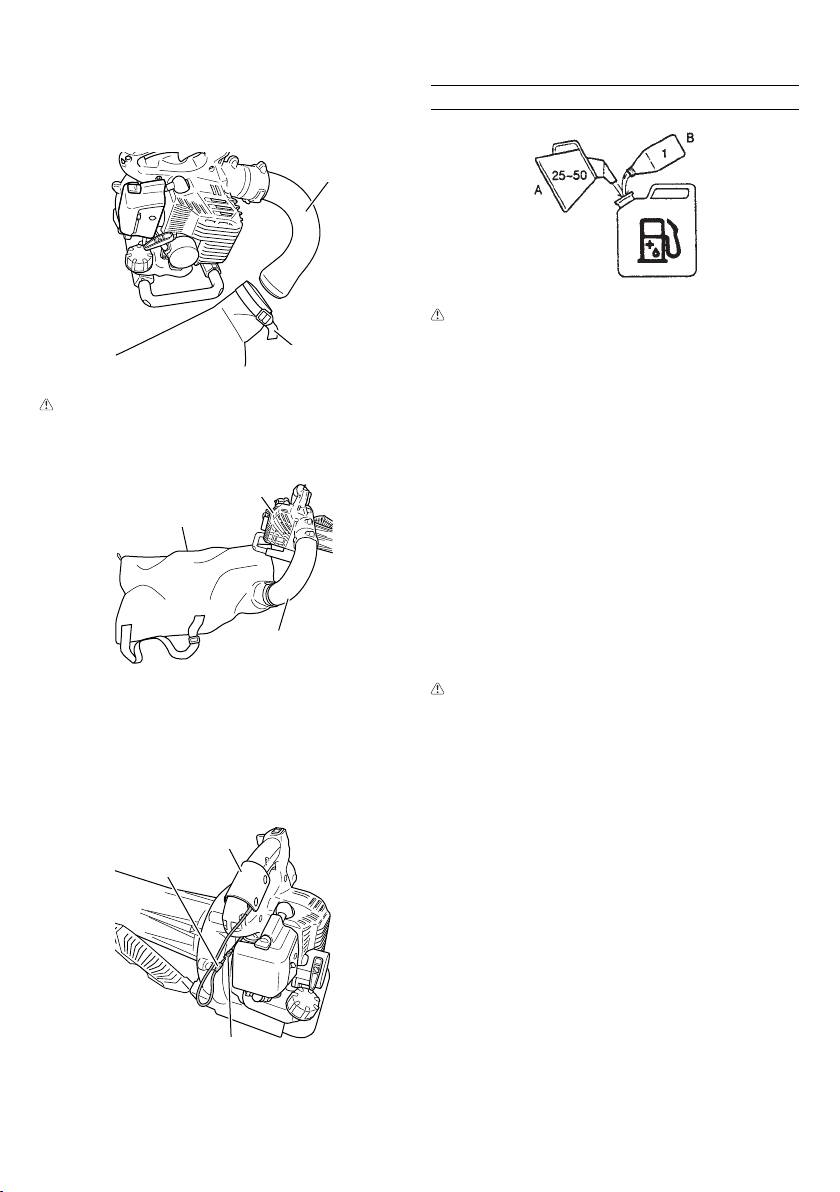
Fuel (Fig . 13)
Fig. 13
WARNING
○ The unit /machi ne is equipped with a t wo-st roke engin e. Always
run the e ngine on fuel, whic h is mixed wi th oil.
Provide good ventilatio n, when fueling or ha ndling fuel.
○ Fuel contains highly fl ammable and it is possible t o get the
serious personal injury when inhaling or spilling on your body.
Always pay attenti on when ha ndling fuel. Always h ave good
ventil ation when handli ng fuel inside buil ding.
Fuel
○ Always u se branded 89 octa ne unlead ed gasol ine.
○ Use gen uine two -cycle oil or use a mi x betwee n 25:1 to 50:1,
pleas e consult the oil bot tle for th e ratio or HiKOKI Autho rized
Service Centers.
○ If genuine oil is not av ailable, use an anti -oxida nt added quality
oil expr essly la beled for a ir-cool ed 2-cycle engine u se (JASO
FC GRADE O IL or ISO EGC GR ADE). Do not u se BIA or TCW
(2-stro ke water-cooling type) mi xed oil.
○ Never us e for four-st roke engi ne oil or was te oil.
○ Always m ix fuel and oil in a sepa rate clea n contai ner.
Always st art by fi ling hal f the amou nt of fuel, which is to be u sed.
Then add the whole a mount of oi l. Mix (shake) the fuel mix ture. Add
the remaining am ount of fuel.
Mix (shake) th e fuel-m ix thorou ghly before fi l ling the fuel tank.
Fueling
WARNING
○ Always shut off the engine an d let it coo l for a few minu tes
before refueling.
○ Slow ly open th e fuel tank, when fi lling up with fuel, so that
possible over-pressure disappears.
○ Tight en the fuel cap caref ully, after fueling.
○ Always move the unit at leas t 3 m from the fueling ar ea before
starting.
○ Do not smoke and/or allow fl ames or sparks near fuel when
handling or fi lling fuel.
○ Always wash any spilled fuel from clothing immediately with
soap.
○ Be sure to check for a ny fuel lea kage after ref ueling.
Before fueling, clean the tank cap area carefully, to ensure that
no dirt falls into t he tank. M ake sure that the fuel i s well mixed by
shaki ng the container, before fueli ng.
28
Fig. 12
7
Page 8

Starting
CAUTION
Do not st art if th e pipe and guard net is o bstruc ted.
(1) Star ting the c old engine
1. Check t he switch (30) to ON po sition. (Fig. 14)
ON
30
Fig. 14
2. Push priming bul b (31) about ten times so that fu el fl ows into
carbu retor. (Fig. 15)
31
Fig. 15
3. Set cho ke lever to CLOSED positi on. (Fig. 16)
CLOSED
RUN (OPEN)
Fig. 16
4. Pull starter handle briskly, taking care to keep the handle in
your gra sp and not allowi ng it to snap back. (Fig. 17)
Fig. 17
5. When you hear the e ngine want to star t, return c hoke lever to
RUN posi tion (open).
6. Then pull star ter handle briskly again.
NOTE
If engi ne does not start, repeat pr ocedures from 2 to 6.
7. After starting engine, allow the eng ine about 2–3 minu tes to
warm up be fore subj ecting i t to any load.
(2) Star ting the warm en gine
Use onl y 1, 2 and 6 of the sta rting p rocedu re for a cold e ngine.
If the engine does not star t, use the s ame star ting procedure a s
for a cold e ngine.
Operating blower (Fig. 18)
○ A low spe ed should be used to bl ow leaves an d dry gra ss.
○ A mediu m speed sh ould be used to clean wet leaves and grass.
○ A high speed should be used when moving gravel, dirt or other
heavy materials.
○ When working in a dusty are a, hose dow n the area with water.
Fig. 18
WARNING
○ Do not direct discharge of a ir toward people or pet.
○ The uni t should be oper ated in a well ventilated area.
○ Neve r perfor m assembly or disa ssembl y proced ures with
engin e running or serious personal injur y may result.
○ Never touc h muffl er, spark plug, or other metallic parts while
engin e is in running or imme diately after shutti ng off engine.
○ Do not us e this blower indoor s.
○ Do not o perate if t here is an open window near the wo rk area
and its s urroundings.
CAUTION
This blower has been designed and adjusted to be used with
blowin g pipes at tached. It must never be opera ted witho ut the
straight pipe.
NOTE
Blowing Pipe Sel ection
• Straight Bl owing Pip e
Allows operat ion at maximu m blow capa city.
Suitable for operation in widespread areas, engine revolution
is kept at a minimum, resulting in improved fuel consumption
when co mpared wi th the con ic/fan -shaped blow ing pipe.
The straight blowing pipe is recommende d for normal use.
• Conic/Fan -Shape d Blowing P ipe
Allows operat ion at maximu m blow spee d.
Idea l for blowing wet leaves s tuck to the g round or re leasing a
power ful air discharge i n limited spaces.
Operating vac uum (Fig. 19)
WARNING
Do not vacuum bot tles , cans or any o ther hard materi als,
which m ay cause da mage or serious in juries .
○ Do not use a bag with hol es or tears in it. Even a sm all hole
can cau se a lot of dus t to come out . Repair or replace i t
immediately.
○ Make sur e zipper of t he bag is com pletely c losed.
8
Page 9

○ Wear shoulder strap over right or left shoulder.
○ Make sur e bevel at end o f suctio n pipe face s downward.
○ The uni t should be oper ated In a well ventilated area.
○ Use rake s and broom s to loosen debris before vacuuming.
○ A low speed should b e used to vac uum small leaves and d ry
grass.
○ A medium speed should be used to vacuum large leaves and
grass.
○ A high speed should be used to vacuum larger or wet leaves
and grass.
○ Dispose of debr is in the bag more freq uently in d usty condit ion.
NOTE
When you hear or feel strange sound or vibration, stop engine
immediately an d check if a nythin g blocks fans or pipes, If so,
remove it and check for damage.
Stopp ing (Fig. 20)
Decrease engine speed an d run at an id le for a few min utes, the n
turn off ignit ion switc h (30).
Fig. 19
OFF
30
Idle sp eed adju stment (T)
Check t hat the air fi lter is clean. If adjustment is required, turn
IDLE spe ed Adjust ment Scr ew (T) clo se (clock wise) to inc rease
engine speed, open (counterclockwise) to decrease engine speed.
Stand ard Idle rpm is 2800 -3200 rpm.
CAUTION
The above adju sting procedure m ust be followed when
adjustment is MADE or DAMAGE to engine will occur because
of the incorrec t condition.
NOTE
Some models sold areas with strict exhaust emission
regulation do no t have high an d low speed carburetor
adjustments. S uch adjustments m ay allow th e engine to b e
operated outsi de of their emission compli ance lim its. For th ese
model s, the only carbure tor adjus tment is idle speed .
Fig. 21
RECOMMENDATION
CARBURE TOR ADJUSTMENT NEEDS THE S KILL OF
EXPERIENCED OR WELL TRAINED PEOPLE, OR IS
RECOMMENDED TO TAKE THE UNIT TO HiKOKI AUTHORIZED
SERVICE CENTERS.
Air fi lter (Fig . 22)
The air fi lter mus t be clean ed from dus t and dir t in order to avoid:
○ Carburetor malfunctions
○ Starting problems
○ Engine power reduction
○ Unnec essary wear o n the engi ne parts
○ Abnor mal fuel consumption
Clean the air fi lter daily or more o ften if working in exc eption ally
dusty areas.
Fig. 20
MAINTENANCE
MAINTENANCE, REPLACEMENT OR REPAIR OF THE EMISSION
CONTRO L DEVICES AND SYSTEM S MAY BE PERFORM ED BY ANY
NON- ROAD ENGINE REPAIR ESTABLI SHMENT OR INDIV IDUAL.
Carbur etor adju stment (F ig. 21)
The car buretor i s a precis ion part that mixes air and fue l, and it is
desig ned to ensu re high pe rformance from t he engin e. Before th e
tool is shipped from the factory, its carburetor is adjusted during
a test run . Only make adjustme nts if it is n ecessa ry beca use of
environmental conditions (the climate or atmospheric pressure), the
type of fuel, the t ype of two-c ycle oil, etc.
WARNING
○ Because the c arburetor is manu facture d with a hig h degree of
preci sion, do no t disass emble it .
○ For th is produ ct, the on ly setti ng of the ca rbureto r that can be
adjusted is the id le speed ( T).
T = Idle sp eed adjustmen t screw.
Fig. 22
Clean ing the ai r fi lter
Open th e air fi lter cover and remove the ai r fi lter. Clean i t. Check
that the fi lter is dry b efore rea ssembl y. An air fi lter that has been
used for s ome time c annot be cleaned completely. Therefor e, it
must regularly be replac ed with a new o ne. A damag ed fi lter must
always be replaced.
Fuel fi lter (Fig. 23)
Remove the fuel fi l ter from th e fuel tan k, and rep lace it if it is dirt y.
NOTE
A blocked fuel fi lter can preve nt the supply of fuel a nd cause a
rotati on malfu nction o f the engine.
9
Page 10

Fig. 23
Spark p lug (Fig. 24)
When removing th e spark plug, twis t and remove t he plug ca p
coveri ng the spark plug as shown in the illustra tion. (Fig. 25)
The spark plug condition i s infl uenced by:
○ An incorrect carburetor setti ng
○ Wrong fu el mixt ure (too muc h oil in the g asolin e)
○ A dirt y air fi lter
○ Hard ru nning co ndition s (such as c old weather)
These factors cause deposits on the spark plug electrodes, which
may resu lt in malfunction and star ting diffi culties. If the engine
is low on power, diffi cult to start or runs poorly at idling speed,
always ch eck the sp ark plug fi rst. If the spa rk plug is d irty, cle an it
and che ck the ele ctrode g ap. Re-adjust if necessar y. The corre ct
gap is 0.6 m m. The spar k plug sho uld be replaced af ter about 100
operation hour s or earlier if the electrodes are b adly erod ed.
0.6 mm
Fig. 24
NOTE
In some are as, loca l law requires using a r esistor spark plu g
to suppr ess igni tion sig nals. If this machi ne was ori ginally
equipped with resistor spark plug, use same type of spark plug
for replacement.
For long-term s torage
Drain a ll fuel fro m the fuel t ank. Sta rt and le t engine r un until it
stops. R epair any d amage whi ch has res ulted fro m use. Clea n the
unit with a clean rag, or the use of high pre ssure air hose. Put a few
drops of t wo-cycle engi ne oil into t he cylinder throu gh the spark
plug ho le, and spin the engine over sever al times to d istrib ute oil.
Cover the unit and st ore it in a dr y area.
Maintenance schedule
Below you will fi nd s ome gene ral maintenance i nstruc tions. Fo r
furt her infor mation please contact your HiKOKI Auth orized Se rvice
Centers.
Daily maintenance
○ Clean t he exterior of the un it.
○ Check t hat the air intake at th e guard net is not clog ged.
○ Check the guard net for damage or cra cks. Chan ge the gua rd
net in ca se of impac ts or crac ks.
○ Check t hat nuts and scr ews are suffi ciently tightened.
Weekl y mainte nance
○ Check t he starter, especially the cord.
○ Clean t he exterior of the sp ark plug.
○ Rem ove the spar k plug and c heck the e lectro de gap. Adju st it
to 0.6 mm, or c hange th e spark plug.
○ Clean t he air fi lter.
Month ly maintenance
○ Rinse t he fuel ta nk with ga soline, a nd clean f uel fi lter.
○ Clean t he exterior of the ca rburetor and the space ar ound it.
Quarterly maintenance
○ Clean t he cooli ng fi ns on the cylind er.
○ Clean t he fan and the space ar ound it.
○ Clean t he muffl er of carb on.
CAUTION
Cleaning of cylinder fi ns, fan and m uffl er shall be done by a
HiKOKI Aut horized S ervice Center.
SELECTING ACCESSORIES
The acc essori es of this machine ar e listed on p age 11.
Fig. 25
SELECTING ATTACHMENTS
Recom mended accessories for ea ch model are presen ted in the ta ble below.
For purc hases, c ontact HiKOKI Autho rized Ser vice Center s.
Please check ca refully a s those ac cessor ies not marked with “● ” cannot be attach ed.
List of r ecomme nded accessories
Code No. Description RB27EAP
6601600 NOZZLE (A) ●●
6698394 NOZZLE (B) ●●
6699184 FAN-HEADED PIPE ●●
6684946 VACUUM PIPE - ●
6601497 BENT PIPE - ●
6601601 DUST BAG - ●
6601500 EARTH GRIP - ●
10
RB27EP
Page 11

6601600
6684764
6698394
6684946
6601497
6699184
6601601
6601500
11
Page 12

Shinagawa Intercity Tower A, 15-1, Konan 2-chome,
Minato-ku, Tokyo, Japan
Code No. E99703712 NA
Printed in China
901
 Loading...