

HIKOKI NR 1890DBCL, NR 1890DBRL, NT 1865DBAL, NT 1850DBSL, NT 1865DBSL Handling Instructions Manual
...Page 1
en
de
NR 1890DBCL • NR 1890DBRL
NR1890DBCL
fr
it
nl
es
pt
sv
da
no
fi
NR1890DBRL
en
Handling instructions
de
Bedienungsanleitung
fr
Mode d’emploi
it
Istruzioni per l’uso
nl
Gebruiksaanwijzing
es
Instrucciones de manejo
pt
Instruções de uso
sv
Bruksanvisning
da
Brugsanvisning
no
Bruksanvisning
fi
Käyttöohjeet
Page 2
BSL1850
UC18YFSL
NR1890DBCL NR1890DBRL
(NNK) (NN) (NNK) (NN)
111111
2 ―― 2 ――
1 ―― 1 ――
111111
1 ―― 1 ――
11― 11―
111111
111111
2
Page 3
1
1
2
4
!
0
9
1
2
8
7
6
5
3
<NR1890DBCL> <NR1890DBRL>
^
%
&
4
5
3
@
#
$
!
6
0
9
8
7
2
9
1
2
3
Page 4

3
1
4
2
2
<UC18YFSL>
%
^
1
56
%
2
&
^
1
2
&
$
1
78
2
0
*
7
4
Page 5
910
6
5
11
13
4
12
1
6
5
2
2
%
^
3
2
&
1
14
&
24
4
*
3
2
$
1
4
5
3
Page 6
15
9
16
17 18
(
1
8
(
1
19 20
)
6
Page 7
21
22
23
7
Page 8
18V (Li-ion)
UC18YFSL (14,4V - 18V)
329897
337528
371896
8
Page 9

(Original instructions)
GENERAL POWER TOOL SAFETY
WARNINGS
WARNING
Read all safety warnings and all instructions.
Failure to follow the warnings and instructions may result in
electric shock, fi re and/or serious injury.
Save all warnings and instructions for future reference.
The term “power tool” in the warnings refers to your mainsoperated (corded) power tool or battery-operated (cordless)
power tool.
1) Work area safety
a) Keep work area clean and well lit.
Cluttered or dark areas invite accidents.
b) Do not operate power tools in explosive
atmospheres, such as in the presence of
fl ammable liquids, gases or dust.
Power tools create sparks which may ignite the dust
or fumes.
c) Keep children and bystanders away while
operating a power tool.
Distractions can cause you to lose control.
2) Electrical safety
a) Power tool plugs must match the outlet.
Never modify the plug in any way.
Do not use any adapter plugs with earthed
(grounded) power tools.
Unmodifi ed plugs and matching outlets will reduce
risk of electric shock.
b) Avoid body contact with earthed or grounded
surfaces, such as pipes, radiators, ranges and
refrigerators.
There is an increased risk of electric shock if your
body is earthed or grounded.
c) Do not expose power tools to rain or wet
conditions.
Water entering a power tool will increase the risk of
electric shock.
d) Do not abuse the cord. Never use the cord for
carrying, pulling or unplugging the power tool.
Keep cord away from heat, oil, sharp edges or
moving parts.
Damaged or entangled cords increase the risk of
electric shock.
e) When operating a power tool outdoors, use an
extension cord suitable for outdoor use.
Use of a cord suitable for outdoor use reduces the
risk of electric shock.
f) If operating a power tool in a damp location
is unavoidable, use a residual current device
(RCD) protected supply.
Use of an RCD reduces the risk of electric shock.
3) Personal safety
a) Stay alert, watch what you are doing and use
common sense when operating a power tool.
Do not use a power tool while you are tired
or under the infl uence of drugs, alcohol or
medication.
A moment of inattention while operating power tools
may result in serious personal injury.
b) Use personal protective equipment. Always
wear eye protection.
Protective equipment such as dust mask, non-skid
safety shoes, hard hat, or hearing protection used for
appropriate conditions will reduce personal injuries.
c) Prevent unintentional starting. Ensure the
switch is in the off position before connecting to
power source and/or battery pack, picking up or
carrying the tool.
Carrying power tools with your fi nger on the switch
or energising power tools that have the switch on
invites accidents.
d) Remove any adjusting key or wrench before
turning the power tool on.
A wrench or a key left attached to a rotating part of
the power tool may result in personal injury.
e) Do not overreach. Keep proper footing and
balance at all times.
This enables better control of the power tool in
unexpected situations.
f) Dress properly. Do not wear loose clothing or
jewellery. Keep your hair, clothing and gloves
away from moving parts.
Loose clothes, jewellery or long hair can be caught in
moving parts.
g) If devices are provided for the connection of
dust extraction and collection facilities, ensure
these are connected and properly used.
Use of dust collection can reduce dust-related
hazards.
4) Power tool use and care
a) Do not force the power tool. Use the correct
power tool for your application.
The correct power tool will do the job better and safer
at the rate for which it was designed.
b) Do not use the power tool if the switch does not
turn it on and off .
Any power tool that cannot be controlled with the
switch is dangerous and must be repaired.
c) Disconnect the plug from the power source and/
or the battery pack from the power tool before
making any adjustments, changing accessories,
or storing power tools.
Such preventive safety measures reduce the risk of
starting the power tool accidentally.
d) Store idle power tools out of the reach of
children and do not allow persons unfamiliar
with the power tool or these instructions to
operate the power tool.
Power tools are dangerous in the hands of untrained
users.
e) Maintain power tools. Check for misalignment
or binding of moving parts, breakage of parts
and any other condition that may aff ect the
power toolʼs operation.
If damaged, have the power tool repaired before
use.
Many accidents are caused by poorly maintained
power tools.
f) Keep cutting tools sharp and clean.
Properly maintained cutting tools with sharp cutting
edges are less likely to bind and are easier to control.
g) Use the power tool, accessories and tool bits
etc. in accordance with these instructions,
taking into account the working conditions and
the work to be performed.
Use of the power tool for operations diff erent from
those intended could result in a hazardous situation.
5) Battery tool use and care
a) Recharge only with the charger specifi ed by the
manufacturer.
A charger that is suitable for one type of battery pack
may create a risk of fi re when used with another
battery pack.
b) Use power tools only with specifi cally
designated battery packs.
Use of any other battery packs may create a risk of
injury and fi re.
9
English
Page 10
English
c) When battery pack is not in use, keep it away
from other metal objects, like paper clips, coins,
keys, nails, screws or other small metal objects,
that can make a connection from one terminal to
another.
Shorting the battery terminals together may cause
burns or a fi re.
d) Under abusive conditions, liquid may be ejected
from the battery; avoid contact. If contact
accidentally occurs, fl ush with water. If liquid
contacts eyes, additionally seek medical help.
Liquid ejected from the battery may cause irritation or
burns.
6) Service
a) Have your power tool serviced by a qualifi ed
repair person using only identical replacement
parts.
This will ensure that the safety of the power tool is
maintained.
PRECAUTION
Keep children and infi rm persons away.
When not in use, tools should be stored out of reach of
children and infi rm persons.
CORDLESS STRIP NAILER SAFETY
WARNINGS
1. Always assume that the tool contains fasteners.
Careless handling of the nailer can result in unexpected
fi ring of fasteners and personal injury.
2. Do not point the tool towards yourself or anyone
nearby.
Unexpected triggering will discharge the fastener
causing an injury.
3. Do not actuate the tool unless the tool is placed
fi rmly against the workpiece.
If the tool is not contact with the workpiece, the fastener
may be defl ected away from your target.
4. Disconnect the tool from the power source when
the fastener jams in the tool.
While removing a jammed fastener, the nailer may be
accidentally activated if it is plugged in.
5. Use caution while removing a jammed fastener.
The mechanism may be under compression and the
fastener may be forcefully discharged while attempting
to free a jammed condition.
6. Do not use this nailer for fastening electrical cables.
It is not designed for electric cable installation and may
damage the insulation of electric cables thereby causing
electric shock or fi re hazards.
ADDITIONAL SAFETY WARNINGS
1. Safe operation through correct usage.
This tool was designed for driving nails into wood and
similar materials. Use it for its intended purpose only.
2. Be careful of ignition and explosions.
Since sparks may fl y during nailing, it is dangerous to use
this tool near lacquer, paint, benzine, thinner, gasoline,
gas, adhesives and similar infl ammable substances as
they may ignite or explode. Under no circumstances
should this tool therefore be used in the vicinity of such
infl ammable material.
3. Always wear eye protection (protective goggles).
When operating the power tool, always
wear eye protection, and ensure that
surrounding people wear eye protection
too.
The possibility of fragments of the nails
that were not properly hit entering the
eye is a threat to sight. Eye protection can be bought at
any hardware store. Always wear eye protection while
operating this tool. Use either eye protection or a wide
vision mask over prescription glasses.
Employers should always enforce the use of eye
protection equipment.
4. Protect your ears and head.
When engaged in nailing work please wear ear muffl ers
and head protection. Also, depending on condition,
ensure that surrounding people also wear ear muffl ers
and head protection.
5. Pay attention to those working close to you.
It would be very dangerous if nails that were not properly
driven in should hit other people. Therefore, always pay
attention to the safety of the people around you when
using this tool. Always make sure that nobody’s body,
hands or feet are close to the nail outlet.
6. Never point the nail outlet towards people.
If the nail outlet is pointed towards
tool. When connecting and disconnecting the battery,
during nail loading or similar operations, be sure the nail
outlet is not pointed towards anyone (including yourself).
Even when no nails are loaded at all, it is dangerous to
discharge the tool while pointing it at someone, so never
attempt to do so. No horseplay. Respect the tool as a
working implement.
7. Check push lever before use.
Make sure the push lever operates properly. (The push
lever may be called “Safety”.) Never use the Nailer
unless the push lever is operating properly, otherwise
the Nailer could drive a fastener unexpectedly. Do not
tamper with or remove the push lever, otherwise the
push lever becomes inoperable.
8. Choice of triggering method is important.
Read and understand section titled “HOW TO USE THE
NAILER” on page 18.
9. Prior to using this product, make sure that it is
operating properly in accordance with the content
of “Testing the nailer” on page 17.
10. Use specifi ed nails only.
Never use nails other than those specifi ed and described
in these instructions.
11. Be careful when connecting the battery.
When connecting the battery and loading nails in
order not to fi re the tool by mistake, make sure of the
followings.
○ Do not touch the trigger.
○ Do not allow the fi ring head to contact with any
surface.
○ Keep the fi ring head down.
Strictly observe the above instructions, and always
make sure that no part of the body, hands or legs is
ever in front of the nail outlet.
12. Do not carelessly place your fi nger on the trigger.
Do not place your fi nger on the trigger except when actually
nailing. If you carry this tool or hand it to someone while
having your fi nger on the trigger, you may inadvertently
discharge a nail and thus cause an accident.
13. Press the nail outlet fi rmly against the material to
be nailed.
When driving in nails, press the nail outlet fi rmly against
the material to be nailed. If the outlet is not applied
properly, the nails may rebound.
14. Keep hands and feet away from the fi ring head
when using.
10
Always assume the tool contains
fasteners.
people, serious accidents may be
caused if you mistakenly discharge the
It is very dangerous for a nail to hit the
hands or feet by mistake.
Page 11

15. Beware of the tool’s kickback.
Do not approach the top of the tool with your head etc.
during operation. This is dangerous because the tool
may recoil violently if the nail currently being driven in
comes into contact with a previous nail or a knot in the
wood.
16. Be careful of double fi re due to recoil.
If the push lever is unintentionally allowed to re-contact
the workpiece following recoil, an unwanted fastener will
be driven.
In order to avoid this undesirable double fi re,
○ Intermittent operation (Trigger fi ring)
1) Set the switching device to FULL SEQUENTIAL
ACTUATION MECHANISM.
2) Pull the trigger rapidly and fi rmly.
○ Continuous operation (Push lever fi ring)
1) Do not press the nailer against the wood with
excessive force.
2) Separate the nailer from the wood as it recoils after
fastening.
17. Take care when nailing thin boards or the corners
of wood.
When nailing thin boards, the nails may pass right
through, as may also be the case when nailing the
corners of wood due to deviation of the nails. In such
cases, always make sure that there is no one (and
nobody’s hands or feet; etc.) behind the thin board or
next to the wood you are going to nail.
18. Simultaneous nailing on both sides of the same
wall is dangerous.
Under no circumstances should nailing be performed on
both sides of a wall at the same time. This would be very
dangerous since the nails might pass through the wall
and thus cause injuries.
19. Do not use the power tool on scaff oldings, ladders.
The power tool shall not be used for specifi c application
for example:
– when changing one driving location to another
involves the use of scaff oldings, stairs, ladders or
ladder alike constructions, e.g. roof laths,
– closing boxes or crates,
– fi tting transportation safety systems e.g. on vehicles
and wagons
20. Remove all remaining fasteners and battery from
nailer when:
1) doing maintenance and inspection;
2) checking proper operation of push lever and trigger;
3) clearing a jam;
4) it is not in use;
5) leaving work area;
6) moving it to another location; and
7) handing it to another person.
Never attempt to clear a jam or repair the Nailer unless
you have removed battery and all remaining fasteners
from the Nailer.
The Nailer should never be left unattended since people
who are not familiar with the Nailer might handle it and
injure the themselves.
21. Remove battery from nailer when:
1) loading nails;
2) turning the adjuster.
22. The operating environment for this device is
between 0°C and 40°C so ensure use within this
temperature range. The device may fail to operate
below 0°C or above 40°C.
23. Always charge the battery at an ambient
temperature of 0–40°C.
A temperature of less than 0°C will result in over charging
which is dangerous. The battery cannot be charged at a
temperature greater than 40°C.
The most suitable temperature for charging is that of
20–25°C.
English
24. Do not use the charger continuously.
When one charging is completed, leave the charger for
about 15 minutes before the next charging of battery.
25. Do not allow foreign matter to enter the hole for
connecting the rechargeable battery.
26. Never disassemble the rechargeable battery or
charger.
27. Never short-circuit the rechargeable battery.
Short-circuiting the battery will cause a great electric
current and overheat. It results in burn or damage to the
battery.
28. Do not dispose of the battery in fi re.
If the battery is burnt, it may explode.
29. Using an exhausted battery will damage the
charger.
30. Bring the battery to the shop from which it was
purchased as soon as the post-charging battery life
becomes too short for practical use.
Do not dispose of the exhausted battery.
31. Do not insert objects into the air ventilation slots of
the charger.
Inserting metal objects or fl ammable into the charger air
ventilation slots will result in an electrical shock hazard or
damage to the charger.
32. NEVER allow magnets (or similar magnetic devices)
to be adjacent to the nailer, because the nailer has a
magnetic sensor inside.
Doing so will cause a failure or risk of injury by
malfunction.
33. Resting the unit after continuous work.
34. The power tool is equipped with a temperature
protection circuit to protect the motor. Continuous
work may cause the temperature of the unit to rise,
activating the temperature protection circuit and
automatically stopping operation. If this happens,
allow the power tool to cool before resuming use.
35. This product may cease to operate when an
abnormality is detected. In such cases, check
the items listed under “TROUBLESHOOTING” on
page 22.
36. Do not give a strong shock to the switch panel or
break it. It may lead to a trouble.
CAUTION ON LITHIUM-ION BATTERY
To extend the lifetime, the lithium-ion battery equips with the
protection function to stop the output.
In the cases of 1 to 3 described below, when using this
product, even if you are pulling the switch, the motor may
stop. This is not the trouble but the result of protection
function.
1. When the battery power remaining runs out, the motor
stops.
In such a case, charge it up immediately.
2. If the tool is overloaded, the motor may stop. In this
case, release the switch of tool and eliminate causes of
overloading. After that, you can use it again.
3. If the battery is overheated under overload work, the
battery power may stop.
In this case, stop using the battery and let the battery
cool. After that, you can use it again.
Furthermore, please heed the following warning and caution.
WARNING
In order to prevent any battery leakage, heat generation,
smoke emission, explosion and ignition beforehand, please
be sure to heed the following precautions.
1. Make sure that swarf and dust do not collect on the
battery.
○ During work make sure that swarf and dust do not fall on
the battery.
○ Make sure that any swarf and dust falling on the power
tool during work do not collect on the battery.
11
Page 12
English
○ Do not store an unused battery in a location exposed to
swarf and dust.
○ Before storing a battery, remove any swarf and dust that
may adhere to it and do not store it together with metal
parts (screws, nails, etc.).
2. Do not pierce battery with a sharp object such as a
nail, strike with a hammer, step on, throw or subject the
battery to severe physical shock.
3. Do not use an apparently damaged or deformed battery.
4. Do not use the battery in reverse polarity.
5. Do not connect directly to an electrical outlets or car
cigarette lighter sockets.
6. Do not use the battery for a purpose other than those
specifi ed.
7. If the battery charging fails to complete even when a
specifi ed recharging time has elapsed, immediately stop
further recharging.
8. Do not put or subject the battery to high temperatures or
high pressure such as into a microwave oven, dryer, or
high pressure container.
9. Keep away from fi re immediately when leakage or foul
odor are detected.
10. Do not use in a location where strong static electricity
generates.
11. If there is battery leakage, foul odor, heat generated,
discolored or deformed, or in any way appears abnormal
during use, recharging or storage, immediately remove it
from the equipment or battery charger, and stop use.
CAUTION
1. If liquid leaking from the battery gets into your eyes,
do not rub your eyes and wash them well with fresh
clean water such as tap water and contact a doctor
immediately.
If left untreated, the liquid may cause eye-problems.
2. If liquid leaks onto your skin or clothes, wash well with
clean water such as tap water immediately.
There is a possibility that this can cause skin irritation.
3. If you fi nd rust, foul odor, overheating, discolor,
deformation, and/or other irregularities when using the
battery for the fi rst time, do not use and return it to your
supplier or vendor.
WARNING
If a conductive foreign matter enters in the terminal of lithium
ion battery, the battery may be shorted, causing fi re. When
storing the lithium ion battery, obey surely the rules of
following contents.
○ Do not place conductive debris, nail and wires such as
iron wire and copper wire in the storage case.
○ To prevent shorting from occurring, load the battery in
the tool or insert securely the battery cover for storing
until the ventilator is not seen.
REGARDING LITHIUM-ION BATTERY
TRANSPORTATION
When transporting a lithium-ion battery, please observe the
following precautions.
WARNING
Notify the transporting company that a package contains a
lithium-ion battery, inform the company of its power output
and follow the instructions of the transportation company
when arranging transport.
○ Lithium-ion batteries that exceed a power output of
100Wh are considered to be in the freight classifi cation
of Dangerous Goods and will require special application
procedures.
○ For transportation abroad, you must comply with
international law and the rules and regulations of the
destination country.
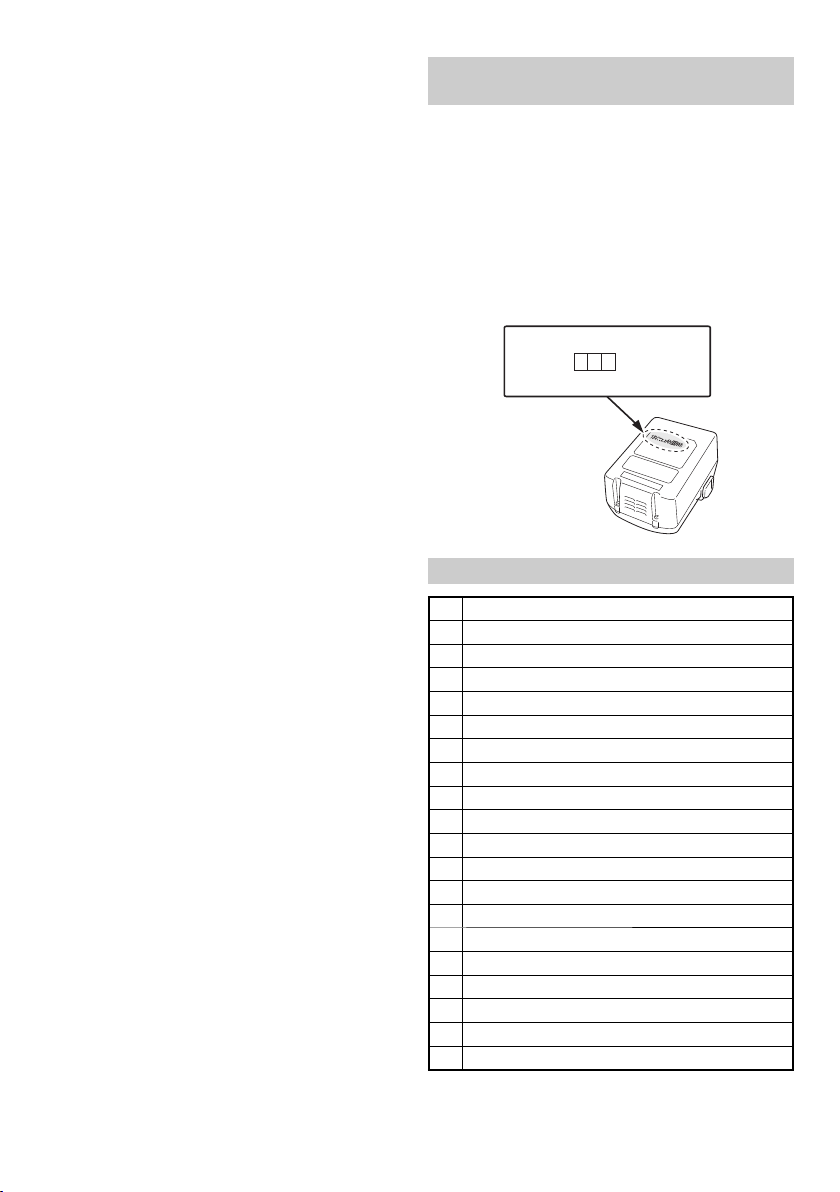
Power Output
Wh
2 to 3 digit number
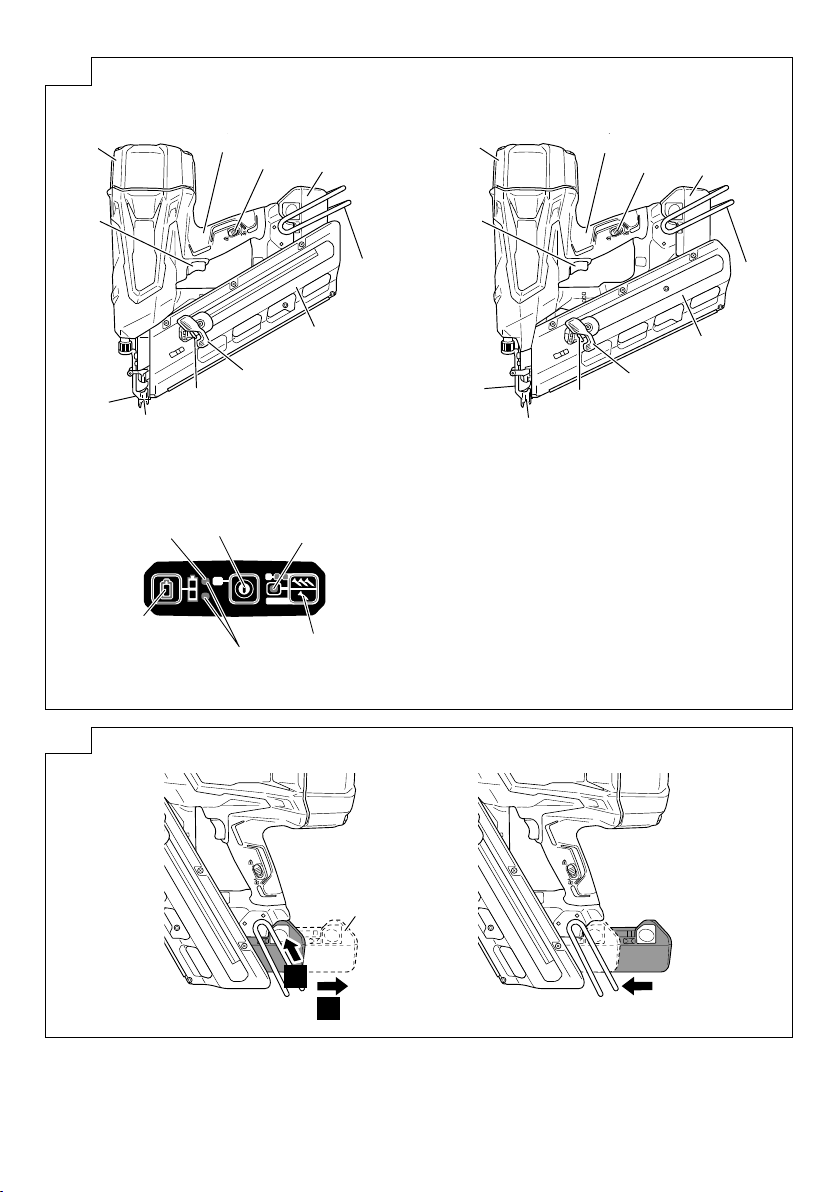
NAMES OF PARTS (Fig. 1 – Fig. 23)
Top cover
1
Trigger
2
Firing head (outlet)
3
Push lever
4
Nail feeder (B)
5
Feeder knob
6
Magazine
7
Hook
8
Battery
9
Lock lever
0
Handle
!
Battery indicator switch
@
Battery indicator
#
Nailing operation switch
$
Power indicator
%
Power switch
^
Nailing operation indicator
&
Nails
*
Adjuster
(
Hook plate
)
12
Page 13
English
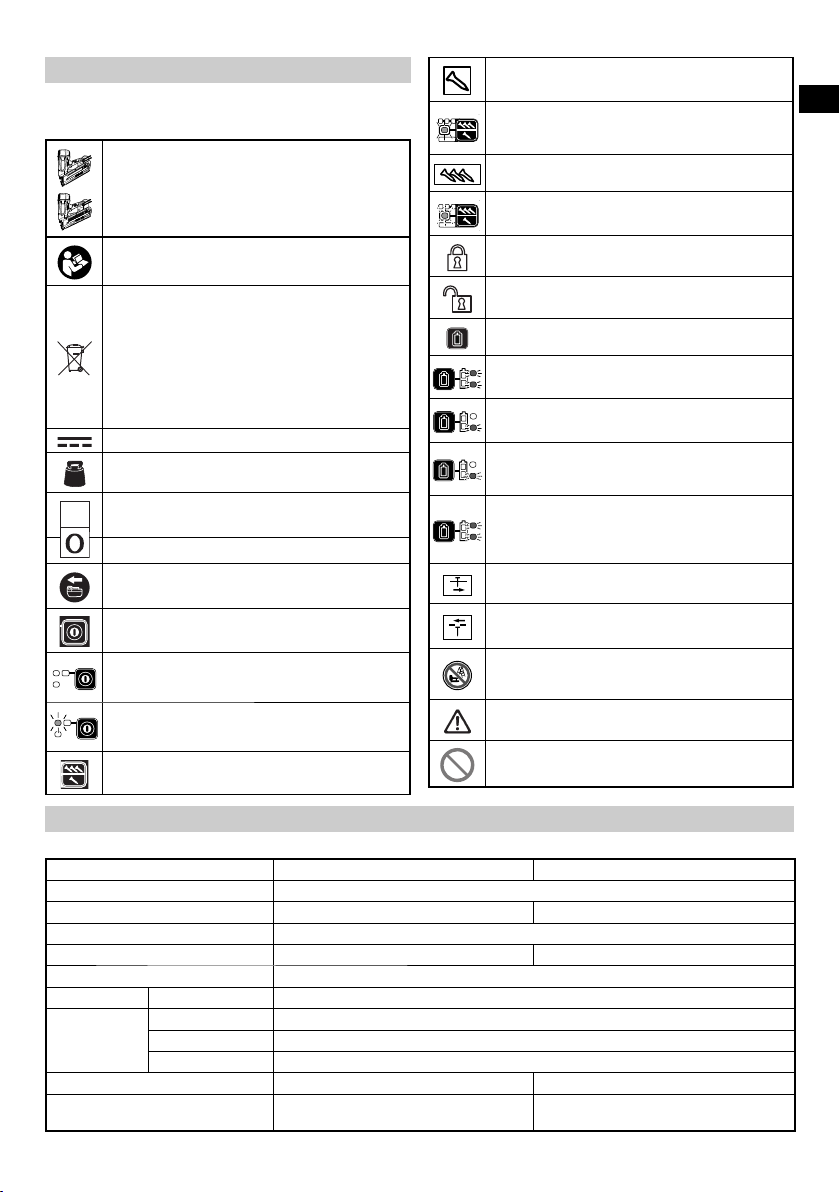
SYMBOLS
WARNING
The following show symbols used for the machine. Be
sure that you understand their meaning before use.
NR1890DBCL: Cordless Strip Nailer
NR1890DBRL: Cordless Strip Nailer
To reduce the risk of injury, user must read
instruction manual
Only for EU countries
Do not dispose of electric tools together with
household waste material!
In observance of European Directive 2002/96/EC
on waste electrical and electronic equipment and
its implementation in accordance with national law,
electric tools that have reached the end of their life
must be collected separately and returned to an
environmentally compatible recycling facility.
Direct current
Weight
kg
(According to EPTA-Procedure 01/2003)
Switching ON
Ϩ
Switching OFF
Disconnect the battery
Power switch
FULL SEQUENTIAL ACTUATION
MECHANISM
FULL SEQUENTIAL ACTUATION
MECHANISM mode
Nailing operation indicator: Light in blue
CONTACT ACTUATION MECHANISM
CONTACT ACTUATION MECHANISM mode
Nailing operation indicator: Blink in blue
Trigger locked
Trigger unlocked
Battery indicator switch
The battery remaining power is enough
Battery indicator: 2 LEDs (Red) light
The battery remaining power is about half.
Battery indicator:1 LED (Red) lights
The battery remaining power is nearly empty.
Recharge the battery as soon as possible.
Battery indicator:1 LED (Red) blink
Contact HiKOKI for inspection.
Battery indicator: 2 LEDs blink in Orange,
after 10 seconds, automatically turn off
Power switch.
Shallow side
Deep side
Power switch OFF
Power switch ON
Power indicator: Light in green
Nailing operation switch
Do not use on scaff oldings, ladders.
Warning
Prohibited action
SPECIFICATIONS
1. Cordless Strip Nailer
Model NR1890DBCL NR1890DBRL
Motor DC Brushless
Applicable Nail ø2.9 – 3.3 mm See Fig. ø2.9 – 3.3 mm See Fig.
Applicable Nail Length 50 mm to 90 mm
Nail Loading capacity [nails] 47 37
Firing mode Full sequential / Contact (Selectable)
Cycle rate [nails/second] 1.5 – 2 (Intermittent)
Battery Model BSL1850
Type Li-ion battery
Voltage DC 18V
Weight* 4.8 kg 4.9 kg
Dimension
Height × Length × Width
* Weight: According to EPTA-Procedure 01/2003
342 mm × 309 mm × 127 mm 342 mm × 342 mm × 137 mm
13
Page 14
English
2. Battery Charger
Model UC18YFSL
Charging voltage DC 14.4 – 18 V
Weight 0.5 kg
NOTE
Due to HiKOKI’s continuing program of research and development, the specifi cations herein are subject to change
without prior notice.
NAIL SELECTION
Choose a suitable nail from Fig. Nails which are not shown in Fig. can not be driven with this tool.
The use of any other nails can result in tool malfunction and/or nail breakdown, leading to serious injuries.
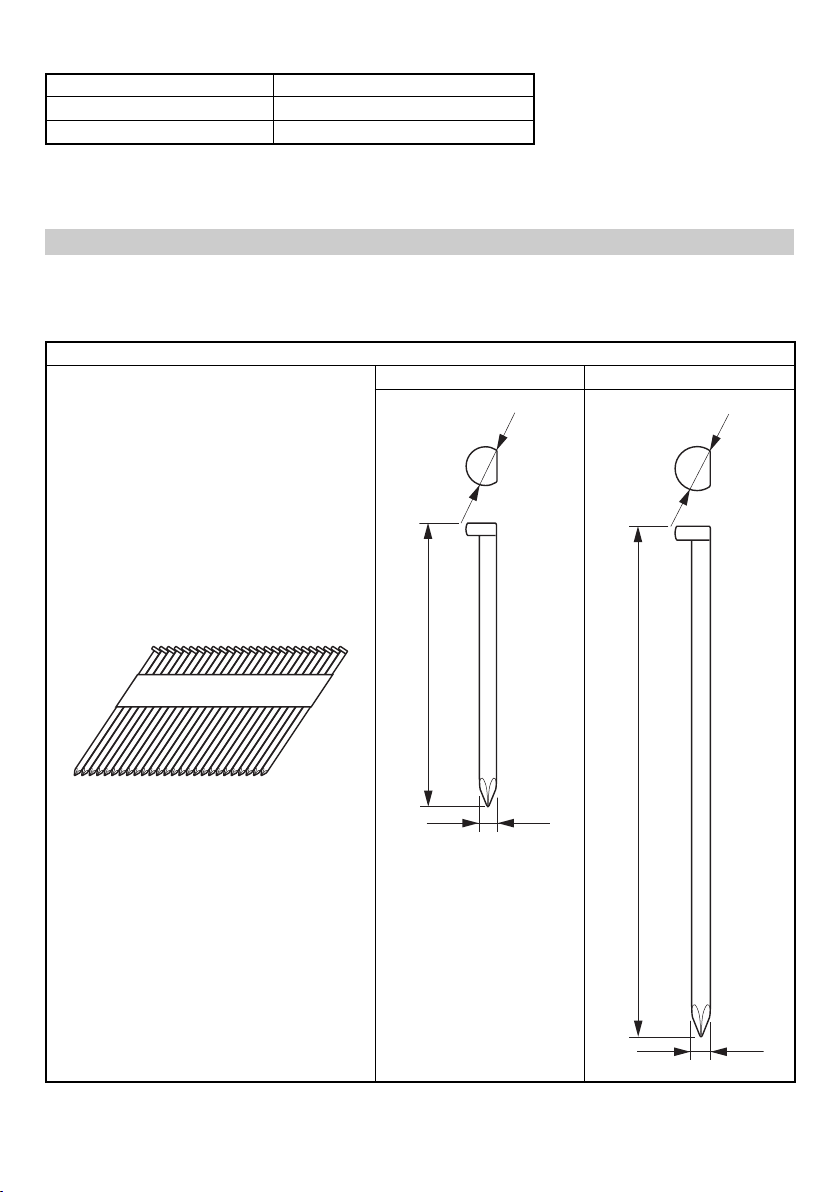
[NR1890DBCL]
Only smooth, barbed and ring type nails are used. Do not use screw nails. Nails are formed into strips which consist of
25 – 37 nails.
NR1890DBCL
Paper collated strip nails
Clipped-head nails
Min. Max.
6.8 mm
7.7 mm
50 mm
14
90 mm
2.9 mm
3.3 mm
Page 15
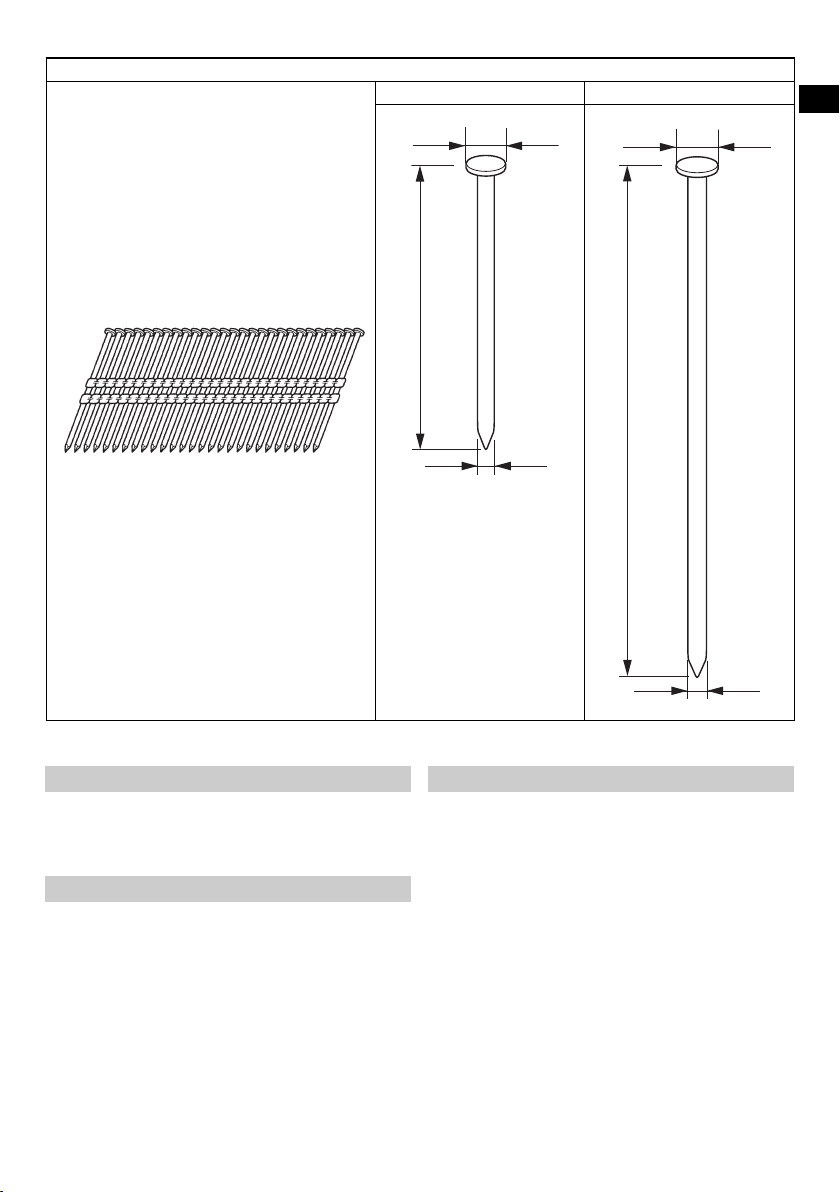
Plastic-collated strip nails
Full-head nails
NR1890DBRL
50 mm
Min. Max.
7 mm
2.9 mm
7.6 mm
90 mm
English
3.3 mm
* This Nailer is not recommended for use with from 75 mm to 90 mm ring shank nails in pressured-treated lumber.
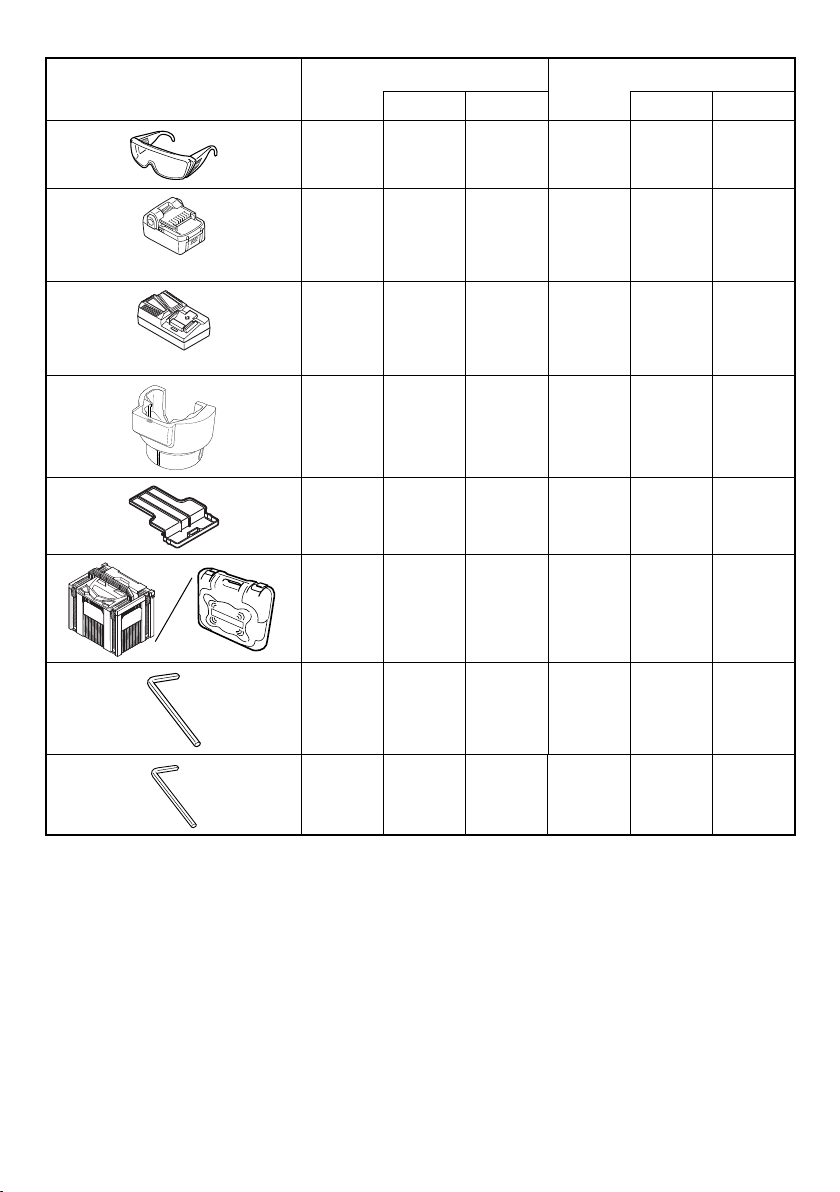
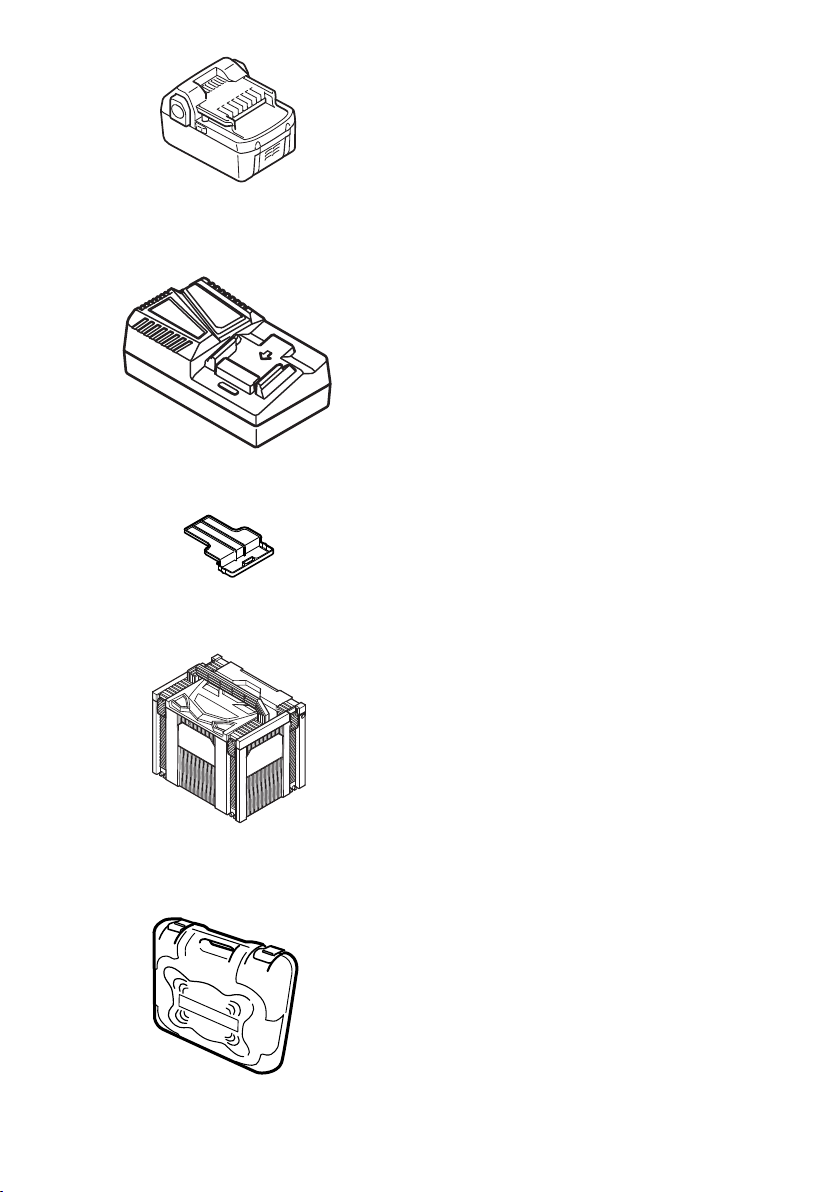
STANDARD ACCESSORIES
In addition to the main unit (1 unit), the package contains the
accessories listed on page 2.
Standard accessories are subject to change without notice.
APPLICATIONS
○ Floor and wall framing.
○ Truss build-up, Window build-up.
○ Subfl ooring and roof decking.
○ Wall sheathing.
○ Mobile home and modular housing construction.
CHARGING
Before using the power tool, charge the battery as follows.
1. Connect the charger’s power cord to the receptacle.
When connecting the plug of the charger to a receptacle,
the pilot lamp will blink in red (At 1- second intervals).
2. Insert the battery into the charger.
Firmly insert the battery into the charger as shown in Fig. 3.
3. Charging
When inserting a battery in the charger, charging will
commence and the pilot lamp will light continuously in
red.
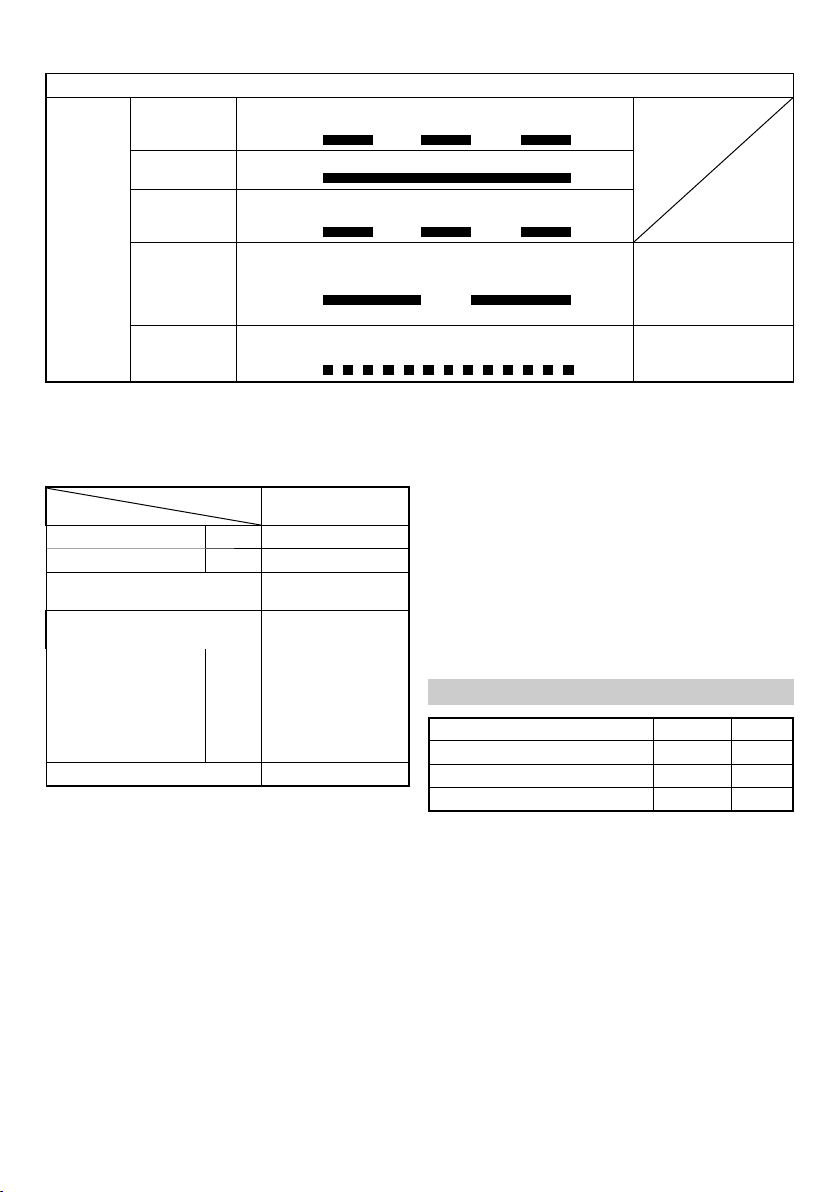
When the battery becomes fully recharged, the pilot lamp
will blink in red. (At 1-second intervals) (See Table 1)
● Pilot lamp indication
The indications of the pilot lamp will be as shown in
Table 1, according to the condition of the charger or the
rechargeable battery.
15
Page 16
English
Pilot lamp
(red)
Before
charging
While charging Lights
Charging
complete
Overheat
standby
Charging
impossible
Blinks
Blinks
Blinks
Flickers
Table 1
Indications of the pilot lamp
Lights for 0.5 seconds. Does not light for 0.5
seconds. (off for 0.5 seconds)
Lights continuously
Lights for 0.5 seconds. Does not light for 0.5
seconds. (off for 0.5 seconds)
Lights for 1 second. Does not light for 0.5
seconds. (off for 0.5 seconds)
Lights for 0.1 seconds. Does not light for 0.1
seconds. (off for 0.1 seconds)
Battery overheated.
Unable to charge.
(Charging will
commence when
battery cools)
Malfunction in the
battery or the charger
● Regarding the temperatures and charging time of the
battery.
The temperatures and charging time will become as
shown in Table 2.
Table 2
Battery
Charging voltage V 14.4 – 18
Weight kg 0.5
Temperatures at which the
battery can be recharged
Charging time for battery
capacity, approx. (At 20oC)
1.3 Ah
1.5 Ah
2.0 Ah
2.5 Ah
3.0 Ah
4.0 Ah
5.0 Ah
Number of battery cells 4 – 10
NOTE
The recharging time may vary according to temperature
and power source voltage.
CAUTION
When the battery charger has been continuously used,
the battery charger will be heated, thus constituting
the cause of the failures. Once the charging has been
completed, give 15 minutes rest until the next charging.
4. Disconnect the charger’s power cord from the
receptacle.
5. Hold the charger fi rmly and pull out the battery.
NOTE
Be sure to pull out the battery from the charger after use,
and then keep it.
CAUTION
○ If the battery is charged while it is heated because it has
been left for a long time in a location subject to direct
sunlight or because the battery has just been used, the
pilot lamp of the charger lights for 1 second, does not
light for 0.5 seconds (off for 0.5 seconds). In such a case,
fi rst let the battery cool, then start charging.
Charger
min.
min.
min.
min.
min.
min.
min.
UC18YFSL
0oC – 50oC
20
22
30
35
45
60
75
○ When the pilot lamp fl ickers (at 0.2-second intervals),
check for and take out any foreign objects in the charger’s
battery connector. If there are no foreign objects, it is
probable that the battery or charger is malfunctioning.
Take it to your authorized Service Center.
○
Since the built-in micro computer takes about 3 seconds to
confi rm that the battery being charged with charger is taken
out, wait for a minimum of 3 seconds before reinserting it
to continue charging. If the battery is reinserted within 3
seconds, the battery may not be properly charged.
○ If the pilot lamp does not blink in red (every second)
even though the charger cord is connected to the power,
it indicates that the protection circuit of the charger may
be activated.
Remove the cord or plug from the power and then connect
it again after 30 seconds or so. If this does not cause the
pilot lamp to blink in red (every second), please take the
charger to the HiKOKI Authorized Service Center.
BEFORE USE
Action Figure Page
Removing and inserting the battery
Charging 3 4
Selecting accessories ― 8
1. How to operate operation panel
(1) Power switch ON (See Fig. 4)
Under the condition of “Power switch OFF”, push and
hold on Power switch more than 1 second, then power
indicator lights in Green.
NOTE
Do not press the push lever and/or pull the trigger during
the process of turning the power switch ON.
Doing so will prevent the power switch from turning ON.
[Auto power off ]
When the power is turned on but the Nailer is not used
for 30 minutes, the Nailer is automatically turned off . To
turn on again, press the power switch.
WARNING
Never leave the Nailer with the power on. This could
result in an accident.
(2) Power switch OFF (See Fig. 4)
Under the condition of “Power switch ON”, push and
hold on Power switch more than 1 second, then power
indicator goes off .
Under the condition of “Power switch ON”, functions
below are active.
16
23
Page 17
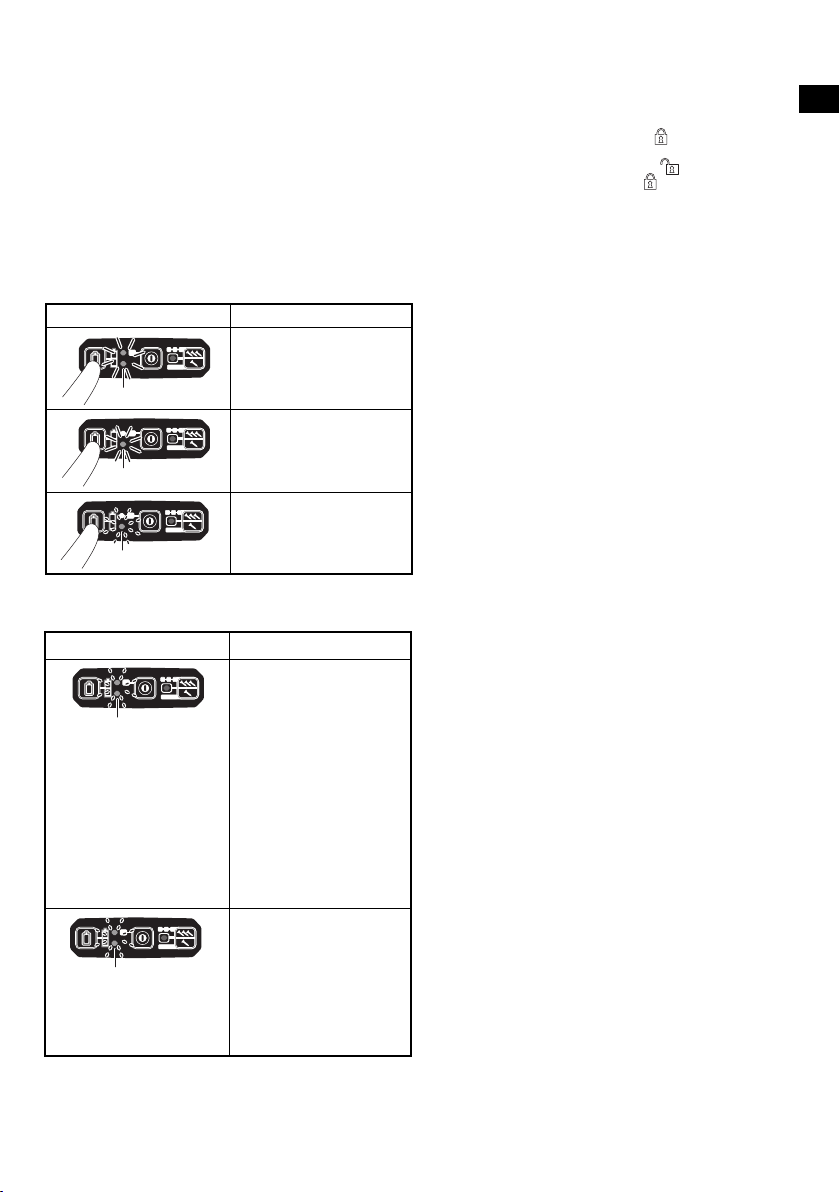
(3) Select Nailing operation mode
(Full sequential actuation / Contact actuation)
After power switch turn ON, always set in Full sequential
actuation mode as initial. (Nailing operation indicator
light in blue.) (See Fig. 5)
To change nailing operation mode, push Nailing
operation switch once. Every pushing, mode will change
between “Full sequential” and “Contact”. (See Fig. 6)
Lighting (Blue):
FULL SEQUENTIAL ACTUATION MECHANISM,
Blinking (Blue):
CONTACT ACTUATION MECHANISM
(4) Check Remaining battery level
When pressing the battery indicator switch, the battery
indicator shows Remaining battery level by status of LED
lamp as below.
Status of indicator
The battery remaining
power is enough.
2 LEDs (Red) light
The battery remaining
power is about half.
1 LED (Red) lights
The battery remaining
power is nearly empty.
Recharge the battery as
1 LED (Red) blinks
(5) Other functions
In case of operation error, LED lamps show as below.
Status of indicator
2 LEDs (Red) blink
2 LED lights blink in an
interval.
• In case of too hot
condition, Blink in
0.5 second interval.
• In case of too cold
condition, Blink in
0.25 second interval.
After 10 seconds, LED
lights and Power switch
automatically turn off .
2 LEDs blink in Orange,
after about 10 seconds,
automatically turn off
Power switch.
soon as possible.
Machine is in too cold
(below -5°C) or too hot
condition.
Allow the nailer to cool
or warm-up thoroughly in
adequate condition.
Contact HiKOKI for
inspection.
English
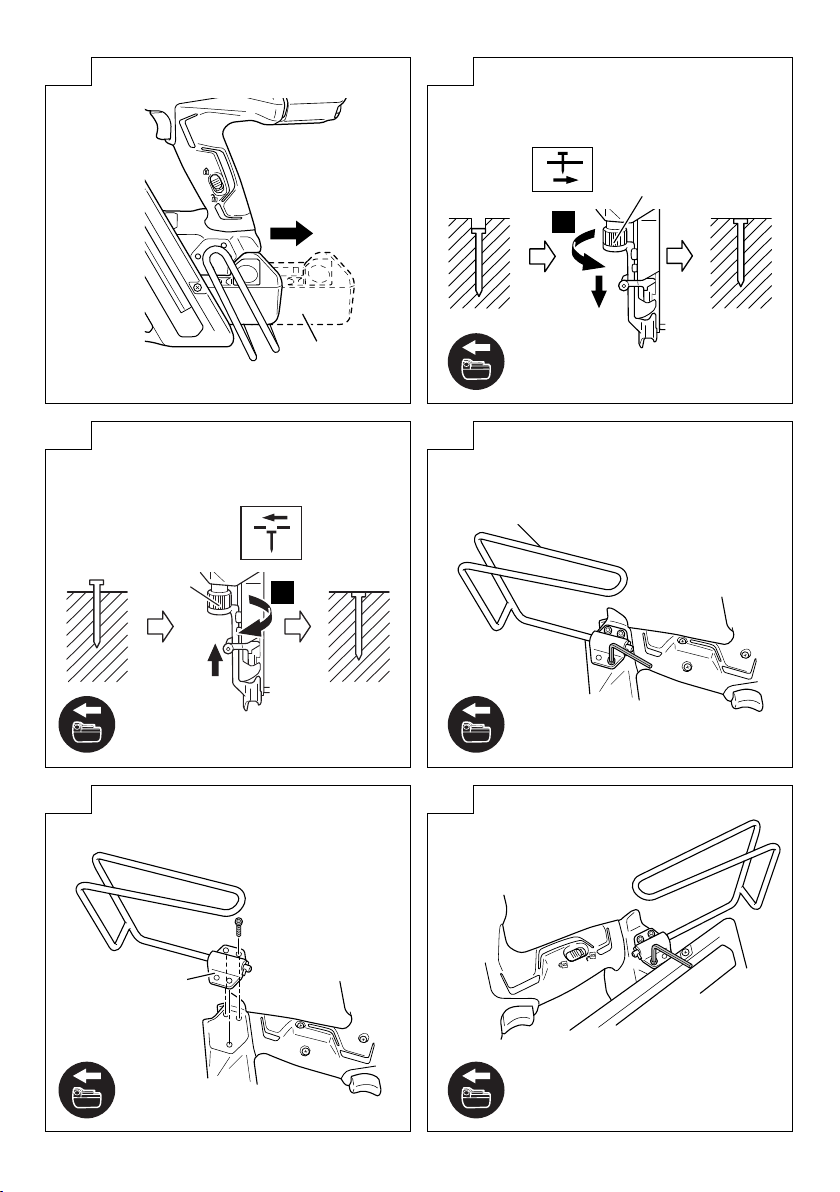
2. Trigger Lock Mechanism (See Fig. 7)
WARNING
Make sure the trigger is locked when not fi ring nails.
This Nailer has a lock mechanism to prevent the nails
from being fi red.
Set the switch lock lever at the
trigger.
Slide the switch lock lever to the
Nailer is to be used, and to the
in use.
3. Testing the nailer
WARNING
○ Make sure the trigger is locked when not fi ring nails.
(See Fig. 7)
○ Never use Nailer unless push lever is operating properly.
The machine employs a preventive mechanism for
unloaded operation.
The machine enters a state where the push lever cannot
be pushed up. This takes place when the magazine is
not loaded with nails or when the remaining number of
nails becomes less than 7 or 9.
CAUTION
Use caution not to throw the push lever tip onto wood.
Before actually beginning the nailing work, test the Nailer by
using the checklist below. Conduct the tests in the following
order.
If abnormal operation occurs, stop using the Nailer and
contact a HiKOKI authorized service center immediately.
(1) REMOVE ALL NAILS AND BATTERY FROM NAILER.
□ ALL SCREWS MUST BE TIGHTENED.
□ THE PUSH LEVER AND TRIGGER MUST MOVE
SMOOTHLY with pulling back the feeder knob.
(2) Installing the battery.
Do not operate the push lever or trigger while installing
the battery. (See Fig. 2)
(3) Turn on the Power switch. (See Fig. 1)
Turn on the Power switch by push and hold on Power
switch more than 1 second.
Make sure the power indicator is lighting in green, and
nailing operation indicator is lighting in blue. (FULL
SEQUENTIAL ACTUATION MECHANISM)
NOTE
Do not press the push lever and/or pull the trigger during
the process of turning the power switch ON.
Doing so will prevent the power switch from turning ON.
[Auto power off ]
When the power is turned on but the Nailer is not used
for 30 minutes, the Nailer is automatically turned off . To
turn on again, press the power switch.
WARNING
Never leave the Nailer with the power on. This could
result in an accident.
Nailing operation indicator
Lighting (Blue):
FULL SEQUENTIAL ACTUATION MECHANISM,
Blinking (Blue):
CONTACT ACTUATION MECHANISM
Make sure the battery indicator is not blinking.
If the battery indicator is blinking in red, the battery
doesn’t have enough power and it needs to be charged.
(4) Remove the fi nger from the trigger and press the push
lever against the workpiece with pulling back the feeder
knob.
□ THE NAILER MUST NOT OPERATE.
position to lock the
position when the
position when it is not
17
Page 18

English
(5) Separate the push lever from the workpiece.
Next, point the nailer downward, with pulling back the
feeder knob, pull the trigger and then wait in that position
for 5 seconds or longer.
□ THE NAILER MUST NOT OPERATE.
(6) 1 Without touching the trigger, depress the push lever
against the workpiece with pulling back the feeder
knob.
Next, pull the trigger.
□ THE NAILER MUST OPERATE.
2 Hold the trigger back and depress the push lever
against the workpiece again.
□ THE NAILER MUST NOT OPERATE.
3 Separate the fi nger from the trigger.
Next, 1 is operated again.
□ THE NAILER MUST OPERATE.
(7) Separate the push lever from the workpiece, pull the
trigger.
Depress the push lever against the workpiece within
2 seconds.
□ THE NAILER MUST NOT OPERATE.
(8) Set the nailing operation indicator blinking ON mode.
(CONTACT ACTUATION MECHANISM)
Push the nailing operation switch once, make sure that
the indicator is blinking Blue.
Separate the push lever from the workpiece, pull the
trigger.
Depress the push lever against the workpiece within
2 seconds.
□ THE NAILER MUST OPERATE.
(9) If no abnormal operation is observed, you may load nails
in the Nailer.
Drive nails into the workpiece that is the same type to be
used in the actual application.
□ THE NAILER MUST OPERATE PROPERLY.
4. Checking push lever operations
WARNING
Make sure the trigger is locked when not fi ring nails.
Always make sure the trigger is locked and the battery
removed from the power tool when checking push lever
operations.
Check to make sure the push lever slides smoothly when
operated.
Clean the sliding area on the push lever if it doesn’t slide
smoothly.
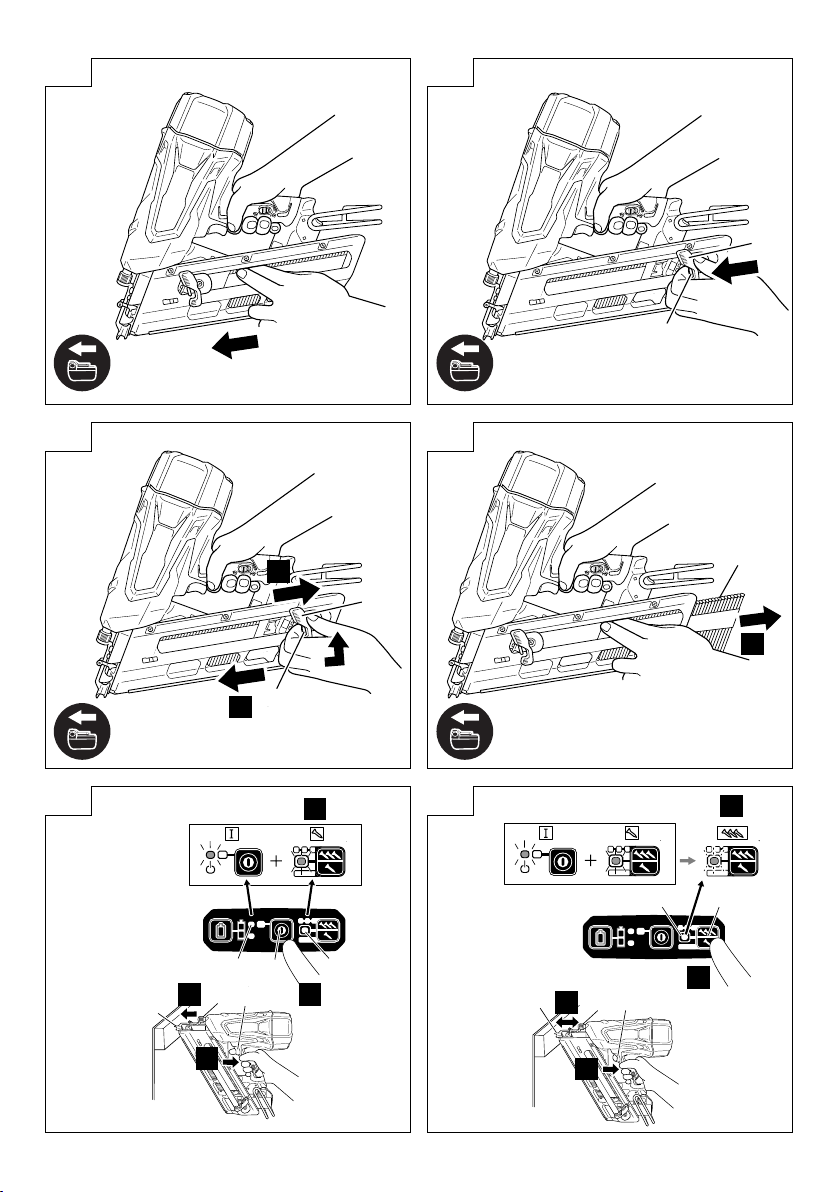
5. Load nails
WARNING
When loading nails into Nailer,
1) remove battery from the nailer;
2) do not pull trigger;
3) do not depress push lever; and
4) keep nailer pointed downward.
2–Action Nail Feeding!
(1) Insert nail strip into the back of the magazine. (See
Fig. 8)
(2) Slide the nail strip forward in the magazine. (See Fig. 9)
(3) Pull the nail feeder (B) back to engage the feeder knob to
the nail strip. (See Fig. 10)
NOTE
○ Quietly push the nail feeder (B) and feeder knob against
the nail.
If the nail feeder (B) and feeder knob are released
from backward the magazine and bumped against the
nail, the connecting paper or plastic of the nail can be
damaged.
○ Use nail strip of more than 10 nails.
○ Use an unbroken nail strip with nails of all the same
length.
The Nailer is now ready to operate.
Removing the nails:
1 Pull the feeder knob backward. (See Fig. 11)
2 Return the feeder knob forward quietly while pushing the
nail feeder (B).
3 Pull out nails from the back of the magazine. (See
Fig. 12)
HOW TO USE THE NAILER
WARNING
○ NEVER point tool at yourself or others in work area.
○ Keep fi ngers AWAY from trigger when not driving nails to
avoid accidental fi ring.
○ Do not use the electrical cord if damaged. Have it
repaired immediately.
○ Choice of triggering method is important.
Please read and understand “1. Nailing procedures”
found below.
○ Before starting work, check the nailing operation
switching device.
This HiKOKI nailer includes a nailing operation switching
device.
Before starting work, make sure that the switching
device is properly set.
If the switching device is not set properly, the nailer will
not operate correctly.
○ Never place your face, hands or feet near fi ring head
when using.
○ Do not drive nails on top of other nails or with Nailer at too
steep of an angle; nails can ricochet and hurt someone.
○ Do not drive nails into thin boards or near corners and
edges of workpiece. Nails can be driven through or away
from workpiece and hit someone.
○ Never drive nails from both sides of a wall at the same
time. Nails can be driven into and through the wall and
hit a person on the opposite side.
○ Never use Nailer which is defective or operating
abnormally.
○ Do not use Nailer as hammer.
○ Remove all remaining fasteners and battery from nailer
when:
1) doing maintenance and inspection;
2) checking proper operation of push lever and trigger;
3) cleaning a jam;
4) it is not in use;
5) leaving work area;
6) moving it to another location; and
7) handing it to another person.
○ Remove battery from Nailer when:
1) loading nails;
2) turning the adjuster.
This HiKOKI nailer is equipped with a nailer operation
switching device.
Use FULL SEQUENTIAL ACTUATION MECHANISM or
CONTACT ACTUATION MECHANISM in accordance with
the work to be performed.
Explanation of the various nailing operations
○ FULL SEQUENTIAL ACTUATION MECHANISM:
First, press the push lever against the wood; next, pull
the trigger to drive the nail.
Follow the same sequence to continue driving nails.
18
Page 19

After nailing once, nailing will not be possible again until
the trigger is released and pressed again.
○ CONTACT ACTUATION MECHANISM:
CONTACT ACTUATION can follow two diff erent
sequences, depending on your use.
To drive several nails:
1. Pull the trigger.
2. Press the push lever against the wood to drive the
nail.
3. If the trigger is held back, a nail will be driven each
time the push lever is pressed against the wood.
To drive a single nail:
1. Press the push lever against the wood.
2. Pull the trigger to drive the nail.
3. Remove your fi nger from the trigger and remove the
nailer from the wood.
[Dry-fi re lockout mechanism]
The machine employs a preventive mechanism for
unloaded operation.
The machine enters a state where the push lever cannot
be pushed up. This takes place when the magazine is
not loaded with nails or when the remaining number of
nails becomes less than 7 or 9.
CAUTION
Use caution not to throw the push lever tip onto wood
when the push lever cannot be pushed up.
1. Nailing procedures
This Nailer is equipped with the push lever and does not
operate unless the push lever is depressed.
There are two methods of operation to drive nails with
this Nailer.
They are:
1. Intermittent operation (Trigger fi re):
2. Continuous operation (Push lever fi re):
(1) Intermittent operation (Trigger fi re)
Use the FULL SEQUENTIAL ACTUATION MECHANISM
setting. (See Fig. 13)
WARNING
○ For intermittent operation, Set the nailing operation switch
to FULL SEQUENTIAL ACTUATION MECHANISM
(Nailing operation indicator is light in blue.) (i.e. Set to
SINGLE ACTUATION MECHANISM.)
○ To avoid double fi ring or accidental fi ring due to recoil.
1) Set to FULL SEQUENTIAL ACTUATION
MECHANISM.
2) Pull the trigger rapidly and fi rmly.
1 Set the nailing operation switch to FULL SEQUENTIAL
ACTUATION MECHANISM (Nailing operation indicator
is light in blue.)
(to set to FULL SEQUENTIAL ACTUATION
MECHANISM).
(Set the switching device to the nailing operation
indicator light in blue mode completely as shown in
the Fig. 13. Otherwise, it will be set to CONTACT
ACTUATION MECHANISM.)
2 Position the nail outlet on the workpiece with fi nger off
the trigger.
3 Depress the push lever fi rmly until it is completely
depressed.
4 Pull the trigger to drive a nail.
5 Remove fi nger from the trigger and lift the tool off the
wood surface completely.
To continue nailing in a separate location, move the nailer
along the wood, repeating steps 2 - 5 as required.
NOTE
Operations 3 and 4 should be done within 2 seconds
of each other. If more than 2 seconds pass after 3, the
Nailer will not work properly. If this happens, retry from
3.
(2) Continuous operation (Push lever fi re)
Using CONTACT ACTUATION MECHANISM (See
Fig. 14)
19
English
WARNING
To avoid double fi ring or accidental fi ring due to recoil.
1) Do not press the nailer against the wood with
excessive force.
2) Separate the nailer from the wood as it recoils after
nailing.
1 Set the nailing operation switch to CONTACT
ACTUATION MECHANISM (Nailing operation indicator
is blink in blue.)
(to set to CONTACT ACTUATION MECHANISM).
(Set the switching device to the nailing operation
indicator blink in blue completely as shown in the
Fig. 14. Otherwise, it will not operate properly.)
2 Pull the trigger with the Nailer off the workpiece.
3 Depress the push lever against the workpiece to drive a
nail.
4 Move the Nailer along the workpiece with a bouncing
motion.
Each depression of the push lever will drive a nail.
As soon as the desired number of nails have been driven,
remove fi nger from the trigger.
NOTE
Operations 2 and 3 should be done within 2 seconds
of each other. If more than 2 seconds pass after 2, the
Nailer will not work properly. If this happens, retry from
2.
WARNING
○ Keep your fi nger off the trigger except during nailing
operation, because serious injury could result if the push
lever accidentally contacts you or others in work area.
○ Keep hands and body away from the discharge area.
This HiKOKI nailer may bounce from the recoil of driving
a nail and unwanted subsequent nail may be driven,
possibly causing injury.
NOTE
○ If all warnings and instructions are followed, safe
operation is possible with all two systems: FULL
SEQUENTIAL ACTUATION MECHANISM, CONTACT
ACTUATION MECHANISM.
○ Always handle nails and package carefully. If nails are
dropped, collating bond may be broken, which will cause
mis-feeding and jamming.
○ After nailing:
1) remove battery from the Nailer;
2) remove all nails from the Nailer;
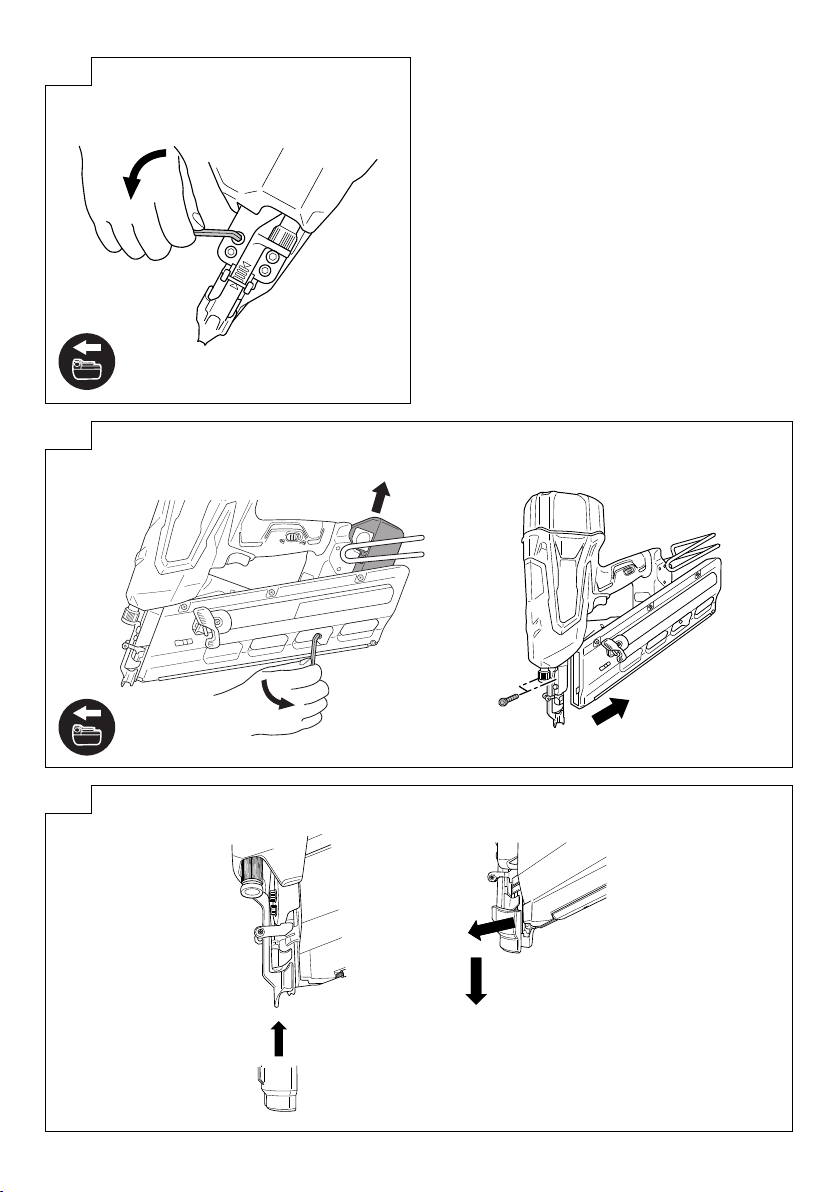
2. Adjusting the nailing depth
To assure that each nail penetrates to the same depth,
be sure that the Nailer is always held fi rmly against the
workpiece.
If nails are driven too deep or shallow into the workpiece,
adjust the nailing in the following order.
1 Remove the battery from the Nailer. (See Fig. 15)
2 If nails are driven too deep, turn the adjuster to the
shallow side. (See Fig. 16)
Adjustments are in half-turn increments.
If nails are driven too shallow, turn the adjuster to the
deep side. (See Fig. 17)
3 Stop turning the adjuster when a suitable position is
reached for a nailing test.
4 Connect the battery to the Nailer.
ALWAYS WEAR SAFETY GLASSES.
Perform a nailing test.
5 Remove the battery from the Nailer.
6 Choose a suitable position for adjuster.
3. Using the hook (See Fig. 18, 19, 20)
WARNING
When using the hook, turn off the power switch (green
light “OFF”). Pay suffi cient attention so that the main
equipment does not fall.
If the tool falls, there is a risk of accident.
Hook can be installed on the left or right side.
1 Remove the battery, then remove all remaining nails
from the magazine.
Page 20

English
2 Securely hold the main unit and remove the screw using
a screwdriver. (See Fig. 18)
3 Remove the hook and hook plate. (See Fig. 19)
4 Install the hook on the other side and securely fasten
with screw. (See Fig. 20)
NOTE
Hook can be used as a hanger.
4. Clearing a jam
If nails are jammed in fi ring head, remove it, and adjust
the nailing in the following order.
CAUTION
Remove the battery from the Nailer.
1 Remove the battery from the Nailer.
2 Remove all nails.
3 Remove the M5 bolts with wrench. (See Fig. 21)
4 Pull magazine away from the fi ring head, and clear jam.
(See Fig. 22)
CAUTION
○ NEVER hit the driver blade.
○ NEVER point the tool at yourself or another person, to
avoid risk of injury by mis-fi ring.
Even if the battery is removed from the nailer, there is still
energy of compressed air remaining inside.
5 Attach the magazine to the injector and tighten with the
M5 bolt.
NOTE
In case of frequent jam, contact a HiKOKI authorized
service center.
5. Using the nose cap (See Fig. 23)
WARNING
When attaching or detaching the nose cap, be sure
to remove your fi nger from the trigger and remove all
remaining fasteners and the battery from the nailer.
If you like to protect the surface of workpiece against
scratches or markings made by the push lever, attach the
accessory nose cap to the push lever.
1 Remove all remaining fasteners and battery from nailer.
2 Put the nose cap to the toe of the push lever.
3 The nose cap is marked to indicate the exit point of the
nail, making alignment easier.
NOTE
The nose cap may reduce nailing depth due to its
thickness. Re-adjustment of nailing depth is required.
MAINTENANCE AND INSPECTION
CAUTION
Be sure to remove all remaining fasteners and battery
from the nailer before maintenance and inspection.
1. Inspecting the magazine
1 Remove battery from the Nailer.
2 Clean the magazine. Remove dust and wooden
chips which may have accumulated in the magazine.
CAUTION
Check that the nail feeder slides smoothly by pulling it
with fi nger.
If not smooth, nails can be driven at an irregular angle
and hurt someone.
2. Inspecting the mounting screws
Regularly inspect all mounting screws and ensure that
they are properly tightened. Should any of the screws be
loose, retighten them immediately. Failure to do so could
result in serious hazard.
3. Maintenance of the motor
The motor unit winding is the very “heart” of the power
tool. Exercise due care to ensure the winding does not
become damaged and/or wet with oil or water.
4. Cleaning on the outside
When the power tool is stained, wipe with a soft dry cloth
or a cloth moistened with soapy water. Do not use chloric
solvents, gasoline or paint thinner, for they melt plastics.
5. Storage
Store the power tool in a place in which the temperature
is less than 40°C and out of reach of children.
NOTE
Storing lithium-ion batteries.
Make sure the lithium-ion batteries have been fully
charged before storing them.
Prolonged storage (3 months or more) of batteries with
a low charge may result in performance deterioration,
signifi cantly reducing battery usage time or rendering
the batteries incapable of holding a charge.
However, signifi cantly reduced battery usage time may
be recovered by repeatedly charging and using the
batteries two to fi ve times.
If the battery usage time is extremely short despite
repeated charging and use, consider the batteries dead
and purchase new batteries.
CAUTION
In the operation and maintenance of power tools, the
safety regulations and standards prescribed in each
country must be observed.
Important notice on the batteries for the HiKOKI
cordless power tools
Please always use one of our designated genuine
batteries. We cannot guarantee the safety and
performance of our cordless power tool when used with
batteries other than these designated by us, or when
the battery is disassembled and modifi ed (such as
disassembly and replacement of cells or other internal
parts).
GUARANTEE
We guarantee HiKOKI Power Tools in accordance with
statutory/country specifi c regulation. This guarantee does
not cover defects or damage due to misuse, abuse, or
normal wear and tear. In case of complaint, please send
the Power Tool, undismantled, with the GUARANTEE
CERTIFICATE found at the end of this Handling instruction,
to a HiKOKI Authorized Service Center.
20
Page 21

Noise Information
Noise characteristic values in accordance with EN 792-13:
The typical A-weighted single-event sound power level
L
The typical A-weighted single-event emission sound
pressure level at work station L
Uncertainty KpA: 3 dB
These values are tool-related characteristic values and
do not represent the noise development at the point of
use. Noise development at the point of use will for example
depend on the working environment, the workpiece, the
workpiece support and the number of driving operations,
etc.
Depending on the conditions at the workplace and the form
of the workpiece, individual noise attenuation measures
may need to be carried out, such as placing workpieces on
sound-damping supports, preventing workpiece vibration by
means of clamping or covering, etc.
In special cases it is necessary to wear hearing protection
equipment.
Vibration Information
The typical vibration characteristic value in accordance with
EN 792-13: 4.6 m/s
Uncertainty K = 1.5 m/s
This values is a tool-related characteristic value and
does not represent the infl uence to the hand-arm-system
when using the tool. An infl uence to the hand-arm-system
when using the tool will for example depend on the gripping
force, the contact pressure force, the working direction, the
adjustment of energy supply, the workpiece, the wrokpiece
support.
2
2
WA,1s,d = 101 dB
pA,1s,d = 90 dB
English
The declared vibration total value has been measured in
accordance with a standard test method and may be used
for comparing one tool with another.
It may also be used in a preliminary assessment of exposure.
WARNING
○ The vibration emission during actual use of the power
tool can diff er from the declared total value depending in
the ways in which the tool is used.
○ Identify safety measures to protect the operator that are
based on an estimation of exposure in the actual conditions
of use (taking account of all parts of the operating cycle
such as the times when the tool is switched off and when
it is running idle in addition to the trigger time).
NOTE
Due to HiKOKI’s continuing program of research and
development, the specifi cations herein are subject to
change without prior notice.
21
Page 22

English
Maintenance chart
ACTION WHY HOW
Clean magazine and feeder
mechanism.
Keep push lever working
properly.
Prevent a jam. Blow clean daily.
Promote operator safety and effi cient
Nailer operation.
Blow clean daily.
TROUBLESHOOTING
Use the inspections in the table below if the tool does not operate normally. If this does not remedy the problem, consult your
dealer or the HiKOKI Authorized Service Center.
PROBLEM CHECK METHOD CORRECTION
Power switch doesn’t turn on.
Turn on once, but turn off
automatically.
Nailer doesn’t operate
(Power switch ON).
Nailer operates, but no nail is
driven.
Weak drive.
Slow to cycle.
Drives too deep. Check position of nailing depth adjustment
Skipping nails.
Intermittent feed.
Nails jam.
Driven nail is bent.
Low battery charge. Charge the battery.
Damaged internal electronics. Contact HiKOKI for replacement.
Push lever and/or trigger is ON state ? Keep push lever and trigger in OFF state.
Keep no operation over 30 minutes ?
(Auto-power off function)
Nailer not enough pressed against
workpiece.
Trigger not enough pulled. Pull the trigger fi rmly.
More than 2 seconds pass from push
lever ON to trigger ON (or trigger ON to
push lever ON).
Preventive mechanism activated.
(No nails, or too few fasteners remaining)
Lock lever (Trigger lock function) is “ON”
position.
Machine is too cold (below -5°C) or too
hot.
Damaged internal electronics. Contact HiKOKI for replacement.
Magazine is dirty. Blow and wipe clean the magazine.
Check for a jam. Clear a jam (refer to Fig. 21, 22).
Driver blade worn or damaged? Contact HiKOKI for replacement.
Ribbon spring weakened or damaged? Replace ribbon spring.
Nail feeder damaged? Replace nail feeder.
Check for proper nails. Use only recommended nails.
Check position of nailing depth adjustment
adjuster.
Driver blade worn? Contact HiKOKI for replacement.
Compressed air pressure has become
low.
Damaged internal electronics. Contact HiKOKI for replacement.
adjuster.
Check for proper nails. Use only recommended nails.
Nail feeder damaged? Replace nail feeder.
Ribbon spring weakened or damaged? Replace ribbon spring.
Driver blade worn or damaged? Contact HiKOKI for replacement.
Check for proper nails. Use only recommended nails.
Driver blade worn or damaged? Contact HiKOKI for replacement.
Push and hold power switch more than 1
second to switch “ON”
Hold nailer fi rmly and press to the
workpiece completely.
Make sure that less than 2 seconds pass
between push lever ON and trigger ON (or
between trigger ON and push lever ON).
Reload the nails into magazine.
Set lock lever to “OFF” position. (Refer to
Fig. 7)
Allow the nailer to cool or warm-up
throughly in adequate condition.
Readjust according to Fig. 16, 17.
Contact HiKOKI for replacement.
Readjust according to Fig. 16, 17.
22
Page 23

(Übersetzung der Original-Gebrauchsanweisung)
ALLGEMEINE
SICHERHEITSHINWEISE FÜR
ELEKTROGERÄTE
WARNUNG
Lesen Sie sämtliche Sicherheitshinweise und
Anweisungen durch.
Wenn die Warnungen und Anweisungen nicht befolgt
werden, kann es zu Stromschlag, Brand und/oder
ernsthaften Verletzungen kommen.
Bitte bewahren Sie alle Warnhinweise und Anweisungen
zum späteren Nachschlagen auf.
Der Begriff „Elektrowerkzeug“ bezieht sich in den
Warnhinweisen auf Elektrowerkzeuge mit Netz(schnurgebunden) oder Akkubetrieb (schnurlos).
1) Sicherheit im Arbeitsbereich
a) Sorgen Sie für einen sauberen und gut
ausgeleuchteten Arbeitsbereich.
Zugestellte oder dunkle Bereiche ziehen Unfälle
förmlich an.
b) Verwenden Sie Elektrowerkzeuge niemals an
Orten, an denen Explosionsgefahr besteht,
wie zum Beispiel in der Nähe von leicht
entfl ammbaren Flüssigkeiten, Gasen oder
Stäuben.
Bei der Arbeit mit Elektrowerkzeugen kann es zu
Funkenbildung kommen, wodurch sich Stäube oder
Dämpfe entzünden können.
c) Sorgen Sie bei der Arbeit mit Elektrowerkzeugen
dafür, dass sich keine Zuschauer (insbesondere
Kinder) in der Nähe befi nden.
Wenn Sie abgelenkt werden, können Sie die
Kontrolle über das Werkzeug verlieren.
2) Elektrische Sicherheit
a) Elektrowerkzeuge müssen mit passender
Stromversorgung betrieben werden.
Nehmen Sie niemals irgendwelche Änderungen
am Anschlussstecker vor.
Verwenden Sie bei Elektrowerkzeugen
mit Schutzkontakt (geerdet) niemals
Adapterstecker.
Stecker im Originalzustand und passende
Steckdosen reduzieren das Stromschlagrisiko.
b) Vermeiden Sie Körperkontakt mit geerdeten
Gegenständen wie Rohrleitungen, Heizungen,
Herden oder Kühlschränken.
Bei Körperkontakt mit geerdeten Gegenständen
besteht ein erhöhtes Stromschlagrisiko.
c) Setzen Sie Elektrowerkzeuge niemals Regen
oder sonstiger Feuchtigkeit aus.
Wenn Flüssigkeiten in ein Elektrowerkzeug
eindringen, erhöht sich das Stromschlagrisiko.
d) Verwenden Sie das Anschlusskabel nicht
missbräuchlich. Tragen Sie das Elektrowerkzeug
niemals am Stromkabel, ziehen Sie es nicht
damit heran und ziehen Sie den Stecker nicht an
der Anschlussschnur aus der Steckdose.
Halten Sie die Anschlussschnur von
Hitzequellen, Öl, scharfen Kanten und
beweglichen Teilen fern.
Beschädigte oder verdrehte Anschlussschnüre
erhöhen das Stromschlagrisiko.
e) Verwenden Sie, wenn Sie ein Elektrowerkzeug
im Freien benutzen, ein für den Außeneinsatz
geeignetes Verlängerungskabel.
Ein für den Außeneinsatz geeignetes Kabel
vermindert das Stromschlagrisiko.
Deutsch
f) Falls sich der Betrieb des Elektrowerkzeugs
in feuchter Umgebung nicht vermeiden lässt,
verwenden Sie eine Stromversorgung mit
Fehlerstromschutzeinrichtung (Residual
Current Device, RCD).
Durch den Einsatz einer Fehlerstromschutzeinrichtung
wird das Risiko eines elektrischen Schlages
reduziert.
3) Persönliche Sicherheit
a) Bleiben Sie wachsam, achten Sie auf das, was
Sie tun, und setzen Sie Ihren Verstand ein, wenn
Sie mit Elektrowerkzeugen arbeiten.
Benutzen Sie keine Elektrowerkzeuge, wenn
Sie müde sind oder unter Einfl uss von Drogen,
Alkohol oder Medikamenten stehen.
Bei der Arbeit mit Elektrowerkzeugen können bereits
kurze Phasen der Unaufmerksamkeit zu schweren
Verletzungen führen.
b) Benutzen Sie eine persönliche Schutzausrüstung.
Tragen Sie immer einen Augenschutz.
Schutzausrüstung wie Staubmaske, rutschsichere
Sicherheitsschuhe, Schutzhelm und Gehörschutz
senken das Verletzungsrisiko bei angemessenem
Einsatz.
c) Vermeiden Sie unbeabsichtigtes Einschalten.
Achten Sie darauf, dass sich der Schalter
in der Aus- (Off -) Position befi ndet, ehe Sie
das Gerät mit der Stromversorgung und/
oder Batteriestromversorgung verbinden, es
aufheben oder herumtragen.
Das Herumtragen von Elektrowerkzeugen mit
dem Finger am Schalter oder das Herstellen der
Stromversorgung bei betätigtem Schalter zieht
Unfälle regelrecht an.
d) Entfernen Sie sämtliche Einstellwerkzeuge
(Einstellschlüssel), ehe Sie das Elektrowerkzeug
einschalten.
Ein an einem beweglichen Teil des Elektrowerkzeugs
angebrachter Schlüssel kann zu Verletzungen
führen.
e) Überstrecken Sie sich nicht. Achten Sie jederzeit
darauf, sicher zu stehen und das Gleichgewicht
zu bewahren.
Dadurch haben Sie das Elektrowerkzeug in
unerwarteten Situationen besser im Griff .
f) Tragen Sie entsprechende Kleidung. Tragen
Sie keine lose Kleidung oder Schmuck. Halten
Sie Haar, Kleidung und Handschuhe von
beweglichen Teilen fern.
Lose Kleidung, Schmuck oder langes Haar kann von
beweglichen Teilen erfasst werden.
g) Wenn Anschlüsse für Staubabsaug- und -
sammelvorrichtungen vorhanden sind, sorgen
Sie dafür, dass diese richtig angeschlossen und
eingesetzt werden.
Durch Entfernen des Staubes können staubbezogene
Gefahren vermindert werden.
4) Einsatz und Pfl ege von Elektrowerkzeugen
a) Überanspruchen Sie Elektrowerkzeuge nicht.
Benutzen Sie das richtige Elektrowerkzeug für
Ihren Einsatzzweck.
Das richtige Elektrowerkzeug erledigt seine Arbeit
bei bestimmungsgemäßem Einsatz besser und
sicherer.
b) Benutzen Sie das Elektrowerkzeug nicht, wenn
es sich nicht am Schalter ein- und ausschalten
lässt.
Jedes Elektrowerkzeug, das nicht mit dem Schalter
betätigt werden kann, stellt eine Gefahr dar und
muss repariert werden.
23
Page 24

Deutsch
c) Stecken Sie den Stecker der Stromversorgung
oder Batteriestromversorgung vom Gerät ab, ehe
Sie Einstellarbeiten vornehmen, Zubehörteile
tauschen oder das Elektrowerkzeug verstauen.
Solche präventiven Sicherheitsmaßnahmen
verhindern den unbeabsichtigten Anlauf des
Elektrowerkzeugs und die damit verbundenen
Gefahren.
d) Lagern Sie nicht benutzte Elektrowerkzeuge
außerhalb der Reichweite von Kindern, lassen
Sie nicht zu, dass Personen das Elektrowerkzeug
bedienen, die nicht mit dem Werkzeug selbst
und/oder diesen Anweisungen vertraut sind.
Elektrowerkzeuge in ungeschulten Händen sind
gefährlich.
e) Halten Sie Elektrowerkzeuge instand. Prüfen
Sie sie auf Fehlausrichtungen, Leichtgängigkeit
beweglicher Teile, Beschädigungen von Teilen
und auf jegliche andere Zustände, die sich auf
den Betrieb des Elektrowerkzeugs auswirken
können.
Lassen Sie das Elektrowerkzeug bei
Beschädigungen reparieren, ehe Sie es
benutzen.
Viele Unfälle mit Elektrowerkzeugen sind auf
schlechte Wartung zurückzuführen.
f) Halten Sie Schneidwerkzeuge scharf und sauber.
Richtig gewartete Schneidwerkzeuge mit scharfen
Schneiden bleiben weniger häufi g hängen und sind
einfacher zu beherrschen.
g) Benutzen Sie Elektrowerkzeuge, Zubehör,
Werkzeugspitzen und Ähnliches in
Übereinstimmung mit diesen Anweisungen
– beachten Sie dabei die jeweiligen
Arbeitsbedingungen und die Art der
auszuführenden Arbeiten.
Der Gebrauch des Elektrowerkzeugs für andere
als die vorgesehenen Anwendungen kann zu
gefährlichen Situationen führen.
5) Verwendung und Pfl ege der Batterie
a) Laden Sie das Gerät nur mit dem vom Hersteller
empfohlenen Ladegerät auf.
Ein Ladegerät für einen speziellen Batterietyp
kann bei Verwendung mit anderen Batterien zu
Brandgefahr führen.
b) Verwenden Sie für das Gerät nur die speziell
empfohlenen Batterien.
Eine Verwendung von anderen Batterien kann zu
Verletzungen und Bränden führen.
c) Ist die Batterie nicht in Gebrauch, achten Sie
darauf, dass sie nicht mit Metallgegenständen,
beispielsweise Büroklammern, Münzen,
Schlüssel, Nägel, Schrauben oder anderen
kleinen Metallgegenständen in Kontakt kommt,
da diese Gegenstände einen Kurzschluss der
Anschlüsse verursachen könnten.
Ein Kurzschluss der Batterieanschlüsse kann zu
Verbrennungen oder Bränden führen.
d) Im Falle von missbräuchlichen Bedingungen,
kann Flüssigkeit aus der Batterie austreten.
Vermeiden Sie in diesem Fall jeglichen Kontakt.
Sollten Sie dennoch mit der Batteriefl üssigkeit
in Berührung kommen, waschen Sie die
betroff ene Stelle gründlich mit Wasser ab. Ist die
Flüssigkeit ins Auge geraten, suchen Sie einen
Arzt auf.
Ausgetretene Batteriefl üssigkeiten können zu
Reizungen oder Verbrennungen führen.
6) Service
a) Lassen Sie Elektrowerkzeuge durch qualifi zierte
Fachkräfte und nur unter Einsatz passender
Originalersatzteile warten.
Dies sorgt dafür, dass die Sicherheit des
Elektrowerkzeugs nicht beeinträchtigt wird.
VORSICHT
Von Kindern und gebrechlichen Personen fernhalten.
Werkzeuge sollten bei Nichtgebrauch außerhalb der
Reichweite von Kindern und gebrechlichen Personen
aufbewahrt werden.
SICHERHEITSHINWEISE FÜR DEN
KABELLOSEN STREIFENNAGLER
1. Gehen Sie immer davon aus, dass das Gerät
Krampen enthält.
Der unvorsichtige Umgang mit dem Nagler kann zum
unerwarteten Abfeuern von Nägeln und zu Verletzungen
führen.
2. Richten Sie das Gerät nie auf sich selbst oder
Personen in Ihrer Umgebung.
Eine ungewollte Betätigung des Auslösers führt zum
Abfeuern einer Krampe und kann Verletzungen zur Folge
haben.
3. Betätigen Sie das Gerät nur, wenn es fest gegen
das Werkstück gedrückt ist.
Wenn das Gerät nicht am Werkstück anliegt, kann die
Krampe von Ihrem Ziel abgelenkt werden.
4. Trennen Sie das Gerät von der Stromversorgung,
wenn sich eine Krampe im Gerät verklemmt.
Wenn ein eingeklemmter Nagel entfernt wird, kann der
Nagler versehentlich aktiviert werden, wenn er an die
Steckdose angeschlossen ist.
5. Gehen Sie beim Entfernen verklemmter Krampen
vorsichtig vor.
Der Mechanismus kann unter Druck stehen und
die Krampe wird möglicherweise mit Gewalt
herausgeschleudert, wenn Sie versuchen, die
Verklemmung zu beheben.
6. Verwenden Sie diesen Nagler nicht zur Befestigung
von Elektrokabeln.
Er ist nicht für die Montage elektrischer Kabel geeignet
und kann die Kabelisolierung beschädigen und dadurch
einen Stromschlag oder einen Brand verursachen.
ZUSÄTZLICHE
SICHERHEITSWARNUNGEN
1. Sichere Arbeitsweise durch korrekten Gebrauch.
Dieses Gerät wurde zum Eintreiben von Nägeln in
Holz oder ähnliches Material entwickelt. Benutzen
Sie es ausschliesslich für den vorgesehenen
Verwendungszweck.
2. Schützen Sie sich vor Bränden und Explosionen.
Da während des Nagelns Funken umherfl iegen
können ist est gefährlich, das Gerät in der Nähe von
Lacken, Farben, Benzin, Verdünnern, Gasolinen, Gas,
Klebstoff en oder ähnlichen brennbaren Substanzen zu
benutzen, da diese sich entzünden oder explodieren
können. Das Gerät darf aus diesem Grunde unter keinen
Umständen in der Nähe solcher brennbaren Materialien
benutzt werden.
24
Page 25
3. Schützen Sie Ihre Augen mit Schutzbrillen.
eindringen und das Augenlicht zerstören.
Schutzbrillen sind in jedem Fachgeschäft erhältlich.
Tragen Sie stets einen Sicherheits-Augenschutz,
entweder eine Schutzbrille oder eine WeitwinkelSchutzmaske mit den vorgeschriebenen Gläsern.
Arbeitgeber sollten das Tragen von Augenschutz immer
vorschreiben.
4. Schützen Sie Ihre Ohren und Ihren Kopf.
Tragen Sie während des Nagelns Lärmschutz und
Sicherheitshelme. Abhängig von den Bedingungen
sollten auch Personen in der Umgebung Lärmschutz
und Sicherheitshelme tragen.
5. Achten Sie auf Personen, die in Ihrer Nähe arbeiten.
Es kann gefährlich werde wenn Nägel, die nicht richtig
eingetrieben wurden andere Personen verletzen.
Achten Sie aus diesem Grunde auf die Sicherheit der
Sie umgebenden Personen wenn Sie dieses Gerät
benutzen. Achten Sie darauf, dass die Mündung des
Gerätes nicht in die Nähe von Personen, Händen oder
Füssen kommt.
6. Richten Sie die Mündung des Gerätes nie gegen
Personen.
Wenn die Mündung des Naglers auf
Werkzeug aus Versehen auslösen. Achten Sie beim
Anschließen und Abtrennen des Akkus, während des
Nachladens von Nägeln oder bei ähnlichen Vorgängen
darauf, dass der Nagelauslass nicht auf eine Person
gerichtet ist (einschließlich Sie selbst). Selbst wenn sich
keine Nägel im Werkzeug befi nden, ist es gefährlich,
das Werkzeug auszulösen, während es auf jemanden
gerichtet ist. Versuchen Sie dies also niemals. Das
Werkzeug ist kein Spielzeug. Betrachten Sie das
Werkzeug ausschließlich als Arbeitsmittel und gehen Sie
entsprechend damit um.
7. Überprüfen Sie den Druckhebel vor Gebrauch.
Vergewissern Sie sich, dass der Druckhebel
ordnungsgemäß funktioniert. (Der Druckhebel kann
als „Sicherheit“ bezeichnet werden.) Benutzen Sie
den Nagler niemals, wenn der Druckhebel nicht
ordnungsgemäß funktioniert, sonst könnte der Nagler
unerwartet einen Nagel abschießen. Verändern Sie den
Druckhebel nicht und entfernen Sie ihn nicht, sonst lässt
sich der Druckhebel nicht mehr bedienen.
8. Die Auswahl des Auslöseverfahrens ist wichtig.
Lesen und verstehen Sie den Abschnitt „VERWENDUNG
DES NAGLERS“ auf Seite 33.
9. Bevor Sie das Produkt benutzen, überzeugen Sie
sich davon, dass es in Übereinstimmung mit dem
Inhalt von „Den Nagler testen“ auf Seite 32
ordnungsgemäß funktioniert.
10. Benutzen Sie ausschliesslich die vorgeschriebenen
Nägel.
Es dürfen ausschliesslich die in der Betriebs-anleitung
bezeichneten Befestigungsmittel verarbeitet werden.
11. Gehen Sie sorgsam beim Anschluss des Akkus vor.
Achten Sie beim Anschluss des Akkus und beim
Laden von Nägeln auf Folgendes, damit es nicht zum
versehentlichen Auslösen des Werkzeugs kommt.
○ Berühren Sie auf keinen Fall den Auslöser.
○ Achten Sie darauf, dass die Mündung nicht mit
irgendeinem Gegenstand in Berührung kommt.
Wenn Sie mit dem Gerät arbeiten tragen
Sie stets eine Schutzbrille und achten Sie
darauf, dass auch in Ihrer Umgebung
Schutzbrillen getragen werden. Es können
Teile von Nägeln, die nicht einwandfrei
eingetrieben wurden, in die Augen
Gehen Sie immer davon aus, dass sich
Nägel im Werkzeug befi nden.
Person gerichtet wird, kann es zu
schweren Unfällen kommen, sollte das
25
Deutsch
○ Halten Sie die Mündung nach unten gerichtet.
Beachten Sie unbedingt die obigen Anweisungen
und sorgen Sie dafür, dass sich keine Körperteile,
Hände oder Füsse vor der Mündung des Gerätes
befi nden.
12. Berühren Sie niemals achtlos den Auslöser.
Berühren Sie den Auslöser mit dem Finger nur beim
Nageln. Wenn Sie das Gerät tragen oder jemandem
überreichen während Sie den Finger am Auslöser haben,
können Sie unbeabsichtigt einen Schuss auslösen und
so einen Unfall verursachen.
13. Drücken Sie die Mündung fest gegen das zu
nagelnde Material.
Wenn Sie Nägel eintreiben, drücken Sie die Mündung
fest gegen das zu nagelnde Material. Geschieht dies
nicht sorgfältig, können die Nägel zurückschlagen.
14. Halten Sie Hände und Füsse während des Arbeitens
von der Mündung entfernt.
15. Schützen Sie sich vor dem Rückschlag des Gerätes.
Nähern Sie sich während des Arbeitens nicht mit
dem Kopf oder anderen körperteilen dem Oberteil
des Gerätes. Dies ist gefährlich, da das Gerät heftig
zurückschlagen kann, wenn ein Nagel auf einen vorher
eingetriebenen oder auf einen Knoten im Holz triff t.
16. Nehmen Sie sich vor Doppelschüssen aufgrund
des Rückstoßes in Acht.
Wenn der Druckhebel nach dem Rückstoß versehentlich
wieder mit dem Werkstück in Kontakt kommt, wird
eventuell unabsichtlich ein Nagel ausgeschossen.
Um diese unbeabsichtigten Doppelschüsse zu
vermeiden
○ Periodischer Betrieb (Abzugauslösung)
1)
Stellen Sie die Schaltvorrichtung auf
VOLLSEQUENZIELLER AUSLÖSEMECHANISMUS.
2) Ziehen Sie schnell und fest am Auslöser.
○ Dauerbetrieb (Druckhebelauslösung)
1) Drücken Sie den Nagler nicht mit übermäßiger Kraft
gegen das Holz.
2) Lösen Sie den Nagler vom Holz, wenn der Rückstoß
nach dem Nageln einsetzt.
17. Seien Sie vorsichtig beim Nageln von dünnen
Brettern oder Holzkanten.
Beim Nageln von dünnen Brettern können die Nägel
durchschlagen, wie dies auch beim Nageln von
Holzkanten durch Querschläger geschehen kann.
Achten Sie in solchen Fällen darauf, dass sich niemand
(auch keine Hände, Füsse etc.) hinter dem Brett oder in
der Nähe des Holzes, das Sie gerade nageln befi ndet.
18. Gleichzeitiges Nageln auf beiden Seiten einer Wand
ist gefährlich.
Unter keinen Umständen darf auf beiden Seiten
derselben Wand gleichzeitig genagelt werden. Dies
wäre gefährlich, da die Nägel durch die Wand schlagen
könnten und so Verletzungen hervorrufen.
19. Verwenden Sie das Werkzeug nicht auf Gerüsten
oder Leitern.
Das Werkzeug darf für bestimmte Anwendungen nicht
verwendet werden, z.B.:
– wenn Änderung des Eintreibungsortes die
Verwendung von Gerüsten, Treppen, Leitern oder
leiterähnlichen Konstruktionen beinhaltet, z.B.
Lattenwerk
– schließen von Kästen oder Kisten,
– angemessene Transportsicherheitssysteme, z.B. auf
Fahrzeugen und Wägen
Es ist sehr gefährlich, wenn ein Nagel
durch einen Fehler in die Hände oder
Füsse eindringt.
Page 26

Deutsch
20. Nehmen Sie alle verbleibenden Nägel und den Akku
aus dem Nagler, wenn:
1) Sie Wartungs- und Inspektionsarbeiten durchführen;
2) Sie die ordnungsgemäße Funktion von Druckhebel
und Abzug prüfen;
3) Sie einen Stau beseitigen;
4) er nicht in Gebrauch ist;
5) Sie den Arbeitsbereich verlassen;
6) Sie ihn an einen anderen Ort bringen; und
7) wenn Sie ihn an eine andere Person übergeben.
Versuchen Sie niemals, einen Stau zu beseitigen oder
den Nagler zu reparieren, wenn Sie nicht den Akku
und alle verbleibenden Nägel aus dem Nagler entfernt
haben.
Der Nagler sollte niemals unbeaufsichtigt bleiben, weil
Personen, die nicht mit dem Nagler vertraut sind, ihn
benutzen und sich dabei verletzen könnten.
21. Entnehmen Sie den Akku aus dem Nagler, wenn:
1) Sie Nägel nachfüllen;
2) Sie den Einsteller drehen.
22. Die zulässige Betriebstemperatur dieses Gerätes
liegt zwischen 0°C und 40°C. Achten Sie daher
bitte darauf, das Gerät nur innerhalb dieses
Temperaturbereiches zu betreiben. Es kann
vorkommen, dass das Gerät unterhalb 0°C oder
oberhalb 40°C nicht mehr arbeitet.
23. Die Batterie immer bei einer Temperatur von 0–40°C
laden.
Laden bei einer Temperatur, die niedriger als 0°C ist, wird
gefährliche Überladung verursachen. Die Batterie kann
nicht bei einer Temperatur über 40°C geladen werden.
Die beste Temperatur zum Laden wäre von 20–25°C.
24. Das Ladegerät nicht fortlaufend laden.
Nach Beendung einer Ladung lassen Sie das Ladegerät
ungefähr 15 Minuten ruhen, bevor die nächste
Batterieladung unternommen wird.
25. Keine Fremdkörper durch das Anschlußloch der
Batterie eindringen lassen.
26. Niemals die Batterie und das Ladegerät
auseinandernehmen.
27. Niemals die Batterie kurzschließen.
Kurzschluß der Batterie verursacht eine zu große
Stromzufuhr und Überhitzung, wodurch Durchbrennen
oder Schaden bei der Batterie entsteht.
28. Die Batterie nicht ins Feuer werfen.
Sie könnte dabei explodieren.
29. Benutzung einer verbrauchten Batterie beschädigt
den Aufl ader.
30. Bringen Sie die Batterie zum Geschäft, wo Sie sie
gekauft haben, sobald die Lebensdauer der Batterie
abrinnt.
Die verbrauchte Batterie nicht wegwerfen.
31. Darauf achten, daß keine Gegenstände durch
Belüftungsschlitze des Aufl aders in das Gerät
eindringen.
Wenn Metallobjekte oder entzündliche Gegen-stände
durch die Belüftungsschlitze des Aufl aders eindringen,
kann dies zu elektrischen Schlägen führen oder den
Aufl ader beschädigen.
32. Lassen Sie es NIEMALS zu, dass Magnete (oder
ähnliche magnetische Vorrichtungen) sich neben
dem Nagler befi nden, da der Nagler über einen
Magnetsensor im Innern verfügt.
Das kann zu einem Versagen oder Verletzungsrisiko
durch Fehlfunktion führen.
33. Lassen Sie das Gerät nach einer Dauerarbeit ruhen.
34. Das Werkzeug ist mit einer TemperaturSchutzschalung ausgestattet, um den Motor zu
schützen. Kontinuierliche Arbeit kann zu einem
Temperaturanstieg des Werkzeugs führen, was
die Temperatur-Schutzschalung aktiviert und den
Betrieb automatisch stoppt. Sollte dies der Fall
sein, lassen Sie das Werkzeug abkühlen, bevor Sie
es wieder benutzen.
26
35. Dieses Produkt funktioniert möglicherweise nicht
mehr, wenn eine Unregelmäßigkeit festgestellt
wird. Überprüfen Sie in solchen Fällen die unter
„FEHLERSUCHE“ auf Seite 37 aufgeführten
Punkte.
36. Setzen Sie die Schalttafel nicht starken
Erschütterungen aus oder beschädigen sie. Dies
kann zu einer Fehlfunktion führen.
WARNUNG ZUM LITHIUM-IONENAKKU
Um die Lebensdauer des Lithium-Ionen-Akkus zu
verlängern, ist dieser mit einer Schutzfunktion zum Stoppen
der Leistungsabgabe ausgestattet.
In den unten beschriebenen Fällen 1 bis 3 kann bei der
Benutzung dieses Produkts der Motor abschalten, selbst
wenn Sie den Schalter drücken. Dies ist kein Defekt sondern
das Resultat der Schutzfunktion.
1. Wenn die verbleibende Akkuleistung nicht mehr
ausreicht, schaltet der Motor ab.
Laden Sie in einem solchen Fall den Akku umgehend
auf.
2. Wenn das Werkzeug überlastet ist, kann es zum
Abschalten des Motors kommen. Lassen Sie in diesem
Fall den Schalter des Werkzeugs los und beseitigen Sie
die Ursache der Überlastung. Danach können Sie das
Werkzeug wieder verwenden.
3. Kommt es während des Betriebs zu einer Überhitzung
der Batterie, wird das Gerät unter Umständen
angehalten.
Unterbrechen Sie in diesem Fall Ihre Arbeit und lassen
Sie die Batterie abkühlen. Danach können Sie das
Werkzeug wieder verwenden.
Bitte beachten Sie die folgenden Warnhinweise.
WARNUNG
Zur Vermeidung eines Auslaufens der Batterie, Erwärmung,
Rauchentwicklung, Explosionen und vorzeitiger Zündung
beachten Sie bitte die folgenden Vorsichtsmaßnahmen.
1. Stellen Sie sicher, dass sich keine Späne und Staub auf
der Batterie ansammeln.
○ Stellen Sie während der Arbeit sicher, dass keine Späne
und Staub auf die Batterie fallen.
○ Stellen Sie sicher, dass sich Staub und Späne, die
während der Bearbeitung auf das Elektrowerkzeug
fallen, nicht auf der Batterie ansammeln.
○ Lagern Sie ungebrauchte Batterien nicht an Plätzen, an
denen Staub oder Späne anfallen.
○ Vor dem Einlagern einer Batterie sind sämtlicher
Staub und Späne zu entfernen. Weiterhin ist zu
berücksichtigen, dass die Batterie nicht zusammen mit
Metallteilen (Schrauben, Nägel, usw.) gelagert werden
darf.
2. Achten Sie darauf, dass die Batterie nicht durch einen
spitzen Gegenstand, beispielsweise einen Nagel,
beschädigt wird. Vermeiden Sie Schläge mit dem
Hammer. Treten Sie nicht gegen die Batterie, werfen Sie
diese nicht, und vermeiden Sie schwere Stöße.
3. Beschädigte oder verformte Batterien dürfen nicht weiter
verwendet werden.
4. Achten Sie auf den richtigen Anschluss der Pole.
5. Schließen Sie die Batterie nicht direkt an
Stromsteckdosen oder Zigarettenanzünder im Auto an.
6. Verwenden Sie die Batterie nur für den angegebenen
Zweck.
7. Falls die Batterie nach Verstreichen der angegebenen
Ladezeit nicht vollständig aufgeladen ist, brechen Sie
den Ladevorgang unverzüglich ab.
8. Vermeiden Sie hohe Temperaturen und hohen Druck,
wie er beispielsweise in der Mikrowelle, einem Trockner,
oder einem Hochdruckbehälter auftritt.
Page 27

9. Halten Sie die Batterie sofort von off enen Flammen fern,
wenn Sie ein Leck oder üblen Geruch feststellen.
10. Vermeiden Sie eine Verwendung an Orten, an denen
starke statische Elektrizität erzeugt wird.
11. Werden ein Leck, übler Geruch, Erwärmung,
Verfärbungen, Verformungen oder sonstige
Anomalitäten während der Verwendung, des Aufl adens
oder der Lagerung festgestellt, entfernen Sie die Batterie
unverzüglich vom Werkzeug oder vom Ladegerät und
beenden Sie die Verwendung.
VORSICHT
1. Tritt die auslaufende Flüssigkeit in Kontakt mit Ihren
Augen, reiben Sie diese nicht, sondern waschen Sie sie
mit sauberem Leitungswasser gut aus und suchen Sie
unverzüglich einen Arzt auf.
Ohne sachgemäße Behandlung können
Augenverletzungen auftreten.
2. Wenn die ausgelaufene Flüssigkeit auf Haut oder
Kleidung triff t, waschen Sie diese unverzüglich mit
sauberem Wasser ab.
Es besteht die Gefahr von Hautreizungen.
3. Beim Auftreten von Rost, üblem Geruch, Erwärmung,
Verfärbungen, Verformungen oder sonstigen
Anomalitäten während der ersten Verwendung der
Batterie, ist diese nicht weiter zu verwenden. Bringen Sie
die Batterie zum Händler oder Verkäufer zurück.
WARNUNG
Wenn ein leitfähiger Fremdkörper in das Gehäuse einer
Lithiumionenbatterie eindringt, kann sie kurzgeschlossen
und ein Brand verursacht werden. Befolgen Sie beim Lagern
einer Lithiumionenbatterie unbedingt folgende Regeln:
○ Legen Sie in das Aufbewahrungsetui keine leitfähigen
Trümmer, Nägel und Drähte wie etwa Eisen- und
Kupferdrähte.
○ Laden Sie, damit kein Kurzschluss auftreten kann, die
Batterie in das Werkzeug oder schieben Sie sie sicher
in die Batteriehülle zum Lagern so weit ein, dass der
Ventilator nicht sichtbar ist.
BEZÜGLICH DES TRANSPORTS VON
LITHIUM-IONEN-BATTERIEN
Beim Transport von Lithium-Ionen-Batterien beachten Sie
bitte die folgenden Vorsichtsmaßnahmen.
WARNUNG
Weisen Sie die Transportfi rma darauf hin, dass ein Paket
eine Lithium-Ionen-Batterie enthält, informieren Sie das
Unternehmen über ihre Leistungsabgabe und befolgen
Sie die Anweisungen der Transportfi rma, wenn Sie den
Transport in die Wege leiten.
○ Lithium-Ionen-Batterien, die eine Leistungsabgabe von
100 Wh überschreiten, werden in der Einstufung des
Frachtguts als Gefahrgüter angesehen und erfordern
spezielle Anwendungsverfahren.
○ Für den Transport über Straßen müssen die
internationalen Gesetze und die Regeln und Vorschriften
des Bestimmungslands eingehalten werden.
Leistungsabgabe
2- bis 3-stellige Nummer
Wh
Deutsch
BEZEICHNUNG DER TEILE
(Abb. 1 – Abb. 23)
Obere Abdeckung
1
Auslöser
2
Schusskopf (Auslass)
3
Druckhebel
4
Nagelzuführung (B)
5
Zuführungsknopf
6
Magazin
7
Haken
8
Akku
9
Sperrhebel
0
Handgriff
!
Schalter der Akkukontrollleuchte
@
Akkukontrollleuchte
#
Nagelbetriebsschalter
$
Netzanzeige
%
Ein-/Aus-Schalter
^
Kontrollleuchte für den Nagelbetrieb
&
Nägel
*
Einsteller
(
Hakenplatte
)
SYMBOLE
WARNUNG
Die folgenden Symbole werden für diese Maschine
verwendet. Achten Sie darauf, diese vor der
Verwendung zu verstehen.
NR1890DBCL: Kabelloser Streifennagler
NR1890DBRL: Kabelloser Streifennagler
Der Anwender muss die Bedienungsanleitung
lesen, um das Risiko einer Verletzung zu
verringern.
Nur für EU-Länder
Werfen Sie Elektrowerkzeuge nicht in den
Hausmüll!
Gemäß der Europäischen Richtlinie 2002/96/
EG über Elektro- und Elektronik-Altgeräte
und Umsetzung in nationales Recht müssen
verbrauchte Elektrowerkzeuge getrennt
gesammelt und einer umweltgerechten
Wiederverwertung zugeführt werden.
Gleichstrom
Gewicht
kg
(Gemäß EPTA-Verfahren 01/2003)
Einschalten ON
Ϩ
27
Page 28
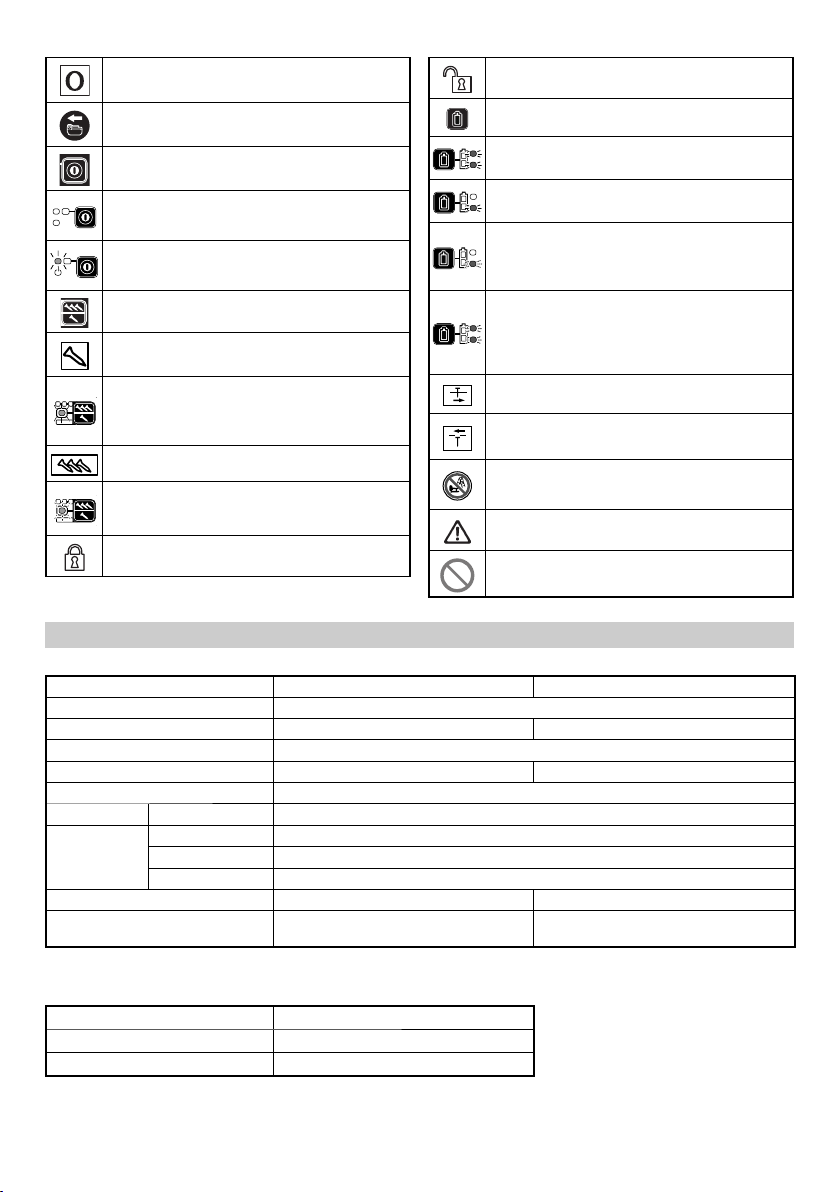
Deutsch
Ausschalten OFF
Batterie abtrennen
Ein-/Aus-Schalter
Ein-/Ausschalter AUS
Ein-/Aus-Schalter EIN
Netzanzeige: Leuchtet grün
Nagelbetriebsschalter
VOLLSEQUENZIELLER
AUSLÖSEMECHANISMUS
Modus VOLLSEQUENZIELLER
AUSLÖSEMECHANISMUS
Kontrollleuchte für den Nagelbetrieb:
Leuchtet blau
KONTAKTAUSLÖSEMECHANISMUS
Modus KONTAKTAUSLÖSEMECHANISMUS
Kontrollleuchte für den Nagelbetrieb: Blinkt
blau
Auslöser verriegelt
Auslöser entriegelt
Schalter der Akkukontrollleuchte
Die verbleibende Akkuladung ist ausreichend
Akkukontrollleuchte: 2 LEDs (rot) leuchten
Es verbleibt etwa die Hälfte der Akkuladung.
Akkukontrollleuchte: 1 LED (rot) leuchtet
Der Akku ist fast leer.
Laden Sie den Akku so bald wie möglich wieder
auf.
Akkukontrollleuchte: 1 LED (rot) blinkt
Wenden Sie sich wegen einer Inspektion an
HiKOKI.
Akkukontrollleuchte: 2 LEDs blinken orange,
nach 10 Sekunden schaltet sich der Ein-/
Ausschalter automatisch ab.
Flache Seite
Tiefe Seite
Nicht auf Gerüsten oder Leitern benutzen.
Warnung
Unzulässige Handlung
TECHNISCHE DATEN
1. Kabelloser Streifennagler
Modell NR1890DBCL NR1890DBRL
Motor Bürstenloser Gleichstrommotor
Verwendbare Nägel ø2,9 – 3,3 mm Siehe Abb. ø2,9 – 3,3 mm Siehe Abb.
Länge der verwendbaren Nägel 50 mm bis 90 mm
Nagelkapazität [Stück] 47 37
Auslösemodus Vollsequenziell/Kontakt (wählbar)
Zyklus [nägel/sekunde] 1,5 – 2 (periodisch)
Akku Modell BSL1850
Typ Li-Ionen-Akku
Spannung 18 V Gleichstrom
Gewicht* 4,8 kg 4,9 kg
Abmessungen
Höhe × Länge × Breite
* Gewicht: Gemäß EPTA-Verfahren 01/2003
2. Akkuladegerät
Modell UC18YFSL
Ladespannung 14,4 – 18 V Gleichstrom
Gewicht 0,5 kg
342 mm × 309 mm × 127 mm 342 mm × 342 mm × 137 mm
HINWEIS
Aufgrund des ständigen Forschungs- und Entwicklungsprogramms von HiKOKI sind Änderungen der hier gemachten
technischen Angaben vorbehalten.
28
Page 29
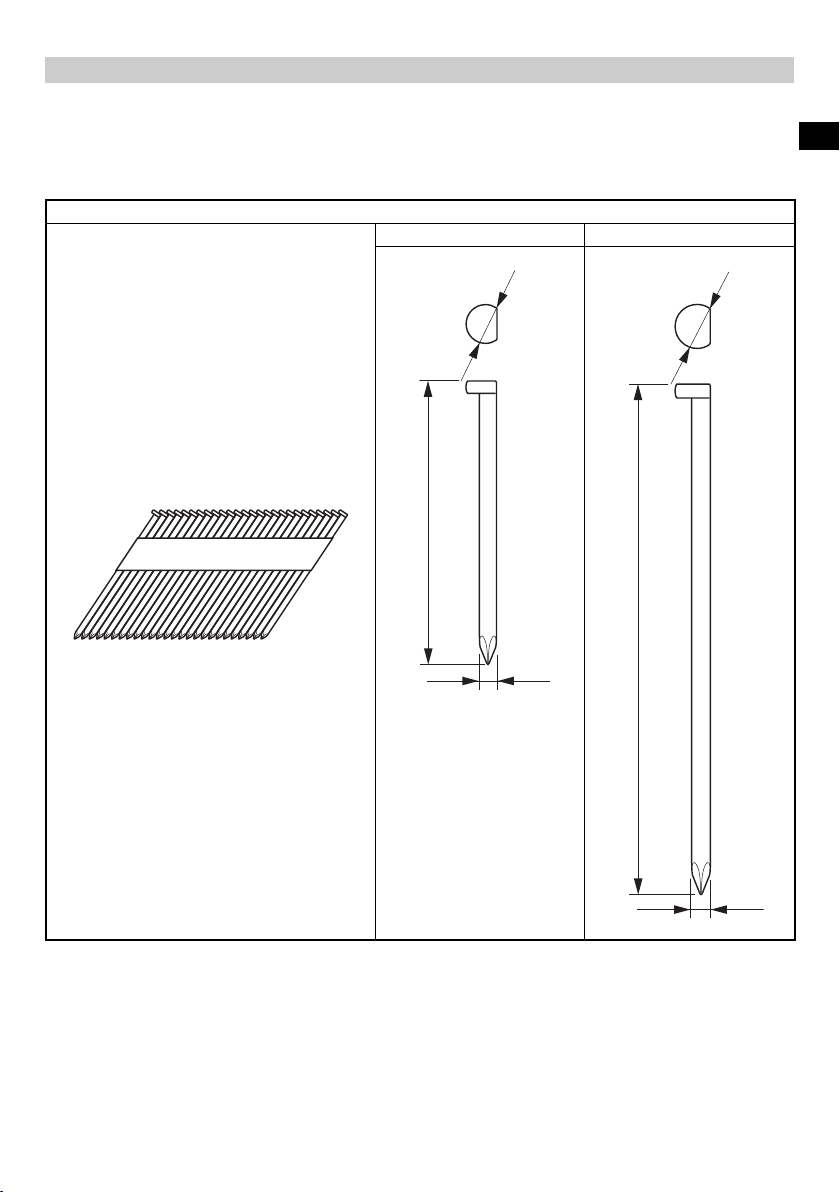
Deutsch
NAGELAUSWAHL
Wählen Sie geeignete Nägel gem. Abb. Nägel, die nicht in Abb. angegeben sind, können in diesem Gerät nciht verarbeitet
werden.
Die Verwendung anderer Nägel kann zu einem Defekt des Werkzeugs und/oder dem Brechen der Nägel führen, was
ernsthafte Verletzungen zur Folge haben kann.
[NR1890DBCL]
Es werden nur glatte Nägel, Nägel mit Widerhaken oder Nägel vom Ringtyp verwendet. Verwenden Sie keine Schraubnägel.
Die Nägel bilden Streifen von 25 bis 37 Nägeln.
NR1890DBCL
Papier-verbundene Nagelstreifen
Geclipte Nägel
Min. Max.
6,8 mm
50 mm
7,7 mm
90 mm
2,9 mm
3,3 mm
29
Page 30
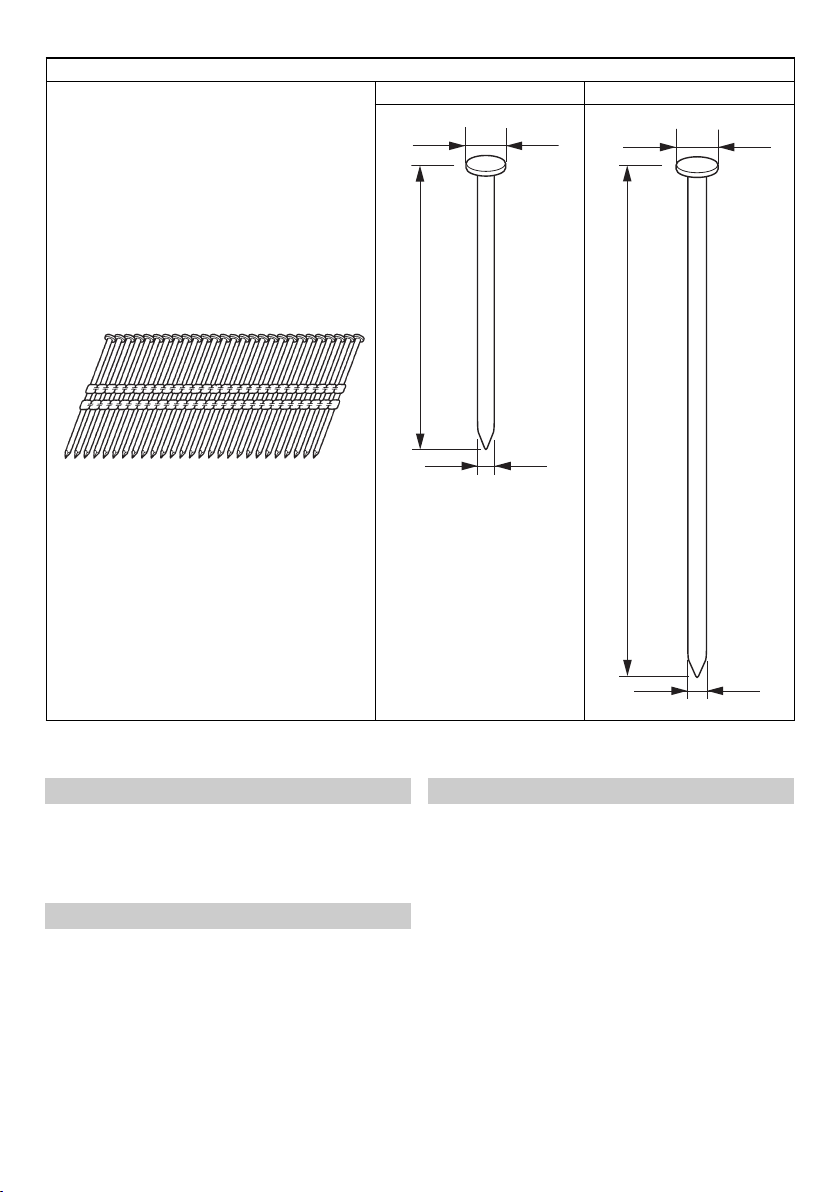
Deutsch
Kunststoff -verbundene Nagelstreifen
Vollkopfnägel
NR1890DBRL
50 mm
Min. Max.
7 mm
2,9 mm
7,6 mm
90 mm
3,3 mm
* Dieser Nagler wird nicht für die Verwendung mit Ringnutnägeln von 75 mm bis 90 mm in druckimprägniertem Holz
empfohlen.
STANDARDZUBEHÖR
Zusätzlich zum Hauptgerät (1 Gerät) enthält die Packung die
auf Seite 2 aufgelisteten Zubehöre.
Das Standardzubehör kann ohne vorherige
Bekanntmachung jederzeit geändert werden.
VERWENDUNG
○ Boden- und Wandrahmen.
○ Fachwerkaufbau, Fensteraufbau.
○ Bodenbelag-Unterbau und Dachbelag.
○ Wandverschalung.
○ Wohnwagen- und modulare Hauskonstruktion.
LADEN
Laden Sie vor dem Gebrauch des Elektrowerkzeugs den
Akku wie folgt auf.
1. Stecken Sie den Netzstecker des Ladegeräts in eine
Steckdose.
Wenn der Stecker des Ladegeräts in eine Steckdose
eingesteckt wird, blinkt die Anzeigelampe rot (in
1-Sekunden-Intervallen).
2. Legen Sie den Akku in das Ladegerät ein.
Schieben Sie den Akku wie in der Abb. 3
das Ladegerät ein
3. Laden
Beim Einlegen eines Akkus in das Ladegerät wird der
Ladevorgang begonnen und die Kontrolllampe leuchtet
beständig rot.
Wenn die Batterie voll aufgeladen ist, blinkt die
Kontrolllampe rot. (In Abständen von 1 Sekunde) (Siehe
Tabelle 1)
● Kontrolllampen-Anzeige
Die Anzeigen der Kontrolllampe entsprechend dem
Zustand des Ladegerätes oder Akkus sind in der Tabelle
1 angegeben.
30
.
gezeigt fest in
Page 31

Vor dem Laden Blinkt
Tabelle 1
Anzeigen der Kontrolllampe
Leuchtet 0,5 Sekunden lang. Erlischt 0,5
Sekunden lang. (Aus für 0,5 Sekunden)
Deutsch
Beim Laden Leuchtet
Laden
Kontrolllampe
(rot)
● Bezüglich der Temperaturen und der Ladezeit des
Akkus.
Die Temperaturen und die Ladezeit sind in Tabelle 2
angegeben.
Akku
Ladespannung V 14,4 – 18
Gewicht kg 0,5
Temperaturen, bei denen der Akku
geladen werden kann
Ladezeit für Akkuleistung,
ungefähr. (bei 20 oC)
Anzahl an Akkuzellen 4 – 10
HINWEIS
Die Aufl adezeit kann je nach Temperatur und Spannung
der Stromquelle unterschiedlich sein.
VORSICHT
Wenn das Ladegerät ständig in Betrieb war, wird es
heiß, das stellt eine Ursache für Ausfälle dar. Sobald
der Ladevorgang abgeschlossen ist, lassen Sie das
Ladegerät vor dem nächsten Ladevorgang 15 Minuten
ruhen.
4. Ziehen Sie den Netzstecker des Ladegeräts aus der
Steckdose.
5. Halten Sie das Ladegerät fest und ziehen Sie den
Akku heraus.
HINWEIS
Ziehen Sie den Akku nach der Benutzung des
Ladegeräts unbedingt aus diesem heraus und bewahren
Sie ihn dann auf.
VORSICHT
○
Wenn der Akku geladen wird, während er heiß ist, weil
er längere Zeit direkter Sonneneinstrahlung ausgesetzt
gewesen ist, oder die Batterie eben erst in Gebrauch
gewesen ist, leuchtet die Kontrolllampe des Ladegeräts
1 Sekunde lang auf, erlischt für 0,5 Sekunden (aus für 0,5
Sekunden). Lassen Sie in einem solchen Fall den Akku
erst abkühlen, bevor Sie mit dem Aufl aden beginnen.
abgeschlossen
Wegen
Überhitzung
angehalten
Laden nicht
möglich
1,3 Ah
1,5 Ah
2,0 Ah
2,5 Ah
3,0 Ah
4,0 Ah
5,0 Ah
Tabelle 2
Ladegerät
min.
min.
min.
min.
min.
min.
min.
Blinkt
Blinkt
Flackert
Leuchtet beständig
Leuchtet 0,5 Sekunden lang. Erlischt 0,5
Sekunden lang. (Aus für 0,5 Sekunden)
Leuchtet 1 Sekunde lang. Erlischt 0,5 Sekunden
lang. (Aus für 0,5 Sekunden)
Leuchtet 0,1 Sekunden lang. Erlischt 0,1
Sekunden lang. (Aus für 0,1 Sekunden)
UC18YFSL
0oC – 50oC
20
22
30
35
45
60
75
Akku überhitzt. Laden
nicht möglich. (Der
Ladevorgang wird nach
Abkühlen des Akkus
gestartet)
Betriebsstörung im
Akku oder im Ladegerät
○ Wenn die Kontrolllampe fl ackert (in 0,2-Sekunden-
Intervallen), kontrollieren Sie den Akkuanschluss des
Ladegerätes auf Fremdkörper und entfernen Sie diese
bei Bedarf. Wenn keine Fremdkörper vorhanden sind,
liegt wahrscheinlich eine Fehlfunktion des Akkus oder
Ladegeräts vor. Die Teile vom autorisierten Kundendienst
prüfen lassen.
○ Da der eingebaute Mikrocomputer etwa 3 Sekunden
braucht, um zu bestätigen, dass der Akku, der mit dem
Ladegerät geladen wurde, herausgenommen wurde,
warten Sie mindestens 3 Sekunden, bevor Sie ihn wieder
einlegen, um den Ladevorgang fortzusetzen. Wird der
Akku innerhalb von 3 Sekunden wieder eingelegt, kann
es sein, dass er nicht richtig aufgeladen wird.
○ Wenn die Kontrolllampe nicht rot blinkt (jede
Sekunde), obwohl das Stromkabel an der Stromquelle
eingesteckt ist, bedeutet das, dass möglicherweise der
Schutzstromkreis des Ladegeräts aktiviert wurde.
Ziehen Sie den Stecker aus der Steckdose und stecken
Sie ihn nach etwa 30 Sekunden wieder ein. Blinkt dann
die Kontrolllampe immer noch nicht (alle Sekunden),
bringen Sie das Ladegerät bitte zu einem autorisierten
Servicezentrum von HiKOKI.
VOR INBETRIEBNAHME
Aktion
Herausnehmen und Einlegen des Akkus
Laden 3
Auswahl von Zubehör ―
1. Umgang mit dem Bedienfeld
(1) Ein-/Aus-Schalter EIN (Siehe Abb. 4)
Halten Sie im Zustand „Ein-/Ausschalter AUS“ den Ein-/
Ausschalter länger als eine Sekunde gedrückt, dann
leuchtet die Netzanzeige grün.
HINWEIS
Betätigen Sie den Druckhebel nicht und ziehen Sie nicht
am Auslöser, während Sie den Ein-/Ausschalter auf EIN
stellen.
Dies führt dazu, dass sich der Ein-/Ausschalter nicht auf
EIN schalten lässt.
[Automatische Abschaltung]
Wenn das Gerät eingeschaltet ist, aber der Nagler 30
Minuten lang nicht benutzt wird, schaltet sich der Nagler
automatisch aus. Drücken Sie den Ein-/Ausschalter, um
ihn wieder einzuschalten.
31
Abbildung
2
Seite
3
4
8
Page 32
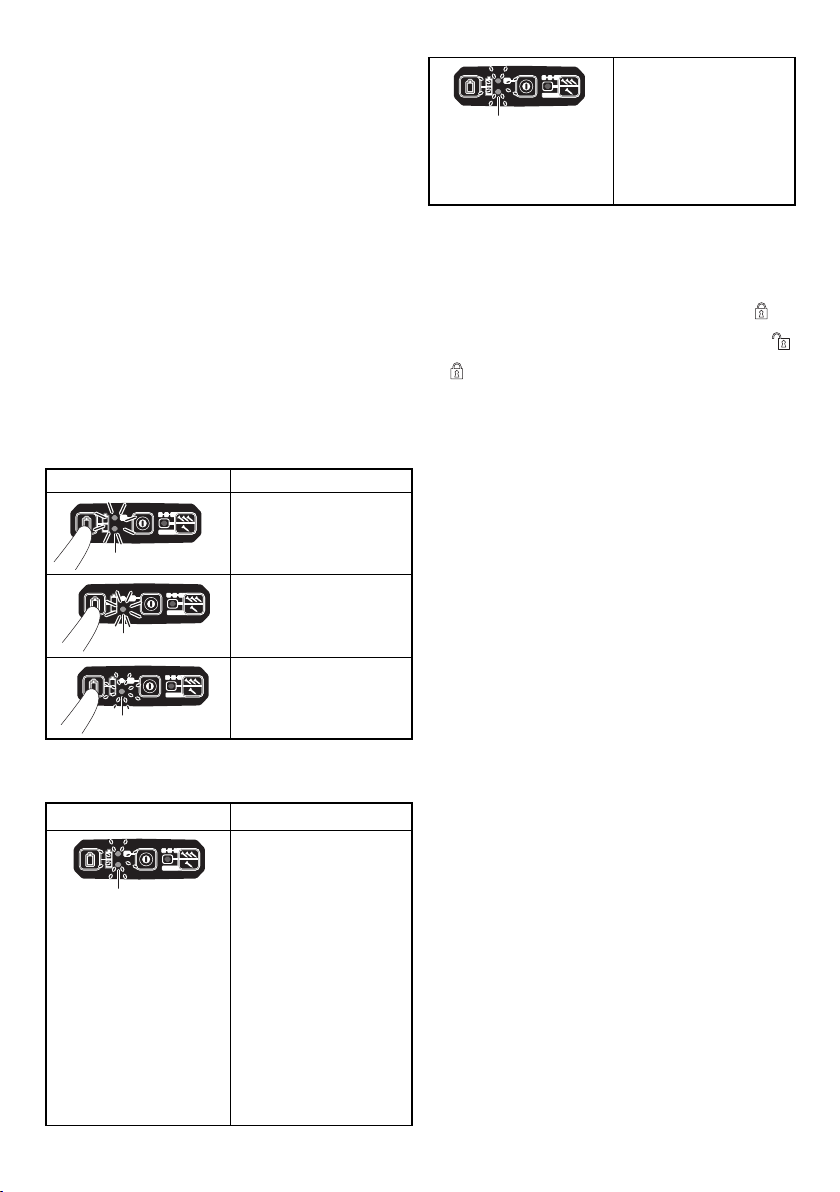
Deutsch
WARNUNG
Lassen Sie den Nagler niemals eingeschaltet liegen.
Dadurch könnte ein Unfall verursacht werden.
(2) Ein-/Aus-Schalter AUS (Siehe Abb. 4)
Halten Sie im Zustand „Ein-/Ausschalter EIN“ den Ein-/
Ausschalter länger als eine Sekunde gedrückt, dann
erlischt die Netzanzeige.
Im Zustand „Ein-/Ausschalter EIN“ sind die
nachstehenden Funktionen aktiv.
(3) Auswahl des Nagelbetriebsmodus
(Vollsequenzielle Auslösung/Kontaktauslösung)
Nach dem EIN-schalten des Ein-/Ausschalters ist zuerst
immer der Modus Vollsequenzielle Auslösung aktiviert.
(Die Nagelbetriebsanzeige leuchtet blau.) (Siehe Abb.
5)
Um den Nagelbetriebsmodus zu ändern, drücken Sie
einmal den Nagelbetriebsschalter. Bei jedem Drücken
wechselt der Modus zwischen „Vollsequenziell“ und
„Kontakt“. (Siehe Abb. 6)
Leuchtet (blau):
VOLLSEQUENZIELLER AUSLÖSEMECHANISMUS,
Blinkt (blau):
KONTAKTAUSLÖSEMECHANISMUS
(4) Prüfen Sie den verbleibenden Akkuladestand
Wenn Sie den Schalter der Akkuanzeige drücken, zeigt
die Akkuanzeige den Ladestand wie folgt mit den LED-
Leuchten an.
Status der Anzeige
Die verbleibende
Akkuladung ist
ausreichend.
2 LEDs (rot) leuchten
Es verbleibt etwa die Hälfte
der Akkuladung.
1 LED (rot) leuchtet
Der Akku ist fast leer.
Laden Sie den Akku so
bald wie möglich wieder
1 LED (rot) blinkt
(5) Andere Funktionen
Bei einer Funktionsstörung leuchten die LED-Lampen
wie folgt auf.
Status der Anzeige
2 LEDs (rot) blinken
2 LED-Leuchten blinken
gleichmäßig.
• Bei zu hoher
Betriebstemperatur
Blinken im Abstand von
0,5 Sekunden.
• Bei zu niedriger
Betriebstemperatur
Blinken im Abstand von
0,25 Sekunden.
Nach 10 Sekunden werden
die LED-Leuchten und
der Ein-/Ausschalter
automatisch ausgeschaltet.
auf.
Das Werkzeug ist zu kalt
(unter -5 °C) oder zu heiß.
Lassen Sie den Nagler
abkühlen bzw. wärmen
Sie ihn auf eine geeignete
Temperatur auf.
32
Wenden Sie sich wegen
einer Inspektion an HiKOKI.
2 LEDs blinken orange,
nach etwa 10 Sekunden
schaltet sich der Ein-/
Ausschalter automatisch
ab.
2. Auslösesperre (Siehe Abb. 7)
WARNUNG
Vergewissern Sie sich, dass der Auslöser gesperrt ist,
wenn Sie nicht nageln.
Dieser Nagler hat einen Sperrmechanismus, der
verhindert, dass Nägel verschossen werden.
Stellen Sie den Schaltersperrhebel in die Stellung
den Auslöser zu sperren.
Schieben Sie den Schaltersperrhebel in die Stellung
wenn der Nagler benutzt werden soll, und in die Stellung
, wenn er nicht gebraucht wird.
3. Den Nagler testen
WARNUNG
○ Vergewissern Sie sich, dass der Auslöser gesperrt ist,
wenn Sie nicht nageln. (Siehe Abb. 7)
○ Benutzen Sie niemals den Nagler, wenn der Druckhebel
nicht ordnungsgemäß funktioniert.
In dem Werkzeug kommt ein Schutzmechanismus zum
Einsatz, der den Betrieb ohne Nägel verhindert.
Das Werkzeug gerät in einen Zustand, in dem der
Druckhebel nicht hoch gedrückt werden kann. Dies
erfolgt, wenn das Magazin nicht mit Nägeln gefüllt ist
oder wenn die verbleibende Anzahl Nägel geringer als 7
oder 9 wird.
ACHTUNG
Seien Sie vorsichtig, dass die Spitze des Druckhebels
nicht gegen das Holz gestoßen wird.
Testen Sie den Nagler nach der unten stehenden Checkliste,
bevor Sie mit den Nagelarbeiten beginnen. Führen Sie die
Teste in der folgenden Reihenfolge aus.
Wenn ein ungewöhnlicher Betriebszustand auftritt, benutzen
Sie den Nagler nicht mehr und wenden Sie sich sofort an ein
HiKOKI-Kundendienstzentrum.
(1) ENTFERNEN SIE ALLE NÄGEL UND DEN AKKU AUS
DEM NAGLER.
□ ALLE SCHRAUBEN MÜSSEN FESTGEZOGEN
SEIN.
□ DER DRUCKHEBEL UND DER AUSLÖSER
MÜSSEN SICH LEICHT BEWEGEN LASSEN, wenn
der Zuführungsknopf zurückgezogen wird.
(2) Einsetzen des Akkus.
Betätigen Sie den Druckhebel und den Auslöser nicht,
während Sie den Akku einsetzen. (Siehe Abb. 2)
(3) Schalten Sie den Ein-/Ausschalter ein. (Siehe Abb. 1)
Schalten Sie den Ein-/Ausschalter ein, indem Sie den
Ein-/Ausschalter länger als 1 Sekunde gedrückt halten.
Vergewissern Sie sich, dass die Netzanzeige grün
leuchtet und die Nagelbetriebsanzeige blau leuchtet.
(VOLLSEQUENZIELLER AUSLÖSEMECHANISMUS)
HINWEIS
Betätigen Sie den Druckhebel nicht und ziehen Sie nicht
am Auslöser, während Sie den Ein-/Ausschalter auf EIN
stellen.
Dies führt dazu, dass sich der Ein-/Ausschalter nicht auf
EIN schalten lässt.
[Automatische Abschaltung]
Wenn das Gerät eingeschaltet ist, aber der Nagler 30
Minuten lang nicht benutzt wird, schaltet sich der Nagler
automatisch aus. Drücken Sie den Ein-/Ausschalter, um
ihn wieder einzuschalten.
, um
,
Page 33

WARNUNG
Lassen Sie den Nagler niemals eingeschaltet liegen.
Dadurch könnte ein Unfall verursacht werden.
Kontrollleuchte für den Nagelbetrieb
Leuchtet (blau):
VOLLSEQUENZIELLER AUSLÖSEMECHANISMUS,
Blinkt (blau):
KONTAKTAUSLÖSEMECHANISMUS
Überzeugen Sie sich davon, dass die Akkuanzeige nicht
blinkt.
Wenn die Akkuanzeige rot blinkt, ist der Akkuladestand
zu gering und er muss aufgeladen werden.
(4) Nehmen Sie den Finger vom Auslöser und drücken Sie
den Druckhebel gegen das Werkstück, während Sie den
Zuführungsknopf zurückziehen.
□ DER NAGLER DARF NICHT AUSLÖSEN.
(5) Lösen Sie den Druckhebel vom Werkstück.
Zielen Sie als nächstes mit dem Nagler nach unten,
ziehen Sie den Zuführungsknopf zurück, betätigen
Sie den Auslöser und warten Sie in dieser Stellung
mindestens 5 Sekunden.
□ DER NAGLER DARF NICHT AUSLÖSEN.
(6) 1 Berühren Sie den Auslöser nicht und drücken Sie
den Druckhebel gegen das Werkstück, während Sie
den Zuführungsknopf zurückziehen.
Betätigen Sie dann den Auslöser.
□ DER NAGLER MUSS AUSLÖSEN.
2 Halten Sie den Auslöser fest und drücken Sie den
Druckhebel noch einmal gegen das Werkstück.
□ DER NAGLER DARF NICHT AUSLÖSEN.
3 Lösen Sie den Finger vom Auslöser.
Als nächstes wird 1 wieder ausgeführt.
□ DER NAGLER MUSS AUSLÖSEN.
(7) Lösen Sie den Druckhebel vom Werkstück und betätigen
Sie den Auslöser.
Drücken Sie den Druckhebel innerhalb von 2 Sekunden
gegen das Werkstück.
□ DER NAGLER DARF NICHT AUSLÖSEN.
(8) Stellen Sie die Nagelbetriebsanzeige in den blinkenden
EIN-Modus. (KONTAKTAUSLÖSEMECHANISMUS)
Drücken Sie den Nagelbetriebsschalter einmal und
überzeugen Sie sich davon, dass die Anzeige blau blinkt.
Lösen Sie den Druckhebel vom Werkstück und betätigen
Sie den Auslöser.
Drücken Sie den Druckhebel innerhalb von 2 Sekunden
gegen das Werkstück.
□ DER NAGLER MUSS AUSLÖSEN.
(9) Wenn kein abweichender Vorgang festgestellt wird,
können Sie Nägel in den Nagler einfüllen.
Treiben Sie Nägel in ein Werkstück, das dem der
tatsächlichen Anwendung entspricht.
□ DER NAGLER MUSS ORDNUNGSGEMÄSS
FUNKTIONIEREN.
Deutsch
4. Überprüfung der Funktion des Druckhebels
WARNUNG
Vergewissern Sie sich, dass der Auslöser gesperrt ist,
wenn Sie nicht nageln.
Gehen Sie stets sicher, dass der Auslöser verriegelt und
der Akku vom Elektrogerät entfernt ist, bevor Sie die
Funktion des Druckhebels überprüfen.
Überprüfen Sie, dass sich der Druckhebel leichtgängig
betätigen lässt.
Reinigen Sie den Gleitbereich, wenn sich der Druckhebel
nicht problemlos betätigen lässt.
5. Nägel einfüllen
WARNUNG
Beim Einfüllen von Nägeln in den Nagler
1) muss der Akku aus dem Nagler genommen werden;
2) darf der Auslöser nicht betätigt werden;
3) darf der Druckhebel nicht eingedrückt werden und
4) muss der Nagler nach unten zielen.
2 – Aktion Nägel zuführen!
(1) Führen Sie den Nagelstreifen an der Rückseite des
Magazins ein. (Siehe Abb. 8)
(2) Schieben Sie den Nagelstreifen nach vorn in das
Magazin. (Siehe Abb. 9)
(3) Ziehen Sie die Nagelzuführung (B) zurück, damit der
Zuführungsknopf in den Nagelstreifen eingreift. (Siehe
Abb. 10)
HINWEIS
○ Drücken Sie die Nagelzuführung (B) und den
Zuführungsknopf ruhig gegen den Nagel.
Wenn die Nagelzuführung (B) und der Zuführungsknopf
von der Rückseite des Magazins losgelassen werden und
gegen den Nagel stoßen, kann das Verbindungspapier
oder der -kunststoff des Nagels beschädigt werden.
○ Verwenden Sie Nagelstreifen mit mehr als 10 Nägeln.
○ Verwenden Sie intakte Nagelstreifen mit Nägeln in
einheitlicher Länge.
Der Nagler ist jetzt einsatzbereit.
Entfernen der Nägel:
1 Ziehen Sie den Zuführungsknopf nach hinten. (Siehe
Abb. 11)
2 Schieben Sie den Zuführungsknopf ruhig wieder nach
vorn und drücken Sie dabei die Nagelzuführung (B).
3 Ziehen Sie die Nägel aus der Rückseite des Magazins
heraus. (Siehe Abb. 12)
VERWENDUNG DES NAGLERS
WARNUNG
○ Zielen Sie mit dem Werkzeug NIEMALS auf sich selbst
oder andere Personen im Arbeitsbereich.
○ Halten Sie Ihre Finger FERN vom Auslöser, wenn Sie
nicht nageln, um eine versehentliche Auslösung zu
verhindern.
○ Benutzen Sie das Stromkabel nicht, wenn es beschädigt
ist. Lassen Sie es sofort reparieren.
○ Die Auswahl des Auslöseverfahrens ist wichtig.
Bitte lesen und verstehen Sie „1. Nagelverfahren“ weiter
unten.
○ Überprüfen Sie vor Beginn der Arbeiten die
Nagelbetriebsschaltvorrichtung.
Dieser HiKOKI-Nagler verfügt über eine
Nagelbetriebsschaltvorrichtung.
Bevor Sie mit der Arbeit beginnen überzeugen Sie sich
davon, dass die Schaltvorrichtung richtig eingestellt ist.
Wenn die Schaltvorrichtung nicht richtig eingestellt ist,
funktioniert der Nagler nicht richtig.
○ Halten Sie während des Betriebs niemals Ihr Gesicht,
Ihre Hände oder Füße in die Nähe des Schusskopfs.
○ Schießen Sie keine Nägel auf andere Nägel und halten
Sie den Nagler nicht in einem zu steilen Winkel; die
Nägel können abprallen und jemanden verletzen.
33
Page 34

Deutsch
○ Treiben Sie keine Nägel in dünne Bretter oder in der
Nähe von Ecken und Kanten des Werkstücks. Die
Nägel können hindurch getrieben werden oder aus dem
Werkstück austreten und jemanden treff en.
○ Treiben Sie niemals gleichzeitig von beiden Seiten einer
Wand Nägel ein. Die Nägel können in die Wand und
durch sie hindurch getrieben werden und eine Person
auf der gegenüberliegenden Seite treff en.
○ Benutzen Sie niemals einen defekten Nagler oder einen,
der nicht normal funktioniert.
○ Verwenden Sie den Nagler nicht als Hammer.
○ Nehmen Sie alle verbleibenden Nägel und den Akku aus
dem Nagler, wenn:
1) Sie Wartungs- und Inspektionsarbeiten durchführen;
2) Sie die ordnungsgemäße Funktion von Druckhebel
und Abzug prüfen;
3) Sie einen Stau beseitigen;
4) er nicht in Gebrauch ist;
5) Sie den Arbeitsbereich verlassen;
6) Sie ihn an einen anderen Ort bringen; und
7) wenn Sie ihn an eine andere Person übergeben.
○ Entnehmen Sie den Akku aus dem Nagler, wenn:
1) Sie Nägel nachfüllen;
2) Sie den Einsteller drehen.
Dieser HiKOKI-Nagler ist mit einer
Nagelbetriebsschaltvorrichtung ausgestattet.
Verwenden Sie die Einstellung VOLLSEQUENZIELLE
AUSLÖSUNG oder KONTAKTAUSLÖSEMECHANISMUS
je nach der auszuführenden Arbeit.
Erläuterung der unterschiedlichen Nagelfunktionen
○ VOLLSEQUENZIELLER AUSLÖSEMECHANISMUS:
Drücken Sie zuerst den Druckhebel gegen das Holz;
betätigen Sie anschließend den Abzug, um den Nagel
einzuschießen.
Schießen Sie mit der gleichen Verfahrensweise weitere
Nägel ein.
Wenn Sie bereits einen Nagel eingeschossen haben,
ist das Einschießen des nächsten Nagels erst dann
möglich, wenn Sie den Auslöser losgelassen und erneut
betätigt haben.
○ KONTAKTAUSLÖSEMECHANISMUS:
Die KONTAKTAUSLÖSUNG kann nach zwei
verschiedenen Verfahrensweisen erfolgen, je nach Ihrer
Anwendung.
Um mehrere Nägel einzuschießen:
1. Ziehen Sie am Auslöser.
2. Drücken Sie den Druckhebel gegen das Holz, um
den Nagel abzuschießen.
3. Wenn der Auslöser festgehalten wird, schießt bei
jedem Druck des Druckhebels gegen das Holz ein
Nagel heraus.
Um einen einzelnen Nagel einzuschießen:
1. Drücken Sie den Druckhebel gegen das Holz.
2. Betätigen Sie den Auslöser, um den Nagel
abzuschießen.
3. Nehmen Sie Ihren Finger vom Auslöser und nehmen
Sie den Nagler vom Holz weg.
[Sperrmechanismus gegen Leerabfeuerung]
In dem Werkzeug kommt ein Schutzmechanismus zum
Einsatz, der den Betrieb ohne Nägel verhindert.
Das Werkzeug gerät in einen Zustand, in dem der
Druckhebel nicht hochgedrückt werden kann. Dies
erfolgt, wenn das Magazin nicht mit Nägeln gefüllt ist
oder wenn die verbleibende Anzahl Nägel geringer als 7
oder 9 wird.
ACHTUNG
Achten Sie darauf, die Spitze des Druckhebels nicht
gegen das Holz zu stoßen, wenn der Druckhebel nicht
hoch gedrückt werden kann.
1. Nagelverfahren
Dieser Nagler ist mit einem Druckhebel ausgestattet und
funktioniert nicht, wenn der Druckhebel nicht betätigt
wird.
Es gibt zwei Betriebsverfahren, mit denen Nägel mit
Das sind:
(1) Periodischer Betrieb (Abzugauslösung)
Verwendet die Einstellung VOLLSEQUENZIELLER
WARNUNG
○ Stellen Sie für den periodischen Betrieb den
○ Zur Vermeidung von Doppelschüssen oder
1 Stellen Sie den Nagelbetriebsschalter auf
(um ihn auf den VOLLSEQUENZELLEN
(Stellen Sie die Schaltvorrichtung vollständig auf
2 Setzen Sie den Nagelauslass auf das Werkstück und
3 Drücken Sie den Druckhebel fest ein, bis er vollständig
4 Betätigen Sie den Auslöser, um einen Nagel
5 Nehmen Sie den Finger vom Auslöser und heben Sie
Um an einer anderen Stelle weiter zu nageln schieben
Sie den Nagler am Holz entlang und wiederholen Sie die
Schritte 2 - 5 nach Bedarf.
HINWEIS
Die Bedienschritte 3 und 4 sollten innerhalb von
(2) Dauerbetrieb (Druckhebelauslösung)
Verwendung des KONTAKTAUSLÖSEMECHANISMUS
WARNUNG
Zur Vermeidung von Doppelschüssen oder
1 Stellen Sie den Nagelbetriebsschalter auf
(Stellen Sie die Schaltvorrichtung vollständig auf den
2 Betätigen Sie den Auslöser, wenn der Nagler das
3 Drücken Sie den Druckhebel gegen das Werkstück, um
4 Bewegen Sie den Nagler in einer springenden Bewegung
Bei jedem Eindrücken des Druckhebels wird ein Nagel
Sobald die gewünschte Anzahl an Nägeln abgefeuert wurde,
nehmen Sie den Finger vom Auslöser.
34
diesem Nagler verschossen werden können.
1. Periodischer Betrieb (Abzugauslösung):
2. Dauerbetrieb (Druckhebelauslösung):
AUSLÖSEMECHANISMUS. (Siehe Abb. 13)
Nagelbetriebsschalter auf VOLLSEQUENZIELLER
AUSLÖSEMECHANISMUS (Nagelbetriebsanzeige
leuchtet blau). (d.h. auf EINZELAUSLÖSEMECHANISMUS stellen.)
versehentlicher Auslösung durch den Rückstoß.
1) Auf VOLLSEQUENZIELLER
AUSLÖSEMECHANISMUS stellen.
2) Ziehen Sie schnell und fest am Auslöser.
VOLLSEQUENZIELLER AUSLÖSEMECHANISMUS
(Nagelbetriebsanzeige leuchtet blau).
AUSLÖSEMECHANISMUS zu stellen).
den Modus, in dem die Nagelbetriebsanzeige blau
leuchtet, wie in Abb. 13 gezeigt. Andernfalls wird sie auf
KONTAKTAUSLÖSEMECHANISMUS eingestellt.)
halten Sie Ihren Finger fern vom Auslöser.
eingedrückt ist.
abzuschießen.
das Werkstück vollständig von der Holzoberfl äche ab.
2 Sekunden nacheinander ausgeführt werden. Wenn
mehr als 2 Sekunden nach 3 vergehen, funktioniert
der Nagler nicht ordnungsgemäß. Falls dies passiert,
versuchen Sie es erneut ab Schritt 3.
(Siehe Abb. 14)
versehentlicher Auslösung durch den Rückstoß.
1) Drücken Sie den Nagler nicht mit übermäßiger Kraft
gegen das Holz.
2) Lösen Sie den Nagler vom Holz, wenn der Rückstoß
nach dem Nageln einsetzt.
KONTAKTAUSLÖSEMECHANISMUS (Nagelbetriebsanzeige
blinkt blau).
(zur Einstellung von KONTAKTAUSLÖSEMECHANISMUS).
Modus, in dem die Nagelbetriebsanzeige blau blinkt,
wie in Abb. 14 gezeigt. Andernfalls funktioniert es nicht
ordnungsgemäß.)
Werkstück noch nicht berührt.
einen Nagel abzuschießen.
am Werkstück entlang.
abgefeuert.
Page 35

HINWEIS
Die Bedienschritte 2 und 3 sollten innerhalb von 2
Sekunden nacheinander ausgeführt werden. Wenn
mehr als 2 Sekunden nach 2 vergehen, funktioniert
der Nagler nicht ordnungsgemäß. Falls dies passiert,
versuchen Sie es erneut ab Schritt 2.
WARNUNG
○ Halten Sie Ihren Finger fern vom Auslöser, außer
beim Nageln, denn es können schwere Verletzungen
auftreten, wenn der Druckhebel versehentlich mit Ihnen
oder anderen im Arbeitsbereich in Kontakt kommt.
○ Halten Sie Hände und Körper fern vom Ausschussbereich.
Dieser HiKOKI-Nagler kann durch den Rückstoß
vom Abschießen eines Nagels zurückprallen und es
kann sich unerwünscht ein weiterer Nagel lösen, was
möglicherweise zu Verletzungen führen kann.
HINWEIS
○ Wenn alle Warnhinweise und Anweisungen befolgt werden,
ist ein sicher Betrieb mit allen beiden Systemen möglich:
VOLLSEQUENZIELLER AUSLÖSEMECHANISMUS,
KONTAKTAUSLÖSEMECHANISMUS.
○ Behandeln Sie Nägel und Verpackung immer mit
Vorsicht. Wenn die Nägel fallen gelassen werden, kann
der Verbindungsstreifen reißen, was zu einer fehlerhaften
Zuführung und Nagelstau führt.
○ Nach dem Nageln:
1) Entnehmen Sie den Akku aus dem Nagler;
2) entfernen Sie alle Nägel aus dem Nagler;
2. Einstellen der Nageltiefe
Um sicherzustellen, dass alle Nägel bis zur gleichen
Tiefe eindringen, achten Sie darauf, dass der Nagler
immer fest gegen das Werkstück gehalten wird.
Wenn die Nägel zu tief oder zu fl ach in das Werkstück
eindringen, stellen Sie die Nagelfunktion in der folgenden
Reihenfolge ein.
1 Nehmen Sie den Akku aus dem Nagler. (Siehe Abb. 15)
2 Wenn die Nägel zu tief eindringen, drehen Sie das
Einstellrad zur fl achen Seite. (Siehe Abb. 16)
Die Einstellung wird in Stufen von einer halben
Umdrehung vorgenommen.
Wenn die Nägel zu fl ach eindringen, drehen Sie das
Einstellrad zur tiefen Seite. (Siehe Abb. 17)
3 Drehen Sie nicht mehr am Einstellrad, wenn eine
geeignete Stellung für einen Nageltest erreicht ist.
4 Setzen Sie den Akku in den Nagler ein.
TRAGEN SIE IMMER EINE SCHUTZBRILLE.
Führen Sie einen Nageltest aus.
5 Nehmen Sie den Akku aus dem Nagler.
6 Wählen Sie eine geeignete Stellung des Einstellrads.
3. Verwendung des Hakens (Siehe Abb. 18, 19, 20)
WARNUNG
Wenn Sie den Haken verwenden, schalten Sie den Ein-/
Ausschalter aus (grüne Leuchte „AUS“). Achten Sie
darauf, dass das Hauptgerät nicht herunterfällt.
Wenn das Werkzeug herunterfällt, besteht die Gefahr
eines Unfalls.
Der Haken kann links oder rechts angebracht werden.
1 Entfernen Sie den Akku und anschließend alle
verbleibenden Nägel aus dem Magazin.
2 Halten Sie das Hauptgerät sicher fest und entfernen Sie
die Schraube mit einem Schraubendreher. (Siehe Abb.
18)
3 Entfernen Sie den Haken und die Hakenplatte. (Siehe
Abb. 19)
4 Bringen Sie den Haken an der anderen Seite an und
befestigen Sie ihn sicher mit der Schraube. (Siehe Abb.
20)
HINWEIS
Der Haken kann als Aufhängung verwendet werden.
4. Staubeseitigung
Wenn die Nägel im Schusskopf klemmen, entfernen Sie
ihn und stellen Sie die Nagelfunktion in der folgenden
Reihenfolge ein.
Deutsch
ACHTUNG
Nehmen Sie den Akku aus dem Nagler.
1 Nehmen Sie den Akku aus dem Nagler.
2 Entfernen Sie alle Nägel.
3 Entfernen Sie mit dem Schlüssel die M5-Schrauben.
(Siehe Abb. 21)
4 Ziehen Sie das Magazin vom Schusskopf weg und
beseitigen Sie den Stau. (Siehe Abb. 22)
ACHTUNG
○ Schlagen Sie NIEMALS auf die Treiberklinge.
○ Zielen Sie mit dem Werkzeug NIEMALS auf sich selbst
oder eine andere Person, um die Gefahr einer Verletzung
durch einen Fehlschuss zu vermeiden.
Auch wenn der Akku aus dem Nagler herausgenommen
ist, bleibt immer noch Energie durch die Druckluft im
Innern.
5 Bringen Sie das Magazin am Injektor an und ziehen Sie
es mit der M5-Schraube fest.
HINWEIS
Wenden Sie sich bei häufi gen Nagelstaus an ein
HiKOKI-Kundendienstzentrum.
5. Verwendung der Nasenabdeckung (Siehe Abb. 23)
WARNUNG
Denken Sie beim Anbringen oder Abnehmen der
Nasenabdeckung immer daran, Ihren Finger vom
Auslöser zu nehmen und alle verbleibenden Nägel und
den Akku aus dem Nagler zu entfernen.
Wenn Sie die Oberfl äche des Werkstücks vor Kratzern
oder Markierungen durch den Druckhebel schützen wollen,
bringen Sie die als Zubehör beiliegende Nasenabdeckung
am Druckhebel an.
1 Nehmen Sie alle verbleibenden Nägel und den Akku aus
dem Nagler.
2 Setzen Sie die Nasenabdeckung auf die Spitze des
Druckhebels.
3 Die Nasenabdeckung hat eine Markierung an der
Stelle, an der der Nagel austritt, um die Ausrichtung zu
erleichtern.
HINWEIS
Die Nasenabdeckung kann aufgrund ihrer Dicke
die Nageltiefe reduzieren. Die Nageltiefe muss neu
eingestellt werden.
WARTUNG UND INSPEKTION
ACHTUNG
Denken Sie vor der Wartung und Inspektion daran, alle
verbleibenden Nägel und den Akku aus dem Nagler zu
entnehmen.
1. Inspektion des Magazins
1 Entnehmen Sie den Akku aus dem Nagler.
2 Reinigen Sie das Magazin. Entfernen Sie Staub und
Holzspäne, die sich im Magazin angesammelt haben
können.
ACHTUNG
Überprüfen Sie, ob die Nagelzuführung reibungslos
gleitet, indem Sie mit dem Finger daran ziehen.
Wenn das nicht der Fall ist, können die Nägel in einem
ungewöhnlichen Winkel austreten und jemanden
verletzen.
2. Inspektion der Befestigungsschrauben
Untersuchen Sie regelmäßig alle Befestigungsschrauben
und stellen Sie sicher, dass sie richtig festgezogen sind.
Sollte sich eine der Schrauben lockern, ziehen Sie sie
sofort wieder fest an. Falls dies nicht getan wird, könnte
das zu ernsthaften Gefahren führen.
3. Wartung des Motors
Die Wicklung des Motors ist das „Herzstück“ des
Elektrowerkzeugs. Wenden Sie die gebotene Sorgfalt
auf, um sicherzustellen, dass die Wicklung nicht
beschädigt und/oder mit Öl oder Wasser benetzt wird.
35
Page 36

Deutsch
4. Außenreinigung
Wenn das Werkzeug schmutzig ist, wischen Sie
es mit einem weichen trockenen Tuch oder einem
mit Seifenwasser befeuchteten Tuch ab. Kein
Chlorlösungsmittel, Benzin oder Farbenverdünner
verwenden, da diese Kunststoff e aufweichen.
5. Lagerung
Das Werkzeug bei einer Temperatur von unter 40 °C und
außerhalb der Reichweite von Kindern lagern.
HINWEIS
Aufbewahren von Lithiumionenbatterien
Vergewissern Sie sich, dass die Lithiumionenbatterien
voll aufgeladen sind, bevor Sie sie lagern.
Das Lagern der Akkus über längere Zeit (3 Monate oder
mehr) mit einem niedrigen Ladestand kann zu einer
Leistungsminderung führen, welche die Nutzungszeit
der Akkus deutlich verkürzt oder mit sich bringt, dass die
Akkus keine Ladung mehr halten können.
Eine deutliche Verkürzung der Nutzungszeit kann jedoch
durch wiederholtes Aufl aden und zwei- bis fünfmaliges
Benutzen der Akkus wieder behoben werden.
Sollte die Nutzungszeit trotz wiederholtem Aufl aden und
Benutzung extrem kurz sein, betrachten Sie die Akkus
als tot und kaufen Sie neue Akkus.
VORSICHT
Bei Betrieb und Wartung von Elektrowerkzeugen
müssen die Sicherheitsvorschriften und Normen
beachtet werden.
Wichtiger Hinweis zu den Akkus für Akku-Geräte
von HiKOKI
Verwenden Sie immer unsere angegebenen
Originalakkus. Wir können die Sicherheit und die
Leistung unseres Akku-Gerätes nicht gewährleisten,
wenn andere als die von uns angegebenen Akkus
verwendet werden, oder wenn der Akku zerlegt und
verändert wird (etwa durch Zerlegen und Ersetzen von
Zellen oder anderen innen gelegenen Teilen).
GARANTIE
Auf HiKOKI-Elektrowerkzeuge gewähren wir eine
Garantie unter Zugrundelegung der jeweils geltenden
gesetzlichen und landesspezifi schen Bedingungen.
Dieses Garantie erstreckt sich nicht auf Schäden, die auf
Missbrauch, bestimmungswidrigen Einsatz oder normalen
Verschleiß zurückzuführen sind. Im Schadensfall senden
Sie das nicht zerlegte Elektrowerkzeug zusammen mit
dem GARANTIESCHEIN, den Sie am Ende dieser
Bedienungsanleitung fi nden, an ein von HiKOKI autorisiertes
Servicezentrum.
Lärminformation
Lärmkennwerte entsprechend EN 792-13:
Typischer A-bewerterer Schallpegel für ein einzelnes
Ereignis: L
Typischer A-bewerterer Schallpegel am Arbeitsplatz:
L
Messunsicherheit KpA: 3 dB
Diese Werte sind mit dem Werkzeug zusammenhängende
Werte und stellen nicht die Lärmentwicklung am
Verwendungspunkt dar. Die Lärmentwicklung am
Arbeitsplatz hängt z.B. von der Arbeitsumgebung, dem
Werkstück, der Werkstückunterstützung, der Anzahl der
Nageleintreibungen usw. ab.
Abhängig von den Bedingungen am Arbeitsplatz und der
Form des Werkstücks müssen möglicherweise individuelle
Lärmverhütungsmaßnahmen durchgeführt werden, z.B.
Aufstellung des Werkstücks auf einer schalldämpfenden
Unterstützung, Verhüten von Werkstückvibration durch
Festklemmen oder Abdecken, usw.
In besonderen Fällen ist das Tragen von Gehörschutz
erforderlich.
Vibrationsinformation
Der typische Vibrationskennwert entsprechend EN 792-13:
Messunsicherheit K = 1,5 m/s
Dieser Wert ist ein mit dem Werkzeug zusam menhängender
Wert und repräsentiert nicht den Einfl uß des Hand-Arm-
Systems bei verwendung des Werkzeugs. Der Einfl uß auf
das Hand-Arm-System bei verwendung des Werkzeugs
hängt z.B. von der Greifkraft, der Kontaktdruckkraft, der
Arbeitsrichtung, der Einstellung der Energieversorgung,
dem Werkstück und der Werkstückunterstützung ab.
Der angegebene Vibrationsgesamtwert wurde nach einer
Standardtestmethode gemessen und kann zum Vergleich
zwischen verschiedenen Werkzeugen dienen.
Er kann auch für eine Vorbeurteilung der Aussetzung
verwendet werden.
WARNUNG
○ Der Vibrationsemissionswert während der tatsächlichen
Benutzung des Elektrowerkzeugs kann von dem
deklarierten Gesamtwert abweichen, abhängig davon,
wie das Werkzeug verwendet wird.
○ Legen Sie Sicherheitsmaßnahmen zum Schutz des
Bedieners fest, die auf einer Expositionseinschätzung
unter den tatsächlichen Benutzungsbedingungen
beruhen (unter Berücksichtigung aller Bereiche des
Betriebszyklus, darunter neben der Triggerzeit auch die
Zeiten, in denen das Werkzeug ausgeschaltet ist oder im
Leerlaufbetrieb läuft).
2
WA,1s,d = 101 dB
pA,1s,d = 90 dB
4,6 m/s
2
HINWEIS
Aufgrund des ständigen Forschungs- und
Entwicklungsprogramms von HiKOKI sind Änderungen der
hier gemachten technischen Angaben vorbehalten.
36
Page 37

Deutsch
Wartungstabelle
AKTION WARUM WIE
Magazin und
Zuführungsmechanismus
reinigen.
Den Druckhebel betriebsfähig
halten.
Stau verhindern. Täglich sauber blasen.
Sicherheit des Bedieners und effi ziente
Naglerfunktion fördern.
Täglich sauber blasen.
FEHLERSUCHE
Nutzen Sie die Kontrollen in der nachfolgenden Tabelle, wenn das Werkzeug nicht normal funktioniert. Wenn das Problem
dadurch nicht behoben wird, wenden Sie sich an Ihren Händler oder an den autorisierten HiKOKI-Kundendienst.
PROBLEM PRÜFVERFAHREN KORREKTURMASSNAHME
Der Ein-/Ausschalter lässt sich
nicht einschalten.
Schaltet sich einmal ein, aber
automatisch wieder ab.
Nagler funktioniert nicht
(Ein-/Aus-Schalter EIN).
Der Nagler arbeitet,
aber es wird kein Nagel
ausgeschossen.
Akkuladung gering. Laden Sie den Akku auf.
Interne Elektronik beschädigt. Wenden Sie sich an HiKOKI für den
Druckhebel und/oder Auslöser im Zustand
EIN?
Haben Sie den Nagler mehr als 30
Minuten nicht benutzt?
(Automatische Abschaltfunktion)
Der Nagler wird nicht stark genug gegen
das Werkstück gedrückt.
Der Auslöser wurde nicht weit genug
betätigt.
Es sind mehr als 2 Sekunden zwischen
EIN des Druckhebels und Auslöser
EIN vergangen (bzw. Auslöser EIN bis
Druckhebel EIN).
Schutzmechanismus ist aktiviert.
(Keine oder zu wenig Nägel im Magazin)
Sperrhebel (Auslösesperre) steht auf
„EIN“.
Das Werkzeug ist zu kalt (unter -5 °C) oder
zu heiß.
Interne Elektronik beschädigt. Wenden Sie sich an HiKOKI für den
Magazin ist verschmutzt. Blasen und wischen Sie das Magazin
Prüfen Sie, ob ein Nagelstau vorliegt. Beseitigen Sie den Nagelstau (siehe Abb.
Treiberklinge verschlissen oder
beschädigt?
Bandfeder geschwächt oder beschädigt? Bandfeder ersetzen.
Nagelzuführung beschädigt? Nagelzuführung ersetzen.
Prüfen, ob die richtigen Nägel verwendet
werden.
Austausch.
Lassen Sie den Druckhebel und Auslöser
um Zustand AUS.
Halten Sie den Ein-/Ausschalter länger als
1 Sekunde gedrückt, um ihn auf „EIN“ zu
schalten
Halten Sie Nagler fest und drücken Sie ihn
ganz auf das Werkstück.
Ziehen Sie fest am Auslöser.
Sorgen Sie dafür, dass weniger als 2
Sekunden zwischen Druckhebel EIN und
Auslöser EIN vergehen (bzw. zwischen
Auslöser EIN und Druckhebel EIN).
Füllen Sie Nägel ins Magazin nach.
Stellen Sie den Sperrhebel in die Stellung
„AUS“. (Siehe Abb. 7)
Lassen Sie den Nagler abkühlen bzw.
wärmen Sie ihn auf eine geeignete
Temperatur auf.
Austausch.
sauber.
21, 22).
Wenden Sie sich an HiKOKI für den
Austausch.
Verwenden Sie nur empfohlene Nägel.
37
Page 38

Deutsch
PROBLEM PRÜFVERFAHREN KORREKTURMASSNAHME
Schwacher Antrieb.
Langsamer Zyklus.
Die Nägel werden zu tief
eingetrieben.
Nägel werden übersprungen.
Unterbrochene Zuführung.
Nagelstau.
Der verschossene Nagel ist
verbogen.
Überprüfen Sie die Stellung des
Nageltiefeneinstellrads.
Treiberklinge verschlissen? Wenden Sie sich an HiKOKI für den
Der Luftdruck ist zu niedrig. Wenden Sie sich an HiKOKI für den
Interne Elektronik beschädigt. Wenden Sie sich an HiKOKI für den
Überprüfen Sie die Stellung des
Nageltiefeneinstellrads.
Prüfen, ob die richtigen Nägel verwendet
werden.
Nagelzuführung beschädigt? Nagelzuführung ersetzen.
Bandfeder geschwächt oder beschädigt? Bandfeder ersetzen.
Treiberklinge verschlissen oder
beschädigt?
Prüfen, ob die richtigen Nägel verwendet
werden.
Treiberklinge verschlissen oder
beschädigt?
Stellen Sie es wie in Abb. 16, 17 gezeigt
ein.
Austausch.
Austausch.
Austausch.
Stellen Sie es wie in Abb. 16, 17 gezeigt
ein.
Verwenden Sie nur empfohlene Nägel.
Wenden Sie sich an HiKOKI für den
Austausch.
Verwenden Sie nur empfohlene Nägel.
Wenden Sie sich an HiKOKI für den
Austausch.
38
Page 39

(Traduction des instructions d’origine)
AVERTISSEMENTS DE SÉCURITÉ
GÉNÉRAUX POUR L’OUTIL
AVERTISSEMENT
Lire tous les avertissements de sécurité et toutes les
instructions.
Ne pas suivre les avertissements et instructions peut donner
lieu à un choc électrique, un incendie et/ou une blessure
sérieuse.
Conserver tous les avertissements et toutes les
instructions pour pouvoir s’y reporter ultérieurement.
Le terme « outil » dans les avertissements fait référence à
votre outil électrique alimenté par le secteur (avec cordon
d’alimentation) ou votre outil fonctionnant sur batterie (sans
cordon d’alimentation).
1) Sécurité de la zone de travail
a) Conserver la zone de travail propre et bien
éclairée.
Les zones en désordre ou sombres sont propices
aux accidents.
b) Ne pas faire fonctionner les outils électriques
en atmosphère explosive, par exemple en
présence de liquides infl ammables, de gaz ou
de poussières.
Les outils électriques produisent des étincelles qui
peuvent enfl ammer les poussières ou les fumées.
c) Maintenir les enfants et les personnes présentes
à l’écart pendant l’utilisation de l’outil.
Les distractions peuvent vous faire perdre le contrôle
de l’outil.
2) Sécurité électrique
a) Il faut que les fi ches de l’outil électrique soient
adaptées au socle.
Ne jamais modifi er la fi che de quelque façon
que ce soit.
Ne pas utiliser d’adaptateurs avec des outils à
branchement de terre.
Des fi ches non modifi ées et des socles adaptés
réduiront le risque de choc électrique.
b) Eviter tout contact du corps avec des surfaces
reliées à la terre telles que les tuyaux, les
radiateurs, les cuisinières et les réfrigérateurs.
Il existe un risque accru de choc électrique si votre
corps est relié à la terre.
c) Ne pas exposer les outils à la pluie ou à des
conditions humides.
La pénétration d’eau à l’intérieur d’un outil
augmentera le risque de choc électrique.
d) Ne pas maltraiter le cordon. Ne jamais utiliser le
cordon pour porter, tirer ou débrancher l’outil.
Maintenir le cordon à l’écart de la chaleur,
du lubrifi ant, des arêtes ou des parties en
mouvement.
Des cordons endommagés ou emmêlés augmentent
le risque de choc électrique.
e) Lorsqu’on utilise un outil à l’extérieur, utiliser un
prolongateur adapté à l’utilisation extérieure.
L’utilisation d’un cordon adapté à l’utilisation
extérieure réduit le risque de choc électrique.
f) Si l’usage d’un outil dans un emplacement
humide est inévitable, utiliser une alimentation
protégée par un dispositif à courant diff érentiel
résiduel (RCD).
L’usage d’un RCD réduit le risque de choc électrique.
3) Sécurité des personnes
a) Rester vigilant, regarder ce que vous êtes en
train de faire et faire preuve de bon sens dans
votre utilisation de l’outil.
Français
Ne pas utiliser un outil lorsque vous êtes fatigué
ou sous l’emprise de drogues, d’alcool ou de
médicaments.
Un moment d’inattention en cours d’utilisation
d’un outil peut entraîner des blessures graves des
personnes.
b) Utiliser un équipement de sécurité. Toujours
porter une protection pour les yeux.
Les équipements de sécurité tels que les masques
contre les poussières, les chaussures de sécurité
antidérapantes, les casques ou les protections
acoustiques utilisés pour les conditions appropriées
réduiront les blessures de personnes.
c) Eviter tout démarrage intempestif. S’assurer
que l’interrupteur est en position arrêt avant
de brancher l’outil au secteur et/ou au bloc de
batteries, de le ramasser ou de le porter.
Porter les outils en ayant le doigt sur l’interrupteur ou
brancher des outils dont l’interrupteur est en position
marche est source d’accidents.
d) Retirer toute clé de réglage avant de mettre
l’outil en marche.
Une clé laissée fi xée sur une partie tournante de
l’outil peut donner lieu à des blessures.
e) Ne pas se précipiter. Garder une position et un
équilibre adaptés à tout moment.
Cela permet un meilleur contrôle de l’outil dans des
situations inattendues.
f) S’habiller de manière adaptée. Ne pas porter
de vêtements amples ou de bijoux. Garder les
cheveux, les vêtements et les gants à distance
des parties en mouvement.
Des vêtements amples, des bijoux ou les cheveux
longs peuvent être pris dans des parties en
mouvement.
g) Si des dispositifs sont fournis pour le
raccordement d’équipements pour l’extraction
et la récupération des poussières, s’assurer
qu’ils sont connectés et correctement utilisés.
Utiliser des collecteurs de poussière peut réduire les
risques dus aux poussières.
4) Utilisation et entretien de l’outil
a) Ne pas forcer l’outil. Utiliser l’outil adapté à votre
application.
L’outil adapté réalisera mieux le travail et de manière
plus sûre au régime pour lequel il a été construit.
b) Ne pas utiliser l’outil si l’interrupteur ne permet
pas de passer de l’état de marche à arrêt et vice
versa.
Tout outil qui ne peut pas être commandé par
l’interrupteur est dangereux et il faut le réparer.
c)
Débrancher la fi che de la source d’alimentation et/ou
la batterie de l’outil avant tout réglage, changement
d’accessoires ou avant de ranger l’outil.
De telles mesures de sécurité préventives réduisent
le risque de démarrage accidentel de l’outil.
d) Conserver les outils à l’arrêt hors de la portée
des enfants et ne pas permettre à des personnes
ne connaissant pas l’outil ou les présentes
instructions de le faire fonctionner.
Les outils sont dangereux entre les mains
d’utilisateurs novices.
e) Observer la maintenance de l’outil. Vérifi er qu’il
n’y a pas de mauvais alignement ou de blocage
des parties mobiles, des pièces cassées
ou toute autre condition pouvant aff ecter le
fonctionnement de l’outil.
En cas de dommages, faire réparer l’outil avant
de l’utiliser.
De nombreux accidents sont dus à des outils mal
entretenus.
39
Page 40
Français
f) Garder aff ûtés et propres les outils permettant
de couper.
Des outils destinés à couper correctement
entretenus avec des pièces coupantes tranchantes
sont moins susceptibles de bloquer et sont plus
faciles à contrôler.
g) Utiliser l’outil, les accessoires et les lames etc.,
conformément à ces instructions, en tenant
compte des conditions de travail et du travail à
réaliser.
L’utilisation de l’outil pour des opérations diff érentes
de celles prévues pourrait donner lieu à des
situations dangereuses.
5) Utilisation des outils fonctionnant sur batteries et
précautions d’emploi
a) Ne recharger qu’avec le chargeur spécifi é par le
fabricant.
Un chargeur qui est adapté à un type de bloc de
batteries peut créer un risque de feu lorsqu’il est
utilisé avec un autre type de bloc de batteries.
b) N’utiliser les outils qu’avec des blocs de
batteries spécifi quement désignés.
L’utilisation de tout autre bloc de batteries peut créer
un risque de blessure et de feu.
c) Lorsqu’un bloc de batteries n’est pas utilisé, le
maintenir à l’écart de tout autre objet métallique,
par exemple trombones, pièces de monnaie,
clés, clous, vis ou autres objets de petite taille
qui peuvent donner lieu à une connexion d’une
borne à une autre.
Le court-circuitage des bornes d’une batterie entre
elles peut causer des brûlures ou un feu.
d) Dans de mauvaises conditions, du liquide peut
être éjecté de la batterie ; éviter tout contact.
En cas de contact accidentel, nettoyer à l’eau.
Si le liquide entre en contact avec les yeux,
rechercher en plus une aide médicale.
Le liquide éjecté des batteries peut causer des
irritations ou des brûlures.
6) Maintenance et entretien
a) Faire entretenir l’outil par un réparateur qualifi é
utilisant uniquement des pièces de rechange
identiques.
Cela assurera le maintien de la sécurité de l’outil.
PRECAUTIONS
Maintenir les enfants et les personnes infi rmes
éloignés.
Lorsque les outils ne sont pas utilisés, ils doivent être
rangés hors de portée des enfants et des personnes
infi rmes.
AVERTISSEMENTS DE SÉCURITÉ
POUR LA CLOUEUSE À BANDE
SANS FIL
1. Partez toujours du principe que l’outil contient des
agrafes.
Une mauvaise manipulation de la cloueuse peut
déclencher une éjection accidentelle des attaches
causant des blessures corporelles.
2. Ne pointez pas l’outil vers vous-même ni vers une
autre personne.
Un déclenchement inattendu entraîne l’éjection d’une
agrafe pouvant blesser quelqu’un.
3. N’actionnez pas l’outil tant qu’il n’est pas fermement
tenu contre la pièce à usiner.
Si l’outil n’est pas au contact de la pièce à usiner, l’agrafe
risque de dévier de votre cible.
4. Débranchez l’outil de la source d’alimentation si
une agrafe reste coincée dans l’outil.
La cloueuse peut être activée accidentellement si elle
est branchée, lors du retrait d’une attache coincée.
5. Soyez vigilant lors du retrait d’une agrafe coincée.
Le mécanisme peut être sous compression et l’agrafe
peut être éjectée de force lorsque vous tentez de
dégager un blocage.
6. Ne pas utiliser cette cloueuse pour la fi xation des
câbles électriques.
La cloueuse n’est pas conçue pour l’installation de
câbles électriques, dont elle peut endommager la gaine
isolante, provoquant ainsi un choc électrique ou un
début d’incendie.
AVERTISSEMENTS DE SÉCURITÉ
SUPPLÉMENTAIRES
1. La manutention en sécurité est garantie par un
usage correcte.
Cet appareil a été construit pour enfoncer des clous
dans du bois ou des matériaux similaires. Utilisez-le
seulement pour les emplois désignés.
2. Evitez les infl ammations et les explosions.
Vu que des étincelles peuvent se produire, il est
dangereux d’utiliser l’appareil à proximité de laques, de
couleurs, d’essence, de dilutants, de fuel, de gaz, de
colles ou d’autres substances infl ammables similaires.
Dans aucun cas, l’appareil ne doit être utilisé proche de
pareils produits infl ammables.
3. Protégez vos yeux à l’aide de lunettes de sécurité.
pour la vue. Vous trouvez des lunettes de sécurité dans
chaque quincaillerie. Portez toujours des lunettes de
sécurité ou un masque de sécurité si vous utilisez le
cloueur. Les employeurs doivent veiller à ce que
l’équipement de protection soit toujours porté.
4. Protégez vos oreillies.
Veuillez porter des oreillettes lors de chaque usage
du cloueur et veillez à ce que les personnes qui vous
entourent en portent aussi.
5. Faites attention aux personnes qui travaillent
proche de vous.
Des clous qui sont mal enfoncés représentent un danger
pour les personnes qui vous entourent. Veillez toujours
à ne pas trop rapprocher votre corps, vos mains ou vos
pieds du déclencheur.
6. Ne pointez jamais l’orifi ce de décharge en direction
d’une personne.
Si l’orifi ce de décharge est pointé
si vous pressez la détente. Lorsque vous connectez ou
déconnectez la batterie, pendant le chargement d’un
clou ou toute autre opération similaire, assurez-vous que
la pointe du clou n’est pas pointée vers quelqu’un (vous
compris). Même s’il n’y a pas de clou dans l’outil, il serait
dangereux de décharger l’outil tout en le dirigeant vers
quelqu’un. Il ne faudra donc pas le faire.
Ne jamais s’amuser avec l’outil. Le cloueur est un
instrument de travail. Le respecter en tant que tel.
Portez toujours des lunettes de sécurité si
vous utilisez l’appareil et assurez que les
personnes qui vous entourent en portent
aussi. La possibilité que des fragments de
clous qui sont mal enfoncés
n’endommagent les yeux est un danger
Toujours assumer que l’outil contient
des clous.
en direction d’une personne, des
accidents sérieux peuvent se produire
40
Page 41

7. Vérifi er avant l’utilisation du levier de poussée.
S’assurer que le levier de poussée fonctionne
correctement. (Le levier de poussée est désigné par le
terme « Sécurité ».) Ne jamais utiliser la cloueuse si le
levier de poussée ne fonctionne pas correctement, sinon
la cloueuse pourrait faire sortir une attache de manière
inattendue. Ne modifi er ni ne retirer le levier de poussée,
sinon il devient inutilisable.
8. Le choix de la méthode de déclenchement est
important.
Veuillez lire et bien comprendre la section intitulée
« COMMENT UTILISER LA CLOUEUSE » à la page
50.
9. Avant d’utiliser ce produit, s’assurer qu’il fonctionne
correctement en conformité avec le contenu de la
section « Test de la cloueuse » à la page 48.
10. Utilisez seulement des clous spécifi és.
Utilisez exclusivement les produits de fi xation indiqués
dans le manuel de manutention.
11. Etre prudent en branchant la batterie.
Pour assurer qu’aucun clou n’est tiré lors du branchement
de la batterie et du chargement des clous, respecter les
instructions suivantes.
○ ne touchez pas la détente.
○ évitez de toucher l’orifi ce de décharge.
○ pointez l’orifi ce de décharge vers le bas.
Respectez rigoureusement les instructions ci-dessus
et ne placez jamais vos mains, jambes ou toute
partie de votre corps en face de l’orifi ce de décharge.
12. Ne touchez pas imprudemment la détente.
Ne posez pas votre doigt sur la détente si vous ne clouez
pas. Si vous portez l’appareil ou si vous le passez à une
autre personne tout en gardant le doigt sur la détente,
vous pouvez causer un accident.
13. Pressez l’orifi ce de décharge fortement contre le
matériel à fi xer.
En enfonçant des clous, pressez l’orifi ce de décharge
fortement contre le matériel à fi xer. Si l’orifi ce est mal-
posé, les clous peuvent rebondir.
14. Eloigner les mains et les pieds de la tête de clouage
pendant l’utilisation.
15. Evitez les contrecoups du cloueur.
Evitez d’approcher le haut du cloueur avec la tête
pendant que vous clouz. Ceci est dangereux puisque
l’appareil peut reculer violemment touchant un ancien
clou enfoncé ou un nœud dans le bois.
16. Faites attention au double déclenchement dû au
recul.
Si le levier de poussée est remis par inadvertance en
contact avec la pièce d’ouvrage suivant le recul, une
attache non-souhaitée risque d’être envoyée.
Afi n d’éviter ce double déclenchement non-souhaité,
○ Fonctionnement intermittent (déclenchement de la
gâchette)
1) Régler le dispositif de commutation sur MÉCANISME
D’ACTIVATION SÉQUENTIELLE COMPLÈTE.
2) Appuyer sur la gâchette rapidement et fermement.
○ Fonctionnement en continu (déclenchement du levier de
poussée)
1) Ne pas presser la cloueuse contre le bois avec une
force excessive.
2) Séparer la cloueuse du bois au moment du recul
après avoir posé une attache.
Il serait très dangereux qu’un clou
frappe les mains ou les pieds par erreur.
Français
17. Soyez prudents en clouant des planches minces ou
les bords du bois.
En clouant des planches minces ou les bords du bois,
les clous peuvent passer à travers ou être déviées. Dans
ces cas, assurez-vous qu’il n’y a personne derrière le
panneau ou proche du bois que vous êtes en train de
clouer.
18. Il est dangereux de clouer simultanément sur les
deux côtés d’un mur.
Il faut absolument éviter de clouer en même temps
sur les deux côtés d’un mur puisque les clous peuvent
passer à travers et causer ainsi de blessures.
19. Ne pas utiliser l’outil électrique sur des
échafaudages ou des échelles.
Ne pas utiliser l’outil pour des applications spécifi ques,
par exemple:
– lorsque le changement d’une position de clouage fait
intervenir l’utilisation d’échafaudages, d’escaliers,
d’échelles ou de toute autre construction de type
échelle, par ex. des lattes de pied,
– la fermeture de boîtes ou de caisses,
– la fi xation de systèmes de sécurité, par ex. sur des
véhicules ou des wagons
20. Retirer toutes les attaches restantes et la batterie
de la cloueuse dans les situations suivantes :
1) entretien et inspection ;
2) vérifi cation du bon fonctionnement du levier de
poussée et de la gâchette ;
3) suppression d’un bourrage ;
4) non utilisation ;
5) sortie de la zone de travail ;
6) transport vers un autre endroit ; et
7) transmission de l’outil à une autre personne.
Ne jamais tenter d’éliminer un bourrage ou de réparer la
cloueuse, à moins d’avoir enlevé la batterie et toutes les
attaches restantes de la cloueuse.
La cloueuse ne doit jamais être laissée sans surveillance,
dans la mesure où des personnes ne sachant pas utiliser
correctement la cloueuse peuvent la manipuler et risquer
de se blesser.
21. Retirer la batterie de la cloueuse dans les situations
suivantes :
1) chargement de clous ;
2) manipulation du dispositif de réglage.
22. L’environnement de fonctionnement de cet appareil
se situe entre 0°C et 40°C ; veiller à l’utiliser dans
cet intervalle de températures. L’appareil est
susceptible de mal fonctionner à une température
inférieure à 0°C ou supérieure à 40°C.
23. Chargez toujours la batterie à une température de
0–40°C.
Une température inférieure à 0°C entraînera une
surcharge dangereuse. La batterie ne peut pas être
chargée à une température supérieure à 40°C.
Le température la plus appropriée serait de 20–25°C.
24. N’utilisez pas le chargeur continuellement.
Quand une charge a été eff ectuée, laissez le chargeur au
repos pendant environ 15 minutes avant de commencer
la prochaine charge de batterie.
25. Ne laissez pas de corps étrangers pénétrer par le
trou de raccord de la batterie rechargeable.
26. Ne désassemblez jamais la batterie rechargeable et
le chargeur.
27. Ne court-circuitez jamais la batterie rechargeable.
Le fait de court-circuiter la batterie génèrera un courant
électrique élevé et une surchauff e, ce qui entraînera la
brûlure ou l’endommagement de la batterie.
28. Ne jetez pas la batterie au feu.
Elle pourrait exploser.
29. L’utilisation d’une batterie usagée endommagera le
chargeur.
41
Page 42

Français
30. Apportez la batterie au magasin où vous l’avez
achetée dès que la durée de vie de post-charge de
la batterie devient trop courte pour une utilisation
pratique.
Ne jetez pas de batterie usagée.
31. Ne pas introduire d’objets métalliques ou des
produits infl ammables dans les fentes d’aération
du chargeur.
Cela provoquera un choc électrique ou endommagera le
chargeur.
32. Ne JAMAIS laisser d’aimants (ou appareils
magnétiques similaires) à proximité de la
cloueuse, car cette dernière est dotée d’un capteur
magnétique à l’intérieur.
Cela risque de provoquer une panne ou un risque de
blessures par dysfonctionnement.
33. Repos de l’appareil après un travail continu.
34. L’outil électrique est équipé d’un circuit de
protection thermique pour protéger le moteur. Une
utilisation en continu risque de provoquer une
augmentation de la température de l’appareil et
d’activer le circuit de protection thermique, ainsi
que d’arrêter automatiquement le fonctionnement.
Dans ce cas, laissez l’appareil électrique refroidir
avant de reprendre l’utilisation.
35. Ce produit peut cesser de fonctionner lorsqu’une
anomalie est détectée. Dans ce cas, vérifi er
les éléments qui fi gurent dans la section
« RÉSOLUTION DES PROBLÈMES » à la page 53.
36. Ne pas faire subir de choc violent au panneau de
commande ni le casser. Cela risque d’entraîner un
dysfonctionnement.
PRÉCAUTIONS RELATIVES À LA
BATTERIE AU LITHIUM ION
Pour prolonger sa durée de vie, la batterie lithium-ion
est équipée d’une fonction de protection qui coupe
automatiquement l’alimentation.
Dans les cas 1 à 3 décrits ci-dessous, il est possible que
le moteur s’arrête lors de l’utilisation de ce produit, même
si le commutateur est actionné. Il ne s’agit pas d’un
dysfonctionnement, mais du fonctionnement normal de la
protection.
1. Lorsque la charge restante de la batterie diminue, le
moteur s’arrête.
Dans ce cas de fi gure, charger immédiatement la
batterie.
2. En cas de surcharge de l’outil, le moteur peut s’arrêter.
Dans ce cas, relâcher le commutateur de l’outil et
éliminer les causes de la surcharge. Vous pouvez ensuite
recommencer à utiliser l’outil.
3. En cas de surchauff e due à un travail trop intensif,
l’alimentation de la batterie peut se couper.
Dans ce cas, arrêter toute utilisation de la batterie et la
laisser refroidir. Vous pouvez ensuite recommencer à
utiliser l’outil.
En outre, respecter la précaution et l’avertissement suivants.
AVERTISSEMENT
Afi n d’éviter toute fuite de la batterie, génération de chaleur,
émission de fumée, explosion et infl ammation, respecter
scrupuleusement les précautions suivantes :
1. S’assurer que les copeaux et la poussière ne
s’accumulent pas sur la batterie.
○ Pendant la tâche, s’assurer que les copeaux et la
poussière ne tombent pas sur la batterie.
○ S’assurer que les copeaux et la poussière qui tombent
sur l’outil lors de la tâche ne s’accumulent pas sur la
batterie.
○ Ne pas conserver une batterie inutilisée dans un endroit
qui est exposé aux copeaux et à la poussière.
○ Avant de stocker une batterie, retirer tous les copeaux et
la poussière qui ont pu y adhérer et ne pas la ranger avec
des pièces métalliques (vis, clous, etc.).
2. Ne pas percer la batterie à l’aide d’un objet pointu tel
qu’un clou. Ne pas la frapper à l’aide d’un marteau. Ne
pas marcher dessus, ni la lancer ou la soumettre à un
choc physique important.
3. Ne pas utiliser une batterie dont l’extérieur est déformé
ou laisse penser qu’elle est défectueuse.
4. Ne pas insérer la batterie à l’envers (pôles inversés).
5. Ne pas raccorder directement la batterie à une prise
électrique ou à un allume-cigare.
6. Ne pas utiliser la batterie à d’autres fi ns que celle
spécifi ée.
7. En cas d’échec du chargement d’une batterie, même
après un certain délai, arrêter immédiatement le
rechargement.
8. Ne pas exposer la batterie à des températures ou une
pression élevées (four à micro-ondes, séchoir, conteneur
sous haute pression).
9. Maintenir la batterie à l’écart de toute fl amme en cas de
détection d’une fuite ou d’une mauvaise odeur.
10. Ne pas utiliser à proximité d’une source puissante
d’électricité statique.
11. En cas de fuite de la batterie, de mauvaise odeur, de
génération de chaleur, de décoloration, de déformation
ou d’anomalie en cours d’utilisation, de rechargement
ou d’entreposage, ôter immédiatement la batterie de
l’équipement ou du chargeur de batterie et cesser de
l’utiliser.
ATTENTION
1. En cas de projection dans les yeux de liquide ayant fui
de la batterie, ne pas se frotter les yeux, les rincer à l’eau
claire et contacter immédiatement un médecin.
En l’absence de traitement, le liquide peut provoquer des
lésions oculaires.
2. En cas de projection de liquide ayant fui de la batterie
sur la peau ou les vêtements, rincer immédiatement ces
derniers à l’eau claire (au robinet).
Le liquide peut provoquer une irritation de la peau.
3. En cas de détection de rouille, de mauvaise odeur, de
surchauff e, de décoloration, de déformation et/ou autres
anomalies lors de la première utilisation de la batterie, ne
pas utiliser cette dernière et la renvoyer au fournisseur
ou au fabricant.
AVERTISSEMENT
Si des corps étrangers conducteurs s’introduisent dans
la borne de la batterie lithium-ion, un court-circuit peut se
produire dans la batterie et provoquer un incendie. Lors
du stockage d’une batterie lithium-ion, veiller à suivre
scrupuleusement les instructions suivantes.
○ Ne pas placer de débris conducteurs, de clous ou de
morceaux de fi ls électriques en fer ou en cuivre dans le
boîtier de rangement.
○ Pour éviter tout court-circuit, charger la batterie dans
l’outil ou insérer le couvercle de la batterie à fond, de
manière à ne plus voir le ventilateur.
42
Page 43

Français
À PROPOS DU TRANSPORT DE LA
BATTERIE LITHIUM-ION
Lors du transport d’une batterie lithium-ion, veuillez observer
les précautions suivantes.
AVERTISSEMENT
Informer la société de transport qu’un paquet contient une
batterie lithium-ion, informez la société de sa puissance de
sortie et suivez les instructions de la société de transport lors
de l’organisation du transport.
○ Les batteries lithium-ion qui dépassent une puissance
de sortie de 100 Wh font partie de la classifi cation
de transport des produits dangereux et nécessitent
l’application de procédures spéciales.
○ Pour un transport vers l’étranger, vous devez vous
conformer aux lois internationales et aux normes et
réglementations en vigueur dans le pays de destination.
Puissance de sortie
Nombre de 2 à 3 chiff res
Wh
NOMS DES PIÈCES (Fig. 1 – Fig. 23)
Couvercle supérieur
1
Gâchette
2
Tête de déclenchement (sortie)
3
Levier de poussée
4
Margeur à clou (B)
5
Bouton du margeur
6
Magasin
7
Crochet
8
Batterie
9
Levier de verrouillage
0
Poignée
!
Commutateur d’indicateur de batterie
@
Indicateur de batterie
#
Commutateur de fonctionnement de clouage
$
Voyant d’alimentation
%
Contacteur d’alimentation
^
Indicateur de fonctionnement de clouage
&
Clous
*
Dispositif de réglage
(
Plaque de crochet
)
SYMBOLES
AVERTISSEMENT
Les symboles suivants sont utilisés pour l’outil.
Bien se familiariser avec leur signifi cation avant
d’utiliser l’outil.
NR1890DBCL: Cloueuse à bande sans fi l
NR1890DBRL: Cloueuse à bande sans fi l
Pour réduire les risques de blessures,
l’utilisateur doit lire le manuel d’utilisation.
Pour les pays européens uniquement
Ne pas jeter les appareils électriques dans les
ordures ménagères !
Conformément à la directive européenne
2002/96/CE relative aux déchets d’équipements
électriques ou électroniques (DEEE), et à sa
transposition dans la législation nationale, les
appareils électriques doivent être collectés à
part et être soumis à un recyclage respectueux
de l’environnement.
Courant direct
Poids
kg
(Selon la procédure EPTA 01/2003)
Mise en marche
Ϩ
Mise hors tension
Débrancher la batterie
Contacteur d’alimentation
Commutateur d’alimentation ARRÊT
Contacteur d’alimentation MARCHE
Voyant d’alimentation : S’allume en vert
Commutateur de fonctionnement de clouage
MÉCANISME D’ACTIVATION SÉQUENTIELLE
COMPLET
Mode de MÉCANISME D’ACTIVATION
SÉQUENTIELLE COMPLET
Indicateur de fonctionnement de clouage :
S’allume en bleu
MÉCANISME D’ACTIVATION PAR CONTACT
Mode de MÉCANISME D’ACTIVATION PAR
CONTACT
Indicateur de fonctionnement de clouage :
Clignote en bleu
Gâchette verrouillée
43
Page 44
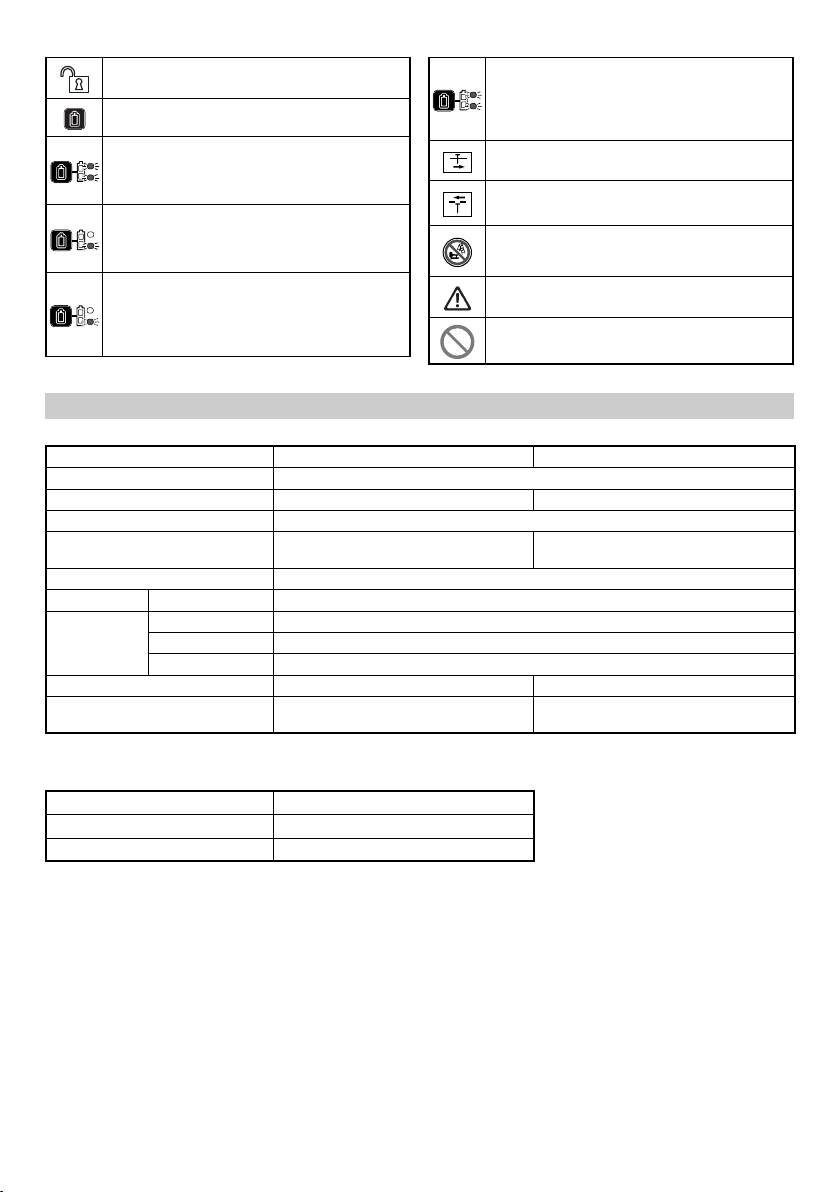
Français
Gâchette déverrouillée
Commutateur d’indicateur de batterie
La puissance résiduelle de la batterie est
suffi sante
Indicateur de batterie : 2 LED (rouges)
s’allument
La puissance résiduelle de la batterie est
d’environ la moitié.
Indicateur de batterie : 1 DEL (rouge)
s’allume
La puissance résiduelle de la batterie est
presque nulle.
Recharger la batterie le plus vite possible.
Indicateur de batterie : 1 DEL (rouge)
clignote
Contacter HiKOKI pour une inspection.
Indicateur de batterie : 2 DEL clignotent
en orange, au bout de 10 secondes,
le commutateur d’alimentation s’éteint
automatiquement.
Côté peu profond
Côté profond
Ne pas utiliser sur des échafaudages, échelles.
Avertissement
Action interdite
SPÉCIFICATIONS
1. Cloueuse à bande sans fi l
Modèle NR1890DBCL NR1890DBRL
Moteur CC sans balai
Clou applicable ø2,9 – 3,3 mm Voir Fig. ø2,9 – 3,3 mm Voir Fig.
Longueur de clou applicable 50 mm à 90 mm
Capacité de chargement de clou
[clous]
Mode de déclenchement Séquentiel complet/contact (Sélectionnable)
Taux de cycle [clous/seconde] 1,5 – 2 (intermittent)
Batterie Modèle BSL1850
Type Batterie Li-ion
Tension 18 V CC
Poids* 4,8 kg 4,9 kg
Dimension
Hauteur × Longueur × Largeur
* Poids : Selon la procédure EPTA 01/2003
2. Chargeur de batterie
Modèle UC18YFSL
Tension de charge 14,4 – 18 V CC
Poids 0,5 kg
342 mm × 309 mm × 127 mm 342 mm × 342 mm × 137 mm
47 37
REMARQUE
Par suite du programme permanent de recherche et de développement HiKOKI, ces spécifi cations peuvent faire l’objet
de modifi cations sans avis préalable.
44
Page 45
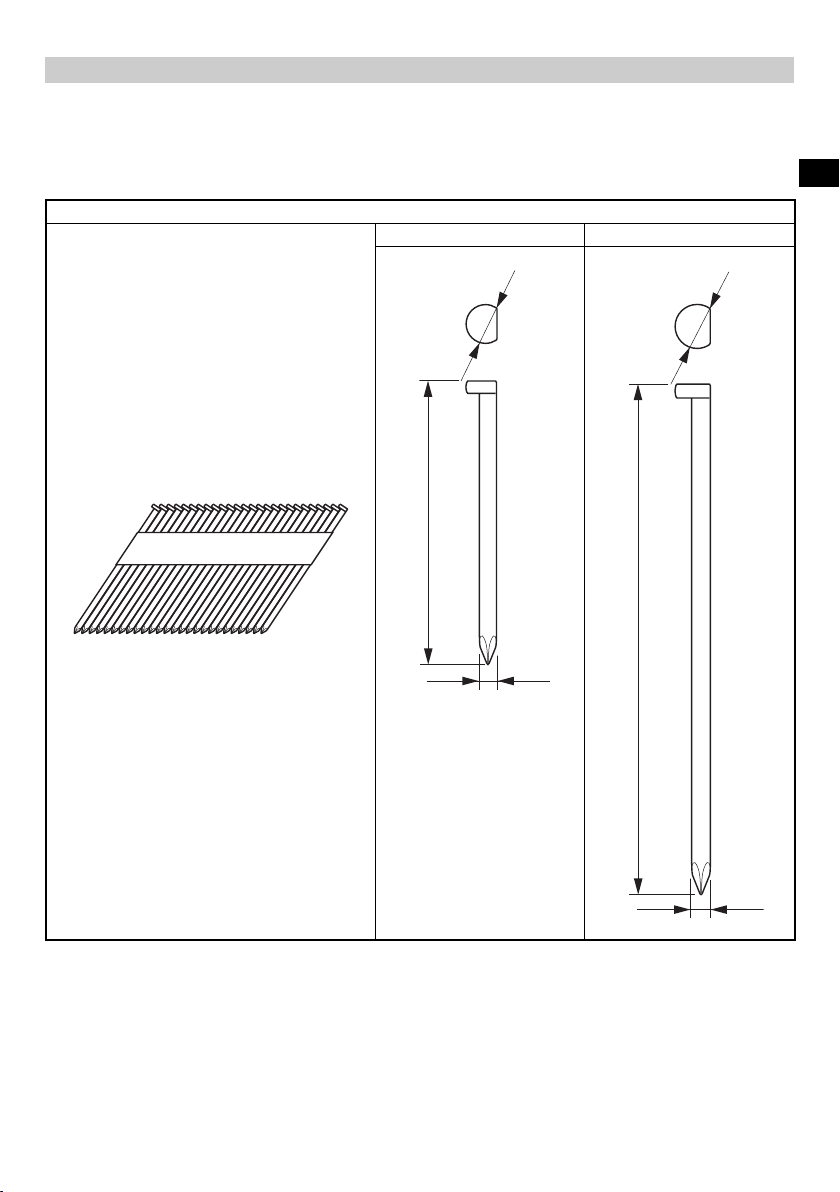
Français
SÉLECTION DE CLOU
Choisissez un clou parmi ceux de la fi g. Des clous qui n’apparaissent pas sur cette fi gure ne peuvent être utilisés dans cet
appareil.
L’utilisation d’autres clous risque de provoquer un mauvais fonctionnement de l’outil et/ou une rupture des clous, et
d’entraîner des blessures.
[NR1890DBCL]
Seuls les clous lisses, les clous à tige indentée et les clous à anneaux peuvent être utilisés. Ne pas utiliser de clous fi letés.
Les clous sont vendus en bandes de 25-37 clous.
NR1890DBCL
Recharge de clous à assemblage sur paier
Clous sans tête
Min. Max.
6,8 mm
50 mm
7,7 mm
90 mm
2,9 mm
3,3 mm
45
Page 46

Français
Recharge de clous à assemblage plastique
Clous à tête
NR1890DBRL
50 mm
Min. Max.
7 mm
2,9 mm
7,6 mm
90 mm
3,3 mm
* Il n’est pas recommandé d’utiliser ce cloueur avec des clous à tige annelée de 75 mm à 90 mm sur du bois d’œuvre traité
sous pression.
ACCESSOIRES STANDARD
Outre l’unité principale (1 unité), l’emballage contient les
accessoires répertoriés à la page 2.
Les accessoires standard sont sujets à changement sans
préavis.
APPLICATIONS
○ Ossature de plancher et mur.
○ Construction de ferme, construction de fenêtre.
○ Platelage de sous-plancher et de sous-toiture.
○ Coff rage de mur.
○ Construction de grandes caravanes et de logements
modulaires.
CHARGE
Avant d’utiliser l’outil électrique, charger la batterie comme
suit.
1. Branchez le cordon d’alimentation du chargeur’à
une prise secteur.
Quand on raccorde la fi che du chargeur à une prise
murale, la lampe témoin clignote en rouge (à intervalles
d’une seconde).
2. Insérer la batterie dans le chargeur.
Insérez fermement la batterie dans le chargeur comme
illustré sur Fig. 3.
3. Charge
Quand une batterie est insérée dans le chargeur, la
charge commence et la lampe témoin s’allume en rouge.
Quand la batterie est complètement chargée, la lampe
témoin clignote en rouge. (À intervalles d’une seconde)
(Voir Tableau 1)
● Pilot indication de lampe
Les indications de la lampe témoin sont indiquées dans
le Tableau 1, selon l’état du chargeur ou de la batterie
rechargeable.
46
Page 47
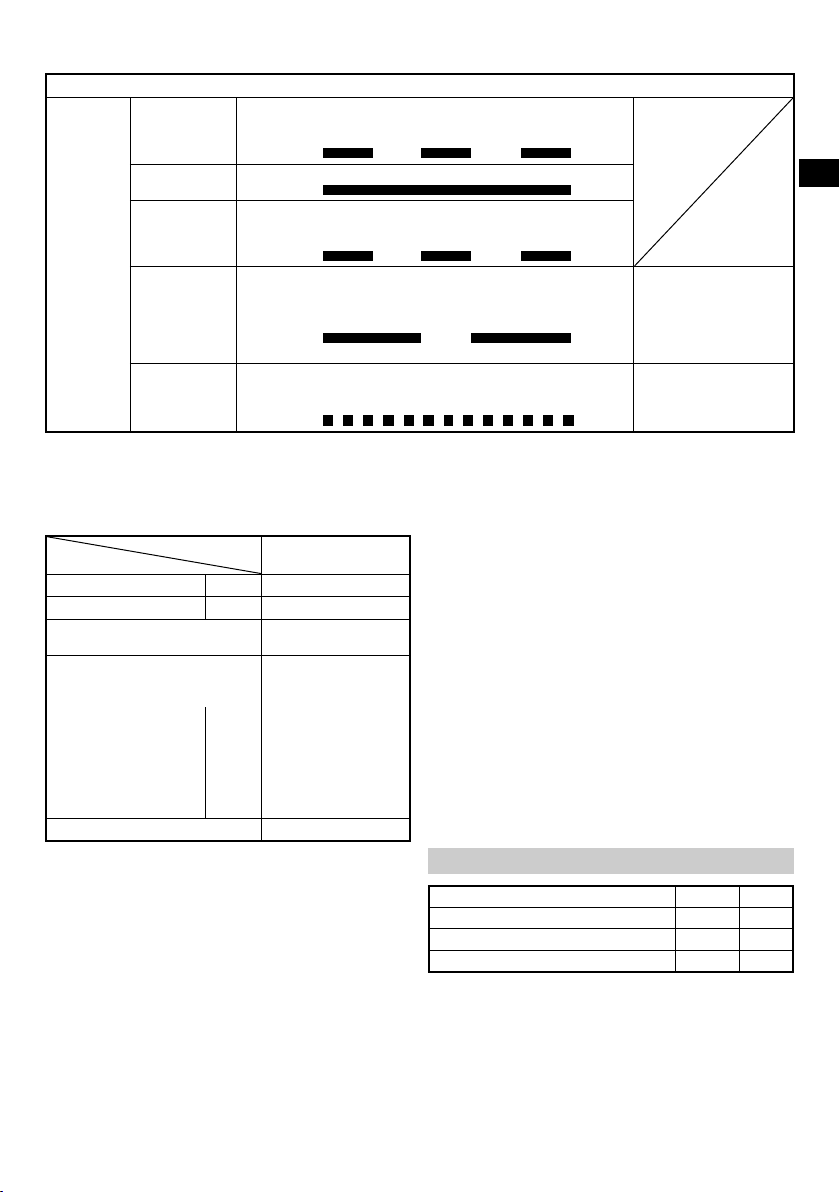
Avant la charge Clignote
Tableau 1
Indications de la lampe témoin
S’allume pendant 0,5 seconde. Ne s’allume
pas pendant 0,5 seconde. (Éteint pendant 0,5
seconde)
Français
Pendant la
charge
Charge
1,3 Ah
1,5 Ah
2,0 Ah
2,5 Ah
3,0 Ah
4,0 Ah
5,0 Ah
terminée
Veille en
surchauff e
Charge
impossible
Lampe
témoin
(rouge)
● Au sujet des températures et de la durée de charge de la
batterie.
Les températures et la durée de charge sont indiquées
dans le Tableau 2
Batterie
Tension de charge V 14,4 À 18
Poids kg 0,5
Températures de recharge de la
batterie
Durée de charge selon la
capacité de la batterie, approx.
(à 20oC)
Nombre de piles 4 À 10
REMARQUE
Le temps de recharge peut varier selon la température et
la tension de la source d’alimentation.
ATTENTION
Si le chargeur de batterie a été utilisé en continu, une
surchauff e risque de se produire, ce qui peut provoquer
des dysfonctionnements. Une fois la charge terminée,
attendez 15 minutes avant la prochaine charge.
4. Débrancher le cordon d’alimentation du chargeur
de la prise secteur.
5. Tenir fermement le chargeur et dégager la batterie.
REMARQUE
Bien sortir la batterie du chargeur après usage, et la
conserver.
ATTENTION
○ Si la batterie est chargée alors qu’elle est encore chaude
parce qu’elle a été laissée longtemps dans un endroit
exposé à la lumière directe du soleil ou qu’elle vient
S’allume
Clignote
Clignote
Scintille
Tableau 2
Chargeur
min.
min.
min.
min.
min.
min.
min.
S’allume sans interruption
S’allume pendant 0,5 seconde. Ne s’allume
pas pendant 0,5 seconde. (Éteint pendant 0,5
seconde)
S’allume pendant 1 seconde. Ne s’allume
pas pendant 0,5 seconde. (Éteint pendant 0,5
seconde)
S’allume pendant 0,1 seconde. Ne s’allume
pas pendant 0,1 seconde. (Éteint pendant 0,1
seconde)
UC18YFSL
0oC À 50oC
20
22
30
35
45
60
75
Batterie en surchauff e.
Impossible de
charger. (La charge
commencera une fois
que la batterie sera
froide).
Anomalie de la batterie
ou du chargeur
d’être utilisée, la lampe témoin du chargeur s’allume
pendant 1 seconde, ne s’allume pas pendant 0,5
secondes (arrêt pendant 0,5 secondes). Dans ce cas,
commencez par laisser la batterie refroidir avant de
démarrer le chargement.
○ Lorsque la lampe témoin scintille (à intervalles de 0,2
seconde), vérifi ez la présence de corps étrangers dans
le connecteur de batterie du chargeur. En l’absence
de corps étrangers, il s’agit probablement d’un
dysfonctionnement de la batterie ou du chargeur. Les
confi er à un service d’entretien autorisé.
○ Comme le micro-ordinateur intégré nécessite environ 3
secondes pour confi rmer le chargement de la batterie
lorsque le chargeur est retiré, attendez au moins 3
secondes avant de le réinsérer pour poursuivre le
chargement. Si la batterie est réinsérée dans un délai de 3
secondes, elle n’est peut-être pas correctement chargée.
○ Si la lampe témoin ne clignote pas en rouge (toutes les
secondes), même avec le cordon du chargeur branché
sur l’alimentation, cela indique que le circuit de protection
du chargeur est peut-être activé.
Débrancher le cordon ou la fi che de l’alimentation, puis
rétablir la connexion au bout d’une trentaine de secondes.
Si cela ne provoque toujours pas le clignotement en
rouge (toutes les secondes) de la lampe témoin, apporter
le chargeur dans un service après-vente HiKOKI agréé.
AVANT USAGE
Action Figure Page
Retrait et insertion de la batterie 2
Charge 3
Sélection des accessoires ―
1. Utilisation du panneau de commande
(1) Interrupteur d’alimentation (Voir Fig. 4)
Sous l’état de « Contacteur d’alimentation Arrêt »,
appuyer et maintenir enfoncé le contacteur
d’alimentation pendant plus d’une seconde, puis
l’indicateur d’alimentation s’allume en vert.
REMARQUE
Ne pas appuyer sur le levier de poussée et/ou sur la
gâchette lors du processus de mise en marche de
l’appareil.
47
3
4
8
Page 48

Français
Cela empêche le contacteur de mettre en marche
l’appareil.
[Mise hors tension automatique]
Lorsque l’appareil est sous tension mais la cloueuse
n’est pas utilisée pendant 30 minutes, elle se met
automatiquement hors tension. Pour la rallumer, appuyer
sur le contacteur d’alimentation.
AVERTISSEMENT
Ne jamais laisser la cloueuse sans l’avoir éteinte. Cela
pourrait provoquer un accident.
(2) Interrupteur d’alimentation Arrêt (Voir Fig. 4)
Sous l’état de « Contacteur d’alimentation Arrêt »,
appuyer et maintenir enfoncé le contacteur
d’alimentation pendant plus d’une seconde, puis
l’indicateur d’alimentation s’éteint.
Sous l’état de « Contacteur d’alimentation Marche », les
fonctions ci-dessous sont actives.
(3) Sélectionner le mode de fonctionnement (de clouage)
(Activation séquentielle complète/activation par contact)
Après la mise sous tension de l’alimentation, régler
toujours le mode d’activation séquentielle complet
comme mode initial. (L’indicateur de fonctionnement
s’allume en bleu.) (Voir la Fig. 5)
Pour changer de mode de fonctionnement de clouage,
appuyer une fois sur le contacteur de fonctionnement de
clouage. Le mode passe de « Séquentiel complet » à
« Par contact » à chaque pression. (Voir la Fig. 6)
Allumé (bleu) :
MÉCANISME D’ACTIVATION SÉQUENTIELLE
COMPLET,
Clignotant (bleu) :
MÉCANISME D’ACTIVATION PAR CONTACT
(4) Vérifi er le niveau de charge restante de la batterie
Lorsque vous appuyez sur le contacteur d’indication
de batterie, l’indicateur de batterie indique le niveau de
charge restant de la batterie par l’état de la lampe DEL
comme indiqué ci-dessous.
Indicateur d’état
La puissance résiduelle de
la batterie est suffi sante.
2 LED (rouges) s’allument
La puissance résiduelle de
la batterie est d’environ la
moitié.
1 LED (rouge) s’allume
La puissance résiduelle
de la batterie est presque
nulle.
1 LED (rouge) clignote
Recharger la batterie le
plus vite possible.
(5) Autres fonctions
En cas d’erreur de fonctionnement, les lampes DEL
s’affi chent comme ci-dessous.
Indicateur d’état
La machine est dans un
état trop froid (en-dessous
de -5 °C) ou trop chaud.
2 LED (rouges) clignotent
2 témoins LED clignotent
par intervalles
• En cas de conditions de
températures trop hautes,
clignotement à intervalles
de 0,5 seconde.
• En cas de conditions de
températures trop basses,
clignotement à intervalles
de 0,25 secondes.
Après 10 secondes,
les témoins LED
et le commutateur
d'alimentation s'éteignent
automatiquement.
2 LED clignotent
en orange, après
environ 10 secondes,
le commutateur
d'alimentation s'éteint
automatiquement.
2. Mécanisme de verrouillage de gâchette (voir Fig. 7)
AVERTISSEMENT
Assurez-vous que la gâchette est verrouillée lorsque
vous ne plantez pas de clous.
Cette cloueuse est dotée d’un mécanisme de
verrouillage pour éviter que les clous ne soient plantés
par accident.
Régler le levier de verrouillage du contacteur sur la
position
Faites glisser le levier de verrouillage du contacteur à la
position
position
3. Test de la cloueuse
AVERTISSEMENT
○ Assurez-vous que la gâchette est verrouillée lorsque
vous ne plantez pas de clous. (Voir la Fig. 7)
○ Ne jamais utiliser la cloueuse si le levier de poussée ne
fonctionne pas correctement.
La machine emploie un mécanisme préventif pour le
fonctionnement à vide.
La machine entre dans un état où le levier de poussée
ne peut pas être poussé vers le haut. Cela se produit
lorsque le magasin n’est pas chargé avec des clous ou
lorsque le nombre de clous restants devient inférieur à 7
ou 9.
ATTENTION
Faire attention à ne pas jeter la pointe du levier de
poussée sur le bois.
Avant de commencer le travail de clouage, tester la cloueuse
en utilisant la liste de contrôle ci-dessous. Eff ectuer les tests
dans l’ordre suivant.
Si un fonctionnement anormal se produit, cesser d’utiliser la
cloueuse et contacter immédiatement un centre de service
après-vente HiKOKI agréé.
pour verrouiller la gâchette.
lorsque la cloueuse doit être utilisée, et à la
lorsqu’elle n’est pas utilisée.
Laisser la cloueuse
refroidir ou se réchauff er
complètement dans des
conditions adéquates.
Contacter HiKOKI pour une
inspection.
48
Page 49

(1) RETIRER TOUS LES CLOUS ET LA BATTERIE DE LA
CLOUEUSE.
□ TOUTES LES VIS DOIVENT ÊTRE SERRÉES.
□ LE LEVIER DE POUSSÉE ET LA GÂCHETTE
DOIVENT BOUGER EN DOUCEUR en tirant le
bouton du margeur vers l'arrière.
(2) Installation de la batterie.
Ne faites pas fonctionner le levier de poussée ou la
gâchette lors de l’installation de la batterie. (Voir la Fig.
2)
(3) Mettre le contacteur d’alimentation sous tension. (Voir la
Fig. 1)
Mettre le contacteur d’alimentation sous tension
en appuyant et maintenant enfoncé le contacteur
d’alimentation pendant plus d’une seconde.
S’assurer que le voyant d’alimentation s’allume en vert, et
que l’indicateur de fonctionnement de clouage s’allume
en bleu. (MÉCANISME D’ACTIVATION SÉQUENTIELLE
COMPLET)
REMARQUE
Ne pas appuyer sur le levier de poussée et/ou sur la
gâchette lors du processus de mise en marche de
l’appareil.
Cela empêche le contacteur de mettre en marche
l’appareil.
[Mise hors tension automatique]
Lorsque l’appareil est sous tension mais la cloueuse
n’est pas utilisée pendant 30 minutes, elle se met
automatiquement hors tension. Pour la rallumer, appuyer
sur le contacteur d’alimentation.
AVERTISSEMENT
Ne jamais laisser la cloueuse sans l’avoir éteinte. Cela
pourrait provoquer un accident.
Indicateur de fonctionnement de clouage
Allumé (bleu) :
MÉCANISME D’ACTIVATION SÉQUENTIELLE
COMPLET,
Clignotant (bleu) :
MÉCANISME D’ACTIVATION PAR CONTACT
S’assurer que l’indicateur de batterie ne clignote pas.
Si l’indicateur de batterie clignote en rouge, la batterie
ne dispose pas d’assez de puissance et a besoin d’être
rechargée.
(4) Retirer le doigt de la gâchette et appuyer sur le levier de
poussée contre la pièce d'ouvrage en tirant le bouton du
margeur vers l’arrière.
□ LA CLOUEUSE NE DOIT PAS FONCTIONNER.
(5) Séparer le levier de poussée de la pièce d’ouvrage.
Ensuite, pointer la cloueuse vers le bas, en tirant
le bouton du margeur vers l’arrière, appuyer sur la
gâchette, puis attendre dans cette position pendant au
moins 5 secondes.
□ LA CLOUEUSE NE DOIT PAS FONCTIONNER.
(6) 1 Sans toucher la gâchette, appuyer sur le levier de
poussée contre la pièce d'ouvrage en tirant le bouton
du margeur vers l’arrière.
Ensuite, appuyer sur la gâchette.
□ LA CLOUEUSE DOIT FONCTIONNER.
2 Maintenir la gâchette et appuyer de nouveau sur le
levier de poussée contre la pièce d’ouvrage.
□ LA CLOUEUSE NE DOIT PAS FONCTIONNER.
Français
3 Sortez votre doigt de la gâchette.
Ensuite, 1 est utilisé à nouveau.
□ LA CLOUEUSE DOIT FONCTIONNER.
(7) Séparer le levier de poussée et la pièce d’ouvrage,
appuyer sur la gâchette.
Appuyer sur le levier de poussée contre la pièce
d’ouvrage dans un délai de 2 secondes.
□ LA CLOUEUSE NE DOIT PAS FONCTIONNER.
(8) Réglage de l’indicateur de fonctionnement sur le mode
de clignotement. (MÉCANISME D’ACTIVATION PAR
CONTACT)
Appuyer sur le bouton de fonctionnement de clouage
une fois, veiller à ce que l’indicateur clignote en bleu.
Séparer le levier de poussée et la pièce d’ouvrage,
appuyer sur la gâchette.
Appuyer sur le levier de poussée contre la pièce
d’ouvrage dans un délai de 2 secondes.
□ LA CLOUEUSE DOIT FONCTIONNER.
(9) En l’absence de fonctionnement anormal, vous pouvez
charger des clous dans la cloueuse.
Les clous que vous plantez dans la pièce d’ouvrage
doivent être du même type, utilisé dans le fonctionnement
actuel.
□ LA CLOUEUSE DOIT FONCTIONNER
CORRECTEMENT.
4. Contrôle du fonctionnement du levier-poussoir
AVERTISSEMENT
Assurez-vous que la gâchette est verrouillée lorsque
vous ne plantez pas de clous.
Vérifi ez toujours que la détente est verrouillée et la
batterie retirée de l’outil électrique avant de vérifi er le
fonctionnement du levier-poussoir.
Vérifi ez que le levier-poussoir glisse sans heurt.
Nettoyez la zone entourant le levier si celui-ci ne glisse pas
correctement.
5. Charger des clous
AVERTISSEMENT
Lors du chargement des clous dans la cloueuse,
1) retirer la batterie de la cloueuse ;
2) ne pas appuyer sur la gâchette ;
3) ne pas appuyer sur le levier de poussée ; et
4) garder la cloueuse dirigée vers le bas.
2-Margeur de clou en action !
(1) Insérer une bande de clou à l’arrière du magasin. (Voir la
Fig. 8)
(2) Faire glisser la bande de clous vers l’avant du magasin.
(Voir la Fig. 9)
(3) Tirer le margeur à clou (B) vers l'arrière pour engager
le bouton du margeur dans la bande de clou. (Voir la
Fig. 10)
REMARQUE
○ Pousser tranquillement le margeur à clou (B) et le bouton
du margeur contre le clou.
Si le margeur à clou (B) et le bouton du margeur sont
relâchés depuis l’arrière du magasin et cognés contre le
mur, le papier ou le plastique de connexion du clou peut
être endommagé.
○ Utiliser des bandes de clous de plus de 10 clous.
○ Utiliser une bande de clous ininterrompue avec des
clous de même longueur.
La cloueuse est maintenant prête à fonctionner.
49
Page 50

Français
Retrait des clous :
1 Tirer le bouton du margeur vers l’arrière. (Voir Fig. 11)
2 Remettre le bouton du margeur vers l’avant tout en
poussant doucement le margeur à clou (B).
3 Retirer les clous de l’arrière du magasin. (Voir Fig. 12)
COMMENT UTILISER LA CLOUEUSE
AVERTISSEMENT
○ Ne JAMAIS pointer l’outil vers soi ou vers d’autres
personnes dans la zone de travail.
○ Ne gardez PAS les doigts sur la gâchette lorsque vous
ne clouez pas, de manière à éviter un déclenchement
accidentel.
○ Ne pas utiliser le cordon électrique s’il est endommagé.
Le faire réparer immédiatement.
○ Le choix de la méthode de déclenchement est important.
Veuillez lire et comprendre la section « 1. Procédures de
clouage » qui se trouve ci-dessous.
○ Avant de commencer le travail, vérifi er le dispositif de
commutation d’opération de clouage.
Cette cloueuse HiKOKI comprend un dispositif de
commutation d’opération de clouage.
Avant de commencer le travail, s’assurer que le dispositif
de commutation est correctement réglé.
Si le dispositif de commutation n’est pas réglé
correctement, la cloueuse ne fonctionnera pas
correctement.
○ Ne jamais approcher le visage, les mains ou les pieds de
la tête de déclenchement lors de l’utilisation.
○ Ne pas enfoncer des clous au-dessus d’autres clous ou
en inclinant la cloueuse avec un angle trop fort ; les clous
peuvent ricocher et blesser quelqu’un.
○ Ne pas enfoncer des clous dans des planches fi nes
ou près de coins et d’angles de la pièce d’ouvrage.
Les clous peuvent traverser ou rebondir sur la pièce
d’ouvrage et blesser quelqu’un.
○ Ne jamais enfoncer des clous des deux côtés d’un mur
en même temps. Les clous peuvent traverser le mur et
blesser quelqu’un de l’autre côté.
○ Ne jamais utiliser une cloueuse défectueuse ou au
fonctionnement anormal.
○ Ne pas utiliser la cloueuse comme un marteau.
○ Retirer toutes les attaches restantes et la batterie de la
cloueuse dans les situations suivantes :
1) entretien et inspection ;
2) vérifi cation du bon fonctionnement du levier de
poussée et de la gâchette ;
3) nettoyage d’un bourrage ;
4) non utilisation ;
5) sortie de la zone de travail ;
6) transport vers un autre endroit ; et
7) transmission de l’outil à une autre personne.
○ Retirer la batterie de la cloueuse dans les situations
suivantes :
1) chargement de clous ;
2) manipulation du dispositif de réglage.
Cette cloueuse HiKOKI est équipée d’un dispositif de
commutation d’opération de clouage.
Utiliser le MÉCANISME À ACTIVATION SÉQUENTIELLE
COMPLÈTE ou le MÉCANISME À ACTIVATION PAR
CONTACT en fonction de la tâche à eff ectuer.
Explication des diff érentes opérations de clouage
○ MÉCANISME À ACTIVATION SÉQUENTIELLE
COMPLÈTE :
D'abord, presser le levier de poussée contre le bois ;
ensuite, appuyer sur la gâchette pour enfoncer le clou.
Suivre le même processus pour continuer à planter des
clous.
Après avoir enfoncé le premier clou, le clouage ne sera
à nouveau possible qu'après que la gâchette a été
relâchée et pressée une nouvelle fois.
50
○ MÉCANISME À ACTIVATION PAR CONTACT :
ACTIVATION PAR CONTACT peut suivre deux
séquences diff érentes, en fonction de votre utilisation.
Pour planter plusieurs clous :
1. Appuyer sur la gâchette.
2. Enfoncer le levier de poussée contre le bois pour
enfoncer le clou.
3. Si la gâchette est maintenue appuyée, un clou sera
enfoncé à chaque fois que le levier de poussée est
pressé contre le bois.
Pour planter un seul clou :
1. Appuyer le levier de poussée contre le bois.
2. Appuyer sur la gâchette pour enfoncer le clou.
3. Retirer le doigt de la gâchette, et retirer la cloueuse
du bois.
[Mécanisme de verrouillage à déclenchement sec]
La machine emploie un mécanisme préventif pour le
fonctionnement à vide.
La machine entre dans un état où le levier de poussée
ne peut pas être poussé vers le haut. Cela se produit
lorsque le magasin n’est pas chargé avec des clous ou
lorsque le nombre de clous restants devient inférieur à 7
ou 9.
ATTENTION
Faire attention à ne pas jeter la pointe du levier de
poussée sur le bois lorsque le levier de poussée ne peut
pas être poussé vers le haut.
1. Procédures de clouage
Cette cloueuse est équipée d’un levier de poussée et
ne fonctionne pas à moins que le levier de poussée soit
enfoncé.
Il existe deux modes de fonctionnement pour enfoncer
des clous avec cette cloueuse.
Ils sont :
1. Fonctionnement intermittent (déclenchement de
la gâchette) :
2. Fonctionnement en continu (déclenchement du
(1) Fonctionnement intermittent (déclenchement de la
Utiliser le réglage de MÉCANISME À ACTIVATION
AVERTISSEMENT
○ Pour un fonctionnement intermittent, régler le
○ Pour éviter un déclenchement double ou un
1 Régler le commutateur d’opération de clouage sur
(pour régler sur MÉCANISME À ACTIVATION
(Basculer complètement le dispositif de commutation
2 Positionner la tête de sortie de clous sur la pièce
3 Appuyer fermement sur le levier de poussée jusqu’à ce
4 Appuyer sur la gâchette pour enfoncer un clou.
5 Retirer le doigt de la gâchette et soulever l’outil de
levier de poussée) :
gâchette)
SÉQUENTIELLE COMPLÈTE. (Voir Fig. 13
commutateur d’opération de clouage sur MÉCANISME
À ACTIVATION SÉQUENTIELLE COMPLÈTE
(L’indicateur d’opération de clouage s’allume en
bleu.) (En d’autres termes, régler sur MÉCANISME À
ACTIVATION SIMPLE.)
déclenchement accidentel dû au recul.
1) Régler sur MÉCANISME À ACTIVATION
SÉQUENTIELLE COMPLÈTE.
2) Appuyer sur la gâchette rapidement et fermement.
MÉCANISME À ACTIVATION SÉQUENTIELLE
COMPLÈTE (L’indicateur d’opération de clouage
s’allume en bleu.)
SÉQUENTIELLE COMPLÈTE).
vers le témoin lumineux d’opération de clouage de
couleur bleue comme indiqué dans la Fig. 13. Sinon,
il sera réglé sur MÉCANISME À ACTIVATION PAR
CONTACT.)
d’ouvrage en gardant le doigt loin de la gâchette.
qu’il soit enfoncé complètement.
manière à ce qu’il ne soit plus du tout en contact avec la
surface en bois.
)
Page 51

Pour continuer à clouer dans un autre endroit, déplacer
la cloueuse le long du bois, en répétant les étapes2 - 5
comme requis.
REMARQUE
Les opérations 3 et 4 doivent être réalisées dans un
intervalle de temps de 2 secondes. Si plus de 2 secondes
s’écoulent après 3, la cloueuse ne fonctionnera pas
correctement. Si cela se produit, réessayer à partir de 3.
(2) Fonctionnement en continu (Tir par levier de poussée)
Utilisation du MÉCANISME À ACTIVATION PAR
CONTACT (Voir la Fig. 14)
AVERTISSEMENT
Pour éviter un déclenchement double ou un
déclenchement accidentel dû au recul.
1) Ne pas presser la cloueuse contre le bois avec une
force excessive.
2) Éloigner la cloueuse du bois car elle recule après le
clouage.
1 Régler le commutateur d’opération de clouage
sur MÉCANISME À ACTIVATION PAR CONTACT
(L’indicateur d’opération de clouage clignote en bleu.)
(pour régler sur MÉCANISME À ACTIVATION PAR
CONTACT).
(Basculer complètement le dispositif de commutation
de sorte que le témoin lumineux d’opération de clouage
clignote en bleu comme indiqué dans la Fig. 14. Sinon, il
ne fonctionnera pas correctement.)
2 Appuyer sur la gâchette en maintenant la cloueuse
éloignée de la pièce d’ouvrage.
3 Enfoncer le levier de poussée contre la pièce d’ouvrage
pour enfoncer un clou.
4 Déplacer la cloueuse le long de la pièce d’ouvrage avec
un mouvement de rebond.
Chaque enfoncement du levier de poussée enfoncera un
clou.
Dès que le nombre souhaité de clous a été enfoncé, retirer
le doigt de la gâchette.
REMARQUE
Les opérations 2 et 3 doivent être réalisées dans un
intervalle de temps de 2 secondes. Si plus de 2 secondes
s’écoulent après 2, la cloueuse ne fonctionnera pas
correctement. Si cela se produit, réessayer à partir de 2.
AVERTISSEMENT
○ Garder le doigt loin de la gâchette sauf pendant
l’opération de clouage, car des blessures graves
pourraient se produire si le levier de poussée entre
accidentellement en contact avec vous ou d’autres
personnes dans la zone de travail.
○ Garder les mains et le corps loin de la zone de
déchargement. Cette cloueuse HiKOKI peut rebondir
à cause du recul suite à l’enfoncement d’un clou et un
autre clou peut être enfoncé de manière inopinée, ce qui
peut engendrer des blessures.
REMARQUE
○ Si tous les avertissements et instructions sont pris en
compte, une utilisation en toute sécurité est possible
avec les deux systèmes : MÉCANISME À ACTIVATION
SÉQUENTIELLE COMPLÈTE, MÉCANISME À
ACTIVATION PAR CONTACT.
○ Toujours manipuler les clous et l’emballage avec
précaution. Si des clous tombent, le lien d’assemblage
peut être rompu, ce qui causera des problèmes
d’alimentation et de bourrage.
○ Après le clouage :
1) retirer la batterie de la cloueuse ;
2) retirer tous les clous de la cloueuse ;
2. Réglage de la profondeur de clouage
Pour s’assurer que chaque clou pénètre jusqu’à la même
profondeur, faire en sorte que la cloueuse soit toujours
maintenue fermement contre la pièce d’ouvrage.
Si les clous sont enfoncés trop profondément ou pas
assez dans la pièce d’ouvrage, régler le clouage en
suivant l’ordre suivant.
Français
1 Retirer la batterie de la cloueuse. (Voir Fig. 15)
2 Si les clous sont enfoncés trop profondément, tourner
le dispositif de réglage vers le côté peu profond. (Voir
Fig. 16)
Les réglages se font par incréments d’un demi-tour.
Si les clous ne sont pas enfoncés assez profondément,
tourner le dispositif de réglage vers le côté profond. (Voir
Fig. 17)
3 Arrêter de tourner le dispositif de réglage lorsqu’une
position convenable est atteinte pour un test de clouage.
4 Connecter la batterie à la cloueuse.
TOUJOURS PORTER DES LUNETTES DE
PROTECTION.
Eff ectuer un test de clouage.
5 Retirer la batterie de la cloueuse.
6
Choisir une position convenable pour le dispositif de
réglage.
3. Utilisation du crochet (Voir Fig. 18, 19, 20)
AVERTISSEMENT
Lors de l’utilisation du crochet, éteindre l’interrupteur
d’alimentation (témoin vert « OFF »). Faire suffi samment
attention à ce que l’équipement principal ne tombe pas.
Si l’outil tombe, il y a un risque d’accident.
Le crochet peut être installé sur le côté gauche ou droit.
1 Retirez la batterie, puis retirez toutes les clous restants
du magasin.
2 Tenir fermement l’unité principale et retirer la vis à l’aide
d’un tournevis. (Voir la Fig. 18)
3 Retirer le crochet et la plaque à crochet. (Voir la Fig. 19)
4 Installer le crochet de l’autre côté et le fi xer fermement
avec la vis. (Voir la Fig. 20)
REMARQUE
Le crochet peut être utilisé comme un cintre.
4. Suppression d’un bourrage
Si des clous sont coincés dans la tête de tir, la retirer, et
régler le clouage en suivant l’ordre suivant.
ATTENTION
Retirer la batterie de la cloueuse.
1 Retirer la batterie de la cloueuse.
2 Retirer tous les clous.
3 Retirer les boulons M5 avec une clé. (Voir Fig. 21)
4 Tirer le magasin à l’écart de la tête de déclenchement, et
éliminer le bourrage. (Voir Fig. 22)
ATTENTION
○ NE JAMAIS frapper la lame de guidage.
○ NE JAMAIS pointer l’outil vers vous ou une autre
personne, pour éviter tout risque de blessure par
déclenchement accidentel.
Même si la batterie est retirée de la cloueuse, il reste
encore l’énergie de l’air comprimé à l’intérieur.
5 Fixer le magasin à l’injecteur puis serrer avec les boulons
M5.
REMARQUE
En cas de bourrages fréquents, contacter un service
après-vente agréé par HiKOKI.
5. Utilisation du capuchon de bec (Voir Fig. 23)
AVERTISSEMENT
Lors de la fi xation ou du retrait du capuchon de bec,
s’assurer de retirer le doigt de la gâchette et retirer toutes
les attaches restantes et la batterie de la cloueuse.
Si vous souhaitez protéger la surface de la pièce d’ouvrage
contre les rayures ou les marques faites par le levier de
poussée, attachez le capuchon de bec accessoire au levier
de poussée.
1 Retirer toutes les attaches restantes et la batterie de la
cloueuse.
2 Placer le capuchon de bec à la pointe du levier de
poussée.
3 Le capuchon de bec est marqué pour indiquer le point de
sortie du clou, de manière à faciliter l’alignement.
51
Page 52

Français
REMARQUE
Le capuchon de bec peut réduire la profondeur de
clouage à cause de son épaisseur. Un réajustement de
la profondeur de clouage est nécessaire.
ENTRETIEN ET INSPECTION
ATTENTION
S’assurer de retirer toutes les attaches restantes et la
batterie de la cloueuse avant l’entretien et l’inspection.
1. Inspection du magasin
1 Retirer la batterie de la cloueuse.
2 Nettoyer le magasin. Retirer la poussière et les
copeaux de bois qui peuvent s’être accumulés dans
le magasin.
ATTENTION
Vérifi er que le margeur à clou glisse facilement en tirant
dessus avec un doigt.
S’il ne glisse pas facilement, les clous peuvent être
entraînés avec un angle irrégulier et causer des
blessures.
2. Vérifi cation des vis de fi xation
Vérifi er régulièrement toutes les vis de fi xation et
s’assurer qu’elles sont bien serrées. S’il advient qu’une
vis se desserre, la resserrer immédiatement. Le fait de
négliger ce point pourrait entrainer de graves dangers.
3. Entretien du moteur
Le bobinage de l’ensemble moteur est le « cœur » même
de l’outil électrique. Veiller soigneusement à ce que ce
bobinage ne soit pas endommagé et/ou mouillé par de
l’huile ou de l’eau.
4. Nettoyage de l’extérieur
Quand l’outil électrique est sale, l’essuyer avec un chiff on
sec et doux ou un chiff on imbibé d’eau savonneuse.
Ne pas utiliser de solvant au chlore, d’essence ou de
diluant, car ils font fondre les matières plastiques.
5. Rangement
Ranger l’outil électrique dans un endroit où la
température est inférieure à 40 °C et hors de portée des
enfants.
REMARQUE
Stockage des batteries au lithium-ion.
S’assurer que les batteries au lithium-ion ont été
entièrement chargées avant de les stocker.
Le stockage prolongé (3 mois ou plus) de batteries
faiblement chargées peut entraîner une détérioration
des performances, réduisant considérablement la durée
d’autonomie des batteries alors incapables de tenir une
charge.
Il est cependant possible de recouvrer la capacité
d’autonomie d’une batterie considérablement
endommagée en alternant deux à cinq fois charge et
utilisation.
Si la durée d’autonomie de la batterie reste extrêmement
courte malgré les charges et utilisations consécutives,
considérer la batterie en fi n de vie et s’en procurer une
neuve.
ATTENTION
Lors de l’utilisation et de l’entretien d’un outil électrique,
respecter les règlements et les normes de sécurité en
vigueur dans le pays en question.
Avis important sur les batteries pour outils
électriques sans fi l HiKOKI
Toujours utiliser une de nos batteries originales
spécifi ées. Nous ne saurions garantir la sécurité et la
performance de notre outil électrique sans fi l s’il est
utilisé avec une batterie autre que celle que nous avons
spécifi ée, ou encore si la batterie est démontée et
modifi ée (par exemple, le démontage et remplacement
des cellules ou autres composants internes).
GARANTIE
Nous garantissons que l’ensemble des outils électriques
HiKOKI sont conformes aux réglementations spécifi ques
statutaires/nationales. Cette garantie ne couvre pas
les défauts ni les dommages inhérents à une mauvaise
utilisation, une utilisation abusive ou l’usure et les dommages
normaux. En cas de réclamation, veuillez envoyer l’outil
électrique, en l’état, accompagné du CERTIFICAT DE
GARANTIE qui se trouve à la fi n du mode d’emploi, dans un
service après-vente HiKOKI agréé.
Information sur le bruit
Valeurs des caractéristiques de bruit conformément à EN
792-13:
Niveau type de puissance sonore de l’enfoncement d’un
clou, pondéré A L
Niveau type de pression sonore d’émission de
l’enfoncement d’un clou, pondéré A, au poste de travail
L
Incertitude KpA: 3 dB
Ces valeurs sont des valeurs caractéristiques relatives à
l’outil et elles ne représentent pas la génération de bruit au
point d’utilisation. La génération de bruit au point d’utilisation
pourra dépendre par exemple de l’environnement de travail,
de la pièce, du support de pièce, du nombre d’opérations
de clouage, etc.
Selon les conditions du lieu de travail et la forme de la
pièce, il faudra peut-être adopter des mesures individuelles
d’atténuation du bruit, par exemple en plaçant les pièces sur
des supports d’insonorisation, en supprimant la vibration
des pièces au moyen de serrage ou de couvertures, etc.
Dans certains cas spéciaux, il faudra porter des protections
anti-bruit.
Information sur les vibrations
La valeur type des caractéristiques de vibrations
conformément à EN 792-13: 4,6 m/s
Incertitude K = 1,5 m/s
Cette valeur est une valeur caractéristique relative à l’outil et
elle ne représente pas l’infl uence sur le système main-bras
lors du fonctionnement de l’outil. L’infl uence sur le système
main-bras lors du fonctionnement de l’outil pourra dépendre
par exemple de la force de saisie, de la force de la pression
de contact, du sens de travail, du réglage de l’alimentation
énergétique, de la pièce et du support de pièce.
2
WA, A,s,d = 101 dB
pA, A,s,d = 90 dB
2
52
Page 53

Français
La valeur totale des vibrations a été mesurée par une
méthode d’essai standard et peut être utilisée pour comparer
un outil à un autre.
Elle peut également être utilisée pour une évaluation
préliminaire du niveau d’exposition.
AVERTISSEMENT
○ La valeur d’émission de vibrations en fonctionnement de
l’outil électrique peut être diff érente de la valeur totale
déclarée, en fonction des utilisations de l’outil.
○ Identifi er les mesures de protection de l’utilisateur
fondées sur une estimation de l’exposition en conditions
d’utilisation (tenant compte de tous les aspects du cycle
d’utilisation, tels que les moments où l’outil est mis hors
tension ou lorsqu’il tourne à vide en plus des temps de
déclenchements).
Tableau d’entretien
ACTION POURQUOI COMMENT
Nettoyer le magasin et le
mécanisme d’alimentation.
Maintenir le levier de poussée
en bon état de marche.
Empêcher un bourrage. Nettoyer en souffl ant quotidiennement.
Promouvoir la sécurité de l’opérateur et un
fonctionnement effi cace de la cloueuse.
REMARQUE
Par suite du programme permanent de recherche et de
développement HiKOKI, ces spécifi cations peuvent faire
l’objet de modifi cations sans avis préalable.
Nettoyer en souffl ant quotidiennement.
RÉSOLUTION DES PROBLÈMES
Procéder aux inspections indiquées dans le tableau ci-dessous si l’outil ne fonctionne pas correctement. Si ceci ne résout
pas le problème, contactez votre revendeur ou le centre de service après-vente HiKOKI agréé.
PROBLÈME MÉTHODE DE VÉRIFICATION CORRECTION
Le commutateur d’alimentation
ne s’allume pas.
Il s’allume une fois, mais
s’éteint automatiquement.
La cloueuse ne fonctionne pas
(Commutateur d’alimentation
en position ON).
Batterie déchargée. Recharger la batterie.
Composantes électroniques internes
endommagées.
Le levier de poussée et/ou la gâchette est
à l’état enfoncé ?
Aucune opération eff ectuée pendant plus
de 30 minutes ?
(Fonction d’extinction automatique)
La cloueuse n’est pas suffi samment
pressée contre la pièce d’ouvrage.
La gâchette n’est pas suffi samment
enfoncée.
Plus de 2 secondes s’écoulent entre
l’enfoncement du levier de poussée
et celui de la gâchette (ou entre
l’enfoncement de la gâchette et celui du
levier de poussée).
Mécanisme préventif activé.
(Pas de clous, ou trop peu d’attaches
restantes)
Le levier de verrouillage (fonction de
verrouillage du déclenchement) est en
position « MARCHE ».
La machine est trop froide (en dessous de
-5 °C) ou trop chaude.
Composantes électroniques internes
endommagées.
Contacter HiKOKI pour un remplacement.
Maintenir le levier de poussée et la
gâchette à l’état relâché.
Appuyer longuement sur le commutateur
d’alimentation pendant plus d’1 seconde
pour le mettre en position « ON ».
Maintenir la cloueuse fermement et la
presser complètement contre la pièce
d’ouvrage.
Appuyer fermement sur la gâchette.
S’assurer que moins de 2 secondes
s’écoulent entre l’enfoncement du levier
de poussée et celui de la gâchette (ou
entre l’enfoncement de la gâchette et celui
du levier de poussée).
Recharger les clous dans le magasin.
Mettre le levier de verrouillage en position
« ARRÊT ». (Se référer à la Fig. 7)
Laisser la cloueuse refroidir ou se
réchauff er complètement dans des
conditions adéquates.
Contacter HiKOKI pour un remplacement.
53
Page 54

Français
PROBLÈME MÉTHODE DE VÉRIFICATION CORRECTION
La cloueuse fonctionne, mais
aucun clou n’est enfoncé.
Entraînement faible.
Cycle lent.
L’enfoncement des clous est
trop profond.
Des clous sont sautés.
Alimentation intermittente.
Bourrage de clous.
Le clou éjecté est plié.
Le magasin est sale. Souffl er et essuyer le magasin pour le
Vérifi er s’il y a un bourrage. Éliminer un bourrage (se reporter aux Fig.
La lame de guidage est usée ou
endommagée ?
Le ressort à ruban est aff aibli ou
endommagé ?
Le margeur à clou est endommagé ? Remplacer le margeur à clou.
Vérifi er si les clous sont appropriés. Utiliser uniquement des clous
Vérifi er la position du dispositif de réglage
de profondeur de clouage.
La lame de guidage est usée ? Contacter HiKOKI pour un remplacement.
La pression de l’air comprimé est devenue
faible.
Composantes électroniques internes
endommagées.
Vérifi er la position du dispositif de réglage
de profondeur de clouage.
Vérifi er si les clous sont appropriés. Utiliser uniquement des clous
Le margeur à clou est endommagé ? Remplacer le margeur à clou.
Le ressort à ruban est aff aibli ou
endommagé ?
La lame de guidage est usée ou
endommagée ?
Vérifi er si les clous sont appropriés. Utiliser uniquement des clous
La lame de guidage est usée ou
endommagée ?
nettoyer.
21, 22).
Contacter HiKOKI pour un remplacement.
Remplacer le ressort à ruban.
recommandés.
Réajuster en suivant les Fig. 16, 17.
Contacter HiKOKI pour un remplacement.
Contacter HiKOKI pour un remplacement.
Réajuster en suivant les Fig. 16, 17.
recommandés.
Remplacer le ressort à ruban.
Contacter HiKOKI pour un remplacement.
recommandés.
Contacter HiKOKI pour un remplacement.
54
Page 55

(Traduzione delle istruzioni originali)
AVVERTIMENTI GENERALI DI
SICUREZZA SUGLI UTENSILI
ELETTRICI
ATTENZIONE
Leggere tutti gli avvertimenti di sicurezza e tutte le
istruzioni.
La mancata osservanza degli avvertimenti e delle istruzioni
potrebbe essere causa di scosse elettriche, incendi e/o gravi
lesioni.
Salvare tutti gli avvertimenti e le istruzioni per
riferimenti futuri.
Il termine “elettroutensili” riportato nelle avvertenze si
riferisce agli elettroutensili azionati con alimentazione di rete
(via cavi) o a batterie (senza cavi).
1) Sicurezza dell’area operativa
a) Mantenere l’area operativa pulita e ordinata.
Aree operative sporche o disordinate possono
favorire gli infortuni.
b) Non utilizzare gli elettroutensili in atmosfere
esplosive, ad es. in presenza di liquidi, gas o
polveri infi ammabili.
Gli elettroutensili generano delle scintille che
potrebbero accendere la polvere o i fumi.
c) Tenere lontani bambini e astanti durante
l’utilizzo degli elettroutensili.
Qualsiasi distrazione può essere causa di perdita di
controllo.
2) Sicurezza elettrica
a) Le spine degli elettroutensili devono essere
idonee alle prese disponibili.
Non modifi care mai le prese.
Con gli elettroutensili a massa (messi a terra),
non utilizzare alcun adattatore.
L’utilizzo di spine intatte e corrispondenti alle prese
disponibili ridurrà il rischio di scosse elettriche.
b) Evitare qualsiasi contatto con le superfi ci a
massa o a terra, quali tubi, radiatori, fornelli e
frigoriferi.
In caso di messa a terra o massa del corpo, sussiste
un maggior rischio di scosse elettriche.
c) Non esporre gli elettroutensili alla pioggia o
all’umidità.
La penetrazione di acqua negli elettroutensili
aumenterà il rischio di scosse elettriche.
d) Non tirare il cavo. Non utilizzarlo per il trasporto,
o per tirare o scollegare l’elettroutensile.
Tenere il cavo lontano da fonti di calore, oli,
bordi appuntiti o parti in movimento.
Cavi danneggiati o attorcigliati possono aumentare il
rischio di scosse elettriche.
e) Durante l’uso degli elettroutensili all’esterno,
utilizzare una prolunga idonea per usi esterni.
L’utilizzo di cavi per esterno riduce il rischio di scosse
elettriche.
f) Se è impossibile evitare l’impiego di un
elettroutensile in un luogo umido, utilizzare
l’alimentazione protetta da un dispositivo a
corrente residua (RCD).
L’uso di un RCD riduce il rischio di scosse elettriche.
3) Sicurezza personale
a) Durante l’uso degli elettroutensili, state all’erta,
verifi cate ciò che state eseguendo e adottate
sempre il buon senso.
Non utilizzate gli elettroutensili qualora siate
stanchi, sotto l’infl uenza di farmaci, alcol o cure
mediche.
Anche un attimo di disattenzione durante l’uso degli
elettroutensili potrebbe essere causa di gravi lesioni
personali.
b) Indossate l’attrezzatura di protezione personale.
Indossate sempre le protezioni oculari.
L’attrezzatura protettiva, quali maschera facciale,
calzature antiscivolo, caschi o protezioni oculari
ridurrà il rischio di lesioni personali.
c) Impedite le accensioni involontarie. Prima del
collegamento a una sorgente di alimentazione
e/o pacco batteria e prima di raccogliere o
trasportare l’utensile, verifi cate che l’interruttore
sia posizionato su OFF.
Il trasporto degli elettroutensili tenendo le dita
sull’interruttore o l’attivazione elettrica degli utensile
che hanno l’interruttore su ON, implica il rischio di
incidenti.
d) Prima di attivare l’elettroutensile, rimuovete
qualsiasi chiave di regolazione.
Lasciando la chiave in un componente in rotazione
dell’elettroutensile, sussiste il rischio di lesioni
personali.
e) Mantenersi in equilibrio. Mantenersi sempre su
due piedi, in equilibrio stabile.
Ciò consente di controllare al meglio l'elettroutensile
in caso di situazioni impreviste.
f) Vestirsi in modo adeguato. Non indossare abiti
larghi o gioielli. Tenere i capelli, gli abiti e i
guanti lontano dalle parti in movimento.
Abiti allentati, gioielli e capelli lunghi potrebbero
impigliarsi nelle parti in movimento.
g) In caso di dispositivi provvisti di collegamento
ad apparecchiature di rimozione e raccolta
polveri, verifi care che queste siano collegate e
utilizzate in modo adeguato.
L’utilizzo della raccolta della polvere può ridurre i
rischi connessi alle polveri.
4) Utilizzo e manutenzione degli elettroutensili
a) Non utilizzare elettroutensili non idonei.
Utilizzare l’elettroutensile idoneo alla propria
applicazione.
Utilizzando l’elettroutensile corretto, si garantirà
un’esecuzione migliore e più sicura del lavoro, alla
velocità di progetto.
b) Non utilizzare l’elettroutensile qualora non
sia possibile accenderlo/spegnerlo tramite
l’interruttore.
É pericoloso utilizzare elettroutensili che non
possano essere azionati dall’interruttore. Provvedere
alla relativa riparazione.
c)
Prima di eff ettuare qualsiasi regolazione, sostituire
gli accessori o depositare gli elettroutensili,
scollegare la spina dalla presa elettrica e/o il
pacco batteria dall’utensile elettrico.
Queste misure di sicurezza preventive riducono il
rischio di avvio involontario dell’elettroutensile.
d) Depositare gli elettroutensili non utilizzati
lontano dalla portata dei bambini ed evitare che
persone non esperte di elettroutensili o non a
conoscenza di quanto riportato sulle presenti
istruzioni azionino l’elettroutensile.
É pericoloso consentire che utenti non esperti
utilizzino gli elettroutensili.
e)
Manutenzione degli elettroutensili. Verifi care che
non vi siano componenti in movimento disallineati
o bloccati, componenti rotti o altre condizioni
che potrebbero infl uenzare negativamente il
funzionamento dell’elettroutensile.
In caso di guasti, provvedere alla riparazione
dell’elettroutensile prima di riutilizzarlo.
Molti incidenti sono causati da una scarsa
55
manutenzione.
Italiano
Page 56

Italiano
f) Mantenere gli strumenti di taglio affi lati e puliti.
Gli strumenti di taglio in condizioni di manutenzione
adeguata, con bordi affi lati, sono meno soggetti al
bloccaggio e sono più facilmente controllabili.
g) Utilizzare l’elettroutensile, gli accessori, le
punte, ecc. in conformità a quanto riportato
nelle presenti istruzioni, tenendo in debita
considerazione le condizioni operative e il tipo
di lavoro da eseguire.
L’uso dell’utensile elettrico per operazioni diverse
da quelle previste potrebbe causare una situazione
pericolosa.
5) Utilizzo e cura dell’utensile batteria
a) Ricaricare solo con il caricatore specifi cato dal
produttore.
Un caricatore adatto per un tipo di gruppo batteria
può creare un rischio di incendio quando viene
utilizzato con un altro gruppo batteria.
b) Usare utensili elettrici con gruppi batteria
specifi catamente designati.
L’utilizzo di qualsiasi altro gruppo batteria può creare
un rischio di lesioni e incendi.
c) Quando il gruppo batteria non viene utilizzato,
tenerlo lontano da altri oggetti metallici come
graff ette, monete, chiavi, chiodi, viti, o altri
piccoli oggetti metallici che possono creare una
connessione da un terminale a un altro.
Cortocircuitare i terminali della batteria insieme può
causare ustioni o incendi.
d) In condizioni abusive, del liquido può fuoriuscire
dalla batteria; evitare il contatto. Se il contatto si
verifi ca accidentalmente, sciacquare con acqua.
Se il liquido entra a contatto con gli occhi,
richiedere assistenza medica.
Il liquido che fuoriesce dalla batteria può causare
irritazioni o ustioni.
6) Assistenza
a) Affi date le riparazioni dell'elettroutensile a
persone qualifi cate che utilizzino solamente
parti di ricambio identiche.
Ciò garantirà il mantenimento della sicurezza
dell’elettroutensile.
PRECAUZIONI
Tenere lontano dalla portata di bambini e invalidi.
Quando non utilizzati, gli strumenti dovranno essere
deposti lontano dalla portata di bambini e invalidi.
AVVERTENZE DI SICUREZZA
CHIODATRICE A STECCA CORDLESS
1. Considerare sempre che l’utensile contenga punti.
Maneggiare incautamente la chiodatrice può provocare
l’inaspettata espulsione dei fi ssaggi e lesioni personali.
2. Non puntare l’utensile verso sé stessi o altre
persone vicine.
Lo scatto imprevisto può far sparare dei punti e causare
lesioni personali.
3. Non azionare l’utensile fi nché non è posizionato
saldamente contro il pezzo da lavorare.
Se l’utensile non è a contatto con il pezzo dal lavorare,
la graff ettatrice potrebbe venire deviata dal punto
desiderato.
4. Scollegare l’utensile dalla fonte di alimentazione
quando i punti si inceppano nell’utensile.
Mentre si rimuove un fi ssaggio inceppato, la chiodatrice
potrebbe essere attivata accidentalmente se è collegata
alla presa.
5. Nella rimozione dei punti inceppati, usare la
massima cautela.
Durante il tentativo di rimuovere l’inceppamento, il
meccanismo potrebbe essere sotto pressione e sparare
forzatamente i punti contenuti.
6. Non utilizzare questa chiodatrice per il fi ssaggio di
cavi elettrici.
L’utensile non è previsto per l’installazione di cavi elettrici
e potrebbe danneggiare l’isolamento dei cavi, con
conseguente pericolo di scosse elettriche e incendio.
PRECAUZIONI DI SICUREZZA
AGGIUNTIVE
1. Operazioni sicure grazie a un corretto uso.
Questo utensile è stato progettato per inserire dei chiodi
nel legno e in altri materiali simili. Usatelo solo a questo
fi ne.
2. Fate attenzione ad accensioni e ad esplosioni.
A causa delle scintille che potrebbero volare durante le
operazioni, è pericoloso usare questo utensile vicino a
lacca, vernice, benzina, solvente, gasolio, gas, adesivi
e altre sostanze infi ammabili simili che potrebbero
infi ammarsi ed esplodere. In nessuna circostanza
questo utensile può essere utilizzato in prossimità di
materiali infi ammabili.
3. Indossate sempre una protezione per gli occhi
(occhiali di protezione).
La possibilità che frammenti di cavo o
chiodi non propriamente inseriti colpiscano gli occhi è
da prevedere. Gli occhiali di protezione possono essere
acquistati in qualsiasi negozio di ferramenta. Indossateli
sempre durante l’uso dell’utensile. Usate gli occhiali
di protezione o la mascherina ad ampia visuale su
prescrizione.
L’utilizzatore dovrebbe sempre preoccuparsi di
utilizzarel’equipaggiamento di protezione.
4. Proteggete le vostre orecchie e la testa.
Quando siete impegnati nell’uso della chiodatrice,
indossate sempre le protezioni per orecchie e testa.
Inoltre, in base alla condizione, assicuratevi che anche
le persone intorno indossino il para orecchie e la
protezione per la testa.
5. Fate attenzione a quelli che lavorano vicino a voi.
Potrebbe essere molto pericoloso se i chiodi che
non sono stati correttamente inseriti colpiscono altre
persone. In ogni caso, fate sempre attenzione alla
sicurezza delle persone attorno a voi quando state
usando la chiodatrice. Assicuratevi che non ci sia il corpo
di qualcuno, mani o piedi vicino all’uscita dei chiodi.
6. Non puntate mai la chiodatrice in direzione delle
persone.
Se l’apertura è puntata in direzione
Quando si collega e si scollega la batteria, durante il
caricamento di chiodi o simili operazioni, assicurarsi
che l’uscita del chiodo non sia puntata verso altre
persone (incluso se stessi). Anche se la chiodatrice non
è caricata, è comunque pericoloso scaricare l’utensile
mentre è puntato in direzione di qualcuno. Non scherzate
con questo prodotto; abbiatene cura come con qualsiasi
altro strumento di lavoro.
Quando usate questo utensile, indossate
sempre gli occhiali di protezione, e
assicuratevi che anche le persone intorno
li indossino.
di plastica che uniscono i chiodi o che
Tenete sempre chiusa la chiodatrice.
di persone, in caso di attivazione
accidentale della chiodatrice,
potrebbero verifi carsi incidenti gravi.
56
Page 57

7. Controllare la leva a pressione prima dell’uso.
Assicurarsi che la leva a pressione funzioni correttamente.
(La leva a pressione potrebbe essere denominata
“Sicurezza”.) Non utilizzare mai la chiodatrice a meno
che la leva a pressione non funzioni correttamente,
altrimenti la chiodatrice potrebbe inaspettatamente
piantare un fi ssaggio. Non manomettere né rimuovere la
leva a pressione, altrimenti la leva a pressione potrebbe
diventare inoperabile.
8. La scelta del metodo di attivazione è importante.
Leggere e comprendere la sezione intitolata “COME
UTILIZZARE LA CHIODATRICE” a pagina 65.
9. Prima di utilizzare questo prodotto, controllare
che funzioni correttamente in conformità con il
contenuto di “Prova della chiodatrice” a pagina
64.
10. Usate solo chiodi specifi ci.
Non usate mai chiodi diversi da quelli descritti in queste
istruzioni.
11. Prestate molta attenzione quando collegate la
batteria.
Quando collegate la batterie e caricate i chiodi, affi nché
la chiodatrice non spari dei colpi accidentalmente,
verifi cate quanto segue.
○ Non toccate il grilletto.
○ Non lasciate che l’estremità della chiodatrice tocchi
alcuna superfi cie.
○ Tenete l’estremità della chiodatrice verso il basso.
Seguite strettamente le istruzioni di cui sopra e
assicuratevi sempre che non vi sia alcuna parte del
vostro corpo o di quello di altre persone di fronte
all’apertura della chiodatrice.
12. Evitate di mettere il dito sul grilletto.
Non mettete il dito sul grilletto eccetto quando dovete
sparare i chiodi. Se porgete o consegnate l’utensile
a qualcuno mentre avete il vostro dito appoggiato sul
grilletto, potreste inavvertitamente sparare un chiodo e
causare un incidente.
13. Premete con forza l’apertura della chiodatrice
contro il materiale interessato.
Quando guidate un chiodo, premete con forza l’apertura
dell’utensile contro il materiale da colpire. Se l’apertura
non è correttamente premuta, i chiodi potrebbero
rimbalzare.
14. Tenete le mani e i piedi lontani dalla testa
dell’utensile quando lo usate.
15. State attenti al contraccolpo.
Non avvicinatevi all’estremità dell’utensile con il capo
durante le operazioni. Sarebbe molto pericoloso perché
l’utensile potrebbe subire un violento contraccolpo se il
chiodo che state guidando, entra in contatto con uno già
inserito o con un nodo del legno.
16. Prestare attenzione alla doppia espulsione causata
dal rinculo.
Se alla leva a pressione viene intenzionalmente
consentito di contattare nuovamente il pezzo dopo il
rinculo, verrà piantato un fi ssaggio non desiderato.
Allo scopo di evitare questa doppia espulsione
indesiderata,
○ Funzionamento intermittente (attivazione a grilletto)
1) Impostare il dispositivo di commutazione su
MECCANISMO DI ATTUAZIONE SEQUENZIALE
COMPLETA.
2) Tirare il grilletto rapidamente e saldamente.
○ Funzionamento continuo (attivazione con leva a
pressione)
1) Non premere la chiodatrice contro il legno con forza
eccessiva.
E’ molto pericoloso che la chiodatrice
colpisca mani o piedi per errore.
Italiano
2) Separare la chiodatrice dal legno poiché rincula
dopo il fi ssaggio.
17. Usate molta cautela quando inchiodate assi sottili o
gli angoli del legno.
Quando inchiodate assi sottili, i chiodi potrebbero
trapassare, così come anche nel caso in cui dovete
inchiodare gli angoli del legno a causa della deviazione
dei chiodi. In questi casi assicuratevi sempre che non vi
sia nessuno nelle vicinanze dietro l’asse o vicino al legno
che dovete inchiodare.
18. La chiodatura simultanea da ambo le parti della
stessa parete è pericolosa.
In nessun caso la chiodatura dovrebbe essere fatta allo
stesso tempo sui due lati di una parete.
Questo potrebbe essere molto pericoloso perchè i chiodi
possono possono attraversare la parete e causare seri
incidenti.
19. Non usare l’utensile elettrico su scaff alature, scale.
L’utensile elettrico non va usato per applicazioni
specifi che, come ad esempio:
– Quando il passaggio da un punto di chiodatura ad
un altro prevede l’uso di scaff alature, gradini, scale o
simili, come intelaiature,
– Chiusura di scatole o casse,
– Applicazione di sistemi di sicurezza per trasporto, ad
esempio su veicoli o rimorchi
20. Rimuovere tutti i fi ssaggi rimanenti e la batteria
dalla chiodatrice quando:
1) si eseguono la manutenzione e l’ispezione;
2) si controlla il corretto funzionamento di leva a
pressione e grilletto;
3) si elimina un inceppamento;
4) non è in uso;
5) si lascia l’area di lavoro;
6) ci si sposta in un’altra posizione; e
7) la si passa a un’altra persona.
Non tentare mai di eliminare un inceppamento o riparare
la chiodatrice a meno che non siano stati rimossi la
batteria e i fi ssaggi rimanenti dalla chiodatrice.
La chiodatrice non deve mai essere lasciata incustodita
poiché le persone che non hanno familiarità con la
chiodatrice potrebbero maneggiarla e ferirsi.
21. Rimuovere la batteria dalla chiodatrice quando:
1) si caricano i chiodi;
2) si ruota il regolatore.
22. L’ambiente di funzionamento di questo apparecchio
è tra i 0°C e i 40°C pertanto assicurarsi di utilizzarlo
entro queste temperature.L’apparecchio potrebbe
non funzionare al di sotto dei 0°C o al di sopra dei
40°C.
23. Caricare la batteria ad una temperatura di 0–40°C.
Una temperatura minore può provocare sovraccarico, il
ché è pericoloso. La batteria non può essere ricaricata
ad una temperatura superiore ai 40°C. La temperatura
ideale è compresa fra i 20–25 gradi.
24. Non usare il caricatore in continuazione.
Quando un’operazione di caricatura è terminata, prima
di iniziarne una seconda, lasciare che il caricatore riposi
per 15 minuti.
25. Non permettere che sostanze estranee entrino nel
foro di collegamento della batteria ricaricabile.
26. Non smontare mai la batteria ricaricabile e il
caricatore.
27. Non provocare assolutamente mai dei corto-circuiti
alla batteria ricaricabile.
Il fenomento provoca surriscaldamento e grande
corrente elettrica. Può quindi causare bruciature o danni
alla batteria.
28. Non gettare la batteria nel fuoco.
Può esplodere.
29. Usando una batteria scarica, il caricatore può venir
danneggiato.
57
Page 58

Italiano
30. Non appena la vita della batteria dopo le operazioni
di ricaricatura diventa troppo breve per fi ni pratici,
si porti la batteria al negozio dove è stata acquistata.
Non la si getti mai via.
31. Non inserire nessun oggetto nelle fessure di
ventilazione del caricatore.
Inserend oggetti metallici o infi ammabili nelle fessure di
ventilazione, si possono causare facilmente delle scosse
elettriche, o si può danneggiare il caricatore.
32. Non permettere MAI che magneti (o simili dispositivi
magnetici) si trovino vicino alla chiodatrice, poiché
la chiodatrice dispone di un sensore magnetico
all’interno.
In caso contrario si causerà un malfunzionamento o ci
sarà un rischio di lesioni a causa del malfunzionamento.
33. Riposo dell’unità dopo lavoro continuo.
34. L'utensile elettrico è dotato di un circuito di
protezione della temperatura per proteggere
il motore. Il lavoro continuo potrebbe causare
l’aumento della temperatura dell’unità, attivando
così il circuito di protezione della temperatura e
arrestando automaticamente il funzionamento. In
tal caso, lasciare che l’utensile elettrico si raff reddi
prima di riutilizzarlo.
35. Questo prodotto potrebbe smettere di funzionare
quando viene rilevata un’anomalia. In tal caso,
controllare le voci elencate in “RISOLUZIONE DEI
PROBLEMI” a pagina 69.
36. Non sottoporre il quadro interruttori a forti urti né
romperlo. Ciò potrebbe causare problemi.
PRECAUZIONI SULLA BATTERIA
AGLI IONI DI LITIO
Per estendere la durata, la batteria agli ioni di litio è munita di
una funzione di protezione per arrestarne l’uscita.
Nei casi da 1 a 3 descritti di seguito, durante l’utilizzo del
prodotto, anche se state premendo l’interruttore, il motore
potrebbe arrestarsi. Ciò non indica un malfunzionamento
ma è il risultato della funzione di protezione.
1. Quando la rimanente alimentazione della batteria si
esaurisce, il motore si arresta.
In tal caso, ricaricarla immediatamente.
2. Se l’utensile è sovraccarico, il motore potrebbe
arrestarsi. In tal caso, rilasciare l’interruttore dell’utensile
ed eliminare le cause del sovraccarico. Dopo ciò, sarà
possibile riutilizzarlo.
3. Se la batteria si surriscalda in lavori di sovraccarico,
l’alimentazione della batteria potrebbe arrestarsi.
In tal caso, interrompere l’uso della batteria e lasciarla
raff reddare. Dopo ciò, sarà possibile riutilizzarlo.
Inoltre, si prega di prestare attenzione al seguente
avvertimento e cautela.
ATTENZIONE
Per prevenire qualsiasi perdita delle batterie, generazione
di calore, emissione di fumi, esplosione e accensione,
assicurarsi di prestare attenzione alle seguenti precauzioni.
1. Assicurarsi che la polvere e i detriti non si accumulino
sulla batteria.
○ Durante la lavorazione, assicurarsi che la polvere e i
detriti non si depositino sulla batteria.
○ Assicurarsi che qualsiasi polvere e detriti che si
depositano sull’utensile elettrico durante la lavorazione
non si accumulino sulla batteria.
○ Non conservare una batteria inutilizzata in un luogo
esposto a polvere e detriti.
○ Prima di ritirare una batteria, rimuovere la polvere e i
detriti che si sono depositati su di essa e non conservarla
insieme a parti metalliche (viti, chiodi, ecc.).
2. Non forare la batteria con un oggetto appuntito come un
chiodo, non colpire con un martello, calpestare, lanciare
o sottoporre la batterie a violenti urti fi sici.
3. Non usare batterie apparentemente danneggiate o
deformate.
4. Non usare batterie con la polarità invertita.
5. Non collegare direttamente a prese elettriche o prese
per caricabatteria da auto.
6. Non usare la batteria per uno scopo diverso da quelli
specifi cati.
7. Se la ricarica della batteria non si completa anche
quando è passato un tempo di ricarica specifi cato,
interrompere immediatamente la ricarica.
8. Non mettere o sottoporre la batteria a temperature
elevate o ad alta pressione come in un forno microonde,
essiccatore o contenitore ad alta pressione.
9. Tenere immediatamente lontano dal fuoco quando si
rilevano perdite o maleodore.
10. Non usare in un luogo dove viene generata forte
elettricità statica.
11. Se si verifi ca la perdita delle batterie, maleodore,
generazione di calore, scolorimento o deformazione, o se
appaiono anormalità di qualsiasi natura durante l’uso, la
ricarica o la conservazione, rimuoverla immediatamente
dall’apparecchio o carica batteria, e interrompere l’uso.
ATTENZIONE
1. Se il liquido che fuoriesce dalla batteria entra negli
occhi, non sfregare gli occhi e lavarli bene con acqua
fresca e pulita come acqua di rubinetto e contattare
immediatamente un medico.
Se non viene trattato, il liquido può causare problemi agli
occhi.
2. Se il liquido fuoriesce sulla pelle o gli abiti, lavare
bene con acqua pulita come l’acqua del rubinetto
immediatamente.
C’è una possibilità che possa causare irritazione alla
pelle.
3. Se si riscontrano ruggine, maleodore, surriscaldamento,
scolorimento, deformazione, e/o altre irregolarità
quando si utilizza la batteria per prima volta, non usarla e
restituirla al fornitore o venditore.
ATTENZIONE
Se nel terminale della batteria a ioni di litio penetrano corpi
estranei conduttivi, potrebbe verifi carsi un cortocircuito
della batteria con conseguente incendio. Nello stoccaggio
della batteria a ioni di litio, attenersi scrupolosamente alle
seguenti istruzioni.
○ Non inserire corpi conduttivi, chiodi e fi li (ad esempio fi li
di ferro o rame) nel vano di stoccaggio.
○ Per impedire cortocircuiti, caricare la batteria nello
strumento o applicare saldamente il coperchio della
batteria per lo stoccaggio fi no a nascondere la ventola.
58
Page 59

Italiano
INFORMAZIONI SUL TRASPORTO
DELLA BATTERIA AGLI IONI DI LITIO
Quando si trasporta una batteria agli ioni di litio, adottare le
seguenti precauzioni.
ATTENZIONE
Avvisare l’azienda di trasporti che il pacchetto contiene una
batteria agli ioni di litio, informare l’azienda della sua potenza
di uscita e seguire le istruzioni della società di trasporti
quando si organizza il trasporto.
○ Le batterie agli ioni di litio che superano la potenza di
uscita di 100 Wh sono classifi cate come merci pericolose
e necessitano di procedure speciali.
○ Per il trasporto all’estero, è necessario rispettare le leggi
internazionali e le norme e i regolamenti previsti nel
Paese di destinazione.
Potenza di uscita
Wh
Da 2 a 3 cifre
NOMI DEI COMPONENTI
(Fig. 1 – Fig. 23)
Coperchio superiore
1
Grilletto
2
Testina di espulsione (uscita)
3
Leva a pressione
4
Alimentatore chiodi (B)
5
Manopola alimentatore
6
Magazzino
7
Gancio
8
Batteria
9
Leva di bloccaggio
0
Maniglia
!
Interruttore indicatore della batteria
@
Indicatore della batteria
#
Interruttore di funzionamento chiodatura
$
Indicatore di alimentazione
%
Interruttore alimentazione
^
Indicatore di funzionamento chiodatura
&
Chiodi
*
Regolatore
(
Piastra di aggancio
)
SIMBOLI
ATTENZIONE
Di seguito mostriamo i simboli usati per la macchina.
Assicurarsi di comprenderne il signifi cato prima
dell’uso.
NR1890DBCL: Chiodatrice a stecca cordless
NR1890DBRL: Chiodatrice a stecca cordless
Per ridurre il rischio di lesioni, l’utente deve
leggere il manuale delle istruzioni.
Solo per Paesi UE
Non gettare le apparecchiature elettriche tra i
rifi uti domestici!
Secondo la Direttiva Europea 2002/96/CE
sui rifi uti di apparecchiature elettriche ed
elettroniche e la sua attuazione in conformità
alle norme nazionali, le apparecchiature
elettriche esauste devono essere raccolte
separatamente, al fi ne di essere reimpiegate in
modo eco-compatibile.
Corrente continua
Peso
kg
(Secondo la procedura EPTA 01/2003)
Accensione
Ϩ
Spegnimento
Scollegare la batteria
Interruttore alimentazione
Interruttore di alimentazione spento
Interruttore alimentazione acceso
Indicatore di alimentazione: si illumina in
verde
Interruttore di funzionamento chiodatura
MECCANISMO DI ATTUAZIONE
SEQUENZIALE COMPLETA
Modalità MECCANISMO DI ATTUAZIONE
SEQUENZIALE COMPLETA
Indicatore di funzionamento chiodatura: si
illumina in blu
MECCANISMO DI ATTUAZIONE A CONTATTO
Modalità MECCANISMO DI ATTUAZIONE A
CONTATTO
Indicatore di funzionamento chiodatura:
lampeggia in blu
Grilletto bloccato
59
Page 60

Italiano
Grilletto sbloccato
Interruttore indicatore della batteria
La carica della batteria restante è suffi ciente
Indicatore della batteria: 2 luci LED (rosse)
La carica della batteria restante è circa metà.
Indicatore batteria: 1 LED (rosso) si illumina
La carica della batteria restante è quasi vuota.
Ricaricare la batteria il prima possibile.
Indicatore batteria: 1 LED (rosso) lampeggia
Contattare HiKOKI per un’ispezione.
Indicatore della batteria: 2 LED lampeggiano
in arancione, dopo 10 secondi, l’interruttore
di accensione si spegne automaticamente.
Lato poco profondo
Lato profondo
Non utilizzare su impalcature, scale.
Avvertenza
Azione non consentita
SPECIFICHE
1. Chiodatrice a stecca cordless
Modello NR1890DBCL NR1890DBRL
Motore CC senza spazzole
Chiodo applicabile ø2,9 – 3,3 mm Vedere Fig. ø2,9 – 3,3 mm Vedere Fig.
Lunghezza chiodo applicabile Da 50 mm a 90 mm
Capacità di carico dei chiodi [chiodi] 47 37
Modalità di espulsione Sequenziale completa/a contatto (selezionabile)
Velocità del ciclo [chiodi/secondo] 1,5 – 2 (intermittente)
Batteria Modello BSL1850
Tipo Batteria agli ioni di litio
Tensione 18 V CC
Peso* 4,8 kg 4,9 kg
Dimensioni
Altezza × lunghezza × larghezza
* Peso: secondo la procedura EPTA 01/2003
2. Caricabatteria
Modello UC18YFSL
Tensione di carica 14,4 – 18 V CC
Peso 0,5 kg
342 mm × 309 mm ×
127
mm 342 mm × 342 mm × 137 mm
NOTA
A causa del continuo programma di ricerche e sviluppo della HiKOKI, le caratteristiche riportate in questo foglio sono
soggette cambiamenti senza preventiva comunicazione.
60
Page 61

Italiano
SELEZIONE CHIODO
Scegliete il chiodo adeguato dalla fi gura. I chiodi non mostrati nella fi gura non possono essere usati con questo utensile.
L’uso di qualsiasi altri chiodi può provocare un malfunzionamento dell’utensile e/o una rottura del chiodo, causando lesioni
gravi.
[NR1890DBCL]
Si possono usare solo chiodi lisci, spinati o di tipo ad anello. Non usare chiodi a vite. I chiodi sono disposti in strisce che
consistono di 25-37 chiodi.
NR1890DBCL
Chiodi a U per carta
Chiodi a testa squadrata
Min. Max.
6,8 mm
50 mm
7,7 mm
90 mm
2,9 mm
3,3 mm
61
Page 62

Italiano
Chiodi a U per plastica
Chiodi a testa piena
NR1890DBRL
50 mm
Min. Max.
7 mm
2,9 mm
7,6 mm
90 mm
3,3 mm
* Si sconsiglia l’uso di questa Chiodatrice con chiodi con gambo ad anello dai 75 mm ai 90 mm in legno trattato a pressione.
ACCESSORI STANDARD
In aggiunta all’unità principale (1 unità), la confezione
contiene gli accessori elencati a pagina 2.
Gli accessori standard possono essere cambiati senza
preavviso.
APPLICAZIONI
○ Intelaiatura di pavimenti e pareti.
○ Costruzione di avvolgimenti. Construzione di fi nestre.
○ Sottopavimenti e piani di tetto.
○ Rivestimento di pareti.
○ Costruzione di case mobili e prefabbricati.
RICARICA
Prima di utilizzare l’utensile elettrico, caricare la batteria nel
seguente modo.
1. Collegare il cavo di alimentazione del caricatore a
una presa.
Quando si collega la spina del caricatore ad una presa
a muro, la spia pilota lampeggia in rosso (A intervalli di 1
secondo).
2. Inserire la batteria nel caricatore.
Inserire saldamente la batteria nel caricatore come
mostrato in Fig. 3.
3. Carica
Quando si inserisce una batteria nel caricatore, la carica
inizia e la spia si illumina stabilmente in rosso.
Quando la batteria è completamente carica, la spia
lampeggia in rosso. (A intervalli di un secondo) (Vedere
la Tabella 1)
● Spia indicazione pilota
Le indicazioni della spia pilota saranno come indicato
nella Tabella 1, a seconda delle condizioni del
caricabatterie o della batteria ricaricabile.
62
Page 63

Spia pilota
(rossa)
Prima della
carica
Durante la
carica
Carica
completa
Standby di
surriscaldamento
Carica
impossibile
Lampeggia
Si illumina
Lampeggia
Lampeggia
Lampeggia
velocemente
Tabella 1
Indicazioni della spia
Si illumina per 0,5 secondi. Non si illumina
per 0,5 secondi. (Spento per 0,5 secondi)
Si illumina stabilmente
Si illumina per 0,5 secondi. Non si illumina
per 0,5 secondi. (Spento per 0,5 secondi)
Si illumina per 1 secondo. Non si illumina
per 0,5 secondi. (Spento per 0,5 secondi)
Si illumina per 0,1 secondi. Non si illumina
per 0,1 secondi. (Spento per 0,1 secondi)
Italiano
Batteria surriscaldata.
Impossibile ricaricare (la
ricarica comincerà quando la
batteria si raff redda).
Malfunzionamento della
batteria o del caricatore
● Informazioni sulle temperature e sul tempo di ricarica
della batteria.
Le temperature e il tempo di ricarica sono indicati nella
Tabella 2
Tabella 2
Batteria
Tensione di carica V 14,4 – 18
Peso kg 0,5
Temperature di carica per le
batterie
Tempo di carica per la capacità
della batteria, circa. (A 20oC)
1,3 Ah
1,5 Ah
2,0 Ah
2,5 Ah
3,0 Ah
4,0 Ah
5,0 Ah
Numero di pile 4 – 10
NOTA
Il tempo di carica può variare a seconda della
temperatura ambiente e della tensione della sorgente di
alimentazione.
ATTENZIONE
Se il caricabatterie viene utilizzato di continuo, potrebbe
surriscaldarsi provocando così malfunzionamenti. Una
volta terminato il caricamento, attendere 15 minuti prima
di ricaricare nuovamente.
4. Scollegare il cavo di alimentazione del caricatore
dalla presa CA.
5. Tenere saldamente il caricatore e estrarre la
batteria.
NOTA
Assicurarsi di estrarre la batteria dal caricatore dopo
l’uso e quindi conservarla.
ATTENZIONE
○ Se la batteria viene caricata mentre è calda perché
rimasta esposta a lungo in un luogo soggetto ai raggi
solari diretti o perché immediatamente dopo l’uso della
batteria, la spia del caricatore si illumina per 1 secondo,
non si illumina per 0,5 secondi (spenta per 0,5 secondi).
In questo caso, prima lasciar raff reddare la batteria e poi
iniziare l’operazione di carica.
Caricatore
min.
min.
min.
min.
min.
min.
min.
UC18YFSL
0oC – 50oC
20
22
30
35
45
60
75
○ Quando la spia pilota lampeggia velocemente (a intervalli
di 0,2 secondi), controllare e rimuovere qualsiasi oggetto
estraneo nel connettore della batteria del caricatore. Se
non sono presenti oggetti estranei, è probabile che la
batteria o il caricatore non funzionino bene. Rivolgersi a
un Centro di assistenza autorizzato.
○ Poiché il micro computer incorporato impiega circa 3
secondi per confermare che la batteria caricata col
caricatore sia stata estratta, attendere almeno 3 secondi
prima di reinserirla per continuare il caricamento. Se la
batteria viene reinserita entro 3 secondi, potrebbe non
venire caricata correttamente.
○ Se la spia non lampeggia di colore rosso (ogni secondo)
anche se il caricatore è collegato alla alimentazione,
signifi ca che potrebbe essere attivato il circuito di
protezione del caricatore.
Rimuovere il cavo o la spina dalla presa e ricollegarlo
dopo circa 30 secondi. Se dopo questa operazione
la spia ancora non lampeggia di colore rosso (ogni
secondo), portare il caricatore presso il centro assistenza
autorizzato HiKOKI.
PRIMA DELL’USO
Azione Figura
Rimozione e inserimento della batteria 2
Carica 3
Selezione degli accessori ―
1. Metodo di azionamento del pannello di comando
(1) Interruttore di alimentazione acceso (Vedere Fig. 4)
Nelle condizioni di “Interruttore di alimentazione spento”,
premere e tenere premuto l’interruttore di alimentazione
per più di 1 secondo, quindi l’indicatore di alimentazione
si illumina in verde.
NOTA
Non premere la leva a pressione e/o tirare il grilletto
durante il processo di attivazione dell’interruttore di
alimentazione.
Farlo impedirà l’attivazione dell’interruttore di
alimentazione.
[Spegnimento automatico]
Quando l’alimentazione viene attivata ma la chiodatrice
non viene utilizzata per 30 minuti, la chiodatrice si
disattiva automaticamente. Per attivarla di nuovo,
premere l’interruttore di alimentazione.
AVVERTENZA
Non lasciare mai la chiodatrice con l’alimentazione
attivata. Ciò potrebbe provocare un incidente.
63
Pagina
3
4
8
Page 64

Italiano
(2) Interruttore di alimentazione spento (Vedere Fig. 4)
Nelle condizioni di “Interruttore di alimentazione acceso”,
premere e tenere premuto l’interruttore di alimentazione
per più di 1 secondo, quindi l’indicatore di alimentazione
si spegne.
Nella condizione di “Interruttore di alimentazione
acceso”, le funzioni di seguito sono attive.
(3) Selezionare la modalità di funzionamento chiodatura
(Attuazione sequenziale completa/attuazione a contatto)
Dopo aver acceso l’interruttore di alimentazione,
impostare sempre l’attuazione sequenziale completa
come modalità iniziale. (La spia dell’indicatore di
funzionamento chiodatura si illumina in blu.) (Vedere
Fig. 5)
Per cambiare la modalità di funzionamento della
chiodatura, premere una volta l’interruttore di
funzionamento chiodatura. A ogni pressione, la modalità
cambia tra “Sequenziale completa” e “A contatto”.
(Vedere Fig. 6)
Si illumina (blu):
MECCANISMO DI ATTUAZIONE SEQUENZIALE
COMPLETA,
Lampeggia (blu):
MECCANISMO DI ATTUAZIONE A CONTATTO
(4) Controllo del livello di carica residua della batteria
Quando si preme l’interruttore indicatore della batteria,
l’indicatore della batteria indica il livello di carica residua
della batteria tramite lo stato della spia LED, come
indicato di seguito.
Indicatore di stato
La carica della batteria
restante è suffi ciente.
2 luci LED (rosse)
La carica della batteria
restante è circa metà.
1 LED (rosso) si illumina
La carica della batteria
restante è quasi vuota.
Ricaricare la batteria il
1 LED (rosso) lampeggia
(5) Altre funzioni
In caso di errore di funzionamento, le spie LED indicano
come segue.
Indicatore di stato
2 LED (rossi) lampeggiano
2 luci LED lampeggiano in
un intervallo.
• In caso di condizione di
troppo caldo, lampeggiano
a intervalli di 0,5 secondi.
• In caso di condizione
di troppo freddo,
lampeggiano a intervalli di
0,25 secondi.
Dopo 10 secondi, il LED si
illumina e l’interruttore di
alimentazione si spegne
automaticamente.
prima possibile.
La macchina è in
condizione di troppo freddo
(sotto i -5 °C) o di troppo
caldo.
Consentire alla chiodatrice
di raff reddarsi o riscaldarsi
completamente in
condizioni adeguate.
Contattare HiKOKI per
un’ispezione.
2 LED lampeggiano in
arancione, dopo circa 10
secondi, l’interruttore di
alimentazione si spegne
automaticamente.
2. Meccanismo di blocco grilletto (Vedere Fig. 7)
AVVERTENZA
Assicurarsi che il grilletto sia bloccato quando non si
espellono chiodi.
Questa chiodatrice dispone di un meccanismo di blocco
per evitare che i chiodi vengano espulsi.
Impostare la leva di blocco interruttore in posizione
per bloccare il grilletto.
Far scorrere la leva di blocco interruttore verso la
posizione
utilizzata e verso la posizione
3. Prova della chiodatrice
AVVERTENZA
○ Assicurarsi che il grilletto sia bloccato quando non si
espellono chiodi. (Vedere Fig. 7)
○ Non utilizzare mai la chiodatrice quando la leva a
pressione non funziona correttamente.
La macchina impiega un meccanismo preventivo per il
funzionamento a vuoto.
La macchina entra in uno stato in cui la leva a pressione
non può essere premuta. Questo avviene quando il
magazzino non è caricato con chiodi o quando il numero
rimanente di chiodi diventa inferiore a 7 o 9.
ATTENZIONE
Fare attenzione a non lanciare la punta della leva a
pressione sul legno.
Prima di iniziare eff ettivamente il lavoro di chiodatura,
provare la chiodatrice utilizzando il seguente elenco di
controllo. Eseguire i test nel seguente ordine.
Se si verifi ca un funzionamento anomalo, interrompere
l’utilizzo della chiodatrice e contattare un centro di assistenza
autorizzato HiKOKI immediatamente.
(1) RIMUOVERE TUTTI I CHIODI E LA BATTERIA DALLA
CHIODATRICE.
□ TUTTE LE VITI DEVONO ESSERE SERRATE.
□ LA LEVA A PRESSIONE E IL GRILLETTO DEVONO
MUOVERSI SCORREVOLMENTE tirando indietro la
manopola alimentatore.
(2) Installazione della batteria.
Non azionare la leva a pressione o il grilletto durante
l’installazione della batteria. (Vedere Fig. 2)
(3) Accendere l’interruttore di alimentazione. (Vedere Fig. 1)
Accendere l’interruttore di alimentazione premendo e
tenendo premuto l’interruttore di alimentazione per più di
1 secondo.
Assicurarsi che l’indicatore di alimentazione si illumini
in verde e che l’indicatore di funzionamento chiodatura
si illumini in blu. (MECCANISMO DI ATTUAZIONE
SEQUENZIALE COMPLETA)
NOTA
Non premere la leva a pressione e/o tirare il grilletto
durante il processo di attivazione dell’interruttore di
alimentazione.
Farlo impedirà l’attivazione dell’interruttore di
alimentazione.
[Spegnimento automatico]
Quando l’alimentazione viene attivata ma la chiodatrice
non viene utilizzata per 30 minuti, la chiodatrice si
disattiva automaticamente. Per attivarla di nuovo,
premere l’interruttore di alimentazione.
64
quando la chiodatrice deve essere
quando non è in uso.
Page 65

AVVERTENZA
Non lasciare mai la chiodatrice con l’alimentazione
attivata. Ciò potrebbe provocare un incidente.
Indicatore di funzionamento chiodatura
Si illumina (blu):
MECCANISMO DI ATTUAZIONE SEQUENZIALE
COMPLETA,
Lampeggia (blu):
MECCANISMO DI ATTUAZIONE A CONTATTO
Accertarsi che l’indicatore della batteria non lampeggi.
Se l’indicatore della batteria lampeggia in rosso, la
batteria non dispone di suffi ciente carica e deve essere
ricaricata.
(4) Rimuovere il dito dal grilletto e premere la leva a
pressione contro il pezzo mentre si tira indietro la
manopola alimentatore.
□ LA CHIODATRICE NON DEVE FUNZIONARE.
(5) Separare la leva a pressione dal pezzo.
Successivamente, puntare la chiodatrice verso il basso
mentre si tira indietro la manopola alimentatore, tirare
il grilletto e quindi attendere in quella posizione per 5
secondi o più.
□ LA CHIODATRICE NON DEVE FUNZIONARE.
(6) 1 Senza toccare il grilletto, premere la leva a pressione
contro il pezzo mentre si tira indietro la manopola
alimentatore.
Quindi, tirare il grilletto.
□ LA CHIODATRICE DEVE FUNZIONARE.
2 Tenere premuto il grilletto all’indietro e premere di
nuovo la leva a pressione contro il pezzo.
□ LA CHIODATRICE NON DEVE FUNZIONARE.
3 Togliere il dito dal grilletto.
Quindi, 1 viene azionato nuovamente.
□ LA CHIODATRICE DEVE FUNZIONARE.
(7) Separare la leva a pressione dal pezzo, tirare il grilletto.
Premere la leva a pressione contro il pezzo entro
2 secondi.
□ LA CHIODATRICE NON DEVE FUNZIONARE.
(8) Impostare l’indicatore di funzionamento chiodatura in
modalità accesa lampeggiante. (MECCANISMO DI
ATTUAZIONE A CONTATTO)
Premere l’interruttore di funzionamento chiodatura una
volta, assicurandosi che l’indicatore lampeggi in blu.
Separare la leva a pressione dal pezzo, tirare il grilletto.
Premere la leva a pressione contro il pezzo entro
2 secondi.
□ LA CHIODATRICE DEVE FUNZIONARE.
(9) Se non si osserva un funzionamento anomalo, è
possibile caricare i chiodi nella chiodatrice.
Far penetrare nel pezzo chiodi dello stesso tipo di quello
da utilizzare nell’applicazione reale.
□ LA CHIODATRICE DEVE FUNZIONARE
CORRETTAMENTE.
4. Controllo del funzionamento della leva di spinta
AVVERTENZA
Assicurarsi che il grilletto sia bloccato quando non si
espellono chiodi.
Italiano
Prima di controllare il funzionamento della leva di spinta,
accertare sempre che il grilletto sia bloccato e che la
batteria sia scollegata dall’utensile elettrico.
Verifi care che, quando azionata, la leva di spinta scorra
agevolmente.
Se non scorre agevolmente, pulire l’area di scorrimento della
leva di spinta.
5. Caricare i chiodi
AVVERTENZA
Quando si caricano i chiodi nella chiodatrice,
1) rimuovere la batteria dalla chiodatrice;
2) non tirare il grilletto;
3) non premere la leva a pressione; e
4) tenere la chiodatrice puntata verso il basso.
Alimentazione chiodi a 2 azioni!
(1) Inserire una striscia di chiodi nel retro del magazzino.
(Vedere Fig. 8)
(2) Far scorrere la striscia di chiodi in avanti nel magazzino.
(Vedere Fig. 9)
(3) Estrarre all’indietro l’alimentatore chiodi (B) per innestare
la manopola alimentatore sulla striscia di chiodi. (Vedere
Fig. 10)
NOTA
○ Spingere delicatamente l’alimentatore chiodi (B) e la
manopola alimentatore contro il chiodo.
Se l’alimentatore chiodi (B) e la manopola alimentatore
vengono rilasciati dalla parte posteriore del caricatore
e vanno a urtare contro il chiodo, la plastica o carta di
collegamento del chiodo può essere danneggiata.
○ Usare strisce di chiodi con più di 10 chiodi.
○ Usare una striscia di chiodi ininterrotta con chiodi tutti
della stessa lunghezza.
La chiodatrice è ora pronta per l’uso.
Rimozione dei chiodi:
1 Estrarre la manopola alimentatore all’indietro. (Vedere
Fig. 11)
2 Riportare la manopola alimentatore in avanti
delicatamente mentre si preme l’alimentatore chiodi (B).
3 Estrarre i chiodi dal retro del magazzino. (Vedere Fig. 12)
COME UTILIZZARE LA CHIODATRICE
AVVERTENZA
○ Non puntare MAI l’utensile verso se stessi o altri nell’area
di lavoro.
○ Tenere le dita LONTANE dal grilletto quando non
si stanno piantando i chiodi per evitare espulsioni
accidentali.
○ Non usare il cavo elettrico se è danneggiato. Farlo
riparare immediatamente.
○ La scelta del metodo di attivazione è importante.
Leggere e comprendere “1. Procedure di chiodatura” qui
di seguito.
○ Prima di avviare il lavoro, controllare il dispositivo di
commutazione del funzionamento di chiodatura.
Questa chiodatrice HiKOKI include un dispositivo di
commutazione operazione di chiodatura.
Prima di iniziare il lavoro, assicurarsi che il dispositivo di
commutazione sia impostato correttamente.
Se il dispositivo di commutazione non è impostato
correttamente, la chiodatrice non funzionerà
correttamente.
○ Non posizionare mai il volto, le mani o i piedi vicino alla
testina di espulsione durante l’uso.
○ Non piantare i chiodi sopra altri chiodi o con la chiodatrice
a un angolo troppo inclinato; i chiodi possono rimbalzare
e ferire qualcuno.
○ Non piantare i chiodi in tavole sottili o in prossimità di
angoli e bordi del pezzo. I chiodi possono passare
attraverso il pezzo o uscirne e colpire qualcuno.
65
Page 66

Italiano
○ Non piantare mai i chiodi da entrambi i lati di una parete
allo stesso tempo. I chiodi potrebbero entrare nella
parete e attraversarla e colpire una persona sul lato
opposto.
○ Non utilizzare mai la chiodatrice se è difettosa o funziona
in modo anomalo.
○ Non utilizzare la chiodatrice come un martello.
○ Rimuovere tutti i fi ssaggi rimanenti e la batteria dalla
chiodatrice quando:
1) si eseguono la manutenzione e l’ispezione;
2) si controlla il corretto funzionamento di leva a
pressione e grilletto;
3) si elimina un inceppamento;
4) non è in uso;
5) si lascia l’area di lavoro;
6) ci si sposta in un’altra posizione; e
7) la si passa a un’altra persona.
○ Rimuovere la batteria dalla chiodatrice quando:
1) si caricano i chiodi;
2) si ruota il regolatore.
Questa chiodatrice HiKOKI è dotata di un dispositivo di
commutazione dell’operazione di chiodatura.
Usare il MECCANISMO DI ATTUAZIONE SEQUENZIALE
COMPLETA o il MECCANISIMO DI ATTUAZIONE A
CONTATTO in base al tipo di lavoro da eseguire.
Spiegazione delle varie operazioni di chiodatura
○ MECCANISMO DI ATTUAZIONE SEQUENZIALE
COMPLETA:
in primo luogo, premere la leva a pressione contro il
legno; quindi, tirare il grilletto per piantare il chiodo.
Seguire la stessa sequenza per continuare a piantare i
chiodi.
Al termine di un’inchiodatura, non sarà possibile
eff ettuarne un’altra fi no a che il grilletto non viene
rilasciato e premuto di nuovo.
○ MECCANISMO DI ATTUAZIONE A CONTATTO:
L’ATTUAZIONE A CONTATTO può seguire due
sequenze diff erenti, a seconda dell’uso.
Per piantare diversi chiodi:
1. Premere il grilletto.
2. Premere la leva a pressione contro il legno per
piantare il chiodo.
3. Se il grilletto viene tenuto tirato indietro, un chiodo
verrà piantato ogni volta che la leva a pressione è
premuta contro il legno.
Per piantare un solo chiodo:
1. Premere la leva a pressione contro il legno.
2. Tirare il grilletto per piantare il chiodo.
3. Togliere il dito dal grilletto e togliere la chiodatrice dal
legno.
[Meccanismo di blocco espulsione a vuoto]
La macchina impiega un meccanismo preventivo per il
funzionamento a vuoto.
La macchina entra in uno stato in cui la leva a pressione
non può essere premuta. Questo avviene quando il
magazzino non è caricato con chiodi o quando il numero
rimanente di chiodi diventa inferiore a 7 o 9.
ATTENZIONE
Fare attenzione a non lanciare la punta della leva a
pressione sul legno quando la leva a pressione non può
essere premuta in alto.
1. Procedure di chiodatura
Questa chiodatrice è dotata di una leva a pressione e
non funziona se la leva non è premuta.
Ci sono due metodi di azionamento per piantare chiodi
con questa chiodatrice.
Questi sono:
1. Funzionamento intermittente (attivazione a
grilletto):
2. Funzionamento continuo (attivazione con leva a
pressione):
(1) Funzionamento intermittente (attivazione a grilletto)
Utilizzare l’impostazione MECCANISMO DI ATTUAZIONE
SEQUENZIALE COMPLETA. (Vedere Fig. 13)
AVVERTENZA
○ Per il funzionamento intermittente, impostare l’interruttore
di funzionamento chiodatura su MECCANISIMO DI
ATTUAZIONE SEQUENZIALE COMPLETA (l’indicatore
di funzionamento chiodatura si illumina in blu). (cioè
impostare su MECCANISMO DI ATTUAZIONE
SINGOLA).
○ Per evitare la doppia espulsione o l’espulsione
accidentale a causa del rinculo.
1) Impostare su MECCANISMO DI ATTUAZIONE
SEQUENZIALE COMPLETA.
2) Tirare il grilletto rapidamente e saldamente.
1 Impostare l’interruttore di funzionamento chiodatura
su MECCANISIMO DI ATTUAZIONE SEQUENZIALE
COMPLETA (l’indicatore di funzionamento chiodatura si
illumina in blu).
(per impostare su MECCANISMO DI ATTUAZIONE
SEQUENZIALE COMPLETA).
(Impostare il dispositivo di commutazione completamente
sulla modalità con indicatore funzionamento chiodatura
illuminato in blu come mostrato in Fig. 13. In caso
contrario, sarà impostato su MECCANISMO DI
ATTUAZIONE A CONTATTO).
2 Posizionare l’uscita chiodi sul pezzo senza tenere il dito
sul grilletto.
3 Premere la leva a pressione con fermezza fi nché non è
completamente premuta.
4 Tirare il grilletto per piantare un chiodo.
5 Rimuovere il dito dal grilletto e sollevare l’utensile dalla
superfi cie del legno completamente.
Per continuare la chiodatura in un sito diverso, spostare la
chiodatrice lungo il legno, ripetendo i passaggi 2 - 5 in
base alle necessità.
NOTA
Le operazioni 3 e 4 devono essere eff ettuate entro
2 secondi l’una dall’altra. Se passano più di 2 secondi
dopo 3, la chiodatrice non funzionerà correttamente. In
questo caso, riprovare da 3.
(2) Funzionamento continuo (attivazione con leva a
pressione)
Uso del MECCANISMO DI ATTUAZIONE A CONTATTO
(Vedere Fig. 14)
AVVERTENZA
Per evitare la doppia espulsione o l’espulsione
accidentale a causa del rinculo.
1) Non premere la chiodatrice contro il legno con forza
eccessiva.
2) Separare la chiodatrice dal legno quando rincula
dopo la chiodatura.
1 Impostare l’interruttore di funzionamento chiodatura
su MECCANISIMO DI ATTUAZIONE A CONTATTO
(l’indicatore di funzionamento chiodatura lampeggia in
blu).
(per impostare su MECCANISMO DI ATTUAZIONE A
CONTATTO).
(Impostare il dispositivo di commutazione completamente
sull’indicatore funzionamento chiodatura lampeggiante
in blu come mostrato in Fig. 14. In caso contrario, l’unità
non funzionerà correttamente.)
2 Tirare il grilletto con la chiodatrice distante dal pezzo.
3 Premere la leva a pressione contro il pezzo per piantare
un chiodo.
4 Spostare la chiodatrice lungo il pezzo con un movimento
a rimbalzi.
Ciascuna pressione della leva a pressione pianta un
chiodo.
Non appena il numero desiderato di chiodi è stato piantato,
rimuovere il dito dal grilletto.
66
Page 67

NOTA
Le operazioni 2 e 3 devono essere eff ettuate entro
2 secondi l’una dall’altra. Se passano più di 2 secondi
dopo 2, la chiodatrice non funzionerà correttamente. In
questo caso, riprovare da 2.
AVVERTENZA
○
Tenere le dita lontane dal grilletto tranne durante
l’operazione di chiodatura, perché potrebbero verifi carsi
gravi lesioni se la leva a pressione contatta accidentalmente
se stessi o altre persone nell’area di lavoro.
○ Tenere le mani e il corpo lontani dall’area di scarico.
Questa chiodatrice HiKOKI potrebbe rimbalzare a causa
del rinculo dopo aver piantato un chiodo e un altro chiodo
indesiderato potrebbe essere piantato, con la possibilità
di causare lesioni.
NOTA
○ Se tutte le avvertenze e le istruzioni di sicurezza
vengono seguite, il funzionamento sicuro è possibile
con tutti e due i sistemi: MECCANISMO DI ATTUZIONE
SEQUENZIALE COMPLETA, MECCANISMO DI
ATTUAZIONE A CONTATTO.
○ Maneggiare sempre i chiodi e la confezione con
attenzione. Se vengono fatti cadere dei chiodi, il
legame tra loro potrebbe rompersi, causando errori di
alimentazione e inceppamenti.
○ Dopo la chiodatura:
1) rimuovere la batteria dalla chiodatrice;
2) togliere tutti i chiodi dalla chiodatrice;
2. Regolazione della profondità di chiodatura
Per garantire che ciascun chiodo penetri alla stessa
profondità, assicurarsi che la chiodatrice sia sempre
tenuta saldamente contro il pezzo.
Se i chiodi sono piantati troppo profondamente o troppo
superfi cialmente nel pezzo, regolare la chiodatura nel
seguente ordine.
1 Rimuovere la batteria dalla chiodatrice. (Vedere Fig. 15)
2 Se i chiodi sono piantati troppo profondamente, ruotare il
regolatore sul lato superfi ciale. (Vedere Fig. 16)
Le regolazioni sono in incrementi di mezzo giro.
Se i chiodi sono piantati troppo superfi cialmente, ruotare
il regolatore sul lato profondo. (Vedere Fig. 17)
3 Smettere di ruotare il regolatore quando è stata raggiunta
una posizione adatta in un test di chiodatura.
4 Collegare la batteria alla chiodatrice.
INDOSSARE SEMPRE OCCHIALI DI SICUREZZA.
Eseguire un test di chiodatura.
5 Rimuovere la batteria dalla chiodatrice.
6 Scegliere una posizione adatta per il regolatore.
3. Uso del gancio (Vedere Fig. 18, 19, 20)
AVVERTENZA
Quando si utilizza il gancio, spegnere l’interruttore di
alimentazione (spia verde “OFF”). Prestare suffi ciente
attenzione in modo che l’apparecchio principale non
cada.
Se l’utensile cade, vi è il rischio di incidenti.
Il gancio può essere installato sul lato sinistro o su quello
destro.
1 Rimuovere la batteria, quindi rimuovere tutti i chiodi
restanti dal magazzino.
2 Tenere saldamente l’unità principale e rimuovere la vite
con un cacciavite. (Vedere Fig. 18)
3 Rimuovere il gancio e la piastra del gancio. (Vedere Fig.
19)
4 Installare il gancio sull’altro lato e fi ssare saldamente con
la vite. (Vedere Fig. 20)
NOTA
Il gancio può essere utilizzato come appendino.
4. Eliminazione di un inceppamento
Se ci sono chiodi inceppati nella testina di espulsione,
rimuoverli e regolare la chiodatura nel seguente ordine.
Italiano
ATTENZIONE
Rimuovere la batteria dalla chiodatrice.
1 Rimuovere la batteria dalla chiodatrice.
2 Rimuovere tutti i chiodi.
3 Rimuovere i bulloni M5 con la chiave. (Vedere Fig. 21)
4 Estrarre il caricatore lontano dalla testina sparapunti ed
eliminare l'inceppamento. (Vedere Fig. 22)
ATTENZIONE
○ Non colpire MAI la lama del driver.
○ Non puntare MAI l’utensile verso se stessi o un’altra
persona, per evitare il rischio di lesioni da errori di
espulsione.
Anche quando la batteria viene rimossa dalla
chiodatrice, c’è sempre energia di aria compressa che
rimane all’interno.
5 Fissare il caricatore all'iniettore e serrare con il bullone M5.
NOTA
In caso di inceppamento frequente, contattare un centro
di assistenza autorizzato HiKOKI.
5. Uso del tappo punta (Vedere Fig. 23)
AVVERTENZA
Durante il montaggio o lo smontaggio del tappo punta,
assicurarsi di rimuovere il dito dal grilletto e di rimuovere
tutti i fi ssaggi rimanenti e la batteria dalla chiodatrice.
Se si desidera proteggere la superfi cie del pezzo da graffi
o marcature prodotte dalla leva a pressione, fi ssare il tappo
punta accessorio sulla leva a pressione.
1 Rimuovere tutti i fi ssaggi rimanenti e la batteria dalla
chiodatrice.
2 Porre il tappo punta sul dito della leva a pressione.
3 Il tappo punta è contrassegnato per indicare il punto di
uscita del chiodo, rendendo più facile l’allineamento.
NOTA
Il tappo punta potrebbe ridurre la profondità di chiodatura
a causa del suo spessore. La regolazione della profondità
di chiodatura è necessaria.
MANUTENZIONE E ISPEZIONE
ATTENZIONE
Assicurarsi di rimuovere tutti i fi ssaggi rimanenti e la
batteria dalla chiodatrice prima della manutenzione e
dell’ispezione.
1. Ispezione del magazzino
1 Rimuovere la batteria dalla chiodatrice.
2 Pulire il magazzino. Rimuovere la polvere e i trucioli
di legno che potrebbero essersi accumulati nel
magazzino.
ATTENZIONE
Controllare che l’alimentatore chiodi scorra regolarmente
tirandolo con un dito.
Se il movimento non è scorrevole, i chiodi possono
essere piantati a un angolo irregolare e ferire qualcuno.
2. Ispezione delle viti di montaggio
Ispezionare regolarmente le viti di montaggio e
assicurarsi che siano ben fi ssate. Se una di queste
dovesse essere allentata, riserrarla immediatamente. Si
rischia in caso contrario di provocare incidenti pericolosi.
3. Manutenzione del motore
L’avvolgimento del motore è il vero e proprio “cuore”
degli attrezzi elettrici. Fare attenzione a non danneggiare
l’avvolgimento e/o non bagnarlo con olio o acqua.
4. Pulizia della carcassa dell’utensile
Se l’utensile elettrico è sporco, pulirlo con un panno
morbido e asciutto o con un panno inumidito con acqua
insaponata. Non usare solventi cloridrici, benzina o
diluenti per benzina, in quanto potrebbero deformare la
plastica.
5. Conservazione
Conservare l’utensile elettrico in un luogo dove la
temperatura sia inferiore a 40 °C e lontano dalla portata
dei bambini.
67
Page 68

Italiano
NOTA
Conservazione delle batterie agli ioni di litio.
Prima di riporre le batterie agli ioni di litio, assicurarsi di
averle caricate completamente.
Riporre le batterie per periodi prolungati (3 mesi o
più) con un basso livello di carica potrebbe provocare
il deterioramento delle prestazioni o la signifi cativa
riduzione del tempo di utilizzo delle batterie, o potrebbe
rendere le batterie incapaci di mantenere la carica.
Tuttavia, la signifi cativa riduzione del tempo di utilizzo
delle batterie può essere risolta caricando e utilizzando
le batterie ripetutamente da due a cinque volte.
Se il tempo di utilizzo delle batterie rimane estremamente
ridotto nonostante le ricariche ripetute, considerare le
batterie inutilizzabili e acquistarne di nuove.
ATTENZIONE
Nell’uso e nella manutenzione degli utensili elettrici
devono essere osservate le normative di sicurezza e i
criteri prescritti in ciascun paese.
Avviso importante sulle batterie per gli utensili
elettrici a batteria HiKOKI
Utilizzare sempre una delle nostre batterie originali.
Non possiamo garantire la sicurezza e le prestazioni
dell’utensile elettrico a batteria quando esso viene
utilizzato con batterie diverse da quelle da noi designate,
o quando la batteria viene smontata e modifi cata (per
esempio lo smontaggio e la sostituzione di pile o altre
parti interne).
GARANZIA
Garantiamo gli Utensili Elettrici HiKOKI in conformità alle
specifi che normative imposte dalla legge e dai paesi.
Questa garanzia non copre difetti o danni dovuti a uso
erroneo, abuso o normale usura. In caso di lamentele, si
prega di inviare l’Utensile Elettrico, non smontato, insieme
al CERTIFICATO DI GARANZIA che si trova al termine di
queste Istruzioni per l’uso, ad un Centro di Assistenza
Autorizzato HiKOKI.
Informazioni sul rumore
Le caratteristiche del rumore sono valutate in accordo con
EN 792-13:
Livello di potenza acustica per singolo colpo (tipo A)
Livello di pressione acustica per singolo colpo (tipo A)
alla stazione di lavoro L
Incertezza KpA: 3 dB
Questi valori rappresentano i valori caratteristici dell’utensile
e non il rumore che si sviluppa durante l’utilizzo. Il rumore che
si sviluppa durante l’uso dipende ad esempio dall’ambiente
di lavoro, dal supporto e dal numero di operazioni.
Dipendono dalle condizioni dell’ambiente di lavoro e dai
pezzi da lavorare, le misure individuali di attenuazione
del rumore che potrebbe essere necessario eseguire,
come disporre i pezzi da lavorare su dei supporti scaricavibrazioni, in modo da prevenire le vibrazioni del pezzo
tramite un fi ssaggio o una copertura, ecc.
In casi speciali è necessario indossare l’equipaggiamento di
protezione per l’udito.
Informazioni sulle vibrazioni
I tipi di vibrazioni caratteristiche sono valutate in accordo con
il EN 792-13: 4,6 m/s
Incertezza K = 1,5 m/s
Questi valori rappresentano i valori caratteristici dell’utensile
e non considerano l’infl uenza del sistema mani-braccia
durante l’uso. L’infl uenza del sistema mani-braccia durante
l’utilizzo, dipende per esempio dalla forza con cui aff errate
l’utensile, dalla pressione che applicate, dalla direzione del
lavoro, dalla regolazione dell’energia applicata, dal pezzo da
lavorare e dal supporto utilizzato.
Il valore totale di emissione vibrazioni dichiarato è stato
misurato in base al metodo di test standard e può essere
utilizzato per confrontare un utensile con un altro.
Può essere inoltre utilizzato per la stima preliminare
dell’esposizione.
ATTENZIONE
○ Il valore di emissione vibrazioni durante l’uso eff ettivo
dell’utensile può essere diverso dal valore totale
dichiarato in base alle modalità di utilizzo dell’utensile
stesso.
○ Identifi care le misure di sicurezza per la protezione
dell’operatore basate su stima dell’esposizione nelle
eff ettive condizioni di utilizzo (prendendo in considerazione
tutte le parti del ciclo di funzionamento come i tempi in cui
l’utensile resta spento e quando funziona senza essere
utilizzato in aggiunta al tempo di avvio).
2
2
L
WA, 1s, d = 101 dB
pA, 1s, d = 90 dB
Tabella di manutenzione
AZIONE PERCHÉ COME
Pulire il magazzino e il
meccanismo di alimentazione.
Mantenere il funzionamento
corretto della leva a pressione.
NOTA
A causa del continuo programma di ricerche e sviluppo della
HiKOKI, le caratteristiche riportate in questo foglio sono
soggette cambiamenti senza preventiva comunicazione.
Evitare un inceppamento. Pulire giornalmente a soffi o.
Promuovere la sicurezza dell’operatore
e un funzionamento effi ciente della
chiodatrice.
Pulire giornalmente a soffi o.
68
Page 69

Italiano
RISOLUZIONE DEI PROBLEMI
Utilizzare i controlli nella tabella sottostante se l’utensile non funziona normalmente. Se ciò non risolve il problema, rivolgersi
al proprio rivenditore o a un centro di assistenza autorizzato HiKOKI.
PROBLEMA METODO DI CONTROLLO CORREZIONE
L’interruttore di alimentazione
non si accende.
Si attiva una volta, ma si
spegne automaticamente.
La chiodatrice non funziona
(Interruttore alimentazione
acceso).
La chiodatrice funziona, ma
nessun chiodo viene piantato.
Chiodatura debole.
Ciclo lento.
Pianta i chiodi troppo in
profondità.
Salta i chiodi.
Alimentazione intermittente.
I chiodi si inceppano.
Il chiodo piantato è piegato.
Carica della batteria bassa. Caricare la batteria.
Componenti elettronici interni danneggiati. Contattare HiKOKI per la sostituzione.
La leva a pressione e/o il grilletto sono in
stato acceso?
Non è stata eseguita alcuna operazione
per oltre 30 minuti?
(Funzione di spegnimento automatico)
La chiodatrice non è suffi cientemente
premuta contro il pezzo.
Grilletto insuffi cientemente tirato. Tirare il grilletto saldamente.
Più di 2 secondi sono passati dalla leva
a pressione attivata al grilletto attivato (o
dal grilletto attivato alla leva a pressione
attivata).
Meccanismo di prevenzione attivato.
(Non ci sono chiodi o fi ssaggi rimanenti o
sono troppo pochi)
La leva di blocco (funzione blocco grilletto)
è in posizione “ON”.
La macchina è troppo fredda (sotto -5 °C)
o troppo calda.
Componenti elettronici interni danneggiati. Contattare HiKOKI per la sostituzione.
Il magazzino è sporco. Pulire a soffi o e strofi nare il magazzino.
Controllare se si è verifi cato un
inceppamento.
La lama del driver è usurata o
danneggiata?
La molla del nastro è indebolita o
danneggiata?
Alimentatore chiodi danneggiato? Sostituire l’alimentatore chiodi.
Verifi care la presenza di chiodi corretti. Utilizzare solo i chiodi consigliati.
Controllare la posizione del regolatore
della profondità di chiodatura.
La lama del driver è usurata? Contattare HiKOKI per la sostituzione.
La pressione aria compressa è diventata
bassa.
Componenti elettronici interni danneggiati. Contattare HiKOKI per la sostituzione.
Controllare la posizione del regolatore
della profondità di chiodatura.
Verifi care la presenza di chiodi corretti. Utilizzare solo i chiodi consigliati.
Alimentatore chiodi danneggiato? Sostituire l’alimentatore chiodi.
La molla del nastro è indebolita o
danneggiata?
La lama del driver è usurata o danneggiata?
Verifi care la presenza di chiodi corretti. Utilizzare solo i chiodi consigliati.
La lama del driver è usurata o danneggiata?
Tenere la leva a pressione e il grilletto in
stato di spegnimento.
Premere e tenere premuto l’interruttore
di alimentazione per più di 1 secondo per
passare a “ON”
Premere e tenere premuta saldamente la
chiodatrice sul pezzo in modo completo.
Assicurarsi che passino meno di 2
secondi tra la leva a pressione attivata e il
grilletto attivato (o tra il grilletto attivato e la
leva a pressione attivata).
Ricaricare i chiodi nel magazzino.
Impostare la leva di blocco in posizione
“OFF”. (Fare riferimento a Fig. 7)
Consentire alla chiodatrice di raff reddarsi
o riscaldarsi completamente in condizioni
adeguate.
Eliminare l’inceppamento (fare riferimento
a Fig. 21, 22).
Contattare HiKOKI per la sostituzione.
Sostituire la molla del nastro.
Regolare nuovamente secondo la
Fig. 16, 17.
Contattare HiKOKI per la sostituzione.
Regolare nuovamente secondo la
Fig. 16, 17.
Sostituire la molla del nastro.
Contattare HiKOKI per la sostituzione.
Contattare HiKOKI per la sostituzione.
69
Page 70

Nederlands
(Vertaling van de oorspronkelijke instructies)
ALGEMENE
VEILIGHEIDSWAARSCHUWINGEN
VOOR ELEKTRISCH GEREEDSCHAP
WAARSCHUWING
Lees alle waarschuwingen en instructies aandachtig
door.
Nalating om de waarschuwingen en instructies op te volgen
kan in een elektrische schok, brand en/of ernstig letsel
resulteren.
Bewaar alle waarschuwingen en aanwijzingen voor
eventuele naslag in de toekomst.
De term „elektrisch gereedschap” heeft zowel betrekking
op elektrisch gereedschap dat via de netvoeding van
stroom wordt voorzien als gereedschap dat via een accu
(snoerloos) van stroom wordt voorzien.
1) Veiligheid van de werkplek
a) Zorg voor een schone en goed verlichte
werkplek.
Een rommelige of donkere werkplek verhoogt de
kans op ongelukken.
b) Gebruik het elektrisch gereedschap niet in
een omgeving met ontvlambare of explosieve
vloeistoff en, gassen of stof.
Elektrisch gereedschap kan vonken afgeven.
Deze vonkjes kunnen stofdeeltjes of gassen doen
ontbranden.
c) Houd kinderen en andere omstanders tijdens
het gebruik van elektrisch gereedschap uit de
buurt.
Afl eidingen kunnen gevaarlijk zijn.
2) Elektrische veiligheid
a) De stekker van het elektrisch gereedschap
moet geschikt zijn voor aansluiting op het
stopcontact.
De stekker mag op geen enkele manier
gemodifi ceerd worden.
Gebruik geen verloopstekker met geaard
elektrisch gereedschap.
Deugdelijke stekkers en geschikte stopcontacten
verminderen het risico op een elektrische schok.
b) Vermijd lichamelijk contact met geaarde
oppervlakken zoals leidingen, radiatoren,
fornuizen en koelkasten.
Wanneer uw lichaam geaard is, loopt u een groter
risico op een elektrische schok.
c) Stel het elektrisch gereedschap niet bloot aan
regen of vochtige omstandigheden.
Het risico op een elektrische schok wordt vergroot
wanneer er water in het elektrische gereedschap
terechtkomt.
d) Behandel het snoer voorzichtig. Gebruik het
snoer niet om het elektrisch gereedschap aan te
dragen of mee te slepen en gebruik het snoer
niet om de stekker uit het stopcontact te trekken.
Houd het snoer uit de buurt van warmtebronnen,
olie, scherpe randen of bewegende onderdelen.
Een beschadigd of verward snoer verhoogt het risico
op een elektrische schok.
e) Gebruik buitenshuis een verlengsnoer dat
specifi ek geschikt is voor het gebruik buiten.
Het gebruik van een snoer dat specifi ek geschikt is
voor gebruik buitenshuis vermindert het risico op een
elektrische schok.
f) Als het elektrisch gereedschap in een vochtige
omgeving gebruikt moet worden, dient een
voeding met aardlekschakelaar te worden
gebruikt.
Gebruik van een aardlekschakelaar vermindert de
kans op een elektrische schok.
3) Persoonlijke veiligheid
a) Blijf waakzaam, let voortdurend op uw werk
en gebruik uw gezond verstand wanneer u
elektrisch gereedschap gebruikt.
Gebruik geen elektrisch gereedschap wanneer
u moe bent of onder invloed van drugs, alcohol
of medicijnen.
Eén moment van onoplettendheid kan in ernstig
lichamelijk letsel resulteren.
b) Gebruik persoonlijke beschermingsmiddelen.
Draag altijd oogbescherming.
Beschermingsmiddelen zoals stofmaskers,
anti-slip veiligheidsschoenen, een helm of
gehoorbescherming vermindert het risico op
lichamelijk letsel.
c) Voorkom dat het gereedschap per ongeluk
kan starten. Controleer of de schakelaar in de
uit-stand staat voordat u de voeding en/of de
accu aansluit, het gereedschap oppakt of gaat
dragen.
Zorg ervoor dat u tijdens het verplaatsen van het
elektrisch gereedschap uw vingers uit de buurt van
de schakelaar houdt en sluit de stroombron niet aan
terwijl de schakelaar op aan staat om ongelukken te
vermijden.
d) Verwijder sleutels en moersleutels uit
het gereedschap voordat u het elektrisch
gereedschap aanzet.
Een (moer-)sleutel die op een bewegend onderdeel
van het elektrisch gereedschap bevestigd is kan in
lichamelijk letsel resulteren.
e) Reik niet te ver. Zorg ervoor dat u te allen tijde
stevig staat en uw evenwicht behoudt.
Op deze manier heeft u tijdens een onverwachte
situatie meer controle over het elektrisch
gereedschap.
f) Draag geschikte kleding. Draag geen loszittende
kleding of sieraden. Houd uw haar, kleding en
handschoenen uit de buurt van bewegende
onderdelen.
Loszittende kleding, sieraden en lang haar kunnen in
de bewegende onderdelen verstrikt raken.
g) Indien het elektrisch gereedschap van een
aansluiting voor stofafzuiging is voorzien, dan
dient u ervoor te zorgen dat de stofafzuiging
aangesloten en op de juiste manier gebruikt
wordt.
Het gebruik van stofafzuiging vermindert eventuele
stofgerelateerde risico’s.
4) Bediening en onderhoud van elektrisch
gereedschap
a) Het elektrisch gereedschap mag niet geforceerd
worden. Gebruik het juiste gereedschap voor
het karwei.
U kunt de klus beter en veiliger uitvoeren wanneer u
het juiste elektrische gereedschap gebruikt.
b) Gebruik het elektrisch gereedschap niet als de
schakelaar niet goed werkt.
Elektrisch gereedschap dat niet via de schakelaar
bediend kan worden is gevaarlijk en moet
onmiddellijk gerepareerd worden.
c) Haal de stekker uit het stopcontact en/of de
accu van het elektrisch gereedschap voor u
afstellingen verricht, accessoires verwisselt of
voordat u het elektrisch gereedschap opbergt.
Dergelijke preventieve veiligheidsmaatregelen
verminderen het risico dat het elektrisch gereedschap
per ongeluk opstart.
70
Page 71

d) Berg elektrisch gereedschap buiten het bereik
van kinderen op en sta niet toe dat personen die
niet bekend zijn met het juiste gebruik van het
gereedschap of deze voorschriften dit elektrisch
gereedschap gebruiken.
Eletrisch gereedschap is gevaarlijk in onbevoegde
handen.
e) Het elektrisch gereedschap moet regelmatig
onderhouden worden. Controleer het
gereedschap op een foutieve uitlijning,
vastgelopen of defecte bewegende onderdelen
en andere problemen die van invloed zijn op de
juiste werking van het gereedschap.
Indien het gereedschap defect of beschadigd
is moet het gerepareerd worden voordat u het
gereedschap opnieuw gebruikt.
Slecht onderhouden elektrisch gereedschap is
verantwoordelijk voor een groot aantal doe-het-zelf
ongelukken.
f) Houd snijwerktuigen scherp en schoon.
Goed onderhouden snijwerktuigen met scherpe
snijranden lopen minder snel vast en zijn
gemakkelijker in het gebruik.
g) Elektrisch gereedschap, toebehoren, bits
enz. moeten in overeenstemming met deze
instructies worden gebruikt, waarbij de
werkomstandigheden en het werk dat gedaan
moet worden in overweging moeten worden
genomen.
Gebruik van het elektrisch gereedschap voor andere
doeleinden dan waarvoor het is bedoeld, kan
resulteren in een gevaarlijke situatie.
5) Gebruik en onderhoud van de accu
a) Herlaad alleen met de lader die door de fabrikant
wordt gespecifi ceerd.
Een lader die geschikt is voor één bepaald type accu
kan brandgevaar veroorzaken bij gebruik met een
andere accu.
b) Gebruik elektrisch gereedschap alleen met de
specifi ek daarvoor bestemde accu’s.
Het gebruik van andere accu’s kan letsel of brand
veroorzaken.
c) Wanneer de accu niet in gebruik is, moet u
deze uit de buurt houden van andere metalen
voorwerpen zoals paperclips, munten,
sleutels, spijkers, schroeven of andere kleine
metalen voorwerpen die de contacten zouden
kortsluiten.
Kortsluiten van de accucontacten kan brandwonden
of brand veroorzaken.
d) Bij een verkeerd gebruik kan er vloeistof uit de
accu lekken; vermijd elk contact daarmee. Als u
dit onverhoopt toch aanraakt, moet u goed met
water spoelen. Indien de vloeistof in contact
komt met de ogen, moet u ook onmiddellijk
medische hulp inroepen.
Vloeistof die uit de accu lekt kan irritatie en
brandwonden veroorzaken.
6) Onderhoud
a) Het gereedschap mag uitsluitend door bevoegd
onderhoudspersoneel worden onderhouden
en er mag daarbij uitsluitend gebruik gemaakt
worden van identieke vervangingsonderdelen.
Hierdoor kunt u er op rekenen dat het elektrisch
gereedschap veilig blijft.
VOORZORGSMAATREGELEN
Houd kinderen en kwetsbare personen op een afstand.
Het gereedschap moet na gebruik buiten het bereik
van kinderen en andere kwetsbare personen worden
opgeborgen.
Nederlands
SNOERLOOS STRIP SPIJKERPISTOOL
VEILIGHEIDSWAARSCHUWINGEN
1. Ga er altijd van uit dat het gereedschap geladen is.
Onvoorzichtigheid bij werkzaamheden met het
spijkerpistool kunnen resulteren in het onverwacht
afschieten van bevestigingsmiddelen en persoonlijk
letsel veroorzaken.
2. Richt het gereedschap niet naar uzelf of naar een
andere persoon in de buurt.
Wanneer het gereedschap per ongeluk wordt bediend,
kan dit letsel veroorzaken.
3. Activeer het gereedschap niet tenzij dit stevig tegen
het werkstuk is geplaatst.
Als het gereedschap niet in contact is met het werkstuk,
kan de niet de verkeerde kant op worden geschoten.
4. Koppel het gereedschap los van de voeding
wanneer een spijker vastloopt in het gereedschap.
Tijdens het verwijderen van een vastgelopen
bevestigingsmiddel, kan het spijkerpistool per ongeluk
worden ingeschakeld als het is aangesloten.
5. Ga voorzichtig te werk bij het verwijderen van een
vastgelopen niet.
Het mechanisme kan nog onder druk staan en de niet
zou met kracht afgeschoten kunnen worden wanneer u
deze uit de vastgelopen positie probeert te verwijderen.
6. Gebruik dit spijkerpistool niet voor het bevestigen
van elektrische kabels.
Het nietapparaat is niet ontworpen voor de montage
van elektrische kabels en kan de isolatie van de kabels
beschadigen met een elektrische schok of brand tot
gevolg.
AANVULLENDE
VEILIGHEIDSWAARSCHUWINGEN
1. Veiligheid door correct gebruik.
Dit pneumatisch gereedschap is ontworpen om spijkers
in hout en vergelijkbare materialen te drijven. Gebruik het
apparaat alleen voor dit doel.
2. Wees beducht voor ontsteking- en
ontploffi ngsgevaar.
Omdat tijdens het spijkeren vonken geslagen
kunnen worden, is het gevaarlijk om dit pneumatisch
gereedschap te gebruiken in de buurt van lak,
verf, benzine, thinner, gasolie, gas, lijmsoorten, en
vergelijkbaar ontvlambare materialen die door de vonken
zouden kunnen ontvlammen of exploderen. Onder geen
enkele voorwaarde mag dit pneumatisch gereedschap
daarom gebruikt worden in de nabijheid van dergelijke
ontvlambare materialen.
3. Draag altijd uw oogbescherming (veiligheidsbril).
een bedreiging voor uw gezichtsvermogen.
Oogbescherming is verkrijgbaar in elke
gereedschapswinkel. Draag altijd een vorm van
oogbescherming wanneer u met dit apparaat werkt. Er
zijn speciale maskers of veiligheidsbrillen die over uw bril
passen.
Werkgevers behoren er op toe te zien dat
oogbescherming gedragen wordt op de werkplek.
4. Bescherm uw hoofd en uw oren.
Draagt u alstublieft een helm en oorbeschermers als u
spijkerwerk doet. Let u er ook op dat de mensen rondom
u, afhankelijk van de omstandigheden, hun helmen en
oorbeschermers dragen.
71
Draag altijd uw oogbescherming wanneer
u met dit pneumatisch gereedschap werkt,
en zorg ervoor dat de mensen in uw
omgeving hetzelfde doen. De mogelijkheid
dat rondvliegende spijkers die niet goed
geraakt werden in uw oog terechtkomen is
Page 72
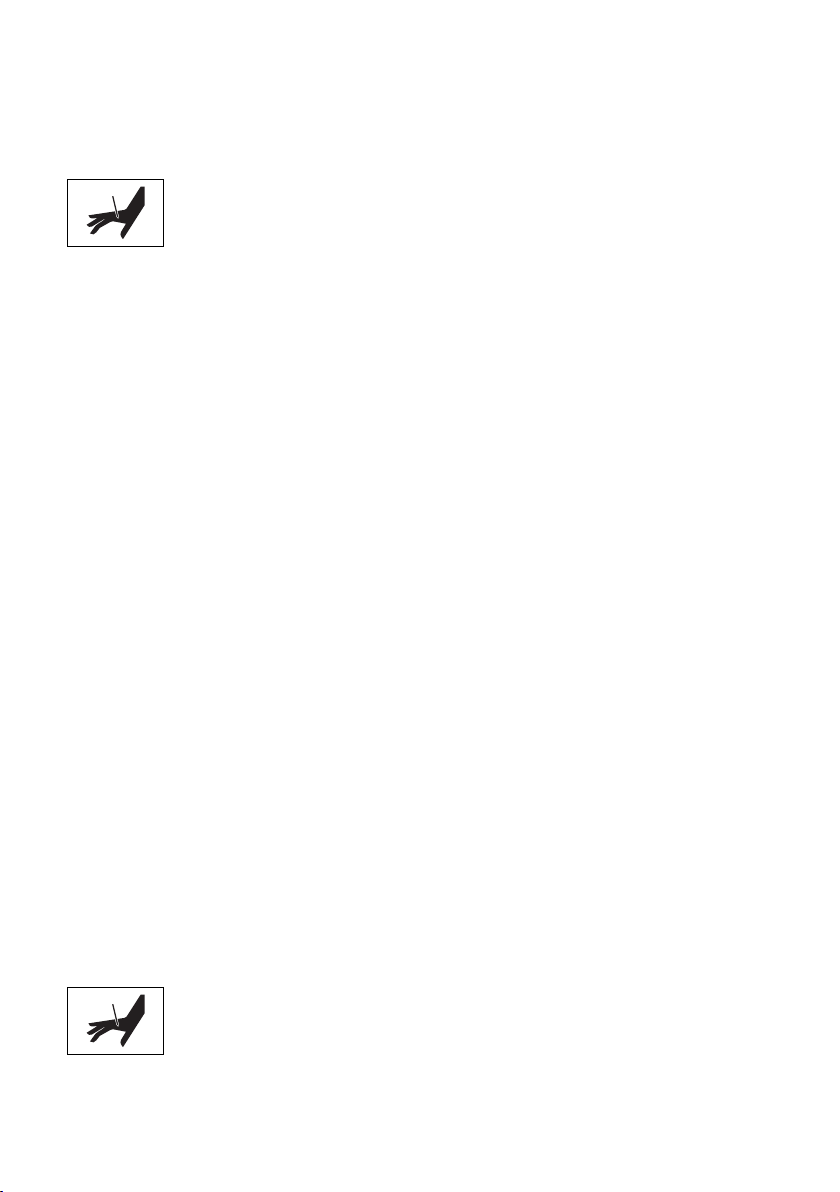
Nederlands
5. Let op de mensen die dicht bij u werken.
Het zou bijzonder gevaarlijk kunnen zijn als spijkers die
niet goed ingeslagen zijn anderen zouden kunnen raken.
Let daarom ook altijd op de veiligheid van de mensen
rondom u wanneer u met dit pneumatisch gereedschap
werkt. Let er altijd op dat er niet iemands lichaam, hand
of voet dichtbij de spijker-uitgang is.
6. Richt het spijkerapparaat nooit op iemand.
Indien het apparaat op personen wordt
wanneer u per ongeluk het apparaat aanzet. Bij het
aansluiten en loskoppelen van de accu, tijdens het laden
van spijkers of soortgelijke handelingen, zorg ervoor dat
de spijkeruitgang niet naar iemand gericht is (inclusief
uzelf). Zelfs wanneer er geen spijkers in het apparaat
zitten is het gevaarlijk om het apparaat af te doen gaan
terwijl het in de richting van een persoon wijst; probeer
dat dus niet. Geen geintjes. Heb respect en ontzag voor
het gereedschap waar u mee werkt.
7. Controleer de hendel vóór gebruik.
Zorg ervoor dat de hendel goed functioneert. (De
hendel kan „Veiligheid” worden genoemd.) Gebruik het
spijkerpistool nooit tenzij de hendel goed functioneert,
anders kan het spijkerpistool onverwachts een
bevestigingsmiddel vernagelen. Verwijder of knoei niet
met de hendel, anders wordt de hendel onbruikbaar.
8. Keuze van activatiemethode is belangrijk.
Lees en begrijp onderstaande paragraaf „HET GEBRUIK
VAN HET SPIJKERPISTOOL” op pagina 80.
9. Voordat u dit product gebruikt, dient u ervoor te
zorgen dat het goed werkt volgens de inhoud van
„Het testen van het spijkerpistool” op pagina 79.
10. Gebruik alleen de voorgeschreven spijkers.
Gebruik nooit andere spijkers dan de in deze handleiding
beschreven en gespecifi ceerde.
11. Wees voorzichtig bij het aansluiten van de batterij.
Let op de volgende punten om te voorkomen dat het
apparaat per ongeluk afgaat wanneer u de batterij
bevestigt en spijkers laadt.
○ Raak de trekker niet aan.
○ Laat de kop van het apparaat niet in contact komen
met enig oppervlak.
○ Houd de kop van het apparaat naar beneden gericht.
Volg bovenstaande instructies zorgvuldig op en let er
altijd op dat er zich geen lichaamsdelen, handen of
benen voor de spijker-uitgang bevinden.
12. Houd niet achteloos uw vinger aan de trekker.
Breng uw vinger alleen aan de trekker wanneer u
inderdaad gaat spijkeren. Als u dit pneumatisch
gereedschap draagt, of u geeft het aan iemand anders
met uw vinger aan de trekker, kunt u per ongeluk een
spijker afschieten en een ongeval veroorzaken.
13. Druk de spijker-uitgang stevig tegen het te spijkeren
materiaal.
Druk de spijker-uitgang stevig tegen het te spijkeren
materiaal wanneer u gaat spijkeren. De spijkers kunnen
terugkaatsen als u de spijker-uitgang niet goed houdt.
14. Houd handen en voeten weg van de kop van het
apparaat wanneer er gespijkerd wordt.
Ga er altijd van uit dat het apparaat
geladen is.
gericht kunnen ernstige ongelukken
worden veroorzaakt, bijvoorbeeld
Het kan ernstige gevolgen hebben
wanneer een spijker per ongeluk een
hand of voet raakt.
15. Wees bedacht op de terugslag van het pneumatisch
gereedschap.
Breng uw hoofd of andere lichaamsdelen niet dicht bij
de bovenkant van het apparaat terwijl het in werking
is. Dit is gevaarlijk omdat het apparaat een krachtige
terugslag kan geven als bijvoorbeeld de spijker die wordt
ingedreven een oude spijker of een knoest in het hout
raakt.
16. Wees voorzichtig met dubbel afschieten door
terugslag.
Als de hendel per ongeluk opnieuw in contact komt
met het werkstuk na terugslag, wordt een ongewenste
bevestiging vernageld.
Om dit ongewenste dubbel afschieten te voorkomen,
○ Intermitterende bediening (trekker afvuren)
1) Stel het schakelbedieningsapparaat in op VOLLEDIG
OPEENVOLGEND BEDIENINGSMECHANISME.
2) Haal de trekker snel en stevig over.
○ Continue bediening (Hendel afvuren)
1) Druk het spijkerpistool niet met overdreven kracht
tegen het hout.
2) Scheid het nagelpistool van het hout bij terugslag na
het bevestigen.
17. Wees voorzichtig wanneer u dun plaatmateriaal of
de hoeken van een stuk hout gaat spijkeren.
Wanneer u dun plaatmateriaal spijkert, kunnen de
spijkers er dwars doorheen vliegen, wat ook kan
gebeuren als u de hoek van een stuk hout spijkert en
de spijker afketst. In dergelijke gevallen dient u ervoor
te zorgen dat er zich niemand (en ook geen handen,
voeten e.d.) achter het dunne plaatmateriaal of naast het
hout dat u wilt spijkeren bevindt.
18. Tegelijkertijd spijkeren aan beide zijden van een
wand is gevaarlijk.
Onder geen enkele voorwaarde mag u aan beide zijden
van een wand samen met iemand anders staan te
spijkeren. Dit kan bijzonder gevaarlijk zijn daar de spijkers
door de wand kunnen dringen en zo verwondingen
kunnen veroorzaken.
19. Gebruik het gereedschap niet op stellingen,
ladders.
Het gereedschap mag niet worden gebruikt in
bijvoorbeeld de volgende gevallen:
– wanneer u van de ene spijkerplaats naar de andere
moet via een steiger, trap, ladder of via dergelijke
constructies, bijv. lattenwerk,
– dichtmaken van dozen of kratten,
– vastzetten van veiligheidssystemen voor het vervoer
enz. op voertuigen en wagons
20. Verwijder alle resterende bevestigingen en de accu
uit het spijkerpistool wanneer:
1) u bezig bent met inspectie en onderhoud;
2) u controleert op goede werking van hendel en
trekker;
3) verhelpen van een verstopping;
4) het apparaat niet in gebruik is;
5) u uw werkgebied verlaat;
6) u het naar een andere locatie verplaatst; en
7) u het aan een ander geeft.
Probeer het apparaat nooit te repareren of een storing te
verhelpen als u de accu en de resterende bevestigingen
niet hebt verwijderd van het spijkerpistool.
Het spijkerpistool mag nooit zonder toezicht worden
achtergelaten aangezien mensen die niet bekend zijn
met het apparaat, het misschien gebruiken en zichzelf
kunnen verwonden.
21. Verwijder de accu uit het spijkerpistool wanneer:
1) u spijkers laadt;
2) u aan de stelschroef draait.
22. Dit appraat dient te worden gebruikt in een
omgeving met een temperatuur tussen de 0°C en
40°C. Het apparaat raakt mogelijk defect bij gebruik
onder 0°C of boven 40°C.
72
Page 73

23. Laad de batterij bij een temperatuur van 0–40°C.
Een temperatuur van onder 0°C kan overlading
veroorzaken, hetgeen gevaarlijk kan zijn. De batterij kan
niet bij een temperatuur van boven de 40°C geladen
worden.
De meest geschikte temperatuur is tussen de 20–25°C.
24. Gebruik de oplader niet kontinu.
Wacht ongeveer 15 minuten voordat met het laden van
een andere batterij begonnen wordt.
25. Voorkom dat stof of vuil in de aansluitopening van
de batterij terecht komt.
26. Demonteer de oplaadbare batterij of oplader niet.
27. Voorkom kortsluiting van de oplaadbare batterij.
Kortsluiting kan resulteren in oververhitting.
Dit kan schade of brandgevaar opleveren.
28. Gooi de batterij niet in het vuur.
Een brandende batterij kan ontploff en.
29. Het gebruik van een uitgeputte batterij zal de
oplader beschadigen.
30. Breng de batterij naar de dealer waar deze gekocht
werd, nadat deze na oplading onvoldoende kracht
heeft voor praktisch gebruik.
Gooi een uitgewerkte batterij niet weg.
31. Steek nooit een voorwerp in de ventilatie-openingen
van de oplader.
Als een voorwerp of ontvlambaar materiaal in de
ventilatie-openingen van de oplader wordt gestoken, kan
dit resulteren in een elektrische schock of beschadiging
aan de oplader.
32. Laat NOOIT magneten (of soortgelijke magnetische
apparaten) in de buurt van het spijkerpistool, want
het apparaat heeft een magnetische sensor.
Als u dit wel doet, zal dit leiden tot een storing of risico op
letsel door verkeerd gebruik.
33. De machine laten rusten na continu werk.
34. Het elektrisch gereedschap is uitgerust met een
temperatuurbeveiligingscircuit om de motor
te beschermen. Ononderbroken werk kan de
temperatuur van de machine doen stijgen,
waardoor het temperatuurbeveiligingscircuit wordt
geactiveerd en de bediening automatisch wordt
gestopt. Indien dit gebeurt, laat u het elektrisch
gereedschap afkoelen voordat u het opnieuw
gebruikt.
35. Dit product kan stoppen met werken als er een storing
is gedetecteerd. In dergelijke gevallen, controleer
dan de items onder „PROBLEEMOPLOSSING” op
pagina 84.
36. Stel het bedieningspaneel niet bloot aan schokken
en breek het niet. Dit kan leiden tot een storing.
Nederlands
OPMERKINGEN BIJ GEBRUIK
LITHIUM-ION BATTERIJ
De lithium-ion accu is voorzien van een beschermingsfunctie
die volledige ontlading van de accu voorkomt waardoor de
levensduur wordt verlengd.
In geval 1 t/m 3 hieronder kan de motor tijdens het gebruik
van het product tot stilstand komen, zelfs wanneer u de
schakelaar ingedrukt houdt. Dit geeft geen probleem
met het product aan maar wordt veroorzaakt door de
beschermingsfunctie.
1. De motor komt tot stilstand wanneer de accu leeg is.
De accu moet in dit geval onmiddellijk opgeladen
worden.
2. De motor kan tot stilstand komen wanneer het
gereedschap overbelast wordt. Laat de schakelaar in
dit geval onmiddellijk los en verhelp de oorzaak van de
overbelasting. Wanneer u het probleem verholpen heeft
kunt u het gereedschap opnieuw gebruiken.
3. Wanneer de accu oververhit is door overbelasting, kan
het zijn dat de accu niet meer werkt.
In dit geval moet u de accu niet verder gebruiken, maar
deze eerst laten afkoelen. Wanneer u het probleem
verholpen heeft kunt u de accu opnieuw gebruiken.
Gelieve eveneens aandacht te schenken aan volgende
waarschuwing en aandachtspunt.
WAARSCHUWING
Om acculekken, het opwekken van warmte, rookontwikkeling,
explosie en ontsteking bijtijds te vermijden, moet u de
volgende voorzorgsmaatregelen nemen.
1. Zorg ervoor dat er zich geen spaanders en stof op de
accu ophopen.
○ Zorg er tijdens de werkzaamheden voor dat er geen
spaanders en stof op de accu kunnen vallen.
○ Zorg ervoor dat de spaanders en het stof die tijdens het
werk op het elektrisch gereedschap vallen zich niet op
de accu ophopen.
○ Bewaar een ongebruikte accu niet op een plaats waar
deze aan spaanders en stof wordt blootgesteld.
○ Verwijder alle spaanders en stof van een accu voordat u
hem opbergt en bewaar de accu niet op dezelfde plek als
metalen onderdelen (schroeven, spijkers, enz.).
2. Doorboor de accu niet met een scherp voorwerp, zoals
een nagel, klop er niet op met een hamer, stap niet op de
accu, gooi er niet mee en stel hem niet bloot aan zware
fysieke schokken.
3. Gebruik geen zichtbare beschadigde of vervormde accu.
4. Gebruik de accu niet met een omgekeerde polariteit.
5. Sluit hem niet rechtstreeks aan op het stopcontact of op
de sigarettenaansteker in een auto.
6. Gebruik de accu niet voor andere doeleinden dan de in
deze gebruiksaanwijzing genoemde.
7. Wanneer de accu niet kan worden opgeladen, zelfs
nadat de specifi eke oplaadtijd verstreken is, moet u
onmiddellijk stoppen met het opladen.
8. Zorg ervoor dat de accu niet te heet wordt of onder
te grote druk komt te staan en stel hem niet aan deze
omstandigheden bloot, zoals in een magnetron, droger
of een hogedrukcontainer.
9. Houd de accu onmiddellijk uit de buurt van vuur nadat er
een lek of vieze geur is vastgesteld.
10. Gebruik de accu niet op een plek waar een grote
statische elektriciteit wordt opgewekt.
11. In geval van een acculek, vieze geur, warmteontwikkeling,
verkleuring of vervorming, of iets abnormaals tijdens
het gebruik, het opladen of de opslag, moet u de accu
onmiddellijk uit het gereedschap of de lader halen en
moet u het gebruik ervan stoppen.
73
Page 74

Nederlands
LET OP
1. Wanneer u de lekkende vloeistof uit de accu in de ogen
krijgt, wrijf dan niet in de ogen, maar was ze goed uit
met zoet en schoon water, zoals kraanwater en roep er
onmiddellijk een dokter bij.
Indien u geen behandeling krijgt, kan de vloeistof
oogproblemen veroorzaken.
2. Wanneer de vloeistof op uw huid of kleding lekt, moet
u ze onmiddellijk goed wassen met schoon water, zoals
kraanwater.
De kans bestaat dat dit huidirritatie veroorzaakt.
3. Wanneer u roest, een vieze geur, oververhitting,
verkleuring, vervorming en/of andere onregelmatigheden
vaststelt wanneer u de accu voor de eerste keer gebruikt,
gebruik hem dan niet verder, maar retourneer de accu
aan uw leverancier of verkoper.
WAARSCHUWING
Als er een geleidende vreemde stof op de contacten
van de lithium-ionaccu terechtkomt, kan de accu worden
kortgesloten, waardoor brand kan ontstaan Wanneer u de
lithium-ionaccu bewaart, dient u de volgende regels in acht
te nemen
○ Plaats geen geleidende stoff en, spijkers en draden zoals
ijzer- en koperdraad in de opslagdoos.
○ Plaats de accu in het gereedschap of bevestig het
accudeksel stevig voor opslag tot u de ventilator niet
meer ziet om kortsluiting te voorkomen.
BETREFFENDE TRANSPORT VAN
LITHIUM-ION ACCU
Neem bij transport van een lithium-ion accu de volgende
voorzorgsmaatregelen in acht.
WAARSCHUWING
Stel het transportbedrijf op de hoogte dat er een lithiumion accu wordt vervoerd, vermeld het vermogen en volg
de instructies van het transportbedrijf bij het regelen van
vervoer.
○ Lithium-ion accu’s die een uitgangsvermogen van
100 Wh overschrijden worden beschouwd als gevaarlijke
goederen binnen de vrachtgoederenclassifi catie en
vereisen speciale procedures.
○ Voor internationaal transport, moet u voldoen aan
internationale wetgeving en wetten en voorschriften van
het land van bestemming.
Uitgangsvermogen
2 tot 3 cijferig nummer
Wh
NAMEN VAN ONDERDELEN
(Afb. 1 – Afb. 23)
Afdekking bovenkant
1
Trekker
2
Schietkop (uitgang)
3
Hendel
4
Spijkerdoseerder (B)
5
Spijkerdoseerder
6
Magazijn
7
Haak
8
Accu
9
Vergrendelingshendel
0
Handgreep
!
Schakelaar accu-indicator
@
Accu-indicator
#
Vernagel-schakelbediening
$
Stroomindicator
%
Aan/uit-schakelaar
^
Vernagel- bedieningsindicator
&
Nagels
*
Regelaar
(
Haakplaat
)
SYMBOLEN
WAARSCHUWING
Hieronder staan symbolen afgebeeld die van
toepassing zijn op deze machine. U moet de
betekenis hiervan begrijpen voor u de machine gaat
gebruiken.
NR1890DBCL: Snoerloos strip spijkerpistool
NR1890DBRL: Snoerloos strip spijkerpistool
Om het risico op verwondingen te verminderen,
moet de gebruiker de instructiehandleiding
lezen.
Alleen voor EU-landen
Geef elektrisch gereedschap niet met het
huisvuil mee!
Volgens de Europese richtlijn 2002/96/EG
inzake oude elektrische en elektronische
apparaten en de toepassing daarvan binnen de
nationale wetgeving, dient gebruikt elektrisch
gereedschap gescheiden te worden ingezameld
en te worden afgevoerd naar een recyclebedrijf
dat voldoet aan de geldende milieu-eisen.
Gelijkstroom
Gewicht
kg
(Volgens EPTA-procedure 01/2003)
AAN zetten
Ϩ
74
Page 75

Nederlands
UIT zetten
Koppel de accu los
Aan/uit-schakelaar
UIT schakelen
AAN schakelen
Stroomindicator: Licht groen op
Vernagel-schakelbediening
VOLLEDIG OPEENVOLGEND
BEDIENINGSMECHANISME
VOLLEDIG OPEENVOLGEND
BEDIENINGSMECHANISME-modus
Vernagel- bedieningsindicator: Licht blauw
op
CONTACT BEDIENINGSMECHANISME
CONTACT BEDIENINGSMECHANISME-modus
Vernagel- bedieningsindicator: Blauw
knipperen
Trekker vergrendeld
Trekker ontgrendeld
Schakelaar accu-indicator
De resterende accucapaciteit is voldoende
Accu-indicator: 2 LEDs (Rood) lichten op
De resterende accucapaciteit is gehalveerd.
Batterijaanduiding:1 LED (rood) licht op
De resterende accucapaciteit is nagenoeg
uitgeput.
Laad de batterij zo snel mogelijk op.
Accu indicator:1 LED (rood) knippert
Neem contact op met HiKOKI voor inspectie.
Accu-indicator: 2 LED's knipperen oranje,
na 10 seconden, schakel automatisch het
apparaat uit.
Ondiepe kant
Diepe kant
Gebruik niet op steigers, ladders.
Waarschuwing
Verboden handeling
TECHNISCHE GEGEVENS
1. Snoerloos strip spijkerpistool
Model NR1890DBCL NR1890DBRL
Motor DC Borstelloos
Geschikte Spijker ø2,9 – 3,3 mm Zie Afb. ø2,9 – 3,3 mm Zie Afb.
Geschikte spijkerlengte 50 mm tot 90 mm
Spijker laadcapaciteit [spijkers] 47 37
Afschietmodus Volledig opeenvolgend/Contact (selecteerbaar)
Cyclussnelheid
Accu Model BSL1850
Gewicht* 4,8 kg 4,9 kg
Afmeting
Hoogte × Lengte × Breedte
* Gewicht: Volgens EPTA-procedure 01/2003
2. Acculader
Model UC18YFSL
Oplaadspanning DC 14,4 – 18 V
Gewicht 0,5 kg
[spijkers/seconde] 1,5 – 2 (onderbroken)
Type Li-ion batterij
Spanning DC 18 V
342 mm × 309 mm × 127 mm 342 mm × 342 mm × 137 mm
OPMERKING
Op grond van het voortdurende research en ontwikkelingsprogramma van HiKOKI kunnen de hierin genoemde
technische gegevens zonder voorafgaande kennisgeving worden gewijzigd.
75
Page 76
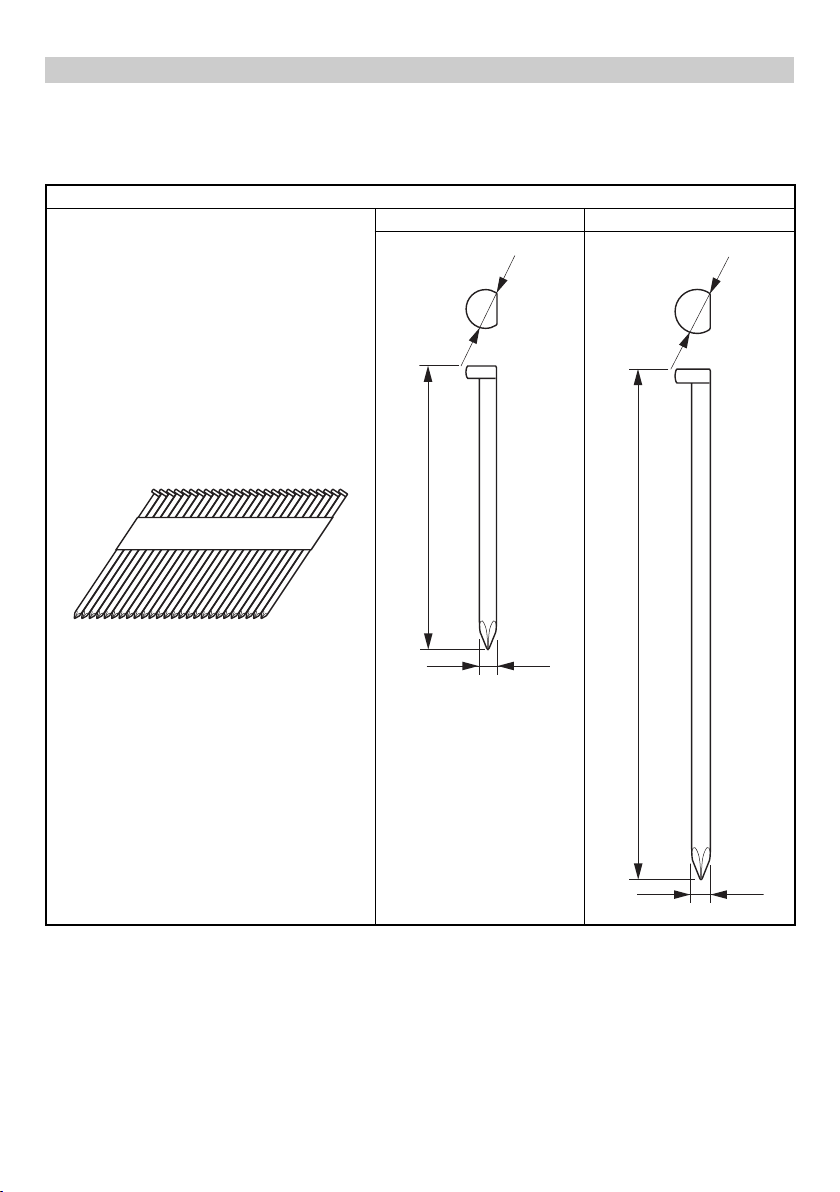
Nederlands
SPIJKERSELECTIE
Kies een geschikte spijker op de Afbeelding. Spijkers die niet op de Afbeelding staan kunnen niet gebruikt worden in dit
apparaat.
Het gebruik van andere spijkers kan leiden tot het slecht functioneren van het gereedschap, met ernstig letsel als gevolg.
[NR1890DBCL]
Alleen gladde spijkers en spijkers met haakjes en ringen kunnen worden gebruikt. Gebruik geen spijkers met schroefachtige
groeven. De spijkers worden in strips van 25-37 spijkers geleverd.
NR1890DBCL
Met papier aan elkaar verbonden stripspijkers
Spijkers met D-vormige kop
Min. Max.
6,8 mm
50 mm
7,7 mm
90 mm
2,9 mm
3,3 mm
76
Page 77

Met plastic aan elkaar verbonden stripspijkers
Spijkers met volledige kop
NR1890DBRL
50 mm
Min. Max.
7 mm
2,9 mm
7,6 mm
90 mm
Nederlands
3,3 mm
* Dit spijkerapparaat wordt niet aanbevolen voor het spijkeren van hechtnagels met volgring (lengte van 75 mm tot 90 mm)
in samengeperst hout.
STANDAARD TOEBEHOREN
Naast het hoofdtoestel (1 toestel), bevat de verpakking de
accessoires die vermeld staan op bladzijde 2.
De standaard toebehoren kunnen zonder nadere
aankondiging gewijzigd worden.
TOEPASSINGEN
○ Bevestigen van vloeren en raamwerk.
○ Bevestigen van gebinte, opbouwen van kozijnen.
○ Bevestigen van ondervloeren en dakbedekking.
○ Bevestigen van wandbeschotting.
○ Bouw van stacaravans en prefab huizen.
OPLADEN
Voor het gebruik van het elektrisch gereedschap dient de
accu als volgt opgeladen te worden.
1. Sluit het netsnoer’van de acculader aan op het
stopcontact.
Wanneer de stekker van de acculader in het stopcontact
wordt gestoken, zal het lampje in rood knipperen (met
tussenpozen van 1 seconde).
2. Steek de batterij in de acculader.
Steek de accu stevig in de acculader zoals u kunt zien op
Afb. 3.
3. Opladen
Wanneer er een accu in de acculader wordt gedaan, zal
het opladen beginnen en zal het controlelampje continu
rood branden.
Wanneer de accu volledig is opgeladen, gaat het
controlelampje rood knipperen. (Met tussenpozen van 1
seconde) (Zie Tabel 1)
● Aanduiding van het controlelampje
De aanduidingen van het controlelampje zijn zoals
aangegeven in Tabel 1, al naar gelang de toestand van
de accu of de acculader.
77
Page 78

Nederlands
Voor het laden Knippert
Tabel 1
Aanduidingen van het controlelampje
Licht ongeveer 0,5 seconde op. Licht ongeveer
0,5 seconde niet op. (0,5 seconde lang uit)
Tijdens
opladen
Na opladen Knippert
Controlelampje
(rood)
Oververhitting
standby
Opladen
onmogelijk
● Over de temperatuur en de oplaadtijd van de accu.
De temperaturen en bijbehorende oplaadtijden worden
gegeven in Tabel 2
Accu
Oplaadspanning V 14,4 – 18
Gewicht kg 0,5
Geschikte temperatuur voor het
opladen
Oplaadtijd voor accucapaciteit,
ca. (bij 20oC)
1,3 Ah
1,5 Ah
2,0 Ah
2,5 Ah
3,0 Ah
4,0 Ah
5,0 Ah
Aantal accucellen 4 – 10
OPMERKING
De oplaadtijd hangt mede af van de temperatuur en het
voltage van de stroombron.
LET OP
Wanneer de acculader onafgebroken wordt gebruikt, zal
deze warm worden, waardoor storingen kunnen worden
veroorzaakt Wacht daarom 15 minuten wanneer het
opladen is voltooid voor u opnieuw begint met opladen.
4. Haal de stekker van het netsnoer van de acculader
uit het stopcontact.
5. Houd de acculader stevig vast en trek de accu eruit.
OPMERKING
U moet de accu na het laden uit de acculader halen en
op een veilige plek bewaren.
LET OP
○ Als de accu wordt opgeladen terwijl deze warm is
omdat de accu langere tijd op een plaats lag die werd
blootgesteld aan direct zonlicht of omdat de accu zojuist
is gebruikt, kan het controlelampje van de acculader 1
seconde lang oplichten, dan 0,5 seconde niet oplichten
(0,5 seconde uit). In dat geval moet u de accu eerst laten
afkoelen voordat u met opladen begint.
Acculader
Tabel 2
min.
min.
min.
min.
min.
min.
min.
Licht op
Knippert
Knippert
snel
Blijft branden
Licht ongeveer 0,5 seconde op. Licht ongeveer
0,5 seconde niet op. (0,5 seconde lang uit)
Licht ongeveer 1 seconde op. Licht ongeveer
0,5 seconde niet op. (0,5 seconde lang uit)
Licht ongeveer 0,1 seconde op. Licht ongeveer
0,1 seconde niet op. (0,1 seconde lang uit)
UC18YFSL
0oC – 50oC
20
22
30
35
45
60
75
De accu is oververhit.
De accu kan niet
opgeladen worden. (Het
opladen wordt hervat
wanneer de accu is
afgekoeld)
Er is iets mis met
de accu of met de
acculader
○ Mocht het controlelampje knipperen (elke 0,2 seconde),
controleer dan op vuil in de accuaansluiting van de
acculader en verwijder het vuil als dat het geval is.
Is er geen sprake van vuil, dan is mogelijk de accu of
acculader defect. Breng deze dan naar een offi cieel
servicecentrum.
○ Aangezien de ingebouwde microcomputer ongeveer 3
seconden nodig heeft om vast te stellen dat de accu die
met de acculader wordt opgeladen eruit is genomen, moet
u minimaal 3 seconden wachten voordat u de accu opnieuw
in de acculader plaatst om het opladen te hervatten. Als u
de accu terugplaatst voordat er 3 seconden zijn verstreken,
is het mogelijk dat de accu niet juist wordt opgeladen.
○ Als het controlelampje niet rood knippert (elke seconde),
terwijl het snoer van de acculader wel van stroom
wordt voorzien, is dit een indicatie dat mogelijk het
beveiligingscircuit van de acculader is geactiveerd.
Ontkoppel het snoer of de stekker en sluit vervolgens
weer aan na ongeveer 30 seconden. Als het
controlelampje nu nog niet rood gaat knipperen (1
keer per seconde), moet u de lader naar een bevoegd
servicecentrum van HiKOKI brengen.
VOOR GEBRUIK
Handeling Afbeelding Bladzijde
Verwijderen en aanbrengen
van de accu
Opladen 3
Selecteren van accessoires ―
1. Het bedienen van het bedieningspaneel
(1) Aan/uit schakelaar AAN (zie afb. 4)
In het geval van „Aan/Uit- schakelaar UIT”, houdt u de
aan/uit schakelaar langer dan 1 seconde ingedrukt,
vervolgens licht de spanningsindicator groen op.
OPMERKING
Druk niet op de hendel en/of trek niet aan de trekker
tijdens het schakelen van de hoofdschakelaar op AAN.
Anders wordt de aan/uit-schakelaar niet op AAN gezet.
[Automatisch uitschakelen]
Wanneer de stroom wordt ingeschakeld maar het
spijkerpistool gedurende 30 minuten niet wordt gebruikt,
wordt het automatisch uitgeschakeld. Om het weer aan
te zetten, drukt u op de aan/uit-schakelaar.
78
2
3
4
8
Page 79

WAARSCHUWING
Laat het spijkerpistool nooit liggen met de stroom aan.
Dit kan leiden tot een ongeval.
(2) Aan/uit schakelaar UIT (zie afb. 4)
In het geval van „Aan/Uit- schakelaar AAN”, houdt u
de aan/uit schakelaar langer dan 1 seconde ingedrukt,
vervolgens gaat de spanningsindicator uit.
In het geval van „de aan/uit schakelaar AAN”, zijn
functies hieronder actief.
(3) Selecteer vernagel- bedieningsmodus
(Volledige opeenvolgende bediening/Contactbediening)
Na het inschakelen van de aan/uit schakelaar, stel altijd
de volledig opeenvolgende bedieningsmodus als eerste
in werking. (Vernagel- bedieningsindicator licht in het
blauw op.) (Zie Afb. 5)
Om de vernagel- bedieningsmodus te veranderen, druk
eenmaal op de Vernagel-bedieningsknop. Elke keer dat
u drukt, verandert de modus tussen „Vol opeenvolgend”
en „Contact”. (Zie Afb. 6)
Licht (Blauw):
VOLLEDIG OPEENVOLGEND
BEDIENINGSMECHANISME,
Knipperend (Blauw):
CONTACT BEDIENINGSMECHANISME
(4) Controleer het resterende vermogen van de accu
Bij het indrukken van de accu-indicatorschakelaar, toont
de accu-indicator het resterende batterijniveau van het
LED-lampje, zoals hieronder.
Indicatorstatus
De resterende
accucapaciteit is
voldoende.
2 LEDs (Rood) lichten op
De resterende
accucapaciteit is
gehalveerd.
1 LED (Rood) licht op
De resterende
accucapaciteit is nagenoeg
uitgeput.
1 LED (Rood) knippert
(5) Andere functies
In het geval van een storing, geven de LED-lampjes het
volgende aan.
Indicatorstatus
2 LED’s (Rood) knipperen
2 LED-lampen knipperen
met een interval.
• In te warme toestand,
knipper met 0,5 seconde
interval.
• In te koude toestand,
knipper met 0,25 seconde
interval.
Na 10 seconden schakelen
de LED-lampen en het
apparaat automatisch uit.
Laad de batterij zo snel
mogelijk op.
De machine is te koud
(onder -5 °C) of te heet.
Laat het spijkerpistool goed
afkoelen of opwarmen in de
juiste omstandigheden.
Nederlands
Neem voor inspectie
contact op met HiKOKI.
2 LED's knipperen oranje,
schakel na ongeveer 10
seconden automatisch
het apparaat uit.
2. Trekker vergrendelingsmechanisme (zie afb. 7)
WAARSCHUWING
Zorg ervoor dat de trekker vergrendeld is wanneer u
geen spijkers vernagelt.
Dit spijkerpistool heeft een vergrendelingsmechanisme
om te voorkomen dat spijkers worden afgeschoten.
Stel de vergrendelingsschakelaar in op de
de trekker te vergrendelen.
Schuif de vergrendelingsschakelaar naar de
vergrendelen wanneer het spijkerpistool moet worden
gebruikt, en in de
is.
3. Het testen van het spijkerpistool
WAARSCHUWING
○ Zorg ervoor dat de trekker vergrendeld is wanneer u
geen spijkers vernagelt. (Zie Afb. 7)
○ Gebruik geen spijkerpistool als de hendel niet naar
behoren werkt.
De machine maakt gebruik van een preventief
mechanisme voor de onbelaste werking.
De machine raakt in een toestand waarin de hendel
niet omhoog kan worden geduwd. Dit gebeurt wanneer
het magazijn niet geladen is met spijkers of als het
resterende aantal spijkers minder is dan 7 of 9.
LET OP
Zorg ervoor dat u de top van de hendel niet op het hout
gooit.
Voordat u begint met het vernagelen, test het spijkerpistool
door gebruik te maken van onderstaande checklist. Voer
deze testen uit in de volgende volgorde.
Als er abnormale werking optreedt, stop dan met het gebruik
van het spijkerpistool en neem contact op met een door
HiKOKI erkend servicecentrum.
(1) VERWIJDER ALLE SPIJKERS EN DE ACCU VAN HET
SPIJKERPISTOOL.
□ ALLE SCHROEVEN DIENEN TE WORDEN
VASTGEDRAAID.
□ DE HENDEL EN TREKKER MOETEN SOEPEL
BEWEGEN bij het terugtrekken van de
spijkerdoseerder.
(2) Installeren van de accu.
Bedien de hendel of trekker niet tijdens het installeren
van de accu. (Zie Afb. 2)
(3) Zet de aan/uit-knop aan. (Zie Afb. 1)
Schakel het apparaat in door de aan/uit-knop gedurende
meer dan 1 seconde ingedrukt te houden.
Controleer of de aan/uit-indicator groen oplicht en de
vernagel- bedieningsindicator blauw oplicht. (VOLLEDIG
OPEENVOLGEND BEDIENINGSMECHANISME)
OPMERKING
Druk niet op de hendel en/of trek niet aan de trekker
tijdens het schakelen van de hoofdschakelaar op AAN.
Anders wordt de aan/uit-schakelaar niet op AAN gezet.
[Automatisch uitschakelen]
Wanneer de stroom wordt ingeschakeld maar het
spijkerpistool gedurende 30 minuten niet wordt gebruikt,
wordt het automatisch uitgeschakeld. Om het weer aan
te zetten, drukt u op de aan/uit-schakelaar.
WAARSCHUWING
Laat het spijkerpistool nooit liggen met de stroom aan.
Dit kan leiden tot een ongeval.
79
stand wanneer deze niet in gebruik
positie om
positie
Page 80

Nederlands
Vernagel- bedieningsindicator
Licht (Blauw):
VOLLEDIG OPEENVOLGEND
BEDIENINGSMECHANISME,
Knipperend (Blauw):
CONTACT BEDIENINGSMECHANISME
Controleer of de accu-indicator niet knippert.
Als de lege accu-indicator rood knippert, betekent dit dat
de accu niet genoeg stroom heeft en opgeladen moet
worden.
(4) Haal uw vinger van de trekker af en druk de hendel
tegen het werkstuk met het terugtrekken van de
spijkerdoseerder.
□ HET SPIJKERPSITOOL MAG NIET IN WERKING
TREDEN.
(5) Scheid de hendel van het werkstuk.
Vervolgens richt u het spijkerpistool naar beneden door
de spijkerdoseerder terug te trekken, trekt u aan de
trekker en wacht u voor tenminste 5 seconden in deze
positie.
□ HET SPIJKERPSITOOL MAG NIET IN WERKING
TREDEN.
(6) 1 U moet, zonder de trekker aan te raken, de hendel
tegen het werkstuk drukken door de spijkerdoseerder
terug te trekken.
Haal vervolgens de trekker over.
□ HET SPIJKERPISTOOL MOET IN WERKING
TREDEN.
2 Houd de trekker naar achteren en druk de hendel
weer tegen het werkstuk aan.
□ HET SPIJKERPSITOOL MAG NIET IN WERKING
TREDEN.
3 Haal de vinger weg van de trekker.
Vervolgens 1 is deze weer in werking.
□ HET SPIJKERPISTOOL MOET IN WERKING
TREDEN.
(7) Scheid de hendel van het werkstuk, haal de trekker over.
Druk de hendel binnen 2 seconden tegen het werkstuk.
□ HET SPIJKERPSITOOL MAG NIET IN WERKING
TREDEN.
(8) Stel de vernagel- bedieningsindicator in op knipperend
AAN-modus. (CONTACT BEDIENINGSMECHANISME)
Druk eenmaal op de vernagel-schakelbediening, zorg
ervoor dat de indicator blauw knippert.
Scheid de hendel van het werkstuk, haal de trekker over.
Druk de hendel binnen 2 seconden tegen het werkstuk.
□ HET SPIJKERPISTOOL MOET IN WERKING
TREDEN.
(9) Als er geen abnormale werking wordt vastgesteld, mag u
spijkers in het spijkerpistool laden.
Vernagel spijkers in het werkstuk die van hetzelfde type
zijn die in de werkelijke applicatie worden gebruikt.
□ HET SPIJKERPISTOOL MOET OP JUISTE WIJZE
IN WERKING TREDEN.
4. Controleren van de werking van de veiligheidshendel
WAARSCHUWING
Zorg ervoor dat de trekker vergrendeld is wanneer u
geen spijkers vernagelt.
Zorg dat de trekker geblokkeerd is en de accu uit het
elektrisch gereedschap is verwijderd wanneer u de
werking van de veiligheidshendel controleert.
Controleer of de veiligheidshendel soepel schuift wanneer
deze wordt bediend.
Reinig het schuifvlak van de veiligheidshendel wanneer
deze niet soepel schuift.
5. Spijkers laden
WAARSCHUWING
Bij het laden van spijkers in het spijkerpistool,
1) verwijder de accu uit het spijkerpistool;
2) haal de trekker niet over;
3) druk niet op de hendel; en
4) houd spijkerpistool naar beneden gericht.
2-Actie Spijkerinvoer!
(1) Plaats de spijkerstrip in de achterzijde van het magazijn.
(Zie Afb. 8)
(2) Schuif de spijkerstrip naar voren in het magazijn. (Zie
Afb. 9)
(3) Trek het spijkerpistool (B) terug om de spijkerdoseerder
te verbinden aan de spijkerstrip. (Zie Afb. 10)
OPMERKING
○ Druk het spijkerpistool (B) en de spijkerdoseerder
zachtjes tegen de spijker.
Wanneer het spijkerpistool (B) en de spijkerdoseerder
worden losgelaten vanuit de achterzijde van het
magazijn en tegen de spijker aanstoten, kan het
verbindende laagje papier of plastic aan de spijker
worden beschadigd.
○ Gebruik een spijkerstrip van meer dan 10 spijkers.
○ Gebruik een ononderbroken spijkerstrip met spijkers van
dezelfde lengte.
Dit spijkerpistool is nu klaar voor gebruik.
Verwijderen van de spijkers:
1 Trek de spijkerdoseerder terug. (Zie Afb. 11)
2 Zet de spijkerdoseerder zachtjes terug terwijl u het
spijkerpistool (B) duwt.
3 Trek de spijkers uit de achterkant van het magazijn. (Zie
Afb. 12)
HET GEBRUIK VAN HET
SPIJKERPISTOOL
WAARSCHUWING
○ Het gereedschap nooit op uzelf of anderen in het
werkgebied richten.
○ Houd uw vingers uit de buurt van de trekker als u geen
spijkers aandrijft om per ongeluk afvuren te voorkomen.
○ Gebruik de elektrische snoer niet wanneer het
beschadigd is. Laat het onmiddellijk repareren.
○ Keuze van activatiemethode is belangrijk.
Lees en begrijp “1. Procedures voor vernagelen” treft u
hieronder aan.
○ Controleer voordat u met de werkzaamheden begint het
vernagel- schakelbedieningsapparaat.
Dit HiKOKI spijkerpistool bevat een vernagel-
schakelbedieningsapparaat.
Voor aanvang van de werkzaamheden, moet u ervoor
zorgen dat het apparaat correct is ingesteld.
Als het apparaat niet juist is ingesteld, zal het
spijkerpistool niet op de juiste wijze functioneren.
○ Houd uw gezicht, handen en voeten uit de buurt bij het
afvuren.
○ Zorg dat u niet op andere spijkers vernageld of het
spijkerpistool op een te steile hoek gebruikt; spijkers
kunnen afketsen en ernstig letsel veroorzaken.
80
Page 81

○ Vernagel de spijkers niet in dunne platen of dichtbij
hoeken en randen van het werkstuk. Spijkers kunnen
door het werkstuk gaan of van het werkstuk afschieten
en iemand raken.
○ Vernagel nooit spijkers aan beide kanten van een wand
op hetzelfde moment. Spijkers kunnen in en door de
wand vernageld worden en een persoon aan de andere
kant raken.
○ Gebruik nooit een spijkerpistool dat niet goed werkt of
defect is.
○ Gebruik een spijkerpistool niet als hamer.
○ Verwijder alle resterende bevestigingen en de batterij uit
het spijkerpistool wanneer:
1) u bezig bent met inspectie en onderhoud;
2) u controleert op goede werking van hendel en
trekker;
3) u een verstopping schoonmaakt;
4) het apparaat niet in gebruik is;
5) u uw werkgebied verlaat;
6) u het naar een andere locatie verplaatst; en
7) u het aan een ander geeft.
○ Verwijder de batterij uit het spijkerpistool wanneer:
1) u spijkers laadt;
2) u aan de stelschroef draait.
Dit HiKOKI spijkerpistool is uitgerust met een vernagelschakelbedieningsapparaat.
Gebruik VOLLE OPEENVOLGENDE
BEDIENINGSMECHANISME of CONTACT
BEDIENINGSMECHANISME in overeenstemming met de
uit te voeren werkzaamheden.
Uitleg van de verschillende vernagel- bedieningen
○
VOLLE OPEENVOLGENDE BEDIENINGSMECHANISME:
Druk eerst de hendel tegen het hout; haal daarna de
trekker over om de spijker te vernagelen.
Ga volgens dezelfde volgorde te werk om spijkers te
blijven vernagelen.
Na één keer vernagelen zal vernagelen niet weer
mogelijk zijn, totdat de trekker wordt losgelaten en weer
wordt ingedrukt.
○ CONTACT BEDIENINGSMECHANISME:
Contact bediening kan in twee verschillende volgordes
gebeuren, afhankelijk van uw gebruik.
Om meerdere spijkers te vernagelen:
1. Haal de trekker over.
2. Druk de hendel tegen het hout om de spijker te
vernagelen.
3. Als de trekker wordt teruggehouden, zal iedere keer
dat de hendel tegen het hout gedrukt wordt, een
spijker worden vernageld.
Om één spijker te vernagelen:
1. Druk de hendel tegen het hout.
2. Haal de trekker over om de spijker te vernagelen.
3. Haal uw vinger van de trekker en haal het
spijkerapparaat van het hout af.
[Dry-fi re vergrendelingsmechanisme]
De machine maakt gebruik van een preventief
mechanisme voor onbelaste werking.
De machine raakt in een toestand waarin de hendel
niet omhoog kan worden geduwd. Dit gebeurt wanneer
het magazijn niet geladen is met spijkers of als het
resterende aantal spijkers minder is dan 7 of 9.
LET OP
Zorg ervoor dat de top van de hendel niet op het hout
gegooid wordt wanneer de hendel niet omhoog geduwd
kan worden.
1. Vernagelen procedures
Dit spijkerpistool is uitgerust met een hendel en werkt
niet tenzij de hendel wordt ingedrukt.
Er zijn twee methoden van bediening om spijkers te
vernagelen met dit spijkerpistool.
Zij zijn:
1. Intermitterende bediening (trekker vuren):
2. Continue bediening (Hendel vuren):
(1) Intermitterende bediening (trekker vuren)
Gebruik de VOLLE OPEENVOLGENDE
BEDIENINGSMECHANISME instelling. (Zie Afb. 13)
WAARSCHUWING
○ Voor intermitterende bediening, Zet de vernagelen-
bedieningsschakelaar op VOLLE OPEENVOLGENDE
BEDIENINGSMECHANISME (Vernagelenbedieningsindicator licht in het blauw op.) (Dwz ingesteld
op ENKELE BEDIENINGSMECHANISME.)
○ Om dubbel afvuren of per ongeluk afvuren als gevolg van
terugslag te voorkomen.
1) Stel in op VOLLE OPEENVOLGENDE
2) Haal de trekker snel en stevig over.
1 Stel de vernagel- bedieningsschakelaar op VOLLE
OPEENVOLGENDE BEDIENINGSMECHANISME
(Vernagel-bedieningsindicator licht in het blauw op.)
(In te stellen op VOLLE OPEENVOLGENDE
BEDIENINGSMECHANISME).
(Stel de schakelinrichting voor de vernagel-
bedieningsindicator licht op in de blauw-modus volledig
zoals aangegeven in Afb. 13. Als dit niet het geval
is, wordt het ingesteld op CONTACT ACTIVERING
MECHANISME.)
2 Plaats het spijker-stopcontact op het werkstuk met de
vinger van de trekker af.
3 Druk de hendel stevig in totdat deze helemaal is
ingedrukt.
4 Haal de trekker over om een spijker te vernagelen.
5 Verwijder uw vinger van de trekker en til het gereedschap
volledig van het houten oppervlak af.
Om door te gaan met vernagelen op een andere locatie,
verplaats het nagelpistool langs het hout en herhaal de
stappen 2 - 5 zoals vereist.
OPMERKING
Handelingen 3 en 4 moeten worden uitgevoerd binnen
2 seconden na elkaar. Als er meer dan 2 seconden
verstrijken na 3 zal het spijkerpistool niet goed werken.
Mocht dit het geval zijn, probeer opnieuw vanaf 3.
(2) Continue bediening (Hendel vuren)
Gebruik CONTACT BEDIENINGSMECHANISME (Zie
Afb. 14)
WAARSCHUWING
Om dubbel afvuren of per ongeluk afvuren als gevolg van
terugslag te voorkomen.
1) Druk op het spijkerpistool niet met overdreven kracht
2) Scheid het nagelpistool van het hout bij terugslag na
1 Stel de vernagel- bedieningsschakelaar in op VOLLE
OPEENVOLGENDE BEDIENINGSMECHANISME
(Vernagel-bedieningsindicatorlicht in het blauw.)
(In te stellen naar CONTACT BEDIENINGSMECHANISME).
(Stel de schakelinrichting voor het vernagel-
bedieningsindicator knippert in de blauw-modus volledig
zoals aangegeven in Afb. 14. Anders zal het niet naar
behoren werken.)
2 Haal de trekker over met het spijkerpistool van het
werkstuk af.
3 Druk de hendel tegen het werkstuk om een spijker te
vernagelen.
4 Verplaats het spijkerpistool langs het werkstuk met een
stuiterende beweging.
Elke keer dat de hendel wordt ingedrukt, wordt er een
spijker vernageld.
Zodra het gewenste aantal spijkers is vernageld, verwijder
vinger van de trekker.
Nederlands
BEDIENINGSMECHANISME.
tegen het hout.
het vernagelen.
81
Page 82

Nederlands
OPMERKING
Handelingen 2 en 3 moeten worden uitgevoerd binnen
2 seconden na elkaar. Als er meer dan 2 seconden
verstrijken na 2 zal het spijkerpistool niet goed werken.
Mocht dit het geval zijn, probeer opnieuw vanaf 2.
WAARSCHUWING
○ Houd uw vinger van de trekker, behalve tijdens het
vernagelen, omdat dit ernstige verwondingen kan
veroorzaken als de hendel per ongeluk in contact komt
met u of anderen in het werkgebied.
○ Houd uw handen en lichaam uit de buurt van het
ontladingsgebied. Dit HiKOKI spijkerpistool kan stuiteren
vanwege de terugslag van het vernagelen van een
spijker en een daaropvolgende nagel kan ongewenst
worden vernageld, en eventueel letsel veroorzaken.
OPMERKING
○ Als alle waarschuwingen en aanwijzingen worden
opgevolgd, is veilige bediening mogelijk met alle
twee de systemen: VOLLE OPEENVOLGENDE
BEDIENINGSMECHANISME, CONTACT
BEDIENINGSMECHANISME.
○ Behandel spijkers en verpakking altijd met zorg. Als
spijkers vallen, kan de ordening worden onderbroken,
hetgeen verstoppingen kan veroorzaken en problemen
met de doorvoer.
○ Na vernagelen:
1) verwijder de batterij uit het spijkerpistool;
2) verwijder alle spijkers uit het spijkerpistool;
2. De vernageldiepte afstellen
Om er zeker van te zijn dat elke spijker doordringt tot
dezelfde diepte, zorgt u ervoor dat het spijkerpistool altijd
stevig tegen het werkstuk wordt gedrukt.
Als de spijkers te diep of ondiep in het werkstuk worden
vernageld, past u het vernagelen dan aan in de volgende
volgorde.
1 Verwijder de accu uit het spijkerpistool. (Zie Afb. 15)
2 Als de spijkers te diep worden vernageld, draait u de
regelaar naar de oppervlakkige kant. (Zie Afb. 16)
Aanpassingen zijn in stappen van een halve draai.
Als de spijkers te ondiep worden vernageld, draait u de
regelaar naar de diepe kant. (Zie Afb. 17)
3 Stop het draaien van de regelaar wanneer een geschikte
positie is bereikt voor een vernagel-test.
4 Verbind de accu met het spijkerpistool.
DRAAG ALTIJD EEN VEILIGHEIDSBRIL.
Voer een vernagel-test uit.
5 Verwijder de accu uit het spijkerpistool.
6 Kies een geschikte positie voor de regelaar.
3. Het gebruik van de haak (zie afb. 18, 19, 20)
WAARSCHUWING
Bij het gebruik van de haak schakelt u de stroom uit
(groen licht „UIT”). Besteed voldoende aandacht zodat
het belangrijkste gereedschap niet valt.
Als het gereedschap valt, is er een risico op een ongeval.
Haak kan worden bevestigd aan de linker- of rechterkant.
1 Verwijder de batterij en haal vervolgens alle resterende
spijkers uit het magazijn.
2 Houd het hoofdtoestel stevig vast en verwijder de
schroef met een schroevendraaier. (Zie Afb. 18)
3 Verwijder de haak en de haakplaat. (Zie Afb. 19)
4 Plaats de haak aan de andere kant en schroef deze
stevig vast. (Zie Afb. 20)
OPMERKING
Haak kan worden gebruikt als hanger.
4. Verhelpen van een verstopping
Als spijkers zijn vastgelopen in de schietkop, verwijder
deze en pas het vernagelen aan in de volgende volgorde.
LET OP
Verwijder de accu uit het spijkerpistool.
1 Verwijder de accu uit het spijkerpistool.
2 Verwijder alle spijkers.
3 Verwijder de M5-bouten met een moersleutel.(Zie Afb.
21)
4 Trek het magazijn weg van het ontstekingshoofd en
maak de klem los. (Zie Afb. 22)
LET OP
○ Raak NOOIT het aandrijfmes aan.
○ Wijs NOOIT met het gereedschap naar uzelf of een
ander persoon, om het risico van letsel door per ongeluk
afvuren te voorkomen.
Zelfs als de batterij van het spijkerpistool wordt
verwijderd, is er nog energie van samengedrukte lucht
die blijft hangen.
5 Bevestig het magazijn aan de injector en draai deze vast
met de M5-bout.
OPMERKING
In geval van een veelvoorkomende storing, neem contact
op met een door HiKOKI erkend servicecentrum.
5. Het gebruik van de neuskap (zie afb. 23)
WAARSCHUWING
Bij het bevestigen of verwijderen van de neuskap, houd
uw vinger weg van de trekker en verwijder alle resterende
bevestigingen en de accu van het spijkerpistool.
Als u het oppervlakte van het werkstuk wil beschermen
tegen krassen of markeringen door de hendel, bevestig het
neuskap-accessoire aan de hendel.
1 Verwijder alle resterende bevestigingen en de accu uit
het spijkerpistool.
2 Zet de neuskap aan de teen van de hendel.
3 De neuskap is gemarkeerd om het uitgangspunt van
de spijker aan te geven, om uitlijning gemakkelijker te
maken.
OPMERKING
De dikte van de neuskap kan de diepte van het
vernagelen verminderen. Bijstelling van vernagel-diepte
is vereist.
ONDERHOUD EN INSPECTIE
LET OP
Zorg ervoor dat alle resterende bevestigingen en de
batterij van het spijkerpistool worden verwijderd vóór
onderhoud en inspectie.
1. Het inspecteren van het magazijn
1 Verwijder de batterij uit het spijkerpistool.
2 Reinig het magazijn. Verwijder stof en houten chips
die zich kunnen hebben opgehoopt in het magazijn.
LET OP
Controleer of de spijkerdoseerder soepel glijdt door er
met een vinger aan te trekken.
Glijdt deze niet soepel, dan kunnen de spijkers in
een ongelijke hoek worden aangedreven en iemand
verwonden.
2. Inspectie van bevestigingsschroeven
Controleer alle bevestigingsschroeven regelmatig en
zorg ervoor dat ze goed aangedraaid zijn. Draai los
zittende schroeven onmiddellijk vast. Doet u dit niet, dan
kunnen ernstige gevaren het gevolg zijn.
3. Onderhoud van de motor
De motorwikkeling is het „hart” van het elektrisch
gereedschap. Let er daarom goed op dat de wikkeling
niet beschadigd raakt en/of nat wordt met olie of water.
4. Reinigen van de behuizing
Wanneer het elektrisch gereedschap vuil is, veegt u het
af met een zachte, droge doek of een doek bevochtigd
met een zeepsopje. Gebruik geen chemische
middelen zoals chloor, of vloeistoff en zoals benzine of
verfverdunner, want deze kunnen het plastic vervormen
of zelfs smelten.
5. Opbergen
Bewaar het elektrisch gereedschap op een plaats met
een temperatuur van minder dan 40 °C en buiten het
bereik van kinderen.
82
Page 83
OPMERKING
Opbergen van lithium-ion accu’s
Zorg dat de lithium-ion accu volledig is opgeladen
voordat u deze opbergt.
Langdurig opbergen (3 maanden of langer) van een accu
die bijna leeg is kan resulteren in slechtere prestaties,
een sterke afname van de gebruiksduur van de accu en
ook is het mogelijk dat de accu niet meer opgeladen kan
worden.
Een sterke afname van de gebruiksduur van de accu
kan soms wel weer verholpen worden door de accu
herhaaldelijk, van twee- tot vijfmaal, op te laden en te
gebruiken.
Als de gebruiksduur van de accu zeer kort blijft nadat
deze meerdere malen is opgeladen en gebruikt, is
de accu versleten en dient u een nieuwe accu aan te
schaff en.
LET OP
Bij gebruik en onderhoud van elektrisch gereedschap
dienen de in het land waar u zich bevindt geldende
veiligheidsregelgeving en veiligheidsstandaarden stipt
te worden opgevolgd.
Belangrijke informatie voor de accu’s van HiKOKI
snoerloos elektrisch gereedschap
Gebruik altijd een van onze voorgeschreven originele
accu’s. Wij kunnen de veiligheid en prestatie van ons
snoerloos elektrisch gereedschap niet garanderen bij
gebruik van andere dan de voorgeschreven accu’s,
of als de accu gedemonteerd of gewijzigd is (zoals
demontage of vervanging van accucellen of andere
inwendige onderdelen).
GARANTIE
De garantie op het elektrisch gereedschap van HiKOKI
is in overeenstemming met de wettelijke/landspecifi eke
richtlijnen. Deze garantie dekt geen defecten of schade
als gevolg van foutief gebruik, misbruik of normale slijtage.
In geval van klachten verzoeken wij u het elektrisch
gereedschap samen met het GARANTIECERTIFICAAT
dat u achterin deze handleiding aantreft naar een erkend
servicecentrum van HiKOKI te sturen.
Nederlands
Geluidsinformatie
Geluidskarakteristiek-waarden in overeenstemming met
EN 792-13:
Het typische A-zwaarte enkele geluidssterkteniveau
L
Het typische A-zwaarte enkele geluidsdrukniveau op de
werkplek L
Onzekerheid KpA: 3 dB
Deze waarden zijn gereedschap-gerelateerde
karakteristieke waarden en geven niet het geproduceerde
geluid op het moment van daadwerkelijk gebruiken van
het apparaat weer. Het geproduceerde geluid tijdens het
werken met het apparaat hangt bijvoorbeeld ook af van de
werkomgeving, het stuk waaraan gewerkt wordt, hoe dat
stuk ondersteund wordt, het aantal spijkers dat ingeslagen
wordt enz.
Afhankelijk van de omstandigheden op de werkplek en de
vorm van het stuk waaraan gewerkt wordt, is het nodig om
persoonlijke beschermingsmiddelen toe te passen, zoals
het plaatsen van het werkstuk op een geluiddempende
ondergrond, voorkomen van vibratie van het werkstuk door
het vast te klemmen of te bedekken, enz.
In speciale gevallen zal het nodig zijn om oorbeschermers
te dragen.
Trillingsinformatie
De typische vibratie karakteristieke waarde in
overeenstemming met EN 792-13: 4,6 m/s
Onzekerheid K = 1,5 m/s
Deze waarde is een gereedschap-gerelateerde
karakteristieke waarde en geeft niet de invloed op het handarm-systeem op het moment van daadwerkelijk gebruiken
van het apparaat weer. De invloed op het hand-arm-systeem
bij het gebruiken van dit apparaat hangt bijvoorbeeld ook af
van de kracht waarmee men het apparaat beet houdt, van
de kracht waarmee het apparaat tegen het werkoppervlak
gedrukt wordt, de richting waarin gespijkerd wordt, de
afstelling van de luchttoevoer, het stuk waaraan gewerkt
wordt, hoe dat ondersteund is enz.
De totale bepaalde trillingswaarde is gemeten in
overeenstemming met een standaard testmethode en kan
worden gebruikt om meerdere gereedschappen met elkaar
te vergelijken.
U kunt dit ook vooraf gebruiken als beoordeling van de
blootstelling.
WAARSCHUWING
○ De trillingsemissiewaarde tijdens het feitelijke gebruik
van het elektrisch gereedschap kan afwijken van de
opgegeven totale waarde afhankelijk van de manieren
waarop het gereedschap wordt gebruikt.
○ Neem kennis van de veiligheidsmaatregelen voor de
bescherming van de gebruiker die gebaseerd zijn
op een schatting van de blootstelling onder feitelijke
gebruiksomstandigheden (rekening houdend met alle
onderdelen van de gebruikscyclus, zoals de tijd dat het
gereedschap is uitgeschakeld en wanneer dit onbelast
draait inclusief de triggertijd).
2
WA, 1s,d= 101 dB
pA, 1s,d= 90 dB
2
OPMERKING
Op grond van het voortdurende research en
ontwikkelingsprogramma van HiKOKI kunnen de hierin
genoemde technische gegevens zonder voorafgaande
kennisgeving worden gewijzigd.
83
Page 84

Nederlands
Onderhoudsschema
HANDELING WAAROM HOE
Reinig het magazijn en het
doseermechanisme.
Zorg ervoor dat de hendel
goed blijft werken.
Voorkom dat er een verstopping ontstaat. Blaas dagelijks schoon.
Bevorder gebruikersveiligheid en effi ciënte
bediening van het spijkerpistool.
Blaas dagelijks schoon.
PROBLEEMOPLOSSING
Controleer het gereedschap aan de hand van de onderstaande tabel indien het gereedschap niet naar behoren functioneert.
Als dit het probleem niet oplost, neem dan contact op met uw dealer of het erkende HiKOKI Service Center.
PROBLEEM BEKIJK DE METHODE CORRECTIE
Aan/uitschakelaar schakelt
niet in.
Schakel één keer in, maar
schakel automatisch uit.
Spijkerpistool werkt niet
(Aan/uit-schakelaar AAN).
Spijkerpistool werkt, maar er
wordt geen spijker vernageld.
Zwakke aandrijving.
Vertragen tot cyclus.
Aandrijving te diep. Controleer de positie van vernagel-
Lage batterij opladen. Laad de batterij op.
Beschadigde interne elektronica. Neem voor vervanging contact op met
Hendel en/of trekker is AAN toestand? Houd hendel en trekker in UIT-toestand.
Bedien niet langer dan 30 minuten?
(Automatische uitschakelfunctie)
Spijkerpistool niet genoeg tegen het
werkstuk gedrukt.
Trekker niet genoeg overgehaald. Haal de trekker stevig over.
Er gaan meer dan 2 seconden voorbij
van het indrukken van de hendel AAN tot
trekker AAN (of trekker AAN tot hendel
AAN).
Preventief mechanisme geactiveerd.
(Geen spijkers, of te weinig
bevestigingsmiddelen overgebleven)
Vergrendelingshendel (Trekker
vergrendelingsfunctie) is ingesteld op
„AAN”.
De machine is te koud (onder -5 °C) of
te heet.
Beschadigde interne elektronica. Neem voor vervanging contact op met
Magazijn is vuil. Blaas en veeg het magazijn schoon.
Controleer op verstopping. Verhelp de verstopping (raadpleeg Afb.
Aandrijfmes versleten of beschadigd? Neem voor vervanging contact op met
Schroefveer verzwakt of beschadigd? Vervang schroefveer.
Spijkerdoseerder beschadigd? Vervang spijkerdoseerder.
Controleer op de juiste spijkers. Gebruik alleen aanbevolen spijkers.
Controleer de positie van vernagel-
diepteverstelling regelaar.
Aandrijfmes versleten? Neem voor vervanging contact op met
De druk van de perslucht is laag
geworden.
Beschadigde interne elektronica. Neem voor vervanging contact op met
diepteverstelling regelaar.
HiKOKI.
Druk de aan/uitschakelaar langer dan 1
seconde in om naar „AAN” te schakelen
Houd spijkerpistool stevig vast en druk
volledig op het werkstuk.
Zorg ervoor dat er minder dan 2 seconden
verstrijken tussen hendel AAN en trekker
AAN (of tussen trekker AAN en hendel
AAN).
Laad de spijkers in het magazijn.
Stel de vergrendelinghendel in op de „UIT”
-stand. (Raadpleeg Afb. 7)
Laat het spijkerpistool goed afkoelen of
opwarmen in een juiste omstandigheid.
HiKOKI.
21, 22).
HiKOKI.
Afstellen volgens Afb. 16, 17.
HiKOKI.
Neem voor vervanging contact op met
HiKOKI.
HiKOKI.
Afstellen volgens Afb. 16, 17.
84
Page 85

PROBLEEM BEKIJK DE METHODE CORRECTIE
Slaat spijkers over.
Intermitterende doseerder.
Spijkers lopen vast.
Genagelde spijker is gebogen.
Controleer op de juiste spijkers. Gebruik alleen aanbevolen spijkers.
Spijkerdoseerder beschadigd? Vervang spijkerdoseerder.
Schroefveer verzwakt of beschadigd? Vervang schroefveer.
Aandrijfmes versleten of beschadigd? Neem voor vervanging contact op met
Controleer op de juiste spijkers. Gebruik alleen aanbevolen spijkers.
Aandrijfmes versleten of beschadigd? Neem voor vervanging contact op met
HiKOKI.
HiKOKI.
Nederlands
85
Page 86

Español
(Traducción de las instrucciones originales)
ADVERTENCIAS DE SEGURIDAD
GENERAL DE LA HERRAMIENTA
ELÉCTRICA
ADVERTENCIA
Lea todas las instrucciones y advertencias de
seguridad.
Si no se siguen las advertencias e instrucciones, podría
producirse una descarga eléctrica, un incendio o daños
graves.
Guarde todas las advertencias e instrucciones para
futura referencia.
El término “herramienta eléctrica” en las advertencias hace
referencia a la herramienta eléctrica que funciona con la red
de suministro (con cable) o a la herramienta eléctrica que
funciona con pilas (sin cable).
1) Seguridad del área de trabajo
a) Mantenga la zona de trabajo limpia y bien
iluminada.
Las zonas desordenadas u oscuras pueden provocar
accidentes.
b) No utilice las herramientas eléctricas en
entornos explosivos como, por ejemplo, en
presencia de líquidos infl amables, gases o
polvo.
Las herramientas eléctricas crean chispas que
pueden infl amar el polvo o los gases.
c) Mantenga a los niños y transeúntes alejados
cuando utilice una herramienta eléctrica.
Las distracciones pueden hacer que pierda el
control.
2) Seguridad eléctrica
a) Los enchufes de las herramientas eléctricas
tienen que ser adecuados a la toma de corriente.
No modifi que el enchufe.
No utilice enchufes adaptadores con
herramientas eléctricas conectadas a tierra.
Si no se modifi can los enchufes y se utilizan tomas
de corriente adecuadas se reducirá el riesgo de
descarga eléctrica.
b) Evite el contacto corporal con superfi cies
conectadas a tierra como tuberías, radiadores y
frigorífi cos.
Hay mayor riesgo de descarga eléctrica si su cuerpo
está en contacto con el suelo.
c) No exponga las herramientas eléctricas a la
lluvia o a la humedad.
La entrada de agua en una herramienta eléctrica
aumentará el riesgo de descarga eléctrica.
d) No utilice el cable incorrectamente. No utilice el
cable para transportar, tirar de la herramienta
eléctrica o desenchufarla.
Mantenga el cable alejado del calor, del aceite,
de bordes afi lados o piezas móviles.
Los cables dañados o enredados aumentan el
riesgo de descarga eléctrica.
e) Cuando utilice una herramienta eléctrica al aire
libre, utilice un cable prolongador adecuado
para utilizarse al aire libre.
La utilización de un cable adecuado para usarse al
aire libre reduce el riesgo de descarga eléctrica.
f) Si no se puede evitar el uso de una herramienta
eléctrica en un lugar húmedo, utilice un
suministro protegido mediante un dispositivo
de corriente residual (RCD).
El uso de un RCD reduce el riesgo de descarga
eléctrica.
3) Seguridad personal
a) Esté atento, preste atención a lo que hace y
utilice el sentido común cuando utilice una
herramienta eléctrica.
No utilice una herramienta eléctrica cuando esté
cansado o esté bajo la infl uencia de drogas,
alcohol o medicación.
La distracción momentánea cuando utiliza
herramientas eléctricas puede dar lugar a lesiones
personales graves.
b) Utilice un equipo de protección. Utilice siempre
una protección ocular.
El equipo de protección como máscara para el
polvo, zapatos de seguridad antideslizantes, casco
o protección auditiva utilizado en las situaciones
adecuadas reducirá las lesiones personales.
c) Evite un inicio involuntario. Asegúrese de que
el interruptor está en “off ” antes de conectar
la herramienta a una fuente de alimentación o
batería, cogerla o transportarla.
El transporte de herramientas eléctricas con el dedo
en el interruptor o el encendido de herramientas
eléctricas con el interruptor encendido puede
provocar accidentes.
d) Retire las llaves de ajuste antes de encender la
herramienta eléctrica.
Si se deja una llave en una pieza giratoria de la
herramienta eléctrica podrían producirse lesiones
personales.
e) No se extralimite. Mantenga un equilibrio
adecuado en todo momento.
Esto permite un mayor control de la herramienta
eléctrica en situaciones inesperadas.
f) Vístase adecuadamente. No lleve prendas
sueltas o joyas. Mantenga el pelo, la ropa y los
guantes alejados de las piezas móviles.
La ropa suelta, las joyas y el pelo largo pueden
quedar atrapados en las piezas móviles.
g) Si se proporcionan dispositivos para la conexión
de extracción de polvo e instalaciones de
recogida, asegúrese de que están conectados
y se utilizan adecuadamente.
La utilización de un sistema de recogida de polvo
puede reducir los riesgos relacionados con el polvo.
4) Utilización y mantenimiento de las herramientas
eléctricas
a) No fuerce la herramienta eléctrica. Utilice
la herramienta eléctrica correcta para su
aplicación.
La herramienta eléctrica correcta trabajará mejor y
de forma más segura si se utiliza a la velocidad para
la que fue diseñada.
b) No utilice la herramienta eléctrica si el
interruptor no la enciende y apaga.
Las herramientas eléctricas que no pueden
controlarse con el interruptor son peligrosas y deben
repararse.
c) Desconecte el enchufe de la fuente eléctrica o
la batería de la herramienta eléctrica antes de
hacer ajustes, cambiar accesorios o almacenar
herramientas eléctricas.
Estas medidas de seguridad preventivas reducen el
riesgo de que la herramienta eléctrica se ponga en
marcha accidentalmente.
d) Guarde las herramientas eléctricas que no se
utilicen fuera del alcance de los niños, y no
permita que utilicen las herramientas eléctricas
personas no familiarizadas con las mismas o
con estas instrucciones.
Las herramientas eléctricas son peligrosas si son
utilizadas por usuarios sin formación.
86
Page 87

e) Realice el mantenimiento de las herramientas
eléctricas. Compruebe si las piezas móviles
están mal alineadas o unidas, si hay alguna
pieza rota u otra condición que pudiera afectar al
funcionamiento de las herramientas eléctricas.
Si la herramienta eléctrica está dañada, llévela a
reparar antes de utilizarla.
Se producen muchos accidentes por no realizar
un mantenimiento correcto de las herramientas
eléctricas.
f) Mantenga las herramientas de corte afi ladas y
limpias.
Las herramientas de corte correctamente
mantenidas con los bordes de corte afi lados son
más fáciles de controlar, y existe menor riesgo de
que se atasquen.
g) Utilice la herramienta eléctrica, los accesorios
y las brocas de la herramienta, etc. de acuerdo
con estas instrucciones, teniendo en cuenta las
condiciones laborales y el trabajo que se va a
realizar.
La utilización de la herramienta eléctrica para
operaciones diferentes a las previstas podría dar
lugar a una situación peligrosa.
5) Utilización y mantenimiento de las herramientas a
batería
a) Recargue solo con el cargador especifi cado por
el fabricante.
Un cargador adecuado para un tipo de batería podría
crear peligro de incendio si se utiliza con otra batería.
b) Utilice herramientas eléctricas solo con baterías
designadas específi camente.
La utilización de otras baterías podría crear peligro
de daños e incendio.
c) Cuando no se utilice la batería, manténgala
alejada de otros objetos metálicos como clips
de papel, monedas, llaves, clavos, tornillos u
otros objetos metálicos pequeños que puedan
crear una conexión entre un terminal y otro.
Si se cortocircuitan los terminales de la batería,
podrían producirse quemaduras o un incendio.
d) En condiciones de uso excesivo, la batería
podría expulsar líquido; evite todo contacto.
Si se produce un contacto accidentalmente,
lávese con agua. Si entra líquido en los ojos,
solicite atención médica.
El líquido de la batería podría causar irritación o
quemaduras.
6) Revisión
a) Solicite a un experto cualifi cado que revise la
herramienta eléctrica y que utilice solo piezas
de repuesto idénticas.
Esto garantizará el mantenimiento de la seguridad
de la herramienta eléctrica.
PRECAUCIÓN
Mantenga a los niños y a las personas enfermas alejadas.
Cuando no se utilicen, las herramientas deben
almacenarse fuera del alcance de los niños y de las
personas enfermas.
ADVERTENCIAS DE SEGURIDAD DE
LA PISTOLA DE CLAVOS EN CINTA
SIN CABLE
1. Asegúrese siempre de que la herramienta contiene
grapas.
Un manejo inadecuado de la pistola de clavos puede
provocar el disparo accidental de los fi jadores y causar
lesiones personales.
Español
2. No apunte la herramienta hacia usted o hacia otra
persona que esté cerca.
Un disparo inesperado descargará la grapa, causando
lesiones.
3. No active la herramienta salvo que ésta esté
colocada con fi rmeza contra la pieza de trabajo.
Si la herramienta no está en contacto con la pieza de
trabajo, el grapa podría desviarse de su objetivo.
4. Desconecte la herramienta de la fuente de
alimentación cuando la grapa se atasque en la
herramienta.
Si está enchufada, la pistola de clavos podría activarse
accidentalmente mientras retira fi jadores atascados.
5. Tenga cuidado cuando retire una grapa atascada.
El mecanismo podría estar bajo compresión y la grapa
podría descargarse forzosamente al tratar de solucionar
el atasco.
6. No use la pistola de clavos para asegurar cables
eléctricos.
No está diseñada para la instalación de cables
eléctricos y podría dañar el aislante de los cables
eléctricos, causando una descarga eléctrica o un peligro
de incendio.
ADVERTENCIAS DE SEGURIDAD
ADICIONALES
1. Emplee la herramienta correctamente para que la
operación sea segura.
Esta herramienta ha sido diseñada para clavar clavos en
madera y materiales similares. Empléela solamente para
los propósitos indicados.
2. Tenga cuidado para evitar fuegos y explosiones.
Puesto que pueden salir disparadas chispas durante
la operación de clavado, es muy peligroso emplear
la herramienta cerca de lacas, pinturas, bencinas,
disolventes, gasolina, adhesivos y sustancias
infl amables similares puesto que podrían encenderse
o explotar. Bajo ninguna circunstancia deberá emplear
esta herramienta en la vecindad de tales materiales
infl amables.
3. Protéjase siempre los ojos (con unas gafas
protectoras).
salgan disparados fragmentos de los clavos lo que es
una amenaza para los ojos. Protéjase siempre los ojos
mientras opera la herramienta. Puede protegerse los
ojos con unas gafas protectoras o también ponerse una
máscara de visión amplia encima de gafas graduadas si
es que las lleva.
Los encargados deben siempre hacer obligatorio el
empleo de protección para los ojos.
4. Protéjase los oídos y la cabeza.
Cuando tenga que efectuar un trabajo de clavado
póngase orejeras y protección en la cabeza. También,
dependiendo de las condiciones, asegúrese de que las
personas que pueda haber en los alrededores también
llevan orejeras y protección en la cabeza.
5. Ponga mucha atención en los que trabajan cerca de
usted.
Sería muy peligroso si los clavos que no son clavados
correctamente golpearan a otras personas. Por lo tanto,
ponga siempre mucha atención a la seguridad de las
personas que pueda haber en los alrededores cuando
emplee la herramienta. Asegúrese siempre de que el
cuerpo, manos o pies de ninguna persona estén cerca
de la salida de los clavos.
87
Cuando opere la herramienta eléctrica,
siempre protéjase los ojos y asegúrese de
que las personas que puedan encontrarse
en los alrededores también se los hayan
protegido.
Existe una gran posibilidad de que
Page 88

Español
6. No dirija nunca la salida de los clavos hacia ninguna
persona.
Si la salida de los clavos enfoca
la herramienta. Al conectar y desconectar la batería,
durante la carga de clavos o durante operaciones
similares, asegúrese de que la salida de clavos no
esté orientada hacia ninguna persona (incluido usted
mismo). Incluso cuando no hay clavos cargados, es
peligroso descargar la herramienta cuando se apunta
hacia alguien, por lo que nunca debe hacerlo. No juegue
nunca con ella. Respete la herramienta como método de
trabajo.
7. Compruebe la palanca de empuje antes del uso.
Asegúrese de que la palanca de empuje opere
correctamente. (La palanca de empuje podría ser
denominada como “Seguridad”). Nunca use la pistola
de clavos a menos que la palanca de empuje funcione
correctamente, de lo contrario la pistola de clavos podría
clavar un fi jador inesperadamente. No altere ni retire
la palanca de empuje, de lo contrario, la palanca de
empuje será inutilizable.
8. Seleccionar el método de disparo es importante.
Lea y comprenda la sección “CÓMO USAR LA PISTOLA
DE CLAVOS” en la página 97.
9. Antes de usar el producto, asegúrese de que
funciona correctamente en conformidad con el
contenido de “Prueba de la pistola de clavos” de la
página 95.
10. Emplee solamente los clavos especifi cados.
No emplee nunca otros clavos que no sean los
especifi cados y descritos en este manual de
instrucciones.
11. Tenga cuidado al conectar la batería.
Cuando conecte la batería y cargue clavos, para no
accionar la herramienta por error, asegúrese de lo
siguiente.
○ No toque el gatillo.
○ No permita que el cabezal de disparo se ponga en
contacto con ninguna superfi cie.
○ Mantenga el cabezal de disparo hacia abajo.
Observe estrictamente las instrucciones de arriba
y asegúrese siempre de que ninguna parte de su
cuerpo, manos o pies se encuentra delante de la
salida de los clavos.
12. No coloque descuidadamente el dedo en el gatillo.
No coloque el dedo en el gatillo excepto cuando vaya
a efectuar la operación de clavado. Si transporta la
herramienta o se la pasa a alguien teniendo usted el
dedo en el gatillo, podría descargar inadvertidamente un
clavo causando un accidente serio.
13. Presione fi rmemente la salida de los clavos contra
el material donde vaya a efectuar el clavado.
Cuando clave clavos, presione fi rmemente la salida de
los clavos contra el material donde vaya a efectuar el
clavado. Si la salida no está correctamente colocada, los
clavos rebotarán.
14. Mantenga las manos y pies alejados del cabezal de
disparo durante la operación.
De por hecho siempre que la
herramienta contiene fi jaciones.
hacia personas, podrían producirse
accidentes si descarga erróneamente
Es muy peligroso si un clavo se clavase
en una mano o pie por error.
15. Tenga en cuenta el retorno de la herramienta.
No acerque la parte superior de la herramienta
a su cabeza, etc., durante la operación. Es muy
peligroso puesto que la herramienta podría retroceder
violentamente si el clavo que está siendo clavado
contactara con otro clavo o grapa que ya estuviera
clavado en la madera.
16. Preste atención para evitar disparos dobles a causa
del retroceso.
Si permite que la palanca de empuje vuelva a entrar
inintencionadamente en contacto con la pieza de trabajo
después de un retroceso, podría clavar accidentalmente
un fi jador.
Para evitar este disparo múltiple no deseado,
○ Operación intermitente (disparo por gatillo)
1) Ajuste el dispositivo de conmutación en
MECANISMO DE ACTUACIÓN COMPLETAMENTE
SECUENCIAL.
2) Pulse el gatillo rápidamente y con fi rmeza.
○ Operación continua (disparo con palanca de empuje)
1) No presione la pistola de clavos contra la madera
con demasiada fuerza.
2) Aleje la pistola de clavos de la madera; retrocederá
después de la fi jación.
17. Tenga cuidado cuando efectúe el clavado en
tableros delgados o en las esquinas de la madera.
Cuando efectúe el clavado en tableros delgados, los
clavos pueden traspasarlos, así como también cuando
clave las esquinas de madera debido a la desviación de
los clavos. En tales casos, asegúrese siempre de que no
haya nadie (ni ninguna mano, pie, etc., de nadie) detrás
del tablero o cerca de la madera que vaya a clavar.
18. El clavado simultáneo en ambos lados de la misma
pared es peligroso.
Bajo ninguna circunstancia deberá clavar en ambos
lados de una pared a la vez. Podría ser muy peligroso
puesto que los clavos podrían pasar a través de la pared
y causar daños personales.
19. No utilice la herramienta eléctrica sobre andamios
o escaleras.
La herramienta eléctrica no deberá utilizarse para
aplicaciones específi cas, como por ejemplo:
– cuando el cambio de un sitio de clavado a otro
implica el uso de andamiaje, escalones, escaleras,
construcciones similares a una escalera, como por
ejemplo, listones,
– cierre de cajas o huacales,
– fi jación de sistemas de seguridad para el transporte,
por ej., en vehículos y vagones
20. Retire todos los fi jadores restantes y la batería de la
pistola de clavos cuando:
1) realice el mantenimiento y la inspección;
2) compruebe el funcionamiento correcto de la palanca
de empuje y el gatillo;
3) libere un atasco;
4) no esté en uso;
5) abandone la zona de trabajo;
6) la traslade a otra ubicación; y
7) la entregue a otra persona.
Nunca intente liberar un atasco ni reparar la pistola de
clavos a menos que haya extraído la batería y todos los
fi jadores restantes de la pistola de clavos.
La pistola de clavos nunca debe permanecer
desatendida, puesto que aquellas personas que no
estén familiarizadas con la pistola de clavos podrían
usarla y lesionarse.
21. Retire la batería de la pistola de clavos cuando:
1) cargue clavos;
2) gire el regulador.
22. El entorno operativo para este dispositivo es de
0 °C a 40°C, por lo que debe utilizarlo dentro de este
rango de temperatura. El dispositivo puede fallar
por debajo de 0°C y por encima de 40°C.
88
Page 89

23. Siempre cargar la batería a una temperatura
comprendida entre 0 a 40°C.
Una temperatura inferior a 0°C causa una sobrecarga,
lo que es peligroso. No puede cargarse la batería a una
temperatura mayor de 40°C.
La temperatura más apropiada para cargar es la de 20 a
25°C.
24. No usar el cargador continuamente.
Cuando se completa la carga, dejar descansar el
cargador por 15 minutos antes de proseguir con la carga
siguiente.
25. No dejar que entre suciedad por el orifi cio de
conexión de la batería recargable.
26. Nunca desarmar la batería recargable ni el cargador.
27. Nunca poner en cortocircuito la batería recargable.
Al poner en cortocircuito la batería puede producir
una corriente eléctrica y enorme y por consecuencia
un recalentamiento, pudiendo quemar o deteriorar la
batería.
28. No tirar la batería al fuego.
Si se quema la batería puede explotar.
29. El uso de una batería descargada dañará el
cargador.
30. Llevar la batería al sitio de compra original en el
caso de que la duración de la batería recargable
sea reducida al usarse.
No tirar la batería descargada.
31. No insertar objetos en las ranuras de ventilación
del cargador.
La inserción de objetos metálicos o infl amables en
dichas ranuras puede provocar descargas eléctricas o
dañar el cargador.
32. NUNCA permita que imanes (o dispositivos
magnéticos similares) se acerquen a la pistola de
clavos, puesto que la pistola de clavos posee un
sensor magnético en su interior.
Hacerlo causará un fallo o riesgos de sufrir lesiones por
un funcionamiento incorrecto.
33. Reposo de la herramienta después de un
funcionamiento prolongado.
34. La herramienta eléctrica está equipada con un
circuito de protección de temperatura para proteger
el motor. Un trabajo continuo podría ocasionar que
la temperatura de la unidad se eleve, activando el
circuito de protección de temperatura y deteniendo
automáticamente la operación. Si esto sucede,
deje que la herramienta eléctrica se enfríe antes de
volver a utilizarla.
35. Este producto podría dejar de funcionar cuando se
detecta una anomalía. En tales casos, compruebe
los elementos que fi guran en la sección “SOLUCIÓN
DE PROBLEMAS” en la página 100.
36. Tenga cuidado de no romper o dar sacudidas
fuertes al panel de interruptores. Podría ocasionar
un problema.
Español
ADVERTENCIAS RELATIVAS A LA
BATERÍA DE LITIO
Para ampliar su duración, la batería de litio está equipada
con la función de protección para detener la salida.
En los casos 1 a 3 descritos a continuación, cuando utiliza
este producto, incluso si acciona el interruptor, el motor
puede detenerse. No es un problema, sino el resultado de
la función de protección.
1. Cuando la batería restante se agota, el motor se detiene.
En este caso, cárguela inmediatamente.
2. Si la herramienta se sobrecarga, el motor puede
detenerse. En este caso, suelte el interruptor de la
herramienta y elimine las causas de la sobrecarga. A
continuación, puede volver a utilizarla.
3. Si la batería se calienta excesivamente al realizar un
trabajo de sobrecarga, la alimentación de la batería
podría detenerse.
En este caso, deje de utilizar la batería y deje que se
enfríe. A continuación, puede volver a utilizarla.
Asimismo, preste atención a las siguientes advertencias y
precauciones.
ADVERTENCIA
Para evitar fugas de la batería, generación de calor, emisión
de humo, explosiones e igniciones, preste atención a las
siguientes precauciones.
1. Asegúrese de que no entran virutas o polvo en la batería.
○ Durante el trabajo, asegúrese de que no caen virutas o
polvo en la batería.
○ Asegúrese de que las virutas o el polvo que caen sobre
la herramienta eléctrica durante el trabajo no entran en
la batería.
○ No almacene una batería sin utilizar en un lugar expuesto
a virutas y polvo.
○ Antes de almacenar una batería, retire las virutas y el
polvo que se hayan adherido y no la almacene junto a
piezas metálicas (tornillos, clavos, etc.).
2. No perfore la batería con un objeto afi lado como un
clavo, no la golpee con un martillo, la pise, la tire ni la
exponga a fuertes impactos físicos.
3. No utilice una batería que parezca estar dañada o
deformada.
4. No utilice la batería con las polaridades cambiadas.
5. No conecte la batería directamente a salidas eléctricas
ni a tomas de mechero de automóviles.
6. No utilice la batería para un fi n diferente a los
especifi cados.
7. Si la carga de la batería no fi naliza ni siquiera cuando ha
transcurrido el tiempo de carga especifi cado, detenga
inmediatamente el proceso de carga.
8. No coloque o exponga la batería a temperaturas
elevadas o alta presión, como en un microondas, una
secadora o en un recipiente de alta presión.
9. Aléjela del fuego inmediatamente cuando se detecte
una fuga o un olor raro.
10. No la utilice en un lugar donde se generen grandes
cantidades de electricidad estática.
11. Si se producen fugas de batería, mal olor, se genera
calor, la batería está descolorida o deformada, o
presenta algún tipo de funcionamiento anómalo
durante su uso, recarga o almacenamiento, retírela
inmediatamente del equipo o del cargador de la batería
y detenga su utilización.
PRECAUCIÓN
1. Si el líquido de fuga de la batería entra en contacto
con los ojos, no se los frote y lávelos bien con agua
limpia como, por ejemplo, agua del grifo, y póngase en
contacto con un médico inmediatamente.
Si no se trata, el líquido podría causar problemas de
visión.
89
Page 90

Español
2. Si el líquido de fuga entra en contacto con la piel o la
ropa, lávela bien con agua limpia como, por ejemplo,
agua del grifo, inmediatamente.
Podría producir irritación cutánea.
3. Si observa óxido, mal olor, recalentamiento,
decoloración, deformación u otras irregularidades
al utilizar la batería por primera vez, no la utilice y
devuélvala al proveedor o distribuidor.
ADVERTENCIA
Si una sustancia extraña conductiva accede al terminal de la
batería de iones de litio, esta podría sufrir un cortocircuito y
provocar un incendio. Cuando guarde la batería de iones de
litio, asegúrese de respetar las siguientes reglas.
○ No deje restos conductivos, clavos ni cables, como por
ejemplo cables de hierro o de cobre, en el estuche de
almacenamiento.
○ Para evitar que se produzcan cortocircuitos, cargue la
batería en la herramienta o fi je con fi rmeza la tapa de la
batería hasta que deje de verse el ventilador.
A PROPÓSITO DEL TRANSPORTE DE
LA BATERÍA DE IONES DE LITIO
Al transportar una batería de iones de litio, tenga en cuenta
las siguientes precauciones.
ADVERTENCIA
Notifi que a la compañía de transporte que un paquete
contiene una batería de iones de litio, informe a la compañía
eléctrica de su potencia de salida y siga las instrucciones de
la compañía de transporte al preparar su transporte.
○ Las baterías de iones de litio que superen una potencia
de salida de 100 Wh se considera que son materiales
peligrosos en la Clasifi cación de Transporte y requieren
procedimientos de aplicación especiales.
○ Para el transporte en el extranjero, deberá cumplir con
las leyes internacionales y las normas y regulaciones del
país de destino.
Potencia de salida
Número de 2 o 3 dígitos
Wh
NOMBRES DE LAS PIEZAS
(Fig. 1 – Fig. 23)
Cubierta superior
1
Gatillo
2
Cabezal de disparo (salida)
3
Palanca de empuje
4
Alimentador de clavos (B)
5
Perilla del alimentador
6
Cámara
7
Gancho
8
Batería
9
Palanca de bloqueo
0
Asa
!
Interruptor del indicador de la batería
@
Indicador de la batería
#
Interruptor de operación de clavado
$
Indicador de alimentación
%
Interruptor de alimentación
^
Indicador de operación de clavado
&
Clavos
*
Regulador
(
Placa del gancho
)
SÍMBOLOS
ADVERTENCIA
A continuación se muestran los símbolos usados
para la máquina. Asegúrese de comprender su
signifi cado antes del uso.
NR1890DBCL:
Pistola de clavos en cinta sin cable
NR1890DBRL:
Pistola de clavos en cinta sin cable
Para reducir el riesgo de lesiones, el usuario
deberá leer el manual de instrucciones.
Solo para países de la Unión Europea
¡No deseche los aparatos eléctricos junto con
los residuos domésticos!
De conformidad con la Directiva Europea
2002/96/CE sobre residuos de aparatos
eléctricos y electrónicos y su aplicación
de acuerdo con la legislación nacional, las
herramientas eléctricas cuya vida útil haya
llegado a su fi n se deberán recoger por
separado y trasladar a una planta de reciclaje
que cumpla con las exigencias ecológicas.
Corriente continua
Peso
(en conformidad con el procedimiento EPTA
kg
01/2003)
90
Page 91
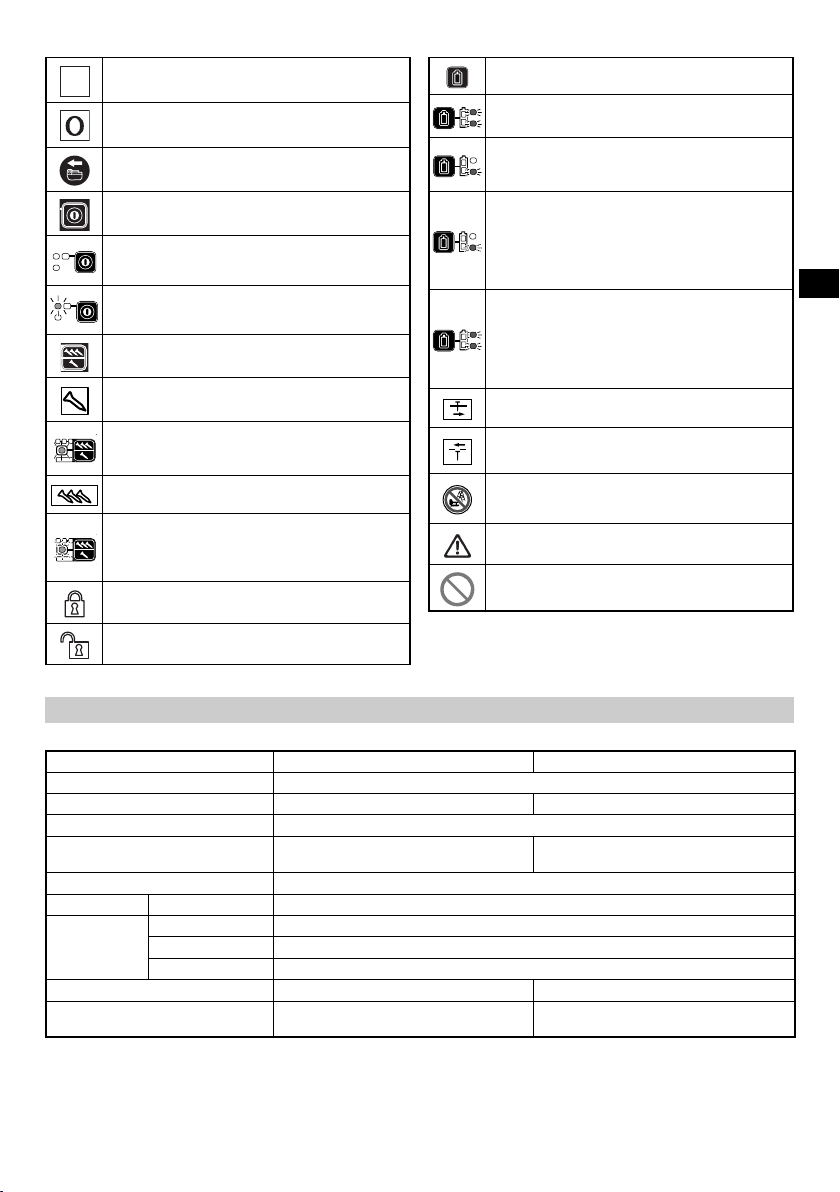
Español
Encendido
Ϩ
Apagado
Desconecte la batería
Interruptor de alimentación
Interruptor de alimentación apagado
Interruptor de alimentación encendido
Indicador de alimentación: Luz verde
Interruptor de operación de clavado
MECANISMO DE ACTUACIÓN
COMPLETAMENTE SECUENCIAL
Modo de MECANISMO DE ACTUACIÓN
COMPLETAMENTE SECUENCIAL
Indicador de operación de clavado: Luz azul
MECANISMO DE ACTUACIÓN POR
CONTACTO
Modo de MECANISMO DE ACTUACIÓN POR
CONTACTO
Indicador de operación de clavado:
Parpadeo azul
Gatillo bloqueado
Gatillo desbloqueado
Interruptor del indicador de la batería
La carga restante de la batería es sufi ciente
Indicador de la batería: 2 luces LED (rojas)
La carga restante de la batería se encuentra a
aproximadamente la mitad.
Indicador de la batería: 1 luz LED (roja)
La carga restante de la batería está
prácticamente agotada.
Recargue la batería tan pronto como sea
posible.
Indicador de la batería: 1 luz LED (roja)
parpadeando
Póngase en contacto con HiKOKI para solicitar
la inspección.
Indicador de la batería: 2 luces LED
parpadean en naranja, después de 10
segundos, se desactiva automáticamente el
interruptor de alimentación.
Lado poco profundo
Lado profundo
No usar en andamios ni escaleras de mano.
Advertencia
Acción prohibida
ESPECIFICACIONES
1. Pistola de clavos en cinta sin cable
Modelo NR1890DBCL NR1890DBRL
Motor Sin escobillas CC
Clavo aplicable ø2,9 – 3,3 mm Consulte la Fig. ø2,9 – 3,3 mm Consulte la Fig.
Longitud de clavo aplicable 50 mm a 90 mm
Capacidad de carga de clavos
[clavos]
Modo de disparo Completamente secuencial/contacto (seleccionable)
Tasa del ciclo [clavos/segundo] 1,5 – 2 (intermitente)
Batería Modelo BSL1850
Tipo Batería de ion de litio
Tensión CC 18 V
Peso* 4,8 kg 4,9 kg
Dimensiones
Altura × Longitud × Anchura
* Peso: En conformidad con el procedimiento EPTA 01/2003
342 mm × 309 mm × 127 mm 342 mm × 342 mm × 137 mm
47 37
91
Page 92
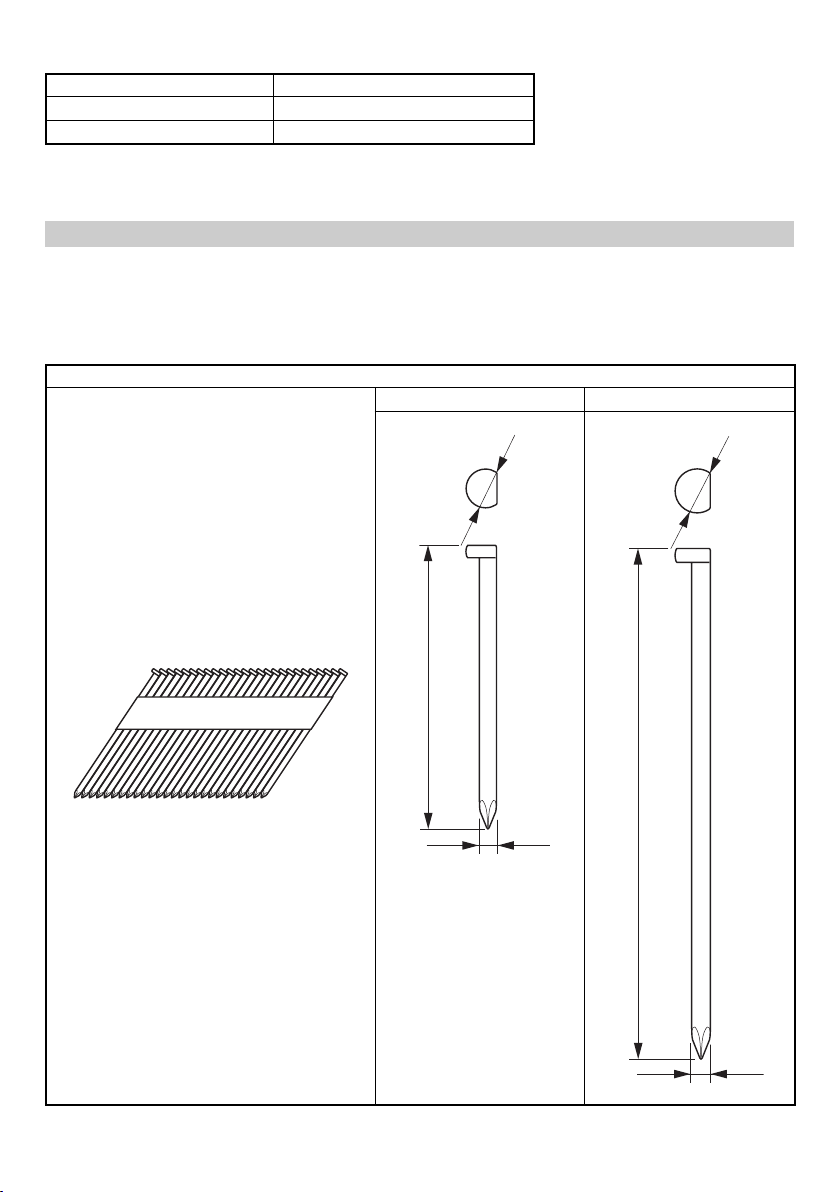
Español
2. Cargador de la batería
Modelo UC18YFSL
Tensión de carga CC 14,4 – 18 V
Peso 0,5 kg
NOTA
Debido al programa continuo de investigación y desarrollo de HiKOKI estas especifi caciones están sujetas a cambio sin
previo aviso.
SELECCIÓN DE CLAVO
Elija los clavos apropiados de la fi gura. Los clavos que no se muestran en la fi gura no pueden ser clavados con esta
herramienta.
El uso de otros clavos puede producir un fallo de funcionamiento de la herramienta y/o la rotura del clavo, lo que provocaría
a su vez lesiones de gravedad.
[NR1890DBCL]
Se utilizan solamente clavos del tipo liso, barbado y de anillo. No utilice clavos de rosca. Los clavos forman ristras
compuestas de 25 a 37 clavos.
NR1890DBCL
Puntas colocadas en ristra de papel
Puntas con cabeza sujetadas
Min. Max.
6,8 mm
7,7 mm
50 mm
92
90 mm
2,9 mm
3,3 mm
Page 93

Clavos colocadas en ristra de plástico.
Clavos con cabeza completa.
NR1890DBRL
50 mm
Min. Max.
7 mm
2,9 mm
7,6 mm
90 mm
Español
3,3 mm
* No se recomienda utilizar esta Clavadora con clavos de cuerpo estriado de 75 mm – 90 mm en madera tratada a presión.
ACCESSORIOS ESTÁNDAR
Además de la unidad principal (1 unidad), el paquete
contiene los accesorios indicados en la página 2.
Los accesorios estándar están sujetos a cambio sin previo
aviso.
APLICACIÓN
○ Construcción de pisos y paredes.
○ Entramado y construcción de ventanas.
○ Refuerzo de pisos y techos.
○ Recubrimiento de paredes.
○ Construcción de casas móviles y viviendas modulares.
CARGA
Antes de utilizar la herramienta eléctrica, cargue la batería
de la siguiente manera.
1. Enchufe el cable de alimentación del cargador a
una toma de corriente de CA.
Al conectar el enchufe del cargador a una toma de
corriente, la lámpara piloto parpadeará en rojo (a
intervalos de un segundo).
2. Inserte la batería en el cargador
Inserte la batería con fi rmeza en el cargador como se
muestra en la Fig. 3.
3. Carga
Cuando inserte una batería en el cargador, la carga
comenzará y la lámpara piloto permanecerá encendida
en rojo de forma continua.
Cuando la batería esté totalmente cargada, la lámpara
piloto parpadeará en rojo (a intervalos de un segundo)
(consulte la tabla 1).
● Indicaciones de la lámpara piloto
Las indicaciones de la lámpara piloto mostradas en la
Tabla 1 se producirán según el estado del cargador o de
la batería recargable.
93
Page 94

Español
Antes de la
carga
Parpadea
Tabla 1
Indicaciones de la lámpara piloto
Se enciende durante 0,5 segundos. No se
enciende durante 0,5 segundos (apagada
durante 0,5 segundos).
Durante la
carga
Carga
Lámpara
piloto (rojo)
● Acerca de las temperaturas y el tiempo de carga de la
batería.
Las temperaturas y el tiempo de carga se ajustarán a los
valores expuestos en la tabla 2
Batería
Tensión de carga V 14,4 – 18
Peso kg 0,5
Temperatura a la que podrá
cargarse la batería
Tiempo de carga de la
capacidad de la batería, aprox.
(A 20 oC)
Número de células de batería 4 – 10
NOTA
El tiempo de carga puede variar según la temperatura y
la tensión de la fuente de alimentación.
PRECAUCIÓN
Si se utiliza el cargador de batería de forma continua,
este se calentará y podría provocar averías. Una vez
fi nalizada la carga, deje pasar 15 minutos hasta la
siguiente.
4. Desconecte el cable de alimentación del cargador
de la toma de corriente.
5. Sostenga el cargador con fi rmeza y saque la
batería.
NOTA
Asegúrese de extraer la batería del cargador después
de usarlo y, a continuación, guárdelo.
PRECAUCIÓN
○ Si la batería se carga cuando está caliente porque ha
permanecido durante un periodo de tiempo prolongado
en un lugar expuesto a la luz directa del sol o porque
la batería acaba de utilizarse, la lámpara piloto del
completa
Espera por
recalentamiento
Carga
imposible
1,3 Ah
1,5 Ah
2,0 Ah
2,5 Ah
3,0 Ah
4,0 Ah
5,0 Ah
Tabla 2
Cargador
mín.
mín.
mín.
mín.
mín.
mín.
mín.
Se
enciende
Parpadea
Parpadea
Destellos
Se enciende de forma continua
Se enciende durante 0,5 segundos. No se
enciende durante 0,5 segundos (apagada
durante 0,5 segundos).
Se enciende durante 1 segundo. No se
enciende durante 0,5 segundos (apagada
durante 0,5 segundos).
Se enciende durante 0,1 segundos. No se
enciende durante 0,1 segundos (apagada
durante 0,1 segundos).
UC18YFSL
0 oC – 50 oC
20
22
30
35
45
60
75
Batería recalentada. No puede
cargarse (la carga comenzará
cuando la batería se enfríe).
Fallo de funcionamiento de la
batería o del cargador
cargador se enciende durante 1 segundo, no se
enciende durante 0,5 segundos (apagada durante 0,5
segundos). En ese caso, deje primero que se enfríe la
batería y, a continuación, inicie la carga.
○ Cuando el piloto indicador parpadea (en intervalos
de 0,2 segundos), compruebe y extraiga los objetos
extraños del conector del cargador de la batería. Si
no hay objetos extraños, es probable que la batería o
el cargador funcionen incorrectamente. Llévelo a su
Centro de servicio técnico autorizado.
○ Como el microordenador incorporado tarda unos 3
segundos en confi rmar que la batería que se está
cargando con el cargador se ha retirado, espere como
mínimo 3 segundos antes de volver a introducirla para
continuar con la carga. Si la batería vuelve a introducirse
antes de que transcurran 3 segundos, puede que no se
cargue correctamente.
○ Si la lámpara piloto no parpadea en rojo (cada segundo)
ni siquiera cuando el cable de conexión está conectado
a la alimentación, indica que el circuito de protección del
cargador podría haberse activado.
Desconecte el cable o el enchufe de la alimentación y,
a continuación, vuelva a conectarlo transcurridos unos
30 segundos. Si tras esto la lámpara piloto no parpadea
en rojo (cada segundo), lleve el cargador al Centro de
servicio técnico autorizado de HiKOKI.
ANTES DEL EMPLEO
Acción Figura
Extracción e inserción de la batería 2
Carga 3
Selección de los accesorios ―
1. Cómo usar el panel de mando
(1) Interruptor de alimentación activado (consulte Fig. 4)
En el estado “Interruptor de alimentación desactivado”,
mantenga presionado el interruptor de alimentación
durante más de 1 segundo; el indicador de alimentación
se ilumina en verde.
NOTA
No presione la palanca de empuje ni pulse el gatillo
durante el proceso de activación del interruptor de
alimentación.
Hacerlo evitará que el interruptor de alimentación se
active.
94
Página
3
4
8
Page 95

[Apagado automático]
Si activa la alimentación pero no usa la pistola de clavos
durante 30 minutos, la pistola de clavos se apagará
automáticamente. Para volver a activarla, pulse el
interruptor de alimentación.
ADVERTENCIA
Nunca deje la pistola de clavos desatendida si está
activada. Podría causar un accidente.
(2) Interruptor de alimentación desactivado (consulte Fig. 4)
En el estado “Interruptor de alimentación activado”,
mantenga presionado el interruptor de alimentación
durante más de 1 segundo; el indicador de alimentación
se apaga.
En el estado de “Interruptor de alimentación activado”,
las siguientes funciones estarán activas.
(3) Seleccione el modo de operación de clavado
(Actuación completamente secuencial/Actuación por
contacto)
Después de activar el interruptor de alimentación, ajuste
siempre primero el modo Actuación completamente
secuencial. (El indicador de operación de clavado se
ilumina en azul). (Consulte la Fig. 5).
Para cambiar el modo de operación de clavado, presione
una vez el interruptor de operación de clavado. Con cada
pulsación, el modo alternará entre “Completamente
secuencial” y “Por contacto”. (Consulte la Fig. 6).
Encendido (azul):
MECANISMO DE ACTUACIÓN COMPLETAMENTE
SECUENCIAL,
Parpadeando (azul):
MECANISMO DE ACTUACIÓN POR CONTACTO
(4) Compruebe el nivel de batería restante
Al pulsar el interruptor del indicador de la batería, el
indicador de la batería mostrará el nivel de batería
restante mediante el estado de la luz LED tal y como se
indica a continuación.
Estado del indicador
La carga restante de la
batería es sufi ciente.
2 luces LED (rojas)
La carga restante de la
batería se encuentra a
aproximadamente la mitad.
1 luz LED (roja)
La carga restante de la
batería está prácticamente
agotada.
1 luz LED (roja) parpadeando
Recargue la batería tan
pronto como sea posible.
Español
(5) Otras funciones
En caso de error de operación, las luces LED aparecen
como se indica a continuación.
Estado del indicador
La máquina está
demasiado fría (por debajo
de -5 °C) o demasiado
2 luces LED (rojas) parpadean
2 luces LED parpadean en
intervalos.
• Si el dispositivo está
demasiado caliente,
parpadea en intervalos de
0,5 segundos.
• Si el dispositivo está
demasiado frío, parpadea
en intervalos de 0,25
segundos.
Tras 10 segundos, las
luces LED se iluminan y el
interruptor de alimentación
se apaga automáticamente.
2 luces LED parpadean
en naranja, después
de alrededor de 10
segundos, se desactiva
automáticamente
el interruptor de
alimentación.
2.
Mecanismo de bloqueo del gatillo (consulte la Fig. 7)
ADVERTENCIA
Asegúrese de bloquear el gatillo cuando no esté
disparando clavos.
Esta pistola de clavos posee un mecanismo de bloqueo
para evitar que se disparen clavos.
Ajuste la palanca de bloqueo del interruptor en la
posición
Deslice la palanca de bloqueo del interruptor hacia la
posición
hacia la posición
3. Prueba de la pistola de clavos
ADVERTENCIA
○ Asegúrese de bloquear el gatillo cuando no esté
disparando clavos. (Consulte la Fig. 7).
○ No use nunca la pistola de clavos a menos que la
palanca de empuje funcione correctamente.
La máquina utiliza un mecanismo de prevención para la
operación descargada.
La máquina entra en un estado en el cual no podrá
empujar la palanca de empuje hacia arriba. Esto se
produce cuando la cámara no está cargada con clavos o
cuando el número restante de clavos es inferior a 7 o 9.
PRECAUCIÓN
Tenga cuidado de no proyectar la punta de la palanca de
empuje hacia la madera.
Antes de comenzar a trabajar, pruebe la pistola de clavos
usando la siguiente lista de comprobación. Realice las
pruebas en el siguiente orden.
Si se produce un funcionamiento incorrecto, deje de usar
la pistola de clavos y póngase inmediatamente en contacto
con un centro de servicio autorizado HiKOKI.
para bloquear el gatillo.
cuando vaya a usar la pistola de clavos, y
caliente.
Permita que la pistola de
clavos se enfríe o caliente
completamente en el
estado adecuado.
Póngase en contacto con
HiKOKI para solicitar la
inspección.
cuando no vaya a usarla.
95
Page 96

Español
(1) RETIRE TODOS LOS CLAVOS Y LA BATERÍA DE LA
PISTOLA DE CLAVOS.
□ TODOS LOS TORNILLOS DEBEN ESTAR
APRETADOS.
□ LA PALANCA DE EMPUJE Y EL GATILLO DEBEN
MOVERSE SUAVEMENTE al retroceder la perilla del
alimentador.
(2) Instalación de la batería.
No accione la palanca de empuje ni el gatillo al instalar la
batería. (Consulte la Fig. 2).
(3) Active el interruptor de alimentación. (Consulte la Fig. 1).
Active el interruptor de alimentación manteniendo
pulsado el interruptor de alimentación durante más de 1
segundo.
Asegúrese de que el indicador de alimentación se
ilumina en verde y que el indicador de operación
de clavado se ilumina en azul. (MECANISMO DE
ACTUACIÓN COMPLETAMENTE SECUENCIAL)
NOTA
No presione la palanca de empuje ni pulse el gatillo
durante el proceso de activación del interruptor de
alimentación.
Hacerlo evitará que el interruptor de alimentación se
active.
[Apagado automático]
Si activa la alimentación pero no usa la pistola de clavos
durante 30 minutos, la pistola de clavos se apagará
automáticamente. Para volver a activarla, pulse el
interruptor de alimentación.
ADVERTENCIA
Nunca deje la pistola de clavos desatendida si está
activada. Podría causar un accidente.
Indicador de operación de clavado
Encendido (azul):
MECANISMO DE ACTUACIÓN COMPLETAMENTE
SECUENCIAL,
Parpadeando (azul):
MECANISMO DE ACTUACIÓN POR CONTACTO
Asegúrese de que el indicador de la batería no parpadea.
Si el indicador de la batería parpadea en rojo, la batería
no tiene carga sufi ciente y debe ser recargada.
(4) Retire el dedo del gatillo y presione la palanca de
empuje contra la pieza de trabajo retrocediendo la perilla
del alimentador.
□ LA PISTOLA DE CLAVOS NO DEBE ACCIONARSE.
(5) Aleje la palanca de empuje de la pieza de trabajo.
A continuación, apunte la pistola de clavos hacia abajo,
retroceda la perilla del alimentador, pulse el gatillo
y espere en dicha posición durante un mínimo de 5
segundos.
□ LA PISTOLA DE CLAVOS NO DEBE ACCIONARSE.
(6) 1 Sin tocar el disparador, presione la palanca de
empuje contra la pieza de trabajo retrocediendo la
perilla del alimentador.
A continuación, pulse el gatillo.
□ LA PISTOLA DE CLAVOS DEBE ACCIONARSE.
2 Mantenga el gatillo pulsado y presione la palanca de
empuje otra vez contra la pieza de trabajo.
□ LA PISTOLA DE CLAVOS NO DEBE ACCIONARSE.
3 Retire el dedo del gatillo.
A continuación, 1 vuelve a accionarse.
□ LA PISTOLA DE CLAVOS DEBE ACCIONARSE.
(7) Aleje la palanca de empuje de la pieza de trabajo y pulse
el gatillo.
Presione la palanca de empuje contra la pieza de trabajo
en un máximo de 2 segundos.
□ LA PISTOLA DE CLAVOS NO DEBE ACCIONARSE.
(8) Ajuste el indicador de operación de clavado
parpadeando en el modo de activación. (MECANISMO
DE ACTUACIÓN POR CONTACTO)
Pulse una vez el interruptor de operación de clavado y
asegúrese de que el indicador parpadea en azul.
Aleje la palanca de empuje de la pieza de trabajo y pulse
el gatillo.
Presione la palanca de empuje contra la pieza de trabajo
en un máximo de 2 segundos.
□ LA PISTOLA DE CLAVOS DEBE ACCIONARSE.
(9) Si no nota ningún comportamiento anómalo, cargue los
clavos en la pistola de clavos.
Introduzca clavos en la pieza de trabajo del mismo tipo
que usará en la aplicación original.
□ LA PISTOLA DE CLAVOS DEBE ACCIONARSE
CORRECTAMENTE.
4. Comprobación de las operaciones de la palanca de
empuje
ADVERTENCIA
Asegúrese de bloquear el gatillo cuando no esté
disparando clavos.
Compruebe siempre que el gatillo está bloqueado y
la batería retirada de la herramienta eléctrica cuando
compruebe las operaciones de la palanca de empuje.
Compruebe que la palanca de empuje se desliza con
suavidad cuando se utiliza.
Limpie la zona de deslizamiento de la palanca de empuje si
ésta no se desliza con suavidad.
5. Carga de clavos
ADVERTENCIA
Al cargar clavos en la pistola de clavos,
1) retire la batería de la pistola de clavos;
2) no pulse el gatillo;
3) no presione la palanca de empuje; y
4) mantenga la pistola de clavos orientada hacia abajo.
2–¡Acción de alimentación de clavos!
(1) Introduzca una cinta de clavos en la parte trasera de la
cámara. (Consulte la Fig. 8
(2) Deslice la cinta de clavos hacia delante en la cámara.
(Consulte la Fig. 9).
(3) Retroceda el alimentador de clavos (B) para acoplar la
perilla del alimentador en la cinta de clavos. (Consulte la
Fig. 10).
NOTA
○ Presione delicadamente el alimentador de clavos (B) y la
perilla del alimentador contra el clavo.
Si el alimentador de clavos (B) y la perilla del alimentador
se liberan de la parte trasera de la cámara y golpean
contra el clavo, es posible que el papel o el plástico
conector del clavo sufra daños.
○ Use cintas de clavos de más de 10 clavos.
○ Use una cinta de clavos que no esté rota y que posea
clavos de la misma longitud.
La pistola de clavos está lista para su uso.
).
96
Page 97

Extracción de los clavos:
1 Tire de la perilla del alimentador hacia atrás. (Consulte la
Fig. 11)
2 Regrese la perilla del alimentador despacio hacia
delante mientras presiona el alimentador de clavos (B).
3 Extraiga los clavos de la parte trasera de la cámara.
(Consulte Fig. 12)
CÓMO USAR LA PISTOLA DE
CLAVOS
ADVERTENCIA
○ NUNCA oriente la herramienta hacia usted ni hacia
ninguna otra persona que se encuentre en la zona.
○ Mantenga los dedos ALEJADOS del gatillo cuando no
clave clavos para evitar su disparo accidental.
○ No utilice el cable de alimentación si está dañado.
Solicite su reparación inmediatamente.
○ Seleccionar el método de disparo es importante.
Por favor, lea y entienda “1. Procedimientos de clavado”
indicado a continuación.
○ Antes de empezar a trabajar, compruebe el dispositivo
de conmutación de la operación de clavado.
Esta pistola de clavos de HiKOKI incluye un dispositivo
de conmutación de la operación de clavado.
Antes de empezar a trabajar, asegúrese de que el
dispositivo de conmutación esté ajustado correctamente.
Si el dispositivo de conmutación no está ajustado
correctamente, la pistola de clavos no operará
correctamente.
○ Nunca coloque su rostro, manos o pies cerca del cabezal
de disparo durante el uso.
○ No clave clavos sobre otros clavos ni con la pistola de
clavos en un ángulo demasiado inclinado; los clavos
podrían rebotar y dañar a alguien.
○ No clave clavos en tableros fi nos ni cerca de las esquinas
y bordes de la pieza de trabajo. Los clavos podrían
atravesar o salirse de la pieza de trabajo y lesionar a
alguien.
○ Nunca clave clavos desde ambos lados de una pared
al mismo tiempo. Los clavos podrían traspasar la pared
y lesionar a la persona que se encuentre en el lado
opuesto.
○ Nunca use una pistola de clavos defectuosa o que no
funcione correctamente.
○ No use la pistola de clavos a modo de martillo.
○ Retire todos los fi jadores restantes y la batería de la
pistola de clavos cuando:
1) realice el mantenimiento y la inspección;
2) compruebe el funcionamiento correcto de la palanca
de empuje y el gatillo;
3) libere una obstrucción;
4) no esté en uso;
5) abandone la zona de trabajo;
6) la traslade a otra ubicación; y
7) la entregue a otra persona.
○ Retire la batería de la pistola de clavos cuando:
1) cargue clavos;
2) gire el regulador.
Esta pistola de clavos de HiKOKI está equipada con un
dispositivo de conmutación de la operación de clavado.
Use el MECANISMO DE ACTUACIÓN COMPLETAMENTE
SECUENCIAL o el MECANISMO DE ACTUACIÓN POR
CONTACTO en conformidad con la tarea a realizar.
Explicación de las diversas operaciones de clavado
○ MECANISMO DE ACTUACIÓN COMPLETAMENTE
SECUENCIAL:
En primer lugar, presione la palanca de empuje contra
la madera; a continuación, pulse el gatillo para clavar el
clavo.
Siga la misma secuencia para seguir clavando clavos.
Español
Después de clavar una vez, no será posible clavar de
nuevo hasta que el disparador se libera y se vuelve a
pulsar otra vez.
○ MECANISMO DE ACTUACIÓN POR CONTACTO:
ACTUACIÓN POR CONTACTO puede seguir dos
secuencias diferentes, dependiendo de su uso.
Para clavar varios clavos:
1. Apriete el gatillo.
2. Presione la palanca de empuje contra la madera
para clavar un clavo.
3. Si mantiene el gatillo en dicha posición, se clavará un
clavo cada vez que presione la palanca de empuje
contra la madera.
Para clavar un solo clavo:
1. Presione la palanca de empuje contra la madera.
2. Pulse el gatillo para clavar el clavo.
3. Retire su dedo del gatillo y retire la clavadora de la
madera.
[Mecanismo de bloqueo de disparo en seco]
La máquina utiliza un mecanismo de prevención para la
operación descargada.
La máquina entra en un estado en el cual no podrá
empujar la palanca de empuje hacia arriba. Esto se
produce cuando la cámara no está cargada con clavos o
cuando el número restante de clavos es inferior a 7 o 9.
PRECAUCIÓN
Tenga cuidado de no orientar la punta de la palanca de
empuje en la madera cuando la palanca de empuje no
pueda ser presionada hacia arriba.
1. Procedimientos de clavado
Esta pistola de clavos está equipada con una palanca de
empuje y no opera a menos que la palanca de empuje
sea presionada.
Existen dos métodos de operación para clavar clavos
con esta pistola de clavos.
Estos son:
1. Operación intermitente (disparo por gatillo):
2. Operación continua (disparo con palanca de
empuje):
(1) Operación intermitente (disparo por gatillo)
Use el ajuste MECANISMO DE ACTUACIÓN
COMPLETAMENTE SECUENCIAL. (Consulte la
Fig. 13).
ADVERTENCIA
○ Para la operación intermitente, ajuste el interruptor de
operación de clavado en MECANISMO DE ACTUACIÓN
COMPLETAMENTE SECUENCIAL (el indicador de
operación de clavado se ilumina en azul). (es decir,
ajuste en MECANISMO DE ACTUACIÓN ÚNICA).
○ Para evitar disparar dos veces o de forma accidental
debido al retroceso.
1) Ajuste en MECANISMO DE ACTUACIÓN
COMPLETAMENTE SECUENCIAL.
2) Pulse el gatillo rápidamente y con fi rmeza.
1 Ajuste el interruptor de operación de clavado en
MECANISMO DE ACTUACIÓN COMPLETAMENTE
SECUENCIAL (el indicador de operación de clavado se
ilumina en azul).
(para ajustar en MECANISMO DE ACTUACIÓN
COMPLETAMENTE SECUENCIAL).
(Ajuste el dispositivo de conmutación completamente en
el modo del indicador de operación de clavado en azul
como se indica en Fig. 13. De lo contrario, se ajustará en
MECANISMO DE ACTUACIÓN POR CONTACTO).
2 Coloque la salida de clavos sobre la pieza de trabajo con
el dedo fuera del gatillo.
3 Presione la palanca de empuje fi rmemente hasta que
esté completamente presionada.
4 Pulse el gatillo para clavar un clavo.
5 Retire el dedo del gatillo y aleje completamente la
herramienta de la superfi cie de la madera.
97
Page 98

Español
Para continuar clavando en otra ubicación, mueva la pistola
de clavos por la madera, repitiendo los pasos 2 - 5 según
sea necesario.
NOTA
Las operaciones 3 y 4 deben realizase en intervalos de
2 segundos. Si transcurren más de 2 segundos después
de 3, la pistola de clavos no funcionará correctamente.
En dicho caso, reintente desde 3.
(2) Operación continua (disparo con palanca de empuje)
Usando MECANISMO DE ACTUACIÓN POR
CONTACTO (consulte Fig. 14)
ADVERTENCIA
Para evitar disparar dos veces o de forma accidental
debido al retroceso.
1) No presione la pistola de clavos contra la madera
con demasiada fuerza.
2) Aleje la pistola de clavos de la madera puesto que
retrocederá después de clavar.
1 Ajuste el interruptor de operación de clavado en
MECANISMO DE ACTUACIÓN POR CONTACTO (el
indicador de operación de clavado parpadea en azul).
(para ajustar en MECANISMO DE ACTUACIÓN POR
CONTACTO).
(Ajuste el dispositivo de conmutación completamente
en el indicador de operación de clavado parpadeando
en azul como se indica en Fig. 14. De lo contrario, no
funcionará correctamente).
2 Pulse el gatillo con la pistola de clavos fuera de la pieza
de trabajo.
3 Presione la palanca de empuje contra la pieza de trabajo
para clavar un clavo.
4 Mueva la pistola de clavos por la pieza de trabajo con
movimientos de rebote.
Cada pulsación de la palanca de empuje clavará un
clavo.
Cuando haya clavado el número de clavos deseado, retire
el dedo del gatillo.
NOTA
Las operaciones 2 y 3 deben realizase en intervalos de
2 segundos. Si transcurren más de 2 segundos después
de 2, la pistola de clavos no funcionará correctamente.
En dicho caso, reintente desde 2.
ADVERTENCIA
○ Mantenga el dedo alejado del gatillo excepto durante la
operación de clavado; podría sufrir lesiones graves si la
palanca de empuje entra accidentalmente en contacto
con usted o cualquier otra persona presente en la zona
de trabajo.
○ Mantenga las manos y el cuerpo alejados de la zona
de descarga. Esta pistola de clavos de HiKOKI podría
rebotar a causa del retroceso provocado al clavar un
clavo y causar que se clave accidentalmente otro clavo,
ocasionando lesiones.
NOTA
○ Si respeta todas las advertencias e instrucciones, podrá
obtener un funcionamiento seguro con los dos sistemas:
MECANISMO DE ACTUACIÓN COMPLETAMENTE
SECUENCIAL, MECANISMO DE ACTUACIÓN POR
CONTACTO.
○ Manipule siempre los clavos y el paquete con cuidado.
Si los clavos se caen, el sello entremedias podría
romperse, causando atascos y una alimentación
incorrecta.
○ Después clavar:
1) retire la batería de la pistola de clavos;
2) retire todos los clavos de la pistola de clavos;
2. Ajuste de la profundidad de clavado
Para garantizar que los clavos penetren a la misma
profundidad, asegúrese de que la pistola de clavos esté
siempre sujeta con fi rmeza contra la pieza de trabajo.
Si clava los clavos con demasiada o insufi ciente
profundidad en la pieza de trabajo, ajuste el clavado en
el siguiente orden.
98
1 Retire la batería de la pistola de clavos. (Consulte la
Fig. 15)
2 Si los clavos se clavan demasiado profundamente, gire
el regulador hacia el lado poco profundo. (Consulte la
Fig. 16).
Los ajustes se realizan en incrementos de media vuelta.
Si los clavos se clavan poco profundamente, gire el
regulador hacia el lado profundo. (Consulte la Fig. 17).
3 Deje de girar el regulador cuando haya logrado la
posición adecuada durante la prueba de clavado.
4 Conecte la batería a la pistola de clavos.
USE SIEMPRE GAFAS DE SEGURIDAD.
Realice una prueba de clavado.
5 Retire la batería de la pistola de clavos.
6
Seleccione una posición adecuada para el regulador.
3. Uso del gancho (consulte Fig. 18, 19, 20)
ADVERTENCIA
Al usar el gancho, desactive el interruptor de
alimentación (luz verde “OFF”). Preste especial atención
de modo que el equipo principal no caiga.
Si la herramienta se cae, existe el riesgo de causar
accidentes.
El gancho puede instalarse en el lado izquierdo o derecho.
1 Retire la batería, a continuación quite todos los clavos
restantes de la recámara.
2 Sostenga fi rmemente la unidad principal y retire el
tornillo usando un destornillador. (Consulte Fig. 18)
3 Retire el gancho y la placa del gancho. (Consulte
Fig. 19)
4 Instale el gancho en el otro lado y asegure fi rmemente
con el tornillo. (Consulte Fig. 20)
NOTA
El gancho puede usarse como colgador.
4. Liberación de un atasco
Si los clavos se atascan en el cabezal de disparo, retírelo
y ajuste el clavado en el orden siguiente.
PRECAUCIÓN
Retire la batería de la pistola de clavos.
1 Retire la batería de la pistola de clavos.
2 Retire todos los clavos.
3 Retire los pernos M5 con la llave. (Consulte la Fig. 21).
4 Saque la cámara del cabezal de disparo y elimine el
atasco. (Consulte la Fig. 22).
PRECAUCIÓN
○ NUNCA golpee la cuchilla impulsora.
○ NUNCA apunte la herramienta hacia usted ni hacia
ninguna otra persona para evitar lesiones a causa de
disparos no intencionados.
Incluso si la batería está extraída de la pistola de clavos,
sigue teniendo energía de aire comprimido en el interior.
5 Coloque la cámara en el inyector y apriétela con el perno
M5.
NOTA
En caso de atascos frecuentes, póngase en contacto
con un centro de servicio autorizado de HiKOKI.
5. Uso de la tapa de la nariz (consulte Fig. 23)
ADVERTENCIA
Al instalar o desinstalar la tapa de la nariz, asegúrese
de retirar su dedo del gatillo y retire todos los fi jadores
restantes y la batería de la pistola de clavos.
Si desea proteger la superfi cie de la pieza de trabajo contra
arañazos o marcas causados por la palanca de empuje,
instale la tapa de la nariz accesoria en la palanca de empuje.
1 Retire todos los fi jadores restantes y la batería de la
pistola de clavos.
2 Coloque la tapa de la nariz en la punta de la palanca de
empuje.
3 La tapa de la nariz está marcada para indicar el punto de
salida del clavo, facilitando el alineamiento.
NOTA
La tapa de la nariz podría reducir la profundidad del
clavado a causa de su grosor. Es necesario reajustar la
profundidad de clavado.
Page 99

Español
MANTENIMIENTO E INSPECCIÓN
PRECAUCIÓN
Asegúrese de retirar los fi jadores restantes y la batería
de la pistola de clavos antes de proceder con el
mantenimiento y la inspección.
1. Inspección de la cámara
1 Retire la batería de la pistola de clavos.
2 Limpie la cámara. Elimine el polvo y las virutas de
madera que puedan haberse acumulado en la
cámara.
PRECAUCIÓN
Compruebe que el alimentador de clavos se deslice
suavemente tirando del él con el dedo.
Si no se desliza suavemente, los clavos podrían clavarse
en ángulos irregulares y causar lesiones.
2. Inspección de los tornillos de montaje
Inspeccione con regularidad todos los tornillos de
montaje y asegúrese de que estén bien apretados. Si
hay algún tornillo suelto, apriételo inmediatamente. No
hacerlo podría provocar riesgos graves.
3. Mantenimiento del motor
El bobinado de la unidad del motor es el auténtico
corazón de la herramienta eléctrica. Tenga el máximo
cuidado posible para asegurarse de que el bobinado no
se daña ni se moja con aceite o agua.
4. Limpieza del exterior
Cuando la herramienta esté sucia, límpiela con un
trapo seco y suave o con un paño humedecido en agua
jabonosa. No utilice disolventes clóricos, gasolina o
disolventes para pinturas ya que estos deforman los
materiales plásticos.
5. Conservación
Guarde la herramienta en un lugar en el que la
temperatura sea inferior a 40 °C y fuera del alcance de
los niños.
NOTA
Almacenamiento de baterías de iones de litio
Compruebe que las baterías de iones de litio se hayan
cargado completamente antes de almacenarlas.
Un almacenamiento prolongado de las baterías (3
meses o más) con poca carga podría deteriorar su
funcionamiento, reduciendo en gran medida el tiempo
de uso de la batería o haciendo que las baterías no
puedan mantener una carga.
No obstante, la reducción en gran medida del tiempo de
uso de la batería puede recuperarse si se carga y utiliza
de dos a cinco veces.
Si el tiempo de uso de la batería es extremadamente
corto a pesar de haber cargado y utilizado la batería
varias veces, deberá considerarla agotada y comprar
una nueva.
GARANTÍA
Las herramientas eléctricas de HiKOKI incluyen una
garantía conforme al reglamento específi co legal/nacional.
Esta garantía no cubre los defectos o daños debidos al
uso incorrecto, el uso excesivo ni tampoco los provocados
por el desgaste normal. En caso de reclamación, envíe la
herramienta eléctrica, sin desmontar y con el CERTIFICADO
DE GARANTÍA que aparece al fi nal de estas instrucciones
de uso, al Centro de servicio autorizado de HiKOKI.
Información sobre el ruido
Valores de la característica de ruido de acuerdo con la
norma EN 792-13:
Nivel de potencia de sonido de un evento de ponderación
A típica L
Nivel de presión de sonido de emisión de un evento de
ponderación A típica en el lugar de trabajo
L
Incertidumbre KpA: 3 dB
Estos valores son los valores característicos relacionados
con la herramienta y no representan el desarrollo del ruido
en el lugar de empleo. El desarrollo de ruido en el lugar de
empleo dependerá del ambiente de trabajo, pieza de trabajo,
soporte de la pieza, número de operaciones de clavado, etc.
Dependiendo de las condiciones del lugar de trabajo y
de la forma de la pieza de trabajo, deberán llevarse a
cabo medidas de atenuación de ruido individuales, tales
como la colocación de las piezas de trabajo en soportes
amortiguadores de ruido, prevención de vibraciones de la
pieza de trabajo mediante sujeción o cobertura, etc.
En casos especiales será necesario llevar puesto un equipo
de protección en los oídos.
Información sobre las vibraciones
El valor característico de vibraciones típico de acuerdo con
la norma EN 792-13: 4,6 m/s
Incertidumbre K = 1,5 m/s
Estos valores son valores característicos relacionados con
la herramienta y no representan la infl uencia en el sistema
de armado a mano cuando se emplea la herramienta. La
infl uencia en el sistema de armado a mano al emplear la
herramienta dependerá de la fuerza de sujeción, fuerza
de presión de contacto, dirección del trabajo, ajuste de
suministro de energía, pieza de trabajo, soporte de la pieza
de trabajo, etc.
2
.
2
WA,1s,d = 101 dB
pA, 1s,d = 90 dB
PRECAUCIÓN
En el manejo y el mantenimiento de las herramientas
eléctricas, se deberán observar las normas y
reglamentos vigentes en cada país.
Aviso importante sobre las baterías de las
herramientas eléctricas a batería de HiKOKI
Utilice siempre una de nuestras baterías genuinas. No
podemos garantizar la seguridad y el funcionamiento de
nuestra herramienta eléctrica a batería cuando se utiliza
con baterías diferentes a las indicadas por nosotros,
o cuando la batería se desmonta y modifi ca (como
cuando se desmontan y sustituyen celdas u otras piezas
internas).
El valor total de vibración declarado se ha medido según
un método de prueba estándar, y permite comparar unas
herramientas con otras.
También resulta útil para llevar a cabo evaluaciones
preliminares de exposición.
ADVERTENCIA
○ La emisión de vibración durante la utilización real de la
herramienta eléctrica puede ser diferente del valor total
declarado en función de las formas de utilización de la
herramienta.
○ Identifi que las medidas de seguridad para proteger al
operador basadas en una estimación de exposición en
condiciones reales de uso (teniendo en cuenta todas
las partes del ciclo de funcionamiento, como tiempos
durante los que la herramienta está apagada y durante
los que funciona lentamente, además del tiempo de
activación).
99
Page 100

Español
NOTA
Debido al programa continuo de investigación y desarrollo
de HiKOKI, estas especifi caciones están sujetas a cambio
sin previo aviso.
Tabla de mantenimiento
ACCIÓN MOTIVO MODO
Limpie la cámara y el
mecanismo alimentador.
Mantenga la palanca de
empuje en perfecto estado de
funcionamiento.
Para evitar un atasco. Limpiando con aire a diario.
Para promover la seguridad del operario y
la operación efi caz de la pistola de clavos.
Limpiando con aire a diario.
SOLUCIÓN DE PROBLEMAS
Utilice las inspecciones en la tabla inferior si la herramienta no funciona con normalidad. Si esto no soluciona el problema,
póngase en contacto con su distribuidor local o con el centro de servicio autorizado de HiKOKI.
PROBLEMA MÉTODO DE COMPROBACIÓN CORRECCIÓN
El interruptor de alimentación
no se enciende.
Se enciende una vez pero se
apaga automáticamente.
La pistola de clavos no
funciona
(Interruptor de alimentación
activado).
La pistola de clavos funciona
pero no salen clavos.
Carga de la batería baja. Cargue la batería.
Componentes electrónicos internos
dañados.
¿Están la palanca de empuje y/o el gatillo
activados?
¿No funciona durante 30 minutos?
(Función de desactivación automática)
Pistola de clavos no presionada
correctamente contra la pieza de trabajo.
El gatillo no está sufi cientemente
apretado.
Han transcurrido más de 2 segundos
desde la activación de la palanca de
empuje hasta la activación del gatillo (o
desde la activación del gatillo hasta la
activación de la palanca de empuje).
Mecanismo preventivo activado.
(Sin clavos o pocos fi jadores restantes)
La palanca de bloqueo (función de
bloqueo del gatillo) está en la posición
“ON”.
La máquina está demasiado fría (por
debajo de -5 °C) o demasiado caliente.
Componentes electrónicos internos
dañados.
La cámara está sucia. Sople y limpie la cámara.
Compruebe si hay atascos. Liberación de atascos (consulte Fig. 21,
¿Cuchilla impulsora desgastada o
dañada?
¿Muelle de la cinta debilitado o dañado? Sustituya el muelle de la cinta.
¿Alimentador de clavos dañado? Sustituya el alimentador de clavos.
Compruebe si está usando los clavos
correctos.
Póngase en contacto con HiKOKI para
solicitar el recambio.
Mantenga la palanca de empuje y el
gatillo desactivados.
Mantenga presionado el interruptor de
alimentación durante más de 1 segundo
para activar.
Mantenga la pistola de clavos fi rmemente
y presione completamente contra la pieza
de trabajo.
Pulse el gatillo fi rmemente.
Asegúrese de que transcurran menos
de 2 segundos entre la activación de la
palanca de empuje y la activación del
gatillo (o entre la activación del gatillo y la
activación de la palanca de empuje).
Vuelva a cargar los clavos en la cámara.
Ajuste la palanca de bloqueo en la
posición “OFF”. (Consulte Fig. 7)
Permita que la pistola de clavos se enfríe
o caliente completamente en el estado
adecuado.
Póngase en contacto con HiKOKI para
solicitar el recambio.
22).
Póngase en contacto con HiKOKI para
solicitar el recambio.
Utilice solamente clavos recomendados.
100
 Loading...