

Page 1
Stapler
Nagler
Agrafeuse
Fissatrice pneumatica
Nietapparaat
Grapadora
Agrafadora
N 5008AC2
Read through carefully and understand these instructions before use.
Keep this Manual available for others before they use the Stapler.
Diese Anleitung vor Benutzung des Werkzeugs sorgfältig durchlesen und verstehen.
Dieses Handbuch ist von allen Bedienern des Naglers vor Gebrauch zu lesen. Bitte bewahren Sie es daher
sorgfältig auf.
Lire soigneusement et bien assimiler ces instructions avant usage.
Conservez ce manuel pour que les futurs utilisateurs puissent s'y référer avant d'utiliser l'agrafeuse.
Prima dell'uso leggere attentamente e comprendere queste instuzioni.
Conservate il presente manuale in modo che sia disponibile per gli altri prima che utilizzino la fi ssatrice
pneumatica.
Deze gebruiksaanwijzing s.v.p voor gebruik zorgvuldig doorlezen.
Zorg ervoor dat deze handleiding beschikbaar is voor anderen voordat zij het nietapparaat gebruiken.
Leer cuidadosamente y comprender estas instucciones antes del uso.
Proporcione este Manual a otras personas antes de que utilicen la grapadora.
Leia cuidadosamente e compreenda estas instruções antes da utilização.
Mantenha este Manual disponível para outros antes de usarem a Agrafadora.
Handling instructions
Bedienungsanleitung
Mode d’emploi
Istruzioni per l’uso
Gebruiksaanwijzing
Instrucciones de manejo
Instruções de uso
Page 2

1
2
4 5
2
3
Page 3

6
8 9
7
10
11
3
Page 4

English Deutsch Français Italiano
Piston Kolben Piston Pistone
Piston O-Ring Kolben-O-Ring Joint torique de piston O-ring del pistone
Driver Blade Schraubenzieherklinge Lame d’entraînement Lama
Nose Nase Bec Naso
Lock Lever Verriegelungshebel Levier de verrouillage Leva di blocco
Blade Guide Klingenführung Guide de lame Guida della lama
Push Lever Auslösesicherung Bras. de contact Leva di spinta
Firing Head (outlet) Schießkopf (Auslass) Tête de clouage (sortie) Testa di sparo (uscita)
Push Lever Piece Auslösesicherungsstück
Staple Feeder Krampenzuführung Alimenteur d’agrafes Alimentatore punti
Magazine Assembly Magazinbaugruppe Ensemble de magasin Gruppo caricatore
Magazine Cover Magazinabdeckung Couvercle du magasin Coperchio caricatore
Air Plug Luftanschluss
Cap Kappe Capuchon Coperchio
Body Körper Corps Corpo
Trigger Auslöser Détente Grilletto
Exhaust Cover Entlüftungsdeckel Chapeau d’aération Copertura scarico
Groove Nut Encoche Scanalatura
Staple Krampe Agrafes Punto
Magazine Magazin Magasin Contenitore
Previously pull the trigger
Screw Schraube Vis Vite
Disconnect air hose Luftschlauchanschluss Débrancher le tuyau d’air Scollegare il tubo dell’aria
Stapler Side Naglerseite Côté agrafeuse
Reducing Valve Reduzier-Ventil Valve réductrice Valvola di riduzione
Vorher den Auslöser
durchziehen
Fixation du levier-poussoir
Bouchon d’air
Au préalable, tirer sur la
gâchette
Pezzo leva di spinta
Tappo aria
Premere prima il grilletto
Lato della Fissatrice
pneumatica
Oiler Oeler Lubrifi cateurs Oliatore
Compressor Side Kompressor-Seite Côté compresseur Lato compressore
Filter Filter Filtre Filtro
4
Page 5

Nederlands Español Português
Zuiger Pistón Êmbolo
O-ring van zuiger Anillo O del pistón O-Ring do êmbolo
Aandrijfblad Cuchilla impulsora Lâmina de accionamento
Neusstuk Morro Nariz
Vergrendeling Palanca de bloqueo Alavanca de bloqueio
Bladgeleider Guía de cuchilla Guia da lâmina
Veiligheidshendel Palanca de empuje Alavanca de pressão
Niet-uitlaat
Onderdeel drukhendel
Nietentoevoer Alimentador de grapas Alimentador da agrafadora
Magazijnconstructie Conjunto de cargador Conjunto de carregador
Magazijnkap Cubierta del cargador Tampa do carregador
Persluchtaansluiting Toma de aire Tampa de ar
Kap Tapa Tampa
Behuizing Cuerpo Corpo
Trekker Gatillo Gatilho
Uitlaatdeksel Cubierta de escape Tampa de escape
Cabeza de salida de los
grapas
Pieza de la palanca de
empuje
Cabeça de disparo (saída)
Peça de alavanca de
pressão
Groef Ranura Ranhura
Niet Grapas Agrafo
Magazijn Cargador Depósito
Haal eerst de trekker over Apriete primero el gatillo Prima primeiro o gatilho
Bout Tornillo Parafuso
Luchtslang loskoppelen
Kant van het nietapparaat Lado de la grapadora Lado da agrafadora
Reductieklep Válvula de reducción Válvula redutora
Zelfsmeernippel Engrasador Lubrifi cador
Kant van de compressor Lado del compresor Lado do compressor
Filter Filtro Filtro
Desconecte la manguera
de aire
Desligue o tubo de ar
5
Page 6

English
(Original instructions)
GENERAL OPERATIONAL PRECAUTIONS
WARNING
Read all safety warnings, instructions,
illustrations and specifi cations provided
Failure to follow all instructions listed below may result in
serious injury.
Save all warnings and instructions for future
reference.
1. Operate the power tool safely for correct uses.
Do not use the power tool for uses other than those
2. For safe operation handle the power tool correctly.
Please follow the instructions given in this instruction
3. Confi rm the safety of the workshop.
Keep unauthorized people away from the workshop.
4. The right parts in the right places.
Do not remove any of the covers or screws. Keep them
Moreover, because it would be dangerous, never
5. Check the tool before using it.
Before using the tool, always check that no parts of it
6. Excessive work could cause accidents.
Do not make tools and accessories work beyond their
7. Stop operation immediately if abnormalities are
Stop operation if you notice abnormalities, or if the
8. Look after the power tool carefully.
If you drop or knock the power tool against things, the
Never use the power tool if a crack develops or if air is
9. Take good care for a long life.
Always take good care of the power tool and keep it clean.
10. Inspection at regular intervals is essential for
Inspe ct the power tool a t regular inte rvals so th at the power
11. Consult an authorized service agent if repair or
Ensure that the power tool is serviced by authorized
12. Keep the power tool in a proper place.
When not in use, the power tool should be kept in a
13. The exploded assembly drawing on this handling
6
with this power tool.
specifi ed in this instructions.
manual and correctly handle this tool so as to ensure
safe operation. Never let the tool be use by children or
people who do not know enough to be able to handle it
co rre ctl y, or l et it be used by peo ple w ho c annot o per ate
it correctly.
Especially children should be kept away.
in place as they have their functions.
make modifi cations to the tool or use it after making
modifi cations.
are broke n, that all screws are completely tight, and that
no parts are missing or rusty.
abilities. Excessive work not only damages the power
tool but also is dangerous in itself.
noticed.
power tool does not work properly; have the power tool
inspected and serviced.
outer frame may be deformed and cracks or other kinds
of d ama ge ma y occur, so pl eas e han dle it w ith suffi cient
care. Al so, do not scratch or e ngrave signs on th e power
tool. Owing to high pressure a ir inside the too l, cracks in
the surface are dangerous.
escaping from a crack.
safety.
tool can be operated safety and effi ciently at all times.
parts replacement is necessary.
service agent only, and that only genuine, replacement
parts are used.
dry place out of the reach of children. Put into the body
about 2cc oil through the hose joint to protect the tool
from rust.
instructions should be used only for authorized
service center.
14. Hold the tool with a fi rm grasp and be prepared to
manage recoil.
15. Store idle power tools out of the reach of children
and do not allow persons unfamiliar with the
power tool or these instructions to operate the
power tool.
Power tools are dangerous in the hands of untrained
users.
16. Do not modify the fastener driving tool.
Modifi cations may reduce the eff ectiveness of
safety measures and increase the risks to the
operator and/or bystander
17. Maintain power tools and accessories. Check
for misalignment or binding of moving parts,
breakage of parts and any other condition that
may aff ect the power tool’s operation. If damaged,
have the power tool repaired before use.
Many accidents are caused by poorly maintained
power tools.
18. Do not overreach. Keep proper footing and
balance at all times.
This enables better control of the power tool in
unexpected situations.
19. Keep children and bystanders away while
operating a power tool.
Distractions can cause you to lose control.
PRECAUTIONS ON USING STAPLER
1. Safe operation through correct usage.
This tool was designed for driving staples into wood
and similar materials. Use it for its intended purpose
only.
2. Make sure air pressure is within the rated range of
air pressure.
Fastener driving tools operated by compressed air shall
only be connected to compressed air lines where the
maximum allowable pressure cannot be exceeded by
a factor of more than 10% which can for example be
achieved by a pressure reduction valve which includes
a downstream safety valve.
(For model N5008AC2, 110% of rated maximum
allowable pressure is 9.1 bar = 130 psi)
Fastener driving tools operated by compressed air
should only be operated at the lowest pressure required
for the work process at hand, in order to prevent
unnecessarily high noise levels, increased wear and
resulting failures.
3. Never operate the equipment with high-pressure
gases other than compressed air.
Never use carbon dioxide, oxygen or another gas from
pressurized containers under any circumstances.
4. Be careful of ignition and explosions.
Since sparks may fl y during stapling, it is dangerous
to use this tool near lacquer, paint, benzine, thinner,
gasoline, gas, adhesives and similar infl ammable
substances as they may ignite or explode. Under no
circumstances should this tool therefore be used in the
vicinity of such infl ammable material.
5. Always wear eye protection (protective goggles).
the eye is a threat to sigh t. Eye protection c an be bought
at any hardware store. Always wear eye protection
while operating this tool. Use either eye protection or a
wide vision mask over prescription glasses.
When operating the power tool, always wear
eye protection, and ensure that surrounding
people wear eye protection too.
The possibility of fragments of staples or
staples that were not properly hit entering
Page 7

English
Employers should always enforce the use of eye
protection equipment.
6. Protect your ears and head.
to high noise levels can cause permanent, disabling,
hearing loss and other problems such as tinnitus
(ringing, buzzing, whistling or humming in the ears).
Risk assessment and implementation of appropriate
controls for these hazards are essential.
Appropriate controls to reduce the risk may include
actions such as damping materials to prevent
workpieces from “ringing”.
Operate and maintain the tool as recommended in
these instructions, to prevent an unnecessary increase
in noise levels.
7. Pay attention to those working close to you.
It would be very dangerous if staples that were not
properly driven in should hit other people. Therefore,
always pay attention to the safety of the people around
you when using this tool. Always make sure that
nobody’s body, hands or feet are close to the staple
outlet.
8. Never point the staple outlet towards people.
Always assume the tool contains fasteners.
If the staple outlet is pointed towards people, serious
accidents may be caused if you mistakenly discharge
the tool. When connecting and disconnecting the hose,
during staple loading or similar operations, be sure the
staple outlet is not pointed towards anyone (including
yourself). Even when no staples are loaded at all, it
is dangerous to discharge the tool while pointing it at
someone, so never attempt to do so. No horseplay.
Respect the tool as a working implement.
9. Before using the power tool, check the push lever.
You may rest the tool on a level surface as shown in
Fig. 5.
Be sure not to apply the force downward onto the tool to
the extent that the push lever is engaged.
Before using the power tool make sure to check that the
push lever and valve operate properly. Without staples
loaded into the power tool, connect the hose and check
the following. If the sound of operation occurs this
indicates a fault, so in such a case do not use the power
tool until it has been inspected and repaired.
○ If merely pulling the trigger causes operating sound
○ If merely pushing the push lever against the
10. Use s pecifi ed staples only.
Never use staples other than those specifi ed and
described in these instructions.
11. Do not modify the fastener driving tool.
Modifi cations may reduce the eff ectiveness of safety
measures and increase the risks to the operator and/or
bystander.
12. Be careful when connecting the hose.
When connecting the hose and loading staples in
order not to fi re the tool by mistake, make sure of the
following.
○ Do not touch the trigger.
○ Do not allow the fi ring head to contact with any
○ Keep the fi ring head down.
When engaged in stapling work please wear
ear muffl ers and head protection. Also,
depending on condition, ensure that
surrounding people also wear ear muffl ers
and head protection. Unprotected exposure
of drive bit movement occur, the power tool is fault y.
material to be stapled causes the sound of drive
bit movement to occur, the power tool is faulty.
Furthermore, with regard to the push lever, please
note that it must never be modifi ed or removed.
surface.
Strictly observe the above instructions, and always
make sure that no part of the body, hands or legs is
ever in front of the staple outlet.
13. Be careful when handling fasteners, especially
when loading and unloading, as the fasteners have
sharp points which could cause injury.
14. Do not carelessly place your fi nger on the trigger.
Do not place your fi nger on the trigger except when
actually stapling. If you carry this tool or hand it to
someone while having your fi nger on the trigger, you
may inadvertently discharge a staple and thus cause
an accident.
15. Completely Close the blade guide and do not open
it during operation.
If stapling is attempted when the blade guide is open,
staples will not be driven into the timber, and there is a
risk of dangerous discharge.
16. Press the staple outlet fi rmly against the material
to be stapled.
When driving in staples, press the staple outlet fi rmly
against the material to be stapled. If the outlet is not
applied properly, the staples may rebound.
17. Keep hands and feet away from the fi ring head
when using.
It is very dangerous for a staple to hit the hands or feet
by mistake.
18. During operation, debris from workpiece and
fastening/collation system may be discharged.
19. Beware of the tool’s kickback.
Do not approach the top of the tool with your head etc.
during operation. This is dangerous because the tool
may recoil violently if the staple currently being driven
in comes into contact with a previous staple or a knot in
the wood.
20. Take care wh en sta pling thin boards or the corners
of wood.
When stapling thin boards, the staples may pass right
through, as may also be the case when stapling the
corners of wood due to deviation of the staples. In
such cases, always make sure that there is no one (and
nobody’s hands or feet; etc.) behind the thin board or
next to the wood you are going to staple.
21. Simultaneous staping on both sides of the same
wall is dangerous.
Under no circumstances should stapling be performed
on both sides of a wall at the same time. This would be
very dangerous since the staples might pass through
the wall and thus cause injuries.
22. Do not use the power tool on scaff oldings, ladders.
The power tool shall not be used for specifi c application
for example:
– when changing one driving location to another
involves the use of scaff orldings, stairs, ladders or
ladder alike constructions, e.g. roof laths,
– closing boxes or crates,
– fi tting transportation safety systems e.g. on
vehicles and wagons
23. Do not disconnect the hose with your fi nger on the
trigger.
I f you disconnec t the hose with your fi nger on the trigger,
the next time the hose is connected, there is a danger
that the power tool will fi re a staple spontaneously, or
operate incorrectly.
24. Disconnect the hose and take out any staples left
in the magazine after use.
Disconnect tool from air before doing tool maintenance,
cleaning a jammed fastener, leaving work area, moving
tool to ano ther locatio n, or after use. It i s very dangero us
for a staple to be fi red by mistake.
7
Page 8

English
25. When removing a staple which has become stuck,
make sure to fi rst of all disconnect the hose and
release compressed air.
When removing a staple which has become stuck in
the staple outlet, fi rst of all make sure to disconnect the
hose and release compressed air inside the power tool.
Accidental fi ring of the staple could be very dangerous.
26. To avoid hazards caused by falling staples,
never open the magazine with the device facing
downward while loading staples.
27. A female plug (air socket) should not be used in
the body.
If a female plug is installed in the body, the compressed
air sometimes can not be drawn when the hose is
disconnected so avoid this.
The tool and air supply hose must have a hose coupling
such that all pressure is remove d from the tool when the
coupling joint is disconnected.
28. While using a tool, the operator shall adopt a
suitable but ergonomic posture.
Maintain secure footing and avoid awkward or off -
balanced postures.
29. If the operator experiences symptoms such as
persi stent or re curring di scomfor t, pain, t hrobbing ,
aching, tingling, numbness, burning sensation, or
stiff ness, do not ignore these warning signs.
The operator shall consult a qualifi ed health
professional regarding overall activities.
30 Long time continuous and repetitive work may
lead to muscular-skeletal disorders.
Do not keep working with a sa me posture or by applying
excessive force for a long time.
And take some rest regularly and especially when you
feel tired.
31. Slips, trips and falls are major causes of workplace
injury.
Be aware of slippery surfaces caused by use of the tool
and also of trip hazards caused by the airline hose.
32. Proceed with additional care in unfamiliar
surroundings.
Hidden hazards may exist, such as electricity or other
utility lines.
33. Make sure there are no electrical cables, gas pipes
etc. that could cause a hazard if damaged by use
of the tool.
34. Risk assessment should include dust created by
the use of the tool and the potential for disturbing
existing dust.
35. Direct the exhaust so as to minimize disturbance
of dust in a dust fi lled environment.
36. Where dust or exhaust hazards are created, the
priority shall be to control them at the point of
emission.
37. Information to conduct a risk assessment of
these hazards and implementation of appropriate
controls is essential.
38. Exposure to vibration can cause disabling damage
to the nerves and blood supply of the hands and
arms.
39. Wear warm clothing when working in cold
conditions, keep your hands warm and dry.
40. If you experience numbness, tingling, pain or
whitening of the skin in your fi ngers or hands,
seek medical advice from a qualifi ed occupational
health professional regarding overall activities.
41. Operate and maintain the tool as recommended
in these instructions, to prevent an unnecessary
increase in vibration levels.
42. Hold the tool with a light, but safe, grip because
the risk from vibration is generally greater when
the grip force is higher.
43. When cleaning the power tool, do not use gasoline
or other infl ammable liquids.
If vapour from an infl ammable liquid gets into the power
tool, there is a danger that sparks produced when
stapling etc. may cause an explosion.
SPECIFICATIONS
Type of power Piston reciprocating
Air pressure (Gauge) 4.9 – 8.3 bar (70 – 120 psi)
Applicable staples ref. Fig.
Amount of loadable staples 150 staples
Size
Weight 2.0 kg (4.4 lbs)
Hose (inside diam.) 6 mm (1/4”)
8
365 mm (L) 258 mm (H) 76 mm (W) (14-3/8” 10-5/32” 3”)
Page 9
English
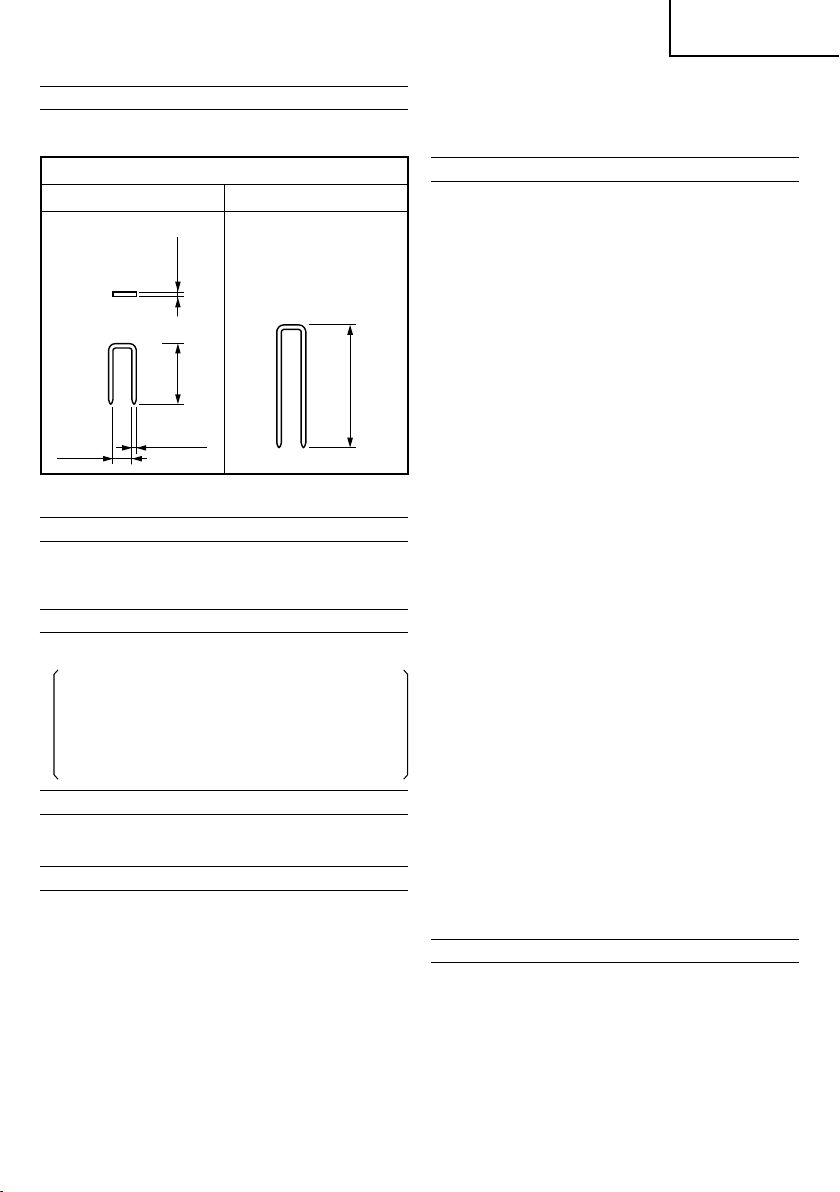
STAPLE SELECTION
Choose a suitable staple from Fig. Staples which are not
shown in Fig. can not be driven with this tool.
16 Gauge 7/16" Crown
Min. Max.
1.61 mm
(.063" )
25 mm (1")
7.9 m m
(.309")
1.45 mm
(.05 7")
Dimension of staples
50 mm (2")
STANDARD ACCESSORIES
(1) Hexagon bar wrench for M5 screw .............................. 1
(2) Eye protection .............................................................. 1
(3) Oiler .............................................................................. 1
OPTIONAL ACCESSORY
○ Sequential Trip Mechanism Kit (Code No.876762)
(Sequential Fire Parts Set, Single Shot Parts)
With the sequential fi re parts, the staple is driven only
by squeezing the trigger after pushing down the push
lever.
By installing these parts, driving staples into improper
positions and unexpected fi ring of staples caused
by accidental operation of the push lever can be
prevented.
APPLICATIONS
○ Construction work such as wall sheathing, subfl ooring.
○ Mobile and modular home construction.
PREPARATION PRIOR TO OPERATION
1. Prepare the hose
Be sure to use the hose provided with minimum 6 mm
(1/4” ) inside di ameter.
NOTE
The air supply hoses must have a minimum working
pressure rating of 12.8 bar (180 psi) or 150 percent
of the maximum pressure produced in the air supply
system, whichever is higher.
2. Check on safety
CAUTION
○ Unauthorized persons (including ch ildren) must be kept
away from the equipment.
○ Wear eye protection.
○ Check the retaining screws which fi x the exhaust cover,
etc. for tightness.
Check the stapler for air leaks and defective or rusty
parts.
○ Check whether or not the push lever works correctly.
Also check whether or not any dirt has adhered to the
moving parts of the push lever.
○ Recheck on operational safety.
BEFORE USE
1. Check the air pressure
CAUTION
The air pressure must be constantly maintained at
4.9 – 8.3 bar (70 – 120 psi).
Adjust the air pressure between 4.9 to 8.3 bar (70 – 120
psi) according to the diameters and length of staples
and hardness of the wood being stapled. Pay special
attention to the output pressure, capacity, and piping
on the air compressor, so that air pressure does not
exceed the specifi ed limit. Note that excessive pressure
may aff ect overall performance, service life, and safety.
2. Lubrication
(1) Prior to operating this stapler, be sure to provide an
air set between the air compressor and this device.
Lubrication through the air set off ers smooth operation,
extended service life, and anticorrosion.
Adjust the oiler so that a single drop of oil is supplied at
intervals of 5 to 10 stapling cycles.
(2) It is recommended using the recommended oil (SHELL
TONNA). Othe r applicable oils are listed. Never mix two
or more types of diff erent oils.
3. Load staples
CAUTION
○ When loading staples into stapler,
(1) do not depress trigger;
(2) do not depress push lever; and
(3)
keep your face, hands feet and other b ody parts, as well
as those of other persons away from the nose m uzzle to
avoid possible injury during usage and carrying.
(1) Pull the staple feeder backward and attach it securely
to a groove of the magazine. (See Fig. 2)
(2) Place the staple strip over the magazine.
Make sure that the staple strip slides freely on the
magazine. (See Fig. 3)
(3) Pull the staple feeder backward. Then, detach it from
the groove of magazine and softly bring the staple back
as if it were being gently pushed, avoiding any impact.
(See Fig. 4)
The stapler is now ready to operate.
CAUTION
○ If the staple feeder is released all of a sudden, it can
return abruptly, causing deformation and/or scatter,
eventually ending up in clogged staples.
Be absolutely sure to bring back the staple feeder,
avoiding any impact.
○ To prevent unintentional operation, never touch the
trigger or place the top end of the push lever on a work
bench on fl oor. Also, never face the staple outlet toward
any part of a person.
HOW TO USE THE STAPLER
CAUTION
○ Do not use the body or any portion of the tool as a
hammer a s staples may be discharged unexpectedly or
the tool may become damaged and serious injury could
occur.
○ Take precautions to ensure the safety of persons in
the vicinity during operation.
○ Ensure tool is always safely engaged on the workpiece
and cannot slip.
○ Never carry a pneumatic tool by its hose.
○ Never drag a pneumatic tool by its hose.
9
Page 10

English
1. Stapling procedures
(1) Intermittent stapling
Depress the staple outlet onto the desired point; then
pull the trigger to drive a staple in a single shot. (See
Fig. 6)
CAUTION
○ This tool will bounce and shoot several staples instead
of just one in rapid succession when strongly pressed
fl ush against a s urface or when using on ha rd materials.
In such cases, fi re the staples by squeezing and quickly
releasing the trigger.
(2) Push lever
When depressing the staple outlet, be sure to fully lift
the push lever (See Fig. 6) to release the safety lock.
Thus, staples cannot be driven without releasing the
safety lock even though the trigger is pulled.
(3) Continuous stapling
First, pull the trigger. Then depress the devise onto the
desired position to automatically drive staples. (See
Fig. 7).
CAUTION
○ Exercise care when stapling corners of lumber. When
continuous stapling corners of lumber, a staple may go
astray or break through the corner.
○ Do not drive a staple on another staple.
○ Do not drive a staple on metal parts.
NOTE
○ Precautions on no-load operation
Sometimes stapling will continue after driving in all
staples previously contained in the magazine.
This is termed “no-load operation”. Such operation may
deteriorate the bumper, magazine, and staple feeder.
To avoid no-load operation, occasionally confi rm the
amount of remaining staples. On the other hand, all
staples should be removed after using this stapler.
○ After stapling:
(1) disconnect air hose from the stapler;
(2) remove all staples from the stapler;
(3) supply 5 – 10 drops of HiKOKI pneumatic tool
lubricant into the air plug on the stapler; and
(4) open the petcock on the air compressor tank to
drain any moisture.
○ Under low temperature conditions, the machine
sometimes does not operate correctly. Always operate
the machine at the appropriate ambient temperature.
2. How to adjust the stapling depth
To assure that each staple penetrates to the same
depth, be sure that:
(1) the air pressure to the stapler remains constant
(regulator is installed and working properly), and
(2) the stapler is always held fi rmly against the
workpiece.
If staples are driven too deep or shallow into the
workpiece, adjust the stapling in the following order.
CAUTION
○ Before adjustment, always disconnect the hose and
release compressed air in the power tool.
○ During adjustment always keep your fi nger off the
trigger.
○ During adjustment make sure that no part of the
body, hands, or legs is ever in front of the staple
outlet.
Please carry out adjustments in the following order.
(See Fig. 8)
To adjust the driven-in depth of a staple, loosen the
screw that secures a push lever piece.
If the staple is driven in deeply, adjust the push lever
piece to ”down”, and if it’s driven in shallowly, adjust the
push lever piece to “up”.
Tighten the screw to fasten the push lever piece.
10
NOTE
○ Please use the minimum air pressure that is suffi cient
to drive the staples to a suitable depth. If an overly high
pressure is used, the life of the piston damper etc. will
be shortened.
INSPECTION AND MAINTENANCE
CAUTION
Be sure to disconnect the hose during cleaning jams,
inspection, maintenance and cleaning.
1. Countermeasure for staple jamming
(1) Remove all staples.
(2) Release the lock lever and open the blade guide. (See
Fig. 9)
(3) Remove the jammed staple with a slotted-head
screwdriver. (See Fig. 10)
(4) Close the blade guide and latch.
(5) In case of frequent jam, contact a HiKOKI authorized
service center.
2. Inspection and maintenance
Periodically inspect the device.
(1) Remove the four hexagon socket hd. bolts securing the
exhaust cover and remove the exhaust cover.
Then, cylinder, piston, and other parts can be removed
in respective assembly groups.
Wipe the drive bit, the piston sliding part and the body
interior with a cloth to remove deposited dirt.
(2) Confi rm that the piston damper off ers normal operation.
A damaged piston damper may cause damage to other
component parts.
(3) Ca refully ch eck the O- ring for wear wh ile disass embling.
A worn or damaged O-ring may deteriorate overall
performance. Replace a worn or damaged O-ring with
new one.
(4) Prior to reassembling the device, apply grease (Attolub
No. 2 Grease) to the O-ring. Also, lubricate the device
with the recommended oil.
3. Check on mounting screws for each part
At regular intervals check every part for loose
mounting screws and whether or not there are any
air leaks. Retighten any loose screws. Operating the
equipment with loose screws untightened will incur a
hazard.
4. Inspecting the push lever
Check if the push lever (Fig. 1) can slide smoothly.
Clean up the sliding area of the push lever and use the
provid ed oil for lubri cation from ti me to time. Lubri cation
enables smooth sliding and simultaneously serves to
prevent the formation of rust.
5. Storing
○ When not in use for an extended period, apply a thin
coat of the lubricant to the steel parts to avoid rust.
○ Do not store the stapler in a cold weather environment.
Keep the stapler in a warm area.
○ When not in use, the stapler should be stored in a warm
and dry place.
Keep out of reach of children.
CAUTION
In the operation and maintenance of power tools, the
safety regulations and standards prescribed in each
country must be observed.
Page 11

English
COMPRESSOR
CAUTION
When the maximum, operating pressure of the air
compressor exceeds 8.3 bar (120 psi), be sure to
provide a reducing valve between the air compressor
and stapler. Then, adjust the air pressure within the
operating range of 4.9 – 8.3 bar (70 – 120 psi). If the
air set is installed, lubrication is also possible, thus
providing additional convenience.
OILER-FILTER-REDUCING VALVE (Air Set)
So that the equipment can be operated under an optimum
condition to ensure extended service life, it is advisable
to use an oiler fi lter reducing valve. Please limit the length
of the hose between the unit and the air set to within 10 m
when using. (Fig. 11)
APPLICABLE LUBRICANTS
Type of lubricant Name of lubricant
Recommended oil SHELL TONNA
Motor oil SAE10W, SAE20W
Turbine oil
ISO VG32 – 68
(#90 – #180)
Noise Information
Noise characteristic values in accordance with EN ISO
1114 8- 13: 20 18
The typical A-weighted single-event sound power level
L
The typical A-weighted single-event emission sound
pressure level at work station L
Uncertainty K = 2.5 dB (A)
These values are tool-related characteristic values and
do not represent the noise development at the point of
use. Noise development at the point of use will for example
depend on the working environment, the workpiece, the
workpiece support and the number of driving operations,
etc.
Depending on the conditions at the workplace and the form
of the workpiece, individual noise attenuation measures
may need to be carried out, such as placing workpieces on
sound-damping supports, preventing workpiece vibration
by means of c lamping or cove ring, adjust ing to the minimu m
air pressure required for the operaion involved, etc.
In special cases it is necessary to wear hearing protection
equipment.
Vibration Information
The typical vibration characteristic value in accordance
with EN ISO 11148-13:2018, 2000: 3.9 m/s
Uncertainty K = 1.5 m/s
This values is a tool-related characteristic value and
does not represent the infl uence to the hand-arm-system
when using the tool. An infl uence to the hand-arm-system
when using the tool will for example depend on the gripping
force, the contact pressure force, the working direction, the
adjustment of energy supply, the workpiece, the workpiece
support.
2
WA,1s,d = 99 dB
pA,1s,d = 81 dB
2
.
11
Page 12

Deutsch
(Übersetzung der Original-Gebrauchsanweisung)
GENERELLE VORSICHTSMASSNAHMEN
WARNUNG
Lesen Sie alle Sicherheitswarnungen,
Anweisungen, Abbildungen und
Spezifi kationen, die dem Elektrowerkzeug
Nichtbeachtung aller untenstehenden Anweisungen kann
zu schweren Verletzungen führen.
Bewahren Sie alle Warnungen und Anweisungen zum
späteren Nachschlagen auf.
1. Benutzen Sie das Gerät sicher und für die richtige
Benutzen Sie das Gerät nie für andere
2. Behandeln Sie das Gerät korrekt für eine sichere
Beachten Sie die Anweisungen dieser Betriebsanleitung
3. Achten Sie auf Sicherheit des Arbeitsplatzes.
Halten Sie unbefugte Personen vom Arbeitsplatz fern,
4. Das richtige Teil am richtigen Platz.
Entfernen Sie keine Deckel oder Schrauben. Lassen
Nehmen Sie keine Äenderungen des Gerätes vor und
5. Prüfen Sie das Gerät vor Gebrauch.
Prüfen Sie vor der Benutzung des Gerätes, ob
6. Überbeanspruchung kann Unfälle hervorrufen.
B eanspruc hen Sie das Ger ät sowie die Zub ehörteil e nie
7. Unterbre chen Sie di e Arbeit so fort bei au ftrete nden
Sobald Sie Unregelmäßigkeiten bemerken, unter-
8. Behandeln Sie das Gerät sorgfältig.
Wenn Sie das Gerät fallen lassen oder gegen andere
Benutzen Sie das Gerät nicht, wenn sich Risse bilden
9. Gute Pfl ege garantiert eine lange Lebensdauer.
Pfl egen Sie das Gerät gut und halten Sie es sauber.
10. Regelmässige Inspek tionen sind für die Sicherheit
Nehmen Sie in regelmässigen Abständen Inspektionen
11. Wenden Sie sich für Reparatur oder Auswechseln
Stellen Sie sicher, daß dieses Elektrowerkzeug nur von
beiliegen.
Verwendung.
Verwend ungszwe cke als die in di eser Betr iebsanl eitung
angegebenen.
Arbeitsweise.
und behandeln Sie das Gerät korrekt, um eine sichere
Arbeitsweise zu gewährleisten. Lassen Sie das Gerät
niemals von Kindern oder von unerfahrenen Personen,
die mit der Arbeitsweise des Gerätes nicht vertraut sind
benutzen.
insbesondere Kinder.
Sie sie dort, wo sie ihre Funktion erfüllen.
benutzen Sie kein geändertes Gerät. Dies könnte
gefährlich sein.
keine Teile gebrochen sind, ob alle Schrauben fest
angezogen sind und ob keine Teile fehlen oder rostig
sind.
stärker als vorgesehen. Überbeanspruchung zerstört
nicht nur das Gerät sondern ist an sich gefährlich.
Unregelmäßigkeiten.
brechen Sie unverzüglich die Arbeit und lassen Sie das
Gerät prüfen und warten.
Gegen stände stoß en, kann der Au ßenkörper d eformier t
werden, brechen, oder anderweitig beschädigt
werden. Behandeln Sie deshalb das Gerät mit Sorgfalt.
Kratzen oder gravieren Sie keinerlei Zeichen auf das
Gerät. Bedingt durch den hohen Innendruck sind
Beschädigungen an der Oberfl äche gefährlich.
oder Luft durch einen Riss entweicht.
wichtig.
vor, damit das Gerät stets sicher und wirksam benutzt
werden kann.
von Teilen an einen autorisierten Agenten.
einem autorisierten Agenten gewartet wird und daß nur
Originalersatzteile verwendet werden.
12. Lagern Sie das Gerät an einem sauberen Platz.
Wenn das Gerät nicht benutzt wird, sollte es an
einem trockenen Platz außer Reichweite von Kindern
aufbewahrt werden. Füllen Sie ca. 2 cm
Schlauchanschluss in den Körper, um das Gerät vor
Rost zu schützen.
13. Die Explosionszeichnung die der Bedienungsanleitung beigefügt ist, ist nur für
autorisierte Service-Werkstätten bestimmt.
14. Halten Sie das Werkzeug fest in der Hand und
seien Sie auf einen Rückschlag gefasst.
15. Bewahren Sie unbenutzte Elektrowerkzeuge
außerhalb der Reichweite von Kindern auf
und erlauben Sie Personen, die nicht mit dem
Elektrowerkzeug oder diesen Anweisungen
vertraut sind, nicht deren Benutzung.
Elektrowerkzeuge sind in den Händen nicht geschulter
Personen gefährlich.
16. Verändern Sie das Eintreibgerät nicht.
Veränderungen können die Wirksamkeit von
Sicherheitsmaßnahmen verringern und die
Gefahren für den Bediener und/oder Umstehende
erhöhen
17. Pfl egen Sie Elektrowerkzeuge und Zubehör.
Prüfen Sie auf eventuelle Fehlausrichtung und
Schwergängigkeit beweglicher Teile, Bruch von
Teilen und andere Zustände, die den Betrieb
des Elektrowerkzeugs beeinträchtigen können.
Lassen Sie beschädigte Elektrowerkzeuge vor
dem Gebrauch reparieren.
Viele Unfälle werden durch schlecht gepfl egte
Elektrowerkzeuge verursacht.
18. Überdehnen Sie sich nicht. Sorgen Sie immer für
einen s icheren Sta nd und ein gutes Gleich gewicht.
Das ermöglicht in unerwarteten Situationen eine
bessere Kontrolle über das Elektrowerkzeug.
19. Halten Sie Kinder und Umstehende während des
Betriebs eines Elektrowerkzeugs fern.
Bei Ablenkung könnten Sie die Kontrolle verlieren.
3
Öl durch den
VORSICHTSMASSNAHMEN BEIM GEBRAUCH
DES NAGLERS
1. Sichere Arbeitsweise durch korrekten Gebrauch.
Dieses Gerät wurde zum Eintreiben von Krampen in
Holz oder ähnliches Material entwickelt. Benutzen
Sie es ausschließlich für den vorgesehenen
Verwendungszweck.
2. Beachten Sie, dass der Luftdruck innerhalb der
vorgeschriebenen Grenzen liegt.
Druckluftbetriebene Werkzeuge dürfen nur an
Druckluftleitungen angeschlossen werden, bei denen
sichergestellt ist, dass der maximal zulässige Druck
um nicht mehr als 10% überschritten werden kann.
Dies kann z. B. durch ein Druckminderungsventil mit
Sicherheitsventil in der Zuleitung erreicht werden.
(Bei Modell N5008AC2: 110% des maximal zulässigen
Nenndrucks entsprechen 9,1 bar = 130 psi).
Druckluftbetriebene Werkzeuge sollten lediglich
mit dem für die jeweilige Tätigkeit ausreichenden
Minimaldruck betrieben werden, um unnötige
Lärmbelästigung, gesteigerten Verschleiß und daraus
resultierende Ausfälle zu vermeiden.
3. Benutzen Sie das Gerät niemals mit HochdruckGas sondern ausschließlich mit komprimierter
Luft.
Be nutze n Sie unte r keinen U mstän den Kohle nstoff dioxyde,
Sauerstoff oder andere Gase aus Druckbehältern.
12
Page 13

Deutsch
4. Schützen Sie sich vor Bränden und Explosionen.
Da während des Heftens Funken umherfl iegen können ist
est gefährlich, das Gerät in der Nähe von Lacken, Farben,
Benzin, Verdünnern, Gasolin, Gas, Klebstoff en oder
ähnlichen brennbaren Substanzen zu benutzen, da diese
sich entzünden oder explodieren können. Das Gerät darf
aus diesem Grunde unter keinen Umständen in der Nähe
solcher brennbaren Materialien benutzt werden.
5. Schützen Sie immer Ihre Augen (Schutzbrille).
Krampen, die nicht korrekt getroff en wurden, in das
Auge eindringen und das Augenlicht zerstören.
Schutzbrillen sind in jedem Fachgeschäft erhältlich.
Tragen Sie stets einen Augenschutz, wenn Sie dieses
Werkzeug verwenden. Verwenden Sie entweder eine
Schutzbrille oder eine Schutzmaske über einer Brille.
6. Schützen Sie Ihre Ohren und Ihren Kopf.
Die Belastung durch hohe Lärmpegel ohne Schutz
kann zu bleibenden Störungen, Hörverlust und anderen
Problemen wie Tinnitus (Klingeln, Summen, Pfeifen
oder Brummen in den Ohren) führen.
Eine Risikobewertung und die Durchführung geeigneter
Kontrollen für diese Gefahren sind von entscheidender
Bedeutung.
Geeignete Kontrollen zur Reduzierung des Risikos
können Maßnahmen wie z. B. der Einsatz von
Dämmstoff en sein, um das „Klingeln“ von Werkstücken
zu verhindern.
Betreiben und warten Sie das Werkzeug wie in dieser
Anleitung empfohlen, um eine unnötige Erhöhung der
Lärmpegel zu verhindern.
7. Achten Sie auf Personen, die in Ihrer Nähe
arbeiten.
Es kann gefährlich werde wenn Krampen, die nicht
richtig eingetrieben wurden andere Personen verletzen.
Achten Sie aus diesem Grunde auf die Sicherheit der
Sie umgebenden Personen wenn Sie dieses Gerät
benutzen. Achten Sie darauf, dass die Mündung des
Gerätes nicht in die Nähe von Personen, Händen oder
Füßen kommt.
8. Richten Sie die Mündung des Gerätes nie auf
Personen.
Ne hmen Sie immer an, dass das Gerät Kra mpen enthält .
Es kann zu schweren Unfällen kommen, wenn Sie das
Gerät versehentlich auslösen, während die Mündung
auf eine Person gerichtet ist. Achten Sie darauf,
dass die Mündung des Gerätes nie auf eine Person
gerichtet ist (auch nicht auf Sie selbst), wenn Sie den
Druckschlauch anschließen oder abtrennen, Krampen
einlegen oder ähnliche Arbeiten durchführen. Selbst
wenn keine Krampen eingelegt sind, ist es gefährlich,
das Gerät auszulösen, während die Mündung auf
eine Person gerichtet ist. Spielen Sie nicht herum.
Respektieren Sie das Werkzeug als ein Arbeitsmittel.
9. Prüfen Sie die Druckhebel, bevor Sie das Gerät
benutzen.
Sie können das Werkzeug auf einer ebenen Fläche
ablegen, wie in Abb. 5 gezeigt.
Ac hten Sie darauf, ke ine nach unten ge richtete Kraf t auf
das Werkzeug auszuüben, durch die der Druckhebel
ausgelöst werden könnte.
Tragen Sie stets eine Schutzbrille, wenn Sie
mit dem Gerät arbeiten, und achten Sie
darauf, dass auch Personen in Ihrer
Umgebung Schutzbrillen tragen.
Es können Teile der Krampen oder
Tragen Sie während des Heftens
Lärmschutz und Sicherheitshelme.
Abhängig von den Bedingungen sollten
auch Personen in der Umgebung
Lärmschutz und Sicherheitshelme tragen.
Achten Sie darauf, dass die Druckhebel und das
Ventil richtig funktionieren, bevor Sie das Gerät
benutzen. Schließen Sie den Schlauch an, ohne dass
sich Krampen im Gerät befi nden und überprüfen Sie
folgendes. Tritt ein Arbeitsgeräusch auf, so zeigt dies
einen Fehler an. Benutzen Sie in diesem Fall das Gerät
nicht, bevor es inspiziert und repariert wurde.
○ Tritt ein Arbeitsgeräusch beim Ziehen des
Auslösers auf, ist das Gerät nicht in Ordnung.
○ Tritt beim Andrücken der Druckhebel an das zu
heftende Material das Geräusch des sich bewegenden
Treibers auf, ist das Gerät nicht in Ordnung.
Bitte beachten Sie außerdem, dass die Druckhebel
niemals verändert oder entfernt werden dürfen.
10. Benutzen Sie ausschließlich die vorgeschriebenen
Krampen.
Es dürfen ausschließlich die in der Betriebs-anleitung
bezeichneten Befestigungsmittel verarbeitet werden.
11. Nehmen Sie keine Veränderungen am
Befestigungsmittel-Eintreibgerät vor.
Veränderungen können die Wirksamkeit von
Sicherheitsvorkehrungen reduzieren und die Gefahren
für den Bediener und/oder Umstehende erhöhen.
12. Schließen Sie den Schlauch sorgfältig an.
Wenn Sie den Schlauch anschließen und Krampen
einführen, beachten Sie folgende Punkte, damit das
Gerät nicht irrtümlich schießt.
○ Berühren Sie auf keinen Fall den Auslöser.
○ Achten Sie darauf, dass die Mündung nicht mit
irgendeinem Gegenstand in Berührung kommt.
○ Halten Sie die Mündung nach unten gerichtet.
Beachten Sie unbedingt die obigen Anweisungen
und sorgen Sie dafür, dass sich keine Körperteile,
Hände oder Füße vor der Mündung des Gerätes
befi nden.
13. Seien Sie vorsichtig beim Umgang mit
Befestigungsmitteln, insbesondere beim Beund Entladen, da die Befestigungsmittel scharfe
Spitzen haben, die zu Verletzungen führen können.
14. Berühren Sie niemals achtlos den Auslöser.
Berühren Sie den Auslöser mit dem Finger nur beim
Heften. Wenn Sie das Gerät tragen oder jemandem
überreichen während Sie den Finger am Auslöser
haben, können Sie unbeabsichtigt einen Schuss
auslösen und so einen Unfall verursachen.
15. Schließen Sie die Krampenführung fest zu und
öff nen Sie sie nicht während des Arbeitens.
Wenn Sie mit geöff neter Krampenführung heften,
werden die Krampen nicht in das Holz eingetrieben und
es besteht die Gefahr einer gefährlichen Entladung.
16. Drücken Sie die Mündung fest gegen das zu
heftende Material.
We nn Sie Krampe n eintreibe n, drücken Sie d ie Mündung
fest gegen das zu heftende Material. Geschieht dies
nicht sorgfältig, können die Krampen zurückschlagen.
17. Halten Sie Hände und Füße während des Arbeitens
von der Mündung entfernt.
Es ist sehr gefährlich, wenn eine Krampe durch einen
Fehler in die Hände oder Füße eindringt.
18. Während des Betriebs können Bruchstücke vom
Werkstück und dem Befestiger-/Bindungssystem
ausgestoßen werden.
19. Schützen Sie sich vor dem Rückschlag des Gerätes
Nähe rn Sie sich wä hrend des Ar beitens ni cht mit dem Kop f
oder anderen Körperteilen dem Oberteil des Gerätes.
Dies ist gefährlich, da das Gerät heftig zurückschlagen
kann, wenn eine Krampe auf eine vorher eingetriebene
Krampe oder auf einen Knoten im Holz triff t.
13
Page 14

Deutsch
20. Seien Sie vorsichtig beim Heften von dünnen
Brettern oder Holzkanten.
Beim Heften von dünnen Brettern können die Krampen
durchschlagen, wie dies auch beim Heften von
Holzkanten durch Querschläger geschehen kann.
Achten Sie in solchen Fällen darauf, dass sich niemand
(auch keine Hände, Füße etc.) hinter dem Brett oder in
der Nähe des Holzes, das Sie gerade heften befi ndet.
21. Gleichzeitiges Heften auf beiden Seiten einer
Wand ist gefährlich.
Unter keinen Umständen darf auf beiden Seiten
derselben Wand gleichzeitig geheftet werden. Dies
wäre gefährlich, da die Krampen durch die Wand
schlagen könnten und so Verletzungen hervorrufen.
22. Verwenden Sie das Werkzeug nicht auf Leitern
und auf Gerüsten.
Das Werkzeug darf für bestimmte Anwendungen nicht
eingesetzt werden, wie z.B.:
– wenn das Wechseln von einer Eintreibstelle
zur anderen über Gerüste, Treppen, Leitern
oder leiterähnlichen Konstruktionen, wie z.B.:
Dachlattungen, erfolgt,
– das Schließen von Kisten und Verschlägen,
– beim Anbringen von Transportsicherungen z. B.:
auf Fahrzeugen und Waggons
23. Klemmen Sie nach der Verwendung den
Druckschlauch ab und entnehmen Sie alle
verbliebenen Krampen aus dem Magazin.
Trennen Sie das Werkzeug von der Luftquelle,
bevor Sie das Werkzeug warten, eine verklemmte
Krampe entfernen, den Arbeitsbereich verlassen, das
Werkzeug an einen anderen Ort bringen oder nach der
Verwendung. Versehentliches Schießen einer Krampe
ist sehr gefährlich.
24. Klemmen Sie den Druckschlauch ab und
entnehmen Sie aus dem Magazin sämtliche
verbliebenen Krampen.
Klemmen sie den Druckschlauch ab und entfernen Sie
nach der Benutzung alle Krampen oder solche, die die
Funktion stören. Klemmen Sie den Schlauch ab, wenn
Sie Teile ersetzen, eine verklemmte Krampe entfernen
oder das Gerät inspizieren.
Es ist sehr gefährlich, wenn eine Krampe durch einen
Fehler geschossen wird.
25. Klemmen Sie den Schlauch ab und lassen
Sie die Druckluft entweichen, bevor Sie eine
steckengebliebene Krampe entfernen.
Bevor Sie eine in der Mündung verklemmte Krampe
entfernen beachten Sie, dass Sie den Druckschlauch
abklemmen und die Druckluft aus dem Gerät
entweichen lassen.
Eine fälschlich abgeschossene Krampe könnte sehr
gefährlich sein.
26. Öff nen Sie das Magazin nicht wenn dieses nach
unten gerichte t ist, um Unfälle durch herabfallende
Krampen zu vermeiden.
27. Im Gerätekörper sollte keine Anschlussbuchse
(Schnellkupplung) verwendet werden.
Wenn im Gerätekörper eine Anschlussbuchse
(Schnellkupplung) installiert ist, kann die Druckluft
manchmal nicht entweichen, wenn der Schlauch
abgetrennt wird. Vermeiden Sie deshalb eine solche
Verwendung.
Das Werkzeug und der Luftschlauch müssen eine
Verbindung haben, die allen Druck aus dem Werkzeug
entweichen lässt, wenn die Verbindung getrennt wird.
14
28. Bei der Verwendung eines Werkzeugs sollte der
Bediener eine geeignete, aber ergonomische
Haltung einnehmen.
Sorgen Sie für sicheren Stand und vermeiden Sie
unangenehme Körperhaltungen und solche, bei denen
Sie nicht das Gleichgewicht halten können.
29. Wenn der Bediener Symptome wie anhaltendes
oder wiederkehrendes Unwohlsein, Beschwerden,
Pochen, Schmerzen, Kribbeln, Taubheitsgefühl,
Brennen oder Steifheit verspürt, dürfen diese
Warnzeichen nicht ignoriert werden.
Der Bediener sollte einen qualifi zierten
Gesundheitsfachmann bezüglich der gesamten
Tätigkeit konsultieren.
30. Langes, durchgängiges und einseitiges Arbeiten
kann zu Erkrankungen des Bewegungsapparats
führen.
Arbeiten Sie nicht über einen längeren Zeitraum in der
gleichen Haltung oder mit übermäßiger Kraft.
Ruhen Sie sich zudem regelmäßig aus, besonders
wenn Sie müde sind.
31. Ausrutschen, Stolpern und Stürze sind
Hauptursachen für Verletzungen am Arbeitsplatz.
Achten Sie auf rutschige Oberfl ächen, die durch den
Gebrauch des Werkzeugs verursacht werden, und auf
Stolperfallen durch den Luftschlauch.
32. Gehen Sie in ungewohnter Umgebung mit erhöhter
Vorsicht vor.
Es können versteckte Gefahren bestehen, wie z. B.
Elektro- oder andere Versorgungsleitungen.
33. Vergewissern Sie sich, dass keine Elektrokabel,
Gasleitungen usw. vorhanden sind, die eine
Gefahr darstellen könnten, wenn sie durch die
Verwendung des Werkzeugs beschädigt werden.
34. Die Risikobewertung sollte den Staub
berücksichtigen, der durch die Verwendung
des Werkzeugs entsteht, und die Möglichkeit,
vorhandenen Staub aufzuwirbeln.
35. Halten Sie die Auslassöff nung so, dass in einer
sehr staubigen Umgebung möglichst wenig Staub
aufgewirbelt wird.
36. Wenn Gefahren durch Staub oder Abgase
entstehen, sollte die Priorität sein, diese am Ort
der Emission zu begrenzen.
37. Informationen zur Durchführung einer
Risikobewertung dieser Gefahren und zur
Anwendung geeigneter Kontrollen sind von
wesentlicher Bedeutung.
38. Vibrationen können die Nerven und die
Durchblutung der Hände und Arme lähmen oder
schädigen.
39. Tragen Sie warme Kleidung, wenn Sie unter kalten
Bedingungen arbeiten und halten Sie Ihre Hände
warm und trocken.
40. Wenn Sie ein Taubheitsgefühl, Kribbeln,
Schmerzen oder weiße Stellen auf der Haut in
Ihren Fingern oder Händen bemerken, wenden Sie
sich bezüglich Ihrer gesamten Tätigkeit an einen
qualifi zierten Arbeitsmediziner.
41. Betreiben und warten Sie das Werkzeug wie in
dieser Anleitung empfohlen, um eine unnötige
Verstärkung der Vibrationspegel zu verhindern.
42. Halten Sie das Werkzeug mit leichtem, aber
sicherem Griff fest, da die Gefahr von Vibrationen
in der Regel größer ist, wenn die Griff kraft höher
ist.
43. Beim Reinigen des Werkzeugs Kein Benzin oder
andere brennbare Flüssigkeiten verwenden.
Im Fall, dass Dampf einer entzündlichen Flüssigkeit
in das Gerät eindringt, können beim Heften Funken
entstehen, die zu einer Explosion führen können.
Page 15

SPEZIFIKATIONEN
Antrieb Kolben, druckluftgetrieben
Luftdruck 4,9 – 8,3 bar
Krampen siehe Abb.
Anzahl Krampen 150 Krampen
Geräteabmessungen 365 mm (L) × 258 mm (H) × 76 mm (B)
Gewicht 2,0 kg
Schlauch (Innen-φ)6 mm
Deutsch
AUSWAHL DER KRAMPEN
Wählen Sie geeignete Krampen gemäß der Abbildung.
Krampen, die nicht in der Abbildung gezeigt sind, können
mit diesem Gerät nicht verarbeitet werden.
Dicke 16, Krone 7/16"
Min. Max.
1,61 mm25 mm
50 mm
7,9 m m
1,45 mm
Abmessungen der Krampen
STANDARDZUBEHÖR
(1) Innensechskantschlüssel für M5 ................................. 1
(2) Augenschutz ................................................................ 1
(3) Ölkanne ........................................................................ 1
SONDERZUBEHÖR
○ Satz für sequentiellen Auslösungsmechanismus (Kode
Nr. 876762)
(Teilesatz für sequentielles Auslösen, Teile für
Einzelauslösung)
Mit den Teilen für sequentielle Auslösung wird
die Krampe nur durch Ziehen am Abzug nach
Herunterdrücken des Druckhebels eingetrieben.
Durch Installieren dieser Teile kann Eintreiben
von Krampen an nicht angemessenen Positionen
und unerwartetes Abfeuern von Krampen durch
ungewollte Betätigung des Druckhebels verhütet
werden.
ANWENDUNGEN
○ Bauarbeiten wie Wandverkleidung, Unterbodenbelag.
○ Bau von Mobilhomes und Bauveränderungen.
VORBEREITUNGEN VOR GEBRAUCH
1. Bereiten Sie den Schlauch vor
Achten Sie darauf, dass der Schlauch einen
Innendurchmesser von min. 6 mm hat.
BEMERKUNG
Die Luftschläuche müssen mindestens für einen
Arbeitsnenndruck von 12,8 bar bzw. 150 Prozent
des durch das Kompressorsystem erzeugten
Maximaldrucks ausgelegt sein, wobei der höhere Wert
gilt.
2. Prüfen Sie die Sicherheit
ACHTUNG
○ Unbefugte Personen (insbes. Kinder) müssen von dem
Gerät ferngehalten werden.
○ Augenschutz tragen.
○ Prüfen Sie die Befestigungsschrauben, die den
Entlüftungsdeckel halten, usw. auf sicheren Sitz.
Untersuchen Sie den Nagler nach undichten Stellen
und defekten oder rostigen Teilen.
○ Prüfen Sie, ob der Kontaktarm richtig arbeitet. Achten
Sie darauf, dass kein Schmutz an den beweglichen
Teilen des Kontaktarmes haftet.
○ Prüfen Sie nochmals die Funktionssicherheit.
VOR INBETRIEBNAHME
1. Prüfen Sie den Luftdruck
ACHTUNG
Der Luftdruck muss konstant zwischen 4,9–8,3 bar
gehalten werden.
Stellen Sie den Luftdruck entsprechend den
Abmessungen und Längen der Krampen sowie der
Härte des zu heftenden Holzes zwischen 4,9 und 8,3
bar ein. Achten Sie besonders auf den Auslassdruck,
die Kapa zität und de n Anschlus s am Kompresso r, damit
der Druck das spezifi zierte Limit nicht überschreitet.
Zu hoher Druck kann die generelle Leistung, die
Lebensdauer und die Sicherheit beeinträchtigen.
2. Ölen
(1) Bringen Sie ein Ölfi lter-Reduzierventil zwischen dem
Kompres sor und dem Ger ät an, bevor Sie mi t dem Gerät
arbeiten. Schmierung durch das Ölfi lter-Reduzierventil
bietet glatten Betrieb, verlängerte Lebenszeit und
Korrosionsschutz.
S tellen Sie den Ö ler so ein, dass a lle 5 bis 10 Heftz yklen
ein Tropfen Öl zugegeben wird.
(2) Benutzen Sie das empfohlene Öl (Shell Tonna). Andere
verwendbare Öle sind am Ende angegeben. Mischen
Sie niemals verschiedene Ölarten.
3. Laden der Krampen
ACHTUNG
○ Wenn Sie die Nägel in den Nagler einlegen,
(1) nicht am Abzug ziehen
(2) nicht gegen den Druckhebel drücken
15
Page 16

Deutsch
(3) die Mündung nicht auf Gesicht, Hände, Füße,
andere Körperteile oder andere Personen richten,
um mögliche Verletzungen während Verwendung
und Transport zu verhüten.
(1) Ziehen Sie die Krampenzuführung nach hinten und
befestigen Sie sie sicher in einer Nut des Magazins.
(Siehe Abb. 2.)
(2) Legen Sie den Krampenstreifen auf das Magazin.
Stellen Sie sicher, dass der Krampenstreifen frei auf
dem Magazin gleitet. (Siehe Abb. 3.)
(3) Ziehen Sie die Krampenzuführung nach hinten. Lösen
Sie sie dann aus der Nut des Magazins, bringen Sie
die Krampen vorsichtig zurück, als würden sie sanft
geschoben, und vermeiden Sie jegliche Stöße. (Siehe
Abb. 4.)
Der Nagler ist nun betriebsbereit.
ACHTUNG
○ Wenn die Krampenzuführung plötzlich losgelassen
wird, kann sie abrupt zurückkehren und Verformung
und/oder Streuung verursachen, was schließlich zu
Verklemmen der Krampen führt.
Achten Sie unbedingt darauf, die Krampenzuführung
ohne jeglichen Stoß zurückzuführen.
○ Um ein unbeabsichtiges Schiessen zu verhindern,
berühren Sie niemals den Abzug und legen Sie nie
den Kontaktarm auf die Werkbank oder auf den Boden.
Richten Sie die Mündung des Naglers niemals gegen
Personen.
BEDIENUNGSANLEITUNG FÜR DEN NAGLER
ACHTUNG
○ Verwenden Sie das Gehäuse oder irgendeinen Teil
des Werkzeugs niemals als Hammer, da Klammern
unerwartet entladen werden könnten oder das
Werkzeug beschädigt werden kann und es zu schweren
Verletzungen kommen kann.
○ Tre ff en Sie die nötigen Vorsichtsmaßnahmen, um die
Sicherheit von Personen in der Nähe während der
Arbeiten zu gewährleisten.
○ Achten Sie darauf, dass das Werkzeug immer sicher
am Werkstück anliegt und nicht abrutschen kann.
○ Tragen Sie ein pneumatisches Werkzeug niemals an
seinem Schlauch.
○ Ziehen Sie ein pneumatisches Werkzeug niemals an
seinem Schlauch.
1. Verschiedene Arten des Heftens
(1) Unterbrochenes Hefter
Drücken Sie die Mündung gegen die gewünschte
Stelle; da nn ziehen Sie den Auslöser. Eine Krampe wird
mit einem Schuss eingetrieben. (Siehe Abb. 6)
ACHTUNG
○ Das Gerät feuert manchmal zweimal in schneller
Reihenfolge wenn es stark direkt gegen die Oberfl äche
ge dr ück t wi rd o der we nn e s au f ha rt em M ate ria l be nu tzt
wird. Ziehen Sie den Auslöser in solchen Fällen nur
ganz leicht und lassen Sie ihn sofort wieder los.
(2) Druckhebel
Achten Sie darauf, dass beim Andrücken der Mündung
der Druckhebel völlig hochgedrückt wird, um den
Sicherheitsmechanismus zu lösen (Siehe Abb. 6). Nur
so ist garantiert, dass keine Krampe ohne Lösen des
Sicherheitsmechanismus eingetrieben werden kann,
auch wenn der Auslöser gezogen ist.
(3) Kontinuierliches Heften
Zi ehen Sie zunäch st den Auslöse r. Drücken Si e danach
das Gerät in die gewünschte Position um kontinuierlich
zu heften. (Siehe Abb. 7)
ACHTUNG
○ Heften Sie sorgfältig an Holzkanten. Bei kontinuier-
lichem Heften von Holzkanten kann eine Krampe
abrutschen oder durch die Kante brechen.
○ Heften Sie keine Krampen auf bereits vorhandene
Krampen.
○ Heften Sie keine Krampen auf Metallteile.
BEMERKUNG
○ Vorsichtsmaßnahmen gegen Leerschüsse
G eleg entl ich w ird we iter gehe ftet , obwohl alle Kramp en
im Magazin verschossen sind.
Dies nennt man “Leerschüsse”. Leerschüsse können
den Puff er, das Magazin und die Krampenzuführung
zerstören. Überprüfen Sie deshalb von Zeit zu Zeit
die Anzahl der sich noch im Magazin befi ndlichen
Kr ampe n, um Leerschüsse z u ver meid en. A nde rersei ts
sind nach der Benutzung des Naglers alle Krampen zu
entnehmen.
○ Nach dem Heften:
(1) muss der Luftschlauch vom Hefter abgetrennt
werden;
(2) müssen alle Krampen aus dem Nagler entfernt
werden;
(3) Geben Sie 5 bis 10 Tropfen HiKOKI-Schmiermittel
für Pneumatikwerkzeuge in den Luftanschluss am
Nagler ein, und
(4) Öff nen Sie d en Ablas shahn am L uftkom pressor tank ,
um alle Feuchtigkeit abzulassen.
○ Bei niedrigen Temperaturen arbeitet das Gerät
manchmal nicht korrekt. Arbeiten Sie deshalb mit dem
Gerät immer in der geeigneten Umgebungstemperatur.
2. Einstellen der Krampen-Einschusstiefe
Achten Sie auf die folgenden Punkte, um
sicherzustellen, dass alle Krampen zur gleichen Tiefe
eingetrieben werden:
(1) Der Luftdruck zum Nagler muss konstant bleiben
(der Regler muss installiert sein und korrekt
funktionieren).
(2) Der Nagler muss immer fest gegen das Werkstück
gehalten werden.
Wenn Krampen zu tief oder nicht tief genug in das
Werkstück eingetrieben werden, so stellen Sie das
Heften in der folgenden Reihenfolge ein.
ACHTUNG
○ Klemmen Sie den Druckschlauch ab und lassen
Sie die Druckluft entweichen, bevor Sie mit dem
Justieren beginnen.
○ Halten Sie die Finger beim Justieren vom Abzug
fern.
○ Beachten Sie dass sich während des Justierens
keine Körperteile, Hände oder Füsse vor der
Mündung des Gerätes befi nden.
Geben Sie zwecks Justierung in folgender Reihenfolge
vor: (Siehe Abb. 8)
Lösen Sie zum Einstellen der Eintreibtiefe der Krampen
die Schraube, die den Schubhebel fi xiert.
Wenn die Krampen zu tief eingetrieben werden, so
verschieben Sie den Schubhebel in Abwärtsrichtung
(down), und wenn sie nicht tief genug eingetrieben
werden, so verschieben Sie den Schubhebel in
Aufwärtsrichtung (up).
Ziehen Sie dann die Schraube fest an, um den
Schubhebel zu fi xieren.
BEMERKUNG
○ Wählen Sie den Luftdruck so, dass Sie eine
ausreichende Einschusstiefe erreichen. Zu hoher
Luftdruck führt zu frühzeitigem Verschleiß des
Kolbendämpfers etc.
16
Page 17

Deutsch
INSPEKTION UND WARTUNG
ACHTUNG
Klemmen Sie den Druckschlauch bei der Reinigung,
Inspektion und Wartung ab.
1. Maßnahmen gegen das Verklemmen von Krampen
(1) Entfernen Sie alle Krampen.
(2) Lösen Sie den Verriegelungshebel und öff nen Sie die
Klingenführung. (Siehe Abb. 9.)
(3) Entfernen Sie die verklemmte Krampe mit einem
fl achen Schraubenzieher. (Siehe Abb. 10.)
(4) Schl ießen Sie die Kl ingenführu ng und die Verrieg elung.
(5) Wenn es oft zu Verklemmen kommt, so wenden
Sie sich bitte an ein von HiKOKI autorisiertes
Kundendienstzentrum.
2. Inspektion und Wartung
Führen Sie regelmäßig eine Inspektion des Gerätes
durch.
(1) Lösen Sie die vier Innensechskantschrauben, die den
Entlüftungsdeckel halten und heben Sie diesen ab.
Danach können der Zylinder, der Kolben und andere
Teile in den entsprechenden Sets entnommen werden.
Wischen Sie den Treiber, die gleitenden Teile des
Kolbens und das Innere des Körpers mit einem Tuch
ab, um abgelagerten Schmutz zu entfernen.
(2) Prüfen Sie, ob der Dämpfer seine richtige Funktion
erfüllt. Ein beschädigter Dämpfer kann andere
benachbarte Teile beschädigen.
(3) Prüfen Sie sorgfältig den O-Ring auf Verschleiß.
Ein verschlissener oder beschädigter O-Ring kann
die Gesamtleistung zerstören. Ersetzen Sie einen
verschlissenen oder beschädigten O-Ring durch einen
neuen.
(4) Bevor Sie das Gerät wieder zusammensetzen, fetten
Sie den O-Ring (Attolub-Fett Nr. 2). Ölen Sie das Gerät
mit dem empfohlenen Öl.
3. Prüfen Sie die Befestigungsschrauben für jedes
Tei l
Prüfen Sie in regelmässigen Abständen jedes Teil nach
lockeren Schrauben und undichten Stellen. Ziehen
Sie lockere Schrauben wieder an. Die Benutzung
des Gerätes mit nicht fest angezogenen Schrauben
bedeutet Gefahr.
4. Inspektion des Druckhebels
Überprüfen Sie, ob der Druckhebel (Abb. 1) glatt
gleiten kann.
Reinigen Sie den Gleitbereich des Druckhebels und
verwenden Sie das mitgelieferte Öl für Schmierung von
Zeit zu Zeit. Schmierung ermöglicht glattes Gleiten und
dient gleichzeitig zur Rostverhütung.
5. Aufbewahrung
○ Wenn das Gerät längere Zeit nicht verwendet werden
soll, so tragen Sie eine dünne Schicht Schmiermittel
auf die Stahlteile auf, um Rosten zu verhüten.
○ Bewahren Sie den Nagler nicht bei kalten
Umgebungstemperaturen auf.
Bewahren Sie den Nagler an einem warmen Ort auf.
○
Wenn der Nag ler nicht verwe ndet wird, bewahr en Sie ihn
an einem warmen und trockenen Ort auf.
Halten Sie den Nagler außerhalb der Reichweite von
Kindern.
ACHTUNG
Bei Betrieb und Wartung von Elektrowerkzeugen
müssen die Sicherheitsvorschriften und Normen
beachtet werden.
KOMPRESSOR
ACHTUNG
Wenn die maximale Arbeitsleistung des Kompressors
8,3 bar übersteigt, benutzen Sie ein Reduzier-Ventil
zwischem dem Kompressor und dem Gerät. Regeln
Sie anschliessend den Luftdruck innerhalb des
Arbeitsbereiches von 4,9–8,3 bar. Bei Installation
eines Air-Sets ist ein gleichzeitiges Ölen möglich, eine
zusätzliche Erleichterung.
ÖLER-FILTER-REDUZIERVENTIL (Air Set)
Es ist empfehlenswert, ein Öler-Filter-Reduzierventil
zu benutzen, um optimale Bedingungen für eine lange
Lebensdauer des Gerätes zu gewährleisten. Beschränken
Sie die Länge des Druckschlauches zwischen dem Gerät
und dem Air-Set auf max. 10 m. (Abb. 11)
ANWENDBARE SCHMIERMITTEL
Typ e Be zei chn ung
Empfohlenes Öl SHELL TONNA
Motor-Öl SAE 10W, SAE 20W
2
.
2
ISO VG32-68
(#9 0–#180)
WA,1s,d = 99 dB
pA,1s,d = 81 dB
Tur bi ne n- Öl
Lärminformation
Lärmkennwerte entsprechend EN ISO 11148-13:2018
Typischer A-bewerterer Schallpegel für ein einzelnes
Ereignis: L
Typischer A-bewerterer Schallpegel am Arbeitsplatz:
L
Messunsicherheit K: 2,5 dB (A)
Diese Werte sind mit dem Werkzeug zusammenhängende
Werte und stellen nicht die Lärmentwicklung am
Verwendungspunkt dar. Die Lärmentwicklung am
Arbeitsplatz hängt z.B. von der Arbeitsumgebung, dem
Werkstück, der Werkstückunterstützung, der Anzahl der
Krampeneintreibungen usw. ab.
Abhängig von den Bedingungen am Arbeitsplatz und der
Form des Werkstücks müssen möglicherweise individuelle
Lärmverhütungsmaßnahmen durchgeführt werden, z.B.
Aufstellung des Werkstücks auf einer schalldämpfenden
Unterstützung, Verhüten von Werkstückvibration durch
Festkl emmen oder Ab decken, Einst ellen auf den m inimalen
für den Betrieb erforderlichen Luftdruck usw.
In besonderen Fällen ist das Tragen von Gehörschutz
erforderlich.
Vibrationsinformation
Typischer Vibrationskennwert entsprechend EN ISO
11148-13:2018, 2000: 3,9 m/s
Messunsicherheit K = 1,5 m/s
Dieser Wert ist ein auf das Werkzeug bezogener Kennwert
und stellt nicht den Einfl uss auf das Hand-Arm-System
bei der Verwendung des Werkzeugs dar. Der Einfl uss auf
das Hand-Arm-System bei Verwendung des Werkzeugs
hängt z. B. von der Greifkraft, der Kontaktdruckkraft, der
Arbeitsrichtung, der Einstellung der Energieversorgung,
dem Werkstück und der Werkstückunterstützung ab.
17
Page 18

Français
(Traduction des instructions d’origine)
AVERTISSEMENTS GENERAUX
AVERTISSEMENT
Lisez tous les avertissements de sécurité,
les instructions, les illustrations et les
spécifi cations fournies avec cet outil
Le non-respect de toutes les instructions ci-dessous peut
entraîner de graves blessures.
Conservez tous les avertissements et toutes les
instructions pour pouvoir vous y reporter ultérieurement.
1. Utilisez l’outil en toute sécurité et pour l’usage
N’utilisez pas l’outil pour des applications non prévues
2. Employez l’appareil correctement afi n d’assurer un
Veuillez suivre les instructions du manuel et employer
3. Assurez la sécurité de l’atelier.
Tenez les personnes non-autorisées et spécialement les
4. Les bonnes pièces sur les bonnes places.
Ne démontez ni les couvercles ni les vis puisqu’ils ont leur
5. Contrôlez l’appareil avant de l’utiliser.
Avant l’utilisation de l’appareil contrôlez toujours si
6. Un travail continu excessif pourrait causer des
N’employez l’appareil pas au-delà de ses capacités. Un
7. Arrêtez le travail immédiatement si vous remarquez
Arrêtez le travail si vous remarquez des anomalies ou
8. Soignez bien l’agrafeuse.
Si vous heurtez ou laissez tomber votre appareil, des
N’utilisez l’appareil jamais si des fi ssures apparaissent
9. Des bons soins assureront une longue vie.
Prenez toujours des bons soins de l’agrafeuse et
10. Des inspections régulières sont essentielles pour
Inspectez l’agrafeuse à des intervalles réguliers afi n
11. Faites réparer et changer les pièces par un agent-
Les réparations ne peuvent être eff ectuées que par
18
électrique.
correct.
dans ce manuel.
fonctionnement en sécurité.
l’appareil correctement. Tenez l’appareil à l’écart des
enfants et des personnes qui ne sont pas au courant du
bon fonctionnement.
enfants en dehors de l’atelier.
fonction précise. En plus, n’eff ectuez pas de modifi cation
à l’appareil et ne l’utilisez pas après une modifi cation.
aucune pièce n’est cassée, si tous les vis sont serrés et
s’il n’y a pas de pièce qui manque ou qui est rouillée.
accidents.
travail continu ne cause pas seulement des dommages
à l’appareil mais doit être considéré comme danger en
soi-même.
des anomalies.
si l’appareil ne fonctionne pas correctement; faites-le
inspecter et réparer.
fi ssures ou d’autres dommages peuvent apparaître.
Veuillez donc faire parvenir les soins nécessaires à
votre agrafeuse. En plus, ne grattez ou gravez pas de
signes sur l’appareil. Vu que l’agrafeuse est destinée à un
emploi sous haute pression, des fi ssures dans la surface
pourraient devenir dangereuses.
ou si l’air échappe par une fi ssure.
gardezla propre.
garantir la sécurité.
qu’elle puisse être utilisé en sécurité et de façon effi cace
à tout moment.
service autorisé.
des agents-service agréés par le producteur sous
respect des instructions indiquées dans le manuel de
manutention.
12. Gardez l’agrafeuse dans un lieu adéquat.
S’il est hors usage, l’appareil doit être tenu dans un lieu sec
hors portée des enfants. Pour protéger l’appareil contre la
rouille, versez env. 2 cc d’huile par le raccord du tuyau.
13. La vue éclatee contenue dans ce manuel d’instructions
doit être utilisée seulement dans un centre de
réparation agrée.
14. Maintenez l’outil fermement pour éviter un
contrecoup.
15. Rangez les outils électriques inutilisés hors de la
portée des enfants et ne laissez aucune personne
qui n’est pas familière avec l’outil électrique ou les
présentes instructions, utiliser l’outil électrique.
Les outils électriques sont dangereux s’ils sont confi és à
des utilisateurs novices.
16. Ne modifi ez pas l’outil d’enfoncement d’éléments de
fi xation. Toute modifi cation peut réduire l’effi cacité
des mesures de sécurité et augmenter les risques
pour l’opérateur et/ou toute personne se trouvant à
proximité
17. Entretenir les outils électriques et les accessoires.
Vérifi ez qu’il n’y a pas de mauvais alignement
ou de blocage des parties mobiles, des pièces
cassées ou toute autre condition pouvant aff ecter
le fonctionnement de l’outil électrique. S’il est
endommagé, faites réparer l’outil électrique avant
de l’utiliser.
De nombreux accidents sont dus à des outils électriques
mal entretenus.
18. Ne vous penchez pas trop en avant. Gardez une
position et un équilibre appropriés à tout moment.
Cela permet de mieux contrôler l’outil électrique dans
des situations imprévues.
19. Tenez les enfants et les personnes présentes à
l’écart, lors du fonctionnement de l’outil électrique.
Les distractions peuvent vous faire perdre le contrôle.
PRECAUTIONS A PRENDRE LORS DE L’USAGE
DE L’AGRAFEUSE
1. La manutention en sécurité est garantie par un
usage correct.
Cet appareil a été construit pour enfoncer des agrafes
dans du bois ou des matériaux similaires. Utilisez-le
seulement pour les emplois désignés.
2. Assurez que la pression d’air soit dans la gamme
nominale de pression d’air prévue.
Les outils de serrage actionnés par air comprimé ne
doivent être raccordés qu’à des lignes d’air comprimé où
la pression maximum autorisée ne peut être excédée d’un
facteur de plus de 10%, qui par exemple, peut être atteinte
par une soupape de réduction de la pression équipée d’une
soupape de sécurité en aval.
(Pour le modèle N5008AC2, 110% de la pression nominale
maximum autorisée est de 9,1 bar = 130 psi).
Les outils de serrage actionnés par air comprimé ne
doivent être utilisés qu’à la pression la plus basse requise
pour travailler à la main, afi n d’éviter les niveaux sonores
inutilement élevés, l’usure accrue et les dysfonctionnements
inhérents.
3. N’utilisez jamais d’autres gaz haute-pression que de
l’air comprimé.
N’utilisez jamais du dioxide de carbone, de l’oxygène
ou d’autres gaz conditionés dans des conteneurs sous
pression.
4. Evitez les infl ammations et les explosions.
Vu que des étincelles peuvent se produire, il est
dangereux d’utiliser l’appareil à proximité de laques, de
couleurs, d’essence, de dilutants, de fuel, de gaz, de
colles ou d’autres substances infl ammables similaires.
Page 19
Français
Dans aucun cas, l’appareil ne doit être utilisé proche de
pareils produits infl ammables.
5. Protégez vos yeux à l’aide de lunettes de sécurité.
ou des agrafes mal touchées n’endommagent les yeux
sont un danger pour la vue. Vous trouvez des lunettes de
sécurité dans chaque quincaillerie. Portez toujours des
lunettes de sécurité ou un masque de sécurité si vous
utilisez l’agrafeuse.
Les employeurs doivent veiller à ce que l’équipement de
protection soit toujours porté.
6. Protégez vos oreillies.
peut causer des pertes auditives permanentes,
incapacitantes, et d'autres problèmes tels que des
acouphènes (siffl ements, tintements ou bourdonnements
dans les oreilles).
L'évaluation des risques et la mise en place de contrôles
appropriés pour ces dangers sont essentielles.
Les contrôles appropriés pour réduire le risque peuvent
inclure des actions telles que l'amortissement des
matériaux pour empêcher les pièces de «sonner».
Utilisez et entretenez l'outil comme recommandé dans
ces instructions, afi n d'éviter toute augmentation inutile
des niveaux sonores.
7. Faites attention aux personnes qui travaillent
proche de vous.
Des agrafes qui sont mal enfoncées représentent un
danger pour les autres. En conséquence, veillez à
assurer la sécurité des personnes alentour pendant le
travail. Veillez toujours à ne pas trop rapprocher votre
corps, vos mains ou vos pieds du déclencheur.
8. Ne pointez jamais l’orifi ce de décharge en direction
d’une personne.
Supposez toujours que l’outil renferme des agrafes.
Si l’orifi ce de décharge est pointé en direction d’une
personne, des accidents sérieux peuvent se produire si
vous pressez la détente. En branchant ou débranchant
le tuyau, en chargeant les agrafes etc., évitez de pointer
l’orifi ce de décharge en direction d’une personne (vous-
même inclus).
Même s’il n’y a pas de agrafes dans l’outil, il serait
dangereux de le décharger en le dirigeant vers quelqu’un.
Pas de jeux brutaux. L’outil est un instrument de travail.
9. Contrôlez le levier de détente avant d’utiliser
l’agrafeuse.
Vous pouvez poser l'outil sur une surface plane comme
indiqué à la Fig. 5.
Veillez à ne pas appliquer la force vers le bas sur l'outil
dans la mesure où le levier de poussée est engagé.
Assurez-vous que le levier de détente et la soupape
fonctionnent correctement. Branchez le tuyau et contrôlez
les points suivants sans charger l’agrafeuse. Si l’agrafeuse
produit le même bruit que lorsque vous enfoncez une
agrafe, ceci indique qu’elle fonctionne mal et qu’elle doit
être inspectée et réparée.
○
○ Si le bruit d’opération est produit par le simple
Portez toujours des lunettes de sécurité si
vous utilisez l’appareil et assurez que les
personnes qui vous entourent en portent
aussi.
La possibilité que des fragments d’agrafe
Veuillez porter des oreillettes lors de chaque
usage de l’agrafeuse et selon les conditions,
veillez à ce que les personnes qui vous
entourent en portent aussi. Une exposition
non protégée à des niveaux sonores élevés
Si le bruit d’opération est produit par le simple appui sur
la détente, l’agrafeuse fonctionne mal.
appui du levier de détente contre le matériel à fi xer,
l’agrafeuse fonctionne mal. Par ailleurs, notez que le
levier de détente ne doit être ni modifi é ni retiré.
10. Utilisez seulement des agrafes spécifi ées.
Utilisez exclusivement les produits de fi xation indiqués
dans le manuel de manutention.
11. Ne modifi ez pas l'outil de fi xation.
Toute modifi cation peut limiter l'effi cacité des mesures de
sécurité et augmenter les risques pour l'opérateur et/ou
toute personne se trouvant à proximité.
12. Soyez prudents en branchant le tuyau.
Pour assurer qu’aucune agrafe n’est tirée lorsque vous
branchez le tuyau ou chargez les agrafes.
○ ne touchez pas la détente.
○ évitez de toucher l’orifi ce de décharge.
○ pointez l’orifi ce de décharge vers le bas.
Observer scrupuleusement les instructions ci-
dessus, et toujours veiller à ce qu’aucune partie du
corps, main ou jambe ne se trouve devant la sortie
des agrafes.
13. Soyez prudent lors de la manipulation des
fi xations, en particulier lors du chargement et du
déchargement, car les fi xations présentent des
pointes acérées pouvant causer des blessures.
14. Ne touchez pas imprudemment la détente.
Ne posez pas votre doigt sur la détente si vous n’agrafez
pas. Si vous portez l’appareil ou si vous le passez à une
autre personne tout en gardant le doigt sur la détente,
vous pouvez causer un accident.
15. Fermez le support de guidage complètement et ne
l’ouvrez pas lors de l’usage.
Si vous essayez d’agrafer pendant que le support de
guidage est ouvert les agrafes ne seront pas enfoncées
dans le bois et vous risquez une décharge dangereuse.
16. Pressez l’orifi ce de décharge fortement contre le
matériel à fi xer.
En enfonçant des agrafes, pressez l’orifi ce de décharge
fortement contre le matériel à fi xer. Si l’orifi ce est mal-
posé, les agrafes peuvent rebondir.
17. Tenez les mains et les pieds à l’écart de l’orifi ce de
décharge.
Il serait très dangereux qu’un outil frappe la main ou le
pied par erreur.
18. Pendant le fonctionnement, des débris de la pièce
à travailler et du système de fi xation/assemblage
peuvent être évacués.
19. Evitez les contrecoups de l’agrafeuse.
Evitez d’approcher le haut de l’agrafeuse avec la tête
pendant que vous agrafez. Ceci est dangereux puisque
l’appareil peut reculer violemment touchant une ancienne
agrafe enfoncée ou un nœud dans le bois.
20. Soyez prudents en agrafant des planches minces ou
les bords du bois.
En agrafant des planches minces ou les bords du bois, les
agrafes peuvent passer à travers ou être déviées. Dans ce
cas, assurez-vous qu’il n’y a personne derrière le panneau
ou proche du bois que vous êtes en train d’agrafer.
21. Il est dangereux d’agrafer simultanément sur les
deux côtés d’un mur.
Il faut absolument éviter d’agrafer en même temps sur les
deux côtés d’un mur puisque les agrafes peuvent passer
à travers et causer ainsi des blessures.
22. Ne pas utiliser l’outillage sur des échafsdages ou
des échelles.
Ne pas utiliser l’outil pour des applications spécifi ques,
par exemple:
– lorsque le changement d’une position d’agrafage fait
intervenir l’utilisation d’échafaudages, d’escaliers,
d’échelles ou de toute autre construction de type
échelle, par ex. des lattes de toit,
– la fermeture de boîtes ou de caisses,
– la fi xation de systèmes de sécurité, par ex. sur des
véhicules ou des wagons
19
Page 20

Français
23. Ne débranchez pas le tuyau à air en gardant le doigt
sur la détente.
Si vous débranchez le tuyau en gardant le doigt sur la
détente, vous risquez que l’appareil éjecte spontanément
une agrafe ou fonctionne mal lors du prochain usage.
24. Débranchez le tuyau à air et sortez toutes les
agrafes du chargeur après l’usage.
Débranchez le tuyau d’eff ectuer un entretien, de retirer
une agrafe coincée, de laisser l’outil sans surveillance,
d’amener l’outil dans un autre endroit, ou après
l’utilisation. Il serait très dangereux qu’une agrafe soit
déchargée par erreur.
25. Si vous sortez une agrafe qui a été coincée dans
l’appareil, débranchez d’abord le tuyau et dégagez
l’air comprimé.
Avant de sortir une agrafe qui est coincée dans l’orifi ce de
décharge de l’appareil, débranchez le tuyau et dégagez
l’air comprimé à l’intérieur de l’agrafeuse.
Il serait très dangereux qu’une agrafe soit déchargée par
erreur.
26. Pour éviter les risques causés par des agrafes qui
tombent, n’ouvrez jamais le chargeur pour le remplir
en pointant l’ouverture vers le bas.
27. Ne branchez pas un raccord-rapide femelle
directement sur l’appareil.
Lorsqu’un raccord-rapide femelle est monté directement
sur l’appareil, l’air comprimé ne pourra sortir lors du
débranchement.
L’outil et le tuyau d’air doivent avoir un couplage tel que
la pression soit entièrement évacuée de l’outil lorsque le
raccord de couplage est débranché.
28. Lors de l'utilisation d'un outil, l'opérateur doit
adopter une posture appropriée mais ergonomique.
Maintenez une position stable et évitez les postures
inconfortables ou déséquilibrées.
29. Si l'opérateur présente des symptômes tels
que gêne persistante ou récurrente, douleur,
palpitations, picotements, engourdissements,
sensation de brûlure ou raideur, n'ignorez pas ces
signes précurseurs.
L'opérateur doit consulter un professionnel de la santé
qualifi é pour l'ensemble des activités.
30. Un travail continu et répétitif de longue durée peut
conduire à des troubles musculo-squelettiques.
Ne continuez pas à travailler avec la même posture ou
en appliquant une force excessive pendant une longue
période.
Et reposez-vous régulièrement et surtout quand vous
vous sentez fatigué.
31. Les glissades, les trébuchements et les chutes sont
les principales causes des blessures sur le lieu de
travail.
Faites attention aux surfaces glissantes causées par
l'utilisation de l'outil, ainsi que des risques de chute
causés par le tuyau d'air.
32. Prenez des précautions supplémentaires dans les
environnements non familiers.
Des dangers cachés peuvent exister, tels que l'électricité
ou d'autres conduites fonctionnelles.
33. Assurez-vous qu'aucun câble électrique, tuyau
de gaz, etc. potentiellement dangereux n'est
endommagé par l'utilisation de l'outil.
34. L'évaluation des risques devrait inclure les
poussières générées par l'utilisation de l'outil et
la possibilité de perturbation par des poussières
existantes.
35. Dirigez l'échappement de manière à minimiser
les perturbations dues à la poussière dans un
environnement rempli de poussière.
36. Lorsqu'il y a des risques liés à la poussière ou
aux gaz d'échappement, la priorité doit être de les
contrôler au point d'émission.
37. Les informations permettant d'eff ectuer une
évaluation des risques de ces dangers et la mise en
œuvre de contrôles appropriés sont essentielles.
38. L'exposition aux vibrations peut causer des lésions
invalidantes aux nerfs et à la vascularisation des
mains et des bras.
39. Portez des vêtements chauds lorsque vous travaillez
dans un environnement froid, gardez vos mains au
chaud et au sec.
40. Si vous ressentez un engourdissement, des
picotements, une douleur ou un blanchissement de
la peau des doigts ou des mains, demandez conseil
à un professionnel de la santé qualifi é pour juger
l'ensemble des activités.
41. Utilisez et entretenez l'outil comme recommandé
dans ces instructions, afi n d'éviter toute
augmentation inutile des niveaux de vibration.
42. Tenez l'outil d’une main légère mais sûre, car le
risque de vibration est généralement plus grand
lorsque la force de préhension est plus élevée.
43. Lors du nettoyage de l’appareil, ne pas utiliser
d’essence ou autre liquide infl ammable.
Si des vapeurs provenant d'un liquide infl ammable
pénètrent à l'intérieur de l'outil électrique, les étincelles
produites au moment de l'agrafage risquent de provoquer
une explosion.
SPECIFICATIONS
Type Piston réciproque
Pression d’air 4,9 – 8,3 bar
Clous appliquables voir Fig.
Nombre de agrafes 150 agrafes
Dimension/l’agrafeuse 365 mm (L) × 258 mm (H) × 76 mm (larg.)
Poids 2,0 kg
Tuyau (dia. int.) 6 mm
20
Page 21

Français
SELECTION DES AGRAFES
Choisissez une agrafe parmi colles de la fi g. Des agrafes qui
n’apparaissent pas sur cettee fi gure ne peuvent être utilisées
dans cet appareil.
Calibre 16 (Couronne 7/16")
Min. Max.
1,61 mm
7,9 mm
25 mm
1,45 mm
Dimension des agrafes
50 mm
ACCESSOIRES STANDARDS
(1) Clef 6 pans creux pour vis M5 ....................................... 1
(2) Protection pour les yeux ................................................ 1
(3) Burette d’huile ............................................................... 1
ACCESSOIRES EN OPTION
○ Kit de mécanisme d’agrafage séquentiel (code No.
876762) (ensemble de pièces pour agrafage continu,
pièces pour agrafage unique)
Avec les pièces pour déclenchement séquentiel,
l’agrafe n’est enfoncée que lorsqu’on appuie sur la
gâchette après avoir appuyé sur le levier-poussoir.
L’installation de ces pièces permet d’éviter
l’enfoncement des agrafes en position incorrecte et le
déclenchement accidentel de l’agrafage sous l’action
inopinée du levier-poussoir.
APPLICATIONS
○ Travaux de contruction comme les revêtements muraux,
les supports de revêtement de sol.
○ Construction de mobil-homes.
PREPARATIONS AVANT USAGE
1. Préparez le tuyau
Assurez-vous que le tuyau utilisé a un diamètre intérieur
minimal de 6 mm.
REMARQUE
Les tuyaux d’approvisionnement d’air comprimé doivent
fournir une pression minimale de 12,8 bars ou de
150 pourcent de la pression maximale produite, à savoir
la valeur la plus forte.
2. Veillez à la sécurité
ATTENTION
○ Des personnes non-autorisées (enfants inclus) doivent
être tenues à l’écart de l’équipement.
○ Portez une protection pour les yeux.
○ Contrôlez si la vis qui tient le chapeau d’aération est bien
serrée.
Contrôlez s’il n’y a pas de fuite d’air ou de pièce
défectueuse.
○ Contrôlez si le levier-poussoir fonctionne correctement et
si aucune crotte s’est posée sur les parties mobiles du
bras.
○ Veillez à la sécurité opérationnelle.
AVANT USAGE
1. Contrôlez la pression de l’air
ATTENTION
La pression d’air doit constamment être maintenue à
4,9 – 8,3 bar en relation avec le diamètre et la longueur de
l’agrafage la dûreté du bois utilisé. Veillez spécialement à
la pression nominale, à la capacité et au tuyautage du
compresseur de façon à ce que la pression ne dépasse
pas la limite indiquée. Notez qu’une pression trop élevée
peut porter préjudice à la performance, à la durée de vie
et à la sécurité de l’agrafeuse.
2. Graissage
(1) Montez un fi ltre-régulateur-lubrifi cateur entre le
compresseur et l’agrafeuse avant d’utiliser l’appareil.
Ceci permet une longue durée de vie et contribue à
l’anticorrosion.
Réglez le lubrifi cateur de façon à ce qu’il fournisse une
seule goutte d’huile tous les 5 à 10 agrafages.
(2) Nous recommandons l’huile (SHELL TONNA). Ne
mélangez jamais deux ou plusieurs types et marques
d’huile.
3. Comment charger les agrafes
ATTENTION
○ Lors du chargement des agrafes dans l'agrafeuse,
(1) ne pas appuyer sur la gâchette ;
(2) ne pas actionner le levier-poussoir ; et
(3) pour éviter tout risque de blessures pendant
l’utilisation et le transport, ne pas approcher le visage,
les mains, les pieds ni aucune autre partie du corps,
de l’opérateur ou des autres personnes, du bec de la
buse.
(1) Tirer l’alimenteur d’agrafes vers l’arrière et le fi xer
solidement à une encoche du magasin. (Voir Fig. 2)
(2) Placer la bande d’agrafes sur le magasin.
Vérifi er que la bande d’agrafes glisse en douceur sur le
magasin. (Voir Fig. 3)
(3) Tirer l’alimenteur d’agrafes vers l’arrière. Ensuite,
le détacher de l’encoche du magasin et ramener
doucement l’agrafe en arrière comme si elle subissait
une poussée douce, en évitant tout impact. (Voir Fig. 4)
L’agrafeuse est maintenant prête à fonctionner.
ATTENTION
○ Si l’on relâche l’alimenteur d’agrafes subitement, il risque
de revenir brusquement, ce qui pourrait déformer et/
ou éparpiller les agrafes, et qui fi nirait par coincer les
agrafes.
Bien ramener l’alimenteur d’agrafes en arrière en évitant
absolument tout impact.
○ Ne touchez pas la détente et ne placez le levier de
détente pas sur le banc de travail ou sur le sol.
En outre, ne pointez jamais l'orifi ce de décharge vers une
personne.
21
Page 22

Français
COMMENT UTILISER L’AGRAFEUSE
ATTENTION
○ Ne vous servez pas de votre corps ou d’une partie de
l’outil en guise de marteau, car les agrafes peuvent sortir
de façon inattendue ou l’outil risque d’être endommagé
et des blessures graves peuvent s’ensuivre.
○ Prenez soins des personnes qui vous entourent lorsque
vous agrafez.
○ Assurez-vous que l’outil est toujours correctement
engagé sur la pièce à usiner et ne puisse pas glisser.
○ Ne transportez jamais un outil pneumatique par le
fl exible.
○ N’essayez jamais de faire glisser un outil pneumatique
par le fl exible.
1. Diff érentes méthodes d’agrafage
(1) Agrafage interrompu
Pressez l’orifi ce de décharge sur le lieu désigné, puis
tirez la détente pour enfoncer l’agrafe. (Voir Fig. 6)
ATTENTION
○ Si vous agrafez dans du bois dur et si vous appliquez
une haute pression, il se peut que l’appareil tire deux fois.
Dans ces cas, pressez la détente doucement.
(2) Levier-poussoir
En pressant l’orifi ce de décharge vers le bas, assurez-
vous que le levier-poussoir est levé sufi samment pour
déclencher le verrou de sécurité (Voir Fig. 6). Sinon, il
sera impossible d’agrafer.
(3) Agrafage continu
Tirez d’abord la détente; puis placez l’orifi ce de décharge
sur le lieu désigné et agrafez automatiquement. (Voir
Fig. 7)
ATTENTION
○ Soyez prudents en agrafant les bords. Lors de l’agrafage
continu, une agrafe risque d’être dévié et de dépasser le
bois.
○ N'enfoncez jamais d'agrafe par dessus une autre agrafe.
○ N'enfoncez jamais d'agrafe sur des pièces métalliques.
REMARQUE
○ Précautions à prendre lors de l’agrafage à viéde
Il peut arriver que l’agrafage continue après que le
magasin a été vidé. Ceci est appelé agrafage à vide et
peut endommager le protecteur, le magasin et le
poussoir d’agrafes. Pour éviter ceci, contrôlez le nombre
d’agrafes de temps en temps. Sortez toujours les agrafes
non-utilisés si vous arrêtez l’agrafage.
○ Après l'agrafage,
(1) débranchez le tuyau pneumatique de l'agrafeuse;
(2) ôtez toutes les agrafes de l'agrafeuse;
(3) mettre 5 ou 10 gouttes d’huile de machine
pneumatique HiKOKI dans le bouchon d’air du
cloueur; et
(4) ouvrir le robinet de purge du réservoir du compresseur
d’air pour purger toute l’humidité.
○ Si les températures extérieures sont trop basses, il se
peut que l’agrafeuse fonctionne mal.
2. Comment ajuster la profondeur de clouage
Pour que les agrafes s’enfoncent toutes à la même
profondeur, s’assurer que:
(1) la pression d’air de l'agrafeuse reste constante (le
régulateur est installé et il fonctionne normalement), et
(2) l'agrafeuse est toujours maintenue fermement contre
la pièce;
Si les agrafes sont enfoncées trop loin ou pas assez dans
la pièce, régler le clouage dans l’ordre suivant.
ATTENTION
○ Avant d’ajuster, débranchez toujours le tuyau d’air et
sortez l’air de l’appareil.
○ Tenez vos doigts à l’écart de la détente pendant
l’ajustement.
22
○ Tenez vos mains et vos pieds à l’écart de l’orifi ce de
décharge pendant l’ajustement.
Veuillez eff ectuer les ajustements dans l’ordre suivant.
(Voir Fig. 8)
Pour régler la profondeur de clouage, desserrer la vis de
fi xation du levier-poussoir.
Si l’agrafe doit être clouée profondément, régler le
levier-poussoir sur ”bas”, et si elle doit être clouée peu
profondément, régler le levier-poussoir sur ”haut”.
Serrer la vis pour fi xer le levier-poussoir.
REMARQUE
○ Utilisez la pression d’air minimale nécessaire pour
enfoncer les agrafes. Une pression trop élevée diminue
la durée de vie de l’amortisseur etc.
INSPECTION ET MANUTENTION
ATTENTION
Débranchez toujours le tuyau d’air si vous nettoyez ou
inspectez l’agrafeuse.
1. Mesures à prendre lors d’un enrayement
(1) Retirer toutes les agrafes.
(2) Libérer le levier de verrouillage et ouvrir le guide de lame.
(Voir Fig. 9)
(3) Retirer l’agrafe coincée avec un tournevis pour écrou à
fente. (Voir Fig. 10)
(4) Refermer le guide de lame et la fermeture.
(5) Si les agrafes se coincent fréquemment, contacter un
service après-vente HiKOKI agréé.
2. Inspection et maintenance
Contrôlez l’appareil périodiquement
(1) Enlevez les 4 vis à 6 pans creux qul fi xent le chapeau
d’aération et démontez le chapeau d’aération.
Vous arrivez alors à démonter le cylindre, le piston et
d’autres pièces.
Nettoyez l’intérieur de l’appareil à l’aide d’un chiff on.
(2) Assurez que la soupape de réglage fonctionne
normalement. Sinon, d’autres pièces de l’appareil
peuvent être endommagées.
(3) Contrôlez minutieusement si le joint n’est pas usé. Un
joint usé ou endommagé peut réduire la performance.
Remplacez-le par un nouveau.
(4) Graissez le joint (Attolub Grease No. 2) avant de
réasssembler l’agrafeuse. Lubrifi ez également
l’agrafeuse avec l’huile recommandée.
3. Contrôlez les vis de fi xation pour chaque pièce
Il faut contrôler régulièrement s’il n’y a pas de vis
desserrés ou de fuites d’air. Employer l’agrafeuse avec
des vis desserrés peut causer des accidents.
4. Vérifi er si le levier-poussir sans diffi culté
Nettoyer la section coulissante du levier-poussoir (Fig. 1)
et la graisser de temps en temps avec l’huile de graissage
fournie.
Le graissage permet de faciliter le coulissement en même
temps qu’il contribue à éviter la formation de rouille.
5. Rangement
○ Quand on ne se sert pas de la cloueuse pendant une
durée prolongée, enduire les pièces en acier d’une fi ne
couche de graisse pour éviter qu’elles ne rouillent.
○ Ne stockez pas l'agrafeuse dans un environnement
soumis au froid.
Conservez l'agrafeuse dans un endroit chaud.
○ Lorsqu'elle n'est pas utilisée, l'agrafeuse doit être stockée
dans un endroit chaud et sec.
Ranger hors de portée des enfants.
ATTENTION
Lors de l’utilisation et de l’entretien d’un outil électrique,
respecter les règlements et les normes de sécurité en
vigueur dans le pays en question.
Page 23

Français
COMPRESSEUR
ATTENTION
Si la pression maximale du compresseur à air dépasse
les 8,3 bar, il vous faut installer une valve réductrice
entre le compresseur et l’agrafeuse. Puis, ajustez la
pression d’air entre 4,9 et 8,3 bar. L’installation d’un fi ltre-
régulateur-lubrifi cateur assure un entretien permanent.
FILTRE-REGULATEUR-LUBRIFICATEUR
Afi n d’assurer un fonctionnement optimal et une longue
durée de vie, il est conseillé d’installer un fi ltre-régulateur-
lubrifi cateur. Limitez la longueur du tuyau entre le fi ltre-
régulateur-lubrifi cateur et l’agrafeuse à 10 mètres. (Fig. 11)
LUBRIFIANTS AUTORISES
TYPE NOM
Huile recommandée SHELL TONNA
Huile moteur SAE 10W, SAE 20W
Huile turbine
ISO VG 32 – 68
(#90 – #180)
Information sur le bruit
Valeurs des caractéristiques de bruit conformément à EN
ISO 11148-13:2018
Niveau type de puissance sonore de l’enfoncement d’une
agrafe, pondéré A L
Niveau type de pression sonore d’émission de
l’enfoncement d’une agrafe, pondéré A, au poste de
travail L
Incertitude K: 2,5 dB (A)
Ces valeurs sont des valeurs caractéristiques relatives à
l’outil et elles ne représentent pas la génération de bruit au
point d’utilisation. La génération de bruit au point d’utilisation
pourra dépendre par exemple de l’environnement de travail,
de la pièce, du support de pièce, du nombre d’opérations
d’agrafage, etc.
Selon les conditions du lieu de travail et la forme de la
pièce, il faudra peut-être adopter des mesures individuelles
d’atténuation du bruit, par exemple en plaçant les pièces sur
des supports d’insonorisation, en supprimant la vibration
des pièces au moyen de serrage ou de couvertures, en
réglant l’outil à la pression d’air la plus faible possible pour
l’opération en question, etc.
Dans certains cas spéciaux, il faudra porter des protections
anti-bruit.
Informations sur les vibrations
La valeur des caractéristiques de vibration type est conforme
à EN ISO 11148-13:2018, 2000: 3,9 m/s
Incertitude K = 1,5 m/s
Cette valeur est une valeur caractéristique relative à l’outil et
elle ne représente pas l’infl uence sur le système main-bras
lors du fonctionnement de l’outil. L’infl uence sur le système
main-bras lors du fonctionnement de l’outil pourra dépendre
par exemple de la force de saisie, de laforce de la pression
de contact, du sens de travail, du réglage de l’alimentation
énergétique, de la pièce et du support de pièce.
2
WA, A,s,d = 99 dB
pA, A,s,d = 81 dB
2
.
23
Page 24

Italiano
(Traduzione delle istruzioni originali)
PRECAUZIONI GENERALI
ATTENZIONE
Leggere attentamente tutte le avvertenze per
la sicurezza, le istruzioni, le illustrazioni e le
La mancata osservanza di tutte le istruzioni elencate di
seguito potrebbe causare gravi lesioni.
Conservare tutte le avvertenze e le istruzioni per
riferimento futuro.
1. Utilizzate l’utensile pneumatico in sicurezza e in
Non usatelo per scopi diversi da quelli specifi cati in
2. Per un utilizzo in sicurezza, impugnate l’utensile
Seguite le istruzioni contenute in questo manuale e
3. Rendete sicuro il luogo di lavoro.
Tenete le persone non autorizzate lontane dal luogo
4. I pezzi giusti al posto giusto.
Non rimuovete tappi o viti. Teneteli al loro posto così che
Non fate mai modifi che all’utensile perché potrebbe
5. Controllate sempre l’utensile prima dell’uso.
Prima di utilizzare l’utensile, controllate sempre
6. Un eccessivo prolungamento del lavoro può
Non fate lavorare l’utensile e gli accessori oltre le loro
7. Fermate immediatamente le operazioni se accade
o se l’utensile non lavora in modo appropriato; fatelo
8. Fate attenzione all’utensile dopo l’uso.
Se appoggiate o urtate l’utensile contro qualcosa, il
9. Tenetelo con cura per una lunga durata.
Tenete sempre l’utensile in buone condizioni e pulito.
10. L’ispezione a intervalli regolari è indispensabile ai
Controllate l’utensile a intervalli regolari in modo
11. Consultate un rivenditore autorizzato se dovete fare
Assicuratevi che la manutenzione venga fatta solo da un
specifi che fornite con l’elettroutensile.
modo appropriato.
queste istruzioni.
correttamente.
impugnate correttamente questo utensile in modo da
operare in sicurezza. Non lasciate mai che l’utensile
venga usato da bambini o da persone che non lo
conoscono abbastanza per poterlo usare correttamente,
o che comunque non sono in grado di usarlo.
di lavoro. Specialmente i bambini dovrebbero tenersi
lontani.
possano funzionare correttamente.
essere molto pericoloso.
che vi siano delle Parti rotte, che tutte le viti siano
completamente fi ssate, che non manchino dei pezzi o
che non siano arrugginiti.
causare incidenti.
possibilità. Un eccessivo prolungamento del lavoro
potrebbe danneggiare non solo l’utensile, ma anche voi
stessi.
qualcosa di insolito.
controllare e fate fare la manutenzione.
telaio esterno potrebbe essere deformato e rompersi o
potrebbe subire altri tipi di danni, quindi maneggiatelo
con cura. Non graffi ate e non incidete scritte sull’utensile.
Lasciando l’aria ad alta pressione all’interno dell’utensile,
le spaccature sulla superfi cie sarebbero pericolose. Non
usate mai l’utensile se si verifi ca una spaccatura o se
l’aria fuoriesce dalle spaccature.
fi ni della sicurezza.
che questo possa operare sempre in sicurezza ed
effi centemente.
delle riparazioni o delle sostituzioni di pezzi.
rivenditore autorizzato e che questo utilizzi soltanto parti
di ricambio originali.
12. Tenete l’utensile in un luogo appropriato.
Quando non lo usate, l’utensile dovrebbe essere tenuto
in un luogo sciutto e lontano dalla portata dei bambini.
Mettete nel serbatoio circa 2 cc di olio attraverso il tubo in
modo da proteggere l’utensile dalla ruggine.
13. Gli esplosi per l’assemblaggio contenuti in queste
istruzioni devono essere usati solo da un centro
assistenza autorizzato.
14. Tenere l’elettroutensile con una solida presa e
tenersi pronti a gestire un eventuale contraccolpo.
15. Conservare gli elettroutensili inattivi lontano dalla
portata dei bambini ed evitare che persone che non
hanno familiarità con l’elettroutensile o con queste
istruzioni lo utilizzino.
Gli elettroutensili sono pericolosi in mano a persone
inesperte.
16. Non modifi care l’utensile di fi ssaggio per rivetti. Le
modifi che possono ridurre l’efficacia delle misure
di sicurezza e aumentare i rischi per l’operatore e/o
per gli astanti
17. Manutenzione di elettroutensili e accessori.
Verifi care per il disallineamento o l’inceppamento
di parti mobili, la rottura di parti e qualsiasi altra
condizione che potrebbe infl uire negativamente sul
funzionamento dell’elettroutensile. Se danneggiato,
far riparare l’elettroutensile prima dell’uso.
Molti incidenti sono causati da elettroutensili con una
manutenzione inadeguata.
18. Non sbilanciarsi. Tenersi ben saldi sui due piedi e in
equilibrio stabile in ogni momento.
Ciò consente un migliore controllo dell’elettroutensile
nelle situazioni impreviste.
19. Tenere lontani bambini e astanti durante l’utilizzo
dell’elettroutensile.
Eventuali distrazioni possono causare una perdita di
controllo.
PRECAUZIONI PER L’USO DELLA FISSATRICE
PNEUMATICA
1. Operazioni sicure grazie a un corretto uso.
Questo utensile è stato progettato per inserire dei punti
nel legno e in altri materiali simili. Usatelo solo a questo
fi ne.
2. Assicuratevi che la pressione dell’aria si mantenga
entro la portata.
Gli utensili di guida di fi ssaggio funzionanti tramite aria
compressa devono essere solamente collegati a linee
d’aria dove la massima pressione consentita non può
essere superata da un fattore di oltre 10% che, per
esempio, può essere ottenuto tramite una valvola di
riduzione della pressione comprendente una valvola di
sicurezza a valle.
(Per il modello N5008AC2, 110% la massima pressione
nominale consentita è 9,1 bar = 130 psi)
Gli utensili di guida di fi ssaggio funzionanti tramite aria
compressa devono essere adoperati solamente alla
pressione più bassa richiesta per il processo di lavoro
corrente, per prevenire livelli di rumore eccessivamente
alti, un aumento dell’usura e conseguenti guasti.
3. Non usate l’equipaggiamento con gas in pressione
diversi dall’aria compressa.
Non utilizzate mai biossido di carbonio, ossigeno o altri
gas da contenitori pressurizzati.
24
Page 25
Italiano
4. Fate attenzione ad accensioni e ad esplosioni.
A causa delle scintille che potrebbero volare durante le
operazioni, è pericoloso usare questo utensile vicino a
lacca, vernice, benzina, solvente, gasolio, gas, adesivi
e altre sostanze infi ammabili simili che potrebbero
infi ammarsi ed esplodere. In nessuna circostanza questo
utensile può essere utilizzato in prossimità di materiali
infi ammabili.
5. Indossate sempre una protezione per gli occhi
(occhiali di protezione).
o di plastica che uniscono i punti o che punti non
propriamente inseriti colpiscano gli occhi è da prevedere.
Gli occhiali di protezione possono essere acquistati
in qualsiasi negozio di ferramenta. Indossateli sempre
durante l’uso dell’utensile. Usate gli occhiali di protezione
o la mascherina ad ampia visuale su prescrizione.
L’utilizzatore dovrebbe sempre preoccuparsi di
utilizzarel’equipaggiamento di protezione.
6. Proteggete le vostre orecchie e la testa.
protezione per la testa. L’esposizione non protetta a livelli
elevati di rumore può causare la perdita permanente e
invalidante dell’udito e altri problemi come l’acufene
(ronzio o fi schio nelle orecchie).
La valutazione del rischio e l’attuazione di controlli
appropriati per questi rischi sono essenziali.
Controlli appropriati per ridurre il rischio possono
includere azioni come lo scarico di materiali in modo da
evitare che i pezzi producano un rumore eccessivo.
Utilizzare ed eff ettuare la manutenzione dell’utensile
come consigliato in queste istruzioni, per evitare un
aumento non necessario dei livelli di rumore.
7. Fate attenzione a quelli che lavorano vicino a voi.
Potrebbe essere molto pericoloso se i punti che non sono
stati correttamente inseriti colpiscono altre persone. In
ogni caso, fate sempre attenzione alla sicurezza delle
persone attorno a voi quando state usando la graff atrice.
Assicuratevi che non ci sia il corpo di qualcuno, mani o
piedi vicino all’uscita dei punti.
8. Non puntate mai la graff atrice in direzione delle
persone.
Tenete sempre chiusa la graff atrice.
Se l’apertura è puntata in direzione di persone,
potrebbero verifi carsi seri incidenti se per errore azionate
la graff atrice.
Quando connettete e sconnettete il tubo, durante il
caricamento dell’utensile o altre operazioni, assicuratevi
che l’apertura della graff atrice non sia puntata in
direzione di persone (inclusi voi stessi).
Se la graff atrice non è caricata, è pericoloso scaricare
l’utensile mentre è puntato verso qualcuno. Abbiate cura
dell’utensile come uno strumento di lavoro.
9. Prima di usare la graff atrice, controllate la leva di
espulsione.
Si può appoggiare l’utensile su una superfi cie piana,
come mostrato nella Fig. 5.
Assicurarsi di non applicare la forza verso il basso
sull’utensile fi no al punto da innestare la leva.
Quando usate questo utensile, indossate
sempre gli occhiali di protezione, e
assicuratevi che anche le persone intorno li
indossino.
La possibilità che frammenti di cavo
Quando siete impegnati nell’uso della
graff atrice, indossate sempre le protezioni per
orecchie e testa. Inoltre, in base alla
condizione, assicuratevi che anche le
persone intorno indossino il para orecchie e la
Prima di usare la graff atrice assicuratevi di controllare la
leva di espulsione e che la valvola funzioni correttamente.
Senza punti caricati nell’utensile, collegate il tubo dell’aria
e controllate ciò che segue. Se dopo aver collegato il
tubo l’utensile spara un colpo, ciò indica un difetto, quindi
non usate la graff atrice fi no a quando questa non viene
controllata e riparata.
○ Se la graff atrice spara azionando solamente il
grilletto, l’utensile è danneggiato.
○ Se spara solamente quando premete la leva contro
un materiale, la graff atrice è danneggiata. Comunque,
riguardo alla leva tastatore, tenete presente che essa
non deve mai essere rimossa o modifi cata.
10. Usate solo punti specifi ci.
Non usate mai punti diversi da quelli descritti in queste
istruzioni.
11. Non modifi care l’utensile per il fi ssaggio dei rivetti.
Le modifi che possono ridurre l’efficacia delle misure
di sicurezza e aumentare i rischi per l’operatore e/o gli
astanti.
12. Fate attenzione quando connettete il tubo.
Quando connettete il tubo e caricate i punti, per non
sparare per errore con la graff atrice, fate attenzione a
quanto segue.
Con la graff
○ Non toccate il grilletto.
○ Non lasciate che l’estremità della graff atrice tocchi
○ Tenete l’estremità della graff atrice verso il basso.
Seguite strettamente le istruzioni di cui sopra e
13. Fare attenzione quando si maneggiano gli elementi
di fi ssaggio, specialmente quando vengono caricati
o scaricati, poiché gli elementi di fi ssaggio hanno
punte affi late che potrebbero causare lesioni.
14. Evitate di mettere il dito sul grilletto.
Non mettete il dito sul grilletto eccetto quando dovete
sparare i punti. Se porgete o consegnate l’utensile a
qualcuno mentre avete il vostro dito appoggiato sul
grilletto, potreste inavvertitamente sparare un punto e
causare un incidente.
15. Chiudete completamente la guida punti e non
apritela durante l’utilizzo.
Se provate a sparare i punti mentre la guida è aperta, il
punto non viene inserito dentro il legno, e c’è il rischio di
un pericoloso scarico del punto.
16. Premete con forza l’apertura della graff atrice contro
il materiale interessato.
Quando guidate un punto, premete con forza l’apertura
dell’utensile contro il materiale da colpire. Se l’apertura
non è correttamente premuta, i punti potrebbero
rimbalzare.
17. Tenete le mani e i piedi lontani dalla testa
dell’utensile quando lo usate.
E’ molto pericoloso che la graff atrice colpisca mani o
piedi per errore.
18. Durante il funzionamento, potrebbero essere
scaricati detriti dal pezzo in lavorazione e dal
sistema di fi ssaggio/raccolta.
19. State attenti al contraccolpo.
Non avvicinatevi all’estremità dell’utensile con il capo
durante le operazioni. Sarebbe molto pericoloso perché
l’utensile potrebbe subire un violento contraccolpo se il
punto che state guidando, entra in contatto con uno già
inserito o con un nodo del legno.
atrice, fate attenzione a quanto segue.
alcuna superfi cie.
assicuratevi sempre che non vi sia alcuna parte del
vostro corpo o di quello di altre persone di fronte
all’apertura della graff atrice.
25
Page 26

Italiano
20. Usate molta cautela quando inchiodate assi sottili o
gli angoli del legno.
Quando inchiodate assi sottili, i punti potrebbero
trapassare, così come anche nel caso in cui dovete
cucire gli angoli del legno a causa della deviazione dei
punti. In questi casi assicuratevi sempre che non vi sia
nessuno nelle vicinanze dietro l’asse o vicino al legno
che dovete cucire.
21. La cucitura simultanea da ambo le parti della stessa
parete è pericolosa.
In nessun caso la cucitura dovrebbe essere fatta allo
stesso tempo sui due lati di una parete.
Questo potrebbe essere molto pericoloso perchè i punti
possono possono attraversare la parete e causare seri
incidenti.
22. Non usare l’utensile pneumatico su scaff alature,
scale.
L’utensile pneumatico non va usato per applicazioni
specifi che, come ad esempio:
– Quando il passaggio da un punto di cucitura ad un
altro prevede l’uso di scaff alature, gradini, scale o
simili, come intelaiature,
– Chiusura di scatole o casse,
– Applicazione di sistemi di sicurezza per trasporto, ad
esempio su veicoli o rimorchi
23. Non sconnettete il tubo con le dita sul grilletto.
Se sconnettete il tubo con le dita appoggiate sul grilletto,
c’è il rischio che la volta successiva che connette
il tubo dell’aria, l’utensile spari un colpo o funzioni
scorrettamente.
24. Disconnettete il tubo e togliete qualsiasi punto
lasciato nel caricatore dopo l’uso.
Disconnettete l’utensile dall’aria prima di eff ettuare la
manutenzione, la pulizia da residui del materiale che lega
i punti, di lasciare l’area di lavoro, di spostare l’utensile in
un altro luogo, o dopo averlo usato. E’ molto pericoloso
che un punto venga sparato per errore.
25. Quando rimuovete un punto inceppato, assicuratevi
prima di tutto.
Prima di tutto di disconnettere il tubo e di rilasciare l’aria
compressa all’interno dell’utensile.
Lo sparo accidentale di un punto potrebbe essere molto
pericoloso.
26. Per evitare incidenti causati dalla caduta dei punti,
non aprite mai il caricatore tenendolo rivolto verso il
basso mentre caricate i punti.
27. Non usate mai un connettore aria femmina nel corpo
macchina.
Quando rimuovete un punto inceppato, assicuratevi
prima di tutto di disconnettere il tubo e di rilasciare l’aria
compressa.
Quando rimuovete un punto inceppato, assicuratevi
prima di tutto di disconnettere il tubo e di rilasciare l’aria
compressa all’interno dell’utensile.
Lo sparo accidentale di un punto potrebbe essere molto
pericoloso.
28. Durante l’uso di un utensile, l’operatore deve
adottare una postura idonea ma ergonomica.
Mantenere una posizione sicura sulle gambe ed evitare
posture scomode o non equilibrate.
29. Se l’operatore avverte sintomi quali fastidio
persistente o ricorrente, dolore, palpitazioni,
pesantezza, formicolio, intorpidimento, sensazione
di bruciore o rigidità, non deve ignorare questi
segnali di avvertenza.
L’operatore deve consultare un operatore sanitario
qualifi cato per quanto riguarda le attività di lavoro
generali.
30. Il lavoro continuo e ripetitivo a lungo termine può
portare a disturbi muscolo-scheletrici.
Non lavorare con una stessa postura o applicando una
forza eccessiva per un lungo periodo di tempo.
Inoltre, riposarsi regolarmente e in special modo quando
si avverte la stanchezza.
31. Slittamenti, inciampi e cadute sono le principali
cause di infortuni sul posto di lavoro.
Prestare attenzione alle superfi ci scivolose dovute all’uso
dell’utensile e anche ai rischi di inciampo causati dal tubo
della linea dell’aria.
32. Procedere con attenzione aggiuntiva in ambienti
non familiari.
Potrebbero essere presenti rischi nascosti, come
elettricità o altre linee di servizio.
33. Accertarsi che non siano presenti cavi elettrici,
tubi del gas, ecc. che potrebbero causare rischi se
danneggiati dall’uso dell’utensile.
34. La valutazione del rischio deve includere la polvere
creata dall’uso dell’utensile e il potenziale di
disturbo della polvere esistente.
35. Dirigere lo scarico in modo da ridurre al minimo
il disturbo della polvere in un ambiente pieno di
polvere.
36. Quando si creano rischi dovuti alla polvere o allo
scarico, la priorità deve essere quella di controllarli
nel punto di emissione.
37. Le informazioni per condurre una valutazione di
questi rischi e l’attuazione di controlli appropriati
sono essenziali.
38. L’esposizione alle vibrazioni può causare danni
invalidanti ai nervi e all’affl usso di sangue alle mani
e alle braccia.
39. Indossare indumenti caldi quando si lavora in
condizioni di freddo e tenere le mani calde e
asciutte.
40. In caso si avvertano intorpidimento, formicolio,
dolore o sbiancamento della pelle delle dita o delle
mani, rivolgersi a un professionista della sanità
qualifi cato per quanto riguarda le attività di lavoro
generali.
41. Utilizzare ed eff ettuare la manutenzione dell’utensile
come consigliato in queste istruzioni, per evitare un
aumento non necessario dei livelli di vibrazione.
42. Tenere l’utensile con una presa leggera ma sicura,
poiché il rischio di vibrazioni è generalmente
maggiore quando la forza di presa è maggiore.
43. Quando si pulisce l’utensile elettrico, non usare
benzina o altri liquidi infi ammabili.
Se il vapore proveniente da un liquido infi ammabile
entra nell’utensile elettrico, vi è il pericolo che le scintille
prodotte durante l’operazione ecc. possano causare
un’esplosione.
26
Page 27

SPECIFICHE
Tipo di potenza Pistone alternativo
Pressione dell’aria 4,9 – 8,3 bar
Punti applicabili Fig. rif.
Quantità punti caricabili 150 punti
Misure 365 mm (Lu) × 258 mm (A) × 76 mm (La)
Peso 2,0 kg
Foro (diametro interno) 6 mm
Italiano
SELEZIONE PUNTI
Scegliete il punto adeguato dalla fi gura. I punti non mostrati
nella fi gura non possono essere usati con questo utensile.
Misura 16 7/16” Crown
Min. Max.
1,61 mm
7,9 mm
25 mm
1,45 mm
Dimensioni dei punti
50 mm
ACCESSORI STANDARD
(1) Chiave esagonale per viti M5 ........................................ 1
(2) Protezione per gli occhi ................................................. 1
(3) Oliatore ......................................................................... 1
ACCESSORI OPTIONAL
○ Kit meccanismo sequenziale (Code No. 876762)
(Set ricambi emissione sequenziale, Ricambi sparo
singolo)
Con i ricambi per l’emissione sequenziale, il punto e
sparato solo premendo il grilletto dopo aver premuto la
leva di emissione.
Installando queste parti, lo sparo di punti in posizioni
scorrette e una inaspettata espulsione di punti causata
da operazioni accidentali della leva di espulsione
possono essere evitati.
APPLICAZIONI
○ Lavori di edilizia, ad esempio rivestimento di pareti,
sottopavimenti.
○ Per roulotte ed edifi ci prefabbricati.
PREPARAZIONE PRIMA DELL’UTILIZZO
1. Preparate il tubo
Assicuratevi di utilizzare un tubo con un diametro interno
di almeno 6 mm.
NOTA
I tubi dell’aria devono avere una pressione minima di
12,8 bar o 150% della pressione massima prodotta dal
sistema dell’aria.
2. Controllate la sicurezza
CAUTELA
○ Le persone non autorizzate (inclusi i bambini) devono
essere tenute lontane dall’equipaggiamento.
○ Indossare la protezione per gli occhi.
○ Controllate che le viti che fi ssano il coperchio dello
scarico siano ben fi ssate.
Controllate che la fi ssatrice pneumatica non abbia
perdite d’aria o parti difettate o arrugginite.
○ Controllate se la leva tastatore lavora correttamente.
Controllate anche che non vi sia della polvere tra le parti
in movimento della leva tastatore.
○ Ricontrollate che le operazioni siano sicure.
PRIMA DELL’USO
1. Controllate la pressione dell’aria
CAUTELA
La pressione dell’aria deve essere mantenuta
costantemente a 4,9 – 8,3 bar.
Regolate la pressione dell’aria tra 4,9 to 8,3 bar in base al
diametro e alla lunghezza dei punti e alla consistenza del
legno che dovete cucire. Prestate particolare attenzione
alla pressione in uscita, alla capacità, ed ai tubi del
compressore aria, in modo che la pressione non superi
il limite specifi cato. Notate che un’eccessiva pressione
potrebbe provocare una diminuzione delle prestazioni,
della durata della vita dell’utensile e della sicurezza.
2. Lubrifi cazione
(1) Prima di utilizzare la fi ssatrice pneumatica, assicuratevi
di mettere un kit deumidifi catore e lubrifi catore tra il
compressore e la macchina.
La lubrifi cazione attraverso questo kit off re un utilizzo
scorrevole, di lunga durata, e protetto dal rischio di
corrosione.
Regolate l’oliatore in modo che una singola goccia di olio
sia fornita ad intervalli di 5 – 10 cicli di cucitura.
(2) Vi preghiamo di usare l’olio raccomandato (SHELL
TONNA). Gli altri oli applicabili sono elencati. Non
mescolate mai due o più tipi di oli diversi.
3. Carico dei punti
CAUTELA
○ Quando caricate i chiodi nella fi ssatrice pneumatica,
(1) non premere il grilletto;
(2) non premere la leva di spinta e
(3) tenere viso, mani, piedi e altri parti del corpo, vostre e
delle altre persone, lontane dal naso dell’utensile per
evitare lesioni durante l’uso o il trasporto.
27
Page 28

Italiano
(1) Tirare l’alimentatore dei punti della graff atrice all’indietro
e fi ssarlo fermamente ad una fermamente ad una
scanalatura del caricatore (Vedere Fig. 2).
(2) Mettere una cartuccia di punti sopra il caricatore.
Controllare che scivoli liberamente sul caricatore (Vedere
Fig. 3).
(3) Tirare l’alimentatore dei punti all’indietro. Staccarlo quindi
dalla scanalatura del caricatore e portarlo piano indietro
come se venisse spinto dalla macchina, evitando urti
(Vedere Fig. 4).
La fi ssatrice pneumatica è ora pronta per il lavoro.
CAUTELA
○ Se l’alimentatore dei punti viene lasciato andare
bruscamente, potrebbe aprirsi di scatto, deformando e/o
facendo volare i punti, causando inceppamenti.
Aprirlo quindi sempre a mano, evitando gli impatti.
○ Per prevenire operazioni involontarie, non toccate mai il
grilletto e non appoggiate mai l’estremità fi nale della leva
di espulsione su un piano di lavoro o su un pavimento.
Inoltre, non rivolgete mai l'uscita dei punti verso alcuna
parte del corpo di una persona.
COME USARE LA FISSATRICE PNEUMATICA
CAUTELA
○ Non usare il corpo o qualsiasi parte dell’utensile come
martello poiché le graff e potrebbero venire scaricate
inaspettatamente o l’utensile potrebbe restare
danneggiato e potrebbero verifi carsi lesioni gravi.
○ Prendete le precauzioni per salvaguardare la sicurezza
delle persone nelle vicinanze delle operazioni.
○ Assicurarsi che l’utensile sia sempre inserito in modo
sicuro sul pezzo in lavorazione e non possa scivolare.
○ Mai trasportare un utensile pneumatico dal suo tubo
fl essibile.
○ Mai trascinare un utensile pneumatico dal suo tubo
fl essibile.
1. Procedure per la puntavra
(1) Cucitura intermittente
Premete la graff atrice nel punto desiderato; poi tirate
il grilletto per piantare un punto con un singolo sparo.
(Vedere la Fig. 6)
CAUTELA
○ Questo utensile può sparare punti in rapida successione
invece che uno alla volta quando viene premuto
fortemente contro una superfi cie o quando viene usata
con materiali molto duri. In questi casi, sparate i punti
premendo e rilasciando il grilletto.
(2) Leva tastatore
Quando premete fuori il punto, assicuratevi di sollevare la
leva tastatore completamente (Vedi Fig. 6) per rilasciare
il blocco. In questo modo i punti non possono essere
guidati senza il rilascio della leva di blocco.
(3) Cucitura continua
Prima premete il grillatto. Poi abbassate il dispositivo
nella posizione desiderata per guidare automaticamente
i punti. (Vedi Fig. 7)
CAUTELA
○ Operate con cura quando chiodate gli angoli dei fl essibili.
Se eff ettuate una cucitura continua degli angoli di un
fl essibile, un punto può andare fuori strada o sfondare
l’angolo.
○ Non inserite un punto su un altro punto.
○ Non inserite un punto sulle parti metalliche.
NOTA
○ Precauzioni nell’operazione di no - carico
Qualche volta la cucitura continua dopo aver guidato tutti
i punti precedentemente contenuti nel caricatore. Questa
è chiamata “operazione no - carico”. Questa operazione
può deteriorare il parabordo, il caricatore, l’alimentatore.
Per evitare l’ operazione no-carico, accertatevi
occasionalmente del numero dei punti rimasti. D’altra
parte tutti i punti devono essere rimossi dopo l’uso di
questa fi ssatrice pneumatica.
○ Dopo l’operazione,
(1) scollegate il tubo dell’aria dalla fi ssatrice pneumatica;
(2) rimuovete tutti i punti dalla fi ssatrice pneumatica;
(3) applicare 5-10 gocce di lubrifi cante HiKOKI per utensili
pneumatici nella presa dell’aria della chiodatrice e
(4) aprire il rubinetto di spurgo del serbatoio del
compressore ad aria per eliminare l’umidità.
○ In condizioni di basse temperature, l’utensile talvolta non
opera in modo corretto. Usatelo sempre in ambienti con
appropriate temperature.
2. Regolazione della lunghezza dei punti
Per assicurarsi che ciascun punto penetri alla stessa
profondità, controllare che:
(1) la pressione dell’aria della fi ssatrice pneumatica
rimanga costante (vale a dire che il regolatore sia
installato e in buone condizioni), e che
(2) la fi ssatrice pneumatica sia sempre tenuta contro il
pezzo da cucire.
Se i punti penetrano poco o troppo, fare quanto segue.
CAUTELA
○
Prima della regolazione, scollegare sempre il tubo
fl essibile e far uscire l’aria compressa dall’utensile.
○ Durante la regolazione tenere sempre il dito lontano
dal grilletto dell’utensile.
○ Durante la regolazione, controllare che nessuna
parte del corpo vostro o altrui sia vicina al foro di
sparo dei punti.
Le varie operazioni di regolazione vanno fatte nel
seguente ordine. (Vedere Fig. 8)
Per allentare la profondità di penetrazione dei punti,
allentare la vite che ferma il pezzo della leva di spinta.
Se i punti penetrano troppo, regolare la vite verso il
“basso”, mentre se penetrano troppo poco, regolarla
verso l’”alto”.
Stringere infi ne la vite per fermare il pezzo della leva di
spinta.
NOTA
○ Usare sempre la pressione dell’aria minima suffi ciente a
far penetrare i punti alla profondità desiderata. Se si usa
una pressione troppo alta, la durata dell’ammortizzatore
a pistone e delle altre parti interessate scende.
28
Page 29

Italiano
CONTROLLI E MANUTENZIONE
CAUTELA
Assicuratevi di disconnettere il tubo durante le operazioni
di controllo, manutenzione e pulizia.
1. Se la macchina si inceppa
(1) Rimuovere tutti i punti.
(2) Liberare la leva di bloccaggio ed aprire la guida della
lama (Vedere Fig. 9).
(3) Rimuovere il punto inceppato con un cacciavite (Vedere
Fig. 10).
(4) Chiudere la guida della lama ed il chiavistello.
(5) Se gli inceppamenti sono frequenti, consultare un centro
assistenza autorizzato HiKOKI.
2. Inspezione e manutenzione
Controllate periodicamente il dispositivo.
(1) Rimuovete la vite esagonale.
Allentate i bulloni del coperchio esagonale e rimuovetelo.
Poi cilindro, pistone e altre parti possono essere rimossi
nei rispettivi gruppi di assemblaggio. Asciugate la punta
guida, la parte slittante del pistone e il corpo interno con
un panno per rimuovere i depositi di polvere.
(2) Assicuratevi che l’ammortizzatore del pistone operi
normalmente. Se questo fosse danneggiato, potrebbe
causare danni alle altre parti componenti.
(3) Controllate con cura che l’anello non sia usurato mentre
lo smontate. Un anello usurato o danneggiato potrebbe
deteriorare completamente la prestazione. Sostituitelo
con uno di nuovo.
(4) Prima di riassemblare il dispositivo, applicate del grasso
(Attolub No.2 Grease) all’anello. Inoltre, lubrifi cate il
dispositivo con l’olio raccomandato.
3. Controllate le viti di montaggio
A intervalli regolari controllate che ogni parte non abbia
le viti di montaggio allentate e che non ci siano perdite
d’aria. Fissate qualsiasi vite allentata. Utilizzando
l’equipaggiamento con le viti allentate potreste incorrere
in un incidente.
4. Ispezione della leva di spinta
Controllare se la leva di spinta (Fig. 1) può scorrere
bene. Pulire la parte scorrevole della leva di spinta e
usare l’olio in dotazione per lubrifi care di tanto in tanto.
La lubrifi cazione permette un buono scorrimento e serve
inoltre ad evitare la formazione di ruggine.
5. Conservazione
○ Quando non si usa l’utensile per lunghi periodi, applicare
un leggero strato di lubrifi cante alle parti in acciaio per
evitare la formazione di ruggine.
○ Non conservate la fi ssatrice pneumatica in un ambiente
freddo.
Conservatela in un ambiente caldo.
○ Quando non viene utilizzata, la fi ssatrice pneumatica
deve essere conservata in un luogo caldo e asciutto.
Tenere fuori della portata dei bambini.
CAUTELA
Nell’uso e nella manutenzione degli utensili elettrici
devono essere osservate le normative di sicurezza e i
criteri prescritti in ciascun paese.
COMPRESSORE
CAUTELA
Quando il massimo della pressione del compressore
aria eccede 8,3 bar, assicuratevi di applicare una
valvola riduttore tra il compressore aria e la fi ssatrice
pneumatica. Poi, regolate la pressione dell’aria tra 4,9
e 8,3 bar. Se installate un set aria sarà possibile anche
la lubrifi cazione. Provvedete così ad incrementare la
convenienza.
OLIATORE-FILTRO-VALVOLA DI RIDUZIONE
(Set aria)
In modo che l’utensile possa essere usato in condizioni
ottimali per una lunga durata di servizio, si consiglia di usare
un oliatore-fi ltro-valvola di riduzione. Limitare la lunghezza
del tubo tra l’unità e il set aria entro 10 m durante l’uso.
(Fig. 11)
LUBRIFICANTI APPLICABILI
Tipo di Lubrifi cante Nome del Lubrifi cante
Olio raccomandato SHELL TONNA
Olio motore SAE10W, SAE20W
Olio turbina
Informazioni sul rumore
Le caratteristiche del rumore sono valutate in accordo con
EN ISO 11148-13:2018
Livello di potenza acustica per singolo colpo (tipo A)
L
Livello di pressione acustica per singolo colpo (tipo A)
alla stazione di lavoro L
Incertezza K: 2,5 dB (A)
Questi valori rappresentano i valori caratteristici dell’utensile
e non il rumore che si sviluppa durante l’utilizzo. Il rumore che
si sviluppa durante l’uso dipende ad esempio dall’ambiente
di lavoro, dal supporto e dal numero di operazioni.
Dipendono dalle condizioni dell’ambiente di lavoro e dai pezzi
da lavorare, le misure individuali di attenuazione del rumore
che potrebbe essere necessario eseguire, come disporre i
pezzi da lavorare su dei supporti scarica-vibrazioni, in modo
da prevenire le vibrazioni del pezzo tramite un fi ssaggio o
una copertura, regolando il minimo della pressione dell’aria
richiesta per le operazioni complesse, ecc.
In casi speciali è necessario indossare l’equipaggiamento di
protezione per l’udito.
Informazioni sulle vibrazioni
Il valore caratteristico delle vibrazioni tipiche conforme alla
norma EN ISO 11148-13:2018, 2000 è: 3,9 m/s
Incertezza K = 1,5 m/s
Questo valore è caratteristico dell’utensile in uso e non tiene
conto dell’eff etto sul sistema mano-braccio quando si utilizza
l’utensile: esso dipende, per esempio, dalla forza con cui si
aff erra l’utensile, dalla pressione applicata, dalla direzione di
lavoro, dalla regolazione dell’energia applicata, dal pezzo da
lavorare e dal relativo supporto.
2
ISO VG32 – 68
(#90 – #180)
WA, 1s, d = 99 dB
pA, 1s, d = 81 dB
2
.
29
Page 30

Nederlands
(Vertaling van de oorspronkelijke instructies)
ALGEMENE VOORZORGEN VOOR HET
GEBRUIK
WAARSCHUWING
Lees alle veiligheidswaarschuwingen,
instructies, illustraties en specifi caties die bij
Het niet opvolgen van alle onderstaande instructies kan
leiden tot ernstig letsel.
Bewaar alle waarschuwingen en instructies voor
toekomstig gebruik.
1. Gebruik dit pneumatisch gereedschap op een
Gebruik dit pneumatisch gereedschap niet voor andere
2. Ga op juiste en veilige wijze om met dit pneumatisch
Volgt u alstublieft de instructies in deze handleiding
3. Verzeker u ervan dat het pneumatisch gereedschap
Houd onbevoegden weg van de werkplaats. In het
4. De juiste onderdelen op de juiste plaats.
Probeer niet een van de deksels of schroeven te
5. Controleer het pneumatisch gereedschap grondig
Controleer voor gebruik altijd of er geen onderdelen
6. Grenzen overschrijden kan tot ongelukken leiden.
Verg niet het uiterste van het pneumatisch gereedschap.
7. Stop het werken met het pneumatisch gereedschap
Stop het werken met het apparaat direct als u iets
8. Zorg goed voor uw pneumatisch gereedschap.
Als u het apparaat laat vallen, of het tegen dingen
9. Goede zorgen verlengen de levensduur.
Houd uw pneumatisch gereedschap mooi schoon en
10. Regelmatige inspectie is essentieel voor de
30
dit elektrische gereedschap zijn meegeleverd.
veilige manier en alleen voor geëigende doelen.
doelen dan die in deze instructies gespecifi ceerd zijn.
gereedschap.
zorgvuldig op en hanteer dit pneumatisch gereedschap
op de correcte manier om zorg te dragen voor uw
en andermans veiligheid. Laat het pneumatisch
gereedschap nooit in handen van kinderen komen of
mensen die er niet genoeg van weten om er verantwoord
mee om te kunnen gaan, of anderszins niet in staat zijn
om het pneumatisch gereedschap op de juiste wijze te
hanteren.
gebruikt wordt in een veilige werkomgeving.
bijzonder behoren kinderen weggehouden te worden van
de werkplaats.
verwijderen. Elk onderdeel heeft zijn eigen functie, dus
laat alles op zijn plaats. Probeer bovendien nooit op eigen
houtje veranderingen aan het apparaat aan te brengen,
of het na zelf gefabriekte modifi caties nog te gebruiken.
voor u het gaat gebruiken.
ontbreken of gebroken, geroest of versleten zijn en of alle
schroeven stevig op hun plaats zitten.
Er zijn grenzen aan wat u ermee kunt doen. Als u teveel
probeert te doen kunt u niet alleen het pneumatisch
gereedschap beschadigen, maar loopt u zelf ook risico.
onmiddellijk als u iets abnormaals opmerkt.
abnormaals waarneemt, of wanneer het pneumatisch
gereedschap niet naar behoren functioneert; laat het
pneumatisch gereedschap nakijken en eventueel
repareren.
stoot, kan het buitenframe vervormd raken en kunnen
er barsten of andere vormen van schade optreden, dus
wees alstublieft voorzichtig. Graveer of kras ook geen
tekens op het pneumatisch gereedschap. Vanwege de
hoge luchtdruk in het binnenste van het apparaat, kunnen
barstjes in de buitenkant zeer gevaarlijk zijn. Gebruik het
pneumatisch gereedschap nooit als zich een barst vormt,
of wanneer lucht ontsnapt via een barst.
zorg er goed voor.
veiligheid.
Kijk het apparaat regelmatig na zodat het pneumatisch
gereedschap altijd veilig en doelmatig functioneert.
11. Raadpleeg een offi ciële service-vertegenwoordiger
wanneer reparatie of vervanging van onderdelen
noodzakelijk zijn.
Let er op dat het pneumatisch gereedschap alleen
door een erkende service-vertegenwoordiger wordt
nagezien en gerepareerd en dat alleen offi ciële identieke
vervangingsonderdelen worden gebruikt.
12. Bewaar het pneumatisch gereedschap op een
geschikte plaats.
Wanneer u het apparaat niet gebruikt, dient u het te
bewaren op een droge plaats die onbereikbaar is voor
kinderen. Om het pneumatisch gereedschap tegen roest
te beschermen, kunt u 2 cc olie in de behuizing doen via
de slang-aansluiting.
13. De opengewerkte montagetekening in deze
handleiding is alleen bedoeld voor erkend service
personeel.
14. Houd het gereedschap stevig vast en zorg ervoor
dat u zich op de terugslag voorbereidt.
15. Bewaar elektrisch gereedschap dat niet wordt
gebruikt buiten het bereik van kinderen en laat
personen die onbekend zijn met het elektrische
gereedschap of deze instructies het elektrische
gereedschap niet gebruiken.
Elektrische gereedschappen zijn gevaarlijk wanneer
deze door onervaren personen worden gebruikt.
16. Wijzig het inslaggereedschap niet. Wijzigingen
kunnen de eff ectiviteit van de veiligheidsmaatregelen
verminderen en de risico's voor de gebruiker en/of
omstanders verhogen
17. Onderhoud van elektrisch gereedschap en
accessoires. Controleer op verkeerde uitlijning
of het vastzitten van bewegende delen, kapotte
onderdelen of andere omstandigheden die mogelijk
invloed kunnen uitoefenen op de werking van het
elektrisch gereedschap. Wanneer er sprake is van
beschadiging, laat u het elektrisch gereedschap
eerst repareren voordat u het gebruikt.
Er worden veel ongevallen veroorzaakt door slecht
onderhouden elektrische gereedschappen.
18. Reik niet te ver. Zorg dat u ten alle tijde stevig staat
en uw evenwicht bewaart.
Dit zorgt voor betere controle van het elektrische
gereedschap in onverwachte situaties.
19. Houd kinderen en omstanders op een afstand terwijl
u een elektrisch gereedschap bedient.
Gebrek aan aandacht kan ertoe leiden dat u de controle
verliest.
VOORZORGEN VOOR HET GEBRUIK VAN HET
NIETAPPARAAT.
1. Veiligheid door correct gebruik.
Dit pneumatisch gereedschap is ontworpen om nieten in
hout en vergelijkbare materialen te drijven. Gebruik het
apparaat alleen voor dit doel.
2. Let er op dat de luchtdruk binnen het opgegeven
bereik voor dit apparaat valt.
Spijkerapparaten die op perslucht werken mogen
uitsluitend op persluchtleidingen worden aangesloten
wanneer de maximaal toelaatbare druk niet met een
factor van meer dan 10% overschreden kan worden. Dit
kan bijvoorbeeld worden bereikt door een reduceerventiel
met afgaand veiligheidsventiel.
(Voor model N5008AC2, 110% van de nominale
maximaal toelaatbare druk is 9,1 bar = 130 psi)
Spijkerapparaten die op perslucht werken mogen
uitsluitend op de laagst mogelijke druk worden gebruikt
Page 31

Nederlands
die nodig is om de werkzaamheden uit te voeren,
teneinde overmatig lawaai, slijtage en defecten van de
apparatuur te voorkomen.
3. Gebruik het pneumatisch gereedschap nooit
met andere gassen onder hoge druk dan
gecomprimeerde lucht.
Gebruik nooit en te nimmer, onder welke omstandigheden
dan ook kooldioxide, zuurstof of andere gassen uit
drukfl essen o.i.d.
4. Wees beducht voor ontsteking- en
ontploffi ngsgevaar.
Omdat tijdens het nieten vonken geslagen kunnen
worden, is het gevaarlijk om dit pneumatisch gereedschap
te gebruiken in de buurt van lak, verf, benzine, thinner,
gasolie, gas, lijmsoorten, en vergelijkbaar ontvlambare
materialen die door de vonken zouden kunnen ontvlammen
of exploderen. Onder geen enkele voorwaarde mag dit
pneumatisch gereedschap daarom gebruikt worden in de
nabijheid van dergelijke ontvlambare materialen.
5. Draag altijd uw oogbescherming (veiligheidsbril).
het draad of het plastic dat de nieten vasthoudt, of nieten die
niet goed geraakt werden in uw oog terechtkomen is een
bedreiging voor uw gezichtsvermogen. Oogbescherming
is verkrijgbaar in elke gereedschapswinkel. Draag altijd een
vorm van oogbescherming wanneer u met dit apparaat
werkt. Er zijn speciale maskers of veiligheidsbrillen die over
uw bril passen.
Werkgevers behoren er op toe te zien dat oogbescherming
gedragen wordt op de werkplek.
6. Bescherm uw hoofd en uw oren.
blootstelling aan hard geluid kan permanente
gehoorschade en andere problemen veroorzaken, zoals
oorsuizen (gerinkel, gezoem, gefl uit of gebrom in de oren).
Risicobeoordeling en implementatie van geschikte
maatregelen voor deze gevaren zijn van essentieel
belang.
Een passende maatregel om het risico te verminderen is
bijvoorbeeld het gebruik van dempingsmaterialen om te
voorkomen dat werkstukken „rinkelen”.
Bedien en onderhoud het gereedschap zoals aanbevolen
in deze instructies om onnodige toename van lawaai te
voorkomen.
7. Let op de mensen die dicht bij u werken.
Het zou bijzonder gevaarlijk kunnen zijn als nieten die
niet goed ingeslagen zijn anderen zouden kunnen raken.
Let daarom ook altijd op de veiligheid van de mensen
rondom u wanneer u met dit pneumatisch gereedschap
werkt. Let er altijd op dat er niet iemands lichaam, hand
of voet dichtbij de niet-uitgang is.
8. Richt het nietapparaat nooit op iemand.
Ga er altijd van uit dat het apparaat geladen is.
Als u het apparaat op iemand richt kunt u ernstige
ongelukken veroorzaken wanneer u per abuis het
apparaat aan zet. Let er goed op dat het apparaat niet
op iemand (inclusief uzelf...) gericht is terwijl u de slang
aan- of afkoppelt, terwijl u nieten in het apparaat laadt,
of gedurende soortgelijke handelingen. Zelfs wanneer er
geen nieten in het apparaat zitten is het gevaarlijk om het
af te doen gaan terwijl het in de richting van een persoon
wijst, dus probeer dat niet. Geen geintjes. Heb respect en
ontzag voor het gereedschap waar u mee werkt.
Draag altijd uw oogbescherming wanneer u
met dit pneumatisch gereedschap werkt, en
zorg ervoor dat de mensen in uw omgeving
hetzelfde doen.
De mogelijkheid dat rondvliegende stukjes van
Draagt u alstublieft een helm en
oorbeschermers als u nietwerk doet. Let u er
ook op dat de mensen rondom u, afhankelijk
van de omstandigheden, hun helmen en
oorbeschermers dragen. Onbeschermde
9. Controleer de veiligheidshendel voor u het
pneumatisch gereedschap gaat gebruiken.
U mag het gereedschap laten steunen op een waterpas
oppervlak zoals wordt getoond in Afb. 5.
Zorg dat u niet neerwaarts kracht uitoefent op het
gereedschap zodanig dat de drukhendel wordt
ingeschakeld.
Voor u het pneumatisch gereedschap gaat gebruiken
moet u controleren of de veiligheidshendel en de afsluiter
goed functioneren. Sluit de slang aan op het apparaat
en controleer het volgende zonder dat er nieten in het
apparaat geladen zijn. Als het apparaat klinkt alsof het
werkt, dan is dat een teken dat er iets fout is en dat u het
pneumatisch gereedschap dus niet kunt gebruiken tot
het nagekeken en eventueel gerepareerd is.
○ Als alleen het bewegen van de trekker het apparaat
doet overgaan, als u dus hoort dat het binnenwerk
beweegt zoals het beweegt wanneer er gewoon
geniet wordt, dan is het pneumatisch gereedschap
defect.
○ Als alleen het drukken van de veiligheidshendel tegen
het te nieten materiaal het apparaat doet overgaan,
als u dus hoort dat het binnenwerk beweegt zoals het
beweegt wanneer er gewoon geniet wordt, dan is het
pneumatisch gereedschap defect. Met betrekking tot
de veiligheidshendel zij bovendien nog opgemerkt
dat deze nooit gewijzigd of verwijderd mag worden.
10. Gebruik alleen de voorgeschreven nieten.
Gebruik nooit andere nieten dan de in deze handleiding
beschreven en gespecifi ceerde.
11. Breng geen wijzigingen aan het spijkerapparaat aan.
Wijzigingen kunnen de eff ectiviteit van de
veiligheidsmaatregelen verminderen en de risico's voor
de gebruiker en/of omstanders verhogen.
12. Wees voorzichtig wanneer u de slang aan- of
afkoppelt.
Let op de volgende punten om te voorkomen dat het
apparaat per ongeluk afgaat wanneer u de slang aan- of
afkoppelt, of nieten laadt.
○ Raak de trekker niet aan.
○ Laat de kop van het apparaat niet in contact komen
met enig oppervlak.
○ Houd de kop van het apparaat naar beneden gericht.
Volg bovenstaande instructies zorgvuldig op en let er
altijd op dat er zich geen lichaamsdelen, handen of
benen voor de niet-uitgang bevinden.
13. Wees voorzichtig bij het hanteren van spijkers,
vooral bij het laden en ontladen, omdat de
spijkers scherpe punten hebben die letsel kunnen
veroorzaken.
14. Houd niet achteloos uw vinger aan de trekker.
Breng uw vinger alleen aan de trekker wanneer
u inderdaad gaat nieten. Als u dit pneumatisch
gereedschap draagt, of u geeft het aan iemand anders
met uw vinger aan de trekker, kunt u per ongeluk een niet
afschieten en een ongeval veroorzaken.
15. Sluit de nietgeleiding geheel en maak hem niet open
terwijl het apparaat in werking is.
Als u probeert te nieten terwijl de nietgeleiding open
staat, zal de niet in het hout gedreven worden en ontstaat
er een gevaarlijke situatie.
16. Druk de niet-uitgang stevig tegen het te nieten
materiaal.
Druk de niet-uitgang stevig tegen het te nieten materiaal
wanneer u gaat nieten. De nieten kunnen terugkaatsen
als u de niet-uitgang niet goed houdt.
17. Houd handen en voeten weg van de kop van het
apparaat wanneer er geniet wordt.
Het kan ernstige gevolgen hebben wanneer een niet per
ongeluk een hand of voet raakt.
31
Page 32

Nederlands
18. Tijdens gebruik kan er vuil van het werkstuk en het
bevestigings-/verzamelsysteem worden afgevoerd.
19. Wees bedacht op de terugslag van het pneumatisch
gereedschap.
Breng uw hoofd of andere lichaamsdelen niet dicht bij de
bovenkant van het apparaat terwijl het in werking is. Dit
is gevaarlijk omdat het apparaat een krachtige terugslag
kan geven als bijvoorbeeld de niet die wordt ingedreven
een oude niet of een knoest in het hout raakt.
20. Wees voorzichtig wanneer u dun plaatmateriaal of
de hoeken van een stuk hout gaat nieten.
Wanneer u dun plaatmateriaal niet, kunnen de nieten
er dwars doorheen vliegen, wat ook kan gebeuren als
u de hoek van een stuk hout niet en de niet afketst. In
dergelijke gevallen dient u ervoor te zorgen dat er zich
niemand (en ook geen handen, voeten e.d.) achter het
dunne plaatmateriaal of naast het hout dat u wilt nieten
bevindt.
21. Tegelijkertijd nieten aan beide zijden van een wand
is gevaarlijk.
Onder geen enkele voorwaarde mag u aan beide zijden
van een wand samen met iemand anders staan te nieten.
Dit kan bijzonder gevaarlijk zijn daar de nieten door de
wand kunnen dringen en zo verwondingen kunnen
veroorzaken.
22. Gebruik het gereedschap niet op stellingen, ladders.
Het gereedschap mag niet worden gebruikt in
bijvoorbeeld de volgende gevallen:
– op steigers, trap, ladder of andere dergelijke
constructies,
– dichtmaken van dozen of kratten,
– vastzetten van veiligheidssystemen voor het vervoer
enz. op voertuigen en wagons
23. Koppel de slang niet af met uw vinger aan de trekker.
Als u de slang afkoppelt met uw vinger aan de trekker,
bestaat het gevaar dat het apparaat spontaan een
niet afschiet wanneer u de volgende keer de slang
aankoppelt, of anderszins niet naar behoren functioneert.
24. Koppel de slang af en verwijder alle nieten die nog
in het magazijn zitten na gebruik.
Koppel het pneumatisch gereedschap van de luchtdruk
af voor u onderhoudswerkzaamheden uit gaat voeren,
een vastzittende niet gaat verwijderen, de werkplek gaat
verlaten, het pneumatisch gereedschap naar een andere
plaats gaat brengen, of nadat u het apparaat gebruikt
hebt. Het is levensgevaarlijk de luchtdruk aangekoppeld
te houden en het risico te lopen dat per ongeluk een niet
afgeschoten wordt.
25. Wanneer u een niet die vast is komen te zitten gaat
verwijderen, moet u er allereerst op letten dat u de
slang afkoppelt en gecomprimeerde lucht die zich
nog in het apparaat bevindt laat ontsnappen.
Het kan zeer gevaarlijk zijn wanneer bijvoorbeeld de niet
opeens loskomt en dan alsnog afgeschoten wordt.
26. Om de risico’s van vallende nieten te vermijden moet
u nooit het magazijn openen terwijl het apparaat
naar beneden gericht is terwijl u nieten laadt.
27. Een ‘vrouwelijke’ aansluiting (pneumatische
koppeling) mag niet in dit apparaat gebruikt worden.
Als een dergelijke aansluiting is geïnstalleerd, is het
soms niet mogelijk om de gecomprimeerde lucht in
het apparaat te laten ontsnappen wanneer de slang
afgekoppeld wordt.
Vermijd het gebruik hiervan dus. Het pneumatisch
gereedschap en de slang voor de luchttoevoer moeten
een koppeling hebben die toestaat dat de in het apparaat
aanwezige gecomprimeerde lucht weg kan wanneer de
slang afgekoppeld wordt.
28. Tijdens gebruik van het gereedschap moet de
gebruiker een geschikte, maar ergonomische
houding aannemen.
32
Zorg dat u stevig staat en vermijd ongemakkelijke
houdingen of dat u uit balans bent.
29. Als de gebruiker symptomen ervaart zoals
aanhoudend of herhaald ongemak, pijn,
kloppingen, steken, tintelingen, gevoelloosheid,
een branderig gevoel of stijfheid, negeer deze
waarschuwingssignalen dan niet.
De gebruiker moet een gekwalifi ceerde
gezondheidsdeskundige raadplegen over al zijn
activiteiten.
30. Langdurig doorlopend en repetitief werk kan leiden
tot stoornissen in spier- en botweefsel.
Werk niet langdurig in dezelfde lichamelijke houding en
oefen niet langdurig overmatig veel kracht uit.
Neem regelmatig rust, zeker als u zich moe voelt.
31. Uitglijden, struikelen en vallen zijn belangrijke
oorzaken van letsel op de werkplek.
Houd rekening met gladde oppervlakken die worden
veroorzaakt door het gebruik van het gereedschap en
ook met het gevaar op struikelen veroorzaakt door de
luchtslang.
32. Wees vooral voorzichtig in een onbekende
omgeving.
Er kunnen verborgen gevaren bestaan, zoals elektriciteit
of andere nutsleidingen.
33. Zorg ervoor dat er geen elektriciteitskabels,
gasleidingen enz. aanwezig zijn die een gevaar
zouden kunnen vormen indien ze worden
beschadigd door gebruik van het gereedschap.
34. Bij de risicobeoordeling moet ook worden gekeken
naar het ontstaan van stof door gebruik van het
gereedschap, en naar mogelijk aanwezig stof dat
wordt opgeblazen.
35. Richt de afvoer zodanig dat in een stoffi ge ruimte
het stof zo min mogelijk wordt verstoord.
36. Wanneer er gevaren met stof of de afvoer ontstaan,
is het belangrijk deze bij de bron aan te pakken.
37. Informatie om een risicobeoordeling van deze
gevaren uit te voeren en implementatie van
passende maatregelen is van essentieel belang.
38. Blootstelling aan trillingen kan leiden tot schade
aan de zenuwen en bloedtoevoer van de handen en
armen.
39. Draag warme kleding wanneer u in koude
omstandigheden werkt, houd uw handen warm en
droog.
40. Als u gevoelloosheid, tintelingen, pijn of wit worden
van de huid in uw vingers of handen ervaart, dient u
medisch advies in te winnen van een gekwalifi ceerde
bedrijfsarts over al uw activiteiten.
41. Bedien en onderhoud het gereedschap zoals
aanbevolen in deze instructies om onnodige
toename van trillingen te voorkomen.
42. Houd het gereedschap met een lichte, maar veilige
grip vast, omdat het risico van trillingen over het
algemeen groter is wanneer de grijpkracht hoger is.
43. Bij het reinigen van het gereedschap mag u in
geen geval gebruik maken van benzine of andere
ontvlambare vloeistoff en.
Wanneer de dampen van een ontvlambare vloeistof in
het elektrisch gereedschap terechtkomen bestaat er
het risico dat er tijdens het nieten enz. vonken worden
geproduceerd die tot een ontploffi ng kunnen leiden.
Page 33
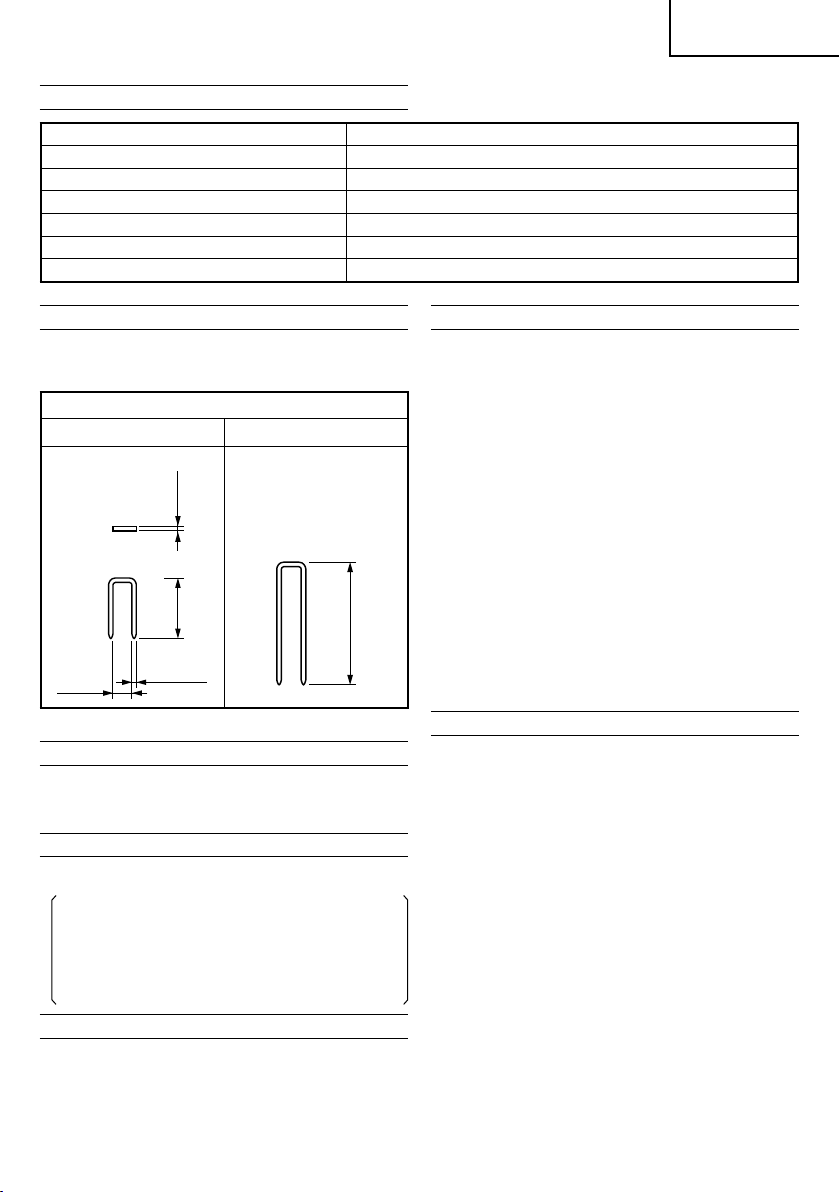
TECHNISCHE GEGEVENS
Krachtbron Reciprocerende zuiger
Luchtdruk (Drukmeter) 4,9 – 8,3 bar
Bruikbare nieten zie Afb.
Aantal te laden nieten 150 nieten
Afmetingen 365 mm (L) × 258 mm (H) × 76 mm (W)
Gewicht 2,0 kg
Slang (binnen diameter) 6 mm
Nederlands
NIETSELECTIE
Kies een geschikte niet op de Afbeelding. Nieten die niet
op de Afbeelding staan kunnen niet gebruikt worden in dit
apparaat.
Maat 16 7/16 inch bovenaan
Min. Max.
1,61 mm25 mm
50 mm
7,9 mm
1,45 mm
Afmetingen van de nieten
STANDAARD ACCESSOIRES
(1) Inbussleutel voor een M5 schroef ................................. 1
(2) Veiligheidsbril ................................................................ 1
(3) Zelfsmeernippel ............................................................ 1
OPTIONELE ACCESSOIRES
○ Continu nietmechanisme kit (codenr. 876762)
(Continu nieten onderdelenset, enkelschots onderdelen)
Met deze set op het apparaat, zal er alleen een niet
worden afgeschoten wanneer de trekker gebruikt wordt
nadat de veiligheidshendel is ingedrukt.
Door deze onderdelen te installeren kunt u voorkomen
dat nieten onverwachts worden afgevuurd, of terwijl het
apparaat zich in een verkeerde positie bevindt omdat
per ongeluk de veiligheidshendel werd ingedrukt.
TOEPASSINGEN
○ Werkzaamheden in de bouw zoals het aanbrengen van
wanden, en ondervloeren.
○ Bouw van mobiele en prefab woningen.
VOORBEREIDINGEN VOOR HET GEBRUIK
1. Leg de slang klaar
Let er op dat de gebruikte slang een minimum binnen
diameter heeft van 6 mm.
OPMERKING
De slang voor de luchttoevoer moet een minimum
werkdruk belasting hebben van 12,8 bar of 150 procent
van de maximum luchtdruk die door het pneumatisch
systeem geleverd kan worden, als dat een hogere
belasting oplevert.
2. Veiligheidscontrole
VOORZICHTIG
○ Onbevoegden (inclusief kinderen) moeten ver van dit
pneumatisch gereedschap vandaan gehouden worden.
○ Draag een veiligheidsbril.
○ Controleer of de schroeven die de uitlaat afdekking enz.
vastzetten goed aangedraaid zijn.
Controleer of het apparaat lekken vertoont en of er
kapotte of verroeste onderdelen zijn.
○ Controleer of de veiligheidshendel naar behoren
functioneert. Controleer ook of de bewegende
onderdelen van de veiligheidshendel niet vuil geworden
zijn.
○ Controleer nogmaals of het veilig is het pneumatisch
gereedschap te gaan gebruiken.
VOOR GEBRUIK
1. Controleer de luchtdruk
VOORZICHTIG
De luchtdruk moet constant gehandhaafd blijven op 4,9 –
8,3 bar.
Stel de luchtdruk bij in het bereik van 4,9 – 8,3 bar, al
naar gelang de doorsnee en de lengte van de nieten
en de hardheid van het te nieten materiaal. Let speciaal
op de uitgangsdruk, de capaciteit en de pijpen en
aansluitingen op de compressor, zodat de luchtdruk niet
de voorgeschreven grenzen overschrijdt. Wij wijzen u er
op dat te hoge druk de prestaties van het apparaat, de
levensduur en de veiligheid kan aantasten.
2. Smering
(1) Voordat u dit nietapparaat gaat gebruiken moet u er op
letten dat er tussen dit apparaat en de compressor een
Luchttoevoer Set gemonteerd is. Smering door middel
van de zelfsmeernippel uit de Set zorgt voor een soepele
werking, langere levensduur en bescherming tegen
roest.
Stel de zelfsmeernippel zo af dat een enkele druppel olie
wordt gegeven om de 5 a 10 niet-acties.
(2) Wij adviseren u de aanbevolen olie (SHELL TONNA)
te gebruiken. Andere geschikte oliesoorten staan
aangegeven. Meng nooit twee of zelfs meer verschillende
soorten olie.
33
Page 34

Nederlands
3. Spijkers laden
VOORZICHTIG
○ Tijdens het laden van nieten in het nietapparaat,
(1) druk niet de trekker in;
(2) druk niet de drukhefboom in; en
(3) houd uw gezicht, handen, voeten en andere
lichaamsdelen, en ook die van andere personen, uit
de buurt van de opening van het neusstuk, om letsel
tijdens het gebruik en het dragen te voorkomen.
(1) Trek de nietentoevoer naar achteren en zet deze goed
vast in een groef in het magazijn. (Zie Afb. 2)
(2) Plaats de nietenstrip over het magazijn.
Zorg ervoor dat de nietenstrip vrij kan bewegen over het
magazijn. (Zie Afb. 3)
(3) Trek de nietentoevoer naar achteren, maak deze los
uit de groef in het magazijn en breng hem vervolgens
zachtjes terug terwijl u ervoor zorgt dat er niets klem komt
te zitten. (Zie Afb. 4)
Het nietapparaat is nu klaar voor gebruik.
VOORZICHTIG
○ Als de nietentoevoer ineens wordt losgelaten, kan deze
ineens terugschieten waardoor nieten vervormd en/
of beschadigd kunnen raken, hetgeen kan leiden tot
vastlopers.
Daarom moet u de nietentoevoer rustig terugbrengen en
ervoor zorgen dat er niets klem zit.
○ Om te voorkomen dat het apparaat per ongeluk afgaat,
mag u nooit de trekker overhalen of de tip van de
drukhefboom op de werkbank of de vloer laten rusten.
De nietuitgang mag niet in de richting van een persoon
wijzen.
GEBRUIK VAN HET NIETAPPARAAT
VOORZICHTIG
○ Gebruik de body of enig ander deel van het gereedschap
niet als een hamer, want hierdoor kunnen er per ongeluk
nieten worden uitgeschoten of het gereedschap kan
beschadigd raken en dit kan tot serieus letsel leiden.
○ Neem uw voorzorgen om de veiligheid van personen in
de buurt te waarborgen.
○ Zorg er ten alle tijde voor dat het gereedschap veilig op
het werkstuk staat en er niet af kan glijden.
○ Draag nooit een pneumatisch gereedschap aan de slang.
○ Sleep nooit een pneumatisch gereedschap aan de slang.
1. Nieten
(1) Nieten van een enkele niet
Druk de niet-uitlaat op de plek waar u de niet in het
werkstuk wilt slaan; haal nu de trekker over om een
enkele niet in het werkstuk te drijven. (Zie Afb. 6)
VOORZICHTIG
○ Dit gereedschap kan snel achter elkaar een reeks nieten
afvuren wanneer u het te hard tegen het oppervlak van
het werkstuk aan drukt of wanneer het gebruikt wordt op
harde materialen. In dergelijke gevallen dient u de nieten
af te vuren door de trekker over te halen en direct weer
los te laten.
(2) Veiligheidshendel
Wanneer u de niet-uitgang indrukt, moet u er op letten dat
de veiligheidshendel helemaal omhoog gaat (Zie Afb. 6)
om de veiligheidsvergrendeling op te heff en. Er kan met
andere woorden niet geniet worden als de vergrendeling
niet opgeheven is, zelfs al is de trekker overgehaald.
(3) Doorlopend nieten
Haal eerst de trekker over. Druk vervolgens het apparaat
op de gewenste plekken tegen het werkstuk om
automatisch nieten af te vuren. (Zie Afb. 7)
VOORZICHTIG
○ Wees voorzichtig wanneer u de hoeken van stukken
hout wilt nieten. Zeker bij het contact-nieten op hoeken,
34
kunnen er gemakkelijk nieten door de hoek heen dringen
of afketsen.
○ Vuur geen nieten af op andere nieten.
○ Vuur geen nieten af op metalen onderdelen.
OPMERKING
○ Voorzorgen met betrekking tot ongeladen nieten.
Soms gaat het apparaat door met nieten terwijl het
magazijn al leeg is. Dit noemen we “ongeladen nieten”.
Dit is slecht voor het apparaat, voor het magazijn en
voor de niettoevoer. Om ongeladen nieten te voorkomen,
dient u zo nu en dan te kijken of er nog voldoende nieten
in het magazijn zitten. U moet er natuurlijk wel voor
blijven zorgen dat na gebruik alle nieten uit het apparaat
verwijderd worden.
○ Na het nieten,
(1) de slang van het nietapparaat afkoppelen;
(2) alle nieten uit het nietapparaat halen;
(3) breng 5 - 10 druppels HiKOKI smeerolie voor
pneumatische gereedschappen aan in de luchtplug
van het spijkergereedschap; en
(4) open het kraantje van de luchtcompressortank om
eventueel vocht te verwijderen.
○ Bij lage temperaturen zal het apparaat soms
niet naar behoren functioneren. Gebruik het
pneumatisch gereedschap alleen bij geschikte
omgevingstemperaturen.
2. Instellen van de nietdiepte
Om er zeker van te zijn dat alle nieten tot dezelfde diepte
worden ingeslagen moet u ervoor zorgen dat:
(1) de luchtdruk voor het nietapparaat constant blijft
(gebruik daarvoor een goed werkende regulateur) en
dat
(2) het nietapparaat altijd stevig tegen het werkstuk
wordt gedrukt.
Als de nieten te diep of te ondiep in het werkstuk worden
geslagen, dient u dit als volgt te corrigeren.
VOORZICHTIG
○ Voor u deze instelling verricht moet u de
persluchtslang loskoppelen en de in het apparaat
aanwezige perslucht laten ontsnappen.
○ Houd uw vinger nooit aan de trekker bij het instellen.
○ Zorg ervoor dat er zich bij het instellen nooit een
lichaamsdeel, hand of been of iets dergelijks voor de
nietuitlaat bevindt.
Voer de instelling als volgt uit. (Zie Afb. 8)
Om in te stellen hoe diep een niet wordt ingeslagen, dient
u de schroef waarmee de drukhendel assemblage vast
zit los te draaien.
Als de nieten te diep worden ingeslagen, moet u de
drukhendel assemblage iets naar beneden doen, en
als de nieten te ondiep worden ingeslagen, moet u de
drukhendel assemblage iets naar boven doen.
Zet tenslotte de drukhendel assemblage weer vast met
de schroef.
OPMERKING
○ Gebruik de minimale persluchtdruk die nodig is om de
nieten tot de gewenste diepte in te slaan. Als u een te
hoge druk gebruikt, zal de levensduur van de zuiger en
andere onderdelen bekort worden.
INSPECTIE EN ONDERHOUD
VOORZICHTIG
Let er op dat u de slang afkoppelt wanneer u vastzittende
nieten verwijdert, het apparaat schoonmaakt,
inspecteert, of er onderhoud aan pleegt.
1. Verhelpen van vastgelopen nieten
(1) Verwijder alle nieten.
(2) Maak de vergrendeling los en open de geleider. (Zie
Afb. 9)
Page 35

Nederlands
(3) Verwijder de vastgelopen niet met behulp van een
schroevendraaier. (Zie Afb. 10)
(4) Sluit de geleider en de vergrendeling.
(5) Als het apparaat vaak vastloopt, dient u een erkend
HiKOKI onderhoudscentrum te raadplegen.
2. Inspectie en onderhoud
U moet het apparaat regelmatig inspecteren.
(1) Verwijder de vier inbusbouten waarmee het uitlaatdeksel
vast zit en haal het uitlaatdeksel los. Vervolgens kunt u de
cilinder, de zuiger en andere onderdelen demonteren in
hun respectievelijke montage-groepen.
Veeg het drijfbit, het op en neer bewegende deel van de
zuiger en de binnenkant van de behuizing schoon met
een doek om het daar opgehoopte vuil te verwijderen.
(2) Controleer of de zuigerdemper naar behoren functioneert.
Een beschadigde zuigerdemper kan andere onderdelen
beschadigen.
(3) Controleer de zuigerring zorgvuldig op slijtage wanneer u
het apparaat demonteert. Een versleten of beschadigde
zuigerring heeft een negatieve invloed op de prestaties
van het apparaat. Vervang een versleten of beschadigde
zuigerring onmiddellijk door een nieuwe.
(4) Smeer de zuigerring voor u het apparaat weer in elkaar
zet (Attolub No. 2 Vet). Smeer het apparaat met de
aanbevolen olie.
3. Controleer de schroeven waar alle onderdelen mee
vast zitten.
Controleer regelmatig of er ergens een schroef los zit en
of er geen lekken zijn. Draai eventueel losse schroeven
weer vast. Het is gevaarlijk om het apparaat te gebruiken
als er schroeven los zitten.
4. Inspecteren van de veiligheidshendel
Controleer of de veiligheidshendel (Afb. 1) soepel kan
bewegen.
Maak de bewegende delen van de veiligheidshendel
schoon en smeer ze geregeld met de meegeleverde
smeerolie. Door geregeld schoon te maken en te smeren
zorg u ervoor dat de veiligheidshendel soepel blijft
functioneren en gaat u de vorming van roest tegen.
5. Opslag
○ Wanneer u het apparaat voor langere tijd niet zult
gebruiken, kunt u het beste een dunne laag machineolie
aanbrengen op de stalen onderdelen van het apparaat
om roest tegen te gaan.
○ Het nietapparaat mag niet in een koude omgeving
worden opgeslagen.
Bewaar het nietapparaat in een warme omgeving.
○ Wanneer het nietapparaat niet gebruikt wordt moet het
op een warme en droge plaats worden opgeborgen.
Buiten bereik van kinderen houden.
VOORZICHTIG
Bij gebruik en onderhoud van elektrisch gereedschap
dienen de in het land waar u zich bevindt geldende
veiligheidsregelgeving en veiligheidsstandaarden stipt te
worden opgevolgd.
COMPRESSOR
VOORZICHTIG
Wanneer de maximum luchtdruk van de compressor
de 8,3 bar overschrijdt, dient u er voor te zorgen dat
er een reductieklep tussen de compressor en het
nietapparaat is aangebracht. Vervolgens stelt u de aan
het nietapparaat geleverde luchtdruk bij tot deze binnen
het bereik van 4,9 - 8,3 bar valt. Als ook de Luchttoevoer
Set gemonteerd is, is het ook mogelijk de smering van
het apparaat op zeer gemakkelijke wijze uit te voeren.
ZELFSMEERNIPPEL-FILTER-REDUCTIEKLEP
(Luchttoevoer set)
Wij bevelen aan het nietapparaat altijd met deze set,
bestaande uit een zelfsmeernippel, een fi lter en een
reductieklep, te gebruiken zodat u het apparaat altijd onder
de meest gunstige omstandigheden kunt gebruiken. Let u er
alstublieft op dat de slang tussen de set en het nietapparaat
niet langer mag zijn dan 10 m. (Afb. 11)
GESCHIKTE SMEERMIDDELEN
Type smeermiddel Naam van het smeermiddel
Aanbevolen olie SHELL TONNA
Motorolie SAE 10W, SAE 20W
Turbine olie
Geluidsinformatie
Geluidskarakteristiek-waarden in overeenstemming met EN
ISO 11148-13:2018
Het typische A-zwaarte enkele geluidssterkteniveau
L
Het typische A-zwaarte enkele geluidsdrukniveau op de
werkplek L
Onzekerheid K: 2,5 dB (A)
Deze waarden zijn gereedschap-gerelateerde karakteristieke
waarden en geven niet het geproduceerde geluid op het
moment van daadwerkelijk gebruiken van het apparaat
weer. Het geproduceerde geluid tijdens het werken met het
apparaat hangt bijvoorbeeld ook af van de werkomgeving,
het stuk waaraan gewerkt wordt, hoe dat stuk ondersteund
wordt, het aantal nieten dat ingeslagen wordt enz.
Afhankelijk van de omstandigheden op de werkplek en de
vorm van het stuk waaraan gewerkt wordt, is het nodig om
persoonlijke beschermingsmiddelen toe te passen, zoals
het plaatsen van het werkstuk op een geluiddempende
ondergrond, voorkomen van vibratie van het werkstuk door
het vast te klemmen of te bedekken, minimaliseren van de
benodigde luchtdruk enz.
In speciale gevallen zal het nodig zijn om oorbeschermers
te dragen.
Trillingsinformatie
De typische trillingskarakteristiek waarde in overeenstemming
met EN ISO 11148-13:2018, 2000: 3,9 m/s
Onzekerheid K = 1,5 m/s
Deze waarde is een gereedschap-gerelateerde
karakteristieke waarde en geeft niet de invloed op het handarm-systeem op het moment van daadwerkelijk gebruiken
van het apparaat weer. De invloed op het hand-arm-systeem
bij het gebruiken van dit apparaat hangt bijvoorbeeld ook af
van de kracht waarmee men het apparaat beet houdt, van
de kracht waarmee het apparaat tegen het werkoppervlak
gedrukt wordt, de richting waarin geniet wordt, de afstelling
van de luchttoevoer, het stuk waaraan gewerkt wordt, hoe dat
ondersteund is enz.
2
ISO VG32 - 68
(#90 - #180)
WA, 1s,d= 99 dB
pA, 1s,d= 81 dB
2
.
35
Page 36

Español
(Traducción de las instrucciones originales)
PRECAUCIONES PARA LAS OPERACIONES EN
GENERAL
ADVERTENCIA
Lea todas las advertencias de
seguridad, instrucciones, ilustraciones y
especifi caciones suministradas con esta
No seguir todas las instrucciones detalladas a continuación
puede provocar lesiones graves.
Guarde todas las advertencias e instrucciones para
poder consultarlas en el futuro.
1. Opere la herramienta eléctrica de forma segura y
No la emplee para otros usos que no sean los
2. Para llevar a cabo una operación segura, maneje la
Siga las instrucciones dadas en este manual de
3. Confi rme la seguridad del lugar de trabajo.
Mantenga alejadas del lugar de trabajo a las personas no
Especialmente deben mantenerse alejados a los niños.
4. Coloque las partes correspondientes en sus lugares
No extraiga ninguna de las cubiertas ni los tornillos.
Además, puesto que podría ser peligroso, no efectúe
5. Compruebe la herramienta antes de usarla.
Antes de usar la herramienta, compruebe que ninguna
6. El trabajo excesivo puede causar accidentes.
No haga funcionar la herramienta y sus accesorios
7. Detenga la operación inmediatamente si nota
Pare la operación si se da cuenta de alguna anormalidad
8. Trate bien y con cuidado la herramienta eléctrica.
Si se le cae o golpea la herramienta eléctrica contra algo,
No utilice nunca la herramienta eléctrica si encuentra
9. Cuide bien la herramienta para que tenga una vida
Cuide siempre la herramienta eléctrica y manténgala
10. Efectúe una inspección a intervalos regulares
Inspeccione la herramienta eléctrica a intervalos
36
herramienta eléctrica.
correctamente.
especifi cados en este manual de instrucciones.
herramienta eléctrica correctamente.
instrucciones y emplee la herramienta de la forma
indicada para asegurar una operación segura. Nunca
permita su uso a niños o personas que no conozcan la
herramienta y su funcionamiento ni a personas que no
puedan emplearla correctamente.
autorizadas.
de forma correcta.
Manténgalos en su lugar puesto que tienen sus
funciones.
nunca modifi caciones en la herramienta ni la emplee
después de haber hecho modifi caciones.
de sus partes esté rota, que todos los tornillos estén bien
apretados y que no haya partes perdidas ni oxidadas.
más allá de sus capacidades. El trabajo excesivo no
solamente dañará la herramienta eléctrica sino que la
convertirá en un aparato peligroso.
alguna anormalidad.
o si la herramienta eléctrica no funciona correctamente.
Haga que le inspeccionen y reparen la herramienta si es
necesario.
el bastidor exterior podría deformarse y agrietarse, o
podrían ocurrir otro tipo de daños, por lo tanto manéjela
siempre con mucho cuidado. Tampoco no raye ni grabe
nada en la herramienta eléctrica. Debido al aire a alta
presión que hay dentro de la herramienta, las grietas en
su superfi cie pueden resultar peligrosas.
alguna grieta y si hay fugas de aire.
de servicio larga.
limpia.
puesto que es esencial para la seguridad.
regulares para poder operarla con seguridad y
efi cientemente en todo momento.
11. Lleve la herramienta a un agente de servicio
autorizado si es necesario efectuar alguna
reparación o reemplazo de alguna parte.
Asegúrese de que la herramienta eléctrica es revisada
solamente por un agente de servicio autorizado y que
solamente se emplean partes de reemplazo idénticas
autorizadas.
12. Mantenga la herramienta eléctrica en un lugar
apropiado.
Cuando no la utilice, deberá guardarla en un lugar seco
fuera del alcance de los niños. Vierta en el cuerpo de la
herramienta unos 2 cc de aceite a través de la junta de la
manguera para protegerla contra la oxidación.
13. El plano de montaje detallado de este manual de
instrucciones debe ser utilizado solamente por el
agente de servicio autorizado.
14. Sujete la herramienta fi rmemente y esté preparado
para administrar el retroceso.
15. Guarde las herramientas eléctricas fuera del
alcance de los niños y no permita que personas no
familiarizadas con ellas o con estas instrucciones
operen la herramienta.
Las herramientas eléctricas son peligrosas en manos de
personas no capacitadas.
16. No modifi que la herramienta clavadora. Las
modifi caciones pueden reducir la efectividad de las
medidas de seguridad y suponer un mayor riesgo
para el operador y/u otras personas
17. Mantenimiento de las herramientas eléctricas y
accesorios. Compruebe si hay desalineación o
unión de piezas móviles, rotura de piezas y cualquier
otra condición que pueda afectar el funcionamiento
de la herramienta eléctrica. Si está dañada, haga
reparar la herramienta eléctrica antes de utilizarla.
Muchos accidentes son causados por un mantenimiento
defi ciente de las herramientas eléctricas.
18. No se estire demasiado. Mantenga un apoyo fi rme
sobre el suelo y conserve el equilibrio en todo
momento.
Ello le permitirá controlar mejor la herramienta eléctrica
en caso de presentarse una situación inesperada.
19. Mantenga alejados a los niños y otras personas al
utilizar la herramienta eléctrica.
Las distracciones pueden hacer que pierda el control.
PRECAUCIONES SOBRE EL USO DE LA
GRAPADORA
1. Emplee la herramienta correctamente para que la
operación sea segura.
Esta herramienta ha sido diseñada para introducir grapas
en madera y materiales similares. Empléela solamente
para los propósitos indicados.
2. Asegúrese de que la presión de aire se encuentra
dentro del valor nominal de presión de aire.
Las herramientas de sujeción operadas por aire
comprimido deben conectarse sólo a líneas de aire
comprimido donde la presión máxima permitida no
pueda ser superada por un factor superior al 10%, que
por ejemplo puede obtenerse mediante una válvula
de reducción de presión que incluya una válvula de
seguridad descendente.
(Para el modelo N5008AC2, 110% de la presión nominal
máxima permitida es de 9,1 bar = 130 psi)
Las herramientas de sujeción operadas por aire
comprimido deben utilizarse sólo a presión más reducida
requerida para el proceso de trabajo a mano, con el fi n de
evitar niveles elevados de ruido innecesarios, un mayor
desgaste y fallos.
Page 37
Español
3. No opere nunca el equipo con gases a alta presión
que no sean aire comprimido.
No utilice nunca dióxido de carbono, oxígeno u otro
gas sellado en un contenedor a presión bajo ninguna
circunstancia.
4. Tenga cuidado para evitar fuegos y explosiones.
Puesto que pueden salir disparadas chispas durante
la operación de grapado, es muy peligroso emplear
la herramienta cerca de lacas, pinturas, bencinas,
disolventes, gasolina, adhesivos y sustancias
infl amables similares puesto que podrían encenderse
o explotar. Bajo ninguna circunstancia deberá emplear
esta herramienta en la vecindad de tales materiales
infl amables.
5. Protéjase siempre los ojos (con unas gafas
protectoras).
Existe una gran posibilidad de que salgan disparados
fragmentos de las grapas o incluso las mismas grapas, lo
que es una amenaza para los ojos. Protéjase siempre los
ojos mientras opera la herramienta. Puede protegerse los
ojos con unas gafas protectoras o también ponerse una
máscara de visión amplia encima de gafas graduadas si
es que las lleva.
Los encargados deben siempre hacer obligatorio el
empleo de protección para los ojos.
6. Protéjase los oídos y la cabeza.
llevan orejeras y protección en la cabeza. La exposición
sin protección a altos niveles de ruido puede causar
pérdida permanente, incapacitante, de la audición y
otros problemas como el tinnitus (pitidos, silbidos o
zumbidos en los oídos).
La evaluación de riesgos y la implementación de
controles apropiados para estos peligros son esenciales.
Los controles apropiados para reducir el riesgo pueden
incluir acciones como la amortiguación de materiales
para evitar que las piezas “suenen”.
Opere y mantenga la herramienta como se recomienda
en estas instrucciones, para evitar un aumento
innecesario en los niveles de ruido.
7. Ponga mucha atención en los que trabajan cerca de
usted.
Sería muy peligroso si las grapas que no se introducen
correctamente golpearan a otras personas. Por lo tanto,
ponga siempre mucha atención a la seguridad de las
personas que pueda haber en los alrededores cuando
emplee la herramienta. Asegúrese siempre de que el
cuerpo, manos o pies de ninguna persona estén cerca
de la salida de las grapas.
8. No dirija nunca la salida de las grapas hacia ninguna
persona.
Piense que la herramienta siempre está cargada con
grapas.
Si dirige la salida de las grapas hacia alguna persona,
podría causar accidentes muy serios si por error
se descargara la herramienta. Cuando conecte y
desconecte la manguera, durante la recarga de grapas
u operaciones similares, asegúrese de que la salida de
las grapas no está encarada hacia ninguna persona
(incluido usted mismo). Incluso cuando sabe que no
hay ninguna grapa en la herramienta es peligroso
Cuando opere la herramienta eléctrica,
siempre protéjase los ojos y asegúrese de
que las personas que puedan encontrarse en
los alrededores también se los hayan
protegido.
Cuando tenga que efectuar un trabajo de
grapado póngase orejeras y protección en la
cabeza. También, dependiendo de las
condiciones, asegúrese de que las personas
que pueda haber en los alrededores también
descargarla mientras la dirige hacia alguien, por lo tanto
no lo haga nunca. No se suba encima de la herramienta.
Respétela como herramienta de trabajo que es.
9. Antes de emplear la herramienta eléctrica,
compruebe la palanca de empuje.
Puede dejar la herramienta en una superfi cie nivelada,
tal como se muestra en la Fig. 5.
Asegúrese de no aplicar la fuerza hacia abajo sobre la
herramienta en la medida en que la palanca de empuje
esté enganchada.
Antes de emplear la herramienta asegúrese de que la
palanca de empuje y la válvula operan correctamente. Sin
grapas cargadas en la herramienta, conecte la manguera
y compruebe lo siguiente. Si se escucha sonido de
operación indica una falla, por lo tanto no emplee la
herramienta hasta que haya sido inspeccionada y
reparada.
○ Si al pulsar meramente el gatillo se escucha el
sonido de operación o si ocurre el movimiento de la
broca de impulsión, signifi ca que la herramienta está
defectuosa.
○ Si al pulsar meramente la palanca de empuje contra
el material donde va a efectuar el grapado se escucha
el sonido de operación o si ocurre el movimiento de la
broca de impulsión, signifi ca que la herramienta está
defectuosa.
Además, con respeto a la palanca de empuje,
tenga en cuenta que no debe nunca modifi carse ni
extraerse.
10. Emplee solamente las grapas especifi cadas.
No emplee nunca otras grapas que no sean los
especifi cadas y descritas en este manual de instrucciones.
11. No modifi que la herramienta para clavar elementos
de fi jación.
Las modifi caciones pueden reducir la efectividad de las
medidas de seguridad y aumentar los riesgos para el
operador y/o el espectador.
12. Tenga cuidado cuando conecte la manguera.
Cuando conecte la manguera y cargue las grapas,
asegúrese de lo siguiente para no accionar la herramienta
por error.
○ No toque el gatillo.
○ No permita que el cabezal de disparo se ponga en
contacto con ninguna superfi cie.
○ Mantenga el cabezal de disparo hacia abajo.
Observe estrictamente las instrucciones de arriba
y asegúrese siempre de que ninguna parte de su
cuerpo, manos o pies se encuentra delante de la
salida de los clavos.
13. Tenga cuidado al manejar los elementos de fi jación,
especialmente durante la carga y descarga, ya que
los elementos de fi jación tienen puntos afi lados que
podrían causar lesiones.
14. No coloque descuidadamente el dedo en el gatillo.
No coloque el dedo en el gatillo excepto cuando vaya
a efectuar la operación de grapado. Si transporta la
herramienta o se la pasa a alguien teniendo usted el dedo
en el gatillo, podría descargar inadvertidamente una grapa
causando un accidente serio.
15. Cierre completamente la guía de las grapas y no la
abra durante la operación.
Si intenta efectuar el grapado mientras la guía de las
grapas está abierta, las grapas no serán grapados en el
madero, y existe el peligro de una descarga peligrosa.
16. Presione fi rmemente la salida de las grapas contra
el material donde vaya a efectuar el grapados.
Cuando introduzca las grapas, presione fi rmemente
la salida de las grapas contra el material donde vaya a
efectuar el grapado. Si la salida no está correctamente
colocada, las grapas rebotarán.
37
Page 38

Español
17. Mantenga las manos y pies alejados del cabezal de
disparo durante la operación.
Es muy peligroso si una grapa se clavase en una mano o
pie por error.
18. Durante la operación, los desechos de la pieza de
trabajo y el sistema de fi jación/colación pueden ser
descargados.
19. Tenga en cuenta el retorno de la herramienta.
No acerque la parte superior de la herramienta
a su cabeza, etc., durante la operación. Es muy
peligroso puesto que la herramienta podría retroceder
violentamente si la grapa que está siendo introducida
contactara con otra grapa que ya estuviera introducida
en la madera.
20. Tenga cuidado cuando efectúe el grapado en
tableros delgados o en las esquinas de la madera.
Cuando efectúe el grapado en tableros delgados, las
grapas pueden traspasarlos, así como también cuando
grape las esquinas de madera debido a la desviación de
las grapas. En tales casos, asegúrese siempre de que no
haya nadie (ni ninguna mano, pie, etc., de nadie) detrás
del tablero o cerca de la madera que vaya a grapar.
21. El grapado simultáneo en ambos lados de la misma
pared es peligroso.
Bajo ninguna circunstancia deberá grapar en ambos
lados de una pared a la vez. Podría ser muy peligroso
puesto que las grapas podrían pasar a través de la pared
y causar daños personales.
22. No utilice la herramienta sobre andamios o
escaleras.
La herramienta no deberá utilizarse para aplicaciones
específi cas, como por ejemplo:
– cuando el cambio de un sitio de trabajo a otro
implica el uso de andamiaje, escalones, escaleras, o
construcciones similares,
– cierre de cajas o jaulas,
– fi jación de sistemas de seguridad para el transporte,
por ej., en vehículos y vagones
23. No desconecte la manguera con el dedo en el
gatillo.
Si desconecta la manguera con el dedo en el gatillo,
la siguiente vez que conecte la manguera existirá
el peligro de que la herramienta dispare una grapa
espontáneamente o que opere incorrectamente.
24. Desconecte la manguera y saque las grapas que
hayan quedado en el cargador después del uso.
Desconecte el aire de la herramienta antes de efectuar el
mantenimiento, extraer una grapa atascada, abandonar
el lugar de trabajo, mover la herramienta a otro lugar o
después de usarla. Es muy peligroso dejar grapas en
la herramienta puesto que podrían ser dispara das por
accidente.
25. Cuando extraiga una grapa que se ha atascado,
asegúrese de desconectar primero la manguera y
de liberar el aire comprimido.
Cuando extraiga una grapa que se ha atascado, primero
asegúrese de desconectar la manguera y liberar el aire
comprimido que hay dentro de la misma.
El disparo accidental de una grapa puede resultar muy
peligroso.
26. Para evitar peligros causados por grapas que se
caen, no abra nunca el cargador con el aparato
encarado hacia abajo mientras carga las grapas.
27. En el cuerpo de la herramienta no debe emplearse
una clavija hembra (enchufe de aire).
Si instala una clavija hembra en el cuerpo de la
herramienta, a veces el aire comprimido no podrá ser
dirigido cuando la manguera está desconectada, por lo
tanto evítelo.
La herramienta y la manguera de suministro de aire
deben tener un acoplamiento de manguera para extraer
toda la presión de la herramienta al desconectar la junta
del acoplamiento.
28. Mientras utiliza una herramienta, el operador debe
adoptar una postura adecuada pero ergonómica.
Mantenga una posición segura y evite posturas
incómodas o desequilibradas.
29. No ignore estas señales de advertencia si el
operador experimenta síntomas como molestias
persistentes o recurrentes, dolor, palpitaciones,
hormigueo, entumecimiento, sensación de ardor o
rigidez.
El operador deberá consultar a un profesional de la salud
califi cado con respecto a las actividades generales.
30. El trabajo continuo y repetitivo durante un
tiempo prolongado puede producir trastornos
musculoesqueléticos.
No siga trabajando con la misma postura o aplicando
una fuerza excesiva durante mucho tiempo.
Descanse periódicamente, especialmente cuando se
sienta cansado.
31. Resbalones, tropezones y caídas son las principales
causas de lesiones en el lugar de trabajo.
Tenga en cuenta las superfi cies resbaladizas causadas
por el uso de la herramienta y también los peligros de
tropiezos causados por la manguera.
32. Proceda con un cuidado adicional en entornos
desconocidos.
Pueden existir peligros ocultos, como líneas eléctricas u
otras líneas de servicios públicos.
33. Asegúrese de que no haya cables eléctricos,
tuberías de gas, etc. que puedan causar un peligro
si se dañan con el uso de la herramienta.
34. La evaluación de riesgos debe incluir el polvo
creado por el uso de la herramienta y la posibilidad
de alterar el polvo existente.
35. Dirija el escape para minimizar la perturbación del
polvo en un entorno lleno de polvo.
36. Cuando se crean peligros de polvo o de escape, la
prioridad será controlarlos en el punto de emisión.
37. La información para realizar una evaluación de
riesgos de estos peligros y la implementación de
controles apropiados es esencial.
38. La exposición a la vibración puede causar daños
incapacitantes en los nervios y el suministro de
sangre de las manos y los brazos.
39. Use ropa de abrigo cuando trabaje en condiciones
frías, mantenga sus manos calientes y secas.
40. Si experimenta entumecimiento, hormigueo, dolor o
blanqueamiento de la piel en sus dedos o manos,
consulte a un profesional de la salud ocupacional
califi cado sobre las actividades generales.
41. Opere y mantenga la herramienta como se
recomienda en estas instrucciones, para evitar un
aumento innecesario en los niveles de vibración.
42. Sostenga la herramienta con un agarre ligero pero
seguro, porque el riesgo de vibración generalmente
es mayor cuando la fuerza de agarre es mayor.
43. No utilice gasolina ni otros líquidos infl amables
para limpiar la herramienta eléctrica.
Si entra vapor de un líquido infl amable en la herramienta
eléctrica, existe peligro de que las chispas producidas al
grapar, etc. causen una explosión.
38
Page 39

ESPECIFICACIONES
Tipo motorizado Pistón alternativo
Presión de aire (medidor) 4,9 – 8,3 bar
Grapas aplicables consultar la Fig.
Cantidad de grapas a cargar 150 grapas
Tamaño
Peso 2,0 kg.
Manguera (diámetro interior) 6 mm
365 mm (L) 258 mm (Al) 76 mm (An)
Español
SELECCIÓN DE LAS GRAPAS
Elija las grapas apropiadas de la fi gura. Las grapas que no
se muestran en la fi gura no pueden ser introducidas con esta
herramienta.
Calibre 16 Corona de 7/16"
Min. Max.
1,61 mm25 mm
50 mm
7,9 mm
1,45 mm
Dimensiones de las grapas
ACCESORIOS ESTÁNDAR
(1) Llave de barra hexagonal para tornillo M5 ..................... 1
(2) Protección para los ojos ............................................... 1
(3) Engrasador ................................................................... 1
ACCESORIOS OPCIONALES
○ Kit del mecanismo de disparo secuencial (Código N°
876762)
(Juego de piezas de disparo secuencial, piezas de
disparo individual)
Con las partes de disparo secuencial, las grapas son
disparadas solamente al apretar el gatillo después de
presionar la palanca de empuje.
Instalando estas partes, pueden evitarse el disparo
de las grapas en posiciones incorrectas y el
disparo inesperado de las grapas causado por un
accionamiento accidental de la herramienta.
APLICACIONES
○ Trabajos de construcción, tales como revestimiento de
paredes, contrapisos.
○ Construcción de casas rodantes y modulares.
PREPARACIÓN PARA ANTES DE LA OPERACIÓN
1. Prepare la manguera
Asegúrese de emplear una manguera con un diámetro
interior mínimo de 6 mm.
NOTA
Las mangueras de suministro de aire deben tener un
margen de presión de trabajo mínima de 12,8 bar o el
150 por ciento de la presión máxima producida en el
sistema de suministro de aire, lo que sea mayor.
2. Comprobación de la seguridad
PRECAUCIÓN
○ Las personas no autorizadas (incluyendo niños) deberán
mantenerse alejadas del equipo.
○ Utilice protección para los ojos.
○ Compruebe los tornillos de retención que fi jan la cubierta
de escape, etc., para ver si están bien apretados.
Compruebe la grapadora para ver si hay fugas de aire o
si alguna de sus partes está defectuosa u oxidada.
○ Compruebe si la palanca de empuje funciona
correctamente.
También compruebe si se ha adherido suciedad en las
partes móviles de la palanca de empuje.
○ Vuelva a comprobar la seguridad operacional.
ANTES DEL EMPLEO
1. Compruebe la presión de aire
PRECAUCIÓN
La presión de aire debe mantenerse constantemente a
4,9 - 8,3 bar.
Ajuste la presión de aire entre 4,9 a 8,3 bar de acuerdo
con el diámetro y longitud de las grapas y la dureza de la
madera que vaya a ser grapada. Ponga especial atención a
la presión de salida, capacidad y tubería del compresor de
aire, para que la presión no exceda del límite especifi cado.
Tenga en cuenta que la presión excesiva podría afectar el
rendimiento total, la vida de servicio y la seguridad.
2. Lubricación
(1) Antes de operar esta grapadora, asegúrese de
proporcionar un equipo de aire entre el compresor de
aire y el aparato.
La lubricación a través del equipo de aire ofrece una
operación suave, una vida de servicio más larga y
anticorrosión.
Ajuste el engrasador de forma que se suministre una sola
gota de aceite a intervalos de 5 a 10 ciclos de grapado.
(2) Se recomienda el uso del aceite recomendado (SHELL
TONNA). Pueden también usarse los aceites listados
más adelante. No mezcle nunca dos o más tipos de
aceite.
3. Cargue los grapas
PRECAUCIÓN
○ Cuando cargue clavos en la grapadora
(1) no apriete el gatillo,
(2) no apriete la palanca de empuje, y
39
Page 40

Español
(3) para evitar posibles lesiones durante el uso y el
transporte, tenga la precaución de mantener la cara,
pies, y otras partes de su cuerpo o de otras personas
alejadas del morro.
(1) Tire del alimentador de grapas hacia atrás y fíjelo
fi rmemente a la ranura del cargador. (Consulte la Fig. 2)
(2) Coloque la tira de rapas sobre el cargador.
Asegúrese de que la tira de grapas se deslice libremente
sobre el cargador. (Consulte la Fig. 3)
(3) Tire de alimentador de grapas hacia atrás. Luego,
sepárelo de la ranura del cargador y regrese suavemente
el alimentador de grapas como si lo estuviera empujando
levemente, evitando cualquier posible impacto. (Consulte
la Fig. 4)
La grapadora habrá quedado lista ahora para poder
utilizarse.
PRECAUCIÓN
○ Si libera repentinamente el alimentador de grapas, podrá
retornar con brusquedad, provocando deformación y/o
dispersión, y eventualmente, el bloqueo de las grapas.
Asegúrese de regresar el alimentador de grapas con
suavidad, evitando cualquier posible impacto.
○ Para evitar una operación involuntaria, no toque nunca
el gatillo ni ponga el extremo superior de la palanca de
empuje sobre un banco de trabajo o el piso. Asimismo,
no coloque la salida de la grapa mirando hacia alguna
parte de una persona.
CÓMO EMPLEAR LA GRAPADORA
PRECAUCIÓN
○ No utilice el cuerpo o cualquier parte de la herramienta
como martillo ya que las grapas podrían descargarse
inesperadamente o la herramienta puede dañarse y
podrían producirse lesiones graves.
○ Tome las precauciones necesarias para asegurar la
seguridad de las personas que se encuentren en los
alrededores durante la operación.
○ Asegúrese de que la herramienta esté siempre
enganchada de forma segura en la pieza de trabajo y no
puede deslizarse.
○ Nunca transporte una herramienta neumática por su
manguera.
○ Nunca arrastre una herramienta neumática por su
manguera.
1. Procedimientos de grapado
(1) Grapado intermitente
Apriete la salida de las grapas sobre el punto deseado,
luego tire del gatillo para introducir una grapa con un solo
disparo. (Consulte la Fig. 6)
PRECAUCIÓN
○ Esta herramienta lanzará y disparará varias grapas en
lugar de una sola en rápida sucesión cuando la presiona
fuertemente al ras contra una superfi cie o cuando la
utiliza sobre materiales duros. En tales casos, dispare las
grapas apretando y soltando rápidamente el gatillo.
(2) Palanca de empuje
Cuando presione la salida de las grapas, asegúrese de
elevar totalmente la palanca de empuje (vea la Fig. 6)
para liberar el bloqueo de seguridad. Esto quiere decir
que las grapas no podrán ser disparadas sin liberar el
bloqueo de seguridad aunque accione el gatillo.
(3) Grapado continuo
En primer lugar, tire del gatillo. Luego presione el aparato
sobre la posición deseada para que las grapas se
introduzcan automáticamente. (Consulte la Fig. 7)
PRECAUCIÓN
○ Tenga cuidado cuando introduzca grapas en esquinas
de maderos. Cuando introduzca continuamente grapas
en esquinas de maderos, alguna grapa podría salirse o
romperse en la esquina.
40
○ No coloque una grapa sobre otra grapa.
○ No coloque una grapa sobre piezas metálicas.
NOTA
○ Precauciones sobre la operación sin grapas cargadas
A veces el grapado continuará después de grapar todos
las grapas contenidos en el cargador.
Esto se llama “Operación sin grapas cargadas”. Tal
operación deteriorará el amortiguador, cargador y el
alimentador de grapas.
Para evitar la operación sin grapas cargadas, confi rme
ocasionalmente la cantidad de clavos restantes. Por otro
lado, todas las grapas deben extraerse al terminar el uso
del martillo con ristra de grapas.
○ Tras el grapado,
(1) desconecte la manguera de aire de la grapadora,
(2) retire todas las grapas de la grapadora,
(3) aplique 5 – 10 gotas de lubricante para herramientas
neumáticas HiKOKI a la entrada de aire del martillo
neumático, y
(4) abra la llave de escape del depósito del compresor
de aire para drenar la humedad que pueda existir.
○ En lugares con temperaturas bajas, la herramienta no
funcionará correctamente algunas veces. Opere siempre
el aparato en lugares con temperaturas apropiadas.
2. Cómo ajustar la profundidad de grapado
Para asegurar que cada grapas penetre con la misma
profundidad, cerciórese de que:
(1) la presión de aire suministrada a la grapadora
permanezca constante (regulador instalado y
trabajando adecuadamente), y
(2) esté sujetando fi rmemente la grapadora contra la
pieza de trabajo.
Si las grapas penetran demasiado o demasiado poco en
la pieza de trabajo, realice el ajuste en el orden siguiente.
PRECAUCIÓN
○ Antes del ajuste, siempre desconecte la manguera
y descargue el aire comprimido de la herramienta
eléctrica.
○ Durante el ajuste, siempre mantenga su dedo
apartado del gatillo.
○ Durante el ajuste, asegúrese de que ninguna parte
de su cuerpo, manos o piernas se encuentre delante
de la salida para las grapas.
Porfavor efectúe los ajustes en el orden siguiente. (Véase
la Fig. 8)
Para ajustar la profundidad de penetración de la grapa,
afl oje el tornillo que asegura a la pieza de la palanca de
empuje.
Para introducir la grapa profundamente, ajuste la pieza
de la palanca de empuje a “down” (abajo), y para
introducirla superfi cialmente, ajuste a “up” (arriba).
Apriete el tornillo que sujeta a la pieza de la palanca de
empuje.
NOTA
○ Por favor utilice una presión de aire mínima, sufi ciente
para introducir las grapas hasta una profundidad
apropiada. Si se utiliza una presión innecesariamente
alta se podrá acortar la vida útil del amortiguador del
pistón, etc.
INSPECCIÓN Y MANTENIMIENTO
PRECAUCIÓN
Asegúrese de desconectar la manguera durante la
limpieza de atascos, inspección, mantenimiento y
limpieza.
1. Medidas contra el atasco de las grapas
(1) Quite todas las grapas.
(2) Suelte la palanca de bloqueo y abra la guía de la cuchilla.
(Consulte la Fig. 9)
Page 41

Español
(3) Extraiga la grapa atascada con un destornillador de
punta plana. (Consulte la Fig. 10)
(4) Cierre la guía de la cuchilla y guía de la cuchilla y el
enganche.
(5) En caso de atasco frecuente, póngase en contacto con
un centro de reparaciones autorizado por HiKOKI.
2. Inspección y mantenimiento
Inspeccione el aparato periódicamente.
(1) Quite los cuatro pernos de cabeza hexagonal que
aseguran la cubierta de escape y retire dicha cubierta.
Luego, el cilindro, el pistón y las demás piezas podrán
desmontarse con los respectivos grupos de montaje.
Limpie con un paño la broca de hincar, la parte deslizante
del pistón y el interior del cuerpo para eliminar las
impurezas depositadas.
(2) Confi rme que el amortiguador de pistón realice una
operación normal. Un amortiguador de pistón dañado
podría estropear las demás piezas componentes.
(3) Inspeccione atentamente la junta tórica por signos de
desgaste mientras efectúa el desarmado. Una junta
tórica gastada o dañada podría deteriorar el rendimiento
total. Reemplace una junta tórica gastada o dañada por
otra nueva.
(4) Antes de volver a armar el aparato, aplique grasa (grasa
Attolub N°2) a la junta tórica. También lubrique el aparato
con el aceite recomendado.
3. Compruebe los tornillos de montaje de cada parte
A intervalos regulares, compruebe cada parte para ver
si hay tornillos de montaje fl ojos y si hay fugas de aire.
Vuelva a apretar los tornillos fl ojos que encuentre. La
operación con tornillos fl ojos sin apretar es peligrosa.
4. Inspeccione la palanca de empuje
Compruebe si la palanca de empuje (Fig. 1) puede
deslizarse con suavidad.
Limpie el área deslizante de la palanca de empuje y
emplee el aceite proporcionado para lubricarla de tanto
en tanto.
La lubricación permitirá un deslizamiento suave sirviendo
a la vez como medida de prevención contra el óxido.
5. Almacenaje
○ Cuando no utilice la herramienta durante mucho tiempo,
aplique una ligera capa de lubricante en las partes de
acero para evitar oxidación.
○ No almacene la grapadora en un lugar frío.
Guarde la grapadora en una zona caliente.
○ Cuando no se utilice, la grapadora debe guardarse en un
lugar caliente y seco.
Manténgala fuera del alcance de los niños.
PRECAUCIÓN
En el manejo y el mantenimiento de las herramientas
eléctricas, se deberán observar las normas y reglamentos
vigentes en cada país.
COMPRESOR
PRECAUCIÓN
Cuando la presión de operación máxima del compresor
de aire exceda de 8,3 bar asegúrese de proporcionar
una válvula de reducción entre el compresor de aire y
la grapadora. Luego, ajuste la presión de aire dentro
del margen de operación de 4,9 – 8,3 bar. Si hay un
equipo de aire instalado, también será posible efectuar la
lubricación, lo que será además una gran conveniencia.
VÁLVULA DE REDUCCIÓN DEL FILTRO DEL
ENGRASADOR (Equipo de aire)
Para que el equipo pueda operar en unas buenas condiciones
y asegurar una larga vida de servicio, se recomienda emplear
una válvula de reducción del fi ltro del engrasador. Durante su
operación, limite la longitud de la manguera entre la unidad y
el equipo de aire a 10 m como máximo. (Fig. 11)
LUBRICANTES APLICABLES
Tipo de lubricante Nombre del lubricante
Aceite recomendado SHELL TONNA
Aceite de motor SAE 10W, SAE 20W
Aceite de turbina
Información sobre el ruido
Valores de la característica de ruido de acuerdo con la norma
EN ISO 11148-13:2018
Nivel de potencia de sonido de un evento de ponderación
A típica L
Nivel de presión de sonido de emisión de un evento de
ponderación A típica en el lugar de trabajo
L
Incertidumbre K: 2,5 dB (A)
Estos valores son los valores característicos relacionados
con la herramienta y no representan el desarrollo del ruido
en el lugar de empleo. El desarrollo de ruido en el lugar de
empleo dependerá del ambiente de trabajo, pieza de trabajo,
soporte de la pieza, número de operaciones de clavado, etc.
Dependiendo de las condiciones del lugar de trabajo y
de la forma de la pieza de trabajo, deberán llevarse a
cabo medidas de atenuación de ruido individuales, tales
como la colocación de las piezas de trabajo en soportes
amortiguadores de ruido, prevención de vibraciones de
la pieza de trabajo mediante sujeción o cobertura, ajuste
de la presión de aire mínima requerida para la operación a
ejecutar, etc.
En casos especiales será necesario llevar puesto un equipo
de protección en los oídos.
Información sobre las vibraciones
Valor característico de vibración típico de acuerdo con EN
ISO 11148-13:2018, 2000: 3,9 m/s
Incertidumbre K = 1,5 m/s
Estos son valores característicos relacionados con la
herramienta y no representan al sistema de mano-brazo
cuando se utiliza la herramienta. La infl uencia sobre el
sistema de mano-brazo al utilizar la herramienta dependerá
por ejemplo, de la fuerza de agarre, de la fuerza de la presión
de contacto, de la dirección del trabajo, del ajuste de la
fuente de energía, de la pieza de trabajo y del soporte de la
pieza de trabajo.
2
ISO VG32 - 68
(N°90 - N°180)
2
.
WA,1s,d = 99 dB
pA, 1s,d = 81 dB
41
Page 42

Português
(Tradução das instruções originais)
PRECAUÇÕES GERAIS DE UTILIZAÇÃO
AVISO
Leia todos os avisos de segurança, instruções,
ilustrações e especifi cações fornecidas com
Não seguir todas as instruções listadas abaixo pode resultar
em ferimentos graves.
Guarde todos os avisos e instruções para referência
futura.
1. Utilizar a ferramenta eléctrica com segurança.
Não utilize a ferramenta eléctrica para efeitos que não os
2. Para uma utilização segura, manusear a ferramenta
Siga as instruções fornecidas neste manual e manuseie
3. Confi rmar a segurança da ofi cina.
Mantenha as pessoas não autorizadas afastadas da
Especialmente as crianças devem ser mantidas
4. As peças correctas nos sítios correctos.
Não retire as tampas nem os parafusos. Mantenha-os no
Acima de tudo, para evitar o perigo, nunca efectue
5. Verifi car a ferramenta antes de a utilizar.
Antes de utilizar a ferramenta, verifi que sempre se esta
6. A utilização excessiva pode provocar acidentes.
Não mantenha as ferramentas e os acessórios a
7. Interromper a utilização imediatamente se detectar
Interrompa a utilização se detectar anomalias ou se
8. Manter a ferramenta eléctrica cuidadosamente.
Se deixar cair ou bater com a ferramenta eléctrica contra
Nunca utilize a ferramenta se surgir uma fenda ou se
9. Proceder a uma boa manutenção para obter uma
Proceda a uma boa manutenção da ferramenta eléctrica
10. A inspecção a intervalos regulares é essencial para
Inspeccione a ferramenta eléctrica a intervalos regulares,
esta ferramenta elétrica.
especifi cados nestas instruções.
eléctrica correctamente.
correctamente esta ferramenta para garantir uma
operação segura. Nunca permita que a ferramenta
seja utilizada por crianças ou pessoas que não
tenham conhecimentos sufi cientes para a manusear
correctamente nem por pessoas que não sejam capazes
de a utilizar correctamente.
ofi cina.
afastadas.
lugar, pois estes têm as suas funções específi cas.
alterações à ferramenta nem a utilize após efectuar
alterações.
não apresenta peças partidas, enferrujadas ou em falta e
se todos os parafusos estão bem apertados.
funcionar para além das respectivas capacidades
de trabalho. A utilização excessiva não só danifi ca a
ferramenta eléctrica como também representa um
perigo.
anomalias.
a ferramenta não funcionar correctamente; solicite a
realização de operações de inspecção e manutenção.
outros objectos, a estrutura externa pode deformarse, abrir fendas ou sofrer outro tipo de danos, por isso,
manuseie a ferramenta com o cuidado exigido. Do
mesmo modo, não efectue marcas nem gravações na
ferramenta eléctrica.
da ferramenta, as fendas na superfície são perigosas.
estiver ar a sair de uma fenda.
longa vida útil.
e mantenha-a limpa.
a segurança.
de modo a que a ferramenta eléctrica possa ser sempre
utilizada com segurança e efi ciência.
Devido ao ar de alta pressão dentro
11. Consultar um agente de assistência autorizado
se for necessário proceder a reparações ou à
substituição de peças.
Certifi que-se de que as operações de assistência
sejam efectuadas apenas por um agente de assistência
autorizado e de que se utilizem apenas peças de
substituição originais.
12. Manter a ferramenta eléctrica num local adequado.
Quando não estiver a utilizar a ferramenta, deve mantê-
la num local seco, fora do alcance das crianças. Coloque
no corpo cerca de 2cc de óleo pela junta do tubo para
proteger a ferramenta da ferrugem.
13. As imagens detalhadas de montagem nestas
instruções de utilização só devem ser utilizadas
pelo centro de apoio autorizado.
14. Segure a ferramenta com fi rmeza e prepare-se para
gerir o recuo.
15. Guarde as ferramentas elétricas inativas fora do
alcance de crianças e não permita que pessoas não
familiarizadas com a ferramenta elétrica ou com
estas instruções usem a ferramenta elétrica.
As ferramentas elétricas são perigosas nas mãos de
utilizadores não treinados.
16. Não modifi que a ferramenta de acionamento do
fi xador. As modifi cações podem reduzir a efi cácia
das medidas de segurança e aumentar os riscos
para o operador e/ou transeuntes
17. Manutenção de ferramentas elétricas e acessórios.
Verifi que se há desalinhamento de partes móveis ou
se estas estão presas, quebra de peças e qualquer
outra condição que possa afetar a operação da
ferramenta elétrica. Se danifi cada, leve a ferramenta
elétrica a ser consertada antes de a usar.
Muitos acidentes são causados por ferramentas elétricas
mal conservadas.
18. Não tente exceder a distância. Mantenha o apoio e o
equilíbrio adequados em todos os momentos.
Isto permite um melhor controlo da ferramenta elétrica
em situações inesperadas.
19. Mantenha crianças e transeuntes afastados
enquanto estiver a operar uma ferramenta elétrica.
As distrações podem fazer com que perca o controlo.
PRECAUÇÕES NA UTILIZAÇÃO DA AGRAFADORA
1. Operação segura através de uma utilização correcta.
Esta ferramenta foi concebida para g rampear grampos em
madeira ou em materiais semelhantes. Utilize-a apenas
para o fi m a que se destina.
2. Certitique-se que a pressão de ar está dentro do
valor nominal da pressão de ar.
Ferramentas de aperto operadas por ar comprimido só
devem estar ligadas a linhas de ar comprimido onde a
pressão máxima admissível não pode exceder 10% que
podem ser alcançados, por exemplo, através de uma
válvula redutora de pressão que inclui uma válvula de
segurança a jusante.
(Para o modelo N5008AC2, 110% de pressão máxima
admissível nominal é 9,1 bar = 130 psi)
Ferramentas de aperto operadas por ar comprimido só
devem ser operadas à pressão mínima requerida para
o processo de trabalho em curso, de modo a evitar altos
níveis de ruído desnecessários, desgaste cada vez
maior e avarias.
3. Nunca opere o equipamento com gases de alta
pressão além de ar comprimido.
Nunca utilize dióxido de carbono, oxigénio ou outro
gás de recipientes pressurizados sob quaisquer
circunstâncias.
42
Page 43

Português
4. Tenha cuidado com incêndios e explosões.
Uma vez que se podem produzir faíscas enquanto se utiliza
a ferramenta, é perigoso utilizar esta ferramenta perto de
verniz, tinta, benzina, diluente, gasolina, gasóleo, adesivos
e substâncias infl amáveis semelhantes, uma vez que estas
podem incendiar ou explodir. Em resumo, esta ferramenta
não deve, sob quaisquer circunstâncias, ser utilizada nas
proximidades dos referidos materiais infl amáveis.
5. Usar sempre protecção ocular (óculos de
protecção).
ou agrafos que não foram bem colocados, ao entrarem
nos olhos são um perigo para a visão. O equipamento
de protecção ocular pode ser adquirido em qualquer loja
de equipamento de segurança. Use sempre protecção
ocular quando utilizar esta ferramenta. Utilize óculos ou
máscara de protecção sobre os óculos de correcção da
visão.
A entidade patronal deve estabelecer a obrigação de uso
de equipamento de protecção.
6. Proteger os ouvidos e a cabeça.
e capacete de protecção. A exposição desprotegida a
altos níveis de ruído pode causar perda auditiva
permanente e incapacitante e outros problemas, como
tinnitus (zunido, zumbido, assobio ou sussurro nos
ouvidos).
São essenciais a avaliação de risco e a implementação
de controlos apropriados para esses riscos.
Controlos apropriados para reduzir o risco podem incluir
ações como materiais de amortecimento para evitar que
as peças “ressoem”.
Opere e mantenha a ferramenta conforme recomendado
nestas instruções para evitar um aumento desnecessário
dos níveis de ruído.
7. Prestar atenção às pessoas que estão a trabalhar
na área circundante.
Seria extremamente perigoso se os grampos
incorrectamente grampeados atingissem as outras
pessoas.
Por isso, preste sempre atenção à segurança das
pessoas que o rodeiam quando utilizar esta ferramenta.
Certifi que-se sempre de que a saída de grampos não
se encontra perto do corpo, das mãos ou dos pés de
alguém.
8. Nunca aponte a saída de agrafos para as pessoas.
Presuma sempre que a ferramenta contém dispositivos
de aperto.
Se a saída de agrafos for apontada para as pessoas,
pode causar acidentes graves se descarregar
involuntariamente a ferramenta. Quando ligar e desligar
o tubo, durante o carregamento de agrafos ou operações
semelhantes, certifi que-se de que a saída de agrafos
não está apontada para ninguém (nem mesmo para si).
Mesmo quando não tiver agrafos carregados, é perigoso
descarregar a ferramenta apontado-a para alguém, por
isso, nunca faça isso. Nada de brincadeiras. Respeite a
ferramenta como um instrumento de trabalho.
9. Antes de utilizar a ferramenta eléctrica, verifi car a
alavanca de pressão.
Pode descansar a ferramenta numa superfície nivelada
como mostrado na Fig. 5.
Quando utilizar a ferramenta eléctrica, use
sempre protecção ocular e certifi que-se de
que as pessoas na área circundante também
estão a usar protecção ocular.
A possibilidade de fragmentos de agrafos
Quando estiver a grampear use tampões nos
ouvidos e capacete de protecção. Do mesmo
modo, dependendo das condições, certifi que-
se de que as pessoas na área circundante
também estejam a usar tampões nos ouvidos
Certifi que-se de que não aplica a força para baixo na
ferramenta até ao ponto em que a alavanca de pressão
esteja engatada.
Antes de utilizar a ferramenta eléctrica, certifi que-se de
que verifi ca se a alavanca de pressão está a funcionar
correctamente. Sem agrafos carregados na ferramenta,
ligue o tubo e verifi que o seguinte. Se o som de operação
ocorrer, indica uma avaria, por isso, neste caso não
utilize a ferramenta até ser inspeccionada e reparada.
○ Se simplesmente ao premir o gatilho causa o som de
operação do movimento da ponta, a ferramenta está
avariada.
○ Se simplesmente ao puxar a alavanca de pressão
contra o material a ser agrafado, causa o som de
movimento da ponta, a ferramenta está avariada.
Além disso, relativamente à alavanca de pressão,
atente que nunca pode ser modifi cada ou removida.
10. Utilize apenas agrafos especifi cados.
Nunca utilize agrafos além dos agrafos especifi cados e
descritos nestas instruções.
11. Não modifi que a ferramenta de fi xação.
As alterações podem reduzir a efi cácia das medidas de
segurança e aumentar os riscos para o operador e/ou as
pessoas presentes.
12. Tenha cuidado quando ligar o tubo
Quando ligar o tubo e carregar os agrafos de modo a não
disparar a ferramenta acidentalmente, certifi que-se do
seguinte.
○ Não toque no gatilho.
○ Não permita que a cabeça de disparo entre em
contacto com qualquer superfície.
○ Mantenha a cabeça de saída para baixo.
Cumpra minuciosamente as instruções acima e
certifi que-se sempre de que nenhuma parte do corpo,
mãos ou pernas esteja à frente da saída de agrafos.
13. Tenha cuidado ao manusear fi xadores,
especialmente ao carregar e descarregar, pois
os fi xadores possuem pontas afi adas que podem
causar ferimentos.
14. Não colocar o dedo no gatilho distraidamente.
Não coloque o dedo no gatilho, excepto quando
pretender grampear os grampos. Se transportar esta
ferramenta ou a entregar a alguém mantendo o dedo no
gatilho, pode descarregar involuntariamente um grampo
e causar um acidente.
15. Feche completamente a guia da lâmina e não a abra
durante a operação.
Se tentar agrafar com a guia da lâmina aberta, os agrafos
não irão entrar na madeira e existe o risco de descarga
perigosa.
16. Prima bem a saída de agrafos contra o material a
ser agrafado.
Quando estiver a agrafar, prima a saída de agrafos
contra o material a ser agrafado. Se a saída não for bem
aplicada, os agrafos podem ressaltar.
17. Manter as mãos e os pés afastados da cabeça de
disparo durante a utilização.
É muito perigoso que um grampo atinja as mãos ou os
pés involuntariamente.
18. Durante o funcionamento, os detritos da peça de
trabalho e do sistema de fi xação/colagem podem
ser descarregados.
19. Ter cuidado com o recuo da ferramenta.
Não aproxime a parte de cima da ferramenta da cabeça,
etc. durante a utilização. Este procedimento é perigoso
pois a ferramenta pode recuar com violência se o
grampo que está a pregar entrar em contacto com um
grampo aplicado anteriormente ou um nó da madeira.
43
Page 44

Português
20. Tenha cuidado quando agrafar tábuas fi nas ou os
cantos de madeira.
Quando agrafar tábuas fi nas, os agrafos podem
atravessar, assim como quando agrafar cantos de
madeira devido ao desvio dos agrafos. Nesses casos,
certifi que-se sempre de que não está ninguém (nem as
mãos ou pés de alguém; etc) por trás da placa fi na ou
próximo da madeira que está a agrafar.
21. Agrafar simultaneamente em ambos os lados da
mesma parede é perigoso.
Nunca deve agrafar em ambos os lados de uma parede
ao mesmo tempo. Isto seria muito perigoso uma vez que
os agrafos podem atravessar a parede e assim causar
ferimentos.
22. Não utilizar a ferramenta eléctrica em andaimes,
escadotes.
A ferramenta eléctrica não deve ser utilizada para
aplicações específi cas, tais como:
– alteração de uma localização de trabalho para outra
que envolva a utilização de andaimes, escadas,
escadotes ou estruturas semelhantes, por exemplo,
para pregar ripas de telhado,
– fechar caixas ou embalagens,
– montagem de sistemas de segurança para
transporte, por exemplo, em veículos
23. Não desligue o tubo com o dedo no gatilho.
Se desligar o tubo com o dedo no gatilho, a próxima vez
que ligar o tubo, existe o perigo da ferramenta disparar
um agrafo acidentalmente ou operar incorrectamente.
24. Desligue o tubo e retire quaisquer agrafos restantes
no carregador após a utilização.
Desligue a ferramenta do ar antes de fazer a manutenção
da ferramenta, limpar um dispositivo de aperto
encravado, abandonar a área de trabalho, deslocar a
ferramenta para outro local ou após a utilização. É muito
perigoso disparar um agrafo acidentalmente.
25. Quando remover um agrafo que está encravado,
certifi que-se de que primeiro desliga o tubo e solta
o ar comprimido.
Quando remover um agrafo que se encravou na saída de
agrafos, primeiro que tudo certifi que-se de que desliga o
tubo e solta o ar comprimido dentro da ferramenta.
O disparo acidental de um agrafo pode ser muito
perigoso.
26. Para evitar perigos causados por agrafos caídos,
nunca abra o carregador com o dispositivo
apontado para baixo enquanto carrega agrafos.
27. Uma fi cha fêmea (tomada de ar) não deve ser
utilizada no corpo.
Se uma tomada fêmea está instalada no corpo, o ar
comprimido por vezes não pode ser atraído quando o
tubo está desligado, por isso evite isto.
A ferramenta e o tubo de alimentação de ar têm de ter um
acoplamento de tubo de modo a que toda a pressão seja
removida da ferramenta quando a junta de acoplamento
está desligada.
28. Ao usar uma ferramenta, o operador deve adotar
uma postura adequada mas ergonómica.
Mantenha um apoio seguro e evite posturas inadequadas
ou desequilibradas.
29. Se o operador apresentar sintomas como
desconforto persistente ou recorrente, dor, latejar,
formigueiro, dormência, sensação de queimadura
ou rigidez, não ignore esses sinais de aviso.
O operador deve consultar um profi ssional de saúde
qualifi cado sobre atividades gerais.
30. Trabalho contínuo e repetitivo prolongado pode
causar distúrbios musculoesqueléticos.
Não continue a trabalhar com a mesma postura nem
aplique força excessiva durante muito tempo.
E descanse regularmente, especialmente quando sentir
cansaço.
31. Escorregões, tropeções e quedas são as principais
causas de lesões no local de trabalho.
Esteja ciente das superfícies escorregadias causadas
pelo uso da ferramenta e também dos riscos de
tropeções causados pela mangueira da linha aérea.
32. Prossiga com cuidado adicional em ambientes
desconhecidos.
Podem existir riscos ocultos, como eletricidade ou outras
linhas de serviços públicos.
33. Certifi que-se de que não existem cabos elétricos,
tubos de gás, etc. que possam causar riscos se
danifi cados pelo uso da ferramenta.
34. A avaliação de riscos deve incluir pó criado pelo
uso da ferramenta e o potencial para perturbar pó
existente.
35. Direcione o escape de forma a minimizar a
perturbação de pó num ambiente com muito pó.
36. Quando forem criados riscos de pó ou escape,
a prioridade deve ser controlá-los no ponto de
emissão.
37. É essencial que existam informações para conduzir
uma avaliação de risco desses perigos e a
implementação de controlos apropriados.
38. A exposição à vibração pode causar danos
incapacitantes nos nervos e no suprimento de
sangue às mãos e braços.
39. Use roupas quentes ao trabalhar em condições
frias, mantenha as mãos quentes e secas.
40. Se sentir dormência, formigueiro, dor ou
branqueamento da pele dos dedos ou das mãos,
consulte um médico qualifi cado sobre atividades
gerais.
41. Opere e mantenha a ferramenta conforme
recomendado nestas instruções para evitar um
aumento desnecessário dos níveis de vibração.
42. Segure a ferramenta apertando-a levemente, mas
de forma segura, porque o risco de vibração é
geralmente maior quando a força de preensão é
maior.
43. Quando limpar a ferramenta, não utilize gasolina ou
outro líquido infl amável.
Se o vapor de um líquido infl amável entrar para a
ferramenta, existe o perigo de provocar faíscas quando
agrafar etc. causando uma explosão.
44
Page 45

ESPECIFICAÇÕES
Tipo de alimentação Alternância do pistão
Pressão de ar (Manómetro) 4,9 – 8,3 bar
Agrafos aplicáveis ref. Fig.
Quantidade de agrafos carregáveis 150 agrafos
Dimensões
Peso 2,0 kg
Tubo (diâm. interno) 6 mm
365 mm (L) 258 mm (H) 76 mm (W)
Português
SELECÇÃO DE AGRAFOS
Escolha um agrafo adequado a partir da Fig. Os agrafos
que não são apresentados na Fig. não podem ser utilizados
nesta ferramenta
16 Manómetro 7/16" Coroa
Mín. Máx.
1,61 mm25 mm
50 mm
7,9 mm
1,45 mm
Dimensão dos agrafos
ACESSÓRIOS DE SÉRIE
(1) Chave sextavada para parafuso M5 .............................. 1
(2) Protector ocular ............................................................. 1
(3) Lubrifi cador ................................................................... 1
ACESSÓRIOS OPCIONAIS
○ Kit mecanismo de disparo sequencial (Nº código
876762)
(Conjunto de peças de disparo sequencial, peças de
disparo único)
Com as peças de disparo sequencial, o agrafo é
disparado apenas se premir o gatilho após empurrar a
alavanca de pressão para baixo.
Ao instalar estas peças, disparar agrafos em posições
inadequadas e disparo acidental de agrafos causado
pela operação acidental da alavanca de pressão pode
ser evitado.
APLICAÇÕES
○ Trabalho de construção como revestimento de parede,
subpisos.
○ Construção de casa móvel e modular.
PREPARAÇÃO PARA UTILIZAÇÃO
1. Prepare o tubo
Certifi que-se de que utiliza o tubo fornecido no mínimo
com 6 mm de diâmetro interno.
NOTA
Os tubos de alimentação de ar têm de ter uma
classifi cação de pressão de funcionamento mínima de
12,8 bar ou 150 por cento da pressão máxima produzida
no sistema de alimentação de ar, o que for maior.
2. Verifi car a segurança
CUIDADO
○ As pessoas não autorizadas (incluindo crianças) devem
ser mantidas afastadas do equipamento.
○ Use protecção ocular.
○ Verifi que o aperto dos parafusos de retenção que fi xam a
tampa de escape etc.
Verifi que a agrafadora por fugas de ar e peças
defeituosas ou com ferrugem.
○ Verifi que se a alavanca de pressão funciona
correctamente Verifi que também se as peças móveis da
alavanca de pressão têm sujidade.
○ Volte a verifi car a segurança operacional.
ANTES DA UTILIZAÇÃO
1. Verifi que a pressão de ar
CUIDADO
A pressão de ar deve ser mantida constantemente a 4,9 –
8,3 bar.
Regule a pressão de ar entre 4,9 a 8,3 bar de acordo
com os diâmetros e comprimento dos agrafos e dureza
da madeira a agrafar. Preste atenção à pressão de saída,
capacidade e tubagem no compressor de ar, de modo
a que a pressão de ar não exceda o limite especifi cado.
Tenha em conta que a pressão excessiva pode afectar o
desempenho geral, vida útil e segurança.
2. Lubrifi cação
(1) Antes de utilizar este agrafador, certifi que-se de que
proporciona um conjunto de ar entre o compressor de
ar e este dispositivo. A lubrifi cação através do conjunto
de ar oferece uma operação suave, vida útil alargada e
anti-corrosão.
Regule o lubrifi cador de modo a que uma gota de
óleo seja fornecida em intervalos de 5 a 10 ciclos de
agrafagem.
(2) É aconselhável utilizar o óleo recomendado (SHELL
TONNA). Estão listados outros óleos aplicáveis. Nunca
misture dois ou mais tipos de óleo diferentes.
3. Carregar agrafar
CUIDADO
○ Quando carregar agrafos na Agrafadora,
(1) não prima o gatilho;
(2) não empurre a alavanca de pressão; e
45
Page 46

Português
(3) mantenha o rosto, mãos, pés e outras partes do
corpo, assim como outras pessoas longe do nariz
para evitar possíveis ferimentos durante a utilização
e deslocação.
(1) Puxe o alimentador de agrafos para trás e engate-o bem
numa ranhura do carregador. (Ver Fig. 2)
(2) Coloque a tira de agrafos sobre o carregador.
Certifi que-se de que a tira de agrafos desliza livremente
no carregador. (Ver Fig. 3)
(3) Puxe o alimentador de agrafos para trás. De seguida,
desengate-o da ranhura do carregador e suavemente
recue o agrafo como se tivesse a ser gentilmente
puxado, evitando qualquer impacto. (Ver Fig. 4)
A agrafadora está agora pronta a funcionar.
CUIDADO
○ Se o alimentador for solto de repente, pode voltar à
posição abruptamente, causando deformação e/ou
dispersão resultando em agrafos obstruídos.
Certifi que-se de que recua o alimentador de agrafos,
evitando qualquer impacto.
○ Para evitar um funcionamento involuntário, nunca toque
no gatilho nem coloque a extremidade superior da
alavanca de pressão numa bancada ou no chão. Além
disso, nunca aponte a saída de agrafos para uma pessoa.
COMO UTILIZAR A AGRAFADORA
CUIDADO
○ Não use o corpo ou qualquer parte da ferramenta como
martelo, dado que os agrafos podem ser descarregados
inesperadamente ou a ferramenta pode fi car danifi cada
e podem ocorrer ferimentos graves.
○ Tenha cuidado para garantir a segurança das pessoas
na zona circundante durante o funcionamento.
○ Certifi que-se de que a ferramenta está sempre engatada
com segurança na peça de trabalho e que não pode
deslizar.
○ Nunca transporte uma ferramenta pneumática pela sua
mangueira.
○ Nunca arraste uma ferramenta pneumática pela sua
mangueira.
1. Procedimento de agrafagem
(1) Agrafagem intermitente
Prima a saída de agrafais contra o ponto pretendido; de
seguida, puxe o gatilho para agrafar num único disparo.
(Ver Fig. 6)
CUIDADO
○ Esta ferramenta irá saltar e disparar vários agrafos em vez
de apenas um, numa rápida sucessão quando premida
fortemente contra uma superfície ou quando utilizada
em materiais duros. Nesses casos, dispare os agrafos
premindo e soltando rapidamente o gatilho.
(2) Alavanca de pressão
Quando premir a saída de agrafos, certifi que-se de que
levanta por completo a alavanca de pressão (Ver Fig. 6)
para soltar o bloqueio de segurança. Assim, os agrafos
não podem ser disparados sem soltar o bloqueio de
segurança mesmo quando o gatilho é premido.
(3) Agrafagem contínua
Primeiro, prima o gatilho. De seguida, prima o dispositivo
contra a posição pretendida para disparar agrafos
automaticamente. (Ver Fig. 7).
CUIDADO
○ Tenha cuidado quando agrafar cantos de madeira.
Quando agrafar continuamente cantos de madeira, um
agrafo pode ser extraviado ou atravessar o canto.
○ Não dispare um agrafo por cima de outro agrafo.
○ Não dispare um agrafo em peças de metal.
NOTA
○ Precauções na operação sem carga
Por vezes a agrafagem continua após disparar todos os
agrafos contidos no carregador.
A isto chama-se "operação sem carga". Essa operação
pode danifi car o protector, o carregador e o alimentador
de agrafos.
Para evitar a operação sem carga, confi rme
ocasionalmente a quantidade de agrafos restantes. Por
outro lado, todos os agrafos devem ser removidos após
a utilização desta agrafadora.
○ Após a agrafagem:
(1) desligue o tubo de ar da agrafadora;
(2) retire todos os agrafos da agrafadora;
(3) forneça 5 – 10 gotas de lubrifi cante de ferramentas
pneumáticas HiKOKI na tomada de ar na máquina de
pregar; e
(4) abra a válvula no depósito do compressor de ar para
purgar a humidade.
○ Sob condições de baixas temperaturas, a máquina, por
vezes, não funciona correctamente. Opere sempre a
máquina à temperatura ambiente adequada.
2. Como ajustar a profundidade de agrafagem
Para garantir que cada agrafo penetra a mesma
profundidade, certifi que-se de que:
(1) a pressão de ar para a agrafadora permanece
constante (regulador está instalado e a funcionar
correctamente) e
(2) a agrafadora está sempre bem segura contra a peça
de trabalho.
Se os agrafos forem disparados muito fundos ou muito
superfi ciais na peça de trabalho, regule a agrafagem da
seguinte forma.
CUIDADO
○ Antes da regulação, desligue sempre o tubo e solte o
ar comprimido na ferramenta.
○ Durante a regulação mantenha sempre o dedo
afastado do gatilho.
○ Durante a regulação certifi que-se de que nenhuma
parte do corpo, mãos ou pernas esteja à frente da
saída de agrafos.
Execute as regulações da seguinte forma. (Ver Fig. 8)
Para regular a profundidade de agrafagem, desaperte o
parafuso que fi xa a alavanca de pressão.
Se o agrafo estiver muito fundo, regule a alavanca de
pressão para "baixo", e se estiver muito superfi cial,
regule a alavanca de pressão para "cima".
Aperte o parafuso para apertar a alavanca de pressão.
NOTA
○ Utilize a pressão de ar mínima que é sufi ciente para
disparar os agrafos a uma profundidade adequada. Se
for utilizada uma pressão demasiado alta, a vida útil do
amortecedor do êmbolo etc. será encurtada.
INSPECÇÃO E MANUTENÇÃO
CUIDADO
Certifi que-se de que desliga o tubo durante a limpeza
de obstruções, inspecção, manutenção e limpeza.
1. Contra-medida para encravamento de agrafos
(1) Retire todos os agrafos.
(2) Solte a alavanca de bloqueio e abra a guia da lâmina.
(Ver Fig. 9)
(3) Retire o agrafo encravado com uma chave de fendas de
cabeça fendida. (Ver Fig. 10)
(4) Feche a guia da lâmina e a lingueta.
(5) Em caso de encravamento frequente, contactar um certo
de apoio HiKOKI.
46
Page 47

Português
2. Inspecção e manutenção
Inspeccione periodicamente o dispositivo.
(1) Retire os quatro parafusos sextavados que fi xam a tampa
de escape e retire a tampa de escape.
De seguida, cilindro, êmbolo e outras peças podem ser
retiradas nos respectivos grupos de montagem.
Limpe a ponta, a peça deslizante do êmbolo e o interior do
corpo com um pano para remover a sujidade.
(2) Confi rme que o amortecedor do êmbolo oferece
um funcionamento normal. Um amortecedor de
êmbolo danifi cado pode causar danos a outros peças
componentes.
(3) Verifi que cuidadosamente o O-ring por desgaste
aquando da desmontagem. Um O-ring desgastado
ou danifi cado pode deteriorar o desempenho geral.
Substitua um O-ring desgastado ou danifi cado por um
novo.
(4) Antes de montar o dispositivo, aplique massa lubrifi cante
(Massa lubrifi cante Attolub Nº. 2) no O-ring. Além disso,
lubrifi que o dispositivo com o óleo recomendado.
3. Verifi que os parafusos de montagem para cada
peça
Verifi que em intervalos regulares cada peça por
parafusos de montagem soltos e por fugas. Reaperte
quaisquer parafusos soltos. Operar o equipamento com
parafusos soltos irá resultar num acidente.
4. Inspeccionar a alavanca de pressão
Verifi que se a alavanca de pressão (Fig. 1) desliza
suavemente.
Limpe a área deslizante da alavanca de pressão e utilize
o óleo fornecido para lubrifi cação periodicamente. A
lubrifi cação permite um deslizamento suave e ao mesmo
tempo serve para evitar a formação de ferrugem.
5. Armazenamento
○ Quando não utilizar por um longo período, aplique uma
camada fi na de lubrifi cante nas peças de aço para evitar
ferrugem.
○ Não guarde a Agrafadora num ambiente de baixas
temperaturas. Guarde a Agrafadora numa área quente.
○ Quando não for utilizada, a Agrafadora deve ser
guardada num local quente e seco.
Mantenha afastada das crianças.
CUIDADO
Na operação e na manutenção das ferramentas
elétricas, devem-se observar as normas de segurança e
os padrões prescritos por cada país.
COMPRESSOR
CUIDADO
Quando a pressão de funcionamento máxima do
compressor de ar exceder 8,3 bar, certifi que-se de que
proporciona uma válvula redutora entre o compressor de
ar e a agrafadora. De seguida, regule a pressão de ar
dentro do intervalo de funcionamento de 4,9 ~ 8,3 bar.
Se o conjunto de ar for instalado, a lubrifi cação também
é possível, fornecendo assim conveniência adicional.
VÁLVULA REDUTORA FILTRO DE ÓLEO
(Conjunto de ar)
De modo a que o equipamento possa ser operado numa
condição ideal para garantir uma vida útil alargada, é
aconselhável utilizar uma válvula redutora fi ltro de óleo.
Limite o comprimento do tubo entre a unidade e o conjunto
de ar para 10m quando utilizar. (Fig. 11)
LUBRIFICANTES APLICÁVEIS
Tipo de lubrifi cante Nome de lubrifi cante
Óleo recomendado SHELL TONNA
Óleo motor SAE10W, SAE20W
Óleo turbina
nformações relativas a ruído
Valores de ruído característicos em conformidade com a
norma EN ISO 11148-13:2018
Nível de potência sonora com ponderação A
L
Pressão sonora com ponderação A na estação de
trabalho L
Imprecisão K: 2,5 dB (A)
Estes valores são valores característicos relacionados com
a ferramenta e não representam o desenvolvimento de
ruído aquando da utilização. O desenvolvimento de ruído
aquando da utilização dependerá, por exemplo, do ambiente
de trabalho, da peça de trabalho, do suporte da mesma, do
número de operações, etc.
Dependendo das condições do espaço de trabalho e
do formato da peça de trabalho, pode ser necessário
implementar medidas de atenuação do ruído individual,
tais como colocar as peças de trabalho em suportes de
amortecimento de som, evitando a vibração da peça de
trabalho através de aperto ou cobertura, etc.
Em casos especiais, é necessário usar equipamento de
protecção auditiva.
Informações relativas a vibração
Valor característico de vibração em conformidade com a
norma EN ISO 11148-13:2018, 2000: 3,9 m/s
Imprecisão K = 1,5 m/s
Estes valores são valores característicos relacionados com a
ferramenta e não representam a infl uência no sistema mão-
braço ao utilizar a ferramenta. Uma infl uência no sistema
mão-braço ao utilizar a ferramenta dependerá, por exemplo,
da força de preensão, da força de pressão de contacto, da
direcção de trabalho, do ajuste do fornecimento de energia,
da peça de trabalho e do suporte da mesma.
2
ISO VG32 – 68
(#90 – #180)
WA,1s,d = 99 dB
pA,1s,d = 81 dB
2
47
Page 48

English Nederlands
We declare under our sole responsibility that Stapler, identifi ed
by type and specifi c identifi cation code *1), is in conformity with
all relevant requirements of the directives *2) and standards *3).
Technical fi le at *4) – See below.
The European Standard Manager at the representative offi ce in
Europe is authorized to compile the technical fi le.
The declaration is applicable to the product affi xed CE marking.
EC DECLARATION OF CONFORMITY
Wij verklaren onder onze eigen verantwoordelijkheid dat Nietapparaat,
geïdentifi ceerd door het type en de specifi eke identifi catiecode*1),
voldoet aan alle relevante bepalingen van de richtlijnen*2) en
normen*3). Technische documentatie bij*4) – zie onder.
De Europese Normen Manager bij de vertegenwoordiging in Europa
is gemachtigd om het technisch dossier samen te stellen.
Deze verklaring is van toepassing op producten voorzien van de CEmarkeringen.
Deutsch Español
Wir erklären in alleiniger Verantwortung, dass der durch den Typ und
den spezifi schen Identifi zierungscode *1) identifi zierte Nagler allen
einschlägigen Bestimmungen der Richtlinien *2) und Normen *3)
entspricht. Technische Unterlagen unter *4) – Siehe unten.
Die Leitung der repräsentativen Behörde für europäische Normen
und Richtlinien ist berechtigt, die technischen Unterlagen
zusammenzustellen.
Die Erklärung gilt für die an dem Produkt angebrachte CEKennzeichnung.
EG-KONFORMITÄTSERKLÄRUNG
Declaramos bajo nuestra única responsabilidad que la Grapadora,
identifi cada por tipo y por código de identifi cación específi co *1), está
en conformidad con todas las disposiciones correspondientes de las
directivas *2) y de las normas *3). Documentación técnica en *4) – Ver
a continuación.
El Director de Normas Europeas en la ofi cina de representación en
Europa está autorizado para elaborar el expediente técnico.
La declaración se aplica al producto con marcas de la CE.
Français Português
Nous déclarons sous notre entière responsabilité que l'Agrafeuse,
identifi ée par le type et le code d'identifi cation spécifi que *1) est en
conformité avec toutes les exigences applicables des directives *2) et
des normes *3). Dossier technique en *4) - Voir ci-dessous.
Le Gestionnaire des normes européennes du bureau de représentation
en Europe est autorisé à constituer le dossier technique.
Cette déclaration s'applique aux produits désignés CE.
DECLARATION DE CONFORMITE CE
Declaramos, sob nossa única e inteira responsabilidade, que a
Agrafadora, identifi cada por tipo e código de identifi cação específi co
*1), está em conformidade com todos os requerimentos relevantes
das diretivas *2) e normas *3). Ficheiro técnico em *4)–Consulte
abaixo.
O Gestor de Normas Europeias no escritório de representação na
Europa está autorizado a compilar o fi cheiro técnico.
A declaração aplica-se aos produtos com marca CE.
Italiano
Dichiariamo sotto la nostra esclusiva responsabilità che la fi ssatrice
pneumatica, identifi cata dal tipo e dal codice identifi cativo specifi co
*1), è conforme a tutti i requisiti delle direttive *2) e degli standard *3).
Documentazione tecnica presso *4) – Vedere sotto.
Il gestore delle norme europee presso l’uffi cio di rappresentanza in
Europa è autorizzato a compilare il fascicolo tecnico.
La dichiarazione è applicabile ai prodotti cui sono applicati i marchi
CE.
DICHIARAZIONE DI CONFORMITÀ CE
EC VERKLARING VAN CONFORMITEIT
DECLARACIÓN DE CONFORMIDAD DE LA CE
DECLARAÇÃO DE CONFORMIDADE CE
*1) N5008AC2 C337655B
*2) 2006/42/EC
*3) EN ISO 11148-13:2018
*4)
Representative offi ce in Europe
Hikoki Power Tools Deutschland GmbH
Siemensring 34, 47877 Willich, Germany
Head offi ce in Japan
Koki Holdings Co., Ltd.
Shinagawa Intercity Tower A, 15-1, Konan 2-chome,
Minato-ku, Tokyo, Japan
29. 11. 2019
Naoto Yamashiro
European Standard Manager
29. 11. 2019
A. Nakagawa
Corporate Offi cer
911
Code No. C99173972 T
Printed in Taiwan
 Loading...