

Page 1
Disc Grinder
Amoladora angular
手提圓盤電磨機
G18MR • G23MR
Handling instructions
Instrucciones de manejo
使用說明書
G23MR
Read through carefully and understand these instructions before use.
Leer cuidadosamente y comprender estas instrucciones antes del uso.
使用前務請詳加閱讀。
Page 2
13
1
@
#
$
15 – 30o
AB
4
3
2
5
6
7
8
9
0
7
!
9
4
(
)
22.5 mm
a
q
w
)
61 6.5 mm
89 8.5 mm
a
25
%
^
&
*
2
q
w
e
r
Page 3

English Español
Brush cover Cubierta de la escobilla
1
Socket for side handle Rosca para el asa lateral
2
Push button (Spindle lock)
3
Spindle Eje
4
Across fl ats Distancia entre caras
5
Wheel guard
6
Wheel washer Arandela molar
7
Depressed center wheel Muela de alisado
8
Wheel nut Contratuerca molar
9
Wrench Llave para tuercas
0
Diamond wheel Adiamantado
!
Side handle Asidero lateral
@
Lock button Botón de seguridad
#
Switch Conmutador
$
Lever Palanca
%
Set piece Pieza de ajuste
^
Screw Tornillo
&
Locating pin
*
Wear limit Límite de uso
(
No. of carbon brush No. de carbón de contacto
)
Usual carbon brush Escobilla de carbón usual
q
Auto-stop carbon brush
w
Spring Resorte
e
Brush holder Portaescobilla
r
Botón pulsador
(bloqueo del eje)
Cubierta protectora de
muela
Pasador de
posicionamiento
Escobilla de carbón de
parada
中國語
碳刷蓋
側柄插座
鎖定銷(主軸鎖)
主軸
對邊寬度
輪罩
輪墊圈
砂輪
砂輪螺帽
扳手
金剛石輪
側柄
開關鎖
開關
手柄
設定片
螺絲釘
定位銷
磨損極限
碳刷號
通常碳刷
自動停止碳刷
彈簧
刷握
ﺔﻳﺑﺭﻌﻟﺍ
ﺓﺎﺷﺭﻔﻟﺍ ءﺎﻁﻏ
ﻲﺑﻧﺎﺟﻟﺍ ﺽﺑﻘﻣﻟﺍ ﺫﺧﺄﻣ
(ﻥﺍﺭﻭﺩﻟﺍ ﺩﻭﻣﻋ ﻝﻔﻗ) ﻁﻐﺿﻟﺍ ﺭﺯ
ﻥﺍﺭﻭﺩﻟﺍ ﺩﻭﻣﻋ
ﺔﻠﺧﺍﺩﺗﻣﻟﺍ ﺢﻁﺳﻷﺍ
ﺔﻠﺟﻌﻟﺍ ءﺎﻗﻭ
ﺔﻠﺟﻌﻟﺍ ﺔﻘﻠﺣ
ﺯﻛﺭﻣﻟﺍ ﺔﻁﻭﻐﺿﻣ ﺔﻠﺟﻋ
ﺔﻠﺟﻌﻟﺍ ﺔﻟﻭﻣﺻ
ﻁﺑﺭﻟﺍ ﺡﺎﺗﻔﻣ
ﺱﺎﻣﻟﺍ ﺓﺭﺎﺳﻛﺑ ﺦﻳﻠﺟﺗ ﺔﻠﺟﻋ
ﻲﺑﻧﺎﺟ ﺽﺑﻘﻣ
ﻝﻔﻘﻟﺍ ﺭﺯ
ﺡﺎﺗﻔﻣ
ﻉﺍﺭﺫ
ﻁﺑﺿﻟﺍ ﺔﻌﻁﻗ
ﺭﺎﻣﺳﻣ
ﺭﺎﻣﺳﻣ ﻊﻗﻭﻣ ﺩﻳﺩﺣﺗ
ﻝﻛﺂﺗﻟﺍ ﺩﺣ
ﻥﻭﺑﺭﻛﻟﺎﺑ ﻝﻘﺻﻟﺍ ﺓﺎﺷﺭﻓ ﻡﻗﺭ
ﺔﻳﺩﺎﻌﻟﺍ ﻥﻭﺑﺭﻛﻟﺍ ﺓﺎﺷﺭﻓ
ﺔﻳﺋﺎﻘﻠﺗ ﻥﻭﺑﺭﻛﻟﺎﺑ ﻝﻘﺻ ﺓﺎﺷﺭﻓ
ﻑﻗﻭﺗﻟﺍ
ﺽﺑﺎﻧﻟﺍ
ﺓﺎﺷﺭﻔﻟﺍ ﻝﻣﺎﺣ
3
Page 4

English
GENERAL POWER TOOL SAFETY WARNINGS
WARNING
Read all safety warnings and all instructions.
Failure to follow the warnings and instructions may result in
electric shock, fi re and/or serious injury.
Save all wa rnings and ins tructions f or future ref erence.
The term “power tool” in the warnings refers to your
mains-operated (corded) power tool or battery-operated
(cordless) power tool.
1) Work ar ea s afe ty
a) Keep work area clean and well lit.
Cluttered or dark areas invite accidents.
b) Do not operate power tools in explosive
atmospheres, such as in the presence of
fl ammable liquids, gases or dust.
Power tools create sparks which may ignite the dust
or fumes.
c) Keep children and bystanders away while
operating a power tool.
Distractions can cause you to lose control.
2) Electrical safety
a) Power tool plugs must match the outlet.
Never modify the plug in any way.
Do not use any adapter plugs with earthed
(grounded) power tools.
Unmodifi ed plugs and matching outlets will reduce
risk of electric shock.
b) Avoid body contact with earthed or grounded
surfaces, such as pipes, radiators, ranges and
refrigerators.
There is an increased risk of electric shock if your
body is earthed or grounded.
c) Do not expose power tools to rain or wet
conditions.
Water entering a power tool will increase the risk of
electric shock.
d) Do not abuse the cord. Never use the cord for
carrying, pulling or unplugging the power tool.
Keep cord away from heat, oil, sharp edges or
moving parts.
Damaged or entangled cords increase the risk of
electric shock.
e) When operating a power tool outdoors, use an
extension cord suitable for outdoor use.
Use of a cord suitable for outdoor use reduces the
risk of electric shock.
f) If operating a power tool in a damp location
is unavoidable, use a residual current device
(RCD) protected supply.
Use of an RCD reduces the risk of electric shock.
3) Personal safety
a) Stay alert, watch what you are doing and use
common sense when operating a power tool.
Do not use a p ower tool whil e you are tired o r under
the infl uence of drugs, alcohol or medication.
A moment of inattention while operating power tools
may result in serious personal injury.
b) Use personal protective equipment. Always
wear eye protection.
Protective equipment such as dust mask, non-skid
safety shoes , hard h at, or hear ing pro tection u sed for
appropriate conditions will reduce personal injuries.
c) Prevent unintentional starting. Ensure the
switch is in the off position before connecting
to power source and/or battery pack, picking
up or carrying the tool.
4
Carr ying power tools with your fi nger on the switch
or energising power tools that have the switch on
invites accidents.
d) Remove any adjusting key or wrench before
turning the power tool on.
A wrench or a key left attached to a rotating part of
the power tool may result in personal injury.
e) Do not overreach. Keep proper footing and
balance at all times.
This enables better control of the power tool in
unexpected situations.
f) Dress properly. Do not wear loose clothing or
jewellery. Keep your hair, clothing and gloves
away from moving parts.
Loose clothes, jewellery or long hair can be caught
in moving parts.
g) If devices are provided for the connection of
dust extraction and collection facilities, ensure
these are connected and properly used.
Use of dust collection can reduce dust-related hazards.
4) Power tool use and care
a) Do not force the power tool. Use the correct
power tool for your application.
The correct power tool will do the job better and
safer at the rate for which it was designed.
b) Do not use the power tool if the switch does not
turn it on and off .
Any power tool that cannot be controlled with the
switch is dangerous and must be repaired.
c) Disconnect the plug from the power source
and/or the battery pack from the power tool
before making any adjustments, changing
accessories, or storing power tools.
Such preventive safety measures reduce the risk of
starting the power tool accidentally.
d) Store idle power tools out of the reach of
children and do not allow persons unfamiliar
with the power tool or these instructions to
operate the power tool.
Power to ols are dangero us in the hands of untrained
users.
e) Maintain power tools. Check for misalignment
or binding of moving parts, breakage of parts
and any other condition that may aff ect the
power toolʼs operation.
If damaged, have the power tool repaired
before use.
Many accidents are caused by poorly maintained
power tools.
f) Keep cutting tools sharp and clean.
Properly maintained cutting tools with sharp cutting
edges a re less likely to bi nd and are easie r to control.
g) Use the power tool, accessories and tool bits
etc. in accordance with these instructions,
taking into account the working conditions and
the work to be performed.
Use of the power tool for operations diff erent from
those i ntended coul d result in a haza rdous situati on.
5) Service
a) Have your power tool serviced by a qualifi ed
repair person using only identical replacement
parts.
This will ensure that the safety of the power tool is
maintained.
PRECAUTION
Keep children and infi rm persons away.
When not in use, tools should be stored out of reach
of children and infi rm persons.
Page 5

English
SAFETY WARNINGS COMMON FOR GRINDING
OR ABRASIVE CUTTING-OFF OPERATIONS
a) This power tool is intended to function as a grinder
or cut-off tool. Read all safety warnings, instructions,
illustrations and specifi cations provided with this
power tool.
Failure to follow all instructions listed below may result
in electric shock, fi re and/or serious injury.
b) Operations such as sanding, wire brushing or
polishing are not recommended to be performed
with this power tool.
Operations for which the power tool was not designed
may create a hazard and cause personal injury.
c)
D
o not use accessories which are not specifi cally
desi
gned and recommended by the tool manufacturer.
Just because the accessory can be attached to your
power tool, it does not assure safe operation.
d) T
he rated speed of the accessory must be at least
equal to th
Accessories running faster than their rated speed can
break and fl y apart.
e) The outside diameter and the thickness of your
accessory must be within the capacity rating of your
power tool.
Incorrectly sized accessories cannot be adequately
guarded or controlled.
f) Threaded mounting of accessories must match the
grinder spindle thread. For accessories mounted by
fl anges, the arbour hole of accessory must fi t the
locating diameter of the fl ange.
A
ccessories that do not match the mounting hardware
of the power tool will run out of balance, vibrate
excessively an
g) Do not use a damaged accessory. Before each use
inspect the accessory such as abrasive wheels for
chips and cracks, backing pad for cracks, tear or
excess wear, wire brush for loose or cracked wires.
If power tool or accessory is dropped, inspect for
damage or install an undamaged accessory. After
inspecting and installing an accessory, position
yourself and bystanders away from the plane of
the rotating accessory and run the power tool at
maximum no-load speed for one minute.
Damaged accessories will normally break apar t during
this test time.
h)
Wear
on application, use face shield, safety goggles or
safety glasses. As appropriate, wear dust mask,
hearing protectors, gloves and workshop apron
capabl
fragments.
The eye protection must be capable of stopping fl ying
debris generated by various operations. The dust mask
or respirator must be capable of fi ltrating particles
generated by your operation. Prolonged exposure to
high intensit y noise may cause hearing loss.
i) Keep bystanders a safe distance away from work
area. Anyone entering the work area must wear
personal protective equipment.
Fragments of workpiece or of a broken accessory may
fl y away and cause injur y beyond immediate area of
operation.
j)
Hol
only, when performing an operation where the
cutting accessory may contact hidden wiring or its
own
Cutting accessory contacting a “live” wire may make
exposed metal par ts of the power tool “ live” and could
give the operator an electric shock.
e maximum speed marked on the power tool.
d may cause loss of control.
personal protective equipment. Depending
e of stopping small abrasive or workpiece
d the power tool by insulated gripping surfaces
cord.
k) Position the cord clear of the spinning accessory.
If you lose c ontrol, the co rd may be cut or sna gged and your
hand or arm may be pulled into the spinning accessory.
l) Never lay the power tool down until the accessory
has come to a complete stop.
The spinning accessor y may grab the surface and pull
the power tool out of your control.
m)
Do not run the power tool while carrying it at your side.
Accidental contact with the spinning accessory could
snag your clothing, pulling the accessory into your body.
n) Regularly clean the power tool’s air vents.
The motor’s fan will draw the dust inside the housing
and excessive accumulation of powdered metal may
cause electrical hazards.
o)
Do n
ot operate the power tool near fl ammable
mate
rials.
Sparks could ignite these materials.
p) Do not use accessories that require liquid coolants.
Using water or other liquid coolants may result in
electrocution or shock.
KICKBACK AND RELATED WARNINGS
Kickback is a sudden reaction to a pinched or snagged
rotating wheel, backing pad, brush or any other accessory.
Pinching or snagging causes rapid stalling of the rotating
accessory which in turn causes the uncontrolled power tool
to be forced in the direction opposite of the accessory’s
rotation at the point of the binding.
For example, if an abrasive wheel is snagged or pinched
by the workpiece, the edge of the wheel that is entering
into the pinch point can dig into the surface of the material
causing the wheel to climb out or kick out. The wheel may
either jump toward or away from the operator, depending on
direction of the wheel’s movement at the point of pinching.
Abrasive wheels may also break under these conditions.
Kickback is the result of po wer tool misuse and/or inc orrect
operating procedures or conditions and can be avoided by
taking proper precautions as given below.
a) Maintain a fi rm grip on the power tool and position
your body and arm to allow you to resist kickback
forces. Always use auxiliary handle, if provided, for
maximum control over kickback or torque reaction
during start-up.
The operator can control torque reactions or kickback
forces, if proper precautions are taken.
b) N
ever
Accessory may kickback over your hand.
c) D
Kickback will propel the tool in direction opposite to the
d) Us
Corners, sharp edges or bouncing have a tendency to
e) Do no
place your hand near the rotating accessory.
o not position your body in the area where power to
will move if kickback occurs.
wheel’s movement at the point of snagging.
e special care when working corners, sharp edges
etc. Avoid bouncing and snagging the acc
snag the rotating acces sory and caus e loss of control o r
kickback.
t attach a saw chain woodcarving blade or tooth
saw blade.
Such
bl ad es c re ate fre qu en t ki ck bac k a nd l os s of co ntr o
essory.
ed
ol
l.
SAFETY WARNINGS SPECIFIC FOR GRINDING
AND ABRASIVE CUTTING-OFF OPERATIONS
a) Use only wheel types that are recommended for
your power tool and the specifi c guard designed
for the selected wheel.
Wheels for which the power tool was not designed
cannot be adequately guarded and are unsafe.
5
Page 6

English
b) The grinding surface of centre depressed wheels
must be mounted below the plane of the guard lip.
An improperly mounted wheel that projects through the
plane of the guard lip cannot be adequately protected.
c)
The
guard must be securely attached to the power
tool and positioned for maximum safety, so the
least a
mount of wheel is exposed towards the
operator.
The guard helps to protect the operator from broken
wheel fragments, accidental contact with wheel and
sparks that could ignite clothing.
d) Wheels must be used only for recommended
applications. For example: do not grind with the
side of cut-off wheel.
Abrasive cut-off wheels are intended for peripheral
grinding, side forces applied to these wheels may
cause them to shatter.
e) Always use undamaged wheel fl anges that are of
correct size and shape for your selected wheel.
Proper wheel fl anges support the wheel thus reducing
the possibility of wheel breakage. Flanges for cut-off
wheels may be diff erent from grinding wheel fl anges.
f) Do not use worn down wheels from larger power
tools.
Wheel intended for larger power tool is not suitable for
the higher speed of a smaller tool and may burst.
ADDITIONAL SAFETY WARNINGS SPECIFIC
FOR ABRASIVE CUTTING-OFF OPERATIONS
a) Do not “jam” the cut-off wheel or apply excessive
pressure. Do not attempt to make an excessive
depth of cut.
Overstressing the wheel increases the loading and
susceptibility to twisting or binding of the wheel in the
cut and the possibility of kickback or wheel breakage.
b) Do not position your body in line with and behind
the rotating wheel.
When the wheel, at the point of operation, is moving
away from your body, the possible kickback may propel
the spinning wheel and the power tool directly at you.
c) When wheel is binding or when interrupting a cut
for any reason, switch off the power tool and hold
the power tool motionless until the wheel comes to
a complete stop. Never attempt to remove the cutoff wheel from the cut while the wheel is in motion
otherwise kickback may occur.
Investigate and take corrective action to eliminate the
cause of wheel binding.
d) Do not restart the cutting operation in the
workpiece. Let the wheel reach full speed and
carefully reenter the cut.
The wheel may bind, walk up or kickback if the power
tool is restarted in the workpiece.
e) Support panels or any oversized workpiece to
minimize the risk of wheel pinching and kickback.
Large workpieces tend to sag under their own weight.
Supports must be placed under the workpiece near the
line of cut and near the edge of the workpiece on both
sides of the wheel.
f) Use extra caution when making a “pocket cut” into
existing walls or other blind areas.
The protruding wheel may cut gas or water pipes,
electrical wiring or objects that can cause kickback.
PRECAUTIONS ON USING DISC GRINDER
1. Never operate these power tools without Wheel
Guards.
2. Check that speed marked on the wheel is equal to or
greater than the rated speed of the grinder.
Use only depressed center wheels rated at 80 m/s or
more.
3. Ensure that the wheel dimensions are compatible with
the grinder and that the wheel fi ts the spindle.
4. Abrasive wheels shall be stored and handled with care
in accordance with manufacturer’s instructions.
5. Inspect the depressed center wheel before use, do not
use chipped, cracked or otherwise defective products.
6. Always hold the body handle and side handle of the
power tool fi rmly. Otherwise the counterforce produced
may result in inac curate and even dangerous opera tion.
7. Do not use cutting-off wheels for side grinding.
8. Do not use of separate reducing bushings or adapters
to adapt large hole abrasive wheels.
9. The wheel continues to rotate after the tool is switched
off .
SPECIFICATIONS
Model G18MR G23MR
Voltage (by areas)
*1
Input
No-load speed 8500 min
Wheel
*2
Weight
*1 Be sure to check the nameplate on product as it is subject to change by areas.
*2 Weight: Only main body
6
*1
Outer dia. 180 mm 230 mm
Inner dia. 22.23 mm
Peripheral speed 80 m/s
(110 V, 220 V, 230 V, 240 V)
2400 W
-1
5.4 kg
6600 min
-1
Page 7

English
STANDARD ACCESSORIES
(1) Wrench ........................................................................1
(2) Side handle ................................................................1
Depressed center wheels are not provided as standard
accessories.
Standard accessories are subject to change without
notice.
APPLICATIONS
○ Removal of casting fi n and fi nishing of various types of
steel, bronze and aluminum materials and castings.
○ G rind ing of we lde d se ctio ns o r se cti ons cut by me ans of
a cutting torch.
○ Grinding of synthetic resins, slate, brick, marble, etc.
○ Cutting of synthetic concrete, stone, brick, marble and
similar materials.
PRIOR TO OPERATION
1. Power source
Ensure that the power source to be utilized conforms
to the power requirements specifi ed on the product
nameplate.
2. Power switch
Ensure that the power switch is in the OFF position. If
the plug is connected to a receptacle while the power
switch is in the ON position, the power tool will star t
operating immediately, which could cause a serious
accident.
3. Extension cord
When the work area is removed from the power source,
use an extension cord of suffi cient thickness and rated
capaci ty. The extension cord sho uld be kept as shor t as
practicable.
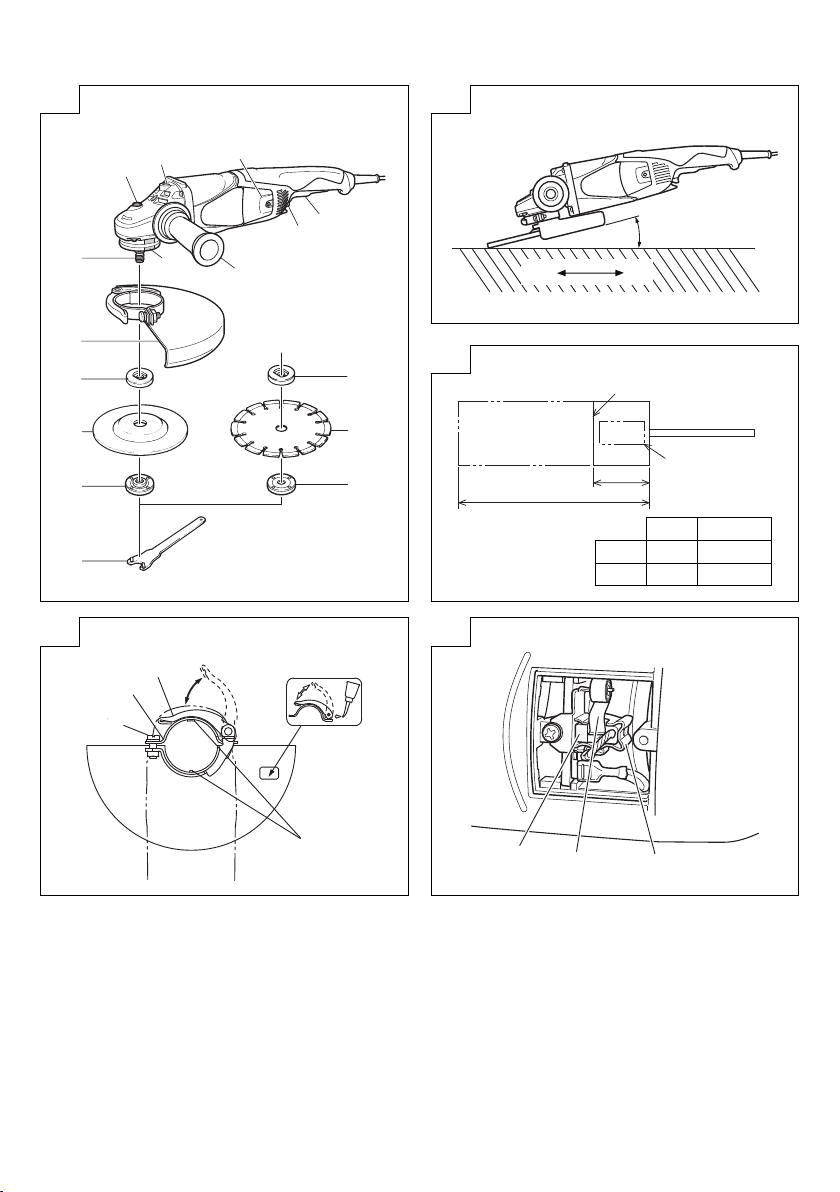
4. Fitting and adjusting the wheel guard
The wheel guard is a protective device to prevent injury
should the depressed center wheel shatter during
operation. Ensure that the guard is properly fi tted and
fastened before commencing grinding operation.
[Installing and adjusting the wheel guard]
○ Open the lever and insert the locating pin of wheel
guard, bringing it into line with the across fl ats of
packing ground.
○ Then, turn the wheel guard to a desired position (for
use).
○ Close the lever and fi x it. If and when required, carry out
adjustments by tightening or loosening the screw.
○ If the lever does not move smoothly, apply some
lubricating oil to the sliding section between the set
piece and the lever.
○ Fasten the wheel guard at the position where the across
fl ats of the wheel guard positioning pin and packing
ground are aligned (the position where the wheel guard
is inserted), but do not use it.
5. Ensure that the depressed center wheel to be utilized is
the correct type and free of cracks or surface defects.
Also ensure that the depressed center wheel is properly
mounted and the wheel nut is securely tightened. Refer
to the section on “Assembling and Disassembling the
Depressed Center Wheel”.
6. Conducting a trial run
Ensure that the abrasive products is correctly mounted
and tightened before use and run the tool at no-load
for 30 seconds in a safe position, stop immediately if
there is considerable vibration or if other defects are
detected.
If th is condition occur s, check the mac hine to determi ne
the cause.
7. C o nfi rm the spindle lock mechanism
Confi rm that the spindle lock is disengaged by pushing
push button two or three times before switching the
power tool on (See Fig. 1).
8. Fixing the side handle
Screw the side handle into the gear cover.
PRACTICAL GRINDER APPLICATION
1. Pressure
To prolong the life of the machine and ensure a fi rst
class fi nish, it is important that the machine should not
be overloaded by applying too much pressure. In most
appli cations, the we ight of the mach ine alone is su ffi cient
for eff ective grinding. Too much pressure will result in
reduced rotational speed, inferior surface fi nish, and
overloading which could reduce the life of the machine.
2. Grinding angle
Do not apply the entire surface of the depressed center
wheel to the material to be ground. As shown in Fig. 3,
the machine should be held at an angle of 15° – 30° so
that the external edge of the depressed center wheel
contacts the material at an optimum angle.
3. To prevent a new depressed center wheel from digging
into the workpiece, initial grinding should be performed
by drawing the grinder across the workpiece toward the
operator (Fig. 3 direction B). Once the leading edge
of the depressed center wheel is properly abraded,
grinding may be conducted in either direction.
4. Switch operation
Switch ON: Push the locking button forward and then
* For c ontinuous use, press th e switch lever.
Switch OFF: Press and release the switch lever.
5. Precautions immediately after fi nishing operation
Af ter switching off the machine, do not put it down until
the depressed center wheel has come to a complete
stop. Apar t from avoiding serious accidents, this
precaution will reduce the amount of dust and swarf
sucked into the machine.
CAUTION
○ Check that the work piece is properly supported.
○ Ensure that ventilation openings are kept clear when
working in dust y conditions.
If it should become necessary to clear dust, fi rst
disconnect the tool from the mains supply (use nonmetallic objects) and avoid damaging internal par ts.
○ Ensure that sparks resulting from use do not create
a hazard e.g. do not hit persons, or ignite fl ammable
substances.
○ Always use eye and ear protection.
Other personal protective equipment such as dust
mask, gloves, helmet and apron should be worn when
necessary.
If in doubt, wear the protective equipment.
○ When the machine is not use, the power source should
be disconnected.
press the switch lever.
The switch lever is locked by pushing
the locking button forward once again.
(*Subject to change depending on area.)
ASSEMBLING AND DISASSEMBLING THE
DEPRESSED CENTER WHEEL
CAUTION
Be sure to switch OFF and disconnect the attachment
plug from the receptacle to avoid a serious accident.
1. Assembling (Fig. 1)
(1) Turn the machine upside down so that the spindle is
facing upward.
7
Page 8

English
(2) Mount the wheel washer onto the spindle.
(3) Fit the protruding part of the depressed center wheel or
diamond wheel onto the wheel washer.
(4) Screw the wheel nut onto the spindle.
(For diamond wheel assembling, use the wheel nut with
the convex side against the diamond wheel.)
(5) Insert the push button to prevent rotation of the spindle,
and tighten the wheel nut with the accessory wrench,
as shown in Fig.1.
2. Disassembling
Follow the above procedures in reverse.
CAUTION
○ Comfi rm that the depressed center wheel is mounted
fi rmly.
○ Confi rm that the push button is disengaged by pushing
push button two or three times before switching the
power tool on.
MAINTENANCE AND INSPECTION
1. Inspecting the depressed center wheel
Ensure that the depressed center wheel is free of
cracks and surface defects.
2. Inspecting the mounting screws
Regularly inspect all mounting screws and ensure that
they are properly tightened. Should any of the screws
be loose, retighten them immediately. Failure to do so
could result in serious hazard.
3. Inspecting the carbon brushes (Fig. 4)
The motor employs carbon brushes which are
consumable parts.
When they become worn to or near the “wear limit”, it
could re sult in motor trouble. Whe n an auto-stop c arbon
brush is equipped, the motor will stop automatically.
At that time, replace both carbon brushes with new
ones which have the same carbon brush numbers
shown in the fi gure. In addition, always keep carbon
brushes clean and ensure that they slide freely within
the brush holders.
4. Replacing carbon brushes (Fig. 5)
<Disassembly>
(1) Loosen the D4 tapping screw retaining the brush cover
and remove the brush cover.
(2) Use the a uxiliar y hexagonal w rench or sm all screwdr iver
to pull up the edge of the spring that is holding down the
carbon brush. Remove the edge of the spring toward
the outside of the brush holder.
(3) Remove the end of the pig-tail on the carbon br ush from
the terminal section of brush holder and then remove
the carbon brush form the brush holder.
<Assembly>
(1) Insert the end of the pig-tail of the carbon brush in the
terminal section of brush holder.
(2) Insert the carbon brush in the brush holder.
(3) Use the a uxiliar y hexagonal w rench or sm all screwdr iver
to return the edge of the spr ing to the head of th e carbon
brush.
(4) Mount the tail cover and tighten the D4 tapping screw.
5. Maintenance of the motor
The motor unit winding is the very “heart ” of the power
tool. Exercise due care to ensure the winding does not
become damaged and/or wet with oil or water.
6. Service parts list
CAUTION
Repair, modifi cation and inspection of HiKOKI Power
Tools must be carried out by an HiKOKI Authorized
Service Center.
Thi s Par ts Li st will be hel pful if pr esen ted w ith t he to ol to
the HiKOKI Au thorized Ser vice Center when requ esting
repair or other maintenance.
8
In the operation and maintenance of power tools, the
safety regulations and standards prescribed in each
countr y must be observed.
MODIFICATIONS
HiKOKI Power Tools are constantly being improved
and modifi ed to incorporate the latest technological
advancements.
Accordingly, some parts may be changed without prior
notice.
NOTE
Due to HiKOKI’s continuing program of research and
development, the specifi cations herein are subject to
change without prior notice.
Page 9

Español
ADVERTENCIAS DE SEGURIDAD GENERAL DE
LA HERRAMIENTA ELÉCTRICA
ADVERTENCIA
Lea todas las instrucciones y advertencias de
seguridad.
Si no se siguen las advertencias e instrucciones, podría
producirse una descarga eléctrica, un incendio o daños
graves.
Guarde todas las advertencias e instrucciones para
futura referencia.
El término “herramienta eléctrica” en las advertencias hace
referencia a la herramienta eléctrica que funciona con la
red de suministro (con cable) o a la herramienta eléctrica
que funciona con pilas (sin cable).
1) Seguridad del área de trabajo
a) Mantenga la zona de trabajo limpia y bien
iluminada.
Las zonas desordenadas u oscuras pueden
provocar accidentes.
b) No utilice las herramientas eléctricas en
entornos explosivos como, por ejemplo, en
presencia de líquidos infl amables, gases o
polvo.
Las herramientas eléctricas crean chispas que
pueden infl amar el polvo o los gases.
c) Mantenga a los niños y transeúntes alejados
cuando utilice una herramienta eléctrica.
Las distracciones pueden hacer que pierda el
control.
2) Seguridad eléctrica
a) Los enchufes de las herramientas eléctricas
tienen que ser adecuados a la toma de
corriente.
No modifi que el enchufe.
No utilice enchufes adaptadores con
herramientas eléctricas conectadas a tierra.
Si no se modifi can los enchufes y se utilizan tomas
de corriente adecuadas se reducirá el riesgo de
descarga eléctrica.
b) Evite el contacto corporal con superfi cies
conectadas a tierra como tuberías, radiadores
y frigorífi cos.
Hay mayor riesgo de descarga eléctrica si su
cuerpo está en contacto con el suelo.
c) No exponga las herramientas eléctricas a la
lluvia o a la humedad.
La entrada de agua en una herramienta eléctrica
aumentará el riesgo de descarga eléctrica.
d) No utilice el cable incorrectamente. No utilice el
cable para transportar, tirar de la herramienta
eléctrica o desenchufarla.
Mantenga el cable alejado del calor, del aceite,
de bordes afi lados o piezas móviles.
Los cables dañados o enredados aumentan el
riesgo de descarga eléctrica.
e) Cuando utilice una herramienta eléctrica al aire
libre, utilice un cable prolongador adecuado
para utilizarse al aire libre.
La utilización de un cable adecuado para usarse al
aire libre reduce el riesgo de descarga eléctrica.
f) Si no se puede evitar el uso de una herramienta
eléctrica en un lugar húmedo, utilice un
suministro protegido mediante un dispositivo
de corriente residual (RCD).
El uso de un RCD reduce el riesgo de descarga
eléctrica.
3) Seguridad personal
a) Esté atento, preste atención a lo que hace y
utilice el sentido común cuando utilice una
herramienta eléctrica.
No utilice una herramienta eléctrica cuando
esté cansado o esté bajo la infl uencia de
drogas, alcohol o medicación.
La distracción momentánea cuando utiliza
herramientas eléctricas puede dar lugar a lesiones
personales graves.
b) Utilice un equipo de protección. Utilice siempre
una protección ocular.
El equipo de protección como máscara para el
polvo, zapatos de seguridad antideslizantes, casco
o protección auditiva utilizado en las situaciones
adecuadas reducirá las lesiones personales.
c) Evite un inicio involuntario. Asegúrese de que
el interruptor está en “off ” antes de conectar
la herramienta a una fuente de alimentación o
batería, cogerla o transportarla.
E l t ran sp or te de her ra mi en ta s el éc tr ic as c on el de do
en el interruptor o el encendido de herramientas
eléctricas con el interruptor encendido puede
provocar accidentes.
d) Retire las llaves de ajuste antes de encender la
herramienta eléctrica.
Si se deja una llave en una pieza giratoria de la
herramienta eléctrica podrían producirse lesiones
personales.
e) No se extralimite. Mantenga un equilibrio
adecuado en todo momento.
Esto permite un mayor control de la herramienta
eléctrica en situaciones inesperadas.
f) Vístase adecuadamente. No lleve prendas
sueltas o joyas. Mantenga el pelo, la ropa y los
guantes alejados de las piezas móviles.
La ropa suelta, las joyas y el pelo largo pueden
quedar atrapados en las piezas móviles.
g) Si se proporcionan dispositivos para
la conexión de extracción de polvo e
instalaciones de recogida, asegúrese de que
están conec tados y se util izan adecu adamente.
La utilización de un sistema de recogida de polvo
puede reducir los riesgos relacionados con el polvo.
4) Utilización y mantenimiento de las herramientas
eléctricas
a)
No fuerce la herramienta eléctrica. Utilice la
herramienta eléctrica correcta para su aplicación.
La herramienta eléctrica correcta trabajará mejor y
de forma más segura si se util iza a la velocidad para
la que fue diseñada.
b) No utilice la herramienta eléctrica si el
interruptor no la enciende y apaga.
Las herramientas eléctricas que no pueden
controlarse con el interruptor son peligrosas y
deben repararse.
c) Desconecte el enchufe de la fuente eléctrica o
la batería de la herramienta eléctrica antes de
hacer ajustes, cambiar accesorios o almacenar
herramientas eléctricas.
Estas m edidas de seguridad preventivas reducen el
riesgo de que la herramienta eléctrica se ponga en
marcha accidentalmente.
d) Guarde las herramientas eléctricas que no
se utilicen fuera del alcance de los niños,
y no permita que utilicen las herramientas
eléctricas personas no familiarizadas con las
mismas o con estas instrucciones.
Las herramientas eléctricas son peligrosas si son
utilizadas por usuarios sin formación.
9
Page 10

Español
e)
Realice el mantenimiento de las herramientas
eléctricas. Compruebe si las piezas móviles
están mal alineadas o unidas, si hay alguna
pieza rota u otra condición que pudiera afe ctar al
funcionamiento de las herramientas eléctricas.
Si la herramienta eléctrica está dañada, llévela
a reparar antes de utilizarla.
Se producen muchos accidentes por no realizar un
mantenimiento correcto de las herramientas eléctricas.
f) Mantenga las herramientas de corte afi ladas y
limpias.
Las herramientas de corte correctamente
mantenidas con los bordes de cor te afi lados son
más fáciles de controlar, y existe menor riesgo de
que se atasquen.
g) Utilice la herramienta eléctrica, los accesorios
y las brocas de la herramienta, etc. de acuerdo
con estas instrucciones, teniendo en cuenta
las condiciones laborales y el trabajo que se va
a realizar.
La utilización de la herramienta eléctrica para
operaciones diferentes a las previstas podría dar
lugar a una situación peligrosa.
5) Revisión
a) Solicite a un experto cualifi cado que revise la
herramienta eléctrica y que utilice solo piezas
de repuesto idénticas.
Esto garantizará el mantenimiento de la seguridad
de la herramienta eléctrica.
PRECAUCIÓN
Mante nga a los niños y a l as persona s enfermas al ejadas.
Cuando no se utilicen, las herramientas deben
almacenarse fuera del alcance de los niños y de las
personas enfermas.
ADVERTENCIAS COMUNES DE SEGURIDAD
PARA LAS OPERACIONES DE MOLIDO O
CORTE ABRASIVO
a) Esta herramienta eléctrica está diseñada para
utilizarse como amoladora o herramienta de
corte. Lea todas las advertencias de seguridad,
instrucciones, ilustraciones y especifi caciones
incluidas con esta herramienta.
Si no se siguen las instrucciones indicadas a
continuación podría producirse una descarga eléctrica,
un incendio o daños graves.
b) No se recomienda realizar operaciones como lijado,
cepillado metálico o pulido con esta herramienta
eléctrica.
Las operaciones para las que no se diseñó la
herramienta eléctrica podrían producir un riesgo y
causar daños personales.
c) No utilice accesorios que no estén diseñados
y estén recomendados específi camente por el
fabricante de la herramienta.
El hecho de que el accesorio pueda acoplarse en la
herramienta eléctrica no garantiza un funcionamiento
seguro.
d) La velocidad nominal del accesorio debe ser al
menos igual a la velocidad máxima marcada en la
herramienta eléctrica.
La utilización de accesorios a una velocidad superior a
su veloci dad nominal po dría provocar que se r ompieran
o se descompusieran.
e) El diámetro exterior y el grosor de su accesorio
deben estar dentro de la clasifi cación de capacidad
de su herramienta eléctrica.
10
Los accesorios de tamaño incorrecto no pueden
supervisarse o controlarse adecuadamente.
f) El montaje roscado de accesorios debe coincidir
con la rosca del husillo de la amoladora. Para los
accesorios instalados por medio de bridas, el
orifi cio del mandril del accesorio debe coincidir
con el diámetro de posicionamiento de la brida.
Los accesorios que no coincidan con la estructura de
montaje de la herramienta eléctrica se desequilibrarán,
vibrar án en exceso y pueden c ausar una pérd ida de control.
g)
No utilice accesorios dañados. Antes de cada uso, revise
el accesorio, comprobando aspectos tales como si las
ruedas abrasivas tienen grietas o roturas, las almohadillas
de respaldo tienen grietas, rasgaduras o desgaste
excesivo o el cepillo metálico está suelto o con el metal
roto. Si se cae la herramienta eléctrica o el accesorio,
compruebe si está dañado o instale un accesorio sin
dañar. Tras inspeccionar e instalar un accesorio, tanto
usted como los viandantes deben alejarse del plano del
accesorio giratorio y utilizar la herramienta eléctrica a
máxima velocidad sin carga durante un minuto.
Los accesorios dañados se romperán durante este
periodo de prueba.
h)
Utilice
un equipo de protección personal.
Dependiendo de la aplicación, utilice protector
facial, gafas protectoras o gafas de seguridad. Si
procede, utilice máscara para polvo, protectores
auditivos, guantes y mono capaz de detener
pequeños fragmentos abrasivos o piezas de trabaj
El protec tor ocula r debe ser ca paz de deten er los desec hos
que salen desprendidos generados por las diferentes
operaciones. La máscara para polvo o respirador debe
ser capaz de fi ltrar par tículas generadas por su operación.
Una exposición prolongada a un ruido de intensidad
elevada podría producir pérdida de audición.
i) Mantenga a los viandantes alejados del área de
trabajo. Toda persona que entre en la zona de
trabajo debe utilizar equipo de protección personal.
Los fragmentos de un trabajo o un accesorio roto
pueden salir despedidos y causar daños más allá del
área de operación inmediata.
j)
Suje
te la herramienta eléctrica solo por las
superfi cies de agarre aisladas cuando realice una
ope
ración en la que el accesorio de corte pueda entrar
en contacto con el cableado oculto o su propio cable.
Si el accesorio de corte entra en contacto con un cable
con corriente, las partes metálicas expuestas de la
herramienta eléctrica pueden transmitir esa corriente y
provocar una descarga eléctrica al operador.
k) Coloque el cable cerca del accesorio giratorio.
Si pierde el control, el cable podría cortarse o engancharse
y la mano o el brazo podrían entrar en el accesorio giratorio.
l)
No c
oloque boca abajo la herramienta eléctrica hasta
que el accesorio se haya parado comple
El accesorio giratorio podría agarrar la superfi cie y
descontrolar la herramienta eléctrica.
m) No ponga en marcha la herramienta eléctrica
cuando la lleve al lado.
Un contacto accidental con el accesorio giratorio podría
enganc har la ropa y el acce sorio podría pr ovocarle lesion es.
n) Limpie regularmente las ranuras de ventilación de
aire de la herramienta eléctrica.
El ventilador del motor extraerá el polvo del interior
de la carcasa, y la acumulación excesiva de metal en
polvo podría producir peligros eléctricos.
o) No utilice la herramienta eléctrica cerca de
materiales infl amables.
Las chispas podrían quemar dichos materiales.
p) No utilice accesorios que requieran refrigerantes
líquidos.
tamente.
o.
Page 11

Español
El uso de agua u otros refrigerantes líquidos podría
provocar electrocución o descargas eléctricas.
RETROCESO Y ADVERTENCIAS
RELACIONADAS
El retroc eso es una reac ción repent ina a una rueda g iratoria,
almohadilla de soporte, cepillo u otro accesorio atrapado
o enganchado. El bloqueo o enganche causa una parada
rápida del accesorio giratorio que, a su vez, hace que la
herramienta eléctrica no controlada vaya en la dirección
opuesta del giro del accesorio en el punto de atasco.
Por ejemplo, si una rueda de abrasión se engancha o
queda atrapada en la pieza de trabajo, el borde de la rueda
que entra en el punto de bloqueo puede hundirse en la
superfi cie del material, provocando que la rueda se salga
o rebote. La rueda puede saltar en dirección al operario
o en sentido contrario, dependiendo de la dirección del
movimiento de la rueda en el punto de bloqueo.
Estas sit uaciones tamb ién pueden provoc ar que las ruedas
abrasivas se rompan.
El retroceso es el resultado de un uso incorrecto o
procedimientos/condiciones de funcionamiento incorrectos
de la herramienta eléctrica, y puede evitarse tomando las
precauciones adecuadas indicadas a continuación.
a) Agarre la herramienta eléctrica con fi rmeza y
coloque el cuerpo y el brazo de forma que le
permitan resistir las fuerzas de retroceso de
la herramienta. Utilice siempre una agarradera
auxiliar, si se incluye, para tener el máximo control
posible sobre el rebote o la reacción del par durante
la puesta en marcha.
El operario puede controlar las reacciones del par o
las fuerzas de retroceso si se toman las precauciones
adecuadas.
b) No coloque nunca la mano cerca del accesorio
giratorio.
Su mano podría recibir el retroceso del accesorio.
c)
No coloque el cuerpo en la zona en la que la herramienta
eléctrica se moverá en caso de producirse retroceso.
El retroceso impulsará la herramienta en dirección
op ue sta al m ovi mie nt o de l a r ued a en el p unt o de blo qu eo.
d) Tenga especial cuidado cuando trabaje con
esquinas, bordes afi lados, etc. Evite que el
accesorio rebote y se bloqueo.
Las esquinas, bordes afi lados o el rebote tienden a
enganchar el ac cesorio giratorio y causan la pérdida de
control y retroceso.
e) No coloque una cuchilla talladora de madera o
cuchilla dentada en la sierra.
Dichas cuchillas suelen provocar retroceso y pérdida
de control.
ADVERTENCIAS DE SEGURIDAD ESPECÍFICAS
PARA LAS OPERACIONES DE MOLIDO Y
CORTE ABRASIVO
a) Utilice solo tipos de ruedas recomendados para
su herramienta eléctrica y el protector específi co
diseñado para la rueda seleccionada.
Las ruedas para las que no se diseñó la herramienta
eléctrica no pueden protegerse adecuadamente y no
son seguras.
b) La superfi cie de molienda de las ruedas presionadas
debe estar montada debajo del plano del labio
protector.
Una rueda mal montada que se proyecta a través del plano
del labi o protector n o puede ser prot egida adecu adamente.
c) La protección debe colocarse con fi rmeza en el
herramienta eléctrica y colocarse para máxima
seguridad, de forma que se exponga al operario a
la cantidad mínima de rueda.
El protector ayuda a proteger al operario de fragmentos
de rueda rota, de un contacto accidental con la rueda y
de las chispas que podrían encender la ropa.
d) Las ruedas deben utilizarse solo para las
aplicaciones recomendadas. Por ejemplo, no
muela con el lado de la rueda de corte.
Las ruedas de corte abrasivas están diseñadas para un
molido periférico. Las fuerzas periféricas aplicadas a
estas ruedas podrían provocar que se rompan.
e)
Uti
lice siempre bridas de ruedas sin dañar con
el tamaño y la forma correctos para la rueda
sel
eccionada.
Las bridas de rueda adecuadas soportan la rueda,
reduciendo la posibilidad de rotura de rueda. Las
bridas para ruedas de corte pueden ser diferentes de
las bridas de rueda de molido.
f) No utilice ruedas gastadas de herramientas
eléctricas más grandes.
La rueda diseñada para una herramienta eléctrica más
grande no es adecuada para la velocidad superior de
una herramienta inferior y podría estallar.
ADVERTENCIAS DE SEGURIDAD
ADICIONALES ESPECÍFICAS PARA LAS
OPERACIONES DE CORTE ABRASIVO
a) No atasque la rueda de corte ni aplique una
presión excesiva. No intente realizar un corte
excesivamente profundo.
Aplicar una tensión excesiva a la rueda provoca el
aumento de la carga y aumenta la susceptibilidad
de que se tuerza o adhiera la rueda en el corte y el
retroceso o la rotura de la rueda.
b) No col oque el cuerpo alineado con la rueda giratoria
ni detrás de ella.
Si la rueda se desplaza en sentido a contrario a su
cuerpo en el punto de operación, el posible retroceso
podría ex pulsar la rued a giratoria y dir igir la herram ienta
eléctrica en su dirección.
c)
Cuando la rueda se atasque o se interrumpa un corte
por algún motivo, apague la herramienta eléctrica y
no mueva la herramienta eléctrica hasta que la rueda
se detenga completamente. No trate de extraer la
rueda de corte del corte mientras la rueda esté en
movimiento, ya que podría producirse retroceso.
Investigue y tome medidas correctivas para eliminar la
causa de atasco de la rueda.
d) No reinicie la operación de corte en la pieza de
trabajo. Deje que la rueda alcance la velocidad
máxima y acceda de nuevo al corte con cuidado.
La rueda puede atascarse, desplazarse o retroceder si
la herramienta eléctrica se pone en marcha de nuevo
sobre la pieza de trabajo.
e) Sostenga los paneles o las piezas con un tamaño
excesivamente grande para minimizar el riesgo de
bloqueo o retroceso de la muela.
Las piezas de trabajo grandes tienden a combarse por
su propio peso. Deben colocarse soportes debajo de la
pieza cerca de la línea de cor te y cerca del borde de la
pieza a ambos lados de la muela.
f) Tenga especial cuidado cuando realice un “corte de
bolsa” en las paredes existentes o en otras áreas
ciegas.
La muela que sobresale podría cortar tuberías de gas o
agua, cables eléctricos u objetos que pueden provocar
retroceso.
11
Page 12

Español
PRECAUCIONES AL UTILIZAR LA
AMOLADORA ANGULAR
1. Nunca trabajar con estas herramientas eléctricas sin
cubiertas protectoras de la muela.
2. Compruebe que la velocidad marcada en la muela sea
igual o mayor que la vel ocidad nomina l de la amoladora .
Emplee sólo muelas de centro hundido con una
velocidad nominal de 80 m /s o más.
3. Compruebe que las dimensiones de la muela sean
compatibles con la amoladora y que la muela encaja en
el husillo.
4. Las muelas abrasivas se deben almacenar y tratar
con cuidado, de conformidad con las instrucciones del
fabricante.
5. Inspeccione la muela rectifi cadora antes del uso, y
no utilice productos descascarados, agrietados o
defectuosos de cualquier otro manera.
6. Sujetar siempre fi rmemente el asidero del cuerpo y
el asidero lateral de la herramienta. De lo contrario
la contrafuerza producida podría causar un
funcionamiento impreciso e incluso peligroso.
7. No utilice las muelas de tallado para el amolado lateral.
8. No utilice los bujes o adaptadores de reducción
separados para adaptar muelas abrasivas de orifi cio
grande.
9. La muela continúa girando aún después de apagar la
herramienta.
ESPECIFICACIONES
Modelos G18MR G23MR
Voltaje (por áreas)
Acometida
Velocidad marcha en vacio 8500 min
Muela
*2
Peso
*1 Verifi car indefectiblemente los datos de la placa de características de la máquina, pues varían de acuerdo al país
de destino.
*2 Peso: Cuerpo principal solamente
*1
*1
Diámetro exterior 180 mm 230 mm
Diámetro interior 22,23 mm
Velocidad periférica 80 m/s
(110 V, 220 V, 230 V, 240 V)
2400 W
-1
5,4 kg
6600 min
-1
ACCESORIOS ESTANDAR
(1) Llave para tuercas .....................................................1
(2) Asidero lateral ............................................................1
Las ruedas centrales abombadas no se proveen como
accesorios estándar.
Los accesorios estándar están sujetos a cambio sin previo
aviso.
APLICACIONES
○ Eliminación de rebabas de juntas y acabado de
diversos tipos de acero, bronce y aluminio, materiales
y fundiciones.
○ Alisado de secciones soldadas o secciones cortadas
por medio de soldadura.
○ Alisado de resina sintética, pizarra,ladrillo, mármol,
etc.
○ Cor te de hormigón sintético, piedra, ladrillos, mármol y
materiales similares.
ANTES DE LA PUESTA EN MARCHA
1. Alimentación
Asegurarse de que la alimentación de red que ha de
ser utilizada responda a las exigencias de corriente
especifi cadas en la placa de características del
producto.
12
2. Conmutador de alimentación
Asegurarse de que el conmutador de alimentación esté
en la posición OFF (desconectado). Si la clavija está
conec tada en la caj a del enchufe m ientras el c onmutador
de alimentación está en posición ON (conectado)
las herramientas eléctricas empezarán a trabajar
inmediatamente, provocando un serio accidente.
3. Cable de prolongación
Cuando está alejada el área de trabajo de la red de
alimentación, usar un cable de prolongación de un
grosor y potencia nominal sufi ciente. El cable de
prolongación debe ser mantenido lo más corto posible.
4. Montar y ajustar la cubierta protectora de muela
La cubierta protectora de muela es un dispositivo
pr ot ec to r p ar a ev it ar he ri da s, en ca so d e q ue la mu el a de
alisado se quiebre durante la operación. Asegurarse de
que la cubierta protectora esté bién montada y apretada
antes de comenzar con la operación de alisado.
[Instalación y ajuste del protector de la rueda]
○ Instalación y ajuste del protector de la rueda Abra la
palanca e inserte el pasador de posicionamiento del
protector de la rueda, alineándolo con la distancia
entre caras del prensaestopas.
○ Luego, gire el protector de la rueda hasta la posición
deseada (de uso).
○ Cierre la palanca y fíjela. De requerirse, realice el
ajuste apretando o afl ojando el tornillo.
○ Si la palanca no se mueve con suavidad, aplique una
li ge ra cap a d e ac ei te lub ri ca nt e en la s ec ci ón des li za nte
entre la pieza de ajuste y la palanca.
Page 13

Español
○ Sujete el protector de la muela en una posición
que permita que las entre caras del pasador de
posicionamiento del protector de la muela y del
prensaestopas se encuentren alineados (la posición
en que se inserta el protector de la muela), pero no lo
utilice.
5. Asegurarse de que la muela de alisado a utilizar sea de
tipo correcto y libre de rajas o defectos de super fi cie.
También asegurarse de que la muela de alisado esté
montada debidamente y que la contratuerca de muela
esté apretada fi rmemente. Dirigirse a la sección de
“montaje y desmontaje de la muela alisado”.
6. Realizar una prueba
Asegúrese de que los productos abrasivos estén
correctamente montados y apretados antes del uso,
y haga funcionar la herramienta sin carga durante
30 segundos en una posición segura. Apáguela
inmediatamente si nota una vibración considerable u
otros defectos.
Si se produce esta condición, inspeccione la
herramienta para determinar la causa.
7. C o nfi rmar el mechanismo de bloqueo del eje
Confi rmar que el mechanismo del bloqueo del eje esté
desconectado, apretando el botón pulsador de cierre
dos o tres veces, antes de conectar el aparato eléctrico
(véase en la Fig. 1).
8. Instalación del asidero lateral
Atornille el asidero lateral en la cubierta de engranaje.
APLICACION PRACTICA DEL ALISADOR
1. Presión
Para prolongar la vida da la máquina y asegurar
un acabado de primera clase, es importante que la
máquina no sea recalentada aplicando demasiada
presión. En la mayoría de las aplicaciones el sólo
peso de la máquina, es sufi ciente para un alisado
efectivo. Demasiada presión ocasionaría una reducida
velocidad rotacional, inferior acabado de super fi cie y
recalentamiento que reduciría la vida de la máquina.
2. Angulo de alisado
No aplicar toda la superfi cie de la muela de alisado al
material a alisar. Como muestra en Fig. 3, la máquina
deberá ser mantenida en un ángulo de 15° – 30° de tal
manera que el canto externo de la muela de alisado
contacte la pieza de trabajo en un ángulo óptimo.
3. Para prevenir que una nueva muela de alisado cave la
pieza de trabajo, el alisado inicial debe ser llevado a
cabo tirando de la amoladora por encima de la pieza de
trabajo hacia el operario (Fig. 3 dirección B). Una véz
que el canto directriz de la muela de alisado esté bién
raspado, el alisado puede ser realizado en cualquier
dirección.
4. Operación del conmutador
Puesta en funcionamento:
Presione el botón de seguridad hacia adelante
* Para una utilización continua, presione
Parada: Presione y suelte la palanca del interruptor.
5. Precauciones inmediatamente después de haber
Después de desconectar la máquina no posarla
y depués presione la palanca del interruptor.
la palanca del interruptor. Esta palanca
quedará trabada al volver a presionar
el botón de seguridad hacia adelante.
(*Sujeto a cambios dependiendo de la zona.)
acabado la operación
antes de que la muela de alisado se haya parado
completamente. Aparte de evitar serios accidentes,
esta precaución reduciría la cantidad de polvo y
limaduras absorbidos por la máquina.
PRECAUCIÓN
○ Compruebe que la pieza de trabajo esté correctamente
soportada.
○ Cuando trabaje en ambientes polvorientos, asegúrese
de que las aberturas de ventilación se mantengan
libres de obstrucciones.
Si llegara a ser necesario eliminar el polvo, primero
desconecte la herramienta del tomacorriente de la red
(use objetos no metálicos) y evite que se dañen las
piezas internas.
○ Asegúrese de que las chispas resultantes del uso
no representen peligro alguno, por ejemplo, que no
alcancen a las personas, ni que incendien sustancias
infl amables.
○ Utilice siempre protectores oculares y auriculares.
Otros equipos de protección personal, como máscara
contra el polvo, guantes, casco y delantal se deben
usar según se requiera.
En caso de dudas, utilice el equipo de protección.
○ C ua n d o n o s e u s a la m á qu i n a, d e b e e s t ar d e sc o n e ct a d a
la acometida de red.
MONTAJE Y DESMONTAJE DE LA MUELA
ALISADO
PRECAUCIÓN
Cerciórese de desconectar la alimentación y
desenchufe el enchufe de la toma de alimentación de
la red para evitar averías serias.
1. Montaje (Fig. 1)
(1) Volver la máquina boca abajo de tal manera que el eje
esté mirando hacia arriba.
(2) Montar la arandela molar en el eje.
(3) Montar la protuberancia de la muela de alisado o la
muela adiamantada en la arandela molar.
(4) Atornillar la contratuerca molar en el eje.
(Para instalar la muela adiamantada, emplee la
contratuerca molar con el lado convexo hacia la muela
adiamantada.)
(5) Insertar el pulsador para prevenir la rotación del eje y
apretar la contratuerca molar con llave accesoria como
muestra en la Fig. 1.
2. Desmontaje
Seguir los procedimientos antedichos a la inversa.
PRECAUCIÓN
○ Confi rme que la muela de alisado esté fi rmemente
montada.
○ Confi rmar que el botón esté desactivado presionando
el botón dos o tres veces antes de conectar la
alimentación de la herramienta eléctrica.
MANTENIMIENTO E INSPECCION
1. Inspeccionar la muela de alisado
Asegurarse de que la muela de alisado esté libre de
rajas y defectos en la superfi cie.
2. Inspeccionar los tornillos de montaje
Regularmente inspeccionar todos los tornillos de
montaje y asegurarse de que estén apretados
fi rmemente. Si cualquier tornillo estuviera suelto,
volver a apretarlo inmediatamente. El no hacer esto
provocaría un riesgo serio.
3. Inspeccionar los carbones de contacto (Fig. 4)
El motor emplea escobillas de carbón que son par tes
consumibles.
Cu ando se gast an o están cer ca del “limi te de desgast e”
pueden causar problemas al motor.
Al equiparse la escobilla de carbón de parada
automática, el motor se detendrá automáticamente
en ese momento hay que proceder a cambiar ambas
13
Page 14

Español
escobillas de carbón por la nuevas, que tengan los
mismos números de escobillas de carbón como
se muestra en la fi gura. Además siempre hay que
manten er las escobi llas de carbó n limpias y aseg urarse
de que se muevan libremente en sus porta- escobillas.
4. Reemplazar el carbón de contacto (Fig. 5)
<Desmontaje>
(1) Afl oje el tornillo autorroscante D4 que retiene a la
cubierta de la escobilla y retire esta cubierta.
(2) Emplee la llave mach o hexagonal auxi liar o un pequeño
destornillador para tirar del borde del resorte helicoidal
que emp uja hacia abajo e l carbón de con tacto. Extra iga
el dorde del resorte hacia afuera el soporte del carbón
de contacto.
(3) Extraiga la sección del soporte carbón de contacto
en la sección del terminal del soporte del carbón de
contacto y después extraiga el carbón de contacto de
su soporte.
<Montaje>
(1) Inserte el extremo del conductor helicoidal del carbón
de contacto en la sección del terminal del soporte del
carbón de contacto.
(2) Inserte el carbón de contacto en el soporte del mismo.
(3) Emplee la llave mach o hexahonal auxi liar o un pequeño
destornillador para devolver el borde del resorte
helicoidal hasta la cabeza del carbón de contacto.
(4) Cierre la cubier ta de la cola y apriete el tornillo
autorroscante D4.
5. Mantenimiento de motor
La unidad de bobinado del motor es el verdadero
“corazón” de las herramientas eléctricas. Prestar el
mayor cuidado a asegurarse de que el bobinado no se
dañe y/o se humedezca con aceite o agua.
6. Lista de repuestos
PRECAUCIÓN
La reparación, modifi cación e inspección de las
herramientas eléctricas HiKOKI deben ser realizadas
por un Centro de Servicio Autorizado de HiKOKI.
Est a lista de repue stos será de uti lidad si es prese ntada
junto con la herramienta al Centro de Ser vicio
Autorizado de HiKOKI, para solicitar la reparación o
cualquier otro tipo de mantenimiento.
En el manejo y el mantenimiento de las herramientas
eléctricas, se deberán observar las normas y
reglamentos vigentes en cada país.
MODIFICACIONES
HiKOKI Power Tools introduce constantemente
mejoras y modifi caciones para incorporar los últimos
avances tecnológicos.
Por consiguiente, algunas partes pueden ser
modifi cadas sin previo aviso.
OBSERVACION
Debido al programa continuo de investigación y desarrollo
de HiKOKI éstas especifi caciones están sujetas a cambio
sin previo aviso.
14
Page 15

中國語
一般安全規則
警告
閱讀所有安全警告說明
未遵守警告與說明可能導致電擊、火災及或其他嚴
重傷害。
請妥善保存所有警告與說明,以供未來參考之用。
「電動工具」一詞在警告中,係指電源操作(有線)
之電動工具或電池操作(無線)之電動工具。
1) 工作場所安全
a) 保持工作場所清潔及明亮。
雜亂或昏暗的區域容易發生意外。
b) 勿在易產生爆炸之環境中操作,譬如有易燃液
體、瓦斯或粉塵存在之處。
電動工具產生火花會引燃粉塵或煙氣。
c) 當操作電動工具時,保持兒童及過往人員遠離。
分神會讓你失去控制。
2) 電氣安全
a) 電動工具插頭必須與插座配合,絕不可以任何
方法修改插頭,且不得使用任何轉接插頭於有
接地之電動工具。
不修改插頭及所結合之插座可減少電擊。
b) 避免身體接觸到接地面諸如管子、散熱器、爐
灶及冰箱。
如果你的身體接地或搭地,會增加電擊的危險。
c) 勿讓電動工具淋雨或曝露在潮濕的環境下。
電動工具進水會增加電繫的危險。
d) 勿濫用電源線。絕勿使用電源線去纏繞、拖拉
電動工具或拔插頭,保持電源線遠離熱氣、油
氣、尖角或可動零件。
損壞或纏繞的電源線會增加電繫之危險。
e) 電動工具在室外操作時要使用一適合室外用的
延長線。
使用合適之室外用延長線會減少電擊的危險。
f) 若無法避免在潮濕地區操作電動工具,請使用
以殘餘電流裝置 (RCD) 保護的電源。
使用 RCD 可降低觸電危險。
3) 人員安全
a) 保持機警,注意你正在做什麼,並運用普通常
識操作電動工具。
當你感到疲勞或受藥品、酒精或醫療影響時,
勿操作電動工具。
操作中瞬間的不注意可能造成人員嚴重的傷
害。
b) 使用個人防護裝備,經常配戴安全眼鏡。
配戴防塵口罩、防滑安全鞋、硬帽等防護裝
備,或在適當情況下使用聽覺防護,可減少人
員傷害。
c) 防止意外啟動。在連接電源及或電池組、拿
起或攜帶工具前,請確認開關是在「off」(關
閉)的位置。
以手指放在開關握持電動工具,或在電動工具
的開關於“on”的狀況下插上插頭,都會導致
意外發生。
d) 在將電動工具啟動前,先卸下任何調整用鑰匙
或扳手。
扳手或鑰匙遺留在電動工具的轉動部位時,可
能導致人員傷害。
e) 身體勿過度伸張,任何時間要保持站穩及平
衡。
以便在不預期的狀態下,能對電動工具有較好
的控制。
f) 衣著要合宜,別穿太鬆的衣服或戴首飾。
保持你的頭髮、衣服及手套遠離轉動部位。
寬鬆的衣服、手飾及長髮會被捲入轉動部位。
g) 如果裝置要用於粉塵抽取及集塵設施,要確保
其連接及正當使用。
使用集塵裝置可減少與灰塵相關的危險。
4) 電動工具之使用及注意事項
a) 勿強力使用電動工具,使用正確之電動工具為
你所需。
正確使用電動工具會依其設計條件使工作做得
更好更安全。
b) 如果開關不能轉至開及關的位置,勿使用電動
工具。
任何電動工具不能被開關所控制是危險的,必
須要修理。
c) 進行任何調整、更換配件或收存電動工具時,
必須將插頭與電源分開,且或將電池組從電
動工具中取出。
此種預防安全措施可減少意外開啟電動機之危
險。
d) 收存停用之電動工具,遠離兒童,且不容許不
熟悉電動工具或未瞭解操作電動工具說明書的
人操作電動工具。
在未受過訓練的人手裡,電動工具極為危險。
e) 保養電動工具,檢核是否有可動零件錯誤的結
合或卡住、零件破裂及可能影響電動工具操作
的任何其他情形。
電動工具如果損壞,在使用前要修好。
許多意外皆肇因於不良的保養。
f) 保持切割工具銳利清潔。
適當的保養切割工具,保持銳利之切削鋒口,
可減少卡住並容易控制。
15
Page 16

中國語
g) 按照說明書使用電動工具、配件及刀具時,必
須考量工作條件及所執行之工作。
若未依照這些使用說明操作電動工具時,可能
造成相關之危害情況。
5) 維修
a) 讓你的電動工具由合格修理人員僅使用相同的
維修零件更換。
如此可確保電動工具的安全得以維持。
注意事項
不可讓孩童和體弱人士靠近工作場所。
應將不使用的工具存放在孩童和體弱人士伸手不及的
地方。
砂磨或砂磨切割操作的通用安
全警告
a) 該電動工具是用於實現砂輪機或切斷工具功能
的。閱讀隨該電動工具提供的所有安全警告、說
明、圖解和規定。
不瞭解以下所列所有說明將導致電擊、著火和 /
或嚴重傷害。
b) 不推薦用該電動工具進行諸如砂光、刷光、拋光
或切斷等操作。
電動工具不按指定的功能去操作,可能會發生危
險和引起人身傷害。
c) 不使用非工具製造商推薦和專門設計的附件。
否則該附件可能被裝到你的電動工具上,而它不
能保證安全操作。
d) 附件的額定速度必須至少等於電動工具上標出的
最大速度。
附件以比其額定速度大的速度運轉會發生爆裂和
飛濺。
e) 附件的外徑和厚度必須在電動工具額定能力範圍
之內。
不正確的附件尺寸不能得到充分防護或控制。
f) 安裝配件的螺紋必須與電磨機主軸螺紋相配。對
於以法蘭安裝的配件,配件的軸孔必須符合法蘭
的定位直徑。
與電動工具的安裝硬體不相配的配件會失去平
衡,劇烈振動,並可能導致失去控制。
g) 不要使用損壞的附。在每次使用前要檢查附件,
例如砂輪是否有碎片和裂縫,靠背墊是否有的裂
縫、撕裂或過度磨損,鋼絲刷是否鬆動或金屬絲
是否斷裂。如果電動工具或附件跌落了,檢查是
否有損壞或安裝沒有損壞的附件。檢查和安裝附
件後,讓自己和旁觀者的位置遠離旋轉附件的平
面,並以電動工具最大空載速度運行 1min。
損壞的附件通常在該試驗時會碎裂。
16
h) 戴上防護用品。根據適用情況,使用面罩、安全
護目鏡或安全眼鏡。適用時,戴上防塵面具、聽
力保護器、手套和能擋小磨料或工件碎片的工作
圍裙。
眼防護罩必須擋住各種操作產生的飛屑。防塵面
具或口罩必須能過濾操作產生的顆粒。長期暴露
在高強度雜訊中會引起失聰。
i) 讓旁觀者與工作區域保持一安全距離。任何進入
工作區域的人必須戴上防護用品。
工件或破損附件的碎片可能會飛出並引起緊靠著
操作區域的旁觀者的傷害。
j) 進行操作時若切割配件可能接觸到暗線或其自身
的電線,請握著電動工具的絕緣手柄表面。
接觸到「通電」電線的切割配件可能使電動工具
的金屬零件「通電」,而造成操作人員觸電。
k) 使軟線遠離旋轉的附件。
如果控制不當,軟線可能被切斷或纏繞,並使得
你的手或手臂可能被捲入旋轉附件中。
l) 直到附件完全停止運動才放下電動工具。
旋轉的附件可能會抓住表面並拉動電動工具而讓
你失去對工具的控制。
m) 當攜帶電動工具時不要開動它。
意外地觸及旋轉附件可能會纏繞你的衣服而使附
件傷害身體。
n) 經常清理電動工具的通風口。
電動機風扇會將灰塵吸進機殼,過多的金屬粉末
沈積會導致電氣危險。
o) 不要在易燃材料附件操作電動工具。
火星可能會點燃這些材料。
p) 不要使用需用冷卻液的附件。
用水或其他冷卻液可能會導致電腐蝕或電擊。
反彈和相關警告
反彈是因卡住或纏繞住的旋轉砂輪、靠背墊、鋼絲刷
或其他附件而產生的突然反作用力。卡住或纏繞會引
起旋轉附件的迅速堵轉,隨之使失控的電動工具在卡
住點產生與附件旋轉方向相反的運動。
例如,如果砂輪被工件纏繞或卡住,伸入卡住點的砂
輪邊緣可能會進入材料表面而引起砂輪爬出或反彈。
砂輪可能飛向或飛離操作者,這取決於砂輪在卡住點
的運動方向。
在此條件下砂輪也可能碎裂。
反彈是電動工具誤用和 / 或不正確操作工序或條件的結
果,可以通過採取以下給出的適當預防措施得以避免。
a) 保持緊握電動工具,使你的身體和手臂處於正確
狀態以抵抗反彈力。如有輔助手柄,則要一直使用,
以便最大限度控制住起動時的反彈力或反力矩。
如採取合適的預防措施,操作者就可以控制反力
矩或反彈力。
Page 17

中國語
b) 絕不能將手靠近旋轉附件。
附件可能會反彈碰到手。
c) 不要站在發生反彈時電動工具可能移動到的地
方。
反彈將在纏繞點驅使工具逆砂輪運動方向運動。
d) 當在尖角、銳邊等處作業時要特別小心。避免附
件的彈跳和纏繞。
尖角、銳邊和彈跳具有纏繞旋轉附件的趨勢並引
起反彈的失控。
e) 不要附裝上鋸鏈、木雕刀片或帶齒鋸片。
這些鋸片會產生頻繁的反彈和失控。
對磨削和砂磨切割操作的專用
安全警告
a) 只使用所推薦的砂輪型號和為選用砂輪專門設計
的護罩。
不是為電動工具設計的砂輪不能充分得到防護,
是不安全的。
b) 去壓中心輪的磨削表面必須安裝在護刃器唇的平
面下方。
突出護刃器唇平面,未妥善安裝的砂輪,無法得
到適當的保護。
c) 護罩必須牢固地裝在電動工具上,且放置得最具
安全性,只有最小的砂輪部分暴露在操作人面前。
護罩有助於保護操作者免於碰觸到損壞的砂輪碎
片,可能點燃衣物的火花,以及與砂輪的意外接觸。
d) 砂輪只用作推薦的用途。例如:不要用切割砂輪
的側面進行磨削。
施加到砂輪側面的力可能會使其碎裂。
e) 始終為所選砂輪選用未損壞的、有恰當規格和形
狀的砂輪法蘭盤。
合適的砂輪法蘭盤支承砂輪可以減小砂輪破裂的
可能性。切割砂輪的法蘭盤可以不同於砂輪法蘭
盤。
f) 不要使用從大規格電動工具上用剩的磨損砂輪。
用於大規格電動工具上的砂輪不適於較小規格工
具的高速工況並可能會爆裂。
c) 當砂輪被卡住或無論任何原因而中斷切割時,關
掉電動工具並握住工具不要動,直到砂輪完全停
止。決不要試圖當砂輪仍然運轉時使切割砂輪脫
離切割,否則會發生反彈。
調查並採取校正措施以消除砂輪卡住的原因。
d) 不能在工件上重新起動切割操作。讓砂輪達到全
速後再小心地重新進入切割。
如果電動工具在工件上重新起動,砂輪可能會卡
住、爬出或反彈。
e) 支撐面板或過大工件,使砂輪受夾住或產生反衝
作用力的風險降到最低。
大工件由於其自身重量,容易趨於下陷。支撐座
必須置於工件下方的砂輪兩側,靠近鋸切路徑與
工件邊緣。
f) 在進行牆壁或其他隱蔽區域之局部鋸切時請格外
小心。
凸出的砂輪可能會鋸切到瓦斯管、水管、電線或
足以產生反衝作用力的物體。
使用手提圓盤電磨機時應注意
事項
1. 沒有砂輪防護裝置千萬不要使用圓盤電磨機這種
動力工具。
2. 確認砂輪上所標示的轉速等於或大於電磨機的額
定轉速只能使用額定轉速為 80 m秒 以上的砂
輪。
3. 確保砂輪尺寸與電磨機相符、砂輪與主軸相配。
4. 須按照廠家的使用說明書小心存放和使用磨輪。
5. 使用前檢查砂輪,不要使用破損、有裂縫的或有
其他缺陷的產品
6. 始終抓緊電動工具的機身手柄和側柄。否則,所
產生的反作用力可能會導致錯誤的、甚至是危險
的操作。
7. 請勿使用切斷砂輪進行側面研磨。
8. 請勿將獨立的減速軸襯或接頭用於大孔砂輪。
9. 在切斷本電動工具的電源之後,砂輪仍會繼續旋
轉一段時間。
對砂輪切割操作的附加專用安
全警告
a) 不要“夾”住切割砂輪或施加過大的壓力。不要
試圖做過深的切割。
給砂輪施加過應力增加了砂輪在切割時的負載,容
易纏繞或卡住,增加了反彈或砂輪爆裂的可能性。
b) 身體不要對著旋轉砂輪,也不要站在其後。
當把砂輪從操作者身邊的操作點移開時,可能的
反彈會使旋轉砂輪和電動工具朝你推來。
17
Page 18

中國語
規 格
型式 G18MR 台灣 G18MR G23MR
電壓(按地區)
輸入功率
額定輸出功率 1000 W 1600 W
無負荷速度 8500 轉分 6600 轉分
砂輪
*2
重量
*1 當須改變地區時應檢查產品上的銘牌。
*2 僅限於本體
*1
*1
外徑 180 mm 230 mm
穴徑 22.23 mm
外緣速度 80 m秒
110 V (110 V, 220 V, 230 V, 240 V)
1560 W 2400 W
5.4 kg
標 準 附 件
(1) 扳手 ................................................................... 1
(2) 側柄 ................................................................... 1
砂輪不作為標準附件附送。
標準附件可能不預先通告而徑予更改。
用 途
○ 用於去除鑄品毛刺,飛邊等物及拋光各種型號的
鋼,青銅,鋁及鑄造品。
○ 研磨焊接部分或研磨用焊接切割的部分。
○ 合成樹脂、石板、磚、大理石等的研磨。
○ 混凝土、石頭、磚、大理石等的切削。
作 業 之 前
1 電源
確認所使用的電源與工具銘牌上標示的規格是否
相符。
2. 電源開關
確認電源開關是否切斷。若電源開關接通,則插
頭插入電源插座時電動工具將出其不意地立刻轉
動,從而招致嚴重事故。
3. 延伸線纜
若作業場所移到離開電源的地點,應使用厚度足
夠、額定電容的延伸線纜,並且要盡可能地短些。
4. 安裝並調整輪罩
輪罩是一種保護裝置,用來防止作業中因砂輪破
裂而受傷。開始研磨作業之前,請確認輪罩裝好
緊固。
18
〔安裝和調整輪罩的方法〕
○ 打開手柄,對準墊座的對邊寬度並插入輪罩的定
位鎖。
○ 然後將輪罩轉動到所需的位置(使用位置)。
○ 關閉手柄使之固定。若有必要,擰緊或擰鬆螺絲
進行調整。
○ 手柄移動不暢時,請給設定鎖與手柄的連接部分
加注潤滑油。
○ 請勿在輪罩的定位銷與墊座的對邊寬度一致的位
置(輪罩的插入位置)固定輪罩並使用。
5. 確認要使用的砂輪屬於正確類型、沒有裂紋或表
面缺陷。同時也要確認砂輪裝好,輪螺母緊固。
參照“砂輪的裝卸”一節。
6. 試行運轉
在使用前確保已正確安裝並擰緊研磨產品,並在
安全場所在空載狀態下運轉 30 秒鐘,若有較大
的振動或察覺到其他缺陷,則應立即停止試運
轉。
遇此情況時,檢查電動工具以究明原因。
7. 檢查主軸鎖的裝置
在打開電源開關之前,撳兩、三下鎖定銷檢查鎖
定銷是否被釋放(圖 1)。
8. 固定側柄
把側柄旋進齒輪罩。
實用手提圓盤電磨機的應用
1. 壓力
本機不可施加過大壓力使其過載,以延長使用壽
命並確保加工品質。在大部份的用法中,機器本
身的重量即夠研磨。加壓過大將導致轉速降低、
表面加工不良以及過載,從而縮短機器壽命。
Page 19

中國語
2. 研磨角度
切勿將砂輪之全表面施加於要研磨的材料上。如
圖 3 所示,機器應保持 15°—30°,使砂輪的外緣
以最佳角度與工件相接觸。
3. 用新砂輪首次進行研磨,應將手提圓盤電磨機由
對面橫過工件往操作人員這邊拉,以免挖入工作
(圖 3 的 B 方向)。等砂輪的前緣適當磨損,就
可往任何方向進行研磨。
4. 手提圓盤電磨機的開關
接通: 將開關鎖往前推,接著按開關的手柄開關
就被接通。
* 長時間使用時,只須再度將開關徑前推,
開關將上鎖。
(* 依地區而異。)
斷開: 按緊開關的手柄,然後釋放,開關就會斷
開。
5. 收工後的注意事項
關掉機器之後,需等手提圓盤電磨機完全停止才
能放下,以免造成嚴重事故,而且還可減少吸入
機器的塵埃與切削量。
注意
○ 檢查工件已被正確固定。
○ 在多塵的條件下工作時,確保通風口暢通無堵
塞現象。
如果需要清除灰塵,首先使電動工具斷開電源
(使用非金屬物品)並避免損壞內部零件。
○ 確保使用時產生的火花不會引起危險:例如,
不要濺在身體上或點燃易燃物。
○ 始終採用視力和聽力保護。
必要時應使用其他個人保護裝置,如口罩、手
套、頭盔和圍裙等。
拿不準時,請使用保護裝置。
○ 未使用本電動工具時,請斷開電源。
砂輪的裝卸
注意
確認開關已斷開並且從電源插座中拔去電源插頭
以避免嚴重事故。
1. 裝配(圖 1)
(1) 將機器翻過去,使主軸朝上。
(2) 將砂輪墊圈裝於主軸上。
(3) 將砂輪或金剛輪的突出部裝入砂輪墊圈。
(4) 將砂輪螺帽旋入主軸。
(使用金剛輪時,請把砂輪螺帽的凸面裝到金剛
輪的相反方向上,並且把螺帽擰到主軸上。)
(5) 按下鎖定銷以防止主軸轉動,並如圖 1 所示用附
送的扳手擰緊砂輪螺帽。
2. 拆卸
按照上述步驟相反的順序進行拆卸。
注意
○ 確認砂輪安裝是否牢固。
○ 確認鎖定銷被解除鎖定。可在打開電源開關之
前通過撳兩、三次鎖定銷進行檢查。
維 護 和 檢 查
1. 檢查砂輪
檢查砂輪確無破裂和表面缺隱。
2. 檢查安裝螺絲
要經常檢查安裝螺絲是否緊固妥善。若發現螺絲鬆
了,應立即重新扭緊,否則會導致嚴重的事故。
3. 檢查碳刷(圖 4)
電動機裏的碳刷是一種消耗品。
碳刷一旦使用到磨損極限,電動機就會出現各種
障礙;如果所使用的碳刷是“自停式”,電動機
將自動地停止轉動。
遇到上述情況,應立即換上與圖上代號一致的新
碳刷。此外,碳刷應經常保持乾淨狀態,以保證
能在刷握裏自由滑動。
4. 更換碳刷(圖 5)
〈拆卸〉
(1) 擰鬆固定碳刷蓋的 D4 自攻螺絲釘,拆下碳刷
蓋。
(2) 使用六角形扳手或小螺絲刀拔起固定碳刷的彈簧
邊緣。朝刷握的外側方拆下彈簧邊緣。
(3) 從刷握的端部取下碳刷上的引出端,然後從刷握
裡拆下碳刷。
〈安裝〉
(1) 將碳刷的引線端插入刷握的端部。
(2) 將碳刷裝入刷握。
(3) 使用六角形扳手或小螺絲刀使彈簧邊緣回到碳刷
頭處。
(4) 安上尾部蓋並擰緊 D4 自攻螺絲釘。
5. 電動機的維護
電動機繞線是電動工具的“心臟部”。應仔細檢
查有無損傷,是否被油液或水沾濕。
6. 維修部件目錄
注意
HiKOKI電動工具的修理、維護和檢查必須由HiKOKI
所認可的維修中心進行。
當尋求修理或其他維護時,將本部件目錄與工具
一起提交給HiKOKI所認可的維修中心會對您有所
幫助。
在操作和維護電動工具中,必須遵守各國的安全
規則和標准規定。
19
Page 20

中國語
改進
HiKOKI電動工具隨時都在進行改進以適應最新的技
術進步。
因此,有些部件可能未預先通知而進行改進。
註
為求改進,本手冊所載規格可能不預先通知而徑
予更改。
20
Page 21

ﺔﻳﺑﺭﻌﻟﺍ
.ﺔﻗﺎﻁﻟﺍ ﺓﺍﺩﺃ ﻥﻣ "ﻁﺳﻭﻷﺍ ءﺯﺟﻟﺍ" ﻭﻫ ﻙﺭﺣﻣﻟﺍ ﺓﺩﺣﻭ ﻑﻠﻣ
ﻙﺭﺣﻣﻟﺍ ﺔﻧﺎﻳﺻ
.ءﺎﻣﻟﺍ ﻭﺃ ﺕﻳﺯﻟﺍ ﺔﻁﺳﺍﻭﺑ ﻪﻠﻠﺑ ﻭﺃ/ﻭ ﻑﻠﻣﻟﺍ ﻑﻠﺗ ﻡﺩﻋ ﻥﻣ ﺭﺍﺭﻣﺗﺳﺎﺑ ﺩﻛﺎﺗ
ﺔﻣﺩﺧﻟﺍ ءﺍﺯﺟﺃ ﺔﻣﺋﺎﻗ
HiKOKI
ﺕﺍﻭﺩﻷ ﺹﺣﻔﻟﺍﻭ ،ﻝﻳﺩﻌﺗﻟﺍﻭ ،ﺡﻼﺻﻹﺍ ﻝﺎﻣﻋﺃ ﺫﻳﻔﻧﺗ ﺏﺟﻳ
HiKOKI
ﺔﻣﺩﺧ ﺯﻛﺭﻣﻟ ﺓﺍﺩﻷﺍ ﻊﻣ ﺎﻬﻣﻳﺩﻘﺗ ﺩﻧﻋ ﺓﺩﻳﻔﻣ ﻩﺫﻫ ءﺍﺯﺟﻷﺍ ﺔﻣﺋﺎﻗ
.ﺩﻣﺗﻌﻣﻟﺍ ﺔﻣﺩﺧﻟﺍ ﺯﻛﺭﻣ ﻝﺑﻗ ﻥﻣ
.ﺔﻧﺎﻳﺻﻟﺍ ﻝﺎﻣﻋﺃ ﻥﻣ ﺎﻫﺭﻳﻏ ﻭﺃ ﺡﻼﺻﻹﺍ ﺏﻠﻁ ﺩﻧﻋ ﺩﻣﺗﻌﻣ
ﺕﺎﻣﻳﻠﻌﺗ ﻉﺎﺑﺗﺍ ﺏﺟﻳ ،ﺎﻬﺗﻧﺎﻳﺻ ﻭﺃ ﺔﻳﺋﺎﺑﺭﻬﻛﻟﺍ ﺩﺩﻌﻟﺍ ﻝﻳﻐﺷﺗ ﺔﻟﺎﺣ ﻲﻓ
.ﺔﻟﻭﺩ ﻝﻛﺑ ﺔﺻﺎﺧﻟﺍ ﺭﻳﻳﺎﻌﻣﻟﺍﻭ ﻥﺎﻣﻷﺍ
ﺕﺎﻳﻧﻘﺗﻟﺍ ﺙﺩﺣﻷ ﺎ
ً
ﻌﺑﺗ ﺎﻬﻠﻳﺩﻌﺗﻭ ﺭﺍﺭﻣﺗﺳﺎﺑ
HiKOKI
ﺕﺍﻭﺩﺃ ﻥﻳﺳﺣﺗ ﻡﺗﻳ
ﺕﻼﻳﺩﻌﺗﻟﺍ
.ﺔﻣﺩﻘﺗﻣﻟﺍ
.ﻕﺑﺳﻣ ﻡﻼﻋﺇ ﻥﻭﺩ ءﺍﺯﺟﻷﺍ ﺽﻌﺑ ﺭﻳﻳﻐﺗ ﻡﺗﻳ ﺩﻗ ،ﻙﻟﺫﻟﻭ
ﺕﺎﻔﺻﺍﻭﻣﻟﺍ ﺭﻳﻐﺗﺗ ،ﺭﻣﺗﺳﻣﻟﺍ ﺭﻳﻭﻁﺗﻟﺍﻭ ﺙﺣﺑﻠﻟ
HiKOKI
ﺔﻅﺣﻼﻣ
ﺞﻣﺎﻧﺭﺑﻟ ﺎًﻌﺑﺗ
.ﻕﺑﺳﻣ ﻡﻼﻋﺇ ﻥﻭﺩ ﺎﻧﻫ ﺓﺭﻭﻛﺫﻣﻟﺍ
5
6
ﻪﻳﺑﻧﺗ
٥
21
Page 22

ﺔﻳﺑﺭﻌﻟﺍ
ﻻ ًﻼﺛﻣﻓ ﺍًﺭﻁﺧ ﺏﺑﺳﺗ ﻻ ﻡﺍﺩﺧﺗﺳﻻﺍ ﻥﻋ ﺔﺟﺗﺎﻧﻟﺍ ﺕﺍﺭﺍﺭﺷﻟﺍ ﻥﺃ ﻥﻣ ﺩﻛﺄﺗ
.ﻝﺎﻌﺗﺷﻼﻟ ﺔﻠﺑﺎﻗ ﺩﺍﻭﻣ ﺏﻧﺎﺟﺑ ﺎﻬﻠﻌﺷﺗ ﻭﺃ ﺹﺎﺧﺷﺄﺑ ﻡﺩﻁﺻﺗ
.ﻥﺫﻷﺍﻭ ﻥﻳﻌﻟﺍ ﻲﻗﺍﻭ ﺎًﻣﺋﺍﺩ ﻡﺩﺧﺗﺳﺍ
ﺔﺑﺭﺗﻷﺍ ﻥﻣ ﻲﻗﺍﻭﻟﺍ ﻉﺎﻧﻘﻟﺍ ﻝﺛﻣ ﻯﺭﺧﻷﺍ ﺔﻳﺋﺎﻗﻭﻟﺍ ﺕﺍﺩﻌﻣﻟﺍ ءﺍﺩﺗﺭﺍ ﺏﺟﻳ
.ﺓﺭﻭﺭﺿﻟﺍ ﺩﻧﻋ ﺭﺯﺋﻣﻟﺍﻭ ﺓﺫﻭﺧﻟﺍﻭ ﺕﺍﺯﺎﻔﻘﻟﺍﻭ
.ﺔﻳﺎﻗﻭﻟﺍ ﺕﺍﺩﻌﻣ ءﺍﺩﺗﺭﺎﺑ ﻡﻗ ،ﺩﻛﺄﺗﻟﺍ ﻡﺩﻋ ﺔﻟﺎﺣ ﻲﻓ
.ﺔﻳﺭﺎﻁﺑﻟﺍ ﻝﺻﻓ ﺏﺟﻳ ،ﺔﻟﻵﺍ ﻡﺍﺩﺧﺗﺳﺍ ﻡﺩﻋ ﺩﻧﻋ
ﺯﻛﺭﻣﻟﺍ ﺔﻁﻭﻐﺿﻣ ﺔﺟﻠﻌﻟﺍ ﻙﻓﻭ ﻊﻳﻣﺟﺗ
ﺏﻧﺟﺗﻟ ﺱﺑﻘﻣﻟﺍ ﻥﻣ ﺕﺎﻘﺣﻠﻣﻟﺍ ﺱﺑﺎﻗ ﻝﺻﻔﺑ ﻡﻗﻭ ﻝﻳﻐﺷﺗﻟﺍ ﻑﺎﻘﻳﺇ ﻥﻣ ﺩﻛﺄﺗ
.ﺓﺭﻁﺧﻟﺍ ﺙﺩﺍﻭﺣﻟﺍ
1
ﻝﻛﺷﻟﺍ) ﻊﻳﻣﺟﺗﻟﺍ
ﺎًﻬﺟﺍﻭﻣ ﻥﺍﺭﻭﺩﻟﺍ ﺩﻭﻣﻋ ﺢﺑﺻﻳ ﻙﻟﺫﻟ ﺏﻘﻋ ﻰﻠﻋ ﺎًﺳﺃﺭ ﺔﻟﻵﺍ ﺏﻠﻘﺑ ﻡﻗ
(
.ﻥﺍﺭﻭﺩﻟﺍ ﺩﻭﻣﻋ ﻲﻓ ﻝﺧﺍﺩ ﺔﻠﺟﻌﻟﺍ ﺔﻘﻠﺣ ﺏﻳﻛﺭﺗ
ﺓﺭﺎﺳﻛﺑ ﺦﻳﻠﺟﺗﻟﺍ ﺔﻠﺟﻋ ﻭﺃ ﺔﻁﻭﻐﺿﻣﻟﺍ ﺯﻛﺭﻣﻟﺍ ﺔﻠﺟﻋ ءﻭﺗﻧ ﺔﻣءﺍﻭﻣﺑ ﻡﻗ
.ﺔﻠﺟﻌﻟﺍ ﺔﻘﻠﺣﻟ ﺱﺎﻣﻟﺍ
.ﻥﺍﺭﻭﺩﻟﺍ ﺩﻭﻣﻌﺑ ﺔﻠﺟﻌﻟﺍ ﺔﻟﻭﻣﺎﺻ ﺕﻳﺑﺛﺗﺑ ﻡﻗ
ﻊﻣ ﺔﻠﺟﻌﻟﺍ ﺔﻟﻭﻣﺎﺻ ﻡﺩﺧﺗﺳﺍ ،ﺱﺎﻣﻟﺍ ﺓﺭﺎﺳﻛﺑ ﺦﻳﻠﺟﺗﻟﺍ ﺔﻠﺟﻋ ﺏﻳﻛﺭﺗﻟ)
.(ﺱﺎﻣﻟﺍ ﺓﺭﺎﺳﻛﺑ ﺦﻳﻠﺟﺗﻟﺍ ﺔﻠﺟﻌﻟ ﻪﺟﺍﻭﻣﻟﺍ ﺏﺩﺣﻣﻟﺍ ﺏﻧﺎﺟﻟﺍ
ﺔﻟﻭﻣﺎﺻ ﻡﺎﻛﺣﺇﻭ ،ﻥﺍﺭﻭﺩﻟﺍ ﺩﻭﻣﻋ ﺭﻳﻭﺩﺗ ﻊﻧﻣﻟ ﻊﻓﺩﻟﺍ ﺭﺯ ﻝﺎﺧﺩﺈﺑ ﻡﻗ
.1 ﻝﻛﺷﻟﺍ ﻲﻓ ﺽﻭﺭﻌﻣ ﻭﻫ ﺎﻣﻛ ،ﺕﺎﻘﺣﻠﻣﻟﺍ ﺡﺎﺗﻔﻣ ﻊﻣ ﺔﻠﺟﻌﻟﺍ
.ﻩﻼﻋﺃ ﺕﺍءﺍﺭﺟﻹﺍ ﺱﻛﻋﺍ
ﺕﺍﺭﻣ ﺙﻼﺛ ﻭﺃ ﻥﻳﺗﺭﻣ ﻪﻳﻠﻋ ﻁﻐﺿﻟﺎﺑ ﻁﻐﺿﻟﺍ ﺭﺯ ﻑﻗﻭﺗ ﻡﺩﻋ ﻥﻣ ﺩﻛﺄﺗ
.ﺍًﺩﻳﺟ ﺯﻛﺭﻣﻟﺍ ﺔﻁﻭﻐﺿﻣ ﺔﻠﺟﻌﻟﺍ ﺕﻳﺑﺛﺗ ﻥﻣ ﺩﻛﺄﺗ
.ﺔﻗﺎﻁﻟﺍ ﺓﺍﺩﺃ ﻝﻳﻐﺷﺗ ﻝﺑﻗ
ﻪﻳﺑﻧﺗ
.ﻝﻔﺳﻷ
ﻙﻔﻟﺍ
ﻪﻳﺑﻧﺗ
ﺹﺣﻔﻟﺍﻭ ﺔﻧﺎﻳﺻﻟﺍ
ﺏﻭﻳﻌﻟﺍﻭ ﻕﻘﺷﺗﻟﺍ ﻥﻣ ﺔﻳﻟﺎﺧ ﺯﻛﺭﻣﻟﺍ ﺔﻁﻭﻐﺿﻣ ﺔﻠﺟﻌﻟﺍ ﻥﺃ ﻥﻣ ﺩﻛﺄﺗ
ﺎﻬﻁﺑﺭ ﻡﺎﻛﺣﺇ ﻥﻣ ﺩﻛﺄﺗﻟﺍﻭ ﺕﻳﺑﺛﺗﻟﺍ ﺭﻳﻣﺎﺳﻣ ﺔﻓﺎﻛﻟ ﻱﺭﻭﺩﻟﺍ ﺹﺣﻔﻟﺎﺑ ﻡﻗ
.ﺭﻭﻔﻟﺍ ﻰﻠﻋ ﺎﻬﻁﺑﺭ ﻡﺎﻛﺣﺈﺑ ﻡﻗ ،ﺭﻳﻣﺎﺳﻣ ﺔﻳﺃ ﻙﻓ ﺔﻟﺎﺣ ﻲﻓ .ﺢﻳﺣﺻ ﻝﻛﺷﺑ
.ﺭﻁﺎﺧﻣ ﻰﻟﺇ ﻙﻟﺫﺑ ﻡﺎﻳﻘﻟﺍ ﻲﻓ ﻝﺷﻔﻟﺍ ﺽﺭﻌﻳ ﺩﻘﻓ
.ﺓﺭﻣﻌﻣ ﺭﻳﻏ ءﺍﺯﺟﻷﺍ ﻥﻣ ﻲﻫﻭ ﺔﻳﻧﻭﺑﺭﻛﻟﺍ ﺓﺎﺷﺭﻔﻟﺍ ﻙﺭﺣﻣﻟﺍ ﻙﻠﻬﺗﺳﻳ
ﺙﻭﺩﺣ ﻲﻓ ﺏﺑﺳﺗﺗ ﻥﺃ ﻥﻛﻣﻳ ،"ﻝﻛﺂﺗﻟﺍ ﺩﺣ" ﻥﻣ ﺎﻬﺑﺍﺭﺗﻗﺍﻭ ﺎﻬﻠﻛﺂﺗ ﺩﻧﻋ
ﺔﻳﺋﺎﻘﻠﺗ ﻥﻭﺑﺭﻛﻟﺎﺑ ﻝﻘﺻ ﺓﺎﺷﺭﻓ ﺭﻳﻓﻭﺗ ﺔﻟﺎﺣ ﻲﻓ .ﻙﺭﺣﻣﻟﺎﺑ ﺕﻼﻛﺷﻣ
ﻥﻭﻛﻳﻭ ﺔﻣﻳﺩﻘﻟﺍ ﻥﻣ ًﻻﺩﺑ ﺓﺩﻳﺩﺟ ﻝﻘﺻ ﺓﺎﺷﺭﻓ ﻡﺩﺧﺗﺳﺍ ،ﺔﻠﺣﺭﻣﻟﺍ ﻩﺫﻫ ﻲﻓ
ﻡﻗ ،ﻙﻟﺫ ﻰﻟﺇ ﺔﻓﺎﺿﻹﺎﺑ .ﻝﻛﺷﻟﺍ ﻲﻓ ﺔﺣﺿﻭﻣﻟﺍ ﻡﺎﻗﺭﻷﺍ ﺱﻔﻧ ﺎﻬﻳﻠﻋ
ﺔﺳﻼﺳﺑ ﺎﻬﻗﻻﺯﻧﺍ ﻥﻣ ﺩﻛﺄﺗﻟﺍﻭ ﺭﺍﺭﻣﺗﺳﺎﺑ ﺔﻳﻧﻭﺑﺭﻛﻟﺍ ﺓﺎﺷﺭﻔﻟﺍ ﻑﻳﻅﻧﺗﺑ
ﻡﻗﻭ ﺓﺎﺷﺭﻔﻟﺍ ءﺎﻁﻏ ﻰﻠﻋ ﺔﻅﻓﺎﺣﻣﻟﺍ ﻊﻣ D4 ﻁﻐﺿﻟﺍ ﺭﻳﻣﺎﺳﻣ ءﺎﺧﺭﺈﺑ ﻡﻗ
ﺏﺣﺳﻟ ﺭﻳﻐﺻﻟﺍ ﻙﻔﻣﻟﺍ ﻭﺃ ﻲﻓﺎﺿﻹﺍ ﻲﺳﺍﺩﺳﻟﺍ ﻁﺑﺭﻟﺍ ﺡﺎﺗﻔﻣ ﻡﺩﺧﺗﺳﺍ
ﺩﻭﻣﻋ ﺔﻓﺎﺣ ﺔﻟﺍﺯﺈﺑ ﻡﻗ .ﺔﻳﻧﻭﺑﺭﻛﻟﺍ ﺓﺎﺷﺭﻔﻟﺍ ﻝﻣﺣﺑ ﻡﻭﻘﺗ ﻲﺗﻟﺍ ﺽﺑﺎﻧﻟﺍ ﺔﻓﺎﺣ
.ﺓﺎﺷﺭﻔﻟﺍ ﻝﻣﺎﺣ ﻥﻣ ﻲﺟﺭﺎﺧﻟﺍ ءﺯﺟﻟﺍ ﻰﺗﺣ ﻥﺍﺭﻭﺩﻟﺍ
ﻝﻣﺎﺣﻟ ﻑﺭﻁﻟﺍ ﻡﺳﻗ ﻥﻣ ﺔﻳﻧﻭﺑﺭﻛﻟﺍ ﺓﺎﺷﺭﻔﻟﺍ ﺔﻠﻳﺩﺟ ﻑﺭﻁ ﺔﻟﺍﺯﺈﺑ ﻡﻗ
.ﺓﺎﺷﺭﻔﻟﺍ ﻝﻣﺎﺣ ﻥﻣ ﺔﻳﻧﻭﺑﺭﻛﻟﺍ ﺓﺎﺷﺭﻔﻟﺍ ﺔﻟﺍﺯﺈﺑ ﻡﻗ ﻡﺛ ﺓﺎﺷﺭﻔﻟﺍ
ﻝﻣﺎﺣﻟ ﻑﺭﻁﻟﺍ ﻡﺳﻗ ﻲﻓ ﺔﻳﻧﻭﺑﺭﻛﻟﺍ ﺓﺎﺷﺭﻔﻠﻟ ﺔﻠﻳﺩﺟﻟﺍ ﻑﺭﻁ ﻝﺎﺧﺩﺈﺑ ﻡﻗ
.ﺓﺎﺷﺭﻔﻟﺍ ﻝﻣﺎﺣ ﻲﻓ ﻥﻭﺑﺭﻛﻟﺍ ﺓﺎﺷﺭﻓ ﻝﺎﺧﺩﺈﺑ ﻡﻗ
ﺔﻓﺎﺣ ﺓﺩﺎﻋﻹ ﺭﻳﻐﺻﻟﺍ ﻙﻔﻣﻟﺍ ﻭﺃ ﻲﻓﺎﺿﻹﺍ ﻲﺳﺍﺩﺳﻟﺍ ﻁﺑﺭﻟﺍ ﺡﺎﺗﻔﻣ ﻡﺩﺧﺗﺳﺍ
.D4 ﻁﻐﺿﻟﺍ ﺭﻳﻣﺎﺳﻣ ﻡﺎﻛﺣﺈﺑ ﻡﻗﻭ ﻑﺭﻁﻟﺍ ءﺎﻁﻏ ﺏﻳﻛﺭﺗﺑ ﻡﻗ
22
ﺯﻛﺭﻣﻟﺍ ﺔﻁﻭﻐﺿﻣ ﺔﻠﺟﻌﻟﺍ ﺹﺣﻓ
.ﺔﻳﺣﻁﺳﻟﺍ
ﺕﻳﺑﺛﺗﻟﺍ ﺭﻳﻣﺎﺳﻣ ﺹﺣﻓ
4
ﻝﻛﺷﻟﺍ) ﺔﻳﻧﻭﺑﺭﻛﻟﺍ ﺓﺎﺷﺭﻔﻟﺍ ﺹﺣﻓ
(
.ﺎًﻳﺋﺎﻘﻠﺗ ﻙﺭﺣﻣﻟﺍ ﻑﻗﻭﺗﻳﺳ ،ﻑﻗﻭﺗﻟﺍ
.ﺓﺎﺷﺭﻔﻟﺍ ﺽﺑﺎﻘﻣ ﻝﺧﺍﺩ
5
ﻝﻛﺷﻟﺍ) ﺔﻳﻧﻭﺑﺭﻛﻟﺍ ﺓﺎﺷﺭﻔﻟﺍ ﻝﺍﺩﺑﺗﺳﺍ
(
<ﻙﻔﻟﺍ>
.ﺓﺎﺷﺭﻔﻟﺍ ءﺎﻁﻏ ﺔﻟﺍﺯﺈﺑ
<ﺏﻳﻛﺭﺗﻟﺍ>
.ﺓﺎﺷﺭﻔﻟﺍ
.ﺔﻳﻧﻭﺑﺭﻛﻟﺍ ﺓﺎﺷﺭﻔﻟﺍ ﻝﻣﺣﺑ ﻡﻭﻘﺗ ﻲﺗﻟﺍ ﺽﺑﺎﻧﻟﺍ
○
ﺏﺑﺳﺗﺗ ﻲﺗﻟﺍ ﺔﺑﺎﺻﻹﺍ ﻊﻧﻣﻳ ﻲﺋﺎﻗﻭ ﺯﺎﻬﺟ ﻥﻋ ﺓﺭﺎﺑﻋ ﺕﻼﺟﻌﻟﺍ ءﺎﻗﻭ ﻥﺇ
○
.ﻝﻳﻐﺷﺗﻟﺍ ءﺎﻧﺛﺃ ﺯﻛﺭﻣﻟﺍ ﺔﻁﻭﻐﺿﻣ ﺔﻠﺟﻌﻟﺍ ﻥﻣ ﺓﺭﺛﺎﻧﺗﻣﻟﺍ ءﺍﺯﺟﻷﺍ ﺎﻬﻳﻓ
ﻪﻁﺑﺿﻭ ﻝﺟﻌﻟﺍ ءﺎﻗﻭ ﺏﻳﻛﺭﺗ
ﺔﻳﻠﻣﻋ ﻲﻓ ءﺩﺑﻟﺍ ﻝﺑﻗ ﺢﻳﺣﺻ ﻝﻛﺷﺑ ﻪﺗﻳﺑﺛﺗﻭ ﻪﺑﻳﻛﺭﺗ ﻡﺗ ءﺎﻗﻭﻟﺍ ﻥﺃ ﺩﻛﺄﺗ
○
ﻡﻗﻭ ،ﺔﻠﺟﻌﻟﺍ ﻲﻗﺍﻭﺑ ﺹﺎﺧﻟﺍ ﺩﻳﺩﺣﺗﻟﺍ ﺭﺎﻣﺳﻣ ﻝﺧﺩﺃﻭ ﻉﺍﺭﺫﻟﺍ ﺢﺗﻓﺍ ○
.ﺔﻋﻭﻣﺟﻣﻟﺍ ﺽﻳﺭﺄﺗﺑ ﺔﺻﺎﺧﻟﺍ ﺔﻠﺧﺍﺩﺗﻣﻟﺍ ﺢﻁﺳﻷﺍ ﻊﻣ ﻪﺗﺍﺫﺎﺣﻣﺑ
[ﻪﻁﺑﺿﻭ ﻝﺟﻌﻟﺍ ءﺎﻗﻭ ﺏﻳﻛﺭﺗ]
.(ﻡﺍﺩﺧﺗﺳﻻﺍ ﺩﻧﻋ) ﺏﻭﻏﺭﻣﻟﺍ ﻊﺿﻭﻟﺍ ﻲﻓ ﺔﻠﺟﻌﻟﺍ ﻲﻗﺍﻭ ﺓﺭﺍﺩﺈﺑ ﻡﻗ ﻡﺛ
ﻝﻼﺧ ﻥﻣ ﺕﻼﻳﺩﻌﺗﻟﺍ ﺫﻳﻔﻧﺗﺑ ﻡﻗ ،ﺔﺟﺎﺣﻟﺍ ﺩﻧﻋ .ﻪﺗﻳﺑﺛﺗﻭ ﻉﺍﺭﺫﻟﺍ ﻕﻼﻏﺈﺑ ﻡﻗ ○
.ﺎﻬﺋﺎﺧﺭﺇﻭ ﺭﻳﻣﺎﺳﻣﻟﺍ ﻡﺎﻛﺣﺇ
ﺕﻭﻳﺯ ﺽﻌﺑ ﻝﺎﻣﻌﺗﺳﺎﺑ ﻡﻗ ،ﺔﻟﻭﻬﺳﺑ ﻉﺍﺭﺫﻟﺍ ﻙﺭﺣﺗ ﻡﺩﻋ ﺔﻟﺎﺣ ﻲﻓ
.ﻉﺍﺭﺫﻟﺍﻭ ﺔﻋﻭﻣﺟﻣﻟﺍ ﻊﻁﻗ ﻥﻳﺑ ﻕﻟﺯﻧﻣﻟﺍ ﻡﺳﻘﻠﻟ ﻡﻳﺣﺷﺗﻟﺍ
ﻊﺿﻭ ﺭﺎﻣﺳﻣ ﺓﺍﺫﺎﺣﻣ ﻪﻳﻓ ﻡﺗﻳ ﻱﺫﻟﺍ ﻊﺿﻭﻟﺍ ﻲﻓ ﺔﻠﺟﻌﻟﺍ ﻲﻗﺍﻭ ﻁﺑﺭﺑ ﻡﻗ
1
ﻝﺎﺧﺩﺇ ﻪﻳﻓ ﻡﺗﻳ ﻱﺫﻟﺍ ﻊﺿﻭﻟﺍ) ﺔﻋﻭﻣﺟﻣﻟﺍ ﺽﻳﺭﺄﺗﻭ ﺔﻠﺧﺍﺩﺗﻣﻟﺍ ﺢﻁﺳﻷﺍ
(1)
ﺢﻳﺣﺻﻟﺍ ﻉﻭﻧﻟﺍ ﻥﻣ ﻡﺩﺧﺗﺳﺗﺳ ﻲﺗﻟﺍ ﺯﻛﺭﻣﻟﺍ ﺔﻁﻭﻐﺿﻣ ﺔﻠﺟﻌﻟﺍ ﻥﺃ ﺩﻛﺄﺗ
(2)
ﺔﻁﻭﻐﺿﻣ ﺔﺟﻠﻌﻟﺍ ﻥﺃ ﺎًﺿﻳﺃ ﺩﻛﺄﺗ .ﺢﻁﺳﻟﺍ ﺏﻭﻳﻋﻭ ﺭﺳﻛﺗﻟﺍ ﻥﻣ ﺔﻳﻟﺎﺧﻭ
(3)
ﺎًﻁﺑﺭ ﺎﻬﻁﺑﺭ ﻡﺗ ﺔﻠﺟﻌﻟﺍ ﺔﻟﻭﻣﺻ ﻥﺃﻭ ﺎًﺣﻳﺣﺻ ﺎًﺑﻳﻛﺭﺗ ﺎﻬﺑﻳﻛﺭﺗ ﻡﺗ ﺯﻛﺭﻣﻟﺍ
(4)
"ﺯﻛﺭﻣﻟﺍ ﺔﻁﻭﻐﺿﻣ ﺔﺟﻠﻌﻟﺍ ﻙﻓﻭ ﻊﻳﻣﺟﺗ" ﻡﺳﻘﻟﺍ ﻰﻟﺇ ﻊﺟﺭﺍ ،ﺎًﻣﻛﺣﻣ
ﻥﻭﻣﺿﻣﻟﺍ ﻁﺷﺎﻛﻟﺍ ﺞﺗﻧﻣﻟﺍ ﻊﻣ ﺎﻫﺭﻓﻭﺗ ﺩﻧﻋ ﺕﺎﻓﺎﺷﻧﻟﺍ ﻡﺍﺩﺧﺗﺳﺍ ﻥﻣ ﺩﻛﺄﺗ
.ﻪﻣﺩﺧﺗﺳﺗ ﻻ ﻥﻛﻟﻭ ،(ﺔﻠﺟﻌﻟﺍ ﻲﻗﺍﻭ
.ﺎﻬﻣﺍﺩﺧﺗﺳﺍ ﺭﻣﻷﺍ ﺏﻠﻁﺗﻳ ﺎﻣﺩﻧﻋﻭ
(5)
ﻡﺍﺩﺧﺗﺳﻻﺍ ﻝﺑﻗ ﻁﺑﺭﻟﺍ ﺔﻣﻛﺣﻣﻭ ﺍًﺩﻳﺟ ﺔﺗﺑﺛﻣ ﻁﺷﺎﻛﻟﺍ ﺕﺎﺟﺗﻧﻣﻟﺍ ﻥﺃ ﻥﻣ ﺩﻛﺄﺗ
2
ﻡﻗﻭ ،ﻥﻣﺁ ﻊﺿﻭ ﻲﻓ ﺔﻳﻧﺎﺛ 30 ﺓﺩﻣﻟ ﻝﻣﺣ ﻥﻭﺩ ﺓﺍﺩﻷﺍ ﻝﻳﻐﺷﺗﺑ ﻡﻗﻭ
.ﺏﻭﻳﻌﻟﺍ ﻥﻣ ﺎﻫﺭﻳﻏ ﻭﺃ ﺯﺍﺯﺗﻫﺍ ﺕﻅﺣﻻ ﺍﺫﺇ ﺭﻭﻔﻟﺍ ﻰﻠﻋ ﻑﺎﻘﻳﻹﺎﺑ
ﻲﺑﻳﺭﺟﺗﻟﺍ
.ﺏﺑﺳﻟﺍ ﺩﻳﺩﺣﺗﻟ ﺔﻟﻵﺍ ﺹﺣﻓﺍ ،ﻙﻟﺫ ﺙﺩﺣ ﺍﺫﺇ
○
ﺙﻼﺛ ﻭﺃ ﻥﻳﺗﺭﻣ ﻪﻳﻠﻋ ﻁﻐﺿﻟﺎﺑ ﻥﺍﺭﻭﺩﻟﺍ ﺩﻭﻣﻋ ﺭﺯ ﻑﻗﻭﺗ ﻡﺩﻋ ﻥﻣ ﺩﻛﺄﺗ
○
1
ﻥﻋ ﻁﻐﺿﻟﺍ ﻝﻳﻠﻘﺗ ﻡﺎﻬﻟﺍ ﻥﻣ ،ﺯﺎﺗﻣﻣ ﻝﻣﻋ ﻥﺎﻣﺿﻭ ﺔﻟﻵﺍ ﺭﻣﻋ ﺔﻟﺎﻁﻹ
2
ﺔﺧﻼﺟﻟﺍ ﻰﻠﻋ ﻩﺩﺣﻭ ﺔﻟﻵﺍ ﻥﺯﻭ ﻲﻔﻛﻳ ،ﺕﺎﻘﻳﺑﻁﺗﻟﺍ ﺏﻠﻏﺃ ﻲﻓ .ﺔﻟﻵﺍ
.(1 ﻝﻛﺷﻟﺍ ﺭﻅﻧﺍ) ﺔﻳﺋﺎﺑﺭﻬﻛﻟﺍ ﺓﺩﻌﻟﺍ ﻝﻳﻐﺷﺗ ﻝﺑﻗ ﺕﺍﺭﻣ
ﻥﺍﺭﻭﺩﻟﺍ ﺩﻭﻣﻌﻟ ﺔﻳﺎﻣﺣﻟﺍ ﺔﻳﻟﺁ ﺩﻳﻛﺄﺗﺑ ﻡﻗ
.ﺱﺭﺗﻟﺍ ﻑﻼﻐﺑ ﻲﺑﻧﺎﺟﻟﺍ ﺽﺑﻘﻣﻟﺍ ﺕﻳﺑﺛﺗﺑ ﻡﻗ
.ﻲﺑﻧﺎﺟﻟﺍ ﺽﺑﻘﻣﻟﺍ ﺕﻳﺑﺛﺗﺑ ﻡﻗ
ﻲﻠﻣﻌﻟﺍ ﺔﺧﻼﺟﻟﺍ ﻕﻳﺑﻁﺗ
ﻰﻠﻋ ﺭﻳﺛﺄﺗﻟﺍﻭ ،ﻥﺍﺭﻭﺩﻟﺍ ﺔﻋﺭﺳ ﻝﻳﻠﻘﺗ ﻰﻟﺇ ﺩﺋﺍﺯﻟﺍ ﻁﻐﺿﻟﺍ ﻱﺩﺅﻳ .ﺔﻟﺎﻌﻔﻟﺍ
.ﺔﻟﻵﺍ ﺭﻣﻋ ﻝﻳﻠﻘﺗ ﻲﻓ ﺏﺑﺳﺗﻳ ﺩﻗ ﺎﻣﻣ ﻁﻐﺿﻟﺍ ﺓﺩﺎﻳﺯﻭ ،ﺢﻁﺳﻟﺍ
3
ﻲﺗﻟﺍ ﺩﺍﻭﻣﻟﺍ ﻊﻣ ﺯﻛﺭﻣﻟﺍ ﺔﻁﻭﻐﺿﻣ ﺔﻠﺟﻌﻠﻟ ﻝﻣﺎﻛﻟﺍ ﺢﻁﺳﻟﺍ ﻡﺩﺧﺗﺳﺗ ﻻ
ﺫﺣﺷﻟﺍ ﺔﻳﻭﺍﺯ
ﺔﻳﻭﺍﺯﺑ ﺔﻟﻵﺎﺑ ﻙﺎﺳﻣﻹﺍ ﺏﺟﻳ ،3 ﻝﻛﺷﻟﺍ ﻲﻓ ﻥﻳﺑﻣ ﻭﻫ ﺎﻣﻛ .ﺎﻫﺫﺣﺷ ﻡﺗﻳ
ﺔﻁﻭﻐﺿﻣ ﺔﻠﺟﻌﻠﻟ ﺔﻳﺟﺭﺎﺧﻟﺍ ﺔﻓﺎﺣﻟﺍ ﺱﻣﻠﺗ ﻰﺗﺣ ﺔﺟﺭﺩ 30 - ﺔﺟﺭﺩ
.ﻰﻠﺛﻣﻟﺍ ﺔﻳﻭﺍﺯﻟﺍ ﺩﻧﻋ ﺓﺩﺎﻣﻟﺍ ﺯﻛﺭﻣﻟﺍ
ﺏﺟﻳ ،ﻝﻣﻌﻟﺍ ﺔﻌﻁﻗ ﻝﺧﺍﺩ ﺓﺩﻳﺩﺟ ﺯﻛﺭﻣﻟﺍ ﺔﻁﻭﻐﺿﻣ ﺔﻠﺟﻌﻟﺍ ﺭﻔﺣ ﺏﻧﺟﺗﻟ
ﻝﻣﺎﻌﻟﺍ ﻩﺎﺟﺗﺍ ﻲﻓ ﻝﻣﻌﻟﺍ ﺔﻌﻁﻗ ﻝﻭﺣ ﺔﺧﻼﺟﻟﺍ ﻡﺳﺭﺑ ﻲﻟﻭﻷﺍ ﺫﺣﺷﻟﺍ ءﺍﺩﺃ
ﻼﻛ ﻲﻓ ﺫﺣﺷﻟﺍ ﻥﻛﻣﻳ ،ﺯﻛﺭﻣﻟﺍ ﺔﻁﻭﻐﺿﻣ ﺔﻠﺟﻌﻟﺍ ﺔﻓﺎﺣ ﻝﻛﺂﺗ ﺩﺭﺟﻣﺑ
4
(1)
(2)
.ﺡﺎﺗﻔﻣﻟﺍ ﻉﺍﺭﺫ ﻰﻠﻋ ﻁﻐﺿﺍ ﻡﺛ ﻡﺎﻣﻸﻟ ﻝﻔﻘﻟﺍ ﺭﺫ ﻊﻓﺩﺍ :ﻝﻳﻐﺷﺗﻟﺍ
ﻝﻔﻗ ﻡﺗﻳ .ﺡﺎﺗﻔﻣﻟﺍ ﻉﺍﺭﺫ ﻰﻠﻋ ﻁﻐﺿﺍ ،ﺭﻣﺗﺳﻣﻟﺍ ﻡﺍﺩﺧﺗﺳﻼﻟ *
.ﻯﺭﺧﺃ ﺓﺭﻣ ﻡﺎﻣﻸﻟ ﻝﻔﻘﻟﺍ ﺭﺫ ﻊﻓﺩ ﻝﻼﺧ ﻥﻣ ﺡﺎﺗﻔﻣﻟﺍ ﻉﺍﺭﺫ
(.ﺔﻘﻁﻧﻣﻟﺍ ﺏﺳﺣ ﺭﻳﻳﻐﺗﻠﻟ ﺔﺿﺭﻋ*)
B
ﻩﺎﺟﺗﻻﺍ 3 ﻝﻛﺷﻟﺍ)
.(
ﺡﺎﺗﻔﻣﻟﺍ ﻝﻳﻐﺷﺗ
.ﻩﺭﻳﺭﺣﺗﺑ ﻡﻗﻭ ﺡﺎﺗﻔﻣﻟﺍ ﻉﺍﺭﺫ ﻰﻠﻋ ﻁﻐﺿﺍ :ﻝﻳﻐﺷﺗﻟﺍ ﻑﺎﻘﻳﺇ
(3)
ﺔﻠﺟﻌﻟﺍ ﻑﻗﻭﺗﺗ ﻰﺗﺣ ﻙﺩﻳ ﻥﻣ ﺎﻬﻌﺿﺗ ﻻ ،ﺔﻟﻵﺍ ﻝﻳﻐﺷﺗ ﻑﺎﻘﻳﺇ ﺩﻌﺑ
ﺔﻳﻠﻣﻌﻟﺍ ءﺎﻬﻧﺇ ﺭﻭﻓ ﺎﻬﻋﺎﺑﺗﺍ ﺏﺟﺍﻭﻟﺍ ﺕﺎﻁﺎﻳﺗﺣﻻﺍ
ﻥﺈﻓ ،ﺓﺭﻳﻁﺧﻟﺍ ﺙﺩﺍﻭﺣﻟﺍ ﺏﻧﺟﺗ ﻰﻟﺇ ﺔﻓﺎﺿﻹﺎﺑ .ﺎًﻣﺎﻣﺗ ﺯﻛﺭﻣﻟﺍ ﺔﻁﻭﻐﺿﻣ
(1)
(2)
(3)
(4)
.ﺔﻟﻵﺎﺑ ﺔﻘﻟﺎﻌﻟﺍ ﺔﻁﺍﺭﺧﻟﺍﻭ ﺔﺑﺭﺗﻷﺍ ﺔﻳﻣﻛ ﻝﻳﻠﻘﺗ ﻪﻧﺄﺷ ﻥﻣ ﻁﺎﻳﺗﺣﻻﺍ ﺍﺫﻫ
.ﺔﺑﺭﺗﻷﺎﺑ ﺔﺋﻳﻠﻣ ﻥﻛﺎﻣﺃ ﻲﻓ ﻝﻣﻌﻟﺍ ﺩﻧﻋ ﺔﻳﻭﻬﺗﻟﺍ ﺕﺎﺣﺗﻓ ﺔﻓﺎﻅﻧ ﻥﻣ ﺩﻛﺄﺗ
.ﺢﻳﺣﺻ ﻝﻛﺷﺑ ﺎﻬﻣﻋﺩ ﻡﺗ ﻝﻣﻌﻟﺍ ﺔﻌﻁﻗ ﻥﺃ ﻥﻣ ﻕﻘﺣﺗ
ﺔﻗﺎﻁﻟﺍ ﺭﺩﺻﻣ ﻥﻣ ﺓﺍﺩﻷﺍ ﻝﺻﻔﺑ ًﻻﻭﺃ ﻡﻗ ،ﺔﺑﺭﺗﻷﺍ ﻑﻳﻅﻧﺗ ﺓﺭﻭﺭﺿ ﺩﻧﻋ
.ﺔﻳﻠﺧﺍﺩﻟﺍ ءﺍﺯﺟﻷﺍ ﻑﻠﺗ ﺏﻧﺟﺗﻭ (ﺔﻳﻧﺩﻌﻣ ﺭﻳﻏ ءﺎﻳﺷﺃ ﻡﺩﺧﺗﺳﺍ) ﻲﺳﻳﺋﺭﻟﺍ
٤
.ﺫﺣﺷﻟﺍ
ﻝﻳﻐﺷﺗﻟﺍ
ﻁﻐﺿﻟﺍ
15
.ﻥﻳﻫﺎﺟﺗﻻﺍ
ﻪﻳﺑﻧﺗ
4
○
○
○
5
6
7
8
1
2
3
4
5
○
○
Page 23

ﺔﻳﺑﺭﻌﻟﺍ
ﺭﺎﺷﺣﻧﺍ ﺭﻁﺧ ﻝﻳﻠﻘﺗﻟ ﻡﺟﺣﻟﺍ ﺭﻳﺑﻛ ﺭﺻﻧﻋ ﻱﺃ ﻭﺃ ﺕﺎﺣﻭﻠﻟﺍ ﻡﻳﻋﺩﺗﺑ ﻡﻗ (ﺝ
.ﺎًﻳﺳﻛﻋ ﺎﻫﺩﺍﺩﺗﺭﺍﻭ ﺓﺭﻔﺷﻟﺍ
ﻊﺿﻭ ﺏﺟﻳ .ﺎﻬﺑ ﺹﺎﺧﻟﺍ ﺎﻬﻧﺯﻭ ﺕﺣﺗ ﻲﺧﺗﺭﺗﻟ ﺓﺭﻳﺑﻛﻟﺍ ﺭﺻﺎﻧﻌﻟﺍ ﻊﻔﺗﺭﺗ
ﺔﻓﺎﺣ ﻥﻣ ﺏﺭﻘﻟﺎﺑﻭ ﻊﻁﻘﻟﺍ ﻁﺧ ﻥﻣ ﺏﺭﻘﻟﺎﺑ ،ﺭﺻﻧﻌﻟﺍ ﺕﺣﺗ ﻡﺋﺎﻋﺩﻟﺍ
.ﺔﻠﺟﻌﻟﺍ ﻲﺑﻧﺎﺟ ﻰﻠﻋ ﺭﺻﻧﻌﻟﺍ
ﺔﻳﻟﺎﺣﻟﺍ ﻁﺋﺍﻭﺣﻟﺍ ﻲﻓ "ﻲﺑﻳﺟ ﻊﻁﻗ" ﻝﻣﻋ ﺩﻧﻋ ﻁﺎﻳﺗﺣﻻﺍ ﻥﻣ ﺍًﺩﻳﺯﻣ ﻝﺫﺑﺍ (ﺡ
.ﻯﺭﺧﻷﺍ ﺓﺩﻭﺩﺳﻣﻟﺍ ﻕﻁﺎﻧﻣﻟﺍ ﻭﺃ
ﺔﻳﺋﺎﺑﺭﻬﻛﻟﺍ ﻙﻼﺳﻷﺍﻭ ،ﻩﺎﻳﻣﻟﺍ ﺏﻳﺑﺎﻧﺃ ﻊﻁﻗ ﻰﻟﺇ ﺓﺯﺭﺎﺑﻟﺍ ﺔﻠﺟﻌﻟﺍ ﻱﺩﺅﺗ ﺩﻗ
.ﻲﺳﻛﻌﻟﺍ ﺩﺍﺩﺗﺭﻻﺍ ﺏﺑﺳﺗ ﺩﻗ ﻲﺗﻟﺍ ءﺎﻳﺷﻷﺍ ﻭﺃ
ﺹﺭﻘﻟﺍ ﺔﻧﻭﺣﺎﻁ ﻡﺍﺩﺧﺗﺳﺍ ﺩﻧﻋ ﺔﻣﺯﻼﻟﺍ ﺕﺎﻁﺎﻳﺗﺣﻻﺍ
ﺔﻧﻧﻘﻣﻟﺍ ﺔﻋﺭﺳﻠﻟ ﺔﻳﻭﺎﺳﻣ ﺔﻠﺟﻌﻟﺍ ﻰﻠﻋ ﺔﻧﻳﺑﻣﻟﺍ ﺔﻋﺭﺳﻟﺍ ﻥﺃ ﻥﻣ ﺩﻛﺄﺗ
ﻭﺃ ﺙ/ﻡ 80 ﻥﻣ ﺡﻭﺍﺭﺗﺗ ﻲﺗﻟﺍﻭ ﺔﻁﻭﻐﺿﻣﻟﺍ ﺯﻛﺭﻣﻟﺍ ﺕﻼﺟﻋ ﻡﺩﺧﺗﺳﺍ
ﻊﻣ ﻕﻓﺍﻭﺗﺗ ﺔﻠﺟﻌﻟﺍ ﻥﺃﻭ ﺔﻧﻭﺣﺎﻁﻟﺍ ﻊﻣ ﺔﻘﻓﺍﻭﺗﻣ ﺔﻠﺟﻌﻟﺍ ﺩﺎﻌﺑﺃ ﻥﺃ ﻥﺎﻣﺿ
ﺕﺎﻣﻳﻠﻌﺗﻟ ﺎًﻌﺑﺗ ﺔﻳﺎﻧﻌﺑ ﺎﻬﻌﻣ ﻝﻣﺎﻌﺗﻟﺍﻭ ﺔﻁﺷﺎﻛﻟﺍ ﺕﻼﺟﻌﻟﺍ ﻥﻳﺯﺧﺗ ﺏﺟﻳ
ﻡﺩﺧﺗﺳﺗ ﻻﻭ ،ﻡﺍﺩﺧﺗﺳﻻﺍ ﻝﺑﻗ ﺔﻁﻭﻐﺿﻣﻟﺍ ﺯﻛﺭﻣﻟﺍ ﺕﻼﺟﻋ ﺹﺣﻓﺍ
ﺓﺩﻌﻠﻟ ﻲﺑﻧﺎﺟﻟﺍ ﺽﺑﻘﻣﻟﺍﻭ ﻝﻛﻳﻬﻟﺍ ﺽﺑﻘﻣ ﻙﺳﻣ ﻰﻠﻋ ﺎًﻣﻭﺩ ﺹﺭﺣﺍ
ﺔﻘﻳﻗﺩ ﺭﻳﻏ ﺕﺎﻳﻠﻣﻋ ﻲﻓ ﺔﻳﺳﻛﻌﻟﺍ ﺓﻭﻘﻟﺍ ﺏﺑﺳﺗﺗﺳ ﻻﺇﻭ .ﻡﺎﻛﺣﺈﺑ ﺔﻳﺋﺎﺑﺭﻬﻛﻟﺍ
ﺕﻼﺟﻌﻟﺍ ﺔﺣﺗﻓ ﻡﺟﺣ ﺭﻳﻳﻐﺗﻟ ﺕﻻﻭﺣﻣ ﻭﺃ ﺔﻠﺻﻔﻧﻣ ﺕﺎﻧﺎﻁﺑ ﻡﺩﺧﺗﺳﺗ ﻻ
.ﺔﻠﺟﻌﻟﺍ ﺕﺎﻳﻗﺍﻭ ﻥﻭﺩﺑ ﻩﺫﻫ ﺔﻗﺎﻁﻟﺍ ﺩﺩﻋ ﻝﻳﻐﺷﺗﺑ ﻡﻘﺗ ﻻ
.ﺎﻬﻧﻣ ﺭﺑﻛﺃ ﻭﺃ ﺔﺧﻼﺟﻠﻟ
.ﺭﺛﻛﺃ
.ﻥﺍﺭﻭﺩﻟﺍ ﺩﻭﻣﻋ
.ﺔﻌﻧﺻﻣﻟﺍ ﺔﻬﺟﻟﺍ
.ﻯﺭﺧﺃ ﺏﻭﻳﻋ ﺎﻬﺑ ﻭﺃ ﺔﻘﻘﺷﻣ ﻭﺃ ﺓﺭﻭﺳﻛﻣ ﺕﺎﺟﺗﻧﻣ
.ﺓﺭﻁﺧﻭ ﻝﺑ
.ﻲﺑﻧﺎﺟﻟﺍ ﺫﺣﺷﻟﺍ ﻲﻓ ﻊﻁﻘﻟﺍ ﺔﻠﺟﻋ ﻡﺩﺧﺗﺳﺗ ﻻ
.ﺔﻁﺷﺎﻛﻟﺍ
.ﺓﺩﻌﻟﺍ ﻝﻳﻐﺷﺗ ﻑﺎﻘﻳﺇ ﺩﻌﺑ ﻥﺍﺭﻭﺩﻟﺍ ﻲﻓ ﺔﻠﺟﻌﻟﺍ ﺭﻣﺗﺳﺗ
G18MRG23MR
1–
ﺔﻘﻳﻗﺩ
ﻡﻠﻣ
240
6600
230
،ﺕﻟﻭﻓ
230
،ﺕﻟﻭﻓ
22.23
80
5.4
220
،ﺕﻟﻭﻓ
1–
ﺔﻘﻳﻗﺩ
.ﺔﻘﻁﻧﻣﻟﺍ ﺏﺳﺣ ﺭﻳﻳﻐﺗﻠﻟ ﺔﺿﺭُﻋ ﺎﻬﻧﺃ ﺙﻳﺣ ﺞﺗﻧﻣﻟﺍ ﻰﻠﻋ ﺓﺩﻭﺟﻭﻣﻟﺍ ﻡﺳﻻﺍ ﺔﺣﻭﻟ ﺹﺣﻓ ﻥﻣ ﺩﻛﺄﺗ 1*
110
180
ﺩﻗ .ﺎﻫﺭﺳﻛ ﺹﺭﻓ ﻥﻣ ﻝﻠﻘﻳ ﺎﻣﻣ ﺔﻠﺟﻌﻟﺍ ﺏﺳﺎﻧﻣﻟﺍ ﻝﺟﻌﻟﺍ ﺭﻭﺣﻣ ﻡﻋﺩﻳ
ﺕﻼﺟﻌﻟ ﻝﺟﻌﻟﺍ ﺭﻭﺎﺟﻣ ﻥﻋ ﻊﻁﻘﻟﺍ ﺕﻼﺟﻌﻟ ﻝﺟﻌﻟﺍ ﺭﻭﺎﺣﻣ ﻑﻠﺗﺧﺗ
.ﺭﺑﻛﺃ ﺔﻗﺎﻁ ﺕﺍﻭﺩﺃ ﻥﻣ ﺔﻠﻛﺂﺗﻣ ﺕﻼﺟﻋ ﻡﺩﺧﺗﺳﺗ ﻻ (ﺡ
ﺔﻳﻟﺎﻌﻟﺍ ﺔﻋﺭﺳﻟﺍ ﻊﻣ ﺏﺳﺎﻧﺗﻳ ﻻ ﺭﺑﻛﻷﺍ ﺔﻗﺎﻁﻟﺍ ﺕﺍﻭﺩﻷ ﻡﺻﺻﻣﻟﺍ ﻝﺟﻌﻟﺍ
.ﺭﺟﻔﻧﻳ ﺩﻗﻭ ﺓﺭﻳﻐﺻﻟﺍ ﺕﺍﻭﺩﻸﻟ
ﺔﻁﺷﺎﻛﻟﺍ ﻊﻁﻘﻟﺍ ﺕﺎﻳﻠﻣﻌﻟ ﺔﻳﻓﺎﺿﺇ ﻥﺎﻣﺃ ﺕﺍﺭﻳﺫﺣﺗ
ﻝﻭﺎﺣﺗ ﻻ .ﺩﺋﺍﺯ ﻝﻣﺣ ﺎﻬﻳﻠﻋ ﻊﺿﺗ ﻭﺃ ﻊﻁﻘﻟﺍ ﺔﻠﺟﻋ ﻰﻠﻋ "ﻁﻐﺿﺗ" ﻻ (ﺃ
ﻭﺃ ﺔﻠﺟﻌﻟﺍ ءﺍﻭﺗﻟﺍ ﺹﺭﻓﻭ ﻝﻣﺣﻟﺍ ﻥﻣ ﺔﻠﺟﻌﻟﺍ ﻰﻠﻋ ﺩﺋﺍﺯﻟﺍ ﻁﻐﺿﻟﺍ ﺩﻳﺯﻳ
1
ﺭﺳﻛﺗ ﻭﺃ ﻲﺳﻛﻌﻟﺍ ﺩﺍﺩﺗﺭﻻﺍ ﺹﺭﻓ ﻥﻣ ﺩﻳﺯﻳ ﺎﻣﻛ ،ﻊﻁﻘﻟﺍ ﺩﻧﻋ ﺎﻫﺩﺍﺩﺳﻧﺍ
2
ﻥﻣﻭ ﺭﻭﺳﻛﻣﻟﺍ ﻝﺟﻌﻟﺍ ﺎﻳﺎﻅﺷ ﻥﻣ ﻝﻣﺎﻌﻟﺍ ﺔﻳﺎﻣﺣ ﻰﻠﻋ ءﺎﻗﻭﻟﺍ ﺩﻋﺎﺳﻳ
3
ﻑﺎﻘﻳﺈﺑ ﻡﻗ ،ﺏﺎﺑﺳﻷﺍ ﻥﻣ ﺏﺑﺳ ﻱﻻ ﻊﻁﻘﻟﺍ ﺔﻗﺎﻋﺇ ﻭﺃ ﺔﻠﺟﻌﻟﺍ ﻁﺑﺭ ﺩﻧﻋ (ﺕ
ﻝﻭﺎﺣﺗ ﻻ .ﺎًﻣﺎﻣﺗ ﺔﻠﺟﻌﻟﺍ ﻑﻗﻭﺗﺗ ﻰﺗﺣ ﺎﻬﻛﺭﺣﺗ ﻻﻭ ﺔﻗﺎﻁﻟﺍ ﺓﺍﺩﺃ ﻝﻳﻐﺷﺗ
4
ﻲﻓ ﻙﻟﺫ ﺏﺑﺳﺗﻳﺳ ﻻﺇﻭ ﺔﻠﺟﻌﻟﺍ ﺔﻛﺭﺣ ءﺎﻧﺛﺃ ﻊﻁﻘﻟﺍ ﻥﻋ ﺔﻠﺟﻋ ﻑﺎﻘﻳﺇ ﺍًﺩﺑﺃ
5
ﺩﺍﺩﺳﻧﺍ ﺙﻭﺩﺣ ﺔﺻﺭﻓ ﻝﻳﻠﻘﺗﻟ ﺢﻳﺣﺻﻟﺍ ءﺍﺭﺟﻹﺍ ﺫﺎﺧﺗﺍﻭ ﺹﺣﻔﻟﺎﺑ ﻡﻗ
6
ﻰﻟﺇ ﻝﺻﺗ ﺔﻠﺟﻌﻟﺍ ﻙﺭﺗﺍ .ﻝﻣﻌﻟﺍ ءﺎﻧﺛﺃ ﻊﻁﻘﻟﺍ ﺔﻳﻠﻣﻋ ﻝﻳﻐﺷﺗ ﺓﺩﺎﻋﺈﺑ ﻡﻘﺗ ﻻ (ﺙ
.ﺎﻬﻔﻠﺧ ﻭﺃ ﻥﺍﺭﻭﺩﻟﺍ ﺔﻠﺟﻋ ﺓﺍﺫﺎﺣﻣﺑ ﻙﻣﺳﺟ ﻊﺿﺗ ﻻ (ﺏ
.ﻊﻁﻘﻟﺍ ﺓﺩﺎﻋﺈﺑ ﺔﻳﺎﻧﻌﺑ ﻡﻗﻭ ﺔﻋﺭﺳ ﻰﺻﻗﺃ
ﺓﺩﺎﻋﺇ ﺕﻣﺗ ﺍﺫﺇ ﺎًﻳﺳﻛﻋ ﺎﻫﺩﺍﺩﺗﺭﺍ ﻭﺃ ،ﺎﻬﻛﺭﺣﺗ ﻭﺃ ،ﺔﻠﺟﻌﻟﺍ ﻁﺑﺭ ﻡﺗﻳ ﺩﻗ
7
8
9
)
8500
ﻲﺟﺭﺎﺧﻟﺍ ﺭﻁﻘﻟﺍﻡﻠﻣ
ﻲﻠﺧﺍﺩﻟﺍ ﺭﻁﻘﻟﺍﻡﻠﻣ
ﺔﻳﻁﻳﺣﻣﻟﺍ ﺔﻋﺭﺳﻟﺍﺙ/ﻡ
.ﺩﺋﺍﺯ ﻕﻣﻌﺑ ﻊﻁﻘﻟﺍ
.ﻝﺟﻌﻠﻟ ﺊﺟﺎﻔﻣﻟﺍ ﺱﻣﻠﻟﺍ
.ﻲﺳﻛﻋ ﺩﺍﺩﺗﺭﺍ
.ﻝﻣﻌﻟﺍ ءﺎﻧﺛﺃ ﺔﻗﺎﻁﻟﺍ ﺓﺍﺩﺃ ﻝﻳﻐﺷﺗ
1
*(ﺔﻘﻁﻧﻣﻟﺍ ﺏﺳﺣ) ﻲﺑﺭﻬﻛﻟﺍ ﺩﻬﺟﻟﺍ (ﺕﻟﻭﻓ
1
*ﺔﻗﺎﻁﻟﺍ ﻝﺎﺧﺩﺇﺕﺍﻭ 2400
ﻝﻣﺣ ﻥﻭﺩﺑ ﺔﻋﺭﺳﻟﺍ
ﻁﻘﻓ ﻲﺳﻳﺋﺭﻟﺍ ﻡﺳﺟﻟﺍ :ﻥﺯﻭﻟﺍ
.ﺫﺣﺷﻟﺍ
.ﺔﻠﺟﻌﻟﺍ
.ﺔﻠﺟﻌﻟﺍ
ﺕﺎﻔﺻﺍﻭﻣﻟﺍ
ﺯﺍﺭﻁﻟﺍ
ﺔﻠﺟﻌﻟﺍ
2
*ﻥﺯﻭﻟﺍﻡﺟﻛ
2
*
ﻝﻳﻐﺷﺗﻟﺍ ﻝﺑﻗ
ﺕﺎﺑﻠﻁﺗﻣﻟ ﻕﺑﺎﻁﻣ ﻪﻣﺍﺩﺧﺗﺳﺍ ﻡﺗﻳﺳ ﻱﺫﻟﺍ ﺔﻗﺎﻁﻟﺍ ﺭﺩﺻﻣ ﻥﺃ ﻥﻣ ﺩﻛﺄﺗ
.ﺞﺗﻧﻣﻟﺍ ﻰﻠﻋ ﺓﺩﻭﺟﻭﻣﻟﺍ ﻡﺳﻻﺍ ﺔﺣﻭﻟ ﻰﻠﻋ ﺓﺩﺩﺣﻣﻟﺍ ﺔﻗﺎﻁﻟﺍ
ﺱﺑﺎﻘﻟﺍ ﻝﻳﺻﻭﺗ ﺔﻟﺎﺣ ﻲﻓ .ﻑﺎﻘﻳﺇ ﻊﺿﻭﻟﺍ ﻰﻠﻋ ﺔﻗﺎﻁﻟﺍ ﺡﺎﺗﻔﻣ ﻥﺃ ﻥﻣ ﺩﻛﺄﺗ
ﺓﺍﺩﺃ ﻝﻳﻐﺷﺗ ﻡﺗﻳﺳﻓ ،ﻝﻳﻐﺷﺗ ﻊﺿﻭﻟﺍ ﻰﻠﻋ ﺔﻗﺎﻁﻟﺍ ﺡﺎﺗﻔﻣ ﻥﺎﻛﻭ ﺱﺑﻘﻣﻟﺎﺑ
.ﺭﻳﻁﺧ ﺙﺩﺎﺣ ﻉﻭﻗﻭ ﻰﻟﺇ ﻱﺩﺅﻳ ﺩﻗ ﺎﻣﻣ ،ﺭﻭﻔﻟﺍ ﻰﻠﻋ ﺔﻗﺎﻁﻟﺍ
ﻝﻳﺻﻭﺗ ﻙﻠﺳ ﻡﺩﺧﺗﺳﺍ ،ﺔﻗﺎﻁﻟﺍ ﺭﺩﺻﻣ ﻥﻣ ﻝﻣﻌﻟﺍ ﺔﻘﻁﻧﻣ ﺔﻟﺍﺯﺇ ﺩﻧﻋ
ﻝﻳﺻﻭﺗﻟﺍ ﻙﻠﺳ ﻝﻅﻳ ﻥﺃ ﺏﺟﻳ .ﺔﻧﻧﻘﻣ ﺔﻌﺳﻭ ٍﻑﺎﻛ ﻙﻣﺳ ﻭﺫ ﻲﻓﺎﺿﺇ
.ﻉﺎﻁﺗﺳﻣﻟﺍ ﺭﺩﻘﺑ ﺍًﺭﻳﺻﻗ ﻲﻓﺎﺿﻹﺍ
ﺔﻗﺎﻁﻟﺍ ﺭﺩﺻﻣ
ﺔﻗﺎﻁﻟﺍ ﺡﺎﺗﻔﻣ
ﻲﻓﺎﺿﻹﺍ ﻝﻳﺻﻭﺗﻟﺍ ﻙﻠﺳ
1
...........................................................ﻁﺑﺭﻟﺍ ﺡﺎﺗﻔﻣ
1
1
......................................................... ﻲﺑﻧﺎﺟ ﺽﺑﻘﻣ
.ﺔﻳﺳﺎﻳﻗ ﺕﺎﻘﺣﻠﻣﻛ ﺔﻁﻭﻐﺿﻣﻟﺍ ﺯﻛﺭﻣﻟﺍ ﺕﻼﺟﻋ ﺭﻳﻓﻭﺗ ﻡﺗﻳ ﻻ
2
ﺔﻳﺯﻧﻭﺭﺑﻟﺍﻭ ﺔﺑﻠﺻﻟﺍ ﺩﺍﻭﻣﻟﺍ ﻥﻣ ﺓﺩﻋ ﻉﺍﻭﻧﺃ ءﺎﻬﻧﺇﻭ ﺏﺻﻟﺍ ﺔﻔﻧﻋﺯ ﺔﻟﺍﺯﺇ ○
3
.ﺩﺍﻭﻣﻟﺍ ﻙﻠﺗﺑ ﺔﺻﺎﺧﻟﺍ ﺕﺎﺑﻭﺑﺻﻣﻟﺍﻭ ﻡﻭﻳﻧﻣﻭﻟﻷﺍ ﺩﺍﻭﻣﻭ
.ﺭﺎﻁﺧﺇ ﻥﻭﺩ ﺔﻳﺳﺎﻳﻘﻟﺍ ﺕﺎﻘﻠﺣﻣﻟﺍ ﻥﺣﺷ ﺏﺟﻳ
.ﻊﻁﻘﻟﺍ ﻝﻌﺷﻣ ﻡﺍﺩﺧﺗﺳﺎﺑ ﺔﻋﻭﻁﻘﻣﻟﺍ ءﺍﺯﺟﻷﺍ ﻭﺃ ﺔﻣﻭﺣﻠﻣﻟﺍ ءﺍﺯﺟﻷﺍ ﺫﺣﺷ ○
.ﻙﻟﺫ ﻰﻟﺇ ﺎﻣﻭ ﻡﺎﺧﺭﻟﺍﻭ ﺏﻭﻁﻟﺍﻭ ﺯﺍﻭﺩﺭﻷﺍﻭ ﺔﻳﻋﺎﻧﻁﺻﻻﺍ ﻥﺋﺍﺩﻠﻟﺍ ﺫﺣﺷ ○
ﺩﺍﻭﻣﻟﺍﻭ ﻡﺎﺧﺭﻟﺍﻭ ﺏﻭﻁﻟﺍﻭ ﺭﺎﺟﺣﻷﺍﻭ ﻲﻋﺎﻧﻁﺻﻻﺍ ﺕﻧﻣﺳﻷﺍ ﻊﻁﻗ ○
.ﻙﻟﺫﻟ ﺔﻬﺑﺎﺷﻣﻟﺍ
٣
ﺔﻳﺳﺎﻳﻗ ﺕﺎﻘﺣﻠﻣ
(1)
(2)
ﺕﺎﻘﻳﺑﻁﺗ
23
Page 24

ﺔﻳﺑﺭﻌﻟﺍ
ﺔﺑﺭﺗﻷﺍ ﻡﻛﺍﺭﺗ ﺓﺩﺎﻳﺯ ﺏﺑﺳﺗﺗ ﺩﻗﻭ ﻪﻠﺧﺍﺩ ﺔﺑﺭﺗﻷﺍ ﻙﺭﺣﻣﻟﺍ ﺔﺣﻭﺭﻣ ﺏﺣﺳﺗ
.ﺭﺍﺭﻣﺗﺳﺎﺑ ﺔﻗﺎﻁﻟﺍ ﺓﺍﺩﺄﺑ ﺔﻳﻭﻬﺗﻟﺍ ءﺯﺟ ﻑﻳﻅﻧﺗﺑ ﻡﻗ (ﺹ
.ﺔﻳﺋﺎﺑﺭﻬﻛ ﺭﻁﺎﺧﻣ ﻲﻓ
.ﻝﺎﻌﺗﺷﻼﻟ ﺔﻠﺑﺎﻗ ﺩﺍﻭﻣ ﻥﻣ ﺏﺭﻘﻟﺎﺑ ﺔﻗﺎﻁﻟﺍ ﺓﺍﺩﺃ ﻝﻳﻐﺷﺗ ﻰﻠﻋ ﻝﻣﻌﺗ ﻻ (ﺽ
.ﺩﺍﻭﻣﻟﺍ ﻩﺫﻫ ﻝﺎﻌﺗﺷﺇ ﻰﻟﺇ ﺭﺭﺷﻟﺍ ﻱﺩﺅﻳ ﺩﻗ
ﺭﺎﻳﺗﻟﺎﺑ ﻕﻌﺻ ﻲﻓ ﺔﻠﺋﺎﺳﻟﺍ ﺕﺍﺩﺭﺑﻣﻟﺍ ﻭﺃ ءﺎﻣﻟﺍ ﻡﺍﺩﺧﺗﺳﺍ ﺏﺑﺳﺗﻳ ﺩﻗ
.ﺔﻠﺋﺎﺳ ﺕﺍﺩﺭﺑﻣ ﺏﻠﻁﺗﺗ ﻲﺗﻟﺍ ﺕﺎﻘﻠﺣﻣﻟﺍ ﻡﺩﺧﺗﺳﺗ ﻻ (ﻁ
.ﺔﻳﺋﺎﺑﺭﻬﻛ ﺔﻣﺩﺻ ﻭﺃ ﻲﺋﺎﺑﺭﻬﻛﻟﺍ
ﺔﻠﺻﻟﺍ ﺕﺍﺫ ﺕﺍﺭﻳﺫﺣﺗﻟﺍﻭ ﻲﺳﻛﻌﻟﺍ ﺩﺍﺩﺗﺭﻻﺍ
،ﻲﻔﻠﺧﻟﺍ ﺢﺑﻛﻟﺍ ﺔﺻﻧﻣﻭ ،ﻥﺍﺭﻭﺩﻟﺍ ﺔﻠﺟﻌﻟ ﺊﺟﺎﻔﻣ ﻝﻌﻓ ﺩﺭ ﻭﻫ ﻲﺳﻛﻌﻟﺍ ﺩﺍﺩﺗﺭﻻﺍ
ﻕﺯﻣﺗﻟﺍ ﻭﺃ ﺏﻘﺛﻟﺍ ﺏﺑﺳﺗﻳ ﺩﻗ .ﺔﻗﺯﻣﻣﻟﺍ ﻭﺃ ﺔﺑﻭﻘﺛﻣﻟﺍ ﻯﺭﺧﻷﺍ ﺕﺎﻘﺣﻠﻣﻟﺍ ﻥﻣ ﻱﺃﻭ
ﺔﻗﺎﻁﻟﺍ ﺓﺍﺩﺃ ﻊﻓﺩ ﻲﻓ ﺏﺑﺳﺗﻳ ﺎﻣﻣ ﻥﺍﺭﻭﺩﻟﺍ ﻕﺣﻠﻣﻟ ﺊﺟﺎﻔﻣﻟﺍ ﻑﻗﻭﺗﻟﺍ ﺔﻋﺭﺳ ﻲﻓ
.ﻁﺑﺭﻟﺍ ﺔﻁﻘﻧ ﻲﻓ ﻕﺣﻠﻣﻟﺍ ﻥﺍﺭﻭﺩﻟ ﺱﻛﺎﻌﻣﻟﺍ ﻩﺎﺟﺗﻻﺍ ﻲﻓ ﻡﻛﺣﺗﻟﺍ ﺓﺩﻗﺎﻓ
ﺩﻗ ،ﻝﻣﻌﻟﺍ ﺔﺟﻳﺗﻧ ﺕﺑﻘُﺛ
ﻭﺃ ﺔﻁﺷﺎﻛ ﺔﻠﺟﻋ ﺕﻗﺯﻣﺗ ﺍﺫﺇ ،ﻝﺎﺛﻣﻟﺍ ﻝﻳﺑﺳ ﻰﻠﻋ
ﻲﻓ ﺏﺑﺳﺗﻣ ﺓﺩﺎﻣﻟﺍ ﺢﻁﺳ ﻝﺧﺍﺩ ﺏﻘﺛﻟﺍ ﺔﻁﻘﻧﺑ ﺔﻠﺧﺍﺩﻟﺍ ﺔﻠﺟﻌﻟﺍ ﺔﻓﺎﺣ ﺱﺭﻐﺗ
ﺎًﻘﻓﻭ ﻙﻟﺫﻭ ﻪﻧﻋ ﺍًﺩﻳﻌﺑ ﻭﺃ ﻝﻣﺎﻌﻟﺍ ﻩﺎﺟﺗﺎﺑ ﺔﻠﺟﻌﻟﺍ ﺕﻠﻔﻧﺗ ﺩﻗ .ﺔﻠﺟﻌﻟﺍ ﺕﻼﻔﻧﺇ
.ﺏﻘﺛﻟﺍ ﺔﻅﺣﻟ ﻲﻓ ﺔﻠﺟﻌﻟﺍ ﺔﻛﺭﺣ ﻩﺎﺟﺗﻻ
.ﻑﻭﺭﻅﻟﺍ ﻩﺫﻫ ﻲﻓ ﻁﺷﻛﻟﺍ ﺕﻼﺟﻋ ﻙﻟﺫﻛ ﻑﻠﺗﺗ ﺩﻗ
ﻝﻳﻐﺷﺗ ﺕﺍءﺍﺭﺟﺇ ﻭﺃ/
ﺎﻣﻛ ﺔﺑﺳﺎﻧﻣﻟﺍ ﺕﺎﻁﺎﻳﺗﺣﻻﺍ ﺫﺎﺧﺗﺎﺑ ﻪﺑﻧﺟﺗ ﻥﻛﻣﻳﻭ ،ﺔﺣﻳﺣﺻ ﺭﻳﻏ ﺕﻻﺎﺣ ﻭﺃ
ﻭ ﺔﻓﺎﻁﻟﺍ ﺓﺍﺩﺃ ﻡﺍﺩﺧﺗﺳﺍ ءﻭﺳ ﺔﺟﻳﺗﻧ ﻭﻫ ﻲﺳﻛﻌﻟﺍ ﺩﺍﺩﺗﺭﻻﺍ
.ﻲﻠﻳ
ﻡﻭﺎﻘﻣ ﻩﺎﺟﺗﺍ ﻲﻓ ﻙﻋﺍﺭﺫﻭ ﻙﻣﺳﺟ ﻥﻭﻛﻳ ﺙﻳﺣﺑ ﺍًﺩﻳﺟ ﺔﻗﺎﻁﻟﺍ ﺓﺍﺩﺃ ﻙﺳﻣﺍ (ﺃ
،ﺭﻓﻭﺗ ﻰﺗﻣ ،ﻲﻓﺎﺿﻹﺍ ﺽﺑﻘﻣﻟﺍ ﺎًﻣﺋﺍﺩ ﻡﺩﺧﺗﺳﺍ .ﻲﺳﻛﻌﻟﺍ ﺩﺍﺩﺗﺭﻻﺍ ﺓﻭﻘﻟ
ﻝﺎﻌﻓﺃ ﺩﻭﺩﺭﻭ ﺱﻛﻌﻟﺍ ﺩﺍﺩﺗﺭﻻﺍ ﻲﻓ ﻡﻛﺣﺗﻠﻟ ﻰﺻﻗﻷﺍ ﺩﺣﻟﺍ ﻰﻠﻋ ﻝﻭﺻﺣﻠﻟ
.ﻝﻳﻐﺷﺗﻟﺍ ءﺩﺑ ءﺎﻧﺛﺃ ﻥﺍﺭﻭﺩﻟﺍ ﻡﺯﻋ
ﺩﺍﺩﺗﺭﻻﺍ ﺓﻭﻗ ﻭﺃ ﻝﻳﻐﺷﺗﻟﺍ ﻡﺯﻋ ﻝﺎﻌﻓﺃ ﺩﻭﺩﺭ ﻲﻓ ﻡﻛﺣﺗﻟﺍ ﻝﻣﺎﻌﻠﻟ ﻥﻛﻣﻳ
.ﺔﺑﺳﺎﻧﻣﻟﺍ ﺕﺎﻁﺎﻳﺗﺣﻻﺍ ﺫﺎﺧﺗﺍ ﺩﻧﻋ ﻲﺳﻛﻌﻟﺍ
.ﻥﺍﺭﻭﺩﻟﺍ ﻕﺣﻠﻣ ﻥﻣ ﺏﺭﻘﻟﺎﺑ ﺍًﺩﺑﺃ ﻙﺩﻳ ﻊﺿﺗ ﻻ (ﺏ
.ﻙﻳﺩﻳ ﻰﻠﻋ ﺎًﻳﺳﻛﻋ ﻕﺣﻠﻣﻟﺍ ﺩﺗﺭﻳ ﺩﻗ
ﺙﺩﺣ ﺍﺫﺇ ﺔﻗﺎﻁﻟﺍ ﺓﺍﺩﺃ ﺎﻬﻳﻓ ﻙﺭﺣﺗﺗ ﻲﺗﻟﺍ ﺔﻘﻁﻧﻣﻟﺍ ﻲﻓ ﻙﻣﺳﺟ ﻊﺿﺗ ﻻ (ﺕ
.ﻲﺳﻛﻌﻟﺍ ﺩﺍﺩﺗﺭﻻﺍ
ﺩﻧﻋ ﺔﻠﺟﻌﻟﺍ ﺔﻛﺭﺣﻟ ﺱﻛﺎﻌﻣ ﻩﺎﺟﺗﺍ ﻲﻓ ﺓﺍﺩﻷﺍ ﻲﺳﻛﻌﻟﺍ ﺩﺍﺩﺗﺭﻻﺍ ﻊﻓﺩﻳ
.ﻕﺯﻣﺗﻟﺍ
ﻑﺍﻭﺣﻟﺍﻭ ،ﻥﺎﻛﺭﻷﺍ ﻲﻓ ﻝﻣﻌﻟﺍ ﺩﻧﻋ ﺔﺻﺎﺧ ﺔﻳﺎﻣﺣ ﺕﺍﺩﻌﻣ ﻡﺩﺧﺗﺳﺍ (ﺙ
.ﻕﺣﻠﻣﻟﺍ ﻕﻳﺯﻣﺗﻭ ﺩﺍﺩﺗﺭﺍ ﺏﻧﺟﺗ .ﺎﻬﻠﺛﺎﻣﻳ ﺎﻣﻭ ،ﺓﺩﺎﺣﻟﺍ
ﻥﺍﺭﻭﺩﻟﺍ ﻕﺣﻠﻣ ﻊﻁﻗ ﻲﻓ ﺩﺍﺩﺗﺭﻻﺍﻭ ﺓﺩﺎﺣﻟﺍ ﻑﺍﻭﺣﻟﺍﻭ ﻥﺎﻛﺭﻷﺍ ﺏﺑﺳﺗﺗ ﺩﻗ
.ﻲﺳﻛﻌﻟﺍ ﺩﺍﺩﺗﺭﻻﺍ ﻭﺃ ﻡﻛﺣﺗﻟﺍ ﻥﺍﺩﻘﻓ ﻲﻓ ﺏﺑﺳﺗﻳ ﺎﻣﻣ
.ﺔﻧﻧﺳﻣ ﺭﺷﻧ ﺓﺭﻔﺷ ﻭﺃ ﺭﺷﻧﻟﺍ ﺔﻠﺳﻠﺳﻟ ﺏﺷﺧ ﺭﻔﺣ ﺓﺭﻔﺷ ﻕﺎﻓﺭﺈﺑ ﻡﻘﺗ ﻻ (ﺝ
.ﻡﻛﺣﺗﻟﺍ ﻥﺍﺩﻘﻓﻭ ﻲﺳﻛﻋ ﺩﺍﺩﺗﺭﺍ ﻰﻟﺇ ﺕﺍﺭﻔﺷﻟﺍ ﻩﺫﻫ ﻱﺩﺅﺗ
ﺔﻁﺷﺎﻛﻟﺍ ﻊﻁﻘﻟﺍﻭ ﺫﺣﺷﻟﺍ ﺕﺎﻳﻠﻣﻌﺑ ﺔﺻﺎﺧﻟﺍ ﻥﺎﻣﻷﺍ ﺕﺍﺭﻳﺫﺣﺗ
ﺔﺻﺎﺧﻟﺍ ﺔﻳﺎﻣﺣﻟﺍﻭ ﺔﻗﺎﻁﻟﺍ ﺓﺍﺩﻷ ﻁﻘﻓ ﺎﻬﺑ ﻰﺻﻭﻣﻟﺍ ﻝﺟﻌﻟﺍ ﻉﺍﻭﻧﺃ ﻡﺩﺧﺗﺳﺍ (ﺃ
ﻝﻛﺷﺑ ﺔﻗﺎﻁﻟﺍ ﺓﺍﺩﻷ ﺔﻣﻣﺻﻣﻟﺍ ﺭﻳﻏ ﺕﻼﺟﻌﻟﺍ ﻥﻳﻣﺄﺗﻭ ﺔﻳﺎﻣﺣ ﺭﺫﻌﺗﺗ
ﺢﻁﺳ ﻝﻔﺳﺃ ﺯﻛﺭﻣﻟﺍ ﺔﻁﻭﻐﺿﻣ ﺕﻼﺟﻌﻠﻟ ﺦﻳﻠﺟﺗﻟﺍ ﺢﻁﺳ ﺏﻳﻛﺭﺗ ﺏﺟﻳ (ﺏ
ﺔﻓﺎﺣ ﺢﻁﺳ ﻰﻠﻋ ﺯﺭﺑﺗﻭ ﺢﻳﺣﺻ ﺭﻳﻏ ﻝﻛﺷﺑ ﺎﻬﺑﻳﻛﺭﺗ ﻡﺗ ﺔﻠﺟﻋ ﻱﺃ
ﻥﻭﻛﻳ ﺙﻳﺣﺑ ﺍًﺩﻳﺟ ﻪﻧﻳﻣﺄﺗﻭ ﺔﻗﺎﻁﻟﺍ ﺓﺍﺩﻷ ﻥﻣﺁ ﻝﻛﺷﺑ ءﺎﻗﻭﻟﺍ ﻕﺎﻓﺭﺇ ﺏﺟﻳ (ﺕ
.ﻝﻣﺎﻌﻟﺍ ﻩﺎﺟﺗﺍ ﻲﻓ ﺔﻠﺟﻌﻟﺍ ﻥﻣ ﺭﻐﺻﻷﺍ ءﺯﺟﻟﺍ
ﻥﻣﻭ ﺓﺭﻭﺳﻛﻣﻟﺍ ﺔﻠﺟﻌﻟﺍ ﺎﻳﺎﻅﺷ ﻥﻣ ﻝﻣﺎﻌﻟﺍ ﺔﻳﺎﻣﺣ ﻰﻠﻋ ءﺎﻗﻭﻟﺍ ﺩﻋﺎﺳﻳ
.ﺱﺑﻼﻣﻟﺍ ﻝﺎﻌﺗﺷﺍ ﻰﻟﺇ ﻱﺩﺅﻳ ﺩﻗ ﺎﻣﻣ ﺭﺭﺷﻟﺍ ﻭ ﺔﻠﺟﻌﻠﻟ ﻲﺿﺭﻌﻟﺍ ﺱﻣﻠﻟﺍ
:ﻝﺎﺛﻣﻟﺍ ﻝﻳﺑﺳ ﻰﻠﻋ .ﺎﻬﺑ ﻰﺻﻭﻣﻟﺍ ﺕﺎﻘﻳﺑﻁﺗﻠﻟ ﻁﻘﻓ ﻝﺟﻌﻟﺍ ﻡﺍﺩﺧﺗﺳﺍ ﺏﺟﻳ (ﺙ
ﺏﺑﺳﺗﻳ ﺩﻗ ﻙﻟﺫﻟﻭ ،ﻲﺣﻁﺳﻟﺍ ﺫﺣﺷﻠﻟ ﺔﻣﻣﺻﻣ ﺔﻁﺷﺎﻛﻟﺍ ﻊﻁﻘﻟﺍ ﺕﻼﺟﻋ
.ﺎﻫﺭﺳﻛ ﻲﻓ ﺕﻼﺟﻌﻟﺍ ﻩﺫﻬﻟ ﺔﻳﺑﻧﺎﺟﻟﺍ ﻯﻭﻘﻟﺍ ﻕﻳﺑﻁﺗ
ﺔﻠﺟﻌﻠﻟ ﻥﻳﺣﻳﺣﺻ ﻝﻛﺷﻭ ﻡﺟﺣﺑ ﻑﻟﺎﺗ ﺭﻳﻏ ﻝﺟﻋ ﺭﻭﺣﻣ ﺎًﻣﺋﺍﺩ ﻡﺩﺧﺗﺳﺍ (ﺝ
24
.ﺓﺩﺩﺣﻣﻟﺍ ﺕﻼﺟﻌﻠﻟ ﺔﻣﻣﺻﻣﻟﺍ
.ﺏﺳﺎﻧﻣ
.ءﺎﻗﻭﻟﺍ ﺔﻓﺎﺣ
.ﺢﻳﺣﺻ ﻝﻛﺷﺑ ﺎﻬﺗﻳﺎﻣﺣ ﻥﻛﻣﻳ ﻻ ،ءﺎﻗﻭﻟﺍ
.ﻊﻁﻘﻟﺍ ﺔﻠﺟﻋ ﺏﻧﺎﺟﺑ ﺫﺣﺷﻟﺎﺑ ﻡﻘﺗ ﻻ
.ﻙﺑ ﺔﺻﺎﺧﻟﺍ ﺓﺩﺩﺣﻣﻟﺍ
ﺔﻁﺷﺎﻛﻟﺍ ﻊﻁﻘﻟﺍ ﻭﺃ ﺫﺣﺷﻟﺍ ﺕﺎﻳﻠﻣﻌﻟ ﺔﻌﺋﺎﺷﻟﺍ ﻥﺎﻣﻷﺍ ﺕﺍﺭﻳﺫﺣﺗ
ﻝﻛ ﺓءﺍﺭﻘﺑ ﻡﻗ .ﻊﻁﻗ ﻭﺃ ﺫﺣﺷ ﺓﺍﺩﺄﻛ ﻝﻣﻌﺗﻟ ﻩﺫﻫ ﺔﻗﺎﻁﻟﺍ ﺓﺍﺩﺃ ﺕﻣﻣُﺻ (ﺃ
ﺔﻣﺩﻘﻣﻟﺍ ﺕﺎﻔﺻﺍﻭﻣﻟﺍﻭ ،ﺕﺎﺣﻳﺿﻭﺗﻟﺍﻭ ،ﺕﺎﻣﻳﻠﻌﺗﻟﺍﻭ ،ﻥﺎﻣﻷﺍ ﺕﺍﺭﻳﺫﺣﺗ
ﺔﻳﺋﺎﺑﺭﻬﻛ ﺔﻣﺩﺻ ﻲﻓ ﻩﺎﻧﺩﺃ ﺓﺩﺭﺳﻣﻟﺍ ﺕﺎﻣﻳﻠﻌﺗﻟﺍ ﻉﺎﺑﺗﺍ ﻲﻓ ﻝﺷﻔﻟﺍ ﺏﺑﺳﺗﻳ ﺩﻗ
ﻭﺃ ،ﺓﺭﻔﻧﺳﻟﺍ ﻝﺛﻣ ﺕﺎﻳﻠﻣﻋ ﻲﻓ ﻩﺫﻫ ﺔﻗﺎﻁﻟﺍ ﺓﺍﺩﺃ ﻡﺍﺩﺧﺗﺳﺎﺑ ﻰﺻﻭﻳ ﻻ (ﺏ
.ﻝﻘﺻﻟﺍ ﻭﺃ ،ﻙﻼﺳﻷﺍ ﻑﻳﻅﻧﺗ
ﻲﻓ ﺎﻬﻟ ﺔﺻﺻﺧﻣﻟﺍ ﺭﻳﻏ ﺕﺎﻳﻠﻣﻌﻟﺍ ﻲﻓ ﺔﻗﺎﻁﻟﺍ ﺓﺍﺩﺃ ﻡﺍﺩﺧﺗﺳﺍ ﺏﺑﺳﺗﻳ ﺩﻗ
.ﺔﻳﺻﺧﺷﻟﺍ ﺔﺑﺎﺻﻹﺍﻭ ﺭﻁﺎﺧﻣﻟﺍ
ﻝﺑﻗ ﻥﻣ ﺎﻬﺑ ﻰﺻﻭﻣﻟﺍﻭ ﺎًﺻﻳﺻﺧ ﺔﻣﻣﺻﻣﻟﺍ ﺭﻳﻏ ﺕﺎﻘﺣﻠﻣﻟﺍ ﻡﺩﺧﺗﺳﺗ ﻻ (ﺕ
ﻥﻣﺿﺗ ﻼﻓ ،ﻙﺑ ﺔﺻﺎﺧﻟﺍ ﺔﻗﺎﻁﻟﺍ ﺓﺍﺩﺄﺑ ﻕﺣﻠﻣﻟﺍ ﻕﺎﻓﺭﺇ ﻥﻛﻣﻳ ﻪﻧﻷﻭ
ﺩﺣﻠﻟ ﻝﻗﻷﺍ ﻰﻠﻋ ﺔﻳﻭﺎﺳﻣ ﻕﺣﻠﻣﻠﻟ ﺔﻧﻧﻘﻣﻟﺍ ﺔﻋﺭﺳﻟﺍ ﻥﻭﻛﺗ ﻥﺃ ﺏﺟﻳ (ﺙ
.ﺔﻗﺎﻁﻟﺍ ﺓﺍﺩﺃ ﻰﻠﻋ ﺔﻧﻳﺑﻣﻟﺍ ﺔﻋﺭﺳﻠﻟ ﻰﺻﻗﻷﺍ
ﺔﻧﻧﻘﻣﻟﺍ ﺔﻋﺭﺳﻟﺍ ﻥﻣ ﺭﺑﻛﺃ ﺔﻋﺭﺳﺑ ﻝﻣﻌﺗ ﻲﺗﻟﺍ ﺕﺎﻘﺣﻠﻣﻟﺍ ﻝﻁﻌﺗﺗ ﺩﻗ
.ﺍًﺩﻳﻌﺑ ﻝﺻﻔﻧﺗ ﻭﺃ ﺎﻬﺑ ﺔﺻﺎﺧﻟﺍ
ﺩﻭﺩﺣ ﻲﻓ ﻪﻛﻣﺳﻭ ﻙﺑ ﺹﺎﺧﻟﺍ ﻕﺣﻠﻣﻠﻟ ﻲﺟﺭﺎﺧﻟﺍ ﺩﻌﺑﻟﺍ ﻥﻭﻛﻳ ﻥﺃ ﺏﺟﻳ (ﺝ
ﺎﻬﺑ ﻡﻛﺣﺗﻟﺍ ﻭﺃ ﺔﺣﻳﺣﺻﻟﺍ ﺭﻳﻏ ﻡﺎﺟﺣﻷﺍ ﺕﺍﺫ ﺕﺎﻘﺣﻠﻣﻟﺍ ﺔﻳﺎﻣﺣ ﻥﻛﻣﻳ ﻻ
ﻥﺍﺭﻭﺩ ﺩﻭﻣﻋ ﻥﺳ ﻊﻣ ﺕﺎﻘﺣﻠﻣﻠﻟ ﻁﺑﺍﺭﺗﻣﻟﺍ ﺏﻳﻛﺭﺗﻟﺍ ﻕﺑﺎﻁﺗﻳ ﻥﺃ ﺏﺟﻳ (ﺡ
ﻥﺃ ﺏﺟﻳ ،ﻩﺎﻔﺷﻟﺍ ﺔﻁﺳﺍﻭﺑ ﺎﻬﺑﻳﻛﺭﺗ ﻡﺗﻳ ﻲﺗﻟﺍ ﺕﺎﻘﺣﻠﻣﻠﻟ .ﺔﺧﻼﺟﻟﺍ
.ﻩﺎﻔﺷﻟﺍ ﺩﻳﺩﺣﺗ ﺭﻁﻗ ﻊﻣ ﻕﺣﻠﻣﻟﺍ ﺭﻭﺣﻣ ﺔﺣﺗﻓ ﺏﺳﺎﻧﺗﺗ
.ﻙﺑ ﺔﺻﺎﺧﻟﺍ ﺔﻗﺎﻁﻟﺍ ﺓﺍﺩﻷ ﺔﻧﻧﻘﻣﻟﺍ ﺔﻌﺳﻟﺍ
ﺎﻬﻧﺯﺍﻭﺗ ﺔﻗﺎﻁﻟﺍ ﺓﺍﺩﺃ ﺏﻳﻛﺭﺗ ﺯﺎﻬﺟ ﻊﻣ ﻰﺷﺎﻣﺗﺗ ﻻ ﻲﺗﻟﺍ ﺕﺎﻘﺣﻠﻣﻟﺍ ﺩﻘﻔﺗ
.ﺓﺭﻁﻳﺳﻟﺍ ﺩﻘﻓ ﻲﻓ ﺏﺑﺳﺗﺗ ﺩﻗﻭ ﺓﺩﺷﺑ ﺯﺗﻬﺗﻭ
ﻲﻓ ﺎﻣﺑ ﻕﺣﻠﻣﻟﺍ ﺹﺣﻔﺑ ﻡﻗ ﻡﺍﺩﺧﺗﺳﺍ ﻝﻛ ﻝﺑﻗ .ﻑﻟﺎﺗ ﻕﺣﻠﻣ ﻡﺩﺧﺗﺳﺗ ﻻ (ﺥ
ﻭﻠﺧﻭ ،ﻕﻭﻘﺷﻟﺍﻭ ﺢﺋﺍﺭﺷﻟﺍ ﻥﻣ ﺔﻁﺷﺎﻛﻟﺍ ﺕﻼﺟﻌﻟﺍ ﻭﻠﺧ ﻥﻣ ﺩﻛﺄﺗﻟﺍ ﻙﻟﺫ
ﺔﺷﺭﻓ ﻭﻠﺧﻭ ،ﻝﻛﺄﺗﻟﺍﻭ ﻕﺯﻣﺗﻟﺍﻭ ﻕﻭﻘﺷﻟﺍ ﻥﻣ ﻲﻔﻠﺧﻟﺍ ﺢﺑﻛﻟﺍ ﺔﺻﻧﻣ
ﺔﻗﺎﻁﻟﺍ ﺓﺍﺩﺃ ﺕﻁﻘﺳ ﺍﺫﺇ .ﺔﻋﺩﺻﺗﻣﻟﺍ ﻭﺃ ﺔﻛﻭﻛﻔﻣﻟﺍ ﻙﻼﺳﻷﺍ ﻥﻣ ﻙﻼﺳﻷﺍ
.ﻑﻟﺎﺗ ﺭﻳﻏ ﻕﺣﻠﻣ ﺏﻳﻛﺭﺗﺑ ﻡﻗ ﻭﺃ ﻑﻠﺗﺗ ﻡﻟ ﺎﻬﻧﺃ ﻥﻣ ﺩﻛﺄﺗ ،ﻕﻠﺣﻣﻟﺍ ﻭﺃ
ﻕﺣﻠﻣﻟﺍ ﻥﻋ ﻙﺑ ﻥﻳﻁﻳﺣﻣﻟﺍﻭ ﺕﻧﺃ ﺩﻌﺗﺑﺍ ،ﻕﺣﻠﻣﻟﺍ ﺏﻳﻛﺭﺗﻭ ﺹﺣﻔﻟﺍ ﺩﻌﺑ
ﻝﻣﺣ ﻥﻭﺩ ﺔﻋﺭﺳﻠﻟ ﻰﺻﻗﻷﺍ ﺩﺣﻟﺍ ﻰﻠﻋ ﺔﻗﺎﻁﻟﺍ ﺓﺍﺩﺃ ﻝﻳﻌﺷﺗﺑ ﻡﻗﻭ ﺭﺍﻭﺩﻟﺍ
.ﺭﺎﺑﺗﺧﻻﺍ ﺕﻗﻭ ﻲﻓ ًﺓﺩﺎﻋ ﺔﻔﻟﺎﺗﻟﺍ ﺕﺎﻘﺣﻠﻣﻟﺍ ﻙﻛﻔﺗﺗ
ﻭﺃ ﻪﺟﻭﻟﺍ ﻲﻗﺍﻭ ﻡﺩﺧﺗﺳﺍ ،ﻡﺍﺩﺧﺗﺳﻻﺍ ﺏﺳﺣ .ﺔﻳﻗﺍﻭﻟﺍ ﺕﺍﺩﻌﻣﻟﺍ ﺩﺗﺭﺍ (ﺩ
ﻥﻣ ﻲﻗﺍﻭﻟﺍ ﻉﺎﻧﻘﻟﺍ ءﺍﺩﺗﺭﺎﺑ ﻡﻗ ،ءﺎﺿﺗﻗﻻﺍ ﺏﺳﺣ .ﺔﻳﻗﺍﻭﻟﺍ ﺕﺍﺭﺎﻅﻧﻟﺍ
ﻝﻣﻌﻟﺍ ﺔﺷﺭﻭ ءﺎﻗﻭﻭ ،ﺕﺍﺯﺎﻔﻘﻟﺍﻭ ،ﻥﺫﻷﺍ ﺔﻳﺎﻣﺣ ﺕﺍﺩﻌﻣﻭ ،ﺔﺑﺭﺗﻷﺍ
ﺞﺗﺎﻧﻟﺍ ﺩﻋﺎﺻﺗﻣﻟﺍ ﻡﺎﻁﺣﻟﺍ ﺩﺻ ﻰﻠﻋ ﺓﺭﺩﺎﻗ ﻥﻳﻧﻳﻌﻟﺍ ﺔﻳﺎﻣﺣ ﻥﻭﻛﺗ ﻥﺃ ﺏﺟﻳ
ﺍًﺭﺩﺎﻗ ﺔﺑﺭﺗﻷﺍ ﻥﻣ ﻲﻗﺍﻭﻟﺍ ﻉﺎﻧﻘﻟﺍ ﻥﻭﻛﻳ ﻥﺃ ﺏﺟﻳ .ﺔﻔﻠﺗﺧﻣﻟﺍ ﺕﺎﻳﻠﻣﻌﻟﺍ ﻥﻋ
.ﺎﻬﺑ ﻡﻭﻘﺗ ﻲﺗﻟﺍ ﺕﺎﻳﻠﻣﻌﻟﺍ ﻥﻋ ﺔﺟﺗﺎﻧﻟﺍ ﺕﺎﺋﻳﺯﺟﻟﺍ ﺢﻳﺷﺭﺗ ﻰﻠﻋ
ﺓﺭﺩﻘﻟﺍ ﻥﺍﺩﻘﻓ ﻲﻓ ﺔﻳﻟﺎﻌﻟﺍ ءﺎﺿﻭﺿﻠﻟ ﺔﻠﻳﻭﻁ ﺕﺍﺭﺗﻔﻟ ﺽﺭﻌﺗﻟﺍ ﺏﺑﺳﺗﻳ ﺩﻗ
ﺔﻘﻁﻧﻣ ﻝﺧﺩﻳ ﻥﻣ ﻝﻛ ﻰﻠﻋ ﺏﺟﻳ .ﻝﻣﻌﻟﺍ ﺔﻘﻁﻧﻣ ﻥﻋ ﺍًﺩﻳﻌﺑ ﺓﺭﺎﻣﻟﺍ ﻕﺑﺍ (ﺫ
.ﺔﻳﺻﺧﺷﻟﺍ ﺔﻳﺎﻗﻭﻟﺍ ﺕﺍﺩﻌﻣ ءﺍﺩﺗﺭﺍ ﻝﻣﻌﻟﺍ
ﺕﺎﻘﺣﻠﻣﻟﺍ ﻭﺃ ﺔﻔﻠﺗﺧﻣﻟﺍ ﺕﺎﻳﻠﻣﻌﻟﺍ ﻥﻋ ﺔﺟﺗﺎﻧﻟﺍ ﺎﻳﺎﻅﺷﻟﺍ ﺭﻳﺎﻁﺗﺗ ﺩﻗ
.ﻝﻣﻌﻟﺍ ﺔﻘﻁﻧﻣ ﺝﺭﺎﺧ ﺔﺑﺎﺻﺇ ﻲﻓ ﺏﺑﺳﺗﺗﻭ ﺓﺭﻭﺳﻛﻣﻟﺍ
ءﺍﺩﺃ ﺩﻧﻋ ﻁﻘﻓ ﺔﻟﻭﺯﻌﻣﻟﺍ ﺽﺑﻘﻣﻟﺍ ﺢﻁﺳﺄﺑ ﺔﻳﺋﺎﺑﺭﻬﻛﻟﺍ ﺓﺩﻌﻟﺍ ﻙﺳﻣﺍ (ﺭ
ﻙﻠﺳﻟﺎﺑ ﻭﺃ ﺔﻳﻔﺧﻣ ﻙﻼﺳﺄﺑ ﻊﻳﻁﻘﺗﻟﺍ ﺕﺎﻘﺣﻠﻣ ﺎﻬﻳﻓ ﻝﺻﺗ ﺩﻗ ﺔﻳﻠﻣﻋ
ﺔﻳﻧﺩﻌﻣﻟﺍ ءﺍﺯﺟﻸﻟ ﺽﺭﻌﺗﺗ ﺩﻗ "ﺭﺷﺎﺑﻣ" ﻙﻠﺳﺑ ﺔﻠﺻﺗﻣﻟﺍ ﻊﻳﻁﻘﺗﻟﺍ ﺕﺎﻘﺣﻠﻣ
.ﺔﻳﺋﺎﺑﺭﻬﻛ ﺔﻣﺩﺻﺑ ﺔﻳﻠﻣﻌﻟﺍ ﺏﻳﺻﺗ ﺩﻗﻭ "ﺓﺭﺷﺎﺑﻣﻟﺍ" ﺔﻳﺋﺎﺑﺭﻬﻛﻟﺍ ﺓﺩﻌﻟﺍ
ﻙﻋﺍﺭﺫﻭ ﻙﺩﻳ ﺏﺣﺳ ﻡﺗﻳﻭ ﻕﺯﻣﺗﻳ ﻭﺃ ﻙﻠﺳﻟﺍ ﻊﻁﻘﻧﻳ ﺩﻘﻓ ،ﻡﻛﺣﺗﻟﺍ ﺕﺩﻘﻓ ﺍﺫﺇ
.ﻥﺍﺭﻭﺩﻟﺍ ﻕﺣﻠﻣ ﻥﻋ ﺍًﺩﻳﻌﺑ ﻙﻠﺳﻟﺍ ﻊﺿ (ﺯ
.ﺎًﻣﺎﻣﺗ ﻕﺣﻠﻣﻟﺍ ﻑﻗﻭﺗﻳ ﻰﺗﺣ ﻝﻔﺳﻷ ﺔﻗﺎﻁﻟﺍ ﺓﺍﺩﺃ ﺍًﺩﺑﺃ ﻊﺿﺗ ﻻ (ﺱ
.ﻡﻛﺣﺗﻟﺍ ﻥﻋ ﺔﻗﺎﻁﻟﺍ ﺓﺍﺩﺃ ﺝﺭﺧﻳﻭ ﺢﻛﺳﻟﺎﺑ ﻥﺍﺭﻭﺩﻟﺍ ﻕﺣﻠﻣ ﻙﺳﻣﻳ ﺩﻗ
.ﻙﺑﻧﺎﺟ ﻰﻠﻋ ﺎﻬﻠﻣﺣ ءﺎﻧﺛﺃ ﺔﻗﺎﻁﻟﺍ ﺓﺍﺩﺃ ﻝﻳﻐﺷﺗ ﻰﻠﻋ ﻝﻣﻌﺗ ﻻ (ﺵ
ﺎﻣﻣ ،ﻙﺳﺑﻼﻣ ﻊﻁﻗ ﻲﻓ ﻥﺍﺭﻭﺩﻟﺍ ﻕﺣﻠﻣﻟ ﺊﺟﺎﻔﻣﻟﺍ ﺱﻣﻠﻟﺍ ﺏﺑﺳﺗﻳ ﺩﻘﻓ
.ﻙﻣﺳﺟ ﻩﺎﺟﺗﺍ ﻲﻓ ﻕﺣﻠﻣﻟﺍ ﺏﺣﺳﻳ
٢
.ﺔﻗﺎﻁﻟﺍ ﺓﺍﺩﺃ ﻊﻣ
.ﺔﺑﺎﺻﺇ ﻭﺃ ،ﻕﻳﺭﺣ ﻭﺃ
.ﺓﺍﺩﻷﺍ ﻊﻳﻧﺻﺗ ﺔﻬﺟ
.ﻥﻣﻵﺍ ﻝﻳﻐﺷﺗﻟﺍ
.ﺏﺳﺎﻧﻣ ﻝﻛﺷﺑ
.ﺓﺩﺣﺍﻭ ﺔﻘﻳﻗﺩﻟ
.ﺎﻳﺎﻅﺷﻟﺍ ﻭﺃ ﻁﺷﻛﻠﻟ ﻡﻭﺎﻘﻣﻟﺍ
.ﻊﻣﺳﻟﺍ ﻰﻠﻋ
.ﺎﻬﺑ ﺹﺎﺧﻟﺍ
.ﻥﺍﺭﻭﺩﻟﺍ ﻕﺣﻠﻣ ﻰﻟﺇ
Page 25

ﺔﻳﺑﺭﻌﻟﺍ
ﻊﺿﻭﻟﺍ ﻲﻓ ﺡﺎﺗﻔﻣﻟﺍ ﻥﺃ ﻥﻣ ﺩﻛﺄﺗ .ﺩﻭﺻﻘﻣﻟﺍ ﺭﻳﻏ ﻝﻳﻐﺷﺗﻟﺍ ﻊﻧﻣ (ﺕ
ﺔﻣﺯﺣ ﻭﺃ/ﻭ ﺔﻗﺎﻁﻟﺍ ﺭﺩﺻﻣﺑ ﻝﻳﺻﻭﺗﻟﺍ ﻝﺑﻗ ﻝﻳﻐﺷﺗﻟﺍ ﻑﺎﻘﻳﺇ
.ﺓﺍﺩﻷﺍ ﻝﻣﺣ ﻭﺃ ﻁﺎﻘﺗﻟﻻﺍﻭ ،ﺔﻳﺭﺎﻁﺑﻟﺍ
ﻭﺃ ﺡﺎﺗﻔﻣﻟﺍ ﻲﻓ ﻙﻌﺑﺻﺇ ﺩﻭﺟﻭ ﻊﻣ ﺔﻳﺋﺎﺑﺭﻬﻛﻟﺍ ﺩﺩﻌﻟﺍ ﻝﻣﺣ ﻱﺩﺅﻳ
ﻝﻳﻐﺷﺗﻟﺍ ﻊﺿﻭ ﻲﻓ ﺡﺎﺗﻔﻣﻟﺍ ﺎﻬﻳﻓ ﻥﻭﻛﻳ ﻲﺗﻟﺍ ﺔﻳﺋﺎﺑﺭﻬﻛﻟﺍ ﺩﺩﻌﻟﺍ ﻝﻳﻐﺷﺗ
.ﺙﺩﺍﻭﺣ ﻉﻭﻗﻭ ﻝﺎﻣﺗﺣﺍ ﻰﻟﺇ
.ﺔﻳﺋﺎﺑﺭﻬﻛﻟﺍ ﺓﺩﻌﻟﺍ ﻝﻳﻐﺷﺗ ﻝﺑﻗ ﻁﺑﺭﻟﺍ ﺡﺎﺗﻔﻣ ﻭﺃ ﻁﺑﺿﻟﺍ ﺩﺩﻋ ﻉﺯﻧﺍ (ﺙ
ﻥﻣ ﻙﺭﺣﺗﻣﻟﺍ ءﺯﺟﻟﺍ ﺭﺎﺳﻳ ﻰﻠﻋ ﻁﺑﺿ ﺡﺎﺗﻔﻣ ﻭﺃ ﻁﺑﺭ ﺡﺎﺗﻔﻣ ﺩﻭﺟﻭ
.ﺔﻳﺻﺧﺷ ﺔﺑﺎﺻﺇ ﺙﻭﺩﺣ ﻰﻟﺇ ﻱﺩﺅﻳ ﺔﻳﺋﺎﺑﺭﻬﻛﻟﺍ ﺓﺩﻌﻟﺍ
ﻥﻳﺑﻭ ﻙﻧﻳﺑ ﺔﺑﺳﺎﻧﻣ ﺔﻓﺎﺳﻣ ﻙﺭﺗﺍ ،ﺔﻳﺋﺎﺑﺭﻬﻛﻟﺍ ﺓﺩﻌﻟﺍ ﻥﻣ ﺏﺭﺗﻘﺗ ﻻ (ﺝ
.ﺕﺎﻗﻭﻷﺍ ﻊﻳﻣﺟ ﻲﻓ ﻙﻧﺯﺍﻭﺗ ﻰﻠﻋ ﻅﻓﺎﺣﻭ ﺔﻳﺋﺎﺑﺭﻬﻛﻟﺍ ﺓﺩﻌﻟﺍ
ﻲﻓ ﻝﺿﻓﺃ ﻝﻛﺷﺑ ﺯﺎﻬﺟﻟﺍ ﻰﻠﻋ ﺓﺭﻁﻳﺳﻟﺍ ﻥﻣ ﻙﻟﺫ ﻙﻟ ﺢﻣﺳﻳﺳ
.ﺔﻌﻗﻭﺗﻣﻟﺍ ﺭﻳﻏ ﻑﻗﺍﻭﻣﻟﺍ
ﻑﺍﺭﻁﺃ ﺎﻬﺑ ﻭﺃ ﺔﺿﺎﻔﺿﻓ ﺱﺑﻼﻣ ﻱﺩﺗﺭﺗ ﻻ ،ﺔﺑﺳﺎﻧﻣ ﺱﺑﻼﻣ ءﺍﺩﺗﺭﺎﺑ ﻡﻗ
ﻲﺗﻟﺍ ﺱﺑﻼﻣﻟﺍﻭ ﻙﺭﻌﺷ ﺩﺎﻌﺑﺇ ﻰﻠﻋ ًﺎﻣﺋﺍﺩ ﻅﻓﺎﺣﻭ ،ﻲﻠﺣ ﻭﺃ ﺔﺑﺋﺎﺳ
.ﺔﻳﺋﺎﺑﺭﻬﻛﻟﺍ ﺓﺩﻌﻟﺍ ﻥﻣ ﺔﻛﺭﺣﺗﻣﻟﺍ ءﺍﺯﺟﻷﺍ ﻥﻋ ًﺍﺩﻳﻌﺑ ﺯﺎﻔﻘﻟﺍﻭ ﺎﻬﻳﺩﺗﺭﺗ
ﻲﻠﺣﻟﺍ ﻭﺃ ﻑﺍﺭﻁﺃ ﺎﻬﺑ ﻲﺗﻟﺍ ﻭﺃ ﺔﺿﺎﻔﺿﻔﻟﺍ ﺱﺑﻼﻣﻟﺍ ﻙﺑﺷﺎﺗﺗ ﺩﻗ
.ﺏﺎﻘﺛﻣﻠﻟ ﺔﻛﺭﺣﺗﻣﻟﺍ ءﺍﺯﺟﻷﺎﺑ ﻝﻳﻭﻁﻟﺍ ﺭﻌﺷﻟﺍﻭﺃ
ﻡﺗﻳﻭ ﺔﻠﺻﺗﻣ ﻥﻣ ﺩﻛﺄﺗﻓ .ﺭﺎﺑﻐﻟﺍ ﻊﻳﻣﺟﺗﻭ ﻁﻔﺷ ﺯﺎﻬﺟ ﺏﻳﻛﺭﺗ ﺯﺎﺟ ﻥﺇ (ﺥ
.ﻡﻳﻠﺳ ﻝﻛﺷﺑ ﺎﻬﻣﺍﺩﺧﺗﺳﺍ
.ﺭﺎﺑﻐﻟﺍ ﻥﻋ ﺔﻣﺟﺎﻧﻟﺍ ﺭﻁﺎﺧﻣﻟﺍ ﻝﻳﻠﻘﺗ ﻰﻟﺇ ﺭﺎﺑﻐﻟﺍ ﻊﻳﻣﺟﺗ ﻡﺍﺩﺧﺗﺳﺍ ﻱﺩﺅﻳ ﺩﻗ
:ﺎﻬﺑ ﺔﻳﺎﻧﻌﻟﺍﻭ ﺔﻳﺋﺎﺑﺭﻬﻛﻟﺍ ﺓﺩﻌﻟﺍ ﻡﺍﺩﺧﺗﺳﺍ ﺔﻘﻳﺭﻁ (
ﺔﻳﺋﺎﺑﺭﻬﻛﻟﺍ ﺓﺩﻌﻟﺍ ﻡﺩﺧﺗﺳﺍﻭ ،ﺔﻳﺋﺎﺑﺭﻬﻛﻟﺍ ﺓﺩﻌﻟﺍ ﻡﺍﺩﺧﺗﺳﺍ ﻲﻓ ﻁﺭﻔﺗ ﻻ (ﺃ
ﻙﺩﻋﺎﺳﻳ ﺍﺫﻫ ﻥﺈﻓ ﻙﻟﺫﻟ ﺔﺻﺻﺧﻣﻟﺍ ﺔﻳﺋﺎﺑﺭﻬﻛﻟﺍ ﺓﺩﻌﻟﺍ ﻙﻣﺍﺩﺧﺗﺳﺍ ﺩﻧﻋ
ﻡﺗ ﻲﺗﻟﺍ ﺔﻣﻬﻣﻠﻟ ًﺎﻌﺑﺗ ًﺎﻧﻣﺃ ﺭﺛﻛﺃﻭ ﻝﺿﻓﺃ ﺔﺟﻳﺗﻧ ﻰﻠﻋ ﻝﻭﺻﺣﻟﺍ ﻰﻠﻋ
.ﻪﺑ ﻡﻭﻘﺗ ﻱﺫﻟﺍ ﻝﻣﻌﻠﻟ ﺔﺑﺳﺎﻧﻣﻟﺍ
.ﺎﻬﻟ ﺏﺎﻘﺛﻣﻟﺍ ﻡﻳﻣﺻﺗ
.ﺔﻳﺋﺎﺑﺭﻬﻛﻟﺍ ﺓﺩﻌﻟﺍ ﻡﺩﺧﺗﺳﺗ ﻻ ﻝﻣﻌﻟﺍ ﻥﻋ ﻝﻳﻐﺷﺗﻟﺍ ﺡﺎﺗﻔﻣ ﻝﻁﻌﺗ ﺔﻟﺎﺣ ﻲﻓ
(ﺏ
ﺎﻬﺑ ﺹﺎﺧﻟﺍ ﻝﻳﻐﺷﺗﻟﺍ ﺡﺎﺗﻔﻣ ﻲﻓ ﻡﻛﺣﺗﻟﺍ ﻥﻛﻣﻳ ﻻ ﺔﻳﺋﺎﺑﺭﻬﻛ ﺓﺩﻋ ﻱﺃ
.ﺡﺎﺗﻔﻣﻟﺍ ﺍﺫﻫ ﺡﻼﺻﺇ ﺏﺟﻳﻭ ﺎﻬﻣﺍﺩﺧﺗﺳﺍ ﺩﻧﻋ ًﺍﺭﻁﺧ ﻝﻛﺷﺗ ﺎﻬﻧﺈﻓ
ﻥﻣ ﺔﻳﺭﺎﻁﺑﻟﺍ ﺔﻣﺯﺣ ﻭﺃ/ﻭ ﺔﻗﺎﻁﻟﺍ ﺭﺩﺻﻣ ﻥﻣ ﺱﺑﺎﻘﻟﺍ ﻝﺻﻔﺑ ﻡﻗ (ﺕ
ﻭﺃ ﺕﺎﻘﺣﻠﻣﻟﺍ ﺭﻳﻳﻐﺗ ﻭﺃ ﺕﻼﻳﺩﻌﺗ ﻱﺃ ﻝﻣﻋ ﻝﺑﻗ ﺔﻳﺋﺎﺑﺭﻬﻛﻟﺍ ﺓﺩﻌﻟﺍ
.ﺔﻳﺋﺎﺑﺭﻬﻛﻟﺍ ﺩﺩﻌﻟﺍ ﻥﻳﺯﺧﺗ
ﺭﻳﻏ ﻝﻛﺷﺑ ﺔﻳﺋﺎﺑﺭﻬﻛﻟﺍ ﺓﺩﻌﻟﺍ ﻝﻳﻐﺷﺗ ﻩﺫﻫ ﻁﺎﻳﺗﺣﻻﺍ ﺕﺍءﺍﺭﺟﺇ ﻊﻧﻣﺗ
.ﺩﻭﺻﻘﻣ
ﻝﻭﺎﻧﺗﻣ ﻥﻋ ًﺃﺩﻳﻌﺑ ﺔﻣﺩﺧﺗﺳﻣ ﺭﻳﻐﻟﺍ ﺔﻳﺋﺎﺑﺭﻬﻛﻟﺍ ﺩﺩﻌﻟﺍ ﻥﻳﺯﺧﺗﺑ ﻡﻗ (ﺙ
ﻝﻳﻐﺷﺗ ﻥﻋ ﺓﺭﻛﻓ ﻪﻳﺩﻟ ﺱﻳﻟ ﺹﺧﺷ ﻱﻷ ﺢﻣﺳﺗ ﻻﻭ ﻝﺎﻔﻁﻷﺍ
.ﺎﻬﻠﻳﻐﺷﺗ ﻭﺃ ﺕﺍﻭﺩﻷﺍ ﻩﺫﻫ ﻥﻣ ﺏﺍﺭﺗﻗﻻﺎﺑ ﺏﺎﻘﺛﻣﻟﺍ
ﻥﻳﺑﺭﺩﻣ ﺭﻳﻐﻟﺍ ﺹﺎﺧﺷﻷﺍ ﻱﺩﻳﺃ ﻲﻓ ﺓﺭﻭﻁﺧ ﻝﺛﻣﺗ ﻝﻳﻐﺷﺗﻟﺍ ﺕﺍﻭﺩﺃ
.ﺎﻬﻳﻠﻋ
ﺔﻳﺣﺎﻧ ﻥﻣ ًﺍﺩﻳﺟ ﺎﻬﺻﺣﻔﺑ ﻡﻗ ،ﺔﻳﺋﺎﺑﺭﻬﻛﻟﺍ ﺩﺩﻌﻟﺍ ﺔﻣﻼﺳ ﻥﻣ ﺩﻛﺄﺗ (ﺝ
ءﺯﺟ ﻱﺃ ﻲﻓ ﺭﺳﻛ ﻱﺃ ﺩﻭﺟﻭ ﻭﺃ ﺔﻛﺭﺣﺗﻣﻟﺍ ءﺍﺯﺟﻷﺍ ﻁﺑﺍﺭﺗ ﻯﺩﻣ
ﻝﺑﻗ ﺎﻬﺣﻼﺻﺇ ﺏﺟﻳ ﻝﻳﻐﺷﺗﻟﺍ ﺕﺍﻭﺩﺄﺑ ﻑﻠﺗ ﺙﻭﺩﺣ ﺔﻟﺎﺣ ﻲﻓ
.ﺎﻬﻠﻳﻐﺷﺗ ﻰﻠﻋ ﺭﺛﺅﻳ ﺎﻣﺑ ﺎﻬﺋﺍﺯﺟﺃ ﻥﻣ
.ﻡﺍﺩﺧﺗﺳﻻﺍ
ﺭﻳﻏ ﻝﻛﺷﺑ ﺔﻧﺎﻳﺻﻟﺍ ﺔﻳﻠﻣﻌﺑ ﻡﺎﻳﻘﻟﺍ ﻭﺃ ﻝﻳﻐﺷﺗﻟﺍ ﺕﺍﻭﺩﺃ ﺔﻧﺎﻳﺻ ﻡﺩﻋ
.ﺙﺩﺍﻭﺣﻟﺍ ﻥﻣ ﺭﻳﺛﻛﻟﺍ ﺙﻭﺩﺣ ﻰﻟﺇ ﻱﺩﺅﻳ ﺢﻳﺣﺻ
ﻝﻬﺳﻳ ﺙﻳﺣﺑ ﻑﺍﻭﺣﻟﺍ ﺓﺩﺎﺣ ﻊﻳﻁﻘﺗﻟﺍ ﺕﺍﻭﺩﺃ ﻰﻠﻋ ﻅﺎﻔﺣﻟﺍ ﻰﺟﺭﻳ
ﺔﻔﻳﻅﻧﻭ ﺓﺩﺎﺣ ﻊﻳﻁﻘﺗﻟﺍ ﺕﺍﻭﺩﺃ ﻰﻠﻋ ﻅﺎﻔﺣﻟﺍ ﻰﺟﺭﻳ (ﺡ
.ﺎﻬﻳﻓ ﻡﻛﺣﺗﻟﺍ
ﻙﻟﺫ ﺭﻳﻏﻭ ﺓﺩﻌﻟﺍ ءﺍﺯﺟﺃﻭ ،ﺕﺎﻘﺣﻠﻣﻟﺍﻭ ،ﺔﻳﺋﺎﺑﺭﻬﻛﻟﺍ ﺓﺩﻌﻟﺍ ﻡﺩﺧﺗﺳﺍ (ﺥ
ﻑﻭﺭﻅ ﺭﺎﺑﺗﻋﻻﺍ ﻲﻓ ﻊﺿﻭﻟﺍ ﻊﻣ ،ﺕﺎﻣﻳﻠﻌﺗﻟﺍ ﻩﺫﻫ ﻊﻣ ﻕﻓﺍﻭﺗﻳ ﺎﻣﻳﻓ
.ﺎﻬﻘﻳﻘﺣﺗ ﺏﻭﻠﻁﻣﻟﺍ ﻝﺎﻣﻋﻷﺍﻭ ﻝﻣﻌﻟﺍ
ﻰﻟﺇ ﺎﻬﻟ ﺔﺻﺻﺧﻣﻟﺍ ﺭﻳﻏ ﺽﺍﺭﻏﻸﻟ ﺔﻗﺎﻁﻟﺍ ﺓﺍﺩﺃ ﻡﺩﺧﺗﺳﺍ ﻱﺩﺅﻳ ﺩﻗ
.ﺭﻳﻁﺧ ﻑﻗﻭﻣ ﺩﻭﺟﻭ
ﺔﻣﺩﺧﻟﺍ (
ﻁﻘﻓﻭ ﻥﻳﺻﺻﺧﺗﻣﻟﺍ ﻝﺑﻗ ﻥﻣ ﻁﻘﻓ ﺔﻳﺋﺎﺑﺭﻬﻛﻟﺍ ﻙﺗﺩﻋ ﺢﻳﻠﺻﺗﺑ ﺢﻣﺳﺍ (ﺃ
. ﻁﻘﻓ ﺔﻳﻠﺻﻷﺍ ﺭﺎﻳﻐﻟﺍ ﻊﻁﻗ ﻝﺎﻣﻌﺗﺳﺈﺑ
.ﺯﺎﻬﺟﻟﺍ ﻥﺎﻣﺃ ﻰﻠﻋ ﺔﻅﻓﺎﺣﻣﻟﺍ ﻙﻟﺫ ﻥﻣﺅﻳ
ﺕﺎﻁﺎﻳﺗﺣﻻﺍ
.ﻥﺳﻟﺍ ﺭﺎﺑﻛﻭ ﻝﺎﻔﻁﻷﺍ ﻝﻭﺎﻧﺗﻣ ﻥﻋ ًﺍﺩﻳﻌﺑ ﺔﻳﺋﺎﺑﺭﻬﻛﻟﺍ ﺓﺩﻌﻟﺍ ﻊﺿﻭ ﻰﺟﺭﻳ
ﻥﻋ ﺓﺩﻳﻌﺑ ﺔﻳﺋﺎﺑﺭﻬﻛﻟﺍ ﺓﺩﻌﻟﺍ ﻰﻠﻋ ﻅﺎﻔﺣﻟﺍ ﺏﺟﻳ ﻡﺍﺩﺧﺗﺳﻻﺍ ﻡﺩﻋ ﺔﻟﺎﺣ ﻲﻓ
.ﻥﺳﻟﺍ ﺭﺎﺑﻛﻭ ﻝﺎﻔﻁﻷﺍ ﻝﻭﺎﻧﺗﻣ
ﺔﻳﺋﺎﺑﺭﻬﻛﻟﺍ ﺓﺩﻌﻟﺍ ﺔﻣﻼﺳﺑ ﺔﺻﺎﺧﻟﺍ ﺔﻣﺎﻌﻟﺍ ﺕﺍﺭﻳﺫﺣﺗﻟﺍ
ﺔﻣﺩﺻ ﻲﻓ ﻩﺎﻧﺩﺃ ﺓﺩﺭﺳﻣﻟﺍ ﺕﺎﻣﻳﻠﻌﺗﻟﺍﻭ ﺕﺍﺭﻳﺫﺣﺗﻟﺍ ﻉﺎﺑﺗﺍ ﻲﻓ ﻝﺷﻔﻟﺍ ﺏﺑﺳﺗﻳ ﺩﻗ
ﺔﻳﺋﺎﺑﺭﻬﻛﻟﺍ ﺓﺩﻌﻟﺍ ﻰﻟﺇ ﺕﺍﺭﻳﺫﺣﺗﻟﺍ ﻲﻓ "ﺔﻳﺋﺎﺑﺭﻬﻛﻟﺍ ﺓﺩﻌﻟﺍ" ﺢﻠﻁﺻﻣ ﺭﻳﺷﻳ
ﺓﺩﻌﻟﺍ ﻭﺃ ﻙﺑ ﺔﺻﺎﺧﻟﺍ ﺔﻳﺳﻳﺋﺭﻟﺍ ﻝﻳﻐﺷﺗﻟﺍ ﺕﻼﺻﻭﻣ ﻝﻣﻌﺗ ﻲﺗﻟﺍ (ﺔﻳﻛﻠﺳﻟﺍ)
(ﺡ
ﺏﺑﺳﺗﺗ ﺓءﺎﺿﻣ ﺭﻳﻐﻟﺍ ﻝﻣﻌﻟﺍ ﺕﻻﺎﺟﻣﻭ ﻝﻣﻌﻟﺍ ﻥﺎﻛﻣ ﻲﻓ ﻰﺿﻭﻔﻟﺎﻓ
ﺩﻭﺟﻭ ﻲﻓ ﻱﺃ ﺔﻳﺭﺎﺟﻔﻧﺍ ءﺍﻭﺟﺃ ﻲﻓ ﺔﻳﺋﺎﺑﺭﻬﻛﻟﺍ ﺩﺩﻌﻟﺍ ﻝﻳﻐﺷﺗﺑ ﻡﻘﺗ ﻻ (ﺏ
.ﺔﻧﺧﺩﻷﺍ ﺭﺎﺑﻏ ﻝﺎﻌﺷﺇ ﻰﻠﻋ ﻝﻣﻌﺗ ﺓﺭﺍﺭﺷ ﺔﻳﺋﺎﺑﺭﻬﻛﻟﺍ ﺩﺩﻌﻟﺍ ﺙﺩﺣﺗ
4
ﻝﺎﻔﻁﻷﺍ ﻝﻭﺎﻧﺗﻣ ﻥﻋ ﺓﺩﻳﻌﺑ ﺔﻳﺋﺎﺑﺭﻬﻛﻟﺍ ﺩﺩﻌﻟﺍ ﻥﻭﻛﺗ ﻥﺃ ﻰﻠﻋ ﻅﻓﺎﺣ (ﺕ
ﻙﺩﻘﻓ ﻰﻟﺇ ﻱﺩﺅﺗ ﻥﺃ ﻥﻛﻣﻣﻟﺍ ﻥﻣ ﺕﻳﺗﺷﺗﻟﺍ ﻝﺎﻛﺷﺃ ﻥﻣ ﻝﻛﺷ ﻱﺃ
ﻱﺄﺑ ﺱﺑﺎﻘﻟﺍ ﻝﻳﺩﻌﺗ ﺭﻅﺣﻳ ،ءﺎﺑﺭﻬﻛﻟﺍ ﺫﻔﻧﻣﺑ ﺱﺑﺎﻘﻟﺍ ﻝﻳﺻﻭﺗ ﺏﺟﻳ (ﺃ
.ﺔﻳﺿﺭﻷﺍ ﺔﻳﺋﺎﺑﺭﻬﻛﻟﺍ ﺩﺩﻌﻟﺍ ﻊﻣ ﺊﻳﺎﻬﻣ ﺱﺑﺎﻗ ﻱﺃ ﻡﺩﺧﺗﺳﺗ ﻻ
ﺭﻁﺧ ﻥﻣ ﺔﻣﺋﻼﻣﻟﺍ ﺱﺑﺎﻘﻣﻟﺍﻭ ﺎﻫﺭﻳﻳﻐﺗ ﻡﺗﻳ ﻡﻟ ﻲﺗﻟﺍ ﺱﺑﺍﻭﻘﻟﺍ ﺽﻔﺧﺗ
ﺏﻳﺑﺎﻧﻷﺍ ﻝﺛﻣ ﺔﻳﺿﺭﻷﺍ ﺢﻁﺳﻷﺍ ﻊﻣ ﻱﺩﺳﺟﻟﺍ ﺱﻣﻼﺗﻟﺍ ﺏﻧﺟﺗ (ﺏ
ﻙﺎﻧﻫ ﺔﻳﺿﺭﻷﺍ ﺢﻁﺳﻷﺍ ﻙﻠﺗ ﻥﻣ ﻱﻷ ﻙﻣﺳﺟ ﺔﺳﻣﻼﻣ ﺔﻟﺎﺣ ﻲﻓ
ﺓﺩﻌﻟﺍ ﻝﺧﺍﺩ ﻰﻟﺇ ءﺎﻣﻟﺍ ﺏﺭﺳﺗ ﻥﺇ ﺔﻳﺋﺎﺑﺭﻬﻛﻟﺍ ﺕﺎﻣﺩﺻﻟﺍ ﺭﻁﺧ ﺩﺍﺩﺯﻳ
ﻭﺃ ﻝﻣﺣﻟ ًﺎﻘﻠﻁﻣ ﻪﻠﻣﻌﺗﺳﺗ ﻻ ،(ﻙﻠﺳﻟﺍ) ﻝﺑﺎﻛﻟﺍ ﻝﺎﻣﻌﺗﺳﺍ ءﻲﺳﺗ ﻻ (ﺙ
.ﺱﺑﻘﻣﻟﺍ ﻥﻣ ﺱﺑﺎﻘﻟﺍ ﺏﺣﺳﻟ ﻭﺃ ﺔﻳﺋﺎﺑﺭﻬﻛﻟﺍ ﺓﺩﻌﻟﺍ ﻊﻓﺩ ﻭﺃ ﺩﺷ
ﻑﺍﻭﺣﻟﺍ ﻭﺃ ﺕﻳﺯﻟﺍ ﻭﺃ ﺓﺭﺍﺭﺣﻟﺍ ﺭﺩﺎﺻﻣ ﻥﻋ ًﺍﺩﻳﻌﺑ ﻪﻳﻠﻋ ﻅﻓﺎﺣﻭ
ﺕﺎﻣﺩﺻﻟﺍ ﺭﻁﺧ ﻥﻣ ﺔﻛﺑﺎﺷﺗﻣﻟﺍ ﻭﺃ ﺔﻔﻟﺎﺗﻟﺍ (ﻙﻼﺳﻷﺍ) ﺕﻼﺑﺎﻛﻟﺍ ﺩﻳﺯﺗ
ﻙﻠﺳ ﻡﺍﺩﺧﺗﺳﺎﺑ ﺢﺻﻧﻳ ،ﺝﺭﺎﺧﻟﺎﺑ ﺔﻳﺋﺎﺑﺭﻬﻛﻟﺍ ﺓﺩﻌﻟﺍ ﻝﻳﻐﺷﺗ ﺔﻟﺎﺣ ﻲﻓ (ﺝ
ﻥﻣ ﻝﻳﻠﻘﺗﻠﻟ ﻲﺟﺭﺎﺧﻟﺍ ﻝﺎﻣﻌﺗﺳﻻﺍ ﻊﻣ ﺏﺳﺎﻧﻣ ﻙﻠﺳ ﻡﺍﺩﺧﺗﺳﺎﺑ ﻡﻗ
ﺭﻔﻣ ﻻ ﺭﻣﺃ ﺏﻁﺭ ﻥﺎﻛﻣ ﻲﻓ ﺔﻳﺋﺎﺑﺭﻬﻛﻟﺍ ﺓﺩﻌﻟﺍ ﻝﻳﻐﺷﺗ ﻥﻭﻛﻳ ﺎﻣﺩﻧﻋ (ﺡ
(RCD)
.
ﻲﻘﺑﺗﻣﻟﺍ ﻲﺑﺭﻬﻛﻟﺍ ﺭﺎﻳﺗﻠﻟ ﻲﻣﺣﻣﻟﺍ ﺩﻭﺯﻣﻟﺍ ﻡﺩﺧﺗﺳﺎﻓ ،ﻪﻧﻣ
.ﺔﻳﺑﺭﻬﻛ ﺕﺎﻣﺩﺻﺑ ﺔﺑﺎﺻﻹﺍ ﺭﻁﺎﺧﻣ ﻝﻳﻠﻘﺗ ﻰﻠﻋ
ﺓﺩﻌﻟﺍ ﺔﻁﺳﺍﻭﺑ ﻝﻣﻌﻟﺎﺑ ﻡﻗﻭ ﻪﻠﻌﻔﺗ ﺎﻣ ﻰﻟﺇ ﻪﺑﺗﻧﺃﻭ ﺎًﻅﻘﻳ ﻥﻛ (ﺃ
ﻙﺭﻭﻌﺷ ﺔﻟﺎﺣ ﻲﻓ ﺔﻳﺋﺎﺑﺭﻬﻛﻟﺍ ﺓﺩﻌﻟﺍ ﻡﺩﺧﺗﺳﺗ ﻻ .ﻝﻘﻌﺗﺑ ﺔﻳﺋﺎﺑﺭﻬﻛﻟﺍ
5
ﺩﺍﻭﻣ ﻭﺃ ﺔﻳﻭﺩﺃ ﻭﺃ ﺓﺭﺩﺧﻣ ﺩﺍﻭﻣ ﺭﻳﺛﺄﺗ ﺕﺣﺗ ﺕﻧﻛ ﺍﺫﺇ ﻭﺃ ﺏﻌﺗﻟﺎﺑ
ﻱﺩﺅﻳ ﺩﻗ ﺔﻳﺋﺎﺑﺭﻬﻛﻟﺍ ﺓﺩﻌﻟﺍ ﻡﺍﺩﺧﺗﺳﺇ ﺩﻧﻋ ﺓﺩﺣﺍﻭ ﺔﻅﺣﻠﻟ ﻩﺎﺑﺗﻧﻹﺍ ﻡﺩﻋ
.ﻥﻳﻌﻠﻟ ﻲﻗﺍﻭﻟﺍ ﻉﺎﻧﻘﻟﺍ ءﺍﺩﺗﺭﺎﺑ ﺎًﻣﺋﺍﺩ ﻡﻗ .ﻥﺎﻣﻷﺍ ﺕﺍﻭﺩﺃ ﻡﺩﺧﺗﺳﺍ (ﺏ
ﺔﻳﺫﺣﺃ ﻭﺃ ﺭﺎﺑﻐﻟﺍ ﻥﻣ ﻲﻗﺍﻭﻟﺍ ﻉﺎﻧﻘﻟﺍ ﻝﺛﻣ ﺔﻳﺎﻣﺣﻟﺍ ﺕﺍﻭﺩﺃ ﻝﻣﻌﺗﺳ
ﻊﻣﺳﻟﺍ ﺔﻳﺎﻣﺣ ﺓﺯﻬﺟﺃ ﻭﺃ ﺔﺑﻠﺻ ﺔﻌﺑﻗ ﻭﺃ ﻕﻻﺯﻧﻼﻟ ﺓﺩﺎﺿﻣﻟﺍ ﻥﺎﻣﻷﺍ
ﺕﻻﺎﻣﺗﺣﺍ ﻝﻳﻠﻘﺗ ﻰﻠﻋ ﺔﻧﻳﻌﻣ ﻑﻭﺭﻅ ﻲﻓ ﺎﻬﻣﺍﺩﺧﺗﺳﺍ ﻡﺗﻳ ﻲﺗﻟﺍﻭ
١
.ﺕﺎﻣﻳﻠﻌﺗﻟﺍ ﺔﻓﺎﻛﻭ ﺔﻣﻼﺳﻟﺍ ﺕﺍﺭﻳﺫﺣﺗ ﺔﻓﺎﻛ ﺓءﺍﺭﻘﺑ ﻡﻗ
.ﺔﺑﺎﺻﺇ ﻭﺃ/ﻭ ،ﻕﻳﺭﺣ ﻭﺃ ﺔﻳﺋﺎﺑﺭﻬﻛ
.ًﻼﺑﻘﺗﺳﻣ ﺎﻬﻳﻟﺇ ﻉﻭﺟﺭﻠﻟ ﺕﺎﻣﻳﻠﻌﺗﻟﺍﻭ ﺕﺍﺭﻳﺫﺣﺗﻟﺍ ﺔﻓﺎﻛ ﻅﻔﺣﺍ
.ﺔﻳﺭﺎﻁﺑﻟﺎﺑ ﻝﻣﻌﺗ ﻲﺗﻟﺍ (ﺔﻳﻛﻠﺳﻼﻟﺍ) ﺔﻳﺋﺎﺑﺭﻬﻛﻟﺍ
.ﻙﻠﻐﺷ ﻥﺎﻛﻣ ﺓءﺎﺿﺇ ﻥﺳﺣﻭ ﺔﻓﺎﻅﻧ ﻰﻠﻋ ﻅﻓﺎﺣ (ﺃ
.ﺭﺎﺑﻏ ﻭﺃ ﻝﺎﻌﺗﺷﻼﻟ ﺔﻠﺑﺎﻗ ﺕﺍﺯﺎﻏ ﻭﺃ ﻝﺋﺍﻭﺳ
ﺔﻳﺑﺭﻬﻛﻟﺍ ﺕﺎﻣﺩﺻﻟﺍ ﻥﻣ ﺔﻳﺎﻗﻭﻟﺍ (
. ﺔﻳﺋﺎﺑﺭﻬﻛﻟﺍ ﺕﺎﻣﺩﺻﻟﺍ ﺙﻭﺩﺣ
.ﺩﻗﺍﻭﻣﻟﺍﻭ ﺕﺎﺟﻼﺛﻟﺍﻭ ﺔﻳﺭﺍﺭﺣﻟﺍ ﺕﻻﺩﺎﺑﻣﻟﺍﻭ
.ﺔﻳﺑﺭﻬﻛ ﺔﻣﺩﺻﻟ ﻙﺿﺭﻌﺗﻟ ﺓﺭﻭﻁﺧ
.ﺔﺑﻭﻁﺭﻟﺍ ﻭﺃ ﺭﻁﻣﻠﻟ ﺔﻳﺋﺎﺑﺭﻬﻛﻟﺍ ﺩﺩﻌﻟﺍ ﺽﺭﻌﺗ ﻻ (ﺕ
.ﺔﻛﺭﺣﺗﻣﻟﺍ ﺯﺎﻬﺟﻟﺍ ءﺍﺯﺟﺃ ﻭﺃ ﺓﺩﺎﺣﻟﺍ
.ﻲﺟﺭﺎﺧﻟﺍ ﻝﺎﻣﻌﺗﺳﻻﺍ ﻊﻣ ﺏﺳﺎﻧﺗﻳ (ﻝﺑﺎﻛ)
.ﺔﻳﺑﺭﻬﻛ ﺔﻣﺩﺻﻟ ﺽﺭﻌﺗﻟﺍ ﺓﺭﻭﻁﺧ
.ﺔﻳﺻﺧﺷ ﺕﺎﺑﺎﺻﻹ ﺽﺭﻌﺗﻟﺍ
ﻝﻣﻌﻟﺍ ﺔﻘﻁﻧﻣ ﺔﻣﻼﺳ (
.ﺙﺩﺍﻭﺣ ﻉﻭﻗﻭ ﻲﻓ
.ﻙﺑ ﻥﻳﻁﻳﺣﻣﻟﺍ ﻭﺃ
.ﺓﺭﻁﻳﺳﻟﺍ
.ﺔﻘﻳﺭﻁ
.ﺔﻳﺋﺎﺑﺭﻬﻛﻟﺍ
.ﺔﻳﺑﺭﻬﻛﻟﺍ
RCD
ﻡﺍﺩﺧﺗﺳﺍ ﻝﻣﻌﻳ
ﺔﻳﺻﺧﺷﻟﺍ ﺔﻣﻼﺳﻟﺍ (
.ﺔﻳﻟﻭﺣﻛ
.ﺓﺭﻳﻁﺧ ﺔﺑﺎﺻﺇ ﻰﻟﺇ
ﺭﻳﺫﺣﺗ
1
2
3
25
Page 26

17
18
19
21
24
20
22
23
25
1
2
3
4
5
6
7
8
501
9
10
11
12
40
41
42
13
14
15
16
43
44
45
46
47
26
27
28
29
30
31
51
47
48
52
54
53
48
49
50
48
53
56
52
32
33
49
48
34
36
35
37
59
58
57
60
38
61
62
39
26
63
Page 27

Item
No.
1 SEAL LOCK SCREW (W/SP.WASHER) M5×14
2 HEX. SOCKET HD. BOLT (W/FLANGE) D5×30
3 PUSHING BUTTON
4 SPRING
5 GEAR COVER ASS'Y
6 SPECIAL NUT
7 PINION
8 SEAL WASHER
9 FELT PACKING
10 BALL BEARING 6301DDCMPS2L
11 RUBBER RING (B)
12 BEARING COVER (A)
13 ARMATURE ASS'Y
14 FAN GUIDE
15 HEX. HD. TAPPING SCREW D5×75
16 STATOR
17 FELT WASHER
18 SIDE HANDLE
19 RETAINING RING FOR D12 SHAFT
20 GEAR
21 MACHINE SCREW M5×10
22 BEARING COVER (B)
23 BALL BEARING 6302DDCMPS2L
24 FELT PACKING (B)
25 SPINDLE
26 SEAL PLATE
27 PACKING GLAND
28 HEX. SOCKET HD. BOLT (W/FLANGE) M5×16
29 LABEL
30 SET PIN
31 LEVER
32 BOLT M8×22
33 SPRING WASHER M8
34 SET PIECE
35 RETAINING RING (E-TYPE) FOR D5 SHAFT
36 WHEEL GUARD ASS'Y
37 WHEEL WASHER (A)
38 D. C. WHEELS 230MM A24R
39 WHEEL NUT
40 O-RING
41 LOCK PIN
42 GEAR AND PINION ASS'Y
43 DUST SEAL
44 BALL BEARING 6200VVCMPS2L
45 HOUSING ASS'Y
Part Name
Item
No.
46 NAME PLATE
47 BRUSH COVER
48 TAPPING SCREW (W/FLANGE) D4×16
49 CARBON BRUSH
50 HANDLE (B)
51 BRAND LABEL
52 BRUSH HOLDER
53 SPRING
54 BEARING LOCK
56 SWITCH
57 CORD CLIP
58 TAPPING SCREW (W/FLANGE) D4×16
59 HANDLE (A)
60 TUBE (D)
61 TERMINAL
62 CORD ARMOR
63 CORD
501 WRENCH
Part Name
27
Page 28

806
Code No. C99126132 M
Printed in Malaysia
 Loading...