

Page 1
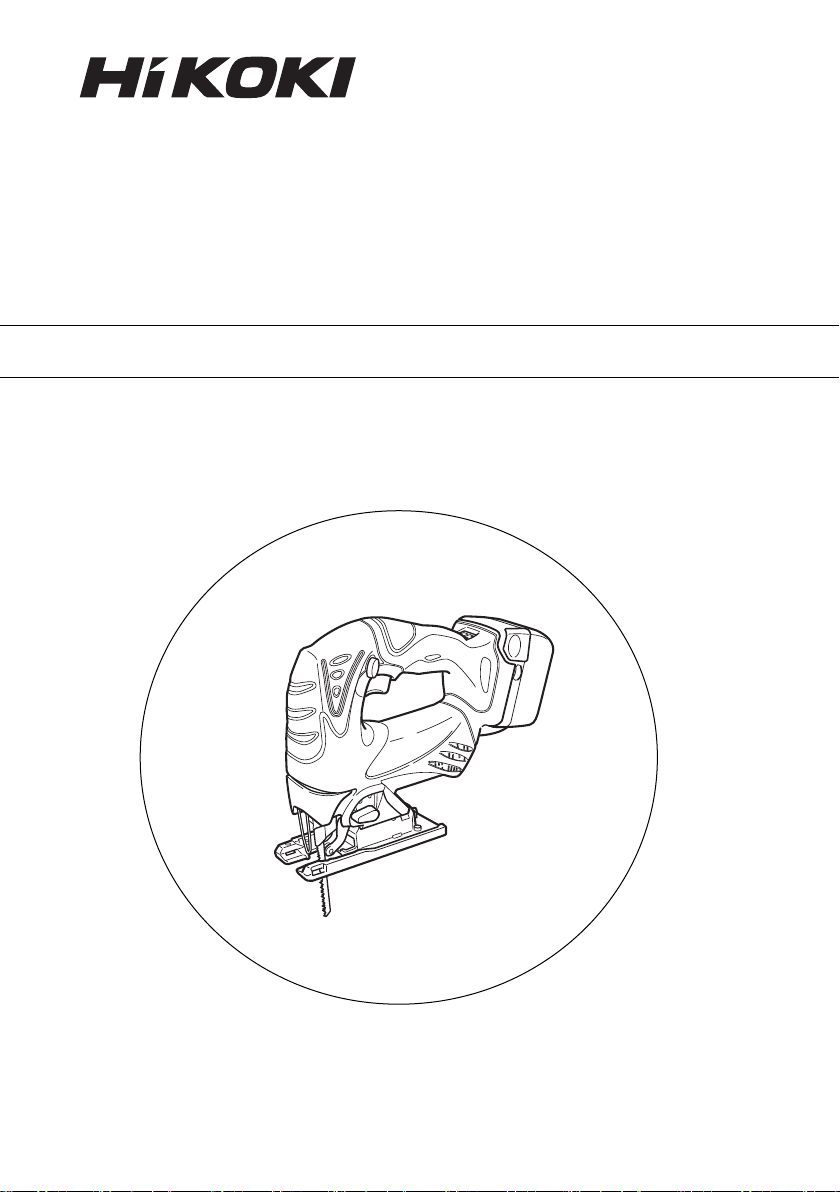
Cordless Jig Saw
충전 직쏘
CJ 14DSL • CJ 18DSL
Handling instructions
취급 설명서
CJ14DSL
Read through carefully and understand these instructions before use.
본 설명서를 자세히 읽고 내용을 숙지한 뒤 제품을 사용하십시오.
Page 2
1
2
1
5
4
3
2
6
2
3
1
0
1
7
8
9
4
A
<BSL1430> <BSL1830>
7
C
E
10
A
C
E
5
8
G
11
F
C
D
B
6
C
D
9
I
H
J
12
B
O
N
L
M
P
M
K
1
Page 3

13
14
15
M
T
Q
16
19
V
M
O
Q
17
20
Y
X
M
W
R
S
18
21
Y
W
U
[
Z
`
22
O
M
b
c
d
a
23
M
g
e
f
b
c
d
24
M
]
\
U
2
Page 4

English
Rechargeable battery
1
Latch
2
Battery cover
3
Terminals
4
Ventilation holes
5
Handle
6
Insert
7
Pull out
8
Charger
9
Pilot lamp
0
Line
!
Lever
@
Blade
#
Blade holder
$
Roller
%
Lock off button
^
Lock
&
Free
*
Switch
(
LED Light
)
Change knob
q
Splinter guard
w
Base
e
Insert
r
Chip cover
t
Insert
y
Open
u
Remaining battery indicator switch
i
Remaining battery indicator lamp
o
Base bolt
p
Hexagonal bar wrench
a
Forward
s
Guide
d
Attachment hole
f
M5 bolt
g
Nail or screw
h
Guide hole
j
Scale
k
Semi-circular part
l
;
-mark -표시
Cleaner
z
Dust collector
x
Adapter
c
Nose
v
Rear hole
b
Hook
n
Notch
m
한국어
충전식 배터리
래치
배터리 커버
단자
통풍구
핸들
삽입
잡아당김
충전기
파일럿 램프
라인
레버
톱날
톱날 고정
롤러
잠금 버튼
잠금
작동
스위치
LED 조명
조절자
작업 표면 보호대
베이스
삽입
톱밥 커버
삽입
오픈
배터리 잔량 표시 스위치
배터리 잔량 표시등
중앙 볼트
육각 렌치
진행 방향
가이드
부착 구멍
M5 볼트
못 또는 나사
가이드 구멍
눈금
반원 부분
청소기
먼지 집진기
어댑터
결합부
후방 구멍
후크
노치
3
Page 5

GENERAL SAFETY RULES
WARNING!
Read all instructions
Failure to follow all instructions listed below may result
in electric shock, fire and/or serious injury.
The term “power tool” in all of the warnings listed below
refers to your mains operated (corded) power tool or
battery operated (cordless) power tool.
SAVE THESE INSTRUCTIONS
1) Work area safety
a) Keep work area clean and well lit.
Cluttered or dark areas invite accidents.
b) Do not operate power tools in explosive
atmospheres, such as in the presence of flammable
liquids, gases or dust.
Power tools create sparks which may ignite the
dust or fumes.
c) Keep children and bystanders away while
operating a power tool.
Distractions can cause you to lose control.
2) Electrical safety
a) Power tool plugs must match the outlet.
Never modify the plug in any way.
Do not use any adapter plugs with earthed
(grounded) power tools.
Unmodified plugs and matching outlets will
reduce risk of electric shock.
b) Avoid body contact with earthed or grounded
surfaces, such as pipes, radiators, ranges and
refrigerators.
There is an increased risk of electric shock if your
body is earthed or grounded.
c) Do not expose power tools to rain or wet
conditions.
Water entering a power tool will increase the risk
of electric shock.
d) Do not abuse the cord. Never use the cord for
carrying, pulling or unplugging the power tool.
Keep cord away from heat, oil, sharp edges or
moving parts.
Damaged or entangled cords increase the risk of
electric shock.
e) When operating a power tool outdoors, use an
extension cord suitable for outdoor use.
Use of a cord suitable for outdoor use reduces the
risk of electric shock.
3) Personal safety
a) Stay alert, watch what you are doing and use
common sense when operating a power tool.
Do not use a power tool while you are tired or
under the influence of drugs, alcohol or medication.
A moment of inattention while operating power
tools may result in serious personal injury.
b) Use personal protective equipment. Always wear
eye protection.
Protective equipment such as dust mask, non-skid
safety shoes, hard hat, or hearing protection used
for appropriate conditions will reduce personal
injuries.
c) Prevent unintentional starting. Ensure the switch
is in the off-position before connecting to power
source and/or battery pack, picking up or carrying
the tool.
Carrying power tools with your finger on the
switch or energising power tools that have the
switch on invites accidents.
d) Remove any adjusting key or wrench before
turning the power tool on.
A wrench or a key left attached to a rotating part
of the power tool may result in personal injury.
e) Do not overreach. Keep proper footing and balance
at all times.
This enables better control of the power tool in
unexpected situations.
f) Dress properly. Do not wear loose clothing or
jewellery. Keep your hair, clothing and gloves
away from moving parts.
Loose clothes, jewellery or long hair can be caught
in moving parts.
g) If devices are provided for the connection of dust
extraction and collection facilities, ensure these
are connected and properly used.
Use of dust collection can reduce dust related
hazards.
4) Power tool use and care
a) Do not force the power tool. Use the correct
power tool for your application.
The correct power tool will do the job better and
safer at the rate for which it was designed.
b) Do not use the power tool if the switch does not
turn it on and off.
Any power tool that cannot be controlled with the
switch is dangerous and must be repaired.
c) Disconnect the plug from the power source and/
or the battery pack from the power tool before
making any adjustments, changing accessories,
or storing power tools.
Such preventive safety measures reduce the risk
of starting the power tool accidentally.
d) Store idle power tools out of the reach of children
and do not allow persons unfamiliar with the
power tool or these instructions to operate the
power tool.
Power tools are dangerous in the hands of
untrained users.
e) Maintain power tools. Check for misalignment or
binding of moving parts, breakage of parts and
any other condition that may affect the power
tools’ operation.
If damaged, have the power tool repaired before
use.
Many accidents are caused by poorly maintained
power tools.
f) Keep cutting tools sharp and clean.
Properly maintained cutting tools with sharp
cutting edges are less likely to bind and are easier
to control.
g) Use the power tool, accessories and tool bits etc.
in accordance with these instructions, taking into
account the working conditions and the work to
be performed.
Use of the power tool for operations different from
those intended could result in a hazardous
situation.
5) Battery tool use and care
a) Ensure the switch is in the off position before
inserting battery pack.
Inserting the battery pack into power tools that
have the switch on invites accidents.
4
Page 6

b) Recharge only with the charger specified by the
manufacturer.
A charger that is suitable for one type of battery
pack may create a risk of fire when used with
another battery pack.
c) Use power tools only with specifically designated
battery packs.
Use of any other battery packs may create a risk
of injury and fire.
d) When battery pack is not in use, keep it away from
other metal objects like paper clips, coins, keys,
nails, screws, or other small metal objects that can
make a connection from one terminal to another.
Shorting the battery terminals together may cause
burns or a fire.
e) Under abusive conditions, liquid may be ejected
from the battery; avoid contact. If contact
accidentally occurs, flush with water. If liquid
contacts eyes, additionally seek medical help.
Liquid ejected from the battery may cause irritation
or burns.
6) Service
a) Have your power tool serviced by a qualified repair
person using only identical replacement parts.
This will ensure that the safety of the power tool
is maintained.
PRECAUTION
Keep children and infirm persons away.
When not in use, tools should be stored out of reach of
children and infirm persons.
PRECAUTIONS FOR CORDLESS JIG SAW
1. Always charge the battery at a temperature of 0 – 40°C.
A temperature of less than 0°C will result in over
charging which is dangerous. The battery cannot be
charged at a temperature greater than 40°C.
The most suitable temperature for charging is that of
20 – 25°C.
2. When one charging is completed, leave the charger
for about 15 minutes before the next charging of
battery.
3. Do not allow foreign matter to enter the hole for
connecting the rechargeable battery.
4. Never disassemble the rechargeable battery and
charger.
5. Never short-circuit the rechargeable battery.
Short-circuiting the battery will cause a great electric
current and overheat. It results in burn or damage to
the battery.
6. Do not dispose of the battery in fire.
If the battery burnt, it may explode.
7. Do not insert object into the air ventilation slots of
the charger.
Inserting metal objects or inflammables into the
charger air ventilation slots will result in electrical
shock hazard or damaged charger.
8. Bring the battery to the shop from which it was
purchased as soon as the post-charging battery life
becomes too short for practical use. Do not dispose
of the exhausted battery.
9. Using an exhausted battery will damage the charger.
10. If the machine is used continuously at low speed, an
extra load is applied to the motor which can result in
motor seizure. Always operate the power tool so that
the blade is not caught by the material during
operation. Always adjust the blade speed to enable
smooth cutting.
CAUTION ON LITHIUM-ION BATTERY
To extend the lifetime, the lithium-ion battery equips with
the protection function to stop the output.
In the cases of 1 and 2 described below, when using this
product, even if you are pulling the switch, the motor
may stop. This is not the trouble but the result of
protection function.
1. When the battery power remaining runs out, the
motor stops.
In such case, charge it up immediately.
2. If the tool is overloaded, the motor may stop. In this
case, release the switch of tool and eliminate causes
of overloading. After that, you can use it again.
Furthermore, please heed the following warning and
caution.
WARNING
In order to prevent any battery leakage, heat generation,
smoke emission, explosion and ignition beforehand,
please be sure to heed the following precautions.
1. Make sure that swarf and dust do not collect on the
battery.
䡬 During work make sure that swarf and dust do not
fall on the battery.
䡬 Make sure that any swarf and dust falling on the
power tool during work do not collect on the battery.
䡬 Do not store an unused battery in a location exposed
to swarf and dust.
䡬 Before storing a battery, remove any swarf and dust
that may adhere to it and do not store it together
with metal parts (screws, nails, etc.).
2. Do not pierce battery with a sharp object such as a
nail, strike with a hammer, step on, throw or subject
the battery to severe physical shock.
3. Do not use an apparently damaged or deformed
battery.
4. Do not use the battery in reverse polarity.
5. Do not connect directly to an electrical outlets or
car cigarette lighter sockets.
6. Do not use the battery for a purpose other than those
specified.
7. If the battery charging fails to complete even when
a specified recharging time has elapsed,
immediately stop further recharging.
8. Do not put or subject the battery to high
temperatures or high pressure such as into a
microwave oven, dryer, or high pressure container.
9. Keep away from fire immediately when leakage or
foul odor are detected.
10. Do not use in a location where strong static
electricity generates.
11. If there is battery leakage, foul odor, heat generated,
discolored or deformed, or in any way appears
abnormal during use, recharging or storage,
immediately remove it from the equipment or
battery charger, and stop use.
5
Page 7

CAUTION
1. If liquid leaking from the battery gets into your eyes,
do not rub your eyes and wash them well with fresh
clean water such as tap water and contact a doctor
immediately.
If left untreated, the liquid may cause eye-problems.
2. If liquid leaks onto your skin or clothes, wash well
with clean water such as tap water immediately.
There is a possibility that this can cause skin irritation.
3. If you find rust, foul odor, overheating, discolor,
deformation, and/or other irregularities when using
the battery for the first time, do not use and return it
to your supplier or vendor.
WARNING
If an electrically conductive foreign object enters the
terminals of the lithium ion battery, a short-circuit may
occur resulting in the risk of fire. Please observe the
following matters when storing the battery.
䡬 Do not place electrically conductive cuttings, nails,
steel wire, copper wire or other wire in the storage
case.
䡬 Either install the battery in the power tool or store
by securely pressing into the battery cover until the
ventilation holes are concealed to prevent shortcircuits (See Fig. 1).
SPECIFICATIONS
Cordless Jig Saw
Model CJ14DSL CJ18DSL
Voltage 14.4 V 18 V
Max. Cutting Depth Wood 135 mm Mild Steel 10 mm
No-Load Speed 0 – 2400 /min
Stroke 26 mm
Min. Cutting Radius 25 mm
Rechargeable battery
Weight 2.3 kg 2.4 kg
BSL1430: Li-ion 14.4 V BSL1830: Li-ion 18 V
(3.0 Ah, 8 cells) (3.0 Ah, 10 cells)
Charger
Model UC18YRSL
Charging voltage 14.4 V 18 V
Weight 0.6 kg
STANDARD ACCESSORIES
1 Blades (No. 41) ....................... 1
Refer to Table 5 for use of the blades.
CJ14DSL
(2LSCK)
CJ18DSL
(2LSCK)
CJ14DSL (NN) Without charger, battery,
CJ18DSL (NN) plastic case and battery cover
Standard accessories are subject to change without notice.
2 Hexagon bar wrench ............. 1
3 Splinter guard ......................... 1
4 Chip cover ............................... 1
5 Charger ..................................... 1
6 Battery ...................................... 2
7 Plastic case .............................. 1
8 Battery cover ........................... 1
OPTIONAL ACCESSORIES ... Sold separately
(1) Various types of blades
Refer to Table 5 for use of the blades.
(2) Guide
(3) Sub base
(4) Dust collector
Optional accessories are subject to change without notice.
APPLICATIONS
䡬 Cutting various lumber and pocket cutting
䡬 Cutting mild steel plate, aluminum plate, and copper
plate
䡬 Cutting synthetic resins, such as phenol resin and vinyl
chloride
䡬 Cutting thin and soft construction materials
䡬 Cutting stainless steel plate (with No. 97 blade)
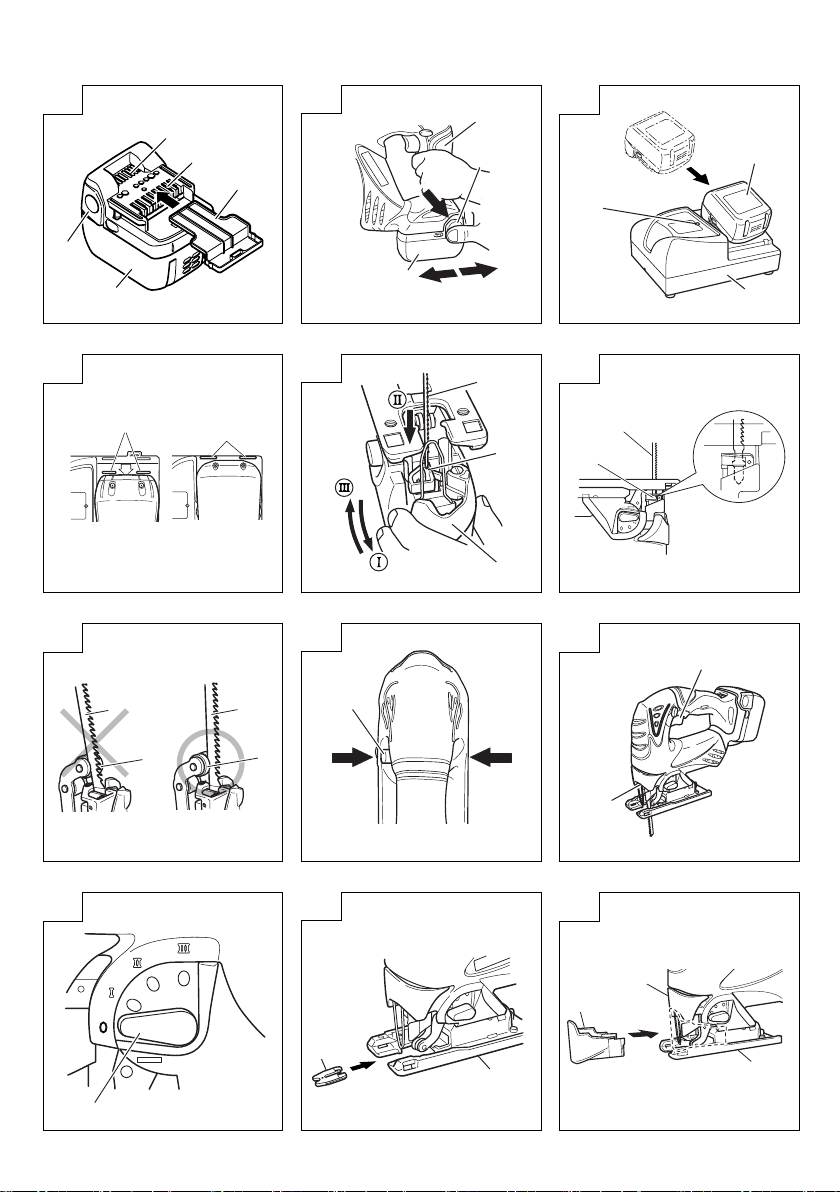
BATTERY REMOVAL/INSTALLATION
1. Battery removal
Hold the handle tightly and push the battery latch to
remove the battery (See Fig. 2).
CAUTION
Never short-circuit the battery.
2. Battery installation
Insert the battery while observing its polarities (See
Fig. 2).
CHARGING
Before using the cordless jig saw, charge the battery as
follows.
1. Connect the charger’s power cord to a receptacle.
When the power cord is connected, the charger’s pilot
lamp will blink in red. (At 1-second intervals)
6
Page 8

2. Insert the battery into the charger.
Firmly insert the battery into the charger until the line
is visible, as shown in Fig. 3, 4.
3. Charging
When inserting a battery in the charger, charging will
commence and the pilot lamp will light continuously
in red.
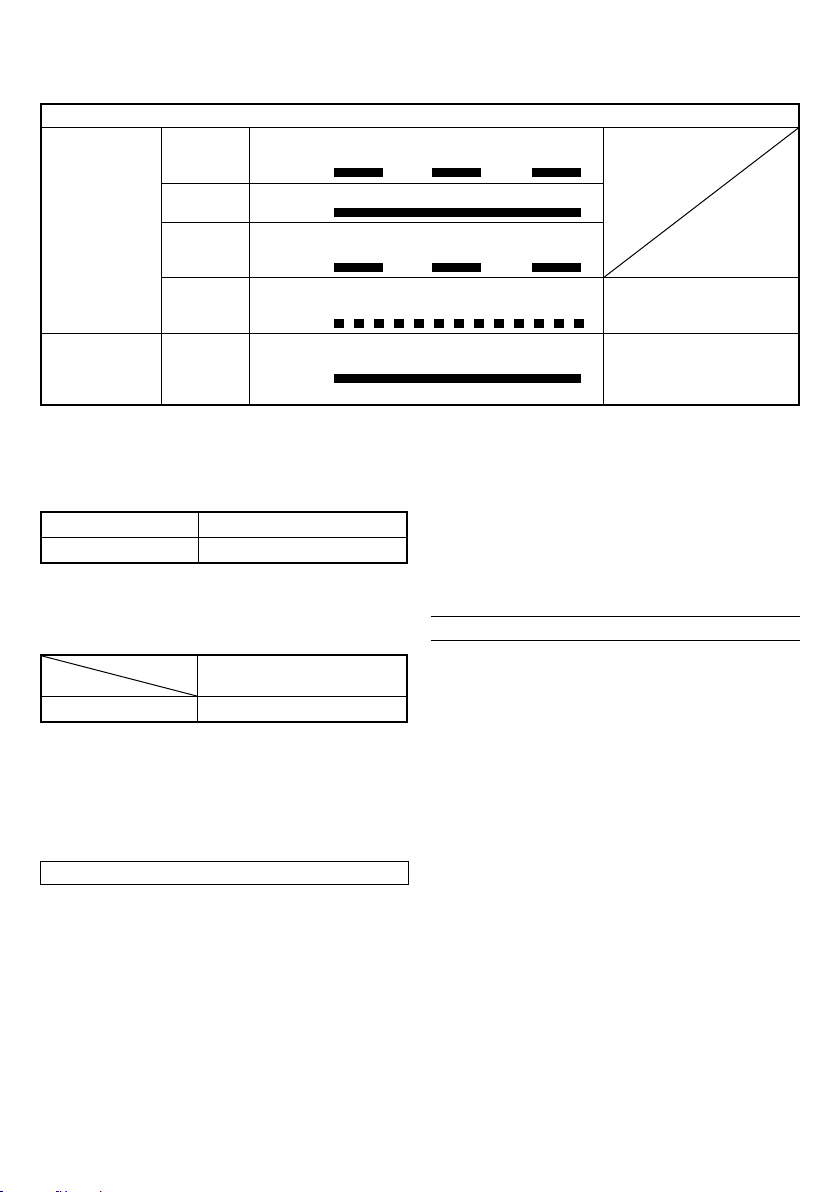
Indications of the pilot lamp
The
pilot
lamp
lights or
blinks in
red.
Before
charging
While
charging
Charging
complete
Blinks
Lights
Blinks
Lights for 0.5 seconds. Does not light for 0.5
seconds. (off for 0.5 seconds)
Lights continuously
Lights for 0.5 seconds. Does not light for 0.5
seconds. (off for 0.5 seconds)
When the battery becomes fully recharged, the pilot
lamp will blink in red. (At 1-second intervals) (See
Table 1)
(1) Pilot lamp indication
The indications of the pilot lamp will be as shown in
Table 1, according to the condition of the charger or
the rechargeable battery.
Table 1
Charging
impossible
The piot
lamp
lights in
green.
(2) Regarding the temperatures of the rechargeable
battery
The temperatures for rechargeable batteries are as
shown in Table 2, and batteries that have become hot
should be cooled for a while before being recharged.
Table 2 Recharging ranges of batteries
Rechargeable batteries
BSL1430, BSL1830
(3) Regarding recharging time
Depending on the combination of the charger and
batteries, the charging time will become as shown in
Table 3.
Table 3 Charging time (At 20°C)
Battery
BSL1430, BSL1830 Approx. 45 min.
NOTE:
The charging time may vary according to temperature
and power source voltage.
4. Disconnect the charger’s power cord from the
receptacle.
5. Hold the charger firmly and pull out the battery.
NOTE:
After operation, pull out batteries from the charger
first, and then keep the batteries properly.
Overheat
standby
Charger
Flickers
Lights
Temperatures at
which the battery
can be recharged
Lights for 0.1 seconds. Does not light for 0.1
seconds. (off for 0.1 seconds)
Lights continuously
0°C – 40°C
UC18YRSL
Malfunction in the
battery or the charger
Battery overheated.
Unable to charge
(Charging will commence
when battery cools).
How to make the batteries perform longer
(1) Recharge the batteries before they become completely
exhausted.
When you feel that the power of the tool becomes
weaker, stop using the tool and recharge its battery.
If you continue to use the tool and exhaust the electric
current, the battery may be damaged and its life will
become shorter.
(2) Avoid recharging at high temperatures.
A rechargeable battery will be hot immediately after
use. If such a battery is recharged immediately after
use, its internal chemical substance will deteriorate,
and the battery life will be shortened. Leave the battery
and recharge it after it has cooled for a while.
CAUTION
䡬 When the battery charger has been continuosly used,
the battery charger will be heated, thus constituting
the cause of the failures. Once the charging has been
completed, give 15 minutes rest until the next
charging.
䡬 If the battery is recharged when it is warm due to
battery use or exposure to sunlight, the pilot lamp
map light in green.
The battery will not be recharged. In such a case, let
the battery cool before charging.
䡬 When the pilot lamp flickers in red (at 0.2-second
intervals), check for and take out any foreign objects
in the charger’s battery installation hole. If there are
no foreign objects, it is probable that the battery or
charger is malfunctioning. Take it to your authorized
Service Center.
7
Page 9

PRIOR TO OPERATION
1. Preparing and checking the work environment
Make sure that the work site meets all the conditions
laid forth in the precautions.
2. Checking the battery
Make sure that the battery is installed firmly. If it is at
all loose it could come off and cause an accident.
3. Dust produced in operation
The dust produced in normal operation may affect
the operator’s health. Either of following way is
recommended.
a) Wear a dust mask
b) Use external dust collection equipment
When using the external dust collection equipment,
connect the adapter with the hose from external dust
collection equipment. (Fig. 23)
4. Changing blades
(1) Open the lever up to the stop. (Fig. 5-arrow I)
(2) Remove fitted blade.
(3) Insert new blade up to the stop in the blade holder.
(Fig. 5-arrow II)
(4) Close the lever. (Fig. 5-arrow III)
CAUTION
䡬 Be sure to switch power OFF and disconnect the
battery from the body when changing blades.
䡬 Do not open the lever when plunger is moving.
NOTE:
䡬 Confirm the protrusions of blade inserted to the blade
holder surely. (Fig. 6)
䡬 Confirm the blade located between the groove of
roller. (Fig. 7)
5. Switch Operation (Fig. 8, 9)
䡬 The saw is provided with a lock off button on the top
of the handle to prevent the motor from being
switched on inadvertently. Pushing in the lock off
button to the locked position prevents the switch from
being pulled. Pushing in the lock off button to the
free position allows the switch to be pulled and the
motor to operate.
䡬 The number of strokes of the blade can be adjusted
to within the range of 0 to 2400 strokes/minute
depending on the amount the switch is pulled. In
addition, releasing the switch activates a break that
stops the blade immediately.
䡬 When the switch is turned on, an LED lamp lights to
illuminate the end of the blade. This lamp goes out
when the switch is released.
CAUTION
䡬 Always make sure to push in the lock off button to
the locked position when not using the saw.
䡬 Do not look directly into the light from the LED lamp.
Continuous and direct exposure to the light from the
LED lamp can injure your eyes.
6. Adjusting the orbital operation
(1) This Jig Saw employs orbital operation which moves
the blade back and forth, as well as up and down. Set
the change knob shown in Fig. 10 to “0” to eliminate
the orbital operation (the blade moves only up and
down). The orbital operation can be selected in 4 steps
from “0” to “III”.
For the hard material, such as a steel plate, etc.,
(2)
decrease the orbital operation. For the soft material,
such as lumber, plastic, etc., increase the orbital
operation to increase work efficiency. To cut the
material accurately, decrease the orbital operation.
7. Cutting stainless steel plates
This Jig Saw can cut stainless steel plates by using
No. 97 blade. Carefully read “Concerning cutting of
stainless steel plates” for proper operation.
8. Splinter guard
Using the splinter guard when cutting wood materials
will reduce splintering of cut surfaces.
Insert the splinter guard in the space on the base, and
push it completely. (See Fig. 11)
9. Chip cover
Chip cover prevents chips from flying off and
improves the efficiency of dust collector.
Insert the chip cover between the base and lever, and
push with a slight pressure until it catches in place.
(Fig. 12)
When removing chip cover, hold both sides of knob
and slightly open until it can be removed from the Jig
Saw. (Fig. 13)
NOTE:
There is a possibility that chip cover is frosted when
cutting the metal.
10. Sub base
Using the sub base (made from steel) will reduce
abrasion of aluminium base especially in cutting
metals.
Using the sub base (made from resin) will reduce
scratching of cut surface. Attach the sub base to the
bottom surface of base by attached 4 screws.
11. About Remaining Battery Indicator
When pressing the remaining battery indicator switch,
the remaining battery indicator lamp lights and the
battery remaining power can be checked. (Fig. 14)
When releasing your finger from the remaining
battery indicator switch, the remaining battery
indicator lamp goes off. The table 4 shows the state
of remaining battery indicator lamp and the battery
remaining power.
Table 4
State of lamp Battery Remaining Power
The battery remaining power
is enough.
The battery remaining power
is a half.
The battery remaining power
is nearly empty.
Re-charge the battery soonest
possible.
As the remaining battery indicator shows somewhat
differently depending on ambient temperature and
battery characteristics, read it as a reference.
NOTE:
䡬 Do not give a strong shock to the switch panel or break
it.It may lead to a trouble.
䡬 To save the battery power consumption, the
remaining battery indicator lamp lights while pressing
the remaining battery indicator switch.
8
Page 10

CUTTING
CAUTION
䡬 In order to prevent blade dislodging, damage or
excessive wear on the Plunger, please make sure to
have surface of the base plate attached to the work
piece while sawing.
䡬 At low speed do not cut a wood with a thickness of
more than 10 mm or metal with a thickness of more
than 1 mm.
1. Rectilinear cutting
When cutting on a straight line, first draw a marking
gauge line and advance the saw along that line. Using
the guide (sold separately) will make it possible to
cut accurately on a straight line.
(1) Loosen the base bolt hexagonal bar wrench attached
on base. (Fig. 15)
(2) Move the base fully forward (Fig. 16), and tighten the
base bolt again.
(3) Attach the guide by passing it through the attachment
hole on the base and tighten the M5 bolt. (Fig. 17)
(4) Set the orbital position to “0”.
NOTE:
To ensure accurate cutting when using the Guide (Fig.
17), always set the orbital position to “0”.
2. Sawing curved lines
When sawing a small circular arc, reduce the feeding
speed of the machine. If the machine is fed too fast, it
could cause the blade to break.
3. Cutting a circle or a circular arc
The guide also will be helpful for circular cutting.
After attaching the guide by same way noted as above,
drive the nail or screw into the material through the
hole on the guide, then use it for an axis when cutting.
(Fig. 18)
NOTE:
Circular cutting must be done with the blade
approximately vertical to the bottom surface of the
base.
4. Cutting metallic materials
(1) Set the orbital position to “0” or “I”.
(2) Cut the material at medium speed.
(3) Always use an appropriate cutting fluid (spindle oil,
soapy water, etc.). When a liquid cutting fluid is not
available, apply grease to the back surface of the
material to be cut.
5. Pocket cutting
(1) In lumber
Aligning the blade direction with the grain of the
wood, cut step by step until a window hole is cut in
the center of the lumber. (Fig. 19)
(2) In other materials
When cutting a window hole in materials other than
lumber, initially bore a hole with a drill or similar tool
from which to start cutting.
6. Angular cutting
The base can be swiveled to both sides by up to 45°
for angular cutting. (Fig. 20)
(1) Loosen the base bolt by hexagonal bar wrench
attached on base and move the base fully forward.
(Fig. 15, 16)
(2) Align the scale (from 0 degrees to 45 degrees by 15-
degree increments) of the semi-circular part of the
base with the [
(3) Tighten the M5 bolt again. (Fig. 15)
(4) Set the orbital position to “0”.
9
] mark on the gear cover. (Fig. 21)
NOTE:
Angular cutting can not be done when adopting chip
cover or dust collector.
CONNECTING WITH CLEANER
By connecting with cleaner (sold separately) through dust
collector (sold separately) and adapter (sold separately),
most of dust can be collected.
(1) Remove the hexagonal bar wrench from the base.
(2) Move the base fully forward. (Fig. 15, 16)
(3) Attach the chip cover.
(4) Connect the dust collector with adapter. (Fig. 22)
(5) Connect the adapter with the nose of cleaner. (Fig.
22)
(6) Insert dust collector into the rear hole of the base until
the hook catches in the notch. (Fig. 23)
(7) Press the hook to remove the dust collector.
NOTE:
Wear the dust mask additionally, if available.
CONCERNING CUTTING OF STAINLESS STEEL
PLATES
CAUTION
In order to prevent blade dislodging, damage or excessive
wear on the Plunger, please make sure to have surface
of the base plate attached to the work piece while sawing.
When cutting stainless steel plates, adjust the unit as
described below:
1. Adjust the speed
Blade
Thickness of material
No. 97 1.5 – 2.5 mm
NOTE:
The higher the speed is, the quicker the material is
cut. But the service life of the blade will be reduced in
this case. When the speed is too low, cutting will take
longer, although the service life will be prolonged.
Make adjustments as desired.
2. Set the orbital position to “0”
NOTE:
䡬 When cutting use cutting fluid (oil base cutting fluid)
to prolong the blade’s service life.
Speed
Middle speed
SELECTION OF BLADES
䡬 Accessory blades
To ensure maximum operating efficiency and results,
it is very important to select the appropriate blade
best suited to the type and thickness of the material
to be cut. Three types of blades are provided as
standard accessories. The blade number is engraved
in the vicinity of the mounting portion of each blade.
Select appropriate blades by referring to Table 5.
HOUSING THE HEXAGONAL BAR WRENCH
It is possible to house the hexagonal bar wrench on the
base. (See Fig. 24)
Page 11

MAINTENANCE AND INSPECTION
1. Inspecting the blade
Continued use of a dull or damaged blade will result
in reduced cutting efficiency and may cause
overloading of the motor. Replace the blade with a
new one as soon as excessive abrasion is noted.
2. Inspecting the mounting screws
Regularly inspect all mounting screws and ensure that
they are properly tightened. Should any of the screws
be loose, retighten them immediately. Failure to do
so could result in serious hazard.
3. Maintenance of the motor
The motor unit winding is the very “heart” of the
power tool.
Exercise due care to ensure the winding does not
become damaged and/or wet with oil or water.
4. Cleaning of the outside
When the cordless jig saw is stained, wipe with a
soft dry cloth or a cloth moistened with soapy water.
Do not use chloric solvents, gasoline or paint thinner,
as they melt plastics.
5. Storage
Store the cordless jig saw in a place in which the
temperature is less than 40°C, and out of reach of
children.
Table 5 List of appropriate blades
6. Service parts list
CAUTION
Repair, modification and inspection of HiKOKI Power
ols must be carried out by a HiKOKI Authorized
To
Service Center.
This Parts List will be helpful if presented with the
tool to the HiKOKI Authorized Service Center when
requesting repair or other maintenance.
In the operation and maintenance of power tools, the
safety regulations and standards prescribed in each
country must be observed.
MODIFICATION
HiKOKI Power Tools are constantly being improved
and modified
advancements.
Accordingly, some parts may be changed without
prior notice.
NOTE:
Due to HiKOKI's continuing program of research and
development, the specifications herein are subject to
change without prior notice.
to incorporate the latest technological
No. 1 No. 1
Material
to be cut
Lumber
Iron plate
Nonferrous
metal
Plastics
Pulp
NOTE:
䡬 The minimum cutting radius of No. 1 (Long), No. 1 (Super Long), No. 21, No. 22 and No. 41 blades is
100 mm.
Material quality Thickness of material (mm)
General lumber
Plywood
Mild steel plate
Stainless steel plate
Aluminium copper,
brass
Aluminium sash
Phenol resin, melamine, 5 ∼ Below 5 ∼ Below 5 ∼
resin, etc. 20 6 15 6 15
Vinyl chloride, 5 ∼ Below 5 ∼ Below 5 ∼ 3 ∼ 5 ∼
acryl resin, etc. 30 10 20 5 30 20 15
Foamed polyethylene, 10 ∼ 3 ∼ 5 ∼ 3 ∼ 10 ∼ 3 ∼ 5 ∼
foamed styrol 55 25 25 25 55 40 25
Card board, 10 ∼ 3 ∼ 10 ∼ 3 ∼
corrugated paper 55 25 55 40
Hardboard
Fiberboard
Blade
(Long)
(Super Long)
Below Below 10 ∼ Below 10 ∼ 5 ∼ 10 ∼
105 135 55 20 55 40 65
No. 12,
No.11
42 46
5 ∼ Below 5 ∼ 3 ∼
30 10 30 20
No. 16,
No. 15
3 ∼ Below 2 ∼ 1.5 ∼
63 510
3 ∼ Below Below
12 3 5
Height Height Height
up to up to up to
25 25 30
3 ∼ Below 3 ∼
25 6 25
No. 21 No. 22 No.41 No. 97
Below
6
123X
1.5 ∼
2.5
10
Page 12

일반적인 안전 수칙
경고!
설명서를 자세히 읽으십시오.
설명서의 내용에 따르지 않을 시에는 감전 사고나 화재가
발생할 수 있으며 심각한 부상을 입을 수도 있습니다.
아래에 나오는 ‘전동 툴’이란 용어는 플러그를 콘센트에
연결해 유선 상태로 사용하는 제품 또는 배터리를 넣어 무선
상태로 사용하는 제품을 가리킵니다.
설명서의 내용을 숙지하십시오.
1) 작업 공간
a) 작업 공간을 깨끗하게 청소하고 조명을 밝게
유지하십시오.
작업 공간이 정리되어 있지 않거나 어두우면 사고가
날 수 있습니다.
b) 인화성 액체나 기체 또는 먼지 등으로 인해 폭발
위험이 있는 환경에서는 전동 툴을 사용하지
마십시오.
전동 툴을 사용하다 보면 불꽃이 튀어서 먼지나
기체에 불이 붙을 수 있습니다.
c) 어린이를 비롯하여 사용자 외에는 작업장소에
접근하지 못하도록 하십시오.
주의가 산만해지면 문제가 생길 수 있습니다.
2) 전기 사용시 주의사항
a) 전동 툴 플러그와 콘센트가 일치해야 합니다.
플러그를 절대로 변형하지 마십시오.
접지된 전동 툴에는 어댑터 플러그를 사용하지
마십시오.
플러그를 변형하지 않고 알맞은 콘센트에 꽂아
사용하면, 감전 위험을 줄일 수 있습니다.
b) 파이프, 라디에이터, 레인지, 냉장고 등 접지된
표면에 몸이 닿지 않도록 주의하십시오.
작업자의 몸이 접지되면, 감전될 위험이 있습니다.
c) 전동 툴에 비를 맞히거나 젖은 상태로 두지 마십시오.
물이 들어가면 감전될 위험이 있습니다.
d) 코드를 조심해서 다루십시오. 전동 툴을 들거나
당기거나 콘센트에서 뽑으려고 할 때 코드를
잡아당기면 안 됩니다.
열, 기름, 날카로운 물건, 움 직이는 부품 등으로부터
코드를 보호하십시오.
코드가 파손되거나 엉키면 감전될 위험이 높아집니다.
e) 실외에서 전동 툴을 사용할 때는 실외 용도에 적합한
연장선을 사용하십시오.
실외 용도에 적합한 코드를 사용해야 감전 위험이
줄어듭니다.
3) 사용자 주의사항
a) 전동 툴을 사용할 때는 작업에 정신을 집중하고,
상식의 범위 내에서 사용하십시오.
약물을 복용하거나 알코올을 섭취한 상태 또는
피곤한 상태에서는 전동 툴을 사용하지 마십시오.
전동 툴을 사용할 때 주의가 흐트러지면 심각한
부상을 입을 수 있습니다.
b) 안전 장비를 사용하십시오. 항상 눈 보호 장구를
착용해야 합니다.
먼지 보호 마스크, 미끄럼 방지 신발, 안전모, 청각
보호 장비 등을 사용하면 부상을 줄일 수 있습니다.
c) 전동 툴이 갑자기 작동되지 않도록 합니다.
플러그를 꽂기 전에 스위치가 ‘OFF’ 위치에 있는지
확인하십시오.
손가락을 스위치에 접촉한 채 전동 툴을 들거나
스위치가 켜진 상태로 플러그를 꽂으면 사고가 날 수
있습니다.
11
d) 전원을 켜기 전에 조정 키 또는 렌치를 반드시
제거해야 합니다.
전동 툴의 회전 부위에 키 또는 렌치가 부착되어
있으면, 부상을 입을 수 있습니다.
e) 작업 대상과의 거리를 잘 조절하십시오. 알맞은
발판을 사용하고 항상 균형을 잡고 있어야 합니다.
그렇게 하면 예기치 못한 상황에서도 전동 툴을 잘
다룰 수 있습니다.
f) 알맞은 복장을 갖추십시오. 헐렁한 옷이나 장신구를
착용하면 안 됩니다. 머리카락, 옷, 장갑 등을
움직이는 부품으로부터 보호하 십시오.
헐렁한 옷이나 장신구, 긴 머리카락이 부품에 딸려
들어갈 수도 있습니다.
g) 분진 추출 및 집진 장비에 연결할 수 있는 장치가
제공되는 경우, 그러한 장치가 잘 연결되어 있고
제대로 작동하는지 확인하십시오.
이러한 장치를 사용하면, 먼지와 관련된 사고를 줄일
수 있습니다.
4) 전동 툴 사용 및 관리
a) 전동 툴을 아무 곳에나 사 용하지 마십시오. 용도에
알맞은 전동 툴을 사용하 십시오.
적절한 전동 툴을 사용하면, 정상 속도로 안전하고
효과적으로 작업을 수행할 수 있습니다.
b) 스위치를 눌렀을 때 전동 툴이 켜지거나 꺼지지
않으면 사용하지 마십시오.
스위치로 작동시킬 수 없는 전동 툴은 위험하므로,
수리를 받아야 합니다.
c) 전동 툴을 조정하거나 부속품을 바꾸거나 보관할
때는 반드시 전원에서 플러그를 빼야 합니다.
이러한 안전 조치를 취해야 전동 툴이 갑자기 켜지는
위험을 피할 수 있습니다.
d) 사용하지 않는 전동 툴은 어린이의 손이 닿지 않는
곳에 보관하고, 사용법을 잘 모르는 사람이 사용하지
못하도록 하십시오.
전동 툴은 미숙련자가 다루기에는 매우 위험한
물건입니다.
e) 전동 툴을 잘 관리하십시오. 움직이는 부품이 잘못
결합되어 있거나 꽉 끼어 움 직이지 못하게 되어 있지
않은지 점검하십시오. 또한 전동 툴의 작동에 영향을
미칠 수 있는 기타 파손이 없는지 확인하십시오.
파손된 부분이 있는 경우, 사용하기 전에
수리하십시오.
전동 툴을 제대로 관리하지 못해서 생기는 사고가
많습니다.
f) 절삭 툴 은 날카롭고 청결한 상태로 관리하십시오.
절삭 날을 날카로운 상태로 잘 관리하면, 원활하게
잘 움직이며 다루기도 훨씬 편합니다.
g) 설명서를 참조하여 전동 툴과 부속품, 툴 비트 등을
사용하십시오. 또한 작업 환 경과 수행할 작 업의
성격을 고려해서 알 맞은 종류의 전동 툴 을 선택하고,
적절한 방식으로 사용하십시오.
원래 목적과 다른 용도로 전동 툴을 사용하면 위험한
사고가 날 수 있습니다.
5) 배터리 도구 사용 및 관리
a) 배터리 팩을 삽입하기 전에 스위치가 꺼졌는지
확인하십시오.
스위치가 켜진 상태에서 배터리 팩을 전동 툴에
삽입하면 사고가 발생합니다.
b) 제조업체가 지정한 충전기로만 충전하십시오.
한 종류의 배터리 팩에 적합한 충전기는 다른 배터리
팩에 사용될 때 화재 위험을 발생시킬 수 있습니다.
c) 구체적으로 지정된 배터리 팩만 전동 툴에
사용하십시오.
다른 배터리 팩을 사용하면 부상 및 화재의 위험이
발생할 수 있습니다.
Page 13

d) 배터리 팩을 사 용하지 않을 때는 종이 클립, 동 전,
열쇠, 못, 나사와 같은 기타 금속 물체 또는 단자간
연결을 만 들어낼 수 있는 기타의 작은 금속 물체와
떨어진 곳에 놓아두십시오.
배터리 단자가 모두 단락되면 화상 또는 화재가
발생할 수 있습니다.
e) 가 혹한 조건 하에서 액체가 배터리에서 누출될 수
있습니다. 배터리 누액과 접촉하지 마십시오. 배터리
누액과 우발적으로 접촉할 경우 물로 씻으십시오.
배터리 누액이 눈에 들어갈 경우 의사의 진찰을
받으십시오.
배터리에서 누출되는 액체는 염증 또는 화상을
일으킬 수 있습니다.
6) 서비스
a) 자격을 갖춘 전문가에게 서비스를 받고, 항상 원래
부품과 동일한 것으로 교체해야 합니다.
그렇게 하면 전동 툴을 보다 안전하게 사용할 수
있습니다.
주의사항
어린이나 노약자가 가까이 오지 못하도록 하십시오.
전동 툴을 사용하지 않을 때는 어린이나 노약자의 손이 닿지
않는 곳에 보관해야 합니다.
무선 드라이버 드릴에 대한 주의사항
1. 항상 배터리를 0°C - 40°C의 온도에서 충전하십시오.
0°C보다 낮은 온도에서 충전하면 과충전되어
위험해질 수 있습니다. 배터리는 40°C보다 높은
온도에서 충전할 수 없습니다.가장 적합한 충전 온도는
20°C - 25°C입니다.
2. 배터리 한 개를 충전한 후 15분 정도 기다렸다가
다음 배터리를 충전하십시오.두 개 이상의 배터리를
연속적으로 충전하지 마십시오.
3. 충전식 배터리 연결 구멍에 이물질이 들어가지 않게
하십시오.
4. 충전식 배터리와 충전기를 절대로 분해하지 마십시오.
5. 충전식 배터리를 절대로 단락시키지 마십시오. 배터리를
단락시키면 전류가 높아져 과열됩니다. 화상을 입거나
배터리가 손상됩니다.
6. 배터리를 불속에 버리지 마십시오.
배터리가 타면 폭발할 수 있습니다.
7. 물체를 충전기 통기 홈에 넣지 마십시오.금속 물체 또는
인화물 을 충전기 통기 홈에 넣으면 감전될 위험이 있거나
충전기가 손상됩니다.
8. 수명후 배터리 수명이 실제 사용 중에 너무 짧아지면
배터리를 구입점에 즉시 갖고 오십시오. 수명을 다한
배터리는 버리지 마십시오.
9. 수명을 다한 배터리를 사용하면 충전기가 손상됩니다.
10. 공구를 저속으로 계속 사용하면 모터에 과부하가 걸려
모터 소착이 발생할 수 있습니다. 전동공구는 항상 작업
동안 톱날이 재료에 물리지 않도록 사용하십시오. 톱날
속도는 항상 부드러운 절단이 가능하도록 조절하십시오.
리튬-이온 배터리에 대한 주의사항
수명을 연장하기 위해서 리튬-이온 배터리에는 출력을
중지시키기 위한 보호 기능이 탑재되어 있습니다.
아래에서 설명한 1 과 2의 경우에, 이 제품을 사용할 때,
스위치를 잡아당기고 있을 때조차, 모터가 정지할 수
있습니다. 이것은 문제는 아니지만 보호 기능의 결과입니다.
1. 남은 배터리 전원이 모두 소모되면, 모터가 정지합니다.
그러한 경우 즉시 충전하십시오.
2. 공구에 과부하가 발생하면 모터가 정지할 수 있습니다.
이러한 경우 공구의 스위치를 놓은 후 과부하의 원인을
제거하십시오. 그런 다음 공구를 다시 사용할 수
있습니다.
또한 다음 경과 및 주의사항에 주의하십시오.
경고
배터리 누액, 발열, 연기 배출, 폭발 및 점화를 사전에
방지하려면, 다음 주의사항에 주의하십시오.
1. 부스러기와 먼지가 배터리에 뭉쳐 있지 않은지
확인하십시오.
○ 작업 중에 부스러기와 먼지가 배터리에 떨어지지 않는지
확인하십시오.
○ 작업 중에 전동 툴에 떨어지는 부스러기와 먼지가
배터리에 뭉쳐 있지 않는지 확인하십시오.
○ 부스러기와 먼지에 노출된 위치에 미사용 배터리를
보관하지 마십시오.
○ 배터리를 보관하기 전에, 배터리에 붙을 수 있는
부스러기와 먼지를 모두 제거하고 배터리를 금속 부품(
나사, 못 등)과 함께 보관하지 마십시오.
2. 못과 같은 날카로운 물체로 배터리에 구멍을 내거나,
배터리를 망치로 두들기거나, 밟거나, 던지거나 배터리에
심한 물리적 충격을 가하지 마십시오.
3. 손상되거나 변형된 듯한 배터리는 사용하지 마십시오.
4. 배터리의 음극과 양극을 반대로 맞춰 사용하지 마십시오.
5. 배터리를 전기 콘센트 또는 차량 시가 라이터 소켓에
직접 연결하지 마십시오.
6. 배터리를 지정된 목적 이외의 목적으로 사용하지
마십시오.
7. 지정된 충전 시간이 경과했는데도 배터리 충전이
완료되지 않을 경우 충전을 즉시 중지하십시오.
8. 배터리를 전자 레인지, 드라이어 또는 고압 용기 등과
같은 고온 또는 고압 기기에 넣거나 고온 또는 고압에
노출시키지 마십시오.
9. 누액 또는 악취가 감지되는 즉시 불에서 멀리
떨어지십시오.
10. 강력한 정전기가 발생하는 곳에서는 사용하지 마십시오.
11. 사용, 충전 또는 보관 중에 배터리 누액, 악취, 발열, 변색
또는 변형이 있을 경우, 또는 어떤 식으로든 비정상으로
보일 경우, 배터리를 즉시 장치 또는 배터리 충전기에서
제거한 후 사용을 중지하십시오.
주의
1. 배터리 누액이 눈에 들어갈 경우 눈을 비비지 말고
수돗물과 같은 깨끗한 물로 잘 닦은 후 즉시 의사의
진찰을 받으십시오.치료하지 않을 경우 액체가 시력
문제를 유발할 수 있습니다.
2. 액체가 피부나 옷에 묻을 경우, 즉시 수돗물과 같은
깨끗한 물로 잘 닦으십시오.
피부에 염증이 발생할 가능성이 있습니다.
3. 배터리를 처음 사용할 때 녹, 악취, 과열, 변색, 변형 및/
또는 기타의 문제가 발견될 경우, 사용하지 말고 공급자
또는 벤더에게 반품하십시오.
경고
전도성 물체가 리튬이온 배터리에 들어갈 경우 배터리는
쇼트가 되어 불이 날 수도 있습니다. 리튬이온 배터리를
보관할 때에는 아래의 원칙을 따라주세요.
○ 전도성 금속조각이나 못, 철선, 동선, 기타 와 이어 등을
케이스에 같이 넣지 마십시오.
○ 쇼트를 방지하기 위해서는 배터리를 공구에 장착해
두시거나 통기구가 안 보이게 배터리 커버로 잘
덮어주세요(도해1).
12
Page 14

사양
전동 툴
모델 CJ14DSL C J18 DS L
전압 14.4 V 18 V
최대 절단 깊이 목재 135 mm 연강 10 mm
무부하 속도 0 - 2400 /
스트로크 26 mm
최소 절단 반경 25 mm
충전식 배터리
중량
충전기
모델 UC18 YRS L
충전 전압 14.4V 18 V
중량 0.6 kg
BSL1430: 리튬 이온 14.4 V (3.0 Ah 8 셀) BSL1830: 리튬 이온 18 V (3.0 Ah 10 셀)
2.3 kg 2.4 kg
주의
배터리를 절대로 단락시키지 마십시오.
2. 배터리 설치
배터리를 음극과 양극을 확인하여 삽입하십시오(그림 2
참조).
분
충전
기본 부속품
1 직쏘 날 (No. 41) .................... 1
표 5의 사용 날 참조
CJ14DSL
(2LSCK)
CJ18DSL
(2LSCK)
CJ14DSL(NN)
CJ18DSL(NN)
기본 부속품은 예고 없이 변경됩니다.
2 육각렌치..............................1
3 작업 표면 보호대 .................... 1
4 톱밥 커버 ............................. 1
5 충전기 ...............................1
6 배터리 ................................2
7 플라스틱 케이스 ..................... 1
8 배터리 커버 ..........................1
충전기, 배터리, 플라스틱 케이스, 배터리
커버 별도
충전 직쏘을 사용하기 전에 배터리를 다음과 같이
충전하십시오.
1. 충 전기의 전원 코드를 콘센트에 연결하십시오.
전원 코드를 연결하면 충전기의 파일럿 램프가
빨간색으로 깜박입니다. (1초 간격으로)
2. 배터리를 충전기에 삽입하십시오.
배터리를 라인이 보일 때까지 충전기에 단단히
삽입하십시오(그림 3, 4 참조)
3. 충전
충전 배터리를 충전기에 삽입하면, 충전이 시작되고
파일럿 램프가 빨간색으로 계속 켜져 있습니다.
배터리가 만충전되면, 파일럿 램프가 빨간색으로
깜박입니다. (1초 간격으로) (표 1 참조)
(1) 파일럿 램프 점등 상태
파일럿 램프의 점등 상태는 충전기 또는 충전식 배터리의
상태에 따라 표 1에 나와 있는 것과 같이 표시됩니다.
옵션 부속품 (별매품)
(1) 다양한 유형의 톱날
톱날 사용은 표 5를 참조하십시오.
(2) 가이드
(3) 하부 베이스
(4) 먼지 집진기
옵션 부속품은 예고 없이 변경됩니다.
용도
○ 다양한 목재 절단 및 포켓 절단
○ 연강판, 알루미늄 판, 동판의 절단
○ 합성 수지(페놀 수지 및 염화비닐)의 절단
○ 가늘고 부드러운 건축자재의 절단
○ 스테인리스강판의 절단(No. 97 톱날 사용)
배터리 제거/설치
1. 배터리 제거
핸들을 세게 잡고 배터리 래치를 밀어 배터리를
제거하십시오(그림 2 참조).
13
Page 15
충전 전 깜박임
표 1
파일럿 램프의 점등 상태
0.5초 동안 켜집니다. 0.5초 동안 켜지지
않습니다. (0.5초 동안 꺼짐)
파일럿 램프는
빨간색으로
켜져 있거나
깜박입니다.
파일럿 램프가
녹색으로
켜집니다.
(2) 충전식 배터리의 온도에 대하여
충전식 배터리의 온도는 표 2에 나와 있는 것과 같으며,
과열된 배터리는 충전 전에 잠시 냉각시켜야 합니다.
표 2 배터리 충전 범위
충전식 배터리 배터리를 충전할 수 있는 온도
BSL1430, BSL1830, 0°C - 40°C
(3) 충전 시간에 대하여
충 전기와 배터리의 조합 에 따라 충 전 시간은 표 3에 나와
있는 것과 같이 됩니다.
표 3 충전 시간 (20°C일 때)
배터리
BSL1430, BSL1830
참고
충전 시간은 온도와 전원 전압에 따라 다를 수 있습니다.
4. 충 전기 전원 코드를 전원 콘센트에서 분리
5. 충 전기를 단단히 쥐고 배터리를 제거
참고
충전 후 먼저 배터리를 충전기에서 빼고 나서 배터리를
올바르게 보관하십시오.
배터리 수명 연장 방법
(1) 배터리를 완전히 방전되기 전에 충전하십시오.
툴의 출력이 점점 약해진다고 느낄 경우, 툴 사용을
멈추고 배터리를 충전하십시오. 툴을 계속 사용하고
전류가 모두 사용된 경우, 배터리가 손상될 수 있고
배터리 수명이 더 짧아집니다.
(2) 고온에서 충전하지 마십시오.
충전식 배터리는 사용 직후 뜨거워집니다.
그러한 배터리를 사용 직후 충전하면 내부에 들어
있는 화학물질이 열화되고 배터리 수명이 줄어듭니다.
배터리를 한 동안 냉각시킨 후 충전하십시오.
주의
○ 배터리 충전기가 연속적으로 사용된 경우, 배터리
충전기가 가열되어 고장의 원인이 될 수 있습니다. 일단
충전이 완료되면 15분 쉬었다가 충전하십시오.
충전 중 켜짐
충전 완료 깜박임
충전 불가능 깜박임
과열 대기 켜짐
충전기
UC18YRSL
계속 켜짐
0.5초 동안 켜집니다. 0.5초 동안 켜지지
않습니다. (0.5초 동안 꺼짐)
0.1초 동안 켜집니다. 0.1초 동안 켜지지
않습니다. (0.1초 동안 꺼짐) 배터리 또는 충전기의 고장
계속 켜짐
약
45
분
배터리 과열.
충전 불가능.
(배터리가 냉각되면 충전이
시작됨)
○ 배터리 사용 또는 햇빛 노출로 인해서 배터리가 따뜻할
때 배터리를 충전할 경우, 파일럿 램프가 녹색으로 켜질
수 있습니다.
배터리는 충전되지 않습니다. 그러한 경우, 배터리를
냉각시킨 후 충전하십시오.
○ 파일럿 램프가 빨간색으로 깜박일 경우(0.2초
간격으로), 충전기 배터리 설치 구멍에 이물질이 있는지
확인해 이물질을 모두 제거하십시오. 이물질이 없을
경우, 배터리 또는 충전기가 오작동 상태일 가능성이
있습니다. 공인 서비스 센터에 가져가십시오.
사용전 주의사항
1. 작업환경을 정리하고 점검하기
위의 주의사항에 작업환경이 적절한지 점검하십시오.
2. 배터리의 확인
배터리가 단단하게 장착되었는지 확인하십시오.
배터리가 헐거우면 사용 중 빠져서 사고로 이어질 수
있습니다.
3. 작 업에서 발생하는 먼지
정상 작업에서 발생하는 먼지는 작업자의 건강에 영향을
줄 수 있습니다. 다음 방법 중 하나를 권장합니다.
a) 방진 마스크 착용
b) 외부 먼지 집진 장비 사용
외부 먼지 집진 장비를 사용할 때는 결합부를 이용해
어댑터와 외부 먼지 집진 장비를 연결하십시오. (도해
23)
4. 톱날 교 체
(1) 레버를 걸릴 때까지 여십시오. (도해 5-화살표 I)
(2) 장착된 톱날을 분리하십시오.
(3) 새 톱날을 걸릴 때까지 톱날 홀더에 삽입하십시오. (도해
5-화살표 II)
(4) 레버를 닫으십시오. (도해 5-화살표 III)
주의
○ 톱날을 교체할 때는 반드시 전원을 끄고 몸체에서
배터리를 분리하십시오.
○ 플런저가 움직일 때는 레버를 열지 마십시오.
참고:
○ 톱날 홀 더에 삽 입된 톱날 돌 출 부 를 반드시 확 인하 십시 오.
(도해 6)
○ 톱날이 롤러의 홈 사이에 끼워졌는지 확인하십시오.
(도해 7)
14
Page 16

5. 스위치 조작(도해 8, 9)
○ 직쏘의 핸들 상 단부에는 모터의 우발적 기동을 방지하는
잠금 버튼이 있습니다. 잠금 버튼을 잠금 위치로 누르면
스위치를 당길 수 없습니다. 잠금 버튼을 작동 위치로
누르면 스위치를 당겨 모터를 구동할 수 있습니다.
○ 톱날 스트로크 횟수는 스위치를 당기는 정도에 따라
0~2400 스트로크/분의 범위로 조절할 수 있습니다.
또한 스 위치에서 손가 락을 떼면 톱 날 이 즉시 정지합니다.
○ 스위치가 켜져 있으면 LED 작업등이 켜져 톱날의 끝을
비춥니다. 스위치에서 손가락을 떼면 LED 작 업등이
꺼집니다.
주의
○ 직쏘를 사용하지 않을 때는 항상 잠금 버튼을 잠금
위치로 누르십시오.
○ LED 작업등을 똑바로 보지 마십시오.
눈이 LED 작업등에 지속적으로 노출되면 시력이 손상될
수 있습니다.
6. 오비탈 작업의 조정
(1) 이 직쏘는 톱날을 앞, 뒤, 아래, 위로 움직이는 오비탈
작업을 제공합니다. 도해 10에 제시한 변경 노브를“0”
으로 설정하면 오비탈 작업이 불가능해집니다(톱날을
위와 아래 로만 움 직일 수 있습 니다). 오비탈 작업 은 “ 0”
부터“III”까지 4단계로 선택할 수 있습니다.
(2) 강판 등과 같은 단단한 재료에서는 오비탈 작업 단계를
낮추십시오. 목재, 플라스틱 등과 같은 무른 재료에서는
오비탈 작업 단계를 높여 작업 효율이 높이십시오.
재료를 정확하게 절단하려면 오비탈 작업 단계를
낮추십시오.
7. 스테인리스강판의 절단
이 직 쏘 는 N o . 9 7 톱 날 을 사 용 해 스 테인 리 스 강판 을 절 단 할
수 있습니다. 올바른 작업을 위해‘스 테인리스강 판의 절단
시 주의사항’을 숙지하십시오.
8. 작업 표면 보호대
목재 절단 시 작업 표면 보호대를 사용하면 절단면의
거스러미가 줄어듭니다.
작업 표면 보호대는 베이스의 공간에 삽입하고 안으로
완전히 미십시오.(도해 11 참조)
9. 톱밥 커버
톱밥 커버는 톱밥이 튀는 것을 방지하고 먼지 집진기의
효율을 높입니다.
베이스와 레버 사이에 톱밥 커버를 삽입하고, 걸릴
때까지 살짝 미십시오.(도해 12)
톱밥 커버를 분리할 때는 노브의 양쪽을 잡고 직쏘에서
분리될 때까지 살짝 여십시오.(도해 13)
참고:
금속을 절단할 때는 톱밥 커버에 서리가 덮일 수
있습니다.
10. 하부 베이스
하부 베이스(강 재질)를 사용하면 특히 금속 절단 시
알루미늄 베이스의 마모를 줄일 수 있습니다.
하부 베이스(수지 재질)를 사용하면 절단면의 긁힘을
줄일 수 있습니다. 하부 베이스는 나사 4개를 이용해
베이스 바닥 표면에 부착하십시오.
11. 배터리 잔량 표시기
배터리 잔량 표시 스위치를 누르면 배터리 잔량 표시등이
켜져 배터리 잔량을 확인할 수 있습니다.(도해 14)
배터리 잔량 표시 스위치에서 손가락을 떼면 배터리 잔량
표시등이 꺼집니다. 표 4은 배터리 잔량 표시등의 상태
및 배터리 잔량을 보여줍니다.
표 4
램프 상태 배터리 잔량
배터리 잔량이 충분함
배터리 잔량이 절반임
배터리 잔량이 거의 없음충전이 필요함
배터리 잔량 표시기는 주변 온도 및 배터리 특성에 따라
다르게 보이므로, 배터리 잔량의 확인에 사용할 수
있습니다.
참고:
○ 스위치 패널에 강한 충격을 주거나 스위치 패널을
파손하지 마십시오. 문제가 발생할 수 있습니다.
○ 배터리 전원 소모를 방지하기 위해 배터리 잔량 표시등은
배터리 잔량 표시 스위치를 누를 경우에만 켜집니다.
절단에 대해
주의
○ 플런저에서 톱날 이탈, 손상 또는 과도한 마모를
방지하려면 작업 동안 베이스 표면을 작업물에
밀착시키십시오.
○ 두께가 10 mm 이상인 목재 또는 두께가 1 mm 이상인
금속은 저속으로 절단하지 마십시오.
1. 직선 절단
직선으로 절단할 때는 먼저 표시선을 긋고 표시선을 따라
직쏘를 전진시키십시오. 가 이드(별도 판매)를 사용하면
직선으로 정확하게 절단할 수 있습니다.
(1) 베이스에 부착된 육각 렌치로 베이스 볼트를 풉니다.
(도해 15)
(2) 베이스를 앞으로 완전히 밀고(도해 16) 베이스 볼트를
다시 조입니다.
(3) 베이스의 부착 구멍을 통과시켜 가이드를 부착하고 M5
볼트를 조입니다.(도해 17)
(4) 오비탈 위치를“0”으로 설정합니다.
참고:
가이드(도해 17) 사용 시 정확하게 절단하려면 오비탈
위치는 항상“0”으로 설정하십시오.
2. 곡 선 절단
작은 원호 등을 절단할 때는 공구의 이동 속도를
줄입니다. 공구를 너무 빨리 움직이면 톱날이 부러질 수
있습니다.
3. 원형 또는 원호 절단
가이드는 원형 절단에서도 유용합니다. 앞에 설명한
방법으로 가이드를 부착한 후, 못이나 나사를 가이드
구멍을 통과해 절단할 재료에 고정한 다음, 절단 시
축으로 사용합니다.(도해 18)
참고:
원형 절단 시 톱날은 베이스 바닥면과 거의 수직을
이루어야 합니다.
4. 금속 재료 절단
(1) 오비탈 위치를“0”또는“I”로 설정합니다.
(2) 재료를 중간 속도로 절단합니다.
(3) 항상 적절한 절단유(스핀들 오일, 비눗물 등)을
사용하십시오. 액상 절단유가 없는 경우 절단할 재료의
뒷면에 그리스를 바르십시오.
15
Page 17

5. 포켓 절단
(1) 목재에서
톱날 방향으로 목재 결에 맞추고, 목재 중앙에 창문
구멍이 생길 때까지 단계적으로 절단합니다.(도해 19)
(2) 다른 재료에서
목재 이외의 재료에서 창문 구멍을 절단할 때는 먼저
드릴이나 비슷한 공구로 절단을 시작할 부분에 구멍을
뚫습니다.
6. 각도 절단
각도 절단 시 베이스는 좌 우로 45도까지 기울기가
가능합니다.(도해 20)
(1) 베이스에 부착된 육각 렌치로 베이스 볼트를 풀고,
베이스를 앞으로 완전히 밉니다.(도해 15, 16)
(2) 베이스 반원 부분의 눈금 (0도에서 45도까지 15도씩
증분)을 기어 커버의 [
(3) M5 볼트를 다시 조입니다.(도해 15)
(4) 오비탈 위치를“0”으로 설정합니다.
참고:
각도절단시에는 톱밥커버와 집진기를 할수 없습니다.
] 표시에 맞춥니다.(도해 21)
청소기 연결
먼지 집진기(별도 판매)와 어댑터(별도 판매)를 통해
청소기(별도 판매)를 연결하면 대부분의 먼지를 흡입할 수
있습니다.
(1) 베이스에서 육각 렌치를 분리합니다.
(2) 베이스를 앞으로 완전히 밉니다.(도해 15, 16)
(3) 톱밥 커버를 부착합니다.
(4) 먼지 집진기에 어댑터를 연결합니다.(도해 22)
(5) 어댑터에 청소기의 결합부를 연결합니다.(도해 22)
(6) 후크가 노치에 걸릴 때까지 베이스의 후방 구멍에 먼지
집진기를 삽입합니다.(도해 23)
(7) 후크를 눌러 먼지 집진기를 분리합니다.
참고:
사용할 수 있는 경우 방진 마스크를 추가로 착용하십시오.
스테인리스강판의 절단 시 주의사항
주의
플런저에서 톱날 이탈, 손상 또는 과도한 마모를 방지하려면
작업 동안 베이스 표면을 작업물에 밀착시키십시오.
스테인리스강판을 절단할 때는 아래와 같이 조절하십시오.
1. 속도 조절
톱날 재료 두께 속도
No. 97
참고:
속도를 높일수록 재료가 빠르게 절단됩니다. 그러나
속도가 빠르면 톱날 수명이 단축됩니다. 속도가 너무
느리면 수명은 길어지더라도 절단 시간이 오래 걸립니다.
원하는 대로 조절하십시오.
2. 오비탈 위치를“0”으로 설정
참고:
○ 절단유(오일 기반 절단유)를 사용하면 톱날 수명이
길어집니다
1.5 – 2.5 mm
중간 속도
톱날 선택
○ 액세서리 톱날
최고의 작동 효율과 결과를 보장하기 위해서는 절단할
재료의 유형 및 두께에 최적인 톱날을 선택하는 것이
중요합니다. 표준 액세서리로 3가지 유형의 톱날을
제공합니다. 톱날 번호는 톱날의 장착부 근처에 각인되어
있습니다. 적절한 톱날은 표 5를 참조해 선택하십시오.
육각 렌치 보관
육각 렌치는 베이스에 보관할 수 있습니다.(도해 24 참조)
관리 및 검사
1. 톱날 검사
무뎌지거나 손상된 톱날을 계속 사용하면 절단 효율이
감소하고 모터에 과부하가 걸릴 수 있습니다. 톱날은
과도한 마모를 발견하는 즉시 새 것으로 교체하십시오.
2. 부착 나사 검사
정기적으 로 모든 부 착 나사를 검사 하고 잘 고정되어 있는
지 확인합 니다. 느슨한 나사가 있는 경우, 즉시 꽉 조여야
합니다. 그렇게 하지 않으면 심각한 사고가 날 수 있습니
다.
3. 모터 관리
모터부 권선은 전동 툴의‘심장부’입니다. 권선이 손상되
거나 물 또는 기름에 젖지 않도록 주의를 기울여야 합니
다.
4. 외부 청소
충전 직쏘가 더러운 경우 부드러운 마른 천이나 비눗물에
적신 천으 로 닦아내십 시오 . 플라스 틱을 녹 일 수 있으 므 로
염소계 용제, 휘발유, 페인트 시너는 절대로 사용하지
마십시오
5. 보관
드라이버 드릴을 온도가 40°C 미만이고 어린이의 손길
이 닿지 않는 곳에 보관하십시오.
6. 서비스 부품 정보
주의
HiKOKI 전동
식 HiKOKI 서비스 센터를 통해서 해야 합니다.
공식 HiKOKI 서비스 센터에 수리 또는 기타 점검을 요
청할 때 툴과 함께 부품 정보를 제공하면 도움이 됩니
다.전동 툴을 사용하거나 점검할 때는 각국의 안전 수
칙 및 규정을 준수해야 합니다.
변경
HiKOKI 전동 툴은 개선 및 수정을 통해 끊임없이 최
신 기술 발전을 반영하고 있습니다.
따라서 일부 부품(코드 번호 및/또는 디자인)은 사전 예
고 없이 변경될 수 있습니다.
참고
HiKOKI는 지속적인 연구개발 프로그램을 진행하고
있으므로, 본 설명서의 사양은 사전 예고 없이 변경될
수 있습니다.
툴의 수리, 변경 및 검사는 반드시 공
16
Page 18

표 5 적절한 톱날의 목록
절단할 재료
목재
철판
비철 금속
플라스틱
펄프
재질
일반 목재
합판
연강판
스테인리스강판
알루미늄, 구리,
황동
알루미늄 새시
페놀 수지,
멜라민 수지 등
염화비닐,
아크릴 수지 등
발포 폴리에틸렌,
발포 스티롤
판지, 골판지
하드보드
섬유판
톱날
No. 1
(Long)
105 미만135
No. 1
(Supe r Long)
미만
No.11
No. 12,
42
No. 15
No. 16,
No. 21 No. 22 No.41 No. 97 123X
46
재료 두께 (mm)
10 ~5520
미만
5 ~3010
미만
3 ~63
3 ~123
최대 높이
25
5 ~206 미만5 ~156
5 ~3010 미만5 ~205 미만5 ~303 ~
10 ~553 ~255 ~253 ~2510 ~553 ~
10 ~553 ~
25
3 ~256
10 ~555 ~4010 ~
5 ~303 ~
미만
미만
10 ~553 ~
미만
6
미만
미만
65
20
최대 높이25최대 높이
20
40
40
참고:
○ No. 1 (Long), No. 1 (Super Long), No. 21, No. 22, No. 41 톱날의 최소 절단 반경은 100 mm입니다.
2 ~51.5 ~
1.5 ~
2.5
5
미만
5 ~
15
5 ~
15
5 ~
25
3 ~
25
10
30
17
Page 19

Part Name Q’TY
Item
Part Name Q’TY
Item
1
MACHINE SCREW (W/WASHER)
M4 × 8
40 ROLLER HOLDER 1
41 PIN 1
42
43 RUBBER BUSHING 1
44 CHANGE KNOB 1
No.
No.
1 HOUSING (A).(B) SET 1
2 LED 1
45 SPRING (C) 1
8
D4 × 20
TAPPING SCREW (W/FLANGE)
3 PUSHING BUTTON 1
4 DC-SPEED CONTROL SWITCH 1
5 O-RING (P-6) 4
6
2
RETAINING RING (E-TYPE) FOR
D3 SHAFT
46 STEEL BALL D3.97 1
47 BASE 1
48 BASE LOCKER 1
49 HEX. SOCKET HD. BOLT M5 × 14 1
50 SWITCH ASS’Y 1
51
501 CHIP COVER 1
502 HEX. BAR WRENCH 4MM 1
503 TABLE INSERT 1
1
1
D3 × 8
TAPPING SCREW (W/SP. WASHER)
BRAND LABEL
7 GUARD BAR 1
8 FENCE 1
9
10
11 NAME PLATE 1
12 CONNECTOR 50091 1
13 CONTROLLER TERMINAL SET 1
15 BALL BEARING 608VVC2PS2L 1
14-1 BATTERY BSL1430 2
14-2 BATTERY BSL1830 2
504 JIG SAW BLADE NO.41 1
505 CASE 1
506 CHARGER (MODEL UC 18YRL) 1
507 BATTERY COVER 1
1
1
SEAL LOCK HEX. SOCKET HD.
BOLT M3 × 8
SEAL LOCK HEX. SOCKET HD.
16 MOTOR DC 14.4V 1
17 LEVER SPRING 1
18 LEVER 1
19 LEVER BOLT 1
20
21
BOLT M3 × 6
22 BLADE HOLDER 1
23 PIN D6 1
24 PLATE SPRING 1
25 PLUNGER HOLDER (A) 1
26 PLUNGER 1
27 RETAINING RING FOR D7 SHAFT 1
28 CONNECTING PIECE 1
29 NEEDLE BEARING 1
30 GEAR 1
31 BALANCE WEIGHT 1
1
RETAINING RING (E-TYPE) FOR
D5 SHAFT
32 ORBITAL CAM 1
33 WASHER (A) 1
34 GEAR HOLDER 1
35
36 PLUNGER HOLDER (B) 1
37 PACKING COVER 1
38 PACKING 1
39 NEEDLE ROLLER 1
18
Page 20

806
Code No. C99160951
Printed in China
 Loading...