

Page 1

Bluefang® Electronic Fence
INSTALLATION, OPERATING AND TRAINING
MANUAL
Please read this entire manual and study all illustrations before
you begin installing your system
This manual describes set up and operation of the electronic fence
functions. For operation of you Bluefang collar, please refer to the
separate collar manual included with your system.
Page 2

TX-2 BASE STATION TRANSMITTER
General Description
The Model TX-2 Base Station Transmitter contains numerous advanced
features not found on competing systems. The TX-2 emits a radio signal that
contains a special, digital code. This code must be received and recognized by
the receiver collar before the collar will administer any stimulus to your pet.
The TX-2 weather sealed and is designed for indoor or OUTDOOR use. The
many super advanced features of your TX-2 Transmitter are as follows.
System Status Display
The fully illuminated display panel gives you the complete status of your Base
Station. On the display, the left column tells you the function being
monitored. The middle and right columns tell you the status of that function.
DISPLAY FUNCTIONS:
SYSTEM: This is the overall status of your base station. If everything is functioning
normally the “OK” lamp to the right of the “SYSTEM” lamp will illuminate. If there
is any malfunction, the “FAIL” lamp will illuminate.
BATT: Back-up battery charge indicator. This indicator is only functional if there is
an optional, rechargeable back-up battery installed. When the base station is in
battery mode and the battery has a full charge, the “OK” lamp will illuminate. If
the charge is low the “LOW” lamp will illuminate indicating that the battery is
charging.
LOOP: Continuity of your boundary wire loop. The “OK” lamp indicates that there
is no break and your boundary wire is conducting current in a continuous loop. If
there is a break in your boundary wire, the “LOOP” and “BREAK” lamps will flash
and the audible alarm will sound indicating that the boundary field is not
functioning and needs repair.
POWER: This indicates the power mode, either AC or Back-up Battery. The TX-2
Base Station uses a “smart” power system. If you have the optional Back-up
Battery installed and there is a power failure, the system automatically switches to
battery mode to keep the boundary field energized and your dog contained. In this
mode all indicator lamps flash to conserve battery power. When power is
restored, the system automatically switches back to AC mode and begins
recharging the Back-up Battery. The operating time of the Back-up Battery
depends upon your field strength setting and the length of your boundary wire.
Typical installations will operate for a full day in Battery Back-up mode.
Field Strength Control
You can control the distance from the boundary wire at which the receiver collar
will begin to activate by use of the “FIELD STRENGTH CONTROL” dial. Turning the
dial clockwise increases transmitter output power and therefore, increases field
width. The maximum field width possible will depend upon your particular
installation. It is affected by the depth at which you bury the wire and the total
length of wire used. The greater the wire depth and length, the less maximum
field will be available. Generally, we recommend that you bury your boundary
2 3
Page 3

wire no more than 4 inches deep and use no more than 6,000 feet of total
boundary wire. Typical installations yield a maximum possible field width of
approximately 15 feet. We recommend that you set the Field Width for at
least 8 feet. The wider your boundary field, the more time and distance your
dog has to properly react to the system. However, if yard space is limited, the
field width can be reduced to just a few feet by turning the Field Width dial
counter-clockwise. When you vary the effective field width of your system, the
Bluefang’s unique Pulsed Proportional Stimulus System will automatically
adjust to the new field strength setting.
Power Boost Switch
This feature boosts the available output power of your transmitter for very
large areas or to overcome special environmental conditions. We recommend
that you use the TX-2 in “NOR” (normal) mode for wire lengths less than 2,000
feet. If you are using more than 2,000 feet of wire you may find the “MAX”
mode useful in increasing the maximum possible field width. In some cases,
rare environmental conditions such as a high content of iron in your soil may
reduce your field width. If you find your system does not achieve acceptable
field width in your particular installation, using the “MAX” setting, even for
smaller areas, may overcome the
problem.
Quick Connect Wire Terminals
At the bottom of the Base Station Transmitter you will find a hinged door
which gives you access to two quick connect wire terminals. The boundary
wire easily plugs into these terminals by simply depressing the tab and
inserting the wire end. The wire should be stripped by ¼ inch at the end
before insertion. No other preparation is required.
Optional Rechargeable Back-up Battery
One of the unique features of your TX-2 is the optional, rechargeable back-up
battery. The rechargeable battery unit is sold separately. Use of the back-up
battery will insure that your Bluefang system continues to contain your dog
during a power outage. When power is restored, the system will automatically
recharge the battery so, you never have to worry about changing batteries.
The back-up battery option is available from the retailer
from whom you purchased your Bluefang system and is also available online
at www.hitecpet.com. If you choose not to purchase the Back-up Battery
option your system will work perfectly with the AC adapter as long as you
have uninterrupted household wall current
available.
Boundary Wire
Even the boundary wire used on you Bluefang system is unique. The copper
alloy wire and insulating coating are all made specially to our custom
specifications. We have designed it to be an efficient radio frequency
broadcast conductor, with a mechanically strong core and an extra thick,
extra tough, outdoor grade insulation that resists sunlight and moisture. If
you need to expand your boundary field, it is acceptable to purchase
standard 18 or 20 gauge “hardware store” quality wire. However, we
recommend that you use our custom wire to insure the best quality and
performance at the best value pricing. Boundary extension kits are available
from www.hitecpet.com and contain a 500 foot spool of wire, 50 extra
boundary flags and 2 improved waterproof wire splices. To locate the item
go to www.hitecpet.com and search on “Wire Flag Kit”.
STEP BY STEP INSTALLATION
STEP 1: Plan Your System Layout
This is the most important step. Be sure to take the time to plan carefully.
This will avoid time consuming corrections to your installation. Before
beginning installation of your system we recommend you make an aerial
sketch of your yard such as the one shown in Figure 6. Your sketch should
include all buildings, large plants, trees, walks, driveway, pool and other
important details. Then sketch in where you plan to place the boundary wire.
Make sure the wire makes a continuous loop.
SAFETY TIP:
Since you will only be burying the cable 4 inches deep at maximum, it is
unlikely that you will disturb power or phone lines. Still, we recommend that
you contact your utility companies to find out the location of all buried wires,
mark them on your sketch and avoid running the boundary cable in these
areas.
4 5
Page 4
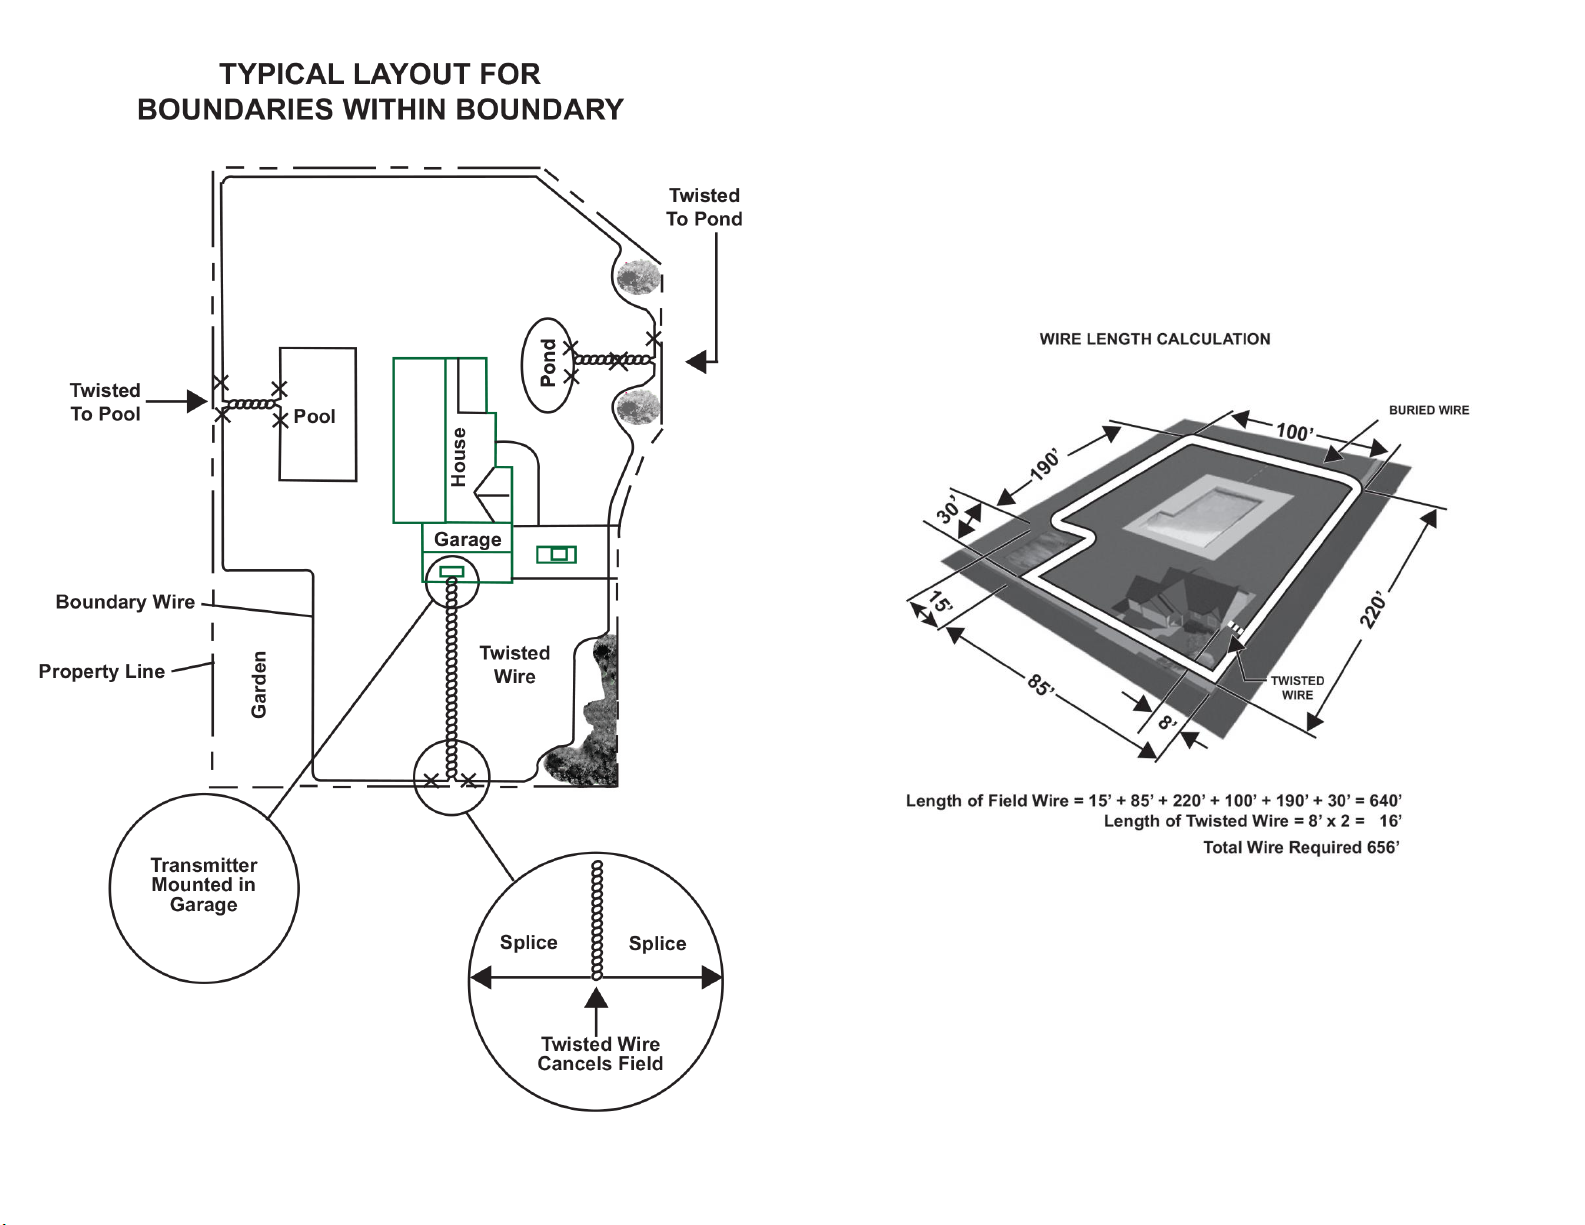
Calculate the total length of wire required to ensure that you have enough to
complete the installation. Remember that twisted wire counts as twice its
length since there are two strands. Figure 7 shows a basic wire length
calculation. In preparing your layout, note that you will need to allow for a field
width of at least 3 feet (preferably 6 – 10 ft.) on each side of the boundary
wire. Your dog will need at least another 5 to 10 ft. for a safe roaming area.
Avoid making passageways too narrow or your dog may be hesitant to use
them.
For the system to work properly, the wire must make a continuous loop. The
signal is transmitted from one terminal of the transmitter through the wire and
back to the other terminal. Twisting two adjacent sections of the wire loop
cancels the signal along the twisted length. So use the twisted wire from the
transmitter out to the exterior loop as shown in Figure 8. This allows the dog to
cross the area without receiving a correction. Use other lengths of twisted wire
to connect smaller boundaries around plants, pools and other pet restricted
areas.
6 7
Page 5
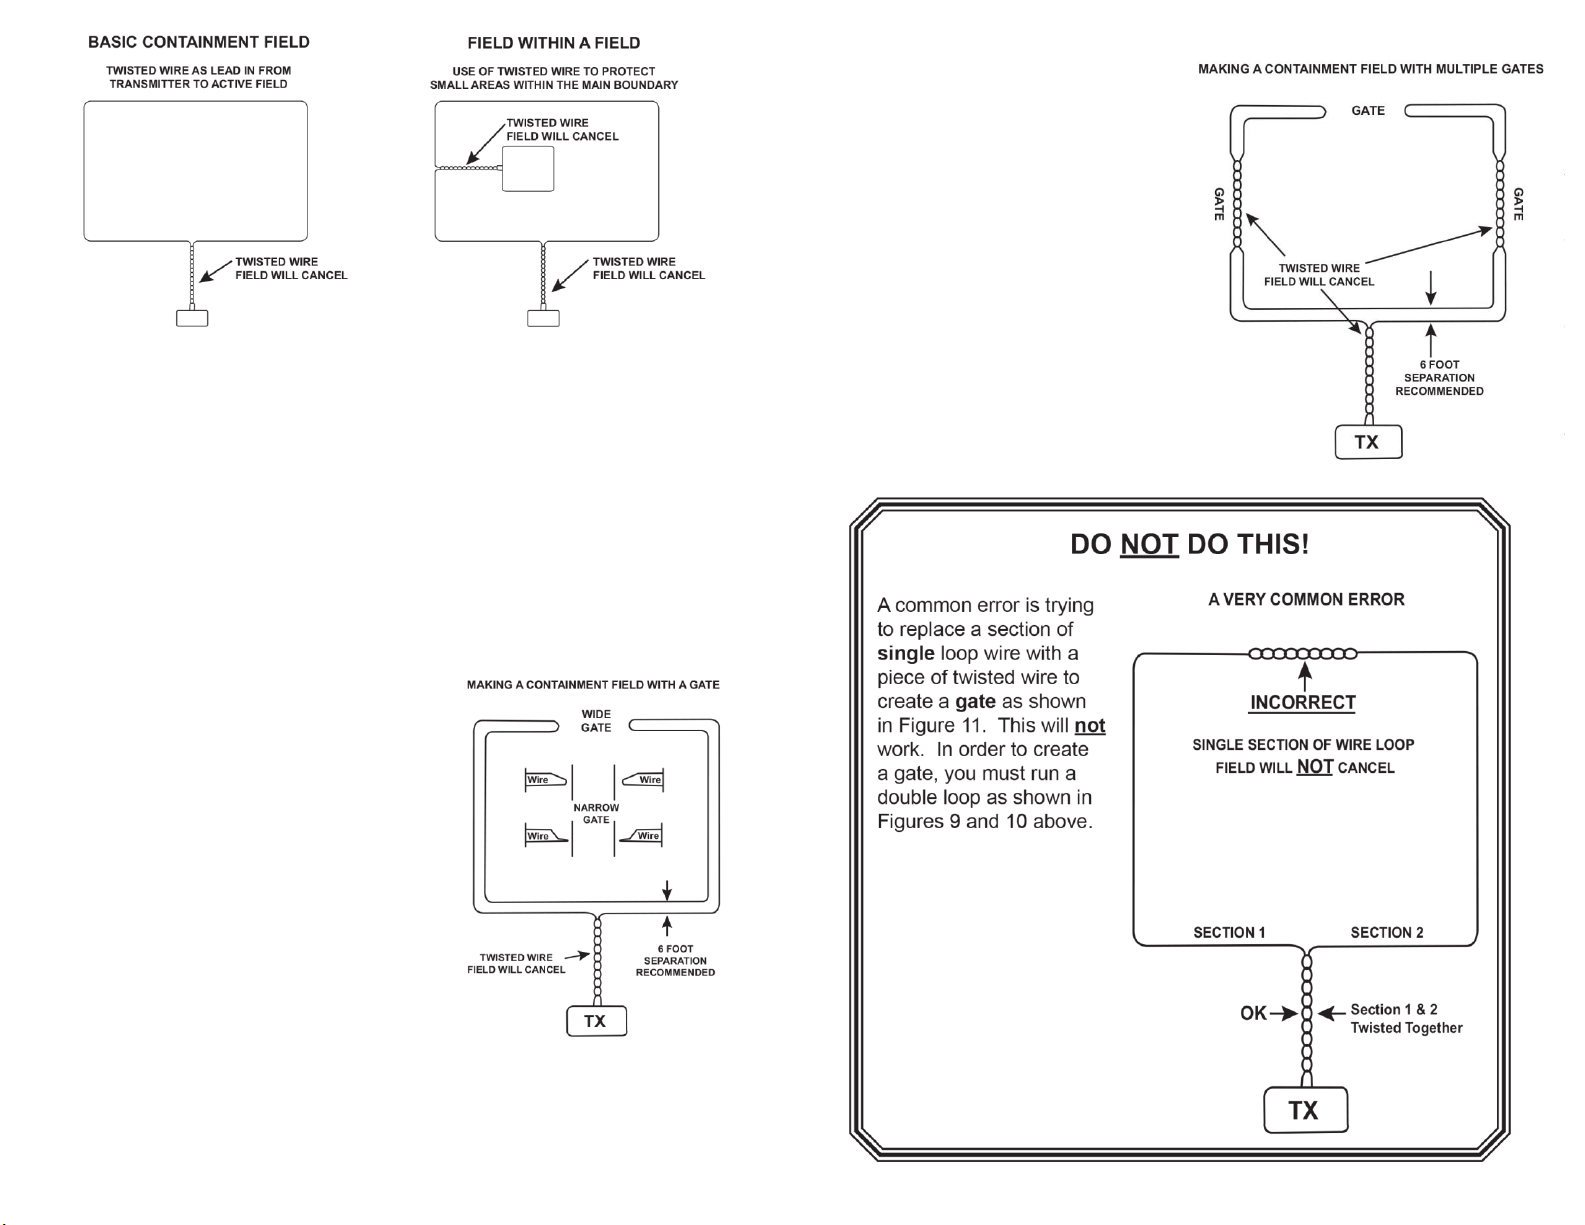
Single Loop Limitations
Note however that the basic single loop containment layouts shown in Figure 8,
cannot have a gate or opening in the fence where the dog can walk or be
transported out of the loop. To let the dog out of the basic containment field,
you must turn off the base transmitter, or interrupt the electrical signal flowing
through the wire by inserting a switch in the loop. Using a switch in the loop
creates a break in the wire which will be detected by the base transmitter and
will result in an audible alarm as long as the switch is open. However it does
work and the dog will learn that the sound of the alarm means the containment
field is off.
Adding a GATE
If you want a permanent opening or
gate in the containment field, you must
use what is commonly called a double
loop. Carefully follow the current
around the wiring and you will realize
that this layout is actually still a single
loop of wire that is folded back upon
itself. If the gate is narrow, you may
have to reduce the boundary field next
to the gate. It is important to have the
inside and outside wires separated by
at least 6 feet all around the
containment. Using less wire
separation reduces the field strength
and requires the dog to be closer to the
wire before receiving a correction.
Once you have chosen to use the
“double loop” layout, you can place
as many other openings/gates in
the boundary field as you wish by
twisting the inner and outer wires
together, or simply bringing the
two wires together tightly.
TIP: The amount of twist and the
direction of the twist is of little
importance, as long as the wires
are touching each other along the
entire “gate” section.
Whatever wire separation you choose, maintain a consistent separation
between the inside and outside wires to insure a consistent correction
distance.
8 9
Page 6
Set Up the Base Station Transmitter
Assemble the Required Tools
Here is the list of tools you will need.
1. Straight edge spade or power edger
2. Wire cutter/stripper
3. Power drill with 1/8” drill bit
4. Phillips screwdriver or Phillips driver bit for your drill
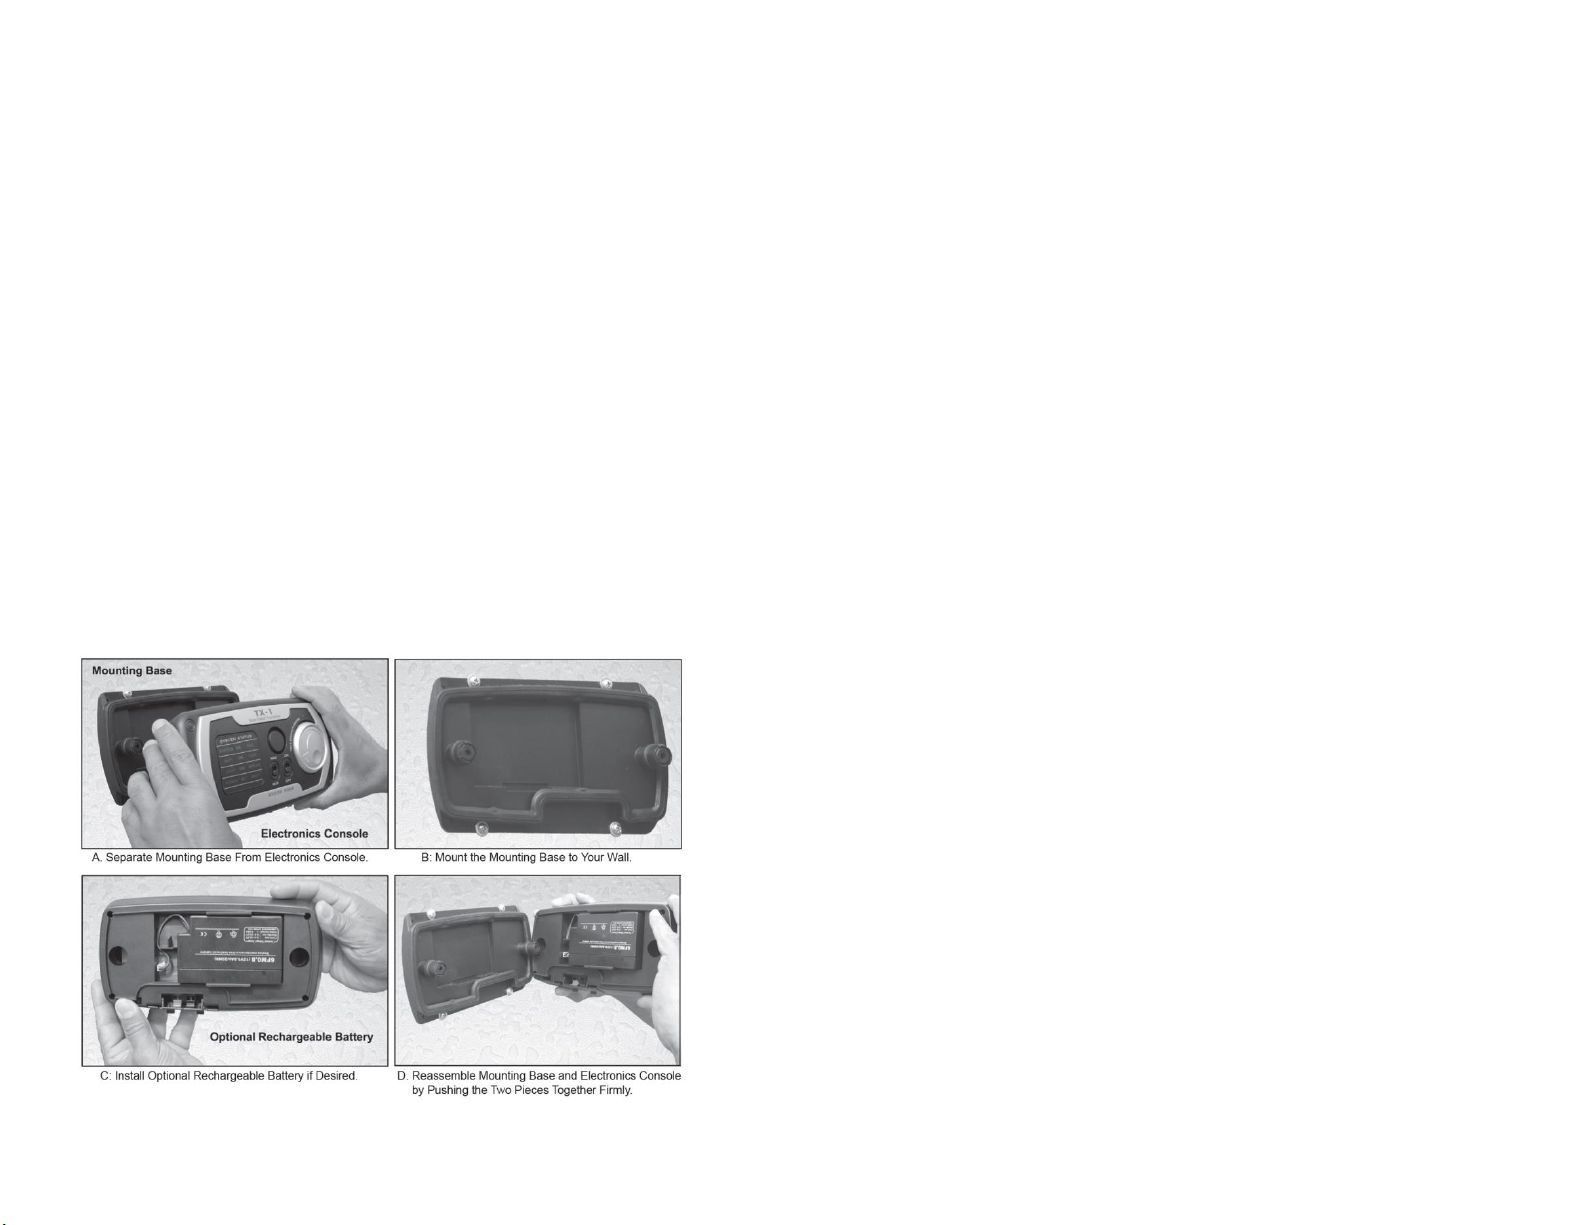
The TX-2 casing is assembled in two parts, the mounting base and the
electronics console. In the package, they are assembled together. You must first
separate the mounting base from the console. This is easily done by simply
pulling them apart. Hold the mounting base in one hand and the console in the
other and firmly pull apart. The snap closures will separate. Using the four
mounting screws provided, mount the Mounting Base in its desired location. If
you have purchased the optional back-up battery, install it in the back of the
electronics console by plugging in the connector and snapping the battery into
place. If you did not purchase the back-up battery it is easy to install it at a later
date should you choose to do so.
Mounting:
Indoor mounting of the TX-2 Base Station Transmitter is preferred.
However, if your layout prohibits indoor mounting, it is acceptable to
mount the TX-2 outdoors. Although the casing is water-sealed, you
should still choose a location that is not directly exposed to rain, wind
and other adverse weather.
AC Adapter: Plug the 16 VDC adapter into a standard 115 Volt outlet and
connect the DC plug into the receptacle on the lower right of the Base Station
Transmitter.
Test The Receiver Collar Radio Function
You should test the receiver by installing a 24 inch long test loop of wire
across the quick connect cable terminals. Set the Power Boost switch
to normal (NOR) and switch on the Base Station Transmitter. Bring the
receiver close to your test loop. A beeping sound emitted by the receiver
collar indicates the system is working properly. Note that with such a short
loop the range will only be a few inches.
Prepare Twisted Wire Lengths First
Prepare the twisted lengths of wire. From your system layout sketch,
determine the length required for each twisted pair. Cut two equal lengths
of wire for each required twisted pair. With the pair of wires side by side,
put one end of each wire in a power drill and spin the wires until there is
approximately one twist per inch of wire. Do not over-twist because this
could damage the wire. Repeat for each required pair.
Layout the Boundary Wire Above Ground
Before burying your boundary wire, we recommend that you run the
complete loop of wire, make all connections and use the receiver collar to
fully test the system with the wire above ground. Referring to the sketch you
made of your system layout, run and connect the wire loop above ground,
connect it to the Transmitter Base Station.
Installation Tip: Leave a little (about 15 inches) slack in the wire
periodically along the perimeter and at the corners of the layout so you
have a little extra wire when needed to repair a break in the loop. Wind
the 15 inch slack into a 5 inch diameter coil and bury it with the wire.
Choose locations for the slack that are easily identified by a terrain
feature and make a map of them.
10 11
Page 7
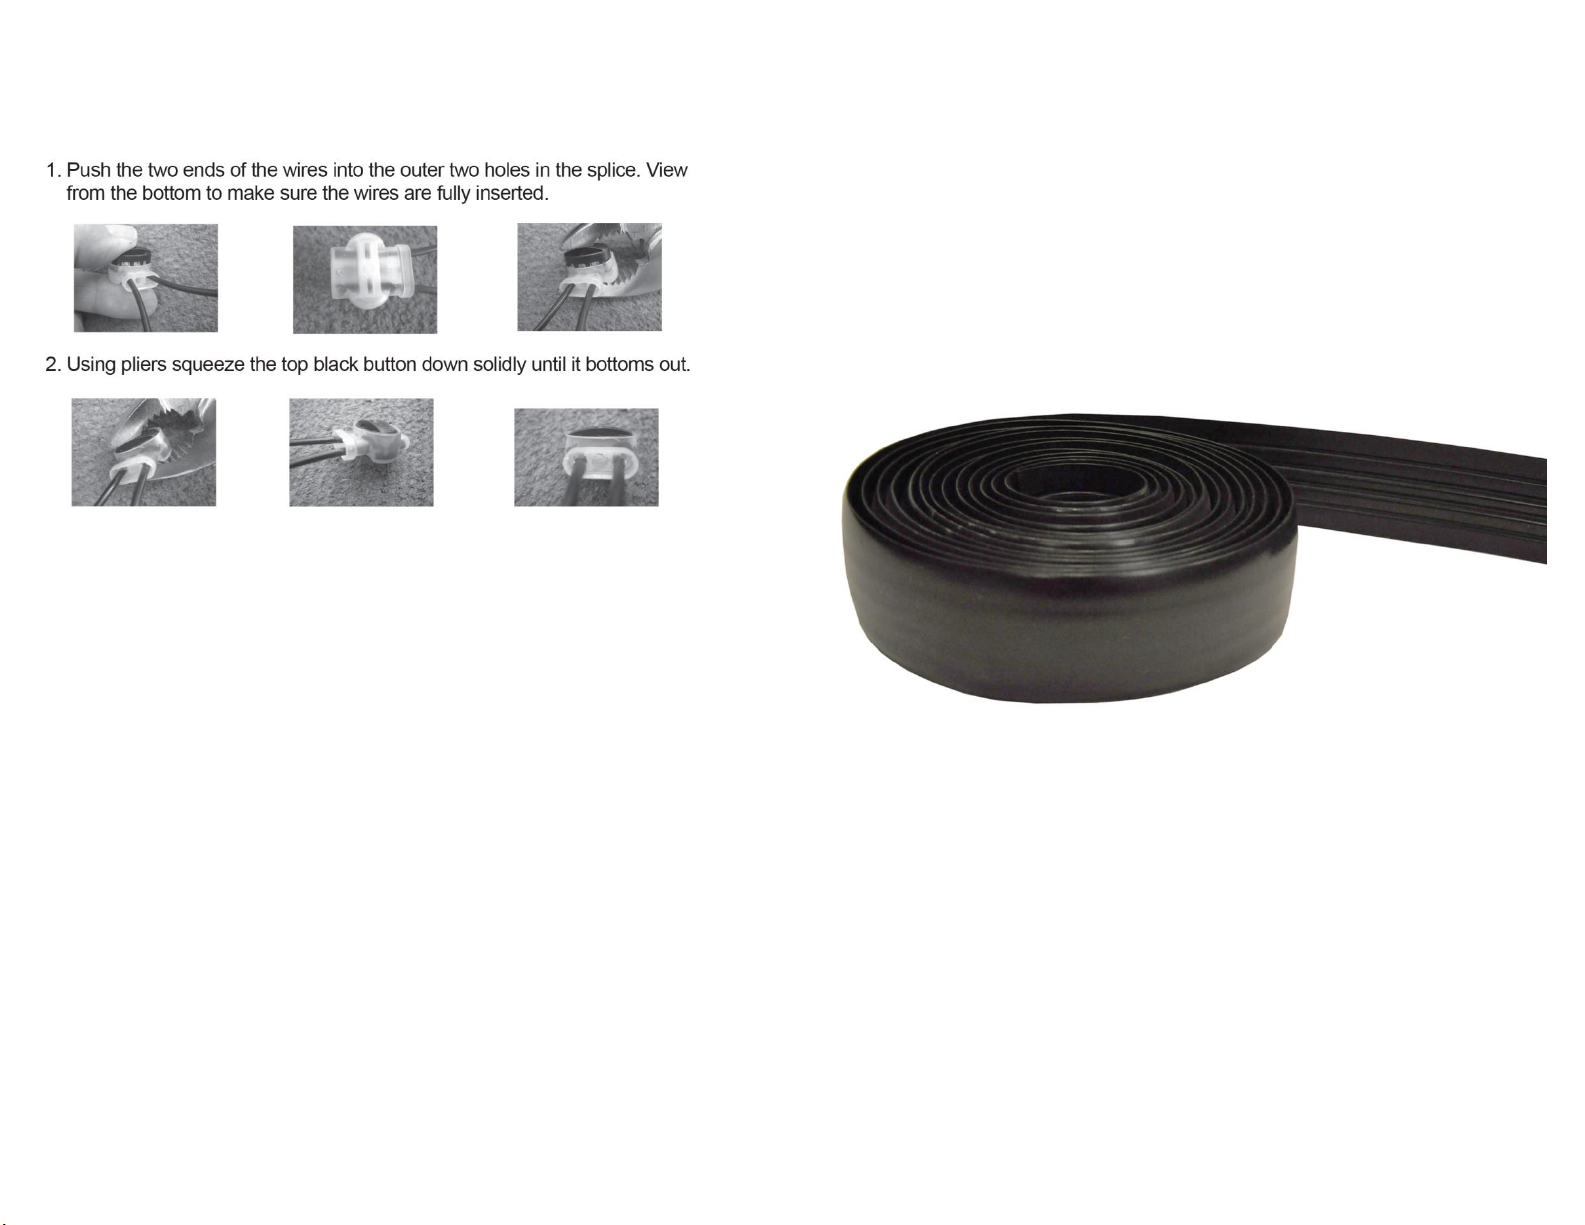
Splicing the Boundary Wire: You may find the included improved waterproof
wire splices useful in connecting individual lengths of wire or twisted wire. To
use these connectors: Additional splices are available from ww.hightechpet.com
Test Your System
Switch the Base Station Transmitter ON. Take your Receiver Collar and walk the
entire boundary ensuring that the collar continues to beep along the entire
perimeter. Also check the lengths of twisted wire to make sure that the field is
inactive in the areas where they are used. If the collar picks up a signal from the
twisted length, the basic layout is probably incorrect – review the discussion of
single and double loop layouts. If you are using a single loop layout, twisted wire
can only be used at the base station, or at the feed from the primary loop to
another primary loop (example: small loop within a large loop).
Bury the Boundary Wire
You do not have to bury the wire for the Humane Contain System to operate
however, for protection of the wire, we recommend that you bury it at least 2
inches, and no more than 4 inches deep. Using a flat spade or rotary blade power
lawn edger, make a narrow trough around the path of the loop. Using gradual
turns at the corners will produce a more consistent signal field. Because of its
advanced digital electronics, stray radio signals are unlikely to cause false
activation of the collar. However, we recommend that you stay at least six feet
away from electrical, telephone, cable TV and other buried wires. These can
cause attenuation or dead spots in your field. Large metal objects may create
reflected signals from the boundary wire itself. You should avoid running the wire
near such structures. If your neighbor has an electronic dog fence you should bury
the wire at least ten feet away.
12 13
Crossing a Driveway or Walk
When crossing a driveway or sidewalk, you may be able to find an
expansion joint into which you can place the wire. Remove any calking
material in the joint, place the wire and re-caulk. If an expansion joint is not
available, you can make a ½ inch deep narrow slit across the drive or walk
using a circular power saw and masonry blade. Place the wire in the slit and
seal with outdoor silicone caulk of matching color. Use asphalt sealant for
asphalt driveways. Another option is High Tech Pet’s new optional Driveway
Traverse Strip, which easily crosses driveways and walks with your
electronic fence wire. This durable rubber slit attractively covers and protects
the pet fence wire. You can drive over it, walk over it, even mow over it
with no damage to the underlying boundary wire. Made of super durable
elastomer, that will last years and years, it takes only minutes to install.
To order, go to http://www.hitecpet.com/dts-1.html or from our main page
www.HighTechPet.com search “Driveway Crossing Strip”.
Crossing Gravel
When crossing gravel, run the wire through a hose or PVC pipe and then bury
at least three inches deep.
Crossing Water
To cross a stream or body of water, run the wire through a hose or PVC
pipe. Anchor each end using large rocks or other stationary objects.
Place the Boundary Flags
Boundary flags are provided so that your pet can easily see the boundary
perimeter. This is especially important during training. Flags should be placed
along the entire perimeter spaced no more than ten feet apart. Using a fully
matching color. Use asphalt sealant for asphalt driveways.
Page 8

Training your dog will require use of a separate restraining collar and short
training lead. Do not use the Bluefang collar as a restraining collar. Structure
your training program to three, fifteen-minute sessions per day, EVERY DAY
until your dog is fully trained. Stick to this program consistently but, do not
train for more that fifteen minutes at a time or you risk losing your dog’s
attention and the training becoming counter productive. Remember that the
most important elements in teaching a behavior are consistency and
repetition.
STAGE 1 TRAINING
Stage 1 training takes place in the outer edge of the boundary field.
A. Choose a Command: You should choose a specific verbal command to
instruct your dog to retreat, such as “Retreat,” “Back” or “Home.” Use this
command exclusively and consistently throughout the training. B. With
boundary flags in place, field fully operational and a fully charged Receiver
Collar on your dog, use the training lead to escort your dog into the outer edge
of the boundary field. When you hear the beeping tone, utter the retreat
command while firmly tugging on the lead and lead your dog into the safe
zone. Use encouraging words such as, “Good Dog!” Praise and pet your dog.
You may also wish to give your dog a food treat. C. Repeat this stage for fifteen
minutes each session until your pet instinctively and immediately retreats the
moment the training tone is heard.
STAGE 2 TRAINING
In Stage 2 training you will lead your pet right up to a boundary flag introducing
the most rapid pulse rate stimulus. As unpleasant as this stage may seem, it is
extremely important that you teach your pet how to react to the intense
stimulus. Otherwise, your dog may become confused and cower in the
correction field or instinctively run the wrong way through the field. Bear in
mind that you do not want to let your dog in on the knowledge that the
stimulus field is only a few feet wide. Let him think it continues forever.
A. With the training lead tightly in hand, escort your dog right up to the
boundary flag where the stimulus will be most intense.
B. The instant your dog reacts, utter the retreat command and escort your
dog into the safe zone. Use encouraging words, praise and pet your dog
and give the animal a treat as before.
C. Repeat this stage for fifteen minutes, three times per day until there is no
doubt that your dog has “Got it,” observing your dog’s resistance to
entering the boundary field or trying to retreat before the stimulus is
received. These are good signs.
14 15
D. Observe your pet: Once you are certain that your pet will INSTINCTIVELY
retreat at the first training tone, allow the animal to roam freely and observe
his behavior. Make sure that you see him stop at the boundary flags on his
own. If your dog shows the slightest sign of confusion or stubborn behavior,
continue the training program using the lead. It’s okay to return to Stage 1
training if you think it is appropriate.
IMPORTANT CAUTION NOTICES
Dogs are Unpredictable: Because individual dogs have unique temperaments,
there is no way of knowing how your dog will react to its introduction to the
training program. For your safety and your dog’s, initial training must take place
using a training lead so that you keep complete control over the situation. Also
realize that an aggressive animal could turn against the handler upon receiving
the shock stimulus. Therefore, if you feel your dog has an aggressive behavior or
has ever exhibited evidence of such behavior, we strongly suggest that you
consult a certified animal behaviorist before using this product as a training aid.
Skin Conditions: A small percentage of dogs may experience a skin condition
called pressure necrosis, caused by the pressure of the two probes against the
same place on the dog’s neck for an extended period of time. This condition
causes an infection, creating irritation and sores. We recommend you check your
dog’s neck often to ensure that no such condition is evident. If your dog has a
history of sensitive skin, eczema, skin allergies or rashes we recommend that
you do not use an electronic fence collar to contain an animal. If you do observe
a skin irritation, take your dog to a veterinarian who may prescribe a local
ointment to clear up the condition. Bear in mind that it is not possible for the
shock stimulus emitted by the Bluefang to directly damage your pet’s skin. The
electrical current output is simply too low to cause burning, or any other type of
cellular, skin or organ damage. The stimulus excites nerve receptors only.
Neurological Conditions: In extremely rare cases, animals may have neurological
disorders such as epilepsy. You should be certain that your dog does not suffer
from such a disease before using any type of sonic, or shock stimulus training
collar. Also, make sure that your dog does not suffer from heart disease or any
other chronic condition and be assured that your pet is in generally good health
before using this product.
Your Bluefang electronic dog fence is the best made electronic fence you can
buy and it’s covered by the best warranty. If anything goes wrong with your
product within one year of purchase, you may return it to us for a free
replacement. For customer support, where you can get product information,
warranty support, tech support and order accessories, visit:
www.hightechpet.com or call us at 1-800-255-1279
Page 9

Exclusive: Pulsed Proportional Stimulus
The unique corrective stimulus used by your High Tech Pet electronic fence
system is delivered in short, intense pulses, not a continuous shock. The pulsed
stimulus gives your dog a chance to think and avoids sending the animal into
panic. As your dog first comes within the outermost boundary area, a slow
beeping tone is sounded and a short duration shock pulse is applied at a slow
pulse rate. This first pulse is a FULL VOLTAGE stimulus but, it is of very SHORT
DURATION. It will immediately get your dog’s attention but, it is so short that
your dog will probably not perceive it as painful. If, instead of retreating, your
dog continues to travel closer to the boundary, the shock pulse RATE continues
to increase along with an increasing rate of sound pulses, until they are
delivered in such rapid succession as to be unbearable to your pet, encouraging
retreat from the boundary into the “safe haven” of your yard. The use of
progressively increasing shock pulse rate is a very humane technique because it
allows your pet to decide for itself how much stimulus is required to initiate the
retreat behavior. (Note that some competing systems use a “tone only” warning
zone before applying shock. This sounds like a good idea, but we have found it
to be ineffective. Often the dog will stand in the warning zone waiting for the
tone to stop. The tone will drain the battery and stop when the battery runs
down, letting the animal know it is now safe to escape!) The Bluefang electronic
fence is not a zone type system. We apply a short shock stimulus at the very
first correction along with the sound stimulus. This will discourage your dog
from standing in the boundary field waiting for the tone to stop. However,
because we use pulsed stimulus, the initial shock will not be traumatic to your
pet. If your dog tries to move forward, pulse rate is immediately increased to
encourage retreat behavior.
Personal Support available at
1-800-255-1279
 Loading...