

High Street TV StarTastic MAX Instruction Manual
ALL-IN-ONE LED PROJECTOR
Instruction Manual
Distributed by: High Street TV,
PO Box 724, Altrincham, WA15 5BJ
Please read all instructions carefully and retain for future reference.
www.highstreettv.com
All rights reserved. Made in China.
Please read all instructions prior to use and save instructions for future reference.
IMPORTANT SAFETY INSTRUCTIONS:
Before using the electrical appliance, these basic
precautions should always be followed:
1. This unit is not intended for use by individuals (including
children) with reduced physical, sensory or mental
capabilities, or lack of experience and knowledge, unless
they have been given supervision or instruction concerning the use of the unit by a person responsible
for their safety. Children should be supervised to ensure that they do not play with the unit.
2. Do not operate the LED projector if the cord or plug is damaged.
3. Do not operate the LED projector if it has been damaged in any way.
4. To reduce the risk of electric shock, unplug the LED projector from the outlet when not in use.
5. Do not intentionally shine into eyes or face.
6. Do not attempt to open the housing of LED light under any circumstance.
7. Do not use near infants/cribs and keep away from children.
REMOTE CONTROL BATTERY PLACEMENT:
1. Remove the battery compartment cover.
2. Install 2 AAA batteries. Ensure the battery is installed correctly with regard to polarity (+ and -).
PAIR REMOTE TO UNIT:
1. To pair the unit and remote control, turn on the power of the remote control first.
2. Next, turn on the power of the unit, wait for 20 seconds.
TURNING UNIT ON/OFF:
Press Power button to turn the unit ON; press again to turn the unit OFF.
USING REMOTE CONTROL:
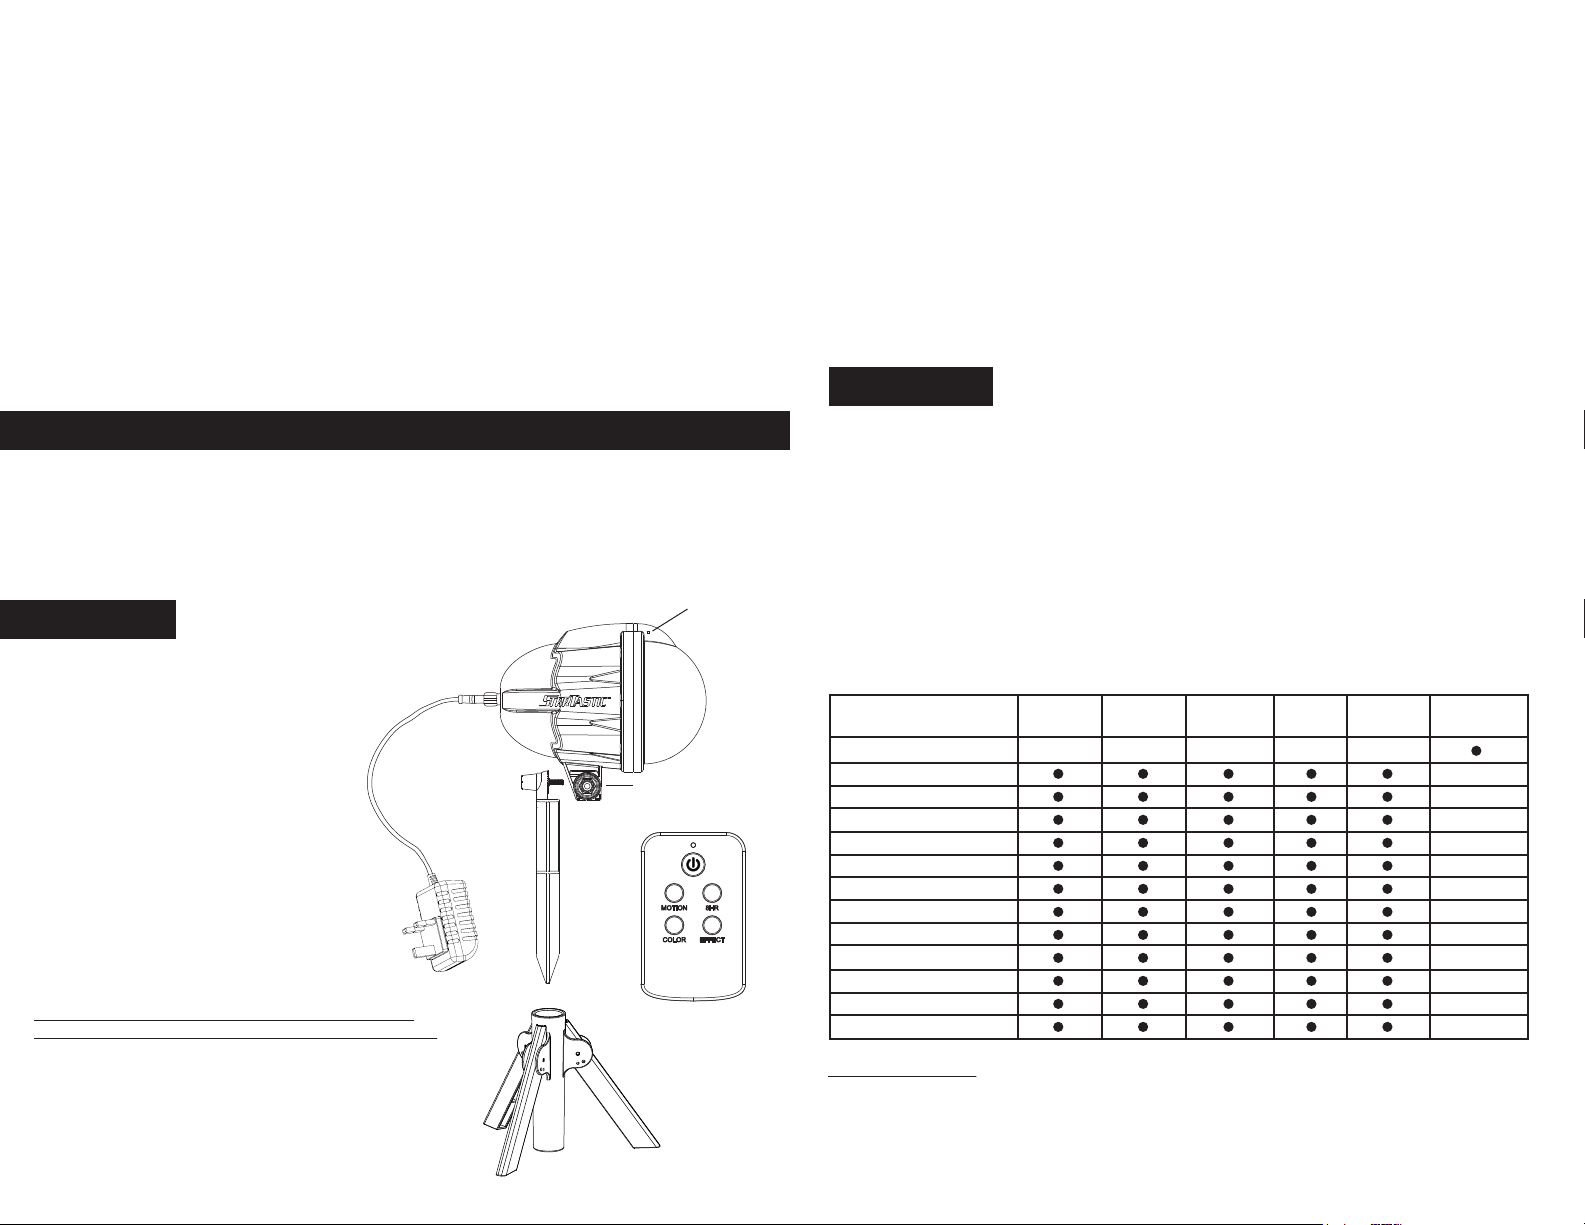
1. The remote has four buttons. See Main Diagram.
2. Press MOTION once for Motion. To turn the Motion off, press MOTION twice.
3. Change light color by pressing COLOR button on remote until you reach the desired color.
4. Press 8H for 8 hours timer setting.
5. Press EFFECT for 5 selections: Twinkle, Steady Ray, Shimmer, Dazzle, Vibrant, Mixed Lightshow.
INCLUDES:
Main unit, remote control, adapter, tripod, stake, 10M extension cable
SELECT THE LOCATION FOR STARTASTIC MAX
When picking the location, keep in mind that there should be no visual obstructions between the Startastic
unit and the surface where the projection will show. This will ensure best results. Projection coverage - approx.
50 feet (when used from 20 feet away). When using outdoors always plug into waterproof outlet.
CAUTION – TO REDUCE THE RISK OF FIRE AND ELECTRIC SHOCK:
• Do not install on trees having needles, leaves or branch coverings of metal or materials which look like metal.
• Do not mount or support wires in a manner that can cut or damage wire insulation.
ASSEMBLY
ATTENTION: Startastic MAX projector is intended to
operate in temperatures from -35°C to 37°C.
At or below freezing temperature, it may take approx.
10 min to warm up and reach its full projection strength.
1.
Locate the curved piece on the top part of the
stake. Hold the stake so that its angled piece is
pointing directly at the surface for Startastic MAX.
Insert the stake into the ground.
insert the pointy end deep enough for unit’s stability.
2. Insert the adjustment screw of the stake into the
other side of the Connector opening. Hold the nut
in place with one hand, while turning the knob
clockwise to tighten. See Main Diagram.
3. Loosen the knob to adjust the angle (up or down) of
Startastic MAX. Tighten the knob to secure the position.
4. Run the extension cord to Startastic MAX. Connect
to the unit’s plug. You should use the waterproof
outdoor electrical outlet to connect to AC adapter.
5. IMPORTANT: Please note the unit will only turn on
in the dark due to the internal
When on, Startastic MAX will appear brightest in complete
darkness,
and will appear dimmer in areas with additional
light sources.
6. Startastic MAX operates with remote control ONLY.
7. Please use the stake for outdoor use.
For indoor use, insert the stake into the tripod.
Make sure you
Dusk-to-dawn Auto Sensor
PLUG
KNOB
STAKE
ADAPTER
.
DUSK-TO-DAWN
SENSOR
PROJECTION
DOME
ANGLE
ADJUSTER
REMOTE CONTROL
TRIPOD
FOR INDOOR USE
USAGE
IMPORTANT: The Startastic MAX has an internal Dusk-to-dawn Auto Sensor so the unit will only work
in the dark and will automatically shut off in daylight.
Note: The effective operating distance of the remote is 50 feet (15 metres).
1. Press Power button on the remote control to turn the unit ON. Startastic MAX keeps the last light
pattern displayed. It will change to multicolored light after a few seconds.
2. To select a specific color, cycle through the settings using the remote control.
3. When using the remote to turn ON your unit, there may be up to a 1-2 seconds delay before
the light pattern starts working.
4. To change light patterns, it is recommended to wait 1-2 seconds each time after pressing the
function button until you reach the desired pattern.
5. If for any reason there is no communication between the remote (transmitter) and the Startastic
Max, reset by pressing the ON/OFF button to turn it off and then press it again to turn it back on.
6. If a power interruption should occur, the system’s memory keeps the last light pattern displayed.
PROGRAM THEME
1 Mixed light show
2 Red
3 Green
4 Blue
5 Red/Red/Green
6 Red/Red/Blue
7 Blue/Blue/Green
8 Red/Blue/Green
9 White
10 White/Red
11 White/Blue
12 White/Green
13 Red/White/Blue
SPECIFICATIONS:
TWINKLE SHIMMER DAZZLE
STEADY
RAY
VIBRANT
Operation: Outdoor/Indoor
Maximum LED Power: 1W LED*1 3W LED*3
AC Adapter Power Input: 100-240VAC 50/60Hz Output: DC 3.8V 1000mA
Operating Temperature: -35°C to 37°C
Projection Coverage: 50 feet wide (distance)
Remote Control: 2 x AAA Batteries
MIXED
LIGHTSHOW
 Loading...