

HighPoint SSD7110 Service Manual

SSD7110
Hybrid Connectivity – M.2 + SAS/SATA Ports, All-in
one RAID Controller
User Guide
V1.01
1

Table of Contents
System Requirements .................................................................................................................................................. 3
SSD7101A Hardware ................................................................................................................................................... 3
NVMe Drive Installation:............................................................................................................................................ 4
Setting up the SSD7110 for a Windows operating system ........................................................................................ 7
Using the HighPoint RAID Manager ......................................................................................................................... 8
Starting the HighPoint RAID Manager ................................................................................................. 8
Verify the Controller Status .................................................................................................................. 9
Manage the RAID Controller ................................................................................................................ 9
Creating an Array ................................................................................................................................ 10
Adding Spare Disks ............................................................................................................................ 14
Obtaining Logical Device Information ............................................................................................... 16
Array Information &Maintenance Options: Normal Status ................................................................ 17
Array Information & Maintenance Options: Critical Status ............................................................... 18
Array Information & Maintenance Options: Disabled Status ............................................................. 19
Expanding an Existing Array .............................................................................................................. 20
Physical Device Information ............................................................................................................... 22
Setting Tab .................................................................................................................................................................. 23
System Settings ................................................................................................................................... 24
Password Settings ............................................................................................................................... 25
Changing your HRM password........................................................................................................... 25
Recovering your HRM password ........................................................................................................ 25
Email Setting ....................................................................................................................................... 25
Recover Tab (Only for SSD7110 SAS Controller) ................................................................................................ ... 28
How to Backup your Recover List ...................................................................................................... 29
How to Reload your Backup Recover List ......................................................................................... 29
Event Tab .................................................................................................................................................................... 30
Table 1. Event Log Icon Guide ........................................................................................................... 30
SHI (Storage Health Inspector) ................................................................................................................................ 31
How to Enable SMART Monitoring ................................................................................................... 32
How to Change the HDD Temperature Threshold .............................................................................. 33
How to Use the Health Inspector Scheduler ....................................................................................... 34
How to Create a New Verify Task ....................................................................................................... 34
BIOS/Firmware Updates ..................................................................................................................................... 35
Using the HRM to update the BIOS/Firmware....................................................................................................... 35
Section 7: Troubleshooting ................................................................................................................................. 36
Handling Critical Arrays .......................................................................................................................................... 37
Rebuilding Stops Due to Bad Sectors ................................................................................................. 38
Critical array becomes disabled when you removed faulty disk ......................................................... 38
Handling Disabled Arrays ......................................................................................................................................... 39
Your PC hangs when the card is installed ............................................................................................................... 40
Help..................................................................................................................................................................... 41
Table 1.HRM Icon Guide .......................................................................................................................................... 42
Table 2. RAID Level Reference Guide ..................................................................................................................... 45
HighPoint Recommended List of Hard Drives ....................................................................................................... 46
Contacting Technical Support .................................................................................................................................. 46
For any help and support, submit a support ticket online at http://www.highpoint-tech.com/websupport/ . ... 46
2
System Requirements
PC Requirements
System with an empty x16 PCIe 3.0 slot
Windows 10 or later
Linux Kernel 3.3 or later
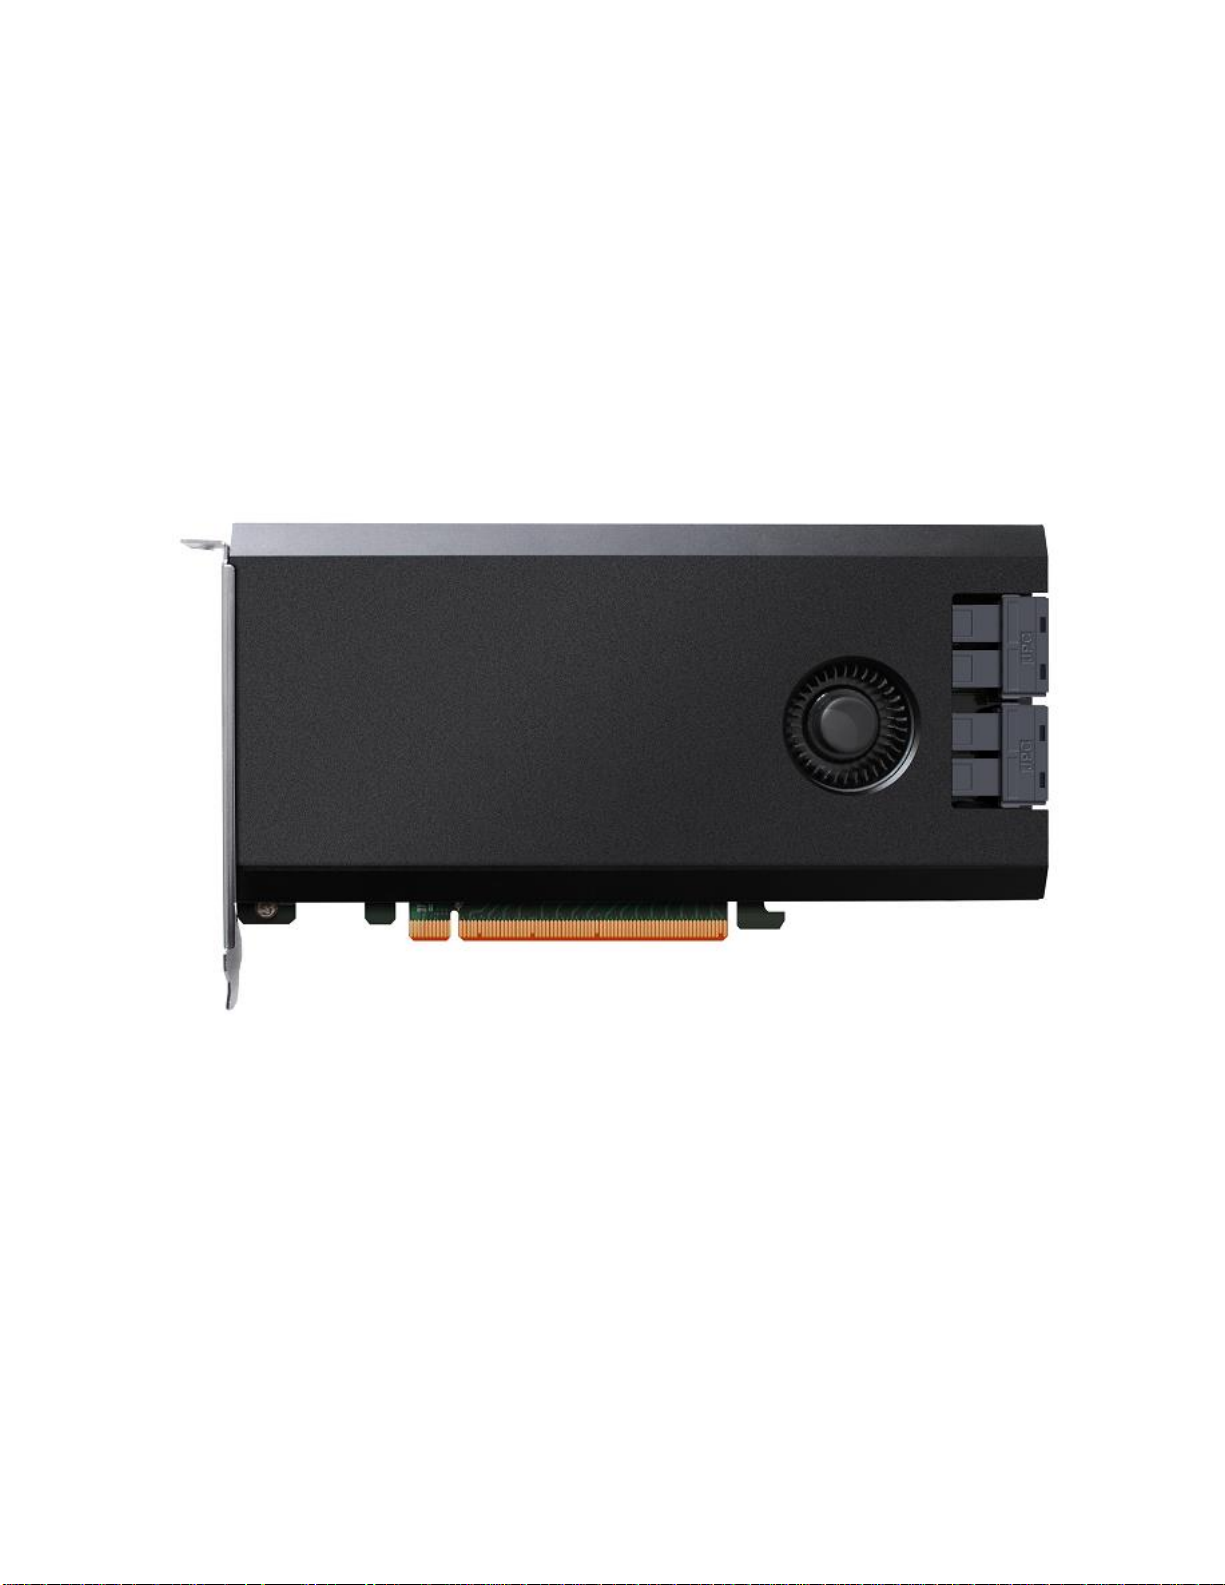
SSD7101A Hardware
Front View
3
NVMe Drive Installation:
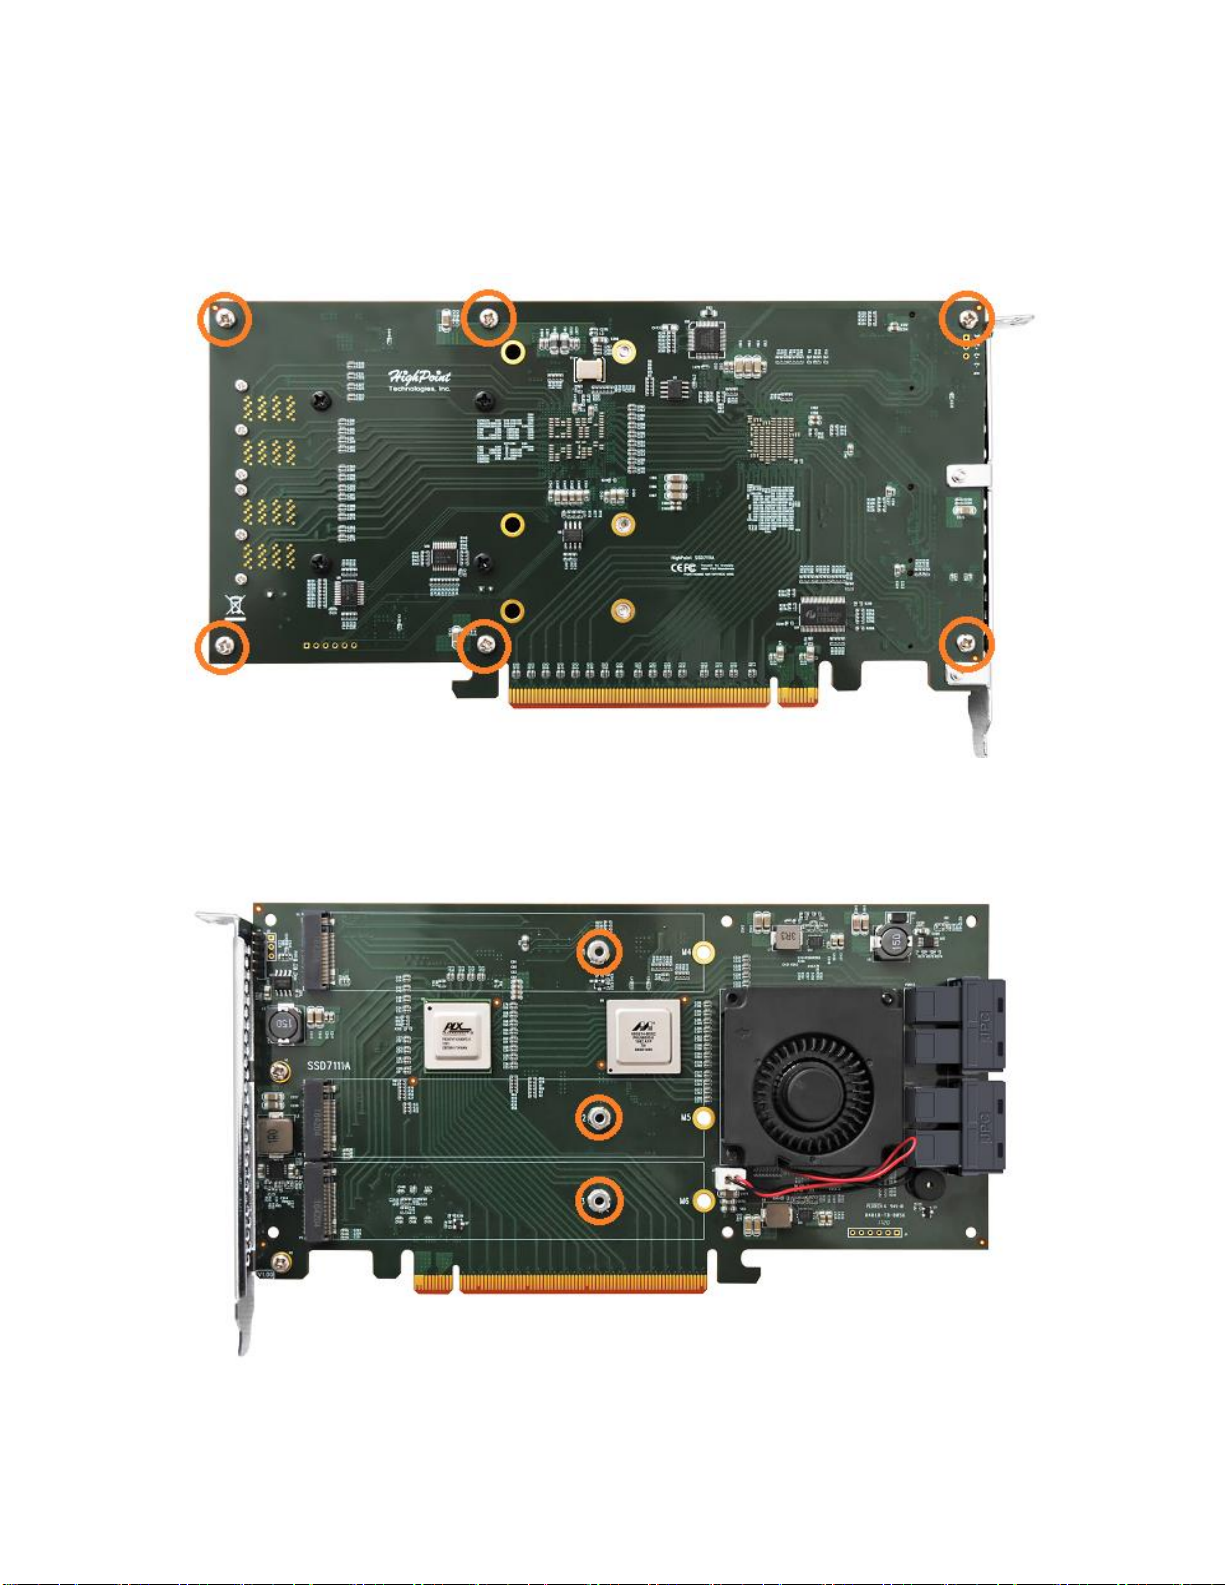
Step 1. On the rear of the SSD7110, remove the six screws that secure
the unit’s front panel to the PCB.
After removing the screws, carefully remove the front panel from the
SSD7110.
Step 2. These 3 screws are used to install the NVMe SSD’s.
4
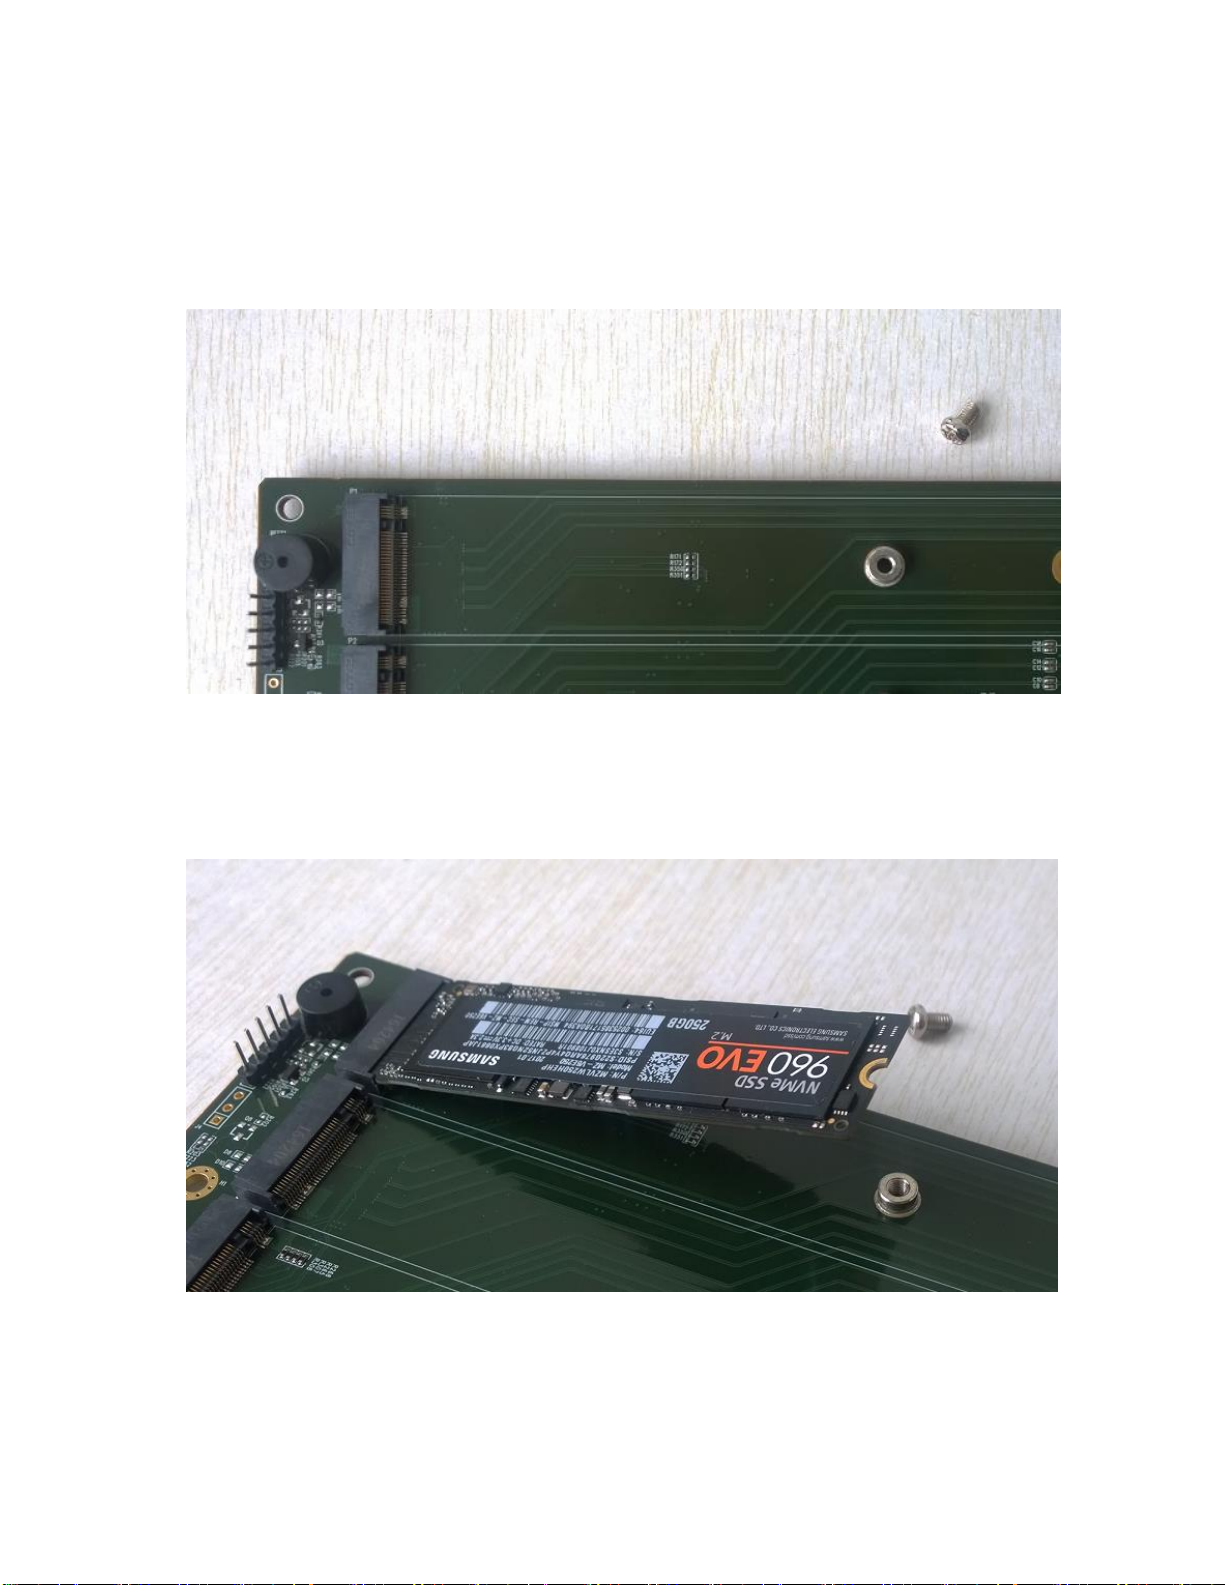
Step 3. The SSDs should be installed from top to bottom.
Remove the top screw.
Step 4. Gently insert the SSD into the slot.
5
Step 5. Refasten the screw to secure the SSD.
Repeat Steps 3 to 5 to install the remaining SSDs.
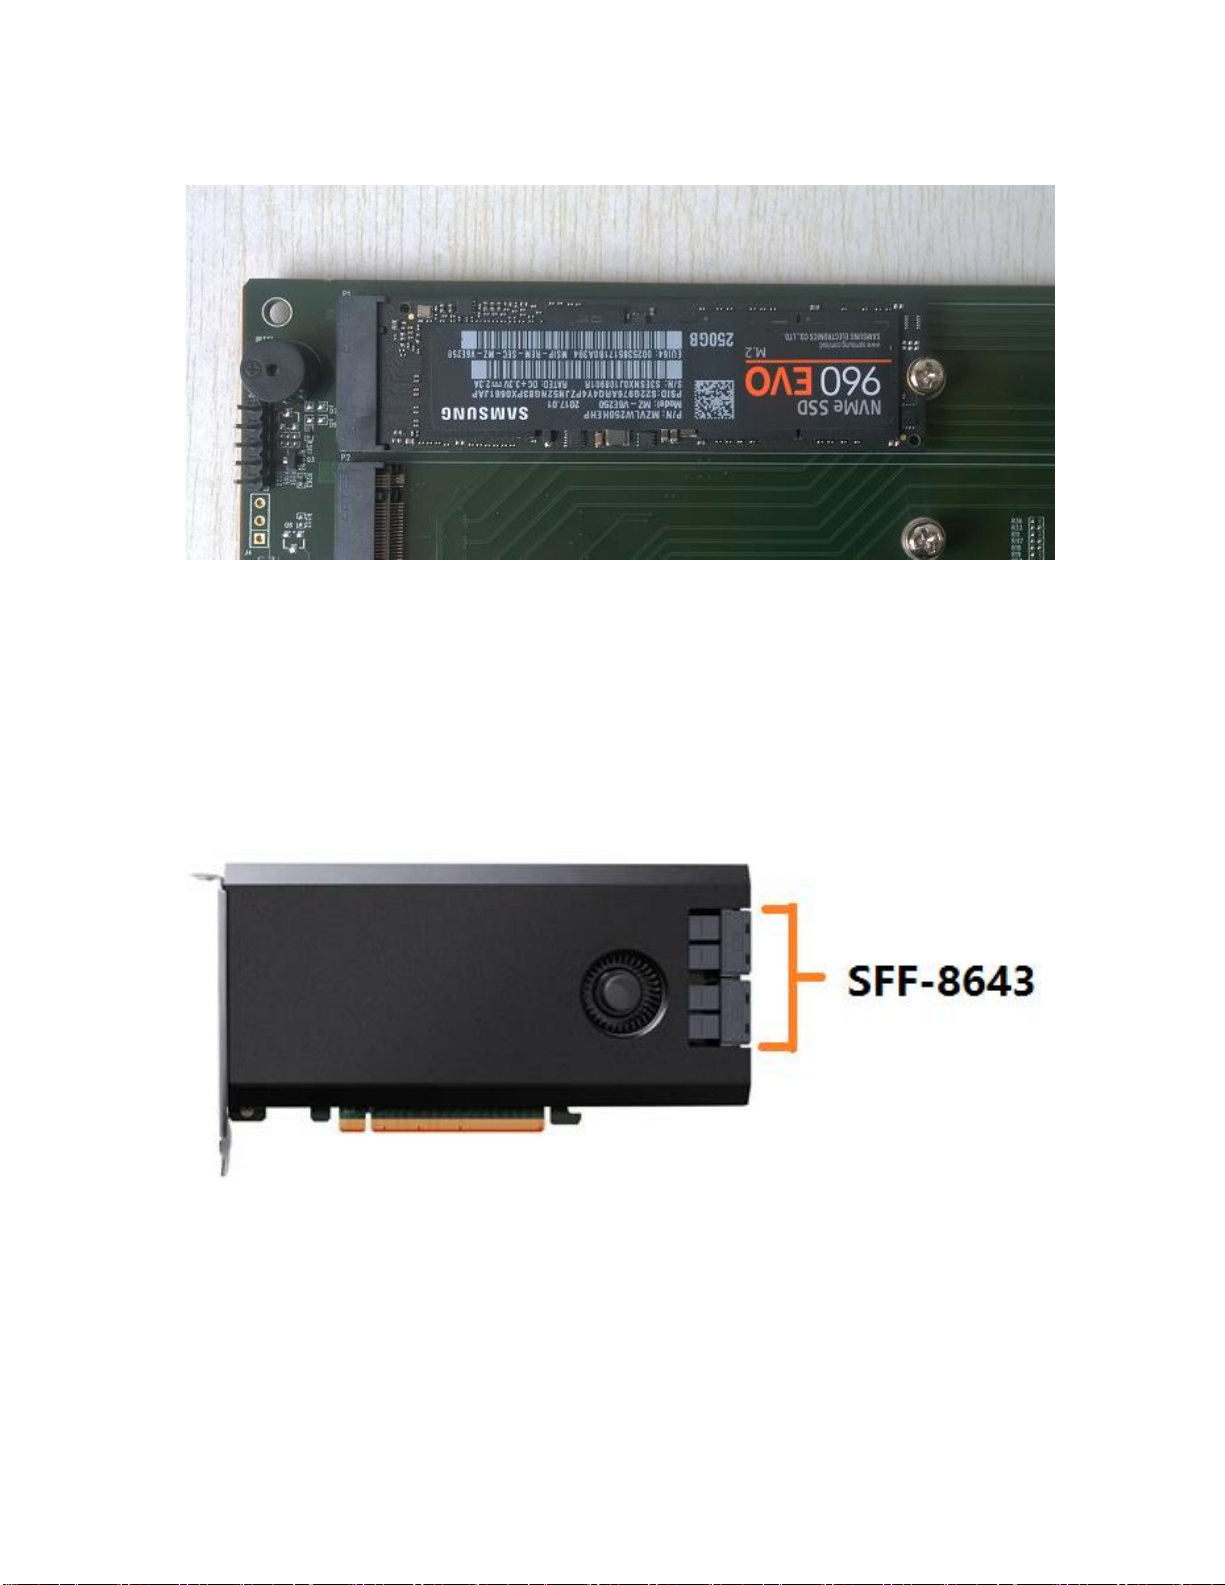
Step 6. Replace the front panel after installing all SSDs
Step 7. On the rear of the SSD7110, refasten the 6 screws that
were removed in step 1.
SAS/SATA Drive Installation
SSD7110 has four SFF-8643 Ports. Please connect the
SAS/SATA drives via SFF-8643 to SAS/SATA cables.
6
Setting up the SSD7110 for a Windows operating
system
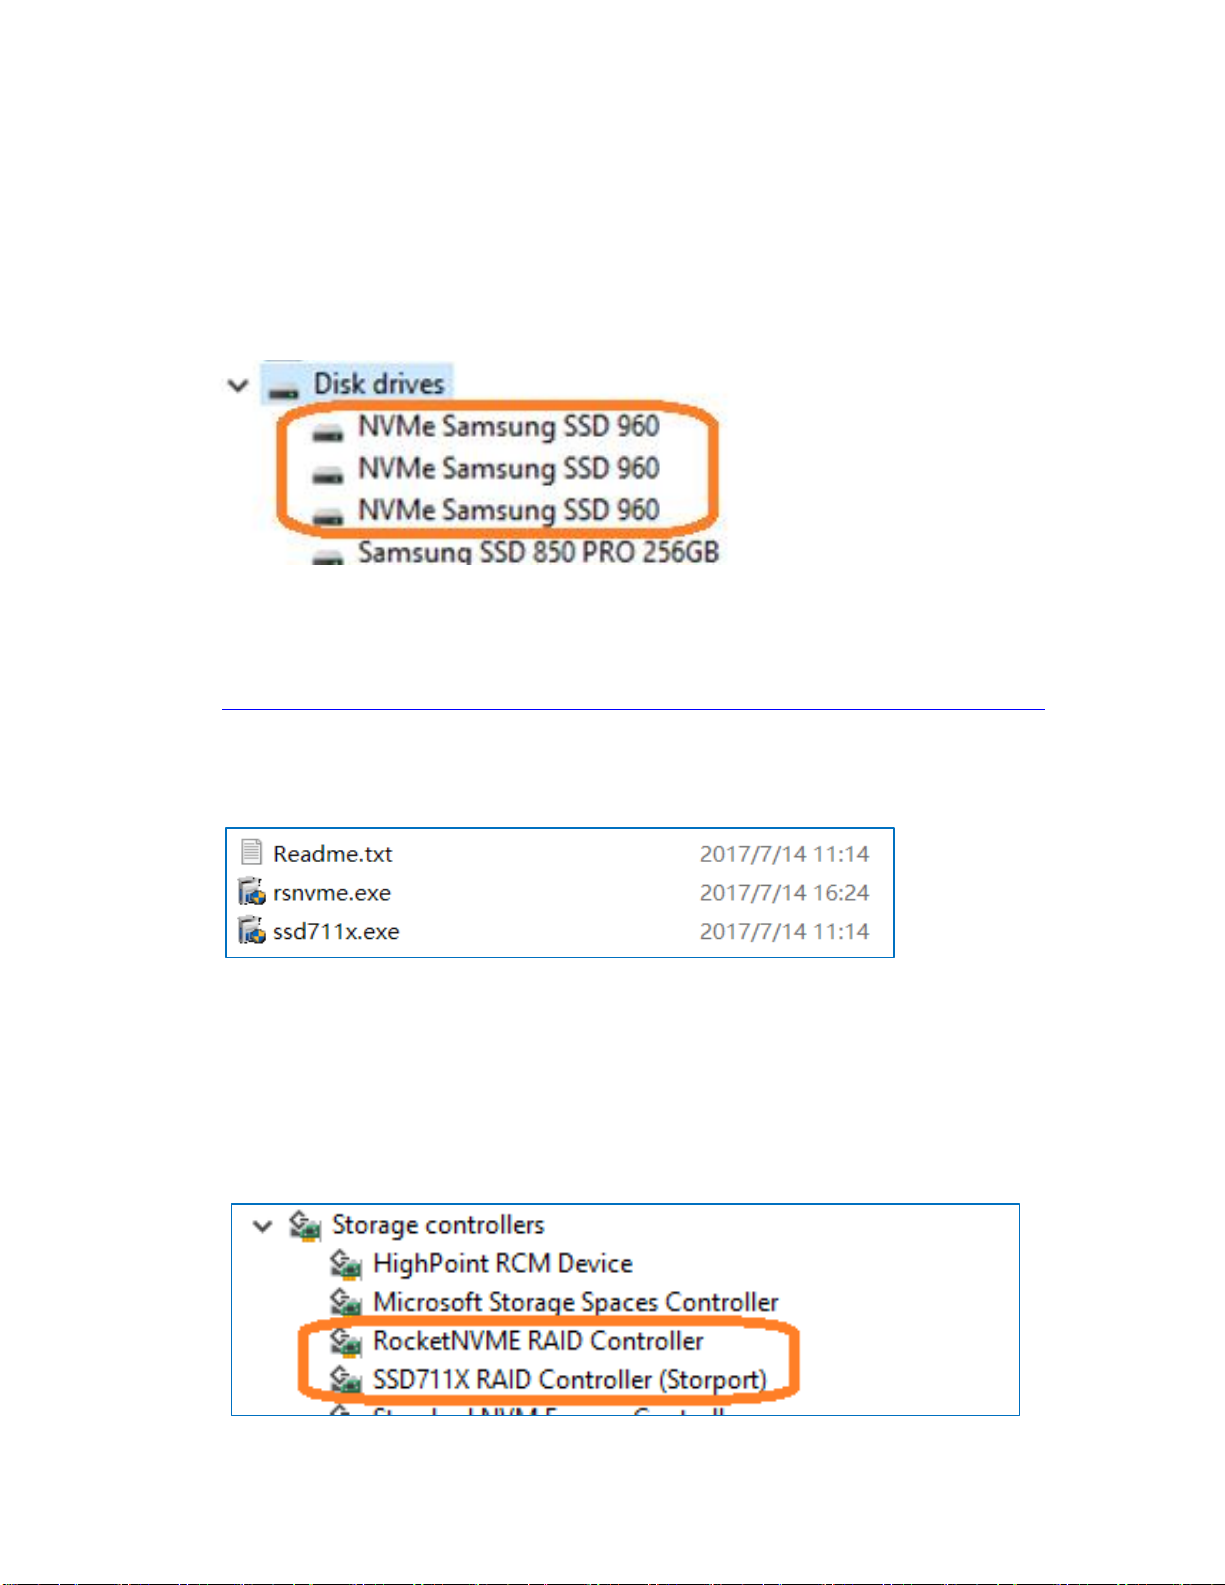
1. Verifying Installation
After booting Windows, open Device Manager, and expand Disk
drives. The installed NVMe drive should be displayed:
2. Driver Installation
1) Download the Windows driver package from the HighPoint
website:
http://www.highpoint-tech.com/USA_new/series-SSD7110-download.htm
2) Once downloaded, locate the folder you downloaded the driver to.
Extract the driver package. There are two driver packages .exe file
for the SSD7110. Please install the driver package one by one:
3) Double click.exe file to start the driver installation.
4) Follow the wizard and reboot system to complete the driver
installation.
5) After rebooting, a RocketNVME RAID Controller and a
SSD711X RAID Controller entry should be displayed under
Storage Controllers:
7
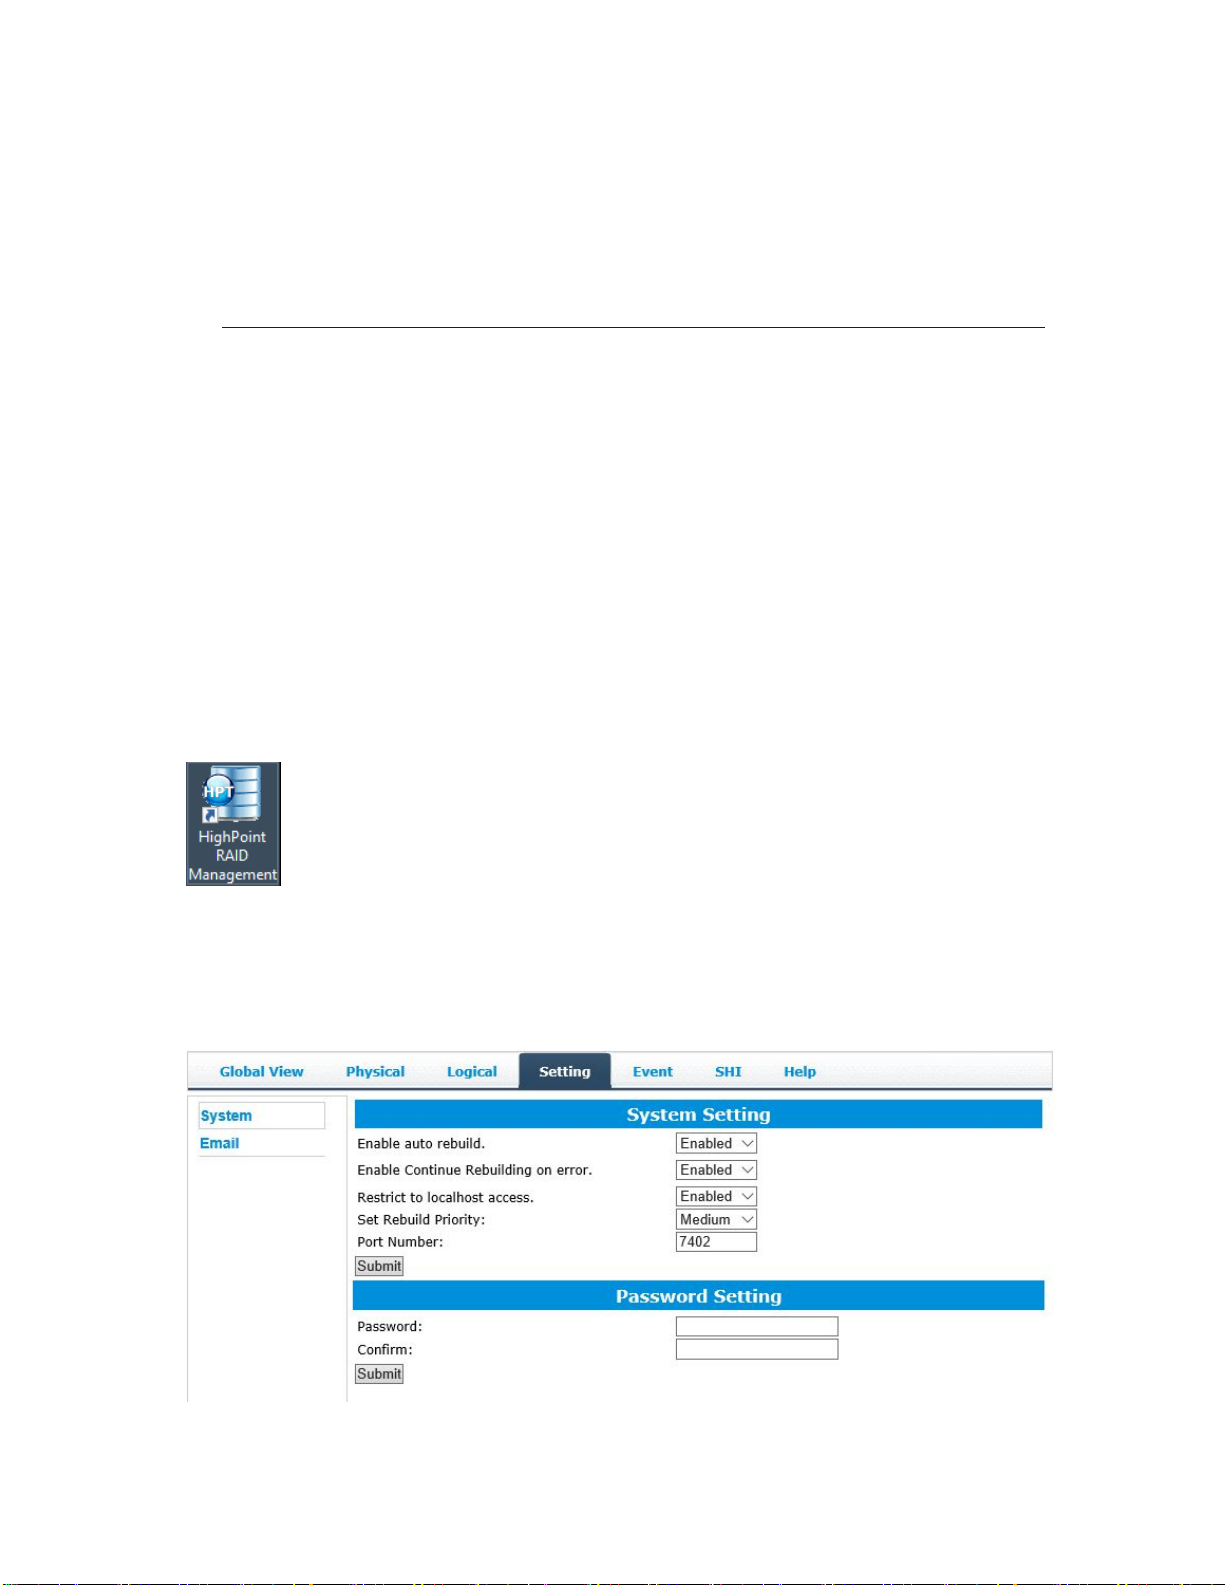
3. Installing the HighPoint RAID Manager(HRM)
The HighPoint RAID Manager is used to configure and monitor the
SSD7110. Download the HighPoint RAID Manager software package
from the HighPoint website:
http://www.highpoint-tech.com/USA_new/series-SSD7110-download.htm
1) Extract the package and double-click the setup.exe program to
install the software.
2) After the installation, start HighPoint RAID Manager by double
clicking the ICON on the desktop:
Using the HighPoint RAID Manager
Starting the HighPoint RAID Manager
Double click the Desktop ICON to start the Web browser. It will
automatically log-in to the HighPoint NVMe Manager using the
default password.
The password can be set after the first log-in. To change the
password, select Setting>Security from the menu bar (see page 15
for more information).
8
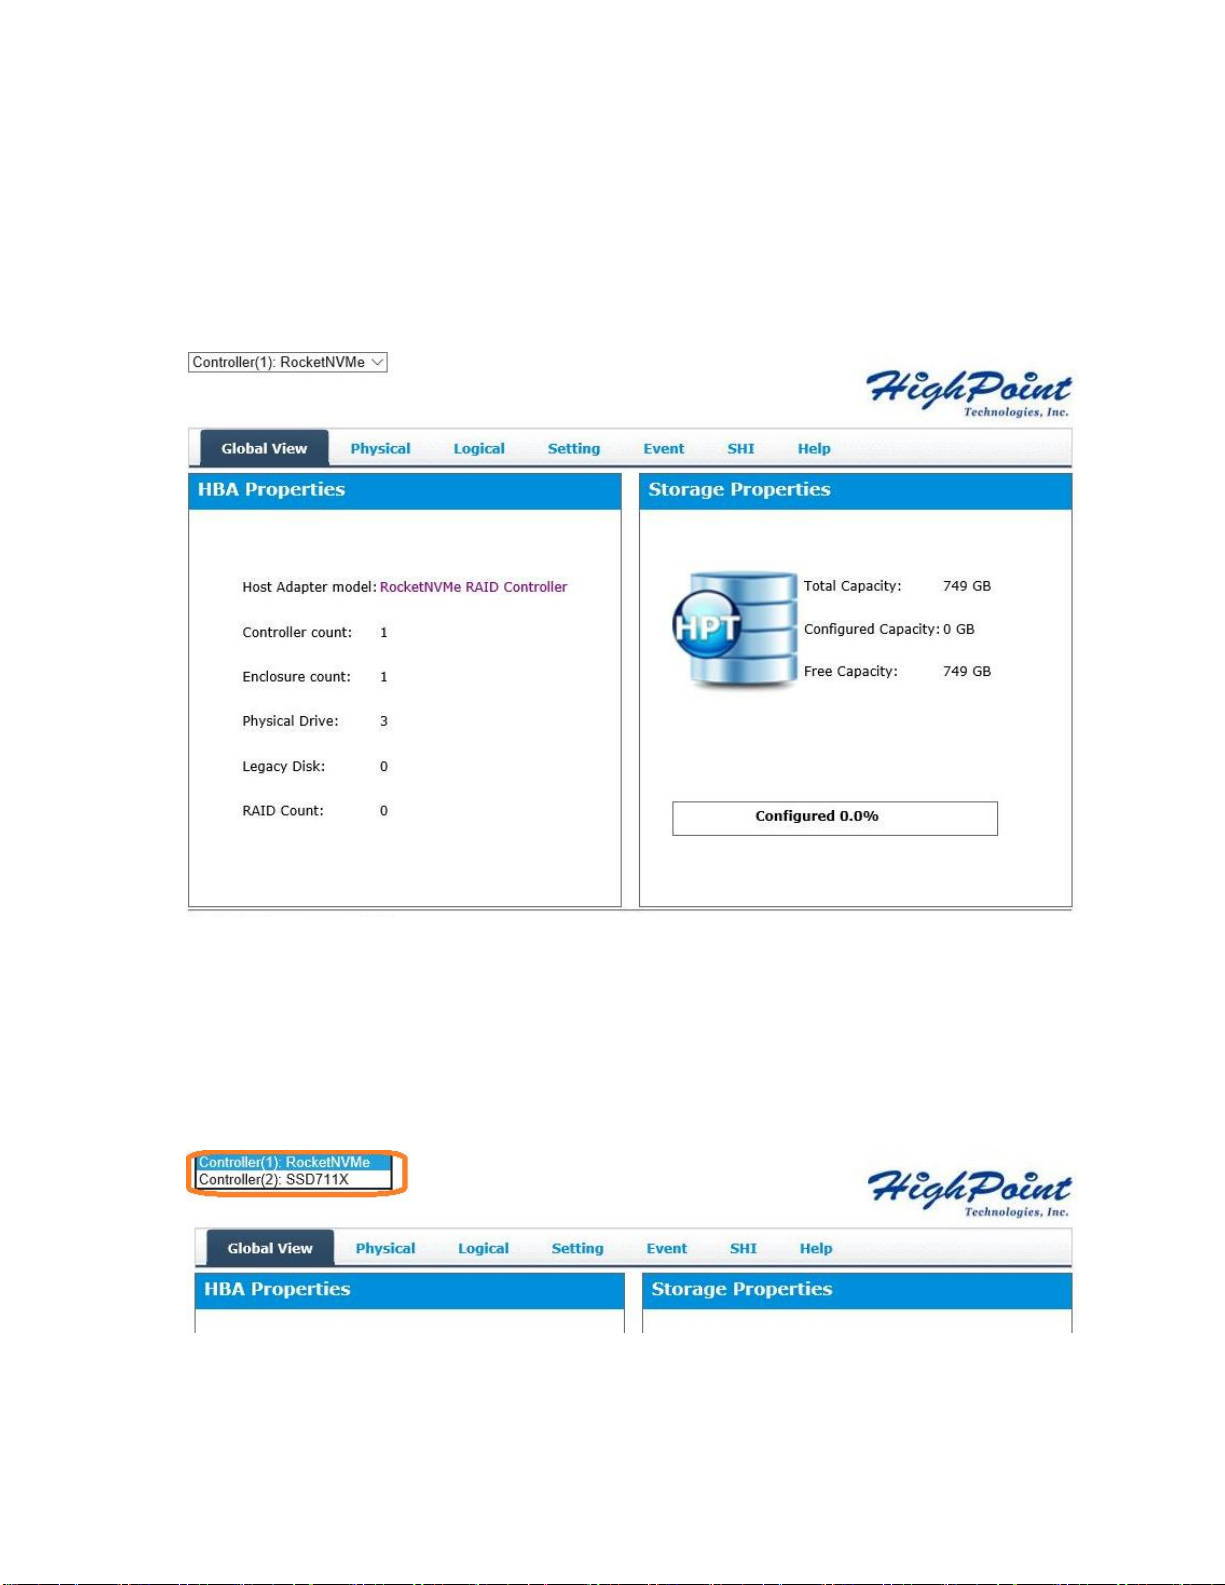
Verify the Controller Status
The Global Tab will display the overall status of the controller.
The Virtual Disk is listed under Logic Device Information. The
individual M.2 SSDs are listed under Physical Device Information.
Manage the RAID Controller
SSD7110 has both NVMe and SAS RAID controllers. You may
switch between the controllers using the controller selection
drop-down menu:
9
Creating an Array
To create an array:
1. Log into HRM
2. Select the proper controller from the drop down on the top left
3. Click Logical
4. Click Create Array
10
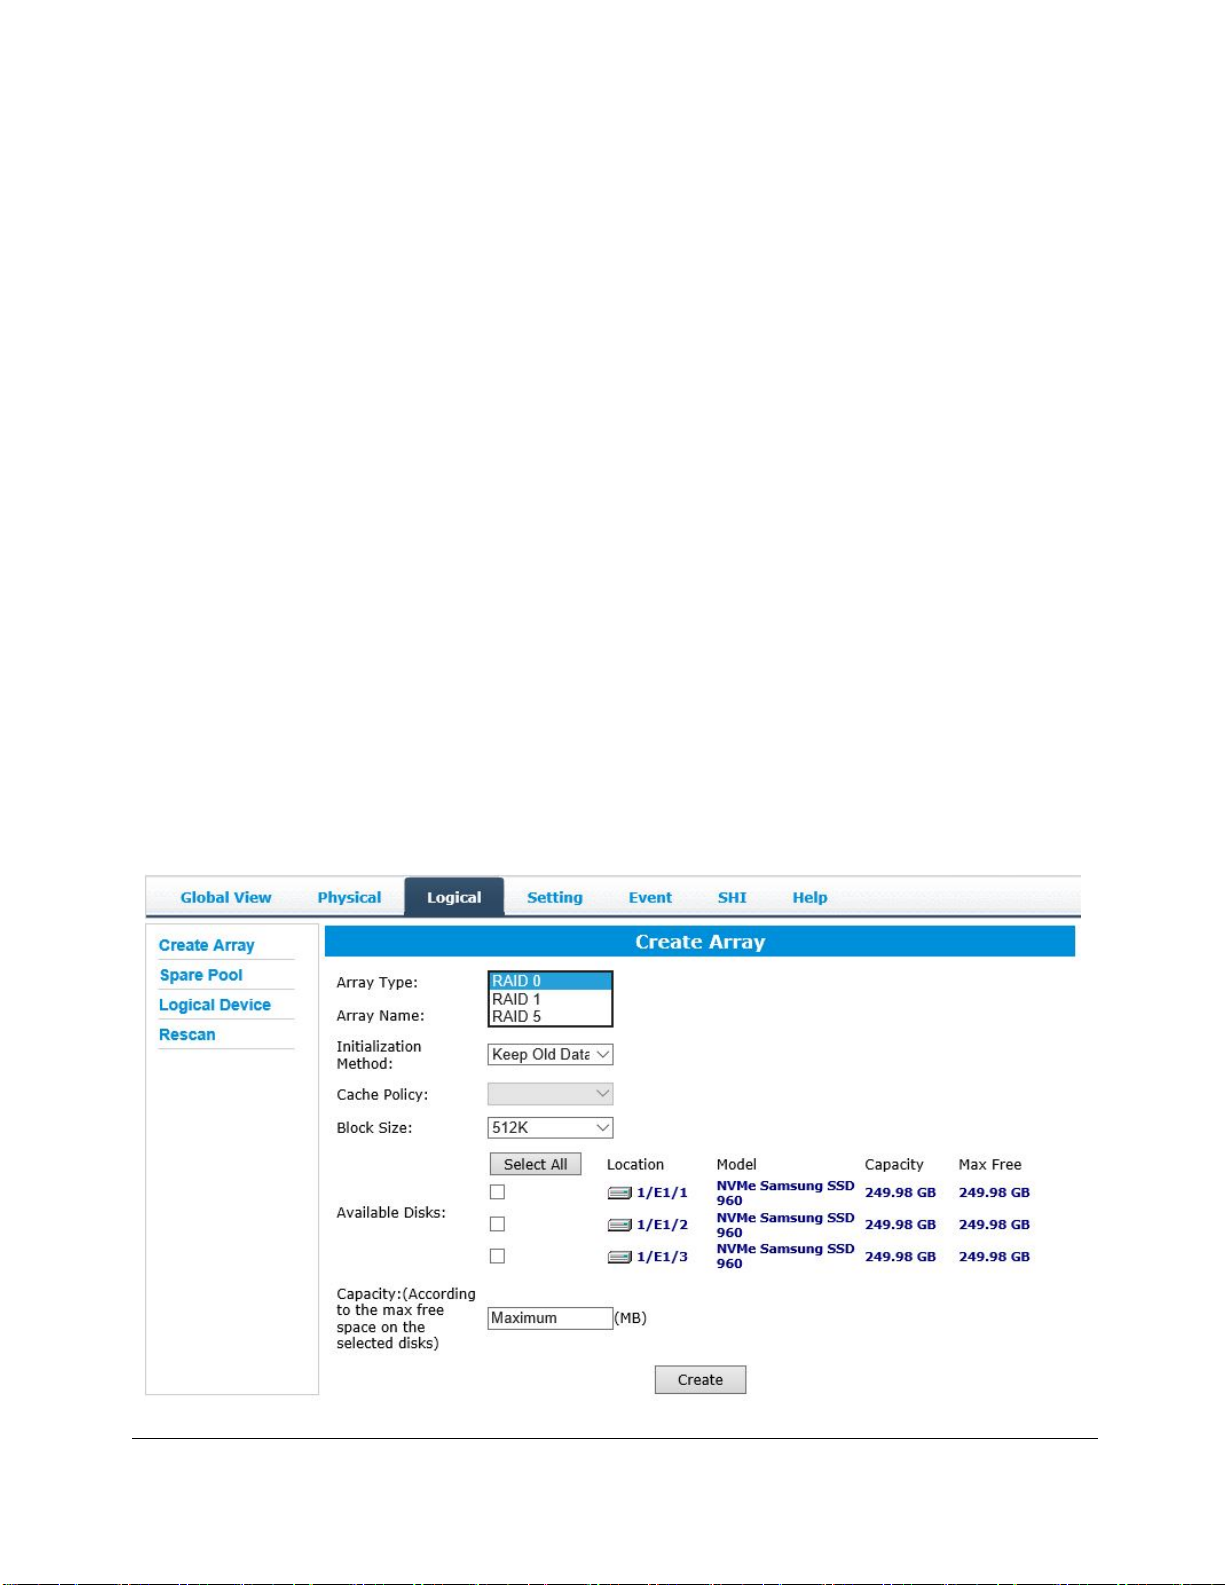
Array Type:
JBOD – Just a Bunch of Disks
RAID 0 - Striping
RAID 1 - Mirroring
RAID 5 – Rotating Parity bit
RAID 1/0 (Same as RAID10) – Striping of Mirrored Drives
RAID 5/0 (Same as RAID50) – Striping of Distributed Parity
RAID 6 – Double Parity Bit
Note: RAID 1/0, RAID 5/0 and RAID 6 require 4 or more disk drives.
The SSD7110’s SAS RAID controller can support these RAID levels.
However, the NVMe controller cannot – it can only support RAID 0, 1
and 5.
An array is a collection of physical disks that will be seen as one virtual
drive by your Operating System (OS).
The SSD7120 is capable of creating the following array types:
11

Each RAID level has its pros and cons based on the application you use
it for (Note: Refer to RAID level Quick Reference)
Array Name: the name that will be displayed in Logical Device
Information (Default: RAID_<level>_<array number>)
Initialization Method: Initialization of a disk sets all data bits to 0,
essentially clearing all the data on the drive. It is important to initialize
disks as previous data physically stored on the drive may interfere with
new data.
Keep Old Data: This option skips the initialization process and all
data on each physical disk of the array will be untouched.
Quick Init: This option grants immediate access to the RAID array
by skipping the initialization process, but it will delete all data.
Note: Skipping initialization is generally not recommended as
residual data on disks may interfere with new data in the future.
Foreground: The array initialization process will be set at high
priority. During this time array is not accessible, but the
initialization process will complete much faster.
Background: The array initialization process will have a lower
priority. During this time the array will be accessible, but the
initialization process will take much longer to complete.
Note1: Initializing takes a significant amount of time (approximately 2
hours per 1 TB when using hard drives).
Background and Foreground Initialization
Fully initializing the array will completely zero out the data on the disks,
meaning the disk will be completely wiped and every bit on the disk will
be set to 0. Foregoing initialization means the array will still be created,
and you can still write new data onto the array. But when your array
requires rebuilding, residual data left behind may interfere with the
12

process.
Cache Policy (Default: Write Back)
Write Back – Any data written to the array will be stored as cache,
resulting in better I/O performance at the risk of data failures due to
power outages. Data will be stored as cache before it is physically written
to the disk; when a power outage occurs, any data in the cache will be
lost.
Write Through – Data written to an array is directly written onto the
disk, meaning lower write performance for higher data availability.
Without cache acting as a buffer, write performance will be noticeably
slower but data loss due to power outages or other failures is
significantly minimized.
Block Size (default: 512K)
[16K or 1024Kare the supported block sizes]
Adjusting the block size towards your disk usage can result in some
performance gain.
In a typical RAID configuration, data of the virtual drive is striped (or
spread across) the physical drives. Having a smaller array block size will
increase the likelihood of accessing all physical drives when processing
large I/O requests. Multiple physical drives working in parallel increases
the throughput, meaning better performance.
For smaller I/O requests (512 bytes to 4 kilobytes), it is better to have
each individual disks handle their own I/O request, improving the IOPS
(I/O per second), rather than having one tiny I/O request being handled
by multiple disks.
A block size of 64k is recommended because it strikes a balance between
the two I/O usage scenarios.
13
Capacity (Default: Maximum)
The total amount of space you want the RAID array to take up. When
creating RAID levels, disk capacities are limited by the smallest disk.
An example of how disk capacities are limited by smallest disk.
You have 3 drives connected to the enclosure.
The first drive is 6 TB, the second is 4 TB, and the third drive is 2 TB.
After creating a RAID level 5 using all three drives and maximum
capacity, the first drive will have 4 TB, the second 2 TB, and the third
drive 0 TB of free capacity
The free capacity on the first and second drive can be used to create a
separate array.
You may also choose how much space each array will utilize. You can
use the remaining space to create another array (up to 4 arrays are
supported).
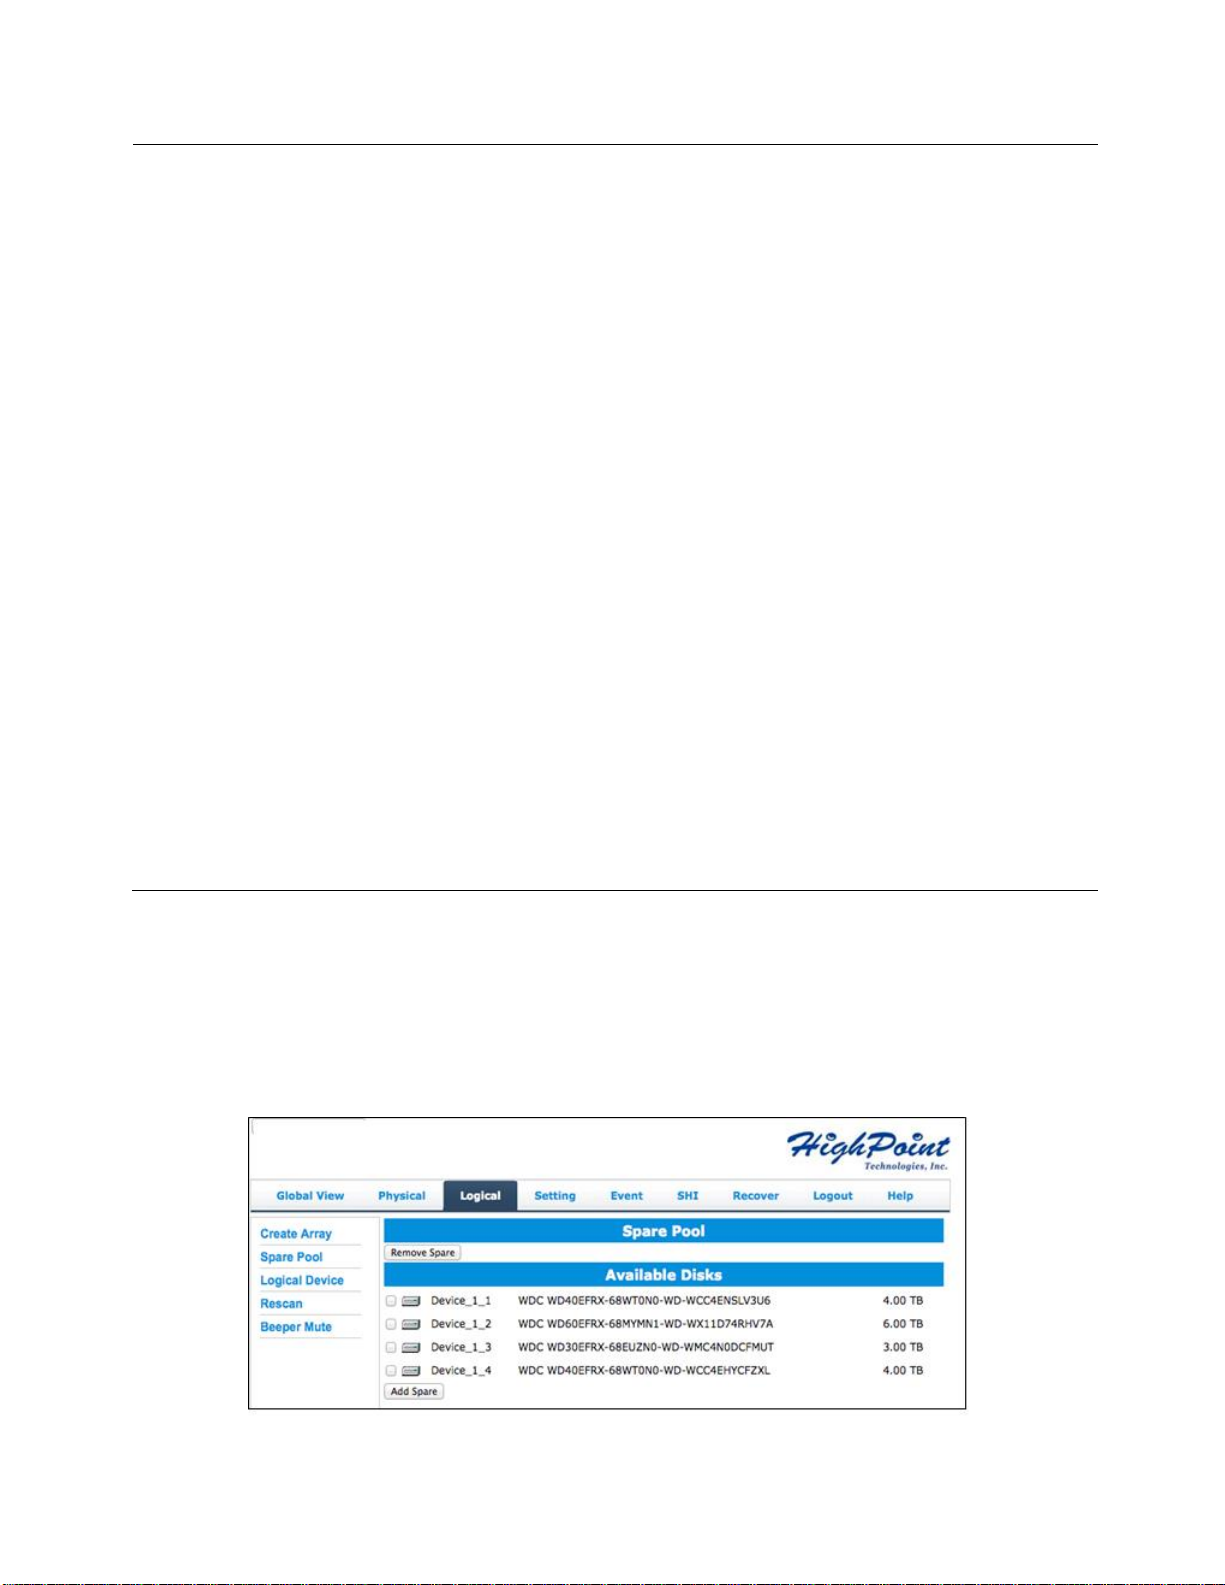
Adding Spare Disks
Spare disks are physical disks that will immediately replace critical disks
in an array.
14
 Loading...