

Page 1

RocketRAID Quad eSATA 6Gb/s For Mac
Version 1.0
Copyright ©2010 HighPoint Technologies, Inc.
All Rights Reserve
Last Update January 30, 2010
Page 2

Table of Contents
Table of Contents
1. About RocketRAID Quad eSATA 6Gb/s For Mac
1.1 Kit Contents
1.2 Physical Specification
1.3 Technical Specification
1.4 System Requirements
1.5 Environmental
2. Hardware Installation
3. Software Installation
4. RocketRAID Browser Based RAID Management utility
4.1 Connecting to external hard drive
4.2 Configuring RAID Mode with RocketRAID Browser Based RAID
Management utility
4.3 Management utility
4.4 RAID basics
4.5 Setting up boot mode
5. Advanced RocketRAID Browser Based RAID Management Utility
Functions
6. FAQ, Tips and Know How
7. Customer Support
Page 3

About RocketRAID Quad eSATA 6Gb/s For Mac
Inside the Box
• RocketRAID Quad eS ATA 6Gb/s For Mac
• Software CD
• Quick Installation Guide
Feature Specification
Non-configured Features Management Utility
Configured Features
Hot plug Yes Yes
Hot Swap Yes Yes
RAID 0, 1, 5, 10 and JBOD N/A Yes
eSATA Connectivity Yes Yes
Array Spare Disk N/A Yes
Email Event Notification Yes Yes
SMART Yes Yes
System Requirements
• Apple Mac Pro ( 2006-2009)
• Web Browser (Safari or Firefox)
• Mac OS X 10.4.11 and above
Verified Mac OS X Applications
Dock + Finder
Time Machine
Energy Saver
Image Capture
Quick Time Playback
Safari
DVD Player
Disk Utility
Terminal
Environmental and Physical Specifications
• Length: 2.84 inches (72.0 mm)
• Height: 2.66 inches (67.5 mm)
• Operating temperature: +5°C -+ 55°C
• Storage Temperature: -20°C +- 80°C
• Relative Humidity Range: 5% - 60 non condensing
• MTBF: 942,585 hours
• RoHS compliant
•
FCCPart15ClassBandCE
Page 4

About RocketRAID Quad eSATA 6Gb/s For Mac
About RocketRAID Quad eSATA 6Gb/s For Mac
What is eSATA ?
eSATA stands for External Serial Advanced Technology Attachment. eSATA
provides the fastest data transfer of up to 6Gb/s (600MB/s) for external devices.
RocketRAID Quad eSATA 6Gb/s For Mac
The RocketRAID Quad eSATA 6Gb/s For Mac is a PCI-Express 2.0 x4 add-in card
with 2 independent 6Gb/s eSATA connectors. It is ideal for those who need fast,
efficient and reliable storage for their Mac Pro systems.
The RocketRAID Quad eSATA 6Gb/s fo r Mac wit h PCI -Express 2.0 x4 lane speed
maximizes performance up to 200MB/s. Support for port multiplier devices offers an
economical way to support higher storage capacities and optimize performance to
capacity ratio.
Handling Precautions
The RocketRAID Quad eSATA 6Gb/s For Mac sh o ul d be h andl ed with care during
unpacking and installation.
Page 5

About RocketRAID Quad eSATA 6Gb/s For Mac
Hardware Installation
Working Safely Inside the Mac Pro
1. Please turn off your Mac Pro and unplug all components.
2. Put the workstation aside to ensure the internal temperature is suitable
for installation.
3. Touch the chassis with your hand to release static electricity.
4. Remove the side panel
5. Remove the PCI bracket – Loosen the two thumbscrews on that holds
the PCI-Express cards in place, and remove the bracket and the port access
cover.
6. Plug the RocketRAID eSATA For Mac into an empty PCI-Express
slot.
7. Install the PCI bracket and tighten the thumb screws
8. Insert the side panel and close the latch (Reconnect the external cables
and power cord)
9. Turn on the power of your Mac Pro.
Software Installation
1. Insert CD
2. Start the installation process by clicking on RR644M.
Page 6
About RocketRAID Quad eSATA 6Gb/s For Mac
3. After finishing then installation Restart the system
If you want to boot Mac OS X from your external
hard drive you will need to use Carbon Copy
Cloner software to clone your Mac OS X disc to the
external hard drive.
Page 7

RocketRAID Browser Based RAID Management utility
Connecting External Hard Drive
Connect the eSATA cable between the external hard drive and the RocketRAID
Quad eSATA 6Gb/s For Mac eSATA port.
Your external hard drive will be ready to access in or on your Mac desktop as a new
disk drive volume.
New Volume on
Deskto
p
Page 8

RocketRAID Browser Based RAID Management utility
Configure RAID Mode with Management Utility
The Management Utility allows you to setup RAID arrays in data protection mode or
in performance tuning mode if you have multiple external hard drives (Oxford) or a
SI (PM) device.
RAID Basics Explained
RAID 0 (striped disks) provides improved performance over standard single drive
configurations. A second external hard drive allows for higher bandwidth and greater
throughput.
RAID 1 (often called “mirroring’) provides protection from disk errors and single
disk failures. All data is duplicated (mirrored) on both external hard drives. The hard
drive continues to operate so long as at least one drive is functioning.
RAID 5 (striped disks with parity) combines three or more disks in a way that
protects data against loss of any one disk; the storage capacity of the array is reduced
by one disk.
Page 9

RocketRAID Browser Based RAID Management utility
Start the Management Utility with (Safari or Firefox)
Type in URL - http://localhost:7402 into the browser
When you are in the Management Utility you will see Logical Device Information
and External Drive Information.
External Drive Information – This is physical drive
that is attached to the RocketRAID Quad eSATA 6Gb/s
For Mac host adapter.
Logical Device Information - A part of a physical
disk drive that has been partitioned and allocated as an
independent unit, and functions as a separate drive
altogether.
Page 10

RocketRAID Browser Based RAID Management utility
Creating a RAID Array
The Create Array tab will bring you to the create RAID array page.
Create Array Tab
Page 11

RocketRAID Browser Based RAID Management utility
Choose the Array Type
Select All button of the drives for that RAID array and click on the Create button.
Select All button
Create button
Once the RAID array is complete. Use Mac OS X Disk Utility to format the new
RAID array.
Page 12

RocketRAID Browser Based RAID Management utility
Updating BIOS
Download the BIOS from www.hptmac.com or www.hptesata.com and Update
BIOS from the Management Utility. Reboot the system once the update has
completed.
Submit Button
To support booting to Mac OS X on Mac Pro (2008-
2009) systems requires 64bit EFI loaded on the
RocketRAID Quad eSATA 6Gb/s For Mac host
adapter.
To support booting to Mac OS X on Mac Pro 2006
systems required 32bit EFI loaded on the
RocketRAID Quad eSATA 6Gbs/s For Mac host
adapter.
Page 13

RocketRAID Browser Based RAID Management utility
Spare Drives
Spare drives will automatically help to rebuild/repair degraded redundant arrays
without user intervention.
Spare drive configured
Page 14

RocketRAID Browser Based RAID Management utility
Setup Boot Mode with Management Utility
It is possible to use an external RAID array as a startup disk (Mac OS X boot
volume). You will need to download Carbon Copy Cloner software from
(http://www.bombich.com/)
Select the (Source Disk) boot volume with (Mac OS X) and then select the (Target
Disk) the External hard drive.
Target Disk to clone
Source Disk for
clone
Booting to Mac OS X is only supported with single hard
drives. RAID arrays will not boot to Mac OS X.
Page 15

Advanced RocketRAID Browser Based RAID Management Utility Functions
Advanced Management Utility Functions
Event will log every event that has occurred . The events can help HighPoint
Technical Support troubleshoot issues and questions you may have.
Task can be used to setup routine, periodical background-rebuild or verification
tasks that will help maintain the integrity of RAID arrays.
Page 16
Advanced RocketRAID Browser Based RAID Management Utility Functions
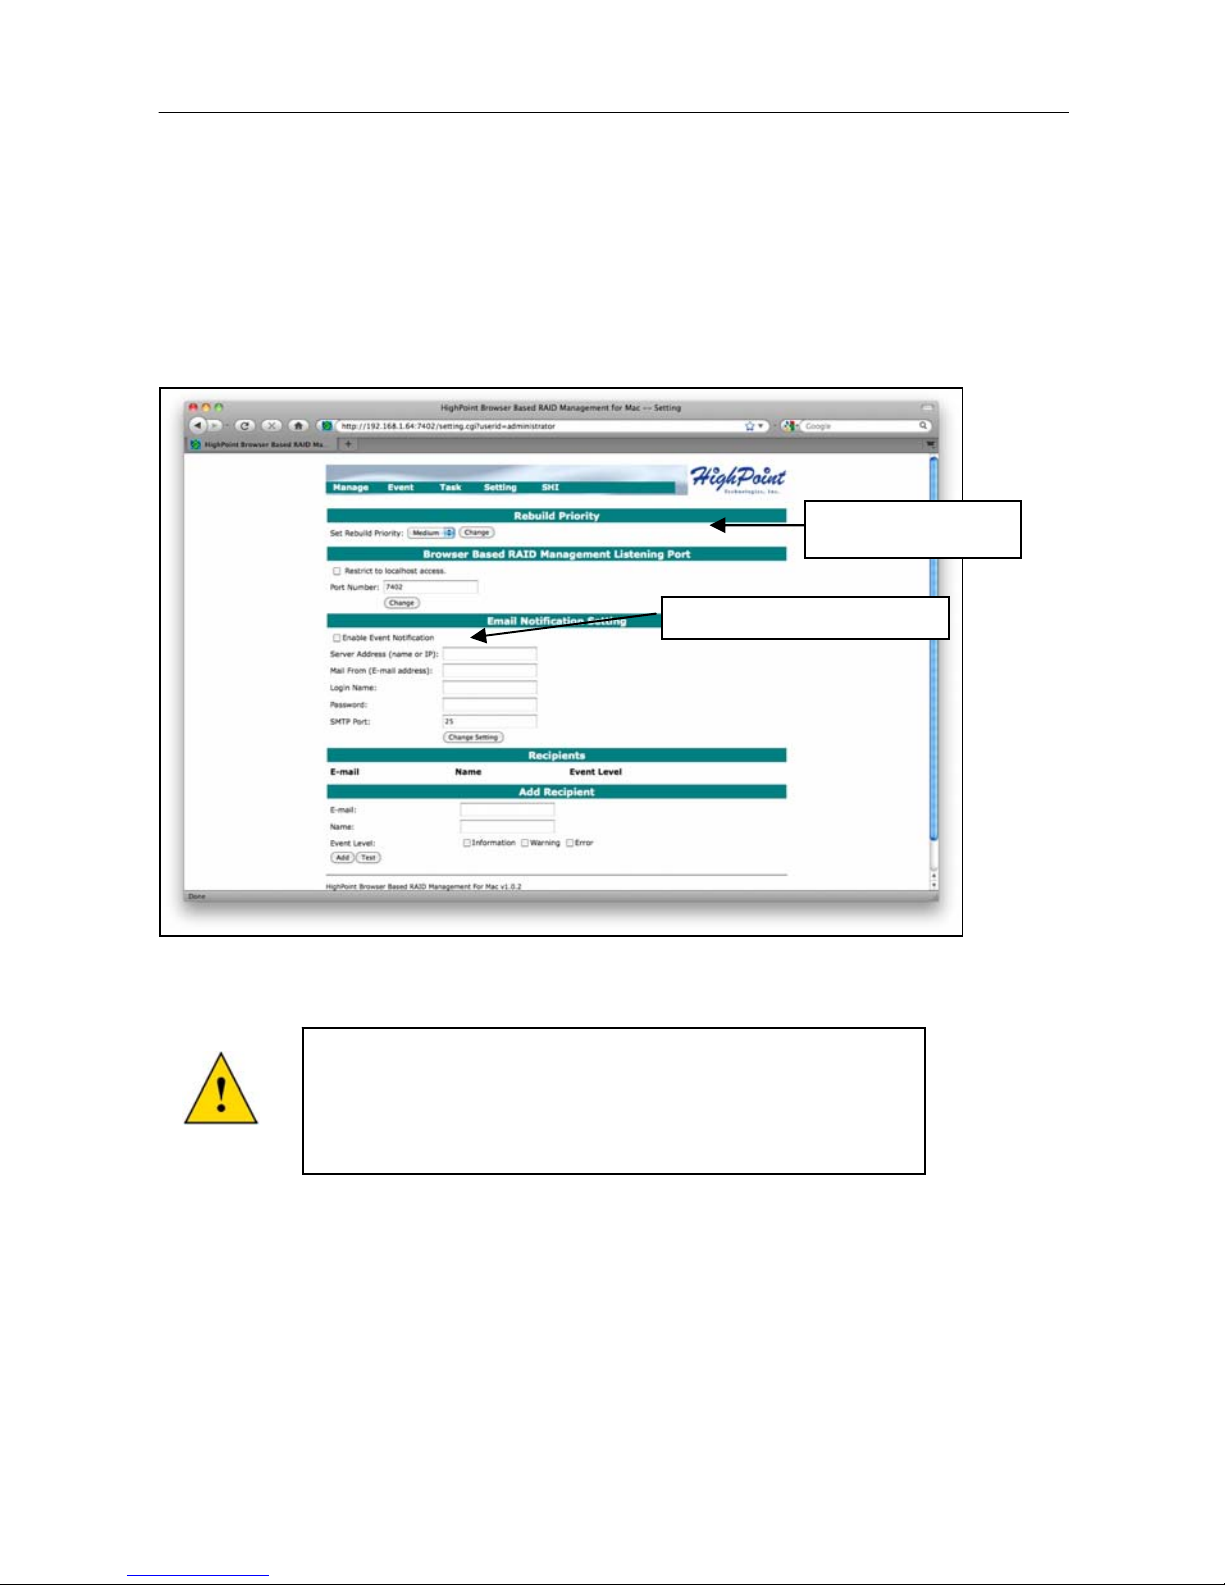
Setting will have the following options
Rebuild Priority – select the system resources dedicated to help repair a degraded
RAID array. Medium is the default value.
Email Notification – Continuous email monitoring and notification for (errors,
warnings and events) sent to you when you ar e away from the externa l hard drive.
Rebuild Priority
Enable Event Notification
To setup email notification you will need to Enable
Event Notificationandupdatetheinformationwith
yourlocalemailsettings.
Page 17
Advanced RocketRAID Browser Based RAID Management Utility Functions
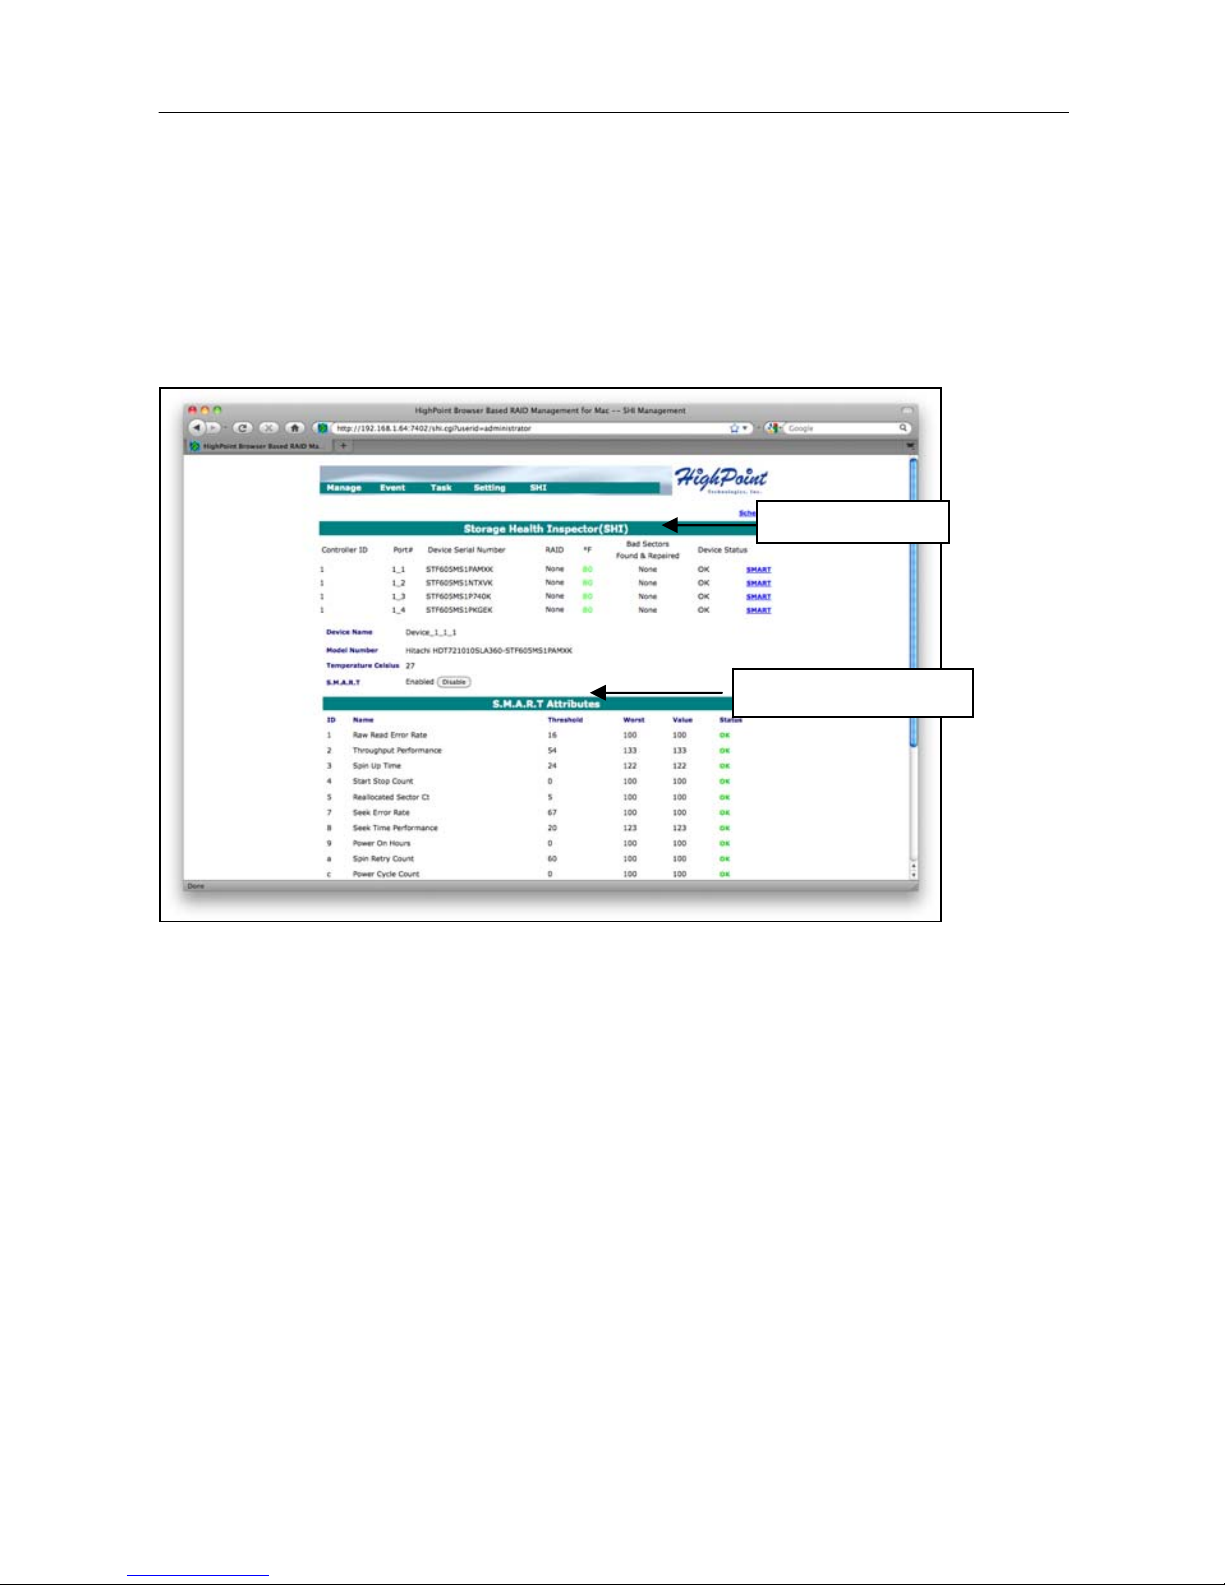
SHI (Storage Health Inspector) – displays a brief “Health” summary of ea ch hard
disk.
You can view S.M.A.R.T. (Self-Monitoring, Analysis, and Reporting Technology)
data about a particular hard disk to help troubleshoot problems that occur. You can
also setup periodically S.M.A.R.T. status checking to send notification messages
when S.M.A.R.T. thresholds are exceeded.
SHI information
SMART information
Page 18

FAQ, Tips and Know How
FAQ
Visit our website www.hptmac.com and www.hptesata.com for the update product
and software updates.
Q: Why does the drive not show on my Desktop?
A: Check that the power adapter and the eSATA connection to your external hard
drive are secure and fully inserted.
Q. Can I use my external hard drive with Time Machine?
A. Yes, the external hard drive must be formatted as HFS+ to work with Time
Machine.
Q. Is Sleep Mode supported?
A. Yes, Sleep Mode is supported
Q: Can I combine an external hard drive with an SI PM (Port Multiplier) device?
A: No. combining an external hard drive with PM enclosure hard drive is not
supported.
Page 19

FAQ, Tips and Know How
Tips and Know How
When using the Management Utility to create and
delete RAID arrays your device will not appear in
the Logical Drive Information or Disk Utility
section until you reboot the Mac Pro
Reboot is required to
have hard drives appear
in Logical Drive
Information or Disk
Utility
Page 20

Customer Support
CONTACT INFORMATION
Customer Support
If you encounter problems utilizing the RocketRAID Quad eSATA 6Gb/s For Mac
RAID host adapter or have any questions contact our Customer Support Department.
Contact Information
Email:
support@highpoint-tech.com
Phone: 408-942-5800
9am to 5pm PST (Monday through Friday)
www.highpoint-tech.com/websupport
Additional information about HighPoint products is av ailable from our websites:
www.hptmac.com
www.hptesata.com
Page 21

Customer Support
FCC PART 15 CLASS B RADIO FREQUENCY
INTERFERENCE STATEMENT
This equipment has been tested and found to comply with the limits for a Class B
digital device, pursuant to part 15 of the FCC Rules. These limits are designed to
provide reasonable protection against harmful interference in a residential installation.
This equipment generates and can radiate radio frequency energy and, if not installed
and used in accordance with the instructions, may cause harmful interference to radio
communications. However, there is no guarantee that interference will not occur in a
particular installation. If this equipment does cause harmful interference to radio or
television reception, which can be determined by turning the equipment off and on,
the user is encouraged to try to correct the interference by one or more of the
following measures:
• Reorient or relocate the receiving antenna
• Increase the separation between the equipment and receiver
• Connect the equipment into an outlet on a circuit different from that to which the
receiver is connected.
• Consult the dealer or an experienced radio/TV technician for help.
Modifications not expressly approved by the manufacturer could void the user’s
authority to operate the equipment under FCC rules.
This device complies with part 15 of the FCC Rules. Operation is subject to the
following two conditions: (1) this device may not cause harmful interference, and (2)
this device must accept any interference received, including interference that may
cause undesired operation.
European Union Compliance Statement
This Information Technologies Equipment has been tested and found to comply with
the following European directives:
• European Standard EN55022 (1998) Class B
• European Standard EN55024 (1998)
 Loading...