

Highly Reliable SYSTEMS High-Rely NetSwap, High-Rely NetSwap Plus, RAIDFrame Plus User Manual

1
Copyright © 2011-2019 by Highly Reliable Systems, Inc. All rights reserved.
High-Rely NetSwap/NetSwap Plus/RAIDFrame Plus
Backup Sys
tem
User Manual V2.16

2
Copyright © 2011-2019 by Highly Reliable Systems, Inc. All rights reserved.
Please Read This First
Important Quick Start Information for your High-Rely d
rive
●
When using “High-Rely Classic” media trays the drive will not spin up until the key is turned
on. This is by design and prevents accidental media removal.
●
Please do NOT ATTEMPT TO REMOVE High-Rely classic media from their drive
ba
ys
w
ithout
“unlocking” the drive with the key first! Forced removal of the drive will void your
warranty. The key has a mechanical interlock that blocks the drive from being removed. This
note does not apply to MPac media, which is removed by simply flipping the metal locking tab
out or RAIDPac media which is removed by pushing the release tab and pulling.
●
We recommend telling all operating systems. to “safely remove” the drive prior to removing
drive to avoid removing drive during a write. If you are sure the drive is not being used, you
may skip this step at your own discretion.
●
The latest Service Packs are important! Microsoft has continued to Debug removable drives on
the Windows 2000, XP, 2003, Vista, Windows 7, 2008 and beyond. If you do not have the latest
service packs you may have problems. For example, XP machines without appropriate Service
Packs cannot properly recognize drives above 137GB. While it may appear to work, the drive
will corrupt data when it fills above that level. Windows XP and 2003 operating systems do not
recognize greater than 2TB drives or GPT partition tables. Read the manual or our web site for
more details.
●
If you are swapping multiple trays in your removable device, you may have a drive letter
problem as you change your media. Sometimes Windows will assign drive letters randomly
which can cause your backup software to fail. You can use the High-Rely Drive Manager
utility HRDM2.MSI to solve this problem. To do this, install HRDM2 on the machine that the
High-Rely system will be connected to.
●
Larger hard drives are extremely sensitive to shock. Please handle all media with care when
transporting off-site or removing and use our padded carrying cases to avoid data loss. Best practice
removal is partially extracting the media, wait 20 seconds for it to spin down and then finish pulling
it out.
●
Photos and screen shots in this manual may not reflect your exact product or operating sys
tem
.
The information in this manual primarily documents Windows. Although our products are known
to work with Windows NT, Linux, Mac OS X and other operating systems, at this time, our tech
support can assist with Windows platforms only.

3
Copyright © 2011-2019 by Highly Reliable Systems, Inc. All rights reserved.
NetSwa
p/RAI
DFrame
Plus
User Man
ual
v2.16
Copyright © 2011-2019 by Highly Reliable Systems, Inc.
All rights reserved. No parts of this work may be reproduced in any form or by any
means - graphic, electronic, or mechanical, including photocopying, recording, taping,
or information storage and retrieval systems - without the written permission of the
publisher.
Products that are referred to in this document may be either trademarks and/or registered
trademarks of the respective owners. The publisher and the author make no claim to these
trademarks.
While every precaution has been taken in the preparation of this document, the publisher
and the author assume no responsibility for errors or omissions, or for damages resulting
from the use of information contained in this document or from the use of programs and
source code that may accompany it. In no event shall the publisher and the author be
liable for any loss of profit or any other commercial damage caused or alleged to have
been caused directly or indirectly by this document

4
Copyright © 2011-2019 by Highly Reliable Systems, Inc. All rights reserved.
Table of Contents
1 Introduction.............................................................................................................................................7
2 NetSwap/RAIDFrame Plus Hardware....................................................................................................8
2.1 Front Panel.....................................................................................................................................8
2.1.1 Desktop Chassis(legacy).......................................................................................................8
2.1.2 2U Rackmount Chassis (NetSwap Plus only).......................................................................9
2.1.3 4U 8 Bay Rackmount Chassis (NetSwap Plus only)..........................................................10
2.1.4 4U RAIDFrame Rackmount Chassis (RAIDFrame Plus only)(legacy)...............................11
2.1.5 Mini Chassis.......................................................................................................................12
2.1.6 Power On Procedure...........................................................................................................12
2.1.7 Power Off Procedure...........................................................................................................13
2.2 Rear Panel....................................................................................................................................13
2.2.1 Desktop Chassis(legacy).....................................................................................................13
2.2.2 2U Rackmount Chassis (2 or 4 Bay)...................................................................................14
2.2.3 4U Rackmount Chassis (8 bay or RAIDFrame)(legacy)....................................................15
2.2.4 Mini Chassis.......................................................................................................................16
3 NetSwap/RAIDFrame Plus Administration..........................................................................................17
3.1 Quick Setup..................................................................................................................................18
3.2 Disk Preparation...........................................................................................................................21
3.2.1 Formatting Disks.................................................................................................................21
3.2.2 Sharing Disks......................................................................................................................22
3.2.3 Creating RAID Disks (NetSwap/RAIDFrame Plus only)...................................................23
3.3 Replication (NetSwap/RAIDFrame Plus Only)...........................................................................24
3.3.1 Replication Jobs, Locations, and Targets............................................................................24
3.3.2 Setting up a Basic Replication Job......................................................................................25
3.3.3 Seeding................................................................................................................................30
3.3.3.1 Seed Using a Replication Seed Job............................................................................30
3.3.3.2 Seed Using SpeedSeedTM...........................................................................................31
3.3.4 Snapshots............................................................................................................................36
3.4 Administration Reference............................................................................................................38
3.4.1 Page Layout.........................................................................................................................38
3.4.2 Status Menu.........................................................................................................................39
3.4.2.1 Status..........................................................................................................................39
3.4.2.2 Tasks...........................................................................................................................41
3.4.2.3 View Log....................................................................................................................42
3.4.3 Settings Menu.....................................................................................................................43
3.4.3.1 Network......................................................................................................................43
3.4.3.2 Dynamic DNS (NetSwap/RAIDFrame Plus Only)....................................................46
3.4.3.3 Admin.........................................................................................................................47
3.4.3.4 Disks...........................................................................................................................49
3.4.3.5 iSCSI..........................................................................................................................51
3.4.3.6 Windows Networking.................................................................................................55

5
Copyright © 2011-2019 by Highly Reliable Systems, Inc. All rights reserved.
3.4.3.7 NFS............................................................................................................................61
3.4.3.8 SMTP.........................................................................................................................62
3.4.3.9 Alerts..........................................................................................................................64
3.4.3.10 Date/Time.................................................................................................................67
3.4.3.11 Dashboard Registration............................................................................................69
3.4.3.12 Export Configuration...............................................................................................70
3.4.3.13 Import Configuration...............................................................................................70
3.4.3.14 Restore Default Configuration.................................................................................71
3.4.3.15 Docs & Software......................................................................................................71
3.4.4 Replication (NetSwap/RAIDFrame Plus Only)..................................................................72
3.4.4.1 Settings.......................................................................................................................72
3.4.4.2 Jobs.............................................................................................................................73
3.4.4.3 Remote Locations......................................................................................................92
3.4.4.4 Targets........................................................................................................................99
3.4.4.5 Amazon Import/Export Jobs....................................................................................101
3.4.5 Virtualization Menu (Select models only, Experimental).................................................104
3.4.5.1 Virtual Machines......................................................................................................104
3.4.5.2 Install Utility OS......................................................................................................108
3.4.6 System Menu.....................................................................................................................108
3.4.6.1 Reboot Device..........................................................................................................108
3.4.6.2 Shutdown Device.....................................................................................................109
3.4.6.3 Check for Updates....................................................................................................109
3.4.6.4 Update Device..........................................................................................................110
3.4.7 Disk Properties..................................................................................................................111
3.4.7.1 Format......................................................................................................................117
3.4.7.2 Disk Tools................................................................................................................120
3.4.7.3 Share.........................................................................................................................122
3.4.7.4 Safely Remove.........................................................................................................122
3.4.7.5 Smart Info................................................................................................................124
3.4.7.6 Mirror Schedule (Plus models only)........................................................................125
3.4.7.7 Mount Disk..............................................................................................................127
3.4.7.8 Quick DeltaSync......................................................................................................127
3.4.8 Seeding Operations (NetSwap/RAIDFrame Plus Only)...................................................129
3.4.8.1 Make Seed................................................................................................................129
3.4.8.2 Unmark Seed Disk...................................................................................................130
3.4.8.3 Seed RAID Disk.......................................................................................................131
3.4.9 Create RAID Disk (NetSwap/RAIDFrame Plus only).....................................................132
3.4.10 RAID Properties (NetSwap/RAIDFrame Plus only)......................................................134
3.4.10.1 Resume RAID........................................................................................................137
3.4.10.2 Pause RAID............................................................................................................137
3.4.10.3 Break RAID...........................................................................................................138
3.4.10.4 Add Disk................................................................................................................139
3.4.10.5 Remove Disk..........................................................................................................140
4 High-Rely iSCSI Connector Software................................................................................................141
4.1 Installation..................................................................................................................................141

6
Copyright © 2011-2019 by Highly Reliable Systems, Inc. All rights reserved.
4.2 Operation....................................................................................................................................145
4.2.1 ISCSI Targets....................................................................................................................145
4.2.1.1 Connect....................................................................................................................146
4.2.1.2 Safely Remove.........................................................................................................147
4.2.1.3 Refresh.....................................................................................................................147
4.2.2 Persistent/Favorite Targets................................................................................................148
4.2.2.1 Edit...........................................................................................................................148
4.2.2.2 Remove....................................................................................................................149
4.2.2.3 Refresh.....................................................................................................................149
5 Configuration Examples.....................................................................................................................149
5.1 iSCSI Mode................................................................................................................................149
5.1.1 Windows............................................................................................................................149
5.2 More Examples..........................................................................................................................159
6 Restore to Factory Defaults.................................................................................................................159
7 NetSwap/RAIDFrame Plus Console...................................................................................................160
7.1 Configure Network....................................................................................................................161
7.1.1 Hostname..........................................................................................................................161
7.1.2 Ethernet X.........................................................................................................................162
7.2 Configure Date/Time..................................................................................................................163
7.2.1 NTP...................................................................................................................................165
7.2.2 Windows Server................................................................................................................165
7.2.3 Manual..............................................................................................................................166
7.3 Restore Default Settings.............................................................................................................167
7.4 Reboot........................................................................................................................................167
7.5 Shutdown...................................................................................................................................168
8 Remote Monitoring and Management (RMM) Support.....................................................................169
8.1 Network (TCP/HTTP) Based Monitoring..................................................................................169
8.1.1 Log Files...........................................................................................................................169
8.1.2 Disk Status Files................................................................................................................169
8.1.3 Replication Status Files.....................................................................................................170
8.1.4 Disk Flag Files..................................................................................................................171
8.1.5 Replication Job Flag Files.................................................................................................172
8.2 File Based Monitoring...............................................................................................................173
8.3 LabTech RMM...........................................................................................................................174
8.3.1 Network Monitor...............................................................................................................174
8.3.2 File Based Monitor............................................................................................................181
8.4 Level Platforms Managed Workplace 2012...............................................................................186
8.4.1 Device Availability Monitor..............................................................................................186
8.4.2 Custom Log File Monitor.................................................................................................194
8.4.3 Performance Counters Monitor.........................................................................................201
9 GPL Code Statement...........................................................................................................................207

7
Copyright © 2011-2019 by Highly Reliable Systems, Inc. All rights reserved.
1 Introduction
The NetSwap/RAIDFrame Plus is a removable-media network-attached backup system connecting via
Gigabit Ethernet using either iSCSI or standard Network Attached Storage (NAS) networking
protocols. 10 Gigabit Ethernet is available as an option.
The NetSwap/RAIDFrame Plus family consists of the NetSwap 200 series (single removable bay, 1
internal disk, and RAID), the 2 or 4 bay 2U rack-mount NetSwap 400 series (2 or 4 removable bays
and RAID), the 2 bay NetSwap 300 series mini-tower (2 bays and RAID), the 8 bay 4U rack-mount
NetSwap 800 series (8 removable bays and RAID), and the 2 or 4 bay RAIDFrame 2000 and 4000 4U
rack-mount (2 or 4 RAIDPac removable bays and RAID). With the exception of the RAIDFrame plus,
all NetSwap models can be equipped with either the High- Rely Classic or MPac media bays.
With the NetSwap/RAIDFrame Plus backup system you can choose one of two sharing modes for each
disk: iSCSI or NAS (Network Attached Storage) connecting over Windows Networking(SMB/CIFS)
and NFS. Windows networking is also called (SMB/CIFS) which stand for “Server Message Block/
Common Internet File System”. NFS stands for “Network File System”, which is often used in
Unix/Linux and for virtualization platforms like VMware.
It is possible to have both Windows networking (SMB/CIFS) and NFS networking turned on at
once
for each disk. The NetSwap/RAIDFrame Plus's internal (NetSwap 200 series only) and removable
drive's are available as a simple Windows network share and as a NFS export point (folder) – basically
as Network Attached Storage (NAS) with a removable drive.
In iSCSI mode the NetSwap/RAIDFrame Plus cannot simultaneously share the disk as a NAS device
since the entire removable hard drive is dedicated to direct connectivity. A given machine (server) will
directly connect and use the entire removable drive. The NetSwap/RAIDFrame Plus's
removable drive
s
are connected using iSCSI initiator software and supports optional CHAP username/name and
password/secret to improve security. If you need to make an iSCSI drive available to multiple servers
for backup simply “share” the drive on the machine with the iSCSI initiator software, making it
available as a network wide resource. This may be thought of as re-sharing the drive to the rest of the
network.
Disks may be formatted with with encryption if desired for added protection. The encryption is
compatible with the popular TrueCrypt disk encryption software allowing for the disk to be decrypted
on any system capable of running TrueCrypt. Some models of the NetSwap/RAIDFrame Plus include
hardware encryption.
Some models add the ability to replicate backups off site; either to another NetSwap or to various cloud
storage providers (including Dropbox, Amazon S3, Google Cloud Storage) or servers or providers
using FTP or SFTP protocols.

8
Copyright © 2011-2019 by Highly Reliable Systems, Inc. All rights reserved.
2 NetSwap/RAIDFrame Plus Hardware
2.1 Front Panel
The front panel of the devices are as follows:
2.1.1 Desktop Chassis (legacy)
3
1
2
7
4
5
6
Illustration 1: Desktop Chassis Front Panel
1
Power/Alarm Indicator*
2
Power Button
3
Removable Drive Bay
4
Clear Alarm Button*
5
Disk Activity Indicator
6
USB P
ort
7
Bay Status Indicators*
*Note: Bay Status Indicators, Alarm Indicator and Clear Alarm button only on G2 models.

9
Copyright © 2011-2019 by Highly Reliable Systems, Inc. All rights reserved.
2.1.2 2U Rackmount Chassis (NetSwap Plus only)
12
6
1
8
5
7 9
2
3
13 4
10
11
Illustration 2: 2U Rackmount Chassis Front Panel
1
Removable Bay 1
2
Removable Bay 2
3
Removable Bay 3
4
Removable Bay 4
5
Power/Alarm Indicator*
6
USB P
ort
7
Power Switch
8
Bay 1 Status Indicator*
9
Bay 2 Status Indicator*
10
Bay 3 Status Indicator*
11
Bay 4 Status Indicator*
12
Clear Alarm Button*
13
Removable Boot Disk Bay
*Note: Bay Status Indicators, Alarm Indicator and Clear Alarm button only on G2 models.
10
Copyright © 2011-2019 by Highly Reliable Systems, Inc. All rights reserved.
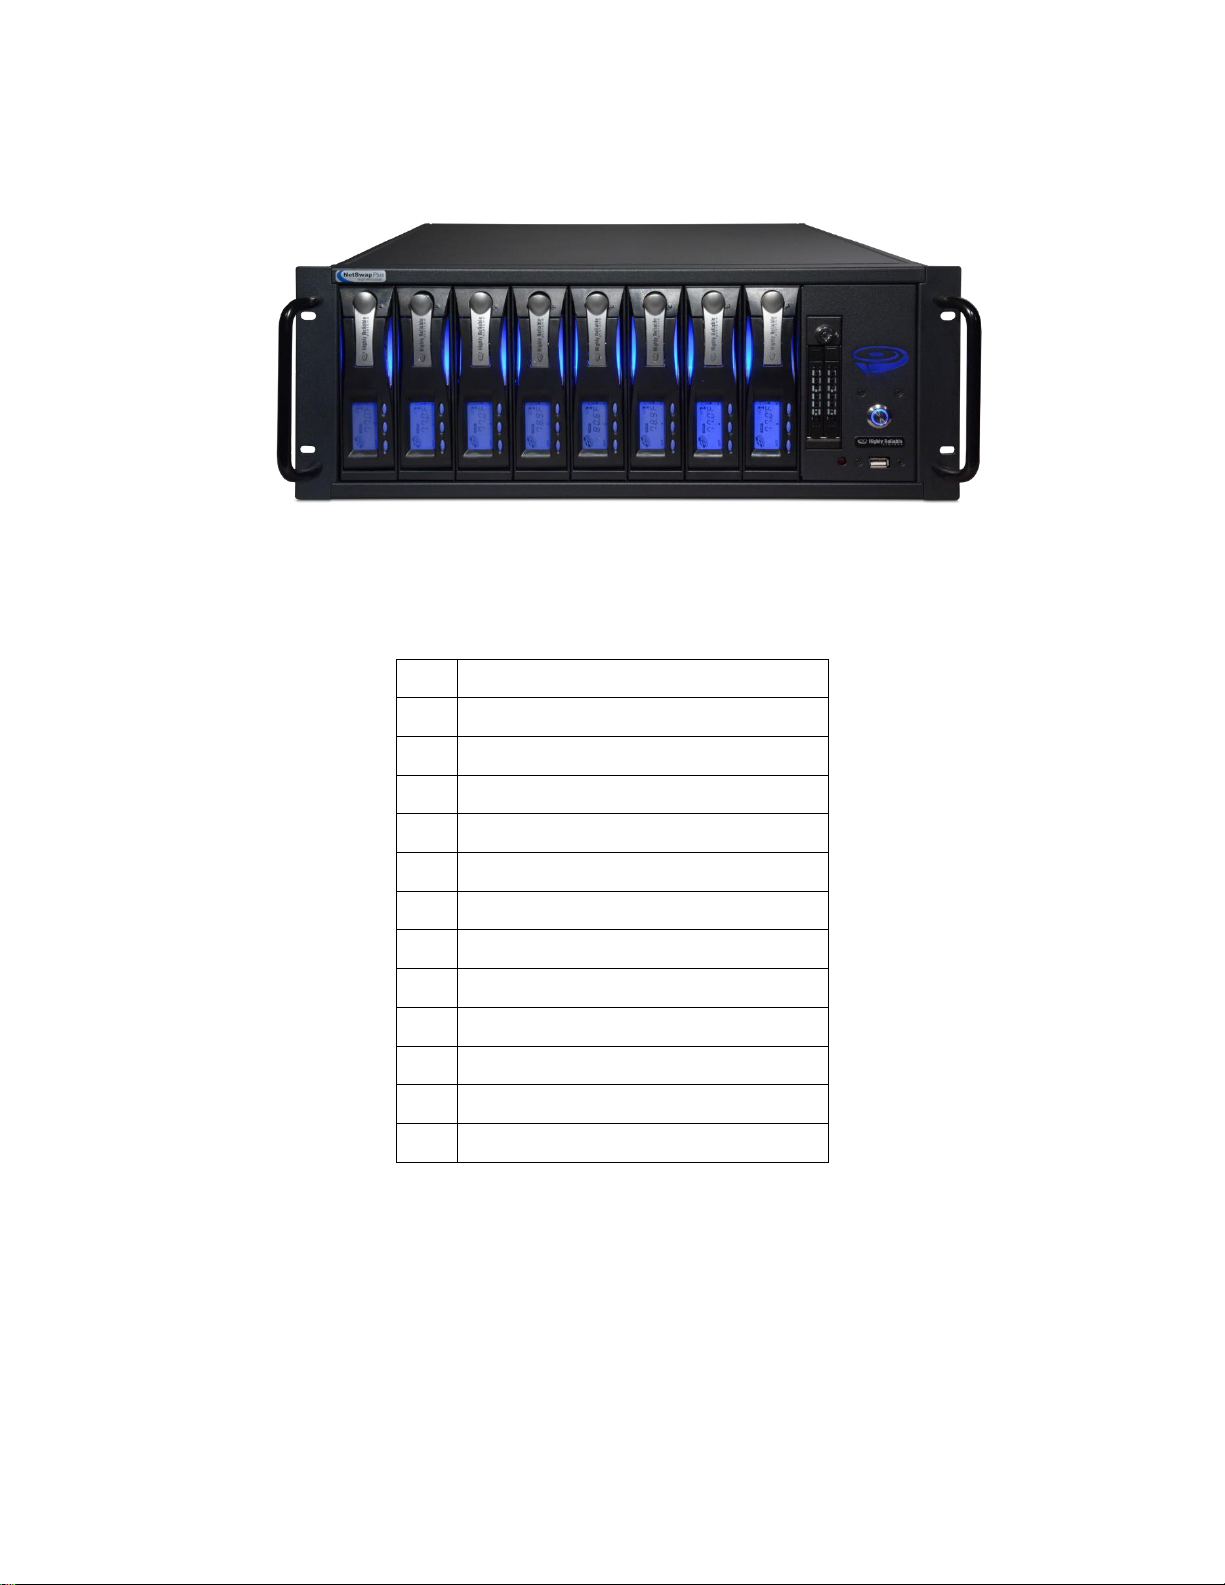
2.1.3 4U 8 Bay Rackmount Chassis (NetSwap Plus only)
10
9
11
1 2 3 4 5 6 7 8
12
13
Illustration 3: 4U 8 Bay Rackmount Chassis Front View
1
Removable Bay 1
2
Removable Bay 2
3
Removable Bay 3
4
Removable Bay 4
5
Removable Bay 5
6
Removable Bay 6
7
Removable Bay 7
8
Removable Bay 8
9
Removable Boot Disk Bay
10
Power/Alarm Indicator
11
Power Button
12
USB P
ort
13
Clear Alarm Button
*Note: Bay Status Indicators, Alarm Indicator and Clear Alarm button only on G2 models.
11
Copyright © 2011-2019 by Highly Reliable Systems, Inc. All rights reserved.
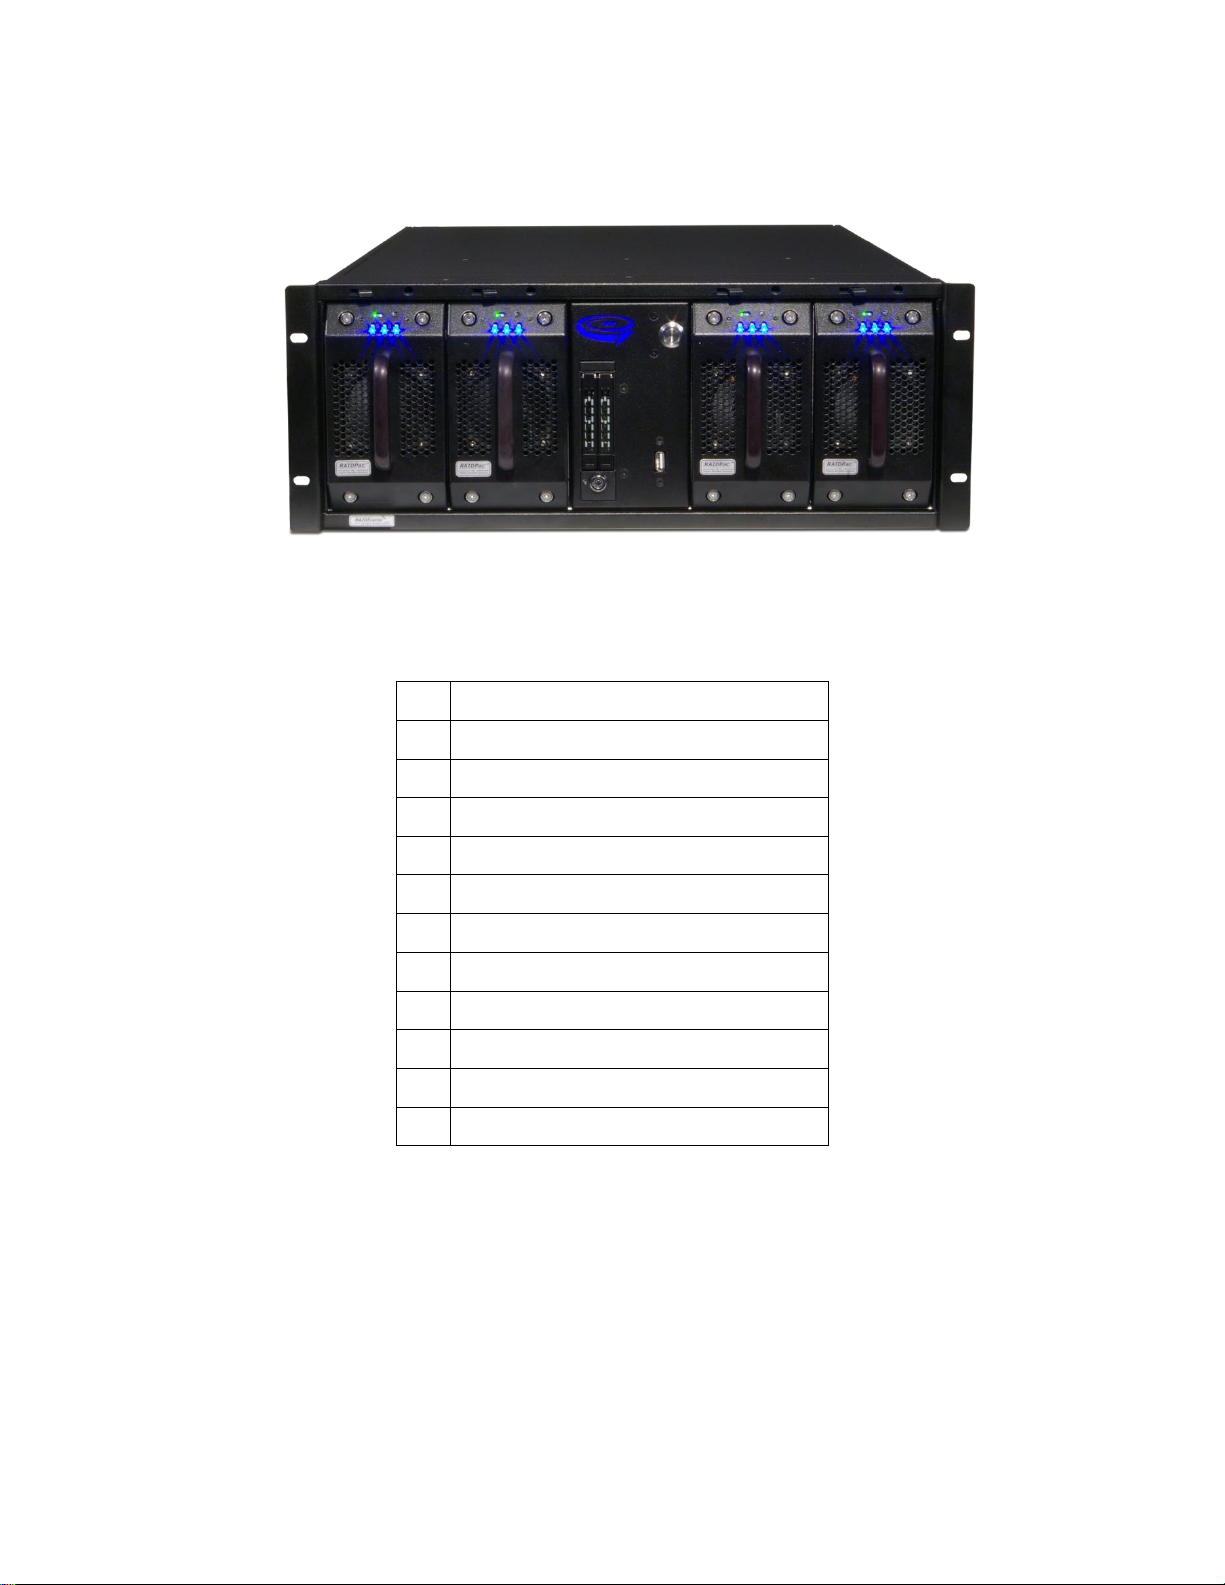
2.1.4 4U RAIDFrame Rackmount Chassis (RAIDFrame Plus only)(legacy)
9 10
11 12
6
1 2
7
3 4
5
8
Illustration 4: 4U RAIDFrame Rackmount Chassis Front View
1
Removable RAIDPac Bay 1
2
Removable RAIDPac Bay 2
3
Removable RAIDPac Bay 3
4
Removable RAIDPac Bay 4
5
Removable Boot Disk Bay
6
Power/Alarm Indicator
7
Power Button
8
USB P
ort
9
Bay 1 Indicator
10
Bay 2 Indicator
11
Bay 3 Indicator
12
Bay 4 Indicator
*Note: Bay Status Indicators, Alarm Indicator and Clear Alarm button only on G2 models.

12
Copyright © 2011-2019 by Highly Reliable Systems, Inc. All rights reserved.
2.1.5 Mini Chassis
Illustration 5: 2 Bay Mini
1
Power Button
2
Reset Button/Unit Activity
3
Removable Drive Bay 1
4
Removable Drive Bay 2
5
Removable Boot Disk Bay
6
Bay 1 Status Indicator
7
Bay 2 Status Indicator
8
USB 3.0/ USB C Ports
9
Drive Activity Indicator (Amber)
10
Drive Activity Indicator (Green)
2.1.6 Power On Procedure
To power on the device, press and release the power button. The clear ring surrounding the power
button will glow blue when the power is on.

13
Copyright © 2011-2019 by Highly Reliable Systems, Inc. All rights reserved.
2.1.7 Power Off Procedure
To power off (shutdown) the device press and release the power button. The device will gracefully
shutdown by saving any unwritten data and properly disconnecting devices. NOTE: YOU MUST
SAFELY REMOVE ANY MEDIA CONNECTED TO REMOTE SERVERS THROUGH ISCSI
BEFORE POWERING OFF THE DEVICE OR DATA LOSS OR CORRUPTION MAY OCCUR!!!!
If the device does not power down automatically after pressing the power button, the device can be
forced to power down by pressing and holding the power button until the device powers off.
You can also power off (shutdown) the device through the web administration interface as documented
below.
2.2 Rear Panel
The rear panel on the devices are as follows:
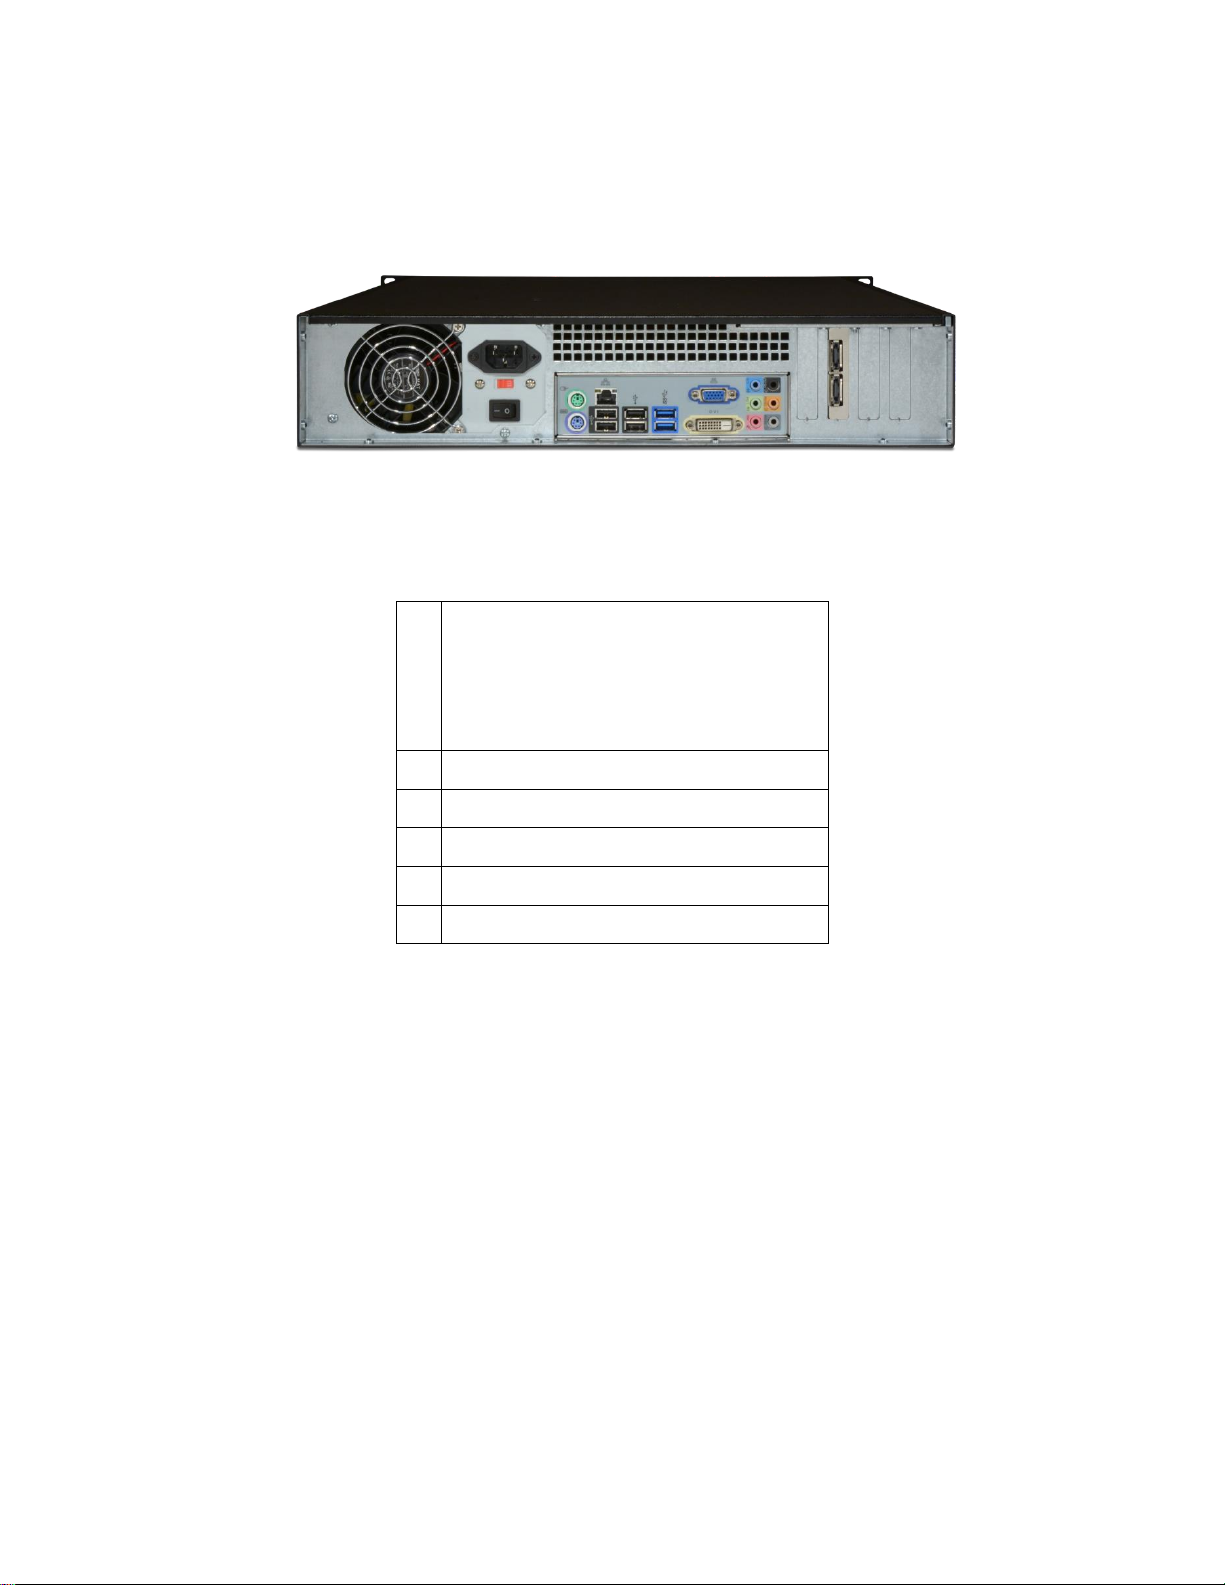
2.2.1 Desktop Chassis (legacy)
4
1
2
3
5
Illustration 6: Desktop Chassis Back View
1
PS/2 Keyboard/Mouse
2
VGA/DVI Video Connectors
3
USB P
ort
s
4
10/100/1000 MB Ethernet Port
5
Power Receptacle - Auto-sw
itc
h
110/220 V
olt
s
Note layout may vary depending on motherboard used.
14
Copyright © 2011-2019 by Highly Reliable Systems, Inc. All rights reserved.
2.2.2 2U Rackmount Chassis (2 or 4 Bay)
1
3
6
2
4
5
Illustration 7: 2U Chassis Back View (2 or 4 Bay)
1
Power Receptacle - 110/220 V
olt
s
Some power supplies are auto-
switch and some are not – check
power supply before conn
ecti
ng
power.
2
PS/2 Keyboard/Mouse
3
10/100/1000 MB Ethernet Port
4
USB P
ort
s
5
DVI/VGA Video Connectors
6
eSATA Ports (optional)
Note layout may vary depending on motherboard used.

15
Copyright © 2011-2019 by Highly Reliable Systems, Inc. All rights reserved.
2.2.3 4U Rackmount Chassis (8 bay or RAIDFrame) (legacy)
7
2
5 6
1
3
4
Illustration 8: 4U Rackmount Chassis Back View (8 Bay or RAIDFrame)
1
PS/2 Keyboard/Mouse
2
10/100/1000 MB Ethernet Port
3
USB P
ort
s
4
DVI/VGA Video Connectors
5
10 Gb Ethernet (optional)
6
eSATA Ports (optional)
7
Power Receptacle - 110/220 V
olt
s
Some power supplies are auto-
switch and some are not – check
power supply before conn
ecti
ng
power.
Note layout may vary depending on motherboard used.

16
Copyright © 2011-2019 by Highly Reliable Systems, Inc. All rights reserved.
2.2.4 Mini Chassis
Illustration 9: 2 Bay Mini
1
Power Receptacle - Auto-sw
itc
h
110/220 V
olt
s
2
Video Connectors
3
Gigabit Ethernet Port
4
USB 3.0 Ports
5
PCIE Expansion Slot
Note layout may vary depending on motherboard used.

17
Copyright © 2011-2019 by Highly Reliable Systems, Inc. All rights reserved.
3 NetSwap/RAIDFrame Plus Administration
Although the NetSwap/RAIDFrame Plus has a VGA, keyboard, and mouse port for emergency use, the
device is normally administered through a web browser so it will not be necessary to directly connect a
monitor. Just hook the device up via an Ethernet cable to your network or directly to the configuring
machine and power it up. Now open a browser on the configuring machine using standard port 80 (or
securely over SSL on port 443).
By default the NetSwap will use a dual IP mode of DHCP+STATIC which means it will attempt to get
an IP address using DHCP as well as use a static IP of 192.168.1.50. The NetSwap Locator software
available from our website (https//high-rely.com) can be used to locate the NetSwap on your network.
To connect to the NetSwap/RAIDFrame Plus either use the NetSwap Locator (skip to step 3) or browse
to 192.168.1.50:
1. If you are currently using a different IP address scheme on your network, you will need to
temporarily change the TCP/IP properties of your configuration computer's network adapter to
access this IP. We recommend making your Network card something like 192.168.1.49 with a
netmask of 255.255.255.0 (as long as this address is unused... “ping 192.168.1.49” first to
verify nothing responds).
Open a web browser and enter “192.168.1.50” into the address bar.
Illustration 10: Web Browser Address Bar
2. If you are unable to connect to the NetSwap/RAIDFrame Plus default IP Address you may have
to use the supplied USB key to reload factory defaults.
3. When prompted enter for username and password:
User Name: hradmin
Password: password
Please NOTE: the username and password are BOTH case sensitive – you will need to use
all lower case.

18
Copyright © 2011-2019 by Highly Reliable Systems, Inc. All rights reserved.
Illustration 11: Username/Password Entry
3.1 Quick Setup
This section provides a set of steps to quickly configure the NetSwap/RAIDFrame Plus and get it
connected to your network. A complete reference for the administration interface is provided below.
1. Change the Admin Password
Click the 'Admin' option under 'Settings' on the administration menu. Enter a new password
and matching confirmation password and click the 'Save' button.
2. Set Network Settings
You will want to adjust the NetSwap/RAIDFrame Plus to match your network IP numbering
scheme. Click the 'Network' option under 'Settings' on the administration menu.
We
recomme
nd STATIC IP mode rather than DHCP since this device will be accessed by the
backup software at a fixed location. Make sure to choose an address outside your DHCP scope
(or make a reservation). Enter the desired values for IP address, Netmask, Gateway, and DNS
and click the 'Save' button. After changing the network settings you may need to reconfigure
your configuring machine's network adapter back to it's previous IP to both work with the res
t
of the network and to reconnect to the NetSwap/RAIDFrame Plus on the new number scheme.
3. Prepare Hard Disks
Prepare each removable disk (and the internal disk on equipped NetSwap Plus models) and
share the disks as detailed in the 'Disk Preparation' section below.
4. Connect to the NetSwap/RAIDFrame Plus
iSCSI – Connect using the iSCSI Initiator using the IP Address, Target Name, and CHAP
authentication as set using the 'iSCSI' menu option (the default is no CHAP authentication).
See the detailed walk through in a later chapter for more detail. You should install the HighRely iSCSI Connector software described below to allow safe removal of the hard drive when
swapping.
When using iSCSI we recommend turning off off default indexing service. Right click the
drive in Explorer and select properties. Uncheck “Allow files on this drive to have contents
indexed in addition to file properties.”

19
Copyright © 2011-2019 by Highly Reliable Systems, Inc. All rights reserved.
Illustration 12: File Indexing
NAS - Connect using the Network Browser or from the command line on Windows using the
command “net use <drive> \\<NetSwap/RAIDFrame Plus ip or hostname>\<share name>”, for
example:
net use x: \\192.168.1.50\Backup password /user:bill
You may want to verify that your Windows network card is at the highest possible speed (e.g.
Gigabit Ethernet). Right click your network connection, select status and verify Speed:

20
Copyright © 2011-2019 by Highly Reliable Systems, Inc. All rights reserved.
Illustration 13: Windows Network Settings
Note: When sharing via NAS \\server\share... we assume that the client's backup software supports and
internally retains storing NTFS and SHARE level permissions. If you copy files directly to
NetSwap/RAIDFrame Plus drive using explorer, Robocopy or similar file program to the
NetSwap/RAIDFrame Plus drive may not preserve all user and group permissions.

21
Copyright © 2011-2019 by Highly Reliable Systems, Inc. All rights reserved.
3.2 Disk Preparation
3.2.1 Formatting Disks
Each disk must be formatted by the NetSwap/RAIDFrame Plus before it can be shared either iSCSI or
NAS. This not only clears and prepares the disk for use but also records meta-data to the disk so the
NetSwap/RAIDFrame Plus can recognize the disk when it is inserted later.
To format a disk click the 'Format' button in the 'Action' column next to the disk you would like to
format from the 'Disks' menu option as shown below:
Format Disk Action
Button
Illustration 14: Format Disk Action Button
See the 'Format' section below for more information on formatting disks.

22
Copyright © 2011-2019 by Highly Reliable Systems, Inc. All rights reserved.
3.2.2 Sharing Disks
Once disks have been formatted and any RAID disks have been created and formatted
(NetSwap/RAIDFrame Plus models only) disks can be shared as either iSCSI or NAS by setting the
Share Mode on the disk 'Properties' screen. To access the disk properties click the 'Properties' button
on the Disks menu option as shown below:
Disk Properties Button
Illustration 15: Disk Properties Button
From the disk properties screen you can set the disk name (used as the share name in NAS mode) and
the Share Mode. Note that if a disk is part of a mirror disk it cannot be shared directly, the mirror disk
must be shared. See the 'Disk Properties' section below for more details.

23
Copyright © 2011-2019 by Highly Reliable Systems, Inc. All rights reserved.
3.2.3 Creating RAID Disks (NetSwap/RAIDFrame Plus only)
Once all disks are formatted (see above) you can create RAID disks from one or more of the disks. To
create a RAID disk click the 'Create RAID Disk' button on the 'Disks' menu as shown below:
Create RAID Button
Illustration 16: Create RAID Disk Button
Once the RAID disk is created, it must be formatted. If creating a RAID 1 (Mirror) with multiple disks
that will be swapped in/out, each additional disk that will be hot-swapped for backup must be added to
the RAID using the 'Add Disk' action from the 'RAID Properties' screen as shown below:

24
Copyright © 2011-2019 by Highly Reliable Systems, Inc. All rights reserved.
Add Disk Button
Illustration 17: Add Disk Button
Note that when adding additional backup disks to a new RAID 1 disk you do not have to wait for the
rebuild operation to complete before physically removing the disk and adding other disks because the
rebuild will need to run again anyway when the disk is swapped in for backup.
When creating a RAID 1 (Mirror) disk using disks that were previously part of a RAID 1 disk where
existing data is to be preserved, create the RAID 1 disk with just one of the disks that is known to
contain good data and then add the additional disk(s). This will insure the disk with the good data is
the 'master' and the data is preserved. NOTE: Even though you specify a master disk when
creating a RAID 1 disk, this master setting is only used for Scheduled Mirroring. To preserve
data, create the RAID 1 disk with a single disk as described above.
3.3 Replication (NetSwap/RAIDFrame Plus Only)
Replication of folders or entire disks are supported from one NetSwap to another NetSwap (or multiple
NetSwaps). Replication is incremental and supports data compression and encryption levels up to
AES-256.
3.3.1 Replication Jobs, Locations, and Targets
A Replication Job is created on the source NetSwap (the NetSwap with data to be replicated) and
define
s the source, the destination, job options such as compression level and bandwidth limiting, and a
schedule that determines when a job will be run.
The source and destination for the job can either be a local disk or a Remote Location (remote NetSwap
or other remote server). Only disks that are shared in NAS mode can be used for a source or
destination, unshared and disks shared iSCSI cannot be used. Normally the source for the Replication

25
Copyright © 2011-2019 by Highly Reliable Systems, Inc. All rights reserved.
Job is a local disk/folder and the destination is a Target on a remote NetSwap, although the source and
destination can be swapped to create a “pull” replication job that can be used for restoring data. In
addition, both source and destination can be local disks to copy data from one disk to another in order
to seed the remote backup.
A Replication Target is created on the destination NetSwap (the NetSwap to which data is to be
replicated). A Target defines a folder on a local disk to receive the replicated data and a username and
password required to access the target. Only disks that are shared in NAS mode can be used for a
Target. Multiple Targets can be created pointing to different folders on a single disk to support
replicating data from multiple NetSwaps to a single remote NetSwap.
3.3.2 Setting up a Basic Replication Job
To begin, make sure your firewall is configured correctly to allow outbound traffic from the NetSwap
being replicated from and the correct ports are forwarded to the NetSwap that is being replicated to.
By default, if the replication job is not being encrypted the port is 873 and if it is encrypted the default
is 8873 (these can be changed on the Replication Settings screen). You may also want to enable
Remote Administration on the NetSwap being replicated to and forward the port (by default 9090) to
the NetSwap as well to allow remote administration of the NetSwap.
Create a Target on the remote NetSwap (the NetSwap that is to receive the replicated data) by clicking
on the 'Targets' menu option under 'Replication' and then clicking on the 'New' button.
Illustration 18: Replication Target
Enter a name, username, and password and then select the desired disk and folder where the data will
be stored and then click 'Save' to save the Target.
Next, on the NetSwap to be replicated, create a Job by clicking on the 'Jobs' menu option under
'Replication' and then clicking the 'New' button. This will popup the Job wizard that will guide you
through setting the details of the new Job.

26
Copyright © 2011-2019 by Highly Reliable Systems, Inc. All rights reserved.
Illustration 19: Replication Job - Source
Select the 'Local Disk' as the 'Source Type' and select a disk and folder to be replicated and click the
'Next' button.

27
Copyright © 2011-2019 by Highly Reliable Systems, Inc. All rights reserved.
Illustration 20: Replication Job - Destination
Select 'Remote Location' for 'Destination Type'. For 'Location' select 'New Remote Location' and a
window will popup to allow creation of a new 'Remote Location'.
Illustration 21: Remote Location
Enter a name, the hostname or IP address of the remote NetSwap, the TCP/IP port, select 'None' for the
the encryption level and click 'Save' to save the new Remote Location. The default TCP/IP port for
unencrypted replication is 873 and for encrypted replication is 8873. The ports are defined on the
remote NetSwap in the 'Settings' menu option under 'Replication'.
28
Copyright © 2011-2019 by Highly Reliable Systems, Inc. All rights reserved.
Now that the Remote Location has been created, select the desired Target. To retrieve the Targets
shared by the remote NetSwap and fill in the Target drop down, click the 'Get Targets' button. Next
enter the username and password for the selected Target. Click the 'Test' button to verify the username
and password are correct and then click 'Next'.
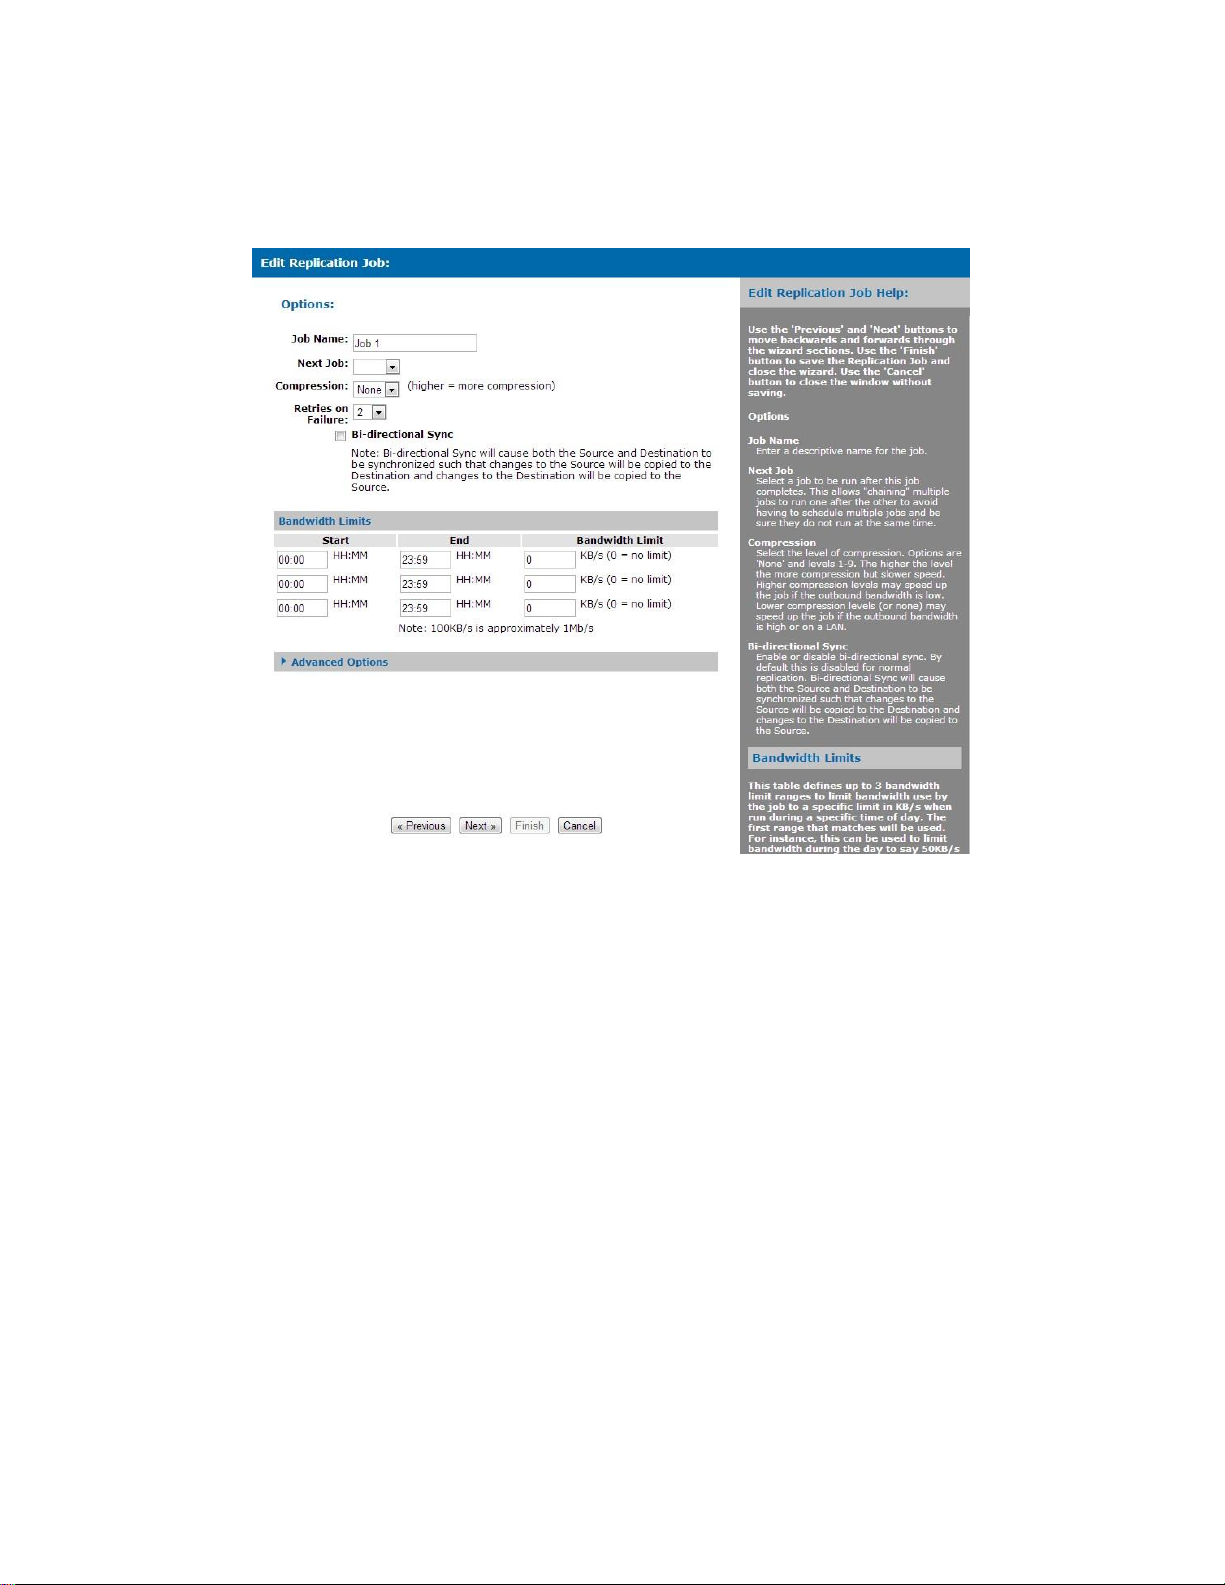
Illustration 22: Replication Job - Options
Enter a name for the Job and click 'Next'.

29
Copyright © 2011-2019 by Highly Reliable Systems, Inc. All rights reserved.
Illustration 23: Replication Job - Schedule
For the schedule, we will just use the default of running the Job every hour. Click 'Finish' the save the
new Job. Now the Job will be displayed on the 'Jobs' page and will show that it is Ready and has
never been run.
Illustration 24: Replication Jobs
To run the Job immediately, click the checkbox next to Job and click the 'Start' button. Once the Job is
started, the Status column will show that the Job is 'Running' and will display a progress bar. You may

30
Copyright © 2011-2019 by Highly Reliable Systems, Inc. All rights reserved.
want to check 'Auto Refresh' so the page will periodically refresh to show the progress of the Job.
O
nce
the job is completed, the Status will go back to 'Ready' and the Last Result will display 'Success'
or 'Failure'. To view the history and logs for the Job, check the box next to Job and click the 'History'
button.
Illustration 25: Replication Job History
3.3.3 Seeding
If the data to be replicated is large, it is desirable to seed the Job by copying the data to a local hard
disk and carry that disk to the remote NetSwap/Service and copy the data onto the remote
NetSwap/Service rather than waiting for the Replication Job to send the data across the network.
There are several ways to create a seed disk on the NetSwap: 1) create a Seed Replication Job for a
specific Replication Job, 2) if you are replicating from a RAID 1 Disk, use the SpeedSeed options
(described below in section 3.4.8), 3) setup both NetSwap's on a LAN and run the Replication Job for
the first time across the LAN then transport the remote NetSwap to the off site location.
3.3.3.1 Seed Using a Replication Seed Job
Insert the disk to be used as the seed disk into the NetSwap (format if necessary). From the Replication
Jobs screen, select the Replication Job you wish to seed and click the 'Seed Out' button. Select the

31
Copyright © 2011-2019 by Highly Reliable Systems, Inc. All rights reserved.
Standard Seed type, the disk to be used for the seed and set the name and options as required (see the
section below on Seed Out Jobs). If you are seeding a Replication Job to Amazon S3, you also need to
create an AWS Import Job from the options page (you should familiarize yourself with the procedures
required to send data to Amazon on the AWS website). Click 'Finish' to create the job. A Replication
Seed Out Job will be created that is associated with the Replication Job selected and will use the
settings from that job to create the seed (e.g. which folder, etc.)
Once the Job is created, run the Job by selecting the seed Job from the Jobs screen and clicking 'Start'.
The NetSwap will copy the files to the seed disk and perform any preparation required depending on
the type of Replication Job. For Amazon S3 seed disks, the SIGNATURE file (created by Amazon
when you create an AWS Import job) will be copied to the disk as required. The job can be monitored
like a regular Replication Job from the Replication Jobs screen.
Once the Job is completed, remove the disk.
If seeding a remote NetSwap , transport the disk to the remote NetSwap and insert the disk. Select the
desired Target from the Replication Targets screen and click 'Seed In'. Fill in the name and select
desired options and click 'Finish'. This will create a Replication Seed In Job with the correct disk and
folder for the Target. Run the Job and remove when completed.
If seeding to Amazon S3 remove the disk and label it with the Disk Id you selected and pack for
shipping along with a filled out Amazon Packing List and ship to the address specified by Amazon for
that AWS Import job (this address is supplied by Amazon when the AWS Import job is created and is
specific to the data center where your bucket is located). You should familiarize yourself with the
requirements for sending media to Amazon on the AWS website. You can monitor the progress of the
AWS Import job through the Replication Seed Out Job (don't delete it until the data is successfully
seeded to Amazon) or from the 'Amazon I/E Jobs' screen.
3.3.3.2 Seed Using SpeedSeed
TM
The SpeedSeed
TM
option takes advantage of the fact that when synced (not rebuilding) both disks in a
RAID 1 (Mirror) Disk contain identical data and one disk can be removed immediately to create a seed
and be transported to the remote site.
For this example we will be using two NetSwap Plus's each with a 4TB internal disk.
To create the seed disk on the NetSwap to be replicated from a synced RAID 1 Disk, select the 'Disks'
menu option.

32
Copyright © 2011-2019 by Highly Reliable Systems, Inc. All rights reserved.
Illustration 26: Make Seed
Click the 'Make Seed' button for the disk to be used as the seed, in our case DISK-2249. Once
confirmed, this will remove the disk from the RAID 1 Disk and mark it as a seed disk. Once
completed, remove the disk from the NetSwap and transport it to the remote site and insert into the
remote NetSwap.

33
Copyright © 2011-2019 by Highly Reliable Systems, Inc. All rights reserved.
Illustration 27: Seed RAID Disk
In the image above from the remote NetSwap, we see our seed disk installed, the internal disk, and we
have no RAID 1 Disks. Click the 'Seed RAID Disk' button for the seed disk.

34
Copyright © 2011-2019 by Highly Reliable Systems, Inc. All rights reserved.
Illustration 28: RAID Disk Seeded
Once the RAID 1 Disk is seeded we can see in the image above a RAID Disk has been created from
DISK-2249 and is in a degraded state since only one disk is active.
At this point the RAID 1 Disk has been seeded with the data and is immediately ready for replication to
and a Replication Target can be created on the NetSwap for the RAID Disk and a Replication Job can
be created and started on the original NetSwap.
Next we will add the internal disk (DISK-0226) to the RAID Disk. Click the 'RAID Properties' button
for the RAID Disk.

35
Copyright © 2011-2019 by Highly Reliable Systems, Inc. All rights reserved.
Illustration 29: RAID Properties
From the RAID Properties screen click the 'Add Disk' button.
Illustration 30: Add Disk
Select the internal disk and click the 'Add' button.

36
Copyright © 2011-2019 by Highly Reliable Systems, Inc. All rights reserved.
Illustration 31: RAID Disk Rebuilding
From the Disks screen we can see the RAID Disk is rebuilding and copying the data from the seed disk
to the internal disk.
Because this was the first time this device was seeded a new RAID Disk was created that is a duplicate
of the original RAID Disk. Subsequent seeds will not need to create the RAID Disk and when the
'Seed RAID Disk' button is clicked when seeding, the existing RAID Disk will be stopped and restarted
with the seed disk as the master and the internal disk will automatically be added back in and the RAID
Disk will begin rebuilding and copying the data to the internal disk without further interaction.
3.3.4 Snapshots
The NetSwap has the ability to create a disk snapshot when starting a Replication Job so that the data
remains as it was when the Replication Job started. This is useful when the data being replicated may
change while the Replication Job is running, such as when incremental backups are run on a continuous
basis (such as hourly), so that the integrity of the data is maintained.
Disk snapshots require that extra disk space be allocated to store all the changes to the data that may
occur while the Replication Job is running. There are two ways to allocate space for a snapshot: 1)
when formatting the disk to be replicated, specify the amount of space to be reserved for the snapshot,
or 2) use another unshared disk for the snapshot.
Enough space must be allocated to store all the changes that could occur. If the NetSwap runs out of
snapshot space for the disk, writes to the disk will fail. If you know that only 200GB could possibly
change while the Replication Job is running, then you could reserve 200GB. The safest option is to
have the snapshot space the same size as the disk. In the case where space is being reserved when the
disk is formatted, reserve half the disk for the snapshot. In the case where a separate disk is being used
for the snapshot, use two disks of the same size.
To specify that a Replication Job is to create a snapshot when it is run, select a disk for 'Snapshot
Storage' for the 'Source' of the Replication Job as shown below:

37
Copyright © 2011-2019 by Highly Reliable Systems, Inc. All rights reserved.
Illustration 32: Replication Job - Snapshot Storage Selection

38
Copyright © 2011-2019 by Highly Reliable Systems, Inc. All rights reserved.
Header
Help
Form
Area
3.4 Administration Reference
3.4.1 Page Layout
Menu
Illustration 33: Form Layout

39
Copyright © 2011-2019 by Highly Reliable Systems, Inc. All rights reserved.
3.4.2 Status Menu
3.4.2.1 Status
The Status option displays the current status and configuration of the NetSwap/RAIDFrame Plus. This
page automatically updates every 10 seconds.
Illustration 34: Status
Basic Information
Hostname
The current hostname as defined in 'Network Settings'.
Date/Time
Current date and time.
Uptime
Current system uptime (i.e. time since system was booted).
Alarm Status (NetSwap/RAIDFrame Plus Only)
Alarm
Displays whether or not the alarm is on and if it is muted. If the alarm is on, a 'Clear Alarm'
button will appear allowing the alarm to be cleared.

40
Copyright © 2011-2019 by Highly Reliable Systems, Inc. All rights reserved.
Reason
The reason the alarm was triggered.
Dashboard
Connected
'Yes' if connected to a remote NetSwap Dashboard, 'No' if not connected, or 'N/A' if this device is
not registered with a remote NetSwap Dashboard.
Last Poll
The date and time of the last poll by a NetSwap Dashboard.
Ethernet X Settings
A section for each Ethernet port where X will be 0, 1, 2, etc.
MAC Address
Hardware MAC address for Ethernet port.
Connected
Yes or no.
Speed
Ethernet connection speed in MB/s.
IP Mode
Either DHCP or STATIC.
IP Address
Configured IP address
Netmask
TCP/IP netmask
Gateway
TCP/IP gateway IP address
DNS S
etti
ngs
DNS 1
DNS server 1 IP address.
DNS 2
DNS server 2 IP address.
Physical Disk/RAID Disks (RAID Disks only appears on NetSwap/RAIDFrame Plus)
Displays information on the currently installed physical and RAID disks.
Bay #
Bay in which disk is installed.

41
Copyright © 2011-2019 by Highly Reliable Systems, Inc. All rights reserved.
#
RAID disk number (only displayed for RAID disks).
Friendly Disk Name
Name assigned to the disk in 'Properties'.
Mode
Share mode assigned to the disk in 'Properties'. Options are N/A (not shared), NAS (Windows
Networking/NFS), and iSCSI. If the disk is part of a RAID, RAIDwill be displayed.
Details
Displays the disk capacity. If the disk is shared in NAS mode and has been formatted with a file
system the free space and file system type will also be displayed.
Status
Displays whether or not the disk is installed, whether or not it is shared, and if it is formatted. If
the disk is being formatted, the format progress will be displayed as well. If it is a RAID Disk
this displays the current status of the RAID Disk. This will indicate if the set is Active or not, if
the array is degraded or not, and if rebuilding it will display the current rebuild status. Note:
RAID disks are only applicable to NetSwap/RAIDFrame Plus.
3.4.2.2 Tasks
Displays the tasks status for currently active tasks and a history of the last 10 completed tasks. Updates
automatically.
Illustration 35: Tasks
ID
Task ID.

42
Copyright © 2011-2019 by Highly Reliable Systems, Inc. All rights reserved.
Description
Simple description of the task.
Status Message
Short message describing what the task is doing.
Work Completed
Percentage of work completed.
State
Task state. Options are: Running, Completed, or Error.
3.4.2.3 View
Log
Displays the last 200 lines of the current log and allows one to download the complete
NetSwap/RAIDFrame Plus, System, Kernel, and Boot logs as text files.
Illustration 36: View Log

43
Copyright © 2011-2019 by Highly Reliable Systems, Inc. All rights reserved.
3.4.3 Settings Menu
3.4.3.1 Network
Configure TCP/IP network settings.
Illustration 37: Network Settings - DHCP
Illustration 38: Network Settings - STATIC

44
Copyright © 2011-2019 by Highly Reliable Systems, Inc. All rights reserved.
Illustration 39: DHCP+STATIC
Host Information
Hostname
TCP/IP hostname. The hostname can optionally contain a domain name, for example 'HRNETSWAP.local'
Ethernet X Settings
One section for each Ethernet port installed where X is 0, 1, 2,
etc
.
IP Mode
IP Mode is DHCP, STATIC, DHCP+STATIC, or DISABLED. If STATIC is selected the Static IP
Address, Netmask, Gateway, DNS1, and DNS2 will be used to configure the network. If
DHCP+STATIC is selected the Static IP Address, Netmask, Gateway, DNS1, and DNS2 will be
used to configure a secondary IP address for the network.
DHCP IP Address
IP Address. In DHCP mode, this is assigned automatically.
Netmask
Netmask. In DHCP mode, this is assigned automatically.
Gateway
Gateway. In DHCP mode, this is assigned automatically.
DNS1
DNS1. In DHCP mode, this is assigned automatically.

45
Copyright © 2011-2019 by Highly Reliable Systems, Inc. All rights reserved.
DNS2
DNS2. In DHCP mode, this is assigned automatically.
STATIC IP Address
IP Address. In DHCP mode, this is assigned automatically.
Netmask
Netmask. In DHCP mode, this is assigned automatically.
Gateway
Gateway. In DHCP mode, this is assigned automatically.
DNS1
DNS1. In DHCP mode, this is assigned automatically.
DNS2
DNS2. In DHCP mode, this is assigned automatically.
MTU
MTU is the maximum transmission unit or maximum size of a packet or frame on the network.
Valid values are from 1500 to 7200 bytes. MTU set larger than 1500 bytes is often referred to as
Jumbo Frames. This can only be set in STATIC mode.
Identify
This will blink the led's on the port for several seconds if supported by the Ethernet port.
Diagnostics
This brings up the Network Diagnostics screen show below:
Illustration 40: Network Diagnos
tic
s
Enter a hostname or IP and click the button to run the desire tool (Ping, Trace Route, or NS
Lookup). The result will be displayed below “Result:”.

46
Copyright © 2011-2019 by Highly Reliable Systems, Inc. All rights reserved.
3.4.3.2 Dynamic DNS (NetSwap/RAIDFrame Plus Only)
View/Edit Dynamic DNS Settings
Service
Illustration 41: Dynamic DNS Settings
Select the dynamic DNS service being used or select 'Other' to use a service other than those
listed.
Current IP
This displays the IP address that was last assigned to the dynamic DNS host.
Last Update
Date and time of the last update.
Server
Hostname or IP of the server that accepts the dynamic DNS IP address updates.
Protocol
Select the dynamic DNS protocol. This is only displayed if the selected Service is 'Other'.
Options
Enter specific options for the dynamic DNS service being used. This is only displayed if the
selected Service is 'Other'.
Hostname
The hostname to update. This is the hostname defined on your dynamic DNS service. For
namecheap.com, this the machine name only (e.g. if the complete hostname is
netswap1.yourdomain.com, this would be netswap1).

47
Copyright © 2011-2019 by Highly Reliable Systems, Inc. All rights reserved.
Username
The username required to authenticate the update on the dynamic DNS service. This is not used
for the namecheap.com service.
Domain
This is the domain portion of the complete hostname (e.g. if the complete host name is
netswap1.yourdomain.com, this would be yourdomain.com). This is used for namecheap.com
only.
Password
The password required to authenticate the update on the dynamic DNS service.
Confirm Password
Reenter the password for verification.
Update Interval (minutes)
The update interval (time between updates) in minutes.
Log All Tests
Check this to log the output from the update that will be performed when 'Save' is clicked even if
it is successful.
3.4.3.3
Admin
Configure the Administration settings.
Illustration 42: Admin
Remote Administration
Remote Admin
Enable or disable the remote administration port. This port is provided as an alternate port to
access the NetSwap/RAIDFrame Plus administration and can be used to map an IP address

48
Copyright © 2011-2019 by Highly Reliable Systems, Inc. All rights reserved.
external to your local network for remote access to the NetSwap/RAIDFrame Plus.
Remote Port
TCP port to assign for remote access. If you would like to access the device from outside your
internal network on the internet, you will probably need to map this TCP port on your router or
firewall to the IP address of this device.
Remote SSL
Enable or disable SSL encryption on the remote admin port.
Security
HTTPS
Enable or disable the HTTPS user interface on port 443.
HTTP Server
SSL Options
Configures the SSL options for the HTTP server allowing specification of the SSL protocols and
cipher suites. Use standard Apache 2 SSL options. This is an advanced option and should only
be modified by those familiar with configuring SSL on Apache 2.
SSH Access
SSH
Enable or disable SSH access to the console on port 22.
Authentication
Admin Password
Admin password. This is optional, only fill in if you wish to change the admin password.
Confirm Password
If changing the admin password, reenter the new password to confirm.

49
Copyright © 2011-2019 by Highly Reliable Systems, Inc. All rights reserved.
3.4.3.4 Disks
View/edit disk information. This page is automatically refreshed every 10 seconds.
Display
Illustration 43: Disks
Select whether to only display installed disks or all 'registered' disks. A 'registered' disk is a disk
that has had a name assigned to it.
Refresh
Refresh the page.
Rescan Disks
Cause the device to rescan the attached disks attached. Note, this can take from 30 seconds to
several minutes to complete and may take disks offline temporarily.
Physical Disks/RAID Disks (RAID disks only appear on NetSwap/RAIDFrame Plus)
Bay #
Bay in which disk is installed.
#
RAID disk number (only displayed for RAID disks).
Friendly Disk Name
Name assigned to the disk in 'Properties'.
Mode
Share mode assigned to the disk in 'Properties'. Options are N/A (not shared), NAS (Windows
Networking/NFS), and iSCSI. If the disk is part of a RAID Disk, RAID will be displayed.

50
Copyright © 2011-2019 by Highly Reliable Systems, Inc. All rights reserved.
Details
Displays the disk capacity. If the disk is shared in NAS mode and has been formatted with a file
system the free space and file system type will also be displayed.
Status
Displays whether or not the disk is installed, whether or not it is shared, and if it is formatted. If
the disk is being formatted, the format progress will be displayed as well. If it is a RAID Disk
this displays the current status of the Mirror Disk. This will indicate if the set is Active or not, if
the array is degraded or not, and if rebuilding it will display the current rebuild status. Note:
RAUD disks are only applicable to NetSwap/RAIDFrame Plus.
Action
Buttons showing the actions that can be taken with the disk by clicking the button. Possibilities
are:
Properties
View/edit disk properties
RAID Properties (only on NetSwap/RAIDFrame Plus)
View/edit Mirror properties.
Format
Format disk. Only displayed if disk is not shared or part of a Mirror Disk.
Identify
Identify disk by blinking disk light. Only displayed if disk is installed.
Share
Share disk if it is installed and has been safely removed.
Safely Remove
Safely remove disk if installed and shared in NAS mode.
Delete
Delete the disk from the system. Only displayed if the disk is not installed.
Resume (NetSwap/RAIDFrame Plus only)
Resume the RAID. This will enable the Mirror and make it available for sharing. This
action should only be used as directed by Technical Support personnel. Only displayed if
the RAID has been paused.
Pause (NetSwap/RAIDFrame Plus only)
Pause the RAID. This will disable the RAID and make it unavailable for sharing. No data
or RAID configuration information will be lost. This action should only be used before
"breaking" a RAID or as directed by Technical Support personnel. Only displayed if the
RAID is enabled.

51
Copyright © 2011-2019 by Highly Reliable Systems, Inc. All rights reserved.
Break RAID (NetSwap/RAIDFrame Plus only)
Break the RAID. This will separate the disks that form the RAID. No data will be lost.
To break the RAID Disk, the RAID Disk must first be Paused. Only displayed if the
RAID has been paused.
Mirror Schedule
Configure the mirror schedule for this disk. Only applicable to the
NetSwap/RAIDFrame Plus (see description in the Disk Properties section below).
Make Seed
Create seed on this disk by removing the disk from the mirror (RAID 1) disk and
marking it as a seed disk. This option is only available on NetSwap/RAIDFrame Plus.
Unmark Seed
Unmark seed disk. This option is only available on NetSwap/RAIDFrame Plus.
Seed RAID Disk
Seed a RAID 1 disk with this disk.
If the RAID 1 (Mirror) disk currently exists, the RAID disk will be paused and restarted
with this disk as the master disk and any other disks already in the RAID will be added
to the restarted mirror disk and a rebuild will start, copying the data from the seed disk to
the other disk(s). The data on the old RAID disk will be overwritten by the new data on
the seed disk.
If the RAID disk does not exist, a new RAID disk will be created with the selected seed
disk as the master.
Mount
This option is only available on NetSwap/RAIDFrame Plus.
Mount encrypted volume.
Pause DeltaSync
Pause DeltaSync for this disk so slave disks may be inserted and mounted to recover
data. Only available on NetSwap/RAIDFrame Plus.
Resume DeltaSync
Resume a paused DeltaSync. Only available on NetSwap/RAIDFrame Plus.
Quick DeltaSync
Copy data from the disk to another disk using DeltaSync. Only available on
NetSwap/RAIDFrame Plus.
3.4.3.5
iSCSI
iSCSI stands for Internet SCSI and allows client machines to send SCSI commands to remote storage
servers such as the NetSwap/RAIDFrame Plus. This allows you to connect a single machine over the
52
Copyright © 2011-2019 by Highly Reliable Systems, Inc. All rights reserved.
network to the a disk on NetSwap/RAIDFrame Plus with the illusion that the NetSwap/RAIDFrame
Plus is a local disk drive on your client machines. The functionality to use iSCSI drives is built into
Windows Vista, Windows 7, Server 2008 and later Windows OS's natively. For Windows 2003 and
Windows XP you will have to download Microsoft's free iSCSI initiator software.
How Does iSCSI Work?
There are two parts to the iSCSI protocol, the first being clients and the second being the storage
device. Clients are called iSCSI initiators and can be configured either using hardware or software
solutions.
The storage device (The NetSwap/RAIDFrame Plus) is called an iSCSI portal and runs software to
receive the incoming requests from the iSCSI initiators. ISCSI portals advertise targets (drives) that
iSCSI initiators can connect to.
Note: You should not connect more than one computer to a given iSCSI target. Data corruption
can occur. If two or more computers need to access a disk shared iSCSI, attach the disk to one
computer and share the disk from that computer.
The following screen shot shows the NetSwap/RAIDFrame Plus iSCSI screen. For a more detailed
walk through See the chapter below titled “Configuration Examples”
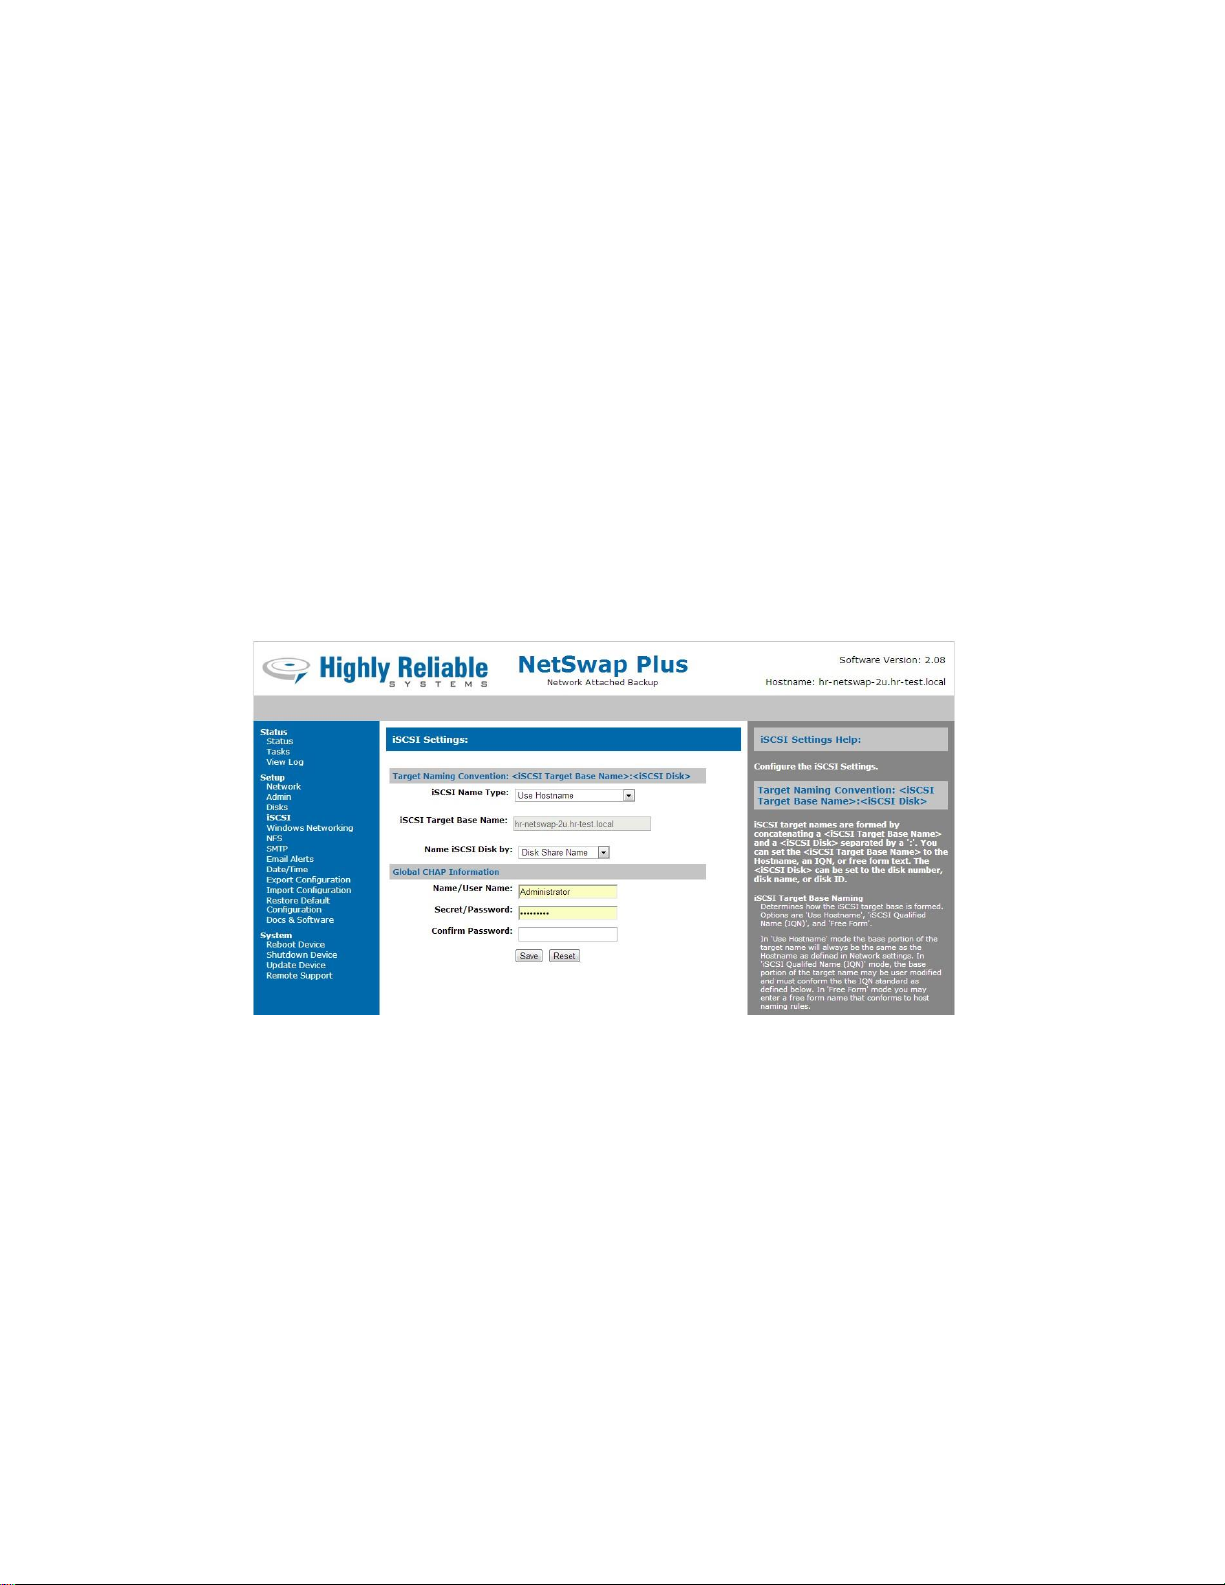
Illustration 44: iSCSI Settings
Target Naming Convention: <iSCSI Target Base Name>:<iSCSI Disk>
iSCSI target names are formed by concatenating a <iSCSI Target Base Name> and a <iSCSI Disk>
separated by a ':'. You can set the <iSCSI Target Base Name> to the Hostname, an IQN, or free form
text. The <iSCSI Disk> can be set to the disk number, disk name, or disk ID.
iSCSI Target Base Naming
Determines how the iSCSI target base is formed. Options are 'Use Hostname', 'iSCSI Qualified
Name (IQN)', and 'Free Form'.
In 'Use Hostname' mode the base portion of the target name will always be the same as the
Hostname as defined in Network settings. In 'iSCSI Qualified Name (IQN)' mode, the base
portion of the target name may be user modified and must conform the the IQN standard as

53
Copyright © 2011-2019 by Highly Reliable Systems, Inc. All rights reserved.
defined below. In 'Free Form' mode you may enter a free form name that conforms to host
naming rules.
iSCSI Name Type
With iSCSI Name Type 'Use Hostname' this will display the current host name.
With iSCSI Name Type 'iSCSI Qualified Name (IQN)' the target name must be in the format:
iqn.<yyyy-mm>.<tld.domain.some.host>[:<identifier>]
The targets name (the iSCSI Qualified Name) must be a globally unique name (as defined by the
iSCSI standard) and has to start with iqn followed by a single dot. The EUI-64 form is not
supported. <yyyy-mm> is the date (year and month) at which the domain is valid. This has to be
followed by a single dot and the reversed domain name. The optional <identifier> - which is
freely selectable - has to be separated by a single colon. For further details please check th
e i
SCSI
spec.
Here is an example:
iqn.2003-12.com.high-rely:6143ec4a-3984-4aed-baa9-9fc2e50984b2.disk0
Leave Target Name blank to use the default Target Name.
With iSCSI Name Type 'Free Form' the target name can be any string conforming to normal host
naming rules.
Name iSCSI disks by
Selects the <iSCSI Disk> portion of the target name. Options are: 'Disk Share Name', 'Disk
Name', or 'Disk ID'.
CHAP Information
This sets the global iSCSI CHAP Information that can be applied for all disks shared iSCSI that do not
have individual CHAP user names and passwords.
CHAP Name/User Name
User name to use when connecting to the iSCSI target on the device.
CHAP Secret/Password
Password to use when connecting to the iSCSI target on the device.
Confirm Password
Enter password again to confirm.
In the iSCSI Initiator on Windows after changing the target name, the old target name can s
ometimes be
seen and Windows will possibly try to reconnect to it. This doesn't cause any problems, however to
remove the old target name do the following:

54
Copyright © 2011-2019 by Highly Reliable Systems, Inc. All rights reserved.
Open iSCSI Initiator - Targets tab - Select the target showing status of "Reconnecting" - Select Details
button - place check mark in box for Identifier - Select Log Off - Select OK on all screens to exit:
Illustration 45: iSCSI Initiator: Targets

55
Copyright © 2011-2019 by Highly Reliable Systems, Inc. All rights reserved.
3.4.3.6 Windows Networking
Configure Windows Networking settings.
Illustration 46: Windows Networking Setting - User
Illustration 47: Windows Networking Settings - Active Directory
Connection Information
Hostname
Displays the current hostname as defined in 'Network' settings. Make sure this machine name is
not shared with any other device on the network. For example, if you had two
NetSwap/RAIDFrame Plus, It would be important to make sure they were not both set to default.

56
Copyright © 2011-2019 by Highly Reliable Systems, Inc. All rights reserved.
Sharing
Share Disk By
Select how to generate the share name for each disk shared in NAS mode. Options are: 'Disk
Share Name', 'Disk Name', or 'Disk ID'
Enable Advanced Sharing
This enables shares for all-disks, all-disks-by-id, and all-disks-by-name which are shares that
contain all disks shared in separate folders by id or name.
Enable Info and Status Shares
This enables READ-ONLY shares (hr-info and hr-status) that contain documentation, software,
drivers, and status and log files.
Authentication
Method
Defines the type of authentication used. Options are 'User' where a single username and password
are defined to access shares on the device and 'Active Directory' where usernames and passwords
are authenticated by a Domain Controller.
Note: If using Active Directory authentication, you should set the NetSwap/RAIDFrame Plus
DNS to your Domain DNS (probably the Domain Controller) and set Date/Time update method
to NTP and set the NTP server to your Domain Controller. If the date/time on the Domain
Controller and the date/time on the NetSwap/RAIDFrame Plus do not match closely enough,
authentication will fail.
For User Authentication
Workgroup
Workgroup name for Windows networking.
For Active Directory Authentication
Domain
Displays the current Domain if the device is currently joined to a Domain.
Global Access Con
trol
For User Authentication
User Name
Username required to access the share. It is not necessary that this be a valid user name on
your existing network or domain. For simplicity and security, user authentication on the
NetSwap/RAIDFrame Plus is kept completely separate from the workgroup or domain to
allow access to backup drives in a network emergency when domain controllers may be down.
Password
Password required to access the share. It is not necessary that this be a valid user password on
your existing network or domain.

57
Copyright © 2011-2019 by Highly Reliable Systems, Inc. All rights reserved.
Confirm Password
Reenter password to confirm.
For Active Directory Authentication:
Allowed Users/Groups
Specific users and/or groups allowed to connect to the device. Leave blank to allow all users
in the domain to connect.
Blocked Users/Groups
Specific users and/or groups that are not allowed to access to the device.
Admin Users/Groups
Specific users and/or groups that will receive administrative access when connected to the
device.
Read Only Users/Groups
Specific users and/or groups that will have read only access (i.e. no write access) when
connected to the device.
Read/Write Users/Groups
Specific users and/or groups that will have read and write access when connected to the
device. Leave blank to allow all allowed users/groups read/write access.
Advanced Options
Advanced Windows networking configuration options. Only make changes to these values if you
fully understand what your are doing or are directed to by High-Rely Technical Support
personnel.
Global
Global options applied when in either 'User' or 'Active Directory' security mode.
User Global
Global options applied when in 'User' security mode.
ADS Global
Global options applied when in 'Active Directory' security mode.
User Share
Options applied to each share when in 'User' security mode.
ADS Share
Options applied to each share when in 'Active Directory' security mode.

58
Copyright © 2011-2019 by Highly Reliable Systems, Inc. All rights reserved.
Join Domain
Illustration 48: Join Domain
Domain Information
Realm
Realm (examples: MYDOMAIN.LOCAL or MYDOMAIN.EXAMPLE.COM).
Domain
Domain name (example: MYDOMAIN)
Domain Controller
Hostname or IP of Domain Controller. This is optional and generally not needed.
Administrative Credentials
Username
Username of domain user with authority to join computers to domains.
Password
Password for user on domain.

59
Copyright © 2011-2019 by Highly Reliable Systems, Inc. All rights reserved.
Leave Domain
Illustration 49: Leave Domain
Administrative Credentials
Username
Username of domain user with authority to remove computers from a domain.
Password
Password for user on domain.
Testing the Connection
Please note that a disk formatted before accessing via Windows Networking as shown below.
Please refer to the appropriate walk through for that.
To test the connection:

60
Copyright © 2011-2019 by Highly Reliable Systems, Inc. All rights reserved.
Technique #1: Click Start, Run and in the run dialog box type \\192.168.1.50 (or whatever the
IP address of your NetSwap/RAIDFrame Plus box) OR \\Hostname (the name you set using the
browser above). Generally using the IP address provides the best quick test to prove connectivity
to the device.
Illustration 50: Run Command
Technique #2: Open a command line on Windows (Start, Run, CMD) on the prompt enter “net
use <drive> \\<NetSwap/RAIDFrame Plus ip address or hostname>\<share name>”, for example:
net use x: \\192.168.1.50\Backup password /user:bill /Persistent:Yes
Note that this “maps” the drive letter X: to the NetSwap/RAIDFrame Plus so that from now on
the NetSwap/RAIDFrame Plus can be accessed from the Windows machine by referring to drive
letter X:. You may view a mapping by typing “Net use” and remove a mapping by typing:
net use x: /d
Technique #3: Right Click Network Devices and select Map Network Drive. Enter
\\hostname\sharename and select “reconnect at logon”. You can also use \\ipaddress\sharename.
You will be asked for username and password entered into the NetSwap/RAIDFrame Plus device
earlier

61
Copyright © 2011-2019 by Highly Reliable Systems, Inc. All rights reserved.
Illustration 51: Map Network Drive
Illustration 52: Map
Network Drive Menu
3.4.3.7 NFS
Configure the NFS settings.
Illustration 53: NFS Settings
Connection Information
Hostname
Displays the current hostname as defined in 'Network' settings.
Sharing
Enable Advanced Sharing
This enables exports for disks, disks-by-id, and disks-by-name which are exports that contain all
disks shared in separate folders by id or name.

62
Copyright © 2011-2019 by Highly Reliable Systems, Inc. All rights reserved.
Export Options
Export options applied to each disk shared. This is a comma separated list of standard NFS
export options. This is an advanced option and should only be modified by those familiar
with configuring NFS.
Global Allowed Hosts
Global allowed hosts that can be applied to each disk shared in NAS mode.
Host/Client 1-4
The hosts or clients that are allowed to connect to the NFS export point. This can be specified in
one of two ways:
1. Host or machine name with optional domain name. Wildcards '*' and '?' are allowed.
Examples are: '*' allows any computer to connect, '*.example.com' allows any computer
in the example.com domain.
2. IP address followed by an optional netmask as 'address/netmask'. The netmask may be
specified specified in dotted-decimal format, or as a contiguous mask length (for
example, either `/255.255.252.0' or `/22' appended to the network base address).
Examples are: '10.1.1.106' allows only the machine at 10.1.1.106,
'10.1.1.0/255.255.255.0' or '10.1.1.0/24' allows all machines in the 10.1.1.0 subnet (e.g.
10.1.1.1, 10.1.1.2, etc.).
3.4.3.8
SMTP
Configure SMTP Settings. If SMTP Relay Host is blank, the device will be configured to send email
directly. If SMTP Relay username/password are left blank, no authentication will be performed.
Illustration 54: SMTP Settings
SMTP Domain
The domain name this device should use when sending email.

63
Copyright © 2011-2019 by Highly Reliable Systems, Inc. All rights reserved.
SMTP Email From
The 'From' field when sending email. If blank, the default of hradmin@HOSTNAME will be
used where HOSTNAME is as defined in Network Settings.
SMTP Relay Host
The Relay host to use to send email.
SMTP Relay Port
The port on the Relay host to use to send email (leave blank for the default of 25).
Enable TLS
Enable TLS (Transport Layer Security) to provide encrypted communication to the Relay host.
SMTP Relay Username
Username for authentication with the Relay host. Leave blank if no authentication is required.
SMTP Relay Password
Password for authentication with the Relay host. Leave blank if no authentication is required.
Confirm Password
SMTP Relay Password again for verification.

64
Copyright © 2011-2019 by Highly Reliable Systems, Inc. All rights reserved.
3.4.3.9
Alerts
Configure alerts.
Illustration 55: Alert Settings
Alert Email Address(s)
The email address to send alerts to. Multiple email addresses must be separated by a comma.
Also see 'SMTP' settings to configure an STMP re lay server if necessary.
Mute Alarm
If checked, the audible alarm will be muted. The alarm light will still blink when the alarm is
triggered, however. This option is only available on the G2 models of the NetSwap/RAIDFrame
Plus.
Enable Hardware Watchdog Timer
If checked, the Hardware Watchdog Timer will be enabled. The Hardware Watchdog Timer will
perform a hardware reboot if it detects that the device is locked up or frozen. This option is only
available on the G2 models of the NetSwap/RAIDFrame Plus.

65
Copyright © 2011-2019 by Highly Reliable Systems, Inc. All rights reserved.
For each of the following alerts, there is a an 'Email' checkbox and an 'Alarm' checkbox.
Check 'Email' to have an email sent when the alert is triggered and check 'Alarm' to have the
audible alarm sound and the alarm light blink when the alert is triggered. Note: the audible
alarm and alarm light and is only available on newer models of the NetSwap/RAIDFrame
Plus.
Alert on Device Startup
Alert whenever the device is booted up.
Alert on Device Shutdown
Alert whenever the device is shutdown or rebooted.
Alert on Disk Remove
Alert whenever a disk is removed.
Alert on Disk Insert
Alert whenever a disk is inserted.
Alert on Disk Faulty
Alert whenever a disk is faulty.
Alert on RAID Disk Degraded
Alert whenever a RAID disk becomes degraded.
Alert on RAID Disk Active
Alert whenever a RAID disk becomes active.
Alert on RAID Disk Inactive
Alert whenever a RAID disk becomes inactive.
Alert on RAID Disk Rebuild Status
Alert whenever a RAID disk rebuild status changes. This will send alerts when a rebuild starts
and finishes as well as several status updates as the rebuild progresses.
Alert on RAID Disk Rebuild Complete
Alert whenever a RAID disk rebuild finishes.
Alert on RAID Disk Rebuild Failed
Alert whenever a RAID disk rebuild fails.
Alert on RAID Disk Fail
Alert whenever a disk in a RAID disk fails. Note: this alert will also trigger when a disk
swapped. In this case, the disk has not actually failed.
Alert on RAID Disk Fail Spare
Alert whenever a spare disk in a RAID disk fails.
Alert on RAID Disk Disappeared
Alert whenever a RAID disk disappears.

66
Copyright © 2011-2019 by Highly Reliable Systems, Inc. All rights reserved.
Alert on DeltaSync Started
Alert whenever a DeltaSync is started.
Alert on DeltaSync Completed
Alert whenever a DeltaSync has completed successfully.
Alert on DeltaSync Failed
Alert whenever a DeltaSync has failed.
Alert on Disk SMART Prefail
Alert whenever a disk reports a SMART status of Prefail. Advise running diagnostics on the disk.
Alert on Disk SMART Failing
Alert whenever a disk reports a SMART status of Failing. The disk has failed and should be
replaced.
Alert on Replication Job Started
Alert whenever a replication job is started.
Alert on Replication Job Completed
Alert whenever a replication job has completed successfully.
Alert on Replication Job Failed
Alert whenever a replication job has failed.
Alert on Logged Error
Alert whenever an error is logged to the log file. This does not alert on normal messages written
to the log file.
Alert on Low Disk Space
Alert when available internal hard drive space is below the threshold set by 'Minimum Dr ive
Space'.
Minimum Drive Space
Specifies the minimum drive space in MB (megabytes) allowed before an alert is sent.

67
Copyright © 2011-2019 by Highly Reliable Systems, Inc. All rights reserved.
3.4.3.10 Date/Time
Configure the Timezone, Update Method, NTP (Network Time Protocol) servers, Windows Server and
optionally set the current data and time. If Update Method is NTP and NTP servers are defined the
NetSwap/RAIDFrame Plus will automatically update the current date and time to the date and time
supplied by the configured servers. If Update Method is Windows Server, the NetSwap/RAIDFrame
Plus will automatically update date and time from the specified Windows server.
Illustration 56: Date/Time Settings: NTP
Illustration 57: Date/Time Settings: Windows Server

68
Copyright © 2011-2019 by Highly Reliable Systems, Inc. All rights reserved.
Illustration 58: Date/Time Settings: Manual
Basic In
formati
on
Date/Time
The current date and time.
Timezone
Select the correct timezone from the dropdown list.
Update Inform
ati
on
Update Method
Method used to automatically update the date and time. Options are NTP (Network Time
Protocol), Windows Server, and Manual. In NTP mode, the date and time will be updated from
the specified NTP server(s). In Windows Server mode, the date and time will be updated from the
specified Windows server. In Manual mode the date and time will not be automatically updated.
NTP Server 1
The hostname or ip of the primary NTP (Network Time Protocol) server. Only appears when
using NTP updates.
NTP Server 2
The hostname or ip of the secondary NTP (Network Time Protocol) server. This is optional. Only
appears when using NTP updates.
Windows Host/IP
The windows hostname or IP address to synchronize time/date with. Only appears when using
Windows Server updates.
Set Date
Enter a date in MM/DD/YYYY format to set the date or leave blank to leave the date set to it's
current setting. Only appears when using Manual updates.

69
Copyright © 2011-2019 by Highly Reliable Systems, Inc. All rights reserved.
Set Time
Enter a time in HH:MM format to set the time or leave blank to leave the time set to it's current
setting. Only appears when using Manual updates.
3.4.3.11 Dashboard
Registration
Register this NetSwap with a NetSwap Dashboard. The NetSwap Dashboard is a RMM tool designed
specifically to monitor local and remote NetSwap devices and is available for free as a download from
the high-rely.com website.
Illustration 59: Dashboard Registration
Dashboard Information
URL
URL for NetSwap Dashboard.
NetSwap ID
ID for the NetSwap on the NetSwap Dashboard. Leave blank to have an ID assigned by the
Dashboard.
Administrative Credentials
Username
Username of user with that is an Administrator on the NetSwap Dashboard.
Password
Password for user on the NetSwap Dashboard.

70
Copyright © 2011-2019 by Highly Reliable Systems, Inc. All rights reserved.
3.4.3.12 Export Configuration
This option allows saving the NetSwap/RAIDFrame Plus configuration to a file.
Illustration 60: Export Configuration
Once you click on this option, you will be prompted to select a folder in which to save the
configuration file. Select a folder and click 'Ok' to download the configuration file.
3.4.3.13 Import
Configuration
This option is used to import a previously exported configuration file.
Illustration 61: Import Configuration

71
Copyright © 2011-2019 by Highly Reliable Systems, Inc. All rights reserved.
Enter the name of the configuration file or click the 'Browse' button to browse for the configuration file
you wish to import. Then click the 'Upload' button. The configuration file will be uploaded to the
NetSwap/RAIDFrame Plus and the new configuration will be loaded. This may take up to 30 seconds
depending what changes are made. If the IP address is changed, you will need to connect to the
NetSwap/RAIDFrame Plus on the new IP address.
3.4.3.14 Restore Default Configuration
This option will restore the NetSwap/RAIDFrame Plus to the factory default settings.
Illustration 62: Restore Default Configuration
Click 'Confirm' to restore factory default settings.
3.4.3.15 Docs & Software
This option provides documentation and software for use with the NetSwap/RAIDFrame Plus that may
be downloaded through your web browser.
Illustration 63: Docs & Software

72
Copyright © 2011-2019 by Highly Reliable Systems, Inc. All rights reserved.
3.4.4 Replication (NetSwap/RAIDFrame Plus Only)
3.4.4.1 Settings
This option allows setting various replication settings.
Illustration 64: Replication
Setti
ngs
Basic Replication Settings
Port
This defines the incoming network port for non-encrypted replication jobs. You may need to
forward this port in your firewall or router to this device.
SSL Port
This defines the incoming network port for encrypted replication jobs. You may need to forward
this port in your firewall or router to this device.
Note: ports 12000-12100 are reserved for internal use.
Advanced Options
Global Advanced Rsync options. These are the default Rsync options used for replication jobs that
do not define their own local options.
Only make changes to these values if you fully understand what you are doing or are directed to by
High-Rely Technical Support personnel.
Rsync Timeout
This determines how to long to wait without response from rsync before retrying. The default is 0
seconds, or no timeout.
Rsync Std Options
Rsync options used for a standard replication job (i.e. not bi-directional).
Rsync Bi-direction Options
Rsync options used for a bi-directional replication job.
Write Sync Output to Log
Check this box to have the log output from replication job written to the log.

73
Copyright © 2011-2019 by Highly Reliable Systems, Inc. All rights reserved.
3.4.4.2 Jobs
View/Edit the currently defined Replication Jobs.
Name
Illustration 65: Replication Jobs
Job name.
Type
Type of Replication Job.
I/O
Replication Job direction, 'In' or 'Out'.
Status
Status of the Replication Job. Options are 'Ready' if the job is ready and scheduled to run,
'Running' if the job is currently running, and 'Disabled' if the schedule for the job has been
disabled.
Last Result
Result of last run. Options are 'Success' if the job ran successfully, 'Failure' if the job failed, and
'Canceled' if the job was canceled.
Action Buttons
Start
Start (run) the selected job(s) immediately.
Stop
Stop the selected job(s) immediately.
New
Create a new Replication Job.
Delete
Delete the selected job(s). Running jobs cannot be deleted.

74
Copyright © 2011-2019 by Highly Reliable Systems, Inc. All rights reserved.
Edit
Edit the selected job.
History
Edit the selected job.
Seed Out
Create a new seed out job for the selected Replication job;.
Seed In
Create new seed in job for the selected Replication Job.
Refresh
Refresh the jobs.
New/Edit Replication Job
Use the 'Previous' and 'Next' buttons to move backwards and forwards through the wizard sections. Use
the 'Finish' button to save the Replication Job and close the wizard. Use the 'Cancel' button to close the
window without saving.
Select Job Type:
NetSwap
Illustration 66: Select Job Type
Replicate to or from another NetSwap device or from disk to disk on this NetSwap. Supports
secure transfers over SSL.

75
Copyright © 2011-2019 by Highly Reliable Systems, Inc. All rights reserved.
Dropbox
Replicate to or from a Dropbox account. Supports secure transfers over SSL.
S3/S3 Compatible
Replicate to or from S3 or S3 compatible bucket. Will work with any service 100% compatible
with Amazon S3. Supports secure transfer over SSL.
FTP
Replicate to or from an FTP server (File Transfer Protocol). Supports secure transfers over SSL.
SFTP
Replicate to or from am SFTP server (Secure File Transfer Protocol over SSH).
Source:
Illustration 67: New/Edit Replication Job - Source
Source Type
Select the type of the source. Options are 'Local Disk' and 'Remote Location'.
For Local Disk:
Source Disk
Select the disk for the source. Note: this will only display disks that are shared in NAS mode;
disks shared iSCSI cannot be used as source or destination.

76
Copyright © 2011-2019 by Highly Reliable Systems, Inc. All rights reserved.
Source Folder
Select the folder on the disk.
Snapshot Storage
Select the disk to use for snapshot storage if a disk snapshot is desired or or select 'Do not
create snapshot' if no snapshot is desired.
If selected, a read-only copy of the disk being replicated will be created that is frozen at the
time the Replication Job starts using the Snapshot Storage to store any writes to the disk. The
Snapshot Storage must be large enough to store all writes to the disk that will occur while the
Replication Job is running or disk writes will fail once the storage is full. The safest way to
know there is enough space on the Snapshot Storage disk is to use a disk with a capacity
greater than or equal to the capacity of the disk being replicated or create a Snapshot Reserve
that is equal in size to half the capacity of the disk.
The Snapshot Storage disk may either be an entire disk that is not shared or a disk that has
been formatted with a Snapshot Reserve greater than 0. If an unshared disk is used, data on the
disk will be destroyed.
For Remote Location:
Location
Select the Remote Location. Options are to create a new Remote Location or select a Remote
Location that has already been defined.
NetSwap:
Target
Select the Target on the Remote Location. Click 'Get Targets' to retrieve the list of
targets from the Remote Location. Targets are defined on the remote device.
Username
Enter the Username for the selected Target. Click the 'Test' button to test authentication
with the Remote Location with the Username and Password.
Password
Enter the Password for the selected Target.
Dropbox:
Source Folder
Select the folder.
S3/S3 Compatible:
Bucket
Select desired bucket. Click 'Get Buckets' to retrieve the list of buckets.

77
Copyright © 2011-2019 by Highly Reliable Systems, Inc. All rights reserved.
Source Folder
Select the folder.
FTP:
Source Folder
Select the folder.
SFTP:
Source Folder
Select the folder.
Destination:
Illustration 68: New/Edit Replication Job - Destination
Destination Type
Select the type of the destination. Options are 'Local Disk' and 'Remote Location'.
For Local Disk:
Source Disk
Select the disk for the destination. Note: this will only display disks that are shared in NAS
mode; disks shared iSCSI cannot be used as source or destination.
Source Folder
Select the folder on the disk.

78
Copyright © 2011-2019 by Highly Reliable Systems, Inc. All rights reserved.
For Remote Location:
Location
Select the Remote Location. Options are to create a new Remote Location or select a Remote
Location that has already been defined.
NetSwap:
Target
Select the Target on the Remote Location. Click 'Get Targets' to retrieve the list of
targets from the Remote Location. Targets are defined on the remote device.
Username
Enter the Username for the selected Target. Click the 'Test' button to test authentication
with the Remote Location with the Username and Password.
Password
Enter the Password for the selected Target.
Dropbox:
Destination Folder
Select the folder.
S3/S3 Compatible:
Bucket
Select desired bucket. Click 'Get Buckets' to retrieve the list of buckets.
Destination Folder
Select the folder.
FTP:
Destination Folder
Select the folder.
SFTP:
Destination Folder
Select the folder.

79
Copyright © 2011-2019 by Highly Reliable Systems, Inc. All rights reserved.
Options:
Job Name
Illustration 69: New/Edit Replication Job: Options
Enter a descriptive name for the job.
Next Job
Select a job to be run after this job co mpletes. This allows "chaining" multiple jobs to run one
after the other to avoid having to schedule multiple jobs and be sure they do not run at the same
time.
Compression
Select the level of compression. Options are 'None' and levels 1-9. The higher the level the more
compression but slower speed. Higher compression levels may speed up the job if the outbound
bandwidth is low. Lower compression levels (or none) may speed up the job if the outbound
bandwidth is high or on a LAN.
Bi-directional Sync
Enable or disable bi-directional sync. By default this is disabled for normal replication. Bidirectional Sync will cause both the Source and Destination to be synchronized such that changes
to the Source will be copied to the Destination and changes to the Destination will be copied to
the
Source.

80
Copyright © 2011-2019 by Highly Reliable Systems, Inc. All rights reserved.
Perform a trial run with no changes made
Check this box to perform a trial run without transferring or deleting files. This can be useful to
see what would be transferred/deleted or checking for problem files or folders that may be
causing replication to fail by checking the log file after the job is complete.
Bandwidth Limits
This table defines up to 3 bandwidth limit ranges to limit bandwidth use by the job to a specific limit
in KB/s when run during a specific time of day. The first range that matches will be used. For
instance, this can be used to limit bandwidth during the day to say 50KB/s between 8am and 5pm
(08:00 to 17:00) and no limit between 5pm and 8am (17:00 to 08:00).
Start Time
Start time for bandwidth limit range (HH:MM 24 hour format).
Stop Time
Stop time for bandwidth limit range (HH:MM 24 hour format).
Bandwidth Limit
Bandwidth limit for the bandwidth limit range in KB/s (0 = no limit).
Advanced Options
Advanced options. Only make changes to these values if you fully understand what you are doing or
are directed to by High-Rely Technical Support personnel. Note: not all options are available for all
types of Remote Locations.
Use Global Options (NetSwap only)
Check this box to use the Global options defined in Replication Settings.
Rsync Std Options (NetSwap only)
Rsync options used for a standard replication job (i.e. not bi-directional).
Rsync Bi-direction Options (NetSwap only)
Rsync options used for a bi-directional replication job.
Propagate deletions
If checked, if a file or folder has been deleted on one side, it will be deleted on the other side.
This option is ignored when performing bi-directional replication. Warning: this can be very
dangerous, use with caution; if you replicate from an empty folder to a folder containing
data, it will delete the existing data.
Safe copy using temporary files
If checked, when copying, copy to a temporary file first and then rename to the destination file.
This prevents incomplete or corrupt files in the case where replication terminates unexpectedly.
Requires additional disk space on destination to store temporary files.
Stats Update Time
Maximum time in seconds between updates of file stats.

81
Copyright © 2011-2019 by Highly Reliable Systems, Inc. All rights reserved.
Override locks
If checked, overwrite any existing lock files. This can be useful if a job terminates unexpectedly
and leaves lock files behind that stop the job from running.
Use disk storage for analysis (reduces memory usage)
If checked, disk storage space will be used when analyzing the files and folders to be transferred
rather than system memory. This can be used for jobs with a large number of files and/or folders
that are aborting due to low system memory.
Use reduced redundancy storage (S3 only)
If checked, files will be stored on reduced redundancy storage.
Use server side encryption (S3 only)
If checked, files will be encrypted on the server.
Access Policy (S3 only)
Select an access policy under which files will be created. If blank, the default will be used.
Send keepalives (FTP only)
If checked, NOOP commands will be sent periodically on the command channel during file
transfers. This is used to stop some FTP servers from dropping the connection due to inactivity
on the command channel during long file transfers.
Block Size (FTP only)
Data transfer blocksize in KB. Larger values can increase transfer speed. Set to 0 to use default
value of 1024 (1MB).
Window Size (SFTP only)
SSH channel window size in KB. Larger values can increase transfer speed. Set to 0 to use
default value of 2048 (2MB).

82
Copyright © 2011-2019 by Highly Reliable Systems, Inc. All rights reserved.
Filters:
Illustration 70: New/Edit Replication Job: Filters
Maximum File Size
Maximum size of files that will be transferred.
This is useful to limit the size of files that are transferred so that large files that would take too
long to transfer such as full backup files are not replicated. These large files can be transferred
physically using a seed or other methods when needed.
For instance, backup software can be configured to create full backups once a month and only do
incrementals or differentials in between the full backups. By limiting the maximum file size to
something greater than the incremental file size but less than the size of a full backup, only the
incrementals will be replicated across the net and the fulls can be transferred physically after each
full backup run.
Include
Filename patterns that determine which files are to be included and transferred. One pattern per
line. Leave blank to include all files, otherwise only files matching an include pattern will be
included. See the section below for details on the syntax of the patterns.

83
Copyright © 2011-2019 by Highly Reliable Systems, Inc. All rights reserved.
Exclude
Filename patterns that determine which files are to be excluded and not transferred. One pattern
per line. See the section below for details on the syntax of the patterns.
With some backup software this option can be used to not replicate the full backup files (that are
large) so those files can transferred physically (as described above under Maximum File Size).
For instance, ShadowProtect full backup files have an extension of 'spf', so entering a pattern of
'*.spf' will exclude all full backups from the transfer.
Pattern Syntax
Patterns can contain all the normal characters that are allowed in filesystem path names plus the '*'
character which will match any sequence of characters and the '?' character which will match any single
character. If the pattern contains the '/' character it will be matched against the entire path name. If a
pattern does not contain a '/' it will only be matched against the base file name.
Schedule:
Illustration 71: New/Edit Replication Job: Schedule
Enable Schedule
Enable or disable the scheduling of this job. If enabled, the job will be scheduled according the
defined schedule.

84
Copyright © 2011-2019 by Highly Reliable Systems, Inc. All rights reserved.
Every <n> minute(s)
Select to schedule the job to run every <n> minutes on the specified days and optionally between a
start and stop time. For example, every 10 minutes every Monday through Friday between 8am and
5pm (08:00 and 17:00).
Every <n> hour(s)
Select to schedule the job to run every <n> hours on the specified days and optionally between a
start and stop time. For example, every 1 hour every Monday through Friday between 8am and
5pm (08:00 and 17:00).
Every <n> day(s)
Select to schedule the job to run every <n> days starting at a specific date and time. For example,
every 2 days starting on 07/16/12 at 17:15.
Every <n> week(s)
Select to schedule the job to be run every <n> weeks on specific days of the week at specific
times starting on specific date. For example, every 1 week on Monday at 06:00, Wednesday at
06:00, and Friday at 19:00 starting on 07/16/12.
Every <n> month(s)
Select to schedule the job to be run every <n> months on specific days of the month at specific
times starting on a specific date. For example, every 1 month on the 1st and 15th at 06:00 starting
on 07/16/12.
Action URL's and Programs
These URL's and programs can be used to to perform actions on this Replication job from a remote
computer. Right click on the URL and select 'Copy link address' and use that to create a shortcut on
your desktop or download the VBScript program to your desktop.
Start Job
URL and program download to start this replication job.

85
Copyright © 2011-2019 by Highly Reliable Systems, Inc. All rights reserved.
New/Edit Seed Job In
Use the 'Previous' and 'Next' buttons to move backwards and forwards through the wizard sections. Use
the 'Finish' button to save the Replication Seed Job and close the wizard. Use the 'Cancel' button to
close the window without saving.
Select Seed Type:
Illustration 72: Seed In Job - Seed Type
Standard Seed
Copy data to/from seed disk.
Speed Seed
Seed to/from Mirror Disk member.

86
Copyright © 2011-2019 by Highly Reliable Systems, Inc. All rights reserved.
Source Disk:
Illustration 73: Seed In Job - Source Disk
Select the disk to seed from.

87
Copyright © 2011-2019 by Highly Reliable Systems, Inc. All rights reserved.
Options:
Job Name
Illustration 74: Seed In Job - Options
Enter a descriptive name for the job.
Start job immediately
If checked, the job will start running as soon as the 'Finish' button is clicked.
Ignore source job maximum file size filter
If checked, the maximum file size filter from the source job will be ignored.
Ignore source job exclude filter
If checked, the exclude filter from the source job will be ignored.
The following only appears for 'S3/S3 Compatible' jobs.
Use Amazon AWS Import/Export Service
If checked, use the the Amazon AWS Import/Export service to import or export seed data from a
bucket at Amazon.
Job Id
AWS job id.
Create Date
Date and time job was created.

88
Copyright © 2011-2019 by Highly Reliable Systems, Inc. All rights reserved.
Type
Job type: import or export.
Status
Current job status.
Disk Id
Disk Id assigned when the job was created to identify the disk.
Location
Current location of the disk.
Carrier
Carrier used to return the disk if it has been shipped from Amazon.
Tracking Number
Tracking number of the package containing the disk if it has been shipped from Amazon.
Ship To Address
Address to ship the disk to.
Packing List Form
Link to the packing list form that must be filled out and included with the disk when shipped.
New/Edit Seed Job
Out
Use the 'Previous' and 'Next' buttons to move backwards and forwards through the wizard sections. Use
the 'Finish' button to save the Replication Seed Job and close the wizard. Use the 'Cancel' button to
close the window without saving.

89
Copyright © 2011-2019 by Highly Reliable Systems, Inc. All rights reserved.
Select Seed Type:
Illustration 75: Seed Out Job - Seed Type
Standard Seed
Copy data to/from seed disk.
Speed Seed
Seed to/from Mirror Disk member.

90
Copyright © 2011-2019 by Highly Reliable Systems, Inc. All rights reserved.
Destination Disk:
Illustration 76: Seed Out Job - Destination Disk
Select the disk to seed to.

91
Copyright © 2011-2019 by Highly Reliable Systems, Inc. All rights reserved.
Options:
Job Name
Illustration 77: Seed Out Job - Options
Enter a descriptive name for the job.
Start job immediately
If checked, the job will start running as soon as the 'Finish' button is clicked.
Ignore source job maximum file size filter
If checked, the maximum file size filter from the source job will be ignored.
Ignore source job exclude filter
If checked, the exclude filter from the source job will be ignored.
The following only appears for 'S3/S3 Compatible' jobs.
Use Amazon AWS Import/Export Service
If checked, use the the Amazon AWS Import/Export service to import or export seed data from a
bucket at Amazon.
Job Id
AWS job id.
Create Date
Date and time job was created.

92
Copyright © 2011-2019 by Highly Reliable Systems, Inc. All rights reserved.
Type
Job type: import or export.
Status
Current job status.
Disk Id
Disk Id assigned when the job was created to identify the disk.
Location
Current location of the disk.
Carrier
Carrier used to return the disk if it has been shipped from Amazon.
Tracking Number
Tracking number of the package containing the disk if it has been shipped from Amazon.
Ship To Address
Address to ship the disk to.
Packing List Form
Link to the packing list form that must be filled out and included with the disk when shipped.
3.4.4.3 Remote Locations
View/Edit the currently defined Remote Locations.
A Remote Location specifies the details of a remote NetSwap device (e.g. the hostname/IP address and
port).

93
Copyright © 2011-2019 by Highly Reliable Systems, Inc. All rights reserved.
Name
Illustration 78: Remote Locations
Remote Location name.
Type
Type of Remote Location.
Details
Details of the Remote Location.
Action Buttons
New
Create a new Remote Location.
Delete
Delete the selected Remote Location(s).
Edit
Edit the selected Remote Location.
Refresh
Refresh the Remote Locations.

94
Copyright © 2011-2019 by Highly Reliable Systems, Inc. All rights reserved.
New/Edit Remote Location
NetSwap:
Type
Illustration 79: New/Edit Remote Location: NetSwap
Select the type of the remote location.
Name
Descriptive name for the Remote Location.
Hostname/IP
The hostname (machine and domain name) or IP of the Remote Location.
Port
TCP/IP port for of the Remote Location. Note: this port may need to be opened on your firewall
or router
Encryption Type
Select the type of encryption to be used when transfering data across the network/internet.
Options are AES-256, TRIPLE DES, AES-128, RC4, DES, and none. Encryption can slow down
data transfer so if your data is already encrypted such as by a VPN or backup or achive program,
you may want to set this to 'None'. The default is 'None'.

95
Copyright © 2011-2019 by Highly Reliable Systems, Inc. All rights reserved.
Dropbox:
Type
Illustration 80: New/Edit Remote Location: Dropbox
Select the type of the remote location.
Name
Name for the Dropbox account.
Description
Description of the Dropbox account.
Authorized
This will display 'Yes' of the NetSwap has been authorized to access the associated Dropbox
account, or 'No' if not.
Authorize Now
Clicking this button will allow authorizing the NetSwap to access a Dropbox account. This
involves logging to a Dropbox account, allowing the NetSwap access, and copy and pasting the
authorization key into the box providing and saving it.

96
Copyright © 2011-2019 by Highly Reliable Systems, Inc. All rights reserved.
Authorizing Dropbox
Illustration 81: Dropbox Authorization
This gives the authorization that allows the NetSwap to access a Dropbox account. Follow the steps in
the window as shown above and copy & paste the authorization code provided by Dropbox and click
'Save'.
S3/S3 Compatible:
Type
Illustration 82: New/Edit Remote Location: S3/S3 Compatible
Select the type of the remote location.

97
Copyright © 2011-2019 by Highly Reliable Systems, Inc. All rights reserved.
Name
Descriptive name for the Remote Location.
Service
Select the service being used and in the case of Amazon S3, the region.
Access Endpoint
The URL used to access the S3 service excluding the 'http://' or 'https://'.
Access Key Id
Access key id assigned by the service.
Secret Key
Secret key assigned by the service.
Secure Mode (encrypted)
If checked, SSL will be used when accessing the service and transferring data.
Use sub-domain or virtual hosting calling format
If checked, sub-domain format access will be used.
Manage AWS Jobs
Manage the AWS Import/Export Jobs for this account (if using Amazon AWS S3).
FTP:
Type
Illustration 83: New/Edit Remote Location: FTP
Select the type of the remote location.
Name
Descriptive name for the FTP server.

98
Copyright © 2011-2019 by Highly Reliable Systems, Inc. All rights reserved.
Hostname/IP
The hostname (machine and domain name) or IP of the FTP server.
Port
TCP/IP port for the FTP server. The default is 21.
Username
Login username.
Password
Login password.
Active FTP mode
If checked active FTP mode will be used, otherwise passive FTP mode is used (default). Active
mode requires the FTP server to connect to the NetSwap on another port. This is often blocked by
a router or firewall and will require special rules to allow access. In passive mode the NetSwap
initiates all connections and this is generally supported by routers and firewalls; however, the
FTP server's firewall must be configured appropriately.
Secure mode (encrypted)
If checked, SSL will be used to secure connection.
SFTP:
Type
Illustration 84: New/Edit Remote Location: SFTP
Select the type of the remote location.
Name
Descriptive name for the SFTP server.

99
Copyright © 2011-2019 by Highly Reliable Systems, Inc. All rights reserved.
Hostname/IP
The hostname (machine and domain name) or IP of the SFTP server.
Port
TCP/IP port for the SFTP server. The default is 22.
Username
Login username.
Password
Login password.
3.4.4.4
Targets
View/Edit the currently defined Targets.
A Target is a folder on this NetSwap device that is shared for use by a remote NetSwap device. Prior to
setting up a Replication Job on a remote NetSwap device that will replicate to this device, a target must
be created by selecting a disk and folder and setting a username and password.
Name
Illustration 85: Targets
Target name.
Disk Name
Target disk name.
Folder
Target folder.

100
Copyright © 2011-2019 by Highly Reliable Systems, Inc. All rights reserved.
Action Buttons:
New
Create a new Target.
Delete
Delete the selected Target(s).
Edit
Edit the selected Target.
Refresh
Refresh the Targets.
New/Edit
Target
View/Edit Target. A Target defines a disk and folder on this device that will be shared with remote
devices for replication.
Name
Illustration 86: New/Edit Target
Descriptive name for this Target.
Username
Username for this Target.
Password
Password for this Target.
 Loading...