

Page 1

HL 721A/B 1351B Plotting Cutter User Manual
Page 1/27
HL 721A/B 1351B Plotting Cutter User Manual
Table of contents
1. Statement from Manufacturer ·········································································· 2
2. Precaution ·································································································· 2
3. Routine Maintenance ····················································································· 3
4. Packing List and Accessories ··········································································· 3
5. Setup ·········································································································· 4
5.1. Machine Assemble ············································································· 4
5.2. Cable Connection ·············································································· 5
5.3. Blade and Pen Assemble ····································································· 5
5.4. Blade Adjustment and Installation ·························································· 6
5.5. Paper Setup ····················································································· 6
6. Offline Operation (Machine Standalone Adjustment) ············································· 7
6.1. Initialize ··························································································· 7
6.2. Check Z Axis (Pen/blade holder heads down or up) ·································· 7
6.3. Check X Axis (Pen/blade carriage moves left or right) ································ 7
6.4. Check Y Axis (Paper feeding shaft rotate forward or backward) ··················· 8
6.5. Check and Adjust Drawing/Cutting Speed ··············································· 8
6.6. Check and Adjust Blade Pressure ························································· 8
6.7. Starting Point & Trial Cut ····································································· 8
6.8. Check and Adjust Baud Rate ································································ 9
6.9. Repeat Previous Cutting Job ································································ 9
6.10. Cancel Current Cutting Job ·································································· 9
6.11. Online Mode ····················································································· 10
6.12. Offline/Pause Mode ············································································ 10
7. Online Operation (Work with PC) ······································································ 11
7.1. Install USB Driver under Windows OS ···················································· 11
7.2. Install Artcut with Graphic CD ······························································· 15
7.3. Work with CorelDRAW (for reference) ··················································· 18
7.4. Work with SignBlazer (for reference) ······················································ 20
8. Technical Specifications ·················································································· 22
9. Trouble Shooting ··························································································· 23
9.1. Carriage Assembly ············································································· 23
9.2. Paper Pressure & Feeding Shaft ··························································· 24
9.3. Power Supply ···················································································· 24
9.4. Random Cutting and Unpredictable ······················································· 24
9.5. Not Output any Work (No Response) ····················································· 24
9.6. Produced Work has Jagged Edges ························································ 24
10. FAQ ········································································································· 25
HIGHLIGHT ELECTRONICS
Page 2
HL 721A/B 1351B Plotting Cutter User Manual
Page 2/27
1. Statement from Manufacturer
1. The manufacturer reserves the right to alter the contents of the manual and specifications of the product without notice.
2. If the machine develops a fault, please contact your authorized agent straight away for prompt attention to your problem.
3. The manufacturer is not liable for damage to persons or property caused by improper or unauthorized repairs or use of the
machine.
4. Windows©, Windows XP©, Roland©, and Artcut© are brand names mentioned in this manual. These names are owned by
their respective copyright© holders. The manufacture makes no claim to these names and they are mentioned in this manual
only to assist users.
2. Precaution
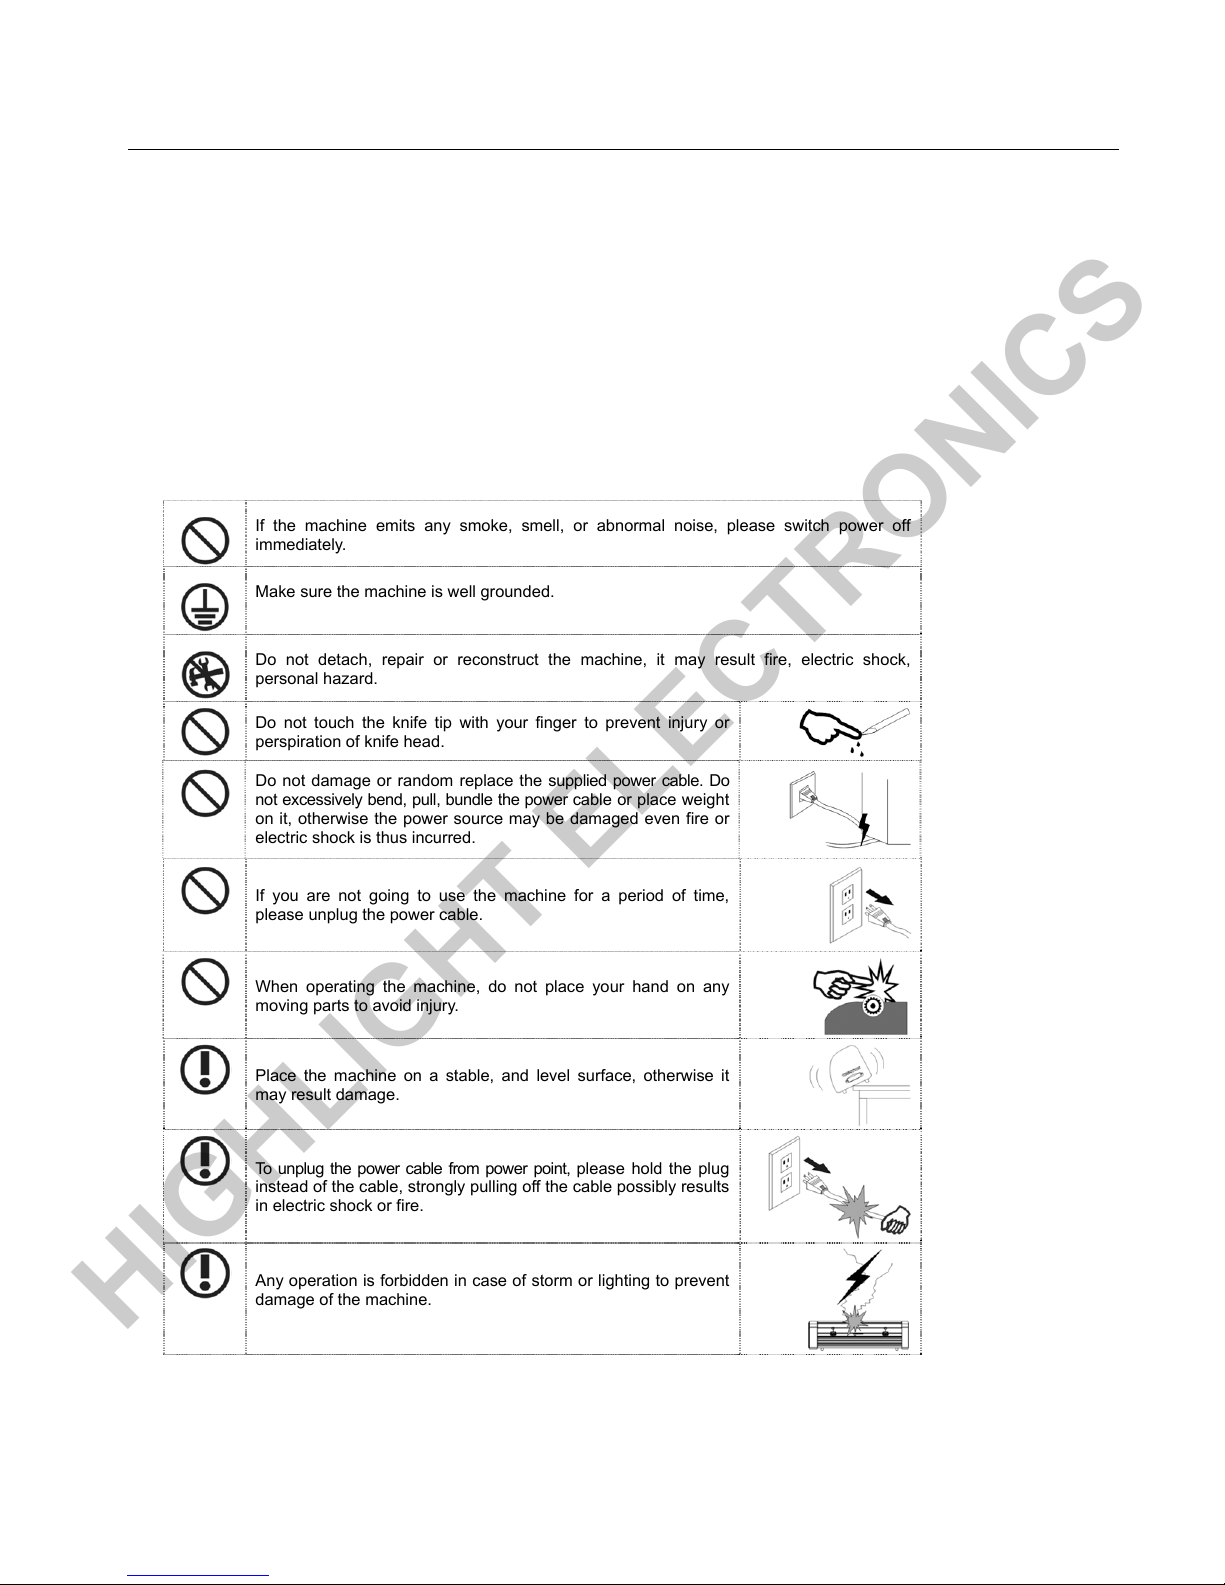
If the machine emits any smoke, smell, or abnormal noise, please switch power off
immediately.
Make sure the machine is well grounded.
Do not detach, repair or reconstruct the machine, it may result fire, electric shock,
personal hazard.
Do not touch the knife tip with your finger to prevent injury or
perspiration of knife head.
Do not damage or random replace the supplied power cable. Do
not excessively bend, pull, bundle the power cable or place weight
on it, otherwise the power source may be damaged even fire or
electric shock is thus incurred.
If you are not going to use the machine for a period of time,
please unplug the power cable.
When operating the machine, do not place your hand on any
moving parts to avoid injury.
Place the machine on a stable, and level surface, otherwise it
may result damage.
To unplug the power cable from power point, ple ase hold the plug
instead of the cable, strongly pulling off the cable possibly results
in electric shock or fire.
Any operation is forbidden in case of storm or lighting to prevent
damage of the machine.
HIGHLIGHT ELECTRONICS
Page 3
HL 721A/B 1351B Plotting Cutter User Manual
Page 3/27
3. Routine Maintenance
1. Make sure the machine is placed on a stable, level surface and in a clean space with easy access.
2. Do not share same power source with any heavy electrical appliances.
3. Do not plug or unplug any cables while power stays on.
4. Do not move the knife carriage by force when the power is off to avoid damage the machine.
5. Do not apply excessive force on any movable parts such as film holding and feeding shafts, lever of film feeding wheel, and
carriage moving belt.
6. Do not drop any tiny substance on the feeding shaft as it may cause inaccuracies and damage to the machine.
7. Keep away from any electrical noise such as electric welders, and magnetic field such as electrical transformer.
8. Always unplug the power cable before start trouble shooting on electrical and mechanical issues.
9. Always lift the latch lever of press wheel when the machine is not in use to prevent deformation to the rollers and thus possible
inaccurate operation.
10. Always check the power point, power cable, fuse, sockets, communication cable, communication plug and sockets first if
something unusual.
11. Unplug the power cable and put the dust cover on when it is not in use.
12. Keep all CDs in good condition.
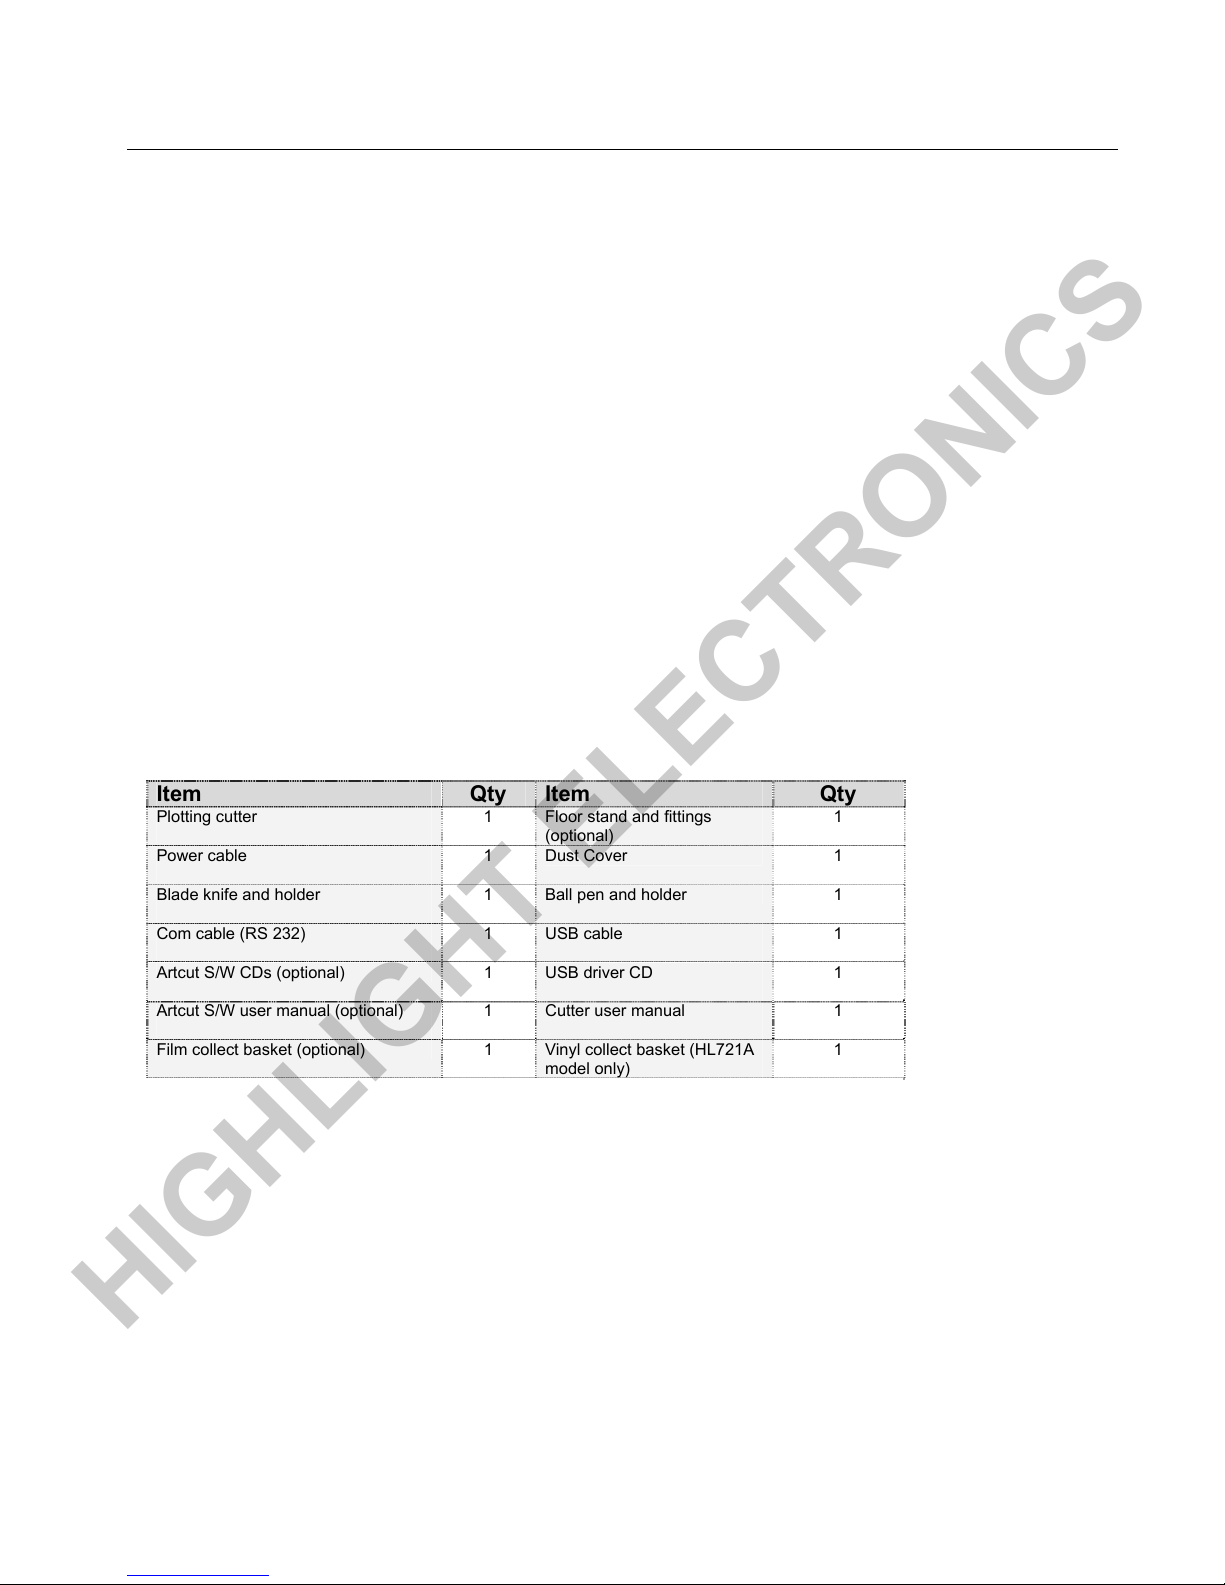
4. Packing List and Aaccessories
Item Qty Item Qty
Plotting cutter
1
Floor stand and fittings
(optional)
1
Power cable
1
Dust Cover 1
Blade knife and holder
1
Ball pen and holder 1
Com cable (RS 232)
1
USB cable
1
Artcut S/W CDs (optional) 1 USB driver CD
1
Artcut S/W user manual (optional)
1
Cutter user manual
1
Film collect basket (optional) 1 Vinyl collect basket (HL721A
model only)
1
HIGHLIGHT ELECTRONICS
Page 4
HL 721A/B 1351B Plotting Cutter User Manual
Page 4/27
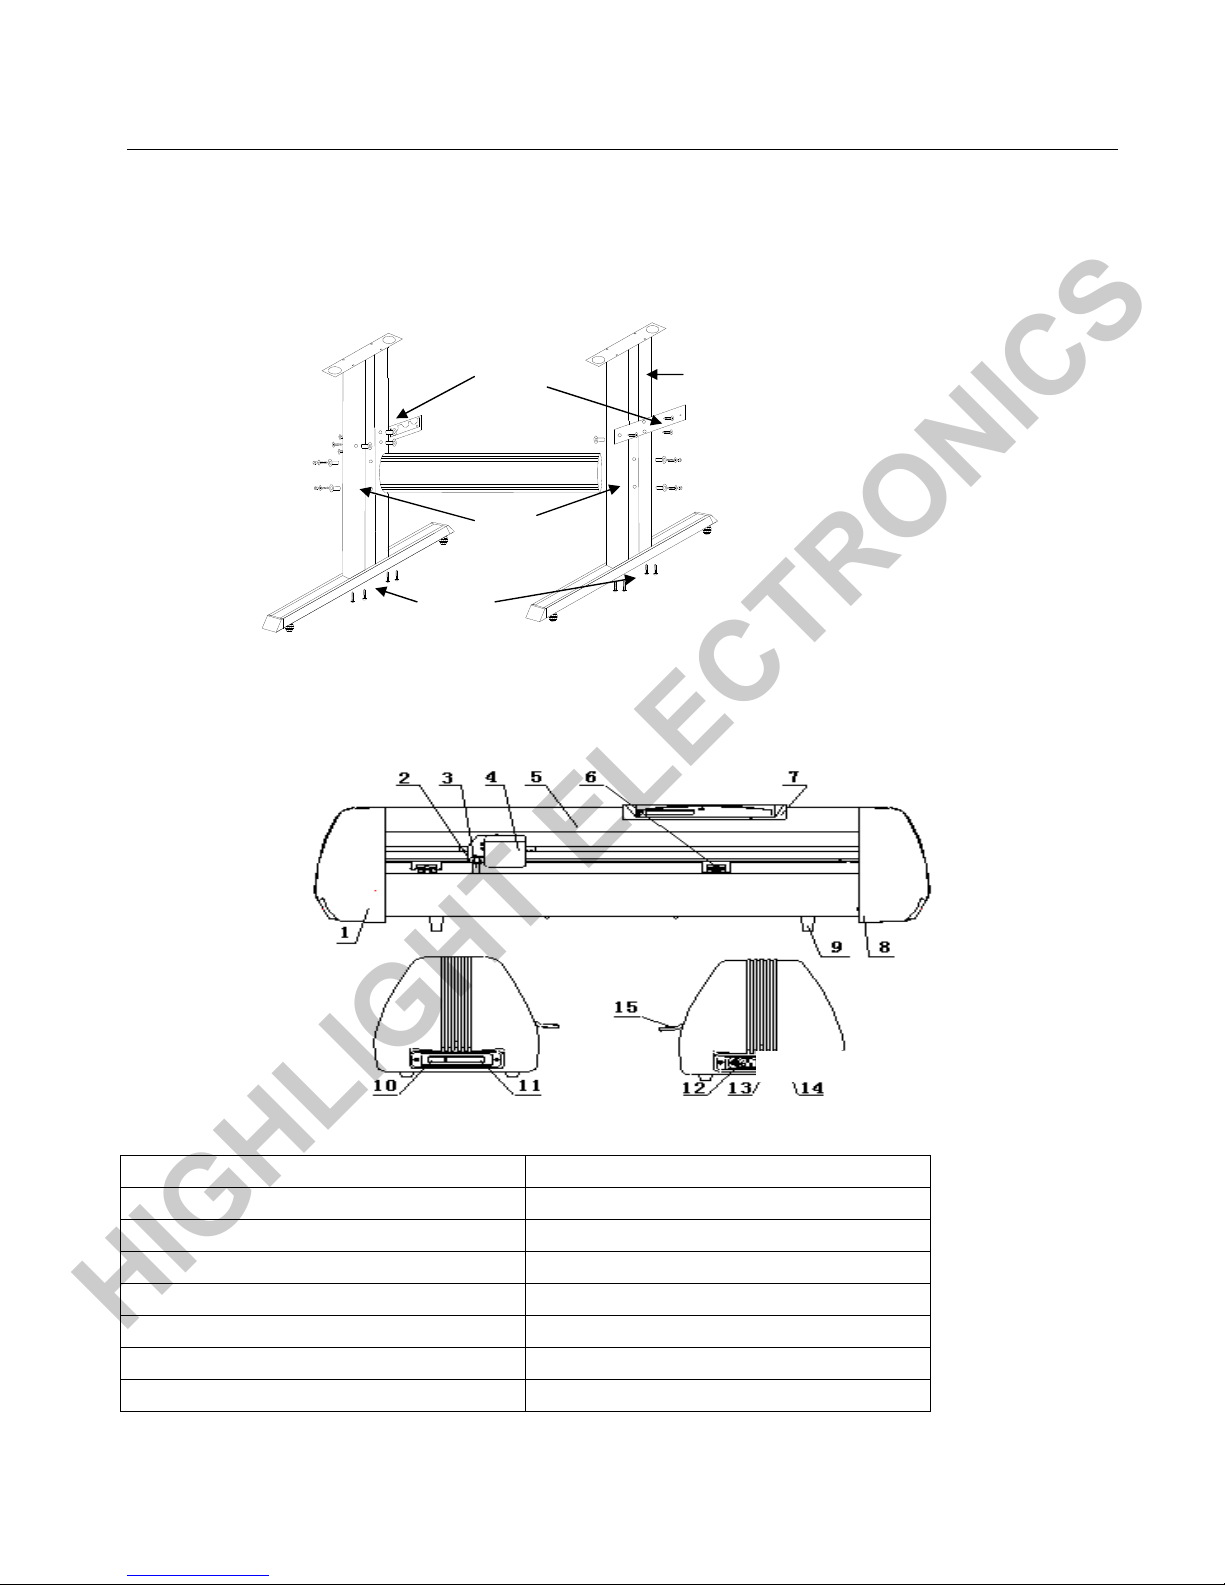
5. Setup
5.1. Machine Assemble
1. LHS cover 9. Mounting support
2. Carriage bracket 10. USB port
3. Holder 11. COM port
4. Carriage 12. Power socket
5. Upper cover 13. Fuse
6. Feeding wheel 14. Power switch
7. LCD panel 15. Feeding wheel lever
8. RHS cover
Step 1
Black short screws with
long plastic sleeve& cap
Qty: 2 x 2
Step 2
S/S big screw with
S/S sleeve
Qty: 3 x 2
Curve side face outside
Flat side face inside
Step 3
S/S long screws
Qty: 4 x 2
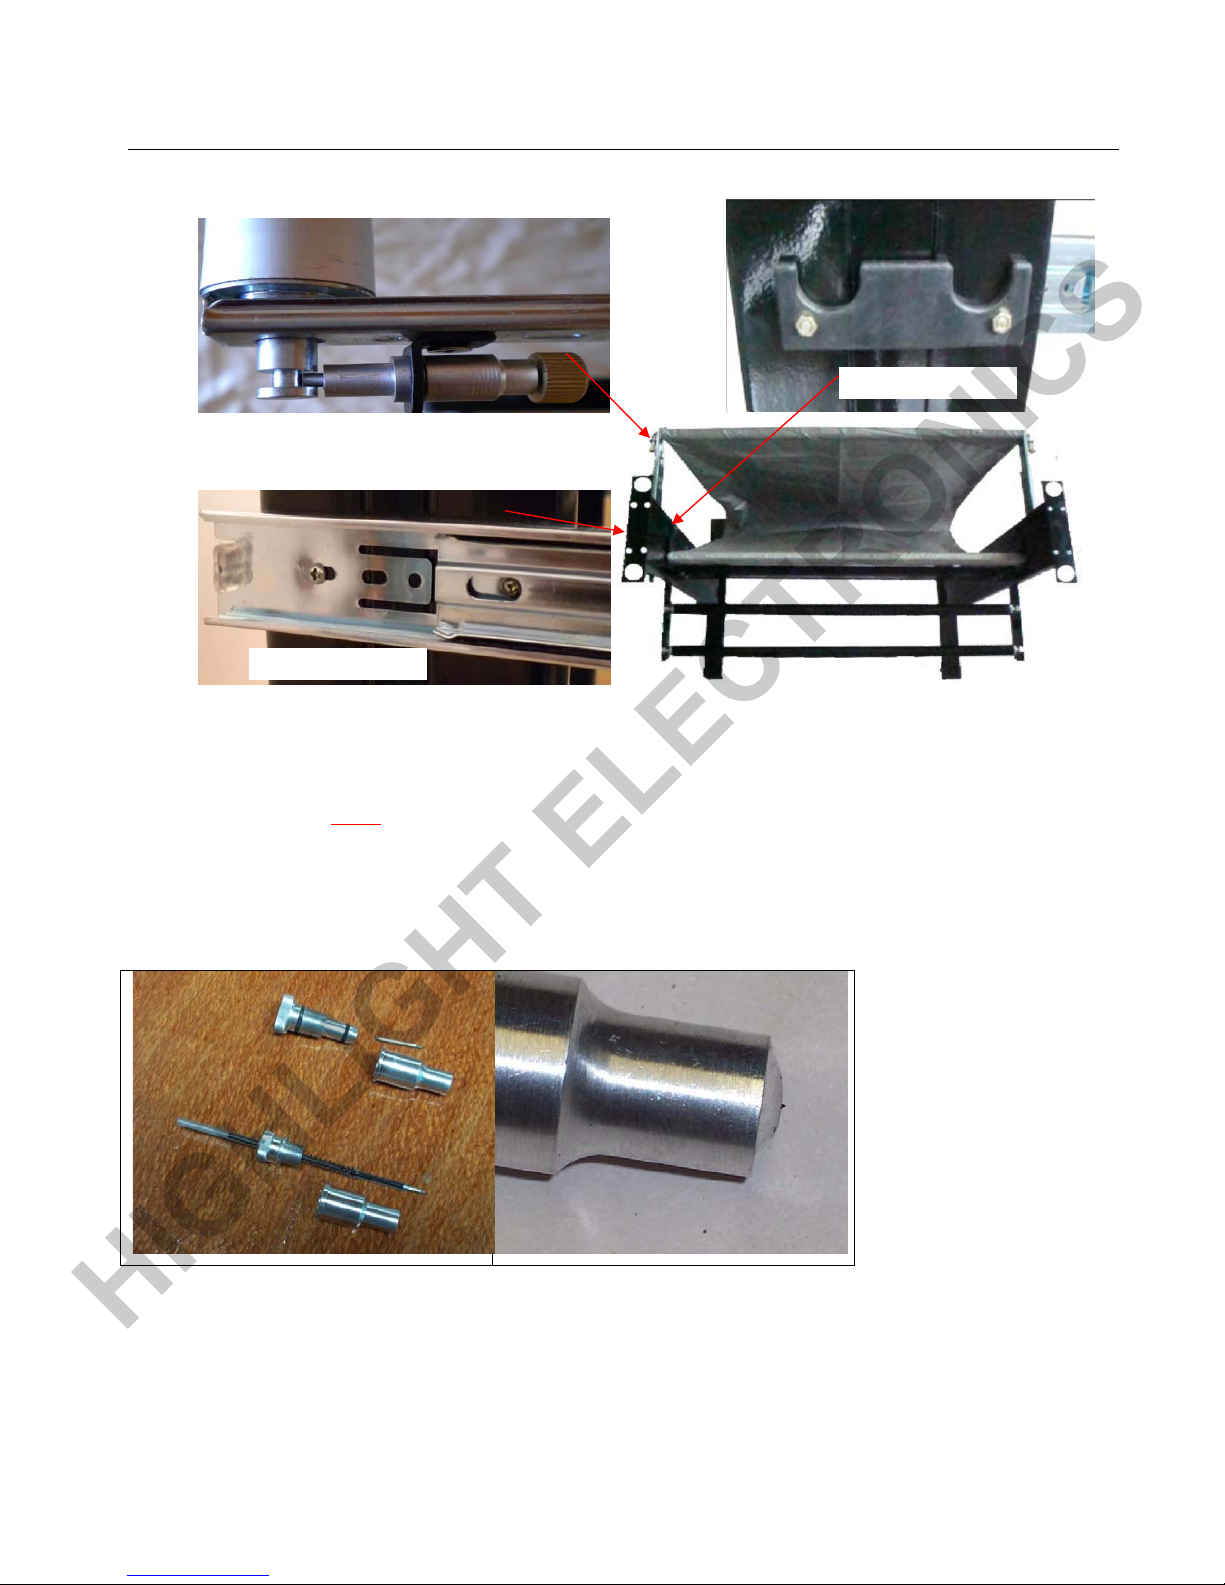
Fig 5.1a Machine Stand
Fig 5.1b Machine
HIGHLIGHT ELECTRONICS
Page 5
HL 721A/B 1351B Plotting Cutter User Manual
Page 5/27
Installation of vinyl collect basket for HL 721A model only
5.2. Cable Connection
1. Turn off both powers of the cutter and PC.
2. Connect USB or RS 232 (9 pin serial cable comes with the machine) to a PC (Only connect one of the cables. If
connects the USB cable, then need to install a USB driver from the CD comes with the machine. If connects the RS
232 cable, then do not need install the USB driver, but still need set up a COM port and data flow settings).
3. Connect power cable to the power source.
* Do not turn on the powers until everything is correct.
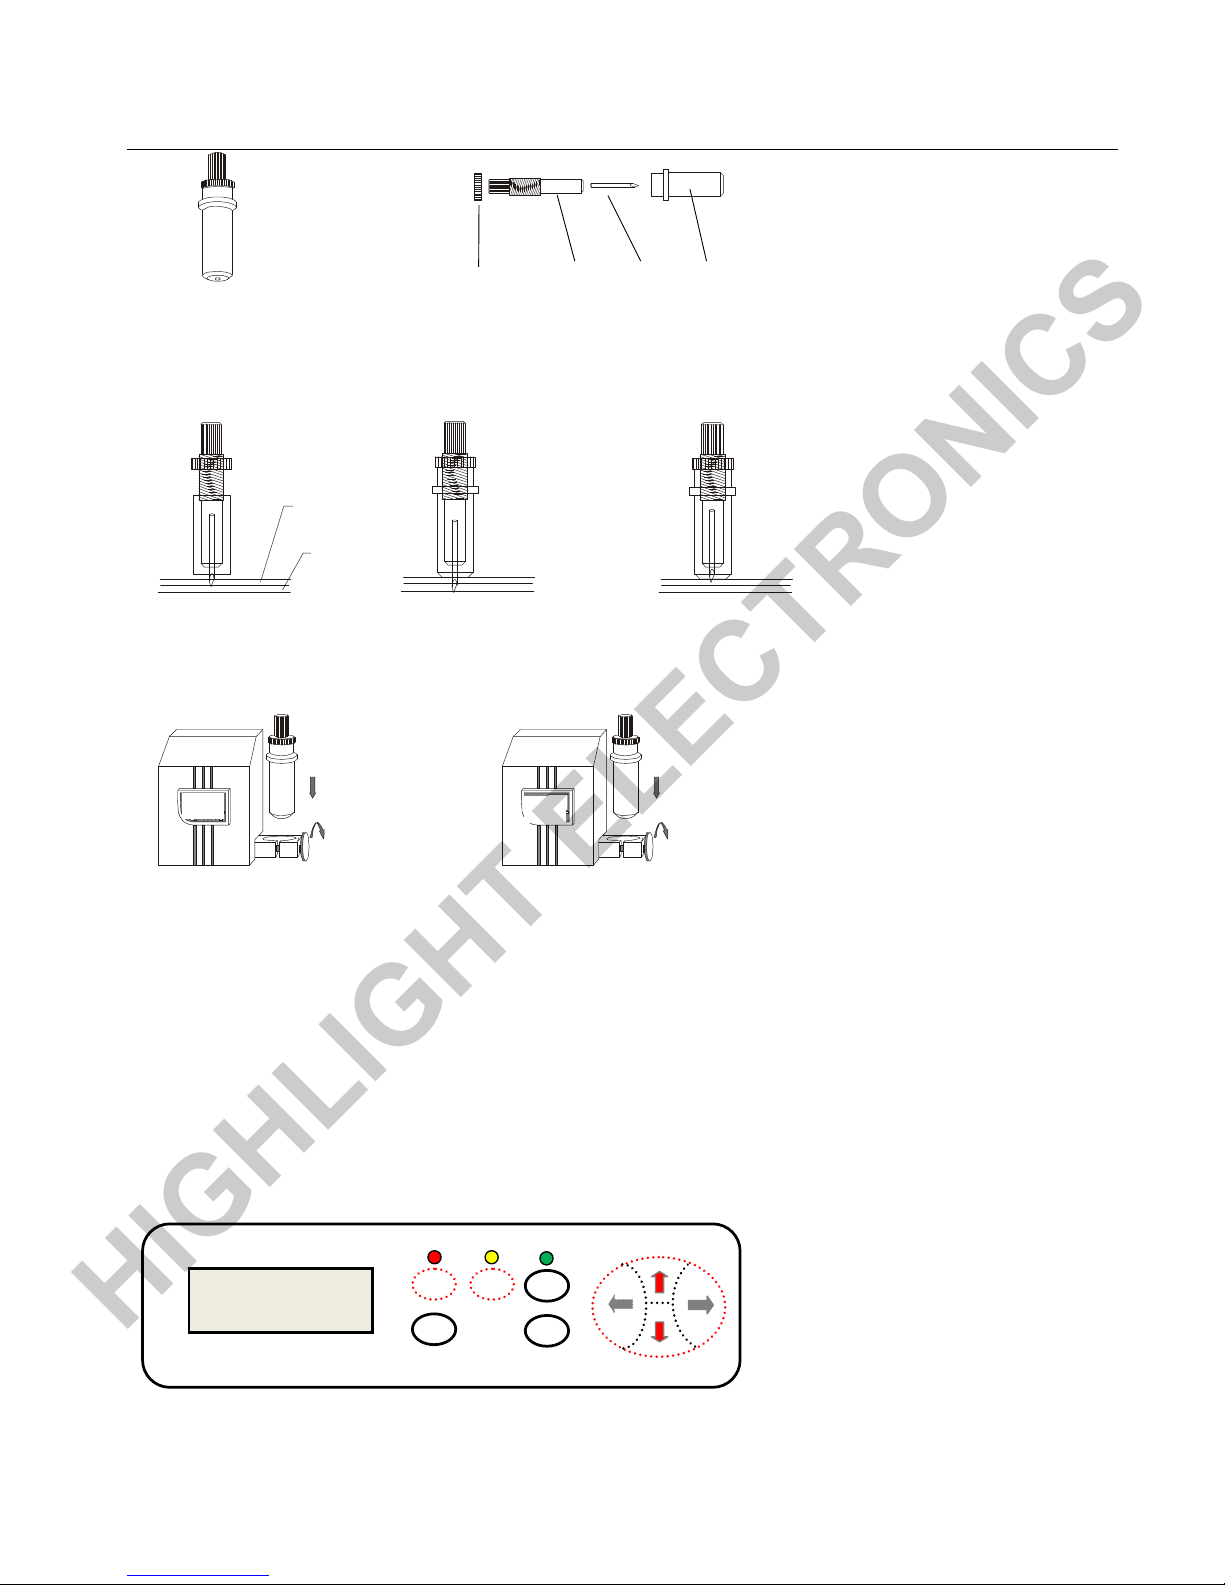
5.3. Ball Pen and Blade Assemble
Fit a ball pen into its holder first and load a piece of paper for an offline trial draw before start using a blade and film.
(External view) (Detail view)
Outside of main frame
Inside of main frame
HIGHLIGHT ELECTRONICS
Page 6
HL 721A/B 1351B Plotting Cutter User Manual
Page 6/27
5.4. Blade Adjustment and Installation
5.4.1. Adjust the protruding length of the knife top as required for specific cutting media。
Correct Too long protruding Too short protruding
length of knife point length of knife point
5.4.2. Undo the screw of carriage holder. 5.4.3 Redo the screw of carriage holder.
When the tool is in appropriate position screw it and fix the screw.
With B model, the front holder is for ball pen, rear holder is for blade.
* Make sure there is 1 ~ 2 mm gap between knife or pen tip and paper when the carriage lifts up.
5.5. Paper/Film Setup (The LCD panel layout of B model is different than A model, but the key operations
are same
)
This machine is suitable for both single-sheet and roll paper (film).
Lift all feeding press wheels.
Line up paper at proper position (level and even) and lower the feeding wheels with avoiding any press wheel seats at the right joint of
two rolling shafts.
1. Turn on the power of machine (a red light of Reset button on LCD panel will be light on).
2. Press the Offline/Pause button on the LCD panel (a yellow light will be light on).
3. Press two arrow buttons (↑ and ↓) to check whether the paper and carriage move nice smooth, square and even.
Adjust the level spring to get a correct wheel pressure.
Knife adjusting screw
Knife handle Knife Knife sheath
Superficial
materials
Base paper
HL
HL
Offline
/Pause
Reset
Setup
Test Origin
Paper adjustment button operation
2
1
3
HIGHLIGHT ELECTRONICS
Page 7
HL 721A/B 1351B Plotting Cutter User Manual
Page 7/27
* Make sure there is 1 ~ 10 cm distance between feeding wheel and paper edge to achieve good feeding.
6. Offline Operation - Machine Standalone Adjustment (The LCD panel
layout of B model is different than A model, but key operations are same
)
Key points:
1. The cutting plotter stands alone, do not need to connect to a PC.
2. Manual check X, Y, Z axis, adjust the carriage speed and pressure.
3. Load a ball pen and a piece of paper; check whether a test pattern (a test square) can be drawn.
4. The cutting plotter will be considered as OK generally as long as it’s able to draw a test square.
6.1. Initialize
1. Load a piece of paper properly (smooth, nice even and square).
2. Load a ball pen into a carriage holder (to eliminate any influence from a knife).
3. Plug power cable to the 240V AC 50Hz power point and turn on the power switch (a red “Reset” LED stays on and a blue
screen on LCD panel).
4. The blade carriage will move to right end position.
5. The rolling shaft will rotate forward and backward.
6. The carriage head will lift up 1~ 2mm.
7. The “Reset” LED stays on which means the cutter is standby.
The factory default settings are:
Baud rate: 9600 bps.
Cutting speed: 480 mm/s.
Cutting force: 240 g.
Starting point: right end of the machine.
Data buffer: empty.
*The default settings can be changed during running.
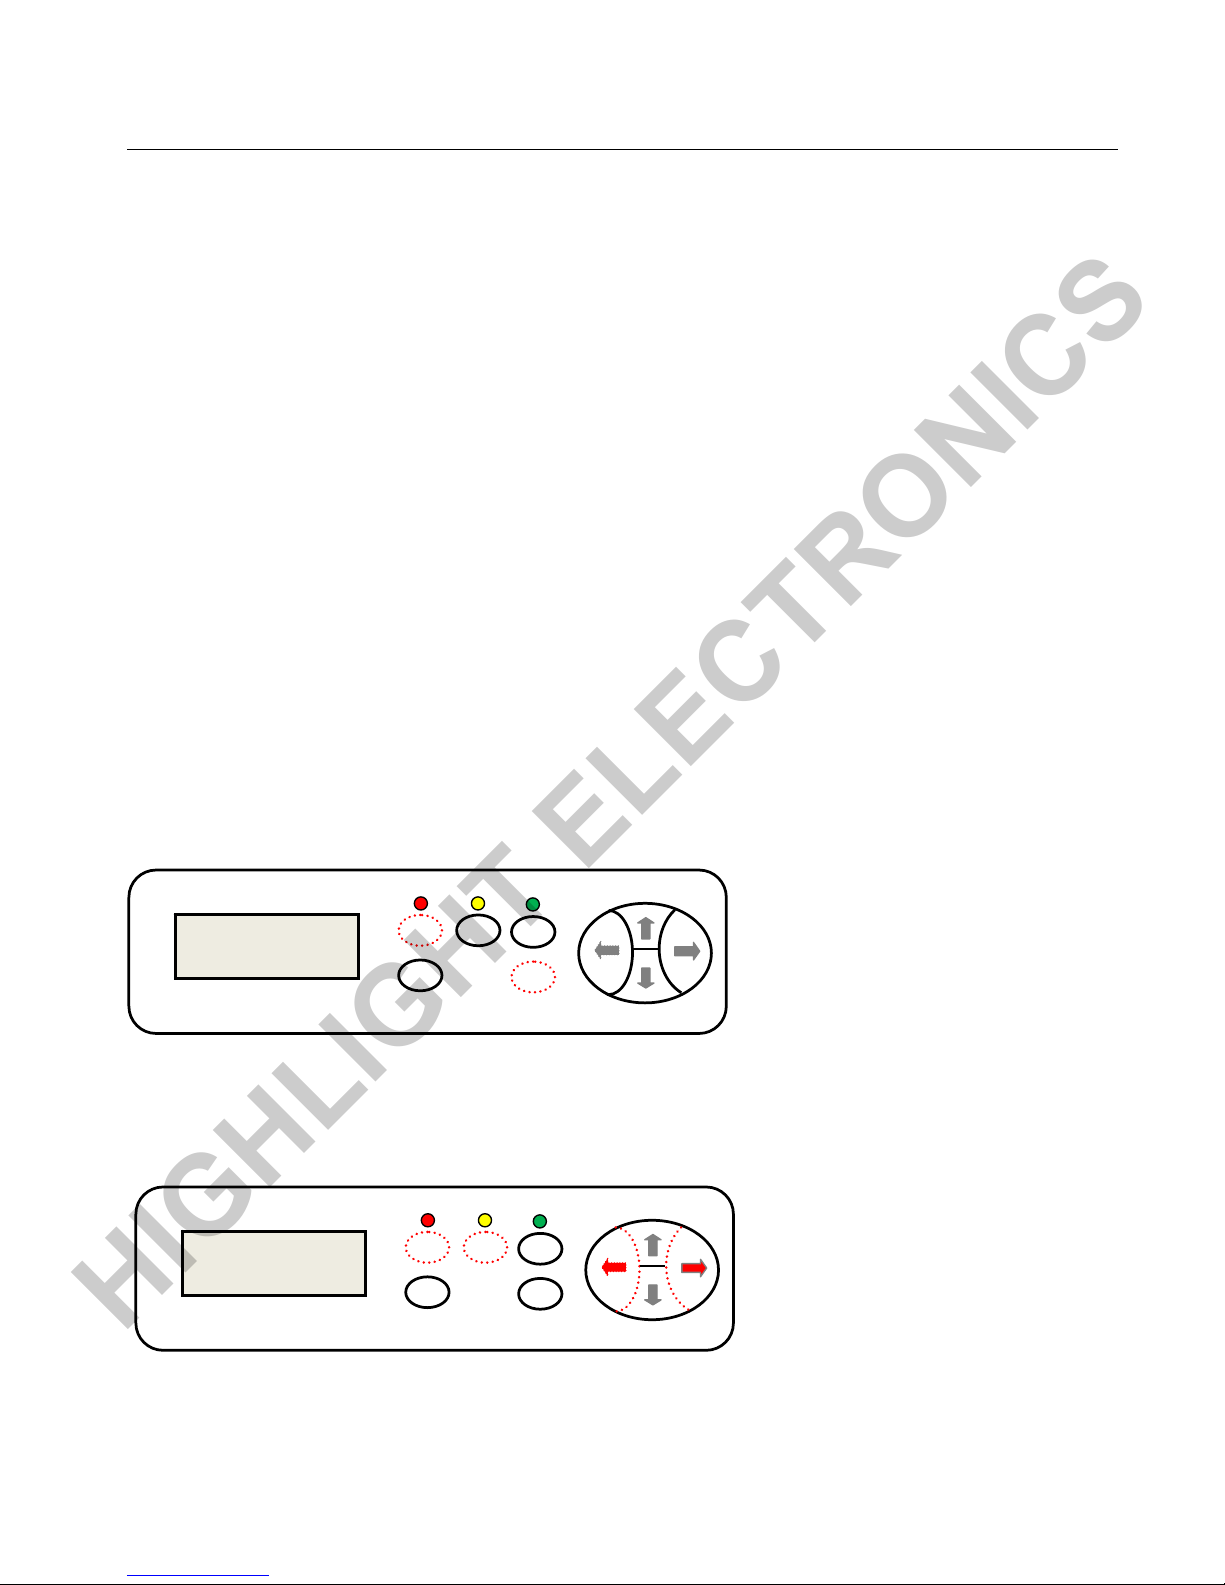
6.2. Check Z Axis (Pen/Blade Holder Heads Down or Up)
1. The red “Reset” LED stays on.
2. Press and hold “Origin” button on the keypad and the blade holder on the carriage will head down, and lift up when release “Origin”
button.
6.3. Check X Axis (Pen/Blade Carriage Moves Left or Right)
1. The red “Reset” LED stays on.
2. Press “Offline/Pause” button, and make sure the yellow LED stays on.
Offline
/Pause
Reset
Setup
Test Origin
X axis operation
1
2
3
Offline
/Pause
Reset
Setup
Test Origin
Z axis operation
2
1
HIGHLIGHT ELECTRONICS
Page 8
HL 721A/B 1351B Plotting Cutter User Manual
Page 8/27
3. Press “
←” or “→” arrow buttons, the pen/blade carriage will move left or right direction corresponding.
6.4. Check Y Axis (Paper Feeding Shaft Rotate Forward or Backward)
1. The red “Reset” LED stays on.
2. Press “Offline/Pause” button, and make sure the yellow LED stays on.
3. Press “↓” or “↑” arrow button, the paper feeding shaft will move forward or backward corresponding.
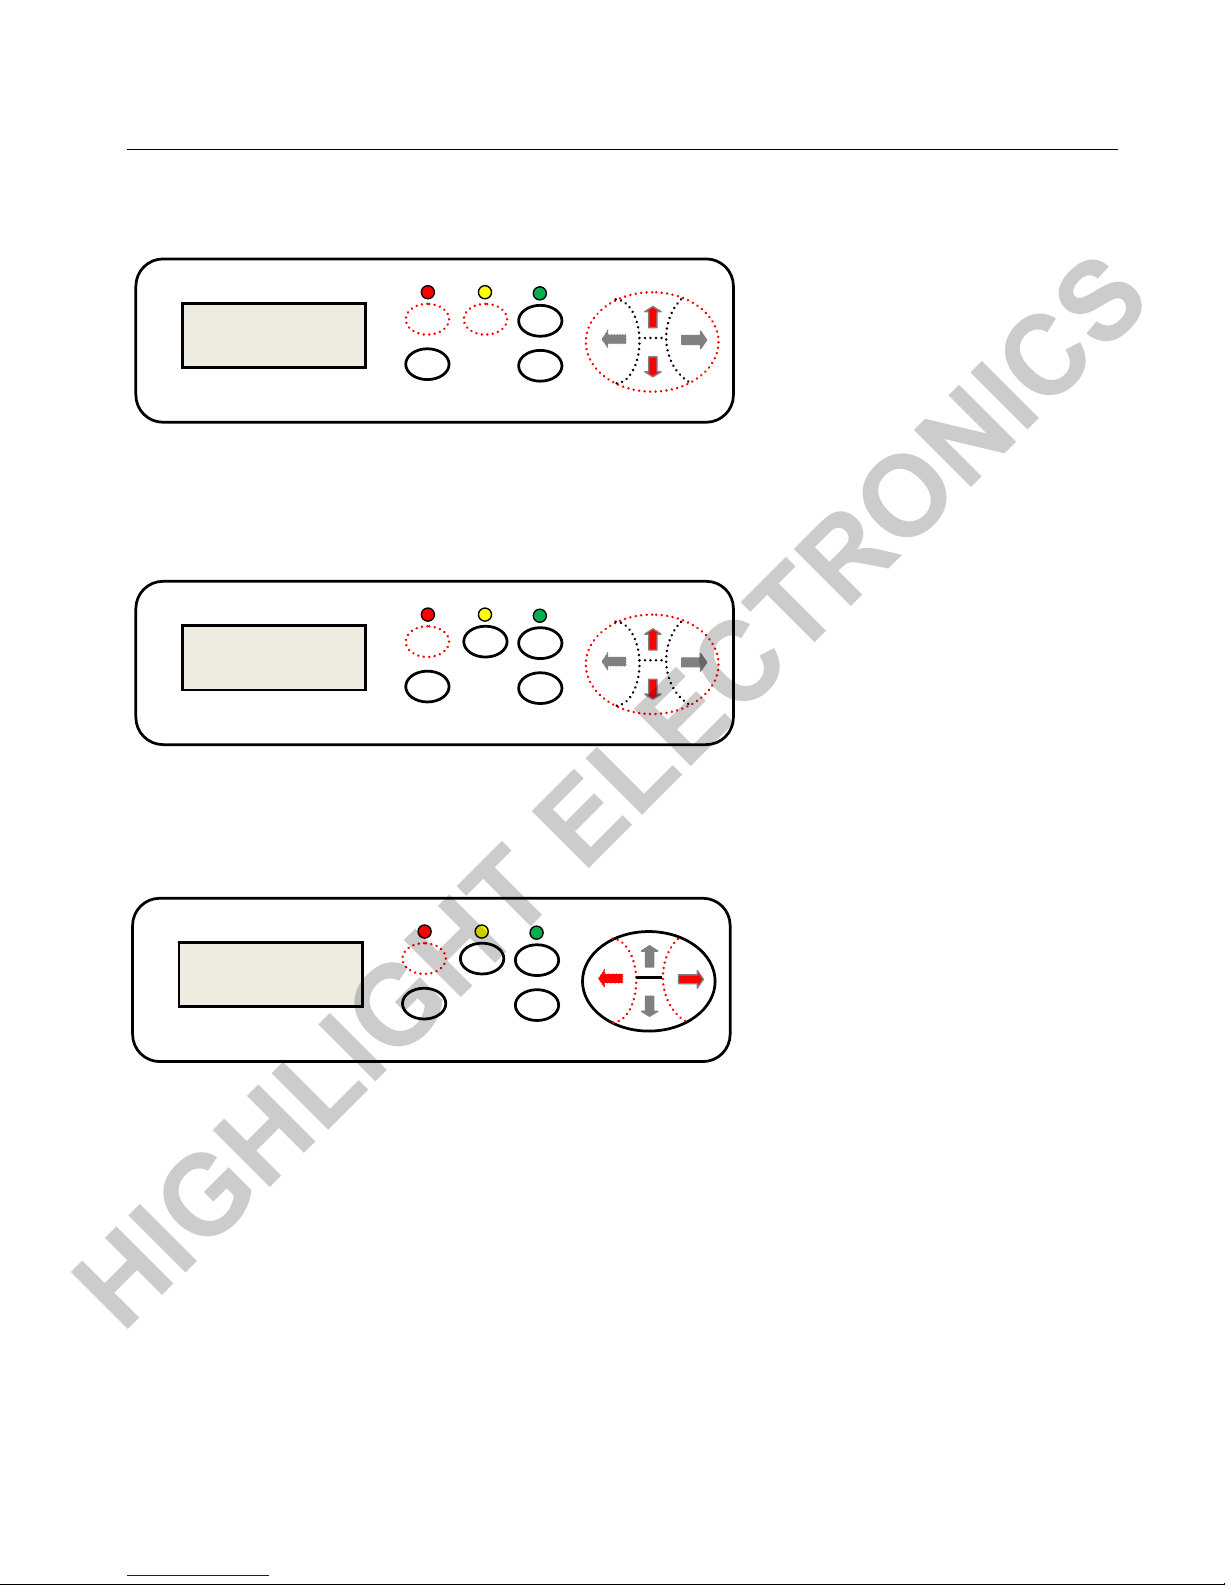
6.5. Check and Adjust Drawing/Cutting Speed
1. The red “Reset” LED stays on.
2. Press the “↓” or “↑” button to increase or decrease the setting, and LCD screen will display “Speed XXX mm/s” corresponding. (The
default setting is 350 mm/s).
6.6. Check and Adjust Blade Pressure
1. The red “Reset” LED stays on.
2. Press “←” or “→” button to increase or decrease the setting, and LCD screen will display “Force XXX g” corresponding. (The default
setting is 100 g).
* Make sure the blade tip should stick out about 0.5 mm or 2/3 thickness of the vinyl. Start from lower force, and then increase
it gradually.
6.7. Starting Point & Trial Cut
* Prefer to set up a ball pen on the carriage holder and load a piece of paper rather than a knife and vinyl film.
* Always do a trial-cut every time starting a new vinyl film to achieve a right cutting force.
* It is always good exercise to adjust paper feeding and carriage moving speed, draw/blade pressure, and paper feeding
wheel pressure to achieve a nice good trial.
* The machine is used to be considered as good on hardware issue if it’s able to draw/cut a trial.
Offline
/Pause
Reset
Setup
Test Origin
Blade pressure Adj.
CutSpeed 50 mm/s
CutPress 50g
1
2
Offline
/Pause
Reset
Setup
Test Origin
Cutting Speed Adj.
CutSpeed 50 mm/s
CutPress 50g
1
2
Offline
/Pause
Reset
Setup
Test Origin
Y axis operation
1
2
3
HIGHLIGHT ELECTRONICS
Page 9
HL 721A/B 1351B Plotting Cutter User Manual
Page 9/27
1. Make sure the red “Reset” LED stays on.
2. Press “Offline/Pause” button, and make sure the yellow LED stays on.
3. Press “↑” or “↓”or “→” or “←”arrow buttons corresponding to align paper and pen/blade carriage horizontally and vertically to find a
proper stating point.
4. Press “Origin” button to Zero the new starting point.
5. Press “Offline/Pause” button again, and make sure the yellow LED stays off.
6. Press “Test” button, the machine should be able to draw or cut a trial cut.
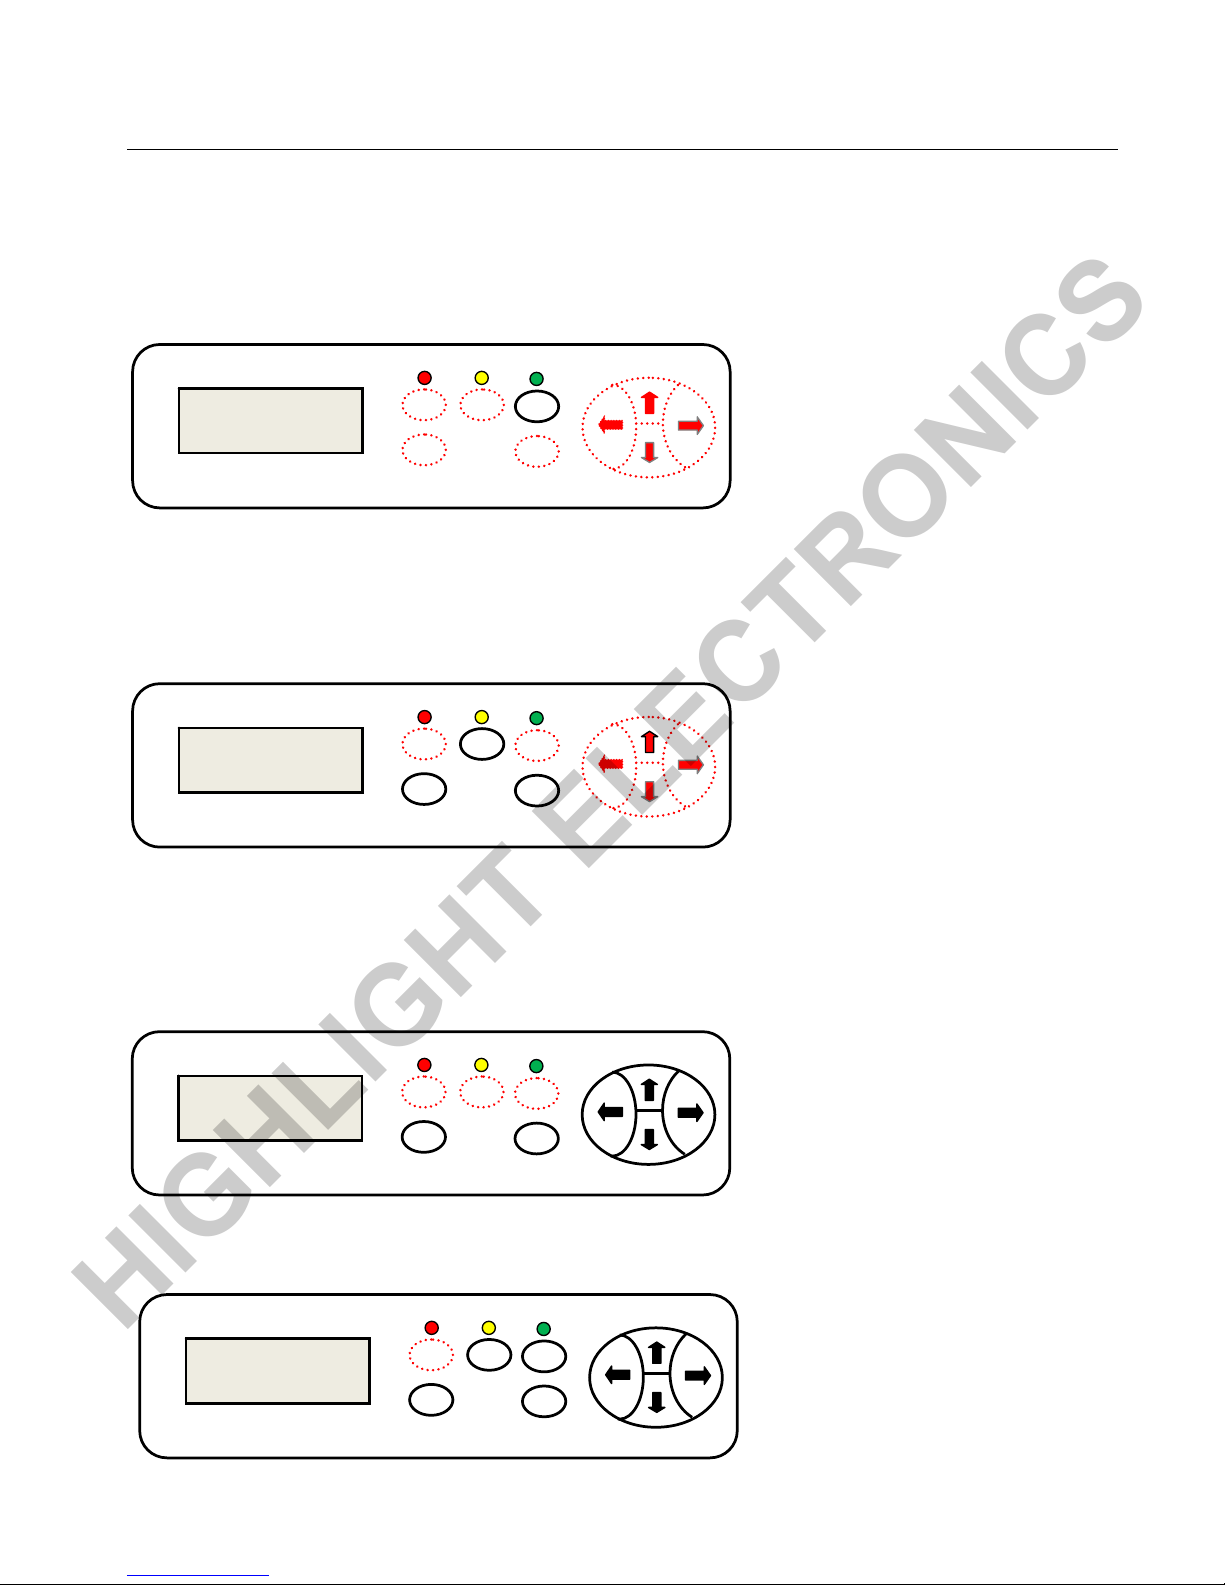
6.8. Check and Adjust Baud Rate (9600 bps) and Up-Speed
* Keep the baud rate setting as 9600 all the time to match what sets at PC control panel and Artcut application software.
* The Up-Speed is a speed for blade carriage and media film return to starting point after a project is finished.
1. Make sure the red “Reset” LED stays on.
2. Press “Setup” button, and make sure the green LED stays on.
3. Press “←” or “→” arrow buttons to adjust the baud rate, “↑” or “↓” arrow buttons to adjust the up-Speed.
6.9. Repeat Previous Cutting Job (Power without been off and reset)
1. Make sure the red “Reset” LED stays on.
2. Press “Offline/Pause” button, and make sure the yellow LED stays on.
3. Press “Setup” button, and make sure the green LED stays on.
* It will not repeat if the green LED flashing which means data error.
6.10. Cancel Current Cutting Job
During a cutting, press the red “Reset” button again, it will cancel current job and return to factory default settings.
Up-Speed 570 mm/s
Baud rate 9600
Offline
/Pause
Reset
Setup
Test Origin
Baud rate & Up_speed setting
1 2 3
Offline
/Pause
Reset
Setup
Test Origin
Offline trial cut
1
2&5
3
46
Up-Speed 570 mm/s
Baud rate 9600
Offline
/Pause
Reset
Setup
Test Origin
Repeat previous cutting
1
2 3
Up-Speed 570 mm/s
Baud rate 9600
Offline
/Pause
Reset
Setup
Test Origin
Cancel current cutting
1&2
HIGHLIGHT ELECTRONICS
Page 10

HL 721A/B 1351B Plotting Cutter User Manual
Page 10/27
6.11 Online Mode
1. Only the red “Reset” button remains on which means the machine is standby to receive data from PC if data settings are correctly.
2. In the meanwhile, the settings of cutting speed and blade pressure can be changed by using arrow buttons.
6.12 Offline/Pause Mode
1. Press the red “Reset” button.
2. Press the yellow “Offline/Pause” button.
3. Change the X, Y values by arrow buttons.
Offline
/Pause
Reset
Setup
Test Origin
Online mode
1 2
Offline
/Pause
Reset
Setup
Test Origin
Offline/Pause operation
1
2
3
HIGHLIGHT ELECTRONICS
Page 11

HL 721A/B 1351B Plotting Cutter User Manual
Page 11/27
7. Online Operation (Work with PC)
7.1. Install & Configure USB Driver under Windows OS
Turn off both powers of PC and the machine.
Connect USB cable between the machine and PC.
Check all connections, cables, ports.
Turn on both powers of PC and the machine.
1. It should be a music sound from windows operating system every time plug or unplug the USB cable which indicates
USB cable is good.
2. If use a 9 pin serial cable which comes with the machine, then don’t connect the USB cable at same time and don’t
need install the USB driver.
Step 1: Control Panel → Device and Printers → click on “Add a printer”
Step 2: Add a local printer
PC
Start > Control Panel > System > Device Manager
Prior and post a USB cable plugged and Power ON
“USB Printing Support” will
appear automatically by OS
HIGHLIGHT ELECTRONICS
Page 12

HL 721A/B 1351B Plotting Cutter User Manual
Page 12/27
Step 3: Choose a printer port
Step 4: Install the Printer driver
Step 5: Insert the USB driver CD comes with the cutter, choose the “GOLDCUT JK Series” file.
Step 6: Use the default printer name (GOLDCUT JK Series).
HIGHLIGHT ELECTRONICS
Page 13

HL 721A/B 1351B Plotting Cutter User Manual
Page 13/27
Step 7: Click on “Next”
Step 8: GoldCut USB drivers has been installed successfully, and then open the “Devices and Printers” windows to see if the new printer icon is
there and make sure it is your default printer.
A new printer called GOLDCUT JK Series and
has been set as a default printer
PC
HIGHLIGHT ELECTRONICS
Page 14

HL 721A/B 1351B Plotting Cutter User Manual
Page 14/27
Up to this stage, three settings at three different places have been done. It’s time to start install Artcut application software.
Location Setting Checking
LCD panel of the machine Baud rate 9600
PC > Device Manager Universal Serial Bus controllers USB Printing Support
PC > Control Panel Device and Printer GOLDCUT JK Series & USB001 Port & Default Printer
USB001 Port (must be same at Artcut software)
HIGHLIGHT ELECTRONICS
Page 15

HL 721A/B 1351B Plotting Cutter User Manual
Page 15/27
7.2. Install ArtCut Software (a sign maker software) with Graphic CD (Contains verify
code, so please keep it in good condition).
Step 1: Install Artcut software by inserting the CD into CD/DVD drive, and follow the installation guide as below.
Up to this stage, the Artcut software has been installed. The next step is verify the Artcut CD via Graphic CD.
HIGHLIGHT ELECTRONICS
Page 16

HL 721A/B 1351B Plotting Cutter User Manual
Page 16/27
Step 2: Insert Graphic CD to verify the Artcut.
Once inserting Graphic CD into the CD/DVD driv and press OK, The Artcut software is ready to run.
To test the ON LINE operation at the beginning, load a ball pen (not a blade), and a piece of paper (not vinyl film).
Step 3: Click on the Artcut icon on PC desktop. Open a sample Artcut file.
The graphic CD contains software key for Artcut, keep it i
n
good condition. Presses “OK” only if you don’t wan
t
install the images on the graphic CD.
HIGHLIGHT ELECTRONICS
Page 17

HL 721A/B 1351B Plotting Cutter User Manual
Page 17/27
After reset up USB 001, turn both machines off, and on again after a while, check the port settings again to confirm.
* Reboot PC every time after modification.
IF the blue progressing bar appears once click on
the “START” button BUT the cutting plotter does
not response, it normally indicates the installation
and configuration of Artcut is OK, please check:
1. USB cable (Music sound while plug/unplug)
2. The machine is under online mode and 9600
baud rate
3. Data settings port (9600 baud rate, 8 Dat bits, 1
Stop Bits, Even Check, Xon/Xoff Sequential
Control)
4. Printer of GOLDCUT JK Series as a default
printer & use USB 001 port as well
After check all of them, reboot both machines
USB001
HL-721(HPGL)
HL-721(HPGL)
HIGHLIGHT
Parameter
USB001
HL 721 (HPGL)
USB001
Even
A
lternative Manufacturers: Jinka
JK721(HPGL) or JK1351(HPGL)
HIGHLIGHT ELECTRONICS
Page 18

HL 721A/B 1351B Plotting Cutter User Manual
Page 18/27
7.3. Work with CorelDRAW under Windows OS (for reference only)
Select the images, then click on “Outline” and choose “Hairline”
Choose “Fill” and “None”
Click “Print” and choose “Goldcut”
HIGHLIGHT ELECTRONICS
Page 19

HL 721A/B 1351B Plotting Cutter User Manual
Page 19/27
HIGHLIGHT ELECTRONICS
Page 20

HL 721A/B 1351B Plotting Cutter User Manual
Page 20/27
7.4 Work with SignBlazer (for reference only)
Even
9600
8
1
HIGHLIGHT ELECTRONICS
Page 21

HL 721A/B 1351B Plotting Cutter User Manual
Page 21/27
HIGHLIGHT ELECTRONICS
Page 22

HL 721A/B 1351B Plotting Cutter User Manual
Page 22/27
8. Technical Specifications
Technical Specifications
Model 721A/B 1351B
Max. paper width
720 mm 1350 mm
Max. cutting width
630 mm 1260 mm
Cutting speed
15 ~ 1000 mm/s
Cutting force
0 ~ 600 g
Buffer capacity
32 Mb
LCD
YES
CPU
16-bit CPU
Special setting
Dual alignment
Strip of plotter
Double sheet(soft sheet and plastic sheet)
Drive
Metal Stepping Motor
Min. character matrix
Approx. 5 mm [0.2''] high
Blade type
Carbide steel [1.2mm and 2.0mm]
Film type
Self -adhesive vinyl film, fluorescent film, reflective film, paper
Display panel
8digits X 2 line LCD
Interfaces
RS 232/USB cable
Power requirements
90-260 V AC 50 Hz
Repeatability
0.0127mm
Mechanical resolution
0.0254mm/step
Commands set
HPGL/DMPL
Environmental temperature
0-35℃
Environmental humidity
5%-65%(without condensation)
HIGHLIGHT ELECTRONICS
Page 23

HL 721A/B 1351B Plotting Cutter User Manual
Page 23/27
9. Trouble Shooting
Check Points
After a machine has been assembled properly, please follow the instructions below.
1. Loadapieceofpaperinsteadofvinylfilmnicesmoothly.
2. Loadaballpeninthefrontholderpositioninsteadofabladeintherearholderposition.
3. Movepressfeedingwheelsproperlybyhandandmakesurenotplacesthemonthejointsofrolling
sha
fts).
4. Adjustthespringsofpressfeedwheelsniceevenly.
5. Connectthepowercableandswitchthepoweron.Thecarriageheadwillmovetotherightendof
themachine.
6. ChecktheLCDscreenofthemachine,thebaudratemustbe9600.TheUp‐speedonLCDscre
en
meanstheidlespeedofcarriagewhenit’snotincutting,e.g.thespeedtoreturntostartingpoint
oncefinishcutting,thespeedofmovingthecarriagetorightorleftbypressingarrowbuttons.
7. Trialdrawing/cuttingMachinehardwarecheck(offlinemode,notconnecttoaPC
)
Action: Power on + Reset on (1st button, red LED) + Test (4
th
button, no LED light).
Response: The machine should draw (ball pen and paper loaded) trail pattern.
8. Ifthetrialdrawing/cuttingisnotOK,thenneedtocheckX,Y,Zaxisseparately.
Z axis check
Action: Reset on (1st button, red LED) + Original (fifth button).
Response: the carriage head should lower and upper correspondingly.
X axis check
Action: Reset on (1st button, red LED) + Online/Offline (2nd button, Yellow LED) +
F+/F- arrow buttons.
Response: The carriage head should move left or right correspondingly.
Y axis check
Action: Reset on (1st button, red LED) + Online/Offline (2nd button, Yellow LED) +
V+/V- arrow buttons.
Response: The rolling shafts should roll forward or backward correspondingly.
9. If the trail drawing/cutting is OK the machine is generally considered as good. Then starts focus
on Software settings of USB driver and Artcut installation. Refer to section 7 of this manual for
detail.
9.1. Carriage Assembly
The knife holder is sluggish to rise: Check the copper connection plates under the dolly cover to ensure they are well
connected. This may require the use of a soldering iron to correct.
The Z axis drive (knife up and down): The drive solenoid winding is burnt out or the connection wire between dolly and main
PCB is broken.
The knife holder can be raised but not lowered: The magnetic Z drive cylinder is touching the windings, There is a large friction
somewhere impeding movement or the –12V from the power supply is missing.
The dolly is jerky when moving or even falls from the guide rail: The nylon guide rollers on the dolly are damaged or badly
worn or the toothed drive belt is loose or damaged.
The dolly won’t move at all or will only move in one direction: a stepper motor is faulty or its driver IC on main board is faulty.
The dolly moves to one side and slams into the metal plate: The limit sensor or limit sensor PCB is faulty or the limit sensor
HIGHLIGHT ELECTRONICS
Page 24

HL 721A/B 1351B Plotting Cutter User Manual
Page 24/27
infra-red beam is not being correctly broken by the interrupter arm fitted to the dolly: Adjust arm or replace faulty parts as
required.
9.2. Paper Pressure & Feeding Shaft
Motors make noise but the paper is not driven correctly or at all: There is too much pressure between the pinch rollers and the
metal drive roller shaft – use one less pressure roller.
Paper runs off to one side while cutting: Incorrect paper installation or the pressure of the pinch rollers is uneven, try using one
pinch roller on the left and two close together on the right side.
The pressure pinch roller assembly’s do not slide well on the rail: Apply a tiny drop of lubricating oil to the shaft and wipe off
any excess oil as it will attract dust and make the problem worse. DO NOT spray pressure pack oil such as WD40© or similar
on the machine at any time.
The pinch roller pressure is not enough to hold the paper firmly: Adjust the pressure as required or the rubber pinch rollers are
worn and require replacement.
The metal drive roller doesn’t move (Y axis): The stepper motor is faulty or the driver IC 3955 is faulty.
9.3. Power Supply
Power cuts on and off when using the machine: The power supply lead is faulty or the power socket on the machine is
damaged.
Power won’t turn on at all: Check the fuse or the power supply is damaged.
9.4. Random Cutting and Unpredictable
Connecting serial cable is damaged.
COM port of computer is faulty.
Main PCB of machine is damaged.
The machine has not reset correctly (press manual reset).
The paper settings in software don’t match the available material.
The machine may be affected by static electricity, ensure correct earth.
Ensure all software settings are correct (this is most likely to be the problem).
9.5. Not Output any work (No Response)
Port settings in software are incorrect (check these settings first).
COM port on computer is damaged.
Machine selection in software is incorrect.
Connecting serial cable is faulty.
Main PCB is faulty.
9.6. Produced Work has Jagged Edges
Insufficient knife pressure.
Check software settings (settings of compensation parameter, closing parameter and accuracy in cutting output parameter will
all affect this).
The internal bearings of the knife holder may be jamming or damaged, check that the blade can spin freely in the holder
(CAUTION – sharp blade).
Fonts in the font database do not match with the drawing sent to the cutter.
Cutting Inaccuracies
There are gaps in the produced work: The white blade pressure strip is damaged or worn or the knife blade cannot rotate in
the holder freely.
The cut depth is different on the left and right sides of the machine: The metal roller is not square to the machine, perform a
adjustment.
The machine only cuts a length of, say, two metres when three have been sent to the machine for cutting: Output setting in
Artcut© (output length limitation in compensation setting) is limiting the length of material the machine can cut.
The depth of cut varies across the work at random: Possible static electricity interference, ensure machine is correctly earthed
to PC.
HIGHLIGHT ELECTRONICS
Page 25

HL 721A/B 1351B Plotting Cutter User Manual
Page 25/27
10. FAQ
Q1: Will the characters below 1CM be deformed?
When graving small characters, please set sharp-angle compensation in the software. For example, in Wentai plotting software.
Steps: File → Cut/Plot… → Setup Plotter Compensation → Sharp angle 0.25
* The compensation ranges within 0.1-0.7, more often we set it to be 0.25 mm. In addition, the plotting speed of the cutter
shall be set below 20.
Q2: Why there is an additional stroke after finishing cutting
1. Check if the tip of cutter is flexible when it is up and down.
2. Check if there are some problems on the files you are working on.
Q3: Why zigzag happen to the cutter?
As cutter motor features high power and speed, so the cutting speed shall be adjusted according to size of character. Generally, to cut
small glossy characters with high requirement for precision, the speed shall not exceed 40.
In most cases, the speed at the shaft 50 ~ 60 is favorable. To cut big characters of large quantity within shortest time, the speed can be
70 ~180, but since step distance of motor is so long that evident zigzag occur. Therefore, you should set the speed to specific size of
characters, and the relationship between speed and size of characters please refer to following table:
Size of font(mm)
Speed
<10 10-20
10-30 30
30-50 40-50
50-500 60
>500 70-80
Q4: Why the paper deviate when it runs by a large margin?
The paper feed bracket containing paper roll shall be completely parallel to paperweight wheel, for big roll of materials, loosen it prior graving
to prevent excessive obstruction when plotting or graving. For the machines with four paperweight wheels, when plotting big image or
characters back and forth, use the two paperweight wheels at sides instead of press the four down simultaneously. Unequal abrasion of the
two wheels also may result in deviation of the paper; in worse case replacing wheels is needed.
Q5: Why the machine feel tingle?
**721 (HPGL) COM 3
HIGHLIGHT ELECTRONICS
Page 26

HL 721A/B 1351B Plotting Cutter User Manual
Page 26/27
The machine might be improperly grounded, make sure central line of the power source grounded。
Q6: Why the job feel not smooth with sharp-angle raised when plotting?
1. The protruding length of knife top is too long, please adjust it as required.
2. The knife is worn, replace it.
Q7: Why the plotter cuts or draws a line before plotting?
Because the machine improperly exited from previous operation, there is still knife-dropping instruction existing in the memory of
plotter. To resolve it, power off the machine and turn it on again.
Q8: Why no or black rows displayed on LCD panel?
1. In case of no display, check whether the power work well.
2. If black blocks are displayed, check whether voltage is at required level. If the troubles remain after the above operation, please
contact maintenance center.
Q9: Why some characters can’t close in strokes when it is plotting?
Because the knife of the plotter is eccentric knife with a eccentric value, to resolve it, set“closing compensation”in the software. For
example, With Artcut software:
1. Click“plotting output”once, a plotting output picture will pop up.
2. Click“set”once, a picture of setting plotter will pop up.
3. Click“compensation setting” a dialog box will pop up.
4. Select closing compensation, adjust the value to required level, generally the value is set to be 0.5.
Q10: Why the plotter has missed some pave of letter when cutting?
1. Check the machine if it presses enough.
2. Reinstall the software.
3. Chook the head of the knife.
4. If the problem is still existence, please contact with repair center.
Q11: Why the plotter starts low-speed after start-up?
Because paper sensor fails to detect the fore end of paper. When feeding paper make fore end of paper cover hole of paper sensor,
and then perform another automatic paper testing.
Q12: Why some nicks deep and other shallow when cutting?
The cutter employs upscale soft PVC materials as knife strip cushion to protect knife. But after using for long period, it may
produce some tracks therefore roughing the stripe cushion, so some nicks become deep, while some become shallow. To resolve
it replace a stripe cushion. If is not so worse, adjust knife pressure (some 120 -150).
Q13: Why the plotter has no response when it is outputting?
1. Check the properties of COM port, baud rate, flow control, parity check and data bits both on PC (device manager) and
Software (Artcut).
2. Check all cables, plugs, fuse and power.
3. PC or Software may affected by virus, remove or reinstall.
Q14: Why an instant-glue paper can’t be peeled off?
1. Perform trial run prior output, adjust press to appropriate level.
2. Check whether the knife worn too much, or whether the knife tip is broken. For new ones the nick is thin in the instant-glue, while
for old ones the nick is thick and impressive. To resolve it replace it with a new knife.
Q15: What steps need to be taken when cutting big characters?
1. When cutting big characters, the system can automatically setup pages, you can cut a big character in several pages, but it is
notable that the setting of output width shall be conformed to the width of instant-glue in addition, when cutting big characters
and output it, you should widen pages or set seaming distance.
2. When you use the special wide machine to cut the big characters, especially the long big characters before cutting input, you
shall instead the paper first look careful the paper if the paper deviates then deviate the big characters into some pouts to input, it
can make sure it won’t deviate and waste paper.
Q16: How to maintain the machine?
HIGHLIGHT ELECTRONICS
Page 27

HL 721A/B 1351B Plotting Cutter User Manual
Page 27/27
The machine employs high grade bearing oil, no extra oil needed even it works for a long time. After operation everyday, clean the
dust with soft brush. The glue remaining in engine base can be cleaned with alcohol. If frequently operated in dusty environment
above two years, please have maintenance technicians clean the dust in machine. If plotting precision degrades, the maintenance
of running parts are desirable (firming and replacing the abraded parts).
Q17: Why the plotter is out of control sometimes?
Check all cables, open the machine properly.
Q18: Why the plotter comes to halt?
Because it encounters vibration for a long period, or has been used for a long period, or is affected by temperature, so dielectric
displacement happen to the servo driving board, therefore resulting in halt, please contact local agent or customer maintenance
center.
Q19: Why the pattern has been deformed or incomplete?
1. Too high pressure or too long blade tip or too dirty platen or too soft stickiness, all of these factors can cause more resistance
to the two faces of paper and make it fall behind the roller rotating, thus result in deformed pattern.
2. The software setting isn’t proper. (The tool compensation value is too big)
3. The carriage belt is too loose, or the metal roller can’t exactly follow the motor running.
4. The motor doesn’t run all the steps.
5. The pattern is normal but not completed. It may be resulted from too small tool compensation value.
Q20: Why does the paper run deviation?
1. The stickiness isn’t placed right.
2. The platen is too dirty so that the resistance from two sides can’t be balanced when the paper is moving.
3. The pinch rollers have been deformed or don’t match to each other.
4. The pressure of the feeding press wheel is a little smaller and the paper is very sensitive to the external force.
5. The balance of the stickiness weight isn’t very good.
Q21: Why some parts of letters missing?
1. The vinyl is too heavy or too tightly wrapped. Metal roller might be soiled by some foreign substance or by vinyl chips.
2. Cutting speed is too fast, cutting force is too great, or cutter tip is too long.
3. Synchromesh belt is too tight, or pinch roller is under too much pressure.
4. Metal roller is faulty. Contact local distributor for repairs and replacement.
Q22: Why different letters on the same line are cut to different depths?
1. Cutter holder is not tightly attached. It should be tightened.
2. Cutter blade is not tightly set in the holder.
Q23: Why letters appear to have ripples?
1. Cutting speed is too fast. Except for cutting large letters, speed should not exceed 480mm/s.
2. Cutting blade is of poor quality, or it has been damaged. Replace it.
3. Cutter holder is not tightly installed. Tighten screw.
Q24: Cutting small letters
When cutting small letters, cutting speed and force should be adjusted to the lowest setting. Similarly cutter tip should be adjusted
to as short as possible.
Q25: Cutting large letters
Cutting speed and force may be increased to higher settings. When cutting large letters Sharp Angle in Artcut software may be
ignored.
The plotting cutter is made in China
HIGHLIGHT ELECTRONICS
 Loading...