

Highlead T-Ever User Manual
T-EI'ER
Purchasing
Copy
Dept
Tacking
1!
Instruction
Parts Catalog
machine
ffl
iJl
EJJj
~
(cylinder
~
* §
31<:
Manual
bed)
__t
#iJ
j(JJJG~4tttt~1f
SHANGK~I
TAICHENG
TECHNOLOGY
~~ 0 ~
DEVELOPMENT
CO;
LTD.

il
JfJ
i5t
P,ij
~
(Instruction Manual)
~
)(
Chinese:
1.
i*1flitrl±~$JJ)!
2.
±~tt#m**
3.
i*1ffi£~
4.
00~~~
5.
~~i}i1Jl)
6.
ffi}jJ;pffifliJi1l"Ti
7.
~~5-J;:j]
8.
;t;ut
9.
:liJi~~iEP
.....................................................
.....................................................
.....................................................
.....................................................
~:lifi~~zviJi1J"Ti
.....................................................
. . . . . . . . . . . . . . . . . . . . . . . . . . . . . . . . . . . . . . . . . . . . . . . . 1
. . . . . . . . . . . . . . . . . . . . . . . . . . . . . . . . . . . . . . . . . . . . . . . . . . . 1
...................................................
.............................................
ONTENTS
2
2
2
2
3
3 - 4
4
~)(
1.
2.
3.
4.
5.
6.
7.
8. TIME
9.
~1ttn*
A.
English:
PRECAUTIONS
MAIN
PREPARATION
THREADING
WINDING
ADJUST
ADJUST
REPLACE
;ffl.JE
SPECIFICATIONS
ADJUSTMENT
THE
THREAD
NEEDLE
ROTATING
C Parts Catalog)
mWJ:
BEFORE
. . . . . . . . . . . . . . . . . . . . . . . . . . . . . . . . . . . . . . . 5
AND
LUBRICATION
. . . . . . . . . . . . . . . . . . . . . . . . . . . . . . . . . . . . . . . . . . . . . . 6
PRESSURE
TENSION
TO ROTAING
HOOK
ARM
BED
AND
.....................................................
B.
J:$!ilmWJ:
NEEDLE
BAR
....................................................
C.
tHEiiJi1ll5fl13ftt
D.
ffi!Jtll~MmWt
E.
ffi)Jtp~fHW1tf:
STITCH REGULATOR MECHANISM
PRESSER
PRESSER
LIFTING,
FOOT
....................................................
F.
#2\l]:g:ll{tf.
DIFFERENTIAL MECHANISM
....................................................
G.
1~irtnWf'r
....................................................
H.
f,fHHWft:
OIL LUBRICATION MECHANISM
ACCESSORIES
....................................................
STARTING
.......................................
OF
PRESSER
....................................
HOOK
......................................
ITS ACCESSORIES
AND
MECHANISM
OPERATION
..................................
FOOT
. . . . . . . . . . . . . . . . . . . . . . . . . . . .
TAKE-UP MECHANISM
FEEDING MECHANISM
.......................
.........................
....
7 - 8
9 -
11
12 -14
15 -17
18
- 20
21 -22
23 -25
26 -27
28 -29
5
6
6
7
7
8

1,
ti1'Fwn.t~•~.vJ
1)
~~tt:l:$J9l:
(1)
~ft!~7f~1J7fJ§,
(2)
~m~w
(3)
~Mi#4fJl.~,
(4)
:tE~~JJ~Jl€~1Jt,
C
5)
fJ1.~7fl9J~~r,
(6)
~o*~t5tT
2)
f*f~IW~9l9;1l:
(
1)
~o*i1E:f'!I*J¥i1f/Jo¥tWi11:!'
(2)
~o*fJl.~Hd~i11:J~IJnf,
C3)
~-F:l~~3HJ1.
rr1tfflPX;~11=1fjli!jlf~1flat,
~~&:w~.&WJ~pj(;ij;l9J;fJL~llt,
&:wlJ-&1?¥1J.PX;1?g~lJ.,
t!IJ\€~at,
¥mjli!j7f;fJL#~&±l9J~IR~o
:i!!¥~:m¥1~,
i~2JJ:m¥1~1IDAtJ~~;ff!W1?'!~JL
m2JJ~1f~Jl~o
:tE~IJnflW/f-~~11=fJl.~o
i~!J&iiE±Z9J~i¥JJiJEII:iJ
i~:mft!~~ffi
~:&,
ff~4m~3:lli:±l9J~&&:wPX;~Jto
:tE¥i1f32;:®3(~15tflffilWi~2JJ:I"*fFfJl.~o
0
i~:mft!~~ffio
m:m¥1~it-FfJl.#PX;±Z9J~~o
o
Uf±Z91~1frl:iJ~J1't:,
c 4 )
ii1I
~
m
ft!
BI
3)
f*ft~ftf::
(
1)
JM~ft~~iE-m-~rlft
c
2)
JM~:tE:tJ<~lf:J:ti
lli
HiP
:JtB
7+ ~ J3t
±Z9J~JiJEII:iJ/'il~at#1frl:iJ
c •
ffi
PX;
- ffD
~ ~
OSOCPX;~~)
r 1tffl
:fJL~
o
11*~*
iir%1~:1!
tU§*J3t
ttff1ff'i
¥M
H*~
M!
_t
i¥J
fx:i1i!i
!!X:1!£¥&i
(SOC~~{!£)
:Jl:
o)
~
ffi
r-B=
0
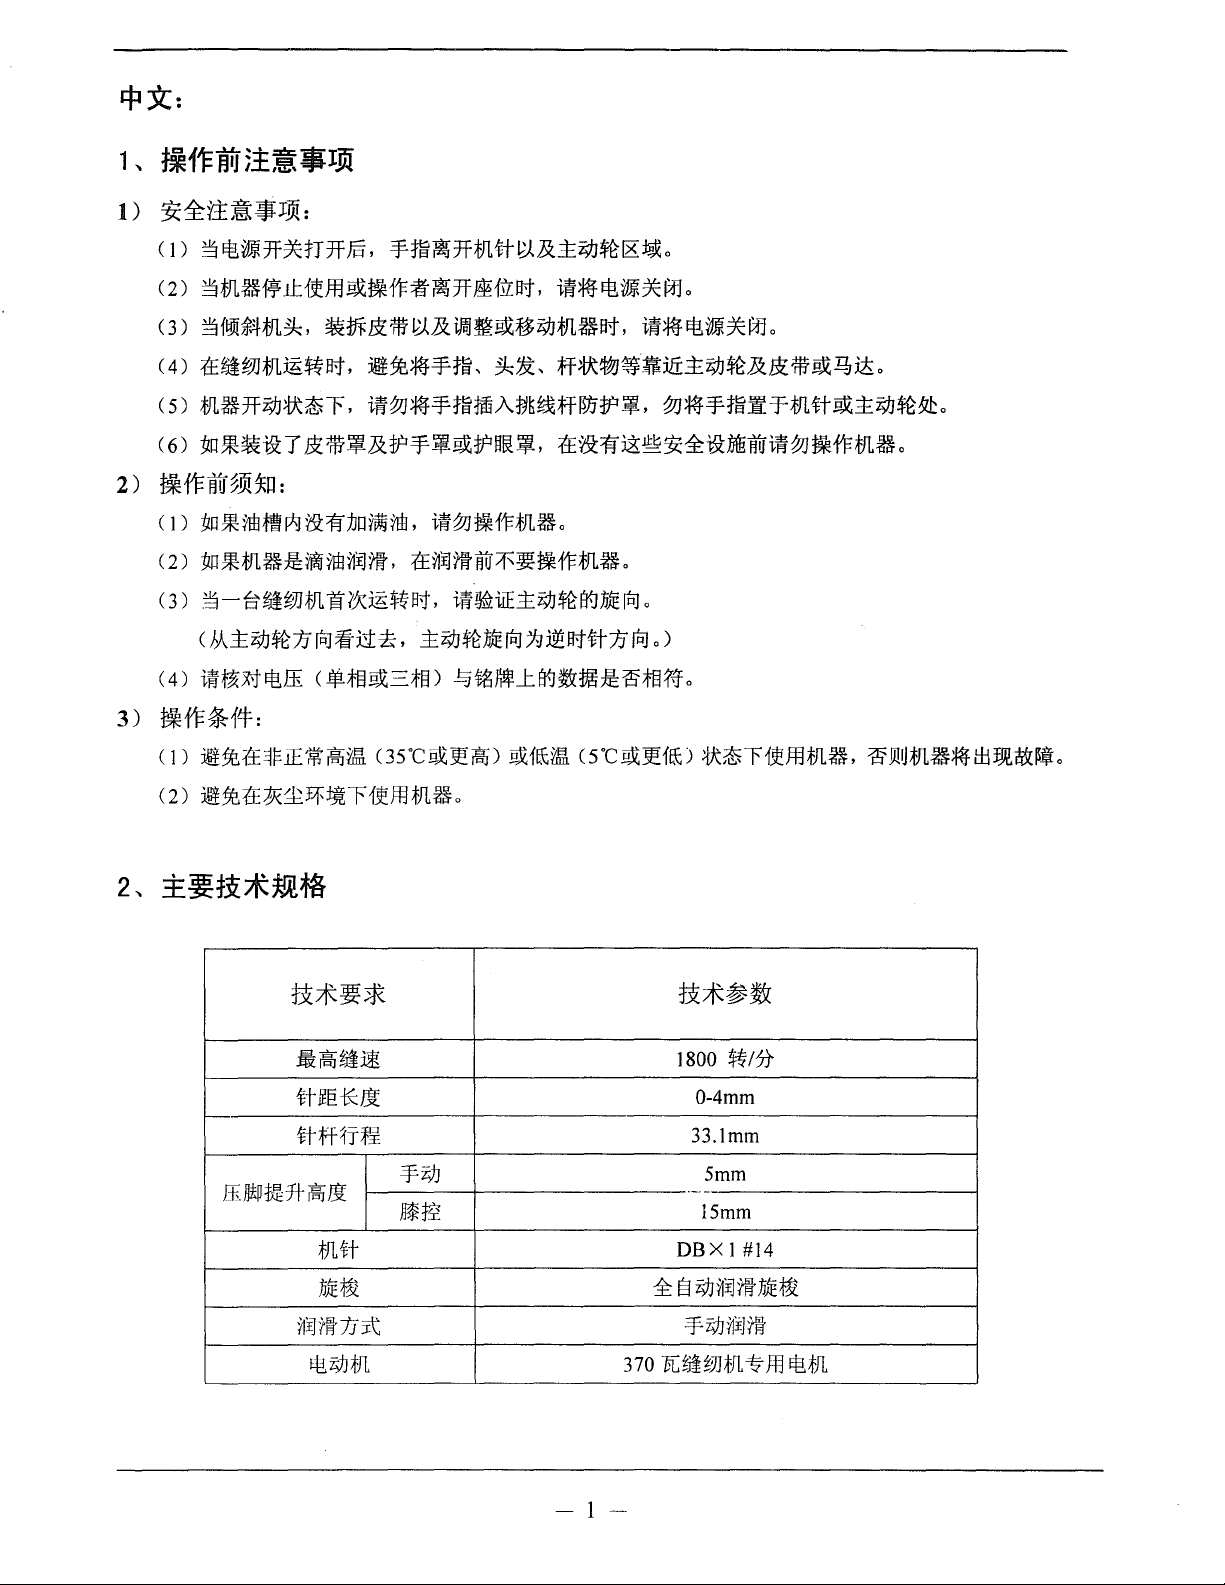
:J:f\:~rftffl:f}l~,
f1Ji(~~
1800
0-4mm
33.1mm
Smm
·-·-
15mm
~!JliJiJL~:mtf:IIJ\l.~~to
~17t
:fJl#
JjJE~
~I]nf1J:r\:
~l9J:fJ1.
DBX1#14
~ § Z9J~I]nfJjJE~
¥Z9J~i]nf
3 7 o
PC
~if
~31
:fJl
-1-
~
ffi
ft!
:fJl
3
..
tiiill-aT
1)
tJ£~m~
m~••n~T~~m#~M. ~•*~-~~~~~M~m.
*~~•tt~~.
~~-~~-~~.~~m~••~mmm~•oo•tt•~·
2)
t&1li
mutl:lrat.
m~m~~-~ml*~;fft•.
h~~fr~~~~.
4
..
00~~5!
~~~;ff~:li:~ffi:i[~,
5
'\
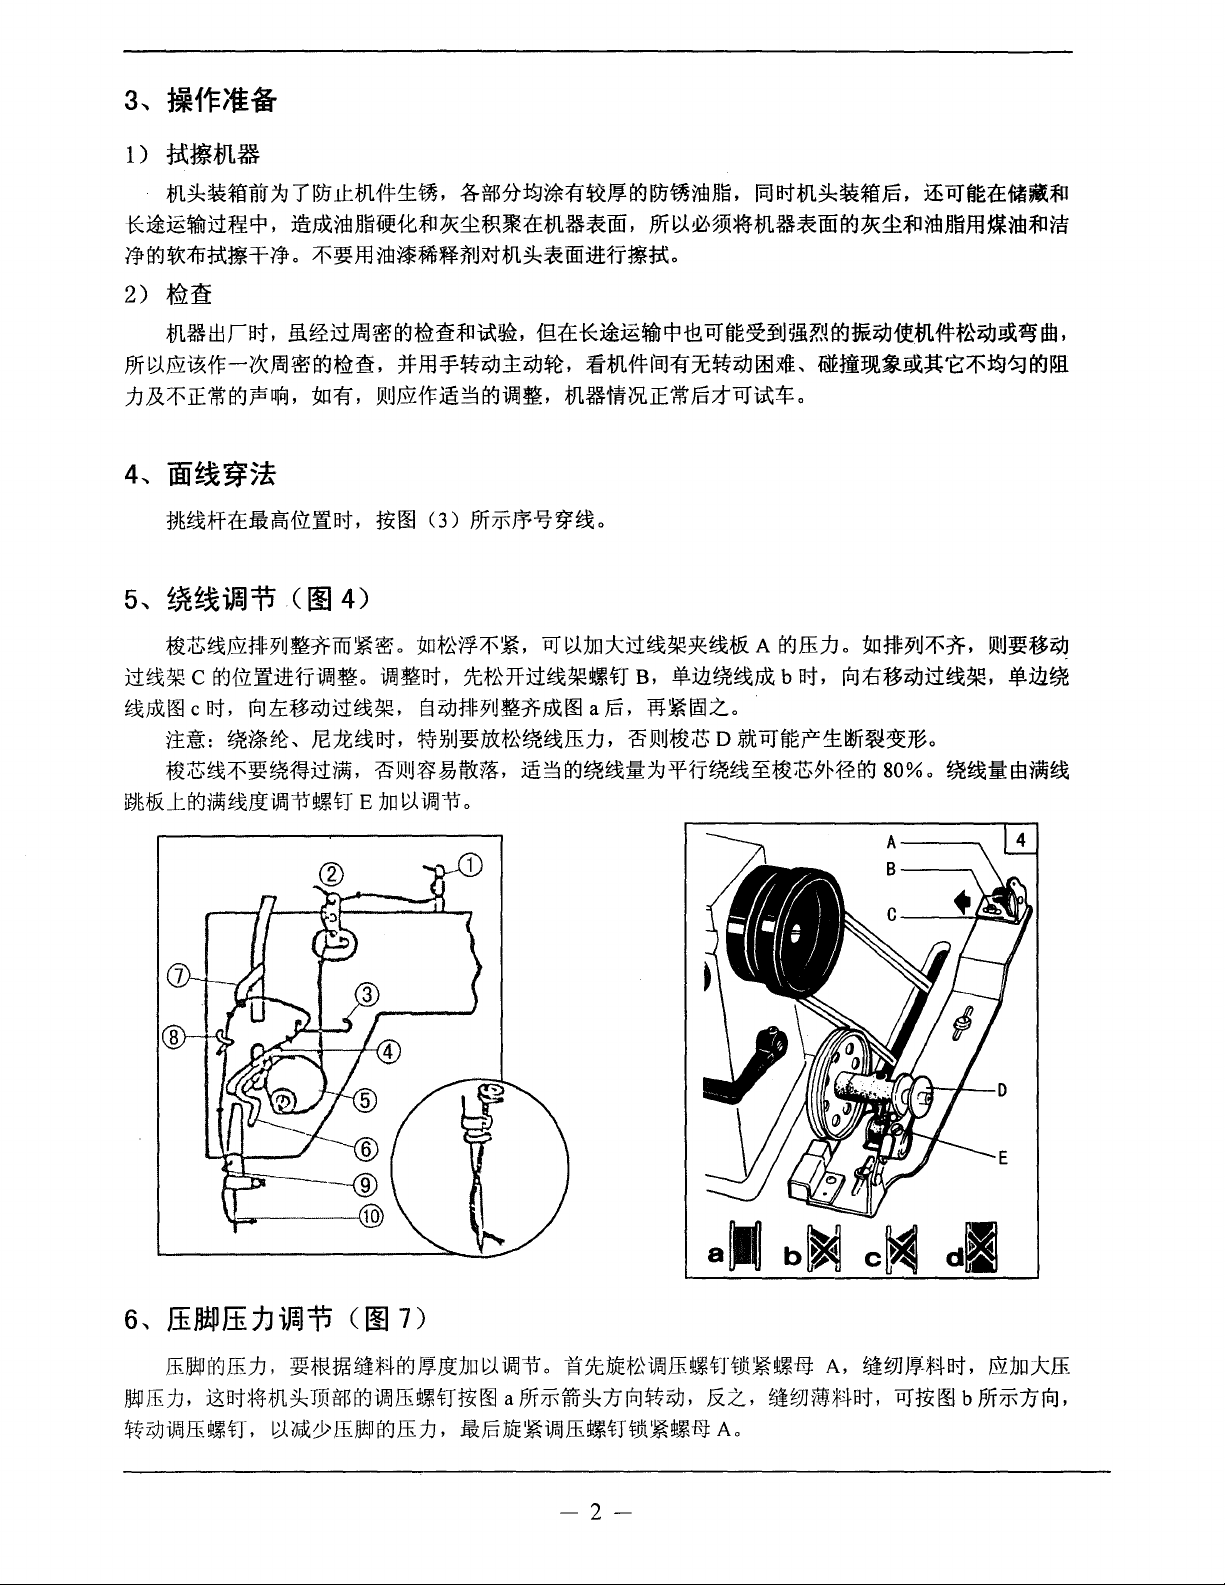
!~~!iJiJ
-~~m*~•~w•*·~~w~•·
tt~~c~ffi:i[*fi••·••~·
~~~c~,
~•=
i'!t~~~~~~tt~.
m*~~-~~-~·BE~~-~.
~-~.~ft~~.~~~-~~~ffih,
~d~n~~~~~~•~m••oo.
£jl\J£ttml*~;fft:Et~lJ.\~.
#m¥~Z;tJ~Z;tJ~.
~~.
fj
( [!)
~~8Z;IJrl~~.
~m~~~~••·
~00
C3)
?JT~ff%~~.
4)
~~fftt~~•ns.
~~*~·~dOOa~.
~])1~~~~1$.
ffi~*~~!f!fil~t!?.m~~~~H~?.!~~~Z;tJ-f!mftt:ttz;tJEJt~lltl.
~m#~~~~Z;tJ~•·••~aEJtx~~~~~m
muM~fr~~~m~*·
m~~*tt~~~~-A~llih.~*~~~.
~~~~~·~Sjl-1fr~~~-Z:9H~~
m~~~•m••oo~~~~~nm•~~M
•~~~db~.
~-~~.
~~-~o•m~~~~•~m.
~~m~••~·~m~~••~
~~•Z;tJ
~~BZ;~Jtt~~.
so%.
~~:tEI3Wij~
•~~
6
..
lli$11Bi1Ji~:P
ffi~~llih.
~ffih,
~M~ffi•n.
~~-m~rn$~-ffi·B~OOaM~fi~~~~~.
~~~ffi~~ffih,
([!)
7)
~*~-~~~~~~~~.~~~~~ffi•nm••mA.
&Z.
:li:ffl~••ffi•nm••mA.
-2-
-~~~~.
-~-~~.m~OObM~~~.
m~*lli
7'
!i~~itt.J
(Ill 1
o,
Ill
11
)
•
+
7
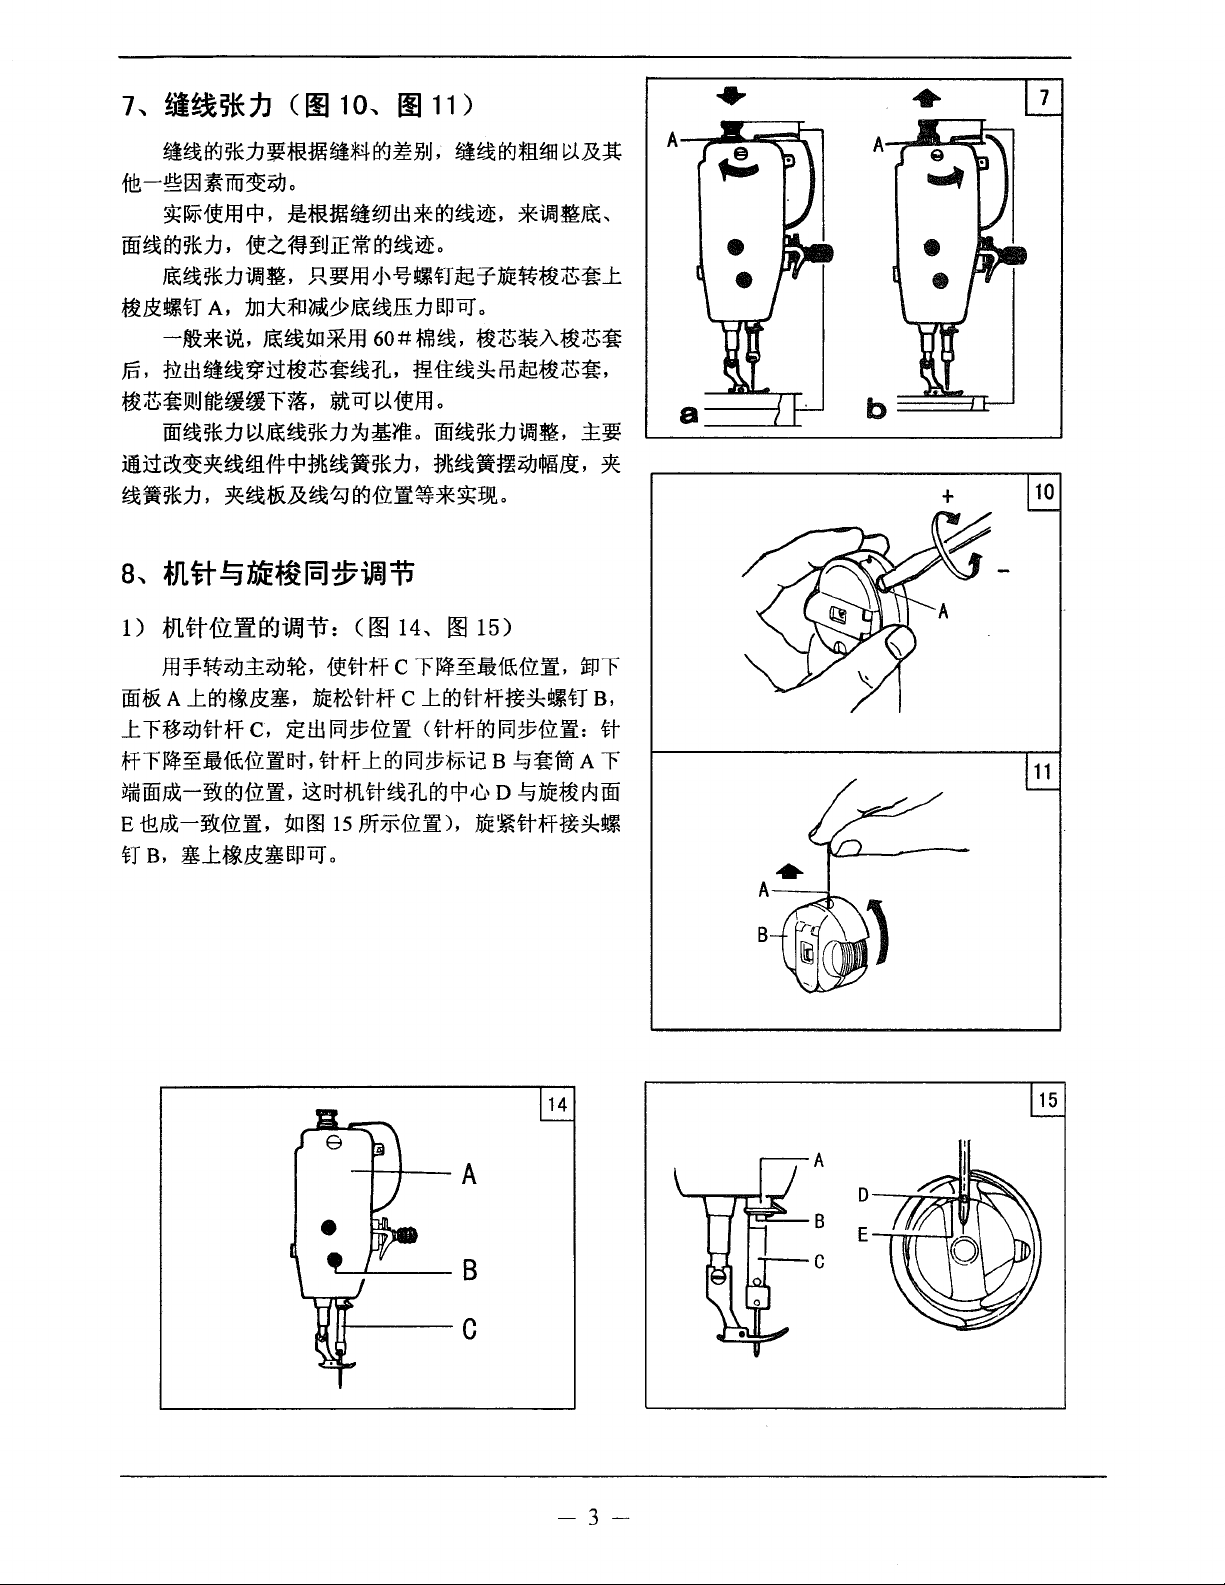
••~*~•*••~~~~.
1tB
-®
~
~
mP:rti9J
~~~m~.
jij~~*~'
•~*~~~.
-~~flA,
-~*~.~~~*ffl60#~~··Z~A·Z~
m.
mw•~9tt•z~~~.Bft~~m~•z~.
•z:giJ!IJ~~~~"Fvtt.
oo•*~~~~*~~~moiii~*~~~.
mtt~~~am#~•~•*~·•~••i9JMN.
~•*n·
a,
~Jl.
1)
mt~--ur~rEJ<JiJWi1:
ffl¥~i91±19J~,~~*C"F~~-~~~.~"F
OO~A~~•~•·
~"F#Z91~*c,
*~~~-~~~~·~*~~~~~~B~~-A"F
-OOd-&~~~.~~m~~~~~~D~--~00
E
illd-&~~.
u
a,
~~~&~~~~~~*~~0
tt
!:3
•J:•~•ep~
o
~m••~m*~~~.
~Z~~Iji£~~~~o
R•m~%~fl~~-~•z~~
~*~-&~~ffi~~~o
JWt~~~m
ME~
[ii]
~
i?aJ
:P
coo
-~~*c~~~*•~~flB,
~w~~~~<~*~~~~~=
:!lrlOO
15
Jiffiftfft~),
o
••~m~~&~
*~~~,
0
14,
oo
15)
-~~*-~!~!.~
±•
~
~
10
11
14
-3-
15
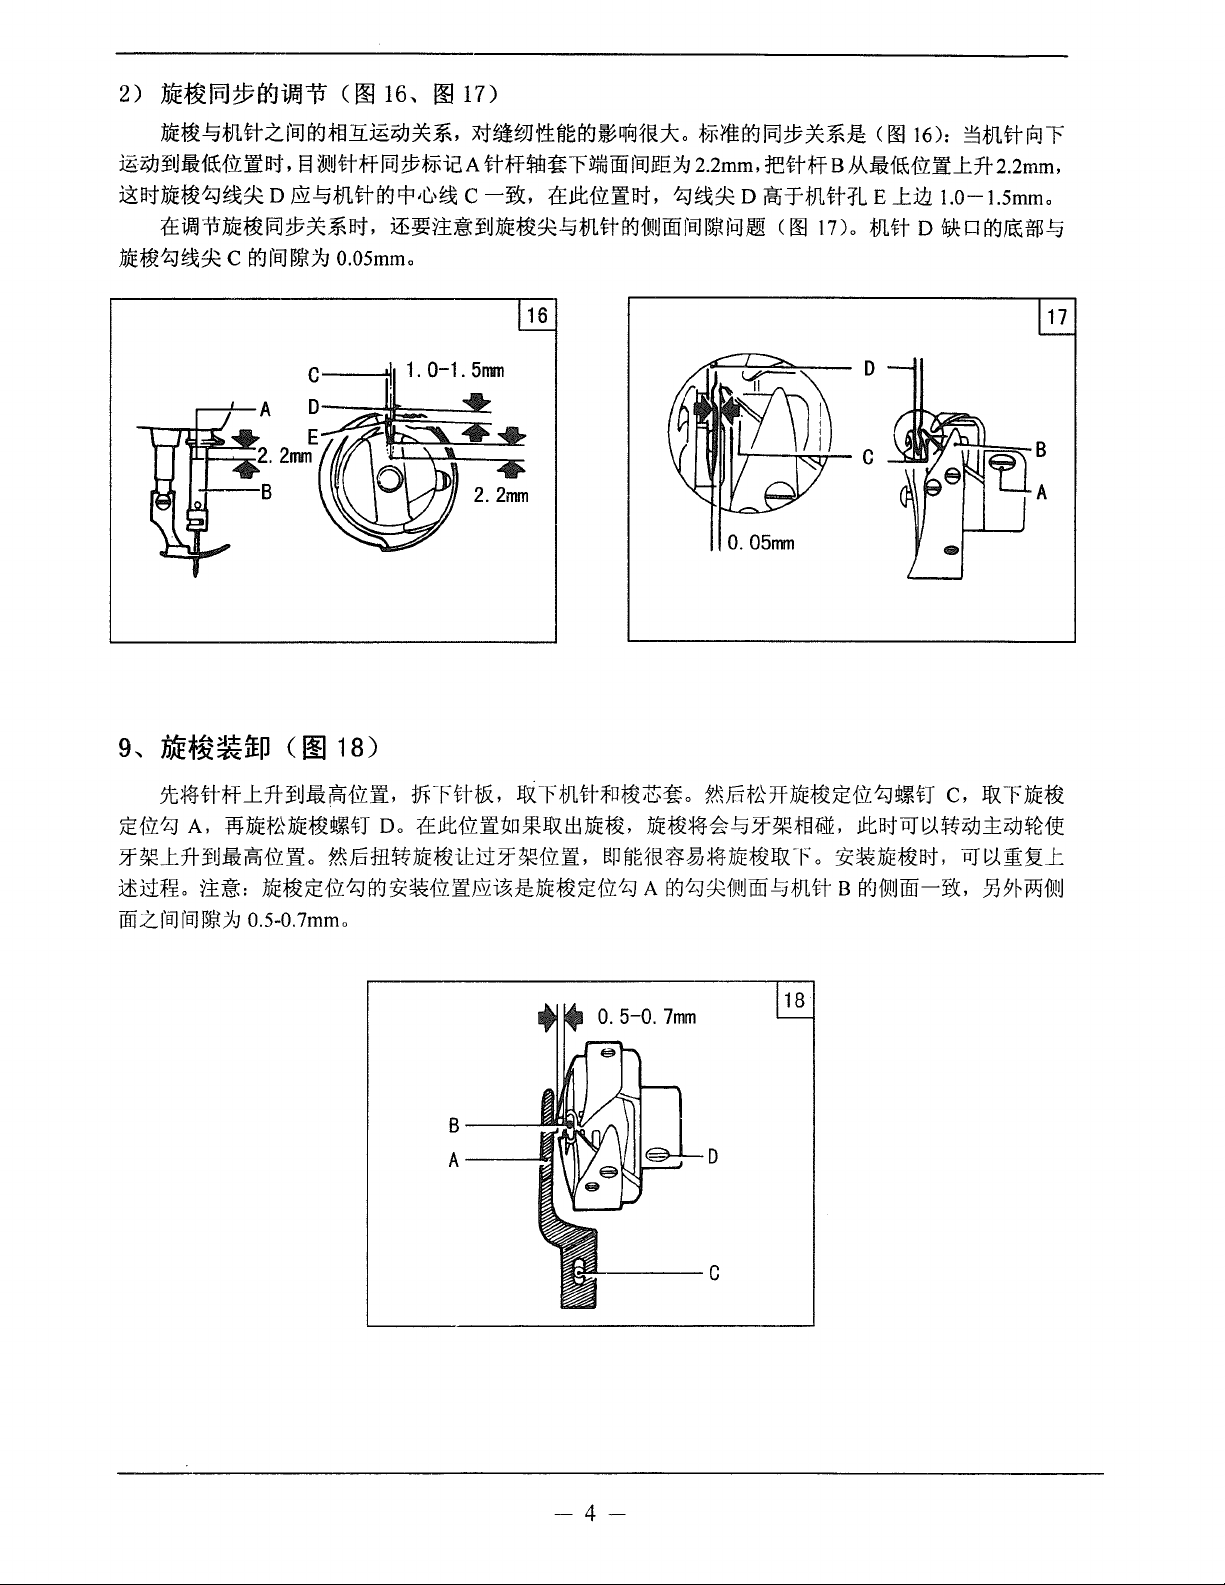
2)
jj}E~jqjtJ11¥JiPJJTi
(
00
16,
00
17)
:fiJE~~;fJHtZ.fBJI¥J#l1i:!Ef;IJ~*·
:!Ef;IJ¥1J:i:fl£1:i'i:Jfllt,
i3:1lt:fiJE~1J~~
t£lFoJ1j:fjJE~IPJZP~*Ilt'
:fiJE~1J~~
C
§
~~ttff!PJ?Pt!FiC.A
D
@~fJLtti¥J.P'~'~
j(f~ff:~¥1J:fj}E~~~;f}ttti¥J{9WiiffBJIDJtf~
i¥JfB]ID]t:;f;]
O.OSmmo
c
·1
1.
X1§it31'i":U~i¥J~IlfllJ1!t7;:o
ttff!ffil~rlii/ij!iffBJRE:;f;J
0-1.
C-)&,
5mm
tEJ.Itf:i'i:Jillt,
16
t!Ff!Ei¥JIPJ?P~*~
2.2mm,
1J~~ D ~-=ftJLtfil
~ (
0.05mm
1Ett;ff B
00
17)o
C
00
16):
§;f}ttt~r
M:i:fl£{il:]f_t:Tf-
E
_L:itlt.O-I.Smmo
;f}ttt
D
2.2mm,
{ljjc
lJ
i¥JJiti;Jf[)~
17
9,
ME~~ftp
5t~tt;ff
~{i1:1JA,
~~_t:Tf-iiJ:i:~1:i'i::lo
:lii1l!JL
00
Z.
ff:~:
fB]
fB]
~Jjt]g
CriJ
18)
_L:Tf-¥1J:i:r%11fi:Ji,
~-~-~-UDotEJ.It{il::i~*~lli-~,
?!.\Foffi~:fiJE~iti1~~1:i'i:Ji,
:fiJE~~1fl1Ji¥J~~1fl1i@~~:fiJE~~1fl1J
0.5-0.
7mm
o
tff~fttf.&,
lti~Fi'JLtt*ll~~~o
??.\Frft~7f:fiJE13UE1:i'i:1Jt~UH
-~~~~~~#!~,
~P~M!t~~~:fiJE~~T
A
i¥J1J~fY1~TIO~;fJLtt
18
D
J.ltatm~~f;IJ~f;IJ~~
o
~!i#(:fiJE~a1,
B
B'Jf9Wrn:f-J&,
---c
c,
~-F:fiJE~
m~:m:~_t
3})7HJ;gffl~
-4-
ENGLISH:
PRECAUTIONS BEFORE STARTING OPERATION
1.
1)
Safety Precautions:
(1) When turning the power on, keep your hands and fingers away from the area around/under the needle and
the area around the balance wheel.
Power must be turned off when the machine
(2)
Power must be turned
(3)
machine; or when replacing.
(4) Avoid placing fingers, hairs, bars etc., near the balance wheel,
motor when the machine
(5) Do not insert fingers into the thread take-up cover, under/around the needle, or balance wheel when the
machine is in operation.
(6) If a belt cover, finger guard, eye guard are installed, do not operate the machine without these safety devices.
2)
Precautions before Starting Operation:
(I)
If
the machine's oil pan has an oil sump, never operate the machine before filling
(2)
If
the machine
(3) When a new sewing machine
power on.
(4)
Verify
the voltage and (single or three) phase with those given on the machine nameplate.
is
(The
off
when tilting the machine head, installing or removing the "V" belt, adjusting the
is
in operation.
lubricated
balance wheel should rotate counter-clockwise when viewed from the balance wheel.)
by
a drop oiler, never operate the machine before lubricating.
is
first turned on, verify the rotational direction
is
not in use, or when the operator leaves the seat.
"V"
belt, bobbin winder balance wheel, or
it.
of
the balance wheel with the
3)
Precautions for Operating Conditions:
(I)
Avoid using the machine at abnormally high temperature (
lower) .
(2) Avoid using the machine in dusty conditions.
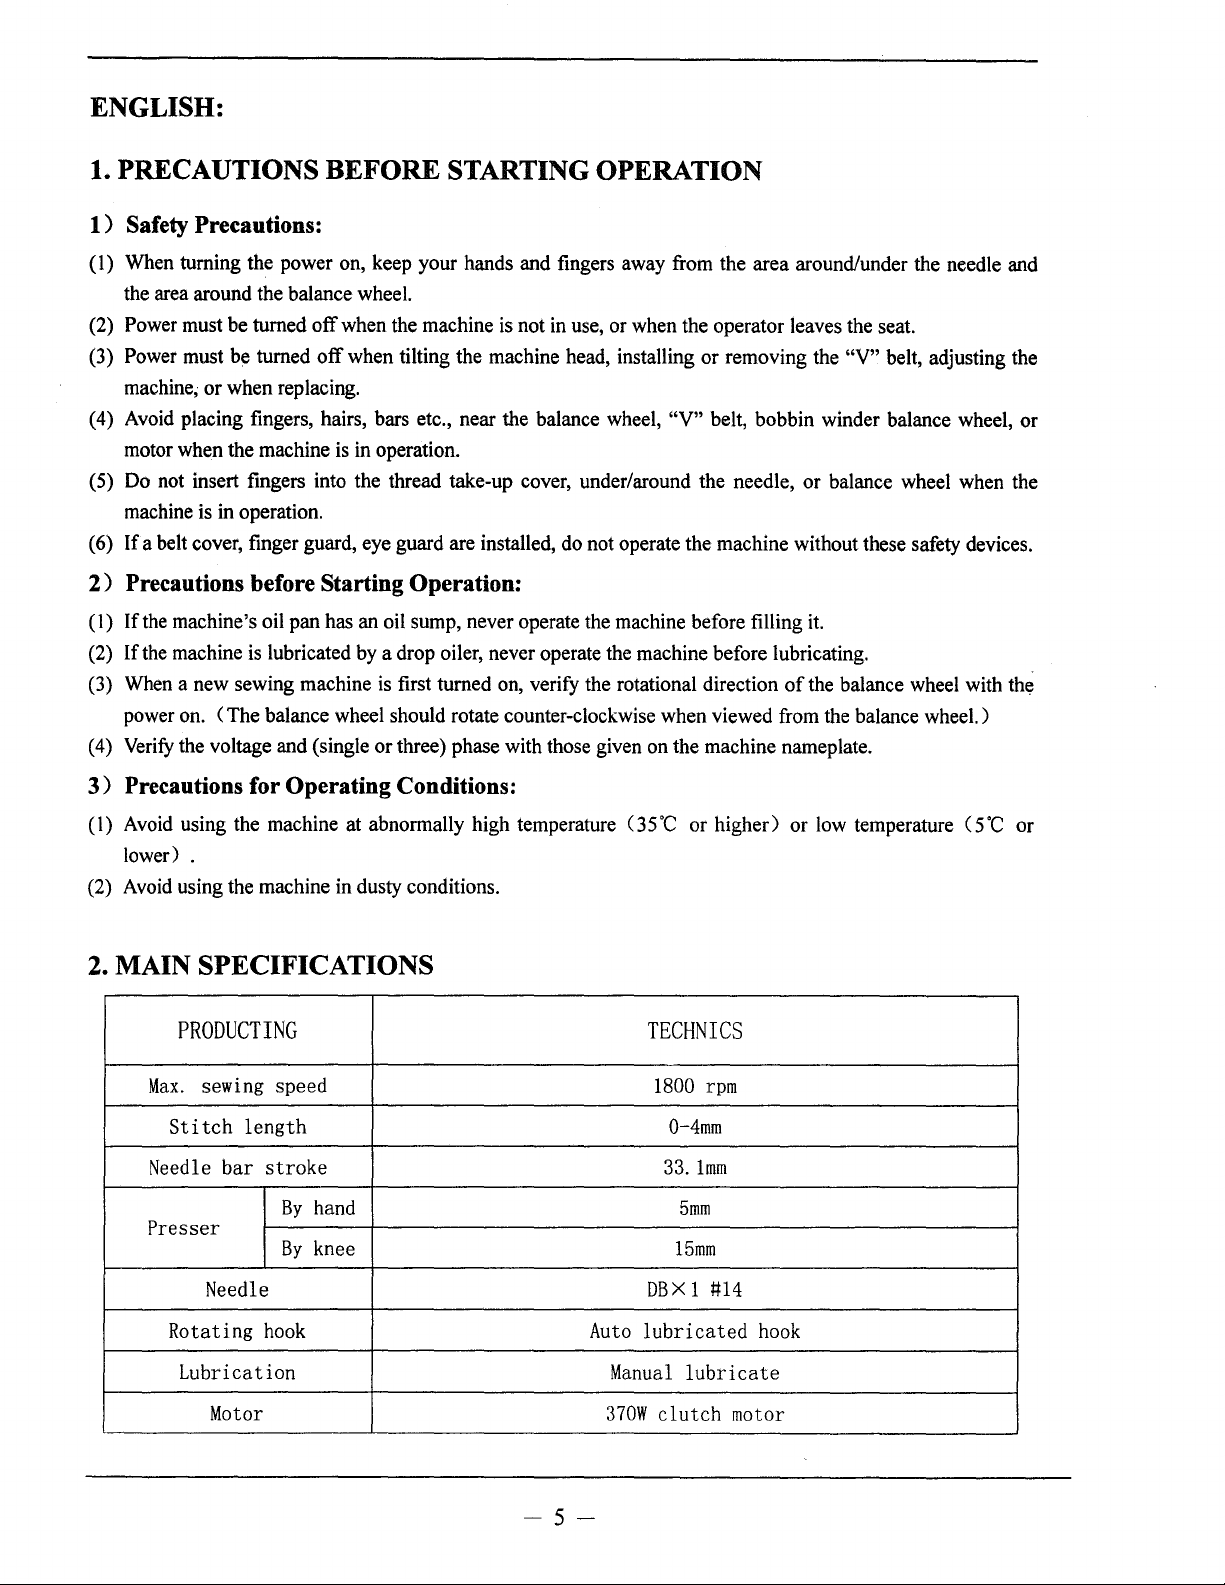
2. MAIN SPECIFICATIONS
PRODUCTING
sewing speed
Max.
Stitch
Needle bar
Presser
Rotating
length
Needle
stroke
By
hand
By
knee
hook
35
TECHNICS
DBX
Auto
lubricated
·c
or higher) or low temperature ( 5
1800
rpm
0-4mm
33.
lmm
5mm
15mm
1
1:114
hook
·c
or
Lubrication
Motor
Manual
370W
lubricate
clutch
-5-
motor
3. PREPARATION AND LUBRICATION
1 ) leaning the machine
Before leaving the factory, the machine parts are coated with rust-preventive grease, which may be
hardened and contaminated by dust during storage and shipment. This grease must be removed with gasoline.
2)
Examination
Though every machine
parts may be loose or deformed after long distance transportation with jolt. A thorough examination must be
performed after cleaning the machine. Turn the balance wheel to see
collision, uneven resistance or abnormal noise.
operation.
is
confirmed by strict inspection and test before leaving the factory, the machine
if
there
is
running obstruction, parts
If
these exist, adjustment must be made accordingly before run-in
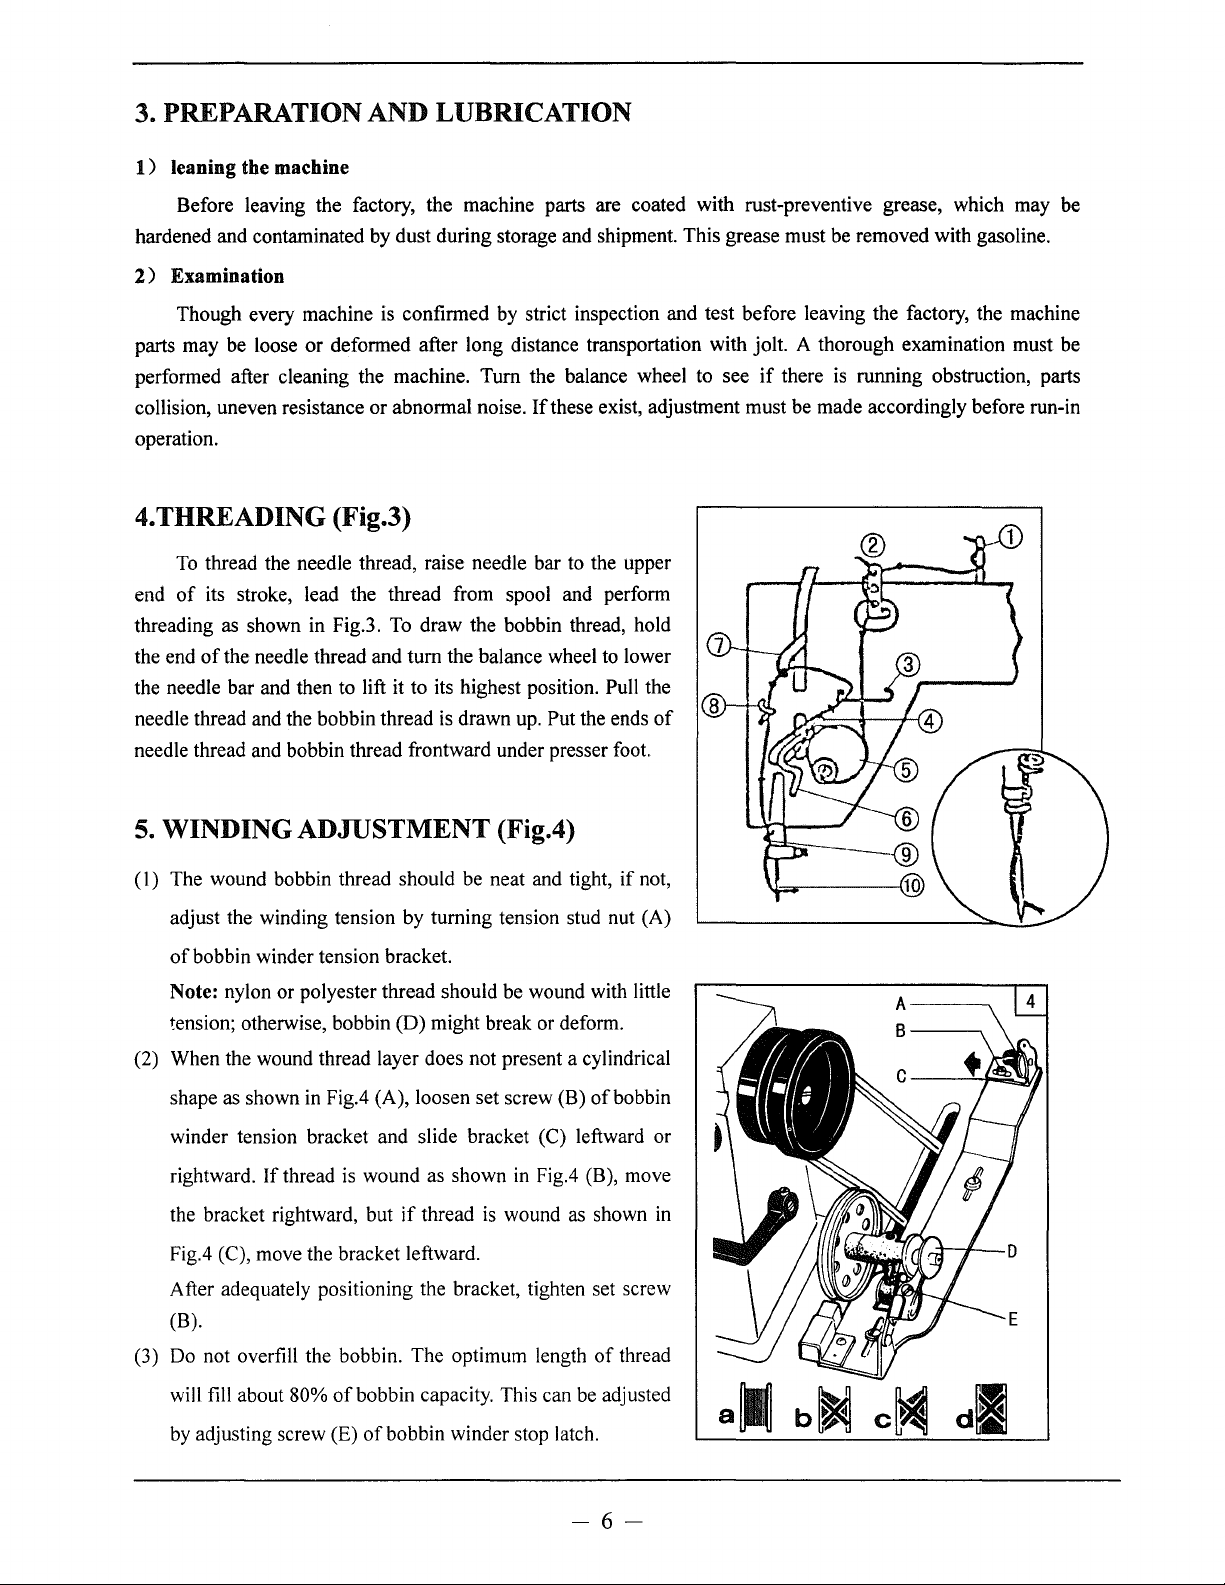
4.THREADING (Fig.3)
To
thread the needle thread, raise needle bar to the upper
end
of
its stroke, lead the thread from spool and perform
as
threading
the end
the needle bar and then to lift it to its highest position.
needle thread and the bobbin thread
needle thread and bobbin thread frontward under presser foot.
5.
WINDING ADJUSTMENT (Fig.4)
(1) The wound bobbin thread should be neat and tight,
shown in Fig.3.
of
the needle thread and turn the balance wheel
To
draw the bobbin thread, hold
is
drawn up. Put the ends
to
lower
Pull the
if
not,
of
adjust the winding tension by turning tension stud nut (A)
of
bobbin winder tension bracket.
Note: nylon or polyester thread should be wound with little
tension; otherwise, bobbin (D) might break or deform.
(2) When the wound thread layer does not present a cylindrical
as
shown
in
shape
winder tension bracket and slide bracket (C) leftward or
rightward.
the bracket rightward, but
Fig.4 (C), move the bracket leftward.
After adequately positioning the bracket, tighten set screw
(B).
(3) Do not overfill the bobbin. The optimum length
will fill about
by
adjusting screw (E)
If
Fig.4 (A), loosen set screw (B)
thread
80%
is
wound as shown
if
thread
of
bobbin capacity. This can
of
bobbin winder stop latch.
is
in
wound
of
bobbin
Fig.4 (B), move
as
shown
of
be
in
thread
adjusted
-6-
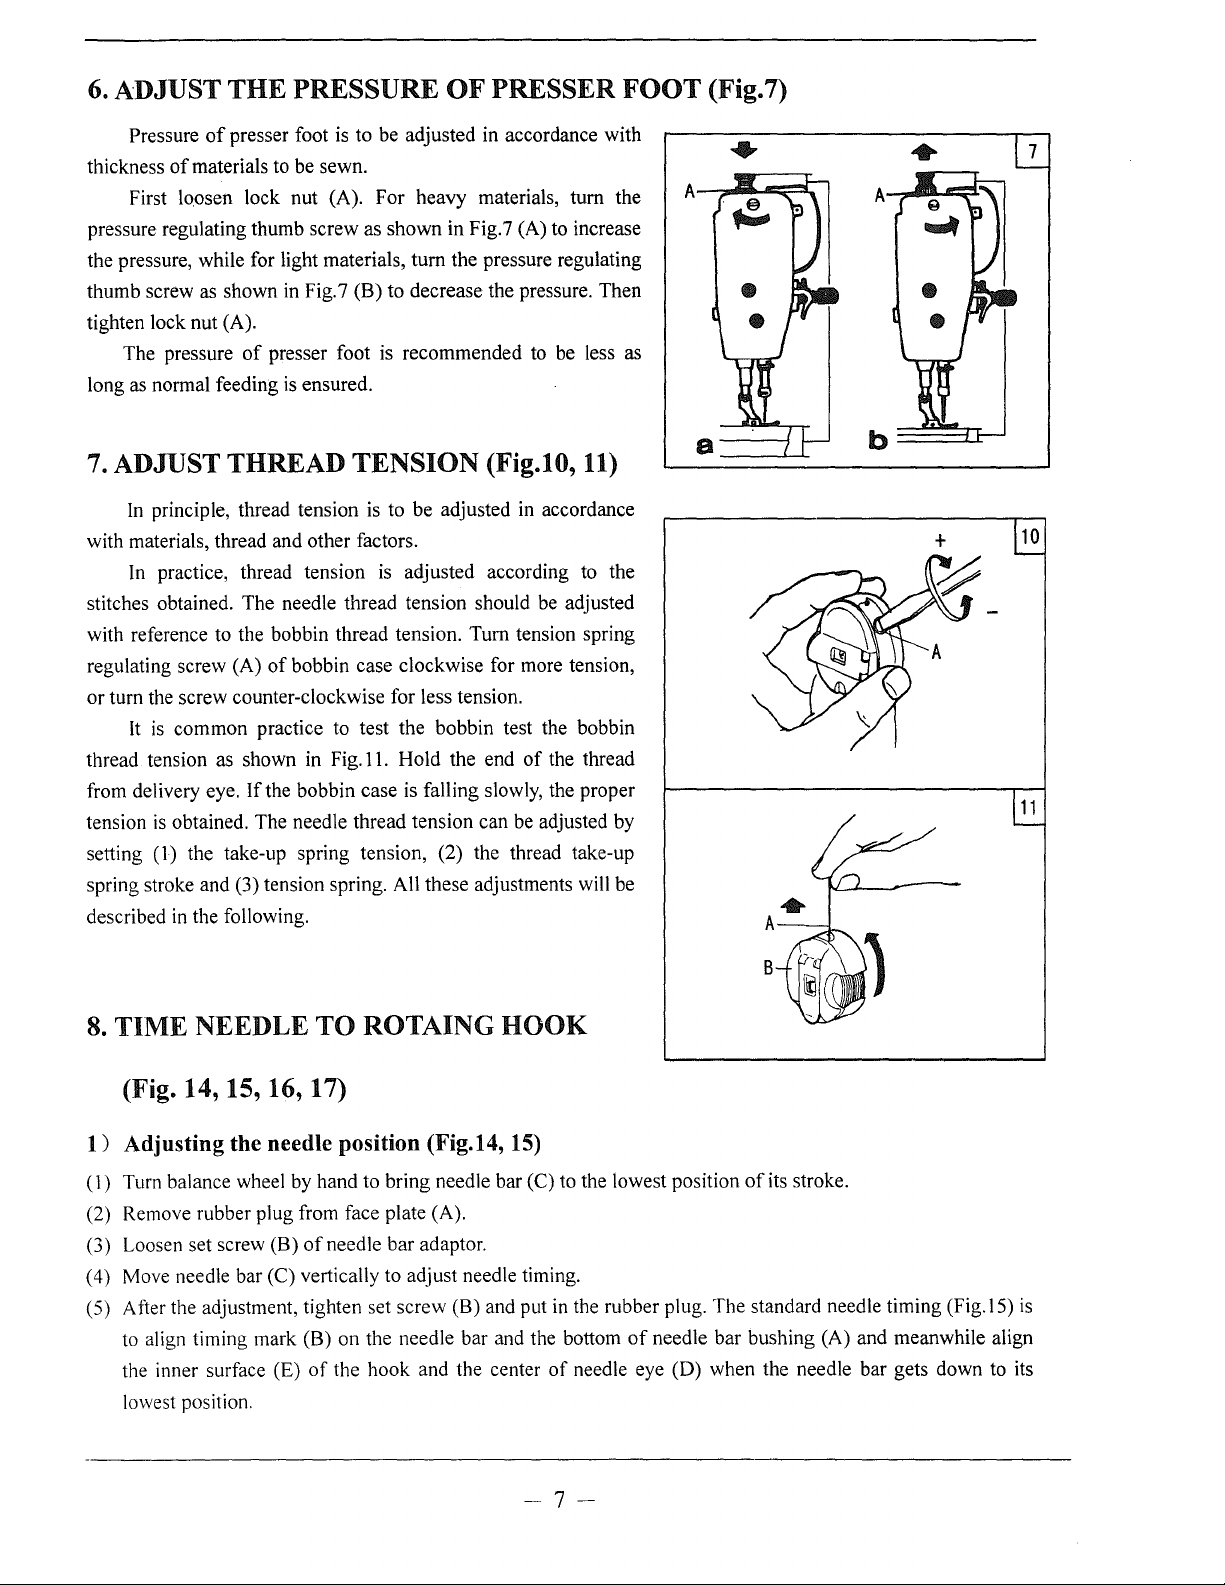
6. ADJUST
THE
PRESSURE
OF
PRESSER
FOOT
(Fig.7)
Pressure
thickness
First loosen lock nut (A). For heavy materials, tum the
pressure regulating thumb screw as shown in Fig.7 (A) to increase
the pressure, while for light materials,
thumb screw
tighten lock nut (A).
The pressure
long
as
7. ADJUST THREAD
In
with materials, thread and other factors.
In practice, thread tension
stitches obtained. The needle thread tension should be adjusted
with reference to the bobbin thread tension. Tum tension spring
regulating screw (A)
or turn the screw counter-clockwise for less tension.
It
thread tension
from delivery eye.
tension
setting (1) the take-up spring tension, (2) the thread take-up
spring stroke and (3) tension spring. All these adjustments will be
described
of
presser foot is to be adjusted in accordance with
of
materials to be sewn.
tum
the pressure regulating
as
shown
normal feeding
principle, thread tension
is
common practice to test the bobbin test the bobbin
as
is
obtained. The needle thread tension can be adjusted by
in
the following.
in
Fig.7 (B) to decrease the pressure. Then
of
presser foot is recommended
is
ensured.
TENSION
is
to be adjusted
is
adjusted according to the
of
bobbin case clockwise for more tension,
shown in Fig.
If
the bobbin case is falling slowly, the proper
11.
Hold the end
to
be less
(Fig.10,
in
accordance
of
the thread
as
11)
+
..
7
10
11
8.
TIME
NEEDLE
TO
ROTAING
HOOK
(Fig. 14, 15, 16, 17)
1)
Adjusting the needle position (Fig.14, 15)
(
1)
Turn balance wheel
(2) Remove rubber plug from face plate (A).
(3) Loosen set screw (B)
(4) Move needle bar
(5) After the adjustment, tighten set screw (B) and put
to
align timing mark (B) on the needle bar and the bottom
the inner surface (E)
lowest position.
by
hand to bring needle bar (C) to the lowest position
of
needle bar adaptor.
(C) vertically to adjust needle timing.
in
the rubber plug. The standard needle timing (Fig.l5)
of
of
the hook and the center
of
needle eye (D) when the needle bar gets down
needle bar bushing (A) and meanwhile align
-7-
of
its stroke.
to
is
its
 Loading...