

Highlead GK500 User Manual
Purchasing
Copy
Dept
HIGH
GKSOO
High-speed
Stretch
LEAD
SERIES
Sewing
Machine
Instruction Manual
Parts Catalog
SHANGHAI
HUIGONG
N0.3
SEWING
MACHINE
FACTORY

-INTRODUCTION-
Thank
This
in
Please
you
very
much
instruction manual
the
best
possible
study
this
conditions.
manual very
CHUTION
OBSERVE
Though
should
8 To
8 Do not leave tools
chine.
8
Before
dents, be sure the
pressed.
THESE
Pegasus
follow
prevent
maintenance,
SAFETY
takes
these
basic
accidents,
for
purchasing
describes
carefully
PRECAUTIONS
the utmost care to
safety
do
not
or
other
adjusting,
power
is
500
daily routine
rules.
remove
unnecessary
cleaning,
turned
off,
Series
before
produce
safety
Check
machine.
maintenance
operating
safe
devices
objects
threading
that
on
the
and safety
the
machine.
sewing
or
parts
the
machine table
or
replacing
machine
machines
while
the needle,
will
precautions
and
operating
while
not
operate
to
devices,
the
machine.
operating
and
to
when
keep
the
operators
the ma-
prevent
acci-
the pedal is
machine
NOTE
In
case a crutch type motor
CD.
If
the machine pedal @
unexpectedly. Keep on stepping on the machine pedal @ until the machine comes to a stop after turning
off
power supply
e Turn the
e
In
the event
e
Check
CD.
power
of a power
that the
off
before
machine
is
used,
it
will keep on rotating
is
stepped on inadvertently, it
'
\
leaving
failure, be
is
securely
the
machine
sure
to turn the
grounded.
table.
machine
by
inertia after turning
is
dangerous because the machine will move
off.
off
power supply

Ill
BEFORE
CONTENTS
OPERATING
1 . Lubrication
...........•........................................................
2. Manual lubrication
3.
Filling the
4.
Threading
5.
Threading
Ill
TEST
1.
Adjusting
Adjusting
2.
3.
Adjusting
4.
Adjusting
Ill
MAINTENANCE
1.
Cleaning
2.
Replacing
3.
Checking
4.
Checking
5.
Replacing the oil
Adjusting
6.
HR
device
.•.•...•.......•........•.•............•....•.............•...........
diagram
SEWING
the
presser
the diff. feed ratio
the
stitch
the thread
the
machine
the needle
the oi I
and
circulation
replacing
Di1nensions
........................................................•...•..
with
silicon
(2-needle,
foot
pressure
oil
.......•..........•...•..............••..........
3-needle,
4-needle)
................•.......•...........
..............................................•..••
...............................................•.......
length
........•..............................•................
tension
..........................................•........
DURING
USE
.................................................
................................................
.............................................
the oil filter
..................................•....
................................................•..............
............................................................
0 • 0
,
......•....
0
•••••••••
0
1
2
3
4
5
6
7
8
0 o
••
9
•••••••
•••••
10
11
12
0
••
13
14
15
Ill
PARTS CATALOG
••••••••••••••••••••••••••••••••••••••••••••••••••••••••••••••••
Ill
GAUGE
PARTS
...........................
LIST
·,
.......................................
0
••
16-24
25-28

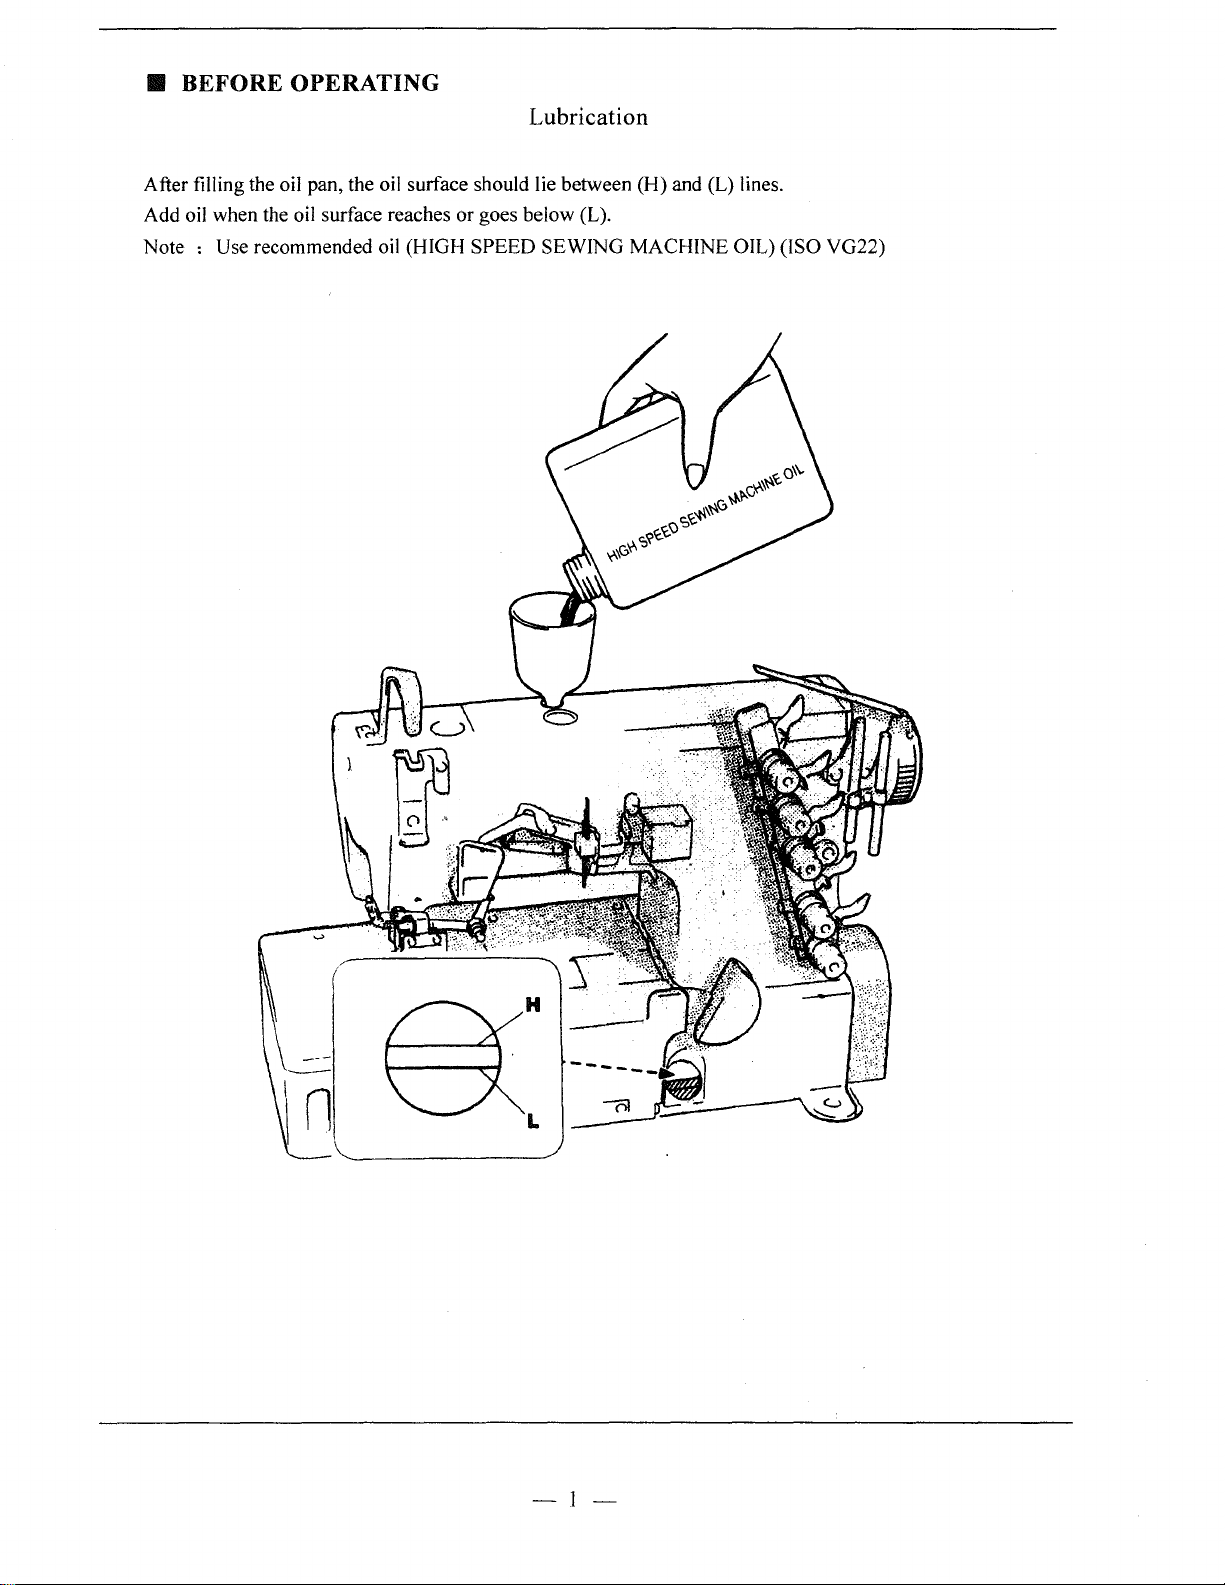
• BEFORE OPERATING
Lubrication
After filling the oil pan, the oil surface should lie between (H) and (L) lines.
Add oil when the oil surface reaches or goes below (L).
Note :
Use recommended oil (HIGH SPEED SEWING MACHINE OIL) (ISO VG22)
-1-
II
BEFORE
OPERATING
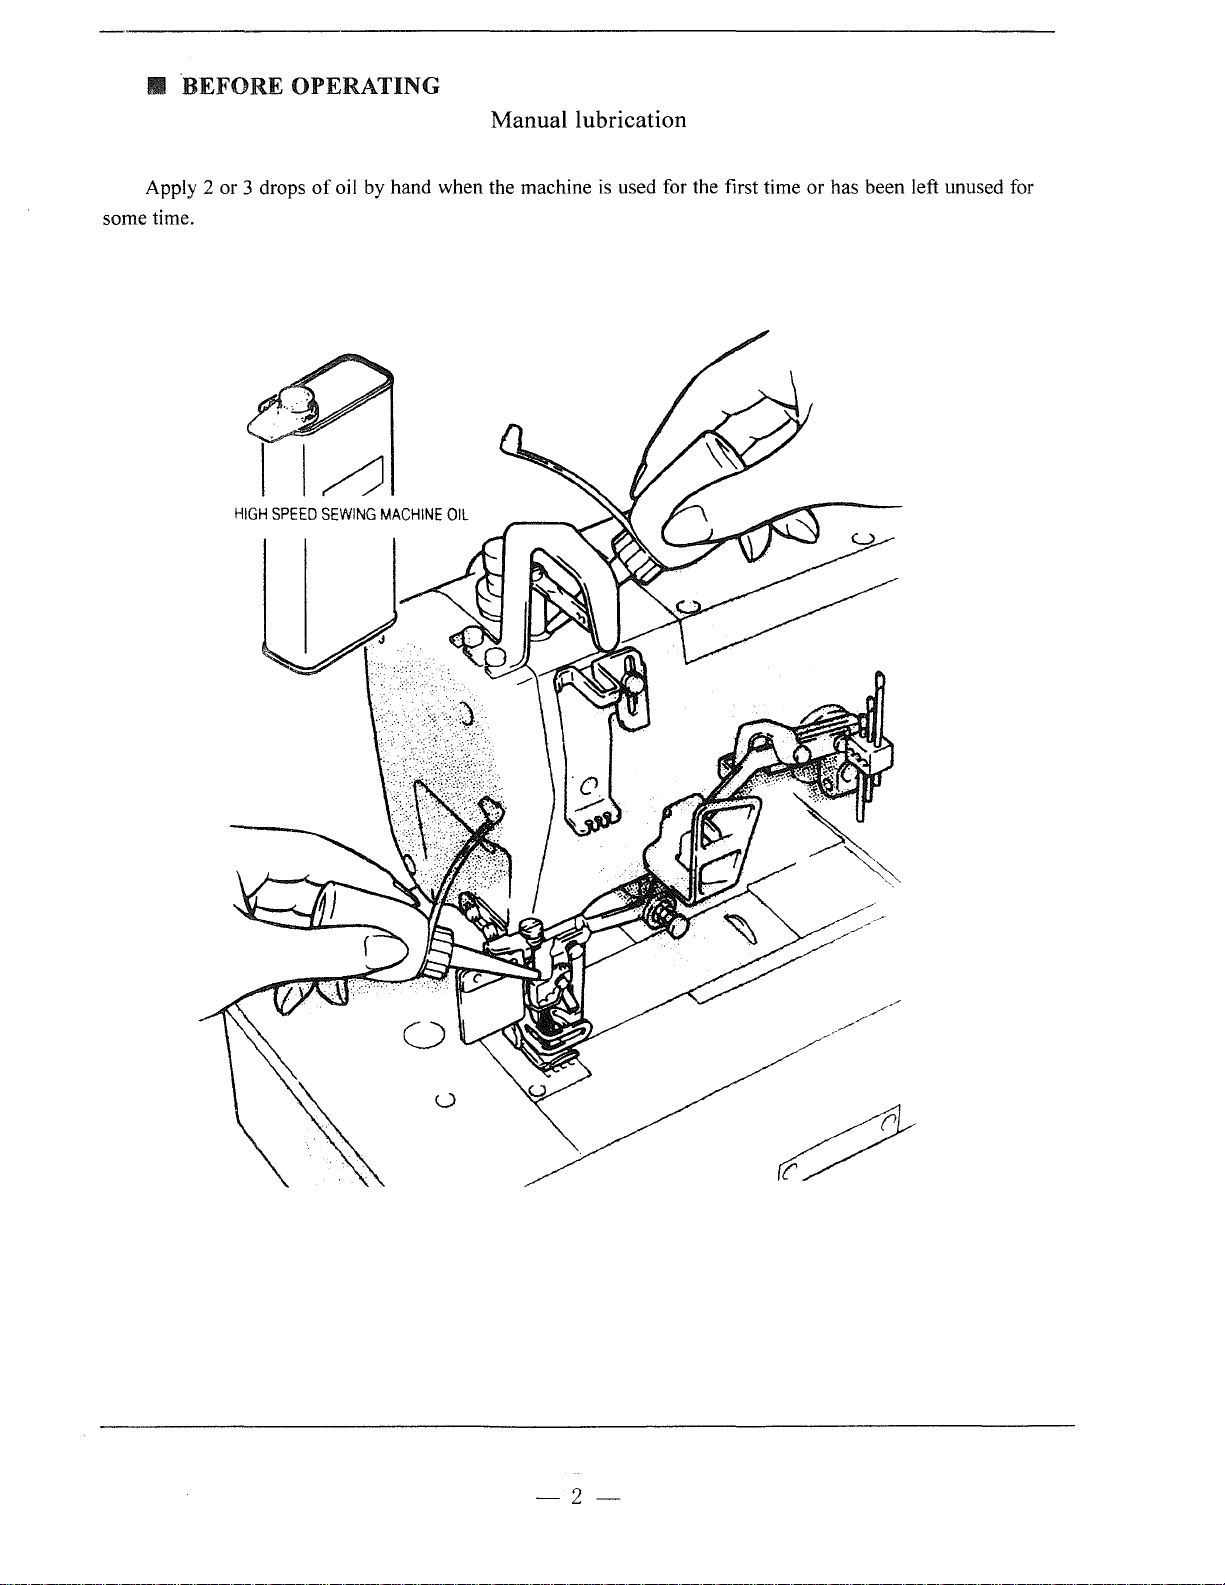
Manual lubrication
Apply 2 or 3 drops
some time.
HIGH
of
SPEED
oil by hand when the machine
SEWING
MACHINE
OIL
is
used for the first time or has been left unused for
-2-
Ill
BEFORE
OPERATING
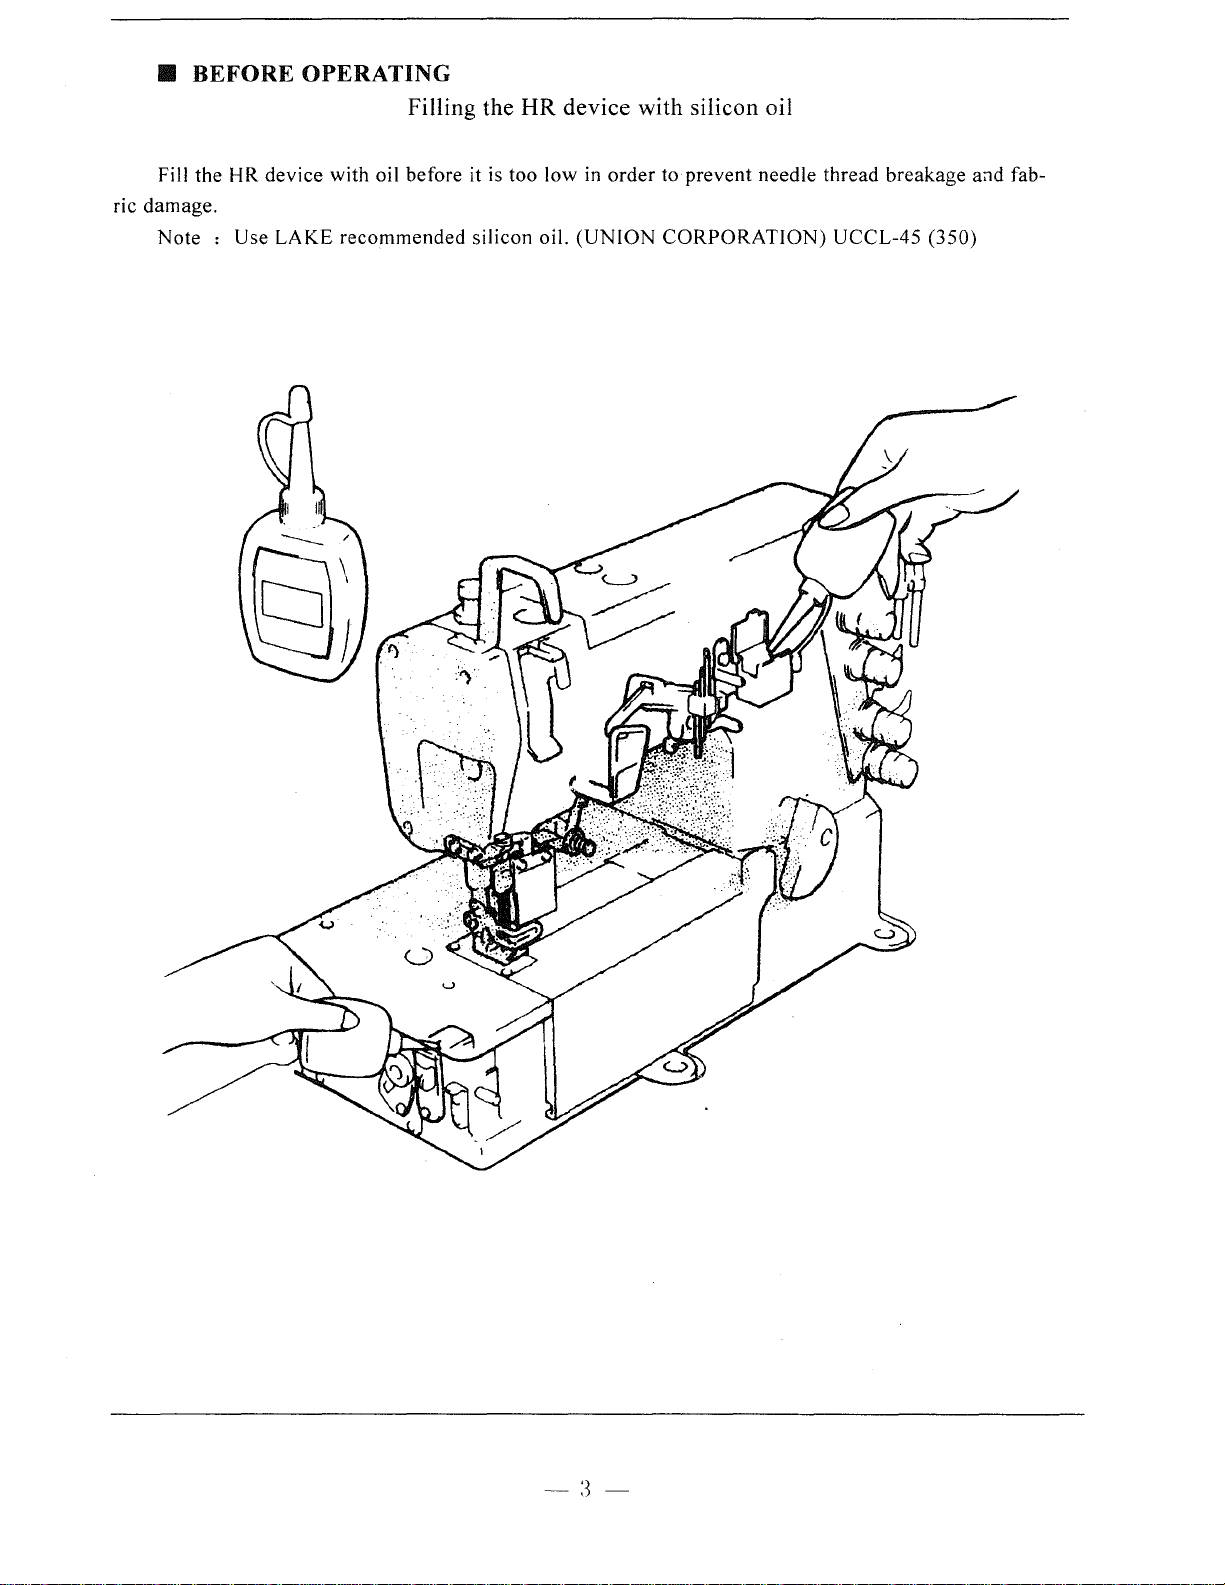
Filling the
HR
device with silicon oil
Fill the HR device with oil before it is too
ric damage.
Note
: Use
LAKE
recommended
low
silicon oil.
in
order
(UNION
to prevent needle thread breakage
CORPORATION)
UCCL-45
(350)
a>~d
fab-
-3-

Ill
BEFORE
G)
~
OPERATING
Open the eye guard and three covers.
Threading
Replace the looper thread
take-up after threading.
The looper thread take-up comes out.
Knot the preset thread and the
thread being used together to
thread the machine.
Needle thread
Tirm the knots off neatly
before passing through
the eye of the
tethread.
needle to
Tirm the knots off
after passing through the
eye of the
looper.
neatly
to
Be sure
correctly by referring to the
threading diagran.
thread the machine
(See
P5)
-4-
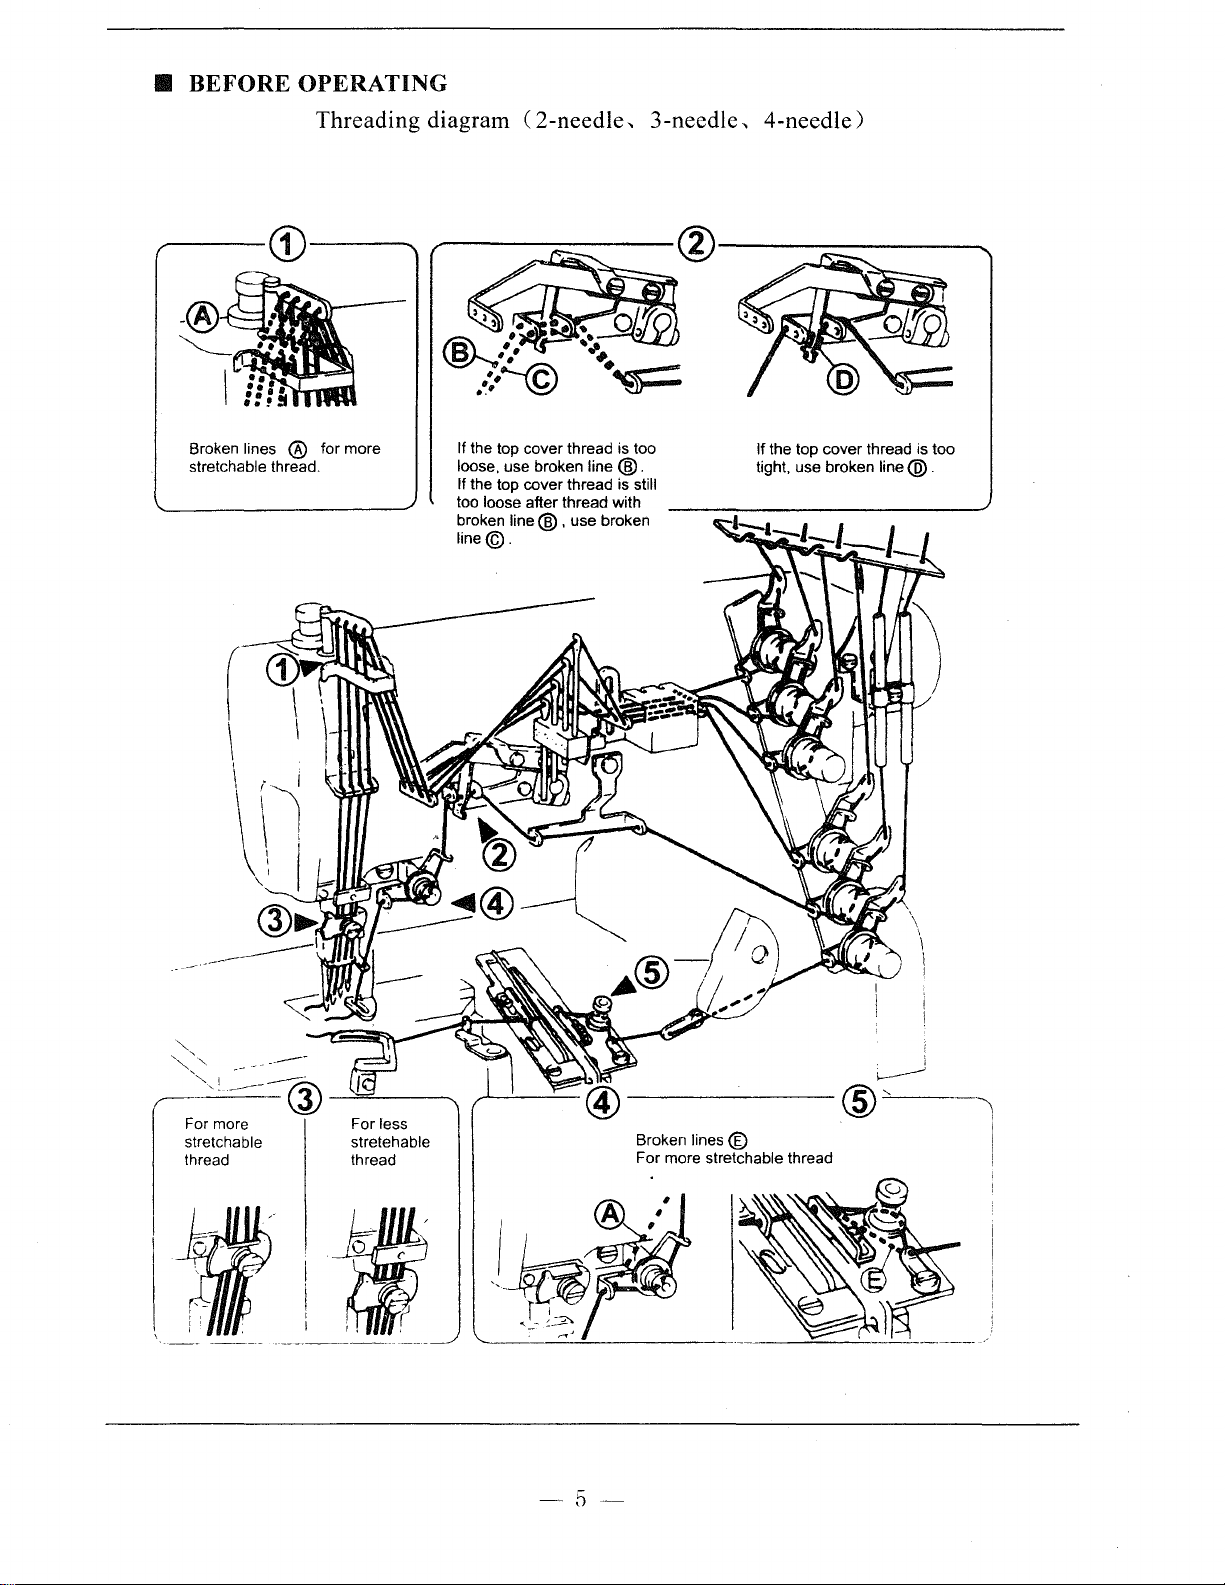
II BEFORE OPERATING
Threading diagram (
-----CD--
Broken lines @ for more
stretchable thread.
2-needle,
If the top cover thread
loose, use broken
If the top cover thread
too loose after thread with
broken
line@
line@.
is
line@.
is
, use broken
3-needle,
too
still
4-needle)
If the top cover thread
tight, use broken
line @ .
is
too
----@-'---'
For
less
stretehable
thread
5
Broken lines ®
For more stretchable thread
'
~
--1
!
I
 Loading...