

Highlead GC2698-2 User Manual
Purchasing
Copy
Dept
HIGH
LEAD
GC2698-2
CYLINDER-BED UNISON FEED
Instruction
Manual
SEWING
MACHINE
Parts
SHANGHAI
HUIGONG
N0.3
Catalog
SEWING
MACHINE
FACTORY

CONTENTS
INSTRUCTION MANUAL
1,
SAFETY .......................................................................................................................................................... 1
1)
GENERAL SAFETY TIPS ............................................................................................................................... 1
2)
IMPORTANT POINTS
3)
SERVICE AND TECHNICAL PERSONNEL ................................................................................................. 1
4)
DANGER TIPS ............................................................................................................................................... 2
2,
TESTING, TRANSPORT & STORAGE .......................................................................................................... 3
1)
TIPS ON TESTING ........................................................................................................................................ 3
. .
2)
TRANSPORT WITHIN THE CUSTOMER SITE ........................................................................................... 3
3)
STORAGE ........................................................................................................................................................ 3
3,
INSTALLATION & FIRST OPERATION ....................................................................................................... 3
1)
ASSEMBLING THE BOBBIN STANDS ........................................................................................................ 3
2)
FIRSTOPERATION ......................................................................................................................................... 3
FOR
THE EMPLOYER ............................................................................................. 1
4,
SPECIFICATIONS ........................................................................................................................................... 3
5,
PREPARATION ................................................................................................................................................ 4
1)
ATTACHING THE NEEDLE ........................................................................................................................... 4
2)
WINDING THE
3)
TAKING OUT THE BOBBIN CAPSULE ....................................................................................................... 5
4)
ROUTING THE UPPER THREAD ................................................................................................................. 6
5)
REGULATING THE TENSION OF THE THREAD ....................................................................................... 6
6,
STITCH LENGTH ADJUSTING LEVER I REVERSE SEWING .................................................................. 7
7,
MAINTENANCE & CARE .............................................................................................................................. 7
1)
MAINTENANCE AND CARE INTERVALS .................................................................................................. 7
2)
CLEANING ...................................................................................................................................................... 7
3)
GENERAL OILING ......................................................................................................................................... 8
4)
OILING THE HEAD ...................................................................................................................................... 8
5)
OILINGTHEROTATINGHOOK
8,
ADJUSTMENT ................................................................................................................................................ 8
LOWER
THREAD, REGULATING THE TENSION OF
................................................................................................................... 8
THE
THREAD ......................... .4
1)
TIPS FOR ADJUSTMENT ............................................................................................................................... 8
2)
ABBREVIATIONS ........................................................................................................................................... 9
3)
POSITION OF THE FEED
DOG
..................................................................................................................... 9
-1-
4)
NEEDLE HEIGHT (PRE-ADruSTMENT) ..................................................................................................... 9
5)
NEEDLE
6)
PRESSER FOOT, WALKING FOOT AND FEED DOG SLIDING MOVEMENT ......................................
7)
HOOK POSITIONER, GRAB DISTANCE AND NEEDLE HEIGHT ..........................................................
8)
HYDRAULIC MOVEMENT OF THE WALKING FOOT AND PRESSER FOOT .....................................
9)
PRESSER FOOT ............................................................................................................................................
IN
THE MIDDLE OF THE STITCHING HOLE .................................... , ..................................... 1 0
11
11
12
12
10) UPPER THREAD TENSION REGULATION ...............................................................................................
11)
THREAD TAKE-UP SPRING ........................................................................................................................
12)
BOBBIN WINDER. ......................................................................................................................................
13)
ADJUSTMENT OF PRESSER PRESSURE ................................................................................................
13
13
14
14
CATALOG
A,
ARM BED AND ITS ACCESSORIES (
A,
ARM BED AND ITS ACCESSORIES
B,
FEEDING AND FEED LIFTING & ROTATING HOOK SHAFT MECHANISM ......................................
C ARM SHAFTMECHANISM ........................................................................................................................ 22
D,
STITCH REGULATOR MECHANISM ........................................................................................................ 24
E,
PRESSER FOOT MECHANISM ...................................................................................................................
F,
NEEDLE BAR FEEDING MECHANISM (
F,
NEEDLEBARFEEDINGMECHANISM
G,
ACCESSORIES .............................................................................................................................................
1)
................................................................................................
(2)
................................................................................................
1)
..........................................................................................
(2)
.......................................................................................... 29
15
16
19
26
28
32
-2-
1.
SAFETY
1)
GENERAL SAFETY TIPS
CD
The machine should only be used after studying the accompanying instruction manual and only by
specially instructed operating staff
® Before bringing the machine into service read the safety tips and the instruction manual
manufacturer.
® The machine may only be used according to their regulations and
protective
threading up, when leaving the work place
unplugged or switched off at the main switch.
specially trained personnel.
spare parts and accessories that are not supplied
use
fittings.
@ When changing sewing tools (for example needle, presser foot, needle
@ Daily maintenance work should only
@ Repair work as well
(j) Working on the electrical equipment should only be carried out
@ Working on active parts and equipment are not permitted.
® Only the spare parts provided
of
such products can
All relevant safety regulations should also be observed.
as
well
as
during maintenance work the machine should be
be
carried out by specially trained
as
special maintenance work should only
by
by
us
should
in
certain circumstances reduce the predetermined
be
used during repairs.
by
us are also not tested or
qualified electricians.
personnel
be
carried
passed
quality
not
without the accompanying
plate
and bobbin winder),when
out
We
explicitly point out that the
by
of
your machine.
of
by
skilled workers or
us.
The installation or
the engine
We
take
no
responsibility for damage caused
2)
IMPORTANT POINTS
CD
This
instruction manual
machine operators.
It
is
necessary
® Operation and maintenance personnel must
working methods.
® The employer must ensure that the machine
@ The employer should make sure that only authorised persons are permitted to work on the machine.
@ Further information can be obtained from the responsible sales office.
3) SERVICE AND
TECHNICAL
by
the use
FOR
is
a component
to
read the manual before using the machine
of
non-original parts.
THE
EMPLOYER
of
be
is
only used
the machine and must
instructed on safety features
if
it
is
PERSONNEL
always
for
in perfect condition.
be at the disposal
the first
of
time.
the machine and safe
(1) Service Personnel
Service personnel are responsible for the preparing, running and cleaning
of
elimination
CD
®
faults in the sewing. Service personnel must observe the following points:
to
follow the safety guidelines in the instruction manual
to
avoid any type
of
work which may reduces the safety
of
the
machine
of
the machine
as
well
of
as
the
'
the
-1-
® to wear tight-fitting clothes and avoid wearing jewellery, like necklaces and rings
@ to
repo~t
immediately changes in the machine which may reduce safety to the employer.
(2) Technical Personnel
Technical personnel are responsible for the lubrication, maintenance, repair and adjustments to the machine.
Technical personnel must observe the following points:
CD
To
follow safety guidelines in the instruction manual
® Before beginning maintenance work the main switch must be switched off and it must be ensured that it
will not be switched on again.
® Working on active parts and equipment
@
Mter
repair and maintenance work the protective covering must be put back and the electric control box
must be closed.
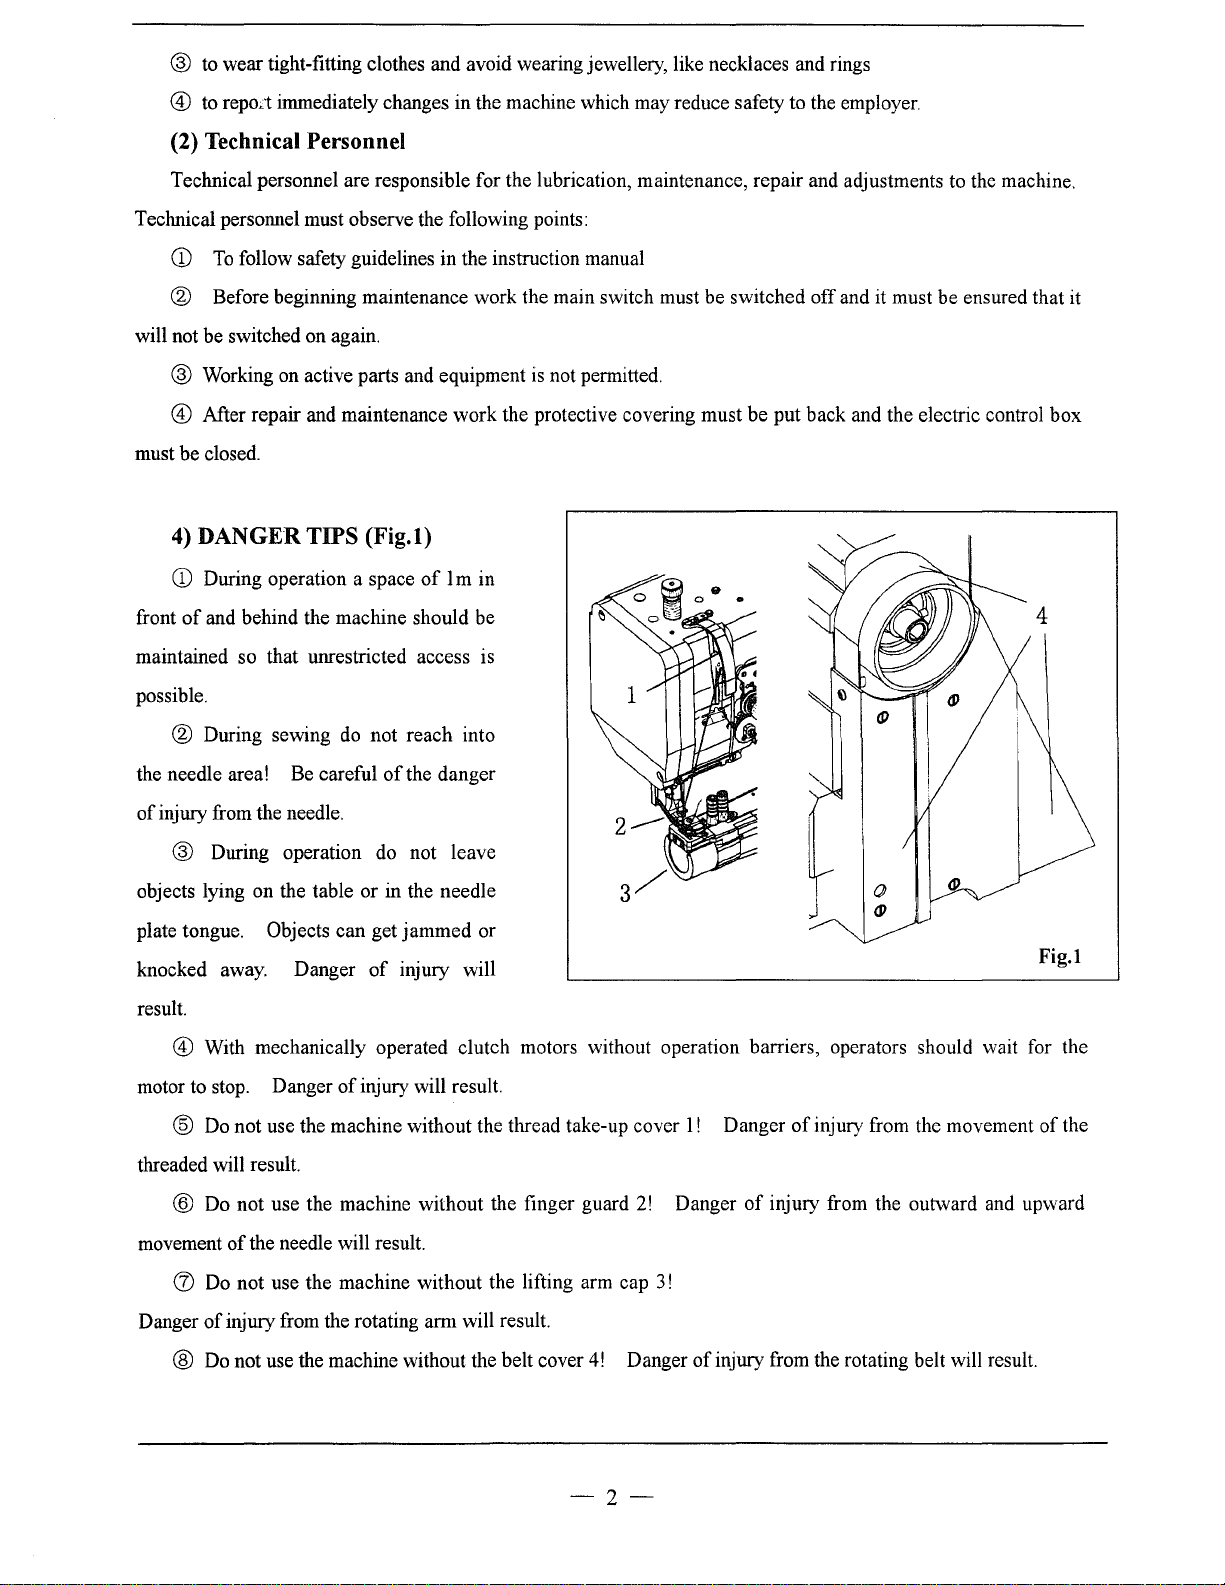
4) DANGER TIPS
CD
During operation a space
of
front
maintained so that umestricted access
possible.
and behind the machine should be
® During sewing
the needle area! Be careful
of
injury from the needle.
(Fig.l)
of
do
not reach into
of
the danger
I m in
® During operation do not leave
objects lying on the table or in the needle
plate tongue.
knocked away. Danger
Objects can get jammed or
of
injury will
ts
is
not permitted.
Fig.l
result.
@ With mechanically operated clutch motors without operation barriers, operators should wait for the
of
motor to stop. Danger
@
Do
not use the machine without the thread take-up cover
threaded will result.
@ Do not use the machine without the finger guard
of
movement
(J)
Danger
the needle will result.
Do not use the machine without the lifting arm cap
of
injury from the rotating arm will result.
® Do not use the machine without the belt cover
injury will result.
4!
2!
Danger
3!
Danger
1!
Danger
of
injury from the rotating belt will result.
-2-
of
injury from the movement
of
injury from the outward
and
of
the
upward

2.
TESTING, TRANSPORT & STORAGE
1)
TIPS ON TESTING
The machine was tested before delivery according
2) TRANSPORT WITHIN
Transport within the customer site is not the responsibility
the machine
3)
The machine can be stored unused for up
If
the machine is
against corrosion, with an oil film for example.
is
correctly transported.
STORAGE
to
be
stored longer the individual parts, in particular the sliding plates, should
3. INSTALLATION &
The machine should only
regulations should be observed. Suitable electricity supply must
technical data). It must
the installation site.
l)ASSEMBLINGTHE
be
be
ensured that there
THE
CUSTOMER SITE
FIRST
installed and started by qualified technical personnel. All the relevant safety
OPERATION
is
BOBBIN STANDS
to
the EN60204-3-1 editionl/86.
of
the manufacturer.
to
6 months.
an even and solid ground surface
It
should
It
should be ensured that
be
protected against dirt and moisture.
be
available
at
the installation site (see
as
well as sufficient lighting at
be
protected
Place the bobbin stands in the drill hole in the table plate and
2)
FIRST OPERATION
Before the first operation check the electric cables in case
CD
Clean and oil the machine thoroughly
® Allow technical specialists to check whether the machine's motor may
main supply and whether it is properly plugged
@ When the machine is running the balance wheel should be turned towards the operator. Otherwise let
technical specialists adjust the motor.
4.
SPECIFICATIONS
Max. Sewing Speed 2200rpm
Max. Stitch Length 6mm
Thread Take-up Lever Stroke 59.55mm
Needle
Bar Stroke 33.4mm
Presser Foot Stroke
Needle
Lubrication System
in.
If
there
By Hand
fix
them into
of
any possible damage.
is
any deviation,
l8mm
DPX35LR
Manual
place
with the enclosed nuts.
be
connected
do
not start the machine.
I
ByKnee
18#-21#
IBmm
to
the available
-3-
5.
PREPARATION
CD
All
regulations and guidelines in this manual should
safety regulations.
®
All
preparation work may only be carried out
work the machine should
be
observed, with special attention being paid
by
specially instructed personnel. Before all preparation
be
disconnected from the main electricity supply
by
switching
off
the main switch or
to
unplugging
The choice
used.
CD
it.
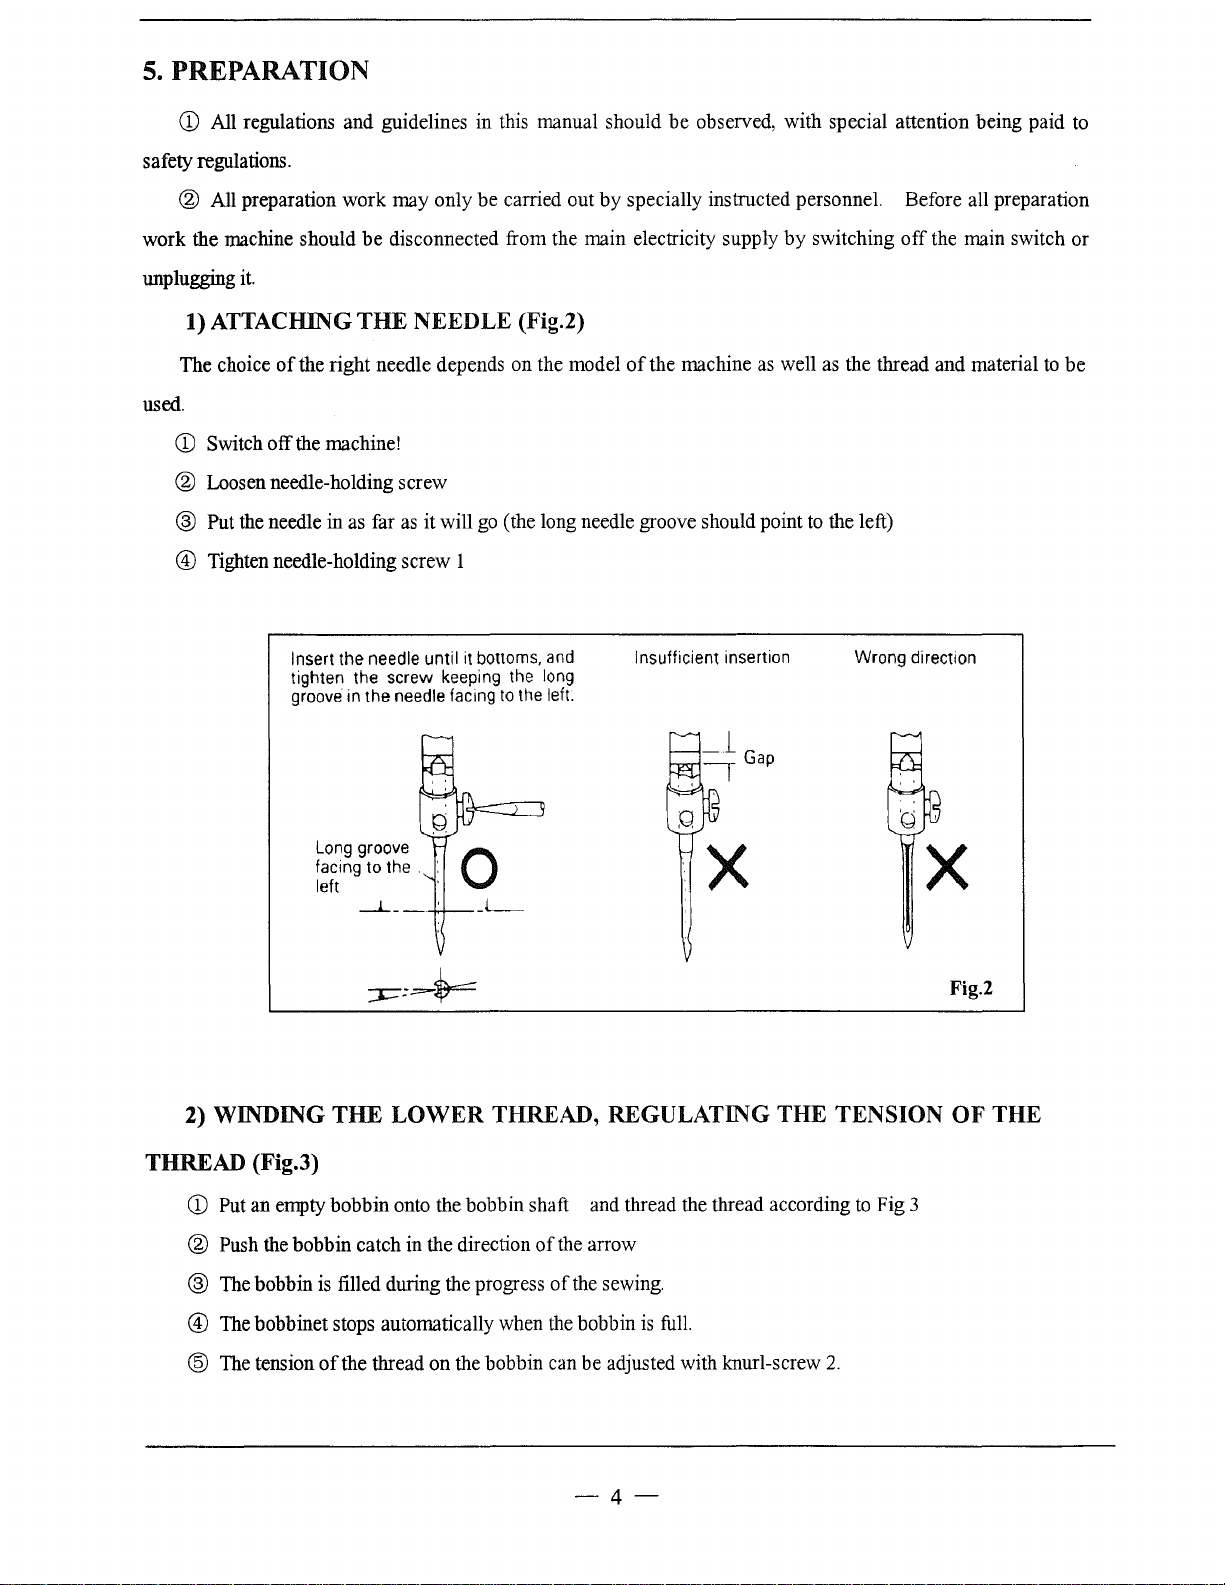
1) ATTACHING
of
the right needle depends on the model
Switch off the machine!
THE
® Loosen needle-holding screw
@ Put the needle in
@ Tighten needle-holding screw 1
as
far
Insert the needle until it bottoms, and
tighten the screw keeping the
in the needle facing
groove
Long groove
facing to the
left
NEEDLE (Fig.2)
as
it will
go
(the long needle groove should point
long
to
the left.
.
of
the machine
Insufficient
as
well
as
the thread and material
to
the left)
insertion Wrong direction
X X
to
be
2) WINDING
THE
LOWER
THREAD, REGULATING THE TENSION
THREAD (Fig.3)
CD
Put an empty bobbin onto the bobbin shaft and thread the thread according
® Push the bobbin catch in the direction
@ The bobbin is filled during the progress
@ The bobbinet stops automatically when the bobbin
® The tension
of
the thread on the bobbin can be adjusted with knurl-screw
of
the arrow
of
the sewing.
-4-
is
full.
2.
to
Fig 3
Fig.2
OF
THE
2
Fig.3
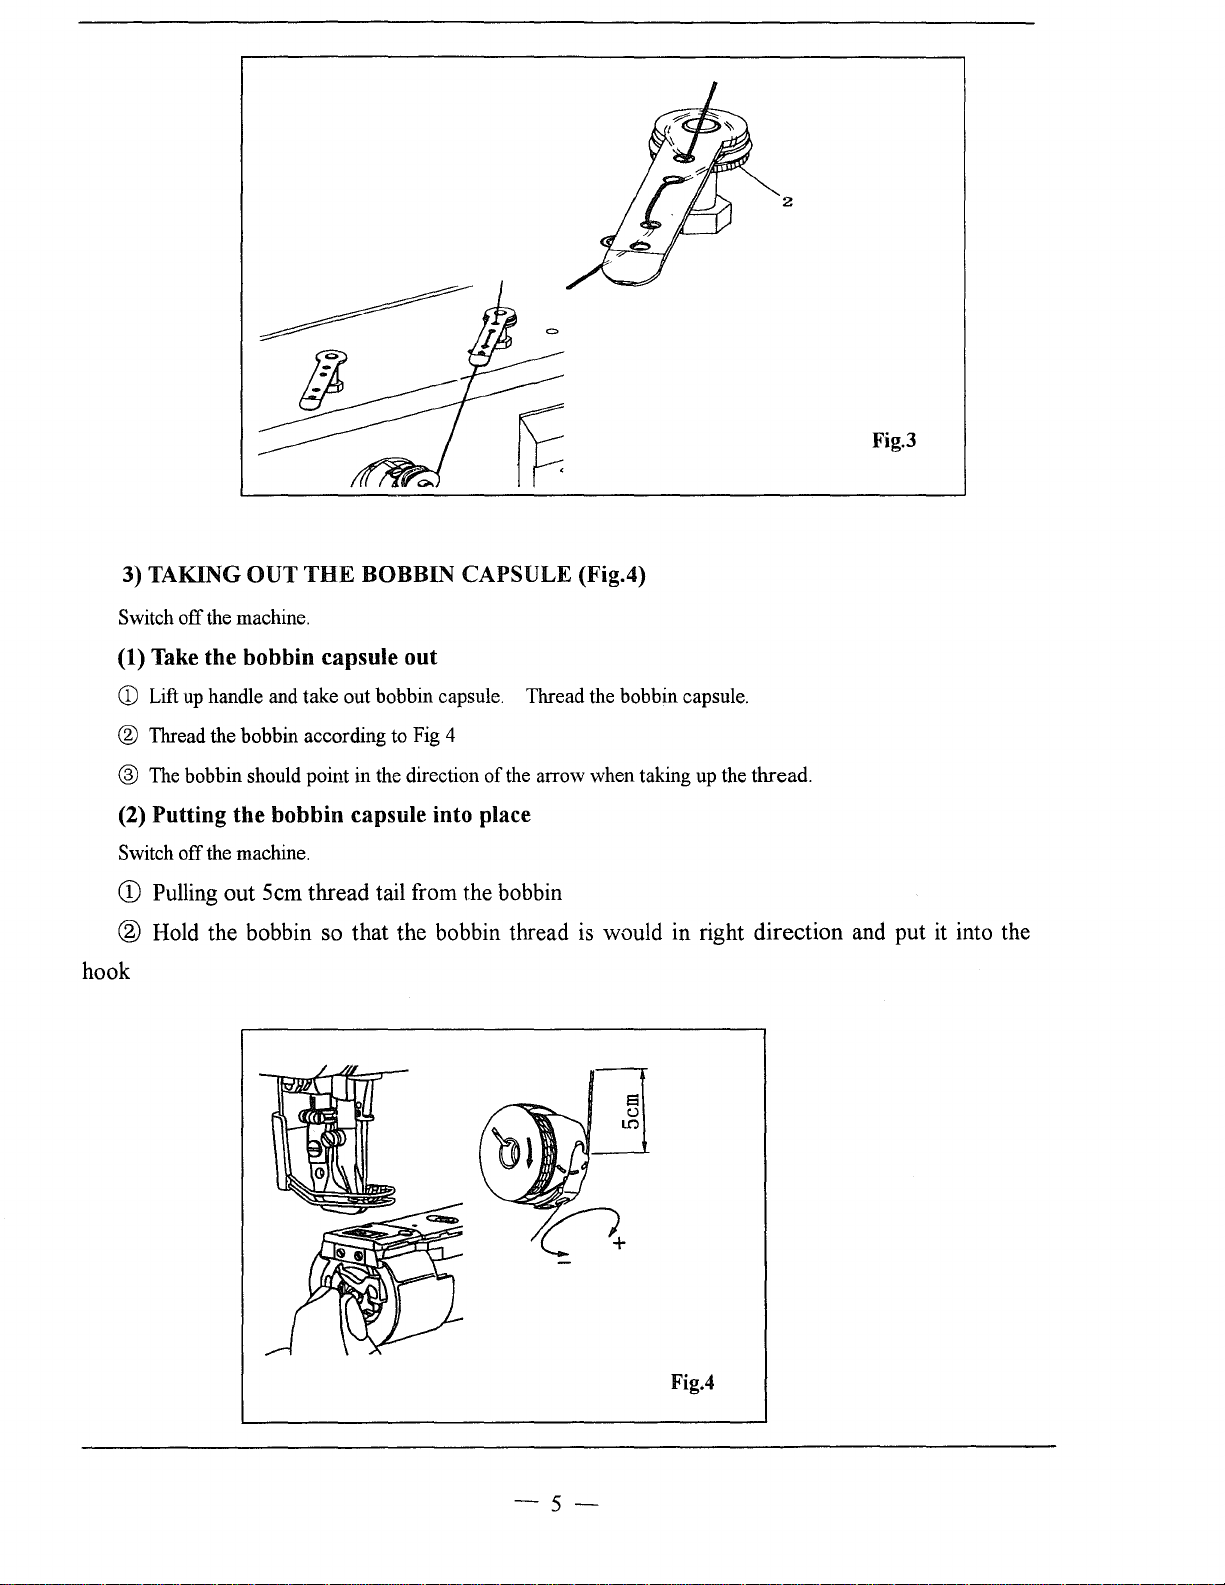
3) TAKING
Switch off the machine.
(1) Take the bobbin capsule
CD
Lift up handle and take out bobbin capsule. Thread the bobbin capsule.
OUT
THE
BOBBIN CAPSULE (Fig.4)
out
® Thread the bobbin according to Fig 4
® The bobbin should point in the direction
(2) Putting
Switch off the machine.
CD
Pulling out Scm thread tail from the bobbin
the
bobbin capsule into place
of
® Hold the bobbin so that the bobbin thread
hook
the arrow when taking up the thread.
is
would in right direction and put it into the
Fig.4
-s-
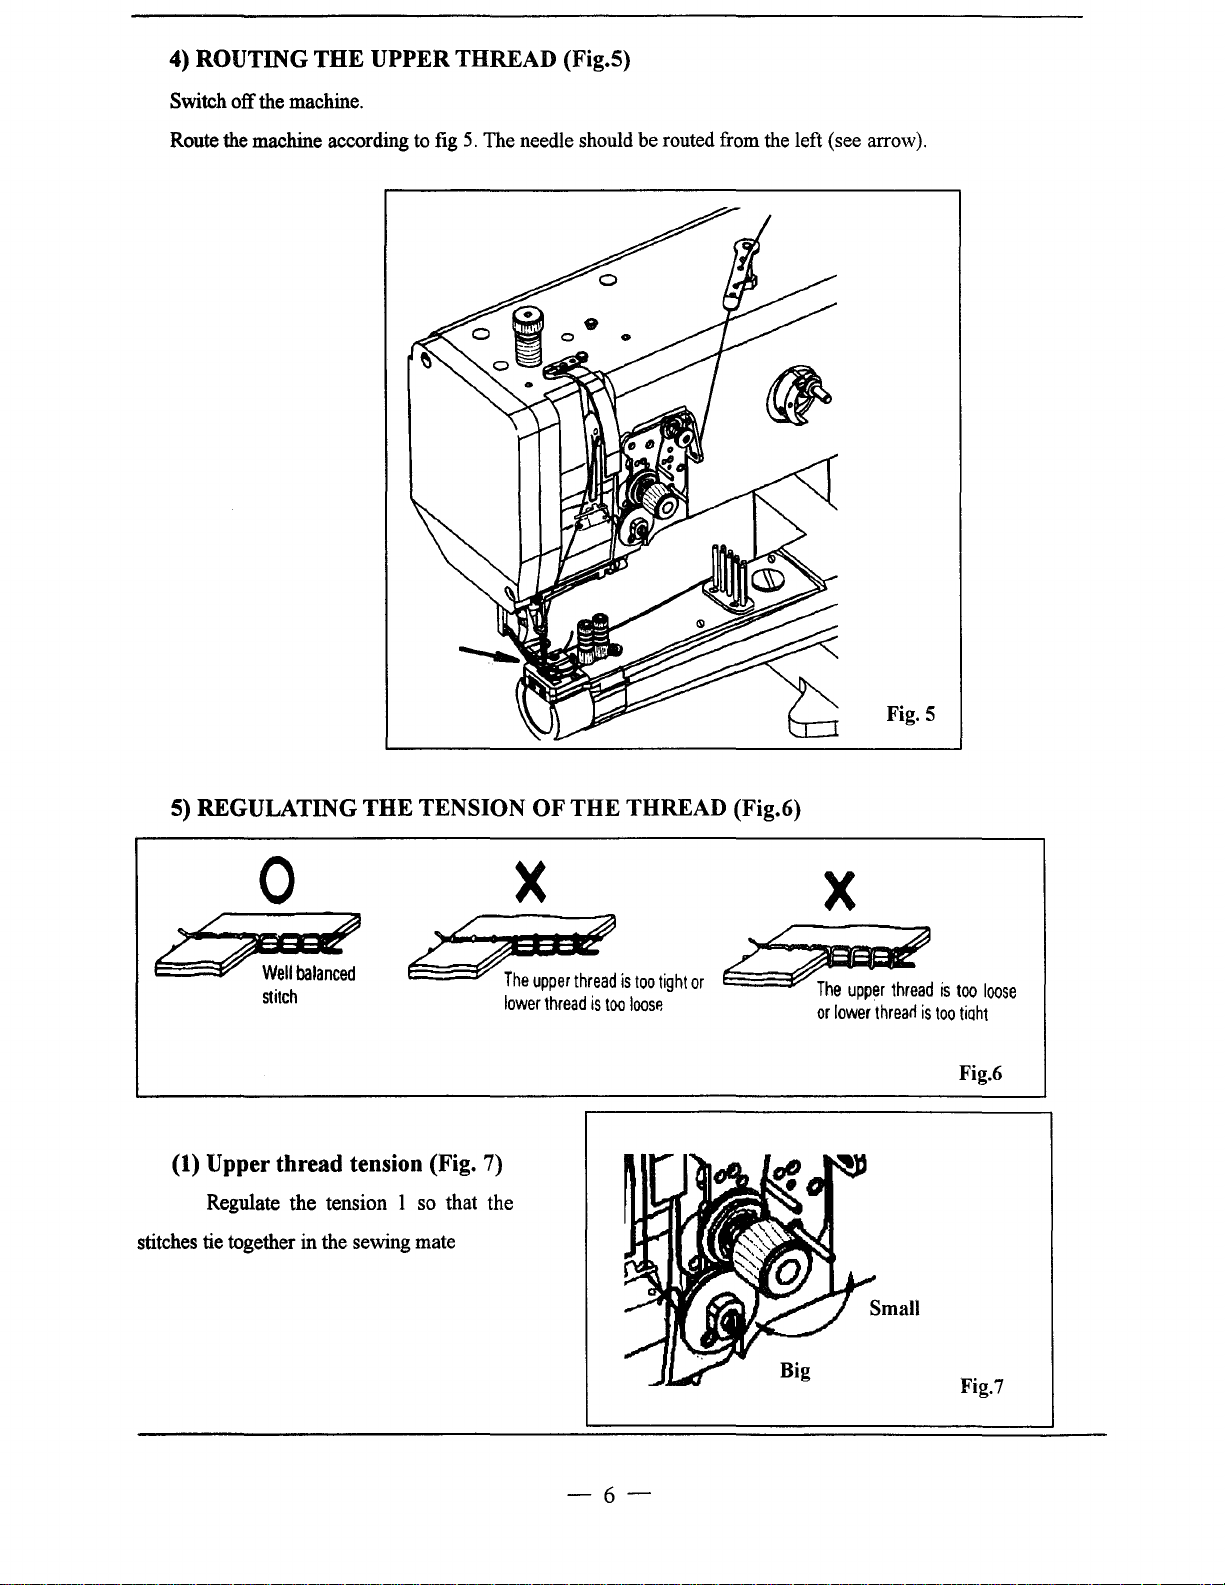
4) ROUTING
Switch off the machine.
Route the machine according to fig
THE
UPPER THREAD (Fig.S)
5.
The needle should be routed from the left (see arrow).
5)
REGULATING
THE
TENSION
0
2.~
~
(1) Upper thread tension (Fig.
stitches tie together in the sewing mate
Well
stitch
Regulate
balanced
the
tension 1 so that the
/~II~
r§-:s
7)
OF
X
The
upper
lower
THE THREAD (Fig.6)
thread
is
too
tight
or
thread
is
too
loosf!
~is tool"''
X
or
lower
Fig. 5
threarf
is
too
tioht
Fig.6
-6-
Fig.7
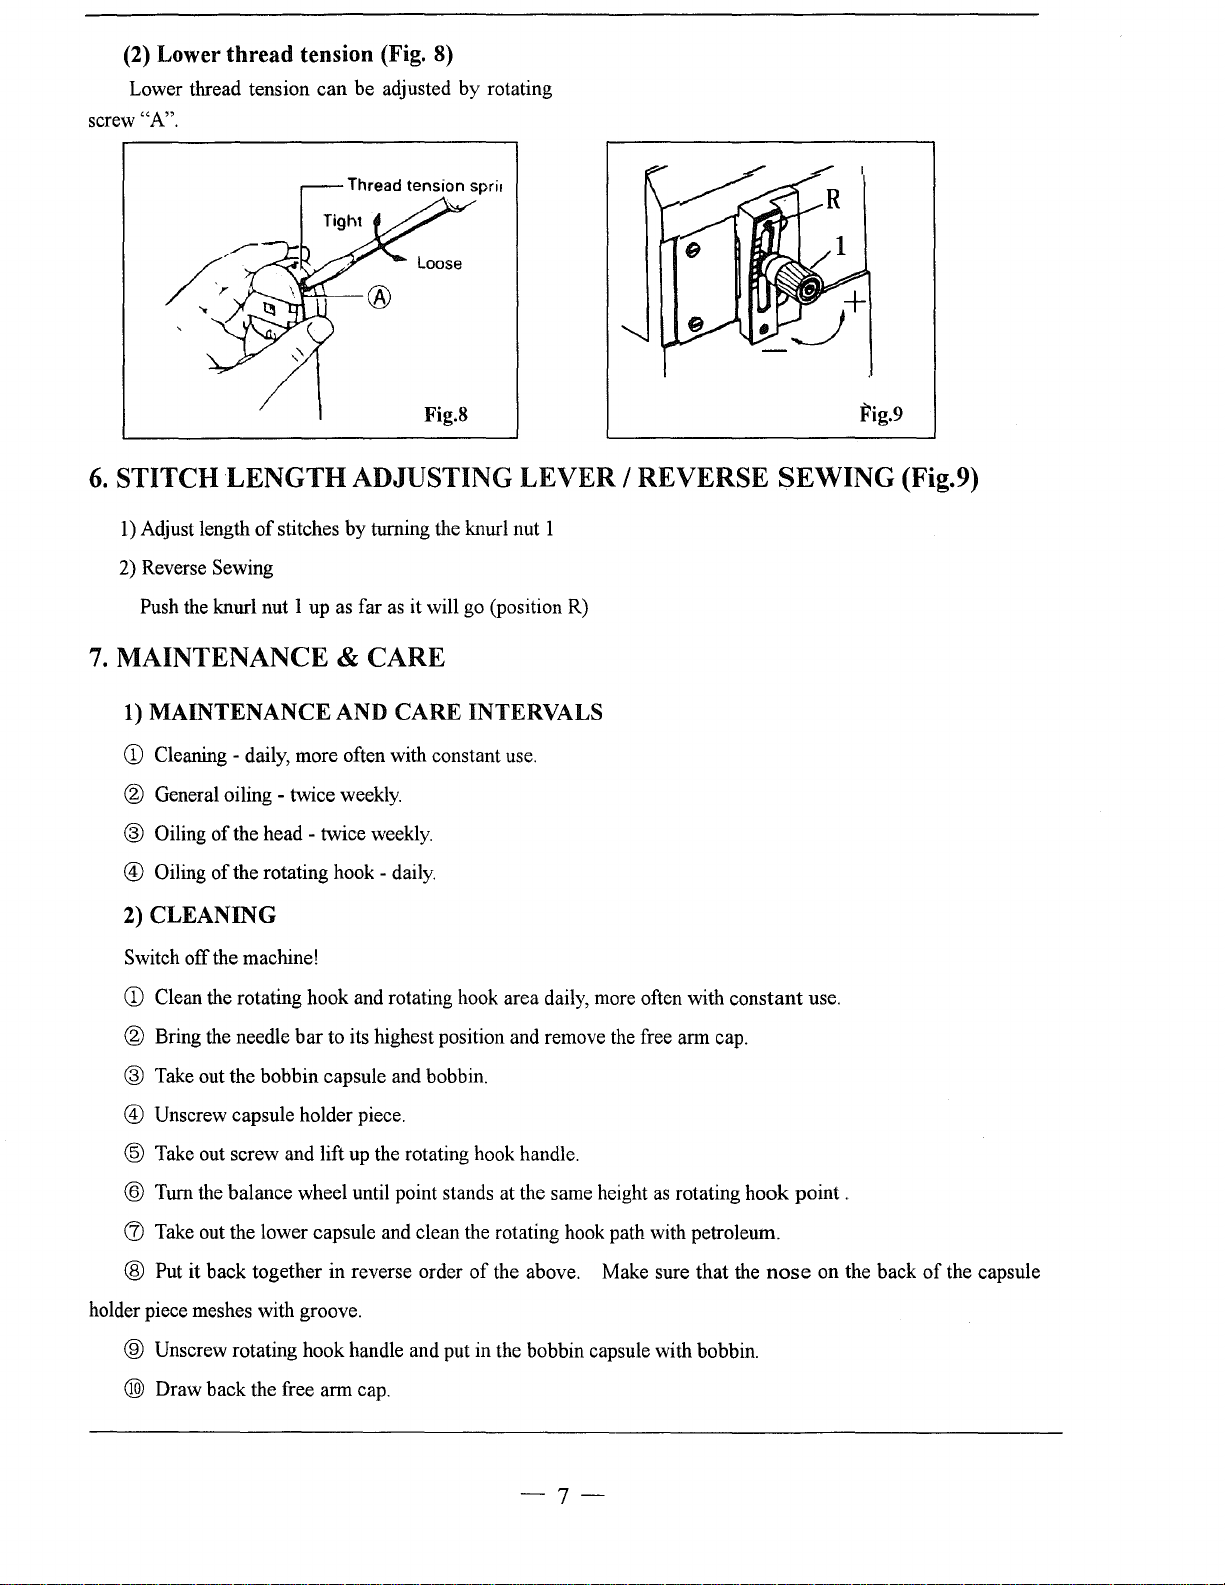
(2) Lower
Lower thread tension
"A".
screw
thread
tension (Fig.
can
be adjusted
8)
by
rotating
6.
STITCH
1)
Adjust length
2) Reverse Sewing
Push the knurl nut 1 up as far
7.
MAINTENANCE & CARE
1)
MAINTENANCE AND CARE INTERVALS
CD
Cleaning - daily, more often with constant use.
LENGTH
of
stitches
ADJUSTING LEVER I REVERSE
by
turning the knurl nut 1
® General oiling - twice weekly.
® Oiling
® Oiling
2)
CLEANING
Switch off the machine!
of
the head - twice weekly.
of
the rotating hook - daily.
Fig.8
as
it will go (position R)
Fig.9
SEWING
(Fig.9)
CD
Clean the rotating hook and rotating hook area daily, more often with
® Bring the needle
bar
to its highest position and remove the free arm cap.
® Take out the bobbin capsule and bobbin.
® Unscrew capsule holder piece.
@ Take out screw and lift up the rotating hook handle.
@ Turn the balance wheel until point stands at the same height
CD
Take out the lower capsule and clean the rotating hook path with petroleum.
@ Put it back together in reverse order
holder piece meshes with groove.
of
the above. Make sure that the
as
rotating
® Unscrew rotating hook handle and put in the bobbin capsule with bobbin.
@)
Draw back the free arm cap.
-7-
constant
hook
nose
use.
point .
on the back
of
the capsule

3) GENERAL OILING (Fig.lO,
Use white spindle oil.
Fig.ll)
Oil all the bearing positions shown in Fig 10 and
Danger ofbeing crushed between the top part and the base!
11
twice weekly.
Fig.ll
Fii!. 10
4)
OILING
Switch
CD
Take
positions shown in fig 12 twice weekly.
® Then screw the cover back
Use white spindle oil.
5)
OILING
Switch
CD
Take the bobbin capsule out and drip one or two
of
drops
oil into the rotating hook path (fig 13) once daily.
THE
HEAD (Fig.12)
off
the machine!
off
the cover and oil all the bearing and sliding
on.
THE
ROTATING
off
the machine!
® Then put the bobbin capsule back in.
8.
ADJUSTMENT
1)
TIPS
FOR
ADJUSTMENT
CD
All adjustments in this manual apply to a completely assembled machine. Covers, which have to be
HOOK
Fig.l2
(Fig.13)
Fig.13
unscrewed and screwed on again for adjustment work are not mentioned in the text.
® The screws or nuts mentioned in brackets are to be loosened before adjustments and tightened again
afterwards.
-8-
 Loading...