

AMIGO USER MANUAL
Important Safety Information
Operation:be careful when operation the aircraft. sensitive components is contained inside, aircraft
may be damaged if drop from high altitude, breaked or expose to water. To avoid propable injury ,
Repair: Please donot disassemble Amigo or repair by yourself, which may cause aircraft damage or
bodily injury. If your Amigo or RC is damgaed, broken down or expose to liquid, Please contact
Battery: please donot disassemble,extrude, strike, burn, drop or tread battery. Please donot make
battery short circuit or contact metal with battery terminal. Please donot put battery under 60 degree
Fly: Keep in mind that you shold be responsible for yourself and others' safety when flying.
Amigo is not suitalbe for the place with lots people, telegraph pole and motor vehicle; the place near
highway or airport. The reason is that Amigo's flying speed is fast, so you need enough space for
operation. Please keep in mind that you should be responsible for yourself and other's safety when
Pleae donot fly under poor weather:
Please donot grasp aircraft when it flying.
Not suggest person who is under 14-year-old and beginner to operate Amigo.
Please take out battery when stop flying, which can avoid the propable injury if someoe unlock
transmitter or aircraft.
Aircraft may be unlocked no matter the RC is locked or not, in this case,please keep far away from the
propeller after unlock aircraft as High-speed revolution may cause injury.
Amigo intelligent battery is Li-polymer battery.
Unlike the normal battery, Li-Po battery's chemical core is encased with tin foil, which can reduct its
height but be more sensitive for improper operation. imporper operation may case battery fire
explosion.
●Please keep battery over 50% capacity for extending its lifespan if not use Amigo for over one
week.
●Please use HighGreat original charger to charge the battery.
●lease donot charge on carpet in case of fire.
●Li-Po battery need charging after stock over 3 months to maintian voltage and ensure its required
lifespan.
1. no disassemble and recombine battery!
2. Forbidden short circuit batteries!
3. Forbidden operating near heat source!
4.Forbidden expose aircraft to water, sea water and make aircrafe wet!
5. Forbidden charging nearing fire or under strong light!
6. Forbidden putting nail into battery, knocking with hammer or treading!
7. Forbidden shking or throwing!
8. Forbidden operation if aircraft is damaged seriously or out sharp!
9. Forbidden welding the battery!
10. Forbidden reverse charging or over discharging!
11. Forbidden reverse charging orantipole connection!
12. Forbidden conncet battey to normal charger or car cigarette lighter!
13. Forbidden fly with unspecified device!
14. Forbidden touch leakage battery! please rinse with water if skin or clothe touched the leakage!
15. Forbidden mix primary battery with amigo battery!
16. Forbidden overcharge!
17. Forbidden put battery into microwave or high-voltage vessel!
18. Forbidden use and place battery under blazing sunshine!
19. Forbidden operating near static electricity(over 64V)!
20. Forbidden opeartion under o degree and over 45 degree!
21. Please stop using and retrun to sell point once appear abnormal situation like leakage , offensive
smell while using battery!
22. Keep Amigo far away from Children!
23. Please charging complywith request, with the specified charger!
24. Partents should guide Juveniles base on User Manual when using batteries!
Please read Disclaimer before operating.
Reading Hints
Legends
Warning Important Hints and Tips
Reference
Recommendation for use
HighGreat provide bellow documents and tutorial videos for AMIGO users:
1.《AMIGO User Manual》
2.《AMIGO Quick Start Guide》
3.《Item list》
3.《Disclaimer》
We recommend that you read the Disclaimer first and then read AMIGO User Manual to learn the
whole operations. You also can watch all tutorial videos on the official HighGreat website. Read the
User Manual for more details and can download it from the official HighGreat website.
HighGreat official website: www.hg-fly.com
Download HG-Fly App
Ensure to use HG-Fly App during flight. Scan the QR code to download it or download it from Google
play or Apple App store.

The iOS version of the HG-Fly App is compatible with iOS 8.0 or later.
The Android version of the HG-Fly App is compatible with Android 4.4 or later.
Contents
Important Safety Information
Reading Hints
Legend
Recommendation for use
Download HG-Fly App
Product Profile
Introduction
Features Highlights
Aircraft Diagram
Remote Cotroller Diagram
Aircraft
The Aircraft Profile
Flight Modes
Flight Status Indicator
Failsafe Return
Intelligent Mode
Visual Positioning System
Flight Data
Propellers
Intelligent Flight Battery
Remote Controller
Remote Controller Profile
Using the Remote Controller
Linking the Remote Controller
The Remote Controller Calibration
Camera
Camera Profile
Camera Pitch Angle Control

HG-Fly App
Profile
Camera
Image
Me
Flight
Flight Environment Requirements
Preflight Checklist
Calibrating the Compass
Using Mobile Device Wi-Fi to Control the Flight
Using Remote Controller to Control the Flight
Appendix
Specifications
Updating the Firmware
After-Sales Information
Product Profile
Introduction
Thank you for purchasing HighGreat product. AMIGO is composed of the aircraft, remote controller,
camera and supported HG-Fly App. You can control the camera by using the HG-Fly App on your
mobile device.
Features Highlights
AMIGO has Visual Positioning System and can achieve indoor and outdoor stability hovering.
Electronic stability system can be stable shooting 1080p HD video and 13 million pixel photos.
Maximum flight speed of 18m / s, flight time is about 16 minutes.
AMIGO uses a leading flight control system that provides safe, stable and agile flight performance. The
return function allows the aircraft to automatically return to the return point and drop when the
remote control signal is lost or the battery is low.
Remote control built-in high-definition map through the ground, and the aircraft body built-in
airborne side with HG-Fly App in the mobile device real-time display high-definition screen, stable
transmission of up to 720p images and uplink and downlink data. Signal transmission distance of up
Aircraft Diagram
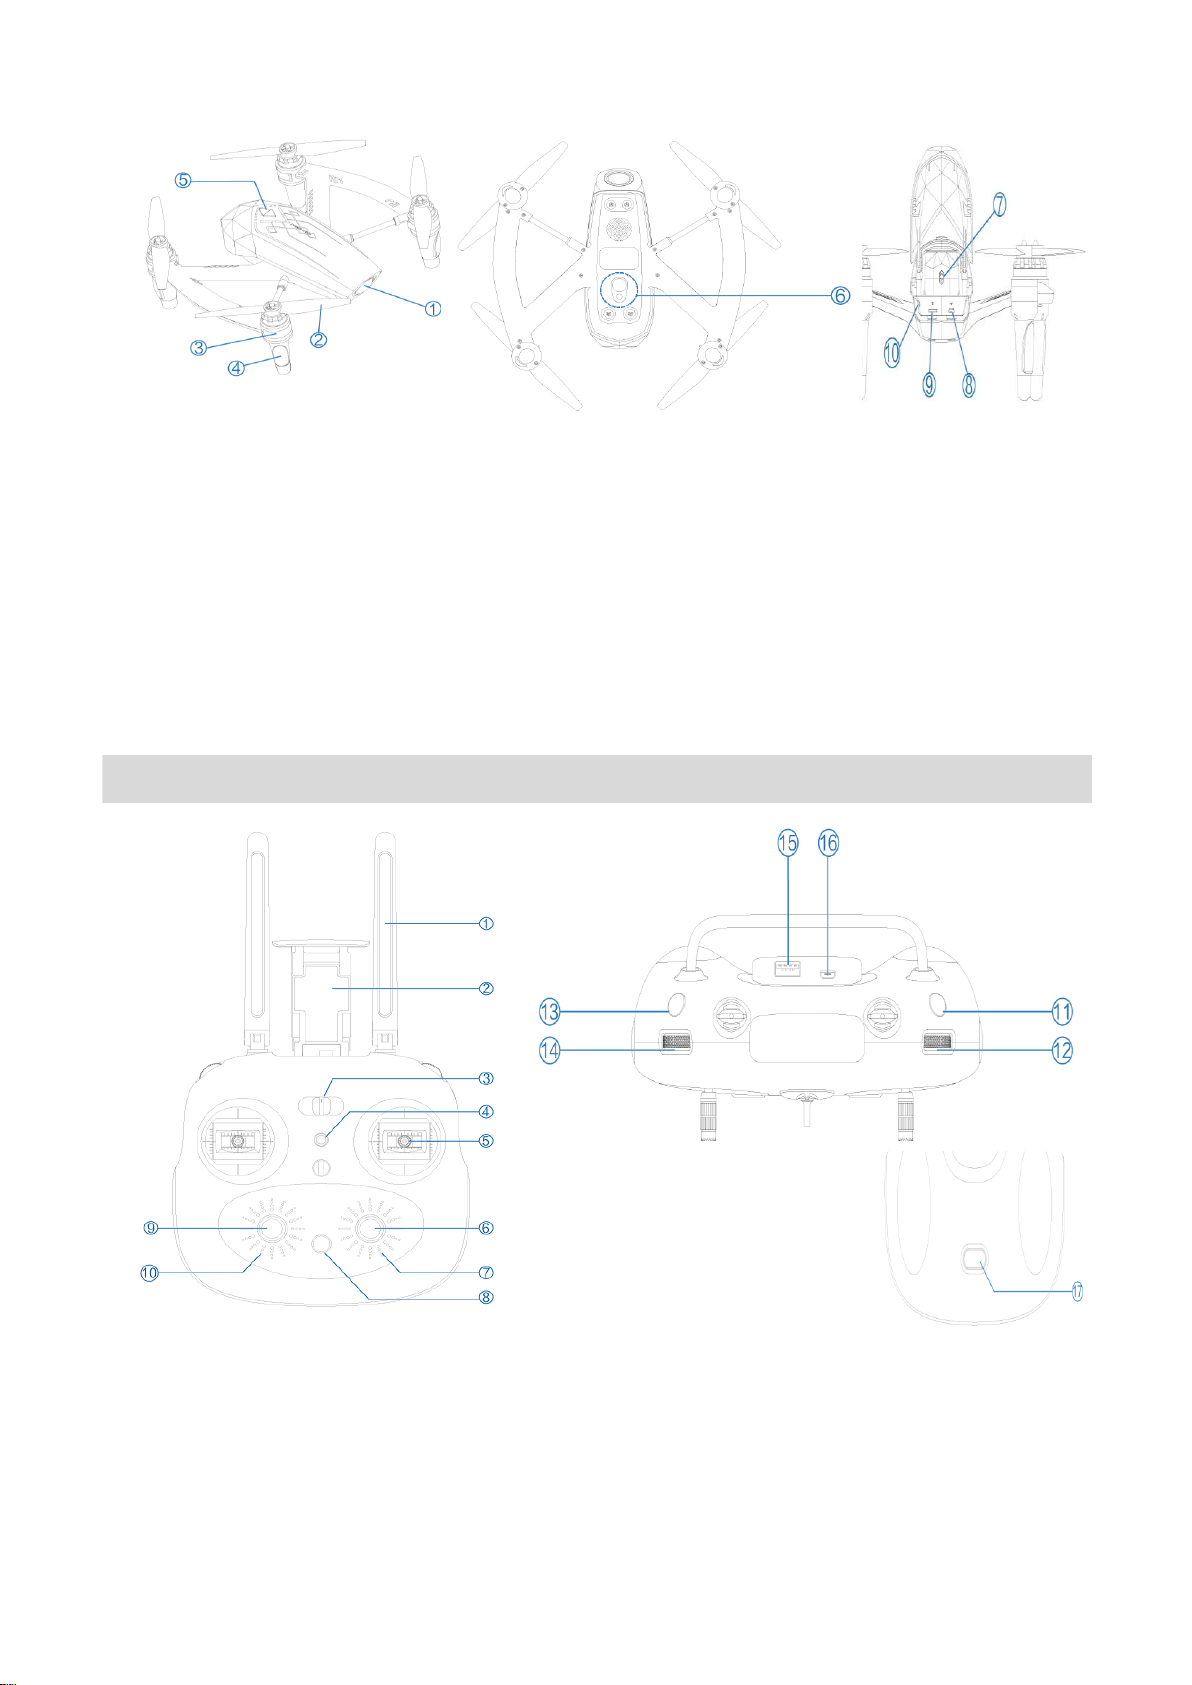
1. Camera
2. Propellers
3. Motors
4. Navigation LEDs
5. Power Button
6. Visual Positioning System
7. Intelligent Flight Battery Locker
8. Micro-USB
9. Camera Micro SD Slot
10. Control Modes Switcher
Remote Controller

1. Antennas
Relays aircraft control and video signal
2. Mobile Device Holder
Securely mounts your mobile device to the remote controller
3.Flight Mode Switcher
3 Modes: P Mode(Positioning),A Mode(only altitude stabilization),S Mode
(Sport)。
4. Push Button
Press to popup the mobile device holder.
5. Joysticks
Controls the orientation and movement of the aircraft
6. Return Button
Press and hold the button to initiate return automatically
7. RC Battery Level LEDs
Display the battery level of the remote controller
8. Stop Button
Exit Smart Modes and the aircraft hover at the current altitude.
10. Aircraft Battery Level LEDs
Display the battery level of the aircraft
11. Record Button:
Press to start recording video
12. Camera Focus Adjustment Wheel
Adjust the camera focus
13. Shoot Button
Press to start shooting photos
14. Camera Pitch Angle Control Wheel:
Adjust the camera angle up and down
15. USB Port
Connect the mobile device to operate HG-Fly App
16. Miscro-USB Port
Used for charging the remote controller
17. Power Button
Power on/off the remote controller
Aircraft
The Aircraft Profile
This section introduces the Flight Controller, Communication System, Positioning System, Power
System, Camera and the Intelligent Flight Battery.
Flight Modes
AMIGO has excellent handling performance and stability, the flight control system supports the
following flight modes:
P-mode(Positioning):Use GPS or visual positioning system to achieve accurate positioning, can
achieve automatic return, intelligent mode and other functions. The sensitivity of the aircraft in this
mode is appropriately reduced.
A-mode(Attitude):When neither the GPS nor the Visual Positioning System is available, the aircraft
will only use its barometer for positioning to control the altitude.
S-mode(Sport):The handling gain values of the aircraft are adjusted to enhance aircraft
maneuverability.

• It is important to note that the user should be aware of the surroundings when using S mode
(motion), and manipulate the aircraft to avoid obstacles on the flight path.
• It is important to note that the flight speed of the aircraft is significantly increased compared to the
P mode and the A mode when the S mode is used, resulting in a relatively large increase in braking
distance. In a windless flight environment, the user should reserve at least 50 meters above the
• The flight mode is switched by the flight mode switch on the remote control. For information
about the flight mode switch, refer to the Remote Control section "Flight Mode Switch" (add page
number).
Flight Status Indicator
AMIGO have Navigation LEDs at front and Aircraft Status Indicators at back.
The Navigation LEDs show the orientation of the aircraft. The Navigation LEDs glow solid red when the
aircraft is turned on. The Aircraft Status Indicators communicate the system status of the flight
controller.
Aircraft Status Indicator Description
1.Self Diagnostic Testing: Four LEDs cycle flashing
2.P Mode(GPS Positioning):Two green flashes;
3.P Mode(Visual Positioning):Single green flashing;
4.A Mode(Attitude):Solid yellow;
5.Signal LEDs:Not match with the frequency,yellow quick flashing,0.3s intervals;
6.Low Battery Warning:Low battery,slow red flashing; Critical low battery(10%),quick red
flashing;
7.Firmware Updating:Alternate red and green flashing;
8.Compass Error:Alternate red and yellow flashing;
9.Compass Calibration Required:Horizontal calibration, Four LEDs alternate red flashing。Vertical
calibration,Four LEDs left and right alternate red flashing;
10.Intelligent Mode:Front slow red flashing;
11.Navigation LEDs Power Button:Open by default,you can close it in "setting" on the App;
12.Power On:Four LEDs solid red waiting for finishing power on and enter self-diagnosis; Power Off:
Return to Base
AMIGO has Return-to-Base function. It brings the aircraft back to the last recorded takeoff point.
There are three types of RTB: Smart RTB, Low Battery RTB and Failsafe RTB.
• When GPS signal is weak (GPS icon turns red,satellite less than 7)or GPS is not working,will
not realize RTB.
• When RTB is activated, the aircraft is not controlled before it climbs up to the height preseted. If you
want to control the aircraft, need to cancel RTB.
• If RTB is activated when the horizontal distance between the aircraft and the landing point less than
20 meters, the aircraft will not climb up to the height preseted.
• Before takeoff, check the environments and must set a RTB height on the HG-Fly App.
Smart RTB
Use the RTB button on the remote controller or tap the RTB button in HG-Fly app and follow the onscreen instructions to initiate RTB. The aircraft will then automatically return to the last recorded
takeoff point. Use the remote controller to control the aircraft's speed or altitude to avoid a collision
Low Battery RTB
The low battery RTB will be triggered when the intelligent battery is depleted to a point that may
affect the safe return of the aircraft. The HG-Fly App will display a notice when a low battery warning
is triggered. The aircraft will automatically return to the takeoff point if no action is taken after a ten-
The aircraft will land automatically if the current battery level can only support the aircraft long
enough to descend from its current altitude and the RTB procedure can not be cancelled. The users
can still use the remote controller to alter the aircraft's orientation during the landing process.
When the critical low battery level warning is triggered, land the aircraft as soon as possible. Or
may cause the aircraft crash.
Failsafe RTB
If GPS signal is strong and compass is functioning normally and the takeoff point is successfully
recorded, Failsafe RTB will be automatically activated if the remote controller signal is lost for more
than 3 seconds. The aircraft will plan its return route and retrace its original flight route home. The RTB
* If can not get signal connect at a long time, users can adjust the position of the remote controller or
get close to the aircraft flight orientation to regain control.
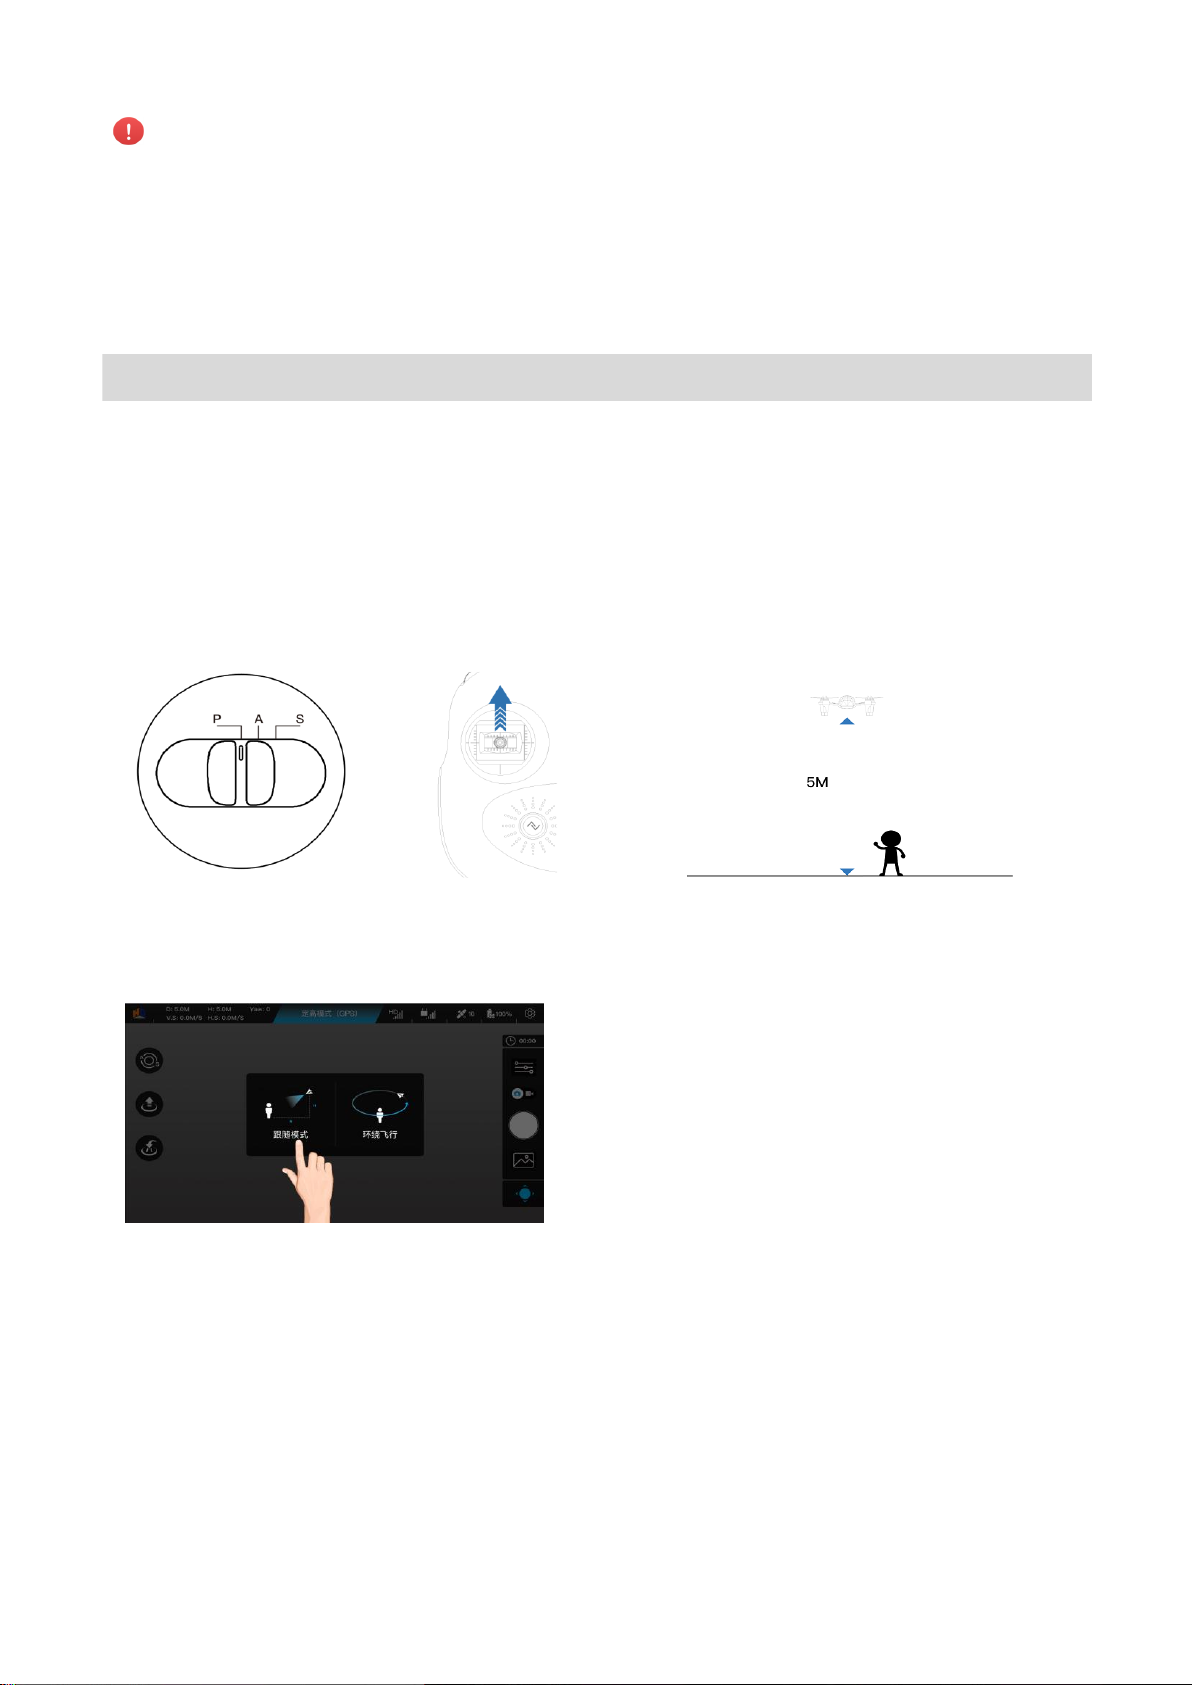
Intelligent Mode
Follow Me
Profile
Follow Me allows you to mark and track a moving subject on your mobile device screen. When choose
your target, the aircraft will follow the target to fly automatically.
Start Follow Me
1. Ensure the battery level is adequate and the aircraft is in P-mode. Power on the aircraft and reaches
16 feet (5meters) above the ground.
2. Tap the camera interface in HG-Fly App to enter in Intelligent Mode interface and then tap Follow
Me icon to start.
3. Tap the screen and reframe the target and then start Follow Me. The aircraft will keep a distance
from the target. If the frame turns to red, need to re-set the target.

If lost the target or target being covered during Follow Me function, need to re-set the target.
• Use Follow Me function in an open area. Do not guide the aircraft to fly towards people,
animals, small and fine objects (e.g. tree branches and power lines) or transparent objectse.g. glass or
water).
• Watch for the obstacles in the flight path and stay clear of them.
• Prepared to tap the "STOP" button in case of emergency or manual control the aircraft.
• Do not track in a terrain.
• Do not use Follow Me function in bellow situations:
1)The target will have a big change in moving.
2)The target is being covered or out of sight.
3)The target is on the area covered with snow.
4)The environments is too dark or bright.
5)The color or pattern of the target is too similar with the environments.
Stop Follow Me
Double tap the "STOP" button on the remote controller or tap the "STOP" button on the screen will
exit Follow Me function, then the aircraft will hover at its current location.
Circling Flight Mode
1. Make sure the aircraft battery level is adequate and in P mode. Power on the aircraft and fly the
airraft on the top of the target.
2. Tap the camera interface in HG-Fly App to enter in Intelligent Mode interface and then tap Circling
Flight Mode icon to start.

3. Operate the aircraft flying to the top of the target and tap "Setting Circle Target" on camera
interface in HG-Fly App.
4. Control the aircraft to meet the requirements and then tap "Start".
Stop Circling Flight Mode
Double tap the "STOP" button on the remote controller or tap the "STOP" button on the screen will
exit Circling Flight mode, then the aircraft will hover at its current location.
Visual Positioning System
Visual Positioning System is at the bottom of the aircraft and is combined of a camera and a
ultrosound. The Visual Positioning System uses ultrosound and image data to help the aircraft
Application
The Visual Positioning System is used for invironments without GPS or GPS signal is weak, especially
for indoor flight. The surface need rich texture, sufficient lighting (> 15 lux, indoor fluorescent normal
The Visual Positioning System is still available in P mode. The Visual Positioning System automatically
switches to the working status without manual operation.
The performance of your Visual Positioning System are affected by the surface being flown over.
Ultrasonic sensors may not be able to accurately measure distances when operating above soundabsorbing materials and camera may not function correctly in suboptimal environments. Operate the
aircraft with great caution in the following situations:
• Flying over monochrome surfaces (e.g. pure black, pure white, pure green).

• Flying over water or transparent surface.
• Flying over a highly reflective surfaces.
• Flying in an area where the lighting changes frequently or drastically.
• Flying over surfaces that can absorb sound waves (e.g. thick carpet).
• Flying over surfaces without clear patterns or texture.
• Flying over surfaces with identical repeating patterns or textures (e.g. tilling).
• Flying over inclined surfaces that will deflect sound waves away from the aircraft.
• The sensors not clean. Dirt or other debrics may adversely affect their affectiveness.
• Visual Positioning System is only effective when the aircraft is at altitudes of 20 to 300cm.
• When use Visual Positioning System function, make sure the surfaces with clear patterns or textures
and enough lighting.
Flight Data
Flight data is automatically recorded to the internal storage of the aircraft. This includes flight
telemetry, aircraft status information, and other parameters. Uers can check these information in your
Flight Recorder on HG-Fly App. To access this data, connect the aircraft to the PC through the Micro
propellers
The propellers of AMIGO is 7 inch and they are fast-assembly proipellers. A and B on the propeller
indicate where they should be attached and in which direction they should spin.
Attaching the Propellers
Mount the propellers with white propeller rings to the motors with white dots. Mount the propellers
with no propeller rings to the motors without dots. Press the propeller down onto the mounting plate
and rotate in the lock direction until it is secured in its position.
Detaching the Propellers
Press the propellers down into the motor mount and rotate in the unlock direction.
• Ensure the propeller mounted in the right way.
• Ensure only use the propellers HighGreat provided.
• Be aware of the sharp edges of the propellers. Handle with care.
• Check that the propellers and motors are installed correctly and firmly before every flight.
• Ensure all the propellers are in good condition before each flight. Do not use aged, chipped, or
broken propellers.

Intelligent Flight Battery
Profile
The HighGreat Intelligent Flight Battery has a capacity of 3000 mAh, a voltage of 11.4V, and a smart
charge/discharge functionality. It should only be charged using an appropriate HighGreat approved
The Intelligent Flight Battery must be fully charged before using it for the first time.
Intelligent Flight Battery Functions
Intelligent Flight Battery functions as bellow:
1.Battery Level Display:The LED indicators display the current battery level.
2.Balanced Charging:Automatically balances the voltage of each battery cell when charging.
3.Overcharge Protection:Charging automatically stops when the battery is fully charged.
4.Over Discharge Protection:To prevent over-discharge damage, discharging automatically stops
when the battery voltage too low.
5. Short Circuit Protection:Automatically cuts the power supply when a short circuit is detected.
6. Battery Storage Management:When do not use the battery at a long time, can set discharge
protection on App to protective the battery.
7. Battery Detection:The HG-Fly APP displays a warning message when a damaged battery cell is
detected.
8. Communication:Information pertaining to the battery's voltage, capacity, current, etc. is
transmitted to the aircraft's main controller.
Checking the Battery Level
Press the Power Button once, the Battery Level indicators will light up to display the current battery
level.
The Battery Level Indicators will also show the current battery level during charging and
discharging. The indicators are defined bellow:
Charging the Intelligent Flight Battery
Connect the Battery Charger to a power source(100~240V,50/60Hz)and connect the Intelligent
Flight Battery to the Battery Charger.

• The LED indicators will alternate flashing and display the current battery level as it is charging.
• Do not charge battery immediately after flight until it cools down to near room temperature.
• Never use non-HighGreat batteries and chargers. HighGreat takes no responsibility for any
damage caused by non-HighGreat batteries and chargers.
• Never transport a damaged battery or a battery with power level higher than 20%.
Attach the Intelligent Flight Battery
Push the Itelligent Flight Battery in the compartment and pay attention to positive and negative. And
then slide the switch down to lock the battery to prevent damage to the battery during flight or cause
other hazards.
Remote Controller
Profile
The remote control with high-definition real-time transmition and complete function keys, can achieve
500 meters communication distance to complete the aircraft control and camera settings, and through
the HG-Fly App in mobile devices to display the image you are shoting. The remote controller can
• Operating Mode:Control can be set to Mode 1 or Mode 2. You can change the modes on HG-
Fly App.
• Mode 1:The right stick serves as the throttle.
• Mode 2:The left stick serves as the throttle.
Using the Remote Controller
Turning the Remote Controller On and Off
There is a built-in battery in the remote controller and the the Battery Level LEDs indicate the battery
level.
Follow the steps to turn on your remote controller:
1. Press the Power Button once, the Battery Level LEDs will display the current battery level. If the
battery level is low, please charge the battery.
2. Press the Power Button once and the press again and hold for 1.5 seconds to power on the remote
controller. The remote controller will beep when it is turned on and the indicators will light up.
3. Repeat Step 2 to turn off the remote controller.

Charging the Remote Controller
Connect the USB charging cable to the USB port and then connect the USB charging cable to the
adapter(5V, bellow 2A)for charging.
Controlling the Aircraft
The Remote Control is set to Mode 2 by default. This section explains how to control the orientation
through the remote controller.
Stick Neutral/Mid-Point: Control sticks are in the center position.
Moving the Control Stick: The control stick is pushed away from the center position.

• Before operating the remote controller, please check the remote control battery level to avoid
the loss.
• Keep away from magnetic objects (such as magnets, loudspeakers, etc.) when using the remote
control, otherwise the remote control joystick may be get the magnetic interference.
• Carry, transport remote controller in a relaxed state, do not make it by external force, so as not to
cause the sticks deformation.
RTB Button
Press and hols the RTB button untill the remote controller beep, which indicates starting return to the
last takeoff point automatically. During RTB process, the users still can use the remote controller to

Transmission Range
Ensure that the aircraft is flying within the optimal transmission zone. To achieve the best transmission
performance, maintain the appropriate relationship between the operator and the aircraft.
Optimal Transmission Range as bellow:
信号强 信号弱
Linking the Remote Controller
The remote controller is linked to your aircraft before delivery. Linking is only required when using a
new remote controller for the first time. Follow these steps to link a new remote controller:
1. Switch the flight mode to WiFi position and turn on the aircraft.
2. Searching SSID HG-Amigo-XXXXXX on your mobile device and then enter the password 12345678.
3. Enter "Camera" in HG-Fly App and tap "Setting" and then tap "Linking RC".
4. When the HG-Fly App pops up the scan window, please scan the QC code on the back of the
remote controller and follow the tips to finish linking.
5. Then turn on the remote controller. If the indicators light up shows the linking finished.
6. If failed, please repeat above steps.
Ensure the aircraft in "WiFi" switcher.

Calibrating the Remote Controller
For long time using, the joystick may deviate from the Mid-Point and often calibrating the remote
controller to ensure emits precise instructions. The calibration as follows:
1. Push the two sides of the joystick to the lower left corner to reach the maximum range, and then
turn on the remote control, LED lights flashing.
2. Push the joysticks to the maximum range and push three laps, then release the joysticks.
3. Turn off the remote controller and calibrating finished.
Camera
Profile
AMIGO camera uses a high-performance camera, can reach 13.24 million effective pixels. Camera is
located at the front and it is a wide-angle fisheye lens which can have a large angel.
Supports the video recording of 1080p at 30fps and 13 megapixel photos shoting. Using advanced EIS
to keep the image in high quality.
Users can get real-time image via HG-Fly App and view photos and videos instantly through the return
feature, and delete the contents on the camera's memory card.
Camera Operation
Support the camera adjust up and down range of +30°~-90°.
Support remote controller dial to control the camera 4 times zoom in.
The aircraft must be turned on before attempting to access the flies on the Miscro SD card.
If you need to shoot, please install the Micro SD card before shoting and ensure the SD card is
good and have enough storage room.
HG-Fly App
Profile
Before operating AMIGO, you need to download HG-Fly App. You can gei it from App Store or Google
Play.

HG-Fly App is a mobile application designed specifically for AMIGO. Use this app to take photo, record
video and other functions. It is recommended that you use a large screen smartphone or tablet for the
best visual experience. You can also share the photos or videos directly to social networks.
Camera Interface
1. Main Interface
Tap and back to the main interface.
2. Flight Status Parameters
D 0.0m:The horizontal distance between the aircraft and the base point.
H 0.0m:The vertical distance between the aircraft and the base point.
V.S 0.0m/s:The vertical flight speed.
H.S 0.0m/s:The horizontal flight speed.
Yaw 0°:Nose direction of the aircraft.
3.System Status
Indicates aircraft flight status and various warning messages.
4.Real-Time Transmission Signal
Indicates the GPS strength between the aircraft and the remote controller. If the signal is weak, the
icon flashes.
5. Remote Controller Signal Strength:
Indicates the GPS strength between the aircraft and the remote controller. If the signal is weak, the
icon flashes.
6. GPS Signal Strength
Shows the current GPS signal strength. Satellite < 7, showing red; Satellite ≥7, showing green.
7. Battery Level
Showing the current battery level. <10%, showing red; ≥10%, showing green.
8.General Setting
Tap to enter general setting menu for checking the informating about the aircraft, remote controller
and the battery.

9. Photo/Videp Button
Tap to switch photo and video recording modes.
10. Shoot/Record Button
Tap to start shooting photos or recording video.
11. Camera Settings:
Tap to set the parameters of shoting /recording.
12. Playback
Tap to enter the playback page and preview photos and videos.
13. Thumbnail
Tap to quickly switch to the map interface.
14.Auto Takeoff/Landing
Tap to initiate auto takeoff or landing.
15.RTB
Initiate RTB home procedure. Tap to have the aircraft return to the last recorded home point.
16. Smart Modes
Tap to select the Intelligent Flight Mode.
Image
You can check the photos and videos in "Image" and can download these drectly to your smart phone
and share to social networks.
Me
Users can do account management, provide advice and access to warranty and other services.
Flight
Once pre-flight preparation is complete, it is recommended that you use the flight simular to enhance
your flight skills and practice flying safely. Ensure that all flights are carried out in an open area and
read the dislaimer before your first flight.
Flight Environment Requirements
1. Fly in an open areas. Tall structures and large metal structures may affect the accuracy of the onboard compass and GPS system.
2. Do not fly in severe weather conditions. these includes strong wind, snow, rain and frog.
3. Aviod obstacles, crowds, high voltage power lines, trees, and bodies of water.
4. Minimize interference by avoiding areas with high levels of electronmagnetism, including base
stations and radio transmission towers.
5. Cannot operate within the polar area.
6. Do not fly in a restricted area or no-fly zone.
Preflight Checklist
1. Remote Controller, Intelligent Flight Battery, and mobile device are fully charged.
2. Propellers are mounted correctly and firmly.
3. Micro SD card has been inserted, if necessary.

4. Motors can start and are functioning normally.
5.HG-Fly App is successfully connected to the aircraft.
6. Ensure the firmware is the latest version to make the aircraft functioning good.
7. Ensure the camera is clean.
Calibrating the Camposs
Ensure to calibrate the compass before your first flight. The compass is susceptible to interference
from other electronic equipment, resulting in abnormal flight data, and even lead to flight accidents.
Regular calibration can keep the compass in the best condition. Please calibrate according to the App
• Do not calibrate your compass where there is a chance of strong magnetic interference, such
as magnetite, parking structures, and steel reinforcements underground.
• Do not carry ferromagnetic materials with you during calibration such as cell phones.
• HG-Fly App will prompt you to resolve the compass issue if the compass is affected by strong
interference after calibration is complete. Follow the prompted instructions to resolve the compass
issue.
Calibrating Procedures
Follow the procedures to calibrate:
When you find that your aircraft offset is large, please do the compass calibration manually.
1. Enter Camera interface in HG-Fly App and tap "setting" and then tap "Aircraft Settings" to choose
compass calibration.
2. When the four LEDs shows cycle flashing, hold the aircraft horizontally and rotate 360 degrees.
3. When the four LEDs shows left and rignt alternate flashing, hold the aircraft vertically with nose
pointing downward and rotate it 360 degrees around the center axis.

4. HG-Fly App will alert you the calibrating successfully or the Navigation lights turn solid flashing
showing the calibration finished.
5. If calibration failed, the LEDs light will red and yellow alternate flashing. Please re-calibration.
Use WiFi on Mobile Device to fly
Connect to the mobile device:
1. Switch flight mode to Wi-Fi。
2. Turn on the aircraft.
3. Open setting on your mobile device and enter WiFi interface to select AMIGO-F-XXXXXX and then
enter the password 12345678.
4. Open HG-Fly App and tap device and then select Wi-Fi mode to enter camera interface.
5. App interface has video input and the device status bar shows the status of the aircraft that means
the connection is successful.
• Users can set their own mobile device Wi-Fi communication frequency of 2.4G (default) or 5G.
• Wi-Fi links are susceptible to electromagnetic interference, which affects aircraft control. Please use a
mobile device to control the aircraft in a small environment with low electromagnetic interference.
One-key Takeoff
The aircraft status indicator green single flash or double flash is available, the steps are as follows:
1.In the App camera interface, click the "one button to take off (icon instead)" button to confirm the
safe take-off conditions, click "confirm" to take off.
2.The aircraft automatically takes off and hovers at 1.2 meters from the ground, waiting for
instructions.
Please pay attention to the flight environment and flight mode of the aircraft, in the visual
positioning state, the aircraft can be achieved in the height of 3 meters below the exact hover.
One-key Landing
The aircraft status indicator green single flash or double flash is available, the steps are as follows:
1.In the App camera interface, click the "one button to drop (icon instead)" button to confirm the safe
landing conditions, click "confirm" to enter the landing.
2.During the fall of the aircraft, the "STOP" icon on the screen can be used to cancel the landing. The
aircraft enters the hover.
3.The aircraft landed on the ground and locked the motor.
Please choose the appropriate environment, the venue for automatic landing.
Virtual Joysticks
When the aircraft is successfully connected to the flight equipment, you can use the virtual rocker to
control the aircraft. The default US hand mode, the following to Mode 2 as an example of
manipulation instructions.

The control area is not limited to the circle.
Use the remote controller to fly
Power on the motor
Push both sticks to outer corners to start the motors. Once the motors have started spinning, release
both sticks simultaneously.
Auto Takeoff Button
After starting the motor, long press the remote control on the "one button takeoff and landing (icon
instead of)" button, remote control "Di" complete the instructions, the aircraft began to take off.
Stop the Motor
After the motor is started, there are two ways to stop the motor.
Method 1: After the landing of the aircraft, the implementation of breaking rod action can stop the
motor. After the motor stops, release the rocker.
Method 2: After landing the aircraft, oh, the throttle stick to reach the maximum range and keep for 3
seconds until the motor stops, release the rocker.

For more information about flying teaching, please watch the video.
Appendix
Specifications
The Aircraft
Takeoff Weight 822 g
Dimensions L407*W370*H100 mm(without protective guard)
Diagonal Distance 300 mm
Max Ascent Speed 2.5 m/s
Max Descent Speed 2.5 m/s
Max Speed 12.0 m/s
Max Service Ceiling Above Sea Level
Max Flight Time 16 mins
Operating Temperature Range -10℃~+40℃
Satellite Positioning Systems GPS
Visual Positioning System
Velocity Range 10m/s (2m above ground,adequate lighting)
Altitude Range 0.2~3.0 m
Operating Environment Detects clearly patterned surfaces with adequate lighting
(lux>15)
Camera
Sensor 1/3.06 inch COMS; Effective pixels: 13 MP
Lens FOV 220° wide angle fish-eye lens
Image Size 4096*3096
Still Photography Modes Single Shot

Video Resolution 1920*1080p 30fps
Photo Format JPEG
ideo Format MP4
Supported SD Card Max 64 GB,Transmission Speed Class 10 and above or
Micro SD Card up to UHS-1
Remote Controller
Operating Frequency 2.400~2.4835GHz
Max Transmission Distance 500 m
Battery 5500 mAh
Transmitter Power (EIRP) 5.8G:FCC≤21 dBm CE≤14 dBm;2.4G:FCC≤25 dBm CE≤
20 dBm
Operating Current/Voltage 3.7V
Operating Temperature Range -10℃~+40℃
Itelligent Battery
Battery Type Li-po 3S
Capacity 3000 mAh
Voltage 11.4 V
Energ 34.2 Wh
Net Weight 190 g
Charging Temperature Range 0℃~45℃
Max Charging Power 28 W
Charger
Voltage 13.05 V
Rated Power 79 W
Firmware Updating
Connect the Remote Cotroller with HG-Fly App and then follow the tips to update (need to connect to
the Internet).
Make sure the battery level of the aircraft and the remote controller more than 50%.
After-Sales Information
Please enter HighGreat official website to get the service and support information.

Warning Statement
This device complies with part 15 of the FCC Rules. Operation is subject to the
following two conditions: (1) This device may not cause harmful interference, and (2)
this device must accept any interference received, including interference that may cause
undesired operation.
Any Changes or modifications not expressly approved by the party responsible for
compliance could void the user's authority to operate the equipment.
Note: This equipment has been tested and found to comply with the limits for a Class B
digital device, pursuant to part 15 of the FCC Rules. These limits are designed to
provide reasonable protection against harmful interference in a residential installation.
This equipment generates uses and can radiate radio frequency energy and, if not
installed and used in accordance with the instructions, may cause harmful interference
to radio communications. However, there is no guarantee that interference will not
occur in a particular installation. If this equipment does cause harmful interference to
radio or television reception, which can be determined by turning the equipment off and
on, the user is encouraged to try to correct the interference by one or more of the
following measures:
-Reorient or relocate the receiving antenna.
-Increase the separation between the equipment and receiver.
-Connect the equipment into an outlet on a circuit different from that to which the
receiver is connected.
-Consult the dealer or an experienced radio/TV technician for help.
This equipment complies with FCC radiation exposure limits set forth for an
uncontrolled environment. This equipment should be installed and operated with
minimum distance 20cm between the radiator & your body.
 Loading...